e-procurement training manual: requisitioning training...e-procurement training manual:...
TRANSCRIPT
Bloomfield College
e-Procurement Training Manual: Requisitioning
Updated 12/9/2013
Prior to starting this process you should read all policies posted on the Business Services web
pages located at
http://www.bloomfield.edu/resources/admin-services/policies-forms
including the Purchasing Policy at
http://www.bloomfield.edu/sites/default/files/common/Purchasing%20Policy_0.pdf
e-Procurement Requisitioning Manual Page 1
Table of Contents LOGIN ............................................................................................................................................................ 2
Open a web browser using either ............................................................................................................. 2
Enter the following: .................................................................................................................................. 2
Message Screen ........................................................................................................................................ 3
Select the easyPurchase link located under Solutions on top left of page. .............................................. 4
The Tabs .................................................................................................................................................... 4
SHOP TAB ...................................................................................................................................................... 5
Non-Catalog Item ...................................................................................................................................... 8
CART TAB ..................................................................................................................................................... 11
CHECKOUT TAB ........................................................................................................................................... 14
Starting the Checkout process. ............................................................................................................... 14
Requisition consists of 3 parts: Header, Body and Footer. ..................................................................... 14
Need By Date .......................................................................................................................................... 15
External Notes ......................................................................................................................................... 16
Internal Notes ......................................................................................................................................... 16
Adding an Attachment ............................................................................................................................ 17
GL (general ledger) Account Number ..................................................................................................... 19
Splitting Order between more than one GL Account Code .................................................................... 19
Approval Route ....................................................................................................................................... 23
Changing Quantity .................................................................................................................................. 24
Deleting an Item ...................................................................................................................................... 24
Delivery Information and Shipping & Handling ...................................................................................... 25
Submitting requisition for approval ........................................................................................................ 25
Status ...................................................................................................................................................... 25
Purchase Order Number ......................................................................................................................... 28
ADDITIONAL FUNCTIONALITY OF THE CHECKOUT TAB .............................................................................. 29
Deleting a Requisition ............................................................................................................................. 29
Searching for a Previously Entered Requisition ...................................................................................... 30
Reports .................................................................................................................................................... 30
Copy Button ............................................................................................................................................ 32
Returned Requisitions from your Approvers .......................................................................................... 33
e-Procurement Requisitioning Manual Page 2
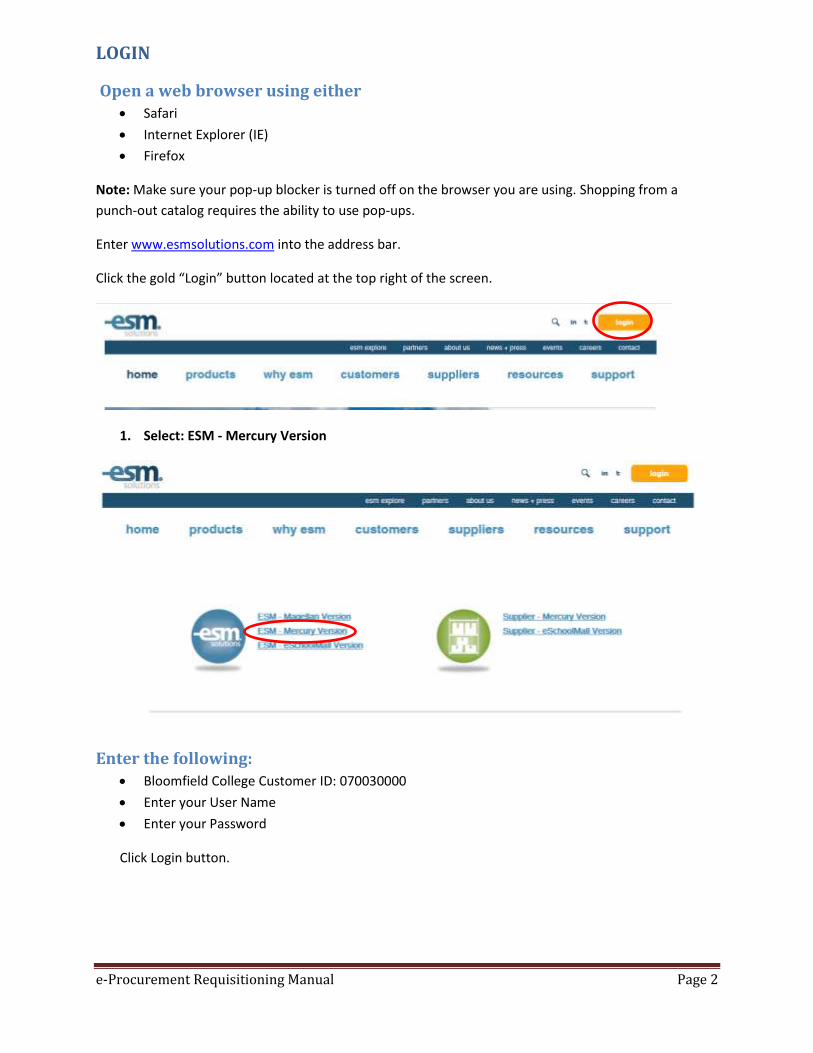
LOGIN
Open a web browser using either Safari
Internet Explorer (IE)
Firefox
Note: Make sure your pop-up blocker is turned off on the browser you are using. Shopping from a
punch-out catalog requires the ability to use pop-ups.
Enter www.esmsolutions.com into the address bar.
Click the gold “Login” button located at the top right of the screen.
1. Select: ESM - Mercury Version
Enter the following: Bloomfield College Customer ID: 070030000
Enter your User Name
Enter your Password
Click Login button.
e-Procurement Requisitioning Manual Page 3
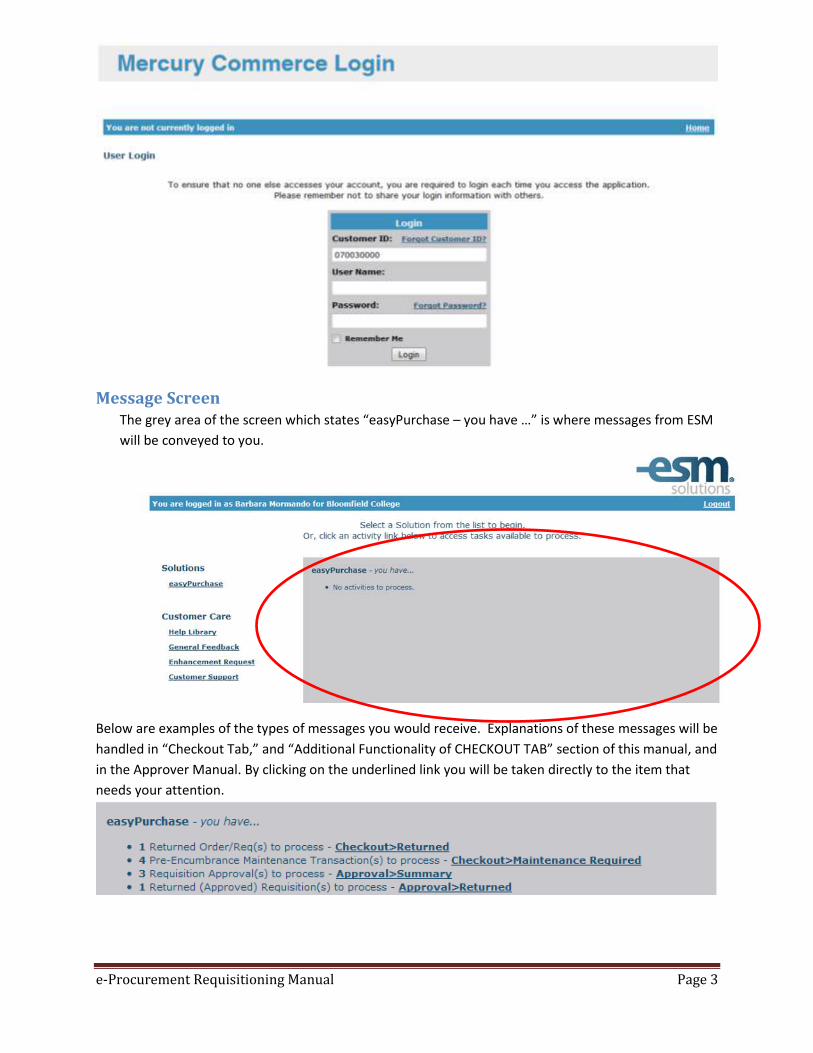
Message Screen The grey area of the screen which states “easyPurchase – you have …” is where messages from ESM
will be conveyed to you.
Below are examples of the types of messages you would receive. Explanations of these messages will be
handled in “Checkout Tab,” and “Additional Functionality of CHECKOUT TAB” section of this manual, and
in the Approver Manual. By clicking on the underlined link you will be taken directly to the item that
needs your attention.
e-Procurement Requisitioning Manual Page 4
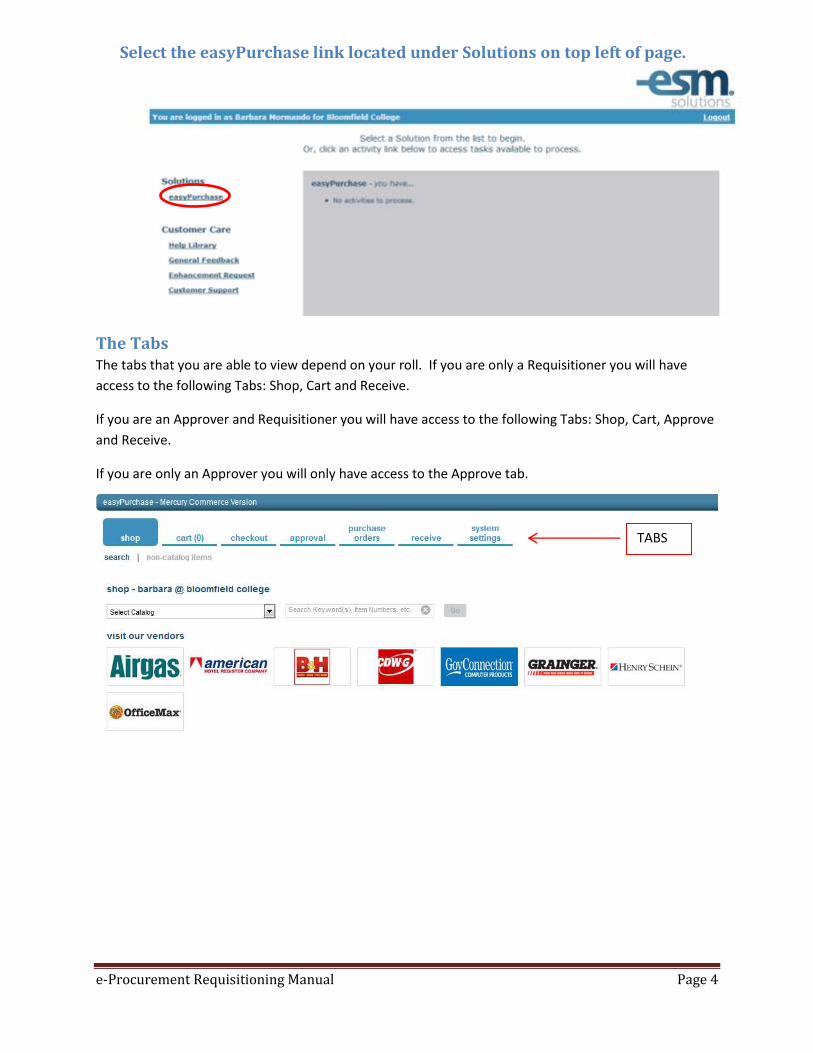
Select the easyPurchase link located under Solutions on top left of page.
The Tabs The tabs that you are able to view depend on your roll. If you are only a Requisitioner you will have
access to the following Tabs: Shop, Cart and Receive.
If you are an Approver and Requisitioner you will have access to the following Tabs: Shop, Cart, Approve
and Receive.
If you are only an Approver you will only have access to the Approve tab.
TABS
e-Procurement Requisitioning Manual Page 5
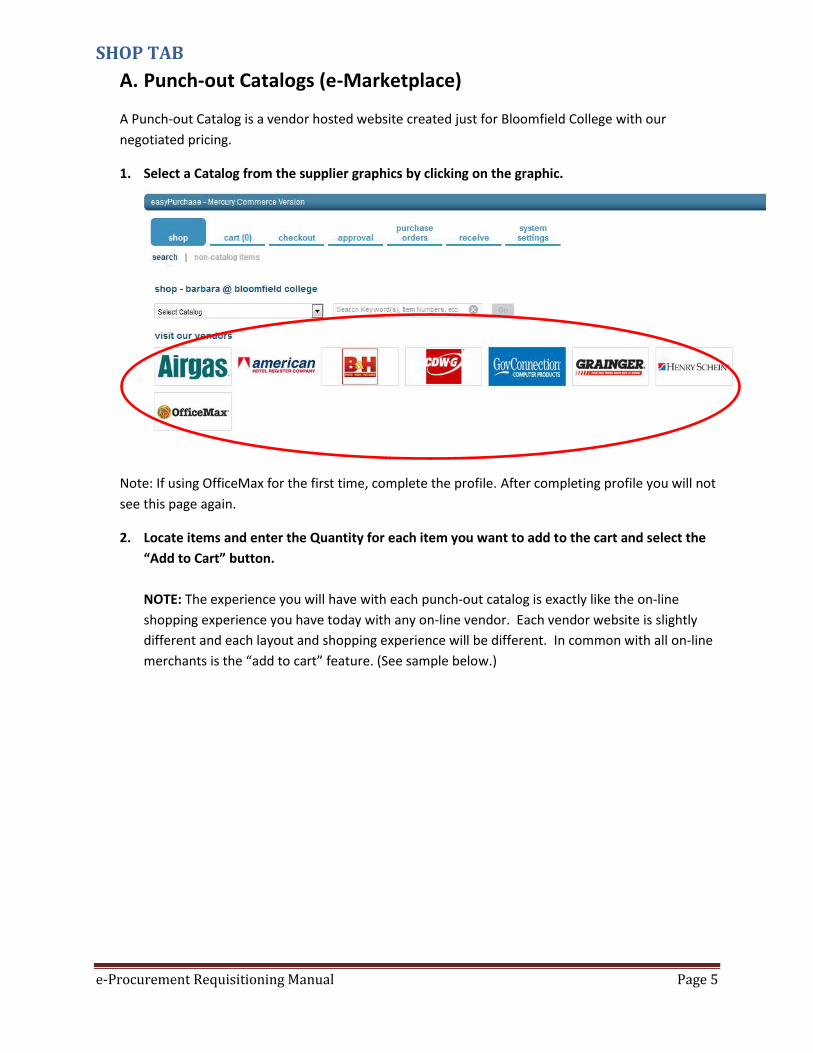
SHOP TAB
A. Punch-out Catalogs (e-Marketplace)
A Punch-out Catalog is a vendor hosted website created just for Bloomfield College with our
negotiated pricing.
1. Select a Catalog from the supplier graphics by clicking on the graphic.
Note: If using OfficeMax for the first time, complete the profile. After completing profile you will not
see this page again.
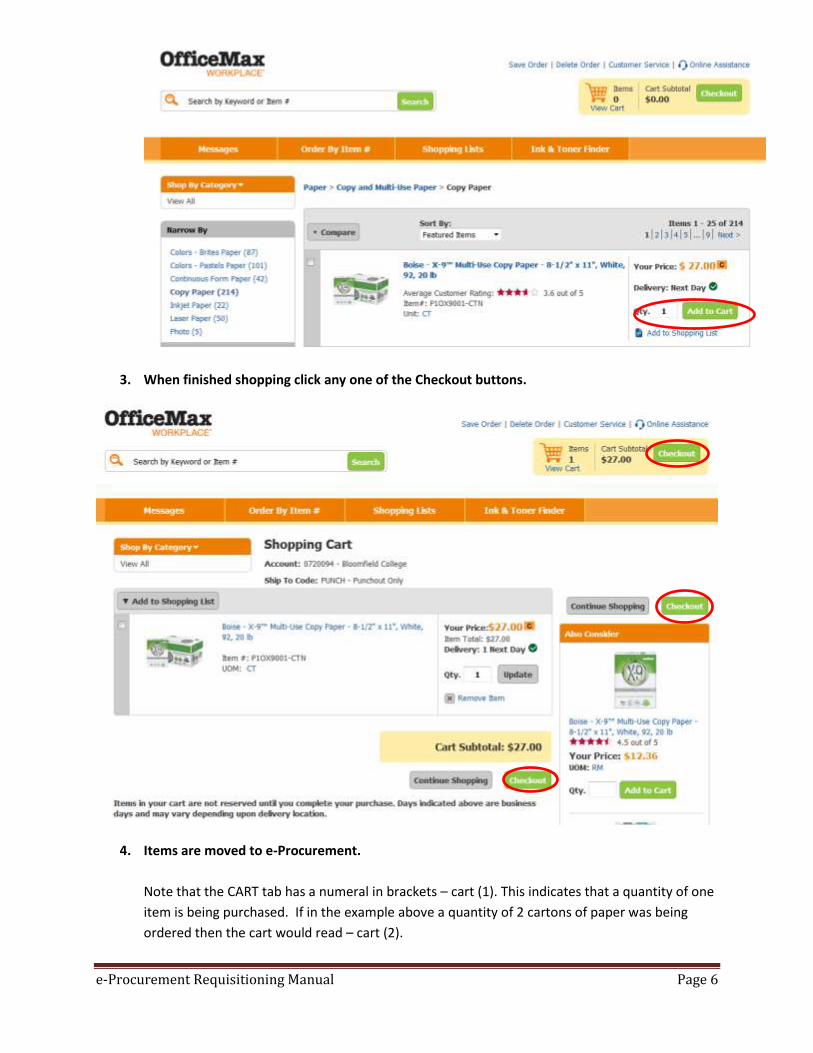
2. Locate items and enter the Quantity for each item you want to add to the cart and select the
“Add to Cart” button.
NOTE: The experience you will have with each punch-out catalog is exactly like the on-line
shopping experience you have today with any on-line vendor. Each vendor website is slightly
different and each layout and shopping experience will be different. In common with all on-line
merchants is the “add to cart” feature. (See sample below.)
e-Procurement Requisitioning Manual Page 6
3. When finished shopping click any one of the Checkout buttons.
4. Items are moved to e-Procurement.
Note that the CART tab has a numeral in brackets – cart (1). This indicates that a quantity of one
item is being purchased. If in the example above a quantity of 2 cartons of paper was being
ordered then the cart would read – cart (2).
e-Procurement Requisitioning Manual Page 7
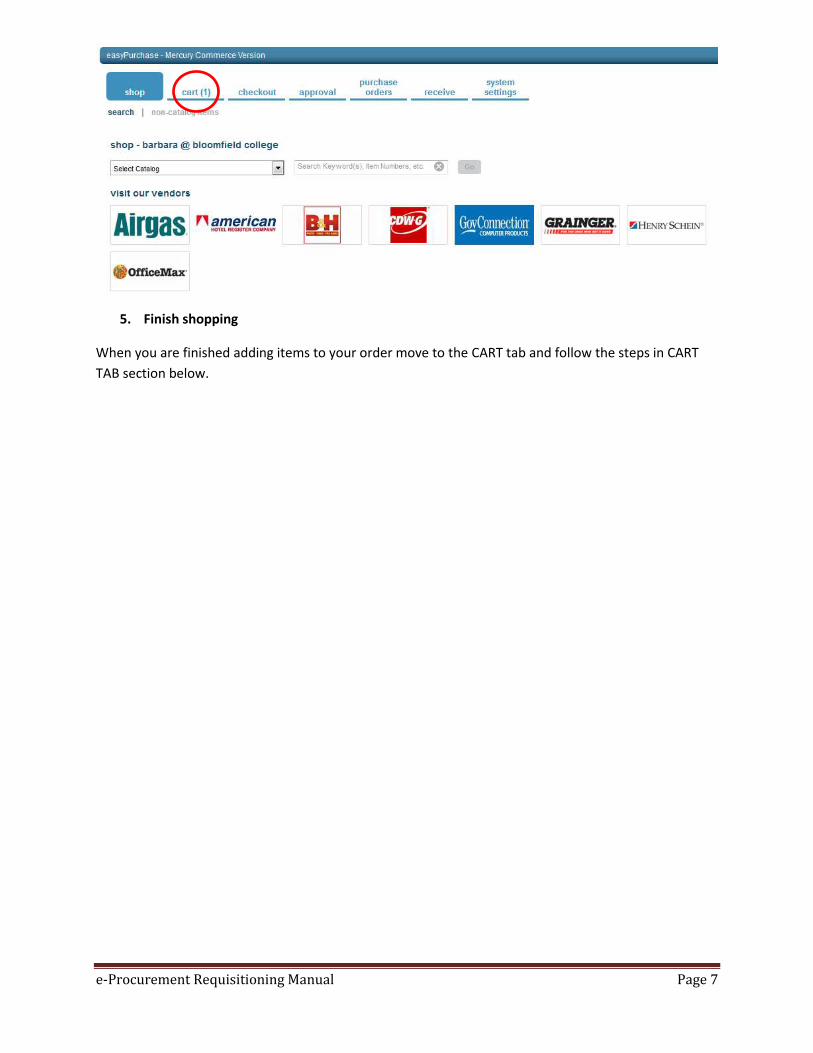
5. Finish shopping
When you are finished adding items to your order move to the CART tab and follow the steps in CART
TAB section below.
e-Procurement Requisitioning Manual Page 8
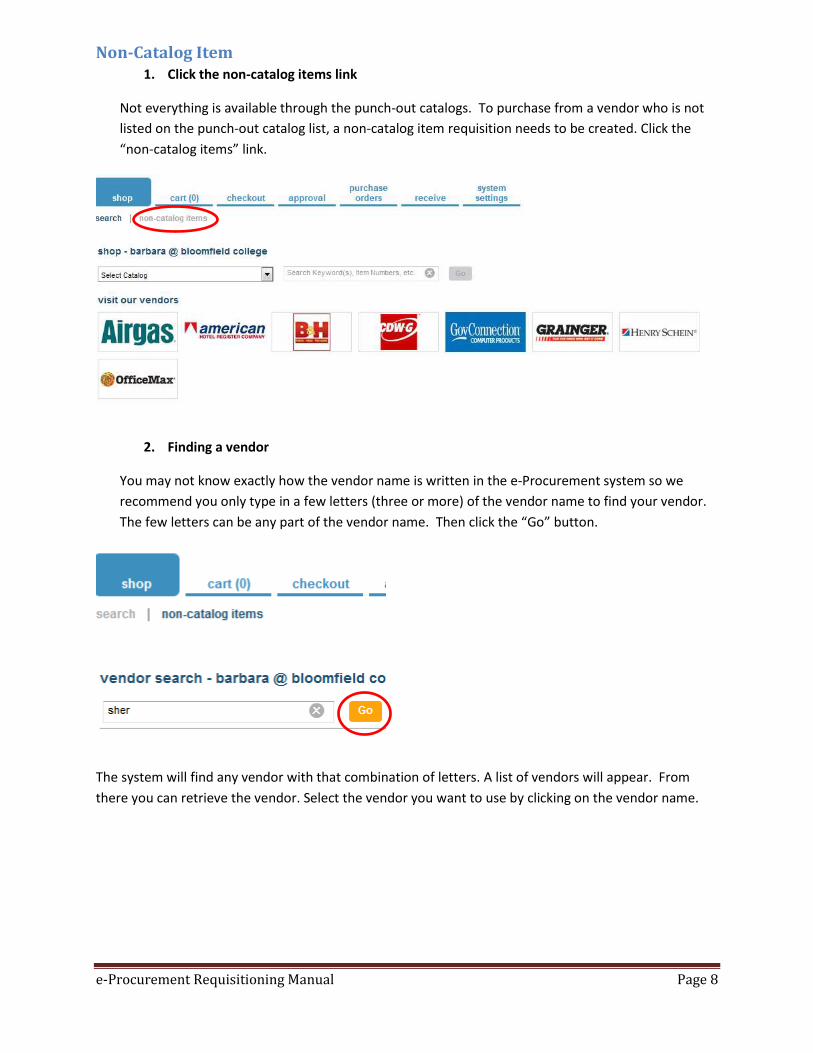
Non-Catalog Item 1. Click the non-catalog items link
Not everything is available through the punch-out catalogs. To purchase from a vendor who is not
listed on the punch-out catalog list, a non-catalog item requisition needs to be created. Click the
“non-catalog items” link.
2. Finding a vendor
You may not know exactly how the vendor name is written in the e-Procurement system so we
recommend you only type in a few letters (three or more) of the vendor name to find your vendor.
The few letters can be any part of the vendor name. Then click the “Go” button.
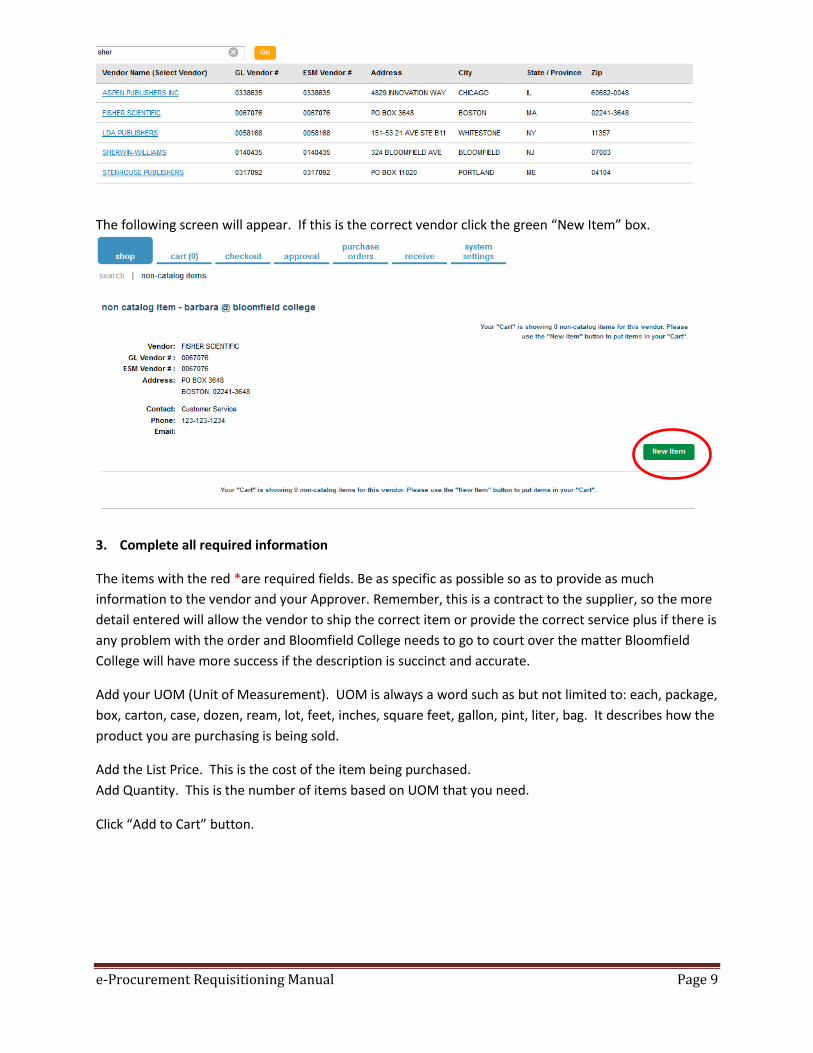
The system will find any vendor with that combination of letters. A list of vendors will appear. From
there you can retrieve the vendor. Select the vendor you want to use by clicking on the vendor name.
e-Procurement Requisitioning Manual Page 9
The following screen will appear. If this is the correct vendor click the green “New Item” box.
3. Complete all required information
The items with the red *are required fields. Be as specific as possible so as to provide as much
information to the vendor and your Approver. Remember, this is a contract to the supplier, so the more
detail entered will allow the vendor to ship the correct item or provide the correct service plus if there is
any problem with the order and Bloomfield College needs to go to court over the matter Bloomfield
College will have more success if the description is succinct and accurate.
Add your UOM (Unit of Measurement). UOM is always a word such as but not limited to: each, package,
box, carton, case, dozen, ream, lot, feet, inches, square feet, gallon, pint, liter, bag. It describes how the
product you are purchasing is being sold.
Add the List Price. This is the cost of the item being purchased.
Add Quantity. This is the number of items based on UOM that you need.
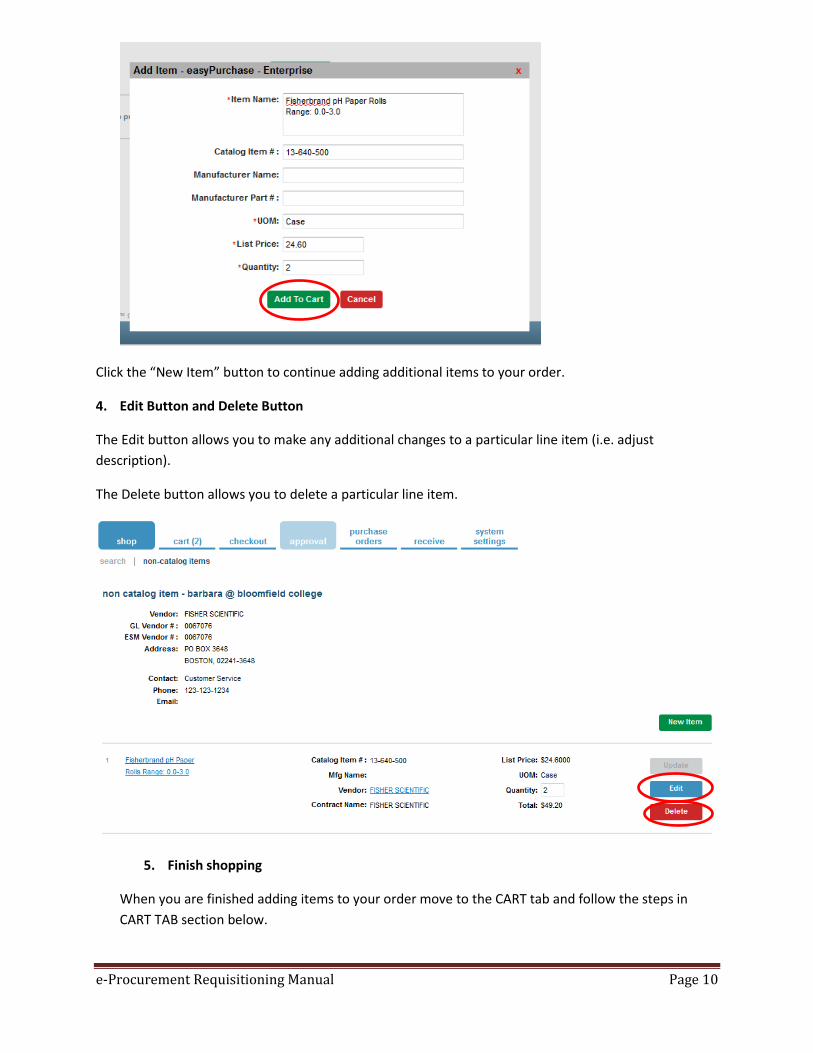
Click “Add to Cart” button.
e-Procurement Requisitioning Manual Page 10
Click the “New Item” button to continue adding additional items to your order.
4. Edit Button and Delete Button
The Edit button allows you to make any additional changes to a particular line item (i.e. adjust
description).
The Delete button allows you to delete a particular line item.
5. Finish shopping
When you are finished adding items to your order move to the CART tab and follow the steps in
CART TAB section below.
e-Procurement Requisitioning Manual Page 11
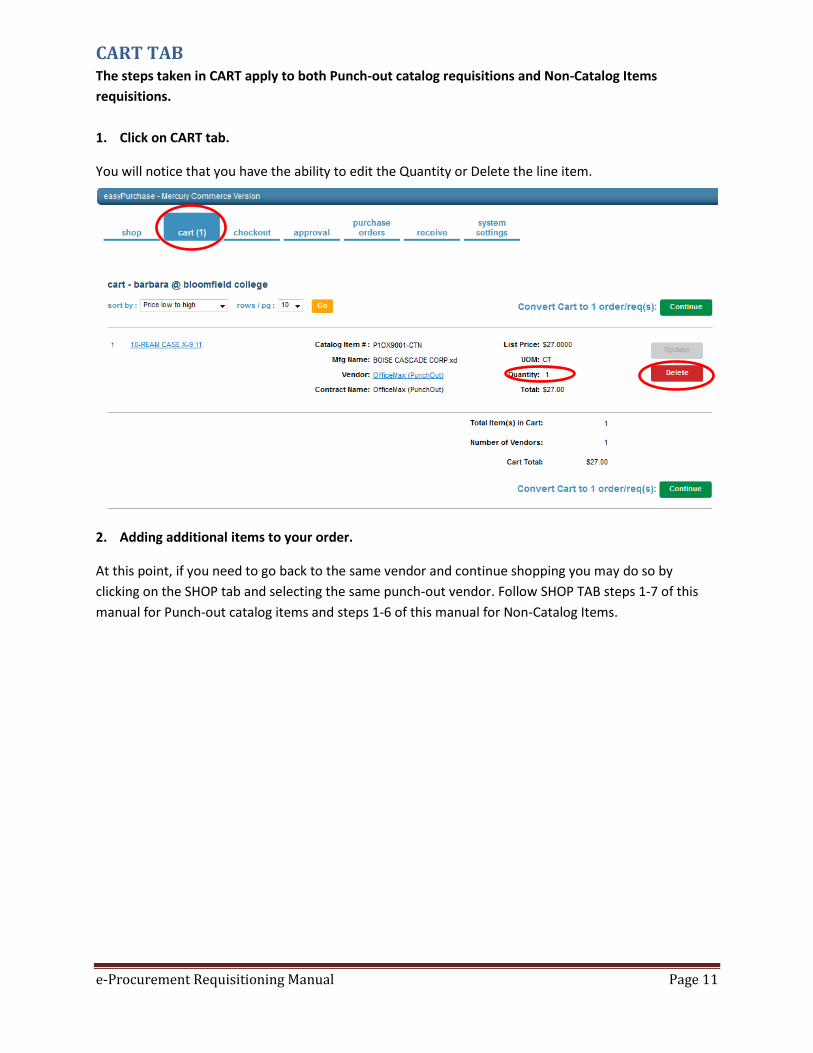
CART TAB The steps taken in CART apply to both Punch-out catalog requisitions and Non-Catalog Items
requisitions.
1. Click on CART tab.
You will notice that you have the ability to edit the Quantity or Delete the line item.
2. Adding additional items to your order.
At this point, if you need to go back to the same vendor and continue shopping you may do so by
clicking on the SHOP tab and selecting the same punch-out vendor. Follow SHOP TAB steps 1-7 of this
manual for Punch-out catalog items and steps 1-6 of this manual for Non-Catalog Items.
e-Procurement Requisitioning Manual Page 12
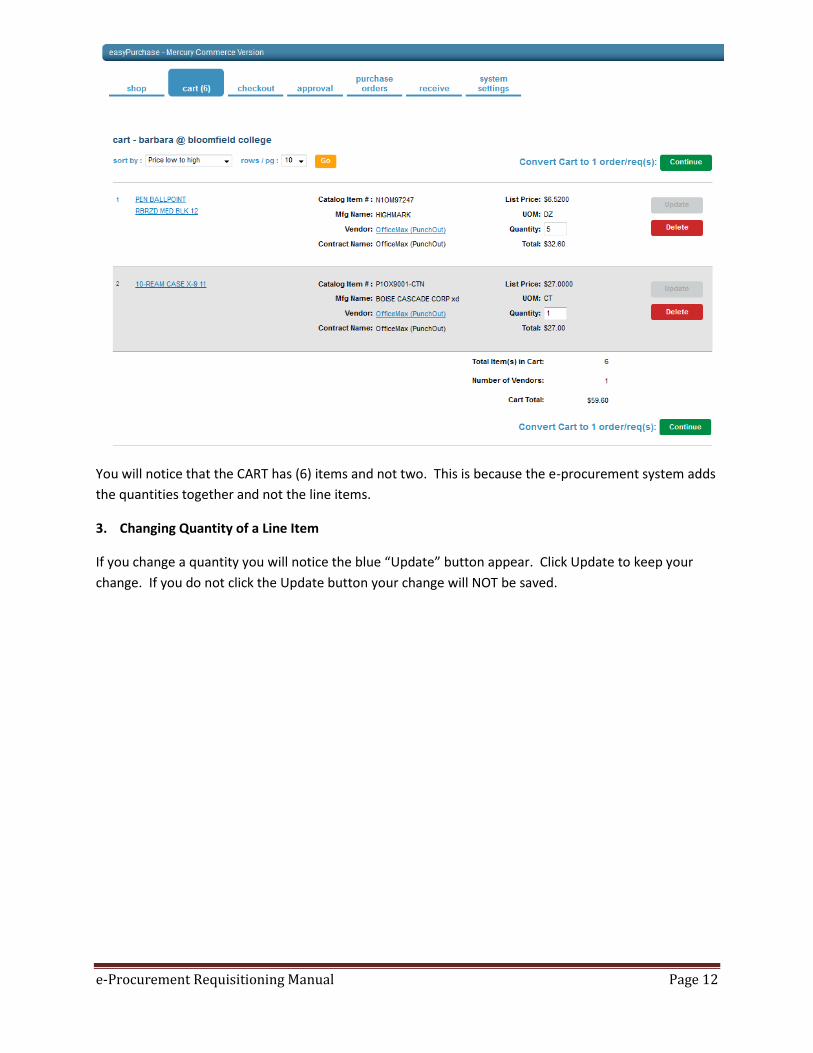
You will notice that the CART has (6) items and not two. This is because the e-procurement system adds
the quantities together and not the line items.
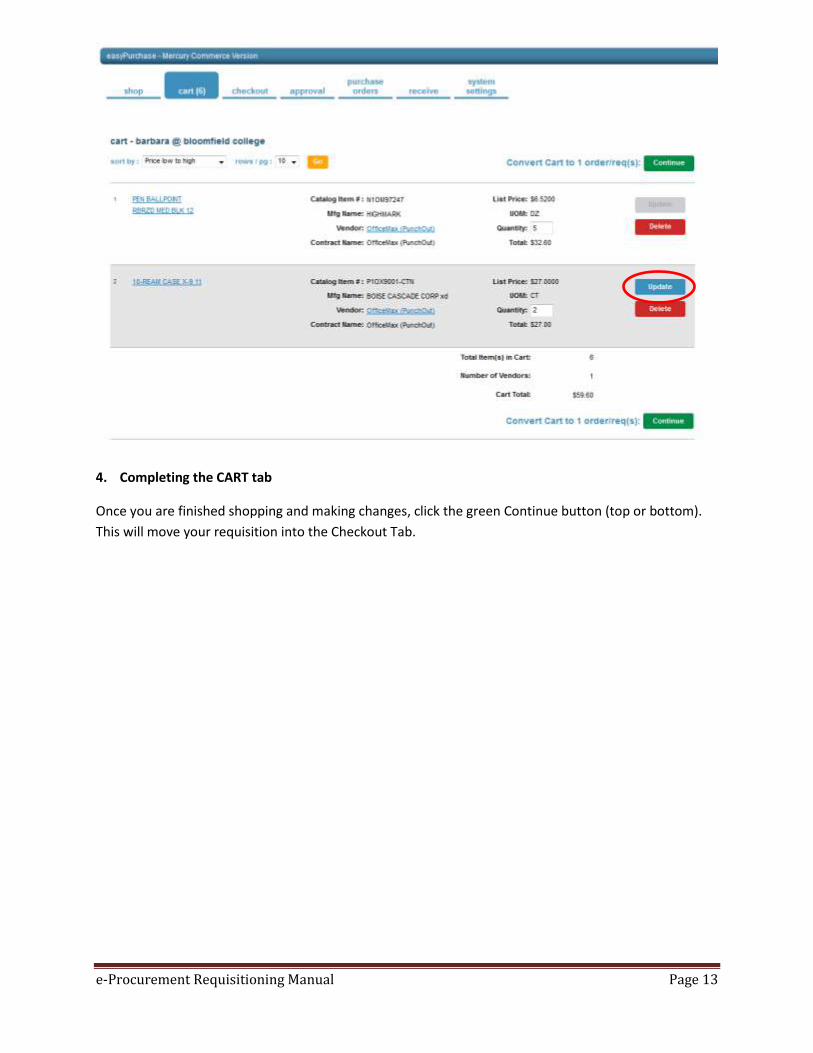
3. Changing Quantity of a Line Item
If you change a quantity you will notice the blue “Update” button appear. Click Update to keep your
change. If you do not click the Update button your change will NOT be saved.
e-Procurement Requisitioning Manual Page 13
4. Completing the CART tab
Once you are finished shopping and making changes, click the green Continue button (top or bottom).
This will move your requisition into the Checkout Tab.
e-Procurement Requisitioning Manual Page 14
CHECKOUT TAB
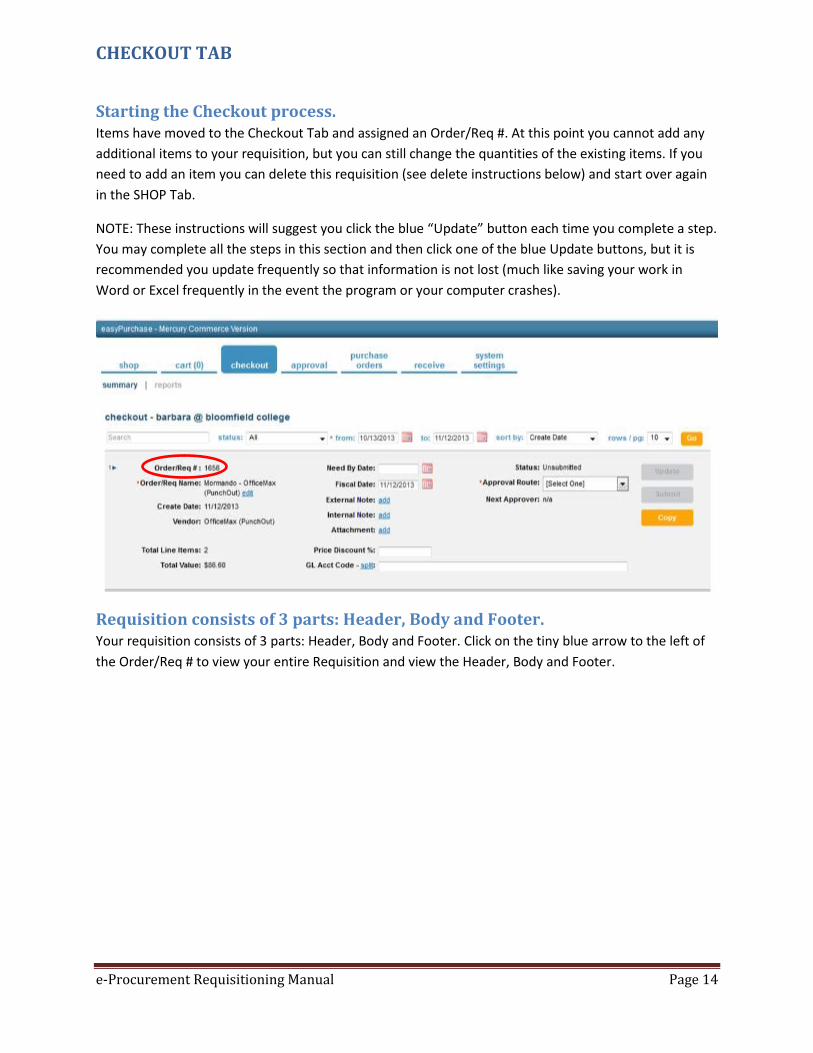
Starting the Checkout process. Items have moved to the Checkout Tab and assigned an Order/Req #. At this point you cannot add any
additional items to your requisition, but you can still change the quantities of the existing items. If you
need to add an item you can delete this requisition (see delete instructions below) and start over again
in the SHOP Tab.
NOTE: These instructions will suggest you click the blue “Update” button each time you complete a step.
You may complete all the steps in this section and then click one of the blue Update buttons, but it is
recommended you update frequently so that information is not lost (much like saving your work in
Word or Excel frequently in the event the program or your computer crashes).
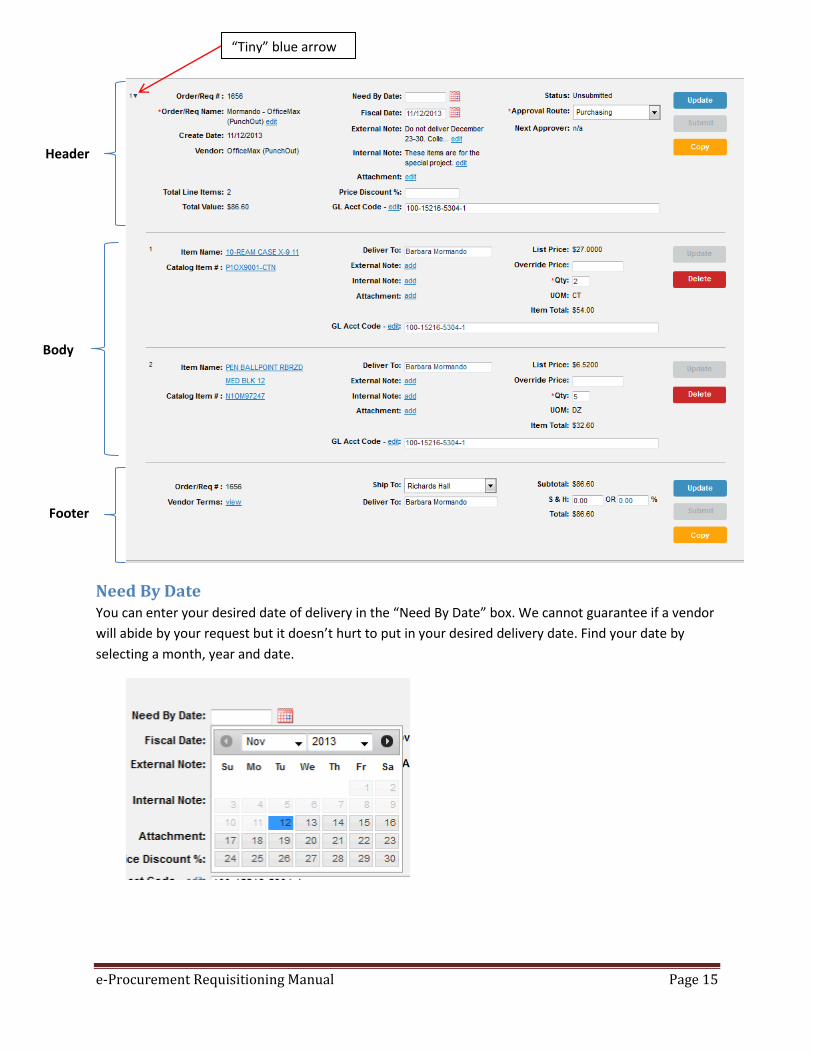
Requisition consists of 3 parts: Header, Body and Footer. Your requisition consists of 3 parts: Header, Body and Footer. Click on the tiny blue arrow to the left of
the Order/Req # to view your entire Requisition and view the Header, Body and Footer.
e-Procurement Requisitioning Manual Page 15
Need By Date You can enter your desired date of delivery in the “Need By Date” box. We cannot guarantee if a vendor
will abide by your request but it doesn’t hurt to put in your desired delivery date. Find your date by
selecting a month, year and date.
Header
Body
Footer
“Tiny” blue arrow

e-Procurement Requisitioning Manual Page 16
External Notes Additional information that you need to convey to the vendor should be entered in the “External
Notes.” “External Notes” are visible only to you, your approver(s), purchasing and the vendor. An
“External Note” in the Header section is something that applies to your entire order. This is NOT the
place to add additional line items.
Notes that you want in External Notes would be delivery instructions, such as the sample below. Other
examples would be:
Referencing a vendor quote: As per Quote #1234 dated 11/12/2013
Referencing a verbal quote from a vendor (orders under $2,500 only): As per verbal quote from
John Smith at the ABC Company on 11/12/2013.
Referencing No Charge for Shipping: Pricing includes shipping and handling.
Click the blue “add” link next to External Note. Type your note and click the blue Update button located
at the bottom of the External Note box.
You will note that the word next to External Note has changed from “add” to “edit.” If you need to
adjust your note just click “edit” and follow the External Notes instructions again.
Click the other button located at the far left of your Header section.
Internal Notes
Add any “Internal Notes” that you want only your Approver and Purchasing to see by clicking on the
blue “add” link next to “Internal Notes.” The Vendor will NOT see any notes typed into “Internal Notes.”
Type in note and click the blue “Update” button located at the bottom of the “Internal Notes” box.
e-Procurement Requisitioning Manual Page 17
You will note that the word next to “Internal Note” has changed from “add” to “edit.” If you need to
adjust your note or view it, just click “edit” and follow the “Internal Notes” instructions again.
Click the other button located at the far left of your Header section to save your work.
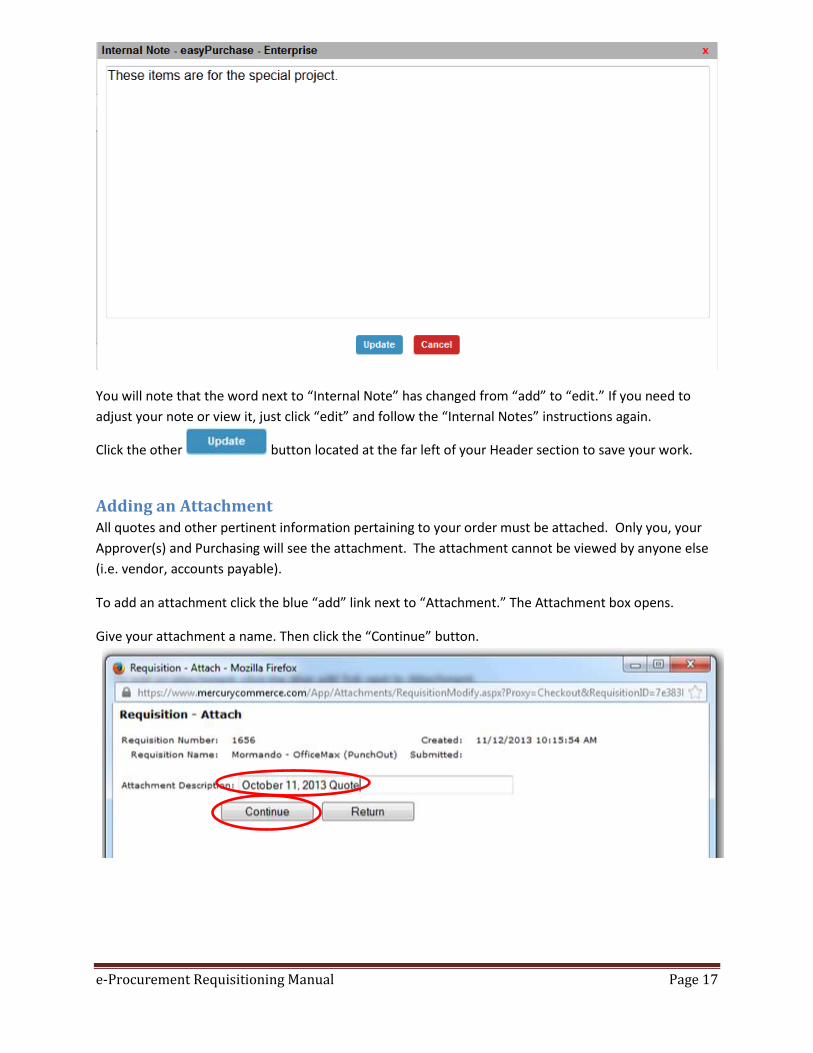
Adding an Attachment All quotes and other pertinent information pertaining to your order must be attached. Only you, your
Approver(s) and Purchasing will see the attachment. The attachment cannot be viewed by anyone else
(i.e. vendor, accounts payable).
To add an attachment click the blue “add” link next to “Attachment.” The Attachment box opens.
Give your attachment a name. Then click the “Continue” button.
e-Procurement Requisitioning Manual Page 18
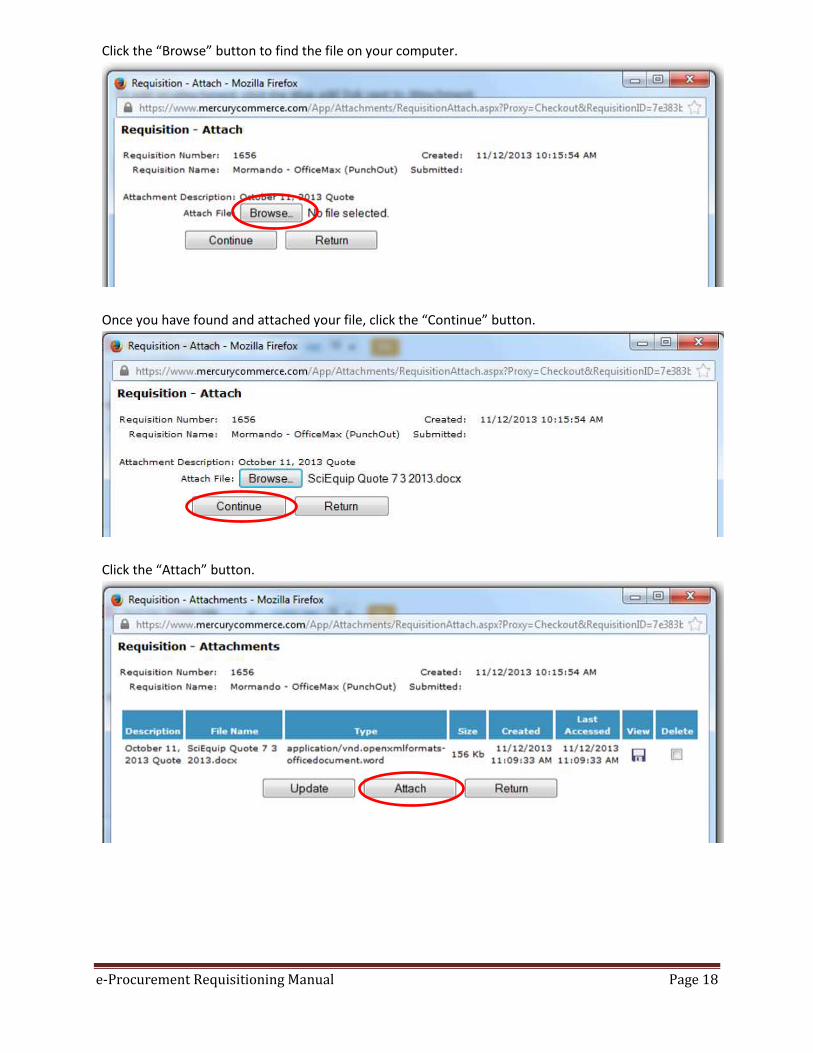
Click the “Browse” button to find the file on your computer.
Once you have found and attached your file, click the “Continue” button.
Click the “Attach” button.
e-Procurement Requisitioning Manual Page 19
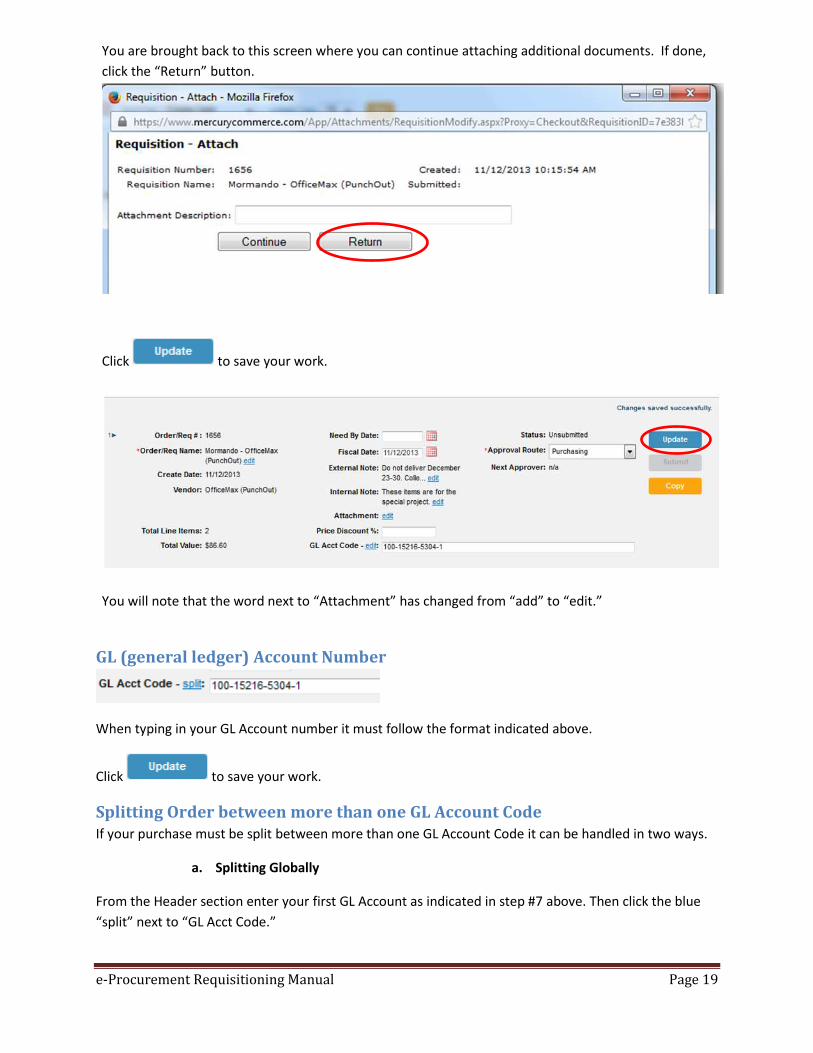
You are brought back to this screen where you can continue attaching additional documents. If done,
click the “Return” button.
Click to save your work.
You will note that the word next to “Attachment” has changed from “add” to “edit.”
GL (general ledger) Account Number
When typing in your GL Account number it must follow the format indicated above.
Click to save your work.
Splitting Order between more than one GL Account Code If your purchase must be split between more than one GL Account Code it can be handled in two ways.
a. Splitting Globally
From the Header section enter your first GL Account as indicated in step #7 above. Then click the blue
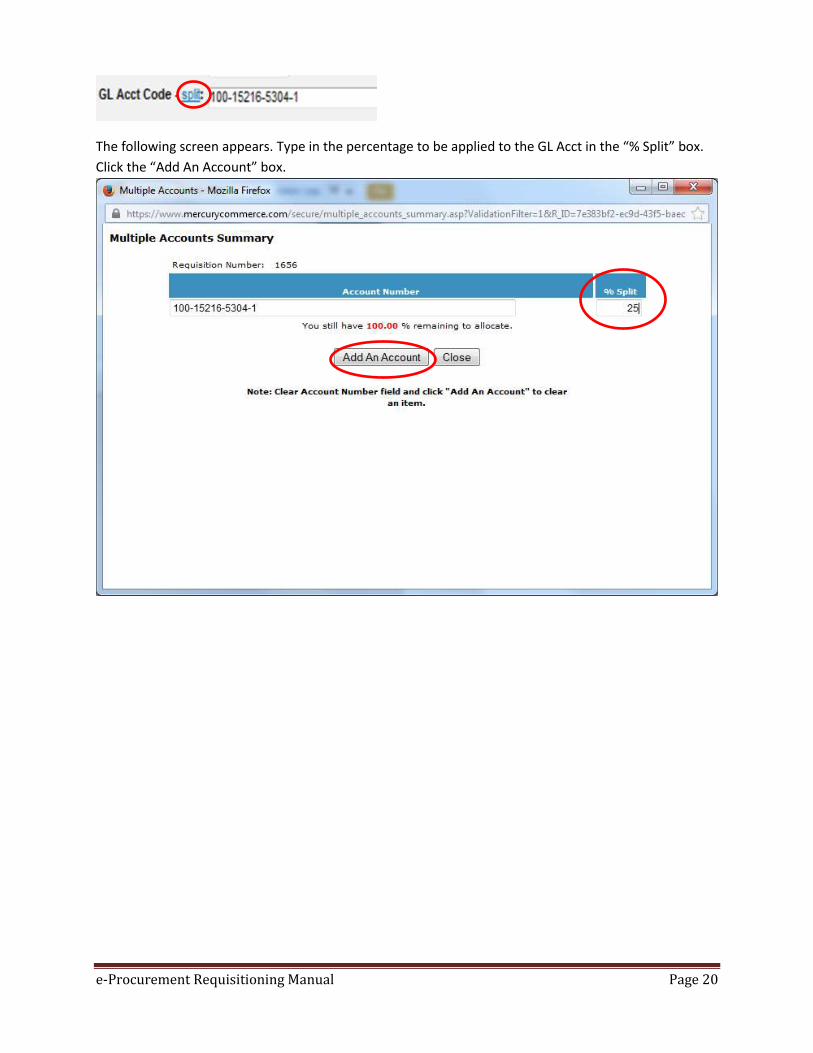
“split” next to “GL Acct Code.”
e-Procurement Requisitioning Manual Page 20
The following screen appears. Type in the percentage to be applied to the GL Acct in the “% Split” box.
Click the “Add An Account” box.
e-Procurement Requisitioning Manual Page 21
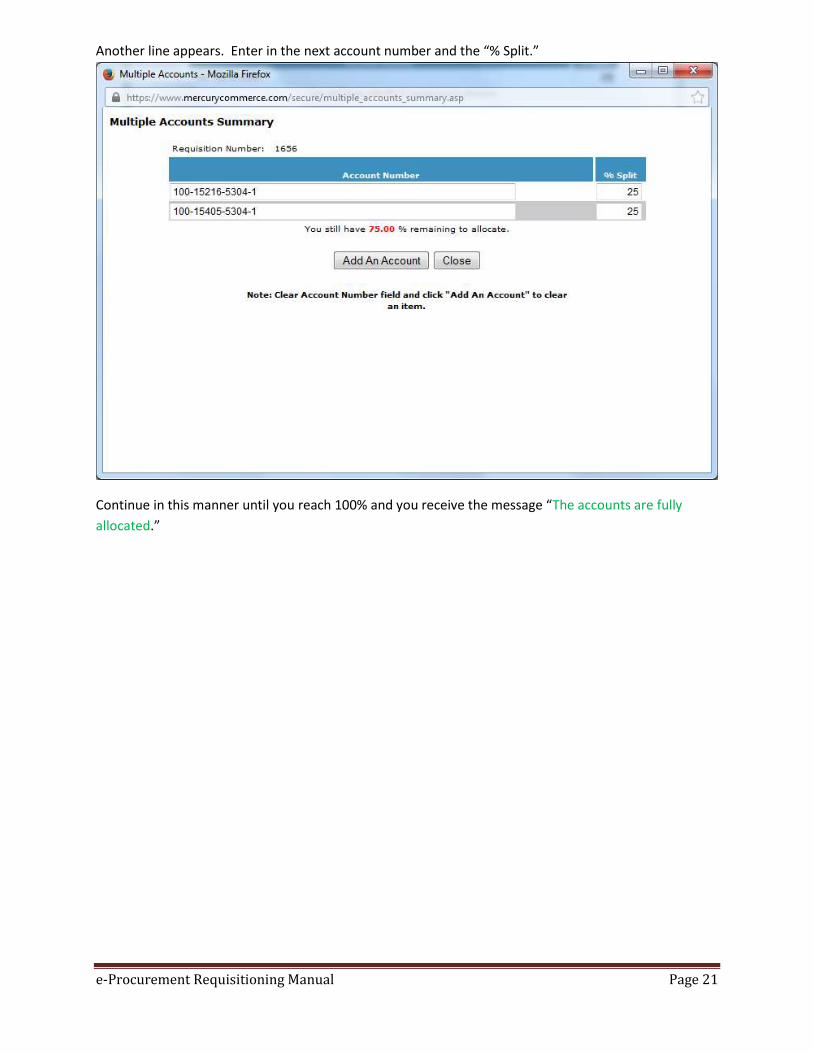
Another line appears. Enter in the next account number and the “% Split.”
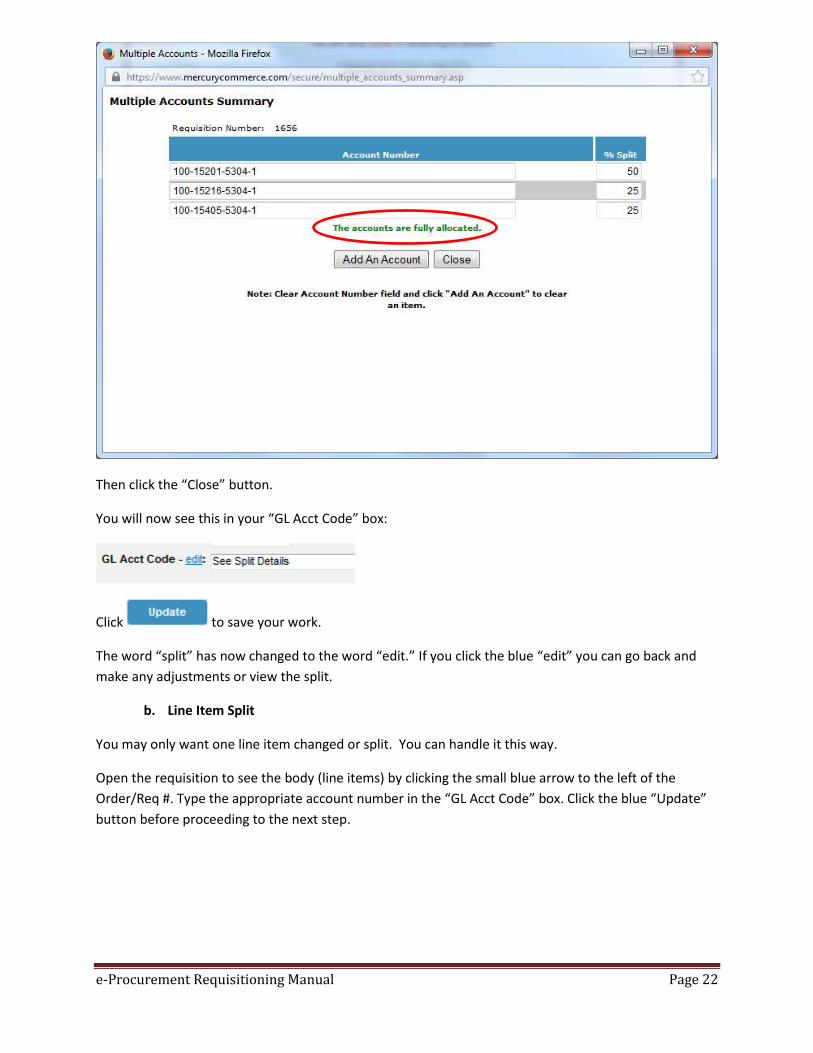
Continue in this manner until you reach 100% and you receive the message “The accounts are fully
allocated.”
e-Procurement Requisitioning Manual Page 22
Then click the “Close” button.
You will now see this in your “GL Acct Code” box:
Click to save your work.
The word “split” has now changed to the word “edit.” If you click the blue “edit” you can go back and
make any adjustments or view the split.
b. Line Item Split
You may only want one line item changed or split. You can handle it this way.
Open the requisition to see the body (line items) by clicking the small blue arrow to the left of the
Order/Req #. Type the appropriate account number in the “GL Acct Code” box. Click the blue “Update”
button before proceeding to the next step.

e-Procurement Requisitioning Manual Page 23
If the line items need to be split further you can click the blue “split” link next to GL Acct Code and
follow directions from step “a. Splitting Globally” above since the split box that will appear on your
screen is identical to the split box that appears from the Header section.
Click to save your work.
Approval Route If you have the phrase [Select One] in you “Approval Route” box with a dropdown arrow, you will need
to select who will approve your Requisition. If you do not have this ability you can bypass this step since
you are hard coded to an Approver.
Click on the route and it will populate in the “Approval Route” box.
Click to save your work.
e-Procurement Requisitioning Manual Page 24
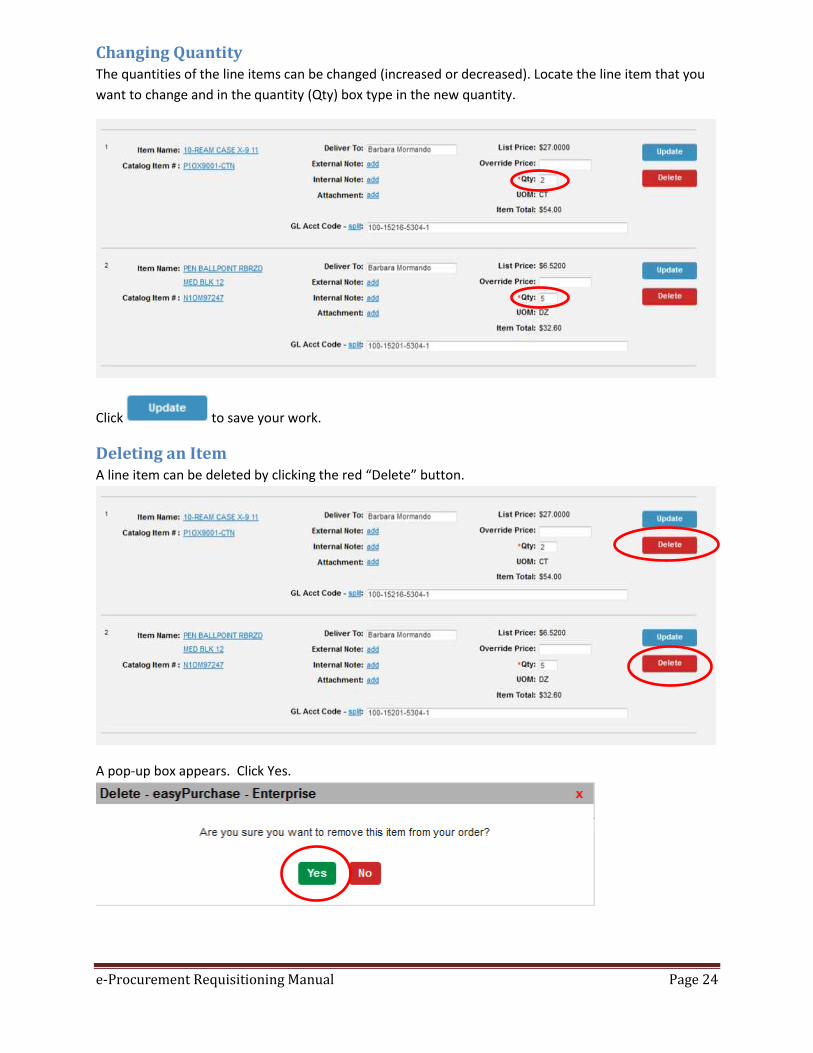
Changing Quantity The quantities of the line items can be changed (increased or decreased). Locate the line item that you
want to change and in the quantity (Qty) box type in the new quantity.
Click to save your work.
Deleting an Item A line item can be deleted by clicking the red “Delete” button.
A pop-up box appears. Click Yes.
e-Procurement Requisitioning Manual Page 25
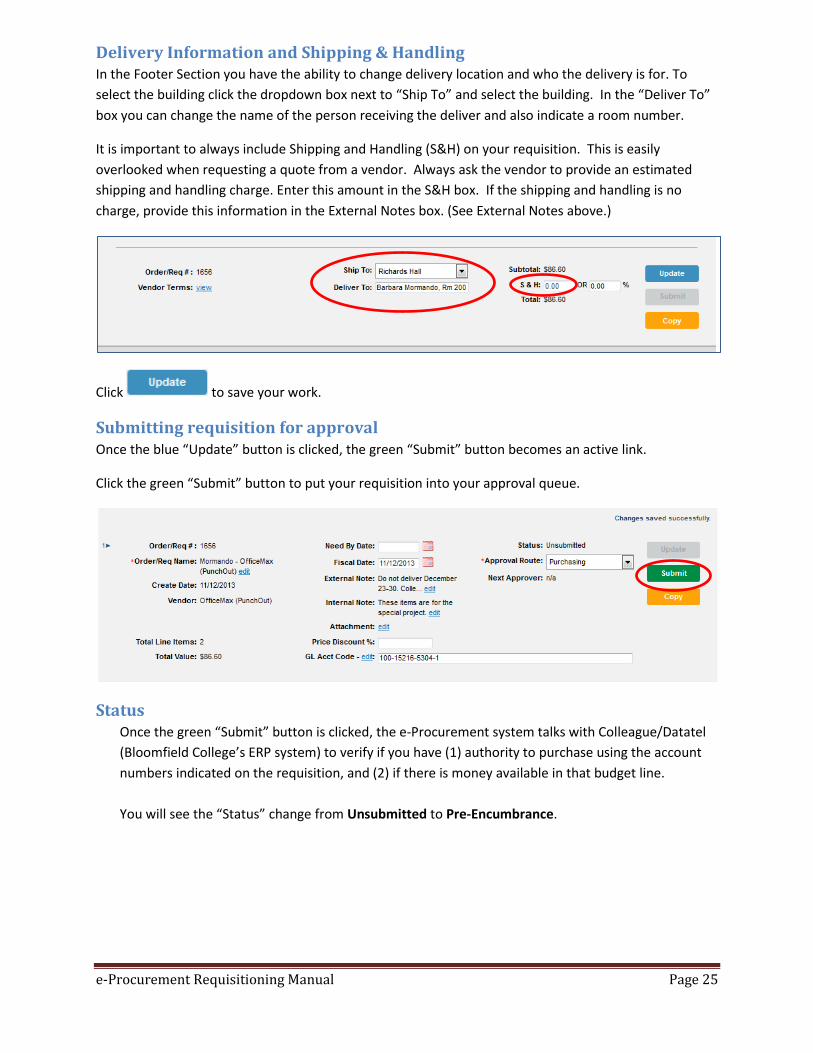
Delivery Information and Shipping & Handling In the Footer Section you have the ability to change delivery location and who the delivery is for. To
select the building click the dropdown box next to “Ship To” and select the building. In the “Deliver To”
box you can change the name of the person receiving the deliver and also indicate a room number.
It is important to always include Shipping and Handling (S&H) on your requisition. This is easily
overlooked when requesting a quote from a vendor. Always ask the vendor to provide an estimated
shipping and handling charge. Enter this amount in the S&H box. If the shipping and handling is no
charge, provide this information in the External Notes box. (See External Notes above.)
Click to save your work.
Submitting requisition for approval Once the blue “Update” button is clicked, the green “Submit” button becomes an active link.
Click the green “Submit” button to put your requisition into your approval queue.
Status Once the green “Submit” button is clicked, the e-Procurement system talks with Colleague/Datatel
(Bloomfield College’s ERP system) to verify if you have (1) authority to purchase using the account
numbers indicated on the requisition, and (2) if there is money available in that budget line.
You will see the “Status” change from Unsubmitted to Pre-Encumbrance.
e-Procurement Requisitioning Manual Page 26
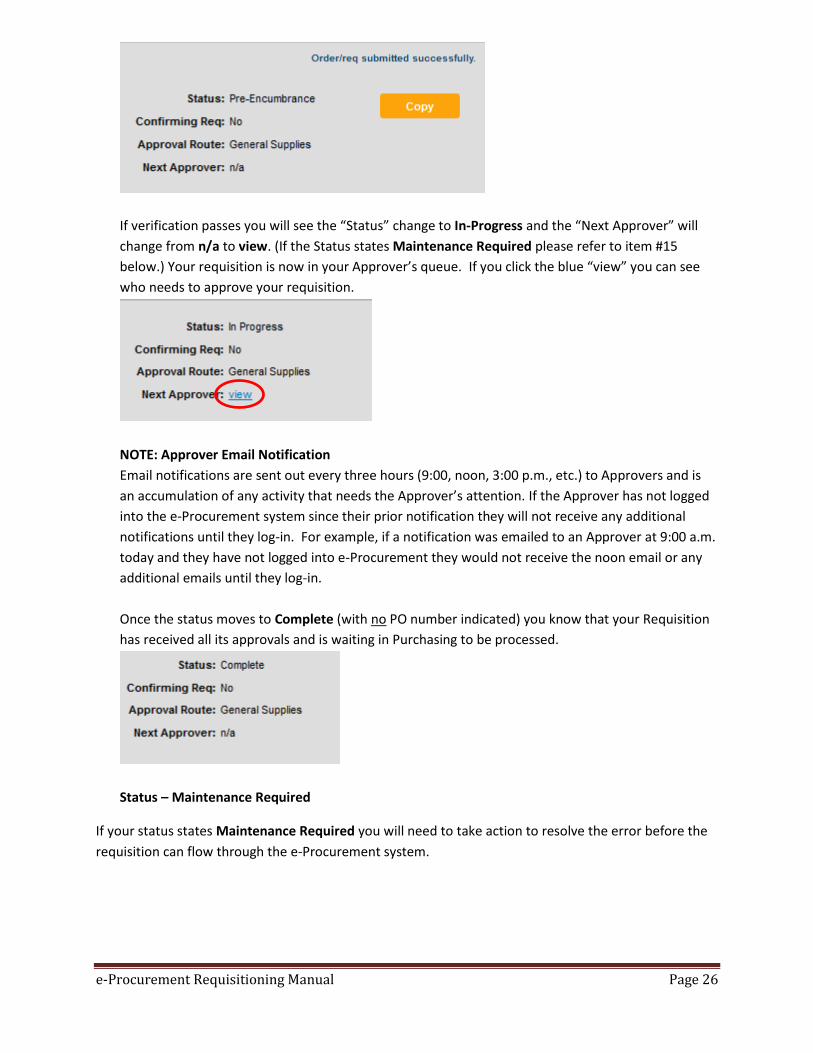
If verification passes you will see the “Status” change to In-Progress and the “Next Approver” will
change from n/a to view. (If the Status states Maintenance Required please refer to item #15
below.) Your requisition is now in your Approver’s queue. If you click the blue “view” you can see
who needs to approve your requisition.
NOTE: Approver Email Notification
Email notifications are sent out every three hours (9:00, noon, 3:00 p.m., etc.) to Approvers and is
an accumulation of any activity that needs the Approver’s attention. If the Approver has not logged
into the e-Procurement system since their prior notification they will not receive any additional
notifications until they log-in. For example, if a notification was emailed to an Approver at 9:00 a.m.
today and they have not logged into e-Procurement they would not receive the noon email or any
additional emails until they log-in.
Once the status moves to Complete (with no PO number indicated) you know that your Requisition
has received all its approvals and is waiting in Purchasing to be processed.
Status – Maintenance Required
If your status states Maintenance Required you will need to take action to resolve the error before the
requisition can flow through the e-Procurement system.
e-Procurement Requisitioning Manual Page 27
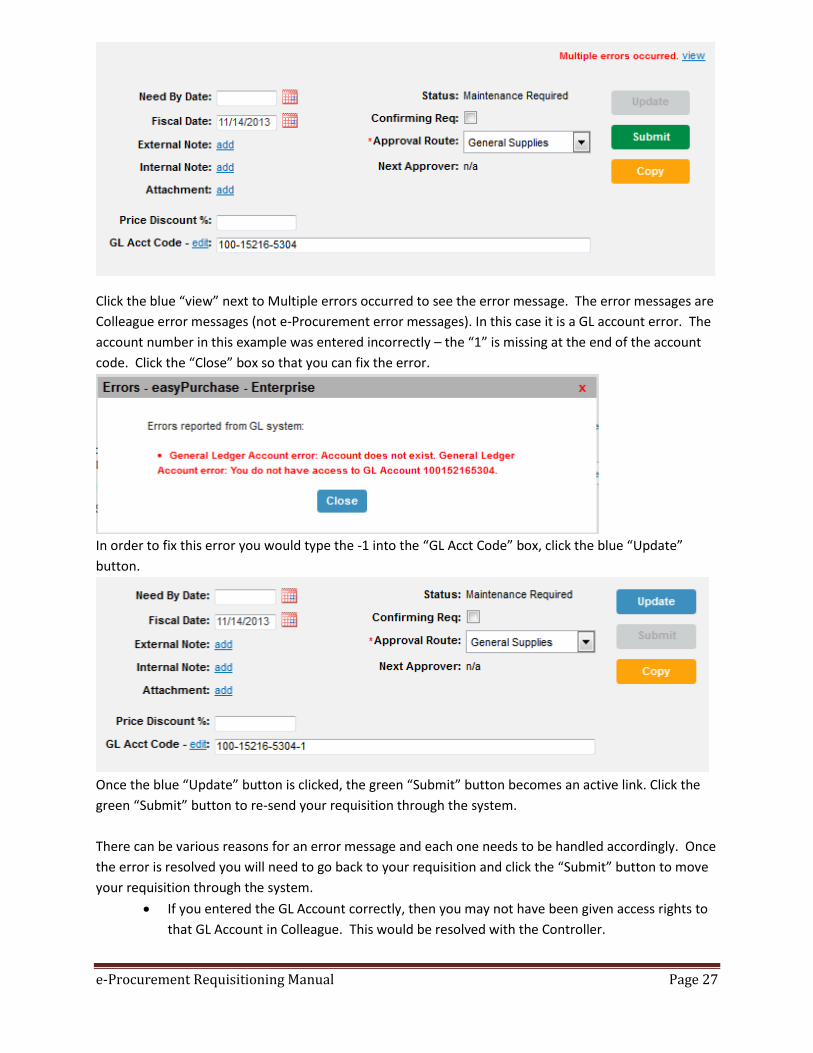
Click the blue “view” next to Multiple errors occurred to see the error message. The error messages are
Colleague error messages (not e-Procurement error messages). In this case it is a GL account error. The
account number in this example was entered incorrectly – the “1” is missing at the end of the account
code. Click the “Close” box so that you can fix the error.
In order to fix this error you would type the -1 into the “GL Acct Code” box, click the blue “Update”
button.
Once the blue “Update” button is clicked, the green “Submit” button becomes an active link. Click the
green “Submit” button to re-send your requisition through the system.
There can be various reasons for an error message and each one needs to be handled accordingly. Once
the error is resolved you will need to go back to your requisition and click the “Submit” button to move
your requisition through the system.
If you entered the GL Account correctly, then you may not have been given access rights to
that GL Account in Colleague. This would be resolved with the Controller.
e-Procurement Requisitioning Manual Page 28
An error message could occur due to lack of funding. This would be resolved with the
Finance department.
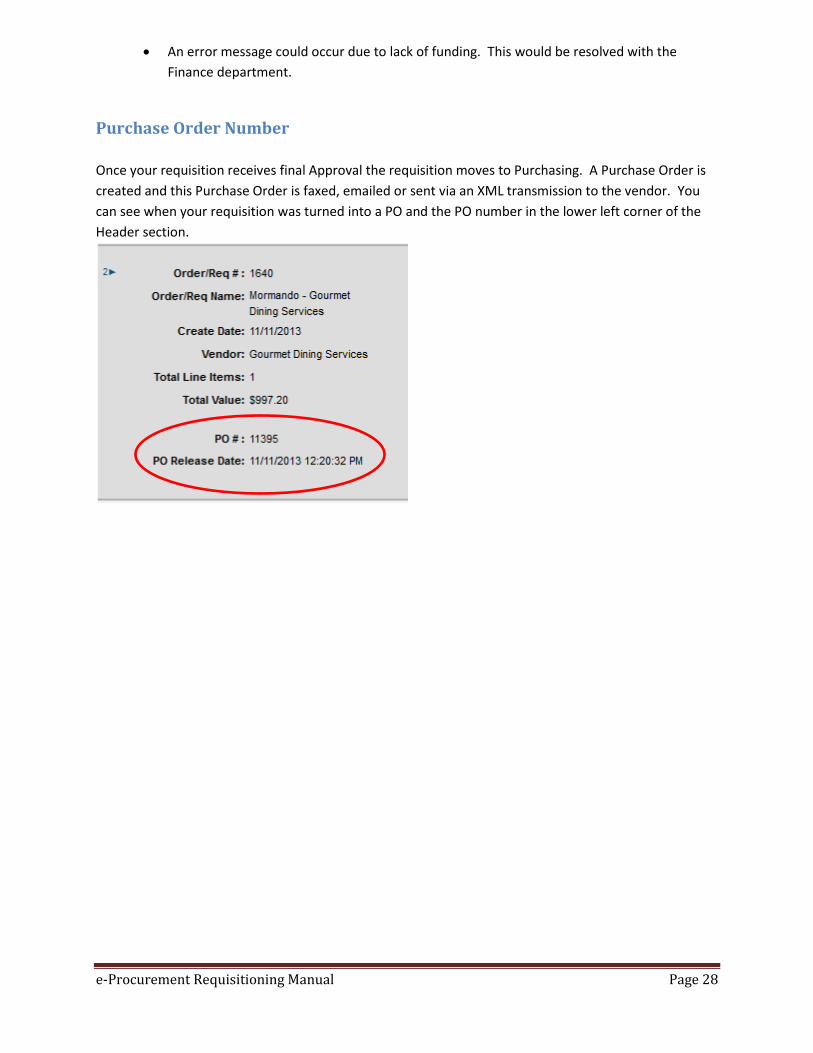
Purchase Order Number
Once your requisition receives final Approval the requisition moves to Purchasing. A Purchase Order is
created and this Purchase Order is faxed, emailed or sent via an XML transmission to the vendor. You
can see when your requisition was turned into a PO and the PO number in the lower left corner of the
Header section.
e-Procurement Requisitioning Manual Page 29
ADDITIONAL FUNCTIONALITY OF THE CHECKOUT TAB
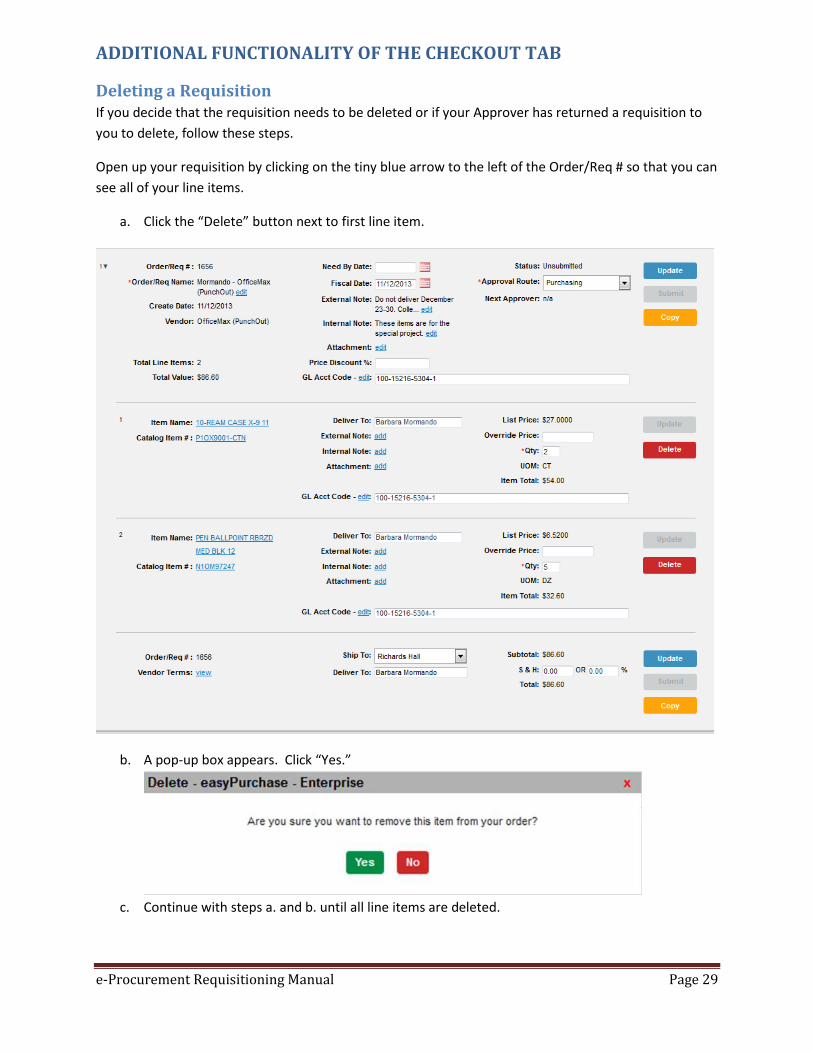
Deleting a Requisition If you decide that the requisition needs to be deleted or if your Approver has returned a requisition to
you to delete, follow these steps.
Open up your requisition by clicking on the tiny blue arrow to the left of the Order/Req # so that you can
see all of your line items.
a. Click the “Delete” button next to first line item.
b. A pop-up box appears. Click “Yes.”
c. Continue with steps a. and b. until all line items are deleted.
e-Procurement Requisitioning Manual Page 30
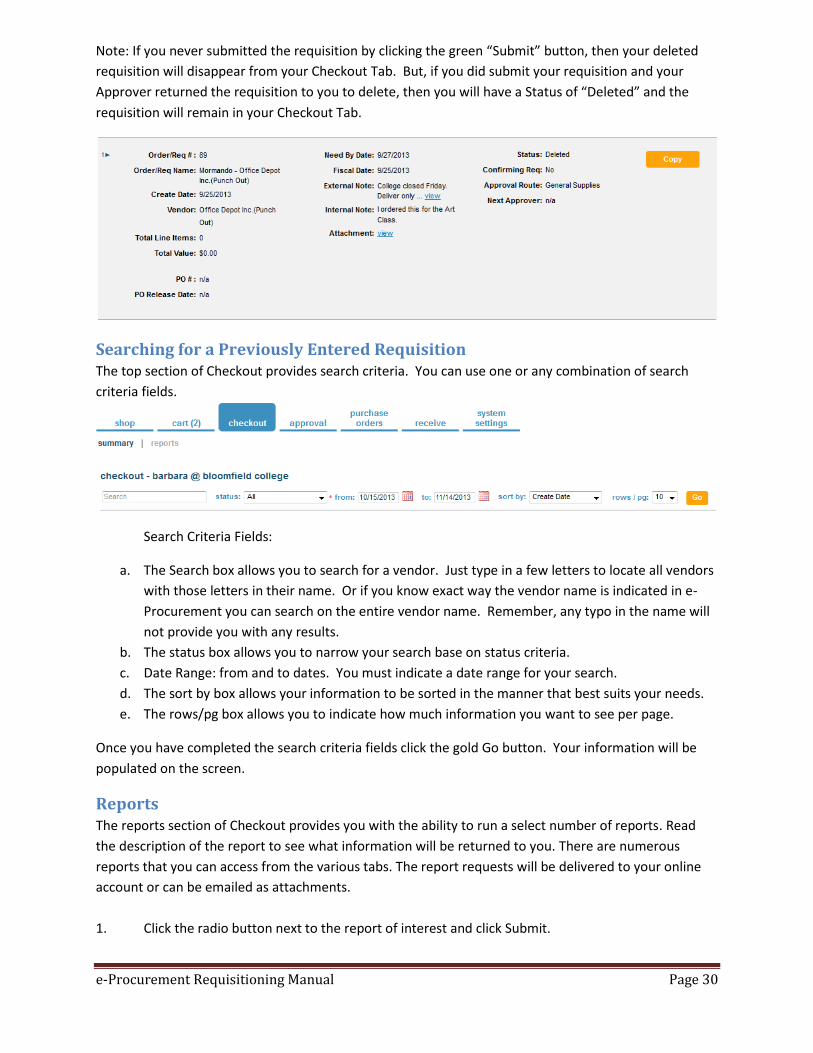
Note: If you never submitted the requisition by clicking the green “Submit” button, then your deleted
requisition will disappear from your Checkout Tab. But, if you did submit your requisition and your
Approver returned the requisition to you to delete, then you will have a Status of “Deleted” and the
requisition will remain in your Checkout Tab.
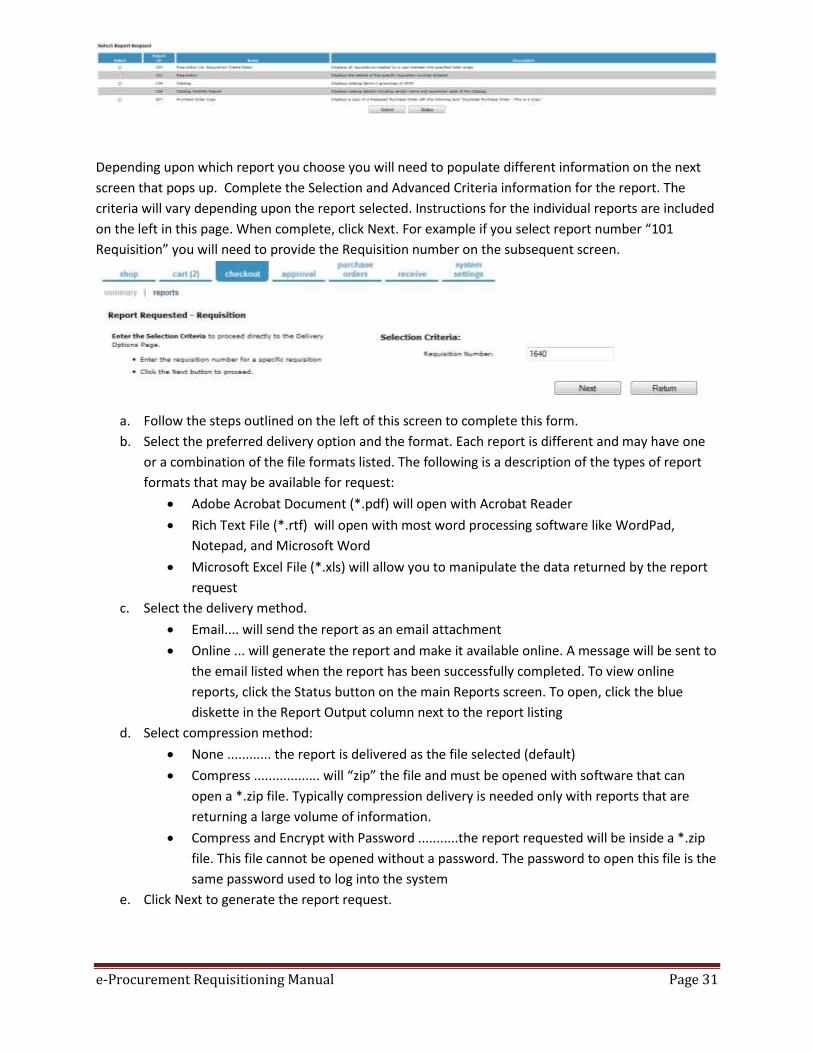
Searching for a Previously Entered Requisition The top section of Checkout provides search criteria. You can use one or any combination of search
criteria fields.
Search Criteria Fields:
a. The Search box allows you to search for a vendor. Just type in a few letters to locate all vendors
with those letters in their name. Or if you know exact way the vendor name is indicated in e-
Procurement you can search on the entire vendor name. Remember, any typo in the name will
not provide you with any results.
b. The status box allows you to narrow your search base on status criteria.
c. Date Range: from and to dates. You must indicate a date range for your search.
d. The sort by box allows your information to be sorted in the manner that best suits your needs.
e. The rows/pg box allows you to indicate how much information you want to see per page.
Once you have completed the search criteria fields click the gold Go button. Your information will be
populated on the screen.
Reports The reports section of Checkout provides you with the ability to run a select number of reports. Read
the description of the report to see what information will be returned to you. There are numerous
reports that you can access from the various tabs. The report requests will be delivered to your online
account or can be emailed as attachments.
1. Click the radio button next to the report of interest and click Submit.
e-Procurement Requisitioning Manual Page 31
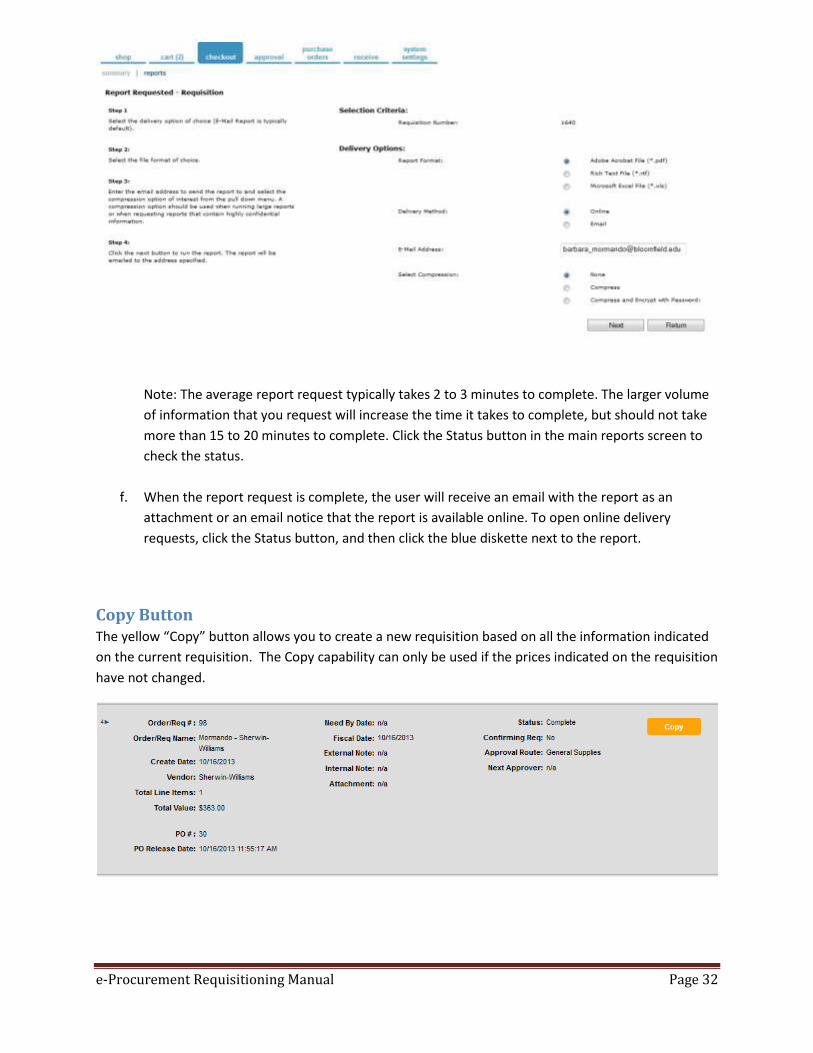
Depending upon which report you choose you will need to populate different information on the next
screen that pops up. Complete the Selection and Advanced Criteria information for the report. The
criteria will vary depending upon the report selected. Instructions for the individual reports are included
on the left in this page. When complete, click Next. For example if you select report number “101
Requisition” you will need to provide the Requisition number on the subsequent screen.
a. Follow the steps outlined on the left of this screen to complete this form.
b. Select the preferred delivery option and the format. Each report is different and may have one
or a combination of the file formats listed. The following is a description of the types of report
formats that may be available for request:
Adobe Acrobat Document (*.pdf) will open with Acrobat Reader
Rich Text File (*.rtf) will open with most word processing software like WordPad,
Notepad, and Microsoft Word
Microsoft Excel File (*.xls) will allow you to manipulate the data returned by the report
request
c. Select the delivery method.
Email.... will send the report as an email attachment
Online ... will generate the report and make it available online. A message will be sent to
the email listed when the report has been successfully completed. To view online
reports, click the Status button on the main Reports screen. To open, click the blue
diskette in the Report Output column next to the report listing
d. Select compression method:
None ............ the report is delivered as the file selected (default)
Compress .................. will “zip” the file and must be opened with software that can
open a *.zip file. Typically compression delivery is needed only with reports that are
returning a large volume of information.
Compress and Encrypt with Password ...........the report requested will be inside a *.zip
file. This file cannot be opened without a password. The password to open this file is the
same password used to log into the system
e. Click Next to generate the report request.
e-Procurement Requisitioning Manual Page 32
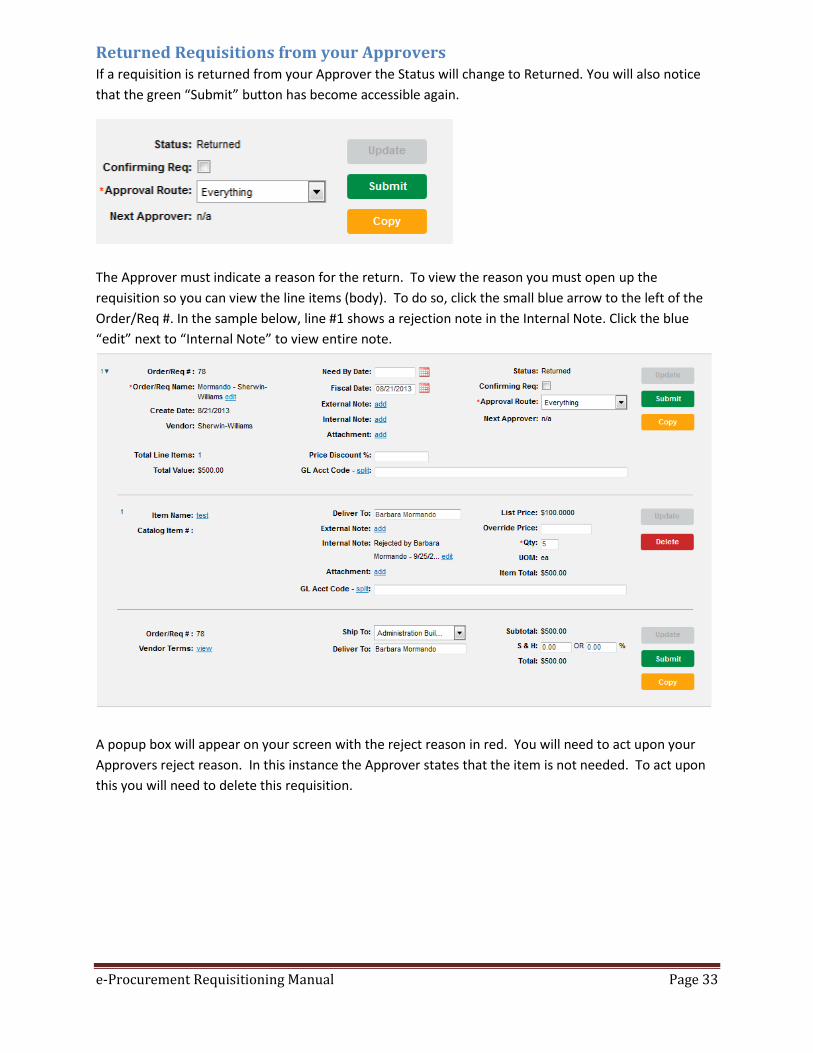
Note: The average report request typically takes 2 to 3 minutes to complete. The larger volume
of information that you request will increase the time it takes to complete, but should not take
more than 15 to 20 minutes to complete. Click the Status button in the main reports screen to
check the status.
f. When the report request is complete, the user will receive an email with the report as an
attachment or an email notice that the report is available online. To open online delivery
requests, click the Status button, and then click the blue diskette next to the report.
Copy Button The yellow “Copy” button allows you to create a new requisition based on all the information indicated
on the current requisition. The Copy capability can only be used if the prices indicated on the requisition
have not changed.
e-Procurement Requisitioning Manual Page 33
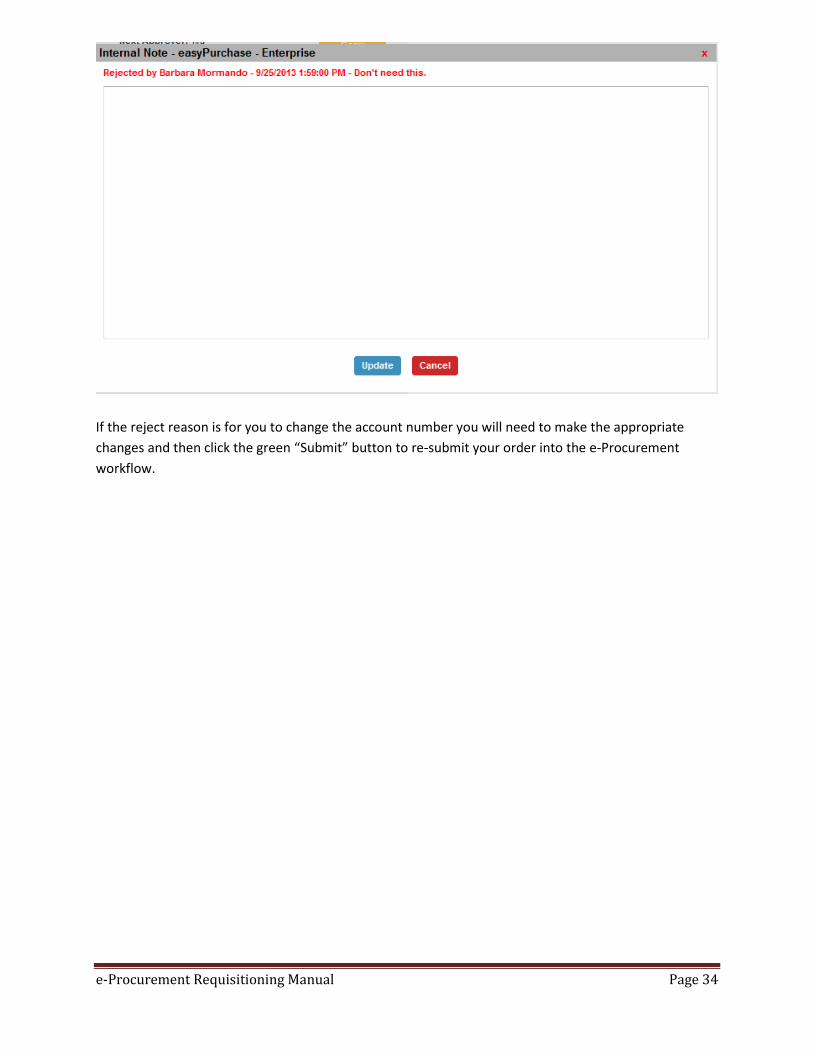
Returned Requisitions from your Approvers If a requisition is returned from your Approver the Status will change to Returned. You will also notice
that the green “Submit” button has become accessible again.
The Approver must indicate a reason for the return. To view the reason you must open up the
requisition so you can view the line items (body). To do so, click the small blue arrow to the left of the
Order/Req #. In the sample below, line #1 shows a rejection note in the Internal Note. Click the blue
“edit” next to “Internal Note” to view entire note.
A popup box will appear on your screen with the reject reason in red. You will need to act upon your
Approvers reject reason. In this instance the Approver states that the item is not needed. To act upon
this you will need to delete this requisition.
e-Procurement Requisitioning Manual Page 34
If the reject reason is for you to change the account number you will need to make the appropriate
changes and then click the green “Submit” button to re-submit your order into the e-Procurement
workflow.