drum sequencer player operation manual · channel 1 in redrum), drum channel 2 is set to control mi...
TRANSCRIPT
DRUM SEQUENCER PLAYEROPERATION MANUAL
The information in this document is subject to change without notice and does not represent a commitment on the part of Propellerhead Software AB. The software described herein is subject to a License Agreement and may not be copied to any other media except as specifically allowed in the License Agreement. No part of this publication may be copied, reproduced or otherwise transmitted or recorded, for any purpose, without prior written permission by Propellerhead Software AB.
©2018 Propellerhead Software and its licensors. All specifications subject to change without notice. Reason, Reason Intro, Reason Lite and Rack Extension are trademarks of Propellerhead Software. All other commercial symbols are protected trademarks and trade names of their respective holders. All rights reserved.
Drum Sequencer Player
DRUM SEQUENCER PLAYER4
IntroductionA Player is a special type of device that automatically processes, filters and generates MIDI Notes, based on input MIDI Notes, to an Instrument device in the rack. Players can also play back MIDI on their own, without any MIDI input; this could for example be pattern sequencers, like the Drum Sequencer Player described in this manual.
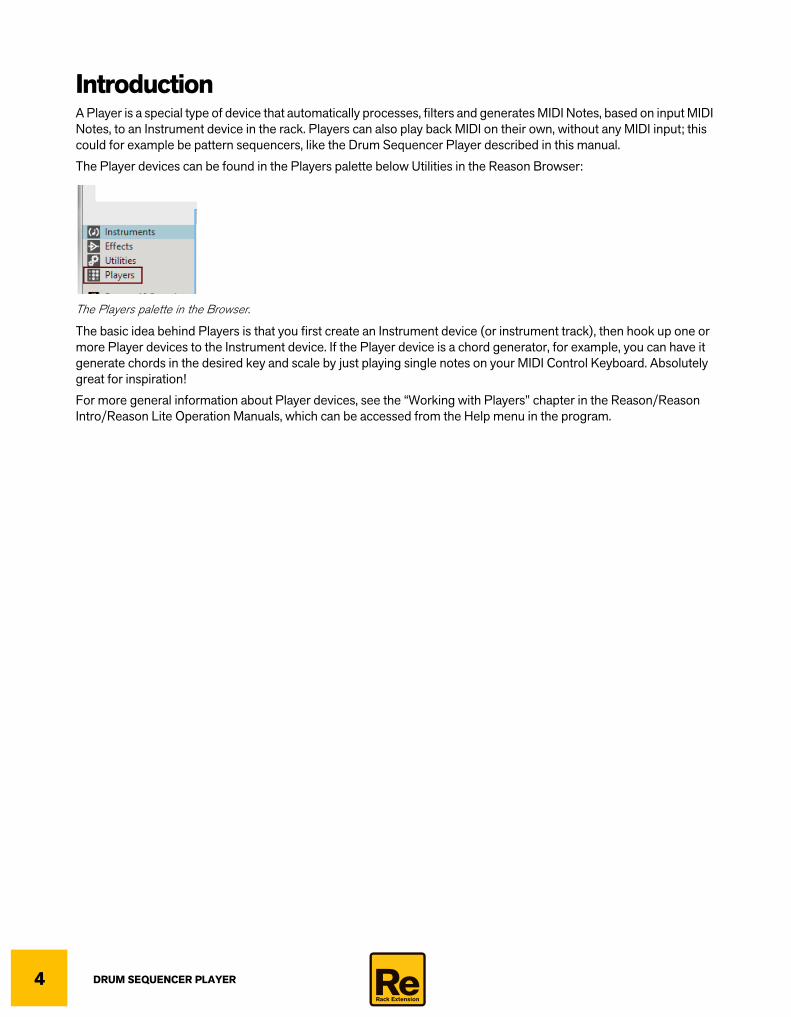
The Player devices can be found in the Players palette below Utilities in the Reason Browser:
The Players palette in the Browser.
The basic idea behind Players is that you first create an Instrument device (or instrument track), then hook up one or more Player devices to the Instrument device. If the Player device is a chord generator, for example, you can have it generate chords in the desired key and scale by just playing single notes on your MIDI Control Keyboard. Absolutely great for inspiration!
For more general information about Player devices, see the “Working with Players” chapter in the Reason/Reason Intro/Reason Lite Operation Manuals, which can be accessed from the Help menu in the program.
DRUM SEQUENCER PLAYER 5
Overview
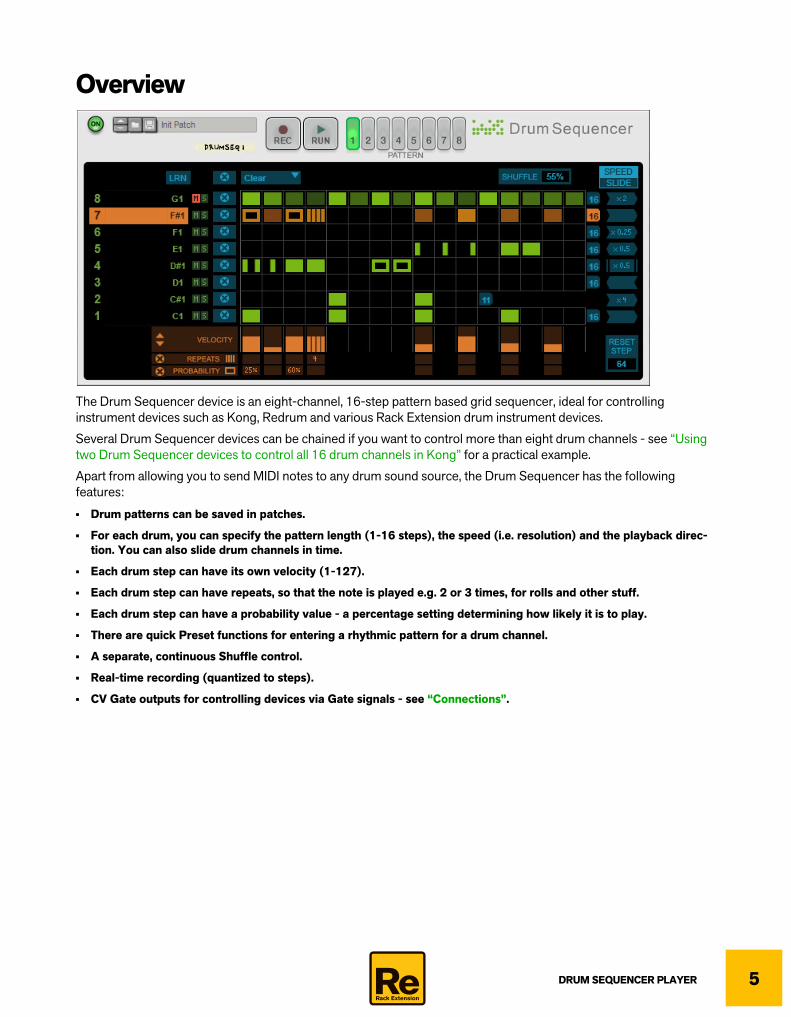
The Drum Sequencer device is an eight-channel, 16-step pattern based grid sequencer, ideal for controlling instrument devices such as Kong, Redrum and various Rack Extension drum instrument devices.
Several Drum Sequencer devices can be chained if you want to control more than eight drum channels - see “Using two Drum Sequencer devices to control all 16 drum channels in Kong” for a practical example.
Apart from allowing you to send MIDI notes to any drum sound source, the Drum Sequencer has the following features:
• Drum patterns can be saved in patches.
• For each drum, you can specify the pattern length (1-16 steps), the speed (i.e. resolution) and the playback direc-tion. You can also slide drum channels in time.
• Each drum step can have its own velocity (1-127).
• Each drum step can have repeats, so that the note is played e.g. 2 or 3 times, for rolls and other stuff.
• Each drum step can have a probability value - a percentage setting determining how likely it is to play.
• There are quick Preset functions for entering a rhythmic pattern for a drum channel.
• A separate, continuous Shuffle control.
• Real-time recording (quantized to steps).
• CV Gate outputs for controlling devices via Gate signals - see “Connections”.
DRUM SEQUENCER PLAYER6
Working with the Drum Sequencer
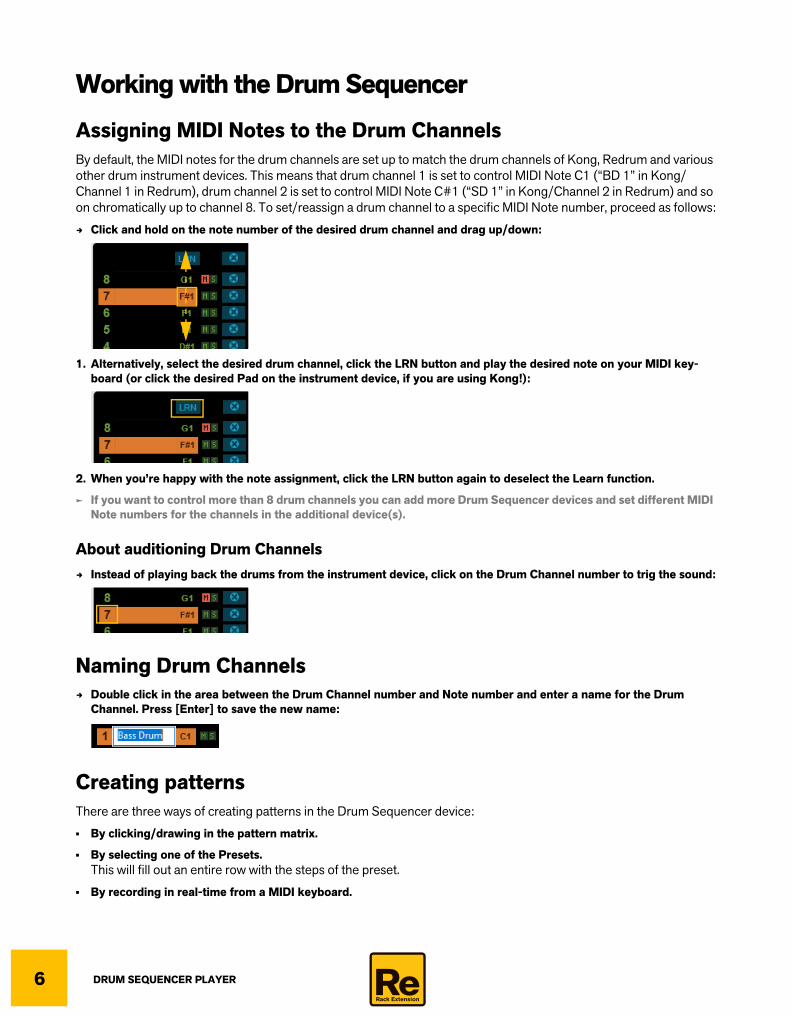
Assigning MIDI Notes to the Drum ChannelsBy default, the MIDI notes for the drum channels are set up to match the drum channels of Kong, Redrum and various other drum instrument devices. This means that drum channel 1 is set to control MIDI Note C1 (“BD 1” in Kong/Channel 1 in Redrum), drum channel 2 is set to control MIDI Note C#1 (“SD 1” in Kong/Channel 2 in Redrum) and so on chromatically up to channel 8. To set/reassign a drum channel to a specific MIDI Note number, proceed as follows:
D Click and hold on the note number of the desired drum channel and drag up/down:
1. Alternatively, select the desired drum channel, click the LRN button and play the desired note on your MIDI key-board (or click the desired Pad on the instrument device, if you are using Kong!):
2. When you’re happy with the note assignment, click the LRN button again to deselect the Learn function.
q If you want to control more than 8 drum channels you can add more Drum Sequencer devices and set different MIDI Note numbers for the channels in the additional device(s).
About auditioning Drum ChannelsD Instead of playing back the drums from the instrument device, click on the Drum Channel number to trig the sound:
Naming Drum ChannelsD Double click in the area between the Drum Channel number and Note number and enter a name for the Drum
Channel. Press [Enter] to save the new name:
Creating patternsThere are three ways of creating patterns in the Drum Sequencer device:
• By clicking/drawing in the pattern matrix.
• By selecting one of the Presets.This will fill out an entire row with the steps of the preset.
• By recording in real-time from a MIDI keyboard.
DRUM SEQUENCER PLAYER 7
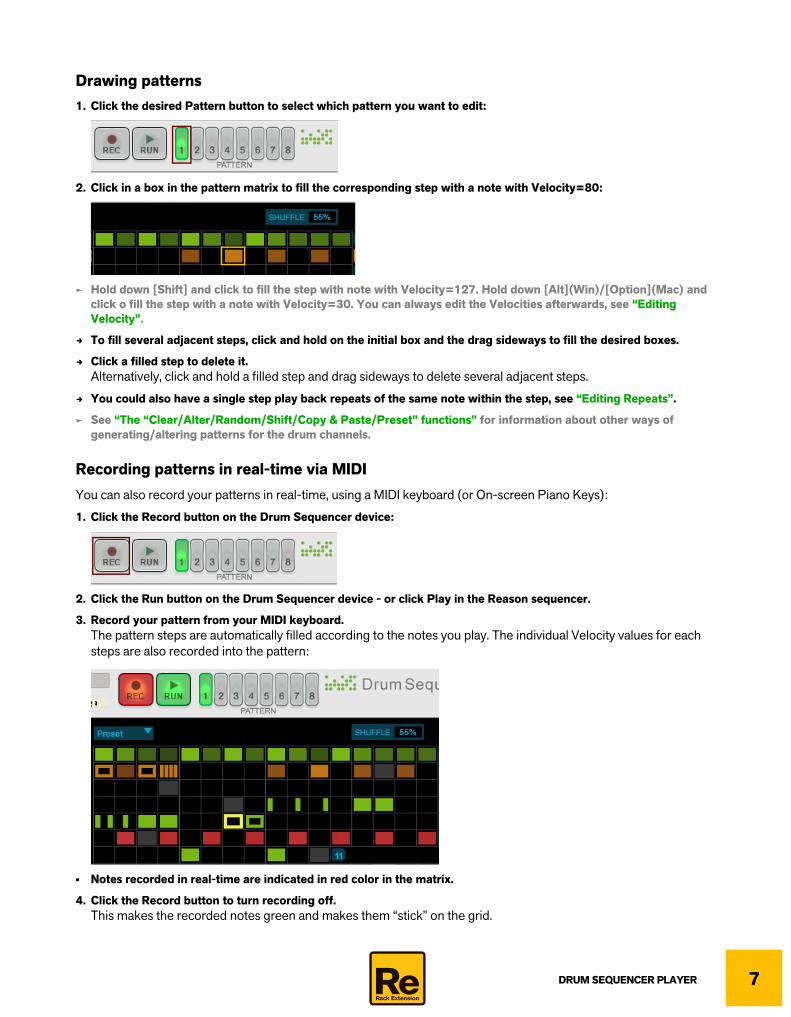
Drawing patterns1. Click the desired Pattern button to select which pattern you want to edit:
2. Click in a box in the pattern matrix to fill the corresponding step with a note with Velocity=80:
q Hold down [Shift] and click to fill the step with note with Velocity=127. Hold down [Alt](Win)/[Option](Mac) and click o fill the step with a note with Velocity=30. You can always edit the Velocities afterwards, see “Editing Velocity”.
D To fill several adjacent steps, click and hold on the initial box and the drag sideways to fill the desired boxes.
D Click a filled step to delete it.Alternatively, click and hold a filled step and drag sideways to delete several adjacent steps.
D You could also have a single step play back repeats of the same note within the step, see “Editing Repeats”.
q See “The “Clear/Alter/Random/Shift/Copy & Paste/Preset” functions” for information about other ways of generating/altering patterns for the drum channels.
Recording patterns in real-time via MIDIYou can also record your patterns in real-time, using a MIDI keyboard (or On-screen Piano Keys):
1. Click the Record button on the Drum Sequencer device:
2. Click the Run button on the Drum Sequencer device - or click Play in the Reason sequencer.
3. Record your pattern from your MIDI keyboard.The pattern steps are automatically filled according to the notes you play. The individual Velocity values for each steps are also recorded into the pattern:
• Notes recorded in real-time are indicated in red color in the matrix.
4. Click the Record button to turn recording off.This makes the recorded notes green and makes them “stick” on the grid.
DRUM SEQUENCER PLAYER8
Playing back PatternsD Click the Run button on the Drum Sequencer - or click Play in Reason’s sequencer - to play back the pattern.
Incoming MIDI notes pass through the Drum Sequencer. This means you can have a pattern going and add live-played drum hits, or loose hits (cymbals, fills etc) from your MIDI keyboard (or On-screen Piano Keys).
Editing patterns
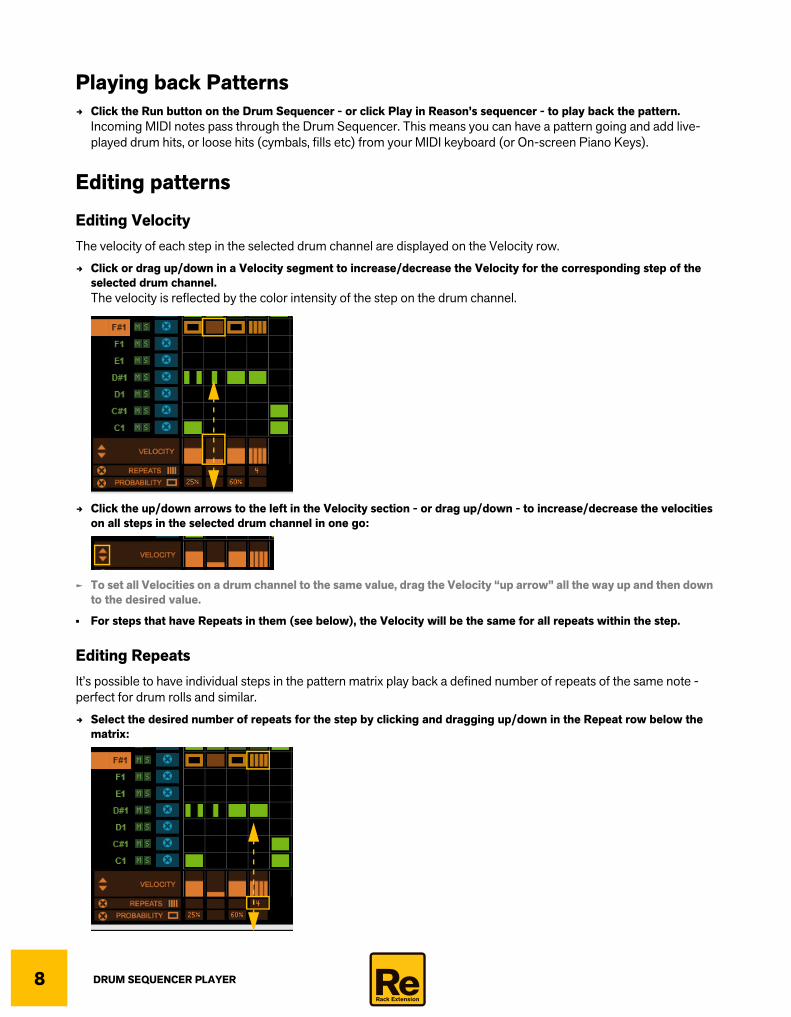
Editing VelocityThe velocity of each step in the selected drum channel are displayed on the Velocity row.
D Click or drag up/down in a Velocity segment to increase/decrease the Velocity for the corresponding step of the selected drum channel.The velocity is reflected by the color intensity of the step on the drum channel.
D Click the up/down arrows to the left in the Velocity section - or drag up/down - to increase/decrease the velocities on all steps in the selected drum channel in one go:
q To set all Velocities on a drum channel to the same value, drag the Velocity “up arrow” all the way up and then down to the desired value.
• For steps that have Repeats in them (see below), the Velocity will be the same for all repeats within the step.
Editing RepeatsIt’s possible to have individual steps in the pattern matrix play back a defined number of repeats of the same note - perfect for drum rolls and similar.
D Select the desired number of repeats for the step by clicking and dragging up/down in the Repeat row below the matrix:
DRUM SEQUENCER PLAYER 9
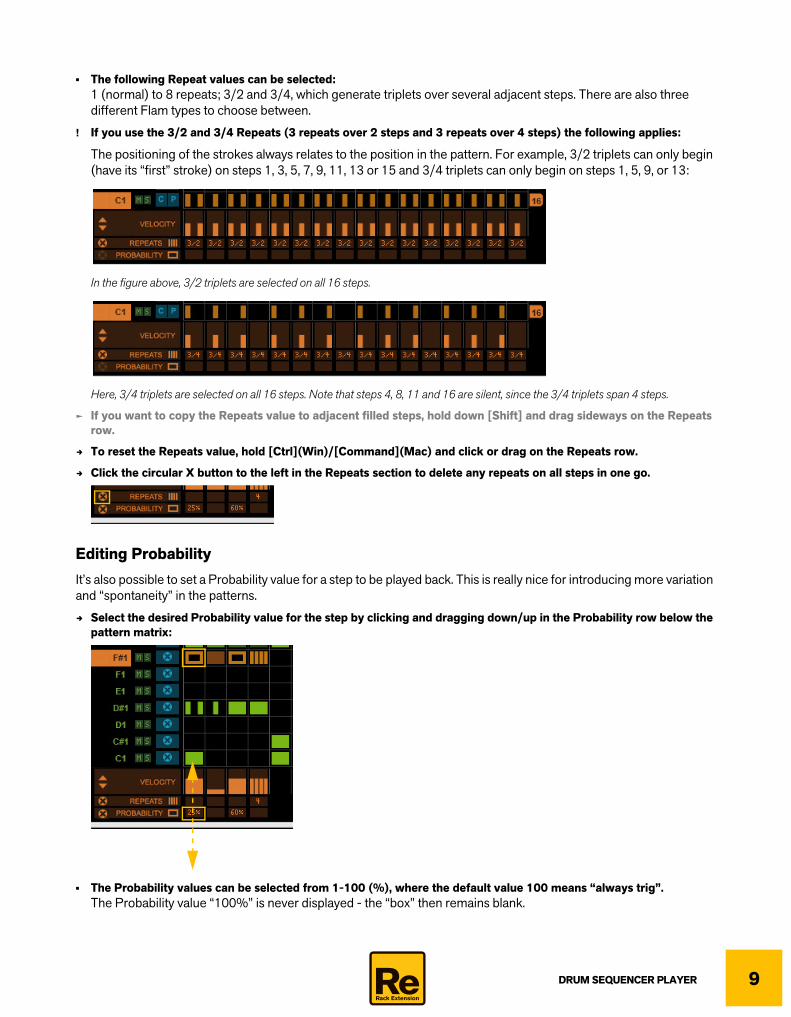
• The following Repeat values can be selected: 1 (normal) to 8 repeats; 3/2 and 3/4, which generate triplets over several adjacent steps. There are also three different Flam types to choose between.
! If you use the 3/2 and 3/4 Repeats (3 repeats over 2 steps and 3 repeats over 4 steps) the following applies:
The positioning of the strokes always relates to the position in the pattern. For example, 3/2 triplets can only begin (have its “first” stroke) on steps 1, 3, 5, 7, 9, 11, 13 or 15 and 3/4 triplets can only begin on steps 1, 5, 9, or 13:
In the figure above, 3/2 triplets are selected on all 16 steps.
Here, 3/4 triplets are selected on all 16 steps. Note that steps 4, 8, 11 and 16 are silent, since the 3/4 triplets span 4 steps.
q If you want to copy the Repeats value to adjacent filled steps, hold down [Shift] and drag sideways on the Repeats row.
D To reset the Repeats value, hold [Ctrl](Win)/[Command](Mac) and click or drag on the Repeats row.
D Click the circular X button to the left in the Repeats section to delete any repeats on all steps in one go.
Editing ProbabilityIt’s also possible to set a Probability value for a step to be played back. This is really nice for introducing more variation and “spontaneity” in the patterns.
D Select the desired Probability value for the step by clicking and dragging down/up in the Probability row below the pattern matrix:
• The Probability values can be selected from 1-100 (%), where the default value 100 means “always trig”.The Probability value “100%” is never displayed - the “box” then remains blank.
DRUM SEQUENCER PLAYER10
• A step which has a Probability value of <100% is indicated by a frame in the pattern matrix.
q If you want to copy the Probability value to adjacent filled steps, hold down [Shift] and drag sideways on the Probability row.
D To reset the Probability value, hold [Ctrl](Win)/[Command](Mac) and click or drag on the Probability row.
D Click the circular X button to the left in the Probability section to delete any Probability values on all steps in one go.
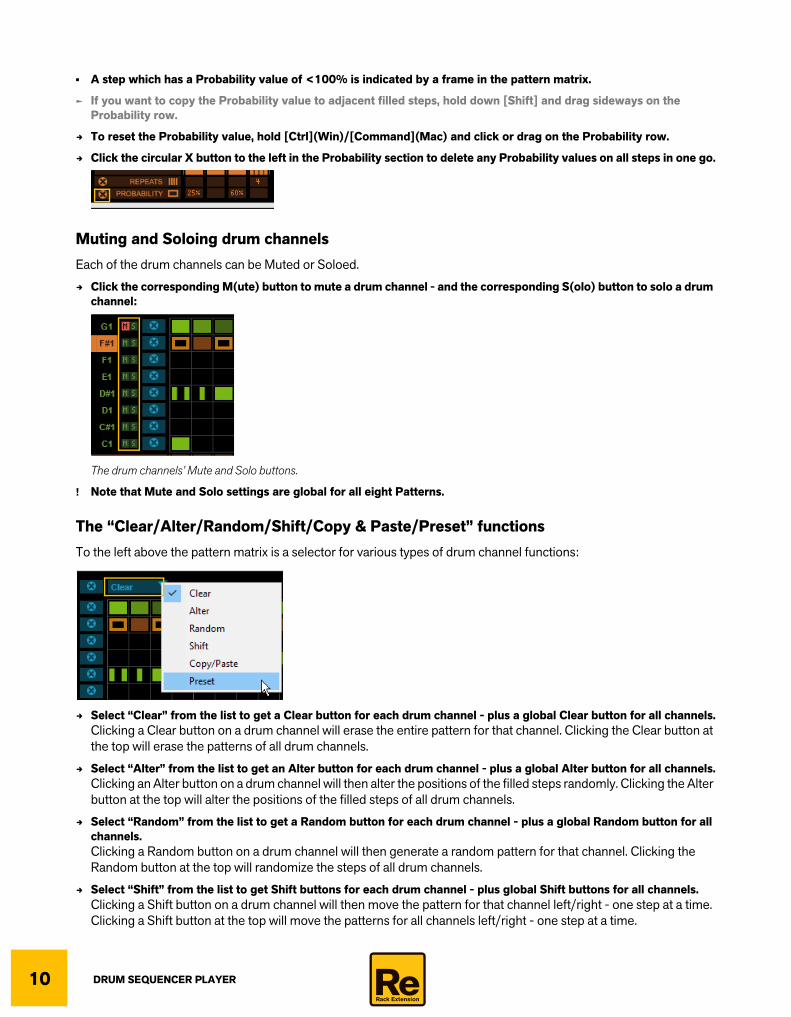
Muting and Soloing drum channelsEach of the drum channels can be Muted or Soloed.
D Click the corresponding M(ute) button to mute a drum channel - and the corresponding S(olo) button to solo a drum channel:
The drum channels’ Mute and Solo buttons.
! Note that Mute and Solo settings are global for all eight Patterns.
The “Clear/Alter/Random/Shift/Copy & Paste/Preset” functionsTo the left above the pattern matrix is a selector for various types of drum channel functions:
D Select “Clear” from the list to get a Clear button for each drum channel - plus a global Clear button for all channels.Clicking a Clear button on a drum channel will erase the entire pattern for that channel. Clicking the Clear button at the top will erase the patterns of all drum channels.
D Select “Alter” from the list to get an Alter button for each drum channel - plus a global Alter button for all channels.Clicking an Alter button on a drum channel will then alter the positions of the filled steps randomly. Clicking the Alter button at the top will alter the positions of the filled steps of all drum channels.
D Select “Random” from the list to get a Random button for each drum channel - plus a global Random button for all channels.Clicking a Random button on a drum channel will then generate a random pattern for that channel. Clicking the Random button at the top will randomize the steps of all drum channels.
D Select “Shift” from the list to get Shift buttons for each drum channel - plus global Shift buttons for all channels.Clicking a Shift button on a drum channel will then move the pattern for that channel left/right - one step at a time. Clicking a Shift button at the top will move the patterns for all channels left/right - one step at a time.
DRUM SEQUENCER PLAYER 11
D Select “Copy/Paste” from the list to get a C(opy) button and a P(aste) button for each drum channel plus global C(opy) and P(aste) buttons for all channels.Clicking a C(opy) button on a drum channel will then copy the entire pattern for that channel to a temporary memory. Clicking a P(aste) button on a drum channel will then paste the pattern currently in the temporary memory. Once you click a C(opy) button on a new drum channel, its pattern will be copied to the temporary memory.
Clicking the C(opy) button at the top will copy the patterns of all drum channels. Select another Pattern and click the global P(aste) button to paste the patterns of all drum channels to the new Pattern. See “Copying Patterns between slots” for an example.
D Select “Preset” from the list to get Preset selection buttons for each drum channel - plus a global Preset button for all drum channels. This function is for quickly adding common beats.Clicking an up/down Preset button on a drum channel will then create a preset pattern for that channel. There are 16 presets available to choose between for individual drum channels. Click the global up/down Preset buttons to select one of the eight available Presets for all drum channels.
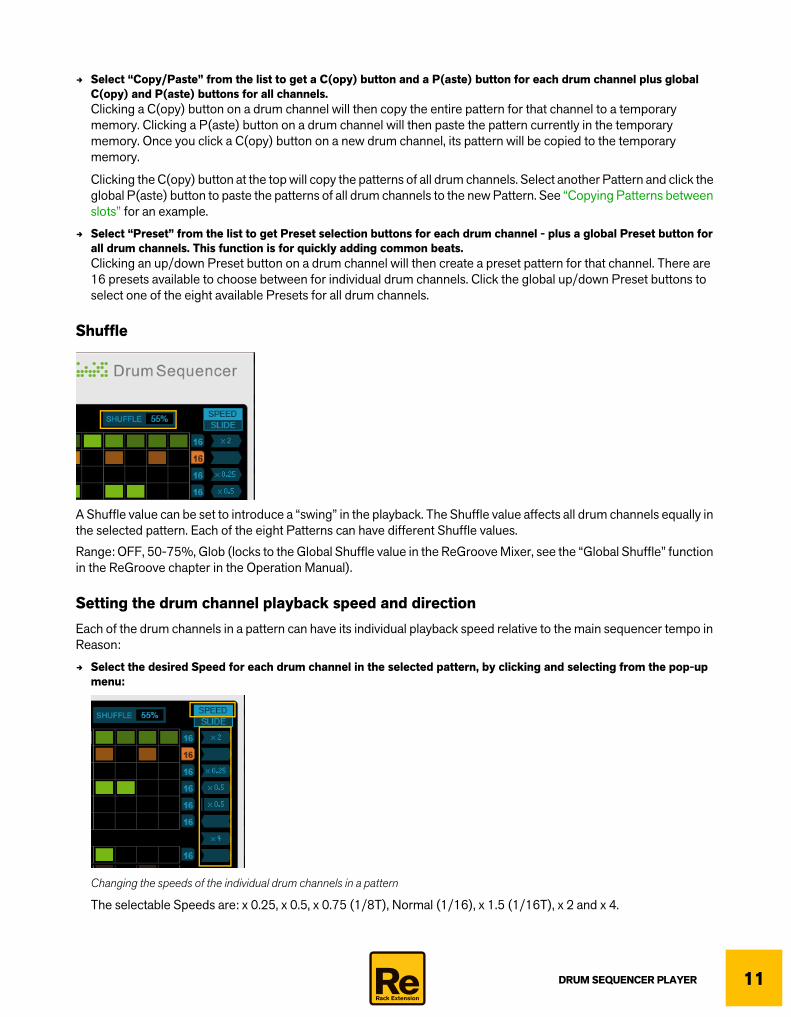
Shuffle
A Shuffle value can be set to introduce a “swing” in the playback. The Shuffle value affects all drum channels equally in the selected pattern. Each of the eight Patterns can have different Shuffle values.
Range: OFF, 50-75%, Glob (locks to the Global Shuffle value in the ReGroove Mixer, see the “Global Shuffle” function in the ReGroove chapter in the Operation Manual).
Setting the drum channel playback speed and directionEach of the drum channels in a pattern can have its individual playback speed relative to the main sequencer tempo in Reason:
D Select the desired Speed for each drum channel in the selected pattern, by clicking and selecting from the pop-up menu:
Changing the speeds of the individual drum channels in a pattern
The selectable Speeds are: x 0.25, x 0.5, x 0.75 (1/8T), Normal (1/16), x 1.5 (1/16T), x 2 and x 4.
DRUM SEQUENCER PLAYER12
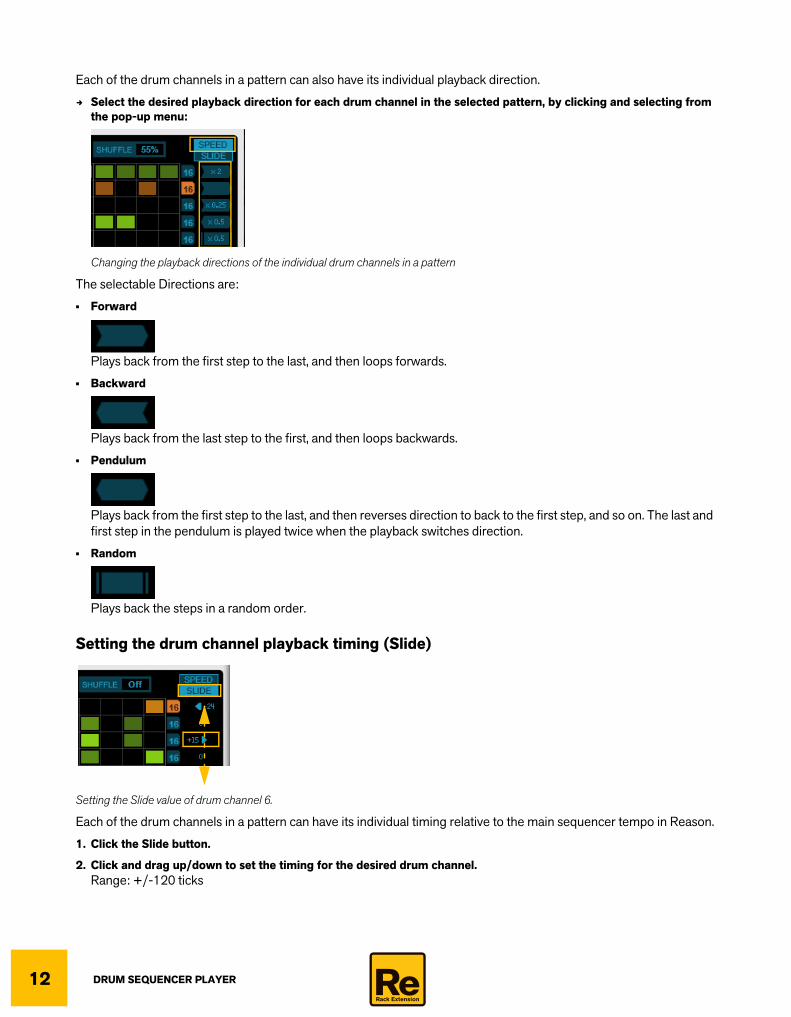
Each of the drum channels in a pattern can also have its individual playback direction.
D Select the desired playback direction for each drum channel in the selected pattern, by clicking and selecting from the pop-up menu:
Changing the playback directions of the individual drum channels in a pattern
The selectable Directions are:
• Forward
Plays back from the first step to the last, and then loops forwards.
• Backward
Plays back from the last step to the first, and then loops backwards.
• Pendulum
Plays back from the first step to the last, and then reverses direction to back to the first step, and so on. The last and first step in the pendulum is played twice when the playback switches direction.
• Random
Plays back the steps in a random order.
Setting the drum channel playback timing (Slide)
Setting the Slide value of drum channel 6.
Each of the drum channels in a pattern can have its individual timing relative to the main sequencer tempo in Reason.
1. Click the Slide button.
2. Click and drag up/down to set the timing for the desired drum channel.Range: +/-120 ticks
DRUM SEQUENCER PLAYER 13
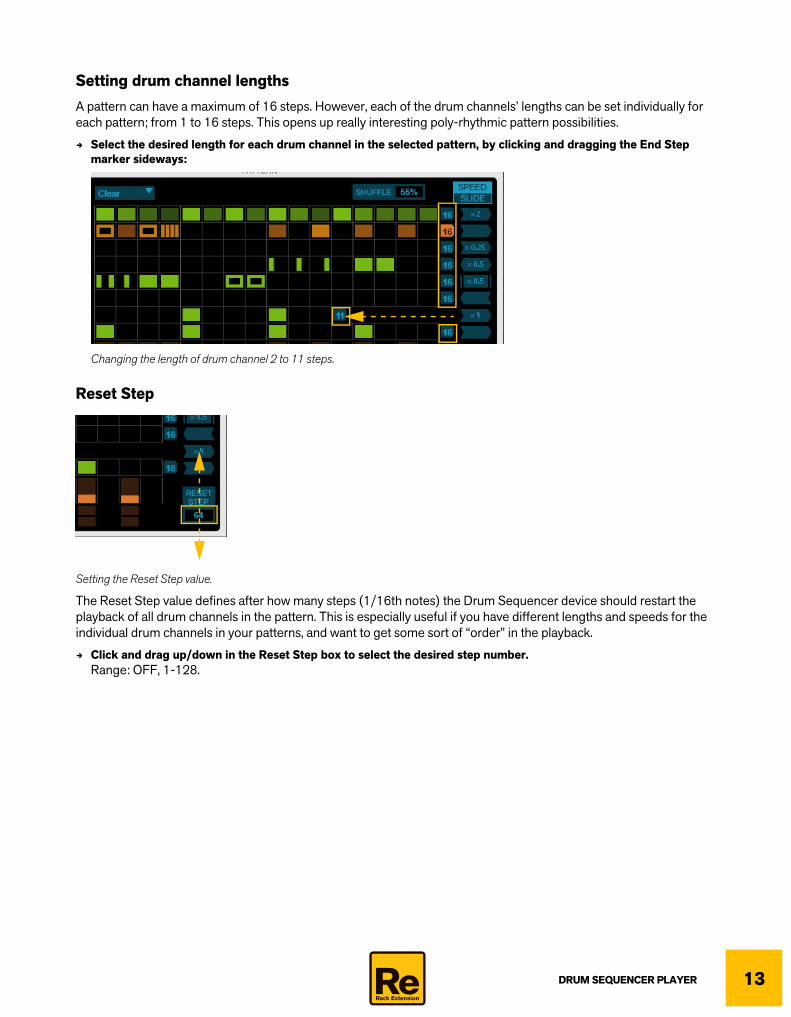
Setting drum channel lengthsA pattern can have a maximum of 16 steps. However, each of the drum channels’ lengths can be set individually for each pattern; from 1 to 16 steps. This opens up really interesting poly-rhythmic pattern possibilities.
D Select the desired length for each drum channel in the selected pattern, by clicking and dragging the End Step marker sideways:
Changing the length of drum channel 2 to 11 steps.
Reset Step
Setting the Reset Step value.
The Reset Step value defines after how many steps (1/16th notes) the Drum Sequencer device should restart the playback of all drum channels in the pattern. This is especially useful if you have different lengths and speeds for the individual drum channels in your patterns, and want to get some sort of “order” in the playback.
D Click and drag up/down in the Reset Step box to select the desired step number.Range: OFF, 1-128.
DRUM SEQUENCER PLAYER14
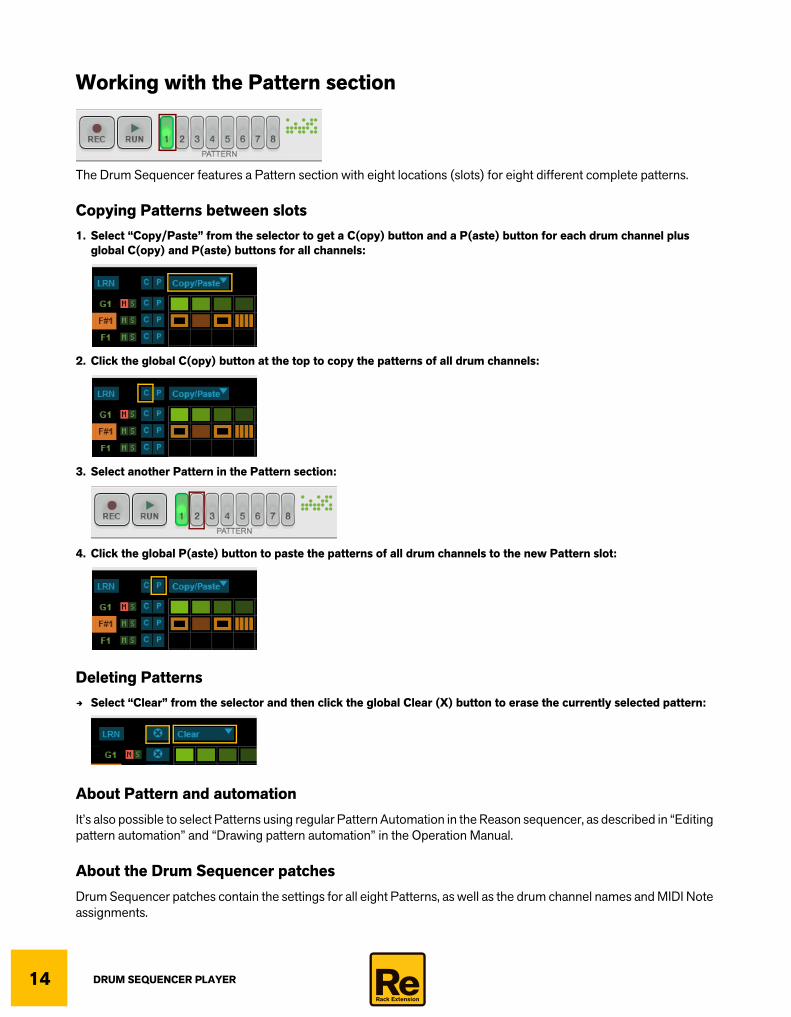
Working with the Pattern section
The Drum Sequencer features a Pattern section with eight locations (slots) for eight different complete patterns.
Copying Patterns between slots1. Select “Copy/Paste” from the selector to get a C(opy) button and a P(aste) button for each drum channel plus
global C(opy) and P(aste) buttons for all channels:
2. Click the global C(opy) button at the top to copy the patterns of all drum channels:
3. Select another Pattern in the Pattern section:
4. Click the global P(aste) button to paste the patterns of all drum channels to the new Pattern slot:
Deleting PatternsD Select “Clear” from the selector and then click the global Clear (X) button to erase the currently selected pattern:
About Pattern and automationIt’s also possible to select Patterns using regular Pattern Automation in the Reason sequencer, as described in “Editing pattern automation” and “Drawing pattern automation” in the Operation Manual.
About the Drum Sequencer patchesDrum Sequencer patches contain the settings for all eight Patterns, as well as the drum channel names and MIDI Note assignments.
DRUM SEQUENCER PLAYER 15
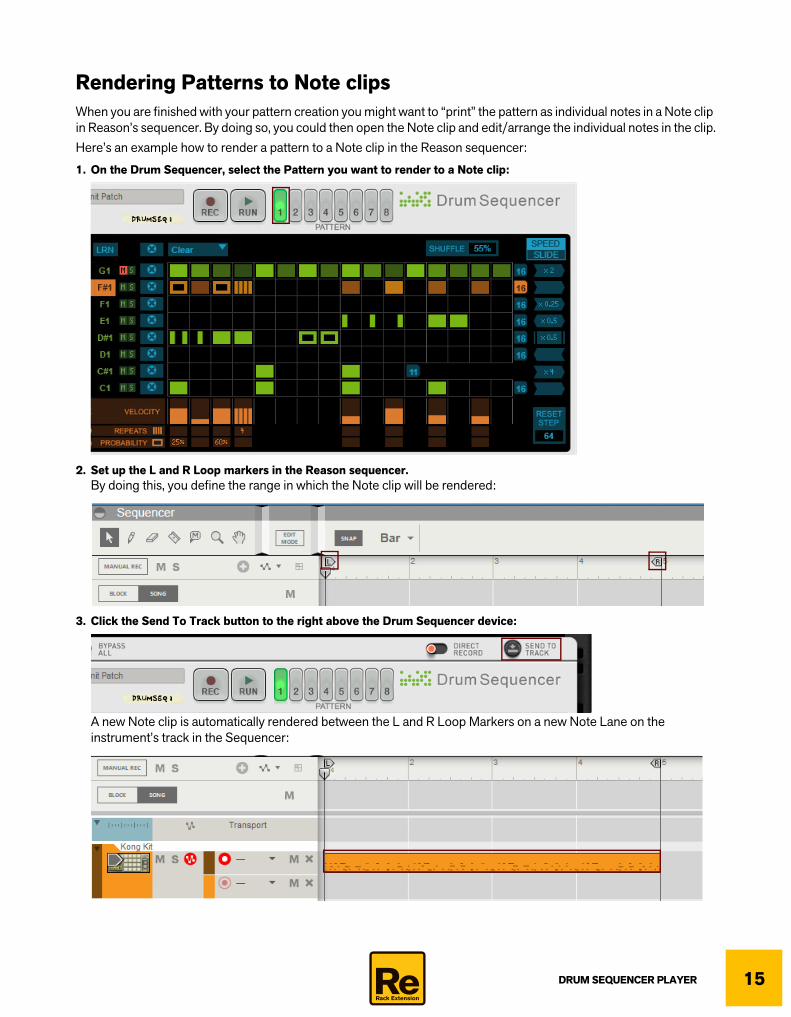
Rendering Patterns to Note clipsWhen you are finished with your pattern creation you might want to “print” the pattern as individual notes in a Note clip in Reason’s sequencer. By doing so, you could then open the Note clip and edit/arrange the individual notes in the clip.Here’s an example how to render a pattern to a Note clip in the Reason sequencer:
1. On the Drum Sequencer, select the Pattern you want to render to a Note clip:
2. Set up the L and R Loop markers in the Reason sequencer.By doing this, you define the range in which the Note clip will be rendered:
3. Click the Send To Track button to the right above the Drum Sequencer device:
A new Note clip is automatically rendered between the L and R Loop Markers on a new Note Lane on the instrument’s track in the Sequencer:
DRUM SEQUENCER PLAYER16
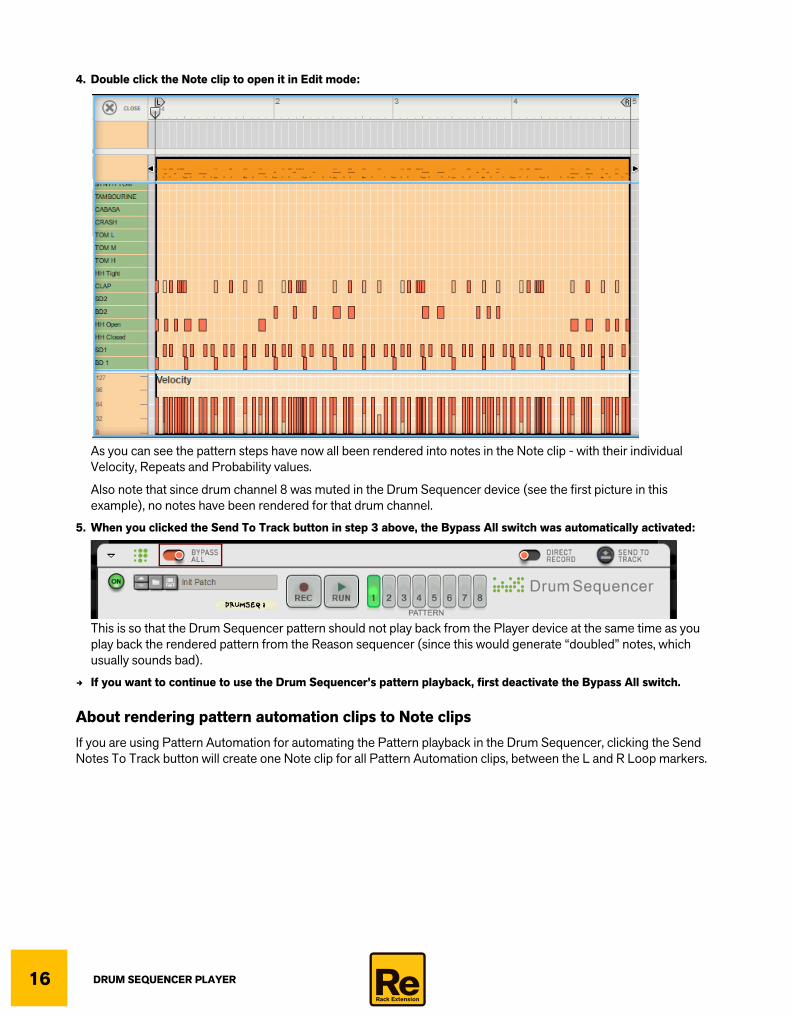
4. Double click the Note clip to open it in Edit mode:
As you can see the pattern steps have now all been rendered into notes in the Note clip - with their individual Velocity, Repeats and Probability values.
Also note that since drum channel 8 was muted in the Drum Sequencer device (see the first picture in this example), no notes have been rendered for that drum channel.
5. When you clicked the Send To Track button in step 3 above, the Bypass All switch was automatically activated:
This is so that the Drum Sequencer pattern should not play back from the Player device at the same time as you play back the rendered pattern from the Reason sequencer (since this would generate “doubled” notes, which usually sounds bad).
D If you want to continue to use the Drum Sequencer’s pattern playback, first deactivate the Bypass All switch.
About rendering pattern automation clips to Note clipsIf you are using Pattern Automation for automating the Pattern playback in the Drum Sequencer, clicking the Send Notes To Track button will create one Note clip for all Pattern Automation clips, between the L and R Loop markers.
DRUM SEQUENCER PLAYER 17
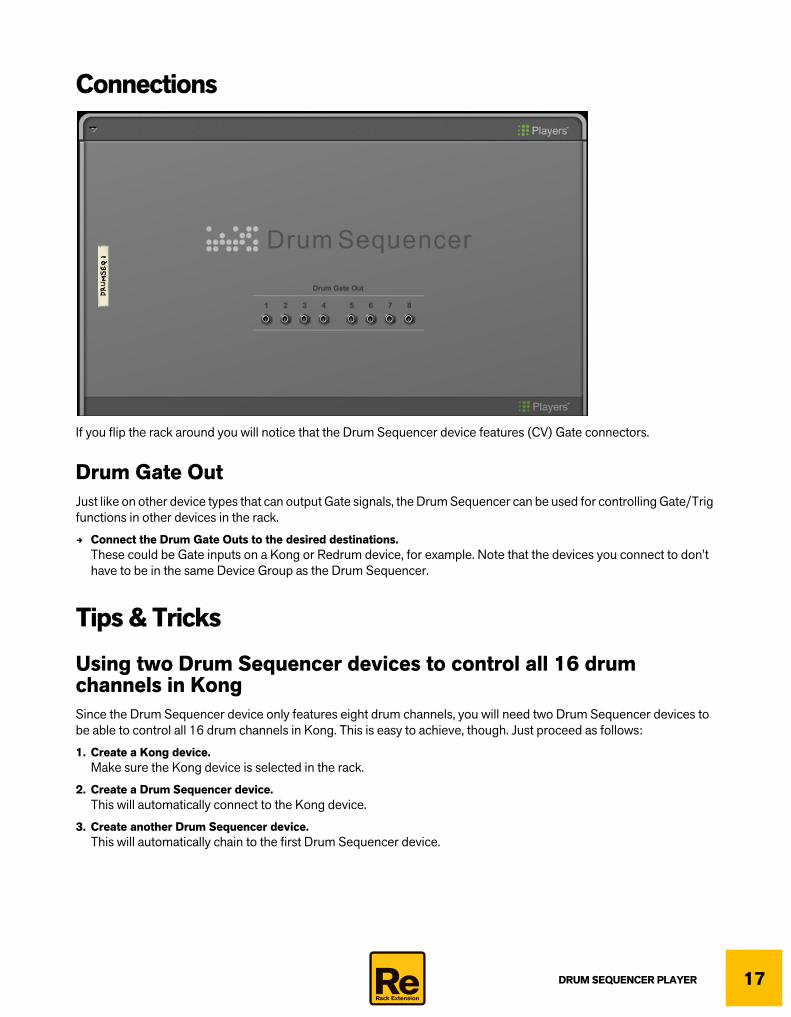
Connections
If you flip the rack around you will notice that the Drum Sequencer device features (CV) Gate connectors.
Drum Gate OutJust like on other device types that can output Gate signals, the Drum Sequencer can be used for controlling Gate/Trig functions in other devices in the rack.
D Connect the Drum Gate Outs to the desired destinations. These could be Gate inputs on a Kong or Redrum device, for example. Note that the devices you connect to don’t have to be in the same Device Group as the Drum Sequencer.
Tips & Tricks
Using two Drum Sequencer devices to control all 16 drum channels in KongSince the Drum Sequencer device only features eight drum channels, you will need two Drum Sequencer devices to be able to control all 16 drum channels in Kong. This is easy to achieve, though. Just proceed as follows:
1. Create a Kong device.Make sure the Kong device is selected in the rack.
2. Create a Drum Sequencer device.This will automatically connect to the Kong device.
3. Create another Drum Sequencer device.This will automatically chain to the first Drum Sequencer device.

DRUM SEQUENCER PLAYER18
4. Since the Drum Sequencer devices already have drum channels 1-8 pre-assigned to Kong’s Pads 1-8 by default, you only have to reassign one of the Drum Sequencer’s drum channels 1-8 to Kong’s Pads 9-16:There is also a pre-made template patch for “Kong Upper Rows”, if you don’t want to reassign yourself.
5. Finally, you might want to combine this setup and save it as a Combi patch.To do that, right click the Kong device and select “Combine” from the context menu. Then, click the Save Patch button on the Combinator panel and save your setup as a Combi (CMB) patch.