Revised 7/20/14 1
2014 – 2015 Independence HS Band
Wind Musician Manual: Woodwind Edition
Chris Cansler, Director of Bands
Tanner Smith, Associate Director of Bands

Revised 7/20/14 2
2014-15 Independence HS Band
-- TABLE OF CONTENTS --
Equipment 3
Detailed Rehearsal Equipment 4
Physical Fitness 5
Marching Band Technique
Posture 6 Air & Breathing Techniques 6-7
Singing 7 Long Tones 8
Going to point 1 (.1) 9 Flow Studies/Flexibility Exercises 9-15
Articulation & Style 16-17 Volume 18
Bopping 19 Balance/Blend 19
Technique Exercises 20-22
The Practice Bucket list 23
Revised 7/20/14 3
Equipment All students should have the proper equipment required to fully participate in rehearsal. Rehearsal Equipment Consists of:
Fall Semester Spring Semester Instrument Mouthpiece/Reeds Neck Strap- if needed for your instrument Music/ Music Folder Pencil Tuner Dotbook Athletic Shoes Water (min. 1/2 Gallon) Hat Sunglasses Sunscreen Black Towel (see section leader for details) Breathing Tubes Instrument Accessories (Oil, grease, etc.)
Instrument Mouthpiece Music/ Music Folder Pencil Tuner & pick-up clip Instrument Accessories (Oil, grease, etc.)
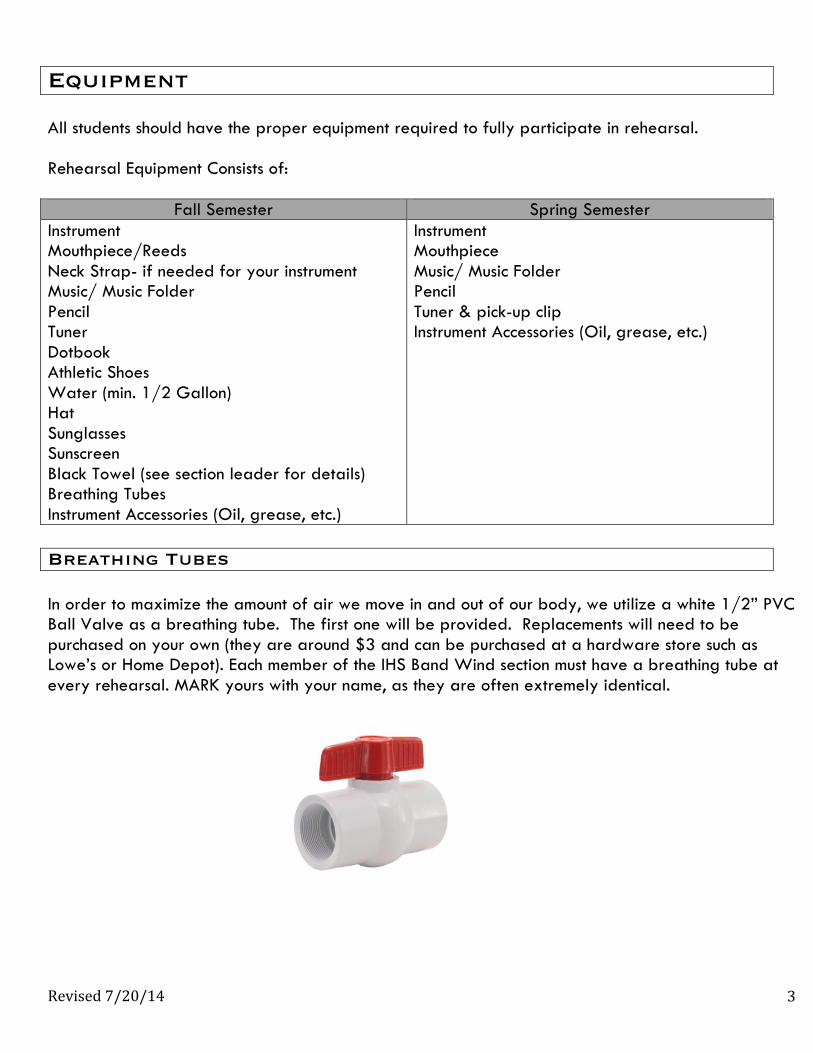
Breathing Tubes In order to maximize the amount of air we move in and out of our body, we utilize a white 1/2” PVC Ball Valve as a breathing tube. The first one will be provided. Replacements will need to be purchased on your own (they are around $3 and can be purchased at a hardware store such as Lowe’s or Home Depot). Each member of the IHS Band Wind section must have a breathing tube at every rehearsal. MARK yours with your name, as they are often extremely identical.
Revised 7/20/14 4
Detailed Rehearsal Equipment Each Member of the IHS Band is required to bring the following materials to all band camp rehearsals and all morning/after school rehearsals: TUNER: All members of the IHS band must own a tuner. (We recommend the Korg CA-30 with a Peterson pick-up clip) METRONOME: All members of the IHS Band must own a metronome. BREATHING TUBES: All members of the IHS Band must have a 1/2” PVC coupler – breathing tube – with them at every band rehearsal. PENCIL: It is extremely important that every music ensemble member have a pencil at all times. Notes should be taken at every rehearsal, especially when rehearsing with clinicians. Write EVERYTHING down! The more details you document, the more details you will remember. BLACK TOWEL: The black towel is used to protect your instrument when placed on hard surfaces, especially outdoors. We would like for every student/section to have instruments on a towel. See your section leader for specifics. BASEBALL CAP: Your cap must cover the top of your head and must shade your face, your eyes and your chops. When rehearsing inside, hats are to come off. TENNIS SHOES / TRAINERS: You will be moving at all rehearsals. Thus, tennis shoes are required at all times. Slip-ons, Sandals, shower shoes, flip-flops, bare feet, etc. are not permitted. CLOTHING: You must wear appropriate clothing that will allow you to perform excessive movement such as light sweats, shorts, t-shirts, etc. NO JEANS!!! Again, you will be moving at all rehearsals. WATER BOTTLES: Every Student is required to have their own personal water jug (no smaller than 1/2 gallon). These jugs must be present and filled with water at all rehearsals. Please mark jug with your NAME and INSTRUMENT.
Revised 7/20/14 5
Physical Fitness Physical ability and fitness is a must in this activity. You must be able to sustain extended lengths of high output cardiovascular during our rehearsals. The reason physical fitness is a must is very simple, the stronger we are, the stronger we will be. Plus it is always easier to listen to instructions when you are not worn out after a rep or rehearsal. Below are some things that can help you achieve your goals: DIET: We don’t pretend to be health experts, however, some things that can help make you feel better is to change your diet in some simple ways: 1. Stop drinking Soda and replace it with water 2. Reduce the amount of fast food you eat 3. Eat more vegetables, especially dark greens 4. Replace sugary snacks with fruits, juices & vegetables 5. Try to eat a breakfast everyday 6. Don’t eat late night snacks 7. Eat more, smaller meals per day EXERCISE: Any type of physical fitness can help you feel better in many ways. When committed to a daily exercise routine you not only improve your health and well being, you will greatly improve your ability to contribute to the band at the highest-level possible. EVERYDAY you should do the following: 1. Stretch your body 2. Walk for an extended amount of time 3. Make sure you get plenty of sleep 4. Keep a record of everything you do 5. Gradually increase the amount of exercise 6. Jog at least 15 minutes Don’t be intimidated by the physical fitness portion of this packet, it is only meant to be some ideas to help you improve as a musician. We believe that being a member of the IHS Band is liken to being a High School athlete at the top of their game. It is imperative that all of our students be in good physical health so we can prevent injuries and enjoy the marching season.
Revised 7/20/14 6
Marching Band Technique The musical technique of our band program is the foundation on which we will build a strong future for our entire band program. So we live by our musical technique program. Posture To be most efficient when playing and marching, the body should be in the most natural and upright position. Improper posture will hinder your instrument playing and can cause back injury. When playing your instrument, your weight should be evenly distributed on both feet; your upper body weight should be lifted up from your waist (NOT leaning on the lower part of your back); your shoulders should be relaxed. The basic rules that apply to all hand positions is that the hands are relaxed and your writs are straight. It is important that you begin to think about SEPARATION OF UPPER AND LOWER BODY. Lifting your weight off of your hips creates more room in your upper body to take in MORE AIR. It also helps to prevent marching or moving from affecting your sound. Air Technique Air should always be relaxed and NEVER forced. There should never be tension in the neck or shoulders. In order to achieve this feeling there are some exercises that can aid in helping us achieve this relaxed feel. Neck rolls, shoulder rolls, arm circles upper body stretches all can be used to help us achieve a relaxed state in the areas that affect our airflow. Air is always moving, either going into your body or coming out. NEVER allow your air to stop movement or what is called capping. This happens when a person inhales and then stops their air before starting the exhale. When this happens many problems occur such as tension, timing issues, explosion of exhale to name a few. When breathing in there should not be any sound and the air should feel cold at the back of the throat. When using your air you must remain relaxed. Your shoulders and upper back should remain relaxed and down during the use of your air. This will help you maintain the proper openings in your throat and breathing passages.
Revised 7/20/14 7
To create a seamless sound we use a technique called stagger breathing. It is really quite simple in regards to technique and implementation. If done correctly you can create a sound that seems unending and seamless. Below are some basic techniques to help you create perfect stagger breathing:
1. Don’t breathe on bar lines 2. Don’t breathe between phrases
3. Always take a complete full breath 4. Take notes out to breathe instead playing partial notes. The ONLY exception
would be during long tones. 5. NEVER breathe when the person next to you takes a breath
6. Sneak out, Sneak In. A few things to think about when creating proper releases:
1. NEVER close or move the face/jaw when releasing the note 2. NEVER stop the air by closing the throat
3. NEVER use the tongue to stop the air or note 4. NEVER change the shape of the mouth during any note or release a clean, square release point
will ring for a moment even after the air has been released. Strive to make the note ring!
Singing All instruments produce sound that imitates the human voice. Singing is an important tool for developing great ensemble tone quality and intonation. The band will sing frequently, and we will have a very serious approach to the technique of singing. The resonance and breath support necessary for singing are quite similar to proper instrument playing. When singing, we use the “radio announcer” voice, the voice that seems to project a great distance. Here are some guidelines for all singing exercises: • The throat should be open. • The face should be relaxed. • The mouth shape should be oval like – the longer part of the oval from nose to chin. • The same approach to breathing, air support, and direction of air with your wind instrument, applies to singing. • Everyone should always be listening to match the pitch. • We will use different vowel sounds, including humming. • We will train you to use audiation, and often check the pitch before, during, and after singing. • We will work on and be able to sing every exercise in the technique book, chorales and show music.

Revised 7/20/14 8
Long Tones There are several benefits from playing long tones everyday. Along with mouthpieces work, this allows the muscles in your face to loosen up and helps you to become comfortable with instrument. Primarily, this is an opportunity for the player to concentrate solely on tone quality, breath support, and intonation. Without the distraction of rhythms and notes, the player can focus on playing in tone with his or her section and throughout the ensemble. Long tones are essential toward establishing a solid center of pitch for the warm-up. Balance and blend are key factors to this portion of the warm-up. Players should be listening for intonation, blend of tone, intensity, as well as quality of sound.
Rules in Ensemble Breathing: • Subdivide in your head • Always move your feet in time • Use a full count to breathe • Full deep breaths (never shallow breaths) • Support to the release • Release by taking a short breath in (reverse the air) • Air is going In or Out, one motion – never “cap” or pause the air
Revised 7/20/14 9
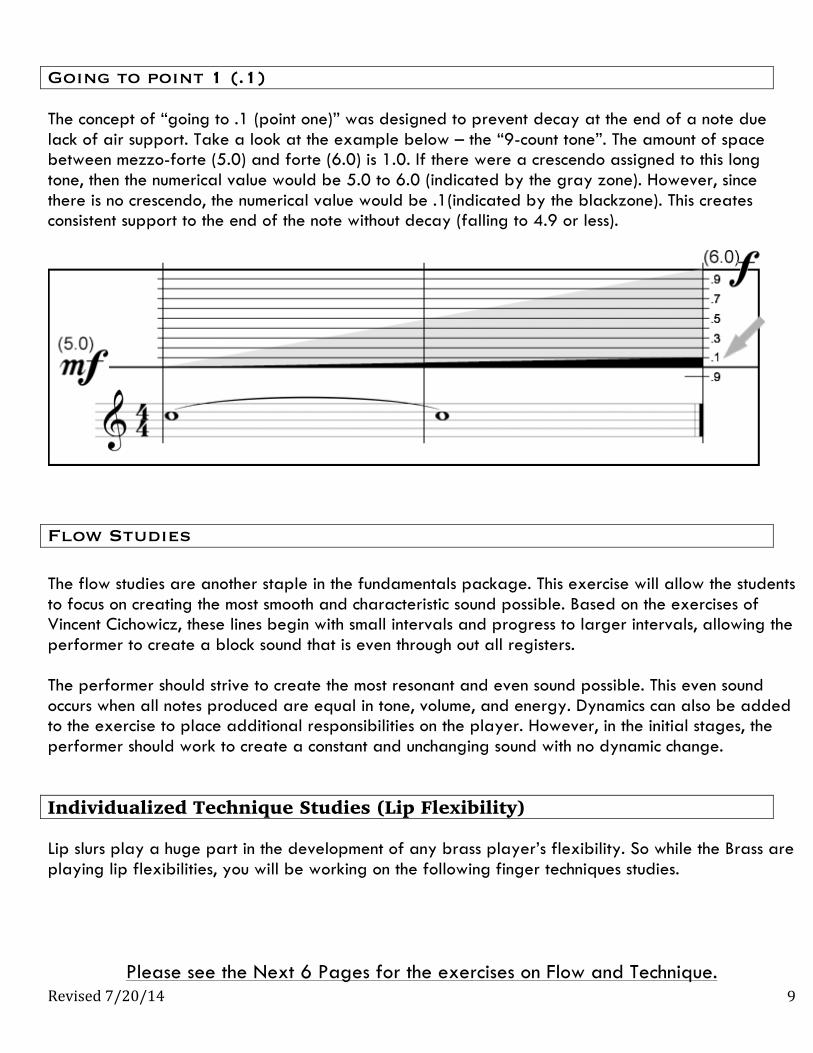
Going to point 1 (.1) The concept of “going to .1 (point one)” was designed to prevent decay at the end of a note due lack of air support. Take a look at the example below – the “9-count tone”. The amount of space between mezzo-forte (5.0) and forte (6.0) is 1.0. If there were a crescendo assigned to this long tone, then the numerical value would be 5.0 to 6.0 (indicated by the gray zone). However, since there is no crescendo, the numerical value would be .1(indicated by the blackzone). This creates consistent support to the end of the note without decay (falling to 4.9 or less).
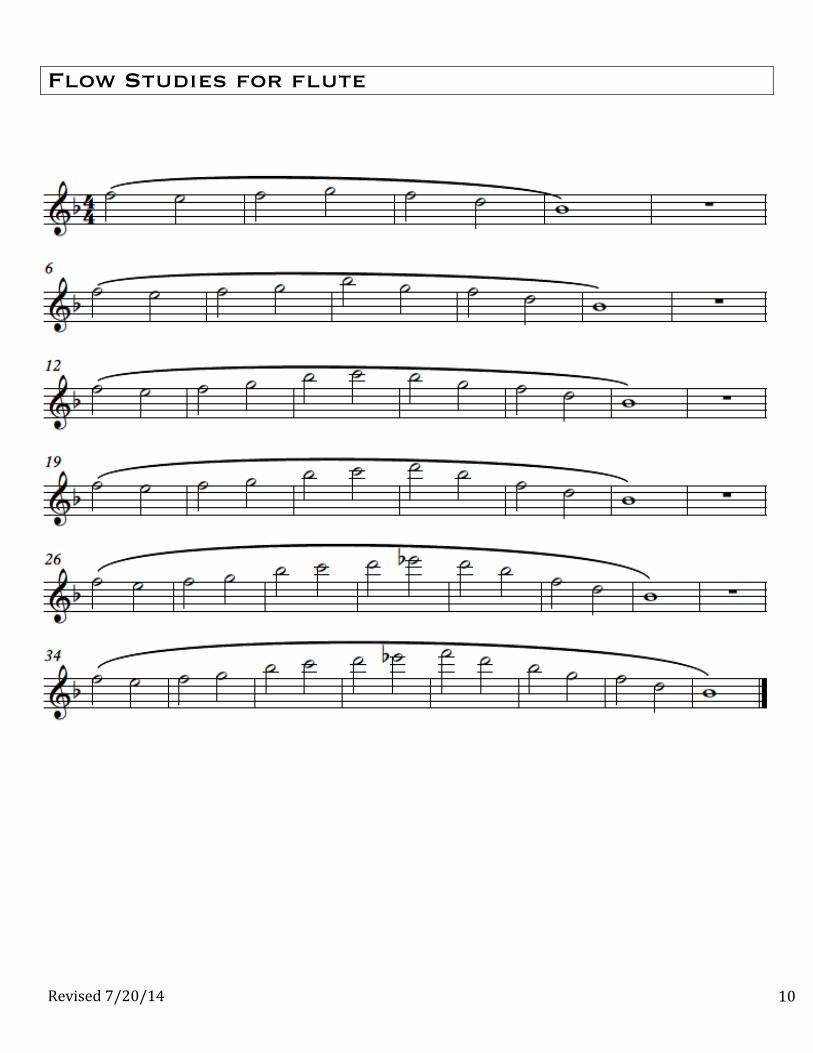
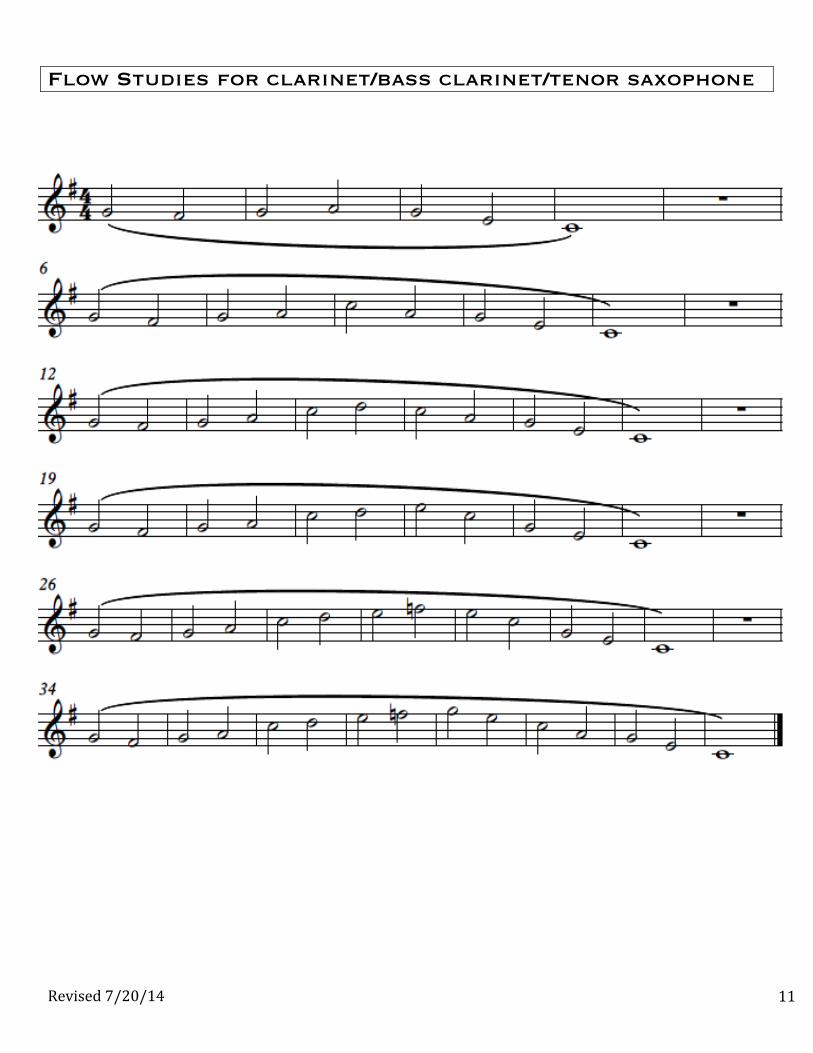
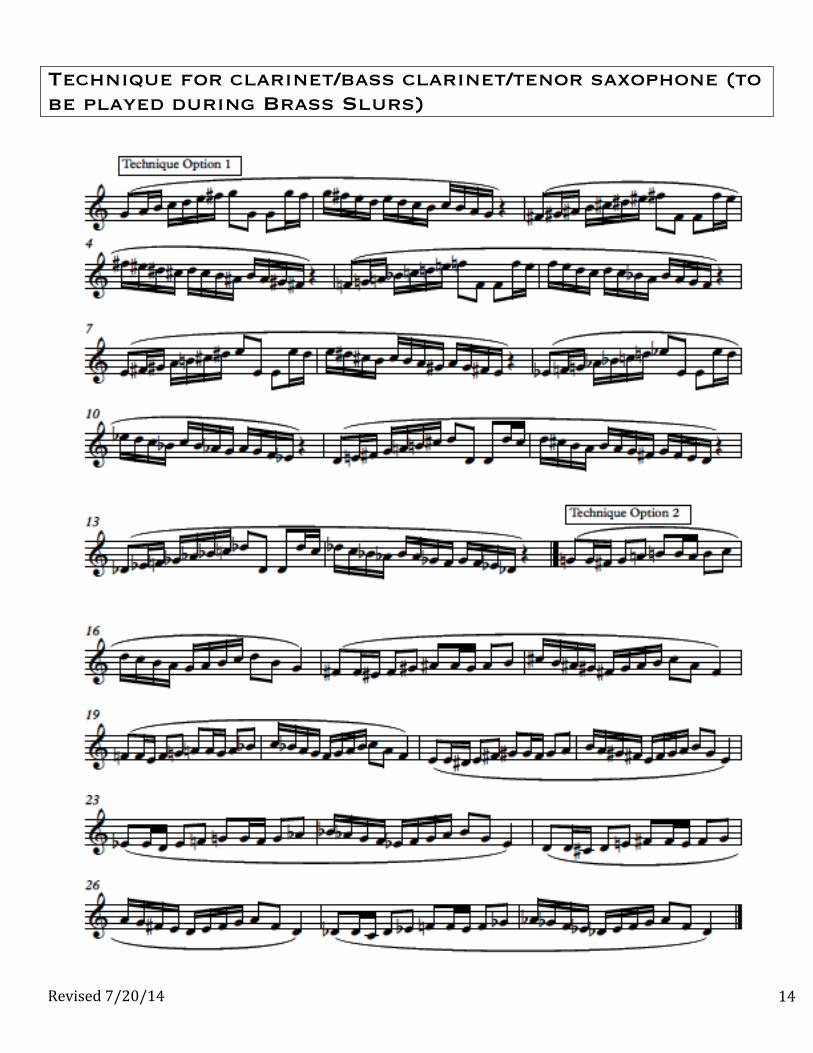
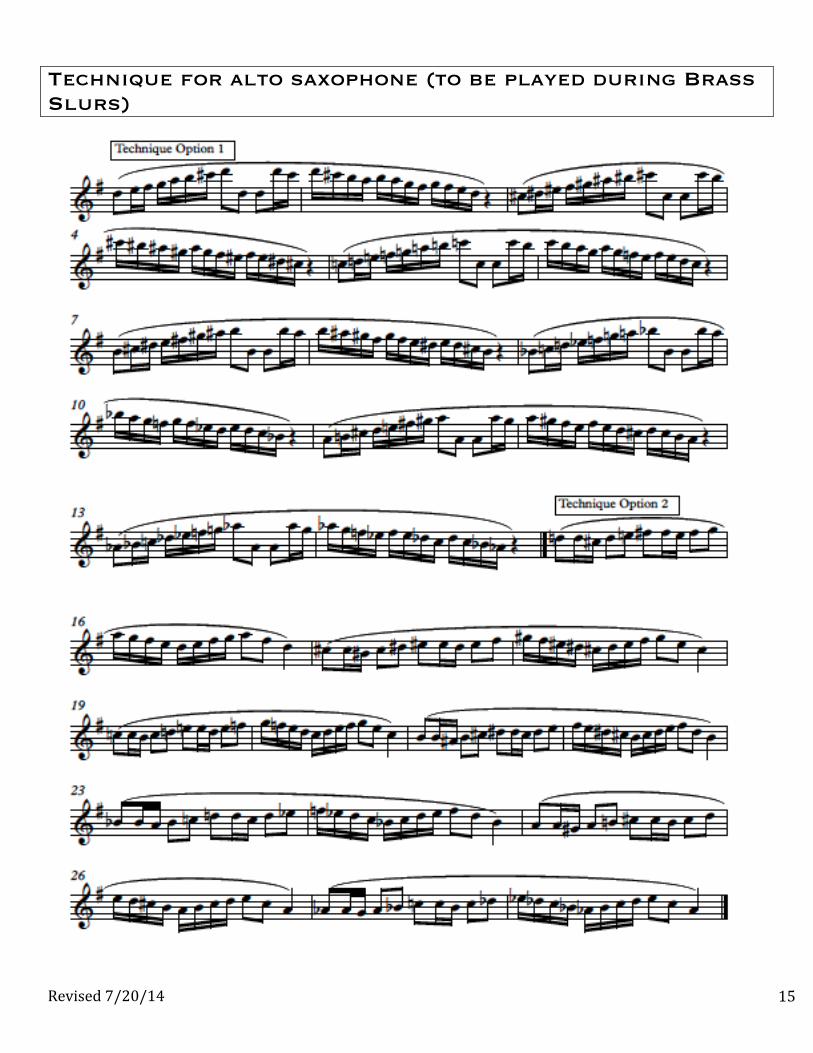
Flow Studies The flow studies are another staple in the fundamentals package. This exercise will allow the students to focus on creating the most smooth and characteristic sound possible. Based on the exercises of Vincent Cichowicz, these lines begin with small intervals and progress to larger intervals, allowing the performer to create a block sound that is even through out all registers. The performer should strive to create the most resonant and even sound possible. This even sound occurs when all notes produced are equal in tone, volume, and energy. Dynamics can also be added to the exercise to place additional responsibilities on the player. However, in the initial stages, the performer should work to create a constant and unchanging sound with no dynamic change. Individualized Technique Studies (Lip Flexibility) Lip slurs play a huge part in the development of any brass player’s flexibility. So while the Brass are playing lip flexibilities, you will be working on the following finger techniques studies.
Please see the Next 6 Pages for the exercises on Flow and Technique.
Revised 7/20/14 10
Flow Studies for flute
Revised 7/20/14 11
Flow Studies for clarinet/bass clarinet/tenor saxophone

Revised 7/20/14 12
Flow Studies for alto saxophone

Revised 7/20/14 13
Technique for flute (to be played during Brass Slurs)
Revised 7/20/14 14
Technique for clarinet/bass clarinet/tenor saxophone (to be played during Brass Slurs)
Revised 7/20/14 15
Technique for alto saxophone (to be played during Brass Slurs)
Revised 7/20/14 16
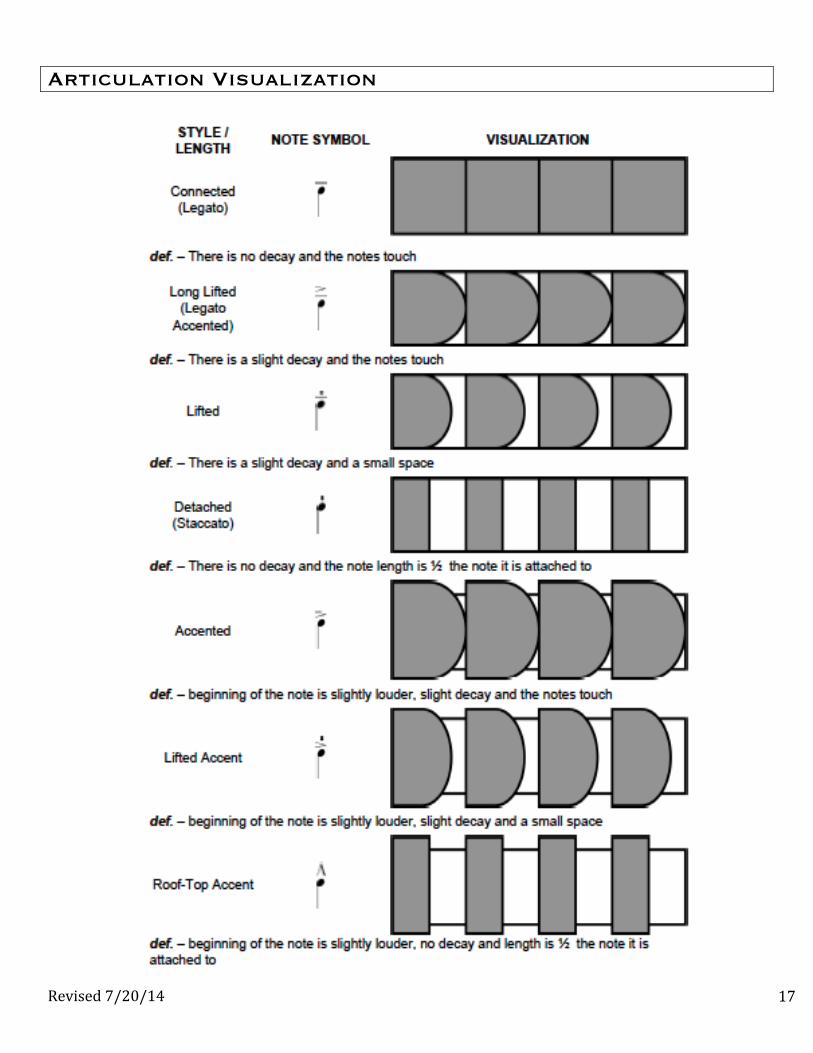
Articulation Articulation is created without explosions on the beginning of the notes. Our band program uses a dAh articulation, which allows for exceptional clarity on all articulations. Take notice of the lower case d and the upper case A. Our articulation requires much less tongue than people think and every performer should strive for less tongue and more focus in the sound to provide more tone. 90% of an attack is air and the other 10% is tongue and you must remember THE AIR STREAM ALWAYS CREATES THE SOUND/TONE, NEVER THE TONGUE. It is important that we create a consistent style of articulation at all times so that we can sound exactly the same at all times throughout the ensemble. The adjudicator community can detect the smallest variations in style and articulation and it is our job to eliminate these inconsistencies. Below is a chart that can help you understand what we are looking in terms of articulation and contains most of the articulations we will see in our musical book. LEGATO TONGUING When tonguing in a legato style, the air is virtually unbroken as the tongue plays each note like a soft paintbrush. Be mindful to keep the tongue moving fast – do not “chew” the notes. STACCATO TONGUING Remember, staccato does not always mean short. It means separated or detached. To produce a good staccato, keep the air stream supported and create perfect blocks of sound: each block identically matching the one that preceded it. Make sure that the tongue starts every note, but does not finish it. Otherwise, a “DIT” articulation will result. Remember to keep a staccato round and open-ended. SYLE EXERCISES When we isolate a particular style, the performer can maximize their practice time by utilizing style exercises. Rhythmic integrity is a primary focus with style exercises and then we can focus on correct interpretation of the musical intent. Then we add note duration and articulation to clarify the intent of the music. ARTICULATION EXERCISES Articulation exercises are an integral part of developing the relationship between the tongue and the air stream. It is important to understand that the tongue cannot articulate properly if there is not enough air support. These exercises are intended to develop a consistent and clear approach to the motion and speed of the tongue and air. It is also important to know that the clarity of the articulation should not be affected by tempo, technique, note length, volume, or range. The only time an articulation will change is when the style being played changes.
Revised 7/20/14 17
Articulation Visualization
Revised 7/20/14 18
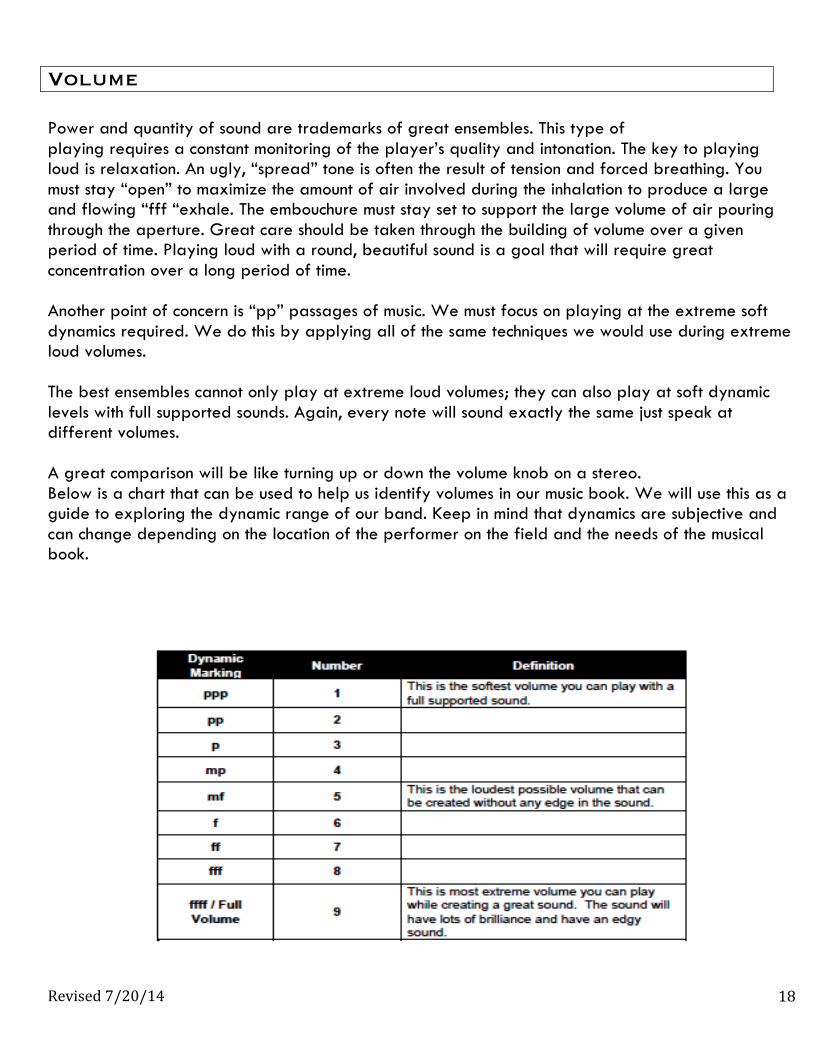
Volume Power and quantity of sound are trademarks of great ensembles. This type of playing requires a constant monitoring of the player’s quality and intonation. The key to playing loud is relaxation. An ugly, “spread” tone is often the result of tension and forced breathing. You must stay “open” to maximize the amount of air involved during the inhalation to produce a large and flowing “fff “exhale. The embouchure must stay set to support the large volume of air pouring through the aperture. Great care should be taken through the building of volume over a given period of time. Playing loud with a round, beautiful sound is a goal that will require great concentration over a long period of time. Another point of concern is “pp” passages of music. We must focus on playing at the extreme soft dynamics required. We do this by applying all of the same techniques we would use during extreme loud volumes. The best ensembles cannot only play at extreme loud volumes; they can also play at soft dynamic levels with full supported sounds. Again, every note will sound exactly the same just speak at different volumes. A great comparison will be like turning up or down the volume knob on a stereo. Below is a chart that can be used to help us identify volumes in our music book. We will use this as a guide to exploring the dynamic range of our band. Keep in mind that dynamics are subjective and can change depending on the location of the performer on the field and the needs of the musical book.
Revised 7/20/14 19
Bopping Bopping is a technique that is used to improve timing and perfect uniform articulation and tone production. Bopping is executed by reducing every note down to a staccato eighth note. Additional rules to bopping are as follows: 1. Everything is performed at the dynamic of mp (mezzo-piano). 2. Slurred passages are played full duration to the end of the slur. 3. Tied notes are not to be played. 4. Make sure the throat is open and relaxed. 5. No “Dit” articulation should be heard. 6. Only “dAAh.” Sounds. 7. Keep all notes open-ended. Balance/Blend The first criterion toward achieving great balance and blend is perfect intonation. If one note in a chord is played out of tune, then balance cannot be achieved properly. The second criterion is to always know who has the moving line, and who has the melody. This is achieved by keeping your ears aware of the parts being played around you. The third criterion is a combination of balance, support, and playing in a manner befitting a soloist. Each part in an ensemble is unique in its own way. We as good musicians know when to support a given line, create balance within that line, or project an important line with a full supported sound. When trying to achieve good balance and blend: Ask yourself, “Am I in tune with the ensemble?” First listen to intonation in your section and then branch out to other sections, always keeping in mind that you should listen down to the bass voice. If you are supporting a moving line, ask yourself, “Am I playing louder than that line?” Finally, ask yourself, “Am I playing within the other sounds, balancing my sound against it with a rich, supported, full bodied tone?” Balance and Blend requires the performer to listen very closely. There are 3 levels of listening required if you are to become a greatly balanced brass section: LEVEL ONE LISTENING focuses on the sounds, volume, style, etc of his or herself. Self- awareness is an important key toward higher level playing. LEVEL TWO LISTENING focuses on the sounds, volume, style, etc of the other members in each respective section. LEVEL THREE LISTENING focuses on the sounds, volume, style, etc of all instruments in the ensemble.
Revised 7/20/14 20
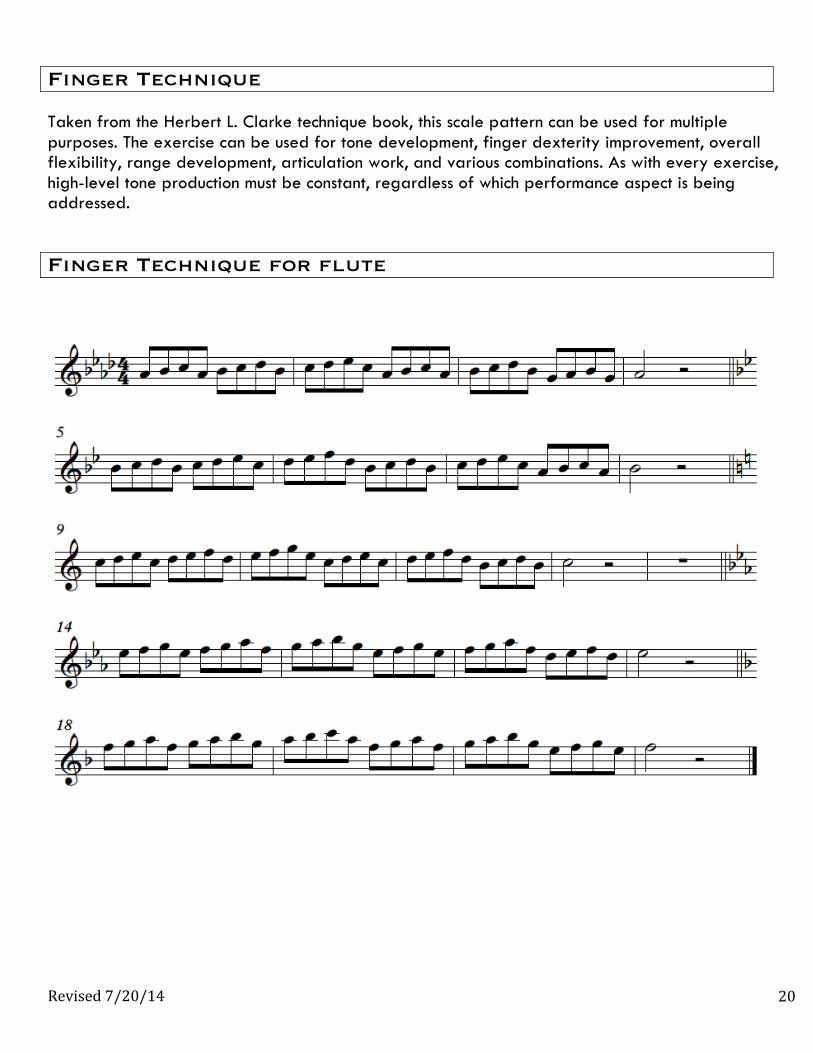
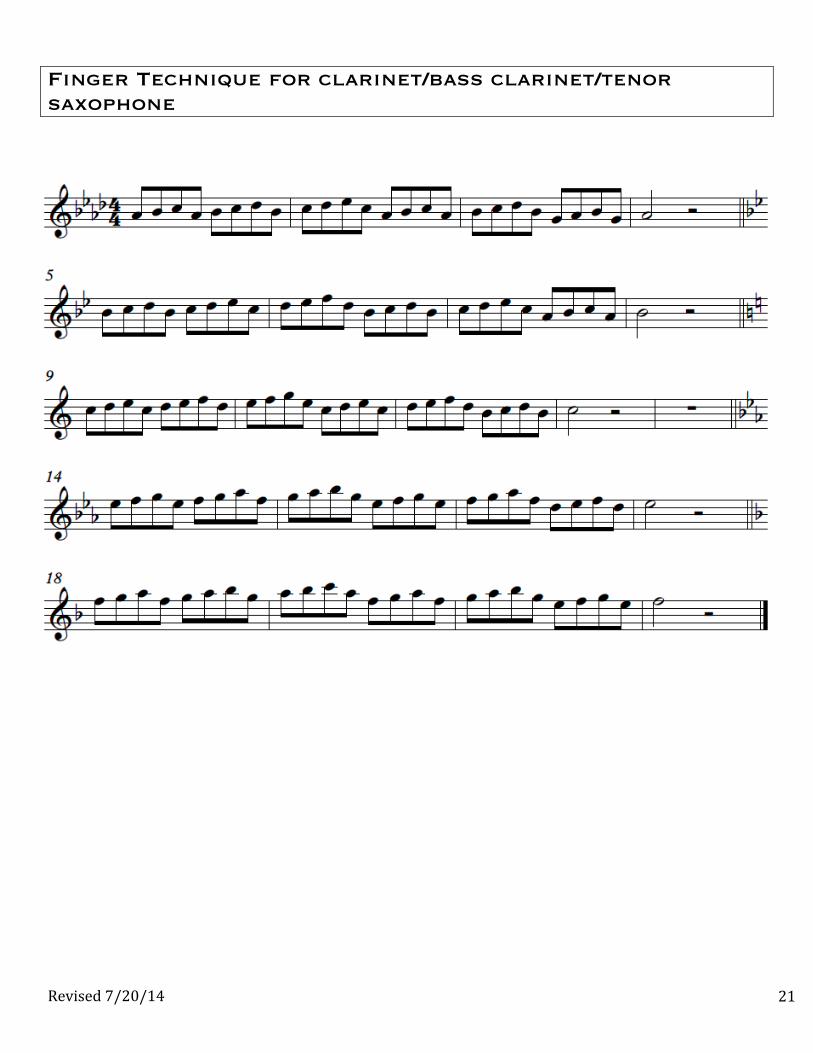
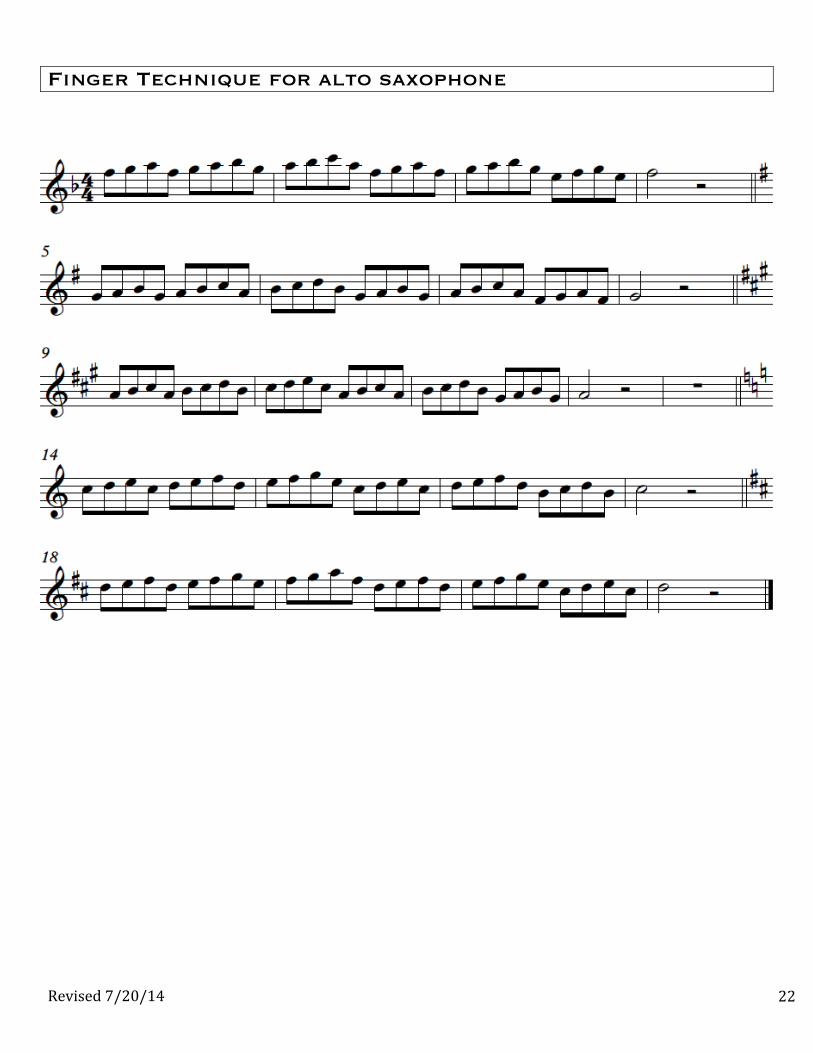
Finger Technique Taken from the Herbert L. Clarke technique book, this scale pattern can be used for multiple purposes. The exercise can be used for tone development, finger dexterity improvement, overall flexibility, range development, articulation work, and various combinations. As with every exercise, high-level tone production must be constant, regardless of which performance aspect is being addressed. Finger Technique for flute
Revised 7/20/14 21
Finger Technique for clarinet/bass clarinet/tenor saxophone
Revised 7/20/14 22
Finger Technique for alto saxophone
Revised 7/20/14 23
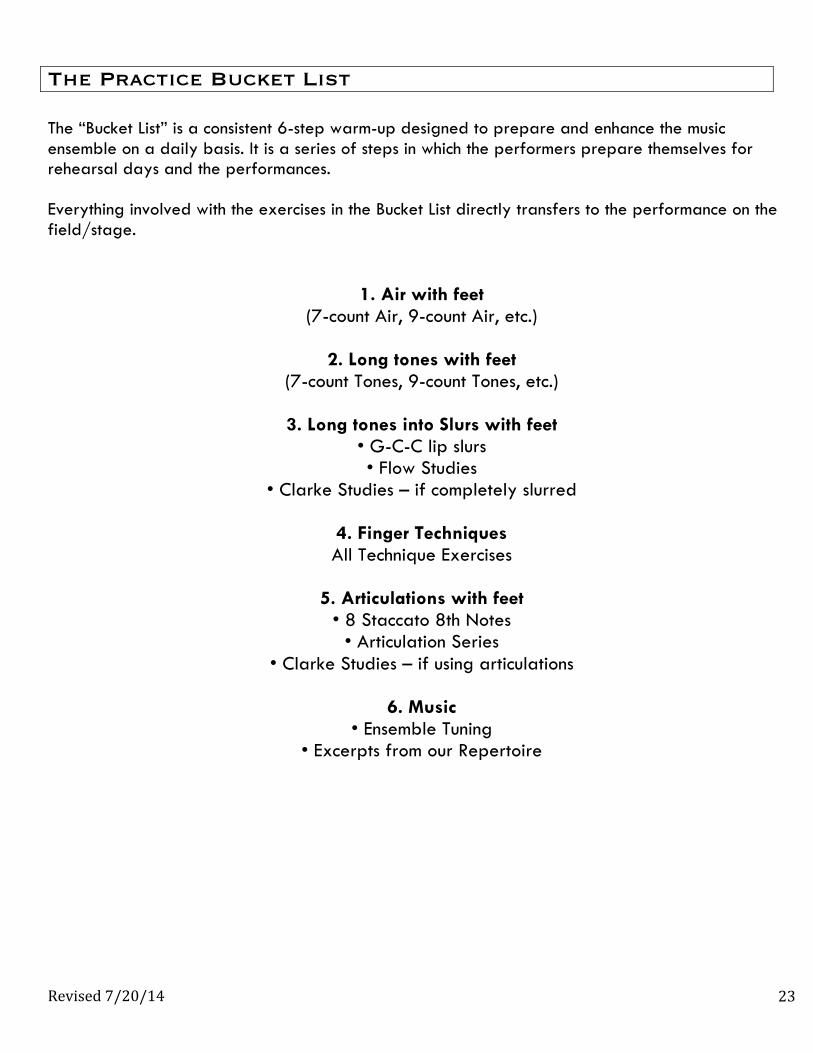
The Practice Bucket List The “Bucket List” is a consistent 6-step warm-up designed to prepare and enhance the music ensemble on a daily basis. It is a series of steps in which the performers prepare themselves for rehearsal days and the performances. Everything involved with the exercises in the Bucket List directly transfers to the performance on the field/stage.
1. Air with feet (7-count Air, 9-count Air, etc.)
2. Long tones with feet
(7-count Tones, 9-count Tones, etc.)
3. Long tones into Slurs with feet • G-C-C lip slurs • Flow Studies
• Clarke Studies – if completely slurred
4. Finger Techniques All Technique Exercises
5. Articulations with feet
• 8 Staccato 8th Notes • Articulation Series
• Clarke Studies – if using articulations
6. Music • Ensemble Tuning
• Excerpts from our Repertoire


