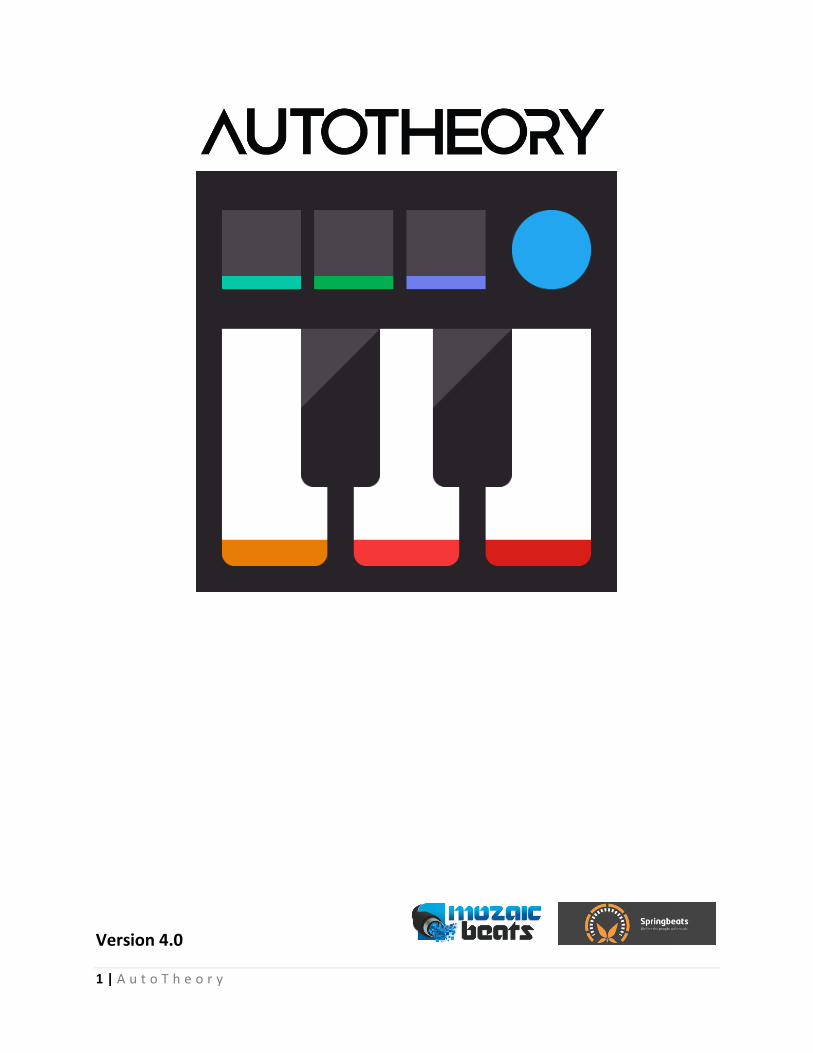
1 | A u t o T h e o r y
Version 4.0

2 | A u t o T h e o r y
Table of Contents Connecting your Keyboard and DAW .......................................................................................................... 3
Global Parameters ........................................................................................................................................ 4
Key / Scale ................................................................................................................................................. 4
Mapping .................................................................................................................................................... 4
Chord Generator ........................................................................................................................................... 5
Outputs & Keyboard Layout ...................................................................................................................... 5
MIDI Effects Chain .................................................................................................................................. 6-7
Chord Editor .................................................................................................................................................. 8
Step, Accidental & Octave Parameters ..................................................................................................... 8
Smart Scale / Multi Arp ................................................................................................................................ 9
Outputs & Keyboard Layout ...................................................................................................................... 9
MIDI Effects Chain .............................................................................................................................. 10-11
Sequencer ................................................................................................................................................... 12
Scene & Loop Parameters ....................................................................................................................... 12
Edit & Record Parameters ....................................................................................................................... 12

3 | A u t o T h e o r y
Connecting your Keyboard and DAW
AutoTheory is an external midi sequencer, it is not a plugin. AutoTheory intercepts and organizes data
from your keyboard and sends up to 8 virtual midi controllers into your DAW. Setting up AutoTheory is
the same as setting up multiple midi controllers within your DAW. AutoTheory also syncs as a slave to
DAWs, providing sequencer alignment through MIDI Beat Clock.
DAW Setup
1 – Disable your keyboard controller as a MIDI input to your DAW.
2 – Enable AutoTheory devices (AutoTheory_1, AutoTheory_2, etc.) as MIDI inputs to your DAW.
3 – Enable “AutoTheory Clock” as a MIDI output within your DAW.
AutoTheory Setup (Options/Preferences/MIDI In)
1 – Enable your keyboard controller as a MIDI input. QWERTY control is also available.
2 – Enable “MIDI Clock”.
3 – Set Output to Devices.
Assign AutoTheory devices to instrument tracks
Each DAW has a different way of doing this. You can assign individual AutoTheory devices to different
instruments in your DAW the same way that you would assign multiple midi controllers.
MIDI CC Data for Knobs, Sliders and Buttons – passes through AutoTheory 1, where you can assign each
parameter of your controller to a parameter within your DAW through Remote or MIDI Learn functions.
Exporting MIDI – AutoTheory can be exported to your DAW in two different ways:
1. Recording into AutoTheory’s internal Sequencer and then using the Export buttons to drag and drop
different MIDI files to your DAW’s Sequencer tracks. We recommend this approach, as it allows you to
alter any AutoTheory parameter after recording.
2. Recording MIDI directly into your DAW without using AutoTheory’s internal Sequencer. For
experienced keyboard players, this might be a more viable option.
MIDI Sync (Beat Clock) – MIDI Sync is an imperfect technology that presents varying levels of “drift”,
where partnering Sequencers fall slightly out of alignment. The impact this has on AutoTheory is very
minimal in most instances, to the point that you may not notice it. Midi that is exported from AutoTheory
will not contain any misalignments due to drift, it only impacts playback from AutoTheory’s Sequencer.
MIDI Sync Offset – You may need to adjust the MIDI Sync Offset parameter within your DAW’s Sequencer
if AutoTheory’s Sequencer is a little bit behind the DAW. You can find this parameter within your DAW’s
MIDI preferences.

4 | A u t o T h e o r y
Global Parameters
AutoTheory’s Global Parameters serve as the overarching parameters which determine how the software
is configured. The Key, Scale and Mapping functions provide users with a wide range of options for
customizing their workflow.
Key - Selecting a Key will define which of the twelve tones will serve as the lowest tone in your
composition. The key serves as an anchor point for your song, and will have a major impact on the overall
pitch and mood of your song. AutoTheory allows users to easily compose Chord Progressions and
Melodies from any Key.
Scale - Selecting a Scale will define which seven of the twelve chromatic tones will be used in your
composition. These seven tones will serve as the foundation from which Chords and Melodies are
built. Each scale places different chord types into the seven different chord positions, while also having a
profound impact on the way that Melodies, Basslines and Arpeggios come together.
Mapping - The Mapping parameter defines how the Chord Generator and Smart Scale/Multi Arp are
organized. It provides five different settings: Chord Tones, Dynamic Scale, Relative Scale, Absolute Scale
and Chromatic Scale. The selection of a Mapping will most likely be related to your experience level playing
the piano and with music theory in general.
Chord Tones (beginners) – Rounds scale tones to white keys. Transposes selected “Key” to first
white key (natural C) and applies chords to white keys of left side octaves. Transposes “Root” of
selected Chord to first white key (natural C) of right side octaves (1-3-5-7-2-4-6
alignment). Applies Key/Scale Shifters to black keys on left side octaves. Applies Arpeggios to
black keys of right side octaves.
Dynamic Scale (low intermediate) – Rounds scale tones to white keys. Transposes selected “Key”
to first white key (natural C) and applies chords to white keys of left side octaves. Transposes
“Root” of selected Chord to first white key (natural C) of right side octaves (1-2-3-4-5-6-7
alignment). Applies Key/Scale Shifters to black keys on left side octaves. Applies Arpeggios to
black keys of right side octaves.
Relative Scale (high intermediate) – Rounds scale tones to white keys. Transposes selected “Key”
to first white key (natural C) of all octaves. Applies Chords to white keys on left side octaves.
Applies Key/Scale Shifters to black keys on left side octaves. Applies Arpeggios to black keys of
right side octaves.
Absolute Scale (advanced) – Rounds scale tones to white keys. Applies Chords to white keys on
left side octaves. Applies Key/Scale Shifters to black keys on left side octaves. Applies Arpeggios
to black keys of right side octaves.
Chromatic Scale (advanced) – Rounds scale tones and applies Chords to white keys on left side
octaves. Applies Key/Scale Shifters to black keys on left side octaves.
Bypass – Disables all AutoTheory functions and sends unfiltered MIDI straight from your keyboard through
AutoTheory 1.

5 | A u t o T h e o r y
Chord Generator
The Chord Generator allows users to play full chords with the selection of a single key. Once a key, scale
and mapping are defined, chords are mapped accordingly on the left side octaves of your keyboard. The
Chord Generator also dictates behavior of the Smart Scale/Multi Arp in the “Chord Tones” and “Dynamic
Scale” mappings.
Active Chord Display – The most recently selected chord title will be displayed. You can left click on this
to engage a drop down menu of different chord types. Selecting a new chord will alter the step on/off
buttons in the Chord Editor. Making a selection will only effect the most recently played chord.
Export – Drag and Drop recorded Chord Generator content (midi files) to your DAW’s sequencer tracks
(Cubase and Studio One must drag to desktop and then DAW if using Windows). The Sequencer must be
stopped from within your DAW before exporting. Exporting mutes the selected Function/Output (CG1,
ML2, etc.).
Outputs – AutoTheory provides eight shared Outputs for the Chord Generator and Smart Scale / Multi
Arp. Outputs can be routed to different instruments within your DAW like MIDI controllers. Left clicking
an Output will activate it. Right click to enable multiple outputs at the same time. Midi channels mode is
also available, and can be activated within Preferences. It will treat the 8 Outputs as midi channels from
the AutoTheory 1 device. Each Chord Generator Output has its own independent midi effects chain,
allowing for further customization of chord playback.
Mute – Mutes midi from actively displayed Chord Generator Output. Mute will automatically be selected
when content is exported to your DAW.
Solo – Solos midi from actively displayed Chord Generator Output.
Copy – Copies recorded midi and effects chain settings from the actively displayed Output.
Paste – Pastes recorded midi and effects chain settings to the actively displayed Output.
Clear – Removes all midi data from the actively displayed Output.
Chord Layout - Displayed on top of each white key in the keyboard display is a Roman numeral. Major
chords use capital letters, minor chords use lower case, diminished chords have an asterisk and
6 | A u t o T h e o r y
augmented chords use a plus sign. When you select a key, it becomes illuminated. The most recently
selected chord has a colored stripe at the top edge of its corresponding piano key. Background outputs
will illuminate keys light grey. Right click on a white key, and a drop down menu will appear with each
chord available as a selection. Any chord can be assigned to any white key in the Chord Generator.
Key/Scale Shifters – Selecting black Chord Generator keys shifts the key and/or scale value of all
AutoTheory parameters. Reselecting the same shifter key will revert AutoTheory back to the original
key/scale selection found within the Global Parameters. Right click on a shifter key, and a drop down
menu will appear with all key or scale values available.
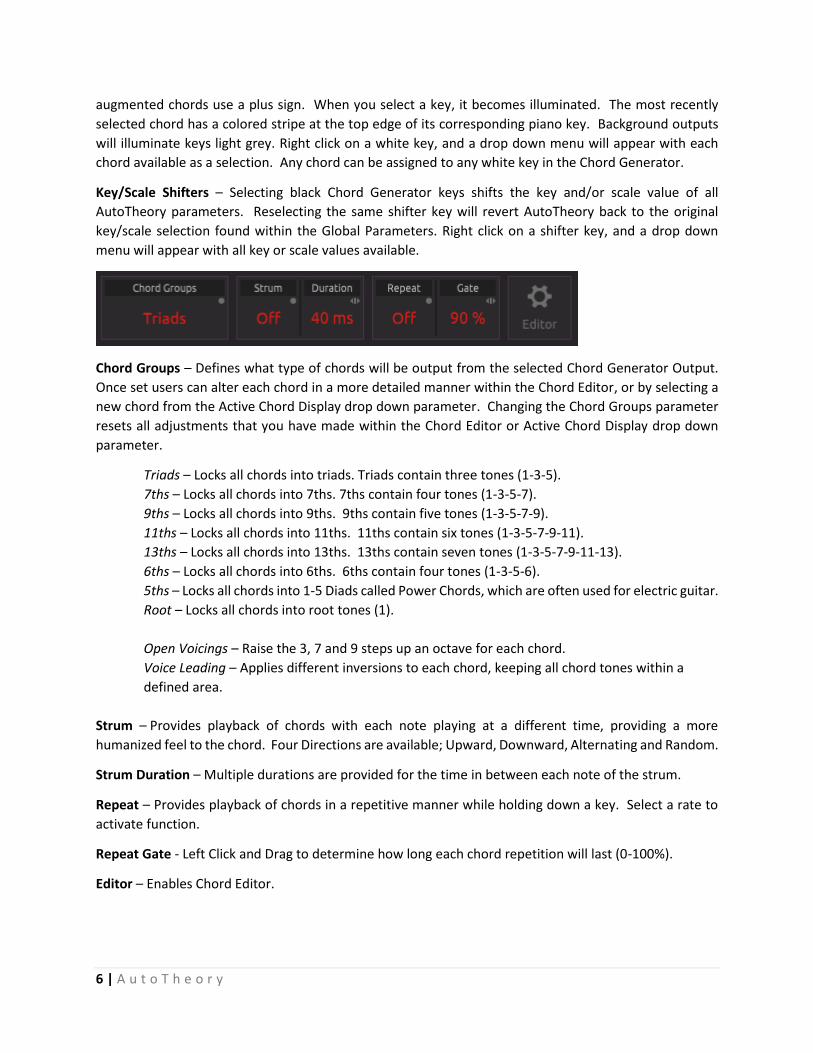
Chord Groups – Defines what type of chords will be output from the selected Chord Generator Output.
Once set users can alter each chord in a more detailed manner within the Chord Editor, or by selecting a
new chord from the Active Chord Display drop down parameter. Changing the Chord Groups parameter
resets all adjustments that you have made within the Chord Editor or Active Chord Display drop down
parameter.
Triads – Locks all chords into triads. Triads contain three tones (1-3-5).
7ths – Locks all chords into 7ths. 7ths contain four tones (1-3-5-7).
9ths – Locks all chords into 9ths. 9ths contain five tones (1-3-5-7-9).
11ths – Locks all chords into 11ths. 11ths contain six tones (1-3-5-7-9-11).
13ths – Locks all chords into 13ths. 13ths contain seven tones (1-3-5-7-9-11-13).
6ths – Locks all chords into 6ths. 6ths contain four tones (1-3-5-6).
5ths – Locks all chords into 1-5 Diads called Power Chords, which are often used for electric guitar.
Root – Locks all chords into root tones (1).
Open Voicings – Raise the 3, 7 and 9 steps up an octave for each chord.
Voice Leading – Applies different inversions to each chord, keeping all chord tones within a
defined area.
Strum – Provides playback of chords with each note playing at a different time, providing a more
humanized feel to the chord. Four Directions are available; Upward, Downward, Alternating and Random.
Strum Duration – Multiple durations are provided for the time in between each note of the strum.
Repeat – Provides playback of chords in a repetitive manner while holding down a key. Select a rate to
activate function.
Repeat Gate - Left Click and Drag to determine how long each chord repetition will last (0-100%).
Editor – Enables Chord Editor.
7 | A u t o T h e o r y
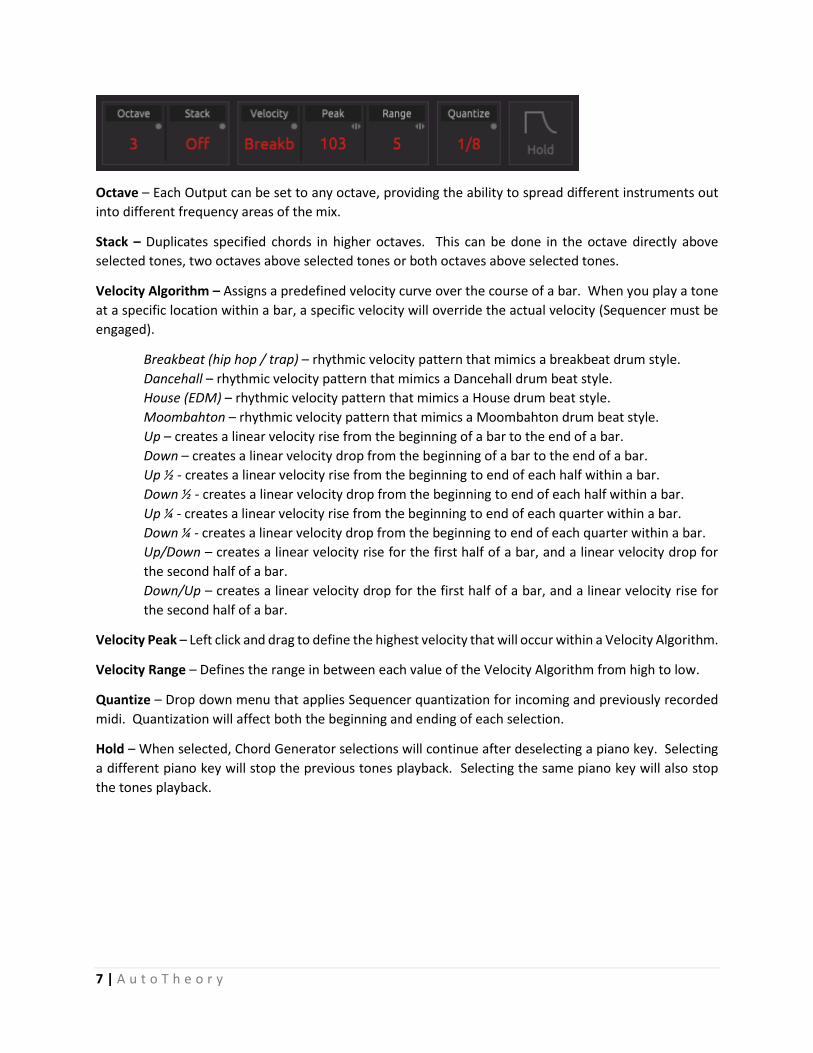
Octave – Each Output can be set to any octave, providing the ability to spread different instruments out
into different frequency areas of the mix.
Stack – Duplicates specified chords in higher octaves. This can be done in the octave directly above
selected tones, two octaves above selected tones or both octaves above selected tones.
Velocity Algorithm – Assigns a predefined velocity curve over the course of a bar. When you play a tone
at a specific location within a bar, a specific velocity will override the actual velocity (Sequencer must be
engaged).
Breakbeat (hip hop / trap) – rhythmic velocity pattern that mimics a breakbeat drum style.
Dancehall – rhythmic velocity pattern that mimics a Dancehall drum beat style.
House (EDM) – rhythmic velocity pattern that mimics a House drum beat style.
Moombahton – rhythmic velocity pattern that mimics a Moombahton drum beat style.
Up – creates a linear velocity rise from the beginning of a bar to the end of a bar.
Down – creates a linear velocity drop from the beginning of a bar to the end of a bar.
Up ½ - creates a linear velocity rise from the beginning to end of each half within a bar.
Down ½ - creates a linear velocity drop from the beginning to end of each half within a bar.
Up ¼ - creates a linear velocity rise from the beginning to end of each quarter within a bar.
Down ¼ - creates a linear velocity drop from the beginning to end of each quarter within a bar.
Up/Down – creates a linear velocity rise for the first half of a bar, and a linear velocity drop for
the second half of a bar.
Down/Up – creates a linear velocity drop for the first half of a bar, and a linear velocity rise for
the second half of a bar.
Velocity Peak – Left click and drag to define the highest velocity that will occur within a Velocity Algorithm.
Velocity Range – Defines the range in between each value of the Velocity Algorithm from high to low.
Quantize – Drop down menu that applies Sequencer quantization for incoming and previously recorded
midi. Quantization will affect both the beginning and ending of each selection.
Hold – When selected, Chord Generator selections will continue after deselecting a piano key. Selecting
a different piano key will stop the previous tones playback. Selecting the same piano key will also stop
the tones playback.

8 | A u t o T h e o r y
Chord Editor
The Chord Editor feature allows users to edit each chord on a step by step basis, allowing for a totally
open ended approach to chord design. Create any extended chord by adjusting the step on/off buttons,
take chords out of scale with the step accidental parameters, and create any type of inversion or voicing
imaginable with the step octave parameters. A colored stripe on the top edge of the keyboard display
indicates which chord is active in the Chord Editor. The Chord Groups parameter alters the step and
octave parameters to define inversions, voicings and chord types.
Step Parameters - Beyond what is defined by the Chord Groups parameter, users can define each chord
on an individual step by step basis. Within each chord users can edit which scale tones are included,
whether there are any accidentals applied and what octaves they will reside upon. The step parameters
are designed to facilitate the creativity of those with a higher level of music theory.
On/Off buttons - Displays active scale tones within each chord. If a button is illuminated, the
corresponding tone is active within the chord. Selecting the button will turn it on or off. This is helpful
for building custom extended chords (9ths, 11ths, 13ths).
Accidental Parameter - For each individual chord, accidentals can be applied to any of the seven tone
positions to design any altered (out of scale) chord. Scales automatically apply accidentals to certain
steps, so that specific extended chords can be easily achieved. These only affect the Smart Scale when
the selected tone is active.
Octave Parameter - For each individual chord, tone positions can be adjusted up or down one to two
octaves, allowing for the design of any voicing or inversion.
9 | A u t o T h e o r y
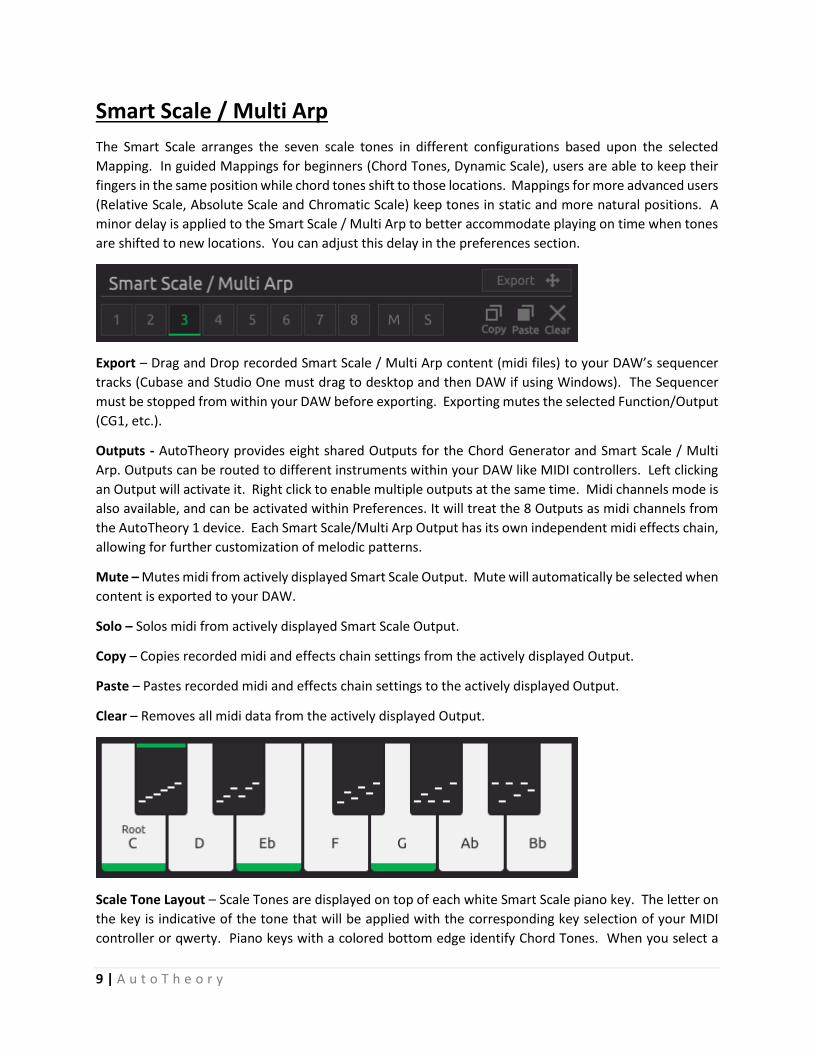
Smart Scale / Multi Arp
The Smart Scale arranges the seven scale tones in different configurations based upon the selected
Mapping. In guided Mappings for beginners (Chord Tones, Dynamic Scale), users are able to keep their
fingers in the same position while chord tones shift to those locations. Mappings for more advanced users
(Relative Scale, Absolute Scale and Chromatic Scale) keep tones in static and more natural positions. A
minor delay is applied to the Smart Scale / Multi Arp to better accommodate playing on time when tones
are shifted to new locations. You can adjust this delay in the preferences section.
Export – Drag and Drop recorded Smart Scale / Multi Arp content (midi files) to your DAW’s sequencer
tracks (Cubase and Studio One must drag to desktop and then DAW if using Windows). The Sequencer
must be stopped from within your DAW before exporting. Exporting mutes the selected Function/Output
(CG1, etc.).
Outputs - AutoTheory provides eight shared Outputs for the Chord Generator and Smart Scale / Multi
Arp. Outputs can be routed to different instruments within your DAW like MIDI controllers. Left clicking
an Output will activate it. Right click to enable multiple outputs at the same time. Midi channels mode is
also available, and can be activated within Preferences. It will treat the 8 Outputs as midi channels from
the AutoTheory 1 device. Each Smart Scale/Multi Arp Output has its own independent midi effects chain,
allowing for further customization of melodic patterns. Mute – Mutes midi from actively displayed Smart Scale Output. Mute will automatically be selected when
content is exported to your DAW.
Solo – Solos midi from actively displayed Smart Scale Output.
Copy – Copies recorded midi and effects chain settings from the actively displayed Output.
Paste – Pastes recorded midi and effects chain settings to the actively displayed Output.
Clear – Removes all midi data from the actively displayed Output.
Scale Tone Layout – Scale Tones are displayed on top of each white Smart Scale piano key. The letter on
the key is indicative of the tone that will be applied with the corresponding key selection of your MIDI
controller or qwerty. Piano keys with a colored bottom edge identify Chord Tones. When you select a
10 | A u t o T h e o r y
key from a right side octave of your MIDI controller, the corresponding key within AutoTheory will become
illuminated. Previously recorded activity from other outputs will illuminate keys light grey.
Arpeggios – Patterns are displayed on top of each black right side octave piano key. Selecting a black key
will begin playback of the selected arpeggio pattern. Each black key has its own separate set of arpeggio
parameters, so users can program different arpeggios of each chord to play in real time. Right clicking a
black Arpeggio key will make it the actively displayed arpeggio in the effects chain. The actively displayed
arpeggio key has a colored stripe across the top.
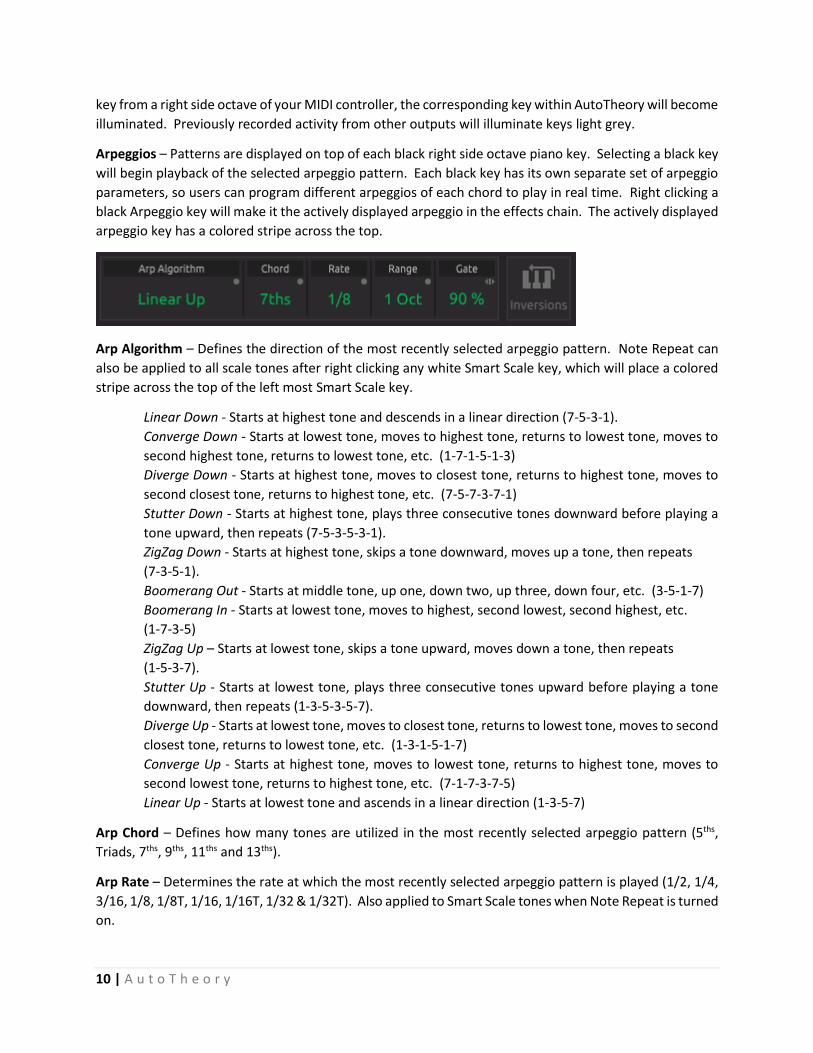
Arp Algorithm – Defines the direction of the most recently selected arpeggio pattern. Note Repeat can
also be applied to all scale tones after right clicking any white Smart Scale key, which will place a colored
stripe across the top of the left most Smart Scale key.
Linear Down - Starts at highest tone and descends in a linear direction (7-5-3-1).
Converge Down - Starts at lowest tone, moves to highest tone, returns to lowest tone, moves to
second highest tone, returns to lowest tone, etc. (1-7-1-5-1-3)
Diverge Down - Starts at highest tone, moves to closest tone, returns to highest tone, moves to
second closest tone, returns to highest tone, etc. (7-5-7-3-7-1)
Stutter Down - Starts at highest tone, plays three consecutive tones downward before playing a
tone upward, then repeats (7-5-3-5-3-1).
ZigZag Down - Starts at highest tone, skips a tone downward, moves up a tone, then repeats
(7-3-5-1).
Boomerang Out - Starts at middle tone, up one, down two, up three, down four, etc. (3-5-1-7)
Boomerang In - Starts at lowest tone, moves to highest, second lowest, second highest, etc.
(1-7-3-5)
ZigZag Up – Starts at lowest tone, skips a tone upward, moves down a tone, then repeats
(1-5-3-7).
Stutter Up - Starts at lowest tone, plays three consecutive tones upward before playing a tone
downward, then repeats (1-3-5-3-5-7).
Diverge Up - Starts at lowest tone, moves to closest tone, returns to lowest tone, moves to second
closest tone, returns to lowest tone, etc. (1-3-1-5-1-7)
Converge Up - Starts at highest tone, moves to lowest tone, returns to highest tone, moves to
second lowest tone, returns to highest tone, etc. (7-1-7-3-7-5)
Linear Up - Starts at lowest tone and ascends in a linear direction (1-3-5-7)
Arp Chord – Defines how many tones are utilized in the most recently selected arpeggio pattern (5ths,
Triads, 7ths, 9ths, 11ths and 13ths).
Arp Rate – Determines the rate at which the most recently selected arpeggio pattern is played (1/2, 1/4,
3/16, 1/8, 1/8T, 1/16, 1/16T, 1/32 & 1/32T). Also applied to Smart Scale tones when Note Repeat is turned
on.

11 | A u t o T h e o r y
Arp Octaves – Defines how many octaves the most recently selected arpeggio will span (1-3). Added
octaves will reach into higher pitches.
Arp Gate – Left Click and Drag to determine how long each tone from the most recently selected arpeggio
pattern will last (0-100%). Also applied to Smart Scale tones when Note Repeat is turned on.
Inversions Button - Keeps all of the scale tones within an octave when using Chord Tones and Dynamic
Scale Mappings. When selected this will sometimes place lower tones to the right of other higher pitched
tones. This is a result of organizing tones based upon chord tone positioning and not by pitch.
Octave – Each Output can be set to any octave, allowing users to spread different instruments out into
different frequency areas of the mix.
Stack – Duplicates specified chords in higher octaves. This can be done in the octave directly above
selected tones, two octaves above selected tones or both octaves above selected tones.
Velocity Algorithm – Assigns a predefined velocity curve over the course of a bar. When you play a tone
at a specific location within a bar, a specific velocity will override the actual velocity.
Breakbeat (hip hop / trap) – rhythmic velocity pattern that mimics a breakbeat drum style.
Dancehall – rhythmic velocity pattern that mimics a Dancehall drum beat style.
House (EDM) – rhythmic velocity pattern that mimics a House drum beat style.
Moombahton – rhythmic velocity pattern that mimics a Moombahton drum beat style.
Up – creates a linear velocity rise from the beginning of a bar to the end of a bar.
Down – creates a linear velocity drop from the beginning of a bar to the end of a bar.
Up ½ - creates a linear velocity rise from the beginning to end of each half within a bar.
Down ½ - creates a linear velocity drop from the beginning to end of each half within a bar.
Up ¼ - creates a linear velocity rise from the beginning to end of each quarter within a bar.
Down ¼ - creates a linear velocity drop from the beginning to end of each quarter within a bar.
Up/Down – creates a linear velocity rise for the first half of a bar, and a linear velocity drop for
the second half of a bar.
Down/Up – creates a linear velocity drop for the first half of a bar, and a linear velocity rise for
the second half of a bar.
Velocity Peak – Defines the highest velocity that will occur within a Velocity Algorithm.
Velocity Range – Defines the range in between each value of the Velocity Algorithm from high to low.
Quantize – Drop down menu that applies Sequencer quantization for incoming and previously recorded
midi. Quantization will affect both the beginning and ending of each selection.
Hold – When selected, Smart Scale and Multi Arp tones will continue after deselecting a piano key.
Selecting a different piano key, the same piano key or reaching the end of a loop will stop the tones
playback.
12 | A u t o T h e o r y
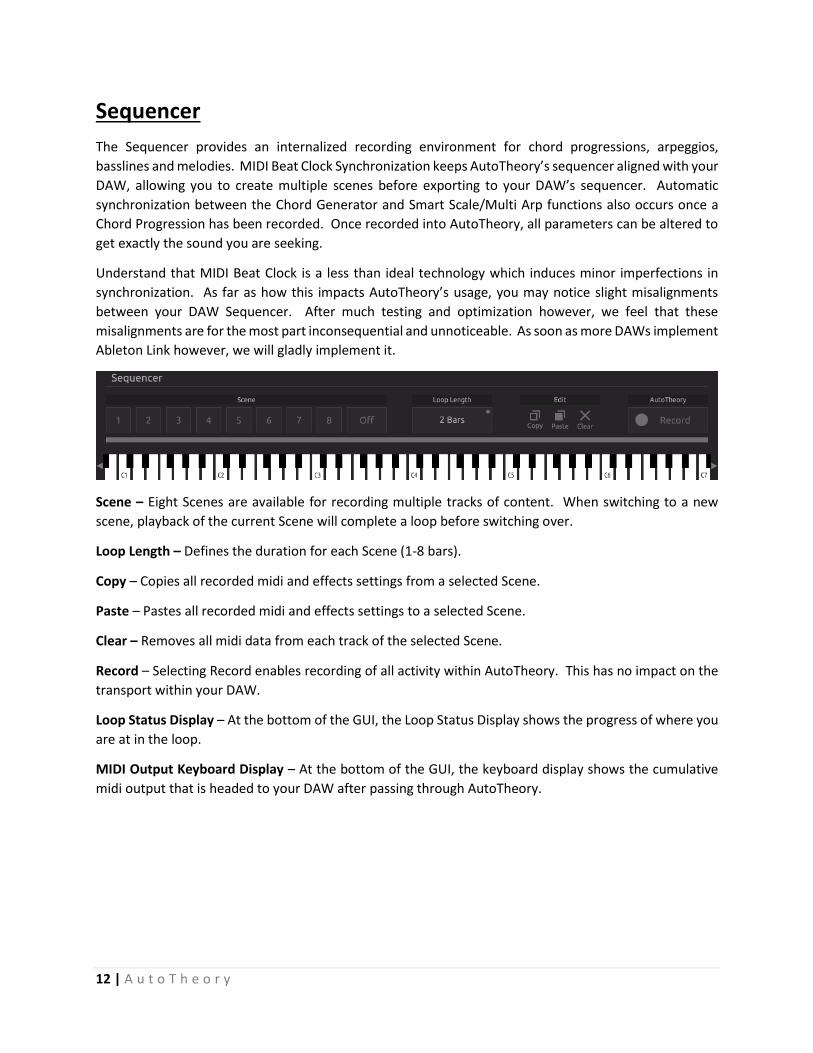
Sequencer
The Sequencer provides an internalized recording environment for chord progressions, arpeggios,
basslines and melodies. MIDI Beat Clock Synchronization keeps AutoTheory’s sequencer aligned with your
DAW, allowing you to create multiple scenes before exporting to your DAW’s sequencer. Automatic
synchronization between the Chord Generator and Smart Scale/Multi Arp functions also occurs once a
Chord Progression has been recorded. Once recorded into AutoTheory, all parameters can be altered to
get exactly the sound you are seeking.
Understand that MIDI Beat Clock is a less than ideal technology which induces minor imperfections in
synchronization. As far as how this impacts AutoTheory’s usage, you may notice slight misalignments
between your DAW Sequencer. After much testing and optimization however, we feel that these
misalignments are for the most part inconsequential and unnoticeable. As soon as more DAWs implement
Ableton Link however, we will gladly implement it.
Scene – Eight Scenes are available for recording multiple tracks of content. When switching to a new
scene, playback of the current Scene will complete a loop before switching over.
Loop Length – Defines the duration for each Scene (1-8 bars).
Copy – Copies all recorded midi and effects settings from a selected Scene.
Paste – Pastes all recorded midi and effects settings to a selected Scene.
Clear – Removes all midi data from each track of the selected Scene.
Record – Selecting Record enables recording of all activity within AutoTheory. This has no impact on the
transport within your DAW.
Loop Status Display – At the bottom of the GUI, the Loop Status Display shows the progress of where you
are at in the loop.
MIDI Output Keyboard Display – At the bottom of the GUI, the keyboard display shows the cumulative
midi output that is headed to your DAW after passing through AutoTheory.
![Sequencer 1, Sequencer 2 or Drum - Arturiadownloads.arturia.com/products/beatstep-pro/manual/BeatStepPro... · —Sequencer 1, Sequencer 2 or Drum SHIFT + [>>] = Extend sequence SHIFT](https://cdn.vdocuments.mx/doc/165x107/5adbc3047f8b9add658e5b6e/sequencer-1-sequencer-2-or-drum-sequencer-1-sequencer-2-or-drum-shift-.jpg)


