10WHAT'S YOUR STORY?
USING WINDOWS MOVIE MAKER TO CREATE THE MOMENT BEHIND THE PHOTO STORYPART 2
WHAT'S YOUR STORY?
Play through your edit a few times, thinking about how you could improve the story by trimming it down, or changing the order. If there are any sections where your attention drifts, think about trimming these sections.
Look at the photo as you listen to the story.
Play it to other people to see how they respond to it.
Edit the story down, until it is under 1 minute 20 seconds.
Before you bring the photo into Windows Movie Maker, you need to crop the photo so that it fills the frame, and make it the correct proportions for Windows Movie Maker.
To do this, you may have photo editing software that you already use, or you can visit a site like www.picnik.com, which has simple tools for cropping your photo.
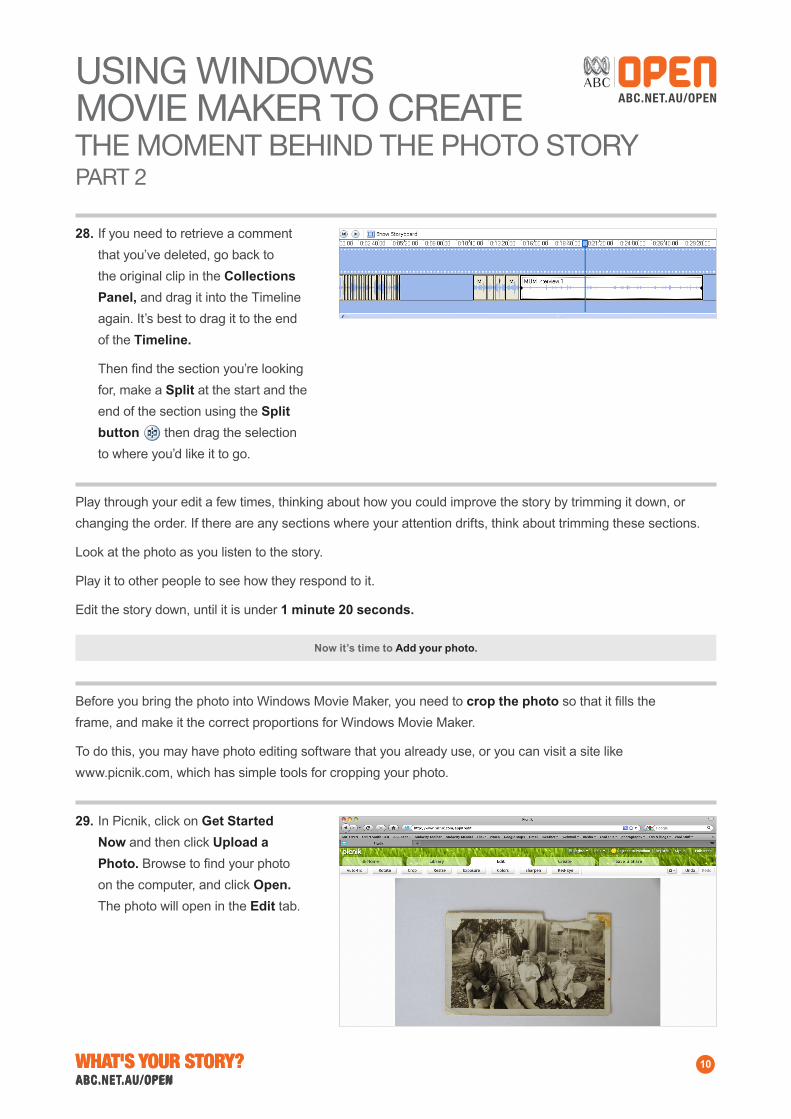
28. If you need to retrieve a comment that you’ve deleted, go back to the original clip in the Collections Panel, and drag it into the Timeline again. It’s best to drag it to the end of the Timeline.
Then find the section you’re looking for, make a Split at the start and the end of the section using the Split button then drag the selection to where you’d like it to go.
29. In Picnik, click on Get Started Now and then click Upload a Photo. Browse to find your photo on the computer, and click Open. The photo will open in the Edit tab.
Now it’s time to Add your photo.
11
USING WINDOWS MOVIE MAKER TO CREATE THE MOMENT BEHIND THE PHOTO STORY
WHAT'S YOUR STORY?
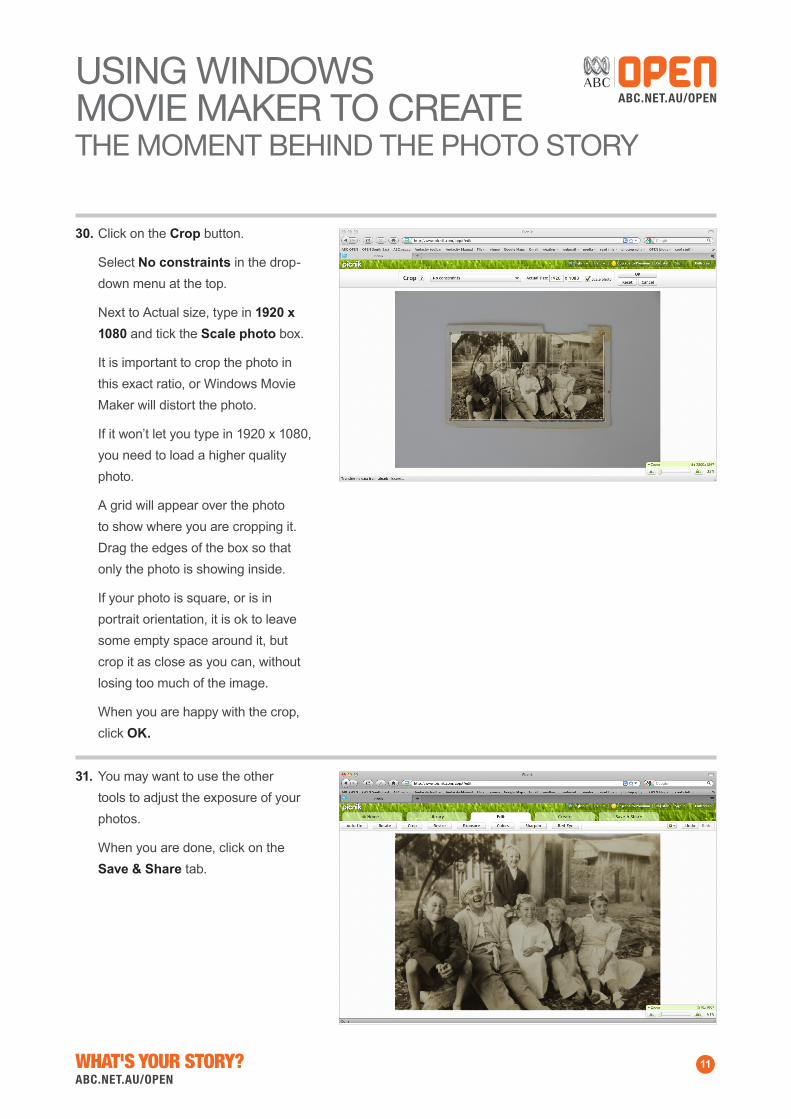
30. Click on the Crop button.
Select No constraints in the drop-down menu at the top.
Next to Actual size, type in 1920 x 1080 and tick the Scale photo box.
It is important to crop the photo in this exact ratio, or Windows Movie Maker will distort the photo.
If it won’t let you type in 1920 x 1080, you need to load a higher quality photo.
A grid will appear over the photo to show where you are cropping it. Drag the edges of the box so that only the photo is showing inside.
If your photo is square, or is in portrait orientation, it is ok to leave some empty space around it, but crop it as close as you can, without losing too much of the image.
When you are happy with the crop, click OK.
31. You may want to use the other tools to adjust the exposure of your photos.
When you are done, click on the Save & Share tab.
12
USING WINDOWS MOVIE MAKER TO CREATE THE MOMENT BEHIND THE PHOTO STORY
WHAT'S YOUR STORY?
32. Give your photo a name, and check the dimensions are 1920 x 1080. Under Format, choose TIFF to save a high quality photo.
Click Save Photo, and choose a location to save the photo.
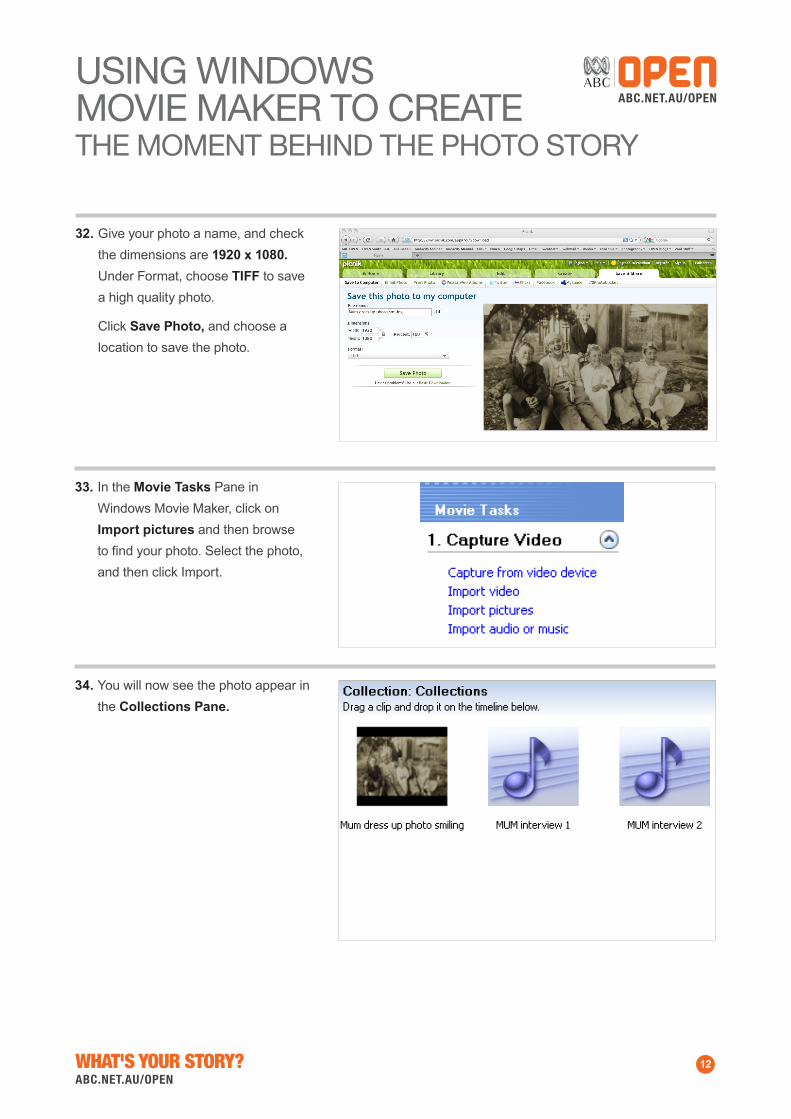
33. In the Movie Tasks Pane in Windows Movie Maker, click on Import pictures and then browse to find your photo. Select the photo, and then click Import.
34. You will now see the photo appear in the Collections Pane.

13
USING WINDOWS MOVIE MAKER TO CREATE THE MOMENT BEHIND THE PHOTO STORY
WHAT'S YOUR STORY?
35. Click and drag the photo from the Collection Pane down onto the Video layer on the Timeline.
The default duration of the photo will be 5 seconds.
Hold the mouse near the end of the clip, and the red Trim Tool will appear. Click and drag the photo so that it slightly longer than your edited audio.
36. To add a subtle move to the photo, go to 2. Edit Movie in the Movie Tasks pane, and click on View video effects.
You will then see thumbnail images for all the effects you can use.
The Ease In effect will gradually zoom in on your photo, or Ease Out will zoom out.
37. Choose which effect you want to use, and drag it onto the photo in the Timeline.
The photo will now have a star, to show that a video effect has been applied.
Play your story to make sure you are happy with the movement.
14
USING WINDOWS MOVIE MAKER TO CREATE THE MOMENT BEHIND THE PHOTO STORY
WHAT'S YOUR STORY?
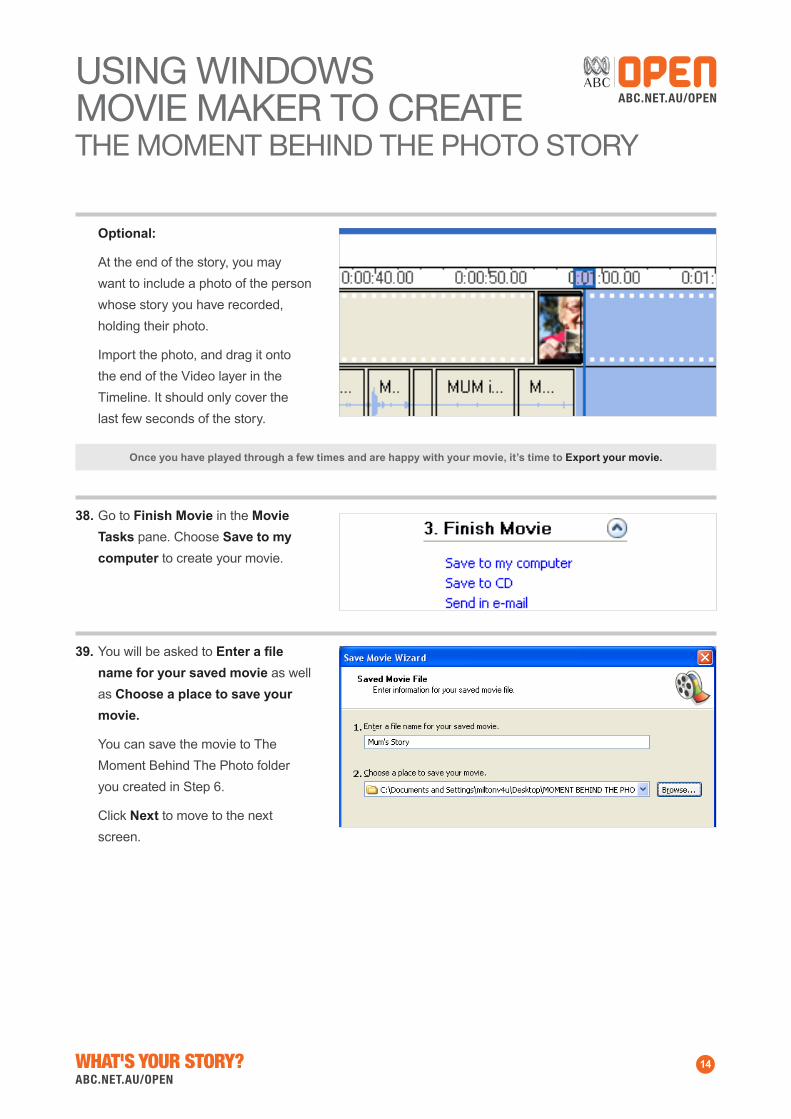
38. Go to Finish Movie in the Movie Tasks pane. Choose Save to my computer to create your movie.
39. You will be asked to Enter a file name for your saved movie as well as Choose a place to save your movie.
You can save the movie to The Moment Behind The Photo folder you created in Step 6.
Click Next to move to the next screen.
Optional:
At the end of the story, you may want to include a photo of the person whose story you have recorded, holding their photo.
Import the photo, and drag it onto the end of the Video layer in the Timeline. It should only cover the last few seconds of the story.
Once you have played through a few times and are happy with your movie, it’s time to Export your movie.
15
USING WINDOWS MOVIE MAKER TO CREATE THE MOMENT BEHIND THE PHOTO STORY
WHAT'S YOUR STORY?
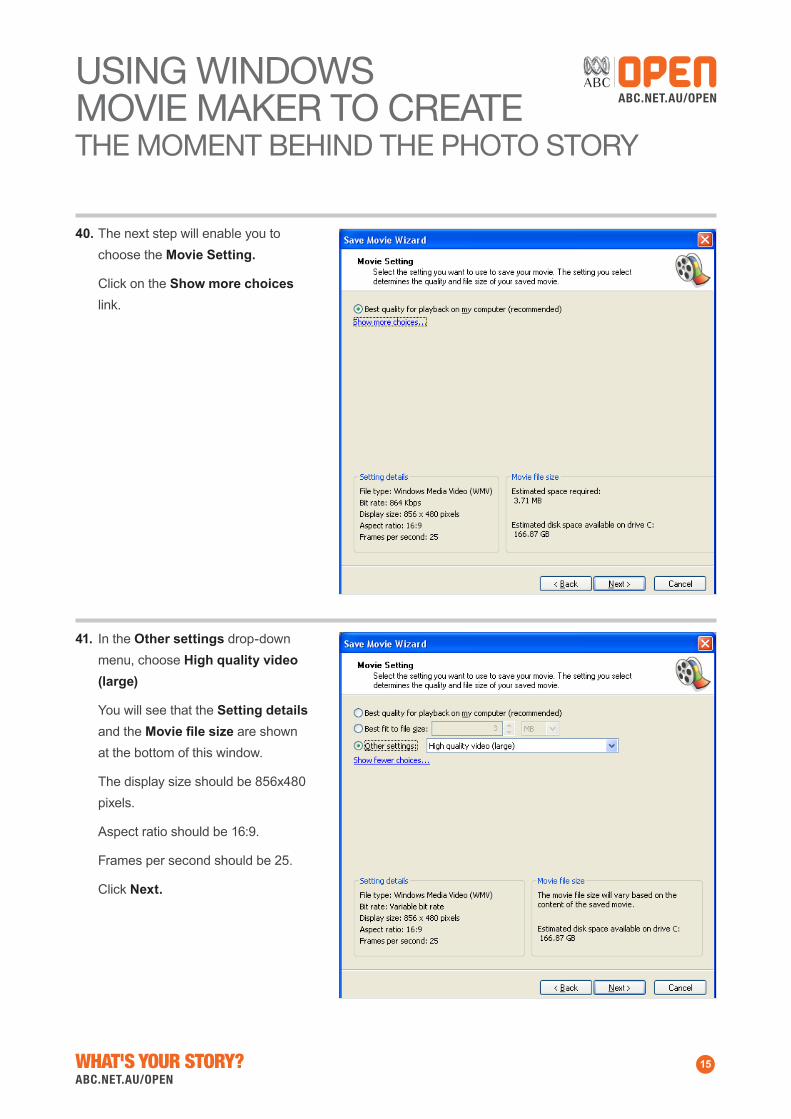
40. The next step will enable you to choose the Movie Setting.
Click on the Show more choices link.
41. In the Other settings drop-down menu, choose High quality video (large)
You will see that the Setting details and the Movie file size are shown at the bottom of this window.
The display size should be 856x480 pixels.
Aspect ratio should be 16:9.
Frames per second should be 25.
Click Next.
16
USING WINDOWS MOVIE MAKER TO CREATE THE MOMENT BEHIND THE PHOTO STORY
WHAT'S YOUR STORY?
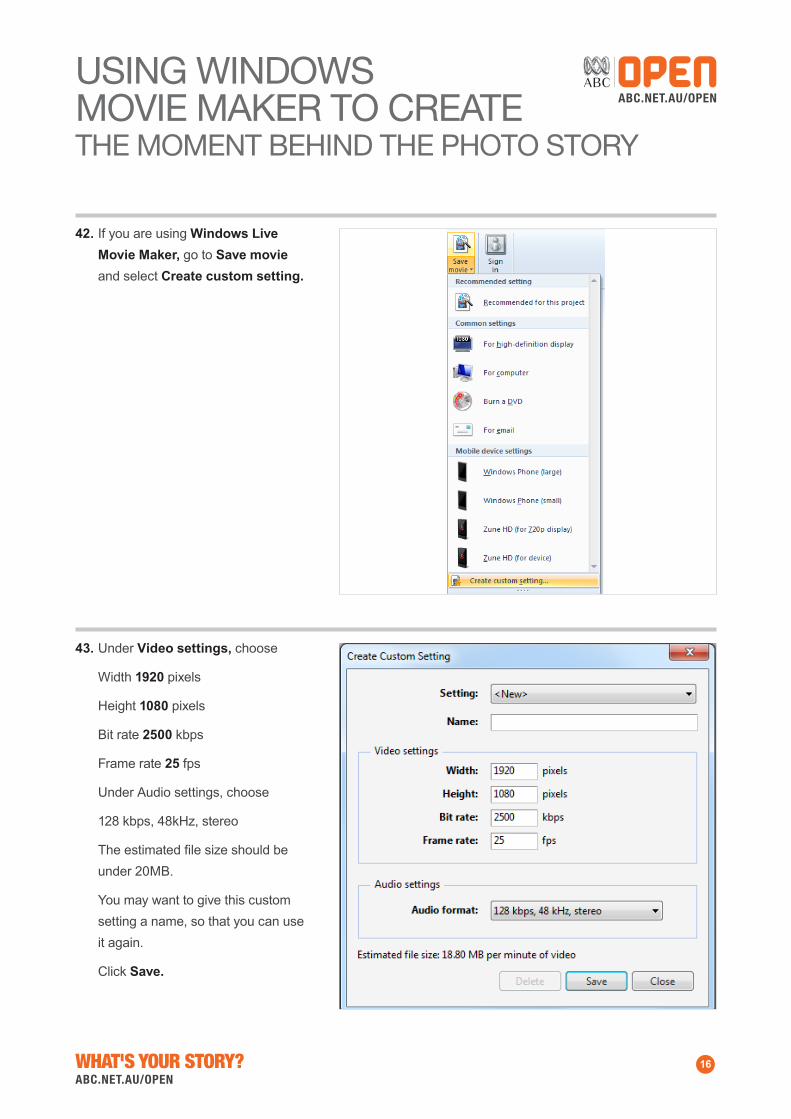
42. If you are using Windows Live Movie Maker, go to Save movie and select Create custom setting.
43. Under Video settings, choose
Width 1920 pixels
Height 1080 pixels
Bit rate 2500 kbps
Frame rate 25 fps
Under Audio settings, choose
128 kbps, 48kHz, stereo
The estimated file size should be under 20MB.
You may want to give this custom setting a name, so that you can use it again.
Click Save.

17
USING WINDOWS MOVIE MAKER TO CREATE THE MOMENT BEHIND THE PHOTO STORY
WHAT'S YOUR STORY?
44. Once the movie has been saved you will be asked if you wish to Play the movie when you click Finish. Check this box and click Finish.
45. Windows Media Player will open and display your movie.
Watch the movie to make sure that you are happy with it. Now, find your movie in the folder you saved it to on your computer, and follow the instructions to upload it to The Moment Behind The Photo vimeo group.


