Teachers Manual: Ultimate
See www.ultimate.org.nz for more resources 1

Teachers Manual: Ultimate
Table Of Contents
Topics Page No.Introduction....................................................................................2Basic Elements of Ultimate..............................................................210 Simple Rules of Ultimate............................................................3Techniques......................................................................................4
- Catching..................................................................................4- Throwing.................................................................................5
Mini Games.....................................................................................6Drills.................................................................................................xTerminology.....................................................................................xPhotocopy Resources......................................................................x
See www.ultimate.org.nz for more resources 2

Teachers Manual: Ultimate
Introduction Welcome to the teacher's manual, This manual will give techniques, example drills, and mini games to introduce the sport to a class. This manual is best suited from year 4 and above (10 years and older).
What is Ultimate? Ultimate is a team sport. It is most easily described as a non-contact cross between American Football and Netball which is played with a Frisbee, or, as we call it, a flying disc. You can play it indoor, on a basketball court, or outdoor, on a larger field.
What is The Aim of Ultimate? The aim is to get the sport disc into the end-zone. This scores a point for the offensive team.
What is the Layout of the Game?Outdoor The official size is 64m by 37m for the playing field and 18m by 37m for the endzone. The endzone is the space of the field where points are made.Indoor An indoor basketball court is the best size. ½ the court is best for the main field and ¼ of the ends of the basketball court can be the endzone.
How are points being made? You score a point for your team if you grab the disc while standing in the endzone. If the catcher has one foot on each side of the line, it isn't a point.
10 Rules of Ultimate Below are 10 simple rules for Ultimate, If you wish to give more in depth rules you can view them at the websites links at the back of this book.1. Spirit of the Game -- Ultimate stresses sportsmanship and fair play. Competitive play is encouraged,
but never at the expense of respect between players, adherence to the rules, and the basic joy of play.
2. The Field -- A rectangular shape with endzones at each end. A regulation field is 70 yards by 40 yards, with endzones 25 yards deep. Any such proportional space can be used.
3. Initiate Play -- Each point begins with both teams lining up on the front of their respective endzone line. The defence throws ("pulls") the disc to the offense. A regulation game has seven players per team.
4. Scoring -- Each time the offense completes a pass in the defence's endzone, the offense scores a point. Play is initiated after each score.
5. Movement of the Disc -- The disc may be advanced in any direction by completing a pass to a teammate. Players may not run with the disc. The person with the disc ("thrower") has ten seconds to throw the disc. The defender guarding the thrower ("marker") counts out the stall count.
See www.ultimate.org.nz for more resources 3

Teachers Manual: Ultimate
6. Change of possession -- When a pass in not completed (e.g. out of bounds, drop, block, interception), the defense immediately takes possession of the disc and becomes the offense.
7. Substitutions -- Players not in the game may replace players in the game after a score and during an injury timeout, but not otherwise during a point.
8. Non-contact -- No physical contact is allowed between players. Picks and screens are also prohibited. A foul occurs when contact is made.
9. Fouls -- When a player initiates contact on another player a foul occurs. When a foul disrupts possession, the play resumes as if the possession was retained. If the player committing the foul disagrees with the foul call, the play is redone.
10. Self-Refereeing -- Players are responsible for their own foul and line calls. Players resolve their own disputes.
Techniques
Catching There are three kinds of catches, the double handed catch, crocodile catch and one-handed catch.
The Double handed Catch
See picture to the left, it is best used either eye-level or higher.
Crocodile Catch
Caught during the midsection range of the body, its best used when you place yourself in front of the disc, if you miss the catch at least you can catch it against the chest. This is the simplest catch in the game. You normally have your arms apart and as it comes into range you slap your hands fast together slow it down and catch it.
One Handed Catch
Hardest catch of all three, normally used for extremely high catches that need you to jump or the low ones. You catch the disc's in the palm of your hand and use your thumb and fingers to hold onto it. This is difficult due to the margin of missing or dropping it from it hitting your hand too fast.
ThrowingBackhand Throwing
Backhand throwing is the simplest of all throws, You can demonstrate to students by positioning the disc in the palm of your hand, you then curl your fingers underneath the disc and your thumb over the top of the disc.
Forehand Throwing
Simple
See www.ultimate.org.nz for more resources 4
Teachers Manual: Ultimate
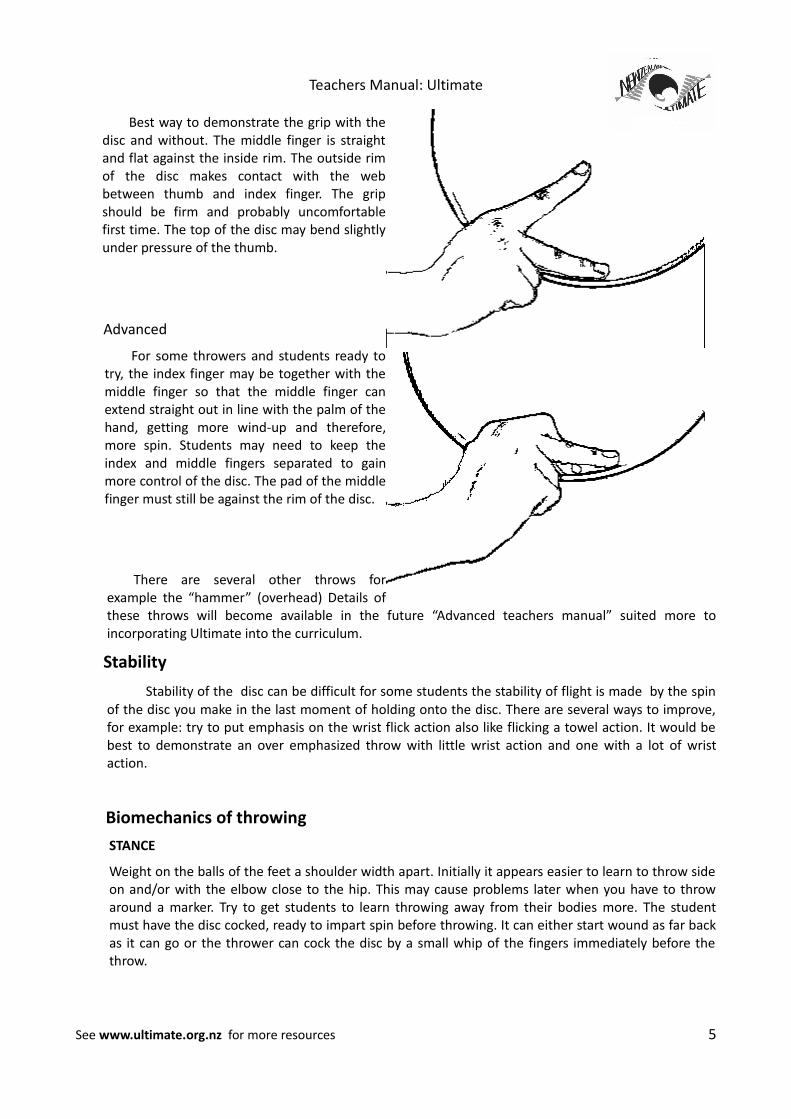
Best way to demonstrate the grip with the disc and without. The middle finger is straight and flat against the inside rim. The outside rim of the disc makes contact with the web between thumb and index finger. The grip should be firm and probably uncomfortable first time. The top of the disc may bend slightly under pressure of the thumb.
Advanced
For some throwers and students ready to try, the index finger may be together with the middle finger so that the middle finger can extend straight out in line with the palm of the hand, getting more wind-up and therefore, more spin. Students may need to keep the index and middle fingers separated to gain more control of the disc. The pad of the middle finger must still be against the rim of the disc.
There are several other throws for example the “hammer” (overhead) Details of these throws will become available in the future “Advanced teachers manual” suited more to incorporating Ultimate into the curriculum.
Stability
Stability of the disc can be difficult for some students the stability of flight is made by the spin of the disc you make in the last moment of holding onto the disc. There are several ways to improve, for example: try to put emphasis on the wrist flick action also like flicking a towel action. It would be best to demonstrate an over emphasized throw with little wrist action and one with a lot of wrist action.
Biomechanics of throwing
STANCE
Weight on the balls of the feet a shoulder width apart. Initially it appears easier to learn to throw side on and/or with the elbow close to the hip. This may cause problems later when you have to throw around a marker. Try to get students to learn throwing away from their bodies more. The student must have the disc cocked, ready to impart spin before throwing. It can either start wound as far back as it can go or the thrower can cock the disc by a small whip of the fingers immediately before the throw.
See www.ultimate.org.nz for more resources 5

Teachers Manual: Ultimate
SWING
The main trick is to keep the outer tip of the disc down. The following points may also help. The motion of the disc while in the hand should not be so much as an arc-like swing, but a whiplash. While increasing speed, the motion towards the target starts from the shoulder, then to the elbow then wrist and finally the fingers. Stepping forward with the non-pivot foot may help. The pivot should be on the opposite side as the throwing hand (right handers pivot on the left foot).
With arc-like swings, the time of release heavily influences the direction of the throw. By using the arm in a whiplash motion rather than a swing, it should be possible to move the center of the disc to the target in more of a straight line, rather than an arc, so the direction in the horizontal plane is easier to master.
RELEASE
Until now, there has been little spin in the disc. The whiplash effect of the swing should culminate in a “snap” imparting maximum spin to the disc. The flight plate of the disc should be spinning within one plane (i.e. if the spin axis is not perpendicular to the flight plate, the disc will wobble). Unless an air-bounce is intended, the direction the disc is launched should lie within this plane.
The time of release is when it all must come to together. The last motions imparted to the disc are the ones it takes with it to combat the wind and gravity. Yet this instant happens so quickly and beginners have so many things to concentrate on, that it's hard to tell what went on.
FOLLOW-THROUGH
Any action by the thrower after letting go of the disc cannot influence the flight of the disc. Nevertheless, some specific follow-through tips are suggested in the next section as an aid to correct specific problems in a throw.
Mini GamesBelow are several mini games that are adapted from the game of ultimate to help students focus
on specific skills of the game.
Throwing Race................................................................................................X
Captain Disc....................................................................................................X
Sliders.............................................................................................................X
Disc Rounders.................................................................................................X
Disc Tennis......................................................................................................X
500..................................................................................................................X
Disc soccer......................................................................................................X
Goaltimate......................................................................................................X
VolleyDisc........................................................................................................X
Throwing Race
Equipment:One disc per teamFour cones.
Area:Can be played on outdoor or indoor
See www.ultimate.org.nz for more resources 6

Teachers Manual: Ultimate
Formation:Line up in two rows with the paired partner in the opposite row. Each row to be 10 meters apart, this distance can be decreased or increased on the students current skill.
Aim: To complete as many successful passes in pairs, competing against other pairs.
Variations:1. Try increasing minimum distance to increase difficulty in accuracy.2. You can give a limited time (2 mins) instead of No. of throws then get students to find out
who threw the most.Teaching Points
• Emphasise that accuracy is more important than power
Captain Disc
Equipment:1 Disc per group
Area:Can be played indoor or outdoor. Have each group stand in a line and have the disc approx 5 meters in front of the line.
Formation:Groups of six is best sized.
Aim:To introduce speed with accuracy in throwing.
Variations:1. Make all throws done by forehand2. You can make it a race between groups
Teaching Point• Accuracy is more important than power
Sliders
Equipment:
See www.ultimate.org.nz for more resources 7
Instructions - Students can move around while holding the disc, as long as they keep further apart than the minimum distance.. - Explain rules and teaching points to students, - They don't need to stay in a row, that can run and move around to catch the disc, they should understand the minimum distance. - Students given 1 point for a backhand throw - Students given 2 points for a forehand throw - First pair to 20 points wins.
Instructions - Once you say “go” the leftmost person run out to the disc - Once they grab the disc they throw it to the rightmost person (from the throwers) - The throw the disc back and forward until every person has thrown it back. - Once the last person has thrown it back to the thrower, the thrower places it on the ground and the next person in the row runs out to do the same

Teachers Manual: Ultimate
6 Discs12 cones (1 cone per player)
Area:Best played outdoors.
Formation:Groups of six is best sized, Have each team line up parallel with the other team, with each cone between them and the space between each team.
Aim:To knock over the other teams cones
Variations:1. For advanced players that one life is taken if the disc can be caught by the other team after
it has gone past the row of cones.Teaching Point
• to help your teammates with accuracy and technique.
Disc Rounder's (Disc Baseball)
Equipment:1 Disc4 cones
Area:Best played outdoors.
Formation:Set up a diamond, similar to baseball.
Aim:Just like baseball, it is to get more home runs than the opposing team.
Teaching Point• Encourage power and from throwing it parallel to the ground
See www.ultimate.org.nz for more resources 8
Instructions - Give each team three disc's - Each person has three lives (represented by the cone) - Each team gets three attempts per turn. (best to start from one end to the other) - Each person has three attempts per game - This goes on until one team has all their lives taken.
Instructions - There is no pitcher (like tee-ball), otherwise the fielding positions are similar. The "batter" simply throws the disc from home base, and must rethrow if it is a foul or doesn't travel at least 5m. - he batter is also out if their throw is caught on the full. Runners are out if the disc reaches the base they are running towards before they do. Only the fielders on a base (the basemen) may run with the disc; everyone else must throw it to a baseman. - The batting team gets a run each time a runner reaches home base, when they get 3 outs the teams switch roles. - For safety reasons, the fielders should be required to be at least 5m away from the batter.

Teachers Manual: Ultimate
Disc Tennis
Equipment:1 disc8cones.
Area:Can be played on outdoor or indoor
Formation:Similar to a tennis court. But with a 2 meter gap between the two squares
Aim: Incorporating power and accuracy in throwing. To accrue points, first team to 15 points wins
Variations:1. You can introduce a net and remove the middle zone2. Increase the middle zone.
Teaching Points• Adding power with throwing and team works should be emphasised.
500
Equipment:1 disc
Area:Played outdoor due to high throws
Formation:Split the students into two groups, separated by approx 20 meters, lay out some cones or a lines on the ground to slow the no-man's land
Aim: Incorporating accuracy in throwing high throws.
Variations:1. Break up into smaller groups to make more competitive or to control non-contact element
Teaching Points
See www.ultimate.org.nz for more resources 9
Instructions - Dropping the disc, or taking more than three passes to get it over the net, scores a point for the opposition. - The receiving team scores a point if the disc lands out-of-bounds.
Instructions - Explain that the aim is to get 500 points for yourself - Explain the non-contact element of ultimate, no pushing or stealing the disc is allowed - explain that if the disc is caught in the no-mans land (20 meters) between the two groups The person doesn't get the points. - First to 500 points win.

Teachers Manual: Ultimate
• Emphasise accuracy with high throws.
Goaltimate
Equipment:1 disc
Area:Best played outdoor on soccer field
Formation:Two teams, even numbered
Aim:Goaltimate is played just like ultimate, but with the aim being to throw the disc into a goal (football or hockey) rather than catch it in an endzone.
Variations:1. play half-court goaltimate, requiring a team to pass the disc outside a box before
attempting to score.Teaching Points
• Emphasise incorporating previous skills and improve teamwork.
Disc Soccer
Equipment:1 disc8 cones.
Area:Can be played indoor or outdoor. Increase size of court to depend on student numbers. Best played on a full sized soccer field
Formation:Soccer Field format. Two equal sized teams.
Aim: Incorporating power and accuracy in throwing. To accrue points, first team to 15 points wins
Variations:1. You could begin with using a goal scoring style like goaltimate if it begins difficult at the
beginning.2. If the game is successful, start shrinking the field to match more of the size for playing
proper ultimate.
See www.ultimate.org.nz for more resources 10
Instructions - To use all rules of ultimate except you score by throwing it into a goal. - Once a goal is made or a turnover the team with possesion has to pass the disc outside of The designated area before they can go for a goal.
Instructions - Once the disc is on the ground, either team may pick it up, but maintain the non-contact rules. - You are not allowed to run with the disc, but the disc is allowed to touch the ground, or roll along the ground. - First person to pick it up off the ground gains control of the disc
Teachers Manual: Ultimate
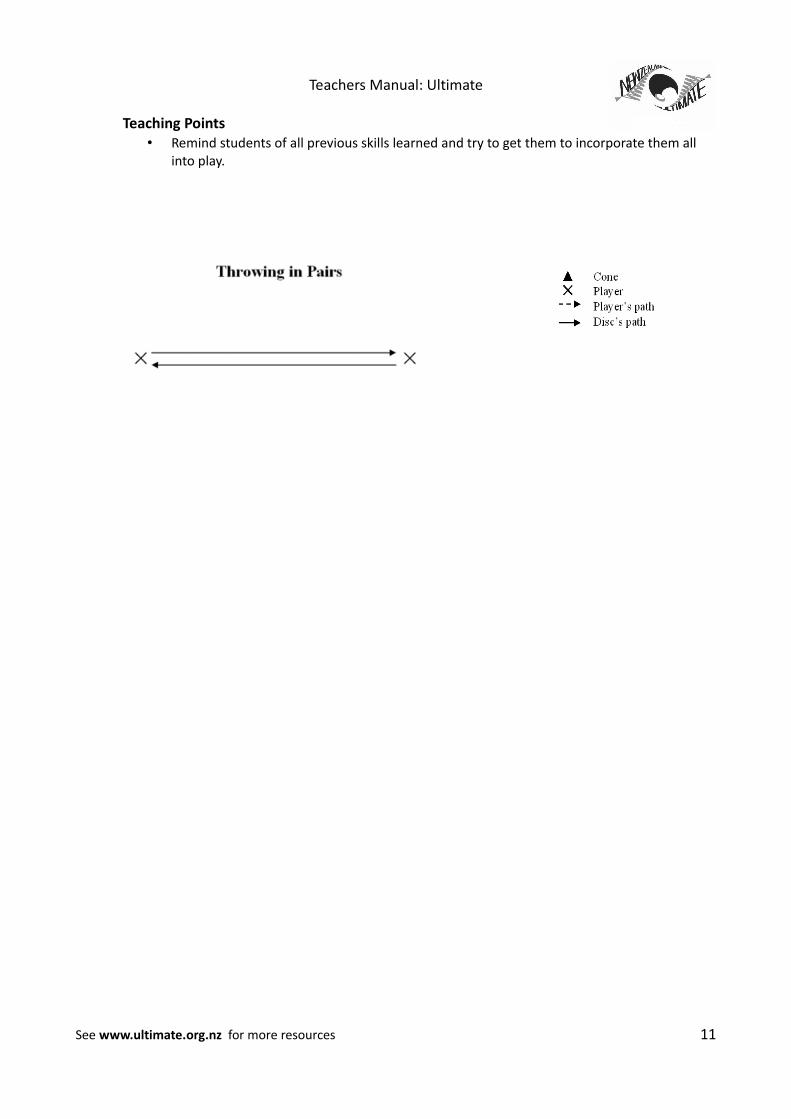
Teaching Points• Remind students of all previous skills learned and try to get them to incorporate them all
into play.
See www.ultimate.org.nz for more resources 11

Teachers Manual: Ultimate
Ultimate Drills
Throwing in PairsEach pair stands a comfortable distance apart and completes passes between each other to
practise the basic techniques of throwing a forehand and backhand.
Variations: Include; throw high floaty passes to practice high catches; thrower takes a step back for each
completed pass or takes a step forward for each incomplete pass, vary catches.
Wheel RelayForm a well-spaced circle facing inwards and with one person holding a disc. The first person passes
the disc to their right and then runs around the outside of the circle in the opposite direction (clockwise). The disc is passed around the circle and meets the thrower as they arrive back in place. They pass it on to the next player (on the right) who then does the same thing. The relay continues until it is the original thrower's turn. Try to get players to throw backhands if right-handed and forehands if left-handed.
Variation: Change direction of passing and running.
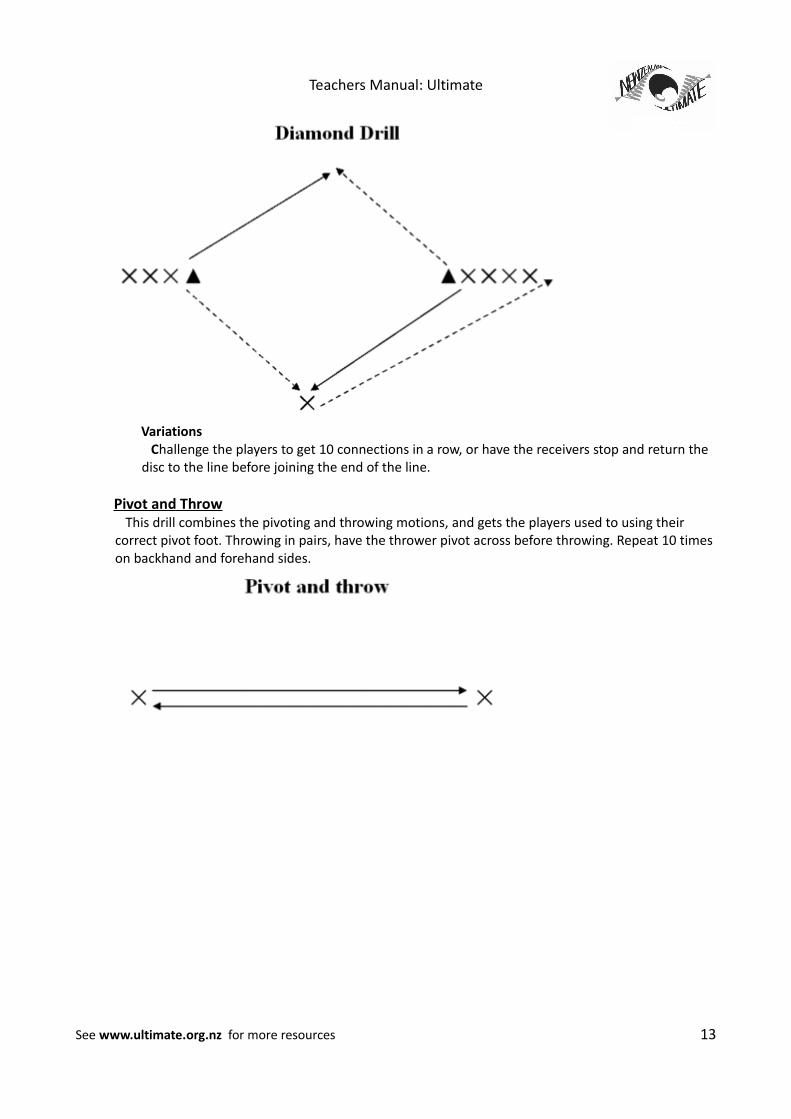
Diamond DrillForm two stacks of at least three players each, facing each other behind cones about 15m apart.
The first player from one line cuts to their right and is thrown the disc by the first player in the other disc. The thrower then makes the next cut to the other line, while the receiver continues through to join the end of the opposite line from which they came. Two extra cones may be used to provide a cutting and throwing target. After a while change the direction of cuts so that both backhands and forehands are practiced.
See www.ultimate.org.nz for more resources 12
Teachers Manual: Ultimate
Variations Challenge the players to get 10 connections in a row, or have the receivers stop and return the
disc to the line before joining the end of the line.
Pivot and ThrowThis drill combines the pivoting and throwing motions, and gets the players used to using their
correct pivot foot. Throwing in pairs, have the thrower pivot across before throwing. Repeat 10 times on backhand and forehand sides.
See www.ultimate.org.nz for more resources 13

Teachers Manual: Ultimate
Piggy in the MiddleThis drill practise's banked throws. Split into groups of three. Have the thrower and receiver stand
at cones 10m apart with the "piggy" in between them. The aim is to connect passes without the piggy getting the disc. The players are not allowed to move. The thrower must throw inside-out or outside-in throws by altering the outside angle of the disc.
Box DrillForm a 10m square with the 4 cones. Start with even stacks behind the cones facing the centre of
the square. The disc is at the front of one line. A player cuts from the next line to the right in a counter-clockwise direction and is thrown the disc. They throw it to a similar cut from the next line and so on. Each thrower joins the next line around the square after throwing. After a while, change the direction.
Variation:Try introducing a second disc going around the square.
See www.ultimate.org.nz for more resources 14

Teachers Manual: Ultimate
Thrower/Marker DrillIn the thrower/marker drill, groups of three practice throwing and marking in rotation. Player A
throws with Player B marking. Player C is the receiver about 10m away. After the pass is completed, C becomes the thrower, A runs to C to become the marker and B becomes the receiver. The marker should force one side or the other. Repeat until each person has thrown 10 times. You may also reverse the rotation so that the throwers get different markers.
VariationsFor strong throwers, allow the marker to mark more straight up rather than forcing to one side.
Flow DrillForm four stacks down the center of the field behind cones. The front stack holds the discs and
faces the other three stacks which are lined up away from the first stack. The first cutter from the second stack cuts to one side and is thrown the disc. A player from the next stack then cuts to the same side to receive the flow pass, and the last cutter does the same. The final receiver take the disc and joins the front stack of throwers. The other players rotate to the next stack in the sequence.
Variation: Challenge the team to complete 5 sequences without mistake.
See www.ultimate.org.nz for more resources 15
Teachers Manual: Ultimate
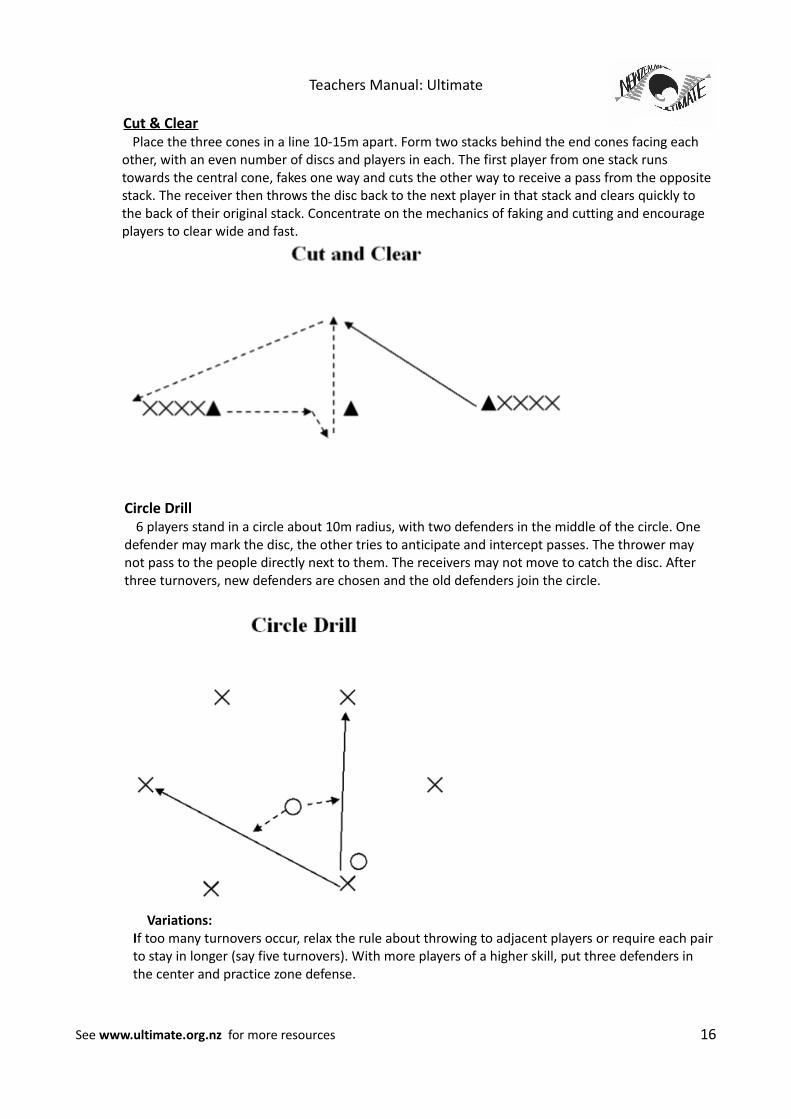
Cut & ClearPlace the three cones in a line 10-15m apart. Form two stacks behind the end cones facing each
other, with an even number of discs and players in each. The first player from one stack runs towards the central cone, fakes one way and cuts the other way to receive a pass from the opposite stack. The receiver then throws the disc back to the next player in that stack and clears quickly to the back of their original stack. Concentrate on the mechanics of faking and cutting and encourage players to clear wide and fast.
Circle Drill6 players stand in a circle about 10m radius, with two defenders in the middle of the circle. One
defender may mark the disc, the other tries to anticipate and intercept passes. The thrower may not pass to the people directly next to them. The receivers may not move to catch the disc. After three turnovers, new defenders are chosen and the old defenders join the circle.
Variations: If too many turnovers occur, relax the rule about throwing to adjacent players or require each pair to stay in longer (say five turnovers). With more players of a higher skill, put three defenders in the center and practice zone defense.
See www.ultimate.org.nz for more resources 16
Teachers Manual: Ultimate
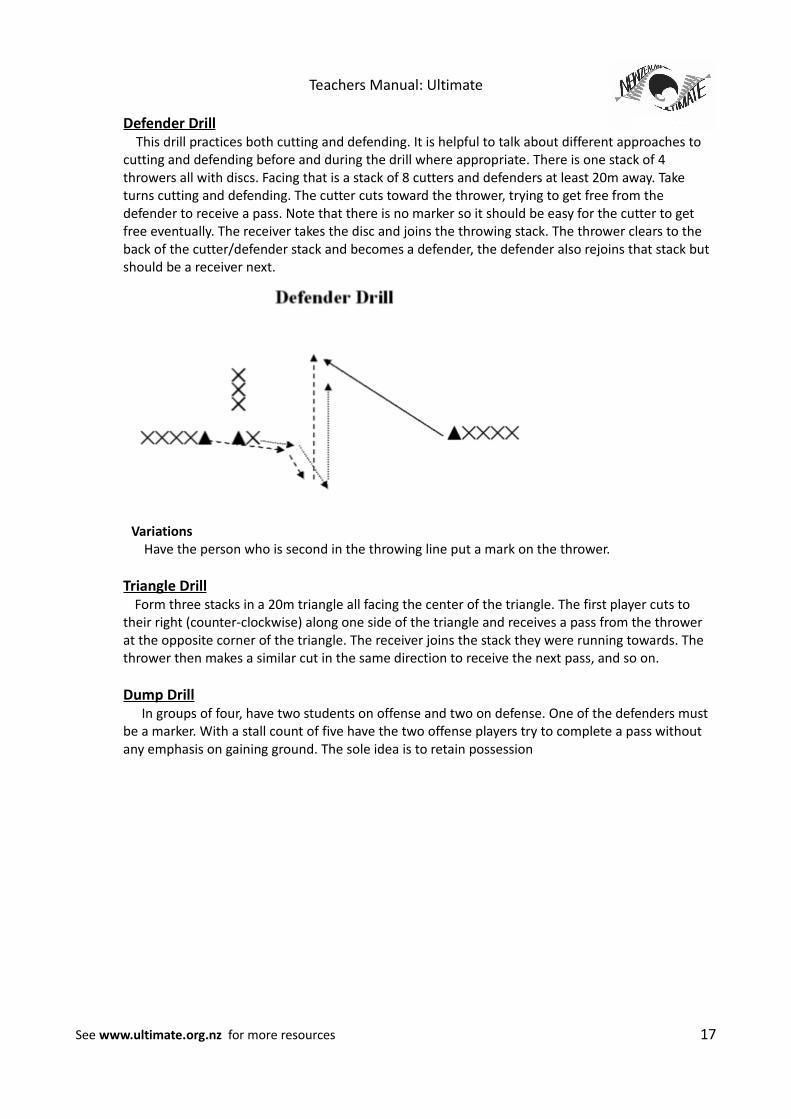
Defender DrillThis drill practices both cutting and defending. It is helpful to talk about different approaches to
cutting and defending before and during the drill where appropriate. There is one stack of 4 throwers all with discs. Facing that is a stack of 8 cutters and defenders at least 20m away. Take turns cutting and defending. The cutter cuts toward the thrower, trying to get free from the defender to receive a pass. Note that there is no marker so it should be easy for the cutter to get free eventually. The receiver takes the disc and joins the throwing stack. The thrower clears to the back of the cutter/defender stack and becomes a defender, the defender also rejoins that stack but should be a receiver next.
VariationsHave the person who is second in the throwing line put a mark on the thrower.
Triangle DrillForm three stacks in a 20m triangle all facing the center of the triangle. The first player cuts to
their right (counter-clockwise) along one side of the triangle and receives a pass from the thrower at the opposite corner of the triangle. The receiver joins the stack they were running towards. The thrower then makes a similar cut in the same direction to receive the next pass, and so on.
Dump DrillIn groups of four, have two students on offense and two on defense. One of the defenders must
be a marker. With a stall count of five have the two offense players try to complete a pass without any emphasis on gaining ground. The sole idea is to retain possession
See www.ultimate.org.nz for more resources 17

Teachers Manual: Ultimate
Kill Drill2 players stand 10m apart. The thrower is stationary, the cutter runs back and forth in front of
the thrower, receiving passes, stopping, returning the pass, then turning and running the other way. Complete a set of 10 passes, then reverse roles. Do 3 sets each. This is generally used as a high-intensity warm-up drill and practices throwing when fatigued.
VariationsTry doing five sets of 8 passes at higher intensity
Swing DrillForm 4 stacks of at least 3 players in each. The stacks line up in an alternating zig-zag pattern
each behind a cone about 15m apart. Players in the first stack each have a disc. The first player from the second stack cuts across to receive the disc, then fakes the flow pass, pivots and swings the disc to a player cutting out of the third stack. Do the same thing for the cutter out of the fourth stack. Each player continues on to the next stack after throwing and the receiver from the fourth stack bring the disc to the front line of throwers.
See www.ultimate.org.nz for more resources 18
Teachers Manual: Ultimate
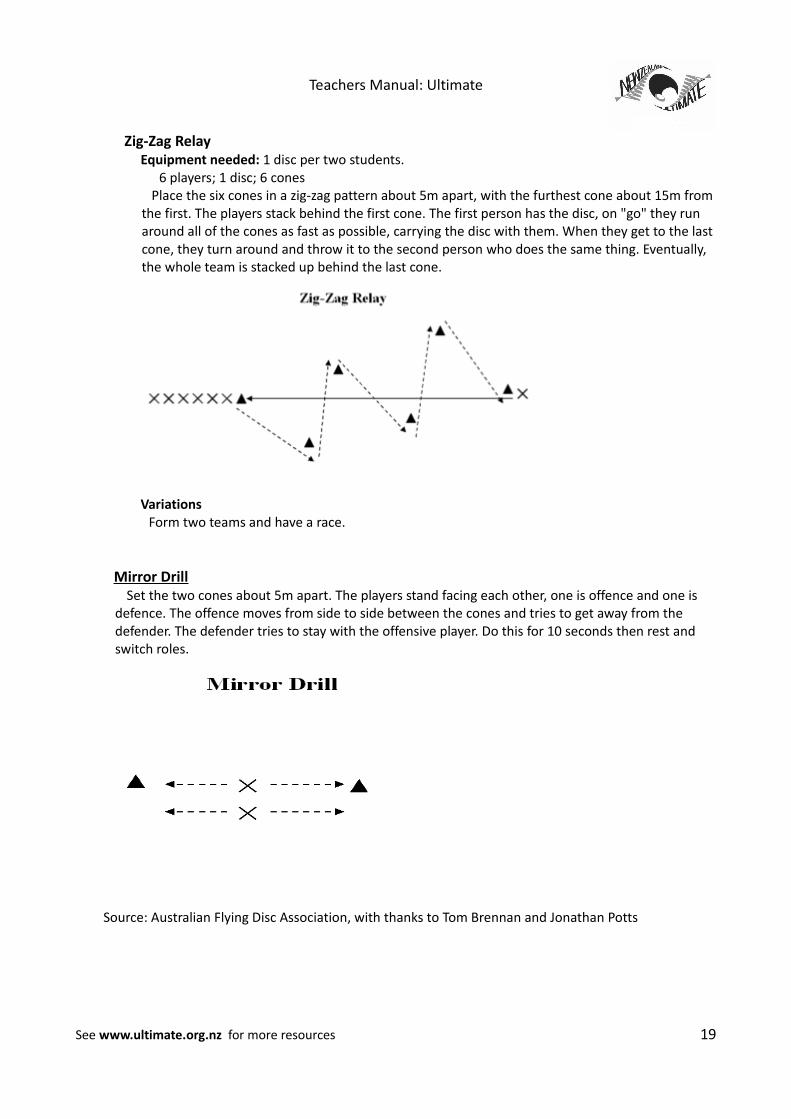
Zig-Zag RelayEquipment needed: 1 disc per two students.
6 players; 1 disc; 6 cones Place the six cones in a zig-zag pattern about 5m apart, with the furthest cone about 15m from the first. The players stack behind the first cone. The first person has the disc, on "go" they run around all of the cones as fast as possible, carrying the disc with them. When they get to the last cone, they turn around and throw it to the second person who does the same thing. Eventually, the whole team is stacked up behind the last cone.
VariationsForm two teams and have a race.
Mirror DrillSet the two cones about 5m apart. The players stand facing each other, one is offence and one is
defence. The offence moves from side to side between the cones and tries to get away from the defender. The defender tries to stay with the offensive player. Do this for 10 seconds then rest and switch roles.
Source: Australian Flying Disc Association, with thanks to Tom Brennan and Jonathan Potts
See www.ultimate.org.nz for more resources 19

Teachers Manual: Ultimate
Terminology
Endzone The area at the end of the playing zone that a team can score points by catching the disc without straddling the endzone line.
See www.ultimate.org.nz for more resources 20

Teachers Manual: Ultimate
Resource 2
Students Name
Catching Backhand Throwing
Forehand throwing
Pivoting & Faking
Marking & forcing
Stacking, Cutting & clearing
Defending Rules
See www.ultimate.org.nz for more resources 21


