
User
The Ultimate Font M
anager


CONTACT INFORMATION
Extensis, Inc. 1800 SW First Avenue, Suite 500 Portland, OR 97201 Toll Free: (800) 796-9798 Phone: (503) 274-2020 Fax: (503) 274-0530Tech Support: (503) 274-7030 [email protected]
Extensis Europe First Floor, Century House The LakesNorthampton NN4 7SJ United Kingdom Phone: +44(0)1604 636 300 Fax +44 (0)1604 636 366Tech Support: +44(0)1604 636 300 [email protected]
Customer Service Phone: (800) 796-9798E-mail: [email protected]
Technical SupportWeb: http://www.extensis.com/support/Phone: (503) 274-7030
© 2003 Extensis, Inc., a Celartem company. This document and the software described in it are copyrighted with all rights reserved. This document or the software described may not be copied, in whole or part, without the written consent of Extensis, Inc., except in the normal use of the software, or to make a backup copy of the software. This exception does not allow copies to be made for others.
Extensis is a registered trademark of Extensis Inc. The Extensis logo, Extensis Library, BeyondPress, Collect Pro, Intellihance Pro, Mask Pro, PhotoFrame, PhotoTools, Portfolio, Portfolio Server, Preflight Pro, PrintReady, pxl SmartScale, QX-Collect&Send, QX-Effects, QX-FindChange, QX-FineTune, QX-Import, QX-ItemStyles, QX-Layers, QX-Scaler, QX-Shortcuts, QX-Tools Pro, QX-Viewer, Suitcase and Suitcase Server are all trademarks of Extensis, Inc. Celartem, Celartem, Inc., the Celartem logo, PixelLive and PixelSafe are trademarks of Celartem, Inc. Adobe, Acrobat, Illustrator, PageMaker, Photoshop, and PostScript are trademarks of Adobe Systems, Incorporated. Apple, AppleScript, Distiller, FontSync, Macintosh, Mac OS 9, Mac OS X, PowerPC, and QuickDraw are registered trademarks of Apple Computer, Inc. Microsoft, Internet Explorer, Windows, Windows XP, Windows 2000, Windows NT, Windows ME and Windows 98 are registered trademarks of Microsoft Corporation. Quark and QuarkXPress are registered trademarks and XTensions is a trademark of Quark, Inc. FontBook is a trademark of 2000 Lemke Software. Netscape and Navigator are registered trademarks of Netscape Communications. All other trademarks are the property of their respective owners.

iii
User Guide Suitcase X1 for Mac
Introducing Suitcase X1.........................................................................1Welcome to Suitcase X1 ........................................................................1Suitcase X1 and Graphic Designers .......................................................1Prepress Operators and Printing Professionals .....................................1The Ultimate Font Manager ..................................................................1System and Software Requirements......................................................2Installation.............................................................................................2Registration and personalization ...........................................................2Technical support ..................................................................................3About this user guide ............................................................................3
What’s New in Suitcase X1 ....................................................................4New Features ........................................................................................4Suitcase and OS X..................................................................................5Utilities...................................................................................................5
Getting Started ......................................................................................6Fonts and your computer ......................................................................6The Suitcase Environment .....................................................................8Adding fonts to Suitcase........................................................................9Activating fonts ................................................................................... 10Building font sets ................................................................................ 12Previewing fonts .................................................................................. 13Automatically activating fonts............................................................. 14
Managing Fonts with Suitcase............................................................15Overview of Suitcase and Font Management...................................... 15How Suitcase Works ............................................................................ 16Adding fonts to Suitcase...................................................................... 17Managing system fonts ....................................................................... 19Activating and deactivating fonts........................................................21Organizing fonts into sets ...................................................................25Keywords and styles ............................................................................30
Contents

iv
User Guide The Ultimate Font Manager
Managing Fonts with Suitcase (continued)Previewing fonts .................................................................................. 31Finding fonts ...................................................................................... 33Problematic fonts ................................................................................35Collecting fonts for output..................................................................38Automating Suitcase with AppleScript ................................................38
User Preferences ..................................................................................39General Preferences.............................................................................39Activation Preferences .........................................................................40Preview Text Preferences ..................................................................... 42Server Connection Preferences............................................................ 42
Suitcase Plug-ins ................................................................................. 44Suitcase XT for Quark XPress ...............................................................44Suitcase Auto-Activation Plug-in for Adobe Illustrator........................46Suitcase Auto-Activation Plug-in for Adobe InDesign.........................48
Keyboard Shortcuts .............................................................................50
Troubleshooting...................................................................................51
Index .....................................................................................................55

1
User Guide Suitcase X1 for Mac
Welcome to Suitcase X1
Suitcase is a powerful font management utility that makes working with fonts faster and easier than ever before.
With Suitcase you can group and open fonts only when you need them, saving valuable system resources. You can even have Suitcase open fonts automatically when an application is launched.
Suitcase solves font management problems for a wide range of creative professionals. From solo graphic designers to prepress and printing professionals, Suitcase provides smooth and effective font management with an intuitive and easy to use interface.
Suitcase X1 and Graphic Designers
Graphic designers frequently manage and browse thousands of fonts. They need to have a very large amount of fonts available at all times, but not necessarily active. Suitcase X1 provides graphic designers an easy and visual way to locate and activate the right font at the right time. With Suitcase, designers can preview and choose the most appropriate fonts for a project before even activating them.
Because system fonts are now stored in many different locations, manually moving system fonts in and out of folders is confusing, tedious and time consuming at best. With Suitcase X1 managing system fonts is a smooth and painless procedure.
Suitcase X1 also gives designers peace of mind by checking for corrupt fonts and then attempting to repair any problem fonts.
Prepress Operators and Printing Professionals
Prepress operators and printing professionals operate expensive equipment on a daily basis. Errors and downtime are expensive and must be avoided if at all possible.
Corrupt fonts can cause system and application instability, and can be difficult, time consuming and expensive to diagnose. Suitcase scans all new fonts to ensure that corrupt fonts are not added to the database.
Suitcase X1 also makes it easy to use the correct font for the job. Suitcase X1 automatically activates fonts as documents are opened, and then automatically closes the fonts when no loner needed. Fonts can also be temporarily added to Suitcase, ensuring that only the client’s fonts are used for each job.
The Ultimate Font Manager
Suitcase X1 is the most elegant solution to the potentially frustrating problem of font management. Whether you work in a home office or a large-scale printing operation, Suitcase efficiently solves all of your font problems.
If you have fonts, you need Suitcase X1.
Introducing Suitcase X1

2
User Guide Introducing Suitcase X1
System and Software Requirements
This Suitcase package is for Macintosh, but Suitcase is also available for Microsoft® Windows®. For more information, contact your local retailer or visit our website at http://www.extensis.com.
To install and use Suitcase, you will need the following:
• Macintosh® PowerPC® or compatible computer
• 128MB of system RAM
• 30 MB available hard disk space
• Mac OS® X 10.2.6 or higher
Installation
You can find instructions for quick and easy installation on the CD-ROM that is included with your product. If you downloaded an Extensis product installer from our web site, running the installer places an informational Read Me on your hard drive.
Registration and Personalization
It is important to register your copy of Suitcase so we can provide you with the best possible service. Registered users of Suitcase are eligible for technical support, information regarding new versions and products, discounts and special offers on new products.
Your serial number is located in one of three locations: on the Suitcase CD sleeve, on the product packaging, or was sent to you via e-mail if you purchased through our website. Enter that number to personalize your copy of Suitcase.
If you choose not to personalize your copy, Suitcase runs in a demonstration mode that allows you to use the product for 30 days. You can purchase additional serial numbers from Extensis. See the contact page at the beginning of this guide for contact information.

3
User Guide Suitcase X1 for Mac
Technical Support
Technical Support is available directly through the Extensis web site. Please fill out an online support form at http://www.extensis.com/support/ for the quickest response. Our tech support representatives will respond by e-mail, usually within 24 hours on weekdays. See the contact page at the beginning of the guide for contact information.
When calling for technical support, please be at your computer and have the following information available:
• Your Suitcase serial number
• Your computer configuration
• Your question or a description of the difficulty you’re experiencing - what specifically occurs and when
Take note of any displayed error numbers or messages and any other information you think may be relevant.
For answers to frequently asked questions and troubleshooting tips, you can also visit the Suitcase page on the Extensis web site:
http://www.extensis.com/suitcase/
About this User Guide
This User Guide covers Suitcase X1 for Macintosh. When describing keyboard shortcuts, “Command” refers to the ⌘ key. References to menu selections are shown as Menu > Command.
For more information on specific Suitcase features, refer to the following:
• Read Me-located in your Suitcase folder, this text file gives you late-breaking information
• Suitcase page on the Extensis web site: http://www.extensis.com/suitcase/
• FontBook from LemkeSoft User Guide PDF
• FontDoctor User Guide PDF

4
User Guide What’s New in Suitcase X1
The following are highlights of the major new features in Suitcase X1:
• Fonts can be immediately activated as they are viewed in the Suitcase Preview pane.
• Styles and keywords allow you to efficiently organize and find specific fonts. You can add your own custom keywords to fonts to make locating fonts easier. Styles allow you to quickly list all of one style type and compare them side by side in the Preview pane.
• The new QuickFind feature allows you to quickly search for fonts by name, keyword or style.
• Improved system font management is built-in to Suitcase X1. You can remove fonts from the system folder, move and add them to Suitcase, override system fonts, as well as quickly return fonts to their original location if needed.
• Fonts are scanned when added. Suitcase scans and attempts to repair any problematic fonts. You can also scan and repair fonts directly within Suitcase.
• With efficient duplicate font management, you can view all duplicate fonts in one window, where you can remove them from Suitcase or delete them from your computer.
• When administering a Suitcase Server, you can now import a list of users, speeding up the process of adding new users..
Suitcase Server is sold separately. To purchase Suitcase Server, see the contact information at the beginning of this guide.
What’s New in Suitcase X1Suitcase X1 is a significant step forward in the world of font management. The new features in version X1 make it easier to navigate large font libraries and activate fonts when and where you need them.
New Features

5
User Guide Suitcase X1 for Mac
Suitcase and OS X
Suitcase X1 is a native OS X application and has many powerful features previously not available with older operating systems.
Open Suitcase at login: In OS X, the Suitcase application must be running before fonts can be activated. Suitcase launches automatically when you log in. Keep Suitcase minimized in the OS X Dock to have continued access to all of your fonts.
OS X Dock: You can toggle font sets opened and closed from the Suitcase Dock Icon menu. Click and hold the dock icon to display the menu, then click to activate the desired set.
Font activation button: The Suitcase X1 toolbar includes a single font activation button. Click the Activate button to activate fonts and sets. You can also toggle the activation state between activating the font permanently and only activating a font until restart. To do so, click to highlight the font or set, then hold down the Option key and click the Activate button.
Classic Bridge: An extension installed in the OS 9 System Extensions folder handles font activation for applications running in Classic mode.
System Fonts: OS X stores system fonts in several locations, so not all system fonts are stored in the System Folder’s Fonts folder. Using the Font View options in the Suitcase Font pane you can display the fonts in any of these locations.
Utilities
Suitcase for Macintosh includes these utilities to make font management even easier!
• FontBook from LemkeSoft: A utility that allows you to preview and print your fonts in any of 24 different templates.
• Suitcase XT: An XTension for QuarkXPress® that automatically opens missing fonts. Suitcase XT uses Apple’s FontSync™ to differentiate between fonts of the same name and help you choose the right one.
• Suitcase Auto-Activation Plug-in for Adobe Illustrator and InDesign: Plug-ins for Adobe® Illustrator® and InDesign® that automatically open missing fonts using Suitcase.
• FontDoctor: A utility that locates and eliminates hard-to-find font problems that wreak havoc on the Macintosh system performance and applications. This utility can also be used to organize all of your fonts into one directory in the finder.

6
User Guide Getting Started
Fonts and your computer
If you’re like many Mac OS X users, you probably have a multitude of fonts strewn about your system in one of many font folders.
The operating system has many locations where fonts can reside, and applications can even install fonts in other directories all over your system. Suitcase makes managing all of your fonts easy.
Organizing your fontsWhen you first install Suitcase, it is likely that you have a real font mess. The FontDoctor utility included with Suitcase X1 makes cleaning up this mess a breeze.
FontDoctor creates a Font Library, which is basically an organized directory of all of your fonts. The following are basic instructions for using FontDoctor to organize your fonts. For more advanced information refer to the FontDoctor Help PDF file.
Depending upon the number of fonts on your system, it can take a long time for FontDoctor to organize your fonts. If you have an extensive collection, run FontDoctor when you aren’t working on other projects.
To organize fonts with FontDoctor:
1. Launch FontDoctor.
2. In the FontDoctor dialog box, select the Organize Fonts tab.
3. In the Search Disks/Folders for Fonts box, check all of the disks that you want to search for fonts. You can also click the folder button and add specific font folders to organize.
4. Check the Move Existing Suitcase Files option. This tells FontDoctor to move all of the current font files to a new location.
5. The remaining options can be left on the default settings. Note that the Skip System Folder option is checked. Suitcase X1 can manages all system fonts and need not be moved.
6. Click Create Library.
7. FontDoctor prompts you to choose a location for your new font library. Click New and choose a convenient location on your hard disk for your library.
8. Click OK to confirm the settings. FontDoctor searches the selected locations and groups all of the fonts in the new library.
Getting Started

7
User Guide Suitcase X1 for Mac
System FontsBefore using Suitcase to manage and organize your fonts, you have to tell Suitcase how to handle fonts that are controlled by the operating system.
Overriding system fonts
Fonts located in any of the system’s Fonts folders under OS X should not be moved. Suitcase can simply override the OS X system fonts.
If a font is controlled by the OS, you are able to preview it in the Suitcase window, but are not be able to use Suitcase to activate or deactivate it until you tell Suitcase to override the OS X system fonts.
To override OS X system fonts:
1. Open Suitcase.
2. Choose Suitcase > Preferences.
3. On the General Tab, check Allow Suitcase to Override System Fonts.
4. Click OK.
Managing system fonts:
Suitcase also provides more robust control over fonts with the Manage System Fonts feature. This feature allows you to activate and deactivate any font in any of the system fonts folders.
To manage OS X system fonts:
1. Open Suitcase.
2. Choose Tools > Manage System Fonts.
3. In the View Fonts In: drop-down menu, choose All System Fonts. You can also manage each type of system font from this dialog box. See the above list for definitions of each system font type.
4. Check all of the fonts in the list that you want Suitcase to manage. Fonts that are dimmed in the list are required by the operating system and cannot be managed.
Some OS 9 fonts in the list are dimmed. These fonts are required by the operating system and cannot be managed by Suitcase. For OS 9 these include Charcoal, Chicago, Geneva, Monaco, and New York. Adobe products also install two fonts that should remain in the system folder: Adobe Sans MM and Adobe Serif MM
If you choose to allow Suitcase to override system fonts, OS X fonts in the list are also dimmed.
5. Check the Activate Managed Fonts option.
6. Click Apply.
7. If prompted, enter your system level password and click OK.
8. Click Done. A new Suitcase set is added to your sets list. This set can be activated and deactivated like any other set.

8
User Guide Getting Started
Suitcase has an intuitive interface where you can preview, organize, activate, deactivate, and search for fonts.
• Toolbar: Provides one-click access to the most commonly used features.
• Sets pane: Organize your fonts by creating groups (called Sets) where you can activate and deactivate a number of fonts at the same time.
• Fonts pane: Displays a list of all fonts and font suitcases managed by Suitcase X1.
• Status column: Shows the current activation status of each font and set.
• Preview pane: Allows you to instantly view, compare and activate selected fonts.
• QuickFind: Use this feature to quickly find fonts by font name, suitcase, keyword or style.
• Keywords and Styles drawer: Add keywords and styles to easily organize and locate your fonts.
The Suitcase Environment
PreviewPane
QuickFind
Toolbar
Vertical Resize
Sets Pane
Fonts Pane
Font List Filter (drop-down menu)
HorizontalResize
Keywords and Styles drawer
Status Column

9
User Guide Suitcase X1 for Mac
Adding fonts to Suitcase
Now that you’ve organized your fonts, it’s time to let Suitcase know where they are. In order to be managed, activated and deactivated, fonts must be added to Suitcase.
To add fonts to Suitcase:
1. Open Suitcase. When you install Suitcase, it automatically launches every time you start your computer.
If it is not open (i.e., viewable in the Dock), navigate to the Applications folder on your hard drive, open the Extensis Suitcase folder, and double-click the Suitcase icon to launch the program.
2. From the Suitcase window, click the Add button
– or –
Drag and drop fonts, suitcases, or folders of fonts into the Sets or Font pane.
– or –
Choose File > Add Fonts(⌘L).
If you drag a folder containing fonts into the Sets pane of the Suitcase window, the program creates a set containing all of those fonts, and uses the same name as the folder you dragged into the window.
To add all fonts on a disk, you can drag that disk from the finder directly onto the Fonts or Sets pane. Depending on the disk size, adding fonts on and entire disk can take a long time to complete.
The selected fonts are added to the Suitcase Fonts Database and are listed in the Fonts pane.
If you don’t see your newly added fonts, choose Show Suitcase Fonts from the drop-down menu in the Fonts pane or from the View menu (⌘4).
Fonts added to Suitcase are not activated until you tell Suitcase to do so. See the next section for how to activate fonts.

10
User Guide Getting Started
Activating fonts
Activating a font or set makes it available to the system and all applications. The Suitcase window displays the activation status of all fonts.
Activation statesBefore activating fonts, it is best to understand the various activation states. Icons in the first column of the Fonts pane show you the activation state of each font. If there is no icon in the first column of the Fonts pane, the font is inactive.
Active until restart – By default when you activate a font or set, you are telling Suitcase
that you need those active fonts now, but not necessarily forever. The yellow icon by the fonts indicates that the font is currently active, but will not be active after you restart your computer .
Active permanently – Fonts that you regularly use should be activated permanently. These
fonts remain active even after you restart your computer.
Auto-activated font – A yellow diamond next to a font’s name indicates that the font has been
auto-activated by Suitcase. Fonts are auto-activated when a document or application is opened that needs that font.
Partially active set– A gray dot next to a font set indicates that some fonts in that set are
active. In the Preview pane, a gray dot indicates that the font is inactive.
System font – System fonts that are being managed by Suitcase are indicated with a
Mac OS icon. The blue face is displayed for OS X fonts and the gray face for OS 9 Classic fonts.
Corrupt font – These fonts display an alert icon. This icon appears next to a font that has
been identified by Suitcase as corrupt. These fonts should be scanned and repaired with the Suitcase Scan and Repair tool, or removed and replaced with a new copy.
Temporary font – Active temporary fonts are represented by an orange “T.” Temporary
fonts are only stored in the Suitcase until restart, and can be added by dragging a font to the Suitcase icon on the dock. Deactivated temporary fonts are marked by a gray “T.” Temporary fonts can also be added as “On Demand” where the font overrides any other fonts of the same name.
Some applications dynamically update font usage lists, while others do not. If an application does not recognize when you activate a font, save your work in that application and restart the application.

11
User Guide Suitcase X1 for Mac
Activating a fontTo activate a font until restart:
• Click in the status column of the Fonts pane next to the font you wish to activate.
— or —
• Control-click a font in the Fonts pane and choose Activate.
— or —
1. Highlight the font name in the Fonts pane.
2. Click the Activate button.
– or –
Choose File > Activate Fonts (⌘O)
– or –
In the Preview pane, click the activation icon for that font.
To activate a font permanently:
• Option-click in the first column of the Fonts pane next to the font you wish to activate.
— or —
• Highlight the font name in the Fonts pane and Option-click the Activate button.
— or —
• Highlight the font name in the Fonts pane. In the Preview pane, option-click the activation icon for that font.
To add and activate a font temporarily:
• Choose File > Add Temporarily... (⌘T)
— or —
• Drag the font onto the Suitcase icon in the Dock.
To activate an “On Demand” temporary font:
• Command-click and drag the font from the Finder into the Fonts pane of Suitcase.
On Demand fonts override any other versions of the font with the same name in Suitcase, and are removed upon restart.

12
User Guide Getting Started
Building font sets
Sets are a way for you to organize your fonts in ways that will allow you to work efficiently and productively with minimal
setup and maintenance.
You can activate or deactivate all the fonts in a set at once, or click the twist down icon to work with individual fonts in a set. Activating and deactivating all the fonts in a set is the same as with individual fonts, except that your actions affect all of the fonts in the set.
To create a new set:
• Drag and drop a font folder from the Fonts pane into the Sets pane.
— or —
• Drag fonts from nearly anywhere: from the Suitcase Fonts pane, from your hard drive, from CD or other removable media, or any Mac-formatted volume mounted on the desktop.
The fonts are automatically added to the Suitcase database, and a set is created with the same name as the folder you just added. This method works well when you’re bringing fonts in from an external source and want to keep track of all the fonts that came in at that time.
— or —
1. Click the New Set button,
– or –
Choose File > New Set (⌘N).
2. Type in a new set name.
3. Drag fonts from the Fonts pane into the new set
– or –
Click the new set and choose File > Add Fonts to Selected Set (⌘L),
– or –
Control-click the set and choose Add Fonts to Selected Set.
To change the name of a set:
• Click once on the name of the set, and momentarily the text becomes editable. Type in your new name.
Application Sets:Suitcase makes it possible to open specific font sets every time you open an application.
Suitcase activates all of the fonts in an application set whenever that application is opened. Those fonts remain open until closed manually or until the computer is restarted.
To create an application set:
1. Use the Finder to navigate to the desired application’s icon.
2. Click and drag the application icon to the Suitcase Sets pane.
3. Add fonts to the application set just like any other set.

13
User Guide Suitcase X1 for Mac
Previewing fonts
Suitcase offers four different ways to view text in selected font faces: Waterfall, Alphabet, Paragraph, and QuickType.
When you preview a font, you can perform many common maintenance tasks directly from the preview pane. Click on the activation icon to activate or deactivate fonts. In addition, you can drag fonts directly from the Preview pane into font sets in the Sets pane.
To preview a font:
• Click on a font or set in the Font or Sets panes. The font is displayed in the Preview pane. Fonts do not need to be activated to be previewed.
You can enter custom type to preview in the QuickType view. Type in your custom text into the text box at the top of the Preview window.
To change views on the Preview Pane:
• Choose a new view from the drop-down menu at the top of the Preview pane.
Shift-click to select multiple fonts contiguously. Command-click to select fonts non-contiguously.
To change preview settings:
Preview settings can be customized in the Preferences dialog.
1. Choose Suitcase > Preferences
2. In the Preferences dialog box, choose the Preview Text tab.
3. Enter new text for the Waterfall, ABC 123 and Paragraph views.
4. Click OK to save the new settings.

14
User Guide Getting Started
You can have Suitcase activate fonts automatically when a document is opened, as long as the font is controlled by Suitcase.
To turn on auto-activation:
1. Open Suitcase
2. Choose Suitcase > Preferences
3. In the Preferences dialog, choose the Activation tab.
4. Check Auto-activate Fonts.
5. If you want to be warned when Suitcase attempts to open a font that has a duplicate, or tell Suitcase what font type you prefer, check the appropriate options.
6. Click OK.
Typically Suitcase auto-activates the first instance of a font that it finds.
Suitcase installs plug-ins for QuarkXPress, Adobe InDesign and Adobe Illustrator that give you more control over which fonts are activated. For more information, see the plug-ins section of this guide.
Automatically activating fonts

15
User Guide Suitcase X1 for Mac
Overview of Suitcase and Font Management
If you haven’t used Suitcase before, you probably have most of your fonts in your system’s Fonts folder. Fonts in the system fonts folders are opened automatically each time the system is started or restarted.
If you have a small number of fonts, it may not matter whether all the fonts are opened all the time. However, if you have a large number of fonts, having every font open all the time means that you probably have fonts open that you don’t need, and possibly will never use. This consumes system memory, slows down your computer, and can make it difficult to wade through application Font menus to find and select fonts. It also takes time for an application to read all that font data to create the Font list, which can slow your work down considerably.
The term “suitcase” originated on the Macintosh, where fonts used to be required to be placed in a “suitcase” or they couldn’t be used by the system. In more recent versions of the Mac OS, fonts do not need to be placed into suitcases. In OS X, you cannot create empty font suitcases, but fonts stored in suitcases will be activated. If needed, you can use the FontDoctor utility to create an empty font suitcase.
Suitcase eliminates these problems, and makes font management a breeze. With Suitcase you can:
• Keep your fonts outside the system’s font folders saving precious system resources, yet easily open as many fonts as you want, any time you want.
• Have Suitcase activate fonts automatically when you open an Adobe InDesign, Adobe Illustrator or Quark XPress document.
• Keep sets of specialty fonts available at your fingertips, without the inconvenience of resorting to a manufacturer’s CD-ROM to search for that special new font for a project.
• Access fonts conveniently, turning them on only when you need them, then turning them off as soon as you’re finished with them thereby releasing system memory for other uses.
• Organize and find fonts by keyword and style.
• Activate fonts on demand simply by dragging and dropping, and deactivate them just as easily.
• Preview fonts to make selecting just the right font easier than ever.
Managing Fonts with Suitcase

16
User Guide Managing Fonts with Suitcase X1
Suitcase activates and deactivates fonts only when you tell it to.
To give control of font activation to Suitcase, fonts must be “added” to Suitcase.
You can either add fonts “loose” to Suitcase, or place them into groups called Sets. After fonts have been added to Suitcase, either loose or in a Set, you use a few simple commands to tell Suitcase when and how to activate those fonts (make them available to the system). Active fonts are displayed in the Font list in your applications.
When you add fonts to Suitcase you are really only adding an alias of the actual font on your hard drive. Thus when you remove a font from Suitcase, the actual font on your hard drive is left unchanged. Suitcase looks for the actual font when you activate it. This allows you to add fonts to Suitcase from remote disks and/or network volumes, as long as the drive or volume is mounted and available when you want to activate those fonts.
Loose fonts and fonts in Sets can include any combination of individual fonts, fonts in suitcases, and/or folders of fonts. You can include fonts in more than one set, and include sets as aliases within other sets.
Additionally, you can create special “Application Sets.” Fonts in Application Sets are activated automatically whenever the application is launched.
Fonts that you add to Suitcase are activated automatically when a document is opened that requires those fonts, as long as Auto-Activation is enabled, and the application is supported by Suitcase.
When you activate a font in Suitcase, the font becomes active immediately and stays activated until either you instruct Suitcase to deactivate it or Suitcase is restarted.
If you move or rename fonts after you add them to Suitcase, you may need to re-link them to Suitcase. Otherwise Suitcase may not know where to find the fonts to activate them.
How Suitcase Works
17
User Guide Suitcase X1 for Mac
Adding fonts to Suitcase
In order to be managed, activated and deactivated, fonts must be added to Suitcase.
Fonts can easily be added in many different ways, and with different results. You can add fonts so that they are permanently included in the Suitcase fonts list, or you can add them temporarily.
Permanently adding fontsFonts added permanently to Suitcase are always available in the Fonts window. This is the default way that fonts are added to Suitcase.
To permanently add fonts to Suitcase:
1. Open Suitcase.
2. From the Suitcase window, click the Add button
– or –
Drag and drop fonts, suitcases, or folders of fonts into the Sets or Font pane.
– or –
Choose File > Add (⌘L).
If you drag a folder containing fonts into the Sets pane of the Suitcase window, the program creates a set containing all of those fonts, and uses the same name as the folder you dragged into the window.
To add all fonts on a disk, you can drag that disk from the finder directly onto the Fonts or Sets pane. Depending on the disk size, adding fonts on an entire disk can take a long time to complete.
The selected fonts are added to the Suitcase Fonts Database and are listed in the Fonts pane.
If you don’t see your newly added fonts, choose Show Suitcase Fonts from the drop-down menu in the Fonts pane or from the View menu (⌘4).
Fonts added to Suitcase are not activated until you tell Suitcase to do so. See the next section for how to activate fonts.
Adding fonts temporarilyTemporary fonts are managed by Suitcase until you restart your system. This is useful if you have fonts that are used only with a specific project and that you may not want on your system after working on the project.
Temporary fonts are listed with an orange “T” in the status column of the fonts list. Deactivated temporary fonts are listed with a gray “T.”
To temporarily add fonts to Suitcase:
1. Choose File > Add Temporarily (⌘T)
2. Navigate to the font to add temporarily and click Open.
— or —
• Drag the fonts to the Suitcase icon on the OS X dock.
To view a list of temporary fonts:
• Choose View > Show Temporary Fonts
• Choose Temporary Fonts from the drop-down menu above the Font pane.

18
User Guide Managing Fonts with Suitcase X1
To deactivate and remove all fonts added temporarily:
1. Choose Edit > Remove Temporary Fonts.
– or –
Press Command+, (⌘ ,)
2. Suitcase displays a warning dialog box. Click OK.
To remove Temporary fonts and bypass the warning dialog box, press Command+Option+, (Command+Option+comma).
To remove some of the temporary fonts and not others:
1. In the Font pane, select the fonts that you want to remove.
2. Choose Edit > Remove Selected Items.
– or –
Ctrl-click the selected fonts and choose Remove Selected Items.
Adding fonts “On Demand”If you are working in a production environment, such as a service bureau or commercial print shop for example, you may need to activate fonts supplied by customers temporarily. For example, just while that job is being output.
When you add a font “On Demand” it is activated immediately, overrides any other fonts of the same name, and all font conflicts are automatically resolved. It is treated otherwise as a temporary font. Fonts activated on demand are also displayed in Suitcase font lists with an orange “T” by their names and are removed from Suitcase when the system is restarted.
This powerful feature is typically used by Service Bureaus and Print vendors who need to have Suitcase “forget” fonts when a job has been completed.
To add and activate an “On Demand” temporary font:
• Command-click and drag the font from the Finder into the Fonts pane of Suitcase.

19
User Guide Suitcase X1 for Mac
OS XBefore using Suitcase to manage and organize your fonts, you have to tell Suitcase how to handle fonts that are controlled by the operating system.
OS X System Fonts
In general, Fonts located in any of the system’s Fonts folders under OS X do not need to be moved. Suitcase can simply override the system fonts. However, if you need to move system fonts, Suitcase provides you with this ability.
If a font is controlled by the OS, you are able to preview it in the Suitcase window, but are not able to use Suitcase to activate or deactivate it until you tell Suitcase to override the OS X system fonts.
To override OS X system fonts:
1. Open Suitcase.
2. Choose Suitcase > Preferences.
3. On the General Tab, check Allow Suitcase to Override System Fonts.
OS X System Font Types and Locations
You can display system fonts in Suitcase by selecting the appropriate item either from the font filter drop-down menu in the Fonts pane, or from the View menu.
• User System Fonts: fonts in the user’s home directory/library/Fonts
• Local System Fonts: fonts in /Library/Fonts
• System Fonts: fonts in /System/Library/Fonts
• Classic System Fonts: fonts in the Fonts folder in the Classic (OS 9) System Folder. Classic fonts can be moved just as they can when booted in OS 9.
• Network System Fonts: fonts on an NFS shared volume mounted by NetInfo
• All System Fonts: All of the System Fonts
Managing system fonts
You can easily tell Suitcase which system fonts to manage.
To manage OS X system fonts:
1. Open Suitcase.
2. Choose Tools > Manage System Fonts.
3. In the View Fonts In: drop-down menu, choose All System Fonts. You can also manage each type of system font from this dialog box. See the above list for definitions of each system font type.
4. Check all of the fonts in the list that you want Suitcase to manage. Fonts that are dimmed in the list are required by the operating system and cannot be managed.
5. Check the Activate Managed Fonts option.
6. Click Apply.
7. If prompted, enter your system level password and click OK.
8. Click Done. A new Suitcase set named Managed System Fonts is added to your sets list. This set can be activated and deactivated like any other set.
Managing system fonts

20
User Guide Managing Fonts with Suitcase X1
Classic system fontsSuitcase can manage fonts that you use with OS 9 Classic applications.
To have Suitcase manage OS 9 Classic fonts:
1. Open Suitcase.
2. Choose Tools > Manage System Fonts.
3. In the View Fonts In: drop-down box, choose Classic System Fonts.
4. Check all of the fonts in the list that you want Suitcase to manage.
Some OS 9 fonts in the list are dimmed. These fonts are required by the operating system and cannot be managed by Suitcase. For OS 9 these include Charcoal, Chicago, Geneva, Monaco, and New York. Adobe products also install two fonts that should remain in the system folder: Adobe Sans MM and Adobe Serif MM
5. Click Apply to add the checked fonts to Suitcase.
6. Click Done. The classic fonts are added to a new set named Managed Classic.

21
User Guide Suitcase X1 for Mac
You can easily activate and deactivate fonts in Suitcase. A simple click in the Fonts, Sets, or Preview pane can activate and deactivate fonts.
Fonts remain active only while the Suitcase application is running. To ensure that fonts remain active, keep Suitcase minimized in the Dock. To have Suitcase launched automatically each time the system is restarted, choose the “Open Suitcase automatically when you login” option in the Suitcase Preferences (this is the default option).
There are two standard activation states for fonts in Suitcase. Fonts can be activated until restart or activated permanently.
Suitcase automatically activates or deactivates all the fonts in a font suitcase at the same time. To work with fonts individually, move them out of the font suitcase.
You can view the current list of active fonts by choosing Show Open Fonts from the Suitcase View menu, or by choosing Open Fonts from the fonts filter drop-down menu, or by pressing Command+2.
Activating fonts until restartWhen you have fonts that you want to open for a short time and then have them closed automatically, open them as Active Until Restart fonts. These fonts stay open until Suitcase is shut down or the system is restarted.
To activate fonts and sets until restart:
1. From the Fonts pane or Sets pane, select the fonts and/or sets that you want to activate.
2. Click the Activate button.
Only one activation button appears in the Suitcase Toolbar. By default, Suitcase activates fonts until restart. You can change the default activation state in the Activation tab of the Suitcase Preferences.
– or –
Click in the activation status column of the Fonts pane.
– or –
Click the activation status icon of the selected font in the Preview pane.
– or –
Choose File > Activate Fonts (⌘O)
An Activated Until Restart icon is displayed in the Status column for the font(s) or set(s), indicating that these fonts are active and available to the system, but will not be active when the system is restarted.
Activating and deactivating fonts
22
User Guide Managing Fonts with Suitcase X1
Activating fonts permanentlyWhen you have fonts that you want to have open all the time (or until you close them), open them as Active Permanently fonts. These fonts stay open until you choose to close them, or until you change their activation state.
To activate fonts and sets Permanently:
1. From the Fonts pane or Sets pane, select the fonts and/or sets that you want to activate.
2. Option-click the Activate button on the toolbar.
Only one activation button appears in the Suitcase Toolbar. By default, Suitcase activates fonts until restart. You can change the default activation state in the Activation tab of the Suitcase Preferences.
– or –
Option-click in the activation status column of the Fonts pane.
– or –
Option-click the activation status icon of the selected font in the Preview pane.
An Activated Permanently icon is displayed in the Status column for the font(s) or set(s), indicating that these fonts are active and available to the system, and remain open until you close them.
Deactivating fontsYou can close entire sets of fonts, or individual fonts in a set, or loose fonts in Suitcase, at any time.
When you close a font, the font is not removed from the Suitcase set or from the Suitcase Fonts Database, nor is it removed from your computer-the font is simply deactivated (made unavailable to the system). You can select the font or set at anytime and reactivate it.
You can view the current list of closed fonts by choosing “Show Closed Fonts” from the View menu, or by choosing “Closed Fonts” from the drop-down menu in the Font pane.
To deactivate fonts or sets:
1. From the Font pane or Sets pane, select the font(s) and/or set(s) that you want to close.
2. Click the Deactivate button.
– or –
Choose File > Deactivate Fonts (⌘K).
– or –
Ctrl-click the selected item and choose Deactivate Fonts.
– or –
In the Fonts, Sets or Preview pane, click the status icon of the desired font or set.
The icons in the status column are removed to show that the fonts are now closed.

23
User Guide Suitcase X1 for Mac
Fonts closed in Suitcase may continue to appear in the Font menu of some applications. To clear the Font list, close and reopen the application.
Closing an application linked to an Application Set also does not close the fonts in an Application Set. These fonts remain open until the system is shut down or restarted, or until you deactivate them manually.
Changing the default activation stateWhen you hover the cursor in the Status column of a font or set, the cursor changes color to show you which state will be set when you click in that column.
Clicking the cursor in this column normally toggles between activate and deactivate. You can use the Option key to change the activation state to whichever state is not currently the default.
You can also change the default activation state by changing the appropriate Suitcase preference.
To change the default activation state preference:
1. Choose Suitcase > Preferences.
2. In the Preferences dialog box, select the Activation tab.
3. In the Activation Options group box, choose either Until Restart or Permanently.
4. Click OK to accept the new settings.
Activating Fonts AutomaticallySuitcase has the powerful ability to automatically activate fonts required by a document when you open that document, saving you both time and frustration.
With Suitcase auto-activation you can create a document using certain fonts, then deactivate those fonts and not have to worry about whether they are active or inactive - simply let Suitcase activate them as necessary.
The fonts required by the document must be added to Suitcase before the document is opened, otherwise Suitcase will not be able to activate them.
When auto-activation is enabled and there are multiple instances of a font in Suitcase, the first instance of the font is activated. If Suitcase encounters a conflict, a dialog box allows you to choose which instance of the font to open.
Additional control over font auto-activation is provided by plug-ins for specific programs. If you have Adobe Illustrator, Adobe InDesign, or Quark XPress, the plug-in is automatically installed into the appropriate location. For more information about the plug-ins, see the Plug-ins section of this User Guide.

24
User Guide Managing Fonts with Suitcase X1
Due to the way some applications, such as Adobe Photoshop, handle font requests to the system, fonts cannot automatically be activated for them. To simulate auto-activation in applications that do not allow it, we suggest you create Application Sets for them.
To have Suitcase automatically open fonts that might conflict with fonts under the control of OS X, enable the “Allow Suitcase to override system fonts” option in the Preferences dialog box.
To turn on Auto-Activation:
1. Choose Suitcase > Preferences
2. In the Preferences dialog box, choose the Activation tab.
3. Check the Auto-Activate Fonts option.
Choose Warn Me About Duplicate Fonts if you want to choose the appropriate font every time there is more than one instance of a font.
You can also choose to have Suitcase prefer True Type or Postscript fonts when automatically activating fonts.
4. Click OK.

25
User Guide Suitcase X1 for Mac
Organizing fonts into sets
Sets are simply collections of fonts within Suitcase. Sets are an organizational tool for you to use to group fonts in ways that make them easier for you to work with.
You use Sets to tell Suitcase “activate all these fonts at the same time,” rather than having to specify activation instructions for each font individually.
Sets ExampleYou might create a Set containing all of the fonts that you need for a particular project. When you are ready to work on the project, you can activate the necessary fonts, all at the same time, by opening the Suitcase application and clicking a button to indicate that you want to open that Set. When you’re finished with the project, you can deactivate the fonts through Suitcase, or you can have the fonts close automatically when the system is shut down.
If you will be working on the project for awhile, you can instruct Suitcase to always activate those fonts at system startup time. Then, when the project is over (days, weeks, or months later) you can tell Suitcase to stop activating those fonts. Since you already have the font set created, you can open those fonts again at any time, simply by instructing Suitcase to do so. By using Sets to organize your fonts in Suitcase, you can quickly activate and deactivate them from the dock.
After fonts have been added to a set in Suitcase, you can work with them as a complete set, or you can work with individual fonts in the set.
To create a set:
1. Click the New Set button
– or –
Choose File > New Set (⌘N)
– or –
Ctrl-click in the Sets pane and choose New Set.
2. A new set is displayed in the Sets window and assigned the name “Untitled Set.” The name of the set is highlighted so that you can easily change it.
3. Add fonts to the set.
— or —
1. Locate individual font files or suitcases and drag them into the Sets pane. A new set is displayed in the Sets window and assigned the name “Untitled Set.” The individual fonts are added to this new set.
— or —
1. Drag a folder containing fonts from the Finder into the Sets pane. The folder can contain any combination of font files and/or font suitcases.
2. A new set appears and is assigned the same name as the dropped folder. The new set contains all of the fonts in the folder and subfolders.

26
User Guide Managing Fonts with Suitcase X1
Adding Fonts to a SetAdding fonts to a set is easy. You can drag fonts from practically any location and drop them onto a set in the Sets pane. Drag fonts from anywhere in the Finder, the Suitcase Fonts pane, or the Preview pane.
When adding PostScript fonts to Suitcase, be sure that the appropriate Printer fonts are located in the same location as the screen fonts. Screen Fonts with a missing Printer Font are indicated by a special printer icon with a red ‘x’ through it.
To add fonts to a set:
1. In the Font pane, click to highlight the fonts that you want to add to a set.
2. Drag the fonts to the Sets pane and drop them onto an existing set icon.
– or –
Drag and drop the fonts into an open area of the Sets pane to create a new set containing those fonts.
— or —
1. Highlight the set to which you want to add fonts.
2. Click the Add button on the Toolbar.
– or –
Choose File > Add Fonts to Selected Sets... (⌘L)
3. Locate and select the fonts that you want to add to the set, then click Open. To add the fonts in sub-folders, check Include Subfolders.
— or —
1. In the Finder, locate the fonts, suitcases, or folders of fonts that you want to add to the Set.
2. Drag and drop the items onto the icon for the desired set. All of the fonts in the folder and any sub-folders are added to the new set.
To display all the fonts in a set after you’ve added them, click the arrow to the left of the set. This expands the set list and allows you to work with individual fonts in the set.

27
User Guide Suitcase X1 for Mac
Creating Application SetsIn Suitcase you can create a special type of set called an Application Set. Fonts in application sets are activated automatically whenever a particular application is launched.
For example, you could have a special set of graphic fonts opened automatically when you open your graphics program, or a special set of illustration fonts made available when you open your vector illustration program.
Application sets are useful if an application isn’t supported by Suitcase’s automatic font activation. Application Sets allow you to automatically activate fonts that you commonly use in that application.
To create an application set:
1. Open Suitcase.
2. From the Finder, locate the application icon for which you want to create a font set.
3. Drag the application icon into the Sets window. A new application set appears and is assigned the same name as the dropped application icon.
4. Add fonts to the set.
— or —
1. Open the Sets window in Suitcase.
2. Choose File > New Application Set.
3. In the Application Set dialog box, locate the desired application, then click Choose. A new application set appears and is assigned the same name as the selected application icon.
4. Add fonts to the set.

28
User Guide Managing Fonts with Suitcase X1
Activating setsAfter you have created a set, you can activate all of the fonts in the set at one time.
To activate a set:
1. In the Sets pane, highlight the sets that you want to activate.
2. On the Toolbar, click Activate. All the fonts in the selected set(s) are activated, and an activation icon is displayed in the status column of the Sets pane. For information on activation states, see Activating and Deactivating Fonts.
– or –
Choose File > Activate Fonts (⌘O)
– or –
Click in the Status column of the set that you want to activate. The mouse pointer indicates the “change to” state in the Status column.
— or —
• Ctrl-click the Suitcase dock menu icon and choose the set from the Suitcase dock icon menu.
By default, fonts are activated temporarily. You can change the default activation state in the Preferences dialog box. To open the dialog box, choose Suitcase > Preferences.
To change fonts or sets to the non-default activation state, press the Option key and click the Activate button, or Option-click the mouse in the status column of the desired set.
Renaming setsTo rename a Set:
1. Open Suitcase.
If the Sets pane is not visible, open it by choosing View > Show Sets, or drag the vertical resize bar until it becomes visible.
2. Select the set that you want to rename.
3. Highlight the current name, then type in the new name (the same as you would do to change the name of a file or folder in the Finder).
4. Click anywhere in the Suitcase window outside of the set name or icon to de-select the set. The name is changed everywhere this set appears in Suitcase.
You cannot rename a set alias (one that is contained inside another set). To change the name of an alias, change the name of the original set.
29
User Guide Suitcase X1 for Mac
Removing fonts and setsIf you no longer want Suitcase to control a font or set, it can be removed from Suitcase. Removing fonts from Suitcase has no effect on the actual font files or suitcases on your system.
To remove a font or set from Suitcase:
1. In the Font pane or Sets pane, select the font and/or set that you want to remove.
2. Click the Remove button.
– or –
Choose Edit > Remove Selected Items
– or –
Press Command+Del.
3. A warning dialog box is displayed, asking you to verify removal. Click OK. The fonts and/or sets are removed from Suitcase. The actual font files on the disk are not affected.
To bypass the warning dialog box, hold down the Option key while pressing Delete.
Notes about removing fonts and sets:• If you remove a set from the top level of the Sets pane
(that is, a set that is not a part of another set), Suitcase removes that set and any aliases of that set in Suitcase. However, if you remove an alias of a set (a set that you copied into another set), the top-level set is not removed.
• When you remove open sets, Suitcase removes the items from the Sets pane, but the fonts remain open and available to the system according to their activation status.
• Removing a set does not remove the fonts from Suitcase. To remove fonts from the database, select the fonts in the Font pane and use the Remove command as described above.

30
User Guide Managing Fonts with Suitcase X1
Keywords and styles
Suitcase X1 includes keywords and styles that can be used to quickly locate and organize your fonts.
Keywords are custom descriptions that you can add to fonts. You can add keywords to fonts that denote a project name, client, owner or even perhaps a description that you feel more accurately describes the font.
A style is a general attribute of a font. The following are all examples of font styles: Italic, Bold, DemiBold, Heavy, Ultra Bold Oblique, and Extra Black Condensed. Suitcase has a wide variety of built-in font styles, or you can add custom styles.
KeywordsTo create and assign a new keyword:
1. Click the Keywords button.
2. In the Keywords and Styles drawer, select the Keywords tab.
3. Click the Add button .
4. Enter the new keyword name.
5. Click and drag the keyword to a font or set to assign the keyword to that font or set.
To create and assign a new style:
1. Click the Keywords button.
2. In the Keywords and Styles drawer, click the Styles tab.
3. Click the Add button.
4. Enter the new style name.
5. Click and drag the style to a font or set to assign the style to that font or set.
To find fonts by keyword or style:
• Type the keyword or style in the QuickFind field and press Enter.
– or –
• In the Keywords and Styles window, double-click the keyword or style.

31
User Guide Suitcase X1 for Mac
Previewing fonts
You can easily see what your fonts look like in various point sizes and formats.
You can display multiple fonts in any of the four views in the Preview pane. Multiple fonts can be selected in the Sets pane or Font pane. To select fonts contiguously, press and hold the Shift key while selecting them. To select fonts non-contiguously, press and hold the Command key while selecting them.
If the Preview pane is not visible, choose View > Show Preview, or drag the horizontal resize bar to about the middle of the Suitcase window.
You can view fonts in the Fonts List by suitcase or by font. To switch between the two states, choose “View by Font” or “View by Suitcase” from the View menu, or press Command+E.
Waterfall ViewWaterfall view allows you to compare text displayed in selected fonts in different point sizes. The default text for Waterfall view is the standard ABC 123 text.
To enable Waterfall view:
1. In the Sets pane or Fonts pane, select the sets or individual fonts that you want to preview.
2. In the Preview pane, choose Waterfall from the View drop-down menu.
3. To display the text in a different point size, choose it from the Font Size menu, or enter a new point size. Suitcase displays the text for all selected fonts in three different point sizes, starting with the point size that you select.
ABC 123 ViewABC 123 view allows you to compare text displayed in the standard alphabet. ABC 123 view displays only one point size at a time. The default text for ABC 123 view is a selection from the standard alphabet.
To enable ABC 123 view:
1. In the Sets pane or Font pane, select the sets or individual fonts that you want to preview.
2. In the Preview pane, choose ABC 123 from the View drop-down menu.
3. To display the text in a different point size, choose it from the Font Size drop-down menu in the Preview pane, or enter a new point size.

32
User Guide Managing Fonts with Suitcase X1
Paragraph ViewParagraph view allows you to compare font faces by displaying large amounts of text. Paragraph view displays only one font size at a time.
To enable Paragraph view:
1. In the Sets pane or Fonts pane, select the sets or individual fonts that you want to preview.
2. In the Preview pane, choose Paragraph from the View drop-down menu.
If the Preview pane is not visible, choose View > Show Preview Pane, or drag the horizontal resize bar to about the middle of the Suitcase window.
3. To display the text in a different point size, choose it from the Font Size drop-down menu in the Preview pane.
To change the text displayed in ABC 123, Paragraph and Waterfall views:
1. Choose Suitcase > Preferences
2. Select the Preview Text tab.
3. Enter the desired text in the ABC 123, Paragraph and Waterfall text fields.
4. Click OK.
QuickType ViewThe most exciting view to use to preview fonts is the QuickType view. In QuickType view you can compare fonts using any text that you choose, simply by typing it into the text box at the top of the Preview pane.
To enable QuickType view:
1. In the Sets pane or Font pane, select the sets or individual fonts that you want to preview.
2. In the Preview pane, choose QuickType from the View drop-down menu.
If the Preview pane is not visible, choose View > Show Preview Pane, or drag the horizontal resize bar to about the middle of the Suitcase window.
3. Enter the text to preview in the QuickType text box. The preview text is displayed as you type.
3. To display the text in a different point size, choose it from the Font Size drop-down in the Preview pane, or enter a new point size.

33
User Guide Suitcase X1 for Mac
Preview Sample PageSuitcase allows you to display and/or print comprehensive information about selected fonts as a Sample Page.
To display or print a Preview Sample Page:
1. Open Suitcase.
2. From the Sets pane or Font pane, select the font(s) for which you wish to display or print a Font Sample.
3. To display the Font Info, choose File > Get Info (⌘I)
– or –
To print a Sample Page, File > Print Sample Pages (⌘P).
A sample page is displayed/printed for each font you select. If a set is selected, a page is displayed/printed for each font in the set.
Finding fonts
Suitcase makes it easy to find fonts. You can locate fonts quickly with the various search features in Suitcase.
Using QuickFind QuickFind is by far the fastest way to locate a font in Suitcase. The QuickFind feature searches Suitcase for font names, keywords and styles.
To find a font with QuickFind:
1. Enter a font name, keyword or style in the QuickFind text box.
2. Press the Enter key. QuickFind results are displayed in the Fonts pane.
Advanced searchingIf you need to perform a more robust search, the Find feature gives you additional options. With this feature, you can search for fonts by foundry, keyword, style, type, and font name.
34
User Guide Managing Fonts with Suitcase X1
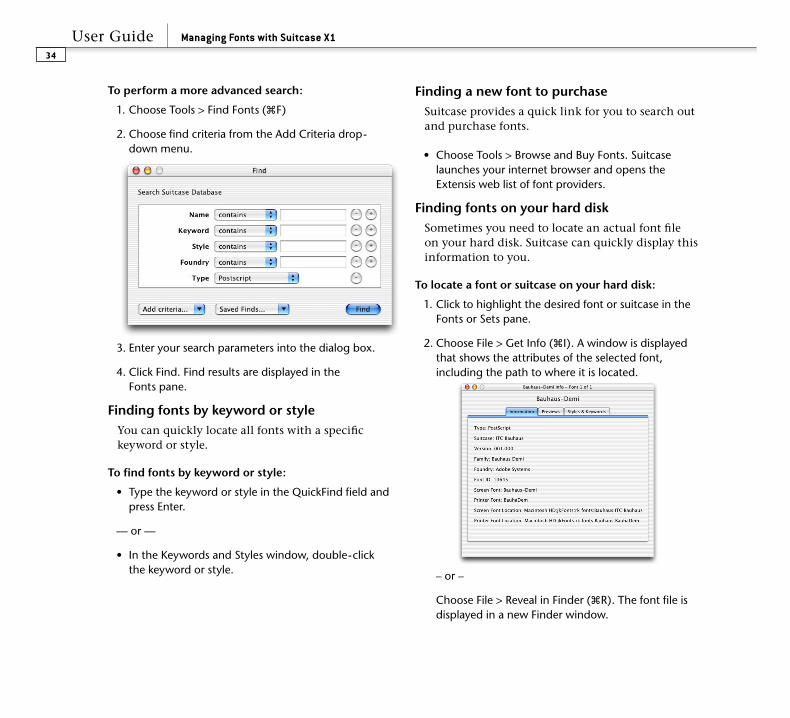
To perform a more advanced search:
1. Choose Tools > Find Fonts (⌘F)
2. Choose find criteria from the Add Criteria drop-down menu.
3. Enter your search parameters into the dialog box.
4. Click Find. Find results are displayed in the Fonts pane.
Finding fonts by keyword or styleYou can quickly locate all fonts with a specific keyword or style.
To find fonts by keyword or style:
• Type the keyword or style in the QuickFind field and press Enter.
— or —
• In the Keywords and Styles window, double-click the keyword or style.
Finding a new font to purchase Suitcase provides a quick link for you to search out and purchase fonts.
• Choose Tools > Browse and Buy Fonts. Suitcase launches your internet browser and opens the Extensis web list of font providers.
Finding fonts on your hard diskSometimes you need to locate an actual font file on your hard disk. Suitcase can quickly display this information to you.
To locate a font or suitcase on your hard disk:
1. Click to highlight the desired font or suitcase in the Fonts or Sets pane.
2. Choose File > Get Info (⌘I). A window is displayed that shows the attributes of the selected font, including the path to where it is located.
– or –
Choose File > Reveal in Finder (⌘R). The font file is displayed in a new Finder window.

35
User Guide Suitcase X1 for Mac
Problematic fonts
Font conflictsIf Suitcase attempts to open a font suitcase that contains a font that conflicts with an already open font, Suitcase will not open the font suitcase.
You can control how Suitcase reacts to font conflicts by changing the settings in the Suitcase Preferences dialog box. Check the appropriate options in the Font Conflict Options group box of the Activation tab.
You can direct Suitcase to always choose a PostScript font, or always choose a TrueType font when a font conflict occurs by selecting the appropriate option in Suitcase Preferences Activation tab.
To resolve the conflict:
1. Close the document.
2. Open Suitcase.
3. Determine which font you want to activate and deactivate any others with the same name.
4. To prevent future occurrences of the problem, use the Manage Duplicates tool (Tools > Manage Duplicates) to remove fonts with identical names.
Scanning and repairing corrupt fontsCorrupt fonts can cause system and application instability when the font is displayed. Suitcase helps you prevent adding corrupt fonts to Suitcase by scanning them as they are added to Suitcase.
You can also scan and repair fonts that are currently managed by Suitcase. This helps identify and repair any problem fonts.
To enable automatic font scanning and repair:
1. Choose Suitcase > Preferences
2. Select the General tab.
3. In the Scan and Repair Options group box, check the following options.
• Scan for corrupt fonts when adding
• Attempt repair automatically
• Scan for corrupt fonts before previewing
4. Click OK.

36
User Guide Managing Fonts with Suitcase X1
To scan and repair fonts managed by Suitcase:
1. Click to highlight suspected corrupt fonts in the Fonts pane.
2. Choose Tools > Scan and Repair Selected Fonts
3. Click Scan All to only scan for corrupt fonts.
– or –
Click Scan and Repair All to scan for and repair any corrupt fonts.
Unmarking corrupt fonts
If for some reason Suitcase marks a font as corrupt, when you know that it is not, you can easily tell Suitcase to ignore the corrupt setting.
To unmark corrupt fonts:
• Choose Tools > Unmark Corrupt Fonts
Removing unrepairable fonts
Some fonts may not be able to be repaired by Suitcase. These fonts must be removed from Suitcase and the original font file deleted from your computer.
To remove unrepairable fonts:
1. Click to highlight the font in the Fonts pane.
2. Choose File > Reveal in Finder (⌘R). The font file is show in a new Finder window.
3. In Suitcase, click the Remove button to remove the font from Suitcase’s control.
4. In the Finder window, delete the corrupt font file.

37
User Guide Suitcase X1 for Mac
Locating and managing duplicate fontsWhen two or more fonts have identical names, there is a font conflict. In a font conflict the Mac OS cannot determine which font to use and chooses arbitrarily. Suitcase helps guarantee that your documents maintain font consistency by prompting you to choose which font to open.
To prevent font conflicts, Suitcase does not open fonts when a font by the same name is already open. Suitcase notifies you immediately when you open fonts and one or more font names conflict with the name of a font that is already open, and allows you to choose which font to open. This happens frequently when fonts by the same name (these could be copies of the same font) reside in multiple suitcases.
If a duplicate font conflict occurs, Suitcase displays a dialog that allows you to choose which font suitcase to activate. You can resolve the conflict quickly by selecting which font to activate by clicking either the Keep Active or the Activate Instead button.
• Keep Active: Tells Suitcase to ignore the new font that it is trying to open, and keep open the font that is already open.
• Activate Instead: Tells Suitcase to activate the new font, and close the font that had been open.
In the event that you have more than one font conflict, hold down the Option key when clicking Keep Active or Activate Instead and Suitcase resolves the remaining conflicts in that suitcase.
You can also have Suitcase automatically choose what type of font to prefer, and whether to warn you about duplicate fonts. See the Preferences section of this guide for more information.
If you have many duplicate fonts, you can manage all of the duplicates from one convenient window.
To manage duplicate fonts:
1. Choose Tools > Manage Duplicate Fonts. A list of duplicates is displayed.
2. Click to highlight the duplicate font to remove.
3. Click Remove Font from Suitcase to only remove the font.
– or –
Click Remove the Font to the Trash to remove the font from Suitcase and place the font file in the Trash.
4. Click Done.
Locating missing fontsUnder OS X, Suitcase tracks fonts that are moved to a different location on the same disk. When Suitcase cannot locate an original font file, a question mark icon is displayed in the font’s Status column.
To locate and relink missing fonts:
1. Choose Tools > Find Missing Fonts. Suitcase searches for any missing fonts and displays a list in the Fonts pane.
2. Double-click a missing font in the list to relink it with the original font file.

38
User Guide Managing Fonts with Suitcase X1
Collecting fonts for output
You can use Suitcase to collect fonts and copy them together into a folder, for example if you need to send certain fonts to your print vendor with your print job.
To collect fonts for output:
1. Select the fonts and/or sets that you want to collect.
2. Choose Tools > Collect Fonts for Output... (⌘D).
3. Locate the folder where you want to put the collected fonts.
4. Click Collect. The screen fonts and any associated printer fonts are collected and placed together at the top level of the chosen folder.
Automating Suitcase with AppleScript
Suitcase allows you to use AppleScript to automate repetitive Suitcase operations. For example, you can script Suitcase to create sets from font folders on removable cartridges, or to automatically compress all fonts. If you script Suitcase in conjunction with other applications, you can create your own custom Suitcase functions (such as to open a font set when you open a particular document).
AppleScript is a programming language, and requires specialized knowledge. The overall best reference for AppleScript continues to be Apple’s own website.
http://www.apple.com/applescript
You will also need the AppleScript editor, available on the system disk that accompanied your computer.
For more information about scripting Suitcase, please refer to http://www.extensis.com/applescript/
Suitcase can be scripted, but not recorded or attached to an application.

39
User Guide Suitcase X1 for Mac
You can control the way that Suitcase acts in many situations by changing the Suitcase Preferences.
To open Suitcase Preferences:
• Choose Suitcase > Preferences... (⌘ ;)
General Preferences
Scan and repair optionsYou can specify when and if Suitcase scans to see if a fonts are potentially corrupt.
Scan for corrupt fonts when adding
Check this option to scan fonts as they are added to Suitcase. Scanning while adding fonts may take a bit longer when adding fonts, but ensures that fonts in Suitcase are not corrupt.
Attempt repair automatically
Check this option to attempt to repair fonts that are found to be corrupt when added to Suitcase.
Scan for corrupt fonts before previewing
Check this option to scan fonts before previewing them in Suitcase. This helps ensure that corrupt fonts are not previewed. Previewing corrupt fonts can cause Suitcase to close unexpectedly.
Style optionsScan fonts for styles when adding
Check this option to scan all newly added fonts for style information. This allows you to quickly search, compare and find fonts based on their style.
A style is the general description of the font, for example Normal, Black, Italic, Bold, etc.
Application optionsHot key to bring Suitcase to the front:
You can specify a key combination to bring Suitcase to the front, making it the active application. The default key combination is Command+Option+S. The hot key only makes Suitcase the active application and does not launch Suitcase if it is not already running.
Open Suitcase Automatically When You Log In
You can have Suitcase launched automatically each time the system is restarted by choosing the “Open Suitcase automatically when you log in” option. This is the default setting for Suitcase.
When Suitcase is launched automatically, it allows fonts to be available as needed. When this option is selected, Suitcase is kept minimized in the OS X Dock.
User Preferences

40
User Guide User Preferences
Override system fontsSuitcase X1 can override and control fonts in any of the OS X system folders. Check this option to enable Suitcase to override these fonts.
For example, if you have a Helvetica font that you want to use in place of the current system font, choose this option. Then, when you activate your Helvetica font in Suitcase, it is used rather than the system font.
For more robust management of system fonts, choose Tools > Manage System Fonts.
Activation Preferences
Activation optionsActivate fonts when added to Suitcase
You can instruct Suitcase to activate fonts as soon as you add them to Suitcase. This feature can save you from having to remember to activate fonts after you add them.
If you choose to enable this feature, fonts are activated according the setting of the Default Activation mode preference.
When this feature is disabled, fonts are not activated when added to Suitcase.

41
User Guide Suitcase X1 for Mac
Default Activation
The Default Activation option tells Suitcase how you want fonts activated when you press the Activate button, click in the status column of the Fonts and Sets panes, and so on.
• Until Restart – Tells Suitcase to activate the selected fonts and/or sets immediately, but do not reactivate them when the system is restarted. These fonts are active until the system is shut down or restarted, or until you deactivate them through Suitcase.
• Permanent – Tells Suitcase to activate the selected fonts and/or sets immediately, and always activate them automatically at system startup. These fonts are kept active until you deactivate them through Suitcase. That is, they are activated each time the system is started or restarted.
Auto-activation optionsAuto-activate fonts
The Auto-activate fonts option instructs Suitcase to activate needed fonts when you open a document.
When duplicate fonts are found
When Auto-activation is enabled, you can choose how you want Suitcase to resolve font conflicts.
• Prefer PostScript Font – tells Suitcase to open PostScript fonts before other font types.
• Prefer TrueType Font – tells Suitcase to open TrueType fonts before other font types.
Warn for Duplicate Fonts
This option tells Suitcase to warn you when a font conflict exists. If this option is un-checked, Suitcase resolves the conflict but does not warn you that a conflict was found. Suitcase resolves the conflict as best it can whether you choose to be warned or not.
Font conflict optionsYou can specify more detailed options about how to handle font conflicts.
• Activate the requested font – tells Suitcase to activate the new font, regardless of what font was opened previously.
• Keep the current font active – tells Suitcase not to open new fonts if there is a conflict, but instead to keep open whatever fonts are already open.
• Ask me what to do – Tells Suitcase to present a dialog box allowing you to determine what to do when a font conflict occurs.

42
User Guide User Preferences
Preview Text Preferences
Suitcase provides default text that is automatically displayed in the Preview window, yet you can easily change this text to anything you like, as often as you like.
Three of the Preview modes can be changed in the Preferences dialog box: Waterfall, ABC 123, and Paragraph. To change text in QuickType view, simply type it into the text box at the top of the Preview pane.
To restore the text options that originally came with Suitcase, click the Restore to Defaults button.
Server Connection Preferences
Server Connection options allow you to connect to a Suitcase Server.
There is a more detailed discussion of Suitcase Server-related features in the Suitcase Server documentation, and in the Suitcase Quick Start guide that came with this copy of Suitcase.
Enable server connection
This option enables the Suitcase Server client. You can disable Suitcase Server access by unchecking this box.
Server IP Address or Hostname
Enter either the Server IP address or the name of the Suitcase Server. Contact your System Administrator for details.
User Name
Enter your Suitcase Server user name.
Password
Enter your Suitcase Server password.

43
User Guide Suitcase X1 for Mac
Check for Update
Choose the time interval for automatic font updates from the Suitcase Server.
To update fonts immediately, choose Tools > Synchronize with Server, or press Command+U.
If you only want to update font files from the Server manually, choose Never in the Check For Update drop-down menu.
Folder to Store Fonts
This option allows you to locate and select a folder for fonts downloaded from the Server. The default folder is named “Suitcase Server Fonts” at the root level of the user folder.

44
User Guide Plug-ins
Extensis provides three plug-ins that automatically activate fonts for files opened in Quark XPress, Adobe Illustrator and Adobe InDesign.
These plug-ins can significantly speed up your workflow by eliminating the time consuming process of locating and opening missing fonts by hand.
Suitcase XT for Quark XPress
Suitcase XT, combined with Suitcase, eliminates the need to locate, open, and manage missing fonts by hand in your QuarkXPress documents.
The Suitcase installer installs a plug-in compatible with Quark 6 as well a plug-in compatible with Quark 4 & 5.
With Suitcase XT, when you open a QuarkXPress document that contains missing fonts, Suitcase XT automatically opens them temporarily in Suitcase.
Suitcase XT can also close fonts that it opens, either when you close the document or when you quit QuarkXPress, depending on which options are enabled in the Suitcase XT Preferences (from QuarkXPress, choose Utilities > Suitcase XT Prefs).
Suitcase XT takes advantage of the Macintosh FontSync technology to locate and differentiate between fonts of the same name.
If, for any reason, Suitcase XT is unable to locate a needed font within Suitcase, a message is displayed.
When one or more duplicate fonts is found, you can choose to let Suitcase XT determine, as best it can, which font to substitute for the missing font, or you can examine the font comparison data that Suitcase XT provides, and choose the substitute font yourself.
A status is displayed for each font: missing or duplicate. A status of “Missing” means that the font could not be found. A status of “Duplicate” followed by a number means that Suitcase XT found more than one occurrence of a font.
Suitcase XT PreferencesTo open the Suitcase XT font activation preferences:
1. Launch Quark XPress 6.0.
2. Choose Utilities > Suitcase XT Prefs...
Enable Suitcase XT
This option allows you to enable and disable the XTension without quitting and restarting QuarkXPress.
Suitcase Plug-ins

45
User Guide Suitcase X1 for Mac
When Suitcase XT is enabled, you are notified of missing fonts and can replace any of those displayed.
Suitcase XT can be disabled by any of the following methods:
• Uncheck Enable Suitcase XT in the Suitcase XT Preferences dialog.
• Disable Suitcase XT in the QuarkXPress XTensions manager
• Remove the Suitcase XT file from the Quark XTensions folder.
Check for duplicate fonts
This option tells Suitcase XT to check for duplicate fonts as they are activated.
With this option disabled, Suitcase XT loses the ability to determine if a missing font also has duplicates. Suitcase XT merely opens the first occurrence of the font that it finds. The benefit of disabling this option is that fonts may open more quickly.
Disabling this feature should be done with caution. If you open a document that contains a font that exists more than once in Suitcase and Check for Duplicate Fonts is disabled, Suitcase XT opens the first occurrence of the font that is found in the Suitcase database.
Enable FontSync support
Using information from FontSync such as Font Type (PostScript or TrueType), kerning tables, and foundry, Suitcase XT attempts to locate the correct font and open it automatically.
If the correct font cannot be found, but there are duplicate fonts (fonts with the same name) available, you are given an idea of how closely each duplicate font matches the missing font. You can choose the font that you think best matches the missing font, or allow Suitcase XT to choose the closest matching font.
Open fonts within EPS images
This option allows you to instruct Suitcase XT to open fonts that are embedded in EPS images. This only occurs when printing a file that contains EPS images.
Close Opened Fonts On Quit
This option allows you to control what happens to fonts that are opened by Suitcase XT. With this feature enabled, when the you quit QuarkXPress, Suitcase XT closes every font that it opened.
When unchecked, fonts activated by Suitcase XT remain active (open) until you restart your machine or manually deactivate (close) them in Suitcase.
Close Un-needed Fonts On Document Close
This option allows Suitcase to determine, when each document is closed, whether the fonts used in it are needed by any other currently open QuarkXPress document. If they are not, the fonts are closed.

46
User Guide Plug-ins
Suitcase Auto-Activation Plug-in for Adobe Illustrator
The Suitcase Auto-Activation Plug-in for Adobe Illustrator automatically activates fonts used in Illustrator or EPS files when opened in Illustrator 8.0 or later.
The plug-in uses Apple’s FontSync technology to save identifying attributes about each font used in a particular file. When the file is opened, the plug-in uses this information to activate the correct font even if several duplicates exist.
The Illustrator plug-in is installed into the Extensions folder of your Adobe Illustrator Plug-ins folder, and is compatible with Illustrator 8, 9, and 10. To use the plug-in with multiple copies of Illustrator, rerun the installer, or manually place a copy of the plug-in in the Extensions folder of each copy of Illustrator.
If fonts used in a document cannot be found by the plug-in, you are warned you that the font is missing. You can choose the Continue button to ignore these fonts and continue to open the file, or choose the Replace button to choose another font to replace the missing font.
PreferencesPreferences for the Auto-Activation plug-in set whether to check for duplicates, when to close fonts, and whether to use Apple’s FontSync technology to match duplicate fonts.
To open the Illustrator font activation preferences:
1. Open Adobe Illustrator.
2. Choose Illustrator > Preferences > Suitcase Auto-Activation Prefs.
Enable Suitcase Auto-Activation
Check this option to turn on and off the Suitcase Auto-Activation plug in for Adobe Illustrator.
Check for duplicate fonts
Check this option to have Suitcase check for duplicate fonts in the Suitcase database. If more than one font is found, Suitcase gives you the following options choose which font to use:
• Choose For Me – Selects the first font found in the database.
• Cancel All – Ends the auto-activation.
• Skip – Moves to the next font.
• Done – Uses the font that is selected.

47
User Guide Suitcase X1 for Mac
Enable FontSync Support
Check this option to use FontSync to match the font in the document with the font in Suitcase.
FontSync information is stored in the document when the document is saved. The next time the document is opened, the Suitcase plug-in goes through the list of fonts in the document and for each one it asks Suitcase for a list of all the fonts by that name in its database.
After Suitcase sends back the list, the plug-in gets FontSync information for each of the fonts on the list and after comparing that information to that of the font originally used in the document, assigns the font a score from 0 to 20, where 20 is a perfect match.
As soon as an exact match is found, that font is activated and the plug-in moves on to the next font in the document. In those cases where there is not an exact match, the Duplicate Fonts Dialog is displayed, listing all the fonts of the same name with their corresponding FontSync scores in the right column.
The ability to enable and use this option depends on the file having been created on a system where FontSync was active and the Auto-Activation plug-in was used to save the file.
Close opened fonts on quit
Choose this option to deactivate fonts opened for Illustrator documents when you quit Illustrator.
Close unneeded fonts on document close
Choose this option to deactivate fonts opened for an Illustrator documents when the document itself is closed.
If neither close option is checked, fonts are not closed until you close them manually in Suitcase.
Activating Fonts in EPS FilesThe plug-in activates fonts in EPS files when the InDesign file is printed.

48
User Guide Plug-ins
Suitcase Auto-Activation Plug-in for Adobe InDesign
The Suitcase Auto-Activation Plug-in for Adobe InDesign automatically activates fonts used in InDesign or EPS files. The plug-in checks the file for the needed fonts and compares this list to fonts managed by Suitcase.
The plug-in uses Apple’s FontSync technology to save identifying attributes about each font used in a particular file. When the file is opened, the plug-in uses this information to activate the correct font even if several duplicates exist.
The InDesign plug-in is installed into the Extensions folder of your Plug-ins folder in Adobe InDesign, and is compatible with InDesign 2.0 or higher. In the event you have multiple copies of InDesign, you can choose which copy of InDesign to use the plug-in with. To use the plug-in with multiple copies of InDesign, rerun the installer or place a copy of the plug-in into the Extensions folder of each copy of InDesign.
PreferencesPreferences for the Auto-Activation plug-in set whether to check for duplicates, when to close fonts, and whether to use Apple’s FontSync technology to match duplicate fonts.
To open the InDesign font activation preferences:
1. Open InDesign.
2. Choose InDesign > Preferences > Suitcase Auto-Activation.
Enable Suitcase auto-activation
Check this option to turn on and off the Suitcase Auto-Activation plug-in.
Check for duplicate fonts
Check this option to have Suitcase check for duplicate fonts in the Suitcase database.
Check either font type option to prefer that type when opening fonts. This tells Suitcase which font to open when duplicates are found.

49
User Guide Suitcase X1 for Mac
If more than one font is found, Suitcase gives you the following options to choose which font to use:
• Choose For Me – Selects the first font found in the Suitcase database.
• Cancel All – Ends the auto-activation.
• Skip – Moves to the next font.
• Done – Uses the font that is selected.
Enable FontSync support
Check this option to use FontSync to match the font in the document with the font in Suitcase.
FontSync information is stored in the document when the document is saved. The next time the document is opened, the Suitcase plug-in goes through the list of fonts in the document and for each one it asks Suitcase for a list of all the fonts by that name in its database.
Deactivate fonts after quitting InDesign
Choose this option to deactivate fonts opened for InDesign documents when you quit InDesign.
Deactivate fonts after closing a document
Choose this option to deactivate fonts opened for an InDesign document when the document itself is closed.
Activate fonts in EPS images
This option allows you to instruct Suitcase XT to open fonts that are embedded in EPS images. This only occurs when printing a file that contains EPS images.

50
User Guide Shortcuts
Command Hot key
Open Suitcase or bring to front (default) Command+Option+S
Select All Command+A
Deselect All Command+Option+A
Show/Hide Font Pane Command+`
Show/Hide Preview Pane Command+0
Show/Hide Sets Pane Command+1
Show Open Fonts Command+2
Show Temporary Fonts Command+3
Show Suitcase Fonts Command+4
Show System Folder Fonts Command+5
Show Fonts in Selected Sets Command+6
Show All Fonts Command+7
Show Closed Fonts Command+8
Show Missing Fonts Command+9
Show Suitcase Server Fonts Command+- (minus)
Show Auto-Activated Fonts Command+= (equal sign)
Show/Hide Keywords & Styles Command+]
View by font/suitcase Command+E
New Set Command+N
Add Fonts Command+L
Add Fonts Temporarily Command+T
Remove Temporary Fonts Command+, (comma)
Remove Temporary Fonts without confirmation Command+Option+, (comma)
Open (Activate) Fonts/Sets Using Default Activation Command+O
Close Fonts/Sets Command+K
Keyboard ShortcutsCommand Hot key
Find Fonts Command+F
Get Font Information Command+I
Reveal in Finder Command+R
Print Sample Pages Command+P
Collect Fonts for Output Command+D
Remove Sets (leaves fonts in database) Command+Delete
Remove Sets without Confirmation Option+Delete, Command+Option+Delete (leaves fonts in database)
Remove Fonts (removes from database) Command+Del, Shift+Remove Icon
Remove Fonts without Confirmation Command+Option+Delete (removes fonts from database)
Remove Fonts AND Sets from database Command+Shift+Del, Shift+Remove Icon
Move Up through List Up Arrow
Move Down through List Down Arrow
Expand List Right Arrow, Command+Right Arrow
Condense List Left Arrow, Command+Left Arrow
Subscribe to Sets Command+B(requires Suitcase Server)
Synchronize with Server Command+U(requires Suitcase Server)
Log into Server Command+\
Edit Users and Groups Command+/
Undo Command+Z
Open Preferences Command+;
Open Suitcase Help Command+?
Close a Suitcase Window / Minimize Command+W
Close Suitcase Application Command+Q

51
User Guide Suitcase X1 for Mac
Sometimes you may run into an issue with Suitcase that you are not quite sure how to handle. This section lists a number of common problems and easy solutions.
Please visit the Extensis web site for an up-to-date list of Frequently Asked Questions (FAQs) for Suitcase.
If you need further technical assistance, please contact Extensis Technical Support. Contact information is listed at the front of this guide.
Why does previewing a font in Suitcase cause Suitcase to close unexpectedly?
When Suitcase closes unexpectedly, it is most likely caused by a corrupt font. Corrupt fonts are shown in Suitcase Font lists with a warning icon. Suitcase can scan and attempt to repair corrupt fonts when they are added to Suitcase and also before they are previewed.
To enable corrupt font scanning and repair:
1. Open Suitcase.
2. Choose Suitcase > Preferences.
3. On the General tab, check the desired scan and repair options.
With these options checked, Suitcase scans and attempts to repair all fonts newly added to Suitcase and also scans fonts before they are previewed.
4. Click OK.
To scan and repair corrupt fonts:
1. Open Suitcase.
2. Choose Tools > Scan & Repair Suitcase Fonts.
3. Click Scan All to scan the list for corrupt fonts.
– or –
Click Scan & Repair All to scan the entire list and attempt to repair any fonts identified as corrupt.
If Suitcase does not identify a font you suspect to be corrupt:
1. Remove the suspect font from Suitcase.
2. Reinstall the font from the original media.
3. Re-add the font to Suitcase.
Troubleshooting

52
User Guide Troubleshooting
Why don’t I see FontSync ratings listed in the Duplicate Fonts dialog?
For FontSync information to be displayed, FontSync must be enabled in the auto-activation plug-in preferences.
To enable FontSync in InDesign:
1. Launch InDesign
2. Choose InDesign > Preferences > Suitcase Auto-Activation...
3. Check Enable FontSync™ Support.
4. Click OK.
To enable FontSync Support in Adobe Illustrator:
1. Open Adobe Illustrator.
2. Choose Illustrator > Preferences > Suitcase Auto-Activation Prefs...
3. Check Enable FontSync Support.
4. Click OK.
What applications support auto-activation?Suitcase automatically activates the fonts you need, when you need them. Suitcase supports the major creative applications you use most including Adobe and Quark Products.
Auto-activation plug-ins
Plug-ins for Adobe InDesign, Adobe Illustrator and Quark XPress activate fonts for documents and in each of those applications. These plug-ins take full advantage of Apple’s FontSync technology to ensure that the exact font you used to create the document is activated. For more detailed information, see the Plug-ins section of this guide.
Global auto-activation
Many other applications take advantage of global auto-activation (that is, auto-activation without an application-specific plug-in). The applications supported by global auto-activation include:
Mac OS X applicationsAdobe GoLive 6
AppleWorks 6
BBedit 6
Corel Draw Suite
FileMaker Pro 5
FileMaker Pro 6
Final Cut Pro 3
iMovie 2.1.2
Macromedia Fireworks MX
Macromedia FreeHand 10
Microsoft Entourage X

53
User Guide Suitcase X1 for Mac
Microsoft Excel X
Microsoft PowerPoint X
Microsoft Word X
Preview (Mac OS X 10.2)
Tex-Edit Plus 4.3+
TextEdit (Mac OS X 10.2)
Classic ApplicationsCorel Draw 8
Macromedia Freehand 8 and 9
Microsoft Office 98 and 2001
QuarkXPress 3.32, 4.04 and 4.1
QuarkXPress Passport 3 and 4
Why are my fonts displayed “jagged” in Classic applications?
Suitcase provides fonts to applications, but is not involved with onscreen font smoothing. To smooth fonts on screen for Classic applications, install ATM Light. ATM Light is available on your Suitcase CD, or can be downloaded free from http://www.adobe.com.
Why are my fonts not grouped by family or displayed WYSIWYG?
In OS X as well as in Classic mode, individual programs are responsible for the display and sorting of font lists.
Suitcase does not have control over the onscreen display within an application. We recommend that you browse and preview fonts in the Suitcase Preview pane.
Why can’t I remove a font from Suitcase using the Delete key?To remove fonts from Suitcase X1:
• Hold down the Command key and press Delete.
If a set is highlighted in the Sets pane, the set is deleted and the fonts in the set remain in Suitcase.
If a font is highlighted in the Sets pane, the font is removed from the set.
If a font is highlighted in the Fonts pane, the font is removed from Suitcase entirely. This does not delete the font from your disk.
Do I need to uninstall my earlier version of Suitcase before installing the latest version?
No, the Suitcase installer replaces prior versions of Extensis Suitcase. The Suitcase installer does not remove the prior Suitcase application folder, because some people choose to put their fonts in that folder. You can delete this folder if you determine that there is nothing in that folder that you need.
Suitcase Preferences are not replaced, so any settings you had in a previous version of Suitcase remain.

54
User Guide Index
IndexAabc 123 view 31, 42activating fonts 9, 21
automatically 14, 23on demand 11permanently 11, 22temporarily 11until restart 11, 21
activating sets 28activation states 10, 23adding fonts 9, 17
permanently 17temporarily 17to sets 26
Adobe Illustratorauto-activation 46
Adobe InDesignauto-activation 48
AppleScript 38application sets 12, 27auto-activation 23
Adobe Illustrator 46Adobe InDesign 48application support 52preferences 41Quark XPress 44turning on 14
automating with AppleScript 38
Bbrowse and buy fonts 34
Cclassic system fonts 20, 53closing fonts 22collecting fonts for output 38contact Extensis iicontents iiicorrupt fonts 10, 51
Ddeactivating fonts 22
temporary fonts 18default activation states 23demonstration mode 2dock icon menu 5, 28duplicate fonts
locating and managing 37prefer Postscript 24prefer True Type 24
EEPS 45, 47, 49extensions
Adobe Illustrator 46Adobe InDesign 48Quark XPress 44
Extensis contact information ii
Ffinding fonts 33
advanced find 33, 33–34by keyword or style 34on the hard disk 34QuickFind 33to purchase 34
FontDoctor 6FontSync 52
Adobe Illustrator 46Adobe InDesign 49Suitcase XT 45
fonts pane 8font conflicts 35
Ggeneral preferences 39getting started 6get info 33, 34
Hhorizontal resize 8hot key 39how Suitcase works 16
Iinstalling Suitcase 2introducing Suitcase 1

55
User Guide Suitcase X1 for Mac
Kkeyboard shortcuts 50keywords and styles 8, 30
Mmanage duplicate fonts 4managing fonts 15managing system fonts 7, 19missing fonts 37
Nnew features 4
Oon demand fonts 10
adding and activating 11, 18opening fonts 9opening Suitcase automatically 39organizing your fonts 6OS X and Suitcase 5output
collecting fonts 38overriding system fonts 19, 40
Ppanes 8paragraph view 32, 42permanent fonts 17
permanently 22personalization 2plug-ins 5
Adobe Illustrator 46Adobe InDesign 48
Quark XPress 44Suitcase XT 44
preferences 39activation 40Adobe Illustrator plug-in 46auto-activation 41general preferences 39preview text 13, 32, 42server connection 42
previewing fonts 13, 31abc 123 view 31paragraph view 32preferences 42QuickType view 32waterfall view 31
preview pane 4, 8preview sample page 33problematic fonts 35
font conflicts 35scanning and repairing 35
purchasing new fonts 34
QQuark XPress 44QuickFind 4, 8, 30, 33QuickType view 32, 42
Rregistration and personalization 2removing fonts and sets 29removing unrepairable fonts 36renaming
sets 28repairing corrupt fonts 39requirements
system and software 2resize panes 8reveal in finder 34
Ssample page 33scanning and repairing corrupt
fonts 35, 39server connection preferences 42sets 25
activating 28adding fonts 26application 12, 27building 12creating a new 12, 25example 25removing 29renaming 28
sets pane 8shortcuts 50software requirements 2status column 8styles
scanning fonts 39styles and keywords 4, 8, 30Suitcase environment 8Suitcase XT 44
duplicate fonts 45preferences 44
system fontsclassic 20managing 7, 19overriding 7, 19, 40
system requirements 2

56
User Guide Index
Ttable of contents iiitechnical support 3temporary fonts 10, 17toolbar 8troubleshooting 51
Uunmarking corrupt fonts 36until restart 21utilities 5
Vvertical resize 8
Wwarn about duplicates 24waterfall view 31, 42whatʼs new 4

57
User Guide Suitcase X1 for Mac

SC11M-NAMAN-0903


