RoxioVenue
User Guide
Roxio Venue Getting Started Guidewww.roxio.comii
Legal InformationCopyright ©1994 - 2008 Sonic Solutions. All Rights reserved. Roxio Creator 2009, Roxio Easy Media Creator, Easy CD & DVD Creator, Easy CD & DVD Burning, WinOnCD, Retrieve, DLA, Music Disc Creator, MyDVD, Backup MyPC, Disc Copier, Label Creator, Sound Editor, Creator Classic, JUST!BURN, WOCBlock, CinePlayer, Roxio Updater, Media Manager, VideoWave, PhotoSuite, Roxio Easy DVD Copy, DVD Info Pro, Disc Image Loader, Easy Audio Capture, RecordNow!, DMX, CineMagic, Drag-to-Disc, Roxio Backup, Media Import, Disc & Device Utility, Express Labeler, Slideshow Assistant, Multi Photo Enhance, Panorama Assistant, Photo Email Assistant and all styles and templates are protected by copyright law and international treaties. Unauthorized reproduction or distribution of these programs, or any portion of them, may result in severe civil and criminal penalties, and will be prosecuted to the maximum extent possible under law. Use of these products is subject to the acceptance of the license agreement included in this product.
Sonic, Sonic Solutions, Roxio, the burning disc logo, Roxio Creator, Roxio Easy Media Creator, WinOnCD, PhotoSuite, VideoWave, the burning CD logo, Easy CD & DVD Creator, Easy CD & DVD Burning, Disc Copier, MyDVD, Creator Classic, JUST!BURN, Easy DVD Copy, BackUp MyPC, CinePlayer, RecordNow!, Drag-to-Disc, and Venue are trademarks of Sonic Solutions, which may be registered in some jurisdictions. All other trademarks used are owned by their respective owners.
SOME OR ALL OF THE FOLLOWING APPLY TO THIS PRODUCT:
Portions of the software are provided by Apple Computer, Inc. Copyright © 2004 Apple Computer, Inc.
DivX and the DivX logo are registered trademarks of DivXNetworks, Inc. in the U.S. and other countries.
MPEG Layer-3 and mp3PRO audio coding technology licensed from Coding Technologies, Fraunhofer IIS and THOMSON.
http://www.iis.fhg.de/amm
Portions utilize Microsoft Windows Media Technologies. Copyright © 1999-2004 Microsoft Corporation. All Rights Reserved. Windows Media and the Windows logo are trademarks or registered trademarks of Microsoft Corporation in the United States and/or other countries.
VST Plug-in Technology by Steinberg Copyright © 2004 Steinberg Media Technologies AG. Steinberg is a registered trademark of Steinberg Soft- und Hardware GmbH.
Some digital content © 1994-2001 Hemera* Technologies Inc. All Rights Reserved. * Trademark of Hemera Technologies Inc.
Roxio Venue Getting Started GuideLegal Information iii
Ogg Vorbis audio compression technology provided courtesy of the Xiph.Org Foundation.
libfishsound
-----------------------
Copyright (C) 2003, 2004 Commonwealth Scientific and Industrial Research Organisation (CSIRO) Australia
THIS SOFTWARE IS PROVIDED BY THE COPYRIGHT HOLDERS AND CONTRIBUTORS ``AS IS'' AND ANY EXPRESS OR IMPLIED WARRANTIES, INCLUDING, BUT NOT LIMITED TO, THE IMPLIED WARRANTIES OF MERCHANTABILITY AND FITNESS FOR A PARTICULAR PURPOSE ARE DISCLAIMED. IN NO EVENT SHALL THE ORGANISATION OR CONTRIBUTORS BE LIABLE FOR ANY DIRECT, INDIRECT, INCIDENTAL, SPECIAL, EXEMPLARY, OR CONSEQUENTIAL DAMAGES (INCLUDING, BUT NOT LIMITED TO, PROCUREMENT OF SUBSTITUTE GOODS OR SERVICES; LOSS OF USE, DATA, OR PROFITS; OR BUSINESS INTERRUPTION) HOWEVER CAUSED AND ON ANY THEORY OF LIABILITY, WHETHER IN CONTRACT, STRICT LIABILITY, OR TORT (INCLUDING NEGLIGENCE OR OTHERWISE) ARISING IN ANY WAY OUT OF THE USE OF THIS SOFTWARE, EVEN IF ADVISED OF THE POSSIBILITY OF SUCH DAMAGE.
------------------------------------------------
libvorbis and libogg
------------------------------------------------
Copyright (c) 1994-2004 Xiph.org Foundation
THIS SOFTWARE IS PROVIDED BY THE COPYRIGHT HOLDERS AND CONTRIBUTORS ``AS IS'' AND ANY EXPRESS OR IMPLIED WARRANTIES, INCLUDING, BUT NOT LIMITED TO, THE IMPLIED WARRANTIES OF MERCHANTABILITY AND FITNESS FOR A PARTICULAR PURPOSE ARE DISCLAIMED. IN NO EVENT SHALL THE REGENTS OR CONTRIBUTORS BE LIABLE FOR ANY DIRECT, INDIRECT, INCIDENTAL, SPECIAL, EXEMPLARY, OR CONSEQUENTIAL DAMAGES (INCLUDING, BUT NOT LIMITED TO, PROCUREMENT OF SUBSTITUTE GOODS OR SERVICES; LOSS OF USE, DATA, OR PROFITS; OR BUSINESS INTERRUPTION) HOWEVER CAUSED AND ON ANY THEORY O OF LIABILITY, WHETHER IN CONTRACT, STRICT LIABILITY, OR TORT (INCLUDING NEGLIGENCE OR OTHERWISE) ARISING IN ANY WAY OUT OF THE USE OF THIS SOFTWARE, EVEN IF ADVISED OF THE POSSIBILITY OF SUCH DAMAGE.
-------------------------------------------------------------
libflac and libflac++
-----------------------------------------
Copyright (C) 2000,2001,2002,2003,2004 Josh Coalson
THIS SOFTWARE IS PROVIDED BY THE COPYRIGHT HOLDERS AND CONTRIBUTORS ``AS IS'' AND ANY EXPRESS OR IMPLIED WARRANTIES, INCLUDING, BUT NOT LIMITED TO, THE IMPLIED WARRANTIES OF MERCHANTABILITY AND FITNESS FOR A PARTICULAR PURPOSE ARE DISCLAIMED. IN NO EVENT SHALL THE FOUNDATION OR CONTRIBUTORS BE LIABLE FOR ANY DIRECT, INDIRECT, INCIDENTAL, SPECIAL, EXEMPLARY, OR CONSEQUENTIAL DAMAGES (INCLUDING, BUT NOT LIMITED TO, PROCUREMENT OF SUBSTITUTE GOODS OR SERVICES; LOSS OF USE, DATA, OR PROFITS; OR BUSINESS INTERRUPTION) HOWEVER CAUSED AND ON ANY THEORY OF LIABILITY, WHETHER IN CONTRACT, STRICT LIABILITY, OR TORT (INCLUDING NEGLIGENCE OR OTHERWISE) ARISING IN ANY WAY OUT OF THE USE OF THIS SOFTWARE, EVEN IF ADVISED OF THE POSSIBILITY OF SUCH DAMAGE.
--------------------------------------------------------
dsfOggDemux, dsfOggMux, dsfVorbisDecoder, dsfVorbisEncoder.dll, dsfNativeFLACSource, dsfFLACDecoder, dsfFLACEncoder, libOOOgg, libOOOggSeek
------------------------------------
Copyright (C) 2003-2005 Zentaro Kavanagh
THIS SOFTWARE IS PROVIDED BY THE COPYRIGHT HOLDERS AND CONTRIBUTORS ``AS IS'' AND ANY EXPRESS OR IMPLIED WARRANTIES, INCLUDING, BUT NOT LIMITED TO, THE IMPLIED WARRANTIES OF MERCHANTABILITY AND FITNESS FOR A PARTICULAR PURPOSE ARE DISCLAIMED. IN NO EVENT SHALL THE ORGANISATION OR CONTRIBUTORS BE LIABLE FOR ANY DIRECT, INDIRECT, INCIDENTAL, SPECIAL, EXEMPLARY, OR CONSEQUENTIAL DAMAGES (INCLUDING, BUT NOT LIMITED TO, PROCUREMENT OF SUBSTITUTE GOODS OR SERVICES; LOSS OF USE, DATA, OR PROFITS; OR BUSINESS INTERRUPTION) HOWEVER CAUSED AND ON ANY THEORY OF LIABILITY, WHETHER IN CONTRACT, STRICT LIABILITY, OR TORT (INCLUDING NEGLIGENCE OR OTHERWISE) ARISING IN ANY WAY OUT OF THE USE OF THIS SOFTWARE, EVEN IF ADVISED OF THE POSSIBILITY OF SUCH DAMAGE.
Roxio Venue Getting Started Guidewww.roxio.comiv
Audio effect engine licensed by Algorithmix. http://www.algorithmix.com
'Dolby' and the double-D symbol are trademarks of Dolby laboratories.
This product contains one or more programs protected under international and U.S. copyright laws as unpublished works. They are confidential and proprietary to Dolby Laboratories. Their reproduction or disclosure, in whole or in part, or the production of derivative works therefrom without the express permission of Dolby Laboratories is prohibited. Copyright 1992-1997 by Dolby Laboratories, Inc. All rights reserved.
Manufactured under license from Dolby Laboratories.
The TWAIN Toolkit is distributed as is. The developer and distributors of the TWAIN Toolkit expressly disclaim all implied, express or statutory warranties including, without limitation, the implied warranties of merchantability, non-infringement of third party rights and fitness for a particular purpose. Neither the developers nor the distributors will be liable for damages, whether direct, indirect, special, incidental, or consequential, as a result of the reproduction, modification, distribution or other use of the TWAIN Toolkit.
Music recognition technology and related data are provided by Gracenote®. Gracenote is the industry standard in music recognition technology and related content delivery. For more information visit www.gracenote.com.
CD and music-related data from Gracenote, Inc., copyright © 2006 Gracenote. Gracenote Software, copyright © 2006 Gracenote. This product and service may practice one or more of the following U.S. Patents: #5,987,525; #6,061,680; #6,154,773, #6,161,132, #6,230,192, #6,230,207, #6,240,459, #6,330,593, and other patents issued or pending. Some services supplied under license from Open Globe, Inc. for U.S. Patent: #6,304,523.
Gracenote the Gracenotelogo, the Gracenote logotype, and CDDB are registered trademarks of Gracenote. MusicID and the "Powered by Gracenote" logo are trademarks of Gracenote.
lFor more information on using the Gracenote Service, visit: www.gracenote.com/corporate
Portions Copyright 1997, Chris Losinger
Portions of this product were created using LEADTOOLS © 1991-2001, LEAD Technologies, Inc. ALL RIGHTS RESERVED.
Product includes the 3ivx Filter Suite. Copyright © 3ivx Technologies Pty. Ltd., 1999-2003, All rights reserved. 3ivx is an international trademark.
Some digital content provided by Digital Vision.
Roxio Venue Getting Started GuideLegal Information v
Certain templates and images: © 2004 ArtBuilders.
Some audio content provided by Darklab Sound.
Some audio content is provided by Todor Kobakov from spineproductions.net.
Some content courtesy of Artbeats. www.artbeats.com
Some digital image content © 2006 Jupiterimages Corporation. All Rights Reserved.
Some audio content © 2006 Ian Nieman Music. All rights reserved.
Portions Copyright 1997-1998 Intel Corporation.
This product uses the LAME MP3 Encoder library (the “Library”). The Library is licensed under the GNU Library General Public License, Version 2, 1991. For a copy of the complete corresponding machine-readable source code for the Library, send your request to Sonic Solutions, 101 Rowland, Suite 110, Novato, CA 94945 Attn: Legal Department. Processing, shipping, and handling charges will apply.
THIS PRODUCT IS LICENSED UNDER THE MPEG-4 VISUAL PATENT PORTFOLIO LICENSE FOR THE PERSONAL AND NON-COMMERCIAL USE OF A CONSUMER FOR (i) ENCODING VIDEO IN COMPLIANCE WITH THE MPEG-4 VISUAL STANDARD (“MPEG-4 VIDEO”) AND/OR (ii) DECODING MPEG-4 VIDEO THAT WAS ENCODED BY A CONSUMER ENGAGED IN A PERSONAL AND NONCOMMERCIAL ACTIVITY AND/OR WAS OBTAINED FROM A VIDEO PROVIDER LICENSED BY MPEG LA TO PROVIDE MPEG-4 VIDEO. NO LICENSE IS GRANTED OR SHALL BE IMPLIED FOR ANY OTHER USE. ADDITIONAL INFORMATION INCLUDING THAT RELATING TO PROMOTIONAL, INTERNAL AND COMMERCIAL USES AND LICENSING MAY BE OBTAINED FROM MPEG LA, LLC. SEE HTTP://WWW.MPEGLA.COM.
PSP is a registered trademark of Sony Computer Entertainment, and Memory Stick is a trademark of Sony Corporation.
The Bluetooth® word mark and logos are owned by the Bluetooth SIG, Inc., and any use of such marks by Sonic Solutions is under license. Other trademarks and trade names are those of their respective owners.
TiVo and the TiVo logo are registered trademarks of TiVo Inc. or its subsidiaries.
This product is protected by certain intellectual property rights of Microsoft Corporation. Use or distribution of such technology outside of this product is prohibited without a license from Microsoft or an authorized Microsoft subsidiary.
Windows Pre-Installation Environment. Disaster recovery applications included in this product may use the Microsoft® Windows® Preinstallation Environment software from Microsoft Corporation (“WinPE”). The WinPE softare included with this software may be used for boot, diagnostic, setup, restoration, installation, configuration, test or disaster recovery purposes only. NOTE: THIS SOFTWARE CONTAINS A SECURITY FEATURE THAT WILL CAUSE YOUR COMPUTER SYSTEM TO REBOOT WITHOUT PRIOR NOTIFICATION TO YOU AFTER 24 HOURS OF CONTINUOUS USE. WinPE may not be used as a general purpose operating system or as a substitute for a fully functional version of any operating system product. Use of WinPE is “as-is.”
Roxio Venue Getting Started Guidewww.roxio.comvi
ChangesThe material in this document is for information purposes only and is subject to change without notice. While reasonable efforts have been made in the preparation of this document to assure its accuracy, Sonic Solutions assumes no liability resulting from errors or omissions in this document, nor from the use of the information contained herein.
Sonic Solutions reserves the right to make changes in the product design without reservation and without notification to its users.
DisclaimerThis product may allow you to reproduce materials in which you own the copyright or have obtained permission to copy from the copyright owner. Unless you own the copyright or have permission to copy such materials from the copyright owner, you may be violating copyright law and be subject to the payment of damages and other remedies. If you are uncertain of your rights, you should contact your legal advisor.
This product may be protected by one or more of the patents listed at http://www.sonic.com/innovation/patents.
vii
Contents
1 Using Venue 9
Welcome to Venue™ . . . . . . . . . . . . . . . . . . . . . . . . . . . . . . . . . 11What you need to get started. . . . . . . . . . . . . . . . . . . . . . . . . . . . 12About the BurnRight System Check . . . . . . . . . . . . . . . . . . . . . . . 13Getting to know the Venue window . . . . . . . . . . . . . . . . . . . . . . 14Buying or renting videos from the video store . . . . . . . . . . . . . . . 17Watching videos . . . . . . . . . . . . . . . . . . . . . . . . . . . . . . . . . . . . . 19Finding videos in your library . . . . . . . . . . . . . . . . . . . . . . . . . . . 21Viewing video information . . . . . . . . . . . . . . . . . . . . . . . . . . . . . 24Purchasing additional licenses. . . . . . . . . . . . . . . . . . . . . . . . . . . 25Setting parental controls . . . . . . . . . . . . . . . . . . . . . . . . . . . . . . . 25Rating videos. . . . . . . . . . . . . . . . . . . . . . . . . . . . . . . . . . . . . . . . 26Adding notes to a video. . . . . . . . . . . . . . . . . . . . . . . . . . . . . . . . 26Deleting videos . . . . . . . . . . . . . . . . . . . . . . . . . . . . . . . . . . . . . . 27Burning videos to disc . . . . . . . . . . . . . . . . . . . . . . . . . . . . . . . . . 28Making disc labels and inserts . . . . . . . . . . . . . . . . . . . . . . . . . . . 30Setting Venue options . . . . . . . . . . . . . . . . . . . . . . . . . . . . . . . . . 30
Index 31
Contentsviii
Roxio Venue User Guidewww.roxio.com
9
Using Venue
In this guide
Welcome to Venue™ 11
What you need to get started 12
About the BurnRight System Check 13
Getting to know the Venue window 14
Buying or renting videos from the video store 17
Watching videos 19
Finding videos in your library 21
Viewing video information 24
Purchasing additional licenses 25
Setting parental controls 25
Rating videos 26
Adding notes to a video 26
Using Venue10
Deleting videos 27
Burning videos to disc 28
Making disc labels and inserts 30
Setting Venue options 30
Venue User Guidewww.roxio.com
Using Venue11
Welcome to Venue™
Welcome to ! It’s never been easier to find, download, burn, and watch your favorite videos. Best of all, you can do everything right from your computer—no trips to the video store, and no more returns or late fees. Using , you can:
■ Browse the video store to purchase and rent videos.
Where available, you can preview video trailers before you buy. Once you’ve made the decision to rent or buy, videos begin to download right away.
■ Play videos on your computer.
■ Burn videos to a special, QFlix™-compatible disc, which you can then play on most set-top DVD players.
■ Organize the videos in your library for quick searching, playback, and burning.
■ Optionally, depending on the version of the application you have installed, you may also be able to use parental controls to filter the types of videos that appear in your Library.
■ Print disc labels and inserts with just a few quick steps.
Venue User Guidewww.roxio.com
Using VenueWhat you need to get started 12
What you need to get startedTo browse, download, watch, and burn videos, you need the following:
■ To purchase videos in the video store, you need an account with the store. If you have an existing account, you can use it. Otherwise, you can set up a new account. For more information, see the video store online help.
■ To download videos, you need sufficient free hard drive space. The amount of space needed can vary between 3 GB and 5 GB.
■ To burn videos to disc, you need a special QFlix-enabled recorder, as well as QFlix media.
Note The BurnRight™ System Check will help to ensure that you have enough hard drive space and a QFlix-compliant recorder. For more information, see About the BurnRight System Check on page 13.
About burning videos to disc—file preparationBefore a video can be burned to disc, needs to prepare the file. This process can take a very long time, often several hours. File preparation requires a lot of disc space, at least 5 GB for each video. This is because a large temporary file is created. The temporary file will be deleted after the video is burned to disc.
File preparation can take place as you download the video from the video store, or it may take place just before you burn the file. Depending on the software version that you are running, and the store from which you purchase videos, you may be able to choose when file preparation happens. In most cases, preparation will happen automatically in the background while the file is downloading from the video store.
For information about changing the default location for the temporary files, click Help or press F1 in the General Options dialog box. (Choose Tools > Options to change options.)
Venue User Guidewww.roxio.com
Using VenueAbout the BurnRight System Check 13
About the BurnRight System CheckThe first time you start , the BurnRight™ System Check. The BurnRight System Check ensures that your computer is properly configured to download, view, and burn videos. BurnRight automatically checks for the following details:
■ Do you have enough free space on the hard drive where videos are downloaded?
■ Is your DVD recorder QFlix-compliant?
■ Do you have an Internet connection?
To run this system test each time you start , select Run system check each time starts. Otherwise, leave the check box empty. To start the BurnRight System check at any time, choose Tools > Run BurnRight System Check.
For more information, click Help in the BurnRight System Check dialog box.
Venue User Guidewww.roxio.com
Using VenueGetting to know the Venue window 14
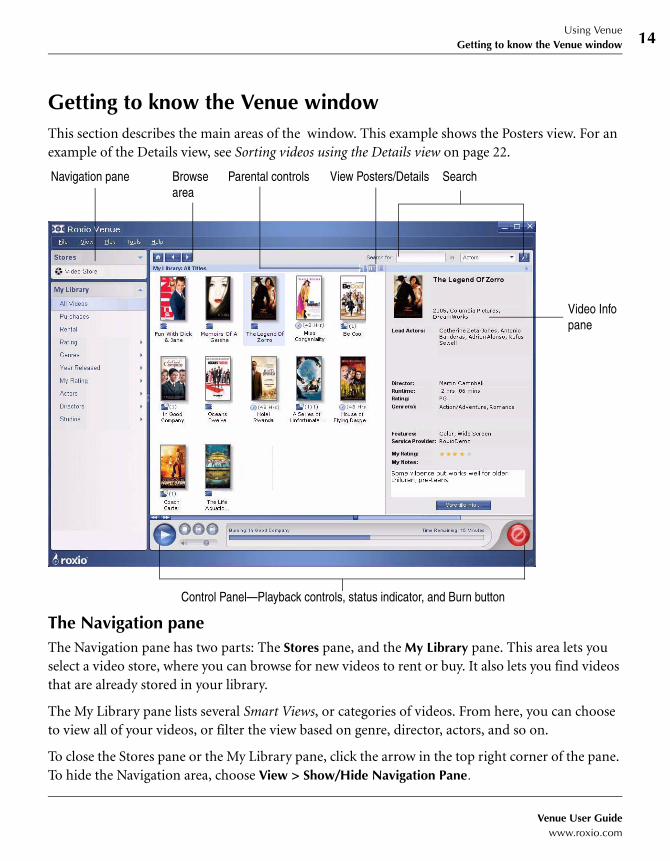
Getting to know the Venue windowThis section describes the main areas of the window. This example shows the Posters view. For an example of the Details view, see Sorting videos using the Details view on page 22.
The Navigation paneThe Navigation pane has two parts: The Stores pane, and the My Library pane. This area lets you select a video store, where you can browse for new videos to rent or buy. It also lets you find videos that are already stored in your library.
The My Library pane lists several Smart Views, or categories of videos. From here, you can choose to view all of your videos, or filter the view based on genre, director, actors, and so on.
To close the Stores pane or the My Library pane, click the arrow in the top right corner of the pane. To hide the Navigation area, choose View > Show/Hide Navigation Pane.
Navigation pane Browse area
Video Info pane
Control Panel—Playback controls, status indicator, and Burn button
SearchView Posters/DetailsParental controls
Venue User Guidewww.roxio.com
Using VenueGetting to know the Venue window 15
For more information about working with Smart Views, see Finding videos in your library on page 21.
The Browse areaThe Browse area has several different views, depending on what you select in the Navigation area. If you select a video store, then the video store appears, and you can browse for new videos to rent or buy.
If you select one of the Smart Views in your library, the videos in that Smart View appear in the Browse area. For example, if you select the Rating Smart View, then you can view all of your videos, grouped by rating.
When you are viewing videos in your library, you can view the video posters with detailed information in the Video Information pane on the right, or you can view the video details in a listed format. To change the view, click the Cover Art View or Details View button.
To add or remove columns in the Details view, choose View > Display Columns, and then select the columns you want to show or hide. For more information about the Details view, see Sorting videos using the Details view on page 22.
You can also sort your videos in the Browse area by title, the date videos were added to your library, or by file size. To sort the videos, choose View > Sort By, and then choose the sort option you prefer.
The Search toolUse the search tool to quickly find videos in your library. To refine your search, you can choose to search by only certain criteria, such as by video genre, or actor’s names. Search results are displayed in the Browse area.
For more information, see Finding videos in your library on page 21.
The Control PanelThe Control panel contains playback, volume control, and Burn buttons. It also shows you the status of activities such as video downloads or burning.
The Video Info paneThe Video Info pane shows you information about the video that is selected in your library, such as the director’s name, year of release, lead actors, and so on. To close the Video Info pane and expand the Browse area, click the arrow button in the top right corner of the pane, or choose View > Show/Hide Video Info Pane.
Venue User Guidewww.roxio.com
Using VenueGetting to know the Venue window 16
To view more information about the selected video, such as license information (for example, the number of days remaining for a rental), click More Video Info in the Video Info pane. If you are in the library Details view, you can also right-click a video, and then select More Video Info.
Venue User Guidewww.roxio.com
Using VenueBuying or renting videos from the video store 17
Buying or renting videos from the video store
You can rent or purchase videos from our partner video stores.The procedure below provides an overview of the steps for a typical rental or purchase. The process may be slightly different depending on the video store from which you select your videos.
Note For more information about browsing the store for videos, see the online Help provided by the video store.
To buy or rent a video from a video store:
1 In the Navigation area, under Stores, select the video store.
2 If you are prompted to log in, enter your user name and password. Otherwise, continue with step 3.
3 Select the video you want to rent or purchase.
4 Click Add to Cart.
Note If you are asked to select a video format, be sure to choose Windows Media Player (WMP). Other file formats (such as RealPlayer) are not currently supported.
5 Click Continue Browsing if you want to select more videos. Otherwise, click Proceed to Checkout.
6 Follow the onscreen instructions to complete the rental or purchase transaction.
7 Once the transaction is complete, you can return to your library. The Control Panel indicates that the video is downloading, and the status bar displays the download progress.
You can also see the video status (for example, whether the video is ready to play) in either the Details or Posters view. In the Details view, there is a Status column. In the Posters view, an icon below the video poster shows the status.
You can start watching your video before the download is complete. Watch for the status to change to Ready, and then click Play. For more information, see Watching videos on page 19.
Venue User Guidewww.roxio.com
Using VenueBuying or renting videos from the video store 18
Note If you are buying the video to burn to disc, there may be occasional pauses during playback.
When the download is complete, you can burn the video to disc if you have purchased a license to do so. For more information, see Burning videos to disc on page 28.
To cancel, pause, or resume downloading:
1 While you are downloading a video, choose one of the following options:
■ To cancel the download, choose File > Cancel Download.
■ To pause the download, choose File > Pause/Resume Download.
2 To resume a paused download, select the video in your library, and then choose File > Pause/Resume Download.
Note Pausing or cancelling downloads in some video stores may affect all of the videos currently downloading, not just the selected video. Similarly, selecting a paused video and then File > Pause/Resume Download will also resume all downloads; however, the selected video will resume downloading first.
Venue User Guidewww.roxio.com
Using VenueWatching videos 19
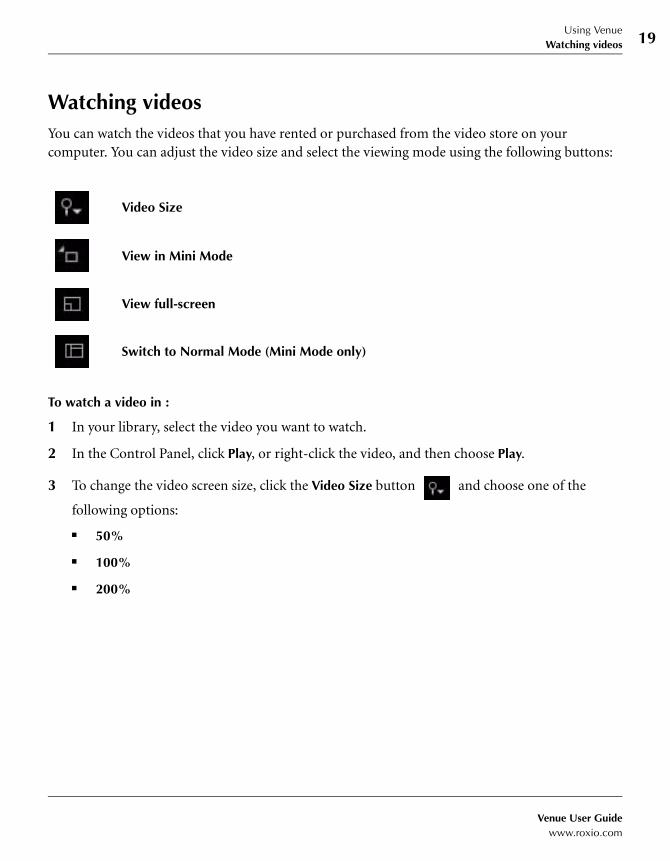
Watching videosYou can watch the videos that you have rented or purchased from the video store on your computer. You can adjust the video size and select the viewing mode using the following buttons:
To watch a video in :
1 In your library, select the video you want to watch.
2 In the Control Panel, click Play, or right-click the video, and then choose Play.
3 To change the video screen size, click the Video Size button and choose one of the
following options:
■ 50%
■ 100%
■ 200%
Video Size
View in Mini Mode
View full-screen
Switch to Normal Mode (Mini Mode only)
Venue User Guidewww.roxio.com
Using VenueWatching videos 20
4 To change the playback mode, choose one of the following buttons:
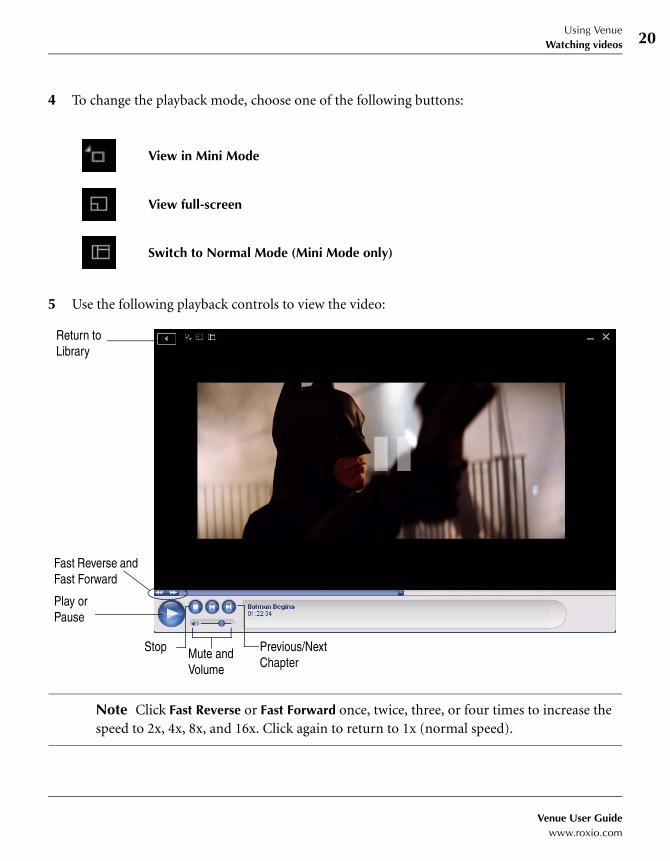
5 Use the following playback controls to view the video:
Note Click Fast Reverse or Fast Forward once, twice, three, or four times to increase the speed to 2x, 4x, 8x, and 16x. Click again to return to 1x (normal speed).
View in Mini Mode
View full-screen
Switch to Normal Mode (Mini Mode only)
Play or Pause
Stop Mute and Volume
Previous/Next Chapter
Fast Reverse and Fast Forward
Return to Library
Venue User Guidewww.roxio.com
Using VenueFinding videos in your library 21
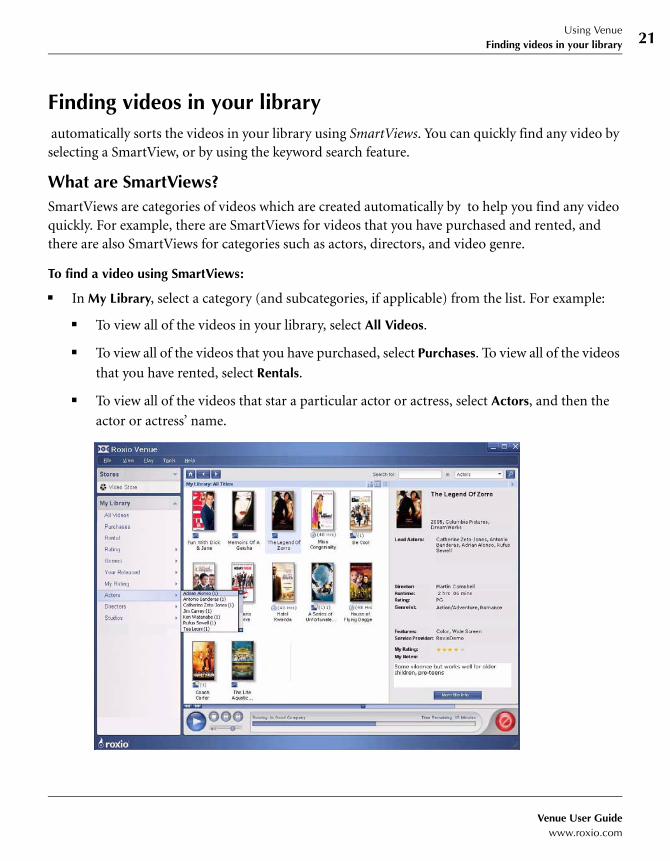
Finding videos in your library automatically sorts the videos in your library using SmartViews. You can quickly find any video by selecting a SmartView, or by using the keyword search feature.
What are SmartViews?SmartViews are categories of videos which are created automatically by to help you find any video quickly. For example, there are SmartViews for videos that you have purchased and rented, and there are also SmartViews for categories such as actors, directors, and video genre.
To find a video using SmartViews:
■ In My Library, select a category (and subcategories, if applicable) from the list. For example:
■ To view all of the videos in your library, select All Videos.
■ To view all of the videos that you have purchased, select Purchases. To view all of the videos
that you have rented, select Rentals.
■ To view all of the videos that star a particular actor or actress, select Actors, and then the
actor or actress’ name.
Venue User Guidewww.roxio.com
Using VenueFinding videos in your library 22
Note Some SmartViews may be empty. For example, if you have not purchased any videos, then the Purchases SmartView is empty.
The videos in the SmartView appear in the Browse area. You can view videos in either the Cover Art or Details view. For more information, see The Browse area on page 15 and Sorting videos using the Details view.
Note The list of SmartViews that appears in your version may be different from the example shown above.
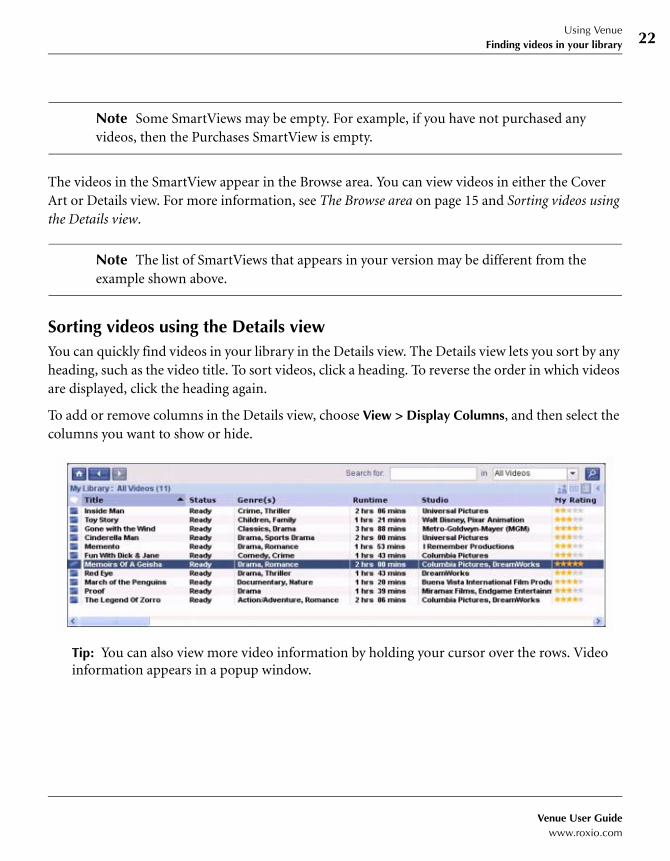
Sorting videos using the Details viewYou can quickly find videos in your library in the Details view. The Details view lets you sort by any heading, such as the video title. To sort videos, click a heading. To reverse the order in which videos are displayed, click the heading again.
To add or remove columns in the Details view, choose View > Display Columns, and then select the columns you want to show or hide.
Tip: You can also view more video information by holding your cursor over the rows. Video information appears in a popup window.
Venue User Guidewww.roxio.com

Using VenueFinding videos in your library 23
Using a keyword searchYou can search in your library for videos using a keyword search, for example, part or all of the video title, or the director’s name. In addition, you can apply a filter to your search to limit the number of results. This is useful if you have a large number of videos in your library.
To use a keyword search:
1 In the Search for box in the top right corner of the Browse area, enter the word(s) you want to search for.
2 Optional. Select a category in which to search for the word or date (for example, select Current View, or Actors).
3 Click the Search button .
Videos that match the search criteria appear in the Browse area. You can view videos in either the Cover Art or Details view. For more information, see The Browse area on page 15.
Venue User Guidewww.roxio.com
Using VenueViewing video information 24
Viewing video informationYou can view file, content, and license details for the videos in your library.
To view video information:
1 In your library, if the Video Info pane is not already open, choose View > Video Info Pane to open it.
2 Select a video in your library.
The basic information appears in the Video Info Pane.
3 For more information, click More Video Info.
The following information tabs are available:
■ File: Details about the video such as file size and location, audio and video format, and so
on.
■ Content: Information about the content of the video file, such as the title, director, lead
actors, genre, and so on.
■ License: Information about your license for the video, such as the rental expiration dates,
or the number of times you can burn it to disc.
Venue User Guidewww.roxio.com
Using VenuePurchasing additional licenses 25
Purchasing additional licensesFollow this procedure to purchase additional licenses for videos if the rental period has expired, or if you have burned the maximum allowed number of copies.
To purchase additional licenses:
1 In your library, select the video you want to purchase a license for.
2 Choose File > Purchase Additional Licenses.
The video store from which you originally purchased the video appears.
3 Follow the instructions on the video store Web site to complete the purchase.
Setting parental controlsParental controls let you select which videos will appear in the library, based on the video rating from the video store. You can choose, for example, to only show videos with G or PG ratings. Videos with more restrictive ratings (such as PG-13 or R) will be hidden.
To set parental controls:
1 Choose Tools > Set Parental Controls.
The Parental Controls options appear in the Browse area.
2 Select the videos to show, based on their rating from the video store (for example, G, PG or PG-13). You may be asked to log in to your account.
After you make your selection and return to your video library, only videos with appropriate ratings appear. If you select a SmartView that contains hidden videos, a message appears, telling you how many videos are hidden.
3 To view the hidden videos, choose Tools > Set Parental Controls again, and choose a less restrictive setting.
Venue User Guidewww.roxio.com
Using VenueRating videos 26
Rating videosAdding a rating to your videos allows you to view videos in your library based on your star rating. For example, you can choose to view all of the videos that you gave a rating of 5 stars.
To rate videos:
1 In your library, select the video you want to rate.
2 Choose Tools > My Rating.
3 Select the rating to apply to the video (for example, 4 Stars).
Adding notes to a videoNotes are simply comments that you can add for your own reference, which appear in the Video Info pane.
To add your notes to the video information:
1 In your library, if the Video Info pane is not already open, choose View > Video Info Pane to open it.
2 Select a video in your library.
3 In the Video Info Pane, enter your notes about the video in the My Notes area.
Venue User Guidewww.roxio.com
Using VenueDeleting videos 27
Deleting videosFollow this procedure to delete videos from your library and hard disk.
To delete videos:
1 In your library, select the video you want to delete.
2 Choose File > Delete.
The Delete Video dialog appears, asking how you want to delete the video. You have the following options:
■ Remove only the Windows Media file from your hard drive. This will free up disk space,
but will leave the cover art and video information in your library. You will not be able to
watch the video, but you can quickly purchase or rent it again by right-clicking the movie
in your library.
■ Delete the video files and all cover art and video information.
3 Select one of the options from the Delete Video dialog, and then click OK to confirm that you want to delete the video.
The video is deleted from your library and your hard disk.
Note If the video you are deleting has been prepared for burning to disc, but not yet burned, more options are presented. You can also delete the large temporary file that was created during the preparation process.
Venue User Guidewww.roxio.com
Using VenueBurning videos to disc 28
Burning videos to discYou can burn your videos to a DVD disc, which you can then play on most set-top DVD players. To burn videos to disc, you’ll need a special QFlix-compliant recorder, as well as QFlix media.
Note The BurnRight™ System Check will help to ensure that you have enough hard drive space and a QFlix-compliant recorder. For more information, see About the BurnRight System Check on page 13.
Depending on the type of license you purchased, or the store from which you purchased the video, there may be a limit to the number of burns and burn attempts you are allowed. In most cases, you can burn one copy of the video. If a burn attempt is not successful, you will be able to try again a limited number of times. If you cannot burn the disc successfully in the number of attempts allowed, contact customer support for assistance.
About burning videos to disc—file preparationBefore a video can be burned to disc, needs to prepare the file. This process can take a very long time, often several hours. File preparation requires a lot of disc space, at least 5 GB for each video. This is because a large temporary file is created. The temporary file will be deleted after the video is burned to disc.
File preparation can take place as you download the video from the video store, or it may take place just before you burn the file. Depending on the version of that you are running, and the store from which you purchase videos, you may be able to choose when file preparation happens. In most cases, preparation will happen automatically in the background while the file is downloading from the video store. If not, the burn process may take several hours as the file is prepared before burning begins.
For information about changing the default location for the temporary files, click Help or press F1 in the General Options dialog box. (Choose Tools > Options to change options.)
To burn a video to disc:
1 In the Browse area, select the video you want to burn to disc.
Note Make sure that the video’s status is Ready to Burn.
2 In the Control Panel, click the Burn button (or choose File > Burn).
Venue User Guidewww.roxio.com
Using VenueBurning videos to disc 29
A confirmation message appears asking you to confirm that you want to burn the video using the selected recorder.
3 Optional. To select a different recorder, click Options, and then select the recorder you want to use to burn the disc.
For more information, click Help in the Burn Options dialog box.
4 Optional. If you want to create a disc label or case insert while the disc burns, select Print label(s).
5 Click Yes, burn now to confirm that you want to burn the video.
begins burning the video to disc. The progress of the burn appears in the Control panel. When the burn is complete, a message appears.
While the disc is burning, you can create a disc label or case insert. For more information, see Making disc labels and inserts on page 30.
Venue User Guidewww.roxio.com
Using VenueMaking disc labels and inserts 30
Making disc labels and insertsWhen you purchase a video from the video store, the video poster and cover art is automatically downloaded to your computer. This means that you can create a professional-looking disc label and case insert in just a few quick steps.
To create disc labels and inserts:
1 Choose one of the following ways to start Express Labeler:
■ Choose Tools > Create DVD Labels and Case Inserts.
■ When you are starting to burn a video to disc, in the Burn Confirmation dialog box, select Print label(s).
Once the burn process begins, the Select Label Type dialog box appears.
2 Choose a layout to print. The layouts that appear may vary depending on the video art that is available. Some examples are:
■ DVD (label)
■ DVD Case
■ DVD Booklet
■ Slim Case Insert
Note You can select one layout at a time to print. If there is more than one layout available, you can return to the Select Layout Type dialog to print more labels and inserts.
3 Click Next to continue.
The Print dialog box appears, showing a preview of the label or insert. For help with printing, click the Help button in the Print dialog box.
4 Click OK to print the label and/or insert.
Setting Venue optionsTo set options, such as playback and video size options, choose Tools > Options.
For detailed information about the available options and settings, click the Help button in the Options dialog box.
Venue User Guidewww.roxio.com
31
Index
Aabout
the BurnRight System Check 13Venue 11
addingnotes about videos 26
adjustingvideo size 19
Bburning
videos to disc 28videos, preparing 12, 28
BurnRight System Checkabout 13
buyingvideos from the video store 17
Ccancelling
video downloads 18
changingvideo size 19
creating labels 30
Ddeleting
videos from the library 27disc inserts
creating 30discs 30
creating inserts 30downloading videos
required hard drive space 12
Ffast forward
using 20fast reverse
using 20file preparation
and hard drive space 12, 28
Index 32
Hhard drive space
required for file preparation 12, 28required for video downloads 12
Kkeywords
using in Venue 23using to find videos 23
Llabels
creating for discs 30license information
viewing for videos 24licenses
purchasing for videos 25
MMy Library
deleting videos from 27description 14
My Ratingadding to video information 26
Nnotes
adding for videos 26
Pparental controls
setting 25pausing
video downloads 18playback controls
in Venue 20using fast forward 20using fast reverse 20
purchasinglicenses for videos 25
QQFlix
required recorder and media 12
Rrating
videos 26ratings
hiding restricted videos 25renting
videos from the video store 17requirements
for Venue 12hard drive space 12QFlix 12video store account 12
resumingvideo downloads 18
Roxio Venue User Guidewww.roxio.com
Index 33
Ssearching
using keywords 23setting
parental controls 25size
adjusting video size in Venue 19SmartViews
description 21in Venue 21using to find videos 21
Uuser notes
adding for videos 26
VVenue
about 11system requirements 12
video informationadding My Rating 26viewing 24
videosadjusting the video size 19burning to disc using Venue 28buying from the video store 17cancelling downloads 18deleting 27finding using keywords 23finding using SmartViews 21pausing downloads 18preparing to burn to disc 12, 28purchasing additional licenses 25
rating 26renting from the video store 17restricting views based on rating 25resuming downloads 18viewing license information 24viewing video information 24watching on your computer 19
viewingvideo information 24
Wwatching videos
on your computer 19playback controls 20using fast forward 20using fast reverse 20
Roxio Venue User Guidewww.roxio.com
Index 34
Roxio Venue User Guidewww.roxio.com


