
Ranger
® 7000 Scales
Instruction Manual
This document hosted by: www.oldwillknottscales.com


RANGER®
7000 SCALES EN-1
TABLE OF CONTENTS
1 INTRODUCTION ....................................................................................................................4 1.1 Description ............................................................................................................................................. 4 1.2 Features ................................................................................................................................................. 4 1.3 Definition of Signal Warnings and Symbols ............................................................................................. 4 1.4 Safety Precautions .................................................................................................................................. 4
2 INSTALLATION .....................................................................................................................5 2.1 Unpacking .............................................................................................................................................. 5 2.2 Installing Components ............................................................................................................................ 6 2.2.1 Terminal Setup............................................................................................................................... 6 2.2.2 Installing the Wind Ring, Weighing Platform ................................................................................... 6 2.3 Selecting the Location ............................................................................................................................. 6 2.4 Connecting Power and Turning ON the Balance ..................................................................................... 6 2.5 Connecting the Interface ......................................................................................................................... 7 2.6 Aligning the scale.................................................................................................................................... 7 2.7 Remote Terminal Operation .................................................................................................................... 7 2.8 Separating the Terminal from the Weighing Base .................................................................................... 8 2.9 Terminal Mounting .................................................................................................................................. 8 2.10 Initial Calibration ..................................................................................................................................... 8 2.10.1 Internal Calibration ....................................................................................................................... 8 2.10.2 External Calibration ...................................................................................................................... 8
3 OPERATION ..........................................................................................................................9 3.1 Overview of Display, Home Screen ......................................................................................................... 9 3.2 Principal Functions and Main Menu....................................................................................................... 10 3.3 Overview of Parts and Features ............................................................................................................ 11
4 APPLICATIONS ...................................................................................................................12 4.1. Weighing .............................................................................................................................................. 12 4.1.1 Application Setup ......................................................................................................................... 12 4.1.2 Accumulation ............................................................................................................................... 13 4.1.3 Input/Output (I/O) Setup ............................................................................................................... 14 4.2 Parts Counting ...................................................................................................................................... 15 4.2.1 Set the Average Piece Weight (APW) ........................................................................................... 15 4.2.2 Application Setup ......................................................................................................................... 16 4.2.3 Accumulation ............................................................................................................................... 17 4.2.4 Input/Output (I/O) Setup ............................................................................................................... 17 4.3 Check ................................................................................................................................................... 18 4.3.1 Check Weighing (default) ............................................................................................................. 18 4.3.2 Check Counting ........................................................................................................................... 20 4.3.3 Application Setup ......................................................................................................................... 20 4.3.4 Input/Output (I/O) Setup ............................................................................................................... 22 4.4 Formulation .......................................................................................................................................... 23 4.4.1 Free Formulation (default) ............................................................................................................ 23 4.4.2 Recipe Formulation ...................................................................................................................... 24 4.4.3 Factor and Tolerance Setup ......................................................................................................... 25 4.4.4 Application Setup ......................................................................................................................... 25 4.4.5 Input/Output (I/O) Setup ............................................................................................................... 26 4.5 Percent Weighing ................................................................................................................................. 27 4.5.1 Establishing a Reference Weight .................................................................................................. 27 4.5.2 Application Setup ......................................................................................................................... 28 4.6 Filling .................................................................................................................................................... 28 4.6.1 Target Weight and Set Points Setup ............................................................................................. 29 4.6.2 Application Setup ......................................................................................................................... 29 4.6.3 Input/Output (I/O) Setup ............................................................................................................... 30 4.7 Dynamic/Animal Weighing .................................................................................................................... 31 4.7.1 Application Setup ......................................................................................................................... 31 4.7.2 Average Time Setup .................................................................................................................... 32 4.7.3 Input/Output (I/O) Setup ............................................................................................................... 33 4.8 Density Determination ........................................................................................................................... 34 4.8.1 Application Setup ......................................................................................................................... 34 4.8.2 Water Temperature / Liquid Density Setup ................................................................................... 35

EN-2 RANGER®
7000 SCALES
4.9 Differential Weighing ............................................................................................................................. 36 4.9.1 Application Setup ......................................................................................................................... 36 4.9.2 Differential Operation ................................................................................................................... 37 4.10 Library .................................................................................................................................................. 38 4.10.1 Creating a Library Record .......................................................................................................... 38 4.10.2 Retrieving a Library Record ........................................................................................................ 39 4.10.3 Editing a Stored Library Record .................................................................................................. 39 4.10.4 Deleting a Stored Library Record ................................................................................................ 39 4.11 Additional Features ............................................................................................................................... 39 4.11.1 Weigh Below .............................................................................................................................. 39
5 MENU SETTINGS ................................................................................................................40 5.1. Menu Navigation ................................................................................................................................... 40 5.2. Main Menu ............................................................................................................................................ 41 5.3. Calibration ............................................................................................................................................ 41 5.3.1 Calibration Sub-menu................................................................................................................... 41 5.3.2 Zero Calibration ........................................................................................................................... 41 5.3.3 Span Calibration .......................................................................................................................... 41 5.3.4 Linearity Calibration ..................................................................................................................... 42 5.3.5 Internal Calibration ....................................................................................................................... 42 5.3.6 Automatic Calibration ................................................................................................................... 42 5.3.7 GEO Adjustment .......................................................................................................................... 42 5.4. Setup .................................................................................................................................................... 43 5.4.1 Scale Set-up Sub-menu ............................................................................................................... 43 5.4.2 Reset ........................................................................................................................................... 43 5.4.3 Language ..................................................................................................................................... 43 5.4.4 Power On Unit.............................................................................................................................. 43 5.4.5 Key Beep ..................................................................................................................................... 43 5.4.6 X10Display................................................................................................................................... 43 5.4.7 Barcode Rule ............................................................................................................................... 44 5.5. Read Out .............................................................................................................................................. 45 5.5.1 Reset ........................................................................................................................................... 45 5.5.2 Stability ........................................................................................................................................ 45 5.5.3 Zero Range .................................................................................................................................. 45 5.5.4 Filter level .................................................................................................................................... 45 5.5.5 Auto Zero Tracking ....................................................................................................................... 46 5.5.6 Brightness .................................................................................................................................... 46 5.5.7 Auto Dim ...................................................................................................................................... 46 5.5.8 Auto Sleep ................................................................................................................................... 46 5.6. Applications .......................................................................................................................................... 46 5.6.1 Turning an Application ON/OFF ................................................................................................... 46 5.7. Weighing Units ..................................................................................................................................... 47 5.7.1 Units Sub-menu ........................................................................................................................... 47 5.7.2 Reset ........................................................................................................................................... 47 5.7.3 Turning a Unit ON/OFF ................................................................................................................ 47 5.8. GLP and GMP Data .............................................................................................................................. 47 5.8.1 Reset ........................................................................................................................................... 47 5.8.2 Date Format ................................................................................................................................. 47 5.8.3 Date ............................................................................................................................................. 47 5.8.4 Time Format ................................................................................................................................ 47 5.8.5 Time ............................................................................................................................................ 48 5.8.6 Project ID ..................................................................................................................................... 48 5.9. Communications ................................................................................................................................... 48 5.9.1 Reset ........................................................................................................................................... 48 5.9.2 Baud Rate .................................................................................................................................... 48 5.9.3 Parity ........................................................................................................................................... 48 5.9.4 Stop Bits ...................................................................................................................................... 48 5.9.5 Handshake................................................................................................................................... 49 5.9.6 Alternate Command ..................................................................................................................... 49 5.9.7 Reset ........................................................................................................................................... 49 5.9.8 Stable Weight Only ...................................................................................................................... 49 5.9.9 Auto Print ..................................................................................................................................... 49 5.9.10 Print Template ............................................................................................................................ 50 5.9.11 Edit Template ............................................................................................................................. 50

RANGER®
7000 SCALES EN-3
5.9.12 Line Feed ................................................................................................................................... 50 5.9.13 Data Transfer ............................................................................................................................. 51 5.10. User Profiles ......................................................................................................................................... 52 5.11. Alibi Memory ......................................................................................................................................... 53 5.12. Event Counter ....................................................................................................................................... 54 5.13. Maintenance ......................................................................................................................................... 54 5.13.1 Export Library............................................................................................................................. 54 5.13.2 Export User Profile ..................................................................................................................... 54 5.13.3 Import Library Drives .................................................................................................................. 54 5.13.4 Import User Profile ..................................................................................................................... 54
6 SERIAL COMMUNICATION ................................................................................................55 6.1. Interface Commands............................................................................................................................. 55 6.2. RS232 Interface .................................................................................................................................... 55 6.2.1 Connecting to a Computer............................................................................................................ 55 6.2.2 Connecting to a Serial Printer ....................................................................................................... 55 6.3. The USB Interface ................................................................................................................................ 56 6.3.1 System Requirements .................................................................................................................. 56 6.3.2 USB Connections ......................................................................................................................... 56 6.3.3 Virtual Port Software Installation ................................................................................................... 57 6.4. USB Host.............................................................................................................................................. 57 6.5. Printout Format ..................................................................................................................................... 57 6.6. Printout Examples ................................................................................................................................. 58
7 LEGAL FOR TRADE ............................................................................................................60 7.1. Settings ................................................................................................................................................ 60 7.2. Verification ............................................................................................................................................ 60 7.3. Sealing ................................................................................................................................................. 60
8 MAINTENANCE ...................................................................................................................61 8.1. Calibration ............................................................................................................................................ 61 8.2. Information ........................................................................................................................................... 61 8.3. Cleaning ............................................................................................................................................... 62 8.4. Troubleshooting .................................................................................................................................... 62 8.5. Service Information ............................................................................................................................... 62 8.6. Software Updates ................................................................................................................................. 62
9 TECHNICAL DATA ..............................................................................................................63 9.1. Specifications ....................................................................................................................................... 63 9.2. Drawings and Dimensions .................................................................................................................... 64 9.3. Table of Geo Values ............................................................................................................................. 65 9.4. Options ................................................................................................................................................. 66 9.5. Button Icons List ................................................................................................................................... 67
10 COMPLIANCE......................................................................................................................71

EN-4 RANGER®
7000 SCALES
1. INTRODUCTION 1.1 Description The Ranger 7000 scale is a precision weighing instrument that will provide you with years of service if properly cared for. The Ohaus Ranger 7000 scales are available in capacities from 3000 grams to 35 kilograms.
1.2 Features Modular Design: Ohaus Ranger 7000 scales are composed of two interconnected modules: a Terminal and a Base. Depending on the user’s needs, the unit can be operated with the Terminal either attached to, or remote from, the Base, with a single interconnect cord 2 meter long. An optional tower kit and extended cord are also available as accessories.
1.3 Definition of Signal Warnings and Symbols Safety notes are marked with signal words and warning symbols. These show safety issues and warnings. Ignoring the safety notes may lead to personal injury, damage to the instrument, malfunctions and false results. Signal Words WARNING for a hazardous situation with medium risk, possibly resulting in injuries or death if not avoided.
CAUTION for a hazardous situation with low risk, resulting in damage to the device or the property or in loss of data, or injuries if not avoided.
Attention For important information about the product Note For useful information about the product
Warning Symbols General Hazard Electrical Shock Hazard Alternating Current Information
1.4 Safety Precautions
Caution: Read all safety warnings before installing, making connections, or servicing this
equipment. Failure to comply with these warnings could result in personal injury and/or property damage. Retain all instructions for future reference.
Verify that the input voltage range printed on the data label and the plug type matches the local AC power to be used.
Only connect models supplied with a grounded power cord to a compatible grounded power receptacle.
Do not position the scale such that it is difficult to disconnect the power cord from the power receptacle.
Make sure that the power cord does not pose a potential obstacle or tripping hazard.
This scale is for indoor use only.
Use the scale in dry locations only.
Do not drop loads on the pan.
Use only approved accessories and peripherals.
Operate the equipment only under ambient conditions specified in these instructions.
Disconnect the equipment from the power supply when cleaning.
Do not operate the equipment in hazardous or unstable environments.
Service should only be performed by authorized personnel.

RANGER®
7000 SCALES EN-5
2. INSTALLATION
2.1 Unpacking Carefully remove your Ranger 7000 scale and each of its components from the package. The included components vary depending on the scale model (see table below). Save the packaging to ensure safe storage and transport.
Included Component Photo R71MHD3 R71MHD6
R71MD3 R71MD6
R71MHD15
R71MHD35
R71MD15 R71MD35
Terminal
X X X X
Weighing Base
X X X X
Weighing Platform
200 x 200 mm
X
Weighing Platform
240 x 240 mm
X
Weighing Platform
311 x 371 mm
X X
Wind Shield
X
Compact Disc
Instruction Manual
X X X X

EN-6 RANGER®
7000 SCALES
2.2 Installing Components Refer to the illustrations and instructions below to identify and assemble your Ranger 7000 scale with its components. All components must be assembled before using the scale.
2.2.1 Terminal Setup When the Ranger 7000 is delivered, the Terminal is already attached (docked) to the Base. No additional setup is necessary. Refer to the illustrations and instructions below to identify and assemble your Ranger 7000 Scale.
Note: The Terminal is identical for all Ranger 7000 Scale models.
2.2.2 Installing the Wind Ring, Weighing Platform
1. Place the Wind Ring in position (R71MHD3, R71MHD6).
2. Place the platform onto the spider.
2.3 Selecting the Location
Avoid excessive vibrations, heat sources, air current, or rapid temperature changes. Allow sufficient space.
Note: Interface cables connect to the terminal. The terminal can be detached and mounted on a wall or positioned on a table separate from the scale.
2.4 Connecting Power and Turning ON the Scale The Ranger 7000 comes with an AC power cord. Connect the power cord to a suitable grounded electrical outlet
and press the ON button on the side of the base (see figure below).
Power ON button on the side of the base
Attention: Allow equipment to warm up for 60 minutes for optimal weighing performance.
Power ON Button

RANGER®
7000 SCALES EN-7
2.5 Connecting the Interface Use the built-in RS-232 port to connect either to a computer or a printer with a standard (straight-through) serial cable. Or connect using the scale’s USB port.
Interface connections on back of Terminal.
Thread terminal cable along cable coils on bottom of scale. Or pass cable through groove near release button.
2.6 Leveling the scale Only scales that have been leveled precisely horizontally provide accurate weighing results. The certified scales have a spirit level to simplify alignment.
Turn the adjustable feet of the scale until the spirit level’s air bubble is inside the inner circle.
2.7 Remote Terminal Operation The Terminal communicates with the weighing base via the Terminal cable. This cable must be plugged into the Terminal for the Ranger 7000 to display properly. If desired, the Ranger 7000 scale may be operated either with the Terminal attached, or remotely (up to 2 meters away).
RS232
USB host
USB slave
Used for options Used for options
Connect to base
Cable groove

EN-8 RANGER®
7000 SCALES
2.8 Separating the Terminal from the Weighing Base 1. To detach, press both the Release buttons inward (both at the same time) and gently pull the Terminal
towards you (outward) until the Terminal is detached. These Release buttons disengage the two hooks holding the Terminal to the Base. A cable is attached to the Terminal. Take care to not damage or disconnect this cable.
2. To reattach the Terminal, press in the two Release buttons and slide the Terminal into the Base until the Terminal hooks click and engage to hold the Terminal in place.
Release Buttons
Base and Terminal
2.9 Terminal Mounting If desired, the Terminal may be mounted to a wall or table using fasteners (not supplied) that are appropriate for the type of mounting surface.
2.10 Initial Calibration When the Scale is first installed, and when it is moved to another location, it must be calibrated to ensure accurate weighing results.
2.10.1 Internal calibration R71MHD models have built in AutoCal which can calibrate the scale automatically and does not require calibration masses. If preferred, the scale can be manually calibrated with external masses. Have the appropriate calibration masses available before beginning calibration. Refer to the Calibration Section for masses and calibration procedure.
2.10.2 External calibration R71MD models can only be manually calibrated with external masses.
50 mm / 1.97 in
Mounting holes

RANGER®
7000 SCALES EN-9
3. OPERATION
3.1 Overview of Display, Home Screen CONTROLS
Button Action
Enter/Exit the library menu
Switch between available application modes
Send the measurement data to available communications ports according to current settings.
Display information about Application Mode, Library, User and Menu
Enter/Exit the User menu
Switch the main weighing unit between the available units
Short Press: Input ‘2’-‘9’
To Enter ‘A’ press 2 times. For lower case ‘Z’, press 5 times.
Short Press: Input ‘0’ Long Press: Go to User Login screen
Short Press: Input ‘1’ Long Press: Switch platform between scale 1 and scale 2
Short Press: Clear character/string when editing string If no input is active, clear the current active library When there is no value added, pressing this button will switch the value sign between positive and negative.
Short Press: Input ‘.’, space, ‘_’
To Enter ‘_’ press 3 times.
Perform Zero operation
Perform Tare operation When entering the value first and then pressing this button the number input will be set to preset Tare value.

EN-10 RANGER®
7000 SCALES
Current Mode Capacity
Assistance Information
Main Weight Field
Capacity or Status Guides: Vary by application Function Icons related to Smart buttons
3.2 Principal Functions and Main Menu
MENU & SCREEN NAVIGATION
Press the Menu button to open the menu list.
Press the button below and to move down and up the list respectively.
To select the highlighted menu item, press . Press to move back to previous screen.
Calibration:
Select to view calibration options.
Setup:
Select to view user preferences.
Read Out:
Select to view scale settings.
Application Modes:
Select to view application modes.
Weighing Units:
Select to view weighing units.
GLP and GMP Data: Insert user data for traceability.
Alibi Memory:
Select to view Alibi Memory settings.
Note: This menu is only displayed when the Alibi option is installed.
Communication:
Select to view communication settings.
Maintenance:
Select to view Maintenance settings.
User Profile:
Select to view User Profile settings.
Event Counter:
Select to view Maintenance settings.
Stability
Gross (NET for net indicator)
Reference Field
Preset Tare

RANGER®
7000 SCALES EN-11
3.3 Overview of Parts and Features
Level Indicator
Terminal
Weighing platform
Power ON/OFF Button
Base
User adjustable leveling feet
EN-12 RANGER®
7000 SCALES
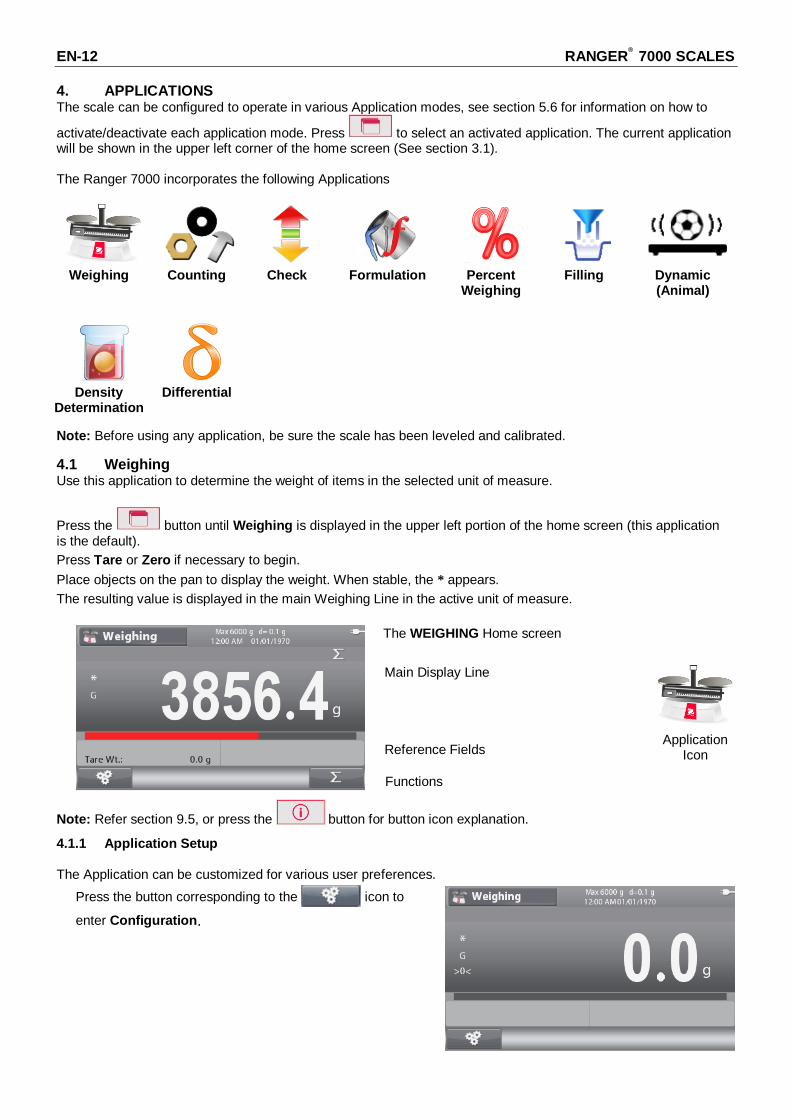
4. APPLICATIONS The scale can be configured to operate in various Application modes, see section 5.6 for information on how to
activate/deactivate each application mode. Press to select an activated application. The current application will be shown in the upper left corner of the home screen (See section 3.1). The Ranger 7000 incorporates the following Applications
Weighing Counting Check
Formulation
Percent
Weighing
Filling
Dynamic (Animal)
Density Determination
Differential
Note: Before using any application, be sure the scale has been leveled and calibrated.
4.1 Weighing Use this application to determine the weight of items in the selected unit of measure.
Press the button until Weighing is displayed in the upper left portion of the home screen (this application is the default).
Press Tare or Zero if necessary to begin.
Place objects on the pan to display the weight. When stable, the * appears.
The resulting value is displayed in the main Weighing Line in the active unit of measure.
The WEIGHING Home screen
Main Display Line
Reference Fields
Application
Icon
Note: Refer section 9.5, or press the button for button icon explanation.
4.1.1 Application Setup The Application can be customized for various user preferences.
Press the button corresponding to the icon to
enter Configuration.
Functions

RANGER®
7000 SCALES EN-13
The Configuration screen is now displayed.
Select the list item and press the button
corresponding to ,to change the setting as
desired.
To return to the Application home screen, press the
button corresponding to .
The Weighing Configurations are defined below (defaults in Bold)
Item Available Settings Comments
Auto Tare On, Off To enable Automatic Tare
Chain Tare On, Off To enable Chain (Continuous) Tare
Accumulate Off , Automatic, Manual To enable Accumulation / Totalization
Statistics On, Off To enable Statistics
4.1.2 Accumulation To start Accumulate weighing data, place the item on the pan and press the button corresponding to the icon
. The top accumulation icon will start blinking. The load to be accumulated has to be >= 5d and the next accumulation can only start once the pan has been cleared.
Note: The Accumulation icon will only be shown if Accumulate is set to Manual (see section 4.1.1). Viewing the Statistics results
When Statistics is set to ON, press the info button to view the statistics results.
Viewing the Accumulation results
To view the accumulation results, press the info button
then press the button corresponding to the icon
. The Accumulate Result screen is displayed.
Note: To return to home screen press the button.
Press the button to print Accumulation result.

EN-14 RANGER®
7000 SCALES
Clearing the Statistics / Accumulation results To clear the statistic / accumulation results, press the button
. A warning message appears. Press the button corresponding
to the icon to confirm the deletion or press the button
corresponding to the icon to abort the deletion and return to previous screen.
4.1.3 Input/Output (I/O) Setup The I/O’s can be customized for various user preferences. The I/O’s are defined below (defaults in Bold).
Item Available Settings
Discrete Input 1 Off, Zero, Tare, Clear Tare, Print, Unit, Accumulate
Discrete Input 2 Off, Zero, Tare, Clear Tare, Print, Unit, Accumulate
Discrete Output 1 Off, Overload, Underload
Discrete Output 2 Off, Overload, Underload
Discrete Output 3 Off, Overload, Underload
Discrete Output 4 Off, Overload, Underload
Note: The I/O’s will only work when the I/O Option Board have been installed. See the Accessory list in section 9.4 for information. The option I/O board provides two isolated inputs and four dry-contact normally open relay outputs which can be used for simple process weighing.
Press the button to enter the Main Menu.
With the button corresponding to the icon, go down the list and highlight Application Mode. Enter this sub-menu
by pressing the button corresponding to the icon.
In the Application Mode menu enter the Weighing sub-menu.

RANGER®
7000 SCALES EN-15
The Weighing sub-menu is now displayed. Select the list item and press the button corresponding to
the icon to change the setting as desired.
4.2 Counting Use this application to count samples of uniform weight.
Counting
Press the button until Counting is displayed in the upper left portion of the home screen. The default (or last) Average Piece Weight (APW) is displayed.
Setup APW value according to section 4.2.1 and then place objects on the pan to display the number of pieces.
The COUNTING Home screen
Main Display Line
Reference Fields
Functions
Application
Icon
Note: Refer section 9.5, or press the button for button icon explanation.
4.2.1 Set the Average Piece Weight (APW) Note: It is recommended that the APW is larger than 1d. If APW is between 0.05d and 1d, a warning screen will be displayed and the information line will show ‘Low APW’. If APW is less than 0.05d an error screen will appear and the APW value cannot be stored. There are three ways to set the APW: 1. Positive Sampling
Place the sample on the pan and then key in the number of pieces using the alphanumerical keypad and press the button
corresponding to the icon to confirm.
Alternatively, press the button corresponding to the icon. A numeric input screen appears. Key in the desired number of pieces using the alphanumerical keypad, and then press the button corresponding to the icon . .
The display returns to the Home screen.

EN-16 RANGER®
7000 SCALES
2. Negative Sampling Place container with the samples on the pan and Tare the scale, a NET 0 will be displayed. Remove the samples from the container; a negative net reading will be displayed. Input the sample size with the numeric keypad and then press the button
corresponding to the icon . The value will be displayed on the screen.
Alternatively, press the button corresponding to the icon.
A numeric input screen appears. Key in the desired number of pieces using the alphanumerical keypad, and then press the button
corresponding to the icon.
The display returns to the Home screen.
3. Entering a Known APW Key in the Piece Weight using the alphanumerical keypad and
press the button corresponding to the icon to confirm and store the APW.
Alternatively, press the button corresponding to the icon. A numeric input screen appears. Key in the Piece Weight using the alphanumerical keypad, then
press the button corresponding to the icon. The display returns to the Home screen with the new APW value displayed in the reference field.
Notes: When current unit is metric (g, kg), APW unit is g. When current weighing unit is imperial (lb, oz), APW unit is lb.
4.2.2 Application Setup The Application can be customized for various user preferences.
Press the button corresponding to the icon to
enter Configuration.

RANGER®
7000 SCALES EN-17
The Configuration screen is now displayed.
Select the list item and press the button
corresponding to the icon to change the setting as desired.
To return to the Application home screen, press
the button corresponding to .
The Counting Configurations are defined below (defaults in Bold).
Item Available Settings Comments
Auto Tare On, Off Turns Automatic Tare on/off
Chain Tare On, Off To enable Chain (Continuous)Tare
Accumulate Off , Automatic, Manual To enable Accumulation / Totalization
Auto Opt.* On, Off To enable Automatic Optimization of APW
APW Auto Save* On, Off To enable APW Automatic save
Opt. Beep On, Off To enable Optimization Beep
Note: * If APW value is directly entered (not through sampling), this feature does not work.
4.2.3 Accumulation See section 4.1.2 for details about the Accumulation feature.
4.2.4 Input/Output (I/O) Setup
The I/O’s can be customized for various user preferences. The I/O’s are defined below (defaults in Bold).
Item Available Settings
Discrete Input 1 Off, Zero, Tare, Clear Tare, Print, Unit, Accumulate
Discrete Input 2 Off, Zero, Tare, Clear Tare, Print, Unit, Accumulate
Discrete Output 1 Off, Overload, Underload
Discrete Output 2 Off, Overload, Underload
Discrete Output 3 Off, Overload, Underload
Discrete Output 4 Off, Overload, Underload
Note: The I/O’s will only work when the I/O Option Board have been installed. See the Accessory list in section 9.4 for information. The option I/O board provides two isolated inputs and four dry-contact normally open relay outputs which can be used for simple process weighing.
Press the button to enter the Main Menu.
With the button corresponding to the icon, go down the list and highlight Application Mode. Enter this sub-menu
by pressing the button corresponding to the icon.

EN-18 RANGER®
7000 SCALES
In the Application Mode menu enter the Counting sub-menu.
The Counting sub-menu is now displayed. Select the list item and press the button corresponding to the
icon to change the setting as desired.
4.3 Check Check is used to compare the weight or pieces of a sample against target limits.
Press the button until Check is displayed in the upper left portion of the home screen. Two different modes can be selected: Weight and Pieces. Three different methods to enter the check limits: Over and Under, Nominal Weight Tolerance, or Nominal Percent Tolerance. Setup check limits according to section 4.3.1 or 4.3.2. Place object on the pan to check if the weight is within the limits. 4.3.1 Check Weighing (default)
Make sure that the check mode is set to check weighing in the configuration menu . Place objects on the pan. The Under/Accept/Over status is shown in the progress bar area while the actual weight of the item is shown on the main Display Line.
The CHECK Home screen
Main Display Line
Reference Fields
Functions Application Icon
Note: Refer section 9.5, or press the button for button icon explanation.

RANGER®
7000 SCALES EN-19
Defining Over/Under Limits and Tolerance
Press the button corresponding to the icon to enter
Limit Setup.
Select Over or Under Limit and press the button
corresponding to the icon to edit the value.
Enter the desired value for the limit using the alphanumerical
keypad. Then press the button corresponding to the
icon to set the value and go back to previous screen.
Alternatively, the limits can be set by Target Weight
Tolerance.
To set the tolerance, press the button corresponding to the
icon to enter the Tolerance setup.
To switch between Over/Under Load, Target Weight
Tolerance, Target Weight Percentage press the button
corresponding to the icon. If desired, edit the value
by using the alphanumerical keypad and press the button
corresponding to the icon to save the changes and
return to the previous screen.
Note: The three set limits methods share the same data.

EN-20 RANGER®
7000 SCALES
4.3.2 Check Counting
Press the configuration button and select Check Mode to Check Counting. Place objects on the pan. The Under/Accept/Over status is shown in the progress bar area while the actual number of pieces is shown on the main Display Line.
The CHECK Home screen
Main Display Line
Reference Fields
Functions
Note: Refer section 9.5, or press the button for button icon explanation. Set the Average Piece Weight (APW) Note: It is recommended that the APW is larger than 1d. If APW is between 0.05d and 1d, a warning screen will be displayed and the information line will show ‘Low APW’. If APW is less than 0.05d an error screen will appear and the APW value cannot be stored. There are three ways to set the APW, see section 4.2.2 for instructions.
Defining Over/Under Limits
Press the button corresponding to the icon to enter
Limit Setup.
Note: See section 4.3.1 for information on how to set the
Over/Under limits.
4.3.3 Application Setup The Application can be customized for various user preferences.
Press the button corresponding to the icon to enter
Configuration Setup.

RANGER®
7000 SCALES EN-21
The Configuration Menu is now displayed.
Select the list item and press the button corresponding
to ,to change the setting as desired.
To return to the Application home screen, press the
button corresponding to .
The Check Configurations are defined below (defaults in Bold).
Item Available Settings Comments
Check Mode Check Weighing, Check Counting To set Mode
Audible Signal Off, Under,Accept,Over, Under&Over To enable Beeper Signal
Auto Opt* On, Off To enable Automatic Optimization of APW
APW Auto Save* On, Off To enable APW Automatic save
Opt. Beep* On, Off To enable Optimization Beep
Auto Tare On, Off, On Accept To enable Automatic Tare
‘On Accept’ means that if the object weight is within accept range, auto Tare will be performed
Chain Tare On, Off To enable Chain (Continuous) Tare
Accumulate Off , Automatic, Manual To enable Accumulation / Totalization
Graph Display Bar, Block To set Graph Display Type
Note: * Only available in Check Counting mode.
Positive Check Positive check is used to determine when the material added to the scale is within the target range. In this case the UNDER and OVER limits must be positive values. (The OVER limit must be greater than the UNDER limit.) Negative Check Negative check is used to determine when the material removed from the scale is within the target range. In this case the UNDER and OVER limits are both negative values. The UNDER limit must be greater than the OVER limit (for example: UNDER= -10/OVER= -15). Place the item to be weighed on the scale and press Tare. Remove a portion of the item until it is within the ACCEPT range. Zero Check Zero check is used when comparing subsequent samples to an initial reference sample. In this case, the UNDER limit must be a negative value and the OVER limit must be a positive value. Place the reference item on the scale and press Tare. Remove the reference sample and place the item to be compared on the scale to determine if it is within the ACCEPT range.

EN-22 RANGER®
7000 SCALES
4.3.4 Input/Output (I/O) Setup
The I/O’s can be customized for various user preferences.
The I/O’s are defined below (defaults in Bold).
Item Available Settings
Discrete Input 1 Off, Zero, Tare, Clear Tare, Print, Unit, Accumulate
Discrete Input 2 Off, Zero, Tare, Clear Tare, Print, Unit, Accumulate
Discrete Output 1 Off, Under, Over, Accept, Under/Over
Discrete Output 2 Off, Under, Over, Accept, Under/Over
Discrete Output 3 Off, Under, Over, Accept, Under/Over
Discrete Output 4 Off, Under, Over, Accept, Under/Over
Note: The I/O’s will only work when the I/O Option Board have been installed. See the Accessory list in section 9.4 for information. The option I/O board provides two isolated inputs and four dry-contact normally open relay outputs which can be used for simple process weighing.
Press the button to enter the Main Menu.
With the button corresponding to the icon, go down the list and highlight Application Mode. Enter this sub-menu
by pressing the button corresponding to the icon.
In the Application Mode menu enter the Check sub-menu.
The Check sub-menu is now displayed. Select the list item and press the button corresponding to the
icon to change the setting as desired.

RANGER®
7000 SCALES EN-23
4.4 Formulation Use this application for compounding and recipe making. The number of components can be 1 to 100. Formulation has two available modes of operation: Free Formulation and Recipe Formulation.
Press the button until Formulation is displayed in the upper left portion of the home screen. 4.4.1 Free Formulation (default)
This mode of Formulation allows the user to freely add components. A recipe can also be saved and printed when the formulation is finished.
The FORMULATION Home screen
Main Display Line
Reference Fields
Functions Application Icon
Note: Refer section 9.5, or press the button for button icon explanation.
Press the button corresponding to the icon to
enter the Enter Component screen.
Select the list item and press the button corresponding to
the icon , to change the value as desired using
the alphanumerical keypad.
The item Name and target Weight are required to be
entered.
Press the button corresponding to the icon to
confirm all the values and continue with the formulation.
Note: The icon will only appear when all the
required values have been entered (name and target
weight).
The entered target weight will be used as preset tare.
Place the required weight on the pan (add weight until the
displayed value reaches zero again).
Press the button corresponding to the icon to
confirm the weight for the current component and to
continue adding other components.

EN-24 RANGER®
7000 SCALES
Notes: To terminate the formulation process, press the
button corresponding to the icon. If the added
weight is over the tolerance limit, compensation will be
performed according to the setup in the configuration (At
the end, Off, Immediately).
When the compensation is active (At the end or
Immediately), if the component added is within tolerance
the capacity bar is always in green color.
If one component added is outside the tolerance, the scale
will do compensation for next items. In this case, the value
displayed is not actual weight and the capacity bar will turn
red.
To finish the formulation, press the button corresponding to
the icon and add the last component.
Then the formulation will finish and a Formulation Result
screen is displayed.
To print the formulation result press the button corresponding to the icon or the button .
To save the formulation result, press the button corresponding to the icon .
To return to the main screen, press the button corresponding to the icon . 4.4.2 Recipe Formulation
Make sure the formulation mode is set to recipe (see
section 4.4.4 for instructions).
The information line will now show ‘Please recall a recipe’
Recall a recipe from the Formulation Library by pressing
the button . See section 4.10 for instructions on
how to create/recall a Library record.
Press the button corresponding to the icon or
scan a barcode to start formulation.

RANGER®
7000 SCALES EN-25
The target weight in each recipe item will be used as
preset tare.
Place the required weight on the pan (add weight until the
displayed value reaches zero again).
Press the button corresponding to the icon to
confirm the weight for the current component and to
continue adding other components or scan another
barcode of the next component.
Notes: To terminate the formulation process, press the
button corresponding to the icon. If the added
weight is over the tolerance limit, compensation will be
performed according to the setup in the configuration (At
the end, Off, Immediately).
When the compensation is active (At the end or
Immediately), if the component added is within tolerance
the capacity bar is always in green color.
If one component added is outside the tolerance, the
scale will do compensation for next items. In this case, the
value displayed is not actual weight and the capacity bar
will turn red.
When all the components of the recipe have been added, the formulation will finish and a Formulation Result screen is displayed. 4.4.3 Factor and Tolerance Setup
Press the button corresponding to the icon to
enter the Parameter screen. Select the list item and press the button corresponding to
the icon , to change the setting as desired
using the alphanumerical keypad.
The Component Factor can be set to a value between
0.20 and 5.00 with 1.0 being the default.
The Tolerance can be set to a value between 0 and
15.0 % with 5 % being the default.
Press the button corresponding to the icon to
return to the Application Home screen.
Note: Factor and Tolerance can only be set after the formulation has started. Tolerance is +/-, for example: Tolerance = 5 % means that the tolerance is the range -5 % ~ +5 %.

EN-26 RANGER®
7000 SCALES
4.4.4 Application Setup The Application can be customized for various user preferences.
Press the button corresponding to the icon to enter
Configuration.
The Configuration Menu is now displayed.
Select the list item and press the button
corresponding to ,to change the setting
as desired.
To return to the Application home screen, press the
button corresponding to .
The Formulation Configurations are defined below (defaults in Bold).
Item Available Settings Comments
Formulation Mode Free, Recipe To set Mode
Compensation Mode At the End, Off, Immediately To set compensation mode
4.4.5 Input/Output (I/O) Setup
The I/O’s can be customized for various user preferences. The I/O’s are defined below (defaults in Bold).
Item Available Settings
Discrete Input 1 Off, Zero, Tare, Clear Tare, Quit, Next Item, Last Item
Discrete Input 2 Off, Zero, Tare, Clear Tare, Quit, Next Item, Last Item
Discrete Output 1 Off, Overload, Underload
Discrete Output 2 Off, Overload, Underload
Discrete Output 3 Off, Overload, Underload
Discrete Output 4 Off, Overload, Underload
Note: The I/O’s will only work when the I/O Option Board have been installed. See the Accessory list in section 9.4 for information. The option I/O board provides two isolated inputs and four dry-contact normally open relay outputs which can be used for simple process weighing.

RANGER®
7000 SCALES EN-27
Press the button to enter the Main Menu.
With the button corresponding to the icon, go down the list and highlight Application Mode. Enter this sub-menu by
pressing the button corresponding to the icon.
In the Application Mode menu enter the Formulation sub-menu.
The Formulation sub-menu is now displayed. Select the list item and press the button corresponding to the
icon to change the setting as desired.
4.5 Percent Weighing Use Percent Weighing to measure the weight of a sample displayed as a percentage of a pre-established Reference Weight.
Press the button until Percent is displayed in the upper left portion of the home screen.
Establish a reference weight according to section 4.5.1 and then place the objects on the pan to check the percentage.
The default (or last) Reference Weight is displayed.
The PERCENT Home screen
Main Display Line
Reference Fields
Functions Application Icon
Note: Refer section 9.5, or press the button for button icon explanation.

EN-28 RANGER®
7000 SCALES
4.5.1 Establishing a Reference Weight
There are three ways to establish a reference weight:
1. Key in the reference weight value using the
alphanumerical keypad and then press the button
corresponding to the icon.
2. Press the button corresponding to the icon to
enter the Edit Reference Weight screen.
The Edit Reference Weight screen is now displayed.
Enter the desired value using the alphanumerical keypad and then press the button corresponding to the
icon to save and return to the Application home screen.
3. Place the reference weight on the pan and press the
button corresponding to the icon.
4.5.2 Application Setup The Application can be customized for various user preferences.
Press the button corresponding to the icon to
enter Configuration.
The Configuration Menu is now displayed.
Select the list item and press the button
corresponding to ,to change the setting
as desired.
To return to the Application home screen, press the
button corresponding to .

RANGER®
7000 SCALES EN-29
The Percent Configurations are defined below (defaults in Bold).
Item Available Settings Comments
Auto Tare On, Off To enable Automatic Tare
Chain Tare On, Off To enable Chain Tare (continuous Tare)
Accumulate Off, Automatic, Manual To enter Accumulation / Totalization
4.6 Filling This application allows the user to fill a container to a pre-determined target weight. The progress bar displays the filling status, and within 10 percent of the target value the progress bar converts to fine resolution (+/– 10%) for accurate results.
Press the button until Filling is displayed in the upper left portion of the home screen. The default (or last) Target weight is displayed. Place objects on the pan to begin.
The FILLING Home screen
Main Display Line
Reference Fields
Functions Application Icon
Note: Refer section 9.5, or press the button for button icon explanation. 4.6.1 Target Weight and Set Points Setup
There are three ways to set up the Target weight:
1. Place the weight on the pan and press button
corresponding to the icon.
2. Key in the target weight value using the alphanumerical
keypad and press the button corresponding to the icon
.
3. Press the button corresponding to the (Set
Point) icon to enter the Edit Settings screen.
The Edit Settings screen is now displayed.
Press the button corresponding to the icon to switch between Weight, Tolerance and Percent.
Select the list item and press the button corresponding
to the icon ,to change the setting as desired
using the alphanumerical keypad.
To return to the Application home screen, press the
button corresponding to the icon .

EN-30 RANGER®
7000 SCALES
4.6.2 Application Setup The Application can be customized for various user preferences.
Press the button corresponding to the icon to
enter Configuration.
The Configuration Menu is now displayed.
Select the list item and press the button
corresponding to the icon ,to change the
setting as desired.
To return to the Application home screen, press the
button corresponding to the icon .
The Filling Configurations are defined below (defaults in Bold).
Item Available Settings Comments
Auto Tare On, Off To enable Automatic Tare
Chain Tare On, Off To enable Chain Tare (Continuous Tare)
Accumulate Off, Manual To enable Accumulation / Totalization
4.6.3 Input/Output (I/O) Setup The I/O’s can be customized for various user preferences. The I/O’s are defined below (defaults in Bold).
Item Available Settings
Discrete Input 1 Off, Zero, Tare, Clear Tare, Print, Start/Stop, Accumulate
Discrete Input 2 Off, Zero, Tare, Print, Start/Stop
Discrete Output 1 Off, SP1, SP2, Target, Alarm
Discrete Output 2 Off, SP1, SP2, Target, Alarm
Discrete Output 3 Off, SP1, SP2, Target, Alarm
Discrete Output 4 Off, SP1, SP2, Target, Alarm

RANGER®
7000 SCALES EN-31
Note: The output will be reset to normally open when either SP1 or SP2 is reached. The I/O’s will only work when the I/O Option Board have been installed. See the Accessory list in section 9.4 for information. The option I/O board provides two isolated inputs and four dry-contact normally open relay outputs which can be used for simple process weighing.
The outputs also only work when the button corresponding to the icon has been pressed.
Press the button to enter the Main Menu.
With the button corresponding to the icon, go down the list and highlight Application Mode. Enter this sub-menu
by pressing the button corresponding to the icon.
In the Application Mode menu enter the Filling sub-menu.
The Filling sub-menu is now displayed. Select the list item and press the button corresponding to the
icon to change the setting as desired.
4.7 Dynamic Weighing Use this application to weigh an unstable load, such as a moving animal. Three different start/reset modes can be selected: Manual (start and stop via key press), Semi-Automatic (auto-start with manual reset), and Automatic (start and stop automatically).
Press the button until Dynamic is displayed in the upper left portion of the home screen.
Press the button corresponding to the icon to start averaging.
To abort the averaging press the button corresponding to the icon .
When the averaging has finished, press the button corresponding to the icon to reset.

EN-32 RANGER®
7000 SCALES
The DYNAMIC Home screen
Main Display Line
Reference Fields
Functions Application Icon
Note: Refer section 9.5, or press the button for button icon explanation. 4.7.1 Application Setup The Application can be customized for various user preferences.
Press the button corresponding to the icon to
enter Application Setup.
The Configuration Menu is now displayed.
Select the list item and press the button
corresponding to ,to change the setting as
desired.
To return to the Application home screen, press the
button corresponding to .
The Dynamic Configurations are defined below (defaults in Bold).
Item Available Settings Comments
Dynamic Mode Manual, Semi-Automatic, Automatic To set the Mode
Auto Tare On, Off To enable Automatic Tare
Chain Tare On, Off To enable Chain (Continuous) Tare
Accumulate Off, Automatic, Manual To enable Accumulate / Totalization

RANGER®
7000 SCALES EN-33
4.7.2 Average Time Setup
Press the button corresponding to the icon to
enter the Edit Average Time screen.
The Edit Average Time screen is now displayed.
Enter the Average Time by using the alphanumerical keypad and press the button
corresponding to the icon to change save the value and return to the Application home screen.
The default Average Time is 10 s.
Note: When the time is set to 0, the first stable weight over 5d will be displayed.
Averaging time can be set to a value between 0 and 60.
4.7.3 Input/Output (I/O) Setup
The I/O’s can be customized for various user preferences. The I/O’s are defined below (defaults in Bold).
Item Available Settings
Discrete Input 1 Off, Zero, Tare, Clear Tare, Print, Start, Reset, Accumulate
Discrete Input 2 Off, Zero, Tare, Clear Tare, Print, Start, Reset, Accumulate
Discrete Output 1 Off, Underload, Overload
Discrete Output 2 Off, Underload, Overload
Discrete Output 3 Off, Underload, Overload
Discrete Output 4 Off, Underload, Overload
Note: The I/O’s will only work when the I/O Option Board have been installed. See the Accessory list in section 9.4 for information. The option I/O board provides two isolated inputs and four dry-contact normally open relay outputs which can be used for simple process weighing.
Press the button to enter the Main Menu.
With the button corresponding to the icon, go down the list and highlight Application Mode. Enter this sub-menu
by pressing the button corresponding to the icon.

EN-34 RANGER®
7000 SCALES
In the Application Mode menu enter the Dynamic sub-menu.
The Dynamic sub-menu is now displayed. Select the list item and press the button corresponding to
the icon to change the setting as desired.
4.8 Density Determination The Ranger 7000 can be used to determine an object’s density. Two types of density determination can be made:
1. Solids more dense than water
2. Solids less dense than water
Press the button until Density is displayed in the upper left portion of the home screen. Before making density measurements, establish the Application Settings.
Press the button corresponding to the icon to start.
Check the object weight in air and when prompted press the button corresponding to the icon . Check the object weight again when it is submerged in the liquid and when prompted press the button
corresponding to the icon . The density of the object will be displayed.
The DENSITY Home screen
Main Display Line
Reference Fields
Functions Application Icon
Notes: Refer section 9.5, or press the button for button icon explanation.

RANGER®
7000 SCALES EN-35
4.8.1 Application Setup The Application can be customized for various user preferences.
Press the button corresponding to the icon to
enter Configuration.
The Configuration Menu is now displayed.
Select the list item and press the button
corresponding to ,to change the setting
as desired.
To return to the Application home screen, press the
button corresponding to .
The Density Determination Configurations are defined below (defaults in Bold).
Item Available Settings Comments
Liquid Type Water, Other* To set the Liquid type
Temperature Type ºC, ºF To set the Temperature Type
Note: * Other liquids that are not water.
4.8.2 Water Temperature / Liquid Density Setup To set the water temperature or Liquid density (other liquids than water), please follow the instructions below. Liquid type: Water
Press the button corresponding to the icon to
enter the Enter Water Temperature screen.

EN-36 RANGER®
7000 SCALES
The Enter Water Temperature screen is now displayed.
Enter the water temperature by using the alphanumerical keypad and press the button
corresponding to the icon, to save the value and return to the previous screen.
Liquid Type: Other
Press the button corresponding to the icon to
enter the Enter Liquid Density screen.
The Enter Liquid Density screen is now displayed.
Enter the liquid density by using the alphanumerical keypad
and press the button corresponding to the icon, to
save the value and return to the previous screen.
4.9 Differential Weighing Differential weighing stores weight values of the samples. The samples can then be dried or processed and the difference in weight calculated. Up to 20 samples can be stored.
Press the Button until Differential is displayed in the upper left portion of the home screen.
The DIFFERENTIAL Home screen
Main Display Line
Reference Fields
Functions Application Icon
Note: Refer section 9.5, or press the button for button icon explanation.

RANGER®
7000 SCALES EN-37
4.9.1 Application Setup The Application can be customized for various user preferences.
Press the button corresponding to the icon to
enter Configuration.
The Configuration Menu is now displayed.
Select the list item and press the button
corresponding to ,to change the setting as
desired.
To return to the Application home screen, press the
button corresponding to .
The Differential Configurations are defined below (defaults in Bold).
Item Available Settings Comments
Auto Tare Off, On To set the Automatic Tare
Chain Tare On, Off To set the Chain Tare
4.9.2 Differential Operation To start differential, please follow the instructions below.
Press the button corresponding to the icon to
enter Edit Item.
The Edit Item Menu is now displayed
Press to add a new item. A maximum of 20 items can be created.
Press , the current item is selected and the scale
returns to the main screen to start differential weighing.
Press to edit the name and values of the item. Note: All data will automatically be cleared when scale is powered Off. An item must be selected to start differential operation.

EN-38 RANGER®
7000 SCALES
4.10 Library When an item is processed on a regular basis, the item’s data may be stored in memory for future use. This memory is referred to as the Scale’s Library.
The following data is stored for the Application used:
Application PN (Part Number)
Name Preset Tare APW Ref./Target Weight
Check Limits
SP Set Points
Max Records
Weighing x x x 300
Counting x x x x 300
Percent N/A x
Check x x x x x 300
Dynamic N/A x
Filling x x x x x 300
Formulation x x x x 30
Differential N/A x
Density N/A x
Notes: Maximum length of PN and Name is 30 characters. For the formulation library, each record can store up to 100 components. 4.10.1 Creating a Library Record
To create a Library record, press the Library button . The requested data records will appear according to the active application mode (see section 4.10 above). In this example the Weighing Library screen is now displayed.
To return to the previous screen press the Library
button again.
To add a Library record, press the button
corresponding to the icon .
The New Library Item screen is displayed
Press the button corresponding to the icon
to enter PN by using the alphanumeric keypad. Press the button corresponding to the icon
again to save the Barcode. Repeat the process to enter Name, Tare Weight and other values by using the button corresponding
to to move down in the list. Note: Library Names can be 8 characters or less.
Press the button corresponding to the icon to go back to Library List screen.

RANGER®
7000 SCALES EN-39
4.10.2 Retrieving a Library Record To load a Library record from the home screen
press the button.
The Weighing Library screen is now displayed.
Then press the button corresponding to the icon
to load the Library data and return to the Application mode related to the Library record.
4.10.3 Editing a Stored Library Record To delete a stored record, follow “Retrieving a Library Record” above.
Use the buttons corresponding to the icons and
to move up and down in the list and highlight the Library item to be edited.
Then press the button corresponding to the icon . The Edit Library Item screen will be displayed. Make the necessary changes and the press the button
corresponding to the icon to return to the Library List.
4.10.4 Deleting a Stored Library Record
To delete a stored record, follow “Editing a Stored Library Record” above.
Press the button corresponding to the icon . A new screen will be displayed asking for confirmation.
Press the button corresponding to the icon to delete the record, or press the button corresponding to the
icon to go back to the previous screen.
4.11 Additional Features 4.11.1 Weigh Below The Ranger 7000 Scale is equipped with a weigh below hook for weighing below the scale.
CAUTION: Make sure that the scale is properly supported so that it cannot fall or detach during use of the Weigh below feature. Failure to follow these instructions could result in personal injury and damage to the equipment.
To use this feature, remove power from the scale, then remove the protective cover for the weigh below opening (2 screws). The protective cover is reversible for easy storage.
With Cover Without Cover The scale can be supported using lab jacks or any other convenient method. Ensure the scale is level and secure. Power on the Scale, then use an appropriate string or wire to attach items to be weighed.

EN-40 RANGER®
7000 SCALES
5. MENU SETTINGS
5.1 Menu Navigation
To enter the Main Menu, press the button from any Application Home screen.
Changing Settings To change a menu setting, navigate to that setting using the following steps:
Enter the Menu
From any Application screen, press the button. The Main Menu List appears on the display.
Select the Sub-Menu Scroll to the desired Sub-menu in the Main Menu List by using the button corresponding to the icon
. Press the button corresponding to the icon
to display the Sub-menu items.
Select the Sub-Menu Item
Scroll to the desired Sub-menu Item using the button corresponding to the icon .
Press the button corresponding to the icon to view the Sub-menu item's settings. Select the Setting.
Scroll to the desired Setting using the button corresponding to the icon .
Press the button corresponding to the icon to select the setting.
Press the button to return to the previous screen.
Press the button or the button corresponding to the icon , to exit the menu mode and return to the last active Application mode.
RANGER®
7000 SCALES EN-41
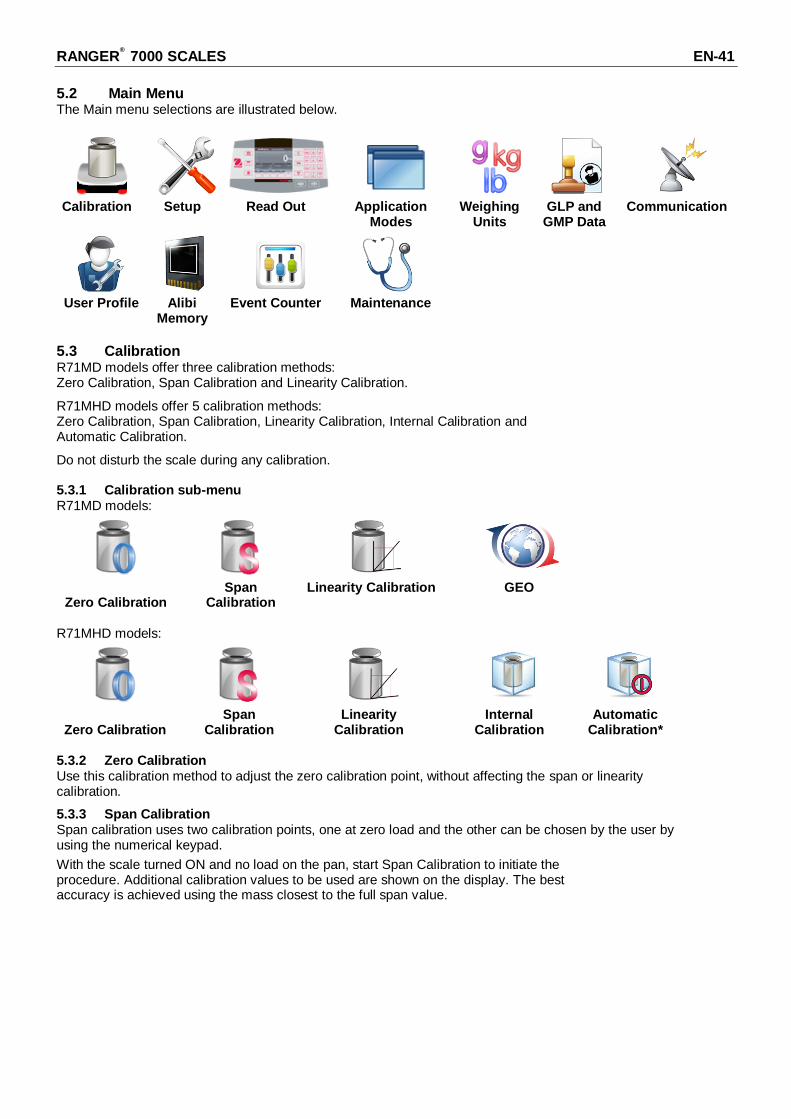
5.2 Main Menu The Main menu selections are illustrated below.
Calibration Setup Read Out
Application
Modes Weighing
Units GLP and
GMP Data Communication
User Profile Alibi Memory
Event Counter Maintenance
5.3 Calibration R71MD models offer three calibration methods: Zero Calibration, Span Calibration and Linearity Calibration.
R71MHD models offer 5 calibration methods: Zero Calibration, Span Calibration, Linearity Calibration, Internal Calibration and Automatic Calibration.
Do not disturb the scale during any calibration. 5.3.1 Calibration sub-menu R71MD models:
Zero Calibration Span
Calibration Linearity Calibration GEO
R71MHD models:
Zero Calibration
Span Calibration
Linearity Calibration
Internal Calibration
Automatic Calibration*
5.3.2 Zero Calibration Use this calibration method to adjust the zero calibration point, without affecting the span or linearity calibration.
5.3.3 Span Calibration Span calibration uses two calibration points, one at zero load and the other can be chosen by the user by using the numerical keypad.
With the scale turned ON and no load on the pan, start Span Calibration to initiate the procedure. Additional calibration values to be used are shown on the display. The best accuracy is achieved using the mass closest to the full span value.

EN-42 RANGER®
7000 SCALES
5.3.4 Linearity Calibration Linearity calibration uses three calibration points, one at zero load and the others at specified loads. Refer to Table 5.1 for Linearity values.
TABLE 5-1 Calibration Masses
Model Linearity Calibration Points Weight Class
R71MHD3 0 kg, 1.5 kg, 3 kg ASTM Class 2 OIML F1
R71MHD6 0 kg, 3 kg, 6 kg ASTM Class 2 OIML F1
R71MHD15 0 kg, 10 kg, 15 kg ASTM Class 2 OIML F1
R71MHD35 0 kg, 20 kg, 35 kg ASTM Class 2 OIML F1
R71MD3 0 kg, 1.5 kg, 3 kg ASTM Class 5 OIML M1
R71MD6 0 kg, 3 kg, 6 kg ASTM Class 5 OIML M1
R71MD15 0 kg, 10 kg, 15 kg ASTM Class 5 OIML M1
R71MD35 0 kg, 20 kg, 35 kg ASTM Class 5 OIML M1
5.3.5 Internal Calibration (R71MHD models) Calibration is accomplished with the internal calibration mass. Internal calibration can be performed at any time, provided the scale has warmed up to operating temperature and is level. With the Scale turned ON and no load on the pan, select Internal Calibration. The Scale begins to calibrate. The display shows the status, then returns to the current application.
To cancel at any time, press . 5.3.6 Automatic Calibration (R71MHD models) When Automatic Calibration is set ON, the scale performs a self-calibration:
• when it senses a temperature change of 1.5°C
• or every 11 hours AutoCal will automatically calibrate the Scale (using the internal mass) each time there is a change in temperature significant enough to affect accuracy. Note: * Automatic Calibration function is only available in certain regions. 5.3.7 GEO Adjustment Enter this sub-menu to set the GEO values.
Press the button corresponding to the icon to adjust the GEO value.
Choose the correct GEO value and press the button
corresponding to the icon to confirm. The values range from 0-31.
Note: GEO is only available in R71MD models. See table 9-3 for GEO values.

RANGER®
7000 SCALES EN-43
5.4 Setup Enter this sub-menu to customize Scale display functionality.
5.4.1 Scale Setup sub-menu
Reset Language Power On
Unit Key Beep X10Display Barcode Rule
Factory default settings are shown below in bold.
5.4.2 Reset Reset all settings to factory default settings.
= Reset.
= Do not reset and return to Setup menu screen.
5.4.3 Language Set the language displayed for menus and displayed messages.
English Spanish German French Italian Chinese
5.4.4 Power On Unit Set the unit that will be displayed at Power On.
Auto Kilogram Pound Gram Ounce Pound:Ounce
5.4.5 Key Beep Set whether or not the beeper sounds when a button is pressed.
OFF = disabled. ON = enabled.
5.4.6 X10 Display Set the X10 Display. When ON, the display shows only one decimal point.
OFF = disabled. ON = enabled. Note: When the scale is used in Legal for Trade the setting will be forced to OFF and it will not be changeable.

EN-44 RANGER®
7000 SCALES
5.4.7 Barcode Rule The barcode rule validates a scanned barcode number. Two different rules can be set. If both rules are enabled, any barcode that match either rule 1 or rule 2 will be accepted by the scale.
Match Rule 1 OFF = disabled. ON = enabled. Match Rule 2 OFF = disabled. ON = enabled.
Example 1:
In this example the barcode rule is set to ‘……..’. This means that
any barcode that is 8 characters long will be accepted by the scale, regardless of what the individual characters are. Example 2:
In this example the barcode rule is set to ‘…..55’. This means that
any barcode that is 7 characters long and ending with the numbers ‘55’ will be accepted by the scale.
Note: The barcode rule is only functional when connecting a barcode scanner through the USB host. Please refer to the barcode scanner manual for supported barcode types. The barcode will be stored as PN (Part Number) in the library. The maximum length of the barcode (PN) is 30 characters.

RANGER®
7000 SCALES EN-45
5.5 Read Out Enter this sub-menu to customize Scale display functionality.
Scale Read Out sub-menu
Reset Stability Zero Range Filter Level
Auto Zero Tracking
Brightness Auto Dim (minutes)
Auto Sleep (minutes)
Factory default settings are shown below in bold.
5.5.1 Reset Reset all settings to factory default settings.
Yes = Reset. No = Do not reset and return to Read Out menu screen.
5.5.2 Stability Set the amount the reading can vary while the stability symbol remains on.
0.5 Division = 0.5 graduations 1 Division = 1 graduation 2 Division = 2 graduations 5 Division = 5 graduations
Note: The setting is forced and locked to 1 Division when the Security Switch is set to the locked position.
5.5.3 Zero Range Set the percentage of scale capacity that may be zeroed.
2% 10%
Note: The setting is forced and locked to 2% when the Security Switch is set to the locked position.
5.5.4 Filter level Set the amount of signal filtering.
LOW = faster stabilization time with less stability. MEDIUM = normal stabilization time with normal stability. HIGH = slower stabilization time with more stability.
Note: The setting is at the current setting when the Security Switch is set to the locked position.

EN-46 RANGER®
7000 SCALES
5.5.5 Auto Zero Tracking Set the automatic zero tracking functionality.
OFF = disabled. 0.5 Division = display maintains zero up to a drift of 0.5 graduation
per second 1 Division = display maintains zero up to a drift of 1 graduation
per second. 3 Division = display maintains zero up to a drift of 3 graduations
per second. Note: The setting is forced and locked to 0.5 Division when the Security Switch is set to the locked position.
5.5.6 Brightness Set the display brightness using the numerical keypad.
20…80…100
5.5.7 Auto Dim (minutes) Set whether the display dims after x seconds/minutes.
OFF = disabled. 1…30 (minutes)
5.5.8 Auto Sleep (minutes) Set whether the display enters sleep mode after x seconds/minutes.
OFF = disabled. 1…100 (minutes)
5.6 Application Mode Enter this sub-menu to enable or disable the desired Scale Applications. Only one application can be running at a time. Note: The use of each Application is described in detail in Section 4. 5.6.1 Turning an Application ON/OFF
Highlight the application by pressing the buttons
corresponding to the icons and then press the button corresponding to the icon
to enter the selected submenu.
In the Item option screen, enter the Enabled menu to turn it on or off.
Once an Application is enabled (turned on) it may be chosen by pressing the Applications button until it’s icon appears in the upper left corner of the home screen. The current menu item status is shown: OFF = disabled, ON = enabled

RANGER®
7000 SCALES EN-47
5.7 Weighing Units Enter this sub-menu to activate the desired units of measure. Note: Due to national laws, the scale may not include some of the units of measure listed. 5.7.1 Units Sub-menu
Reset kilogram pound gram ounce pound:ounce
Notes: The setting is locked when the Security Switch is set to the locked position. 5.7.2 Reset To reset the unit settings to factory default settings select Reset and then confirm either Yes or No.
5.7.3 Turning a Unit ON/OFF Select the desired unit, then press the button corresponding to
the icon and then choose either On or Off.
The current menu item status is shown. OFF = disabled ON = enabled
5.8 GLP and GMP Data Enter this menu to set the Good Laboratory Practices (GLP) and Good Manufacturing Practice data.
Reset Date Format Date Time
Format Time Project ID
GLP Data Sub-menu
5.8.1 Reset Resets the settings to factory default settings. Reset the settings to factory default settings.
5.8.2 Date Format Set the scale date format.
MMDDYYYY = Month Day Year (default) DDMMYYYY = Day Month Year YYYYMMDD = Year Month Day
5.8.3 Date Set the current date using the alphanumeric keypad.
5.8.4 Time Format Set the scale time format.
24H = 24 hour format (default) 12H = 12 hour format

EN-48 RANGER®
7000 SCALES
5.8.5 Time Set the current time.
5.8.6 Project ID Set the project ID by using the alphanumerical keypad.
5.9 Communication Enter this menu to define external communication methods and to set printing parameters. Data may be output to either a printer or PC (see section 6.5 for output string). Factory default settings are shown in bold.
Communication Sub-menu
RS232 USB
Choosing an item brings up another menu level (RS232 shown):
Configuration Print Setup
Choosing an item brings up yet another menu level, the device settings are dependent on the COM chosen (RS232 shown) Configuration Menu: (RS232 shown)
5.9.1 Reset Resets the settings to factory default settings. Reset the settings to factory default settings.
5.9.2 Baud Rate Set the baud rate (bits per second).
300 600 1200 2400 4800 9600 19200
5.9.3 Parity Set the data bits and parity.
7 EVEN = 7 data bits, even parity 7 ODD = 7 data bits, odd parity 7 NONE = 7 data bits, no parity 8 NONE = 8 data bits, no parity
5.9.4 Stop Bits Set the stop bits.
1 BIT 2 BIT

RANGER®
7000 SCALES EN-49
5.9.5 Handshake Set the flow control method.
NONE = no handshaking XON/XOFF = XON/XOFF handshaking HARDWARE = hardware handshaking (COM1 menu only)
5.9.6 Alternate Command Enter this sub-menu to set a different command character for the P (Print), T(Tare) or Z(Zero)
Alternate Print Command Set the alternate command character for Print. Settings of A(a) to Z(z) are available, except T&Z. The default setting is P. Alternate Tare Command Set the alternate command character for Tare. Settings of A(a) to Z(z) are available, except P&Z. The default setting is T. Alternate Zero Command Set the alternate command character for Zero. Settings of A(a) to Z(z) are available, except P&T. The default setting is Z. Print Setup Menu: (RS232 shown)
5.9.7 Reset Resets the settings to factory default settings. Reset the settings to factory default settings.
5.9.8 Stable Weight Only Set the printing criteria.
OFF = values are printed immediately, regardless of stability. ON = values are printed only when the stability criteria are met.
5.9.9 Auto Print Set the automatic printing functionality
OFF = disabled ON STABLE = printing occurs each time the stability criteria are met. INTERVAL = printing occurs at the defined time interval. CONTINUOUS = printing occurs continuously.
When ON STABLE is selected, set the time interval using the numeric keypad. LOAD = prints when the displayed load is stable LOAD ZERO = prints when the displayed load or zero reading is stable.
When INTERVAL is selected, set the time interval using the numeric keypad. Settings of 1 to 3600 seconds are available.
Note: Pressing the print button when INTERVAL has been selected will print the displayed result immediately.

EN-50 RANGER®
7000 SCALES
5.9.10 Print Template This sub-menu is used to define the format of the data output to a printer or computer.
Simple = only prints result and unit Standard = prints result, tare, mode, unit, GMP, PN, Lib, ID, name Custom 1 = customized printout format. If not customized, Simple template will be used Custom 2 = customized printout format. If not customized, Simple template will be used Custom 3 = customized printout format. If not customized, Simple template will be used
Custom 4 = customized printout format. If not customized, Simple template will be used Custom 5 = customized printout format. If not customized, Simple template will be used Example (Standard Template):
5.9.11 Edit Template This sub-menu is used to edit the Print templates. Note: Only the Custom templates can be edited.
Simple Standard Custom1 Custom2 Custom3
Custom4 Custom5
Each item in the content on the left side can be switched On/Off. The right side will show all the
enabled items.
The content for the templates includes:
Header (5 header lines) , User ID, Project ID, Scale No., Date & Time, PN, Result, Gross, Net,
Tare, Mode, Unit, Info (i.e. reference weight, check limits), Accu, Library ID, Library Name, Alibi
Record(6 digits, i.e. 000235), Footer (2 footer lines).
The item Header, Footer, Date/Time, User ID, Project ID and Scale NO have selections “Off,
Single, Continuous”. Single means that the related item will be printed out only one time after
power on or the related menu setting changed. Continuous means that the related item will be
printed out at each print out.
The item Accumulation has selections “Off, Result, All”. Result means that only the total
weight/PCS will be printed out. All means that all the accumulated information as well as
statistical information will be printed out.
See section 6.6 for sample printouts.
5.9.12 Line Feed Set the paper feed
1 Line = move the paper up one line after printing. 4 Line = move the paper up four lines after printing. FORM = a form feed is appended to the output.

RANGER®
7000 SCALES EN-51
5.9.13 Data Transfer Output weighing results directly to a PC application. Setup is easy and no additional software is required.
Note: Data Transfer Function is not supported in Windows® 7. OHAUS provides SPDC software
for Windows 7 users. Please download from below link:
OFF = do not print. ON = print the specified settings.
Click the Start Menu in Windows XP system and click “Settings” –>open Control Panel. Double click Accessibility Options in Control Panel.
Select the General tab in Accessibility Options.
Check Use Serial Keys, and click the Settings button.
Select the Serial Port, and set the Baud rate to 9600. After selecting, click OK to close setting for serial keys. Close the Control Panel. Run Excel
® to open one blank sheet. Click on the cell where the data is to be placed.
At this time, if the scale sends data to the PC through the RS232 port, the data will be put into the cell, and the cursor will automatically move to the next vertical cell. Note: If the weighing value is a negative number, set the target cell in TEXT format. Otherwise, Excel will not distinguish it as a negative number.

EN-52 RANGER®
7000 SCALES
5.10 User Profiles Create users with user name and password.
User Screen
Functions
1. The User profile is used for saving user specific parameters in menu 2. Total 50 user profiles can be saved in file system 3. User name max length: 12 4. Password max length: 6
User authorities
1. User types a) Administrator b) Power user c) Guest Notes: Only one Administrator user The first user is always Administrator If no user have been created, login as Administrator.
Administrator Account: Only the Administrator user can create, delete and edit other users and itself. If an administrator user is deleted, all the power users will also be deleted. Power User Account: The Power user can only modify the menu settings but cannot create, delete or edit other users or itself. Guest Account:
Login as a Guest user will occur directly when pressing the button corresponding to the icon , no password is required. The Guest user can view but cannot modify the general menu settings. All the menus are locked. The Guest user can modify the app configurations but cannot add/edit library records.

RANGER®
7000 SCALES EN-53
Login Screen
Long press the button to start the User login screen to change the user. Login is also required during power up.
To login as Adminstrator press the button corresponding to the icon . A login screen is displayed with a password field. Enter the password associated with the account. If the wrong password is entered, an error screen will be displayed. Press the button correpsonding to the icon
to return to the login screen.
To login as guest press the button corresponding to the icon .
Note: if no user was created, no login is required and automatically login as administrator.
5.11 Alibi Memory Note: This menu is only visible if the Alibi memory hardware option has been installed. Alibi memory is used to store the weight history for reference. Each Alibi record contains a Record ID, Net Weight value, Tare value and Date & Time.
Enter the Check Records menu item to review the records. Notes: The maximum number of record is 262112. When the memory is full and another record is stored the first record will automatically be deleted. At this time a warning message will appear, asking for the user’s confirmation.
The latest record is always displayed on top. Use the buttons corresponding to the icons and to move up and down the list.
Press the button corresponding to the icon to locate a record by entering it’s ID No.
Press the button corresponding to the icon to print a range of records.
Press the button corresponding to the icon to return to previous menu.
Note: Only stable weight can be printed to the Alibi memory.

EN-54 RANGER®
7000 SCALES
5.12 Event Counter For jurisdictions that use the audit trail sealing method, the local weights and measures official or authorized service agent must record the current configuration and calibration event counter values at the time of sealing. These values will be compared to values found during a future inspection.
Note: A change to an event counter value is equivalent to breaking a physical seal.
The audit trail uses two event counters to record changes to configuration and calibration settings.
The configuration event counter (CFG) will index by 1 when exiting the menu if one or more of the following menu settings are changed: Zero Range, Stable Range, Auto Zero Tracking (AZT), Units (kg, g, oz, lb or lb:oz) or Stable Only.
The calibration event counter (CAL) will index by 1 when exiting the menu if a Span Calibration or GEO setting change is made. Note that the counter only indexes once, even if several settings are changed.
5.13 Maintenance
Export Library
Export User Profile
Import Library Drives
Import User Profile
Note: The import/export is only functional when the current user is administrator.
Maintenance Sub-menu
5.13.1 Export Library Export Library to USB flash drive.
5.13.2 Export User Profile Export Export User Profile to USB flash drive. .
5.13.3 Import’ Library Drives Import Library from USB flash drive.
5.13.4 Import User Profile Import User Profile from USB flash drive. Note: The existing users will be replaced when importing users.

RANGER®
7000 SCALES EN-55
6. SERIAL COMMUNICATION
6.1 Interface Commands Commands listed in the following table will be acknowledged by the scale.
Command Function
IP Immediate Print of displayed weight (stable or unstable).
P Print displayed weight (stable or unstable).
CP Continuous
SP Print on Stability.
xS 0S: Turn off “Stable Only” menu item and allow unstable print. 1S: Turn on “Stable Only” menu item and only print stable print.
xP Interval Print x = Print Interval (1-3600 sec), 0P turns auto print OFF
Z Same as pressing Zero Key.
T Same as pressing Tare Key.
xT Download Tare value in grams (positive values only). Sending 0T clears tare (if allowed).
PU Print current unit: g, kg, lb, oz, lb:oz, t
xU Set scale to unit x: 1=g, 2=kg, 3=lb, 4=oz, 5=lb:oz, 6=t
xM Set scale to mode x. 1=Weighing, 2=Counting, 3=Check, 4=Formulation, 5=Percent, 6=Filling, 7=Dynamic, 8=Density, 9=Differential. M will scroll to next enabled mode.
PV Version: print name, software revision and LFT ON (if LFT is set ON).
H x y “text” Enter Header line, where x = print template number 1 to 5, y = line number 1 to 5 , “text” = header text up to 40 alphanumeric characters
F x y “text” Enter Footer line, where x = print template number 1 to 5, y = line number 1 to 2 “text” = footer text up to 40 alphanumeric characters.
\EscR Global reset to reset all menu settings to the original factory defaults.
SNS x Switch the platform: x = 1, 2
Notes: The second commands listed are “legacy’ commands, which maintain compatibility with older products.
6.2 RS232 Interface
RS232 (DB9) Pin Connections:
Pin 2: Scale transmit line (TxD)
Pin 3: Scale receive line (RxD)
Pin 5: Ground signal (GND)
Pin 7: Clear to send (hardware handshake) (CTS)
Pin 8: Request to send (hardware handshake) (RTS)
Use the built-in RS-232 Port to connect either to a computer or a printer. 6.2.1 Connecting to a Computer
Connect to the computer with a standard (straight-through) serial cable.
Use HyperTerminal or a similar terminal software to test communication with the computer.
Set up HyperTerminal as follows:
Choose New Connection, “connect using” COM1 (or available COM port).
Select Baud=9600; Parity=8 None; Stop=1; Handshaking=None. Click OK.
Choose Properties/Settings, then ASCII Setup. Check boxes as illustrated: (Send line ends…; Echo typed characters…; Wrap lines…)
Verify communication by pressing the Print button. If HyperTerminal is set up properly, the value on the display will be displayed in the window.
6.2.2 Connecting to a Serial Printer
Connect the cable supplied with the printer to the scale’s RS-232 port.

EN-56 RANGER®
7000 SCALES
Make sure that the balance and printer communication settings match.
Test communication with the printer by pressing the Print button. If the balance and printer are set up properly, the value on the display will be printed.
6.3 The USB Device Interface
The Ohaus USB Device Interface is a unique solution to the problem of connecting a scale to a computer using a Universal Serial Bus (USB). USB devices are categorized into classes such as disk drives, digital cameras, printers, etc. Scales do not have a commonly used class so the Ohaus USB interface uses a generic interface based on the RS232 serial standard.
Data sent from the scale to a computer is in USB format. The USB data is directed to a virtual port. This port then appears as an RS232 port to the application program.
When sending a command from a computer to the scale, the application program sends a command to the virtual port as if it were an RS232 port. The computer then directs the command from the virtual port to the computers USB connector where the scale is connected. The port receives the USB signal and reacts to the command.
The USB Interface includes a CD with the software drivers to create the required virtual port on the computer. 6.3.1 System Requirements
PC running Windows 98, Windows 98SE, Windows ME, Windows 2000, Windows XP or Windows 7
Available USB port (Type A, 4-pin, female) 6.3.2 USB Connection The scale’s USB port terminates with a 4-pin, female, USB Type B connector. A USB Cable (type B/male to type A/male) is required (not supplied).
1. Ensure that the scale is powered on and working properly.
2. Power on the computer and verify that its USB port is enabled and working properly.
3. Plug the cable’s USB connectors into the computer’s USB port and the scale’s USB port. Windows should detect a USB device and the New Hardware Wizard will be initialized.
USB Device
USB Host

RANGER®
7000 SCALES EN-57
6.3.3 Virtual Port Software Installation
1. Insert the supplied CD into the computer’s CD drive. Different versions of Windows have slightly different steps to load the driver that is on the CD. In all versions the New Hardware Wizard guides you through the required steps to select the driver that is located on the CD.
2. After clicking Finish, the virtual port should be ready for use. Windows typically adds the virtual port in sequence after the highest number COM port. For example, on PC’s equipped with up to 4 COM ports, the virtual port will be COM5.
When using the USB interface with programs that limit the number of COM port designations (e.g. Ohaus MassTracker allows only COM1, 2, 3, & 4), it may be necessary to assign one of these port numbers to the new virtual port.
Example of Windows XP Hardware Wizard
This can be done in the Port Settings of the Device Manager utility, found in the Windows Control Panel.
6.4 USB Host The USB Host can be used to connect a keyboard, barcode scanner and USB flash drive to the Ranger 7000.
6.5 Printout Format Printout string for g, kg, lb, oz units:
Field Weight Space Unit Space Stability Space G/N Space Message Term.Char(s)
Length 9 1 3 1 1 1 1 1 5 2
The printout string has a fixed length of 23 characters.
Each Space field is a delimiting space used to separate the other fields.
The Weight field is 9 right justified characters. If the value is negative, the '‐' character is printed at the
immediate left of the most significant digit.
The Unit/Mode field is 3 left justified characters.
The Stability field is 1 character.
The G/N field is 1 character. 'G' is printed for a gross weight. 'N' is printed for a net weight.
The Message field is 5 left justified characters. Note: The Termination Characters Carriage Return and Line Feed are appended to the printout. Printout string for the lb:oz unit Field Weight1 Space Unit1 Space Weight2 Space Unit2 Space Stability Space G/N Space Message Term.Char(s)
Length 4 1 2 1 7 1 2 1 1 1 1 1 5 2
The printout string has a fixed length of 28 characters.
Each Space field is a delimiting space used to separate the other fields.
The Weight1 field is 4 right justified characters. If the value is negative, the '‐' character is located at the
immediate left of the most significant digit.
The Unit1 field is 2 left justified characters.
The Weight2 field is 7 right justified characters.
The Unit2 field is 2 left justified characters.
The Stability field is 1 character. A space is printed if the weight value is stable. A '?' is printed if the weight value is not stable.
The G/N field is 1 character. 'G' is printed for a gross weight. 'N' is printed for a net weight.
The Message field is 5 left justified characters.
Note: The Termination Characters Carriage Return and Line Feed are appended to the printout.

EN-58 RANGER®
7000 SCALES
6.6 Printout Examples
Parts Counting Description Enabled
Company Name Header 1
Address 1 Header 2
Address 2 Header 3
Address 3 Header 4
Address 4 Header 5
Scale ID: 123 User ID
03:58 PM 09/11/2013 Project ID
PN: 80251234 Scale ID
1125 PCS N Date & Time
2725 PCS G PN
1125 PCS N Result
0.56975 kg T Gross
Mode: Counting Net
APW: 0.356094 g Tare
Library ID: 1 Mode
Library Name: Screw Unit
Signature___________ Information
Verified by_________ Accumulate
Library ID
Library Name
Alibi Record
Footer 1
Footer 2
Weighing Description Enabled
Company Name Header 1
Address 1 Header 2
Address 2 Header 3
Address 3 Header 4
Address 4 Header 5
Scale ID: 123 User ID
03:57 PM 09/11/2013 Project ID
0.79300 kg N Scale ID
1.36275 kg G Date & Time
0.79300 kg N PN
0.56975 kg T Result
Mode: Weighing Gross
Signature___________ Net
Verified by_________ Tare
Mode
Unit
Information
Accumulate
Library ID
Library Name
Alibi Record
Footer 1
Footer 2
Filling Description Enabled
Company Name Header 1
Address 1 Header 2
Address 2 Header 3
Address 3 Header 4
Address 4 Header 5
User ID: USER1 User ID
Project ID: P123 Project ID
1793.00 g N Scale ID
Mode: Filling Date & Time
Target: 1800.00 g PN
SP1: 1700.00 g Result
SP2: 1790.00 g Gross
Net
Tare
Mode
Unit
Information
Accumulate
Library ID
Library Name
Alibi Record
Footer 1
Footer 2
Density Description Enabled Company Name Header 1 Address 1 Header 2 Address 2 Header 3 Address 3 Header 4 Address 4 Header 5 User ID: USER1 User ID Project ID: P125 Project ID Scale ID: S21 Scale ID 04:58 PM 09/11/2013 Date & Time 18.058 g/cm3 PN Mode: Density Result Weight in air: 1001.70 g Gross Weight in liquid: 946.35 g Net Auxiliary liquid: Water Tare
Water Temp.: 20.0 ℃ Mode
Liquid Density: 0.9982 g/cm3 Unit
Information
Accumulate
Library ID
Library Name
Alibi Record
Footer 1
Footer 2

RANGER®
7000 SCALES EN-59
Formulation (Recipe)
Item: 001
PN: 1234
Name: Egg
Formu.Wt: 100.00 g
Actual Wt: 99.60 g
Item: 002
PN: 1235
Name: Water
Formu.Wt: 500.00 g
Actual Wt: 497.95 g
Item: 003
PN: 1236
Name: Sugar
Formu.Wt: 120.00 g
Actual Wt: 124.10 g
Item: 004
PN: 1237
Name: Salt
Formu.Wt: 80.00 g
Actual Wt: 80.85 g

EN-60 RANGER®
7000 SCALES
7. LEGAL FOR TRADE When the scale is used in trade or a legally controlled application it must be set up, verified and sealed in accordance with local weights and measures regulations. It is the responsibility of the purchaser to ensure that all pertinent legal requirements are met.
7.1 Settings Before verification and sealing, perform the following steps in order:
1. Verify that the menu settings meet the local weights and measures regulations.
2. Units menu should be reviewed. Verify the units turned on meet the local weights and measures regulations.
3. Perform a calibration as explained in Section 5.
3. Set the position of the Security Switch to the locked position.
7.2 Verification A weights and measures official or authorized service agent must perform the verification procedure.
7.3 Sealing After the scale has been verified, it must be sealed to prevent undetected access to the legally controlled settings. Before sealing the device, ensure that the security switch is in the Locked position and the Legal for Trade setting in the scale Setup menu has been set to ON.
If using a wire seal, pass the sealing wire through the holes in the security screw and tab, as shown.
If using a paper seal, place the seal over the flat head screw as shown
A. Base Un-Locked Locked with Wire Seal Locked with Paper Seal B. Terminal
Un-locked Locked with Wire Seal Locked with Paper Seal
Note: The Terminal only needs to be sealed if a second scale is attached to the optional 2
nd A/D board.

RANGER®
7000 SCALES EN-61
8. MAINTENANCE 8.1 Calibration Periodically verify calibration by placing an accurate weight on the scale and viewing the result. If calibration is required, perform as explained in section 5.
8.2 Information
Information is available from any application and is accessed by pressing the button. The following data is available for the Application used:
Application Statistics Accumulation General Status
Help Icons
Explanation
Weighing x x x x x
Counting x x x x
Percent x x x x
Check x x x x
Dynamic x x x x
Filling x x x x
Formulation x x x
Differential x x x
Density x x x
Menu/Others x
Press the button to enter the Information area.
Use the buttons corresponding to the icons and
to toggle through the various Information
screens.
Note: To return to Application Home screen from the
Information area, press the button.
To clear data, use the buttons corresponding to the icons
and to select the item to be cleared,
then press the button.
A warning message appears, press the button
corresponding to the icon to confirm the deletion.
To abort the deletion press the button corresponding to the
icon .

EN-62 RANGER®
7000 SCALES
8.3 Cleaning
Disconnect the Ranger 7000 Scale from the power supply before cleaning. Make sure that no liquid enters the interior of the Terminal or Base.
Clean the Scale at regular intervals.
Housing surfaces may be cleaned with a lint-free cloth slightly dampened with water or a mild cleaning
agent.
Attention: Do not use solvents, harsh chemicals, ammonia or abrasive cleaning agents.
8.4 Troubleshooting
TABLE 8-1. TROUBLESHOOTING
Error Code Description Cause
EEP Error EEPROM Checksum Error Corrupted EEPROM data
Power on Overload
Power On Error Weight reading exceeds Power On Zero limit.
Power on Underload
Power On Error Weight reading below Power On Zero limit.
Overload Over Range Error Weight reading exceeds Overload limit.
Underload Under Range Error Weight reading below Underload limit.
Tare Error Tare out of range Error Tared at one unit but after switching to another unit the tare value exceeds the maximum.
Display Overflow
Display Overflow Weight exceeds 6 digits.
No Calibration
Calibration data error Calibration data does not exist.
------- Busy message Displayed during tare setting, zero setting, printing
--NO-- Action not allowed message
Function not executed.
Calibration Error
Calibration Error Calibration value outside allowable limits
Low Reference
Low reference weight warning message
Average Piece Weight too small. (Warning)
Reference Error
Unacceptable reference weight message
Reference Weight too small. The weight on the pan is too small to define a valid reference weight.
8.5 Service Information If the troubleshooting section does not resolve your problem, contact an Authorized Ohaus Service Agent. Please visit our website www.ohaus.com to locate the Ohaus office nearest you. An Ohaus Product Service Specialist will be available to assist you.
8.6 Software Updates Ohaus is continuously improving its scale software. To obtain the latest release, please contact your Authorized Ohaus Dealer or Ohaus Corporation.

RANGER®
7000 SCALES EN-63
9. TECHNICAL DATA
9.1 Specifications
Ambient conditions
Indoor use only
Altitude: Up to 2000 m
Specified Temperature range: 10 °C to 30 °C (R71MHD3/6/15/35 models)
-10 °C to 40 °C (R71MD3/6/15/35 models)
Humidity: maximum relative humidity 80 % for temperatures up to 30 °C
decreasing linearly to 50 % relative humidity at 40 °C
Mains supply voltage fluctuations: up to ±10 % of the nominal voltage
Installation category II
Pollution degree: 2
Operability is assured at ambient temperatures between 5 °C to 40 °C.
Materials
Base Housing; die-cast Aluminum, Painted
Terminal housing: die-cast Aluminum, Painted
Weighing Pan: 304 Stainless Steel
TABLE 9-1. SPECIFICATIONS
MODEL R71MHD3 R71MHD6 R71MHD15 R71MHD35
Capacity 3000 g 6000 g 15000 g 35000 g
Readability d 0.01 g 0.02 g 0.1 g 0.1 g
Approved Readability e 0.1 g 0.2 g 1 g 1 g
Repeatability (std. dev.) 0.01 g 0.02 g 0.1 g 0.1 g
Linearity ± 0.02 g ± 0.04 g ± 0.2 g ± 0.2 g
Weighing units gram, kilogram, ounce, pound, pound:ounce, tonne
Applications Weighing, Parts Counting, Percent Weighing, Check Weighing, Dynamic
Weighing, Filling, Formulation, Differential Weighing, Density
Stabilization time (typical) Within 1 second
Safe overload protection 150 % of Capacity
Display TFT Graphic LCD
Display size 4.3 inch
Backlight White LED
Communication RS-232, USB
Power supply Power Input: 100-240 V~ 0.5 A 50/60 Hz
Platform size 240 x 240 mm 377 x 311 mm
9.4 x 9.4 inch 14.8 x 12.2 inch
Terminal Housing dimensions (W x D x H)
267 x 118 x 72 mm
10.5 x 4.6 x 2.8 inch
Base Housing dimensions 280 x 280 x 114 mm 377 x 311 x 128 mm
(W x D x H) 11 x 11 x 4.5 inch 14.9 x 12.2 x 5 inch
Assembled dimensions 280 x 420 x 114 mm 377 x 467 x 128 mm
(W x D x H) 11 x 11 x 4.5 inch 14.9 x 18.4 x 5 inch
Net weight 7.2 kg / 16 lb
10.9 kg / 24 lb
Shipping weight 9.2 kg / 20.3 lb
14.4 kg / 31.7 lb
Shipping dimension 605 x 405 x 244 mm 23.8 x 15.9 x 9.6 inch
665 x 525 x 330 mm 26.2 x 20.7 x 13 inch

EN-64 RANGER®
7000 SCALES
TABLE 9-2. SPECIFICATIONS (continued)
MODEL R71MD3 R71MD6 R71MD15 R71MD35
Capacity 3000 g 6000 g 15000 g 35000 g
Readability d 0.05 g 0.1 g 0.2 g 0.5 g
Approved Readability e 0.5 g 1 g 2 g 5 g
Repeatability (std. dev.) 0.05 g 0.1 g 0.2 g 0.5 g
Linearity ± 0.1 g ± 0.2 g ± 0.4 g ± 1 g
Weighing units gram, kilogram, ounce, pound, pound:ounce, tonne
Applications Weighing, Parts Counting, Percent Weighing, Check Weighing, Dynamic
Weighing, Filling, Formulation, Differential Weighing, Density
Stabilization time (typical) Within 1 second
Safe overload capacity 150 % of Capacity
Display TFT Graphic LCD
Display size 4.3 inch
Backlight White LED
Communication RS-232, USB
Power supply Power Input: 100-240 V~ 0.5 A 50/60 Hz
Platform size 280 x 280 mm 377 x 311 mm
11 x 11 inch 14.8 x 12.2 inch
Terminal Housing dimensions 267 x 118 x 72 mm
(W x D x H) 10.5 x 4.6 x 2.8 inch
Base Housing dimensions 280 x 280 x 114 mm 377 x 311 x 128 mm
(W x D x H) 9.4 x 9.4 x 4.5 inch 14.9 x 12.2 x 5 inch
Assembled dimensions 240 x 420 x 114 mm 377 x 467 x 128 mm
(W x D x H) 17.4 x 16.5 x 4.5 inch 14.9 x 18.4 x 5 inch
Net weight 6.8 kg / 15 lb
9.9 kg / 21.8 lb
Shipping weight 8.5 kg / 18.7 lb
13.4 kg / 29.5 lb
Shipping dimensions 605 x 405 x 244 mm 23.8 x 15.9 x 9.6 inch
665 x 525 x 330 mm 26.2 x 20.7 x 13 inch
9.2 Drawings and Dimensions Fully assembled dimensions
Figure 9-1. Ranger 7000 dimensions
A. Large base
B. Small Base

RANGER®
7000 SCALES EN-65
9.3 Table of Geo Values For weighing instruments verified by the manufacturer, the geo value indicates the country or geographical zone for which the instrument is verified. The Geo value set in the instrument (e.g."Geo 18") appears briefly after switch-on or is specified on a label. Note: GEO values are only applicable for models R71MD3, R71MD6, R71MD15 and R71MD35
TABLE 9-3. GEO CODES
0 325 650 975 1300 1625 1950 2275 2600 2925 3250
325 650 975 1300 1625 1950 2275 2600 2925 3250 3575
0 1060 2130 3200 4260 5330 6400 7460 8530 9600 10660
1060 2130 3200 4260 5330 6400 7460 8530 9600 10660 11730
0°00' 5°46' 5 4 4 3 3 2 2 1 1 0 0
5°46' 9°52' 5 5 4 4 3 3 2 2 1 1 0
9°52' 12°44' 6 5 5 4 4 3 3 2 2 1 1
12°44' 15°06' 6 6 5 5 4 4 3 3 2 2 1
15°06' 17°10' 7 6 6 5 5 4 4 3 3 2 2
17°10' 19°02' 7 7 6 6 5 5 4 4 3 3 2
19°02' 20°45' 8 7 7 6 6 5 5 4 4 3 3
20°45' 22°22' 8 8 7 7 6 6 5 5 4 4 3
22°22' 23°54' 9 8 8 7 7 6 6 5 5 4 4
23°54' 25°21' 9 9 8 8 7 7 6 6 5 5 4
25°21' 26°45' 10 9 9 8 8 7 7 6 6 5 5
26°45' 28°06' 10 10 9 9 8 8 7 7 6 6 5
28°06' 29°25' 11 10 10 9 9 8 8 7 7 6 6
29°25' 30°41' 11 11 10 10 9 9 8 8 7 7 6
30°41' 31°56' 12 11 11 10 10 9 9 8 8 7 7
31°56' 33°09' 12 12 11 11 10 10 9 9 8 8 7
33°09' 34°21' 13 12 12 11 11 10 10 9 9 8 8
34°21' 35°31' 13 13 12 12 11 11 10 10 9 9 8
35°31' 36°41' 14 13 13 12 12 11 11 10 10 9 9
36°41' 37°50' 14 14 13 13 12 12 11 11 10 10 9
37°50' 38°58' 15 14 14 13 13 12 12 11 11 10 10
38°58' 40°05' 15 15 14 14 13 13 12 12 11 11 10
40°05' 41°12' 16 15 15 14 14 13 13 12 12 11 11
41°12' 42°19' 16 16 15 15 14 14 13 13 12 12 11
42°19' 43°26' 17 16 16 15 15 14 14 13 13 12 12
43°26' 44°32' 17 17 16 16 15 15 14 14 13 13 12
44°32' 45°38' 18 17 17 16 16 15 15 14 14 13 13
45°38' 46°45' 18 18 17 17 16 16 15 15 14 14 13
46°45' 47°51' 19 18 18 17 17 16 16 15 15 14 14
47°51' 48°58' 19 19 18 18 17 17 16 16 15 15 14
48°58' 50°06' 20 19 19 18 18 17 17 16 16 15 15
50°06' 51°13' 20 20 19 19 18 18 17 17 16 16 15
51°13' 52°22' 21 20 20 19 19 18 18 17 17 16 16
52°22' 53°31' 21 21 20 20 19 19 18 18 17 17 16
53°31' 54°41' 22 21 21 20 20 19 19 18 18 17 17
54°41' 55°52' 22 22 21 21 20 20 19 19 18 18 17
55°52' 57°04' 23 22 22 21 21 20 20 19 19 18 18
57°04' 58°17' 23 23 22 22 21 21 20 20 19 19 18
58°17' 59°32' 24 23 23 22 22 21 21 20 20 19 19
59°32' 60°49' 24 24 23 23 22 22 21 21 20 20 19
60°49' 62°90' 25 24 24 23 23 22 22 21 21 20 20
62°90' 63°30' 25 25 24 24 23 23 22 22 21 21 20
63°30' 64°55' 26 25 25 24 24 23 23 22 22 21 21
64°55' 66°24' 26 26 25 25 24 24 23 23 22 22 21
66°24' 67°57' 27 26 26 25 25 24 24 23 23 22 22
67°57' 69°35' 27 27 26 26 25 25 24 24 23 23 22
69°35' 71°21' 28 27 27 26 26 25 25 24 24 23 23
71°21' 73°16' 28 28 27 27 26 26 25 25 24 24 23
73°16' 75°24' 29 28 28 27 27 26 26 25 25 24 24
75°24' 77°52' 29 29 28 28 27 27 26 26 25 25 24
77°52' 80°56' 30 29 29 28 28 27 27 26 26 25 25
80°56' 85°45' 30 30 29 29 28 28 27 27 26 26 25
85°45' 90°00' 31 30 30 29 29 28 28 27 27 26 26
Elevation in meters
Elevation in feet
GEO valueLatitude

EN-66 RANGER®
7000 SCALES
9.4 Options
TABLE 9-4. OPTIONS
DESCRIPTION PART NUMBER
Rechargeable Battery Kit, EX HiCap, R71 30041295
Accessory Tower Kit, R71 30095408
Accessory RS232, Kit, R31, RC31, V71, R71 30037448
Accessory 2nd
Platform Kit, R71 30097590
Accessory Discrete I/O, R71 30097591
Accessory Ethernet Kit, R31, RC31, V71, R71 30037447
Alibi Memory Kit, T71, R71 80500503
Accessory Extension Cable 9 Meters, R71 30101495

RANGER®
7000 SCALES EN-67
9.5 Button Icons List
TABLE 9-5. BUTTON ICONS
WEIGHING APPLICATION
ICON FUNCTION ICON FUNCTION
Setup Weighing mode configurations
Edit selected record (used in Library)
Manual Accumulation
Recall selected record (used in Library)
Quit (Used in Library)
Delete selected record (used in Library)
Add a record (used in Library)
COUNTING APPLICATION
Setup Counting mode configurations
Add a record (Used in Library)
Set APW (Average Piece Weight)
by number of samples
Delete selected record (used in Library)
Enter APW (Average Piece Weight) value directly
Recall selected record (used in Library)
Manual Accumulation
Edit selected record (used in Library)
Quit (Used in Library)
CHECK APPLICATION
Setup Check mode configurations
Quit (Used in Library)
Change Check limits
Add a record (Used in Library)
Set APW (Average Piece Weight)
by number of samples
Delete selected record (used in Library)
Enter APW (Average Piece Weight) value directly
Recall selected record (used in Library)
Manual Accumulation
Edit selected record (used in Library)
Switch the Check Limit’s input method

EN-68 RANGER®
7000 SCALES
TABLE 9-5. BUTTON ICONS (Continued)
DENSITY APPLICATION
ICON FUNCTION ICON FUNCTION
Setup Density mode configurations
Enter liquid density
Accept current weight
Start
Set water temperature
Cancel
FILLING APPLICATION
ICON FUNCTION ICON FUNCTION
Setup Filling mode configurations
Switch the Setpoints' input
method
Set input value or current weight on the pan as target
Quit (Used in Library)
Set Target, Setpoint1 and Setpoint2 value
Add a record (Used in Library)
Stop
Delete selected record (used in Library)
Start
Recall selected record (used in Library)
Manual Accumulation
Edit selected record (used in Library)
DYNAMIC APPLICATION
ICON FUNCTION ICON FUNCTION
Setup Dynamic mode configurations
Start
Set Averaging Time
Cancel
Manual Accumulation
Reset

RANGER®
7000 SCALES EN-69
TABLE 9-5. BUTTON ICONS (Continued)
DIFFERENTIAL APPLICATION
ICON FUNCTION ICON FUNCTION
Setup Differential mode configurations
Accept current weight
Edit Items
Reset
PERCENT APPLICATION
ICON FUNCTION ICON FUNCTION
Setup Percent mode configurations
Manual Accumulation
Set reference weight
FORMULATION APPLICATION
ICON FUNCTION ICON FUNCTION
Setup Formulation mode configurations
Print formulation result
Set factor
View selected record (Used in
Library)
Start
Edit record Name (Used in
Library)
Select
Delete selected record (Used in
Library)
Reset
Go back to previous screen
Next component
Go to next screen
Last Component
Add a record (Used in Library)
Quit (Used in Library)
Edit selected record (used in Library)
Save formulation result as a new recept

EN-70 RANGER®
7000 SCALES
TABLE 9-5. BUTTON ICONS (Continued)
ICON FUNCTION ICON FUNCTION
Guest
Print Range
Login
Locate Alibi record

RANGER®
7000 SCALES EN-71
10. COMPLIANCE Compliance to the following standards is indicated by the corresponding mark on the product.
Mark Standard
This product conforms to the EMC Directive 2004/108/EC, the Low Voltage Directive 2006/95/EC and the Non-automatic Weighing Instruments Directive 2009/23/EC. The complete Declaration of Conformity is available online at europe.ohaus.com/europe/en/home/support/compliance.aspx.
AS/NZS CISPR 11, AS/NZS 61000.4.3
UL Std. No. 60950-1 (2nd
edition) CAN/CSA-C22.2 No. 61010-1-04
Important notice for verified weighing instruments
Weighing instruments verified at the place of manufacture bear one of the preceding marks on the packing label and the green ‘M’ (metrology) sticker on the descriptive plate. They may be put into service immediately.
Weighing instruments to be verified in two stages have no green ‘M’ (metrology) on the descriptive plate and bear one of the preceding identification marks on the packing label. The second stage of the initial verification must be carried out by the approved service organization of the authorized representative within the EC or by the national weights and measures (W+M) authorities.
The first stage of the initial verification has been carried out at the manufacturer’s work. It comprises all tests according to the adopted European standard EN45501:1992, paragraph 8.2.2.
If national regulations limit the validity period of the verification, the user of the weighing instrument must strictly observe the re-verification period and inform the respective W+M authorities.
FCC Note This equipment has been tested and found to comply with the limits for a Class A digital device, pursuant to Part 15 of the FCC Rules. These limits are designed to provide reasonable protection against harmful interference when the equipment is operated in a commercial environment. This equipment generates, uses, and can radiate radio frequency energy and, if not installed and used in accordance with the instruction manual, may cause harmful interference to radio communications. Operation of this equipment in a residential area is likely to cause harmful interference in which case the user will be required to correct the interference at his own expense.
Industry Canada Note This Class A digital apparatus complies with Canadian ICES-001.
ISO 9001 Registration In 1994, OHAUS Corporation, USA, was awarded a certificate of registration to ISO 9001 by Bureau Veritus Quality International (BVQI), confirming that the OHAUS quality management system is compliant with the ISO 9001 standard’s requirements. On June 21, 2012, OHAUS Corporation, USA, was re-registered to the ISO 9001:2008 standard.

EN-72 RANGER®
7000 SCALES
Disposal
In conformance with the European Directive 2002/96/EC on Waste Electrical and Electronic
Equipment (WEEE) this device may not be disposed of in domestic waste. This also applies to
countries outside the EU, per their specific requirements.
The Batteries Directive 2006/66/EC introduces new requirements from September 2008 on removability of batteries from waste equipment in EU Member States. To comply with this Directive, this device has been designed for safe removal of the batteries at end-of-life by a waste treatment facility.
Please dispose of this product in accordance with local regulations at the collecting point specified for
electrical and electronic equipment.
If you have any questions, please contact the responsible authority or the distributor from which you
purchased this device.
Should this device be passed on to other parties (for private or professional use), the content of this regulation
must also be related.
Disposal instructions in Europe are available online at
europe.ohaus.com/europe/en/home/support/weee.aspx.
Thank you for your contribution to environmental protection.

RANGER®
7000 SCALES EN-73
LIMITED WARRANTY
Ohaus products are warranted against defects in materials and workmanship from the date of delivery through the duration of the warranty period. During the warranty period Ohaus will repair, or, at its option, replace any component(s) that proves to be defective at no charge, provided that the product is returned, freight prepaid, to Ohaus.
This warranty does not apply if the product has been damaged by accident or misuse, exposed to radioactive or corrosive materials, has foreign material penetrating to the inside of the product, or as a result of service or modification by other than Ohaus. In lieu of a properly returned warranty registration card, the warranty period shall begin on the date of shipment to the authorized dealer. No other express or implied warranty is given by Ohaus Corporation. Ohaus Corporation shall not be liable for any consequential damages.
As warranty legislation differs from state to state and country to country, please contact Ohaus or your local Ohaus dealer for further details.


Ohaus® and Ranger® are either registered trademarks or trademarks of Ohaus Corporation in the United States and/or other countries. Microsoft®, Windows® and Excel® are either registered trademarks or trademarks of Microsoft Corporation in the United States and/or other countries. Ohaus Corporation 7 Campus Drive Suite 310 Parsippany, NJ 07054 USA Tel: +1 (973) 377-9000 Fax: +1 (973) 944-7177
With offices worldwide www.ohaus.com
*30125491*
P/N 30125491 © 2013 Ohaus Corporation, all rights reserved.


