
T r a i n i n g G u i d e
7 – Shapes
Microsoft PowerPoint 2010
- Level 1

Microsoft PowerPoint 2010 - Level 1
© Learning and Development Service Page 2 Shapes
SHAPES
Diagrams are an effective way to communicate important information, as people are more likely to receive your message as intended when the message is communicated visually rather than via words alone.
PowerPoint provides many ready-made shapes that you can draw and insert onto your slides, including lines, rectangles, icons, arrows, stars, banners, buttons, equation shapes, and the list goes on. By drawing shapes, you can communicate plans, diagrams, flowcharts, processes and much more. Or, you can draw shapes to highlight or to embellish a particular point or aspect of a slide.
Shapes can also be edited and formatted like any other object in PowerPoint.
In this booklet we will show you how to:
draw shapes
resize shapes
edit shapes
position shapes
arrange shapes
combine shapes
format shapes
copy shapes
align shapes
insert and format text in shapes
add connectors to shapes
group shapes
rotate shapes.
INFOCUS
Microsoft PowerPoint 2010 - Level 1
© Learning and Development Service Page 3 Shapes
DRAWING SHAPES
For Your Reference…
To draw shapes: 1. Click on the Insert tab, then click on
Shapes in the Illustrations
group 2. Click on a shape to select it, then click
and drag on the slide to draw the shape
Handy to Know…
You can draw any shape in the Shapes gallery using the techniques described in this exercise.
Pressing while drawing a line or
arrow will force the line to remain straight while drawing it.
3
5
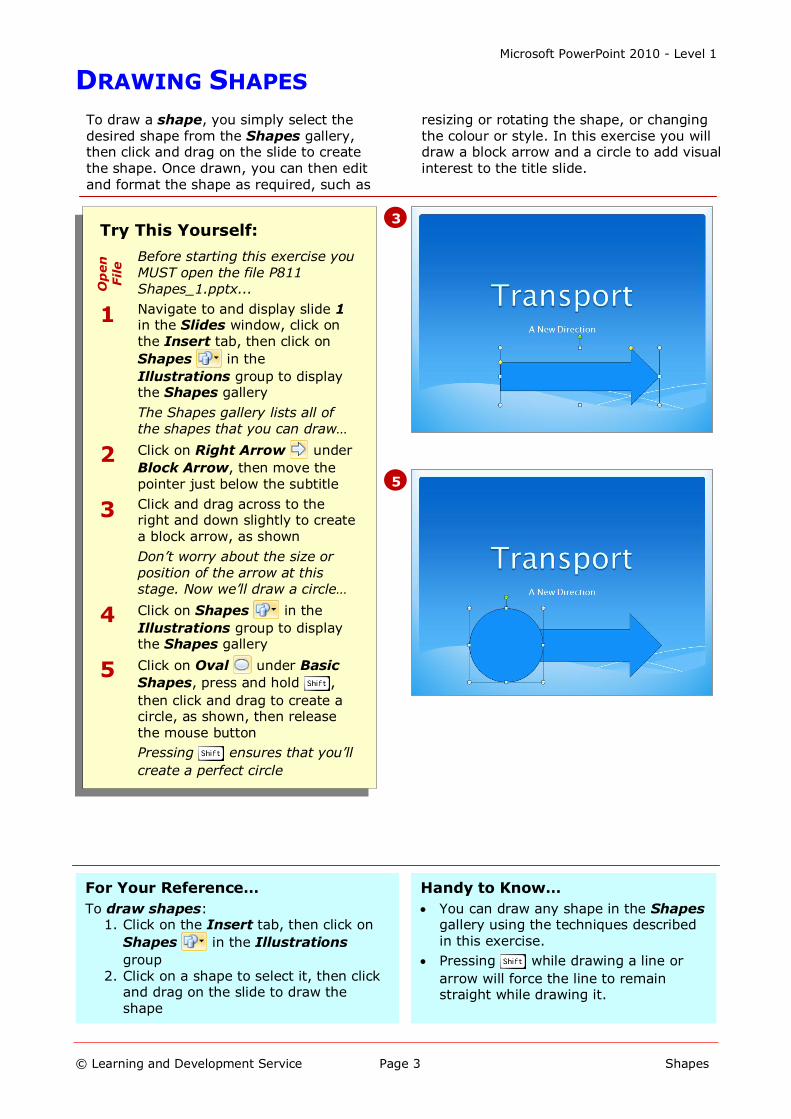
To draw a shape, you simply select the desired shape from the Shapes gallery, then click and drag on the slide to create the shape. Once drawn, you can then edit
and format the shape as required, such as
resizing or rotating the shape, or changing the colour or style. In this exercise you will draw a block arrow and a circle to add visual interest to the title slide.
Try This Yourself:
Op
en
Fil
e Before starting this exercise you
MUST open the file P811
Shapes_1.pptx...
1 Navigate to and display slide 1 in the Slides window, click on the Insert tab, then click on
Shapes in the
Illustrations group to display the Shapes gallery
The Shapes gallery lists all of the shapes that you can draw…
2 Click on Right Arrow under
Block Arrow, then move the pointer just below the subtitle
3 Click and drag across to the right and down slightly to create
a block arrow, as shown
Don’t worry about the size or position of the arrow at this stage. Now we’ll draw a circle…
4 Click on Shapes in the
Illustrations group to display the Shapes gallery
5 Click on Oval under Basic
Shapes, press and hold ,
then click and drag to create a circle, as shown, then release the mouse button
Pressing ensures that you’ll
create a perfect circle
Microsoft PowerPoint 2010 - Level 1
© Learning and Development Service Page 4 Shapes
RESIZING SHAPES
For Your Reference…
To resize shapes: 1. Click on the shape to select it, and
then: Click and drag on a border handle to
resize it, or
Specify the Height and Width in the Size group on the Drawing Tools: Format tab
Handy to Know…
Click on the dialog box launcher for
the Size group to open the Format Shape dialog box to display further resizing options.
4
3
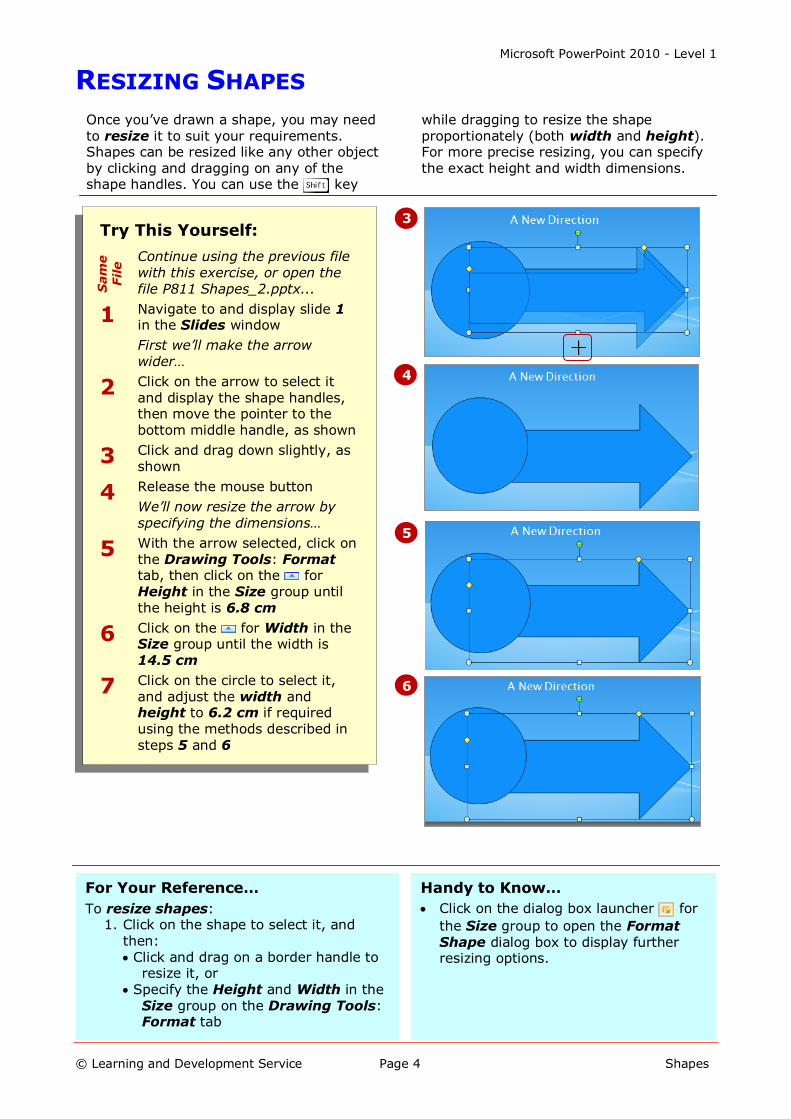
Once you’ve drawn a shape, you may need to resize it to suit your requirements. Shapes can be resized like any other object by clicking and dragging on any of the shape handles. You can use the key
while dragging to resize the shape proportionately (both width and height). For more precise resizing, you can specify the exact height and width dimensions.
5
6
Try This Yourself:
Sam
e
Fil
e Continue using the previous file
with this exercise, or open the
file P811 Shapes_2.pptx...
1 Navigate to and display slide 1 in the Slides window
First we’ll make the arrow wider…
2 Click on the arrow to select it and display the shape handles, then move the pointer to the bottom middle handle, as shown
3 Click and drag down slightly, as shown
4 Release the mouse button
We’ll now resize the arrow by
specifying the dimensions…
5 With the arrow selected, click on the Drawing Tools: Format tab, then click on the for Height in the Size group until the height is 6.8 cm
6 Click on the for Width in the Size group until the width is 14.5 cm
7 Click on the circle to select it, and adjust the width and height to 6.2 cm if required using the methods described in steps 5 and 6

Microsoft PowerPoint 2010 - Level 1
© Learning and Development Service Page 5 Shapes
EDITING SHAPES
Try This Yourself:
Sam
e
Fil
e
Continue using the previous file with this
exercise, or open the file P811 Shapes_3.pptx...
1 Navigate to and display slide 1 in the Slides window if required, then click on the arrow to select this shape
You will notice that two yellow diamond handles appear on this shape. You will edit the shape so that the arrowhead is longer…
2 Move the pointer to the yellow diamond handle
that appears above the arrowhead so that the pointer changes to a small pointer, as shown
3 Click and drag the handle to the left, as shown
4 Release the mouse button
The shape has now been customised
For Your Reference…
To edit shapes: 1. Select the shape to be edited 2. Click and drag on a yellow diamond
handle as required
Handy to Know…
For even greater control over the shape of an object, select it, click on Drawing Tools: Format tab, click on Edit Shape in the Insert Shapes group and select Edit Points. You can
then click and drag on any point (or corner) of the object to reshape it.
4
2
Many of the shapes available in PowerPoint can be edited in some way. This means that you can edit parts of the shape to customise or reshape the shape. When
selected, shapes that can be edited will
appear with yellow diamond handles in specific areas indicating where the shape can be altered. Click and drag on a yellow diamond handle to modify the shape.
3

Microsoft PowerPoint 2010 - Level 1
© Learning and Development Service Page 6 Shapes
POSITIONING SHAPES
Try This Yourself:
Op
en
Fil
e
Before starting this exercise you MUST open
the file P811 Shapes_4.pptx...
1 Navigate to and display slide 1 in the Slides window, then click on the arrow to select it
We’ll move the arrow into
position…
2 Click and drag the arrow upwards so that it sits over the text Transport, then release the mouse button
The text is now hidden behind the shape. Now we’ll move the circle into position…
3 Click on the circle to select it, then press and to
move the circle into position, as shown
For Your Reference…
To position shapes:
1. Select the shape and then:
Click and drag the shape to its new location, or
Click on the Drawing Tools: Format tab,
then click on Align in the Arrange
group and select an alignment option
Handy to Know…
When positioning shapes you may prefer to use gridlines to help you to position or draw your shapes precisely. To view gridlines click on the Drawing Tools: Format tab, then click on Align
in the Arrange group and select
View Gridlines. Repeat this step to hide gridlines.
2
When you draw shapes you’ll most likely need to move them into position. The easiest method for positioning shapes is to either drag the selected shapes to their new location or use the arrow keys ( , ,
and ). A smart guide (dotted line)
may appear when moving shapes. This indicates when a shape is aligned with a
nearby shape making it easy for you to align them.
3

Microsoft PowerPoint 2010 - Level 1
© Learning and Development Service Page 7 Shapes
ARRANGING SHAPES
Try This Yourself:
Sam
e
Fil
e
Continue using the previous file with this
exercise, or open the file P811 Shapes_5.pptx...
1 Navigate to and display slide 1 in the Slides window, click on the arrow, then press and
click on the circle to select both shapes
2 Click on the Drawing Tools: Format tab, then click on the bottom half of
Send Backward and
select Send to Back
Both shapes will be sent
behind all other objects…
3 Use the arrow keys as required to position the shapes as shown
We want the arrow to sit in front of the circle…
4 Click away from the shapes to deselect the shapes, then click on the arrow to select it
5 Click on the top half of
Bring Forward in the
Arrange group to bring
the arrow in front of the circle
For Your Reference…
To arrange shapes: 1. Select the shape/s to be arranged 2. Click on the Drawing Tools: Format
tab, then click on the top half of Send
Backward or Bring Forward
in the Arrange group and select an
option
Handy to Know…
When arranging objects, you are actually layering objects on top of one another. When you send an object to the back or front, it sits behind or in front of all other objects, that is, will be
the bottom or top layer. To send backward or bring forward will send an object behind or forward one layer.
3
When you’re working with multiple shapes and objects on a slide, often you’ll find that some objects overlap or hide other objects. For example, a particular object sits in
front of another object, but you want it to sit behind. In PowerPoint you can arrange shapes in such a way as to bring shapes in front of or behind other shapes.
1
2
5

Microsoft PowerPoint 2010 - Level 1
© Learning and Development Service Page 8 Shapes
COMBINING SHAPES
For Your Reference…
To combine shapes: 1. Add Combine Shapes to the Quick
Access toolbar if required 2. Select the shapes to be combined
3. Click on Combine Shapes in the
QAT and select an option
Handy to Know…
The Combine Shapes tool also includes Shape Intersect and Shape Subtract. Shape Intersect will remove all parts of the shape except the area where two or more objects overlap. Shape Subtract
will crop or cut holes in the shape in the form of the overlapping object/s.
6
5
New to PowerPoint 2010 is the ability to combine two or more existing shapes to create a new custom shape. The Combine Shapes tool must be added to the Quick
Access toolbar before you can use it, as
this tool does not appear on the Ribbon by default. The Combine Shapes tool allows you to combine shapes in various ways to create different effects and results.
Try This Yourself:
Sam
e
Fil
e Continue using the previous file
with this exercise, or open the
file P811 Shapes_6.pptx...
1 Click on More in the Quick
Access toolbar and select More Commands
You will add the Combine Shapes tool to the Quick Access toolbar…
2 Click on the drop arrow for Choose commands from and select Commands Not in the Ribbon
3 Scroll down to and click on Combine Shapes, then click on [Add] to add this command to the QAT, then click on [OK]
4 Navigate to and display slide 1 in the Slides window, click on the circle, press and click
on the arrow to select both shapes
5 Click on Combine Shapes
in the QAT and select Shape Combine
This has created an interesting effect, but not exactly what we’re after…
6 Press + to undo the
command, then click on
Combine Shapes in the
QAT and select Shape Union
The two shapes will be combined into a single shape

Microsoft PowerPoint 2010 - Level 1
© Learning and Development Service Page 9 Shapes
FORMATTING SHAPES
Try This Yourself:
Sam
e
Fil
e
Continue using the previous file with this
exercise, or open the file P811 Shapes_7.pptx...
1 Navigate to and display slide 1 in the Slides window, then double-click on the arrow
You will notice that the
Drawing Tools: Format tab is displayed when you double-click on the shape…
2 Click on More in the
Shape Styles group to display the Shape Styles gallery
Here you can select from a range of preformatted shape styles…
3 Point to the various shape styles to see them applied temporarily to the shape in Live Preview
4 Click on Subtle Effect – Blue, Accent 1 to apply this shape style to the shape
Now we’ll position the shape…
5 With the shape selected, use and to move the
shape into position, as shown
For Your Reference…
To format shapes: 1. Select the shape/s, then click on the
Drawing Tools: Format tab
2. Click on More in the Shape Styles
group and select a shape style
Handy to Know…
Once you’ve applied a shape style, you can then alter individual elements of the style if required, including the colours, fonts and effects. To do this, select the shape, then use the Shape
Fill, Shape Outline and Shape Effects tools in the Shape Styles group to customise the shape style.
2
4
When you draw shapes, they will be formatted in line with the applied theme. Formatting includes applied colours, fonts and effects. If you’re not entirely satisfied
with the default formatting, you can apply
a shape style to the shape. Each shape style is preformatted and consists of a particular colour set, font and font size, borders and shading, as well as effects, such
as gradient fills.
5

Microsoft PowerPoint 2010 - Level 1
© Learning and Development Service Page 10 Shapes
COPYING SHAPES
Try This Yourself:
Sam
e
Fil
e Continue using the previous file with
this exercise, or open the file P811 Shapes_8.pptx...
1 Navigate to and display slide 6 – Freight – in the Slides window
2 Click on the Insert tab, then click on
Shapes to display the Shapes
gallery and click on Rounded
Rectangle under Basic Shapes
3 Click and drag on the slide to create a small rounded rectangle, as shown
We’ll now adjust the size…
4 Click on the Drawing Tools: Format tab, then click on the for Height in
the Size group until the height is 2.5 cm
5 Click on the for Width in the Size group until the width is 4 cm
6 With the rectangle selected, click on
the Home tab, then click on Copy
in the Clipboard group to copy the rectangle onto the clipboard
We’ll now paste the rectangle onto the slide…
7 Click on the top half of Paste in the
Clipboard group to paste a copy of the rectangle onto the slide
8 Repeat the above step 3 times to paste three more rectangles onto the slide
For Your Reference…
To copy shapes: 1. Select the shape to be copied 2. Click on the Home tab, then click on
Copy in the Clipboard group
3. Click on the top half of Paste in the
Clipboard group
Handy to Know…
As well as copying and pasting shapes to copy existing shapes, you can also duplicate shapes. To do this, select the shape, click on the Home tab, then click on the drop arrow for
Copy and select Duplicate. The
shape will be copied without having to paste it.
3
5
Where you’re using the same shape repeatedly, it is much easier (and more precise!) to copy the existing shape instead of redrawing it each time. Copying
shapes works the same way as copying
other objects. When you copy a shape it is placed onto the clipboard, ready for you to paste onto the slide. Here you will draw a rectangle and then copy it several times in
preparation for a drawing.
7
8

Microsoft PowerPoint 2010 - Level 1
© Learning and Development Service Page 11 Shapes
ALIGNING SHAPES
Try This Yourself:
Sam
e
Fil
e Continue using the previous file with
this exercise, or open the file P811
Shapes_9.pptx...
1 Navigate to and display slide 6 in the Slides window
2 Click on the top rectangle to select it, then drag it into position, as shown
3 Repeat step 2 to position the remaining
rectangles, as shown
4 Click on the first rectangle to select it, press and hold and click on each
rectangle to select all five rectangles
5 Click on the Drawing Tools: Format
tab, then click on Align in the
Arrange group and select Distribute Horizontally
All shapes will now be distributed evenly, meaning equal space on the right and/or left sides of the shapes…
6 Deselect all shapes, then repeat step 4 to select the three top shapes
7 Click on Align in the Arrange
group and select Align Top
The selected shapes will be aligned with the top of the highest shape. You could have also used Align Bottom or Align Middle for this selection…
8 Repeat step 6 to select the two lower
shapes, then click on Align in the
Arrange group and select Align Bottom
For Your Reference…
To align shapes: 1. Select the shapes to align 2. Click on the Drawing Tools: Format
tab, click on Align in the Arrange
group and select an alignment option
Handy to Know…
You can align objects with other objects or with the slide. In this exercise we aligned objects with each other. But you can also align one or more objects with the slide by selecting the object/s, then clicking on
Align in the Arrange group (Drawing Tools: Format tab) and selecting Align to Slide.
2
3
When you’re working with multiple shapes and objects, often you’ll want to arrange objects so that they are aligned with other objects. Aligning objects means that
objects line up with each other on the
slide, which improves the overall layout of the slide. An audience will respond better to a slide where objects are aligned than they will to the random placement of shapes.
5
7
8

Microsoft PowerPoint 2010 - Level 1
© Learning and Development Service Page 12 Shapes
INSERTING AND FORMATTING TEXT
Try This Yourself:
Sam
e
Fil
e Continue using the previous file
with this exercise, or open the file P811 Shapes_9.pptx...
1 Navigate to and display slide 6 in the Slides window if required
2 Click on the first rectangle to select it, then type Create
3 Click on the next rectangle (to the
right) and type Storage
4 Repeat the above steps to type the following text into the remaining three rectangles:
Ship Market Review
5 Click on the first rectangle, then press and hold and click on
the remaining four rectangles to select all five rectangles
Now we’ll format the text…
6 Click on the Home tab, then click
on the drop arrow for Font
Size and select 24 to increase the text size
7 Deselect all shapes and then save the presentation
For Your Reference…
To insert and format text: 1. Select the shape and type the required
text 2. Apply formatting using the commands
in the Font and Paragraph groups on
the Home tab, and/or the commands in the WordArt Styles group on the
Format tab
Handy to Know…
You can use any of the formatting tools in the Font and Paragraph groups on the Home tab to format the text for a selected shape. You can also use the text formatting tools in the WordArt
Styles group on the Drawing Tools: Format tab.
2
3
Each shape also acts like a text box. This means that you can simply type in the shape if required. When you insert text, it will be preformatted in line with the
applied theme or shape style. Text will also
be centred in the shape. Once inserted, text can be formatted like any other text. In this exercise you will label each rectangle and then format the text to make it larger.
4
7

Microsoft PowerPoint 2010 - Level 1
© Learning and Development Service Page 13 Shapes
CONNECTING SHAPES
Try This Yourself:
Sam
e
Fil
e Continue using the previous file with
this exercise, or open the file P811 Shapes_10.pptx...
1 Navigate to and display slide 6 in the Slides window if required
2 Click on the Insert tab, click on
Shapes in the Illustrations
group, then click on Arrow under
Lines and hover over the first rectangle
You’ll notice that four red connector points appear around the shape…
3 Move the pointer to the right connector point, then click and drag to the next rectangle
4 When the pointer is over the left connector of the second rectangle, release the mouse button
5 Repeat steps 2 to 4 to connect the second rectangle to the third rectangle
We’ll add an elbow connector…
6 Click on Shapes in the
Illustrations group and click on
Elbow Arrow Connector , then
hover over the third rectangle, click on the bottom connector point and drag to the right connector point in
the lower rectangle
7 Repeat steps 2 to 4 to draw a connector from the Review rectangle to the Market rectangle
For Your Reference…
To connect shapes:
1. Click on Shapes and select Line,
Arrow, Double Arrow or one of the Connectors
2. Hover over the shape, click on a connector point and drag to the required connector point of the
connecting shape
Handy to Know…
To reroute a connector, click on the line or arrow, then click on and drag the red dot that appears at either end of the connector to the new location.
To delete a connector, click on the line or arrow to select it, then press .
2
4
PowerPoint lets you connect shapes (or any object for that matter) with arrows and lines called connectors. Connecting shapes is particularly useful when depicting
processes or steps. When you rearrange
connected shapes, the connectors remain attached and move with the shapes. This means that you don’t need to select and move the lines as well as the shape.
5
6
7

Microsoft PowerPoint 2010 - Level 1
© Learning and Development Service Page 14 Shapes
GROUPING SHAPES
Try This Yourself:
Sam
e
Fil
e Continue using the previous file
with this exercise, or open the file P811 Shapes_11.pptx...
1 Navigate to and display slide 6 in the Slides window
2 Click on the first connector, press and hold and click on the
remaining three connectors to
select all four connectors
We’ll group and then format the lines…
3 Click on the Drawing Tools: Format tab, then click on Group
in the Arrange group and
select Group to group the lines
4 With the group selected, click on
Shape Outline in the Shape
Styles group, select Weight, then select 3 pt, then deselect the group
We’ll group and then format the
rectangles…
5 Repeat steps 2 and 3 to select and group five rectangles
6 Click on More in the Shape
Styles group and click on Moderate Effect – Blue, Accent 1 to apply this shape style to the group, then click on Align and select Align Centre
As the connectors move with the shapes, they don’t need to be selected prior to re-aligning the grouped rectangles
For Your Reference…
To group shapes: 1. Select the shapes and objects to group 2. Click on the Drawing Tools: Format
tab, then click on Group in the
Arrange group and select Group
Handy to Know…
To separate grouped objects, select the grouped object, click on the Drawing Tools:
Format tab, then click on Group in the
Arrange group and select Ungroup.
To edit individual objects within a grouped object, select the grouped object, then click on the individual object and edit as required.
3
4
When working with multiple shapes, such as where you have drawn a number of individual objects to make up a single diagram, you may find it easier to group
the shapes. Grouped shapes act as a single
object and as such, can be moved, aligned and formatted as a single object. Here you will group various shapes and then format the grouped object.
6

Microsoft PowerPoint 2010 - Level 1
© Learning and Development Service Page 15 Shapes
ROTATING SHAPES
Try This Yourself:
Sam
e
Fil
e Continue using the previous file
with this exercise, or open the file P811 Shapes_12.pptx...
1 Navigate to and display slide 8 in the Slides window, then click on the Insert tab, click on Shapes
to display the Shapes gallery,
then click on Circular Arrow
under Block Arrows
2 Click and drag on the slide to draw the circular arrow, as shown
Don’t worry too much about the size…
3 Click on the Home tab, then click
on the drop arrow for Copy and
select Duplicate
We’ll rotate the copied shape…
4 Click on the Drawing Tools: Format tab, then click on Rotate
in the Arrange group and
select Rotate Right 90°
5 Repeat the step 5 to rotate the shape again
The object will now be rotated 180° from its original position…
6 Press once to line up the shapes
7 Move the shapes into position, as shown, then save and close the presentation
For Your Reference…
To rotate shapes: 1. Select the shape 2. Click on the Drawing Tools: Format
tab, then click on Rotate in the
Arrange group and select a rotation option
Handy to Know…
You can freely rotate selected objects. To do this, click on the green rotate handle
that appears above the selected shape, then drag the handle to the right or left to rotate.
If you make a mistake while drawing shapes, press + to undo the change,
or select the shape and press .
2
4
As with other objects, you can rotate a shape to a certain degree from its current axis. For example, you can rotate a shape to 45° from its current position. Shapes
can be rotated in any direction. You can
freely rotate a shape by dragging the green rotate handle that appears for a selected shape, or you can specify the position to rotate to by using the Rotate tool.
5
7

Microsoft PowerPoint 2010 - Level 1
© Learning and Development Service Page 16 Shapes
CONCLUDING REMARKS
Congratulations!
You have now completed the Shapes booklet. This booklet was designed to get you to the point where you can competently perform a variety of operations as outlined in the task list on page 2.
We have tried to build up your skills and knowledge by having you work through specific tasks. The step by step approach will serve as a reference for you when you need to repeat a task.
Where To From Here…
The following is a little advice about what to do next:
Spend some time playing with what you have learnt. You should reinforce the skills that you have acquired and use some of the application's commands. This will test just how much of the concepts and features have stuck! Don't try a big task just yet if you can avoid it - small is a good way to start.
Some aspects of the course may now be a little vague. Go over some of the points that you may be unclear about. Use the examples and exercises in these notes and have another go - these step-by-step notes were designed to help you in the
classroom and in the work place!
Here are a few techniques and strategies that we've found handy for learning more about technology:
visit CLD’s e-learning zone on the Intranet
read computer magazines - there are often useful articles about specific techniques
if you have the skills and facilities, browse the Internet, specifically the technical
pages of the application that you have just learnt
take an interest in what your work colleagues have done and how they did it - we don't suggest that you plagiarise but you can certainly learn from the techniques of others
if your software came with a manual (which is rare nowadays) spend a bit of time each day reading a few pages. Then try the techniques out straight away - over a period of time you'll learn a lot this way
and of course, there are also more courses and booklets for you to work through
finally, don’t forget to contact CLD’s IT Training Helpdesk on 01243-752100


