
Page 1 / 82
KEB COMBIVIS 6 The new KEB parameterization and start-up tool
KEB COMBIVIS 6 The new operating program for KEB COMBIVERT F5/B6/G6/H6/P6 and KEB COMBICONTROL C5/C6
Version: 6.1.2.1 Datum: 27.01.2012 Author: Bernd Tünnermann

Page 2 / 82
KEB COMBIVIS 6 The new KEB parameterization and start-up tool
Inhaltsverzeichnis 1. Overview ........................................................................................................................ 5
1.1. Properties .............................................................................................................. 5
1.2. Types ..................................................................................................................... 5
1.3. System requirements ............................................................................................. 6
1.4. Version information ................................................................................................ 6
1.5. Interface hardware ................................................................................................. 7
1.5.1. Connection of COMBIVERT F5 ........................................................................... 7
1.5.2. Connection of COMBIVERT B6 ........................................................................... 8
1.5.3. Connection of COMBIVERT G6 .......................................................................... 8
1.5.4. Connection of COMBIVERT H6 .......................................................................... 9
1.6. Accessories ........................................................................................................... 9
1.6.1. DIN 66019II - RS-232 cable, PC / operator ......................................................... 9
1.6.2. KEB-USB-serial converter ................................................................................. 10
1.6.3. HSP5-adapter ................................................................................................... 11
1.6.4. Port Expander ................................................................................................... 12
2. Start-up .........................................................................................................................13
2.1. Start page .............................................................................................................13
2.2. Start-up online ......................................................................................................14
2.2.1. Starting via project assistant .............................................................................. 14
2.2.2. Searching for devices ........................................................................................ 15
2.2.3. Open device editor ............................................................................................ 16
2.2.4. Start-up with empty project ................................................................................ 17
2.2.5. Searching for devices – manually ...................................................................... 17
2.3. Start-up offline (without inverter) ...........................................................................18
2.3.1. Open an existing project .................................................................................... 20
3. Device editor .................................................................................................................21
3.1. Device reference ...................................................................................................21
3.2. Screen layout ........................................................................................................22
3.3. KEB-device ...........................................................................................................23
3.4. Inverter parameters ..............................................................................................23
3.5. Set addressing ......................................................................................................24
3.6. Operator parameters.............................................................................................25
3.7. Online wizards ......................................................................................................25
3.8. Information ............................................................................................................26
4. Property Editor (input window) ......................................................................................26

Page 3 / 82
KEB COMBIVIS 6 The new KEB parameterization and start-up tool
4.1. Basic setting .........................................................................................................26
4.2. Feature selection ..................................................................................................27
4.3. Numerical value input ...........................................................................................28
4.4. Basic information ..................................................................................................28
5. General adjustments .....................................................................................................29
5.1. Language settings ................................................................................................29
5.2. Parameter view .....................................................................................................30
5.3. Communication .....................................................................................................30
5.4. Parameter lists ......................................................................................................31
5.5. Behaviour ..............................................................................................................31
5.6. Device scan ..........................................................................................................32
5.7. Data paths ............................................................................................................33
5.8. Loading and saving ...............................................................................................33
6. Window layout ...............................................................................................................34
7. Parameter lists ..............................................................................................................36
7.1. Properties .............................................................................................................36
7.2. Open a blank list ...................................................................................................36
7.3. Open a list with marked parameters .....................................................................37
7.4. Open existing list ..................................................................................................37
7.5. Create complete list ..............................................................................................38
7.6. Fragmentation .......................................................................................................38
7.7. Self-created parameter list ....................................................................................40
7.8. Inserting an empty line ..........................................................................................41
7.9. Inserting a transfer pause .....................................................................................42
7.10. Changing of device reference ...............................................................................42
7.11. Upload from the inverter into a parameter list .......................................................43
7.12. Parameter download .............................................................................................43
7.13. Renaming parameter list .......................................................................................45
7.14. Insertion of parameter list .....................................................................................45
7.15. Comparing parameter lists directly .......................................................................46
7.16. Comparing parameter lists ....................................................................................47
7.17. Parameter backup ................................................................................................48
8. Scope ............................................................................................................................51
8.1. Characteristics ......................................................................................................51
8.2. Open scope ..........................................................................................................51
8.3. Basic settings ........................................................................................................52
8.4. Channel configuration / new channel ....................................................................54

Page 4 / 82
KEB COMBIVIS 6 The new KEB parameterization and start-up tool
8.5. Channel settings ...................................................................................................55
8.6. Recording .............................................................................................................56
8.7. Display window .....................................................................................................57
8.8. Adapt display ........................................................................................................58
8.9. Display – Zoom .....................................................................................................60
8.10. Display – Cursor ...................................................................................................61
8.11. Save recording ......................................................................................................63
8.12. Import / Export ......................................................................................................64
8.13. Export to .csv-format .............................................................................................64
8.14. Trigger function (online) ........................................................................................65
8.15. Offline Mode .........................................................................................................66
8.15.1. Switch on and adjustment of time basis............................................................. 67
8.15.2. Adjusting of trigger source ................................................................................. 67
8.15.3. Adjusting of trigger position ............................................................................... 68
8.15.4. Practice ............................................................................................................. 69
8.15.5. Offline-storage capacity ..................................................................................... 70
9. Start-up assistants (wizards) .........................................................................................71
9.1. Online Start-Up wizard ..........................................................................................71
9.1.1. Online Start-Up wizard COMBIVERT H6 ........................................................... 71
9.1.1.1. State machine ............................................................................................ 71
9.1.1.2. Motor data configurator .............................................................................. 72
9.2. Offline Start-Up wizard ..........................................................................................72
9.2.1. Offline start-up wizard for COMBIVERT F5 ....................................................... 74
9.2.1.1. Motor configurator F5-S ............................................................................. 74
9.2.1.2. Process data adjustment of F5 bus operators ............................................ 75
9.2.2. Offline Start-up wizard for COMBIVERT G6 ...................................................... 75
9.2.3. Offline Start-up wizard for COMBIVERT H6 ...................................................... 75
9.2.4. Offline start-up wizard overview ........................................................................ 76
10. Frequently asked questions ..........................................................................................76
10.1. FAQ Scope ...........................................................................................................78
10.2. Realized effects/problems in Version 6.1.2.0/1 .....................................................78
11. Update ...........................................................................................................................79
12. KEB-FTP file transfer program ......................................................................................81
13. Remark ..........................................................................................................................82

Page 5 / 82
KEB COMBIVIS 6 The new KEB parameterization and start-up tool
1. Overview
1.1. Properties
Based on CoDeSys V3 of 3S-Software GmbH and Microsoft‟s “.NET-Framework”.
Upgraded project handling compared to COMBIVIS 5.6
Upgraded and enhanced COMBIVIS-Scope
History for errors and messages
Possibility to integrate start-up assistants (wizards)
16-channel oscilloscope
Serial communication via serial protocol DIN 66019II or TCP/IP
IP-addressing for several devices
Searching on several serial interfaces in parallel
HSP-5 service via USB-serial converter or port expander
Update function via Internet
Config.-IDs available from generation 5 and 6
No visualization of CP-Menu and operator parameter of KEB F5 InterBus-Operator
Can be used to COMBIVIS 5 in parallel, but no service of the same COM-Port Enhancements version 6.1.2.x compared to Version 6.1.1.x amongst others:
Comparison of parameter lists
Several scopes in a project
Data storage list storable directly with project
Proxy adjustments for update function
Pre-adjustments for parameter lists
Fixing of Y-axis in scope as an option
Improvement of function handling
1.2. Types
Parameterization version “COMBIVIS 6” (issue of this manual) o For free o Registration welcome
Programming version „COMBIVIS studio 6“
o Additionally: SPS programming in IEC 61131-3 (C6 controllers) Bus configuration (e. g. EtherCAT, CAN, Profibus, ...) Configuration of Remote I/Os Other additional components
o Licensing requested with costs o Demo version for free, time-constrained

Page 6 / 82
KEB COMBIVIS 6 The new KEB parameterization and start-up tool
1.3. System requirements Minimum equipment for smaller projects:
1 GB RAM
MS-Windows 2000, Windows XP, Windows Vista, Windows 7 32-bit and 64-bit version
1 GHz Pentium
1 GB hard disk storage free
Screen resolution min. 1024 x 768
1.4. Version information The version information is displayed at the start page also by menu: “Help” → “About….”
Version of COMBIVIS 6, here: 6.1.2.1
Version of subjacent CoDeSys-software, here: 3.4.4.20 (not shown at every version)

Page 7 / 82
KEB COMBIVIS 6 The new KEB parameterization and start-up tool
1.5. Interface hardware
1.5.1. Connection of COMBIVERT F5 Connection COMBIVERT F5-inverter – PC
By using an interface operator connection at D-SUB 9-polig X6C: RS-232 cable PC / operator Part No. 00.58.025-001D Alternative: USB-serial-converter Part No. 00.58.060-0020
HSP5 diagnostic interface X6B in field bus-operators and interface-operators USB-serial-converter Part No. 00.58.060-0020 Additionally: HSP5-adapter D-SUB 9-pole / RJ45 Part No.: 00.F5.0C0-0020 Connection also via TCP/IP-operator
Part No.: 00.F5.060-8000
HSP-5 interface D-SUB 9-pole X4A: USB-serial-converter Part No. 00.58.060-0020
Page 8 / 82
KEB COMBIVIS 6 The new KEB parameterization and start-up tool
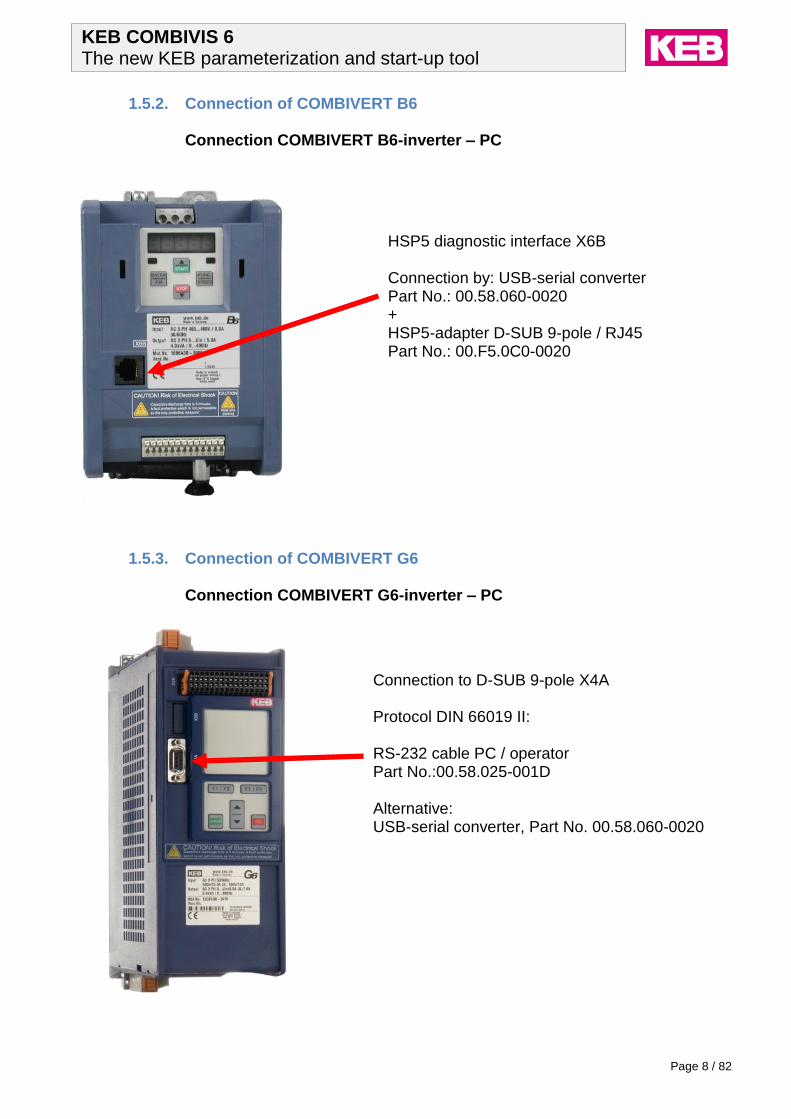
1.5.2. Connection of COMBIVERT B6 Connection COMBIVERT B6-inverter – PC
1.5.3. Connection of COMBIVERT G6 Connection COMBIVERT G6-inverter – PC
HSP5 diagnostic interface X6B Connection by: USB-serial converter Part No.: 00.58.060-0020 + HSP5-adapter D-SUB 9-pole / RJ45 Part No.: 00.F5.0C0-0020
Connection to D-SUB 9-pole X4A Protocol DIN 66019 II: RS-232 cable PC / operator Part No.:00.58.025-001D Alternative: USB-serial converter, Part No. 00.58.060-0020

Page 9 / 82
KEB COMBIVIS 6 The new KEB parameterization and start-up tool
1.5.4. Connection of COMBIVERT H6 Connection COMBIVERT H6-inverter – PC
1.6. Accessories
1.6.1. DIN 66019II - RS-232 cable, PC / operator Part No. 00.58.025-001D
Connection drive units directly to serial D-SUB 9-pole protocol DIN 66019 II: RS-232 cable PC / operator Part No. 00.58.025-001D Alternative: USB-serial converter Part No. 00.58.060-0020
Access to drive units also via control unit by TCP/IP UDP
H6 / G6 /
F5 operator PC

Page 10 / 82
KEB COMBIVIS 6 The new KEB parameterization and start-up tool
1.6.2. KEB-USB-serial converter Part No. 00.58.060-0020 Converts USB into serial DIN 66019 II and HSP5 D-SUB 9-pole
The USB-serial-converter represents a virtual COM interface.
It is not a customary USB serial converter, because the serial protocol is not transferred completely.
On USB„s side always DIN66019II is running
A connection of several USB-serial-converters, each with a serial- or HSP5-unit, is pos-sible.
The 9-pole serial side supports with auto detection: o DIN66019 based on of RS 232 o HSP5 (TTL level)
38.4 kBaud should be used as baud rate. o Max. baud rate is 115,2 kBaud o No support for automatic adjusting of baud rates o Baud rate can be adjusted with COMBIVIS 6
USB INF file “kebcdc_win7.inf” has to be installed separately for each PC-USB interface
ATTENTION! The USB-serial converter cannot be used for software flashing! Driver installation From version 6.1.2.1 you will find the USB driver “kebcdc_win7.inf” in the COMBIVIS 6 in-stallation folder “C:\Programs\KEB\COMBIVIS_6\Drivers”. At some Windows7 versions a driver of STElectronic is installed automatically. This can be used with COMBIVIS 6 without limitations. But in the name “KEB device” is not given in the “W7- control panel”. For this the KEB driver has to be installed manually.
Page 11 / 82
KEB COMBIVIS 6 The new KEB parameterization and start-up tool
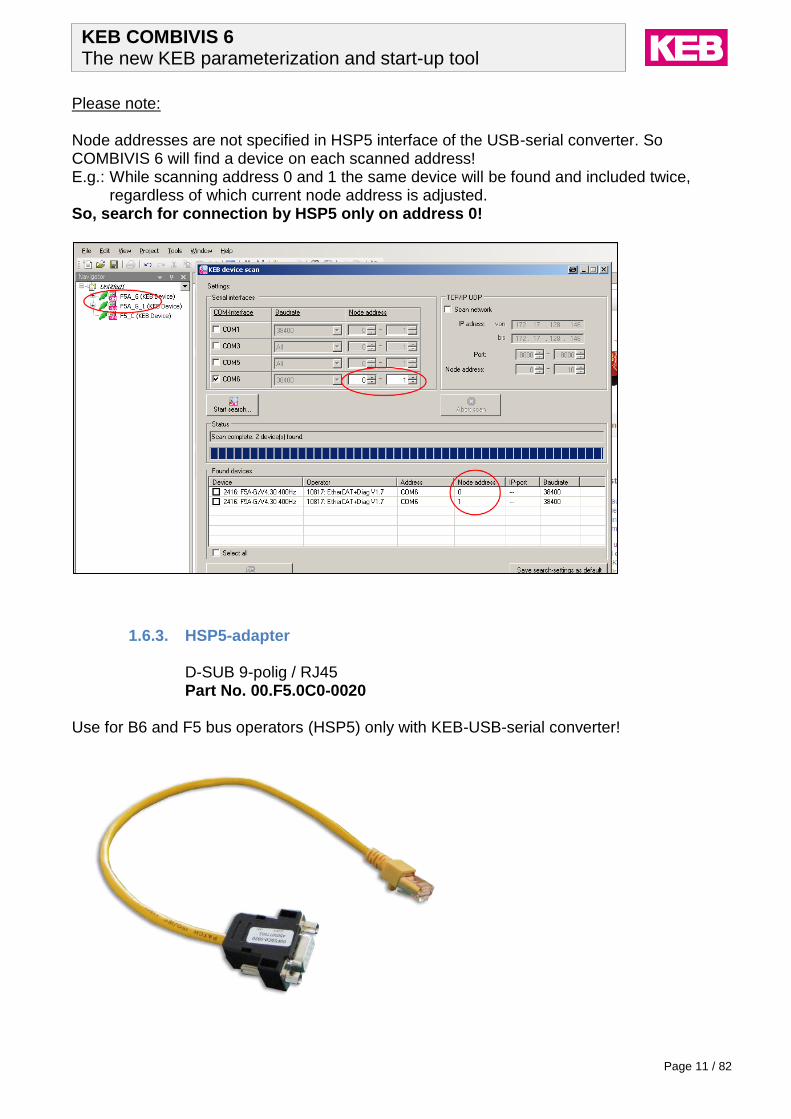
Please note: Node addresses are not specified in HSP5 interface of the USB-serial converter. So COMBIVIS 6 will find a device on each scanned address! E.g.: While scanning address 0 and 1 the same device will be found and included twice,
regardless of which current node address is adjusted. So, search for connection by HSP5 only on address 0!
1.6.3. HSP5-adapter D-SUB 9-polig / RJ45 Part No. 00.F5.0C0-0020 Use for B6 and F5 bus operators (HSP5) only with KEB-USB-serial converter!

Page 12 / 82
KEB COMBIVIS 6 The new KEB parameterization and start-up tool
1.6.4. Port Expander Ethernet / USB – HSP5 converter Part-No. 00.F5.025-0080
Input: TCP/IP or USB protocol DIN 66019II
Output: 4x HSP5 or 3x HSP5 + 1x RS485
Allows the connection of up to 4 COMBIVERT B6 or F5 bus operators to HSP5
Alternatively at port X4D a RS485 bus can be connected
External 24V supply is necessary
For searching the devices the node addresses 0 to 5 have to be adjusted (node 0 = Port Expander, node 1-4= the HSP5 ports X4A – X4D).
Driver installation From version 6.1.2.1 you will find the USB driver “FTDI_USB_Serial_Converter” in the COMBIVIS 6 installation folder “C:\Programs\KEB\COMBIVIS_6\Drivers” (please unpack before installation)

Page 13 / 82
KEB COMBIVIS 6 The new KEB parameterization and start-up tool
2. Start-up Communication set-up online via project assistant (basic setting)
2.1. Start page Handling of a KEB device requires at every time generating or starting an existing project.
After that the window “project assistant” / “empty project” will be shown.
Via icon the starting page can be activated again at any time.

Page 14 / 82
KEB COMBIVIS 6 The new KEB parameterization and start-up tool
2.2. Start-up online
2.2.1. Starting via project assistant The automated project wizard (assistant) opens a new project, operates a predefined searching for connected devices and integrates the located devices into the project. By selection “Empty project” the searching / integration of devices have to be done manual-ly.
Input of project‟s name and storage location

Page 15 / 82
KEB COMBIVIS 6 The new KEB parameterization and start-up tool
2.2.2. Searching for devices The searching for devices depends on the presetting and goes on automatically.
Please note: Inverters connected by RS485 need to have different node addresses! Attention! In case of device-searching in a network all connected devices with permitted addresses will be found. Also those, which are in other rooms or buildings!
Searching can be interrupted; the adjustments can be changed and reconfig-ured.

Page 16 / 82
KEB COMBIVIS 6 The new KEB parameterization and start-up tool
2.2.3. Open device editor There are two ways to open the device editor:
Via double-click on the name of the device(s) which is/are to edit, or:
Marking the name of the device(s) (1.) → click on “down arrow” (2.) → “open in editor” (3.)
For continuing please see: 3. Device editor
2.
1.
3.

Page 17 / 82
KEB COMBIVIS 6 The new KEB parameterization and start-up tool
2.2.4. Start-up with empty project
With an empty project it is possible to start a specific scan with connected devices or with-out connected devices they can be integrated manually.
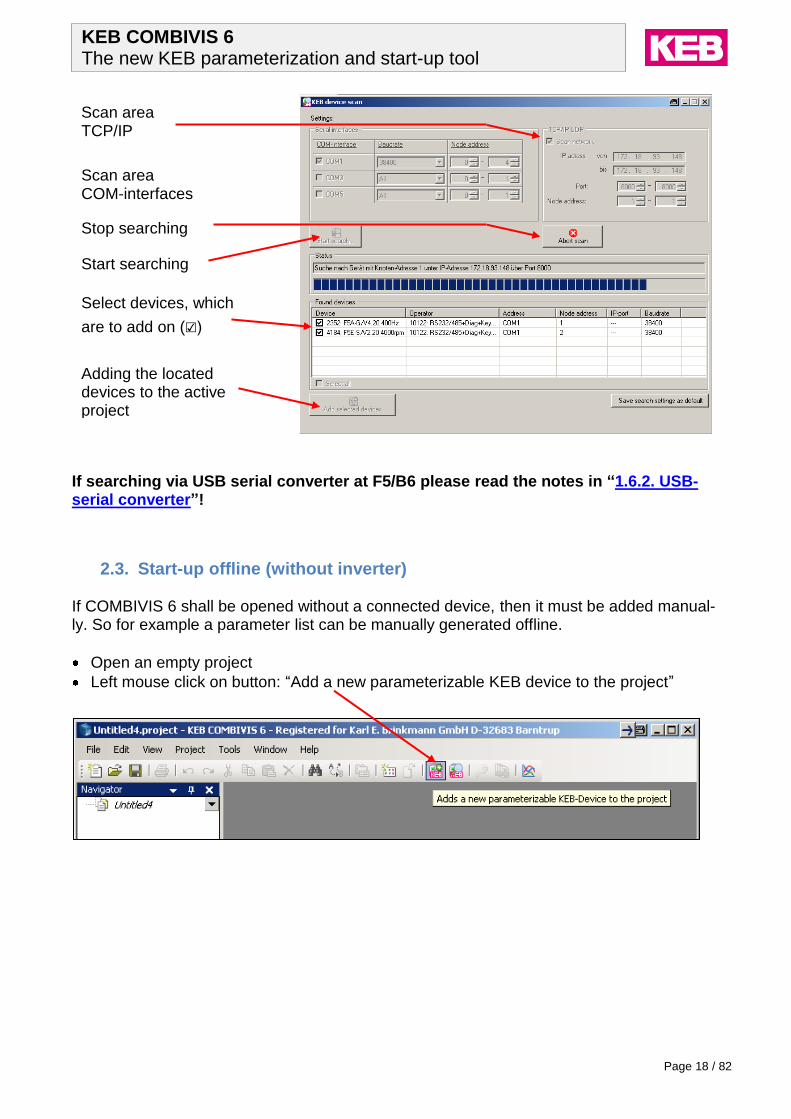
2.2.5. Searching for devices – manually Open an empty project – or from an existing project – click on: “Project” → “KEB device scan”. Or another way: Click on button “KEB device scan” in the tool bar.
The scan run can be controlled in the window “KEB device scan”. Differing to the standard setting other COM-interfaces, addresses, baud rates or IP-addresses can be scanned temporary.
Start with an empty project
Page 18 / 82
KEB COMBIVIS 6 The new KEB parameterization and start-up tool
If searching via USB serial converter at F5/B6 please read the notes in “1.6.2. USB-serial converter”!
2.3. Start-up offline (without inverter) If COMBIVIS 6 shall be opened without a connected device, then it must be added manual-ly. So for example a parameter list can be manually generated offline.
Open an empty project
Left mouse click on button: “Add a new parameterizable KEB device to the project”
Stop searching
Select devices, which
are to add on (☑)
Start searching
Adding the located devices to the active project
Scan area TCP/IP
Scan area COM-interfaces

Page 19 / 82
KEB COMBIVIS 6 The new KEB parameterization and start-up tool
Fill in the name of the device which is to add.
Offline device will be added and the window “device editor” opens. → Continue like “online” mode Connection status “inactive” will be activated when device is connected with current com-munication adjustments.
• Choose device group and -type re-spectively device config-ID. If necessary also choose an operator
• Enter “Create new device”

Page 20 / 82
KEB COMBIVIS 6 The new KEB parameterization and start-up tool
2.3.1. Open an existing project
On start page → “open a project from
disk”
Or:
• Open an existing project with
“File” → “open project”
• Or open an existing project with
“File”→ “recent projects”

Page 21 / 82
KEB COMBIVIS 6 The new KEB parameterization and start-up tool
After opening an existing project without connected devices: When saving the project the status of the devices will remain
3. Device editor
The device editor corresponds to COMBIVIS 5.x project explorer.
Online data communication, all parameter values will be modified online in the device.
Parameter storing has to be effected by a separate parameter list (see: “Tools” / “Parameter backup”
Each device has got its own device editor.
3.1. Device reference The device reference number is the instrument to distinguish precisely all devices in the project. This number will be assigned in order of locating during device scan and describes the position of the drive in data bus. It is independent from device node address. That means it can change after modification of the wiring and a new scan! Each device reference can only exist once. It can be changed manually after switching the device communication into “inactive”. A reference list with all devices can be displayed:
Right mouse click in navigation window → “List KEB-Devices”
In menu bar; “project” → “List KEB-Devices”
Device active, but no connection
Device inactive, but no control of commu-nication

Page 22 / 82
KEB COMBIVIS 6 The new KEB parameterization and start-up tool
3.2. Screen layout
Navigator: presentation and activation of the project‟s particular objects and devices.
Editor: Editing objects and devices, brake down in tabs according to: a) device and b) range.
Messages: Status, alarm- and error information will be indicated and jour-nalized.

Page 23 / 82
KEB COMBIVIS 6 The new KEB parameterization and start-up tool
3.3. KEB-device
3.4. Inverter parameters
Status of the device (online / offline)
Selection of device or object
Selection of device‟s or object‟s function tables
KEB-device:
Device reference number in the project (not device address!)
Communication data
Node- / device address
Software ID stored in the pro-ject
Operator ID stored in the pro-ject
All indicated values are online = active in device
Parameter groups: Open via click on “+” / “-“ or tab key “Enter” / “Space”
Set-programmable parameters
Edit parameter values: Left mouse - double click, or marking parameter and press key: “Enter” or: Double click → modify val-ue in property editor
Control of communication
Device‟s current software ID
Operator‟s current software ID

Page 24 / 82
KEB COMBIVIS 6 The new KEB parameterization and start-up tool
3.5. Set addressing In standard setting the selection of those parameter sets which are to edit is done indirectly via parameter index Fr.09. The values which are displayed in the 1st under-layer belong to set which is preset in Fr.09 (not set programmable parameters are equal in all sets). Active set: the parameter of the set which currently drives the inverter is displayed in the 1st under-layer (please see ru.26, active set). With direct set addressing the set‟s belonging will be displayed in [ ] directly behind the pa-rameter‟s name. In the 2nd under-layer (2nd „+“) always all 8 parameters will be displayed For example: Direct set addressing with set 0 + 2:
Please see: “Tools” → “Options” → “KEB-settings” → Tab: “Parameter”
„right mouse click“
All in monitor indicated parame-ters will be updated
Only selected parameters will be indicated and updated
Open parameter groups, possible with keys r, o, p, c… (F8), close with “space”-key
Create a new parameterlist with se-lected Parameters. Multiple selec-tions by “Shift” and “Ctrl” –key. At first open all parameter groups from which parameters may be selected.

Page 25 / 82
KEB COMBIVIS 6 The new KEB parameterization and start-up tool
3.6. Operator parameters Same behaviour like in tab „inverter parameters“
3.7. Online wizards Online wizards are a start-up and adjustment help. Parameters and adjustments are done direct in the device. See 9.1. Online start-up wizard

Page 26 / 82
KEB COMBIVIS 6 The new KEB parameterization and start-up tool
3.8. Information Information: General information about the device.
4. Property Editor (input window)
4.1. Basic setting In area “Property editor” can be adjusted if input window should be displayed sequential or permanently. Please click on: “Tools” → “Options” → “KEB Parameterization” → “Behav-iour“.

Page 27 / 82
KEB COMBIVIS 6 The new KEB parameterization and start-up tool
4.2. Feature selection
Selection list
“OK” takes the current value
Input value. This value will be tak-en by “OK”. (Can also be given directly as a number)
Scrollbar
Selection list viewable / hidden
Selection list and scrollbar can be used in parallel.

Page 28 / 82
KEB COMBIVIS 6 The new KEB parameterization and start-up tool
4.3. Numerical value input
4.4. Basic information
“OK” takes the current value
Direct input and Scrollbar can be
used in parallel.
Scrollbar
Direct input of number. This value will be taken with “OK”
Via click on this arrow a window will be opened which displays basic data of the parameter:
hex. -address
Limits
Default value
Resolution
Data length
…..

Page 29 / 82
KEB COMBIVIS 6 The new KEB parameterization and start-up tool
5. General adjustments General and special options can be indicated and adjusted in “Tools” → “Options”….
These adjustments will be saved automatically non-volatile.
5.1. Language settings

Page 30 / 82
KEB COMBIVIS 6 The new KEB parameterization and start-up tool
5.2. Parameter view
5.3. Communication
Display of normally invisi-ble service parameters
Display of service param-eters with special pass-word protection
Parameter language, if language file is not available, English will be used.
Set addressing of pa-rameters when generating a parameter list
Adjustments for drive pro-files according to DS402 (only COMBIVERT H6)
Active attribution of interface and respec-tive transfer rate. The number of COM inter-faces depends on the PC hardware.
Max. waiting time for reply
Control of circuit status after each x seconds

Page 31 / 82
KEB COMBIVIS 6 The new KEB parameterization and start-up tool
5.4. Parameter lists Default settings of new opened parameter lists
5.5. Behaviour
Behaviour of the property editor (input window)
Behaviour at error messages
Available assis-tants will be direct-ly attached to the located device

Page 32 / 82
KEB COMBIVIS 6 The new KEB parameterization and start-up tool
5.6. Device scan Pre-settings for device scan
With KEB Port-Expander search minimum at node addresses 0 - 4. 0 = Port Expander 1-4 = HSP5-Ports The pre-setting for the device scan will be directly assumed in the project assistant. When scan is started manually it is still adaptable by “Project” → “KEB-device scan”.
Activates search-ing in the TCP/IP network
IP address range
All: Search on all baud rates, beginning with the fastest. Active only: Only the baud rate of the (active) stand-ard setting (see tab com-munication).
Search range for node- (device-) addresses
Selection of the inter-faces, which should be scanned

Page 33 / 82
KEB COMBIVIS 6 The new KEB parameterization and start-up tool
5.7. Data paths Data path for the parameter description file (xml-file). Here are stored xml-files of all addressable devices. This folder can be placed elsewhere but the data path has to be achieved here.
5.8. Loading and saving Settings for loading, saving and for the start-window
Actualize file
Start window display
Create backup file automatically

Page 34 / 82
KEB COMBIVIS 6 The new KEB parameterization and start-up tool
6. Window layout Reset Window layout: All changes in the window layout can be reset by: Menu bar: “Window” → “Reset Window Layout”
Change window layout manually: The data tabs (editor-window, scope, parameter list…) can be displayed one below the oth-er or side by side: Activate the data tab group which is to relocate – choose task menu “Window” → “New Hor-izontal or Vertical Tab Group”.
Alternative: Click on data tab which is to relocate and put it to the middle of the screen. A cross for the orientation will appear. If the data tab will be arranged above, below, on the right or on the left side depends on the selection (blue deposited area).

Page 35 / 82
KEB COMBIVIS 6 The new KEB parameterization and start-up tool
Data tabs which are arranged one below the other or side by side can be rearranged by drag and drop to be placed as flags. Same behaviour when the flag is pulled to the center of the orientation cross (see before).

Page 36 / 82
KEB COMBIVIS 6 The new KEB parameterization and start-up tool
7. Parameter lists
7.1. Properties
Parameter lists can be attached to projects or devices
Parameters of different devices can be filled in one list and can be up- and downloaded in parallel
On- and offline data will be indicated in the list at the same time
Direct and indirect set addressing of the parameters
“Drag and drop function” for parameters out of the device editor
Direct copying of direct and indirect addressed parameters
Parameter lists will be saved with the project
Export / import of .dw5 and .wr5 (=COMBIVIS 5) lists
Printer functions
Parameter can get user-defined names
Parameter lists can be exported individually in CV6 or CV5 format
Parameter lists can be compared with actual device adjustments or with other parameter lists
Online and offline values can be compared directly
7.2. Open a blank list Attach a parameter list to a device or project: Respective device/project Right-mouse-click → choose “Add Object” → “KEB Parameterlist…” → give list a name → “Open”, or:
In tool bar click on icon → “KEB Parameterlist…” → give new list a name → “Open”
Page 37 / 82
KEB COMBIVIS 6 The new KEB parameterization and start-up tool
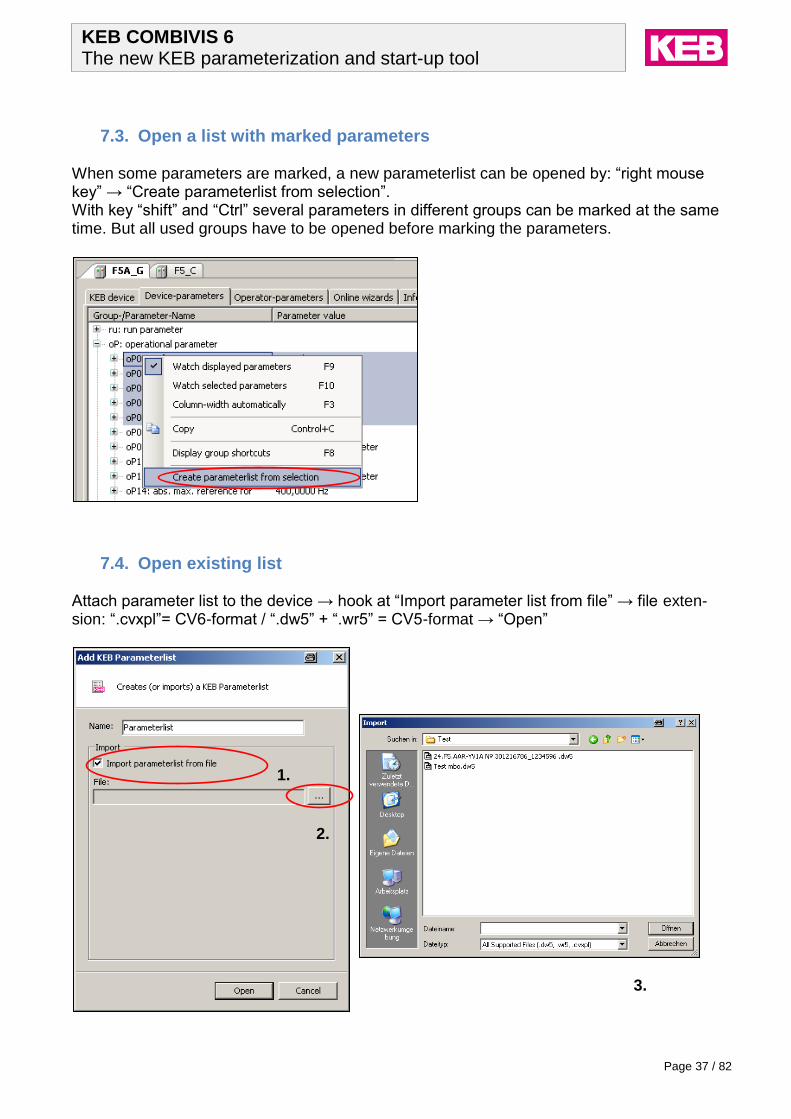
7.3. Open a list with marked parameters When some parameters are marked, a new parameterlist can be opened by: “right mouse key” → “Create parameterlist from selection”. With key “shift” and “Ctrl” several parameters in different groups can be marked at the same time. But all used groups have to be opened before marking the parameters.
7.4. Open existing list Attach parameter list to the device → hook at “Import parameter list from file” → file exten-sion: “.cvxpl”= CV6-format / “.dw5” + “.wr5” = CV5-format → “Open”
1.
3.
2.

Page 38 / 82
KEB COMBIVIS 6 The new KEB parameterization and start-up tool
7.5. Create complete list Open choice box by right click on the respective device → Choose “Create Complete List” → A parameter list with all device parameters will be created.
7.6. Fragmentation
Attention: This complete list is filled in column “offline” with COMBIVIS-default values and does not include yet the actual values of the device. For data storage it is essential to take an up-load from the device before saving!
Tab of parameter list
Area for notes
Basis Cfg-ID of devices in this parameter list
Origin. CFG-ID of the parameters
Fading out description

Page 39 / 82
KEB COMBIVIS 6 The new KEB parameterization and start-up tool
Display of columns in the parameter list The columns which may be shown can be chosen by pulling up and close with mouse or: “right mouse click” → “columns” → “set hook”
Reference of device
Line number Notes area User-defined name of parameter, changeable
Parameter ID
Set number Set point value (offline)
Actual value (online)
Write / read permission
Parameter‟s origin name
Parameter address (hex)

Page 40 / 82
KEB COMBIVIS 6 The new KEB parameterization and start-up tool
Display grid lines: The grid lines can be activated by: “right mouse key” → “Advanced” → “Display grid lines”
7.7. Self-created parameter list Open blank list → mark and copy the parameter in the device editor → insert into the pa-rameter list.
Open with right mouse click

Page 41 / 82
KEB COMBIVIS 6 The new KEB parameterization and start-up tool
Open list → mark the parameter in the device editor with left mouse key → hold the key → pull the parameter into the parameter list (Drag and drop).
7.8. Inserting an empty line To insert an empty line “right mouse click” → “Insert empty line”
Empty lines have no influence. They are used only for structuring.

Page 42 / 82
KEB COMBIVIS 6 The new KEB parameterization and start-up tool
7.9. Inserting a transfer pause
Transfer pause (at download to the device):
- Offline value: -2000 ms: 2sec pause, the remark text will be shown, after that the down-load goes on automatically.
- Offline value: (+) xx ms: unlimited pause and display of remark text. Download goes on after click on “OK”.
7.10. Changing of device reference The device reference of a parameter can be effected by double-click on the device refer-ence number. The change of one or more device references can be effected by: Marking of the corresponding lines in the column “DRef” → “right mouse click” → “Edit De-vice-Reference” → choose new device reference → “OK”.

Page 43 / 82
KEB COMBIVIS 6 The new KEB parameterization and start-up tool
7.11. Upload from the inverter into a parameter list
a) Click on icon in the tool bar, or: b) Right mouse click in the parameter window, choose “Upload List”, or: c) Tap key “F5” and answer the following questions with “Yes”. The column “Offline value” will become overwritten with the values (online values) which are adjusted in the device.
Be sure that the device reference in the list matches the target device´s reference! Otherwise adapt the reference of the list or of the device.
7.12. Parameter download Open the terminal control release before download of parameter list into the device, because some parameters can be written only at open control release terminal.
a) Click on icon in the tool bar, or: b) Right mouse click in the parameter window, choose “Download List”, or: c) Tap key “F4” and answer the following questions with “Yes”.

Page 44 / 82
KEB COMBIVIS 6 The new KEB parameterization and start-up tool
The values, which are adjusted in the device, will become overwritten with the values of the column “Offline Values”. Only the writeable parameters which are actually in the list will get overwritten. All the rest will remain unaffected.
Be sure that the device reference in the list matches the target device´s reference! Otherwise adapt the reference of the list or of the device. Parameter-Download from a parameter list to several devices: Parallel up-/download from/to several devices (here: DRef 0 and 1) from a list is possible. Each parameter is dedicated to one special device. Therefor the suitable target-CFG-IDs have to be registered. Missing CFG-IDs will be added at up/download optionally.

Page 45 / 82
KEB COMBIVIS 6 The new KEB parameterization and start-up tool
7.13. Renaming parameter list Double-click slowly in the navigator on parameter list‟s name and rename.
7.14. Insertion of parameter list External parameter lists can be integrated completely in already existing lists. Existing pa-rameters will still kept. The new parameters will be added at the end of the actual list. Click with right mouse key in the parameter list → “File” → “Import” → “COMBIVIS 5 / 6 Files”. At .dw5- or .wr5-lists allocate the device reference of the new parameters. At .cvxpl-lists the device reference is still kept: Check and change if needed.

Page 46 / 82
KEB COMBIVIS 6 The new KEB parameterization and start-up tool
7.15. Comparing parameter lists directly On- and Offline values can be compered in a parameterlist directly: Right mouse click → “Advanced” → “Enable quick-compare” In column “Online value”: Green: On- /Offline values equal Red: On- /Offline values unequal Yellow: Parameter not existing
Please note: If the parameter list is designed with indirect set pointer, all parameters in all sets will be compared only with 1 set (the set to which the set pointer fr.09 is adjusted). For an expedi-ent comparing use direct set addressing for the parameter list. (See 7.17. Parameter back-up) Some parameter values depend on pointer positions (e.g. ud.16, ud.22, In.24 …). Online (in the device) these parameters are shown only once. In a complete data saving list these parameters are shown each by each with the related pointer. So the different list parame-ters are compared every time with the same device parameter! Example: ud.15 (CP-selector) is the pointer for ud.16 (CP-Address). In ud.15 one of 36 possible parameters and in ud.16 the related (application-) parameter address can be cho-sen. In a data saving list all 36 „ud.15“ and „ud.16“ must be listed, but online, in the device, ud.15 shows every time the same value. That gives at comparing once an equal and 35x an unequal value.

Page 47 / 82
KEB COMBIVIS 6 The new KEB parameterization and start-up tool
7.16. Comparing parameter lists A parameter list can be compared with an actual device adjustment or with the offline val-ues of another parameter list. Right mouse click → “Compare list”
Online – Offline Comparing of a parameter list‟s offline values with actual online values in a device generate a new parameter list with the different values of the device.
It is possible to compare one list with parameters of several devices in parallel.
Empty lines will be kept
Useless set pointer and index parameter are cleared in the result list

Page 48 / 82
KEB COMBIVIS 6 The new KEB parameterization and start-up tool
Offline – Offline Comparing of a parameter list‟s offline values with another offline parameter list creates a new list with the unequal values of the 2nd list.
Please note: Only the values in the same lines will be compared, independent which parameter is in this line! Displacements in the list, e.g. by additional parameters will cause in a wrong result!
7.17. Parameter backup Open → “Tools” → “Parameter Saving”
All parameters of all devices will be saved in one list!
Empty lines and user inputs are kept in the result list
Useless set pointer and index parameter are cleared in the result list
Ignore different device references
Ignore empty lines at comparing
Ignore lines with pause and user input at compar-ing

Page 49 / 82
KEB COMBIVIS 6 The new KEB parameterization and start-up tool
“Start”→ Upload starts. An interruption is possible with “Abort”. After upload is finished a window for adjustment of storage location will open. This list can be integrated in the project or it can be stored externally.
An external storage is only possible in COMBIVIS6-format (.cvxpl). With reopen and “export” function it is also possible to generate a list in .dw5-format.
Choose devices you want to save from
Choose if device- and/or operator parameters are to save
Choose how to list the parameters (with regards to content completely equal). For description see below

Page 50 / 82
KEB COMBIVIS 6 The new KEB parameterization and start-up tool
Parameter list design with indirect set addressing: Design of the list:
Set pointer Fr.09 = 0 All set programmable parameters of set 0 and all not set programmable parameters
Set pointer Fr.09 = 1 All set programmable parameters of set 1
…..
Set pointer Fr.09 = 7 All set programmable parameters of set 7
Operator parameters
If the inverter works in contouring mode (synchronous bus mode) the indirect set addressing has to be used! Parameter list design with direct set addressing, joined parameters: Without set pointer, each parameter belongs direct to one set or several sets Design of the list:
Parameter X of set 0
Parameter X of set 1
Parameter X of set 2
Parameter X of set 3 ……
Parameter X of set 7
Parameter Y of set 0
Parameter Y of set 1
Parameter Y of set 2
Parameter Y of set 3 ……
Parameter Y of set 7 …….
Operator parameters All not set programmable parameters are written in set 0 Parameter list design with direct set addressing, joined sets: Without set pointer, each parameter belongs direct to one set or several sets. Design of the list:
All set programmable parameters of set 0 and all not set programmable parameters
All set programmable parameters of set 1 …..
All set programmable parameters of set 7
Operator parameters

Page 51 / 82
KEB COMBIVIS 6 The new KEB parameterization and start-up tool
8. Scope
8.1. Characteristics
Activation of 1x Scope per project possible, but several scope can be added
Direct attach and save with the project
Total up to 16 channels per scope
The first 4 channels of each device work in synchronous mode
(2x32-bit + 2x16-bit) or (1x32-bit +3x16-bit) or (4x16-bit) parameters automatically re-served, regardless sequence
Display as dot, line, step curve or interpolated curve
It is possible to record channels in all devices of the project at the same time
Export in Excel-compatible .csv-format
Offline-Mode (4 channels buffer in a device)
Online-Trigger mode
2 horizontal and 2 vertical cursors at the same time
Extensive zoom-functions
Auto scaling function (splaying of the curve to the whole X- and Y-range)
Basic adjustment in % of the parameter value range
Additionally display of the parameters unit value at the Y-axis
Ex- and import individual channels (planned function)
Import of sc5-files (COMBIVIS 5) (planned function)
8.2. Open scope
Open first scope: Click on icon in the tool bar.

Page 52 / 82
KEB COMBIVIS 6 The new KEB parameterization and start-up tool
Open first or additional scope: Right mouse click on “Project” → “Add Object” → “COMBIV-IS Scope”
Or: In the “Navigator”: Scope copy and paste Or: In the tool bar: Icon “Add Object”→ “COMBIVIS Scope”
. Note: Only one scope can be active at the same time! With each scope one recording can be saved with the project. Channels and adjustments can be different in each scope.
8.3. Basic settings It is possible to configure basic setting in window “KEB Scope-Settings”. These adjustments will be pre-set always when scope will be opened. Menu bar → “Tools” → “Options” → in window “KEB Scope-Settings”

Page 53 / 82
KEB COMBIVIS 6 The new KEB parameterization and start-up tool
In window “Settings” in scope itself settings can be adjusted which are valid only for this special scope.
Description for scope
Trigger option (Identification of spe-cial occurrences in recording – see there)
Data channel is reserved only for scope
Cursor s into measuring value
Display / design of cursor, grid and legend
Online (direct display of recorded values in CV6) / Offline mode (see there)
Basis of time axis (X-axis)
Time gap between 2 measuring points: 0 = shortest possible time

Page 54 / 82
KEB COMBIVIS 6 The new KEB parameterization and start-up tool
8.4. Channel configuration / new channel Channel allocation In window “New Channel” you can choose a parameter directly for this channel.
Alternative:
Control data of device
Device reference (-selection) (doesn„t mean device„s bus address!!). I.e. from which device the channels shall be recorded
Parameter group selection
Parameter selection
Set selection
Set addressing mode (directly or indirectly)
Acceptance and activation of the channel
Select parameter in device-editor and pull it to the window “scope”. (Doesn´t matter if scope is in tab “display”, “set-tings” or “new channel”) Please don‟t forget acceptance and activation!
Drag and drop

Page 55 / 82
KEB COMBIVIS 6 The new KEB parameterization and start-up tool
8.5. Channel settings
Channel number
Optional description
Channel switched on/off
Delete channel
Display channel allocation
Change channel allocation
Auto scaling of this channel
Scaling at Y-axis. Parameter value at 0% Y-axis default: 0
Length of parameter (16- or 32-bit)
Channel mode (act. no adjustment)
Parameter value at 100% Y-axis default: positive max. value
Load default values
Show unit-axis
Synchronize with other channel
Parameter will be recorded in synch. mode (max. 4 channels per device).
Benchmark at 10% of Y-axis

Page 56 / 82
KEB COMBIVIS 6 The new KEB parameterization and start-up tool
8.6. Recording Start recording in window “Display” as follows:
Menu: “Scope” → “Start Scope” or
“Right mouse click” → “Start scope” or
Tap key “F9” or
Click on Symbol
Display as line, interpolated connection between points
Display of curve
Display in points
Display as line, linear connection between points
Interpolation value
Color of curve
Measurement value point highlighted
Width of curve.
Display as stairs

Page 57 / 82
KEB COMBIVIS 6 The new KEB parameterization and start-up tool
Stop with same functions but a stop-icon will be shown:
Recording time is not limited. Per hour you can calculate approx. 90 MB with 4 chan-nels.
8.7. Display window Behaviour of the display while recording: “Right mouse click”→ “Auto-Zoom/Scroll”:
Saves the current Y-axis proportioning for a new recording
At recording the displayed window jumps with the rec-orded value to the next window width
The window runs syn-chronous with the ac-tual recorded value

Page 58 / 82
KEB COMBIVIS 6 The new KEB parameterization and start-up tool
8.8. Adapt display Time axis (X-axis)
X-Axis: Recording time in ms or µs Y-Axis: Parameter value in basic setting refers to 100% = max. value range 0% = 0 -100% = min. value range By passing the curve with the mouse, the actual value will be displayed.
Scrolling window
Stretch / compress time axis
Display of full recording time in the window
Fading in and out of value schedule
Page 59 / 82
KEB COMBIVIS 6 The new KEB parameterization and start-up tool
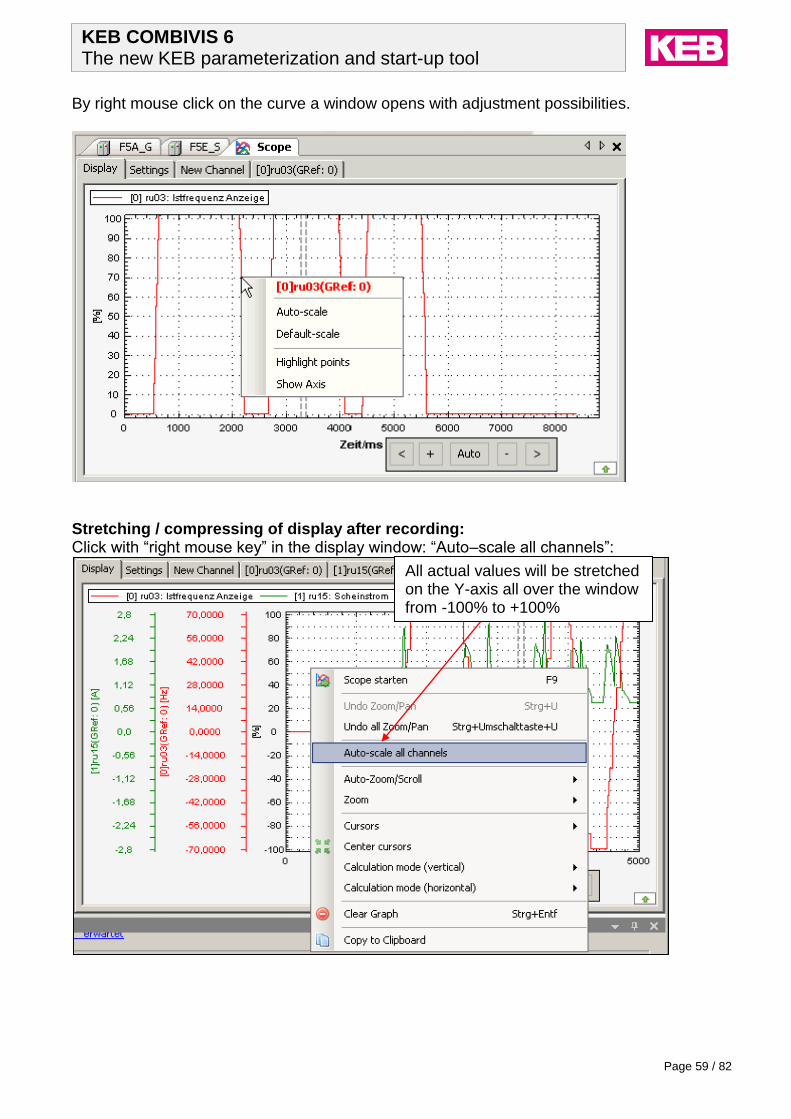
By right mouse click on the curve a window opens with adjustment possibilities.
Stretching / compressing of display after recording: Click with “right mouse key” in the display window: “Auto–scale all channels”:
All actual values will be stretched on the Y-axis all over the window from -100% to +100%

Page 60 / 82
KEB COMBIVIS 6 The new KEB parameterization and start-up tool
8.9. Display – Zoom At zooming the relation between the curves is still kept. Zoom to display 0-100% (or rather -100- +100%): - “Right mouse click” → “Zoom” → “All axes” (or only “X- or Y-axis”) - Tab key F5 (F3 / F4)
Zoom by mouse:
Whole display with mouse wheel or keys “+” and “-“
Parts of display: mark with left mouse key
The view in the window can be displaced by using the buttons “← ↑ → ↓” or: tap key “Strg” and left mouse key in parallel or: with pressed mouse wheel or: Only the time (X-) axis: click and hold with mouse and scroll to right or left side or by:

Page 61 / 82
KEB COMBIVIS 6 The new KEB parameterization and start-up tool
Fixing of Y-axis: Zooming will be done only at the time- (X-) axis by mouse Point to the Y-(%-) axis → “right mouse key” → “Fix Y-axis scale”
8.10. Display – Cursor There are 2 vertical and 2 horizontal cursors: To integrate: “Right mouse click” → “Cursors” → “Vertical 1 or 2 and horizontal 1 or 2” The cursors will be placed in the center of the display. Displace them by picking with the left mouse key.
Alternative with keys: Alt+A: Vertical 1 Alt+B: Vertical 2 Alt+C: Horizontal 1 Alt+D: Horizontal 2

Page 62 / 82
KEB COMBIVIS 6 The new KEB parameterization and start-up tool
On the basis of vertical cursor values it is possible to realize several calculation types: dif-ference, integral or average. On basis of horizontal cursor values only difference is possi-ble.
For changing click onto the name with left mouse key. With this it is possible to get very easy the average current of a drive unit over a running circuit.
Vertical cursor 1 and 2
Horizontal cursor 1 and 2
Cursor chart: Values of the active horizontal cursor posi-tion (Y-axis) or rather the intercept point of the vertical cursor position with the channel-curve
Cursor chart viewable / hidden

Page 63 / 82
KEB COMBIVIS 6 The new KEB parameterization and start-up tool
If the cursors as a result of zooming are not viewable, it is possible to bring them back to the center of the display as follows: “Right mouse click” → “Center cursors”.
8.11. Save recording Several scope recordings can be connected to the project and saved with it. Each scope can save one recording. Please see 8.2. Open Scope

Page 64 / 82
KEB COMBIVIS 6 The new KEB parameterization and start-up tool
8.12. Import / Export
8.13. Export to .csv-format
Adjustments of csv-format by: “Tools” → “Options” → “KEB-Scope” → “Extended”
Clears the display
Copies the displayed picture to the clipboard. Can be used e.g. in MS-Office programs.
Imports a CV6 scope file, the actual displayed curves will be erased.
Exports the actual scope curves in a XML-format. E.g. for saving. The project saves actual only the last recording!
1.) Exports the current scope curves in a csv-format. With it it´s possible to export the scope as a data sheet (e.g. to MS-Excel)
2.)

Page 65 / 82
KEB COMBIVIS 6 The new KEB parameterization and start-up tool
8.14. Trigger function (online) Trigger function in online mode This function realizes in case of long-term recordings a limitation of the saved period (e. g. period around a defined error occurrence). Therefor a trigger event will be defined (e.g. a special inverter status or a reached current level). Around this event a predefined time domain will be saved. That results in a compact scope-file also for long term recordings. This function will be adjusted and activated in the window “Scope” → “Settings”. The trigger event will be placed in scope display at 0 ms on the time axis. Triggering (Online Mode)
Overtravel time, saved time after the trigger event
Level, absolute relating to unit or percental relating to range of values
Lead time: Saved time before trigger event
Activate trigger function
Trigger channel: On which channel shall be triggered?
Which trigger pulse edge or level?

Page 66 / 82
KEB COMBIVIS 6 The new KEB parameterization and start-up tool
Example:
8.15. Offline Mode The Offline mode uses the function of the fast scope mode‟s 4 channels to buffer parameter values in the device. Therefor a part of the device‟s storage is reserved. Via channel allocation recording and filling of storage will generated. The storage works like a drum store, each new value over writes the oldest one. The store will be frozen by a trigger event and can be read-out by scope. Because of a faster data communication in the devices than to the PC it can be recorded with a shorter time period. Useful for:
Shorter time period, therewith better hit rate in short peaks
Recording without PC
Recording of sporadically events Characteristics:
Available for F5-C, F5-G, F5-A/M, F5-S, F5-H, F5-E, B6, G6, H6 and P6 inverters
Contrary to online mode data won„t be readout sequential from the inverter and displayed but internally saved in the inverter
No dependency on communication time, therefore very short frames realizable
Up to 4 channels in one device will be recorded with chronological synchronism and in a fixed frame (fast scope mode)
For data recording a connection inverter to PC must not be active
Flexible trigger conditions allow a selective recording of particular sequences
Trigger will be released by a digital input
Also after inverter„s power-off the trigger requirement will remain unaffected (only F5-A/M, -S, -H, -K, -L, -P, -E ≥ D-housing). So it is possible to trigger intermittent effects over a long period
Trigger
Delay Lead-time
Trigger level

Page 67 / 82
KEB COMBIVIS 6 The new KEB parameterization and start-up tool
8.15.1. Switch on and adjustment of time basis Activating of Offline Mode: “Scope” → “Settings” → “Mode”
Adjust scanning-frequency: Max. number of buffered values * scan time = stored time. That means: the smaller time base the shorter recorded time. Max. quantity of values depends on controller„s data space. (Please see: 8.15.5. Offline-storage capacity
8.15.2. Adjusting of trigger source Digital inputs act as trigger source. The activation of inputs initiates a saving of the scope recording. Via software inputs IA … ID complex trigger requirements can be indirectly realized by out-puts OA … OD (COMBIVERT F5/B6/G6). E.g. setting “F” for recording of acceleration or: by OutA switching condition: “current > level” to input IA
Read out of a stored recording. Channel allocation will be read out automatically

Page 68 / 82
KEB COMBIVIS 6 The new KEB parameterization and start-up tool
8.15.3. Adjusting of trigger position Trigger position defines how many percent of the complete recording period before trigger event shall be displayed. Example 20%: = 20% of recording indicate the period before the trigger event.

Page 69 / 82
KEB COMBIVIS 6 The new KEB parameterization and start-up tool
8.15.4. Practice
Start offline recording via click on start/stop button or tap key “F9”.
In the bottom of the scope-window the flashing code “wait for trigger” appears. The in-verter waits for the trigger event.
The code will change into “data recording” as soon as the trigger event occurs. The re-cording will be realized and saved.
If the saving process is finished, the code will change into “offline data readout”. The saved data will be readout by Scope and displayed.
After readout the diagram can be handled like in online-mode. Recording without connected PC and read out afterwards
Start offline-recording by start/stop button or tap key „F9“ → at the bottom of the display is shown blinking “Wait for trigger”→ the device is waiting for the trigger condition
Close COMBIVIS 6 without stopping the scope, if applicable save project.
When the first trigger condition occurs, the curves will be saved in the device´s storage. Further will be ignored.
Connect cables as shown before → start COMBIVIS 6 with the respective or with a new project → if needed get connection to the device → at “Scope” → ”Settings” click on:
→ the saved data will be read out of the device and displayed in Scope.
The saved data will be erased at F5-A/-S/-E/-H; ≥D-housing only by a new starting of offline recording. Inverter can also be switched of in the meantime. At G6/ H6/ F5-A-Servo (A-Housing) trigger requirements and saved data will be erased also by switching off of the device or by overwriting.

Page 70 / 82
KEB COMBIVIS 6 The new KEB parameterization and start-up tool
For example: Time base: 500µs / trigger source: F / trigger position: 5%
8.15.5. Offline-storage capacity E.g. in KEB COMBIVERT F5.A Version 4.2: ≥ D-housing: For 1x or 2x 16-bit-parameters: approx. 1900 values/channel For 3x or 4x 16-bit-parameters: approx. 950 values/channel For 1x or 2x 16- and 1x or 2x 32-bit-parmeters: approx. 470 values/channel (32-bit-parameters are e.g.: position, torque, and control / status word long…) Therewith 4 channels with 16-bit in 0.5ms time basis give approx. 0.47s recording time. For the other inverters this might differ strongly. For example: a KEB COMBIVERT G6 has approximately 20% more space. COMBIVERT F5-C has approx. 70% less and COMBIVERT B6 approx. 86% less.
Trigger
5% 95%

Page 71 / 82
KEB COMBIVIS 6 The new KEB parameterization and start-up tool
9. Start-up assistants (wizards)
Start-up wizards are tools for an easy creating of parameter lists and parameter adjust-ments.
Only the compatible wizards will be offered in the project.
Complete adjustments can be loaded directly to the device or saved as parameter list.
Start-up wizards will be created or upgraded continuously. Currently available: o Process data allocation H6/G6 o Motor data configurator H6, F5-S; (for F5/G6 also the motor data configurator is
available on KEB‟s website). o Creation of EtherCAT device description files G6/F5 o Velocity profiles H6
9.1. Online Start-Up wizard
9.1.1. Online Start-Up wizard COMBIVERT H6
9.1.1.1. State machine With the State Machine start and stop of the axis can be done direct in the same way as by bus controller.
Handling
Display sta-tus

Page 72 / 82
KEB COMBIVIS 6 The new KEB parameterization and start-up tool
9.1.1.2. Motor data configurator Open in device editor:
9.2. Offline Start-Up wizard Open start-up wizards If there is a wizard for the device software offered, it will be shown direct in the navigator window.
If it isn´t shown because e.g. the software mode has switched, the start-up wizard can be opened manually: Mark device → right mouse key → “Add object” → “Start-up Wizard”
Input data
Choose motor type
Write down to the device
Display of motor data list, KEB- or user defined mo-tor data list

Page 73 / 82
KEB COMBIVIS 6 The new KEB parameterization and start-up tool
Or: mark device → Tool bar: Icon → “Start-up assistant”

Page 74 / 82
KEB COMBIVIS 6 The new KEB parameterization and start-up tool
9.2.1. Offline start-up wizard for COMBIVERT F5
9.2.1.1. Motor configurator F5-S The motor configurator F5-S creates a parameter list with related motor data based on the KEB synchronous motors or self-defined data. This list can be stored or direct loaded to the F5-S. Actual only synchronous motors are available.
Choose motor, e.g.: B1.SM.000-6200:
Reduction of list for design, voltage, speed, pole num-ber
Adjust design of cool-ing type
Adjust encoder type
Pre-adjustment of speed controller: 2=strong, 15=weak, (bases on motor inertia)
Forward
Forward Back

Page 75 / 82
KEB COMBIVIS 6 The new KEB parameterization and start-up tool
Define your own synchronous motor:
In → Overview it can be chosen if the parameter would be load directly into the device or if a parameter list shall be created.
9.2.1.2. Process data adjustment of F5 bus operators Follows later
9.2.2. Offline Start-up wizard for COMBIVERT G6 Follows later
9.2.3. Offline Start-up wizard for COMBIVERT H6 Follows later
Enter motor name
Put motor data into motor list
Use motor data directly for parameterization

Page 76 / 82
KEB COMBIVIS 6 The new KEB parameterization and start-up tool
9.2.4. Offline start-up wizard overview
10. Frequently asked questions a.) Is it possible to use COMBIVIS 5 and COMBIVIS 6 in parallel? Both programs can be installed and opened at the same time. But each COM- and USB-interface can be used only by one of them. (e.g. CV5 by COM1/serial and CV6 by USB-COM6 will work) b.) Is it possible to use COMBIVIS 6 twice at the same time? CV6 can be open several times at same time. But each COM- and USB-interface can be used only by one of them. c.) Is it possible to use parameter lists (.dw5), work lists (.wr5) and scope files (.sc5) of COMBIVIS 5 at COMBIVIS 6? With COMBIVIS 6 .dw5- and .wr5-files can be opened and saved. Sc5-files cannot be han-dled actual. d.) In case of device-searching and removing of the previous devices the device ref-erences won„t be reserved new again. They will be added to the previous device ref-erences. (e.g. previous 0-3, then 4-6) This is deliberate. Possibly it may happen that there are parameter lists in the same project which include the old reference. It will be very confusing if a new device would be included
Create a parameter list with all parameters of selected wizards
Do a down load to the device with all parameters of select-ed wizards
Choose which parame-ter of which wizard shall be used for listing or down load
Create and export a parameter list with all parameters of selected wizards

Page 77 / 82
KEB COMBIVIS 6 The new KEB parameterization and start-up tool
with a previous reference. Therefore a reference will be automatically allocated only once. It is possible to adjust previous references (here: 0-3) manually but only if these references have been deleted before. e.) Is it possible to parameterize older KEB inverters (e.g. F4) with CV6? No, it is not intended. f.) After inserting a parameter list into the project, there is shown: “channel closed” in the online values. The device reference in the parameter list is not the same as in the actual device. → Adjust the device reference in the list or in the device. g.) Is it possible to open several projects with CV6 at the same time? CV6 can handle only one project at the same time. But CV6 can be opened several times with different projects (also in different languages). h.) Why asks CV6 for a device reference number at each opening of a CV5-list in .dw5-format? The device reference in CV6 is used for assignment of parameters and scope channels to the devices. In CV6 it is possible to take parameters of several devices in one list, also channels of several devices to one scope file. With it the device addresses (SY.06) cannot be used for identifying like in CV5. At CV6 there can be connected devices with same ad-dresses at different COM-interfaces. i.) Why asks CV6 during saving of a CV5-list in dw5-format for a node address? In CV5 the identifying of the device is done by the node address (e.g. SY.06 at COMBI-VERT F5/G6). This is in CV6 not used, so it is necessary to add it. j.) Why will be found the same device several times by using the USB-Serial-Converter Part-No. 00.58.060-0020? Because of the not specified node addresses at HSP5 the F5/HSP5 or B6 inverter will be found at each scanned node address. (HSP5 is a face to face communication with only 2 members) → search only at one node address or, at manually searching, mark and open only one device. k.) By using USB-Serial-Converter at a HSP5-interface of F5/B6, the device will be not or only by searching several times found. In default of CV6 the searching procedure starts with 9600 baud and counts up afterwards. This needs a little time, so that the device may not be detected. → use CV6 at searching on HSP5 with fixed 38400 baud. Note: on serial interface DIN66019 other, smaller baud rates may be used (F5, default= 9600 baud) l.) At handling of a parameter value the property editor window is not shown. Please try to open the property editor window in the toolbar menu “view”. Afterwards search at the screen frame. May be the property editor window is collapsed. If found, click into the property editor window and open it. Clicking on the pin symbol fixes the window open. A complete restoring of all windows can be done by: toolbar: “Window” → “Reset window layout”

Page 78 / 82
KEB COMBIVIS 6 The new KEB parameterization and start-up tool
m.) Windows in screen are displayed incompletely, protrude from frame or overlap. Please check DPI adjustment in the MS-Windows settings: “Start” → “Settings” → “Control panel” → “Display” → “Adjustments” → “Enhanced” → “General”. Adjustment must be 96 dpi (standard-size). Different values are as far as our experience goes not compatible with Microsoft .net framework
10.1. FAQ Scope a.) Is it possible to record more than 16 channels? Each scope can handle max. 16 channels, but Scope can be opened several times in a pro-ject, each with 16 different channels. b.) If a channel which is in the fast mode will be disabled, does the 5th channel move up into the fast mode or does the previous reservation persist? Yes. The channel “moves up”. c.) Is it possible to save a CV6-scope in CV5 (.sc5) format? No, because of different and upgraded structures it is not possible. d.) Is it possible to merge channels from different scope recordings? This is planned for a later COMBIVIS 6 version. Currently it is already possible, but only indirectly via export in an Excel-compatible format for example “.csv”. In Excel it is possible to merge curves as tables on the basis of time-axis and compare them directly via diagram function.
10.2. Realized effects/problems in Version 6.1.2.0/1
At renaming of a parameter list the name cannot begin with a number (Message: name is still existing).
At switching from online mode to offline mode the window offline trigger is not shown. The window (online-) trigger is shown instead of it. Solution: please switch again back to online mode and then back to offline mode again. After that the display is correct.

Page 79 / 82
KEB COMBIVIS 6 The new KEB parameterization and start-up tool
This error is corrected from version 6.1.2.1.
11. Update Manually checking for updates With function “Check for updates” in menu “Help” an automatically connection to the KEB-homepage is done if a connection to the internet is available. The parameter description file paras.xml is checked for a newer date and downloaded/integrated if desired. But currently program version can‟t be checked!

Page 80 / 82
KEB COMBIVIS 6 The new KEB parameterization and start-up tool
Automatically checking for updates As background function COMBIVIS 6 can search automatically for an update if the internet connection is active.
Active in background
Proxy settings

Page 81 / 82
KEB COMBIVIS 6 The new KEB parameterization and start-up tool
Automatic check for update weekly or monthly means: next check 7 or 30 days after the last one if internet connection is active or at the next connection after this date.
12. KEB-FTP file transfer program With KEB File Transfer Program files can be exchanged between PC and KEB-Portable Operator (Part No. 00.58.060-1010 / -1110) or COMBICONTROL C5/C6. Open: Menu bar “Tools” → “KEBFTP”
Note: KEB-FTP is a separate program running parallel to COMBIVIS 6. It is not possible for KEB-FTP and COMBIVIS 6 to serve the same COM-Port. So the used COM Port in KEB-FTP must be inactive in COMBIVIS 6. Adjustments: IP-address or COM-Port and password if required (see device manual) have to be adjusted. Then click on Button “Connect”. The password resets, depending on device, sometime after last serving. The file length is limited compared to Windows Explorer COMBICONTROL C5 = 8 digits + file extension COMBICONTROL C6 = 32 digits + file extension Portable Operator = 32 digits + file extension

Page 82 / 82
KEB COMBIVIS 6 The new KEB parameterization and start-up tool
13. Remark The information contained in the technical documentation, as well as any user-specific ad-vice in spoken and written, are made to best of our knowledge. However, they are consid-ered for information only without responsibility. This also applies to any violation of industri-al property rights of a third-party. For description of properties are only considered the technical documentations (manuals) of the unit. Application and use of our units in the target products is outside of our control and therefore lies exclusively in the area of responsibility of the user. We reserve the right to make technical changes without obligation. All rights reserved. Any piratic printing, mimeographing or photomechanical reproduction, even in extracts, is strictly prohibited.
Delete data in the device.
Data in the PC Data in the operator(C) and SD-card (A) or C5/C6
Transfer data from PC to device Transfer data from device to PC


![New KEB COMBIVERT F5-B - gongkongdownload.gongkong.com/file/company/keb/4-5.pdf · 2002. 5. 28. · f5.b1e-1500 13033 [mm] 5 8.6 15.1 21.6 35.6 48 66 keb combivert f5-b antriebstechnik](https://cdn.vdocuments.mx/doc/165x107/612889a8d68e0944374eab28/new-keb-combivert-f5-b-2002-5-28-f5b1e-1500-13033-mm-5-86-151-216-356.jpg)


