Installing and Administering the IP OfficeB179 SIP Conference Phone
September 2013

© 2013 Avaya Inc.
All Rights Reserved.
Notice
While reasonable efforts have been made to ensure that theinformation in this document is complete and accurate at the time ofprinting, Avaya assumes no liability for any errors. Avaya reserves theright to make changes and corrections to the information in thisdocument without the obligation to notify any person or organization ofsuch changes.
Documentation disclaimer
“Documentation” means information published by Avaya in varyingmediums which may include product information, operating instructionsand performance specifications that Avaya generally makes availableto users of its products. Documentation does not include marketingmaterials. Avaya shall not be responsible for any modifications,additions, or deletions to the original published version ofdocumentation unless such modifications, additions, or deletions wereperformed by Avaya. End User agrees to indemnify and hold harmlessAvaya, Avaya's agents, servants and employees against all claims,lawsuits, demands and judgments arising out of, or in connection with,subsequent modifications, additions or deletions to this documentation,to the extent made by End User.
Link disclaimer
Avaya is not responsible for the contents or reliability of any linkedwebsites referenced within this site or documentation provided byAvaya. Avaya is not responsible for the accuracy of any information,statement or content provided on these sites and does not necessarilyendorse the products, services, or information described or offeredwithin them. Avaya does not guarantee that these links will work all thetime and has no control over the availability of the linked pages.
Warranty
Avaya provides a limited warranty on its hardware and Software(“Product(s)”). Refer to your sales agreement to establish the terms ofthe limited warranty. In addition, Avaya’s standard warranty language,as well as information regarding support for this Product while underwarranty is available to Avaya customers and other parties through theAvaya Support website: http://support.avaya.com. Please note that ifyou acquired the Product(s) from an authorized Avaya Channel Partneroutside of the United States and Canada, the warranty is provided toyou by said Avaya Channel Partner and not by Avaya. “Software”means computer programs in object code, provided by Avaya or anAvaya Channel Partner, whether as stand-alone products or pre-installed on hardware products, and any upgrades, updates, bug fixes,or modified versions.
Licenses
THE SOFTWARE LICENSE TERMS AVAILABLE ON THE AVAYAWEBSITE, HTTP://SUPPORT.AVAYA.COM/LICENSEINFO AREAPPLICABLE TO ANYONE WHO DOWNLOADS, USES AND/ORINSTALLS AVAYA SOFTWARE, PURCHASED FROM AVAYA INC.,ANY AVAYA AFFILIATE, OR AN AUTHORIZED AVAYA CHANNELPARTNER (AS APPLICABLE) UNDER A COMMERCIALAGREEMENT WITH AVAYA OR AN AUTHORIZED AVAYACHANNEL PARTNER. UNLESS OTHERWISE AGREED TO BYAVAYA IN WRITING, AVAYA DOES NOT EXTEND THIS LICENSE IFTHE SOFTWARE WAS OBTAINED FROM ANYONE OTHER THANAVAYA, AN AVAYA AFFILIATE OR AN AVAYA AUTHORIZEDAVAYA CHANNEL PARTNER; AVAYA RESERVES THE RIGHT TOTAKE LEGAL ACTION AGAINST YOU AND ANYONE ELSE USINGOR SELLING THE SOFTWARE WITHOUT A LICENSE. BYINSTALLING, DOWNLOADING OR USING THE SOFTWARE, ORAUTHORIZING OTHERS TO DO SO, YOU, ON BEHALF OFYOURSELF AND THE ENTITY FOR WHOM YOU ARE INSTALLING,DOWNLOADING OR USING THE SOFTWARE (HEREINAFTERREFERRED TO INTERCHANGEABLY AS “YOU” AND “END USER”),AGREE TO THESE TERMS AND CONDITIONS AND CREATE A
BINDING CONTRACT BETWEEN YOU AND AVAYA INC. OR THEAPPLICABLE AVAYA AFFILIATE (“AVAYA”).
Avaya grants you a license within the scope of the license typesdescribed below, with the exception of Heritage Nortel Software, forwhich the scope of the license is detailed below. Where the orderdocumentation does not expressly identify a license type, theapplicable license will be a Designated System License. The applicablenumber of licenses and units of capacity for which the license is grantedwill be one (1), unless a different number of licenses or units of capacityis specified in the documentation or other materials available to you.“Designated Processor” means a single stand-alone computing device.“Server” means a Designated Processor that hosts a softwareapplication to be accessed by multiple users.
License types
Designated System(s) License (DS). End User may install and useeach copy of the Software only on a number of Designated Processorsup to the number indicated in the order. Avaya may require theDesignated Processor(s) to be identified in the order by type, serialnumber, feature key, location or other specific designation, or to beprovided by End User to Avaya through electronic means establishedby Avaya specifically for this purpose.
Concurrent User License (CU). End User may install and use theSoftware on multiple Designated Processors or one or more Servers,so long as only the licensed number of Units are accessing and usingthe Software at any given time. A “Unit” means the unit on which Avaya,at its sole discretion, bases the pricing of its licenses and can be,without limitation, an agent, port or user, an e-mail or voice mail accountin the name of a person or corporate function (e.g., webmaster orhelpdesk), or a directory entry in the administrative database utilizedby the Software that permits one user to interface with the Software.Units may be linked to a specific, identified Server.
Database License (DL). End User may install and use each copy of theSoftware on one Server or on multiple Servers provided that each ofthe Servers on which the Software is installed communicates with nomore than a single instance of the same database.
CPU License (CP). End User may install and use each copy of theSoftware on a number of Servers up to the number indicated in theorder provided that the performance capacity of the Server(s) does notexceed the performance capacity specified for the Software. End Usermay not re-install or operate the Software on Server(s) with a largerperformance capacity without Avaya’s prior consent and payment of anupgrade fee.
Named User License (NU). You may: (i) install and use the Softwareon a single Designated Processor or Server per authorized NamedUser (defined below); or (ii) install and use the Software on a Server solong as only authorized Named Users access and use the Software.“Named User”, means a user or device that has been expresslyauthorized by Avaya to access and use the Software. At Avaya’s solediscretion, a “Named User” may be, without limitation, designated byname, corporate function (e.g., webmaster or helpdesk), an e-mail orvoice mail account in the name of a person or corporate function, or adirectory entry in the administrative database utilized by the Softwarethat permits one user to interface with the Software.
Shrinkwrap License (SR). You may install and use the Software inaccordance with the terms and conditions of the applicable licenseagreements, such as “shrinkwrap” or “clickthrough” licenseaccompanying or applicable to the Software (“Shrinkwrap License”).
Heritage Nortel Software
“Heritage Nortel Software” means the software that was acquired byAvaya as part of its purchase of the Nortel Enterprise SolutionsBusiness in December 2009. The Heritage Nortel Software currentlyavailable for license from Avaya is the software contained within the listof Heritage Nortel Products located at http://support.avaya.com/LicenseInfo under the link “Heritage Nortel Products”. For HeritageNortel Software, Avaya grants Customer a license to use HeritageNortel Software provided hereunder solely to the extent of the
2 Installing and Administering the IP Office B179 SIP Conference Phone September 2013Comments? [email protected]
authorized activation or authorized usage level, solely for the purposespecified in the Documentation, and solely as embedded in, forexecution on, or (in the event the applicable Documentation permitsinstallation on non-Avaya equipment) for communication with Avayaequipment. Charges for Heritage Nortel Software may be based onextent of activation or use authorized as specified in an order or invoice.
Copyright
Except where expressly stated otherwise, no use should be made ofmaterials on this site, the Documentation, Software, or hardwareprovided by Avaya. All content on this site, the documentation and theProduct provided by Avaya including the selection, arrangement anddesign of the content is owned either by Avaya or its licensors and isprotected by copyright and other intellectual property laws including thesui generis rights relating to the protection of databases. You may notmodify, copy, reproduce, republish, upload, post, transmit or distributein any way any content, in whole or in part, including any code andsoftware unless expressly authorized by Avaya. Unauthorizedreproduction, transmission, dissemination, storage, and or use withoutthe express written consent of Avaya can be a criminal, as well as acivil offense under the applicable law.
Third Party Components
“Third Party Components” mean certain software programs or portionsthereof included in the Software that may contain software (includingopen source software) distributed under third party agreements (“ThirdParty Components”), which contain terms regarding the rights to usecertain portions of the Software (“Third Party Terms”). Informationregarding distributed Linux OS source code (for those Products thathave distributed Linux OS source code) and identifying the copyrightholders of the Third Party Components and the Third Party Terms thatapply is available in the Documentation or on Avaya’s website at: http://support.avaya.com/Copyright. You agree to the Third Party Terms forany such Third Party Components.
Preventing Toll Fraud
“Toll Fraud” is the unauthorized use of your telecommunicationssystem by an unauthorized party (for example, a person who is not acorporate employee, agent, subcontractor, or is not working on yourcompany's behalf). Be aware that there can be a risk of Toll Fraudassociated with your system and that, if Toll Fraud occurs, it can resultin substantial additional charges for your telecommunications services.
Avaya Toll Fraud intervention
If you suspect that you are being victimized by Toll Fraud and you needtechnical assistance or support, call Technical Service Center TollFraud Intervention Hotline at +1-800-643-2353 for the United Statesand Canada. For additional support telephone numbers, see the AvayaSupport website: http://support.avaya.com. Suspected securityvulnerabilities with Avaya products should be reported to Avaya bysending mail to: [email protected].
Trademarks
The trademarks, logos and service marks (“Marks”) displayed in thissite, the Documentation and Product(s) provided by Avaya are theregistered or unregistered Marks of Avaya, its affiliates, or other thirdparties. Users are not permitted to use such Marks without prior writtenconsent from Avaya or such third party which may own the Mark.Nothing contained in this site, the Documentation and Product(s)should be construed as granting, by implication, estoppel, or otherwise,any license or right in and to the Marks without the express writtenpermission of Avaya or the applicable third party.
Avaya is a registered trademark of Avaya Inc.
All non-Avaya trademarks are the property of their respective owners.Linux® is the registered trademark of Linus Torvalds in the U.S. andother countries.
Downloading Documentation
For the most current versions of Documentation, see the AvayaSupport website: http://support.avaya.com.
Contact Avaya Support
See the Avaya Support website: http://support.avaya.com for productnotices and articles, or to report a problem with your Avaya product.For a list of support telephone numbers and contact addresses, go tothe Avaya Support website: http://support.avaya.com, scroll to thebottom of the page, and select Contact Avaya Support.
Installing and Administering the IP Office B179 SIP Conference Phone September 2013 3

4 Installing and Administering the IP Office B179 SIP Conference Phone September 2013Comments? [email protected]

Contents
Chapter 1: B179 SIP conference phone............................................................................ 7Description................................................................................................................................................ 7
Minimum requirements..................................................................................................................... 8B179 phone detail............................................................................................................................ 8Keypad............................................................................................................................................. 10
Chapter 2: B179 display information................................................................................. 13Display screens......................................................................................................................................... 13
On hook display................................................................................................................................ 13Off hook display................................................................................................................................ 14Information text................................................................................................................................. 14Line status table............................................................................................................................... 15Line menu......................................................................................................................................... 15
Navigating the menus............................................................................................................................... 16Using the web interface............................................................................................................................. 17
Checking the IP address.................................................................................................................. 17Logging into the web server............................................................................................................. 18
Chapter 3: Installing your B179......................................................................................... 19Connecting the B179................................................................................................................................ 19Obtaining a network address.................................................................................................................... 20Registering an account............................................................................................................................. 20Software upgrades and basic settings...................................................................................................... 21
Upgrading the B179 software........................................................................................................... 21Setting the time and region.............................................................................................................. 22Setting the language........................................................................................................................ 22Setting the PIN code........................................................................................................................ 23
Chapter 4: Configuring your B179 in IP Office................................................................. 25IP Office SIP extensions........................................................................................................................... 25B179 licensing information........................................................................................................................ 26Enabling SIP extension support................................................................................................................ 27B179 extension settings............................................................................................................................ 29
Codec selection................................................................................................................................ 31B179 user settings.................................................................................................................................... 32
Configuring a Conference Add Shortcode........................................................................................ 34Allowing Extn/User Auto-creation.............................................................................................................. 35Checking the B179 extension status......................................................................................................... 36
Chapter 5: B179 settings configuration............................................................................ 37Basic settings............................................................................................................................................ 37Account settings........................................................................................................................................ 39Network settings........................................................................................................................................ 40NAT traversal settings............................................................................................................................... 41Transport settings..................................................................................................................................... 43
TLS settings..................................................................................................................................... 44Media settings........................................................................................................................................... 45LDAP settings........................................................................................................................................... 47
Installing and Administering the IP Office B179 SIP Conference Phone September 2013 5
Web interface settings............................................................................................................................... 49Time settings............................................................................................................................................. 49Region settings......................................................................................................................................... 51System settings......................................................................................................................................... 51Quality of service....................................................................................................................................... 52
Chapter 6: Hard system recovery...................................................................................... 55Reset configuration................................................................................................................................... 55Restore firmware....................................................................................................................................... 55
Chapter 7: Headset and PA installation and settings...................................................... 57Connecting a wireless headset................................................................................................................. 57Connecting a PA interface box................................................................................................................. 57PA settings................................................................................................................................................ 58
Activating internal microphone and speakers................................................................................... 59Adjusting microphone volume from PA............................................................................................ 59Adjusting PA calibration manually.................................................................................................... 60
Chapter 8: Provisioning...................................................................................................... 61Firmware upgrade on a single phone....................................................................................................... 61
Upgrading firmware using the web interface.................................................................................... 61Upgrading firmware from a downloaded file..................................................................................... 62Firmware binary................................................................................................................................ 62Upgrading firmware from a SD card................................................................................................. 63Upgrading Firmware Using IP Office Check-Sync........................................................................... 63
Provisioning from a configuration file........................................................................................................ 64Exporting configuration..................................................................................................................... 71Importing configuration..................................................................................................................... 71
Provisioning from a device management server....................................................................................... 71Configuring device management...................................................................................................... 74Setting up a device management server.......................................................................................... 75
Chapter 9: Managing contacts and conference groups.................................................. 77Importing and exporting contacts.............................................................................................................. 77
Importing contacts............................................................................................................................ 78Exporting contacts............................................................................................................................ 78
Importing and exporting conference groups............................................................................................. 79Chapter 10: Checking status and logs.............................................................................. 81
Checking device status............................................................................................................................. 81Checking media status.............................................................................................................................. 81Checking network status........................................................................................................................... 82Checking SIP status.................................................................................................................................. 82Checking account status........................................................................................................................... 83Checking NAT traversal status.................................................................................................................. 83Checking transport status......................................................................................................................... 84Checking time and region status............................................................................................................... 84Obtaining logs........................................................................................................................................... 84
Chapter 11: Technical data................................................................................................ 87Index..................................................................................................................................... 91
6 Installing and Administering the IP Office B179 SIP Conference Phone September 2013
Chapter 1: B179 SIP conference phone
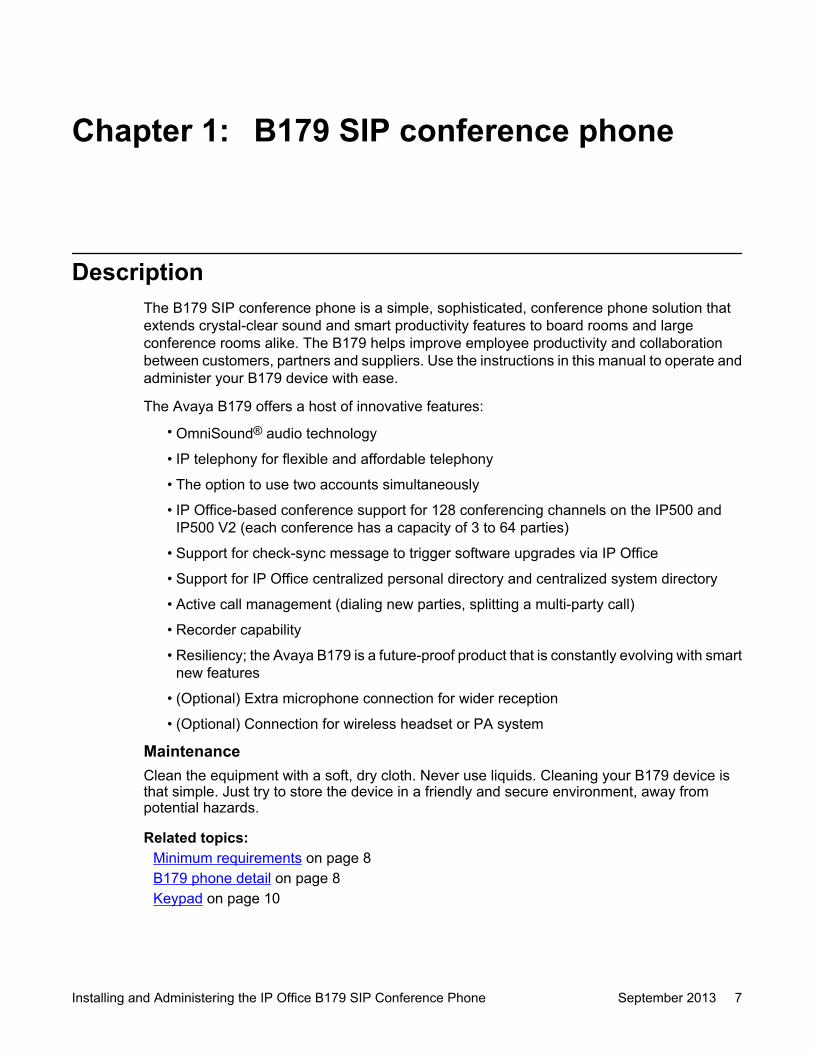
DescriptionThe B179 SIP conference phone is a simple, sophisticated, conference phone solution thatextends crystal-clear sound and smart productivity features to board rooms and largeconference rooms alike. The B179 helps improve employee productivity and collaborationbetween customers, partners and suppliers. Use the instructions in this manual to operate andadminister your B179 device with ease.
The Avaya B179 offers a host of innovative features:
• OmniSound® audio technology
• IP telephony for flexible and affordable telephony
• The option to use two accounts simultaneously
• IP Office-based conference support for 128 conferencing channels on the IP500 andIP500 V2 (each conference has a capacity of 3 to 64 parties)
• Support for check-sync message to trigger software upgrades via IP Office
• Support for IP Office centralized personal directory and centralized system directory
• Active call management (dialing new parties, splitting a multi-party call)
• Recorder capability
• Resiliency; the Avaya B179 is a future-proof product that is constantly evolving with smartnew features
• (Optional) Extra microphone connection for wider reception
• (Optional) Connection for wireless headset or PA system
MaintenanceClean the equipment with a soft, dry cloth. Never use liquids. Cleaning your B179 device isthat simple. Just try to store the device in a friendly and secure environment, away frompotential hazards.
Related topics:Minimum requirements on page 8B179 phone detail on page 8Keypad on page 10
Installing and Administering the IP Office B179 SIP Conference Phone September 2013 7

Minimum requirementsBefore you proceed, ensure that you have the minimum required components:
• a working B179 device
• a power cable and AC adapter (for each device you install)
• an Ethernet network cable (for each device you install)
• a memory card (min. 2GB)
Optional componentsYou might incorporate any of the optional components during or following installation, such asa PA interface box, security lock and cable, or wall-mounting bracket. Expansion microphonesare also supported, which can extend the voice pickup range from 320 sq. ft. to up to 750 sq.ft. We advise that you refer to the appropriate documentation when installing thesecomponents.
The images that follow illustrate the B179 design and device interface. All the relevant ports,indicators, and feature/dial buttons are identified.
B179 phone detail
Label Description
1 Three speakers
2 Microphone
3 Display screen
B179 SIP conference phone
8 Installing and Administering the IP Office B179 SIP Conference Phone September 2013Comments? [email protected]
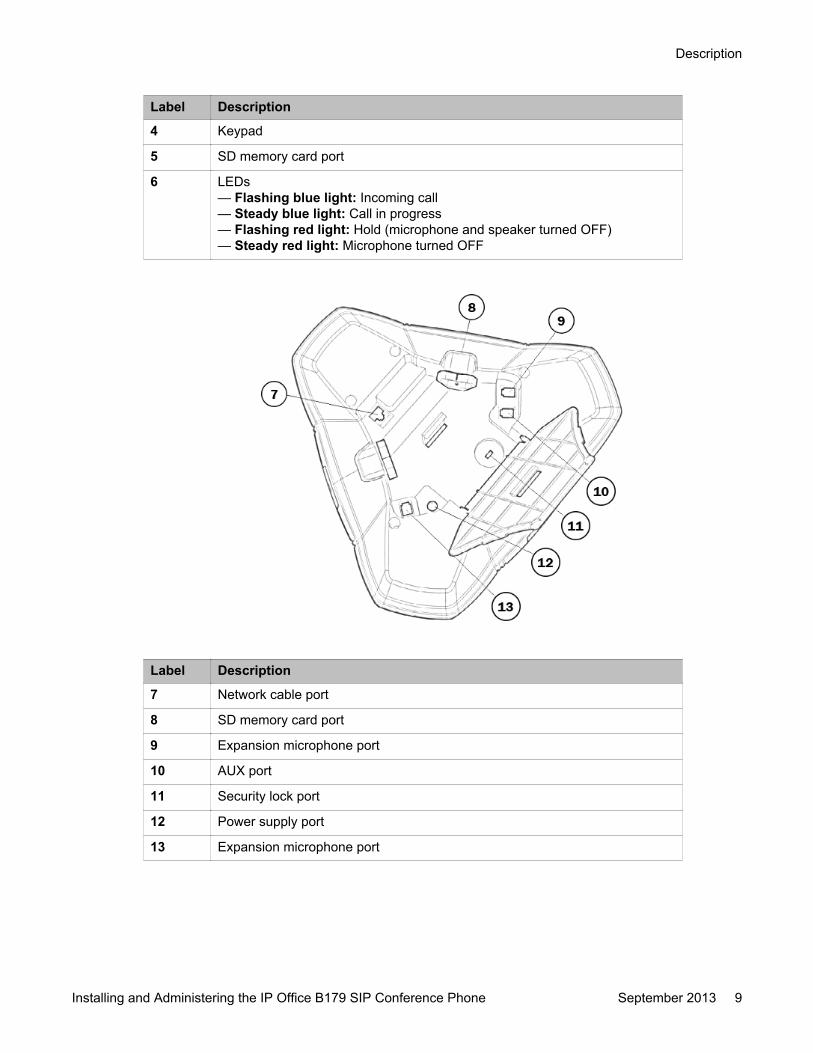
Label Description
4 Keypad
5 SD memory card port
6 LEDs— Flashing blue light: Incoming call— Steady blue light: Call in progress— Flashing red light: Hold (microphone and speaker turned OFF)— Steady red light: Microphone turned OFF
Label Description
7 Network cable port
8 SD memory card port
9 Expansion microphone port
10 AUX port
11 Security lock port
12 Power supply port
13 Expansion microphone port
Description
Installing and Administering the IP Office B179 SIP Conference Phone September 2013 9
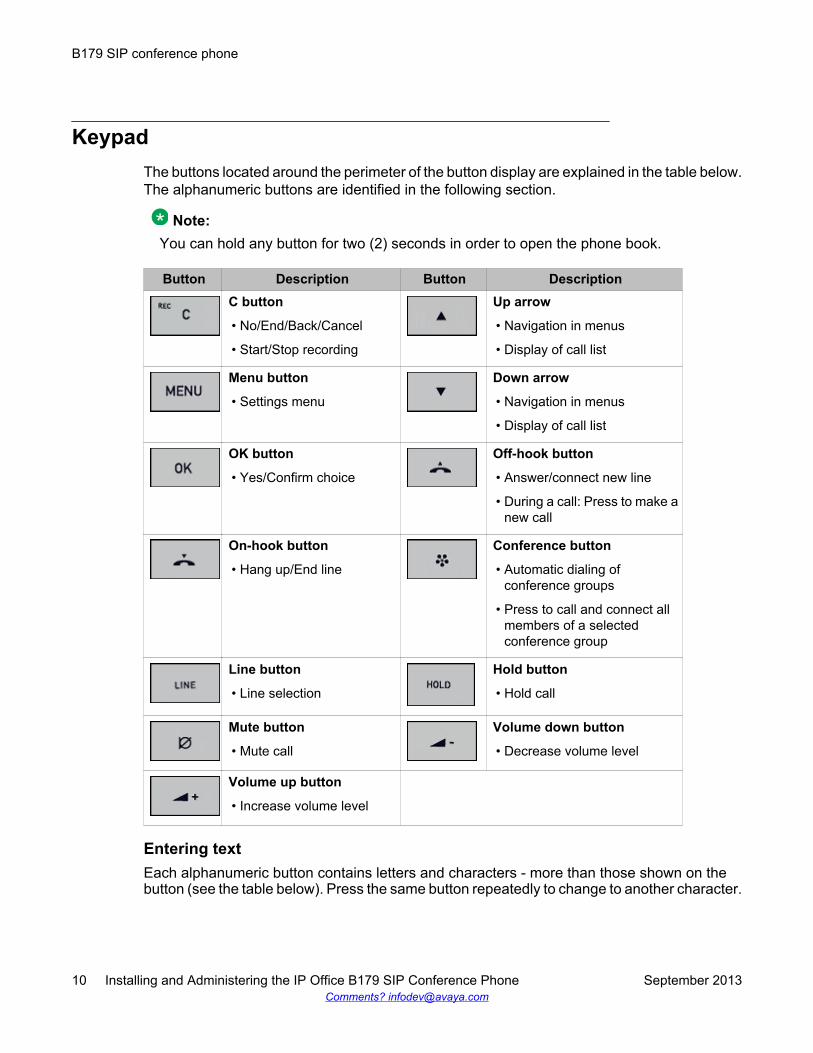
KeypadThe buttons located around the perimeter of the button display are explained in the table below.The alphanumeric buttons are identified in the following section.
Note:You can hold any button for two (2) seconds in order to open the phone book.
Button Description Button DescriptionC button
• No/End/Back/Cancel
• Start/Stop recording
Up arrow
• Navigation in menus
• Display of call list
Menu button
• Settings menu
Down arrow
• Navigation in menus
• Display of call list
OK button
• Yes/Confirm choice
Off-hook button
• Answer/connect new line
• During a call: Press to make anew call
On-hook button
• Hang up/End line
Conference button
• Automatic dialing ofconference groups
• Press to call and connect allmembers of a selectedconference group
Line button
• Line selection
Hold button
• Hold call
Mute button
• Mute call
Volume down button
• Decrease volume level
Volume up button
• Increase volume level
Entering textEach alphanumeric button contains letters and characters - more than those shown on thebutton (see the table below). Press the same button repeatedly to change to another character.
B179 SIP conference phone
10 Installing and Administering the IP Office B179 SIP Conference Phone September 2013Comments? [email protected]
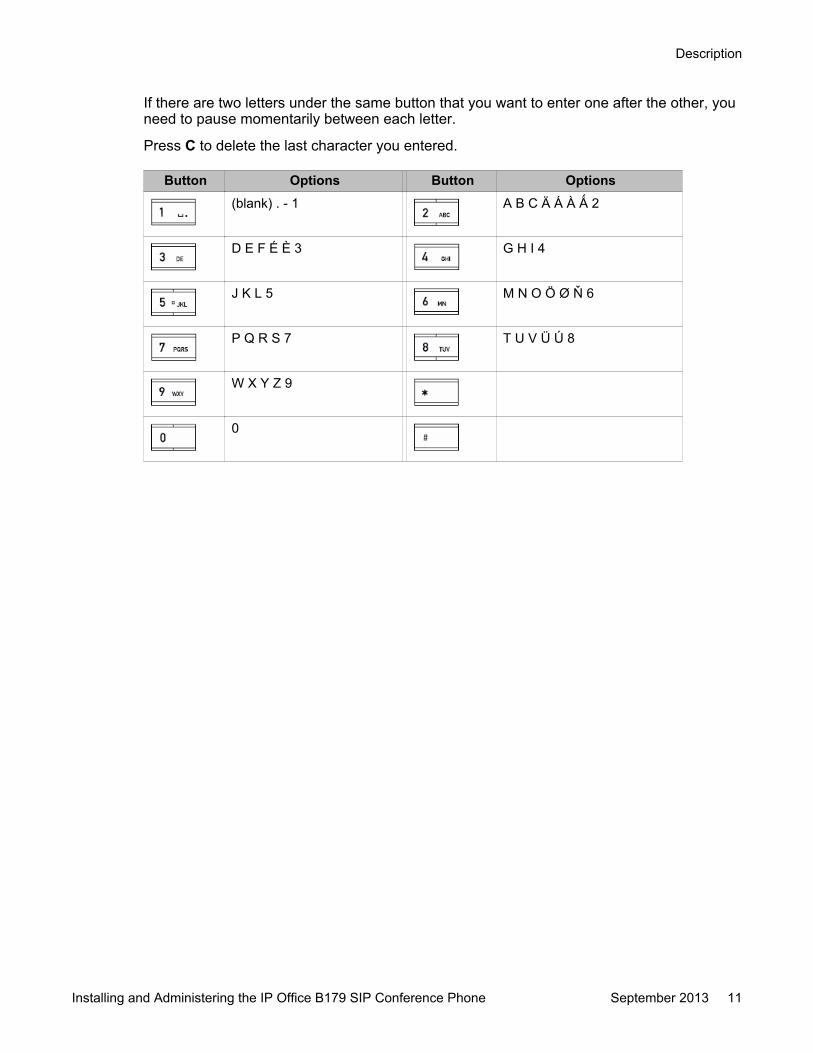
If there are two letters under the same button that you want to enter one after the other, youneed to pause momentarily between each letter.
Press C to delete the last character you entered.
Button Options Button Options(blank) . - 1 A B C Ä Á À Ǻ 2
D E F É È 3 G H I 4
J K L 5 M N O Ö Ø Ň 6
P Q R S 7 T U V Ü Ú 8
W X Y Z 9
0
Description
Installing and Administering the IP Office B179 SIP Conference Phone September 2013 11

B179 SIP conference phone
12 Installing and Administering the IP Office B179 SIP Conference Phone September 2013Comments? [email protected]
Chapter 2: B179 display information
Display screensThe display screens allow you to view line statuses and menu items. Line statuses will appearon the main screen with different icons to indicate each status. The following sections illustratethe main displays, their icons, and their functions. When you press the MENU button, thedisplay screen will change so that you can view the menu options. Refer to the section Navigating the menus on page 16 for more information on the menu options. Note also thatthe display screen changes depending on whether or not your phone is on the hook.
Related topics:On hook display on page 13Off hook display on page 14Information text on page 14Line status table on page 15Line menu on page 15
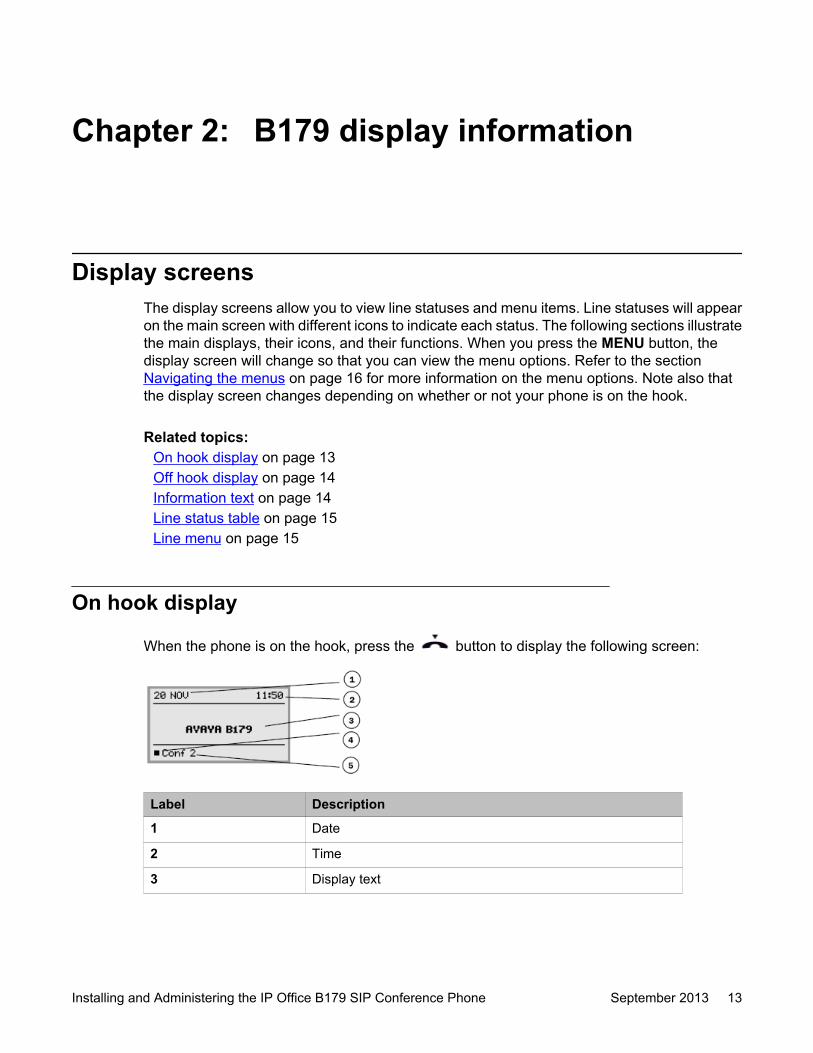
On hook display
When the phone is on the hook, press the button to display the following screen:
Label Description
1 Date
2 Time
3 Display text
Installing and Administering the IP Office B179 SIP Conference Phone September 2013 13
Label Description
4 Registered
Not registered
5 Account name
Off hook display
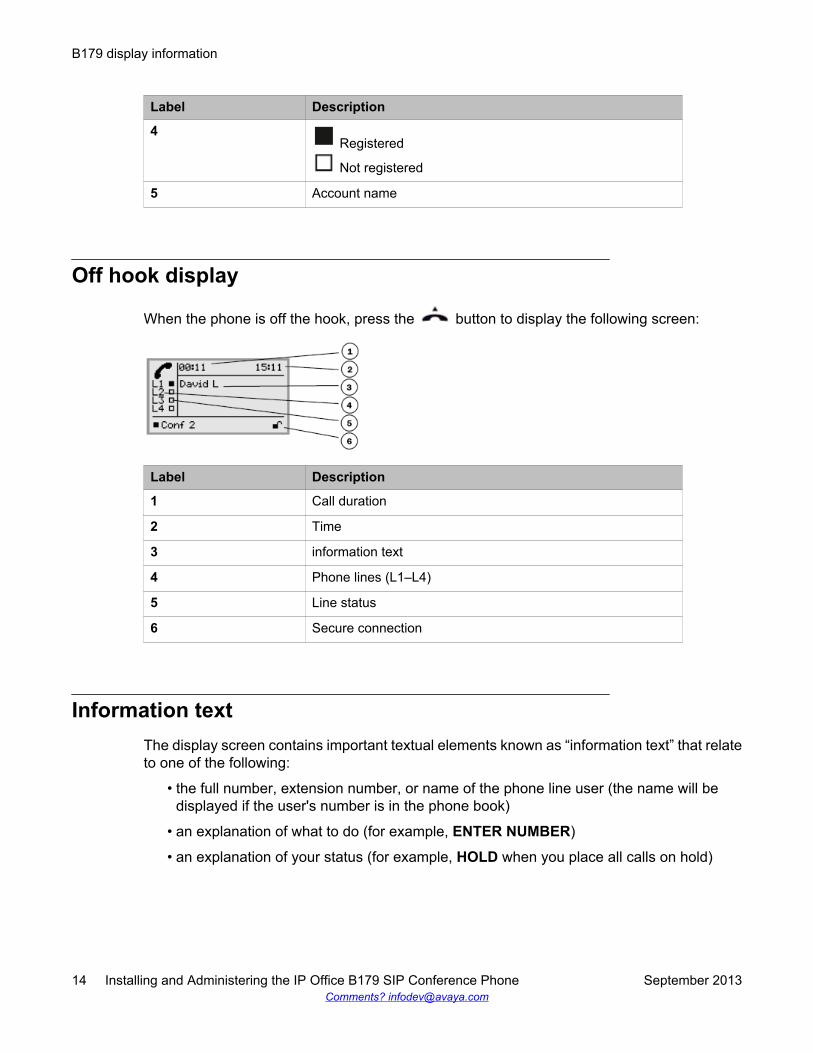
When the phone is off the hook, press the button to display the following screen:
Label Description
1 Call duration
2 Time
3 information text
4 Phone lines (L1–L4)
5 Line status
6 Secure connection
Information textThe display screen contains important textual elements known as “information text” that relateto one of the following:
• the full number, extension number, or name of the phone line user (the name will bedisplayed if the user's number is in the phone book)
• an explanation of what to do (for example, ENTER NUMBER)
• an explanation of your status (for example, HOLD when you place all calls on hold)
B179 display information
14 Installing and Administering the IP Office B179 SIP Conference Phone September 2013Comments? [email protected]
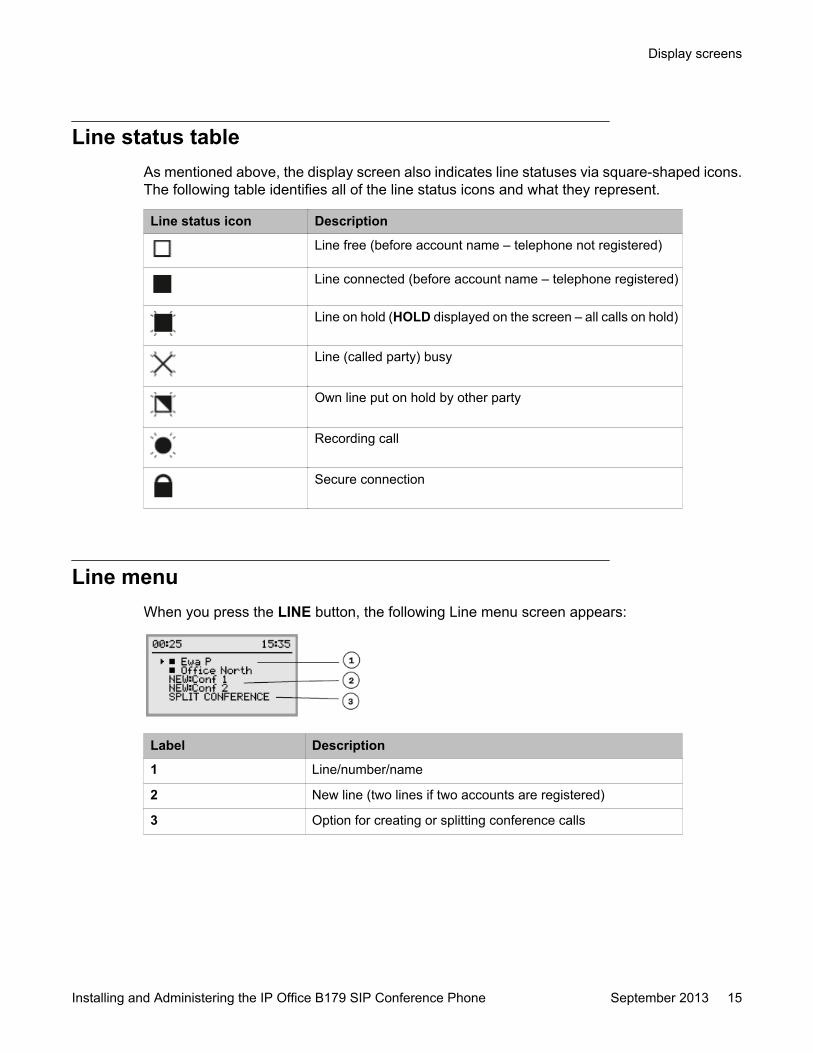
Line status tableAs mentioned above, the display screen also indicates line statuses via square-shaped icons.The following table identifies all of the line status icons and what they represent.
Line status icon Description
Line free (before account name – telephone not registered)
Line connected (before account name – telephone registered)
Line on hold (HOLD displayed on the screen – all calls on hold)
Line (called party) busy
Own line put on hold by other party
Recording call
Secure connection
Line menuWhen you press the LINE button, the following Line menu screen appears:
Label Description
1 Line/number/name
2 New line (two lines if two accounts are registered)
3 Option for creating or splitting conference calls
Display screens
Installing and Administering the IP Office B179 SIP Conference Phone September 2013 15
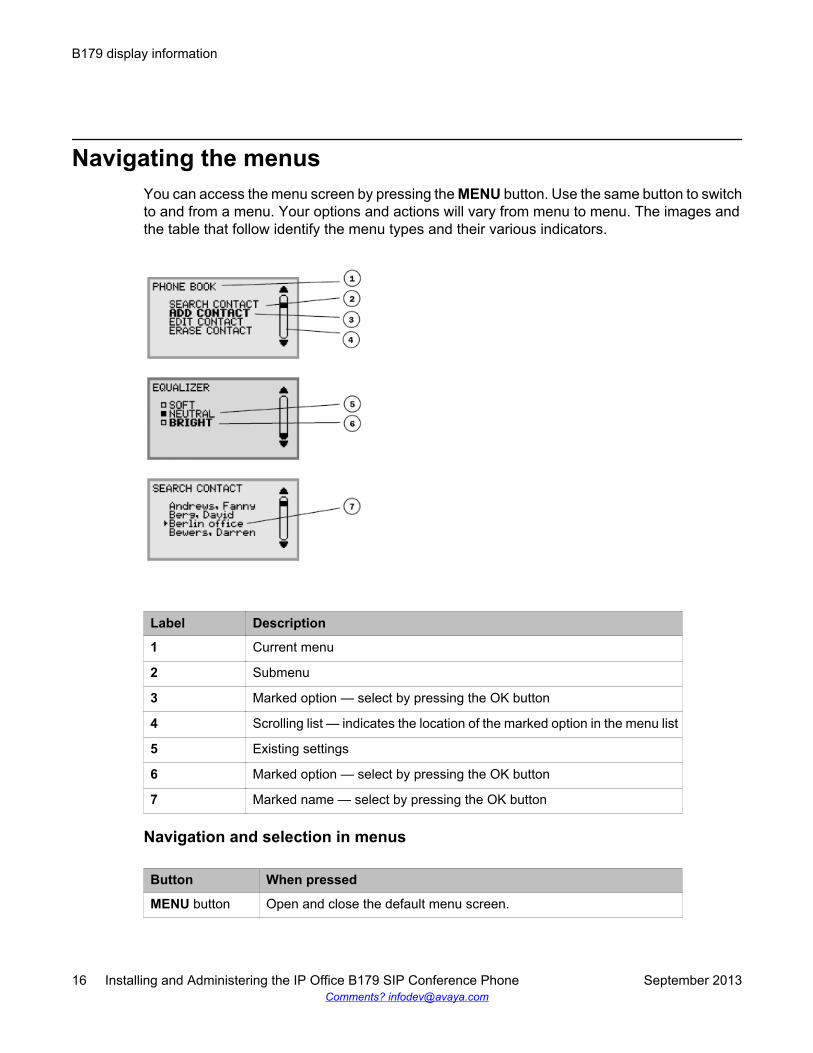
Navigating the menusYou can access the menu screen by pressing the MENU button. Use the same button to switchto and from a menu. Your options and actions will vary from menu to menu. The images andthe table that follow identify the menu types and their various indicators.
Label Description
1 Current menu
2 Submenu
3 Marked option — select by pressing the OK button
4 Scrolling list — indicates the location of the marked option in the menu list
5 Existing settings
6 Marked option — select by pressing the OK button
7 Marked name — select by pressing the OK button
Navigation and selection in menus
Button When pressed
MENU button Open and close the default menu screen.
B179 display information
16 Installing and Administering the IP Office B179 SIP Conference Phone September 2013Comments? [email protected]
Button When pressed
C button Cancel the setting or return to the previous menu.
OK button Selects the marked option. This button is also used as a confirmationbutton; after you have made changes to a setting, you must press OKto activate the new setting.
Arrow buttons Navigate to an option in the menu.
Numericalbuttons
Navigate to a corresponding option in the menu (see the menu treesbelow).For example, press 2 to open PHONE BOOK and then press 3 to selectEDIT CONTACT.
Using the web interfaceYou can use the web browser of a PC connected to the network to manage the B179 contacts,conference groups, and settings. For security reasons, recordings can only be manageddirectly on the Avaya B179. All other settings that can be made directly on the Avaya B179can also be made via the web interface.
It is also possible to import and export contacts and conference groups, name user profiles,and change PIN codes, which can be done via the web interface or through the IP Officeconfiguration file. The administrator can also view logs, update software and create aconfiguration file.
The default setting for the PIN code is 0000 for the user account (Default, Profile 1, Profile 2,Profile 3 and Profile 4) and 1234 for the administrator’s account (Admin). We recommend thatyou change the PIN codes in order to protect the settings. The code may consist of eight digits.The administrator can always view and change the PIN codes to the user accounts. Theadministrator’s PIN code can only be reset with a complete reset to factory settings. Refer to Reset configuration on page 55 for more information.
Checking the IP addressThe following procedure allows you to check the network address that you will use to log intothe web server for the conference phone.
Procedure
1. Press MENU.
2. Select the sub menu STATUS > NETWORK (or press 8, 2 from the main menu).The Network screen appears.
Using the web interface
Installing and Administering the IP Office B179 SIP Conference Phone September 2013 17
3. Check and make note of the conference phone’s network address listed under theheading IP ADDRESS.
Logging into the web serverUsing the information you retained from the previous procedure, you can access the web serverto which the conference phone connects. Note that you will require a profile and PIN code inorder to access the web server.
Procedure
1. Type the conference phone IP address into your web browser and press Enter inorder to access the web server login page. If you are not sure of your conferencephone network address, refer to the section Checking the IP address on page 17.
2. On the web server login page, select the appropriate profile, enter the correct PINcode, and click the Login button.
B179 display information
18 Installing and Administering the IP Office B179 SIP Conference Phone September 2013Comments? [email protected]
Chapter 3: Installing your B179
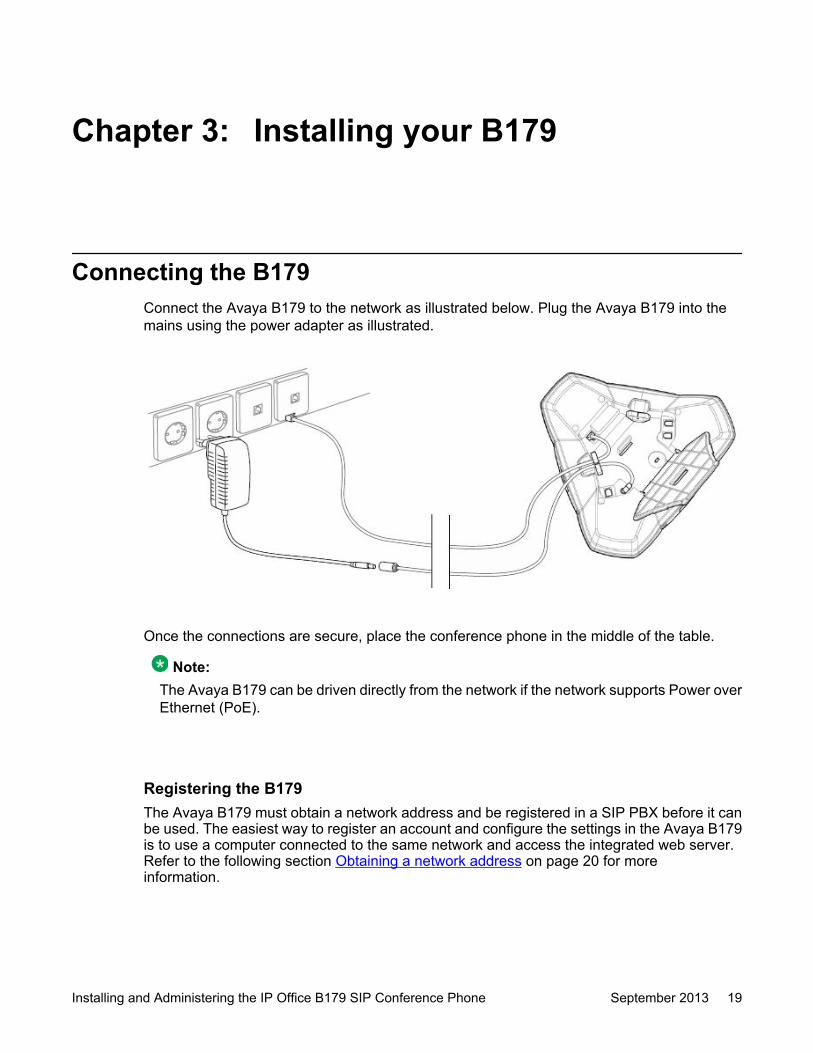
Connecting the B179Connect the Avaya B179 to the network as illustrated below. Plug the Avaya B179 into themains using the power adapter as illustrated.
Once the connections are secure, place the conference phone in the middle of the table.
Note:The Avaya B179 can be driven directly from the network if the network supports Power overEthernet (PoE).
Registering the B179The Avaya B179 must obtain a network address and be registered in a SIP PBX before it canbe used. The easiest way to register an account and configure the settings in the Avaya B179is to use a computer connected to the same network and access the integrated web server.Refer to the following section Obtaining a network address on page 20 for moreinformation.
Installing and Administering the IP Office B179 SIP Conference Phone September 2013 19
Obtaining a network addressTo connect to a network using DHCP: See the section Checking the IP address onpage 17.
To connect to a network with static IP addresses: Use the following procedure.
Before you beginYou will need the IP address, host name, domain, netmask, gateway, DNS 1, and DNS 2. Thehost name can be set freely. The domain and secondary DNS can be left blank.
Procedure
1. Press MENU.
2. Select the sub menu SETTINGS > ADVANCED (or press 6, 2 from the mainmenu).
3. Enter the PIN code. The default is 1234.
4. Select NETWORK (2).
5. Select STATIC IP.
6. Enter values for the IP ADDRESS; enter three digits (begin with 0 if necessary),press OK, enter three digits, and so on.
7. Enter the HOST NAME (default is 'Avaya'), DOMAIN, NETMASK, GATEWAY,DNS1, and DNS2.When you are finished, the display shows 'DONE.'
Registering an accountThe conference phone can be registered in a company SIP PBX or with a public IP telephonyservice provider. You can store settings for two accounts in the Avaya B179.
To register your phone, you must have access to the account information and all necessarysettings that the SIP PBX or service provider requires.
For more information, refer to Account settings on page 39.
Procedure
1. From the web interface, select Settings > SIP.
Installing your B179
20 Installing and Administering the IP Office B179 SIP Conference Phone September 2013Comments? [email protected]
2. Click Yes at “Enable account” under Account 1.
3. Enter the account information you have received.The account name can be chosen freely and is the name or phone number youwant to appear on the phone display. Leave the default values if you have no otherinformation.
4. Select a method of NAT traversal if you have received this information.
5. Select a different transport protocol if you have received this information.
6. Save the settings by clicking the Save button.The Avaya B179 responds by showing “REGISTERING.” If registration issuccessful, your selected account name will appear at the bottom of the displayscreen next to a shaded square.
Next stepsConfigure your desired media settings. Refer to Media settings on page 45 for moreinformation.
Software upgrades and basic settingsThe following settings should be made during installation. Note that all settings on the Basictab also affect the Default user profile. Other user profiles can be changed individually. Thesettings on the Basic tab, except the name and PIN for Admin, can be modified by any user.Other settings require a login as Admin.
Note also that these configurations are set in the web interface only.
Related topics:Upgrading the B179 software on page 21Setting the time and region on page 22Setting the language on page 22Setting the PIN code on page 23
Upgrading the B179 softwareUse the following procedure to upgrade the B179 software to the latest version.
Procedure
1. From the web interface, select Settings > Provisioning.
2. Click the Check now button.
Software upgrades and basic settings
Installing and Administering the IP Office B179 SIP Conference Phone September 2013 21
3. Compare the latest software version with the current version (shown on the webpage).
4. If you want to upgrade, select the desired version in the list box and click theUpgrade button.The browser window and the display on the Avaya B179 shows that the upgradehas begun.
Note:The download and installation of the new software can take several minutes. Donot interrupt the upgrade and do not disconnect plugs to the Avaya B179 duringthe upgrade. Doing so may render the conference phone inoperable.
5. When installation is complete, the text “Upgrade Complete. The unit will berebooted.” is shown in your browser.After a short while, you should hear the Avaya music signature that indicates thereinitiation of the conference phone.
Setting the time and regionUsing the procedure below you can set the time and region of the device. You can also set thedaylight savings time (DST) and fixed start/stop dates.
Procedure
1. From the web interface, select Settings > Time & Region.
2. Select the time zone from the drop down menu and, if you wish, select the correctionfor DST. It is also possible to set the time and date manually or choose a differenttime server.
3. Select the region where you are. This setting affects the signalling.
4. Click the Save button.The Avaya B179 reboots with the new settings.
Setting the languageThe B179 includes support for various languages. Use the following procedure to configurethe language set for the device.
Installing your B179
22 Installing and Administering the IP Office B179 SIP Conference Phone September 2013Comments? [email protected]

Procedure
1. From the web interface, select Settings > Basic.
2. Select the desired language using the drop down menu next to “Phone Language”(in the “Preferences” section).
3. When you are satisfied with the setting, click the Save button.
Setting the PIN codeWe recommend that you change the Admin PIN code from the default configuration to protectthe system settings. Make a note of the new PIN code and keep it in a safe place. Theadministrator’s PIN code can only be reset by a full factory reset!
Procedure
1. From the web interface, select Settings > Basic.
2. Under the “Profiles” section click the Edit button on the Admin line.
3. Enter a new PIN (must consist of eight [8] digits).
4. When you are satisfied, click Set and then Save.
Software upgrades and basic settings
Installing and Administering the IP Office B179 SIP Conference Phone September 2013 23

Installing your B179
24 Installing and Administering the IP Office B179 SIP Conference Phone September 2013Comments? [email protected]
Chapter 4: Configuring your B179 in IPOffice
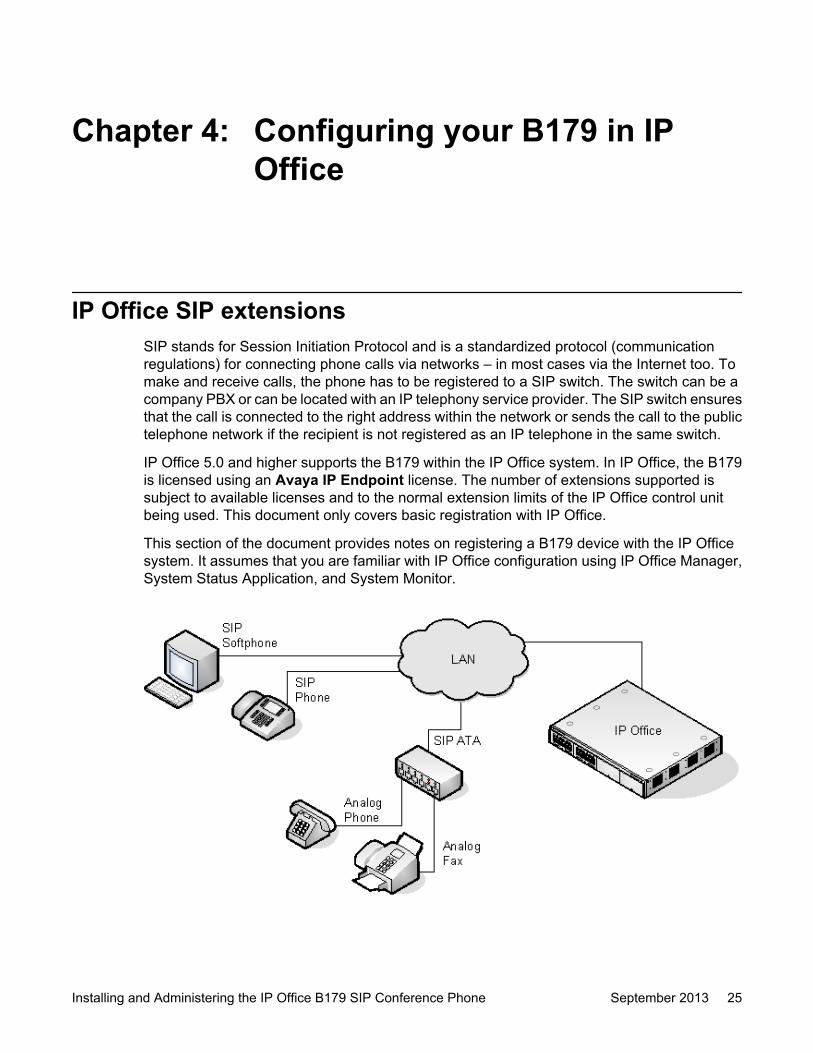
IP Office SIP extensionsSIP stands for Session Initiation Protocol and is a standardized protocol (communicationregulations) for connecting phone calls via networks – in most cases via the Internet too. Tomake and receive calls, the phone has to be registered to a SIP switch. The switch can be acompany PBX or can be located with an IP telephony service provider. The SIP switch ensuresthat the call is connected to the right address within the network or sends the call to the publictelephone network if the recipient is not registered as an IP telephone in the same switch.
IP Office 5.0 and higher supports the B179 within the IP Office system. In IP Office, the B179is licensed using an Avaya IP Endpoint license. The number of extensions supported issubject to available licenses and to the normal extension limits of the IP Office control unitbeing used. This document only covers basic registration with IP Office.
This section of the document provides notes on registering a B179 device with the IP Officesystem. It assumes that you are familiar with IP Office configuration using IP Office Manager,System Status Application, and System Monitor.
Installing and Administering the IP Office B179 SIP Conference Phone September 2013 25
SIP configuration features
• No NAT
Connection of B179 devices from locations where Network Address Translation (NAT) isapplied to the connection is not supported. The IP Office does not provide NAT traversalservices (for example STUN or TURN) for SIP extension devices.
• Multiple line SIP devices
If used with an IP Office, each SIP line requires a separate IP Office SIP extension, user,and license. Note that this refers to a SIP device that can handle multiple simultaneouscalls itself and not one that is handling multiple calls by holding them on the IP Office orby receiving call waiting indication for waiting calls on the IP Office.
• IP Office as the SIP registrar and SIP proxy
In most cases, a SIP extension device is configured with settings for a SIP registrar anda SIP proxy. For SIP devices connecting to an IP Office, the LAN1 or LAN2 IP addresson which the SIP registrar is enabled is used for both roles.
• Codec selection
Unlike H323 IP devices which always support at least one G711 codec, the B179 doesnot support a single common audio codec. It is therefore important to ensure that the IPOffice SIP extension codecs are configured to match a codec for which the B179 deviceis configured.
• IP Office Call Waiting = SIP 'REFER'
For the IP Office user associated with a B179 extension, Call Waiting should be enabled.This is required for functions such as transferring a call.
• Phone features
Beyond basic call handling via the IP Office (see the features listed below), Avaya cannotmake any commitments as to which features will or will not work, nor how features areconfigured on the device.
- Answer calls
- Make calls
- Hang up
- Hold
- Supervised transfer
- Unsupervised transfer
- Voicemail collect
- Set forwarding / DND
- Park / Unpark
B179 licensing informationB179 devices that are handled within the IP Office configuration use Avaya IP Endpointlicenses. Successful registration consumes one (1) license count.
Configuring your B179 in IP Office
26 Installing and Administering the IP Office B179 SIP Conference Phone September 2013Comments? [email protected]
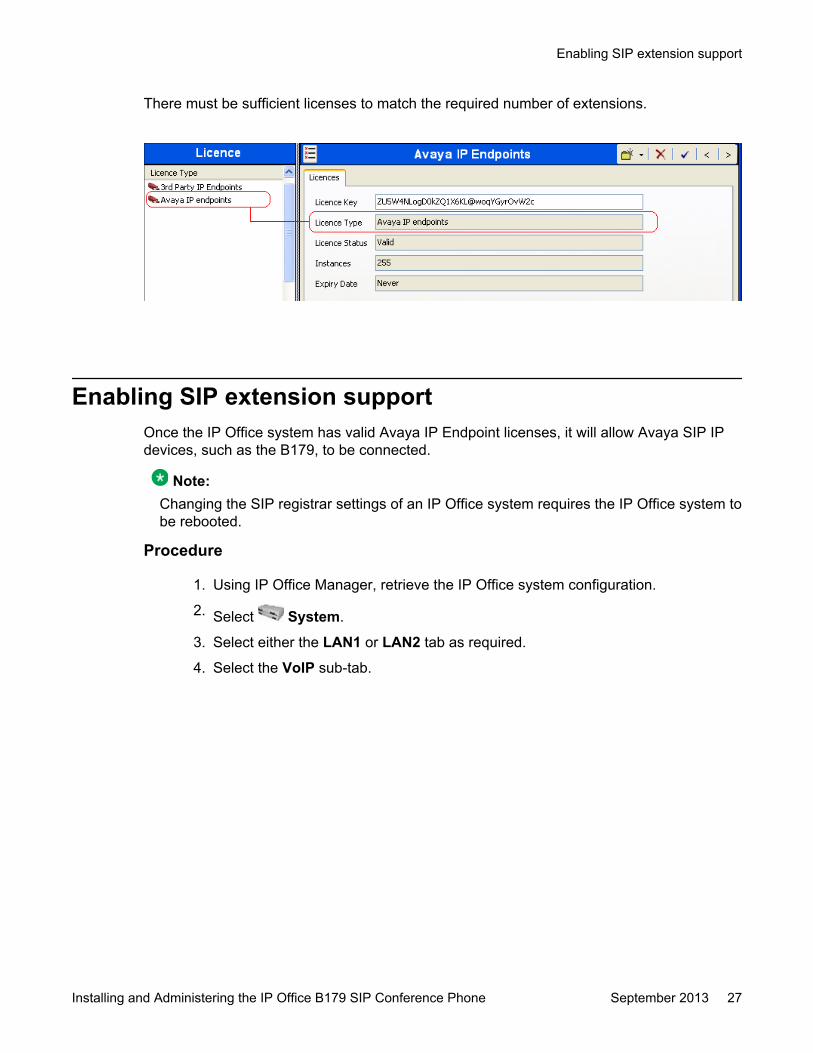
There must be sufficient licenses to match the required number of extensions.
Enabling SIP extension supportOnce the IP Office system has valid Avaya IP Endpoint licenses, it will allow Avaya SIP IPdevices, such as the B179, to be connected.
Note:Changing the SIP registrar settings of an IP Office system requires the IP Office system tobe rebooted.
Procedure
1. Using IP Office Manager, retrieve the IP Office system configuration.
2. Select System.
3. Select either the LAN1 or LAN2 tab as required.
4. Select the VoIP sub-tab.
Enabling SIP extension support
Installing and Administering the IP Office B179 SIP Conference Phone September 2013 27
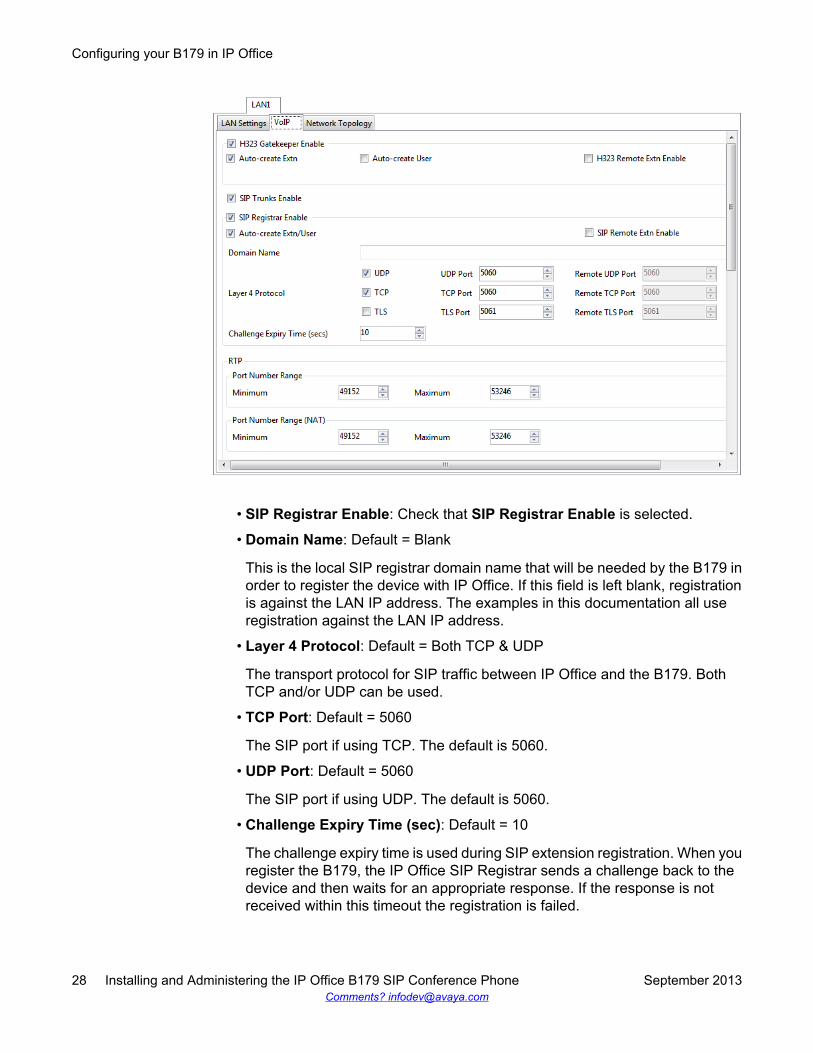
• SIP Registrar Enable: Check that SIP Registrar Enable is selected.
• Domain Name: Default = Blank
This is the local SIP registrar domain name that will be needed by the B179 inorder to register the device with IP Office. If this field is left blank, registrationis against the LAN IP address. The examples in this documentation all useregistration against the LAN IP address.
• Layer 4 Protocol: Default = Both TCP & UDP
The transport protocol for SIP traffic between IP Office and the B179. BothTCP and/or UDP can be used.
• TCP Port: Default = 5060
The SIP port if using TCP. The default is 5060.
• UDP Port: Default = 5060
The SIP port if using UDP. The default is 5060.
• Challenge Expiry Time (sec): Default = 10
The challenge expiry time is used during SIP extension registration. When youregister the B179, the IP Office SIP Registrar sends a challenge back to thedevice and then waits for an appropriate response. If the response is notreceived within this timeout the registration is failed.
Configuring your B179 in IP Office
28 Installing and Administering the IP Office B179 SIP Conference Phone September 2013Comments? [email protected]
• Auto-create Extn/User: Default = On
If this option is selected, the IP Office will automatically create user and SIPextension entries in its configuration based on SIP extension registration. Ifthis method is being used for installation, it is important to check that thesettings created match those of the B179. It is also important to deselect thisoption after installation of the device.
5. If you have made any changes, send the configuration back to IP Office.
B179 extension settingsExtensions for the B179 can be created manually using | SIP Extension or automaticallycreated during registration of the SIP device. Even if auto-created, the extension settingscreated in IP Office should be checked after installation.
This section looks just at the key configuration settings that affect B179 device extensions. Forfull details of all the fields shown, refer to the IP Office Manager manual.
Procedure
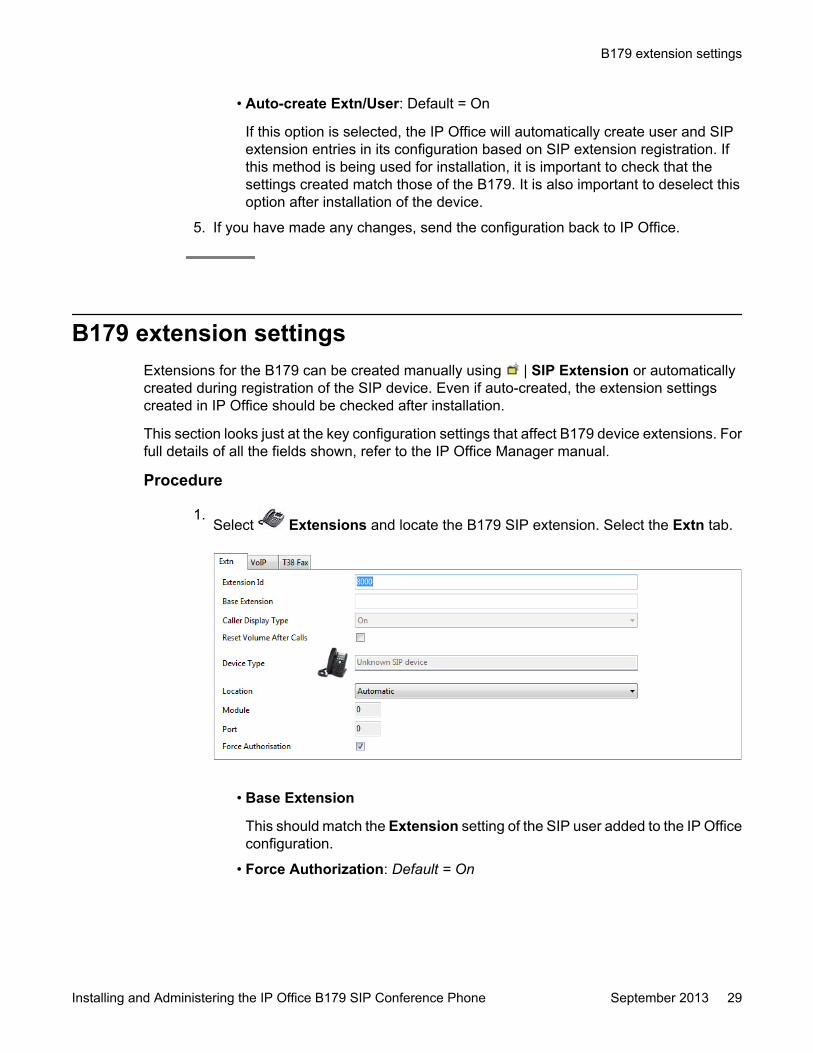
1.Select Extensions and locate the B179 SIP extension. Select the Extn tab.
• Base Extension
This should match the Extension setting of the SIP user added to the IP Officeconfiguration.
• Force Authorization: Default = On
B179 extension settings
Installing and Administering the IP Office B179 SIP Conference Phone September 2013 29
If enabled, SIP devices are required to register with the IP Office system usingthe Name and Login Code configured for the user within the IP Officeconfiguration.
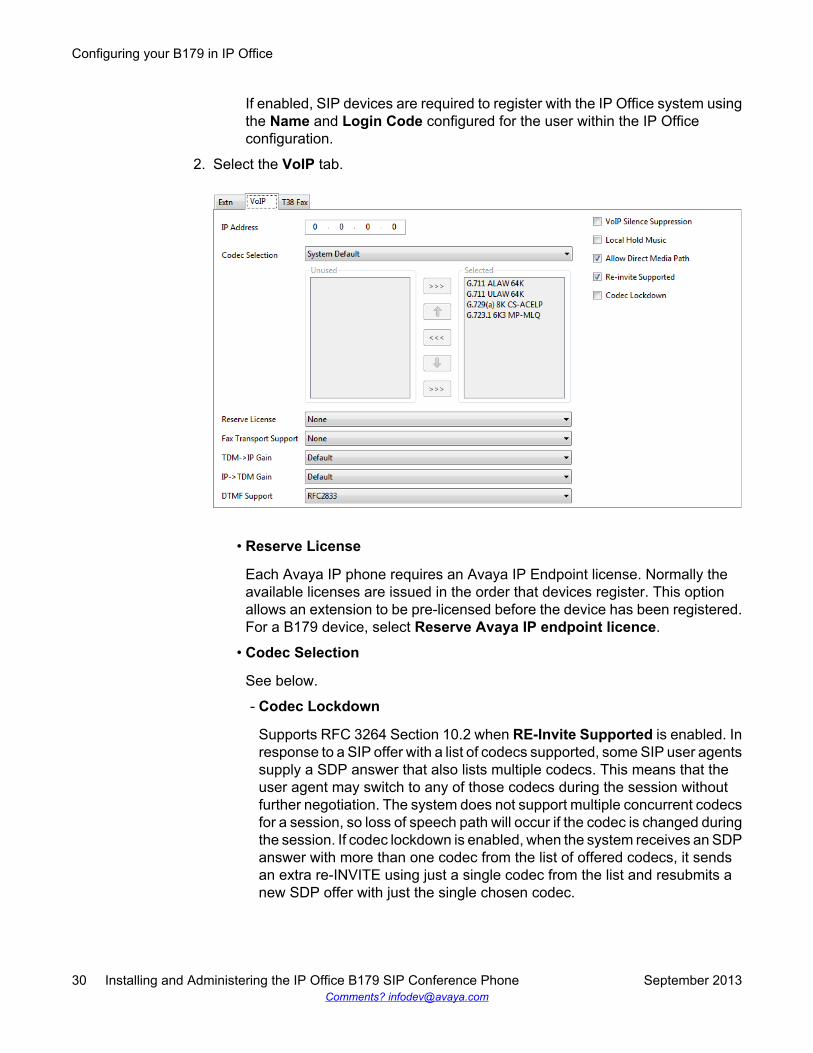
2. Select the VoIP tab.
• Reserve License
Each Avaya IP phone requires an Avaya IP Endpoint license. Normally theavailable licenses are issued in the order that devices register. This optionallows an extension to be pre-licensed before the device has been registered.For a B179 device, select Reserve Avaya IP endpoint licence.
• Codec Selection
See below.
- Codec Lockdown
Supports RFC 3264 Section 10.2 when RE-Invite Supported is enabled. Inresponse to a SIP offer with a list of codecs supported, some SIP user agentssupply a SDP answer that also lists multiple codecs. This means that theuser agent may switch to any of those codecs during the session withoutfurther negotiation. The system does not support multiple concurrent codecsfor a session, so loss of speech path will occur if the codec is changed duringthe session. If codec lockdown is enabled, when the system receives an SDPanswer with more than one codec from the list of offered codecs, it sendsan extra re-INVITE using just a single codec from the list and resubmits anew SDP offer with just the single chosen codec.
Configuring your B179 in IP Office
30 Installing and Administering the IP Office B179 SIP Conference Phone September 2013Comments? [email protected]
• DTMF Support
This can be set to one of the two common methods used by SIP devices;RFC2833 or Inband. If the method is not known or varies on a per call basis,deselecting Allow Direct Media Path allows a VCM channel to be used forDTMF support when necessary. The selection should be set to match themethod used by the B179, otherwise you will be unable to access voicemail inIP Office via the B179 as a result of incompatible signalling tones. Refer to Media settings on page 45 for B179 configuration.
• Local Hold Music
Select this option if you want the B179 to support its own Hold Music source.
• Re-invite Supported
Select this option if you want the B179 to receive REINVITE messages.
Codec selectionThe setting you choose for codec selection in IP Office must match the codec selection onthe B179 itself (as described Media settings on page 45). When the codec settings do notmatch, calls between certain devices will fail to initiate and you may experience other issues.
The following codecs are supported:
Codec Explanation
G.722 G.722 is an ITU-T standard codec that provides 7 kHz wideband audio ata data rate within 64 kbit/s. It offers greatly improved speech qualitycompared with older narrowband codecs such as G.711, but requires ahigh quality network connection between the devices.
G.723 G.723 is an ITU-T standard codec that provides 300Hz to 3400Hzwideband audio using ADPCM.
G.729 G.729 is an ITU-T standard codec that operates at 8 kbit/s. It is mostlyused in VoIP applications with low bandwidth requirements.
G.711 A-lawG.711 μ-law
G.711 is an ITU-T standard codec that uses audio companding.Companding algorithms reduce the dynamic range of an audio signal. Inanalog systems, this can increase the signal-to-noise ratio achieved duringtransmission and, in the digital domain, can reduce the quantizationerror.Two main compression algorithms are defined in the standard; the μ-lawalgorithm (used in North America and Japan) and A-law algorithm (usedin Europe and the rest of the world).
B179 extension settings
Installing and Administering the IP Office B179 SIP Conference Phone September 2013 31
If Codec Selection is left set to System Default, the extension will use the system codecpreferences. In most cases this is preferred and any changes required should be made at thesystem level to ensure consistency for all IP trunks and extensions.
If required, the Codec Selection of each individual trunk and extension can be adjusted todiffer from the system defaults, although this is not recommended.
Procedure
1. Using IP Office Manager, retrieve the system's configuration.
2.To display the extension's settings, click Extension in the left-hand panel.
3. Select the VoIP tab.
4. Change the Codec Selection to Custom.
5. The Unused and Selected lists can be used to select which codecs the B179 usesand their order of preference.
6. Save the configuration changes back to the system.
B179 user settingsB179 users can be created manually using | User or automatically created during deviceregistration. Even if auto-created, the user settings created in the IP Office configuration shouldbe checked during installation.
This section looks at the key IP Office configuration settings that affect SIP extension devices.For full details of all the fields shown, refer to the “IP Office Manager Manual.”
Procedure
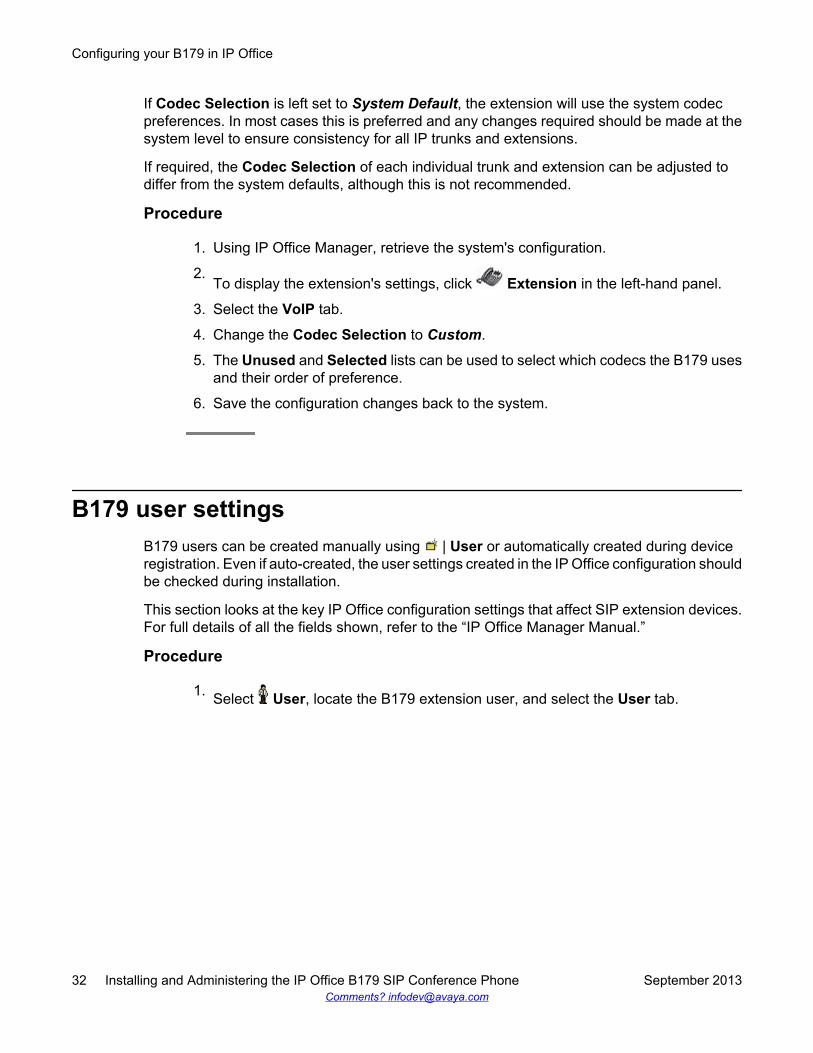
1. Select User, locate the B179 extension user, and select the User tab.
Configuring your B179 in IP Office
32 Installing and Administering the IP Office B179 SIP Conference Phone September 2013Comments? [email protected]
• Name
If the SIP extension is set to Force Authorization (the default). This field isused as the Authorization Name that must be set in the B179 device'sconfiguration.
• Extension
This should match the SIP ID of the B179 device and the Base Extensionsetting in IP Office.
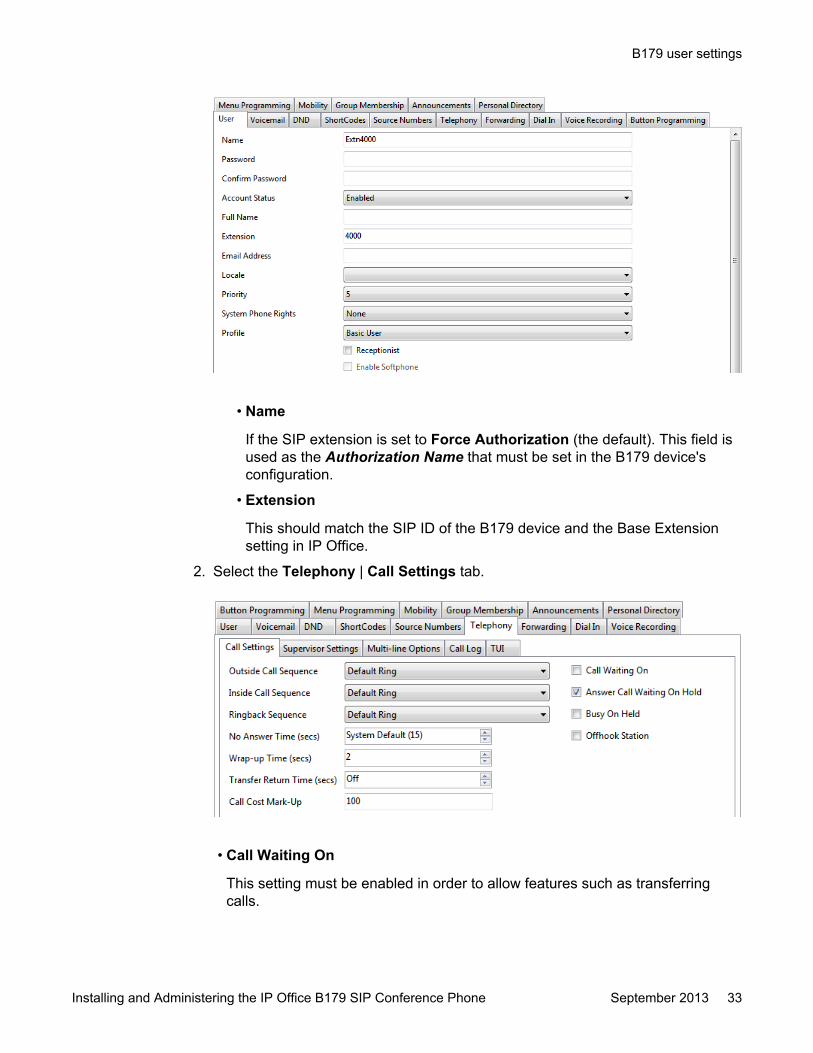
2. Select the Telephony | Call Settings tab.
• Call Waiting On
This setting must be enabled in order to allow features such as transferringcalls.
B179 user settings
Installing and Administering the IP Office B179 SIP Conference Phone September 2013 33
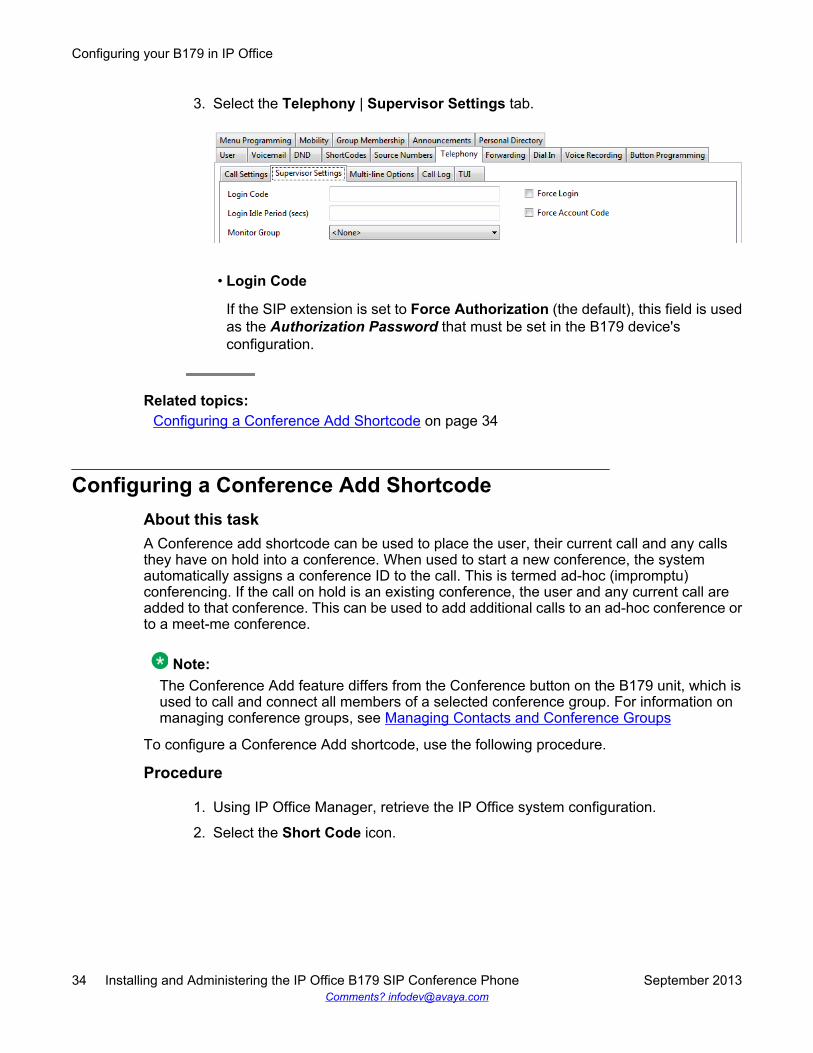
3. Select the Telephony | Supervisor Settings tab.
• Login Code
If the SIP extension is set to Force Authorization (the default), this field is usedas the Authorization Password that must be set in the B179 device'sconfiguration.
Related topics:Configuring a Conference Add Shortcode on page 34
Configuring a Conference Add ShortcodeAbout this taskA Conference add shortcode can be used to place the user, their current call and any callsthey have on hold into a conference. When used to start a new conference, the systemautomatically assigns a conference ID to the call. This is termed ad-hoc (impromptu)conferencing. If the call on hold is an existing conference, the user and any current call areadded to that conference. This can be used to add additional calls to an ad-hoc conference orto a meet-me conference.
Note:The Conference Add feature differs from the Conference button on the B179 unit, which isused to call and connect all members of a selected conference group. For information onmanaging conference groups, see Managing Contacts and Conference Groups
To configure a Conference Add shortcode, use the following procedure.
Procedure
1. Using IP Office Manager, retrieve the IP Office system configuration.
2. Select the Short Code icon.
Configuring your B179 in IP Office
34 Installing and Administering the IP Office B179 SIP Conference Phone September 2013Comments? [email protected]
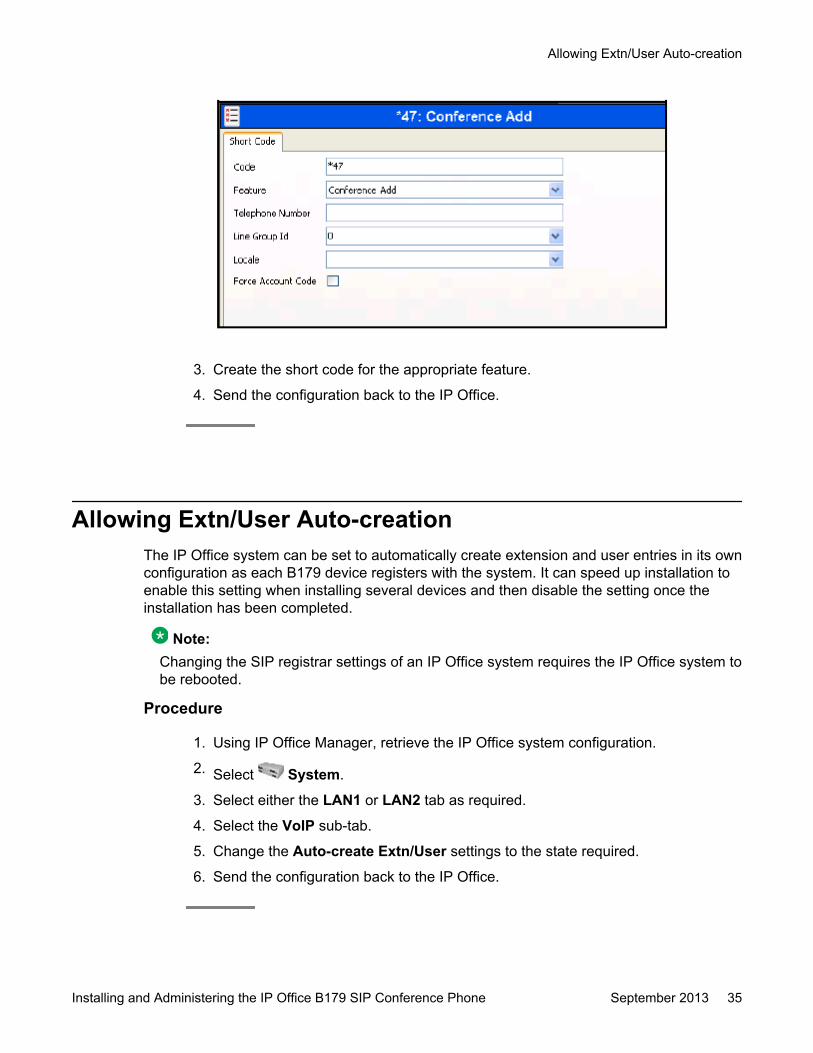
3. Create the short code for the appropriate feature.
4. Send the configuration back to the IP Office.
Allowing Extn/User Auto-creationThe IP Office system can be set to automatically create extension and user entries in its ownconfiguration as each B179 device registers with the system. It can speed up installation toenable this setting when installing several devices and then disable the setting once theinstallation has been completed.
Note:Changing the SIP registrar settings of an IP Office system requires the IP Office system tobe rebooted.
Procedure
1. Using IP Office Manager, retrieve the IP Office system configuration.
2. Select System.
3. Select either the LAN1 or LAN2 tab as required.
4. Select the VoIP sub-tab.
5. Change the Auto-create Extn/User settings to the state required.
6. Send the configuration back to the IP Office.
Allowing Extn/User Auto-creation
Installing and Administering the IP Office B179 SIP Conference Phone September 2013 35

Checking the B179 extension statusYou can view the status of the B179 extensions in the IP Office configuration using the IP OfficeSystem Monitor application.
Procedure
Select Status | SIP Phone Status to display the SIP extension list.
Configuring your B179 in IP Office
36 Installing and Administering the IP Office B179 SIP Conference Phone September 2013Comments? [email protected]
Chapter 5: B179 settings configuration
Basic settingsAlmost all settings can be done directly on the Avaya B179. For safety reasons, recordingscan only be managed directly on the B179. As an administrator, you can also study logs,upgrade the software, and create an XML-based configuration file for easier management ofa set of phones.
To configure these settings in the web interface, select Settings > Basic.
Basic settings include the following:
• Default account
• Language
• Key tone
• Ring level
• Recording/recording tone
• External equipment (Aux)
• Time format
• Equalizer
• Screen text
Default accountThis setting determines which account will be used as default.
1. On the phone, press MENU > SETTINGS > BASIC > ACCOUNT (or press 6,1,1from the main menu).
Note:Press LINE before dialing a number to choose the alternative account for thecall.
2. Select the desired account and press OK to confirm your choice.
Language
1. On the phone, press MENU > SETTINGS > BASIC > LANGUAGE (or press 6,1,2from the main menu).
2. Select the desired language and press OK to confirm your choice.
Key toneConfigure this setting to determine whether or not a tone is heard when you press a button.
1. On the phone, press MENU > SETTINGS > BASIC > KEY TONE (or press 6,1,3from the main menu).
2. Select the desired volume and press OK to confirm your choice.
Installing and Administering the IP Office B179 SIP Conference Phone September 2013 37
Ring levelThere are six volume levels plus a silent mode. You will hear the ring tone for each level youselect. If you select silent mode, only the blue LEDs on the phone flash when an incoming callis received.
1. On the phone, press MENU > SETTINGS > BASIC > RING LEVEL (or press 6,1,4from the main menu).
2. Select the desired volume and press OK to confirm your choice.
RecordingIt is possible to turn off the recording feature. This setting can only be done by the administrator,(through the web interface or configuration .xml file during IP Office provisioning) and affectsall profiles.
1. From the web interface, select Settings > Basic.2. Enable or disable the recording feature by selecting the appropriate radial button
next to 'Recording' under the “Preferences” section.3. When you are satisfied, click on the Save button.
Recording toneWhen a call is being recorded, all parties are informed every 20 seconds by a short beep. Thisdefault feature can be turned off.
1. On the phone, press MENU > RECORDING > SETTINGS (or press 5,5 from themain menu).
2. Select the desired volume and press OK to confirm your choice.
Settings when connecting external equipment (Aux)The Avaya B179 can be connected to a wireless headset or an external PA system, althougha PA interface box (not included with the Avaya B179) is required for PA system connection.You can configure the settings for the external equipment through the PA menu.
Warning:Do not select the PA option unless a PA system is connected. This option turns off theinternal microphone and internal speakers as default. On the contrary, you may select theHEADSET option whether or not a headset is connected.
1. On the phone, press MENU > SETTINGS > BASIC > PA (or press 6,1,7 from themain menu).
2. Activate or deactivate features for your external microphone mixer and PA systemas desired.
3. Press OK to confirm your choice.
Time format
1. On the phone, press MENU > SETTINGS > BASIC > TIME FORMAT (or press 6,1,8from the main menu).
2. Select the desired time format (12 or 24 hour) and press OK to confirm yourchoice.
B179 settings configuration
38 Installing and Administering the IP Office B179 SIP Conference Phone September 2013Comments? [email protected]
EqualizerYou can adjust sound reproduction to the required or desired pitch (SOFT, NEUTRAL, orBRIGHT).
1. On the phone, press MENU > SETTINGS > BASIC > EQUALIZER (or press 6,1,5from the main menu).
2. Select Soft, Neutral, or Bright, and press OK to confirm your choice.
Screen textThe text on the display screen is shown when the Avaya B179 is in stand-by mode (on hook).You can enter your own text to replace the default text.
1. On the phone, press MENU > SETTINGS > BASIC > SCREEN TEXT (or press 6,1,9from the main menu).
2. Enter your new text in the text box and press OK to confirm your choice.
Account settingsYou may wish to register a second account to the extension, especially if the IP Office controlunit and the phone are located in separate countries. Otherwise, local calls using the telephonenetwork, connected through the ordinary PBX or SIP server, would be connected asinternational calls. To configure account settings, you must access the advanced menu, whichrequires you to enter an administrator's PIN code.
Procedure
1. On the phone, press MENU > SETTINGS > ADVANCED > enter your PIN >ACCOUNTS (or press 6,2,1 from the main menu—you will be asked to enter thePIN).
2. Configure the account settings and press OK when you are satisfied. Refer to thetable below for a brief description of the account setting options.
Account setting Description
Enable account It is possible to store account information for future use, buttemporarily disable it.
Account name This is the name displayed on the screen. It can be set accordingto company standards.
User The account (customer) name.
Registrar Shall contain the IP address or the public name of the IP Officeunit to which the account is registered (e.g. 10.10.1.100 for a localSIP server)
Proxy Shall contain the proxy server used for Internet communication,if any.
Account settings
Installing and Administering the IP Office B179 SIP Conference Phone September 2013 39
Account setting Description
Can be left blank.
Realm The protection domain where the SIP authentication (name andpassword) is valid. This is usually the same as the registrar. If leftblank, or marked with a “*”, the phone will respond to any realm.If specified, the phone will only respond to the specific realm whenasked for credentials.
Authentication name The name used for the Realm authentication. This may be thesame as the user name, but must be filled in.
Password The password used for the Realm authentication.
Registration interval This is a request to IP Office for when the registration shouldexpire. Avaya B179 automatically renews the registration withinthe time interval if the phone is still on and connected to the server.The default value is 1800 seconds.
Network settingsYou can configure network settings only if you have proper authorization. You must accessthe advanced menu, which requires an administrator's PIN code. However, you can alsoaccess network settings through the web interface, via Settings > Network.
Procedure
1. On the phone, press MENU > SETTINGS > ADVANCED > enter your PIN >NETWORK (or press 6,2,2 from the main menu—you will be asked to enter thePIN).
2. Configure the network settings and press OK when you are satisfied. Refer to thetable below for a brief description of the network setting options.
Network setting Description
DHCP Dynamic Host Configuration Protocol is used by network devices(clients) to obtain the parameters necessary for operation in theIP network. This protocol reduces system administrationworkload, allowing devices to be added to the network with littleor no manual configuration.DHCP should be set to On if no other information is given. Whenset to On, all information on this page will be set automatically.
IP address IP address of the B179. The address is provided by the networkadministrator or service provider if DHCP is not in use.
Hostname Set to avaya as default. Can be changed to suitable name.
B179 settings configuration
40 Installing and Administering the IP Office B179 SIP Conference Phone September 2013Comments? [email protected]
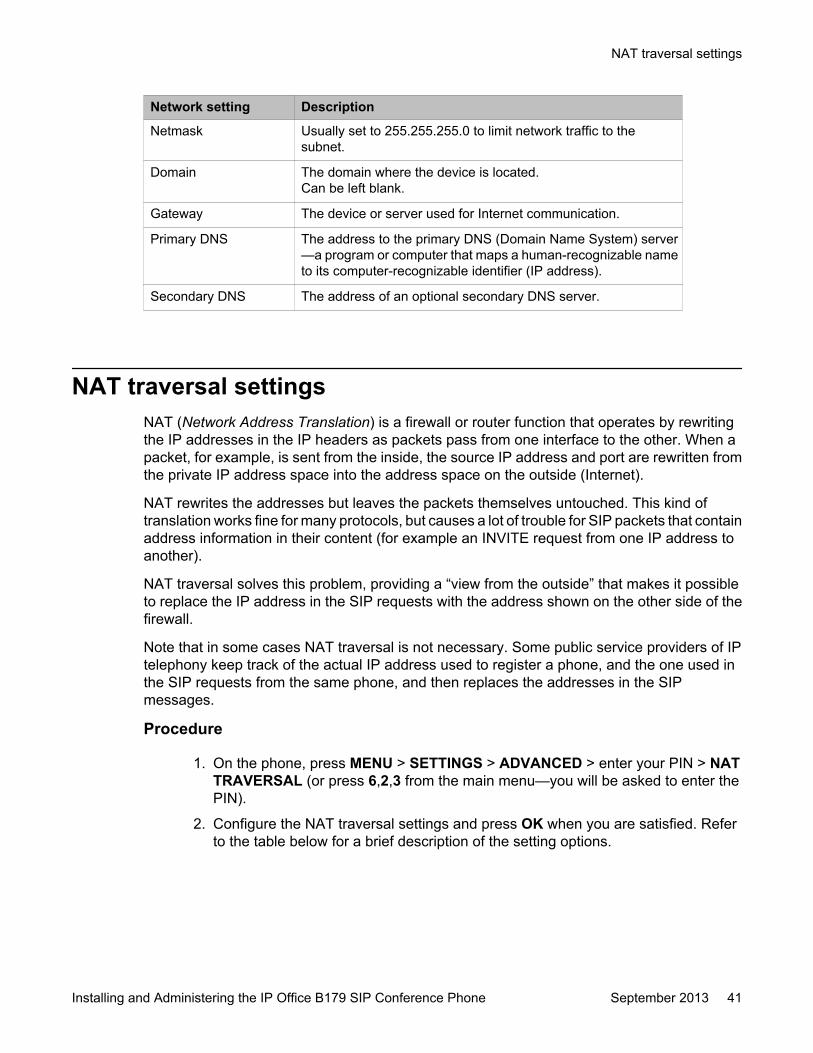
Network setting Description
Netmask Usually set to 255.255.255.0 to limit network traffic to thesubnet.
Domain The domain where the device is located.Can be left blank.
Gateway The device or server used for Internet communication.
Primary DNS The address to the primary DNS (Domain Name System) server—a program or computer that maps a human-recognizable nameto its computer-recognizable identifier (IP address).
Secondary DNS The address of an optional secondary DNS server.
NAT traversal settingsNAT (Network Address Translation) is a firewall or router function that operates by rewritingthe IP addresses in the IP headers as packets pass from one interface to the other. When apacket, for example, is sent from the inside, the source IP address and port are rewritten fromthe private IP address space into the address space on the outside (Internet).
NAT rewrites the addresses but leaves the packets themselves untouched. This kind oftranslation works fine for many protocols, but causes a lot of trouble for SIP packets that containaddress information in their content (for example an INVITE request from one IP address toanother).
NAT traversal solves this problem, providing a “view from the outside” that makes it possibleto replace the IP address in the SIP requests with the address shown on the other side of thefirewall.
Note that in some cases NAT traversal is not necessary. Some public service providers of IPtelephony keep track of the actual IP address used to register a phone, and the one used inthe SIP requests from the same phone, and then replaces the addresses in the SIPmessages.
Procedure
1. On the phone, press MENU > SETTINGS > ADVANCED > enter your PIN > NATTRAVERSAL (or press 6,2,3 from the main menu—you will be asked to enter thePIN).
2. Configure the NAT traversal settings and press OK when you are satisfied. Referto the table below for a brief description of the setting options.
NAT traversal settings
Installing and Administering the IP Office B179 SIP Conference Phone September 2013 41
Setting Detail
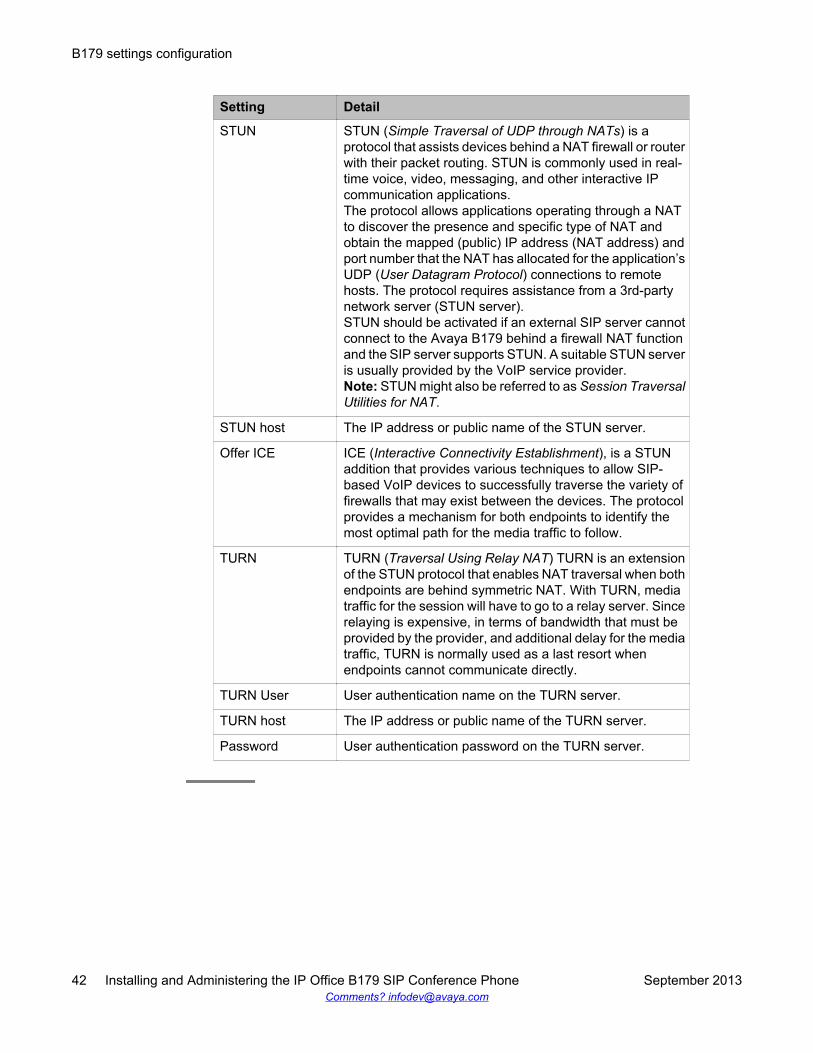
STUN STUN (Simple Traversal of UDP through NATs) is aprotocol that assists devices behind a NAT firewall or routerwith their packet routing. STUN is commonly used in real-time voice, video, messaging, and other interactive IPcommunication applications.The protocol allows applications operating through a NATto discover the presence and specific type of NAT andobtain the mapped (public) IP address (NAT address) andport number that the NAT has allocated for the application’sUDP (User Datagram Protocol) connections to remotehosts. The protocol requires assistance from a 3rd-partynetwork server (STUN server).STUN should be activated if an external SIP server cannotconnect to the Avaya B179 behind a firewall NAT functionand the SIP server supports STUN. A suitable STUN serveris usually provided by the VoIP service provider.Note: STUN might also be referred to as Session TraversalUtilities for NAT.
STUN host The IP address or public name of the STUN server.
Offer ICE ICE (Interactive Connectivity Establishment), is a STUNaddition that provides various techniques to allow SIP-based VoIP devices to successfully traverse the variety offirewalls that may exist between the devices. The protocolprovides a mechanism for both endpoints to identify themost optimal path for the media traffic to follow.
TURN TURN (Traversal Using Relay NAT) TURN is an extensionof the STUN protocol that enables NAT traversal when bothendpoints are behind symmetric NAT. With TURN, mediatraffic for the session will have to go to a relay server. Sincerelaying is expensive, in terms of bandwidth that must beprovided by the provider, and additional delay for the mediatraffic, TURN is normally used as a last resort whenendpoints cannot communicate directly.
TURN User User authentication name on the TURN server.
TURN host The IP address or public name of the TURN server.
Password User authentication password on the TURN server.
B179 settings configuration
42 Installing and Administering the IP Office B179 SIP Conference Phone September 2013Comments? [email protected]
Transport settingsThe transport setting only concerns the protocol to be used for SIP messages between thedevices involved. These settings do not include the media (the actual call). The settings on theMedia tab should be set accordingly.
Note that if you choose to use a secure connection, both units must support it. Otherwise theycannot negotiate a connection. If an incoming call demands a secure TLS or SIPS connection,the Avaya B179 uses the appropriate protocol even if you have set the phone to use UDP.
Procedure
1. On the phone, press MENU > SETTINGS > ADVANCED > enter your PIN >ACCOUNTS > TRANSPORT (or press 6,2,1,3 from the main menu—you will beasked to enter the PIN).
2. Configure the transport settings and press OK when you are satisfied. Refer to thetable below for a brief description of the protocols.
Note:Even if Transport is set to TLS or SIPS, the Avaya B179 still accepts incomingUDP or TCP signalling.
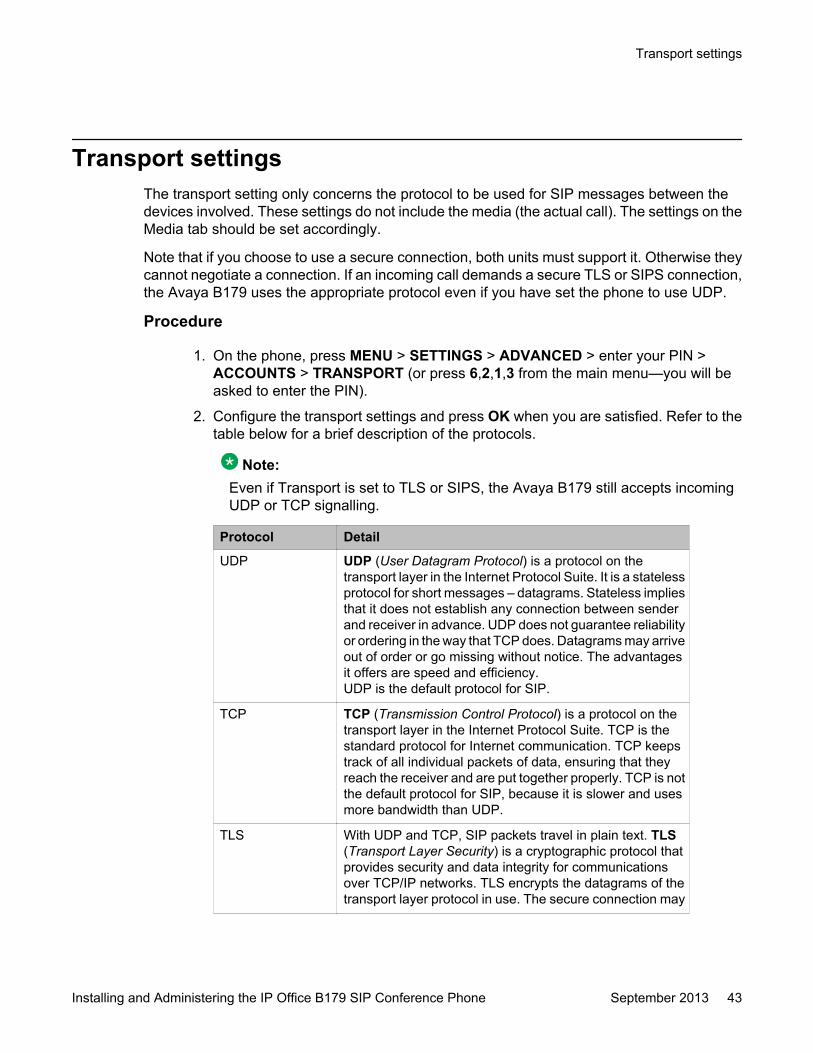
Protocol Detail
UDP UDP (User Datagram Protocol) is a protocol on thetransport layer in the Internet Protocol Suite. It is a statelessprotocol for short messages – datagrams. Stateless impliesthat it does not establish any connection between senderand receiver in advance. UDP does not guarantee reliabilityor ordering in the way that TCP does. Datagrams may arriveout of order or go missing without notice. The advantagesit offers are speed and efficiency.UDP is the default protocol for SIP.
TCP TCP (Transmission Control Protocol) is a protocol on thetransport layer in the Internet Protocol Suite. TCP is thestandard protocol for Internet communication. TCP keepstrack of all individual packets of data, ensuring that theyreach the receiver and are put together properly. TCP is notthe default protocol for SIP, because it is slower and usesmore bandwidth than UDP.
TLS With UDP and TCP, SIP packets travel in plain text. TLS(Transport Layer Security) is a cryptographic protocol thatprovides security and data integrity for communicationsover TCP/IP networks. TLS encrypts the datagrams of thetransport layer protocol in use. The secure connection may
Transport settings
Installing and Administering the IP Office B179 SIP Conference Phone September 2013 43
Protocol Detail
be to the end device or to the first server (usually the SIPserver where the phone is registered). There is noguarantee that there is a secure channel to the end point,but because the SIP server is the only part receiving theuser authentication, this is still a rather secure solution.
SIPS SIPS (Secure SIP) is a security measure that uses TLS toprovide an encrypted end-to-end channel for the SIPmessages. To use SIPS, however, both VoIP devices andthe SIP server must support it.
TLS settingsIf you select TLS or SIPS under the transport setting, this additional setting appears on thepage.
It may be possible to use secure communication without a certificate and make changes tothese settings. In some cases, if you choose TLS or SIPS, the SIP server requires a certificatefor user/client verification. This should be specified in the account information.
You can further increase security by requiring verification of the server, or the client when theAvaya B179 acts as a server for incoming calls.
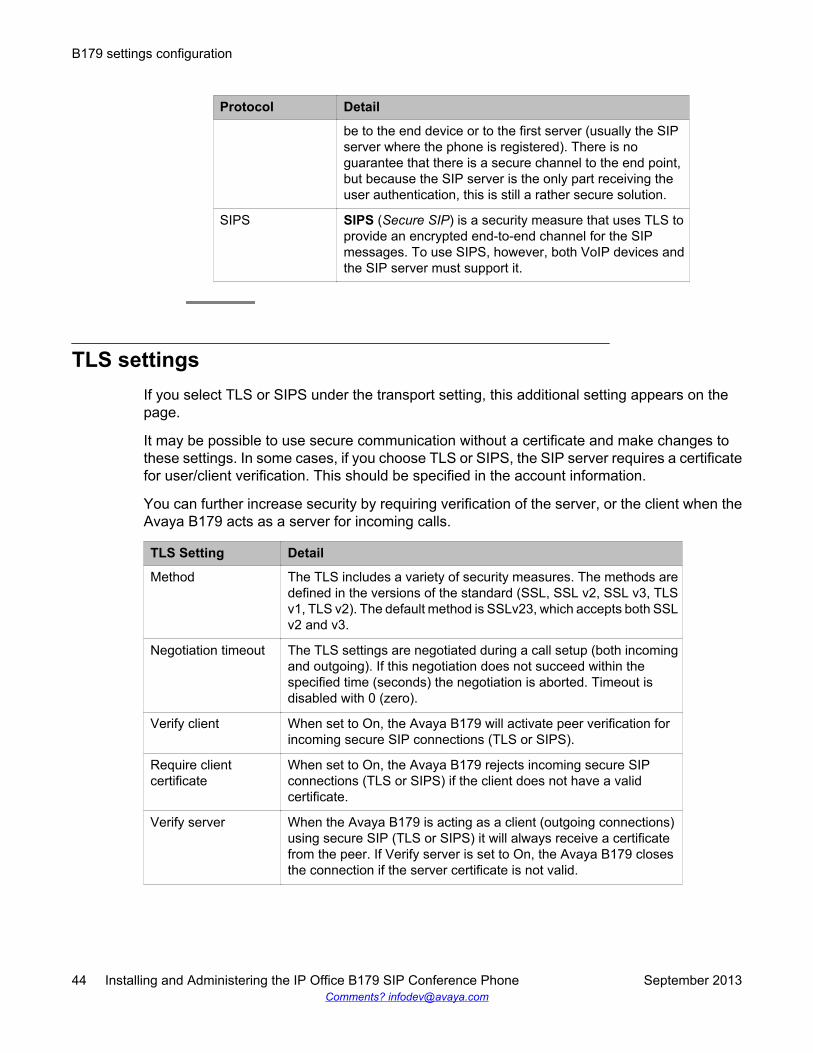
TLS Setting Detail
Method The TLS includes a variety of security measures. The methods aredefined in the versions of the standard (SSL, SSL v2, SSL v3, TLSv1, TLS v2). The default method is SSLv23, which accepts both SSLv2 and v3.
Negotiation timeout The TLS settings are negotiated during a call setup (both incomingand outgoing). If this negotiation does not succeed within thespecified time (seconds) the negotiation is aborted. Timeout isdisabled with 0 (zero).
Verify client When set to On, the Avaya B179 will activate peer verification forincoming secure SIP connections (TLS or SIPS).
Require clientcertificate
When set to On, the Avaya B179 rejects incoming secure SIPconnections (TLS or SIPS) if the client does not have a validcertificate.
Verify server When the Avaya B179 is acting as a client (outgoing connections)using secure SIP (TLS or SIPS) it will always receive a certificatefrom the peer. If Verify server is set to On, the Avaya B179 closesthe connection if the server certificate is not valid.
B179 settings configuration
44 Installing and Administering the IP Office B179 SIP Conference Phone September 2013Comments? [email protected]
TLS Setting Detail
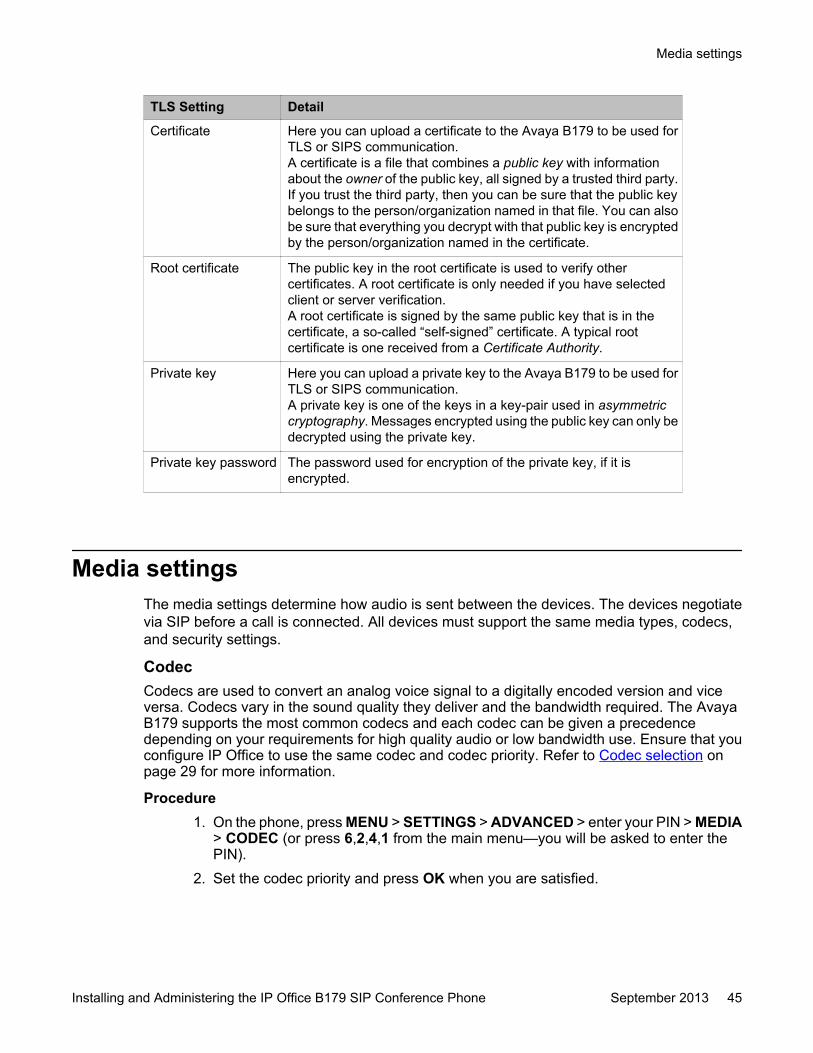
Certificate Here you can upload a certificate to the Avaya B179 to be used forTLS or SIPS communication.A certificate is a file that combines a public key with informationabout the owner of the public key, all signed by a trusted third party.If you trust the third party, then you can be sure that the public keybelongs to the person/organization named in that file. You can alsobe sure that everything you decrypt with that public key is encryptedby the person/organization named in the certificate.
Root certificate The public key in the root certificate is used to verify othercertificates. A root certificate is only needed if you have selectedclient or server verification.A root certificate is signed by the same public key that is in thecertificate, a so-called “self-signed” certificate. A typical rootcertificate is one received from a Certificate Authority.
Private key Here you can upload a private key to the Avaya B179 to be used forTLS or SIPS communication.A private key is one of the keys in a key-pair used in asymmetriccryptography. Messages encrypted using the public key can only bedecrypted using the private key.
Private key password The password used for encryption of the private key, if it isencrypted.
Media settingsThe media settings determine how audio is sent between the devices. The devices negotiatevia SIP before a call is connected. All devices must support the same media types, codecs,and security settings.
CodecCodecs are used to convert an analog voice signal to a digitally encoded version and viceversa. Codecs vary in the sound quality they deliver and the bandwidth required. The AvayaB179 supports the most common codecs and each codec can be given a precedencedepending on your requirements for high quality audio or low bandwidth use. Ensure that youconfigure IP Office to use the same codec and codec priority. Refer to Codec selection onpage 29 for more information.
Procedure1. On the phone, press MENU > SETTINGS > ADVANCED > enter your PIN > MEDIA
> CODEC (or press 6,2,4,1 from the main menu—you will be asked to enter thePIN).
2. Set the codec priority and press OK when you are satisfied.
Media settings
Installing and Administering the IP Office B179 SIP Conference Phone September 2013 45
The priority can be set from 4 (high) to 1 (low) or 0 (disabled), and must match thatof IP Office.
SecurityThe media in VoIP calls is usually sent using the RTP protocol (Real-time TransportProtocol). RTP is a standardized packet format for delivering audio and video over theInternet.
SRTP (Secure Real-time Transport Protocol) is an extension of RTP to provide encryption,message authentication and integrity for the audio and video streams.
All devices must support SRTP to establish a connection. It is therefore possible to set SRTPas disabled, optional or mandatory.
1. On the phone, press MENU > SETTINGS > ADVANCED > enter your PIN > MEDIA> SECURITY (or press 6,2,4,4 from the main menu—you will be asked to enter thePIN).
2. Configure SRTP and secure signalling and press OK. Refer to the table below fora brief description of each option.
SRTP If set to disabled, the media is sent using RTP. Note that despite thissetting, the Avaya B179 will still use a secure channel if the oppositedevice demands it.If set to optional or mandatory, a padlock will be shown in the bottomright-hand corner of the screen. If the other devices support SRTP, thepadlock will be locked. Otherwise, an open padlock will be displayed.If set to mandatory, the call will not be connected if the other devicesdo not support SRTP.
Secure signalling The SIP messages (signalling) and the SRTP cipher key are sent on adifferent channel than the media and are not affected by the RTP/SRTPsetting. To ensure a secure connection, the signalling must be securedusing TLS or SIPS. Note that the SIP transport setting must be setaccordingly.
VADVoice Activity Detection (speech detection) is a technique used in speech processing to detectthe presence or absence of human speech in regions of audio. In VoIP applications, VAD ismainly used to avoid unnecessary coding and transmission of silence packets, saving oncomputation and network bandwidth.
1. On the phone, press MENU > SETTINGS > ADVANCED > enter your PIN > MEDIA> VAD (or press 6,2,4,2 from the main menu—you will be asked to enter thePIN).
2. Configure speech detection and press OK when you are satisfied.
DTMFDTMF (Dual-tone Multi-Frequency) signalling is used for telephone signalling over the line tothe phone switch or PBX.
B179 settings configuration
46 Installing and Administering the IP Office B179 SIP Conference Phone September 2013Comments? [email protected]
If the device itself generates the tones and they are sent in the voice-frequency band, themethod is called Inband. This is not the best method when using VoIP. Low bit rate codecsmay corrupt the signalling tones and make it difficult for the switch to identify them.
RFC 2833 is a method of carrying DTMF signals in RTP packets using a separate RTP payloadformat. With this method a PSTN gateway reproduces the DTMF tones sent from the enddevice.
With SIP Info, the DTMF signals are sent as SIP requests. The SIP switch creates the tonesif the call is transferred to the PSTN.
Use RFC 2833 or SIP Info as preferred methods. Switch to inband only if you encounterproblems using DTMF signalling with your PBX/SIP switch.
Ensure that the DTMF configuration on the phone matches the DTMF configuration in IP Office.Otherwise, you will be unable to access voicemail in IP Office via the B179 as a result ofincompatible signalling tones. Refer to B179 extension settings on page 29 for IP Officeconfiguration.
Procedure1. On the phone, press MENU > SETTINGS > ADVANCED > enter your PIN > MEDIA
> DTMF SIGNALLING (or press 6,2,4,3 from the main menu—you will be asked toenter the PIN).
2. Configure the desired signalling settings and press OK when you are satisfied.
AdvancedFirst RTP port— If the RTP packets must be directed to a specific port series, the first portnumber is set here.
LDAP settingsAvaya B179 has support for an external phone book, which means it can communicate with adirectory server using LDAP (Lightweight Directory Access Protocol). The built in searchfunction dynamically filters the content from the LDAP database, based on the searchcharacters the user enter.
Note:Once this feature is enabled, the B179 will be able to download the IP Office centralizedpersonal directory and centralized system directory .
To make the LDAP phone book available, the administrator has to activate and configure theLDAP feature.
Procedure
From the web interface, select Settings > LDAP.The following table identifies the settings available for configuration:
LDAP settings
Installing and Administering the IP Office B179 SIP Conference Phone September 2013 47
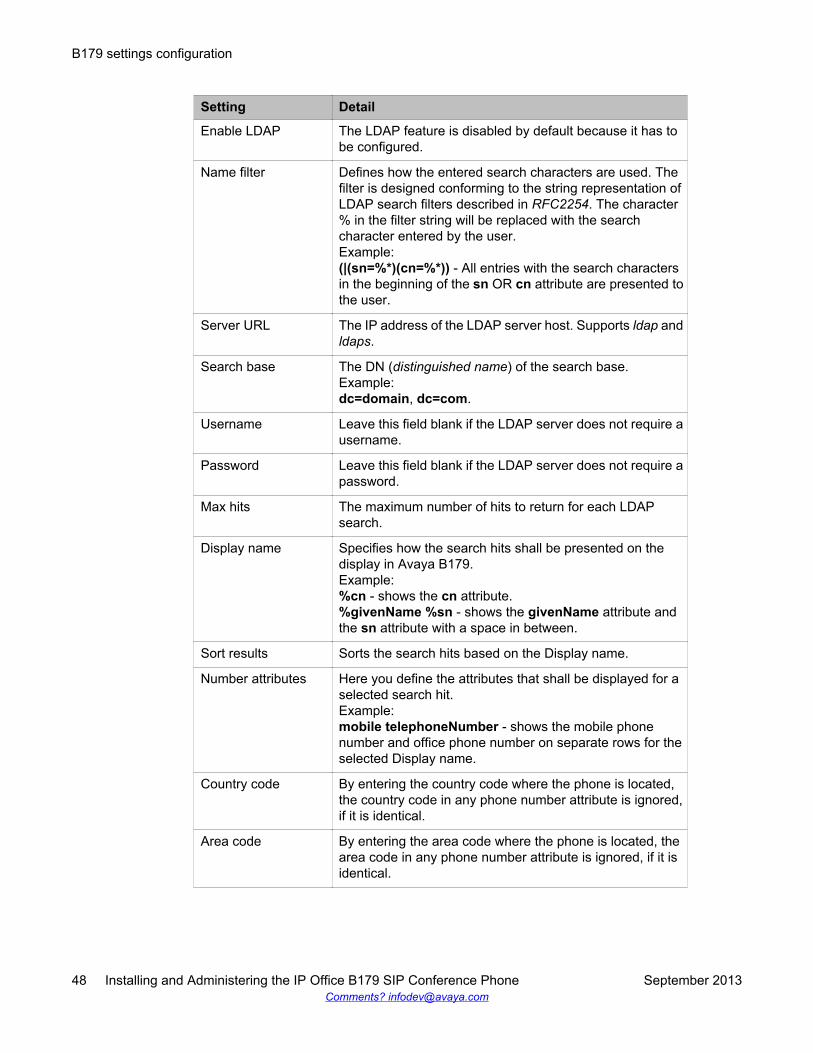
Setting Detail
Enable LDAP The LDAP feature is disabled by default because it has tobe configured.
Name filter Defines how the entered search characters are used. Thefilter is designed conforming to the string representation ofLDAP search filters described in RFC2254. The character% in the filter string will be replaced with the searchcharacter entered by the user.Example:(|(sn=%*)(cn=%*)) - All entries with the search charactersin the beginning of the sn OR cn attribute are presented tothe user.
Server URL The IP address of the LDAP server host. Supports ldap andldaps.
Search base The DN (distinguished name) of the search base.Example:dc=domain, dc=com.
Username Leave this field blank if the LDAP server does not require ausername.
Password Leave this field blank if the LDAP server does not require apassword.
Max hits The maximum number of hits to return for each LDAPsearch.
Display name Specifies how the search hits shall be presented on thedisplay in Avaya B179.Example:%cn - shows the cn attribute.%givenName %sn - shows the givenName attribute andthe sn attribute with a space in between.
Sort results Sorts the search hits based on the Display name.
Number attributes Here you define the attributes that shall be displayed for aselected search hit.Example:mobile telephoneNumber - shows the mobile phonenumber and office phone number on separate rows for theselected Display name.
Country code By entering the country code where the phone is located,the country code in any phone number attribute is ignored,if it is identical.
Area code By entering the area code where the phone is located, thearea code in any phone number attribute is ignored, if it isidentical.
B179 settings configuration
48 Installing and Administering the IP Office B179 SIP Conference Phone September 2013Comments? [email protected]
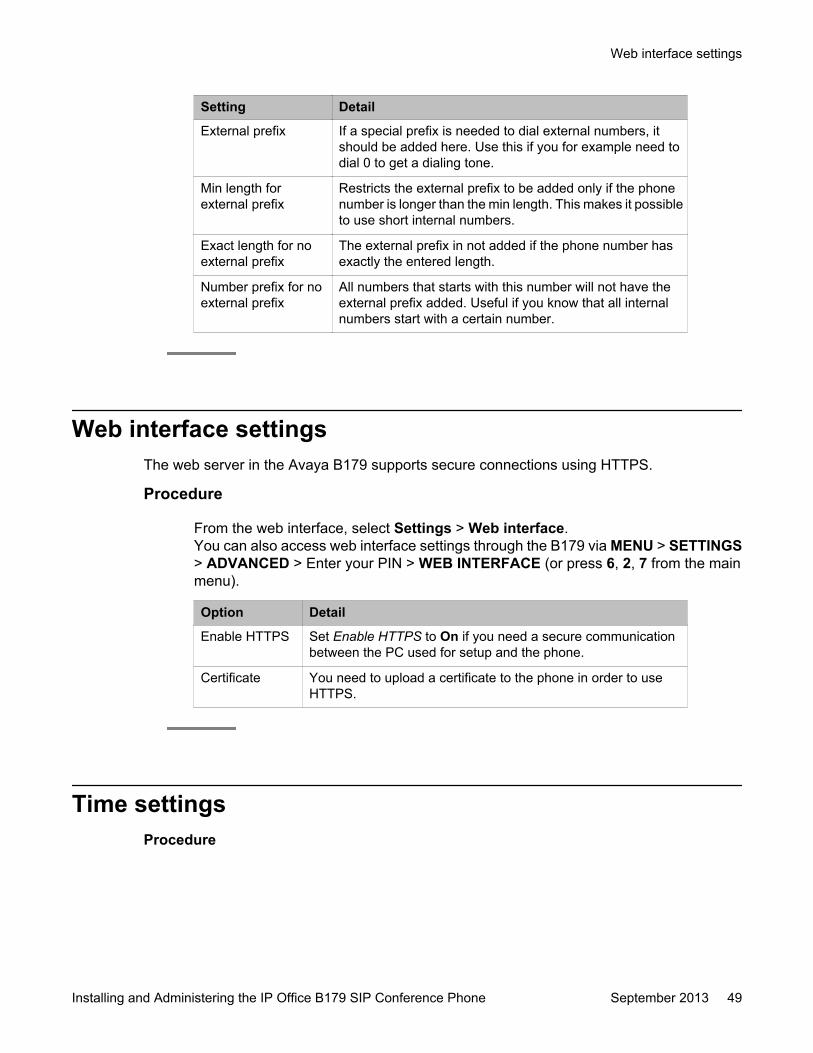
Setting Detail
External prefix If a special prefix is needed to dial external numbers, itshould be added here. Use this if you for example need todial 0 to get a dialing tone.
Min length forexternal prefix
Restricts the external prefix to be added only if the phonenumber is longer than the min length. This makes it possibleto use short internal numbers.
Exact length for noexternal prefix
The external prefix in not added if the phone number hasexactly the entered length.
Number prefix for noexternal prefix
All numbers that starts with this number will not have theexternal prefix added. Useful if you know that all internalnumbers start with a certain number.
Web interface settingsThe web server in the Avaya B179 supports secure connections using HTTPS.
Procedure
From the web interface, select Settings > Web interface.You can also access web interface settings through the B179 via MENU > SETTINGS> ADVANCED > Enter your PIN > WEB INTERFACE (or press 6, 2, 7 from the mainmenu).
Option Detail
Enable HTTPS Set Enable HTTPS to On if you need a secure communicationbetween the PC used for setup and the phone.
Certificate You need to upload a certificate to the phone in order to useHTTPS.
Time settingsProcedure
Web interface settings
Installing and Administering the IP Office B179 SIP Conference Phone September 2013 49
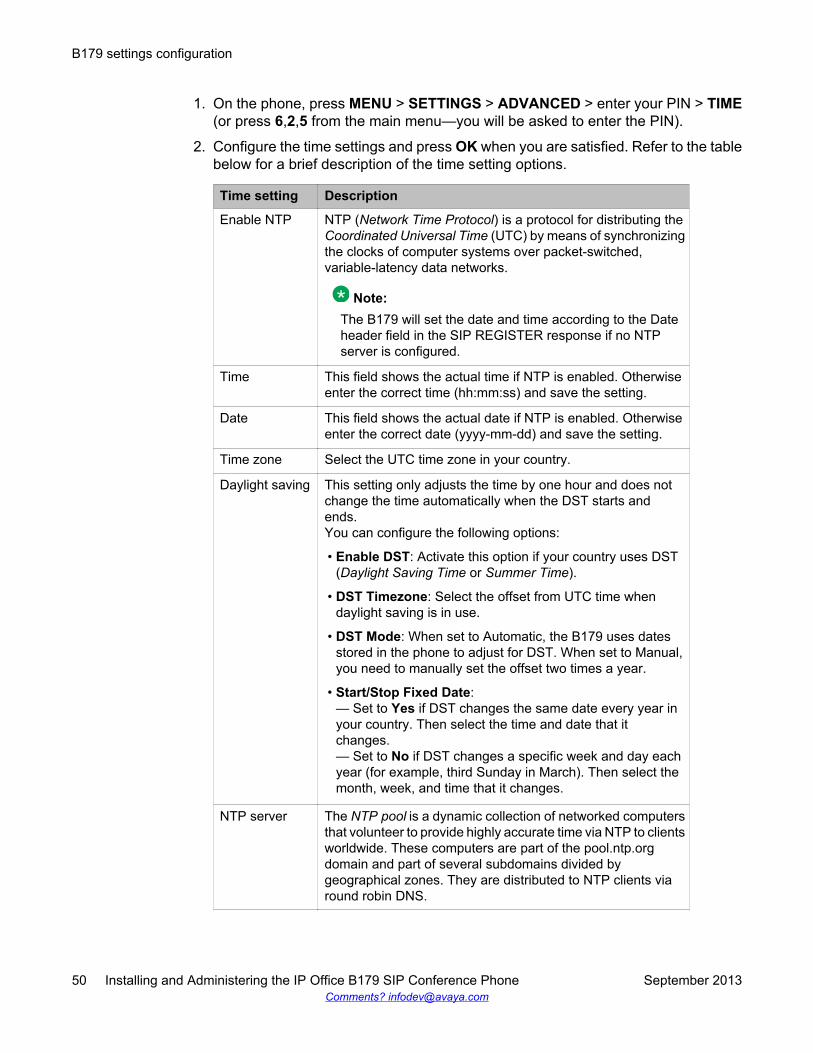
1. On the phone, press MENU > SETTINGS > ADVANCED > enter your PIN > TIME(or press 6,2,5 from the main menu—you will be asked to enter the PIN).
2. Configure the time settings and press OK when you are satisfied. Refer to the tablebelow for a brief description of the time setting options.
Time setting Description
Enable NTP NTP (Network Time Protocol) is a protocol for distributing theCoordinated Universal Time (UTC) by means of synchronizingthe clocks of computer systems over packet-switched,variable-latency data networks.
Note:The B179 will set the date and time according to the Dateheader field in the SIP REGISTER response if no NTPserver is configured.
Time This field shows the actual time if NTP is enabled. Otherwiseenter the correct time (hh:mm:ss) and save the setting.
Date This field shows the actual date if NTP is enabled. Otherwiseenter the correct date (yyyy-mm-dd) and save the setting.
Time zone Select the UTC time zone in your country.
Daylight saving This setting only adjusts the time by one hour and does notchange the time automatically when the DST starts andends.You can configure the following options:
• Enable DST: Activate this option if your country uses DST(Daylight Saving Time or Summer Time).
• DST Timezone: Select the offset from UTC time whendaylight saving is in use.
• DST Mode: When set to Automatic, the B179 uses datesstored in the phone to adjust for DST. When set to Manual,you need to manually set the offset two times a year.
• Start/Stop Fixed Date:— Set to Yes if DST changes the same date every year inyour country. Then select the time and date that itchanges.— Set to No if DST changes a specific week and day eachyear (for example, third Sunday in March). Then select themonth, week, and time that it changes.
NTP server The NTP pool is a dynamic collection of networked computersthat volunteer to provide highly accurate time via NTP to clientsworldwide. These computers are part of the pool.ntp.orgdomain and part of several subdomains divided bygeographical zones. They are distributed to NTP clients viaround robin DNS.
B179 settings configuration
50 Installing and Administering the IP Office B179 SIP Conference Phone September 2013Comments? [email protected]
Region settingsProcedure
1. On the phone, press MENU > SETTINGS > ADVANCED > enter your PIN >REGION (or press 6,2,6 from the main menu—you will be asked to enter thePIN).
2. Configure the region settings and press OK when you are satisfied.
System settingsYou can access system settings via the B179 phone's main menu. You can access thefollowing restart, reboot, and reset options:
Application restartRestart the phone application using the procedure below.
1. On the phone, press MENU > SYSTEM > RESTART (or press 7,1 from the mainmenu).
The application takes less than 30 seconds to restart.
System rebootReboot the entire device using the procedure below.
1. On the phone, press MENU > SYSTEM > REBOOT (or press 7,2 from the mainmenu).
Rebooting the system may take about two minutes.
Factory resetUse this option to reset the Avaya B179 to factory default settings. All personal settings,including account information, are erased.
1. On the phone, press MENU > SYSTEM > FACTORY RESET (or press 7,3 from themain menu).
Hard reset to factory settingsIf you have forgotten your Admin PIN code and need to reset the B179 device to factorysettings, refer to Hard system recovery on page 55.
Region settings
Installing and Administering the IP Office B179 SIP Conference Phone September 2013 51
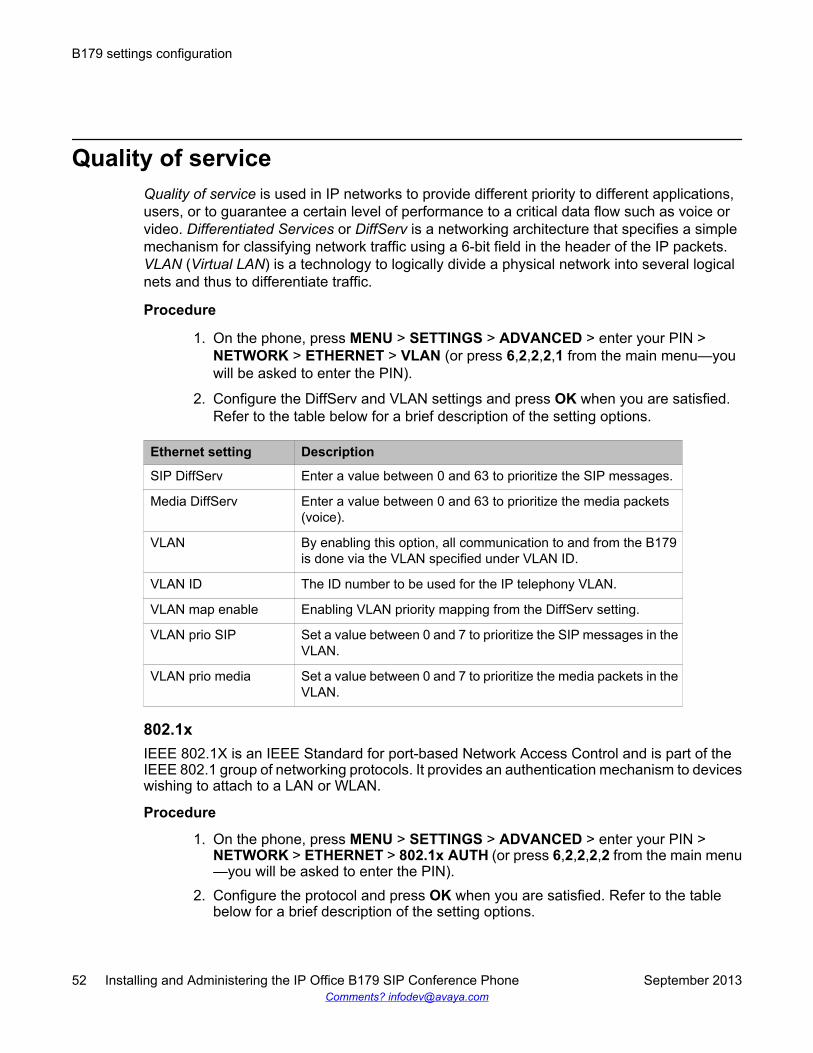
Quality of serviceQuality of service is used in IP networks to provide different priority to different applications,users, or to guarantee a certain level of performance to a critical data flow such as voice orvideo. Differentiated Services or DiffServ is a networking architecture that specifies a simplemechanism for classifying network traffic using a 6-bit field in the header of the IP packets.VLAN (Virtual LAN) is a technology to logically divide a physical network into several logicalnets and thus to differentiate traffic.
Procedure
1. On the phone, press MENU > SETTINGS > ADVANCED > enter your PIN >NETWORK > ETHERNET > VLAN (or press 6,2,2,2,1 from the main menu—youwill be asked to enter the PIN).
2. Configure the DiffServ and VLAN settings and press OK when you are satisfied.Refer to the table below for a brief description of the setting options.
Ethernet setting Description
SIP DiffServ Enter a value between 0 and 63 to prioritize the SIP messages.
Media DiffServ Enter a value between 0 and 63 to prioritize the media packets(voice).
VLAN By enabling this option, all communication to and from the B179is done via the VLAN specified under VLAN ID.
VLAN ID The ID number to be used for the IP telephony VLAN.
VLAN map enable Enabling VLAN priority mapping from the DiffServ setting.
VLAN prio SIP Set a value between 0 and 7 to prioritize the SIP messages in theVLAN.
VLAN prio media Set a value between 0 and 7 to prioritize the media packets in theVLAN.
802.1xIEEE 802.1X is an IEEE Standard for port-based Network Access Control and is part of theIEEE 802.1 group of networking protocols. It provides an authentication mechanism to deviceswishing to attach to a LAN or WLAN.
Procedure
1. On the phone, press MENU > SETTINGS > ADVANCED > enter your PIN >NETWORK > ETHERNET > 802.1x AUTH (or press 6,2,2,2,2 from the main menu—you will be asked to enter the PIN).
2. Configure the protocol and press OK when you are satisfied. Refer to the tablebelow for a brief description of the setting options.
B179 settings configuration
52 Installing and Administering the IP Office B179 SIP Conference Phone September 2013Comments? [email protected]
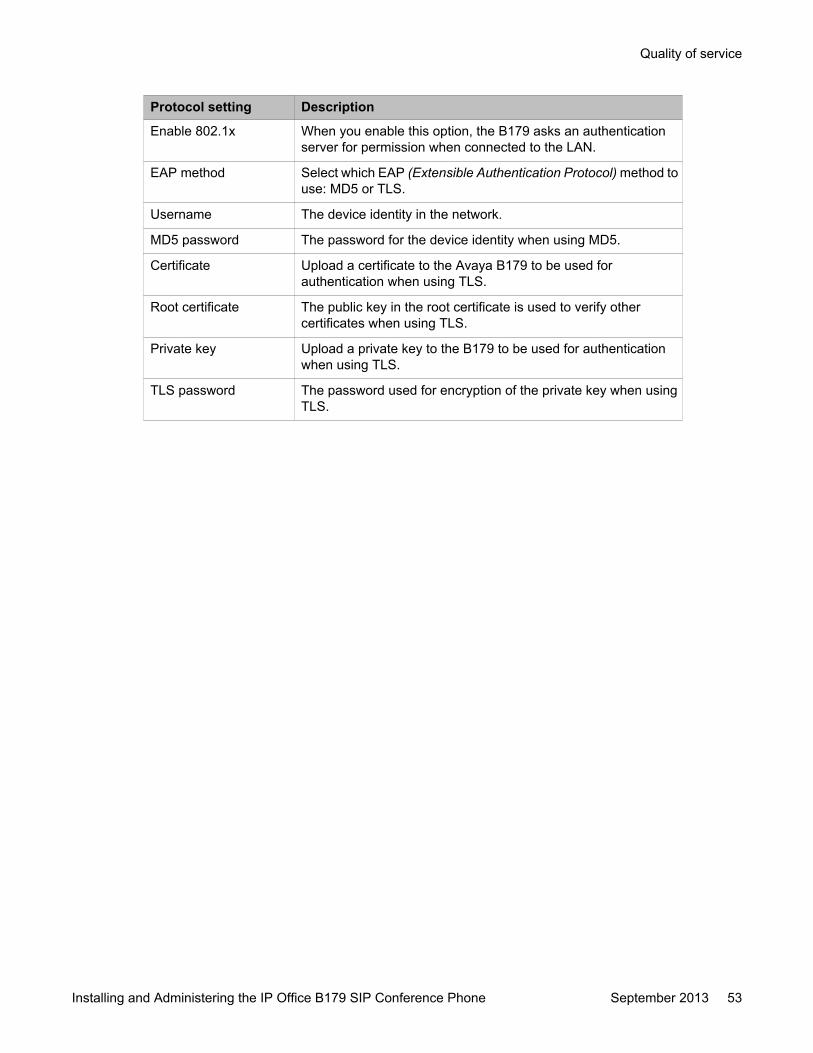
Protocol setting Description
Enable 802.1x When you enable this option, the B179 asks an authenticationserver for permission when connected to the LAN.
EAP method Select which EAP (Extensible Authentication Protocol) method touse: MD5 or TLS.
Username The device identity in the network.
MD5 password The password for the device identity when using MD5.
Certificate Upload a certificate to the Avaya B179 to be used forauthentication when using TLS.
Root certificate The public key in the root certificate is used to verify othercertificates when using TLS.
Private key Upload a private key to the B179 to be used for authenticationwhen using TLS.
TLS password The password used for encryption of the private key when usingTLS.
Quality of service
Installing and Administering the IP Office B179 SIP Conference Phone September 2013 53

B179 settings configuration
54 Installing and Administering the IP Office B179 SIP Conference Phone September 2013Comments? [email protected]
Chapter 6: Hard system recovery
Reset configurationIf you have forgotten the Admin PIN code, the only way to reset it to default is to do a hardfactory reset. This is the same as the factory reset in the system menu (MENU > SYSTEM >FACTORY RESET).
Note:This erases all settings, including account information and contacts!
Procedure
1. Disconnect the power supply cable. Note that this is the same as the network cableif the phone uses Power over Ethernet (PoE).
2. Press and hold the MENU button while you connect the cable again (i.e. start theAvaya B179). Hold the button pressed until the SYSTEM RECOVERY menu isshown on the display.You can press any other button than 1, 2, or 3 to start the phone withoutresetting.
3. Press 1 to select Reset Configuration and confirm your selection by pressingOK.
4. When the phone starts, upgrade to the latest version of the software and re-configure account setup and other settings (see Basic settings on page 37 for moreinformation).
Restore firmwareThis replaces the current software with the one supplied with the phone.
Note:This erases all settings including account information and contacts!
Installing and Administering the IP Office B179 SIP Conference Phone September 2013 55
Procedure
1. Disconnect the power supply cable. Note that this is the same as the network cableif the phone uses Power over Ethernet (PoE).
2. Press and hold the MENU button while you connect the cable again (i.e. start theAvaya B179). Hold the button until the SYSTEM RECOVERY menu is shown onthe display.
Note:If you are using POE and not the external power supply, you must wait for Avayato appear on the display, then press and hold Menu until the SYSTEMRECOVERY menu appears.
You can press any other button than 1, 2, or 3 to start the phone without restoringthe firmware.
3. Press 3 to select Restore Firmware and confirm your selection by pressing OK.All content in the phone’s memory is erased and the firmware supplied with thephone is written to the memory.
4. When the phone starts, upgrade to the latest version of the software and re-configure account setup and other settings (see Basic settings on page 37 for moreinformation).
Hard system recovery
56 Installing and Administering the IP Office B179 SIP Conference Phone September 2013Comments? [email protected]
Chapter 7: Headset and PA installation andsettings
Connecting a wireless headsetThe microphones from the Avaya B179 and the wireless headset will work simultaneously andtransmit the call to other participants in the phone conference. Please refer to your headsetmanual for further information.
Procedure
Connect the headset to the AUX port on the Avaya B179 device.
Connecting a PA interface boxThe Avaya B179 can be connected to an external PA system using a PA interface box.
Note:Always disconnect the power supply from the electrical outlet before disconnecting orconnecting equipment to the Avaya B179.
Installing and Administering the IP Office B179 SIP Conference Phone September 2013 57
1 2.5 meter connection cable
2 To mixer/microphone
3 To amplifier/speakers
4 PA interface box
5 AUX port
Procedure
1. Connect the PA box to the AUX port on the Avaya B179 with the included cable.
2. Connect the external amplifier to the RCA connector marked with a speaker.
3. Connect the microphone mixer to the RCA connector marked with a microphone.
PA settingsTo match several types of situations and equipment, access the PA settings available in theAvaya B179 menu.
Related topics:Activating internal microphone and speakers on page 59Adjusting microphone volume from PA on page 59Adjusting PA calibration manually on page 60
Headset and PA installation and settings
58 Installing and Administering the IP Office B179 SIP Conference Phone September 2013Comments? [email protected]

Activating internal microphone and speakersThese settings can only be activated on the B179 device.
Note:To ensure maximum audio quality, do not use the internal microphone and externalmicrophones connected via the PA box at the same time.
Procedure
1. Select MENU > SETTINGS > BASIC > PA (or press 6,1,7 from the main menu).
2. Select INTERNAL MIC and press OK to switch between on (indicated by a shadedbox) and off (indicated by an empty box).Only the internal microphone is turned off. Any external microphones connected tothe B179 remain turned on.
3. Select INTERNAL SPKR and press OK to switch between on (indicated by ashaded box) and off (indicated by an empty box).
Adjusting microphone volume from PAProcedure
1. During a call, select MENU > PA > PA MONITOR.
PA settings
Installing and Administering the IP Office B179 SIP Conference Phone September 2013 59
2. Adjust the microphone volume from the mixer so that the level on the display screenis around 10–12 when speaking in a normal tone.
Adjusting PA calibration manuallyIt is possible to calibrate the duplex performance of the conference phone when it is connectedto a PA system. The calibration level can be set automatically by the B179 device or adjustedmanually to any value between 0 and 5 (0 being full duplex).
• Increase the calibration if the other party experiences disturbing echo.
• Decrease the calibration if the other party experiences low duplex, i.e. your voice is mutedor clipped when the other party is speaking.
Note:The position of the PA system’s microphones and speakers and the amplifier’s settings mayaffect full duplex performance.
Procedure
1. Select MENU > PA > CALIBRATION.
AUTO is the default setting and is recommended in most cases. The figure shownin brackets ( ) is the measured calibration value.
2. Select different levels and compare the audio quality to achieve your preferredsetting.
Next stepsCall someone and ask them to assess the effect(s) of any adjustment you make.
Headset and PA installation and settings
60 Installing and Administering the IP Office B179 SIP Conference Phone September 2013Comments? [email protected]
Chapter 8: Provisioning
Firmware upgrade on a single phoneThe easiest way to upgrade the Avaya B179 is via a computer connected to the same network.Via the web interface, you can check for a more recent version and then automatically installit.
It is also possible to download the latest version, via the Avaya website (http://support.avaya.com), and then install the file via the web interface or using a SD card.
Related topics:Upgrading firmware using the web interface on page 61Upgrading firmware from a downloaded file on page 62Firmware binary on page 62Upgrading firmware from a SD card on page 63Upgrading Firmware Using IP Office Check-Sync on page 63
Upgrading firmware using the web interface
Note:Download and installation can take several minutes. Do not interrupt the upgrade and donot disconnect plugs to the Avaya B179 during the upgrade. Interrupting the upgrade mayrender the conference phone inoperable.
Procedure
1. From the web interface, select Settings > Provisioning.
2. Click on the Check Now button.
3. Compare the latest software version with the current version (shown on the samepage).
4. If you choose to upgrade, select a version in the list box and click on the Upgradebutton.The browser window and the Avaya B179 display shows that the upgrading hasbegun.
Installing and Administering the IP Office B179 SIP Conference Phone September 2013 61
When installation is complete, the text “Upgrade Complete. The unit willbe rebooted.” is shown in your browser, and after a while you hear the Avayamusic signature, which indicates that the conference phone has started.
Note:If DHCP is used in the network, the IP address may have been changed. If theweb browser loses contact with Avaya B179, check the IP address on theconference phone.
Upgrading firmware from a downloaded fileIt is possible to download a firmware file from support.avaya.com and install it on the AvayaB179 from the local hard disk.
Procedure
1. Download the firmware file from support.avaya.com.
2. Click on the Browse… button and locate and select the downloaded file.
3. Click on the Upgrade button.
Note:If DHCP is used in the network, the IP address may have been changed. If theweb browser loses contact with Avaya B179, check the IP address on theconference phone.
Firmware binaryProcedure
1. Place the firmware binary file on the Provisioning server.
2. Create a Firmware metadata file and place it on the File server address specifiedabove.Depending on the server used, and the security settings, there might be necessaryto add the file type .kt to the MIME settings on the server. This is easily checked bytrying to download the kt file from a web browser.
Provisioning
62 Installing and Administering the IP Office B179 SIP Conference Phone September 2013Comments? [email protected]
Upgrading firmware from a SD cardUpgrading from SD card may be suitable if you have many phones to upgrade. The phonesdo not have to be connected to the network.
Procedure
1. Download the latest firmware as above and save it on a SD card.
2. Put the SD card in the phone you want to upgrade.
3. Disconnect the power supply cable. Note that this is the same as the network cableif the phone uses Power over Ethernet (PoE).
4. Press and hold the MENU button while you connect the cable again (i.e. starts theAvaya B179). Hold the button pressed until the SYSTEM RECOVERY menu isshown on the display.You can press any other button than 1, 2, or 3 to start the phone without anychange.
5. Press 2 to select SD-card upgrade.The Avaya B179 is upgraded with the firmware file on the SD card and starts whenthe upgrade is done.
Note:If DHCP is used in the network, the IP address may have been changed. If theweb browser loses contact with Avaya B179, check the IP address on theconference phone.
Upgrading Firmware Using IP Office Check-SyncThe B179 SIP phone can initiate a firmware upgrade by acquiring avayab179_fw_version.xmlfrom file manager.
When the firmware version specified in avayab179_fw_version.xml is different from its currentfirmware, the B179 SIP phone downloads the new firmware from file manager.
The B179 SIP phone starts the firmware upgrade process:
• During boot up• Upon receiving a check-sync notification message from IP Office
- Check-sync with no xml body- Check-sync with xml body: file_ID=TR_IMG
Firmware upgrade on a single phone
Installing and Administering the IP Office B179 SIP Conference Phone September 2013 63
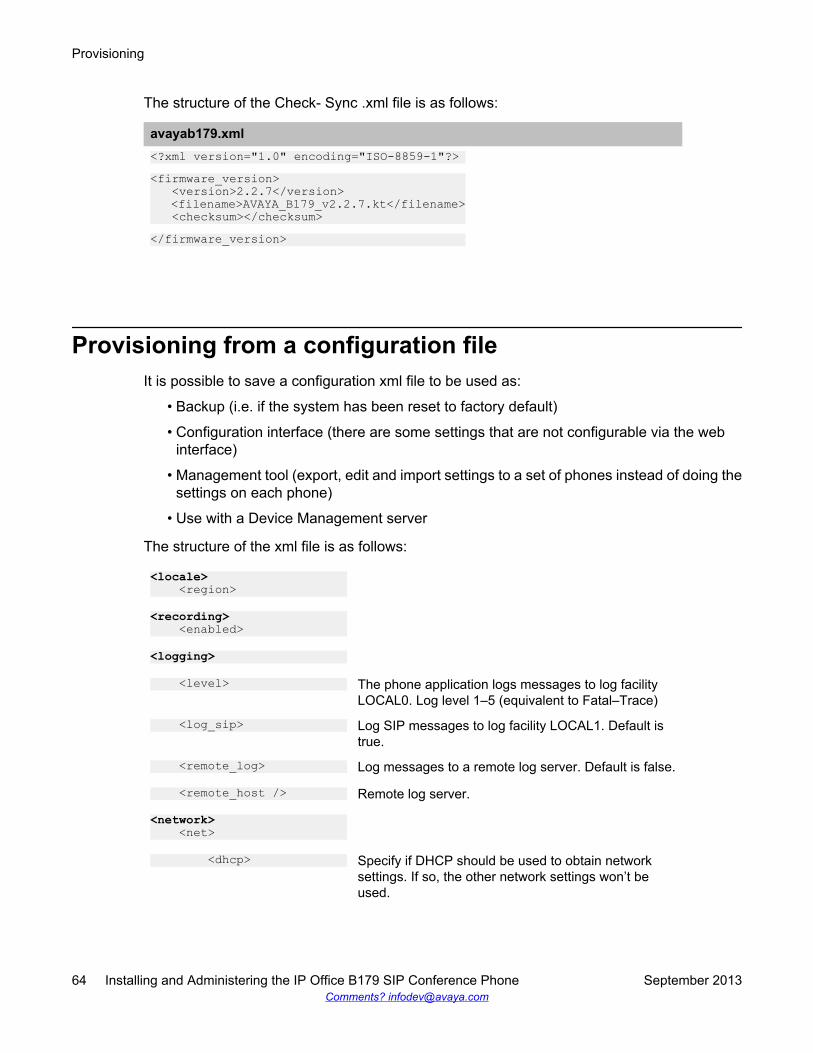
The structure of the Check- Sync .xml file is as follows:
avayab179.xml<?xml version="1.0" encoding="ISO-8859-1"?><firmware_version> <version>2.2.7</version> <filename>AVAYA_B179_v2.2.7.kt</filename> <checksum></checksum></firmware_version>
Provisioning from a configuration fileIt is possible to save a configuration xml file to be used as:
• Backup (i.e. if the system has been reset to factory default)
• Configuration interface (there are some settings that are not configurable via the webinterface)
• Management tool (export, edit and import settings to a set of phones instead of doing thesettings on each phone)
• Use with a Device Management server
The structure of the xml file is as follows:
<locale> <region>
<recording> <enabled>
<logging>
<level> The phone application logs messages to log facilityLOCAL0. Log level 1–5 (equivalent to Fatal–Trace)
<log_sip> Log SIP messages to log facility LOCAL1. Default istrue.
<remote_log> Log messages to a remote log server. Default is false.
<remote_host /> Remote log server.
<network> <net>
<dhcp> Specify if DHCP should be used to obtain networksettings. If so, the other network settings won’t beused.
Provisioning
64 Installing and Administering the IP Office B179 SIP Conference Phone September 2013Comments? [email protected]

<ip> Specify the IP address of the Avaya B179.
<netmask> The netmask of the IP address.
<gateway> Specify the default gateway to be used.
<dns> <dns>
Specify at most two Domain Name Servers to beused.
<hostname> Specify host name.
<domain /> Specify domain name.
<vlan>
<enable> Virtual LAN enabled if set to true.
<id> <std_prio_map> <sip_priority> <media priority> <ether_8021x> <enable> <username /> <eap_md5> <enable> <password> <eap_tls> <enable> <password> <qos> <dscp_sip> <dscp_media> <time> <ntp> <timezone> <daylight_save> <ntps>
VLAN ID.
<sip>
<udp_transport> Specify if UDP shall be used as transport.
<udp_port> Specify the UDP port to listen to.
<tcp_transport> Specify if TCP shall be used as transport.
<tcp_port> Specify the TCP port to listen to.
<tls_transport> Specify if TLS shall be used as transport.
<sips_transport> Specify if SIPS shall be used as transport.
<tls_port> Specify the TLS port to listen to.
<rtp_port> Specify the start port for RTP traffic.
<outbound_proxy /> Specify the URL of outbound proxies to visit for alloutgoing requests. The outbound proxies will be usedfor all accounts and will be used to build the route setfor outgoing requests. The final route set for outgoing
Provisioning from a configuration file
Installing and Administering the IP Office B179 SIP Conference Phone September 2013 65
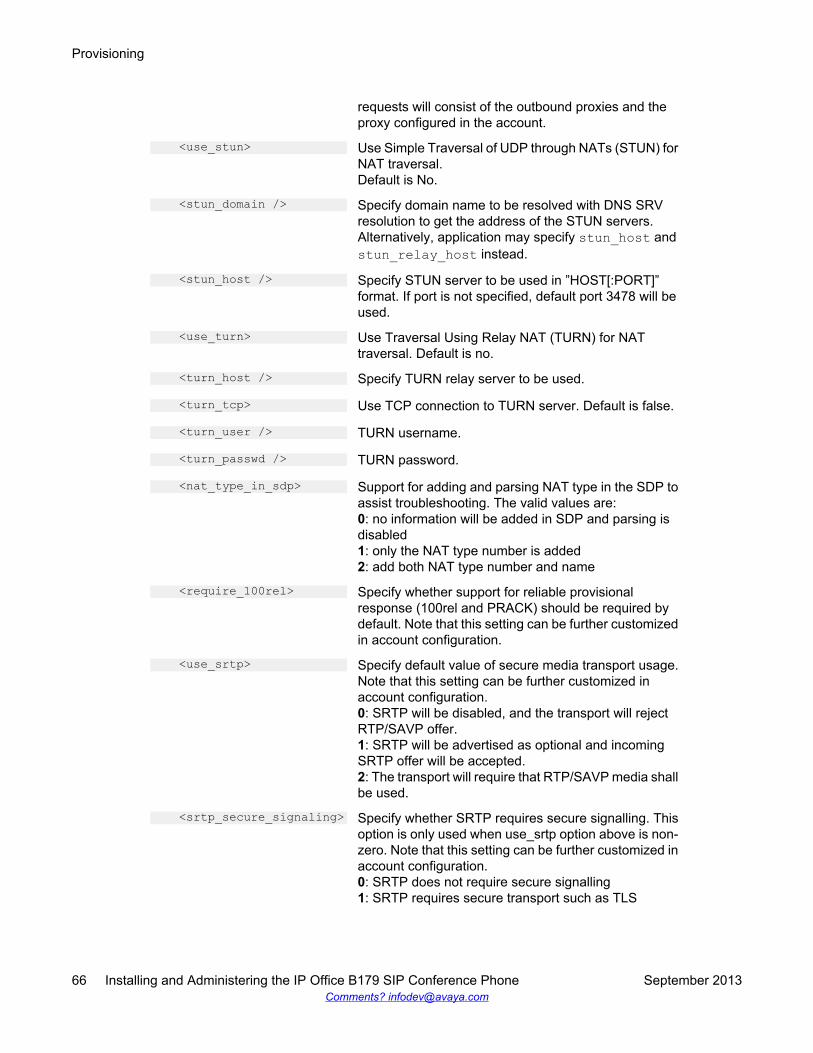
requests will consist of the outbound proxies and theproxy configured in the account.
<use_stun> Use Simple Traversal of UDP through NATs (STUN) forNAT traversal.Default is No.
<stun_domain /> Specify domain name to be resolved with DNS SRVresolution to get the address of the STUN servers.Alternatively, application may specify stun_host andstun_relay_host instead.
<stun_host /> Specify STUN server to be used in ”HOST[:PORT]”format. If port is not specified, default port 3478 will beused.
<use_turn> Use Traversal Using Relay NAT (TURN) for NATtraversal. Default is no.
<turn_host /> Specify TURN relay server to be used.
<turn_tcp> Use TCP connection to TURN server. Default is false.
<turn_user /> TURN username.
<turn_passwd /> TURN password.
<nat_type_in_sdp> Support for adding and parsing NAT type in the SDP toassist troubleshooting. The valid values are:0: no information will be added in SDP and parsing isdisabled1: only the NAT type number is added2: add both NAT type number and name
<require_100rel> Specify whether support for reliable provisionalresponse (100rel and PRACK) should be required bydefault. Note that this setting can be further customizedin account configuration.
<use_srtp> Specify default value of secure media transport usage.Note that this setting can be further customized inaccount configuration.0: SRTP will be disabled, and the transport will rejectRTP/SAVP offer.1: SRTP will be advertised as optional and incomingSRTP offer will be accepted.2: The transport will require that RTP/SAVP media shallbe used.
<srtp_secure_signaling> Specify whether SRTP requires secure signalling. Thisoption is only used when use_srtp option above is non-zero. Note that this setting can be further customized inaccount configuration.0: SRTP does not require secure signalling1: SRTP requires secure transport such as TLS
Provisioning
66 Installing and Administering the IP Office B179 SIP Conference Phone September 2013Comments? [email protected]
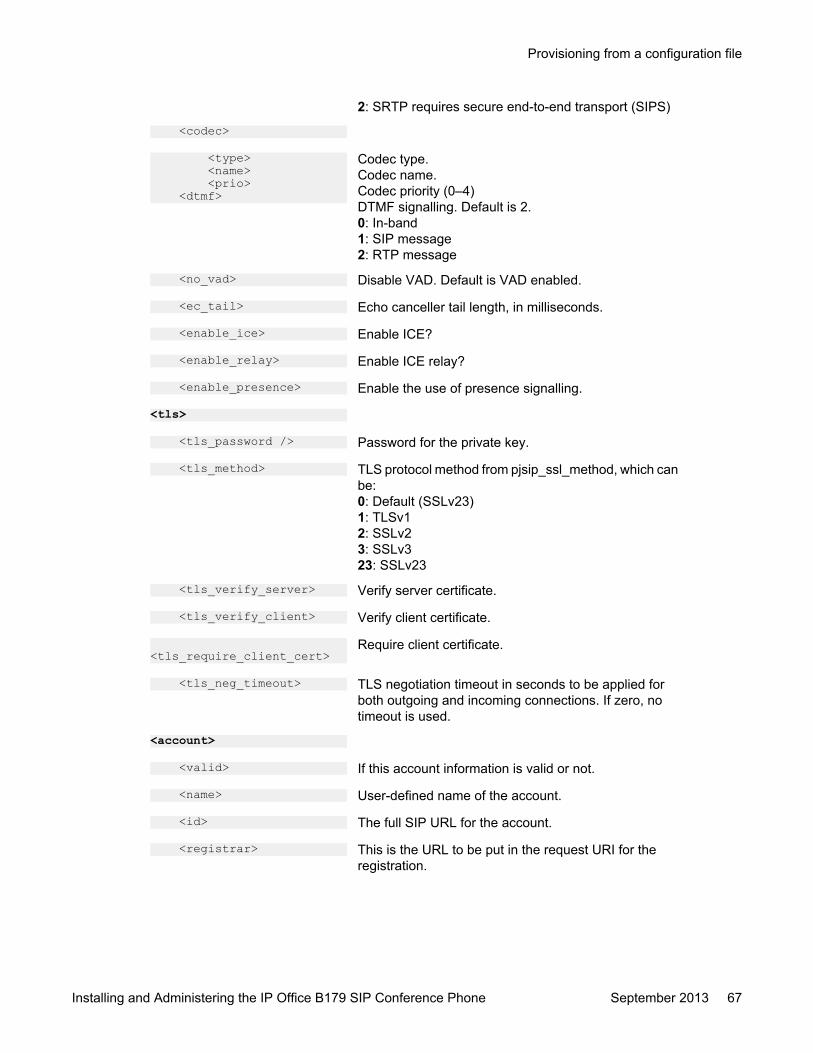
2: SRTP requires secure end-to-end transport (SIPS)
<codec>
<type> <name> <prio> <dtmf>
Codec type.Codec name.Codec priority (0–4)DTMF signalling. Default is 2.0: In-band1: SIP message2: RTP message
<no_vad> Disable VAD. Default is VAD enabled.
<ec_tail> Echo canceller tail length, in milliseconds.
<enable_ice> Enable ICE?
<enable_relay> Enable ICE relay?
<enable_presence> Enable the use of presence signalling.
<tls>
<tls_password /> Password for the private key.
<tls_method> TLS protocol method from pjsip_ssl_method, which canbe:0: Default (SSLv23)1: TLSv12: SSLv23: SSLv323: SSLv23
<tls_verify_server> Verify server certificate.
<tls_verify_client> Verify client certificate.
<tls_require_client_cert>
Require client certificate.
<tls_neg_timeout> TLS negotiation timeout in seconds to be applied forboth outgoing and incoming connections. If zero, notimeout is used.
<account>
<valid> If this account information is valid or not.
<name> User-defined name of the account.
<id> The full SIP URL for the account.
<registrar> This is the URL to be put in the request URI for theregistration.
Provisioning from a configuration file
Installing and Administering the IP Office B179 SIP Conference Phone September 2013 67

<publish_enabled> If this flag is set, the presence information of thisaccount will be published to the server where theaccount belongs.
<initial_auth> If this flag is set, the authentication client framework willsend an empty Authorization header in each initialrequest.
<initial_algo /> Specify the algorithm to use when empty Authorizationheader is to be sent for each initial request (seeabove).
<pidf_tuple_id /> Optional PIDF tuple ID for outgoing PUBLISH andNOTIFY. If this value is not specified, a random stringwill be used.
<force_contact /> Optional URI to be put as Contact for this account. It isrecommended that this field is left empty, so that thevalue will be calculated automatically based on thetransport address.
<require_100rel> Specify whether support for reliable provisionalresponse (100rel and PRACK) should be required forall sessions of this account.
<proxy_uri /> Optional URI of the proxies to be visited for all outgoingrequests that are using this account (REGISTER,INVITE, etc).
<reg_timeout> Optional interval for registration, in seconds. If the valueis zero, default interval will be used.
<cred> Array of credentials. Normally, if registration is required,at least one credential should be specified tosuccessfully authenticate the service provider. Morecredentials can be specified, for example when it isexpected that requests will be challenged by the proxiesin the route set.
<realm> Realm. Use ”*” to make a credential that can be used toauthenticate any challenges.
<scheme /> Scheme (e.g. ”digest”).
<username> Authentication name.
<cred_data_type> Type of data (0 for plaintext password).
<cred_data> The data, which can be a plaintext password or ahashed digest.
<auto_update_nat> This option is useful for keeping the UDP transportaddress up to date with the NAT public mappedaddress. When this option is enabled and STUN isconfigured, the library will keep track of the public IPaddress from the response of REGISTER request.
Provisioning
68 Installing and Administering the IP Office B179 SIP Conference Phone September 2013Comments? [email protected]
Once it detects that the address has changed, it willunregister current Contact, update the UDP transportaddress and register a new Contact to the registrar.
<ka_interval> Set the interval for periodic keep-alive transmission forthis account. If this value is zero, keep-alive will bedisabled for this account. The keep-alive transmissionwill be sent to the registrar’s address after successfulregistration.
<ka_data /> Specify the data to be transmitted as keep-alivepackets. Default: CR-LF.
<use_srtp> Specify whether secure media transport should be usedfor this account.0: SRTP will be disabled and the transport will rejectRTP/SAVP offer.1: SRTP will be advertised as optional and incomingSRTP offer will be accepted.2: The transport will require that RTP/SAVP media isused.
<srtp_secure_signaling> Specify whether SRTP requires secure signalling. Thisoption is only used when use_srtp option above is non-zero.0: SRTP does not require secure signalling1: SRTP requires secure transport such as TLS2: SRTP requires secure end-to-end transport (SIPS)
<account> Same as above, but for account 2.
<provisioning> <upgrade>
<url> Place to find software upgrades. The supported URLtypes are: HTTP, FTP, and TFTP.
<dev_mgnt>
<enable> Device management enabled, true or false.
<use_dhcp_option> Use DHCP option for DM server address.
<dhcp_option> Specification of which DHCP option to use.
<file_server_address>
DM server address if not provided by DHCP option.
<pagename /> Base name of configuration files to download.
<type /> Configuration file type specification.
<update_interval> Timing for downloading files. Shall be entered in crontabformat: * * * * * where the * stands for minute (0–59),hour (0–23), day of month (1–30), month (1–12), day ofweek (0–7) (Sunday =0 or 7)
Provisioning from a configuration file
Installing and Administering the IP Office B179 SIP Conference Phone September 2013 69
Example: 0 6 * * * = the files are downloaded daily at6:00.
<https_check_srv_cert>
Controls server certificate, true or false.
<https_protocol> Possibility to set https protocol if open-ssl auto detectionfails.
<www>
<enable_https> Secure communication to the Avaya B179 web server.Default is false.
<pa>
<enable_pa> PA enabled, true or false.
<enable_internal_mic> Internal mic enabled when PA set to true.
<enable_internal_spkr> Internal speakers enabled when PA set to true.
<calibration> Calibration value. Note that 0 is auto, 1 is calibrationvalue 1, 2 is calibration value 1, etc.
<ldap>
<enable> LDAP enabled, true or false.
<name_filter> Name filter according to RFC2254.
<server_url> LDAP server address.
<search_base> The DN (distinguished name) of the search base.
<username /> <password /> <max_hits> <country_code> <area_code> <external_prefix /> <min_length_for_ext_prefix /> <exact_length_for_no_ext_prefix /> <number_prefix_for_no_ext_prefix /> <number_attributes> <display_name> <sort_results>
Related topics:Exporting configuration on page 71Importing configuration on page 71
Provisioning
70 Installing and Administering the IP Office B179 SIP Conference Phone September 2013Comments? [email protected]
Exporting configurationProcedure
1. From the web interface, select Settings > Provisioning.2. Click on the Export button under Configuration.
The configuration file is shown in the web browser.3. Choose to save the page as an xml file.
The xml file is as default saved in your folder for downloaded files.4. If necessary, edit the xml file in a suitable editor.
Importing configurationProcedure
1. From the web interface, select Settings > Provisioning.2. Select the xml file and choose to open it.3. Click on the Import button.
Provisioning from a device management serverUsing Device management facilitates the upgrading and configuration of multiple conferencephones. To use this feature, the Device management needs to be enabled (default) andconfigured and the appropriate files must be located on a server reachable from all phones,here called a device management server.
The configuration and firmware download are controlled with a configurable frequency. Thedefault value is once every 30 minutes.
Note:The interval can only be edited directly in the configuration file.
Configuration prioritiesBecause the same configuration parameters can be entered in multiple locations, there is aneed for priorities. The local configuration files have the highest priority followed by the global
Provisioning from a device management server
Installing and Administering the IP Office B179 SIP Conference Phone September 2013 71
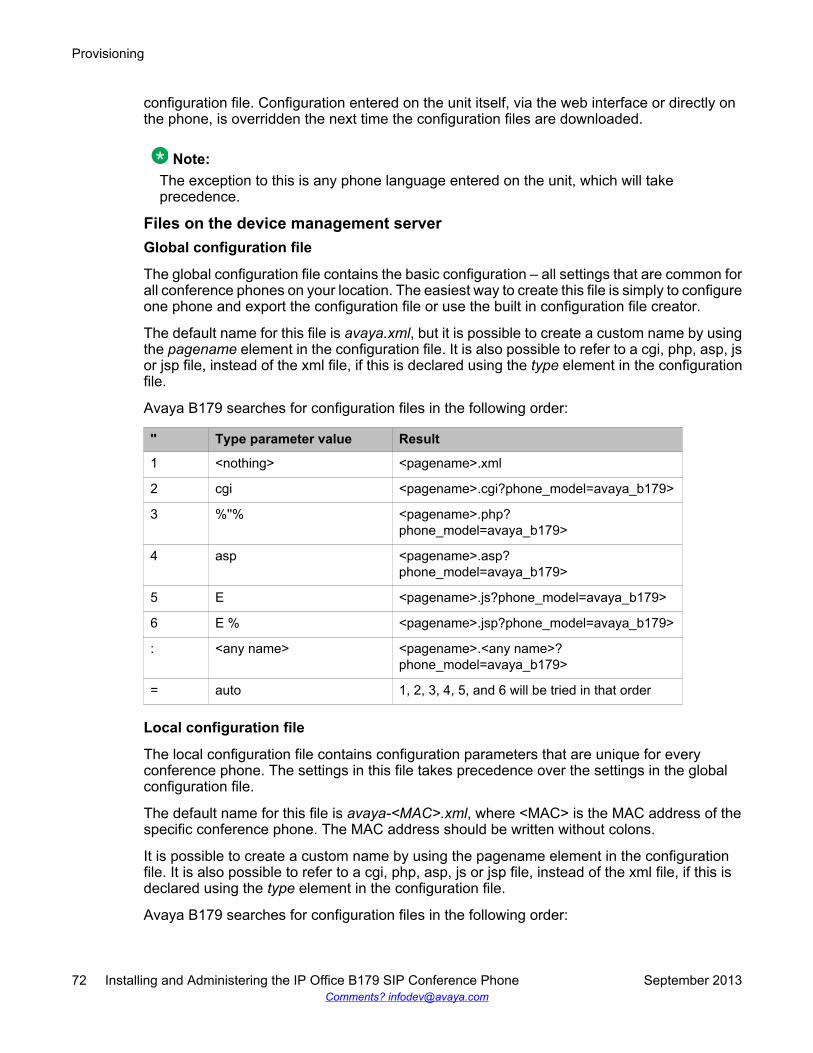
configuration file. Configuration entered on the unit itself, via the web interface or directly onthe phone, is overridden the next time the configuration files are downloaded.
Note:The exception to this is any phone language entered on the unit, which will takeprecedence.
Files on the device management serverGlobal configuration file
The global configuration file contains the basic configuration – all settings that are common forall conference phones on your location. The easiest way to create this file is simply to configureone phone and export the configuration file or use the built in configuration file creator.
The default name for this file is avaya.xml, but it is possible to create a custom name by usingthe pagename element in the configuration file. It is also possible to refer to a cgi, php, asp, jsor jsp file, instead of the xml file, if this is declared using the type element in the configurationfile.
Avaya B179 searches for configuration files in the following order:
'' Type parameter value Result
1 <nothing> <pagename>.xml
2 cgi <pagename>.cgi?phone_model=avaya_b179>
3 %''% <pagename>.php?phone_model=avaya_b179>
4 asp <pagename>.asp?phone_model=avaya_b179>
5 E <pagename>.js?phone_model=avaya_b179>
6 E % <pagename>.jsp?phone_model=avaya_b179>
: <any name> <pagename>.<any name>?phone_model=avaya_b179>
= auto 1, 2, 3, 4, 5, and 6 will be tried in that order
Local configuration file
The local configuration file contains configuration parameters that are unique for everyconference phone. The settings in this file takes precedence over the settings in the globalconfiguration file.
The default name for this file is avaya-<MAC>.xml, where <MAC> is the MAC address of thespecific conference phone. The MAC address should be written without colons.
It is possible to create a custom name by using the pagename element in the configurationfile. It is also possible to refer to a cgi, php, asp, js or jsp file, instead of the xml file, if this isdeclared using the type element in the configuration file.
Avaya B179 searches for configuration files in the following order:
Provisioning
72 Installing and Administering the IP Office B179 SIP Conference Phone September 2013Comments? [email protected]
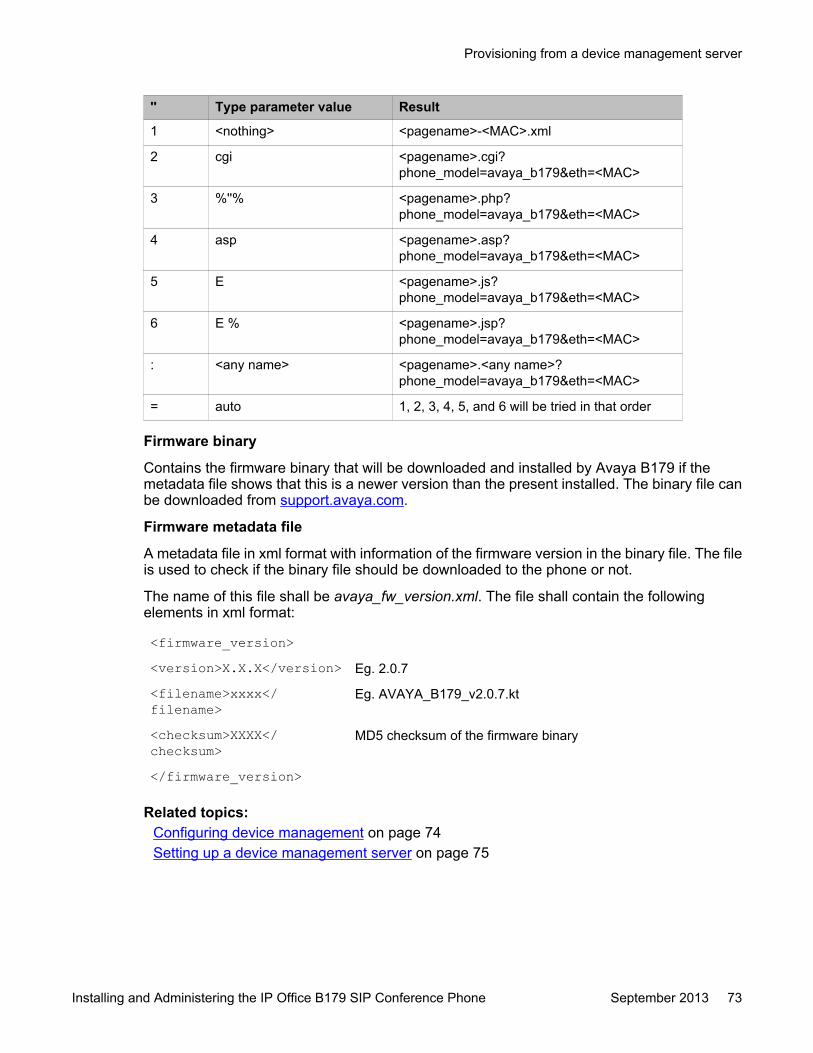
'' Type parameter value Result
1 <nothing> <pagename>-<MAC>.xml
2 cgi <pagename>.cgi?phone_model=avaya_b179ð=<MAC>
3 %''% <pagename>.php?phone_model=avaya_b179ð=<MAC>
4 asp <pagename>.asp?phone_model=avaya_b179ð=<MAC>
5 E <pagename>.js?phone_model=avaya_b179ð=<MAC>
6 E % <pagename>.jsp?phone_model=avaya_b179ð=<MAC>
: <any name> <pagename>.<any name>?phone_model=avaya_b179ð=<MAC>
= auto 1, 2, 3, 4, 5, and 6 will be tried in that order
Firmware binary
Contains the firmware binary that will be downloaded and installed by Avaya B179 if themetadata file shows that this is a newer version than the present installed. The binary file canbe downloaded from support.avaya.com.
Firmware metadata file
A metadata file in xml format with information of the firmware version in the binary file. The fileis used to check if the binary file should be downloaded to the phone or not.
The name of this file shall be avaya_fw_version.xml. The file shall contain the followingelements in xml format:
<firmware_version><version>X.X.X</version> Eg. 2.0.7
<filename>xxxx</filename>
Eg. AVAYA_B179_v2.0.7.kt
<checksum>XXXX</checksum>
MD5 checksum of the firmware binary
</firmware_version>
Related topics:Configuring device management on page 74Setting up a device management server on page 75
Provisioning from a device management server
Installing and Administering the IP Office B179 SIP Conference Phone September 2013 73
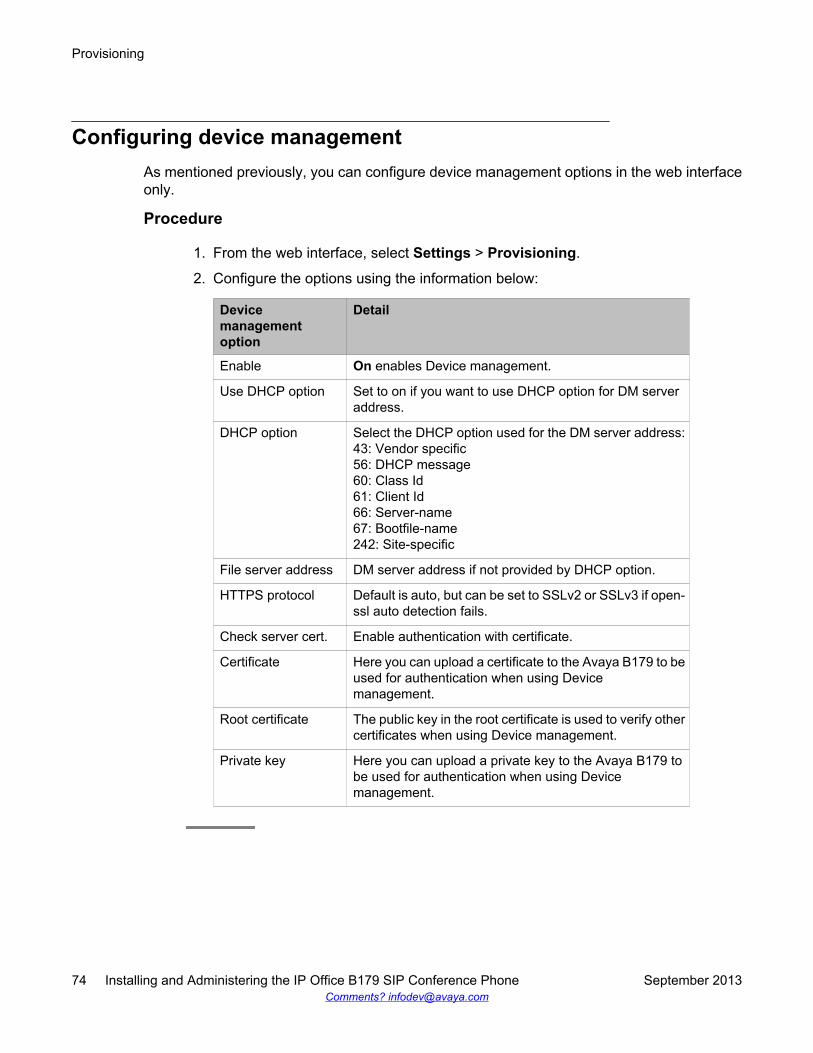
Configuring device managementAs mentioned previously, you can configure device management options in the web interfaceonly.
Procedure
1. From the web interface, select Settings > Provisioning.
2. Configure the options using the information below:
Devicemanagementoption
Detail
Enable On enables Device management.
Use DHCP option Set to on if you want to use DHCP option for DM serveraddress.
DHCP option Select the DHCP option used for the DM server address:43: Vendor specific56: DHCP message60: Class Id61: Client Id66: Server-name67: Bootfile-name242: Site-specific
File server address DM server address if not provided by DHCP option.
HTTPS protocol Default is auto, but can be set to SSLv2 or SSLv3 if open-ssl auto detection fails.
Check server cert. Enable authentication with certificate.
Certificate Here you can upload a certificate to the Avaya B179 to beused for authentication when using Devicemanagement.
Root certificate The public key in the root certificate is used to verify othercertificates when using Device management.
Private key Here you can upload a private key to the Avaya B179 tobe used for authentication when using Devicemanagement.
Provisioning
74 Installing and Administering the IP Office B179 SIP Conference Phone September 2013Comments? [email protected]
Setting up a device management serverThis is a description of a manual method to create the configuration files.
Procedure
1. From the web interface, select Settings > Provisioning.
2. Enable device management and enter the server information.
Related topics:Firmware binary on page 62Creating a global configuration file on page 75Creating a local configuration file on page 75
Creating a global configuration file
Procedure
1. Configure a phone with the basic configuration.
2. Click on Export to create a configuration file.
3. If necessary, edit the xml file in a suitable editor.
Note:Some parameters can’t be entered via the web interface (update frequency,pagename, and filetype).
To avoid confusion, it may be wise to delete the local information from the file(eg. account information).
4. Save the file with the name avaya.xml on the File server address specifiedabove.
Creating a local configuration file
Provisioning from a device management server
Installing and Administering the IP Office B179 SIP Conference Phone September 2013 75
Procedure
1. Save a copy of the configuration file for each conference phone on your locationwith content only in the elements that shall be unique for each conference phone(eg. account information).The default name for each file is avaya-<MAC>.xml where <MAC> is the MACaddress of the specific conference phone.
2. Place the configuration files on the File server address specified above.
Firmware binary
Procedure
1. Place the firmware binary file on the Provisioning server.
2. Create a Firmware metadata file and place it on the File server address specifiedabove.Depending on the server used, and the security settings, there might be necessaryto add the file type .kt to the MIME settings on the server. This is easily checked bytrying to download the kt file from a web browser.
Provisioning
76 Installing and Administering the IP Office B179 SIP Conference Phone September 2013Comments? [email protected]
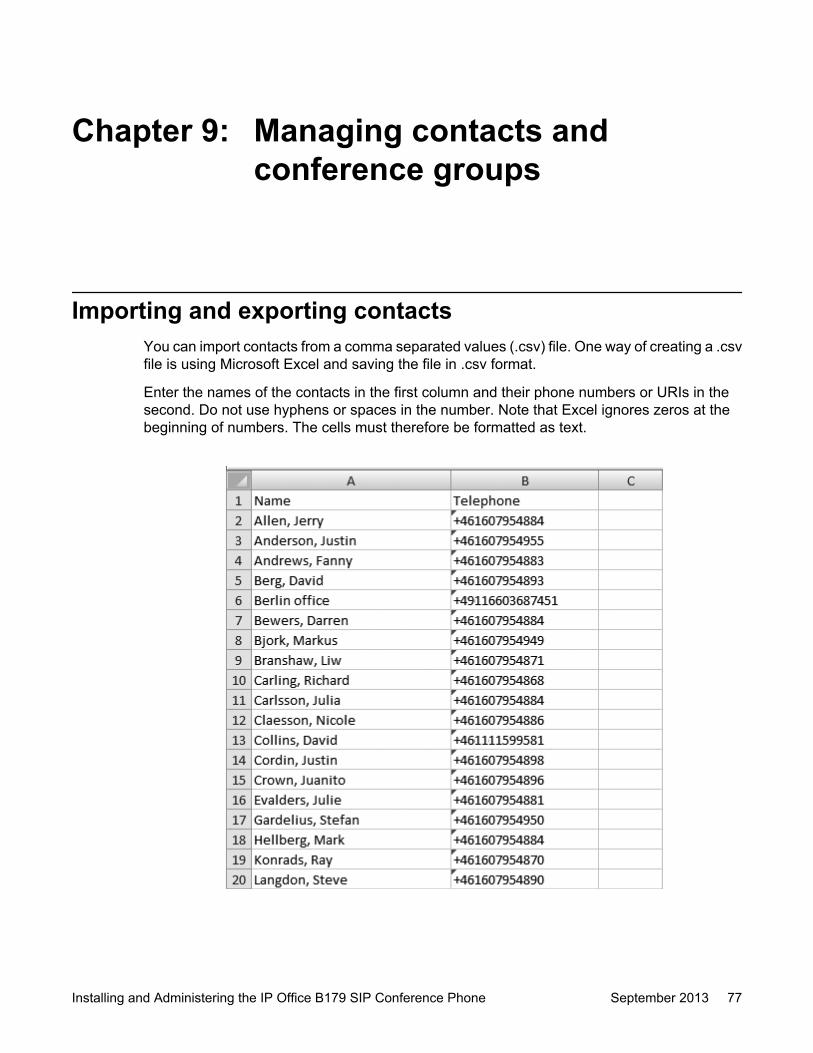
Chapter 9: Managing contacts andconference groups
Importing and exporting contactsYou can import contacts from a comma separated values (.csv) file. One way of creating a .csvfile is using Microsoft Excel and saving the file in .csv format.
Enter the names of the contacts in the first column and their phone numbers or URIs in thesecond. Do not use hyphens or spaces in the number. Note that Excel ignores zeros at thebeginning of numbers. The cells must therefore be formatted as text.
Installing and Administering the IP Office B179 SIP Conference Phone September 2013 77
Note:It is normally possible to export contact books stored in your PC in CSV format.
The way the number can be written may depend on the SIP PBX being used, but normally youcan use:
• Complete phone number, including country code
• Phone number, including area code
• Local phone number only
• Internal speed dial number (with company’s own PBX)
• URI, e.g. sip:[email protected]
• URI with IP address, e.g. sip:10.10.1.100 (within a local network)
Importing contactsProcedure
1. From the web interface, select Phone Book.
2. Click on the Scroll… button under the heading 'Import' in the web window.
3. Open your .csv file.
4. Click on Import.The name is limited to 15 characters, since the Avaya B179 screen cannot displaymore than 15 characters.
Exporting contactsYou can export your contacts as a .csv document in order to import them into anotherphone.
Procedure
1. Click on Export.
2. Save the document.
Managing contacts and conference groups
78 Installing and Administering the IP Office B179 SIP Conference Phone September 2013Comments? [email protected]
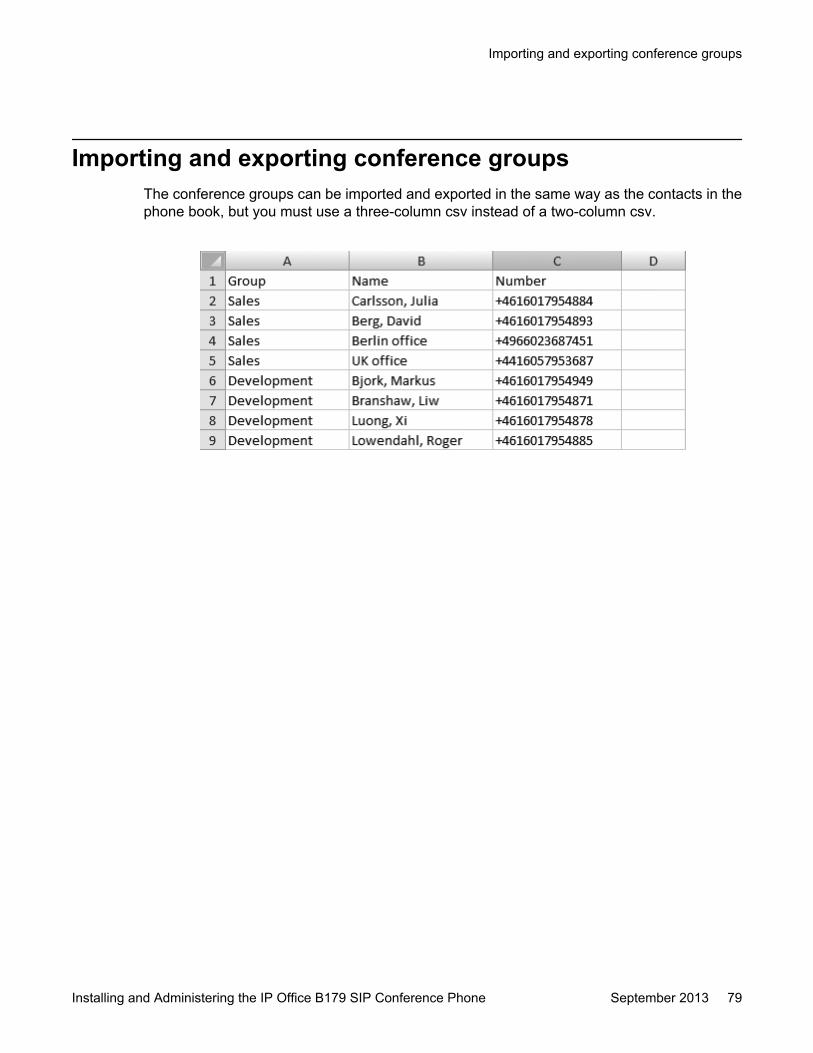
Importing and exporting conference groupsThe conference groups can be imported and exported in the same way as the contacts in thephone book, but you must use a three-column csv instead of a two-column csv.
Importing and exporting conference groups
Installing and Administering the IP Office B179 SIP Conference Phone September 2013 79

Managing contacts and conference groups
80 Installing and Administering the IP Office B179 SIP Conference Phone September 2013Comments? [email protected]
Chapter 10: Checking status and logs
Checking device statusThe Device menu lists phone information such as serial number, network port, and currentsoftware version.
Procedure
On the phone, press MENU > STATUS > DEVICE (or press 8,6 from the mainmenu).You will be able to view the status of the following:
• Avaya B179 (software version and date)
• Serial number
• MAC address
Checking media statusYou can check the status of the media settings, such as codec priority and media security,using the procedure below.
Procedure
On the phone, press MENU > STATUS > MEDIA (or press 8,4 from the main menu).You will be able to view the status of the following:
• Codec priority
• VLAD
• DTMF signalling
• Security RTP
• Secure signalling
Installing and Administering the IP Office B179 SIP Conference Phone September 2013 81
Checking network statusYou can view your network information via the Network menu. You will find informationincluding the IP address, the gateway, the quality of service, and more.
Procedure
On the phone, press MENU > STATUS > NETWORK (or press 8,2 from the mainmenu).You will be able to view the status of the following:
• DHCP
• IP address
• Hostname
• Domain
• Network
• Gateway
• DNS 1
• DNS 2
• VLAN
Checking SIP statusYou can check the status of the SIP settings in the web interface using the procedure below.
Procedure
From the web interface, select STATUS > SIP.
Note:From this screen you will also be able to view NAT traversal and transport settings,as well as the status of the active account(s).
Checking status and logs
82 Installing and Administering the IP Office B179 SIP Conference Phone September 2013Comments? [email protected]
Checking account statusYou can check the status of either account registered to the device using the procedurebelow.
Procedure
On the phone, press MENU > STATUS > ACCOUNTS and select the desired account(alternatively, press either 8,1,1 from the main menu to view the status of Account 1or press 8,1,2 from the main menu to view the status of Account 2).You will be able to view the status of the following:
• Account name
• Registrar
• SIP ID
• Auth. name
• Realm
• Proxy
Checking NAT traversal statusIt may be necessary to check the status of the NAT traversal if the phone is behind a firewall.You can check whether address conversion is activated using the following procedure.
Procedure
On the phone, press MENU > STATUS > NAT TRAVERSAL (alternatively, press 8,3from the main menu).You will be able to view the status of the following:
• STUN
• TURN
• ICE
Checking account status
Installing and Administering the IP Office B179 SIP Conference Phone September 2013 83

Checking transport statusYou can check the status of the transport setting using the following procedure.
Procedure
On the phone, press MENU > STATUS > ACCOUNTS > TRANSPORT (alternatively,press 8,1,3 from the main menu).
Checking time and region statusYou can check the status of the time and region settings using the procedure below.
Procedure
On the phone, press MENU > STATUS > TIME (or press 8,5 from the main menu).You will be able to view the status of the following:
• NTP
• NTP server
• Timezone
Obtaining logsYou can view and obtain logs using the web interface. There are five types of log messagesthat can be useful when troubleshooting. Read below the procedure for more information onthe types of logs available.
Procedure
1. From the web interface, select Status > Log.
2. Select the log you want to review and click the Change button.
Note:Clicking the Refresh button will add all the new messages sent since the presentlog was chosen.
Checking status and logs
84 Installing and Administering the IP Office B179 SIP Conference Phone September 2013Comments? [email protected]
Application logThis shows the phone application messages. The log can be filtered from “Fatal” (only the fatalerror messages) to “Trace” (all messages).
The Clear log button erases all content in the log.
SIP TraceThe SIP Trace logs the communication between the phone and the SIP PBX.
The Clear log button erases all content in the log.
It is possible to disable the SIP trace log:1. Select SIP logging Off and click on the Set button.
System logShows the phone system messages.
Device management logLogs the device management activities.
Upgrade logLogs the upgrade procedure.
Obtaining logs
Installing and Administering the IP Office B179 SIP Conference Phone September 2013 85

Checking status and logs
86 Installing and Administering the IP Office B179 SIP Conference Phone September 2013Comments? [email protected]
Chapter 11: Technical data
DEVICE
Size Diameter 240 mm, height 77 mm
Weight 1kg
Colour Liquorice black
Display screen Illuminated graphics (LCD), 128x64
Keypad Alphanumerical 0–9, *, on, off, mute, hold, volumeup, volume down, 5 buttons for menu navigation,line mode, conference guide
Anti-theft protection Kensington security slot
Memory Support for SD memory cards up to 2 GB
CONNECTIVITY
Network connection Modular 8P8C (RJ45), Ethernet 10/100 Base T
Power supply AC adapter 100–240 V AC/13.5 V DC IEEE802.3af Power over Ethernet
Extra microphones Two (2) modular 4P4C
Auxiliary Modular 4P4C for wireless headset
NETWORK & COMMUNICATION
Network addressing DHCP and static IP
NAT traversal STUN, ICE, and TURN
Connection protocol SIP 2.0 (RFC 3261 and companion RFCs)
Transport UDP, TCP, TLS and SIPS
Security SRTP and TLS
Quality of service DiffServ, VLAN and 802.1x
Installing and Administering the IP Office B179 SIP Conference Phone September 2013 87
NETWORK & COMMUNICATION
Audio support Codecs: G.722, G.711 A-law, G.711 μ-law,G.729ab
DTMF tone generation RFC, SIP INFO, In-band
Time servers NTP and SNTP— Daylight saving: Configurable for automaticadjustments
DIRECTORY
Internal phone book 1,000 entries per profile (4 password protectedprofiles)Export/import of directory Call list
External directory Support for LDAP
SOUND
Technology OmniSound® 2.0 Wideband
Microphone Omni-directional
Reception area Up to 30 metres2, >10 people
Speaker Frequency band 200–7000 Hz,
Volume 90 dB SPL 0.5 m
Equalizer Three pitches: soft, neutral, bright
ENVIRONMENT
Temperature 5°–40°C
Relative humidity 20-80% condensation free
Recommended acoustic conditions Reverberation period: 0.5 S Rt 60Background noise: 45 dBA
Technical data
88 Installing and Administering the IP Office B179 SIP Conference Phone September 2013Comments? [email protected]
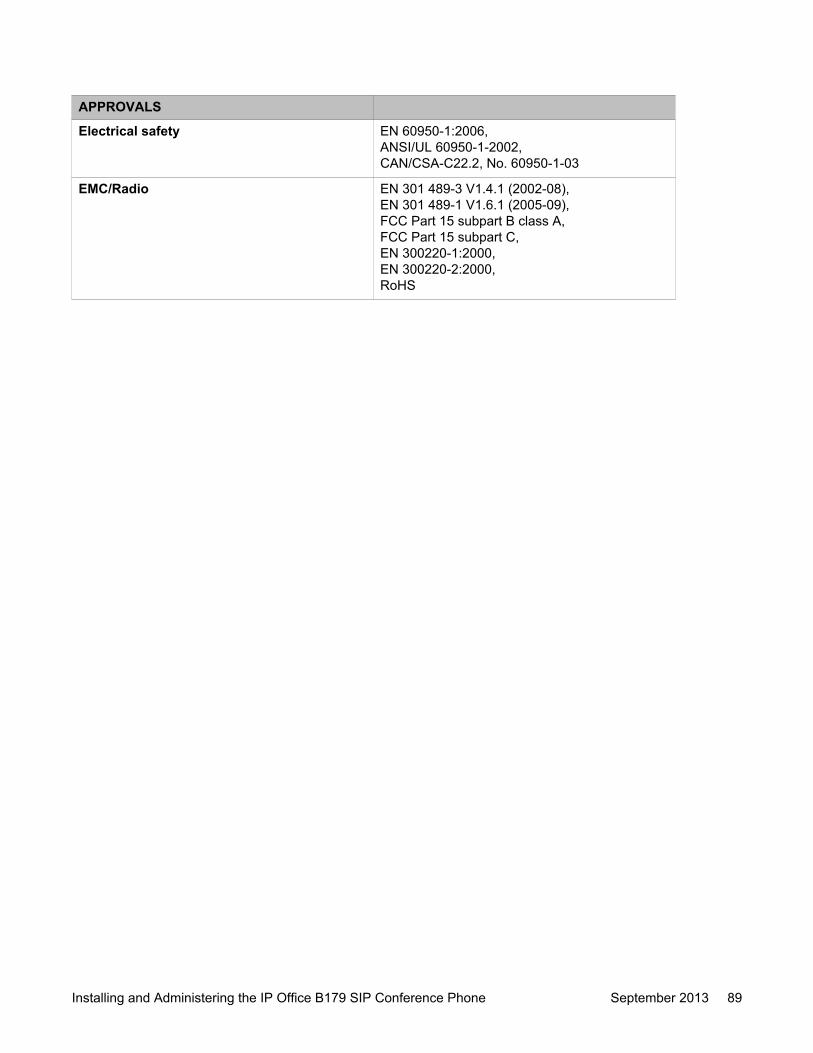
APPROVALS
Electrical safety EN 60950-1:2006,ANSI/UL 60950-1-2002,CAN/CSA-C22.2, No. 60950-1-03
EMC/Radio EN 301 489-3 V1.4.1 (2002-08),EN 301 489-1 V1.6.1 (2005-09),FCC Part 15 subpart B class A,FCC Part 15 subpart C,EN 300220-1:2000,EN 300220-2:2000,RoHS
Installing and Administering the IP Office B179 SIP Conference Phone September 2013 89

Technical data
90 Installing and Administering the IP Office B179 SIP Conference Phone September 2013Comments? [email protected]
Index
Numerics
3rd-party ..................................................................... 41802.1x .........................................................................52
A
account ..................................... 17, 20, 37, 40, 43, 83, 84default .................................................................. 37enable .................................................................. 20name ....................................................................40register .................................................................20settings .................................................................43status ..............................................................83, 84transport ......................................................... 43, 84
address ........................................................... 17, 20, 71IP ....................................................................17, 20MAC .....................................................................71network ...........................................................17, 20
amplifier ......................................................................58application .............................................................51, 85
log ........................................................................ 85restart ...................................................................51
asp ..............................................................................71asymmetric cryptopgraphy ......................................... 45audio ...........................................................................60
quality ...................................................................60authentication ..................................................40, 41, 52authorization name .....................................................32Auto-create Extn/User .......................................... 27, 35auto-creation .............................................................. 35AUX port .....................................................................58Avaya ....................................................................26, 61
endpoint ............................................................... 26IP ..........................................................................26website .................................................................61
Avaya IP ..................................................................... 29endpoint license ...................................................29
avaya.xml ..............................................................71, 75
B
backup ........................................................................70bandwidth ................................................................... 45basic settings ..............................................................37
C
calibration ................................................................... 60
PA ........................................................................ 60call settings .................................................................32call waiting ............................................................ 26, 32certificate .............................................................. 52, 74
root .......................................................................74cgi ...............................................................................71Challenge Expiry Time ............................................... 27code ......................... 17, 18, 20, 23, 41, 47, 51, 52, 55, 70
PIN ................................17, 18, 20, 23, 41, 51, 52, 55setting .................................................................. 23
codec ......................................................... 26, 29, 45, 81codec selection .................................................... 29priority .................................................................. 81
components ..................................................................7conference group ....................................................... 79
export ...................................................................79import ...................................................................79
configuration ...................................21, 55, 70, 71, 75, 76export ...................................................................71file ............................................................. 70, 75, 76global ................................................................... 75import ...................................................................71local ......................................................................76provisioning ..........................................................70reset .....................................................................55
connecting ............................................................ 19, 58contacts ...................................................................... 78
export ...................................................................78import ...................................................................78
coordinated universal time ......................................... 51csv ........................................................................ 78, 79
D
date ............................................................................ 51settings .................................................................51
description ....................................................................7detail .............................................................................7device ................................................................... 74, 81
management ........................................................74settings .................................................................74status ................................................................... 81
device management ........................................70, 71, 85log ........................................................................ 85server ...................................................................71
device management server ........................................ 75
Installing and Administering the IP Office B179 SIP Conference Phone September 2013 91
setup .................................................................... 75DHCP ............................................. 20, 41, 61–63, 74, 82
Dynamic Host Configuration Protocol ..................41display screen ............................................................ 13distinguished name .................................................... 47DND ............................................................................26DNS ...................................................................... 41, 51
Domain Name System .........................................41primary .................................................................41secondary ............................................................ 41
DNS1 .................................................................... 20, 82DNS2 .................................................................... 20, 82domain ............................................................ 20, 41, 82domain name ..............................................................27download .................................................................... 62
firmware ............................................................... 62DST .......................................................................22, 51
daylight savings time ............................................22DTMF .............................................................. 29, 45, 81
Dual-tone Multi-Frequency ...................................45signalling ........................................................ 45, 81support .................................................................29
duplex .........................................................................60duplex performance ............................................. 60
E
EAP ............................................................................ 52Extensible Authentication Protocol ...................... 52MD5 ..................................................................... 52TLS ...................................................................... 52
equalizer .....................................................................37equipment ...................................................................37
AUX ......................................................................37external ................................................................ 37
ethernet ...................................................................... 52Media DiffServ ..................................................... 52settings .................................................................52SIP DiffServ ......................................................... 52VLAN ....................................................................52
Excel ...........................................................................78export .............................................................. 71, 78, 79
conference group .................................................79configuration ........................................................ 71contacts ................................................................78
extension ..............................................27, 29, 32, 35, 36base extension .....................................................29Extn ................................................................ 29, 35settings .................................................................29SIP ....................................................................... 27status ................................................................... 36
extensions .................................................................. 26
F
factory reset .......................................................... 51, 55Fatal ........................................................................... 85file server address ...........................................62, 74–76firewall ........................................................................ 41firmware ............................................... 56, 61–63, 71, 76
binary ........................................................62, 71, 76download ........................................................62, 63file ...................................................................62, 76metadata ...................................................62, 71, 76restore ..................................................................56SD card ................................................................63upgrade .......................................................... 61–63
web interface ................................................. 61force authorisation ......................................................29force authorization ......................................................32forwarding ...................................................................26
G
G.711 A-law ................................................................29G.711 μ-law ................................................................29G.722 ..........................................................................29G.723 ..........................................................................29G.729 ..........................................................................29gateway ...........................................................20, 41, 82global configuration file ......................................... 71, 75
H
hard reset ................................................................... 51headset .......................................................................57hold .............................................................................29
hold music ............................................................29hostname ........................................................ 20, 41, 82HTTPS ........................................................................49
certificate ..............................................................49enable .................................................................. 49
HTTPS protocol ..........................................................74
I
ICE ........................................................................41, 83Offer ICE ..............................................................41
IEEE ........................................................................... 52802.1 ....................................................................52
import .............................................................. 71, 78, 79conference group .................................................79
92 Installing and Administering the IP Office B179 SIP Conference Phone September 2013
configuration ........................................................ 71contacts ................................................................78
inband .........................................................................45installing ................................................................19, 58integrated web server .................................................19IP .....................................................................41, 61–63
address .....................................................41, 61–63telephony .......................................................41
IP address ....................................................... 17, 78, 82checking ...............................................................17status ................................................................... 17
IP Office ..........................................26, 27, 29, 32, 35, 36Manager ......................................................... 26, 27system configuration ............................................27
IP telephony ............................................................7, 52
J
js .................................................................................71jsp ...............................................................................71
K
key ........................................................................ 37, 45private .................................................................. 45public ....................................................................45tone ......................................................................37
keypad .................................................................... 7, 10kt ........................................................................... 62, 76
L
LAN1 .....................................................................27, 35LAN2 .....................................................................27, 35language ............................................................... 23, 37
setting .................................................................. 23Layer 4 protocol ..........................................................27LDAP .......................................................................... 47license ............................................................. 26, 27, 29
Avaya IP ...............................................................27endpoint ............................................................... 27
Lightweight Directory Access Protocol ....................... 47line ..............................................................................13
menu ....................................................................13status ................................................................... 13
local configuration file .................................................71login ............................................................................18login code ................................................................... 32logs .............................................................................85
obtaining .............................................................. 85application ..................................................... 85
device management ...................................... 85SIP Trace ...................................................... 85status .............................................................85system ........................................................... 85upgrade ......................................................... 85
M
MAC address ........................................................ 76, 81maintenance .................................................................7management .............................................................. 74
device ...................................................................74management tool ........................................................70MD5 ............................................................................52meda .......................................................................... 81
status ................................................................... 81media ..........................................................................45
security .................................................................45settings .................................................................45
menu .......................................................................... 16advanced ............................................................. 16indicators ..............................................................16navigation .............................................................16trees .....................................................................16
mic ..............................................................................59microphone .................................................................59
external ................................................................ 59internal ................................................................. 59level ......................................................................59volume ................................................................. 59
MIME .................................................................... 62, 76mixer ...........................................................................59music .................................................................... 21, 61
N
NAT ............................................................................ 41Network Address Translation ...............................41traversal ............................................................... 41
NAT traversal ........................................................82, 83status ................................................................... 83
netmask ......................................................................41network ...................................................... 20, 41, 45, 82
address ................................................................ 20authorization ........................................................ 41connect ................................................................ 20settings .................................................................41status ................................................................... 82
network address ......................................................... 19network address translation ....................................... 26
NAT ......................................................................26
Installing and Administering the IP Office B179 SIP Conference Phone September 2013 93
NTP .......................................................................51, 84enable .................................................................. 51pool ...................................................................... 51server ...................................................................51settings .................................................................51status ................................................................... 84
NTP server ................................................................. 84status ................................................................... 84
O
OmniSound® ................................................................ 7
P
PA ......................................................................... 58–60box ....................................................................... 58calibration .............................................................60interface box ........................................................ 58monitor .................................................................59settings ...........................................................58, 59
parameters ................................................................. 71park ............................................................................ 26password .........................................................40, 45, 47php ............................................................................. 71PIN .................................17, 18, 20, 21, 23, 41, 51, 52, 55
code ..............................17, 18, 20, 23, 41, 51, 52, 55setting ............................................................23
port ............................................................................. 27TCP ......................................................................27UDP ..................................................................... 27
power ..........................................................................19adapter .................................................................19
Power over Ethernet ....................................... 19, 55, 56PoE ...........................................................19, 55, 56
prefix ...........................................................................47external ................................................................ 47
private key ............................................................ 52, 74profile ..........................................................................17
default .................................................................. 17profiles ........................................................................23provisioning ...............................21, 61, 62, 70, 71, 74–76
configuration ........................................................ 70server ............................................................. 62, 76
proxy ...........................................................................40
Q
quality ......................................................................... 60audio .................................................................... 60
R
RCA ............................................................................58realm .......................................................................... 40reboot ......................................................................... 21recording .................................................................... 37
tone ......................................................................37region .............................................................. 22, 51, 84
setting .................................................................. 22settings .................................................................51
register ....................................................................... 20account ................................................................ 20
registrar ...................................................................... 40registration ..................................................................40
interval ................................................................. 40reinvite ........................................................................29requirements ................................................................ 7reset ........................................................................... 55
configuration ........................................................ 55factory .................................................................. 55
restore firmware ......................................................... 56RFC 2833 ................................................................... 45RFC2254 .................................................................... 47ring ............................................................................. 37
level ......................................................................37tone ......................................................................37
router .......................................................................... 41RTP .......................................................................45, 81
packet .................................................................. 45port .......................................................................45Real-time Transport Protocol ...............................45security .................................................................81
S
screen text ..................................................................37SD card .................................................................61, 63secure .........................................................................81
signalling ..............................................................81secure signalling .........................................................45security ................................................................. 45, 81
media ..............................................................45, 81RTP ......................................................................81settings .................................................................45
serial number ..............................................................81server ......................................................................... 75Session Initiation Protocol .......................................... 26settings ................................20–23, 37, 43, 45, 49, 51, 74
basic ......................................................... 21, 23, 37DST ......................................................................22language .............................................................. 23
94 Installing and Administering the IP Office B179 SIP Conference Phone September 2013
media ..............................................................20, 45PIN code .............................................................. 23provisioning ..........................................................74region ............................................................. 22, 51security .................................................................45SIP ....................................................................... 20system ..................................................................51time .................................................................22, 51
date ............................................................... 51NTP ............................................................... 51time zone .......................................................51
transport ...............................................................43web interface ........................................................49
signalling ...............................................................22, 81DTMF ...................................................................81secure .................................................................. 81
SIP ...................................... 20, 26, 27, 32, 41, 43, 45, 82configuration ........................................................ 26extension ..............................................................27ID ......................................................................... 32proxy .................................................................... 26registrar ................................................................26settings ...........................................................20, 82status ................................................................... 82
SIP PBX .......................................................... 19, 20, 78SIP phone status ........................................................ 36SIP registrar ..........................................................27, 35SIP Trace log ..............................................................85SIPS ......................................................................43, 45software ................................................................ 21, 81
date ......................................................................81upgrade ................................................................21version ................................................................. 81
sort ............................................................................. 47speaker .......................................................................59
activation ..............................................................59external ................................................................ 59internal ................................................................. 59
specifications ..............................................................87SRTP ..........................................................................45SSL .............................................................................45static IP .......................................................................20status ......................................................... 17, 36, 81–84
account ...........................................................83, 84authorisation name .............................................. 83checking ..............................................17, 36, 81–84device ...................................................................81
checking ........................................................ 81extension ..............................................................36IP address ............................................................17media ................................................................... 81
NAT traversal .......................................................83network ...........................................................17, 82NTP ......................................................................84NTP server ...........................................................84proxy .................................................................... 83realm ....................................................................83region ...................................................................84registrar ................................................................83security .................................................................81SIP ....................................................................... 82SIP ID ...................................................................83time ...................................................................... 84timezone .............................................................. 84transport ...............................................................84
STUN .................................................................... 41, 83STUN host ........................................................... 41
supervisor settings ..................................................... 32support.avaya.com ..................................................... 61system ....................................................... 27, 51, 55, 56
configuration ........................................................ 27reboot ...................................................................51recovery ..........................................................55, 56reset .....................................................................51restart ...................................................................51settings .................................................................51
system log .................................................................. 85System Monitor .......................................................... 26System Status Application ..........................................26
T
TCP ............................................................................ 43TCP port ..................................................................... 27technical data ............................................................. 87
approvals ............................................................. 87communication .....................................................87connectivity .......................................................... 87device ...................................................................87directory ............................................................... 87environment ......................................................... 87network ................................................................ 87sound ................................................................... 87
telephony ....................................................................32text ............................................................................... 7time ............................................................22, 37, 51, 84
format ...................................................................37setting .................................................................. 22settings .................................................................51status ................................................................... 84
time zone ....................................................................22setting .................................................................. 22
timezone .....................................................................84
Installing and Administering the IP Office B179 SIP Conference Phone September 2013 95
status ................................................................... 84TLS ..................................................................43, 45, 52
method .................................................................45negotiation ........................................................... 45password ..............................................................52timeout ................................................................. 45verify client ...........................................................45
certification .................................................... 45tone ............................................................................ 37
key ....................................................................... 37recording ..............................................................37ring .......................................................................37
Trace .......................................................................... 85transfer ....................................................................... 26transport .......................................................... 43, 82, 84
settings .................................................................43status ................................................................... 84
traversal ......................................................................41TURN ....................................................................41, 83
TURN user ...........................................................41TURN host .....................................................41
U
UDP ...................................................................... 41, 43UDP port .....................................................................27unpark ........................................................................ 26upgrade ........................................................... 21, 61–63
download ..............................................................62firmware ..........................................................61–63
web interface ................................................. 61SD card ................................................................63software ............................................................... 21
upgrade log ................................................................ 85URI ............................................................................. 78URL ............................................................................ 47user ...................................................... 21, 32, 35, 40, 41
authentication .......................................................41default .................................................................. 21profile ................................................................... 21settings .................................................................32
username ..............................................................47, 52UTC ............................................................................ 51
V
VAD ............................................................................ 45version ........................................................................81
software ............................................................... 81VLAD .......................................................................... 81VLAN .......................................................................... 82Voice Activity Detection ..............................................45voicemail .................................................................... 26VoIP ...................................................................... 27, 29volume ........................................................................59
level ......................................................................59microphone .......................................................... 59
W
web browser ....................................................62, 71, 76web interface .......................17, 21, 23, 49, 61, 71, 75, 85
settings .................................................................49web server ..................................................................18wireless headset .........................................................57
X
xml ...................................................................70, 71, 75
96 Installing and Administering the IP Office B179 SIP Conference Phone September 2013


