
Illustrator CC 2017 Essential Skills Adobe Illustrator Creative Cloud 2017
Learning Technologies, Training & Audiovisual Outreach
University Information Technology Services

Copyright © 2017 KSU Division of University Information Technology Services
This document may be downloaded, printed, or copied for educational use without further permission
of the University Information Technology Services Division (UITS), provided the content is not modified
and this statement is not removed. Any use not stated above requires the written consent of the UITS
Division. The distribution of a copy of this document via the Internet or other electronic medium
without the written permission of the KSU - UITS Division is expressly prohibited.
Published by Kennesaw State University - UITS 2017
The publisher makes no warranties as to the accuracy of the material contained in this document and
therefore is not responsible for any damages or liabilities incurred from UITS use.
University Information Technology Services
Illustrator CC 2017 Essential Skills
Adobe Illustrator Creative Cloud 2017
Table of Contents Introduction ................................................................................................................................................ 6
About Vector Graphics ................................................................................................................................ 6
Learning Objectives ..................................................................................................................................... 6
Opening Illustrator ...................................................................................................................................... 7
Start Workspace .......................................................................................................................................... 7
Exploring the Workspace ............................................................................................................................ 8
Illustrator Tools and Shortcuts .................................................................................................................... 9
Keyboard Shortcuts for Drawing ........................................................................................................... 10
The New Document Dialog ....................................................................................................................... 11
Creating a New Document ........................................................................................................................ 12
Applying Color in Illustrator ...................................................................................................................... 13
Pen Tools ................................................................................................................................................... 14
Pen Tool ................................................................................................................................................ 14
Add Anchor Point Tool .......................................................................................................................... 17
Delete Anchor Point Tool ...................................................................................................................... 18
Anchor Point Tool ................................................................................................................................. 18
Selection Tools .......................................................................................................................................... 19
Selection Tool ........................................................................................................................................ 19
Selecting an Object ........................................................................................................................... 19
Selecting Multiple Objects ................................................................................................................ 20
Alternate Selection Option ............................................................................................................... 21
Resizing an Object ............................................................................................................................. 21
Moving an Object .............................................................................................................................. 21
Duplicating an Object ........................................................................................................................ 22

Direct Selection Tool ............................................................................................................................. 22
Selecting an Anchor Point to Manipulate an Object ........................................................................ 22
Selecting Multiple Anchor Points ...................................................................................................... 23
Group Selection Tool ............................................................................................................................ 24
Magic Wand Tool ...................................................................................................................................... 24
Lasso Tool .................................................................................................................................................. 25
Line Tools .................................................................................................................................................. 25
Line Segment Tool ................................................................................................................................. 26
Creating a line ................................................................................................................................... 26
Changing the line color ..................................................................................................................... 26
Changing the thickness of the line .................................................................................................... 27
Changing the shape of the line ......................................................................................................... 27
Arc Tool ................................................................................................................................................. 28
Spiral Tool ............................................................................................................................................. 28
Rectangular Grid Tool ........................................................................................................................... 29
Polar Grid Tool ...................................................................................................................................... 30
Drawing Tools ........................................................................................................................................... 31
The Shaper Tool .................................................................................................................................... 31
Shape Conversion ............................................................................................................................. 31
Overlapping Shape Punch Out .......................................................................................................... 32
Merging Shapes................................................................................................................................. 33
Pencil Tool ............................................................................................................................................. 34
Adding to a Path .................................................................................................................................... 35
Reshape a closed path ...................................................................................................................... 35
Smooth Tool .......................................................................................................................................... 36
Path Eraser Tool .................................................................................................................................... 36
Join Tool ................................................................................................................................................ 37
Creating Basic Shapes ............................................................................................................................... 39
Rectangle Tool....................................................................................................................................... 39
Rounded Rectangle Tool ....................................................................................................................... 40
Ellipse Tool ............................................................................................................................................ 41

Polygon Tool.......................................................................................................................................... 42
Star Tool ................................................................................................................................................ 43
The Flare Tool........................................................................................................................................ 44
Editing Tools .............................................................................................................................................. 45
The Eraser Tool ..................................................................................................................................... 45
Changing the Eraser Tool Options .................................................................................................... 45
Shape Builder Tool .................................................................................................................................... 46
Live Paint Bucket Tool ............................................................................................................................... 48
Changing the Background Color of an Artboard ....................................................................................... 49
Text............................................................................................................................................................ 51
Point Type ............................................................................................................................................. 52
Area Type .............................................................................................................................................. 52
Adding Text to a Path ............................................................................................................................ 53
Adding Text on a Closed Shape ............................................................................................................. 53
Saving a file ............................................................................................................................................... 54
Printing ...................................................................................................................................................... 56
Resources .................................................................................................................................................. 57
Additional Help ......................................................................................................................................... 57
Revised 4/6/2017 Page 6 of 57
Introduction Illustrator is a vector graphic editing program by Adobe. This booklet is designed to introduce you to
the essential skills you will need to get started using some of the basic Illustrator tools. These
instructions were created using Illustrator CC 2017 for Windows; the Mac Sierra version is similar.
About Vector Graphics Vector graphics are made up of lines and curves called vectors. They are resolution-independent,
meaning they can be scaled to any size and printed at any resolution without losing detail. You can
move, resize, or change the color of vector objects without losing the quality in the graphic.
Learning Objectives After completing the instructions in this booklet, you will be able to:
Recognize Illustrator terminology
Locate tools, panels, bars, and windows in the workspace
Learn how to use the pen, selection, line, pencil, basic shapes, eraser, and shape builder tools
Create text by itself or on a path of an object
Save files in different versions or formats
Page 7 of 57
Opening Illustrator Follow these instructions to access Adobe Illustrator CC 2017:
1. Click the Windows Start button. 2. Click Adobe Illustrator CC 2017.
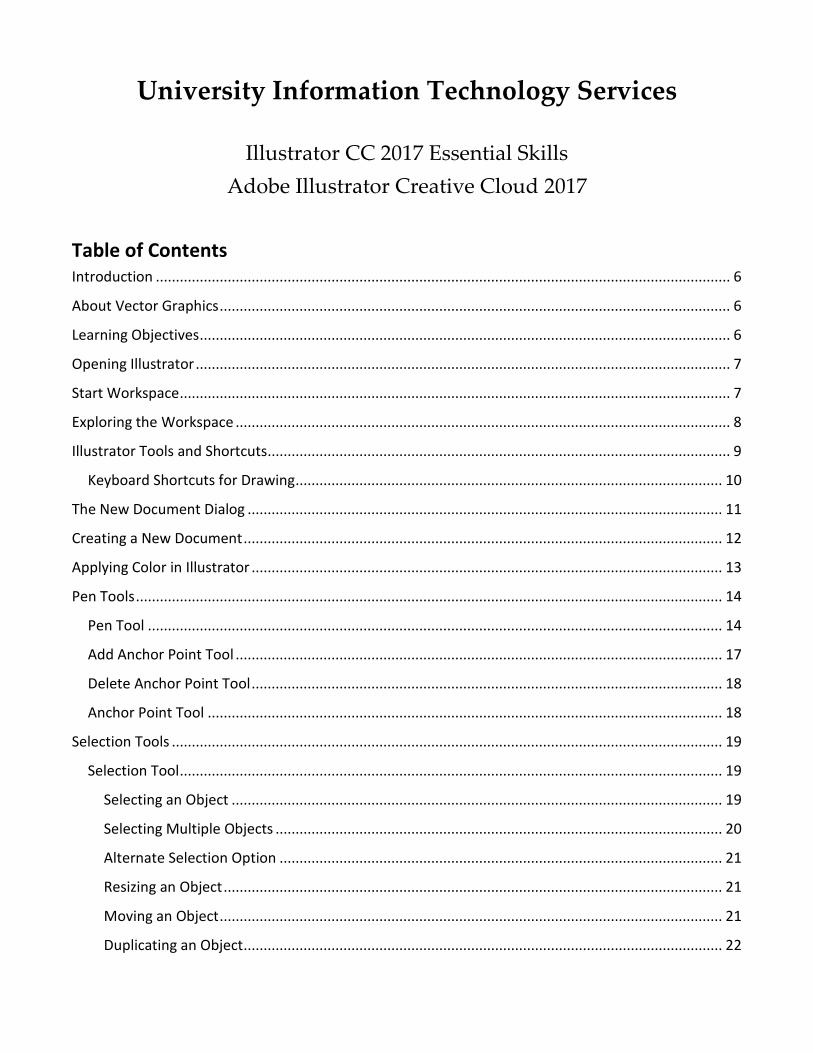
Start Workspace When you open Adobe Illustrator CC 2017, you will see the Start Workspace window. This window is
described below:
Figure 1 - Start Workspace
The Start Workspace window is displayed when Illustrator CC 2017 is launched and no documents are
open.
1. Recent - Files that you have recently opened (See Figure 1).
2. CC Files - List of libraries associated with your Creative Cloud account (See Figure 1).
3. Mobile Creations - Download apps to sketch, draw, and paint and create layouts for mobile
devices (See Figure 1).
4. New - Create a new document (See Figure 1).
5. Open - Open a document that has already been created (See Figure 1).
Page 8 of 57
Exploring the Workspace The Workspace is where you edit your creations and arrange the various panels, bars, and windows.
The section below explains some of the more important areas:
Figure 2 - Workspace
1. Menu Bar - File, Edit, etc. Illustrator functions are available from the drop-down menus
(See Figure 2).
2. Application Bar - Access menus and application controls (See Figure 2).
3. Workspace Switcher - A workspace is the selection of Illustrator tools laid out on your screen
for easy access (See Figure 2). The default workspace is Essentials.
4. Control Panel - Displays options relevant to the currently selected object (See Figure 2).
5. Tools Panel - Tools used to create and edit images, artwork and page elements (See Figure 2).
6. Tabbed Document Windows - A tab for each file you have open (See Figure 2).
7. Document - Create and edit objects, images, text, and page elements in this area (See Figure 2).
8. Paste Board - Objects and images can be created in the scratch area, but will not be printed
(See Figure 2).
9. Panel Title Bar - Panels hold multiple options used for editing and manipulating objects
(See Figure 2). To display more panels, go to Window on the menu bar.

Page 9 of 57
Illustrator Tools and Shortcuts
Figure 3 - Tools in the Illustrator tools panel; image from Adobe.
Image from Adobe, http://helpx.adobe.com/illustrator/using/tools.html; visit the link to see more
detail about the tools, including examples.
Figure 4 - More Tools
Note: Most tools show a triangle icon, denoting that more tools are hidden behind the one you see.
Page 10 of 57
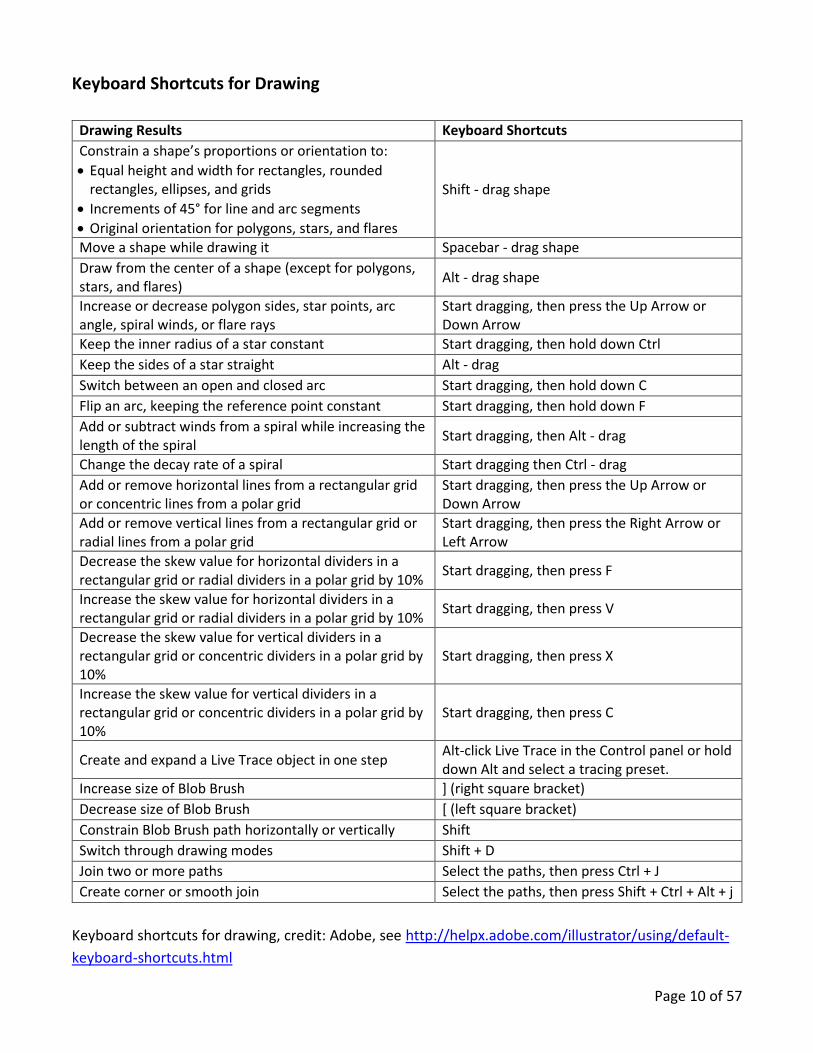
Keyboard Shortcuts for Drawing
Drawing Results Keyboard Shortcuts
Constrain a shape’s proportions or orientation to:
Equal height and width for rectangles, rounded rectangles, ellipses, and grids
Increments of 45° for line and arc segments
Original orientation for polygons, stars, and flares
Shift - drag shape
Move a shape while drawing it Spacebar - drag shape
Draw from the center of a shape (except for polygons, stars, and flares)
Alt - drag shape
Increase or decrease polygon sides, star points, arc angle, spiral winds, or flare rays
Start dragging, then press the Up Arrow or Down Arrow
Keep the inner radius of a star constant Start dragging, then hold down Ctrl
Keep the sides of a star straight Alt - drag
Switch between an open and closed arc Start dragging, then hold down C
Flip an arc, keeping the reference point constant Start dragging, then hold down F
Add or subtract winds from a spiral while increasing the length of the spiral
Start dragging, then Alt - drag
Change the decay rate of a spiral Start dragging then Ctrl - drag
Add or remove horizontal lines from a rectangular grid or concentric lines from a polar grid
Start dragging, then press the Up Arrow or Down Arrow
Add or remove vertical lines from a rectangular grid or radial lines from a polar grid
Start dragging, then press the Right Arrow or Left Arrow
Decrease the skew value for horizontal dividers in a rectangular grid or radial dividers in a polar grid by 10%
Start dragging, then press F
Increase the skew value for horizontal dividers in a rectangular grid or radial dividers in a polar grid by 10%
Start dragging, then press V
Decrease the skew value for vertical dividers in a rectangular grid or concentric dividers in a polar grid by 10%
Start dragging, then press X
Increase the skew value for vertical dividers in a rectangular grid or concentric dividers in a polar grid by 10%
Start dragging, then press C
Create and expand a Live Trace object in one step Alt-click Live Trace in the Control panel or hold down Alt and select a tracing preset.
Increase size of Blob Brush ] (right square bracket)
Decrease size of Blob Brush [ (left square bracket)
Constrain Blob Brush path horizontally or vertically Shift
Switch through drawing modes Shift + D
Join two or more paths Select the paths, then press Ctrl + J
Create corner or smooth join Select the paths, then press Shift + Ctrl + Alt + j
Keyboard shortcuts for drawing, credit: Adobe, see http://helpx.adobe.com/illustrator/using/default-
keyboard-shortcuts.html
Page 11 of 57
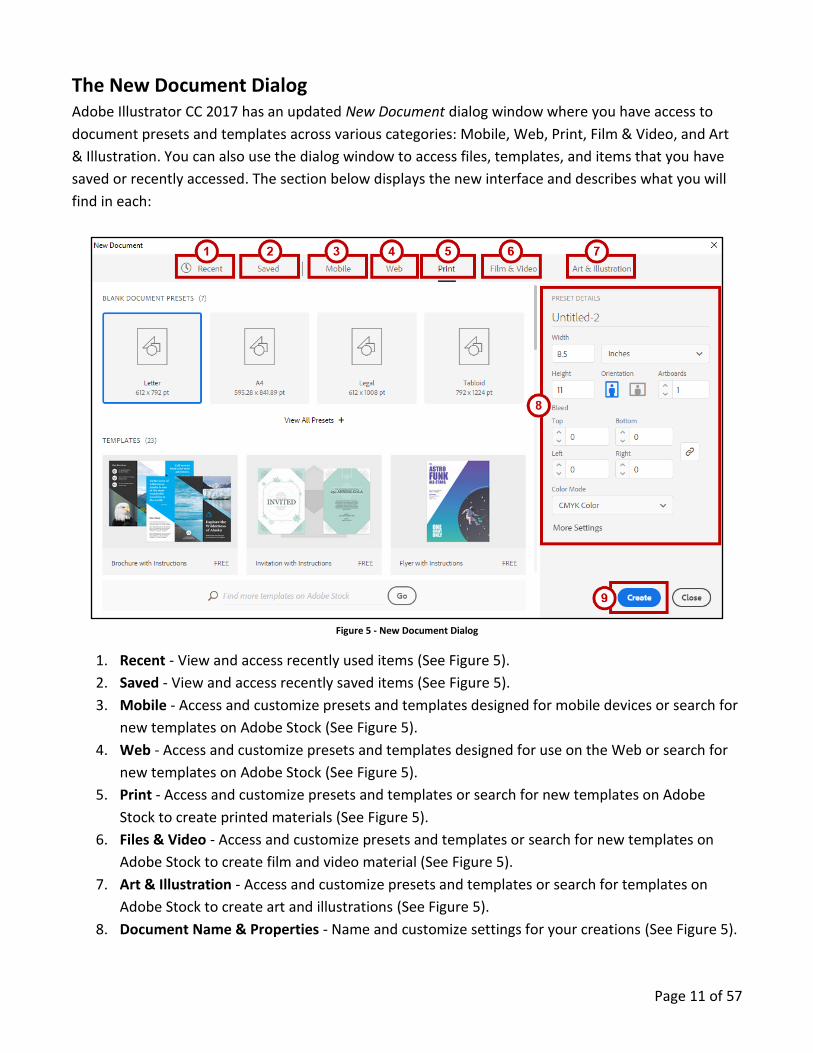
The New Document Dialog Adobe Illustrator CC 2017 has an updated New Document dialog window where you have access to
document presets and templates across various categories: Mobile, Web, Print, Film & Video, and Art
& Illustration. You can also use the dialog window to access files, templates, and items that you have
saved or recently accessed. The section below displays the new interface and describes what you will
find in each:
Figure 5 - New Document Dialog
1. Recent - View and access recently used items (See Figure 5).
2. Saved - View and access recently saved items (See Figure 5).
3. Mobile - Access and customize presets and templates designed for mobile devices or search for
new templates on Adobe Stock (See Figure 5).
4. Web - Access and customize presets and templates designed for use on the Web or search for
new templates on Adobe Stock (See Figure 5).
5. Print - Access and customize presets and templates or search for new templates on Adobe
Stock to create printed materials (See Figure 5).
6. Files & Video - Access and customize presets and templates or search for new templates on
Adobe Stock to create film and video material (See Figure 5).
7. Art & Illustration - Access and customize presets and templates or search for templates on
Adobe Stock to create art and illustrations (See Figure 5).
8. Document Name & Properties - Name and customize settings for your creations (See Figure 5).
Page 12 of 57
9. Create Button - When you have made your selections, create your new document (See Figure
5).
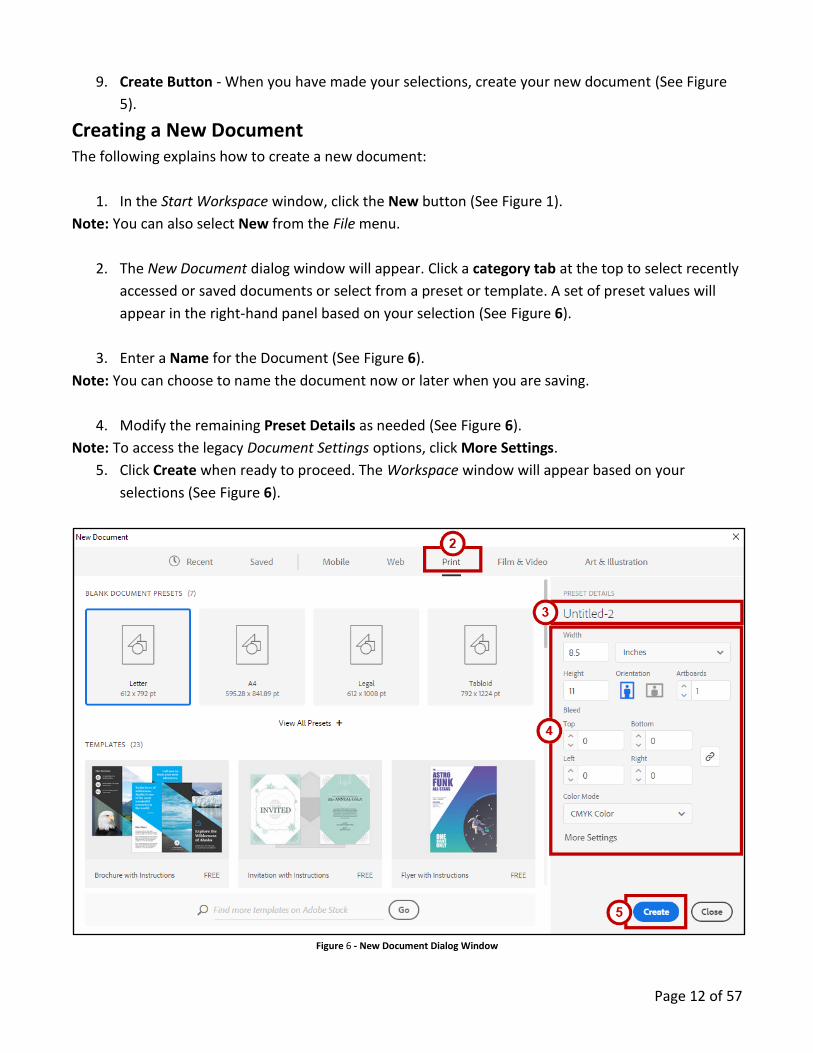
Creating a New Document The following explains how to create a new document:
1. In the Start Workspace window, click the New button (See Figure 1).
Note: You can also select New from the File menu.
2. The New Document dialog window will appear. Click a category tab at the top to select recently
accessed or saved documents or select from a preset or template. A set of preset values will
appear in the right-hand panel based on your selection (See Figure 6).
3. Enter a Name for the Document (See Figure 6).
Note: You can choose to name the document now or later when you are saving.
4. Modify the remaining Preset Details as needed (See Figure 6).
Note: To access the legacy Document Settings options, click More Settings.
5. Click Create when ready to proceed. The Workspace window will appear based on your
selections (See Figure 6).
Figure 6 - New Document Dialog Window
Page 13 of 57
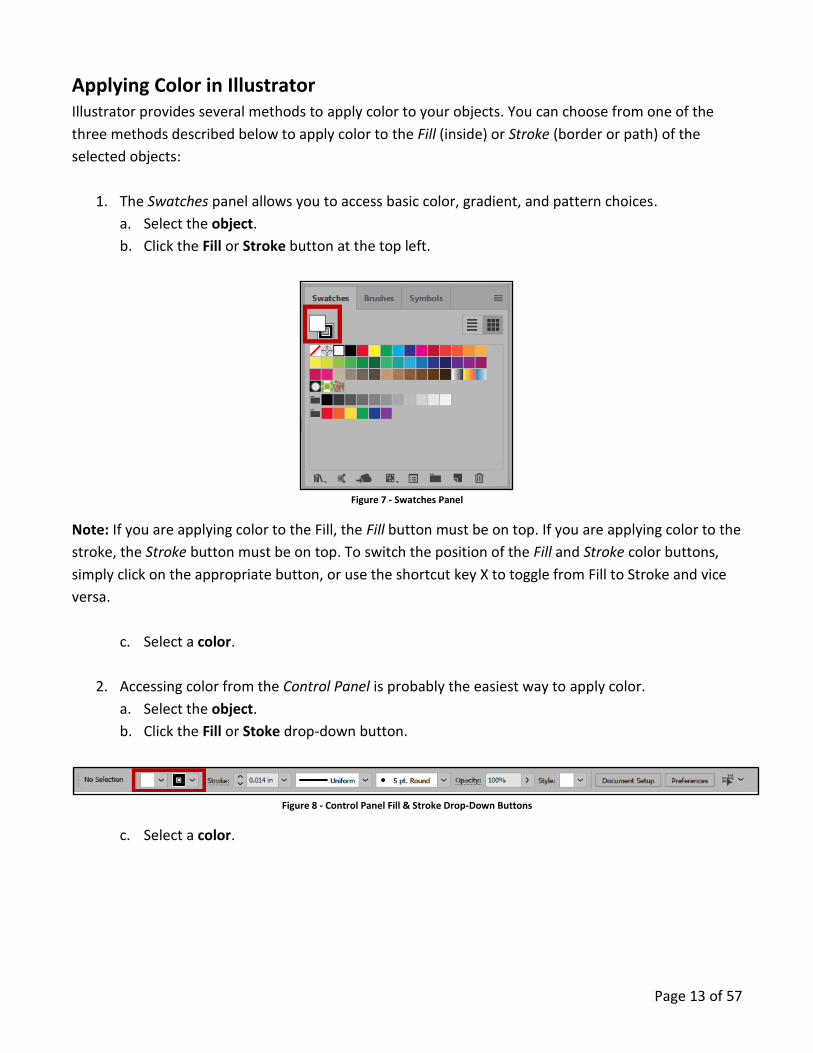
Applying Color in Illustrator Illustrator provides several methods to apply color to your objects. You can choose from one of the
three methods described below to apply color to the Fill (inside) or Stroke (border or path) of the
selected objects:
1. The Swatches panel allows you to access basic color, gradient, and pattern choices.
a. Select the object.
b. Click the Fill or Stroke button at the top left.
Figure 7 - Swatches Panel
Note: If you are applying color to the Fill, the Fill button must be on top. If you are applying color to the
stroke, the Stroke button must be on top. To switch the position of the Fill and Stroke color buttons,
simply click on the appropriate button, or use the shortcut key X to toggle from Fill to Stroke and vice
versa.
c. Select a color.
2. Accessing color from the Control Panel is probably the easiest way to apply color.
a. Select the object.
b. Click the Fill or Stoke drop-down button.
Figure 8 - Control Panel Fill & Stroke Drop-Down Buttons
c. Select a color.
Page 14 of 57
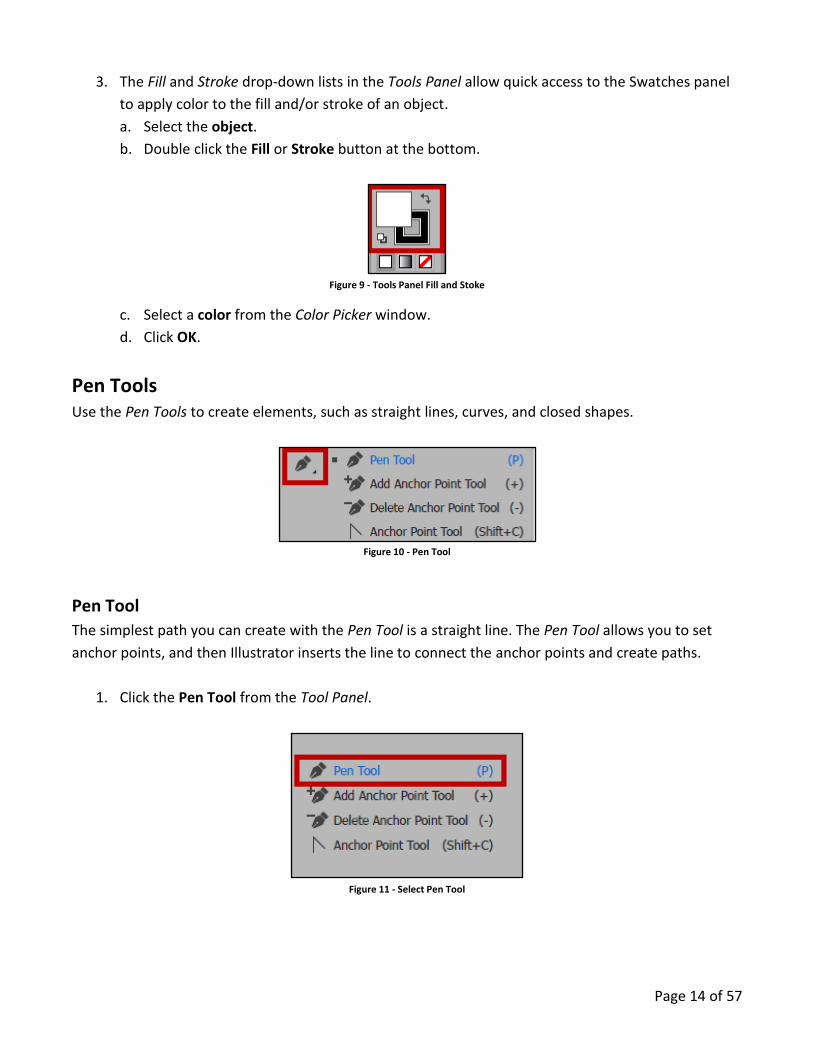
3. The Fill and Stroke drop-down lists in the Tools Panel allow quick access to the Swatches panel
to apply color to the fill and/or stroke of an object.
a. Select the object.
b. Double click the Fill or Stroke button at the bottom.
Figure 9 - Tools Panel Fill and Stoke
c. Select a color from the Color Picker window.
d. Click OK.
Pen Tools Use the Pen Tools to create elements, such as straight lines, curves, and closed shapes.
Figure 10 - Pen Tool
Pen Tool
The simplest path you can create with the Pen Tool is a straight line. The Pen Tool allows you to set
anchor points, and then Illustrator inserts the line to connect the anchor points and create paths.
1. Click the Pen Tool from the Tool Panel.
Figure 11 - Select Pen Tool

Page 15 of 57
2. Click the Artboard where you want the line to begin, to set the first anchor point.
Figure 12 - 1st Anchor Point
3. Move the Pen Tool across from the anchor point you just created, as if drawing a straight line,
and click on the Artboard again to set the second anchor point and create the line segment.
Figure 13 - Guide and 2nd Anchor Point
Note: As you move the Pen Tool across the Artboard, you will notice a line appear. This line is called a
guide. The guide helps you to stay in line with the previous anchor point created, to ensure the
connecting path will be a straight line.
4. Move the Pen Tool up to set the top point of the triangle. As you move up and toward the
center of the path you previously created, you will notice a vertical guide verifying that you are
at the center point of the path.
Figure 14 - Vertical Guide
Page 16 of 57
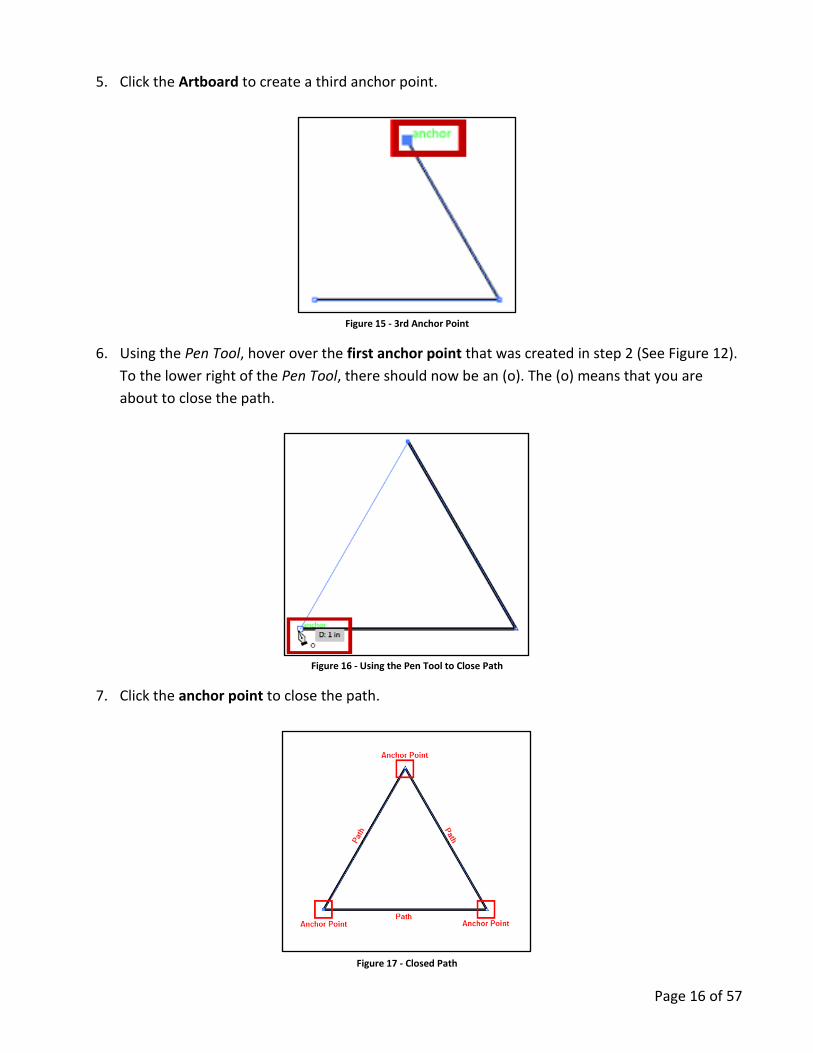
5. Click the Artboard to create a third anchor point.
Figure 15 - 3rd Anchor Point
6. Using the Pen Tool, hover over the first anchor point that was created in step 2 (See Figure 12).
To the lower right of the Pen Tool, there should now be an (o). The (o) means that you are
about to close the path.
Figure 16 - Using the Pen Tool to Close Path
7. Click the anchor point to close the path.
Figure 17 - Closed Path
Page 17 of 57
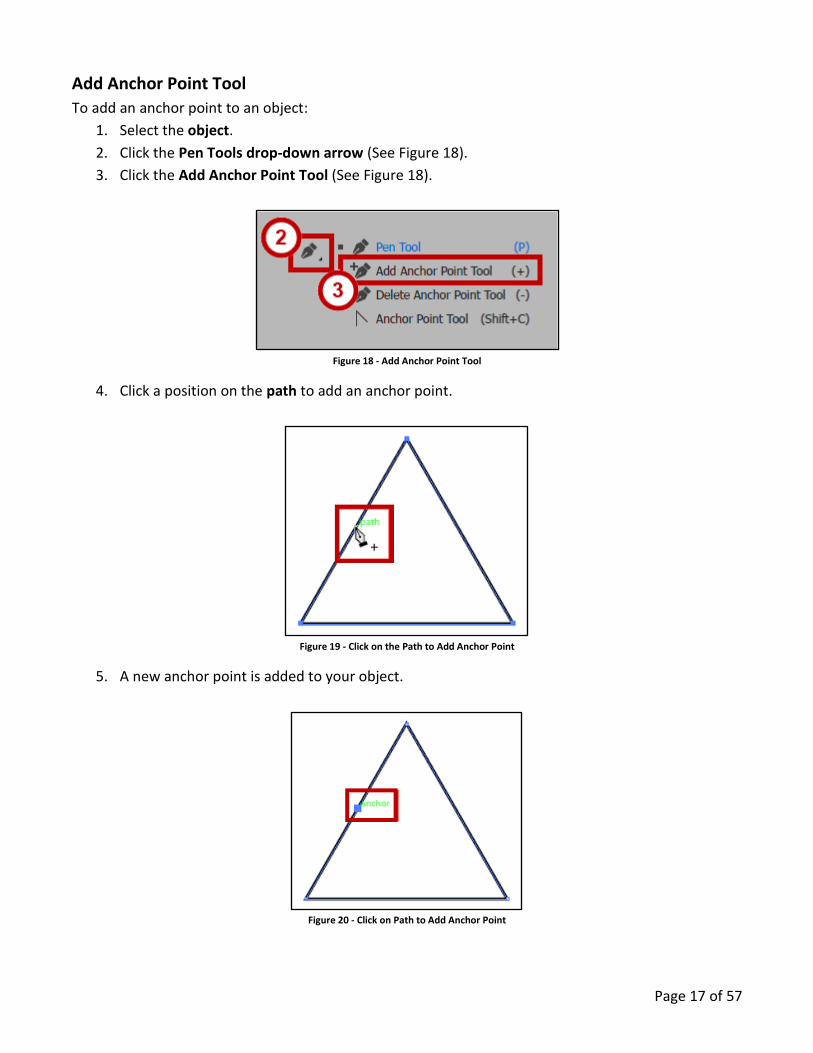
Add Anchor Point Tool
To add an anchor point to an object:
1. Select the object.
2. Click the Pen Tools drop-down arrow (See Figure 18).
3. Click the Add Anchor Point Tool (See Figure 18).
Figure 18 - Add Anchor Point Tool
4. Click a position on the path to add an anchor point.
Figure 19 - Click on the Path to Add Anchor Point
5. A new anchor point is added to your object.
Figure 20 - Click on Path to Add Anchor Point
Page 18 of 57
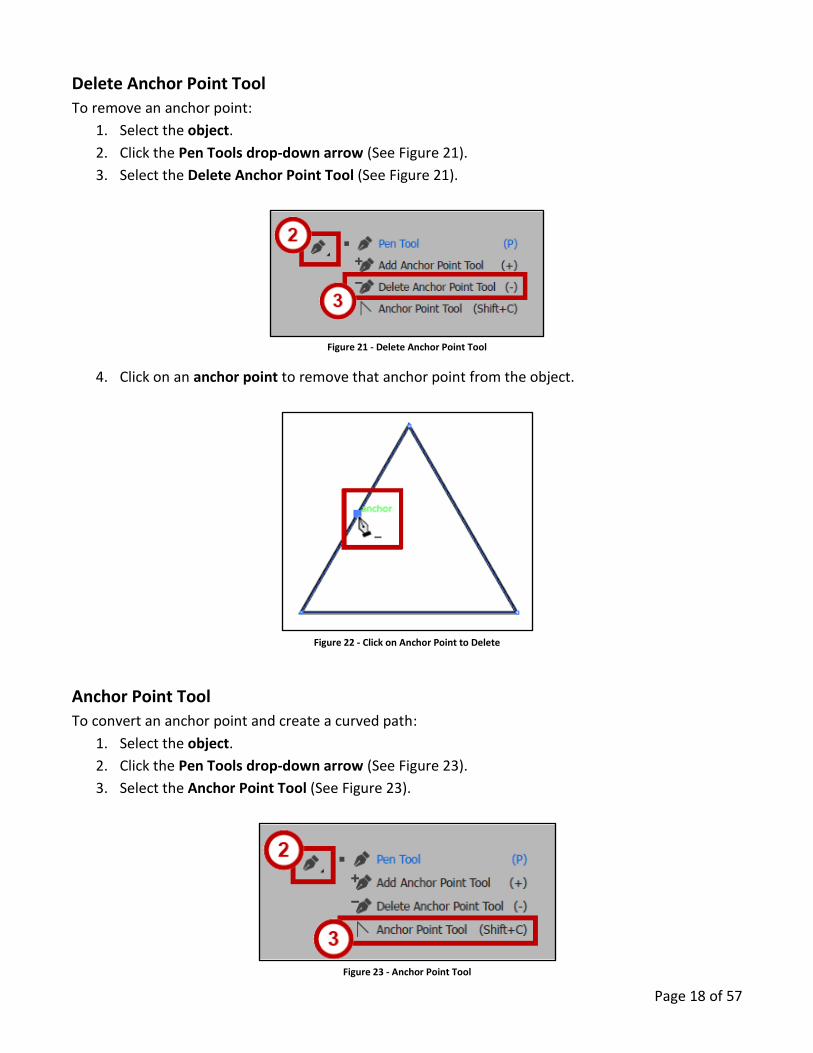
Delete Anchor Point Tool
To remove an anchor point:
1. Select the object.
2. Click the Pen Tools drop-down arrow (See Figure 21).
3. Select the Delete Anchor Point Tool (See Figure 21).
Figure 21 - Delete Anchor Point Tool
4. Click on an anchor point to remove that anchor point from the object.
Figure 22 - Click on Anchor Point to Delete
Anchor Point Tool
To convert an anchor point and create a curved path:
1. Select the object.
2. Click the Pen Tools drop-down arrow (See Figure 23).
3. Select the Anchor Point Tool (See Figure 23).
Figure 23 - Anchor Point Tool
Page 19 of 57
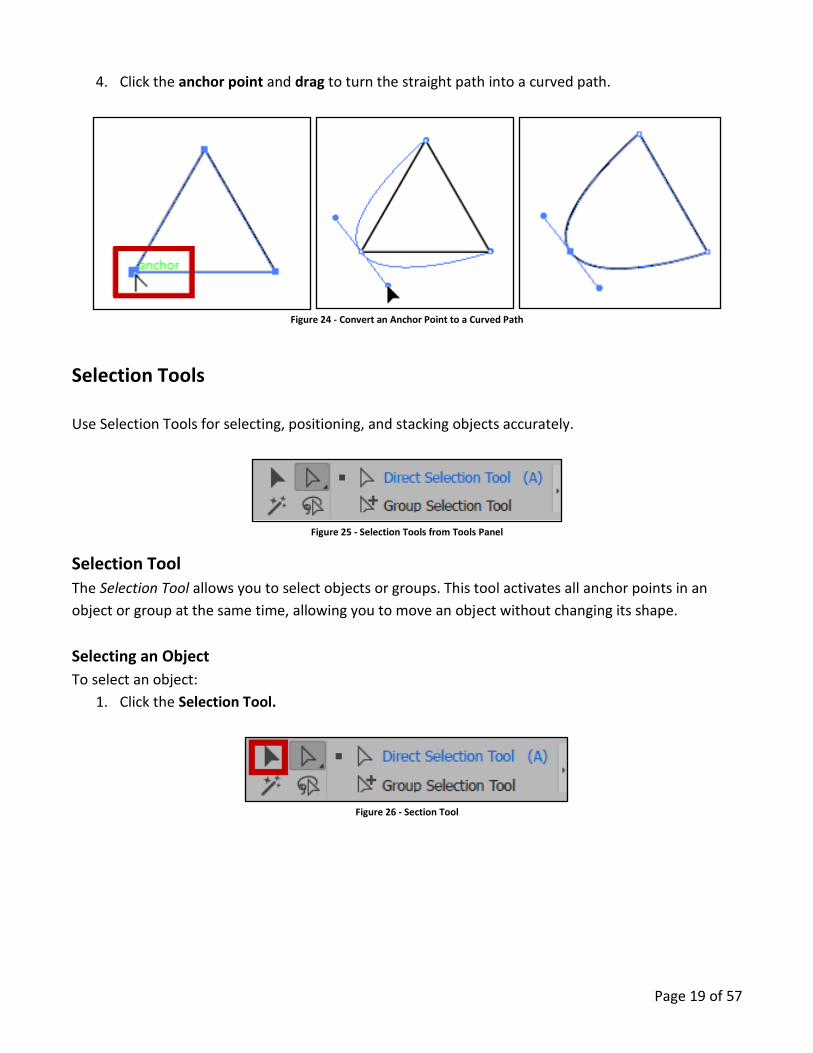
4. Click the anchor point and drag to turn the straight path into a curved path.
Figure 24 - Convert an Anchor Point to a Curved Path
Selection Tools
Use Selection Tools for selecting, positioning, and stacking objects accurately.
Figure 25 - Selection Tools from Tools Panel
Selection Tool
The Selection Tool allows you to select objects or groups. This tool activates all anchor points in an
object or group at the same time, allowing you to move an object without changing its shape.
Selecting an Object
To select an object:
1. Click the Selection Tool.
Figure 26 - Section Tool
Page 20 of 57
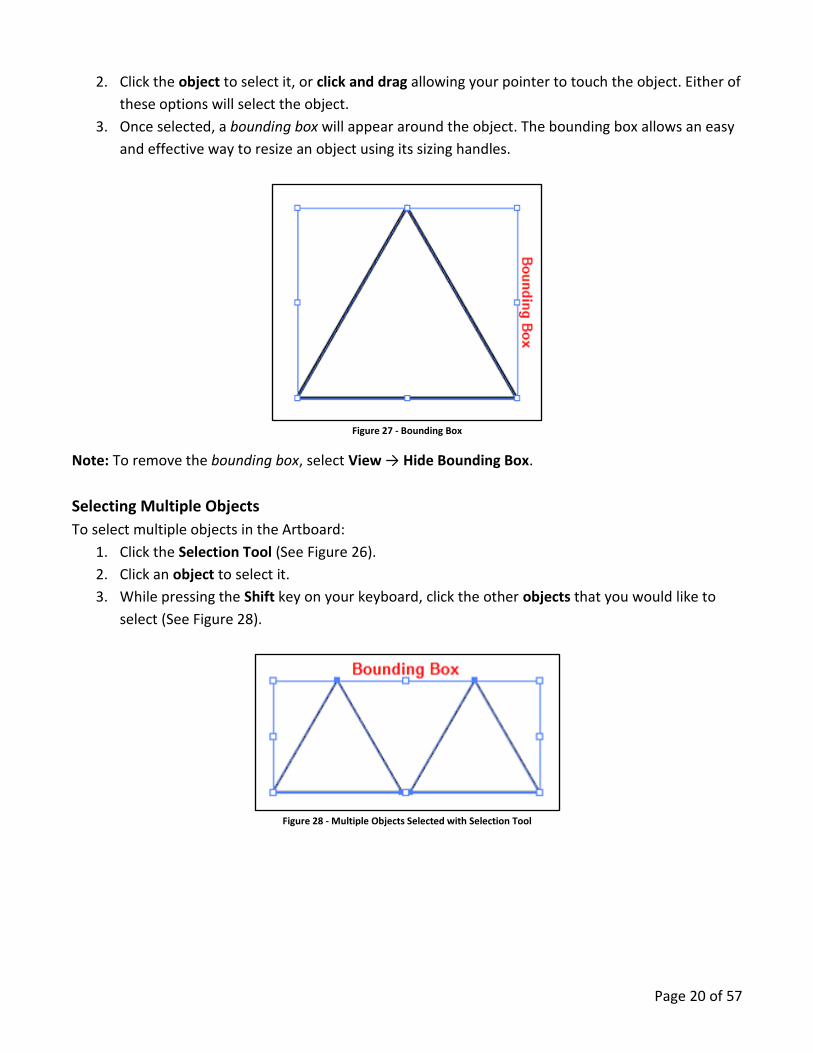
2. Click the object to select it, or click and drag allowing your pointer to touch the object. Either of
these options will select the object.
3. Once selected, a bounding box will appear around the object. The bounding box allows an easy
and effective way to resize an object using its sizing handles.
Figure 27 - Bounding Box
Note: To remove the bounding box, select View → Hide Bounding Box.
Selecting Multiple Objects
To select multiple objects in the Artboard:
1. Click the Selection Tool (See Figure 26).
2. Click an object to select it.
3. While pressing the Shift key on your keyboard, click the other objects that you would like to
select (See Figure 28).
Figure 28 - Multiple Objects Selected with Selection Tool

Page 21 of 57
Alternate Selection Option
The following explains an alternative method to select multiple objects:
1. Click the Selection Tool (See Figure 26).
2. Click and drag, touching each object that you want to select (See Figure 29).
Figure 29 - Select Objects by Click and Drag with Selection Tool
Resizing an Object
To resize an object on the Artboard:
1. Click the Selection Tool (See Figure 26).
2. Hover over one of the corners or side sizing handles.
3. Left-Click and drag to resize the object (See Figure 30).
Figure 30 - Resize an Object with Selection Tool
Moving an Object
To move an object on the Artboard:
1. Select the Selection Tool (See Figure 26).
2. Hover over a path in the object.
3. Click the path and drag to move to your desired location (See Figure 31).
Figure 31 - Move an Object with Selection Tool
Page 22 of 57
Duplicating an Object
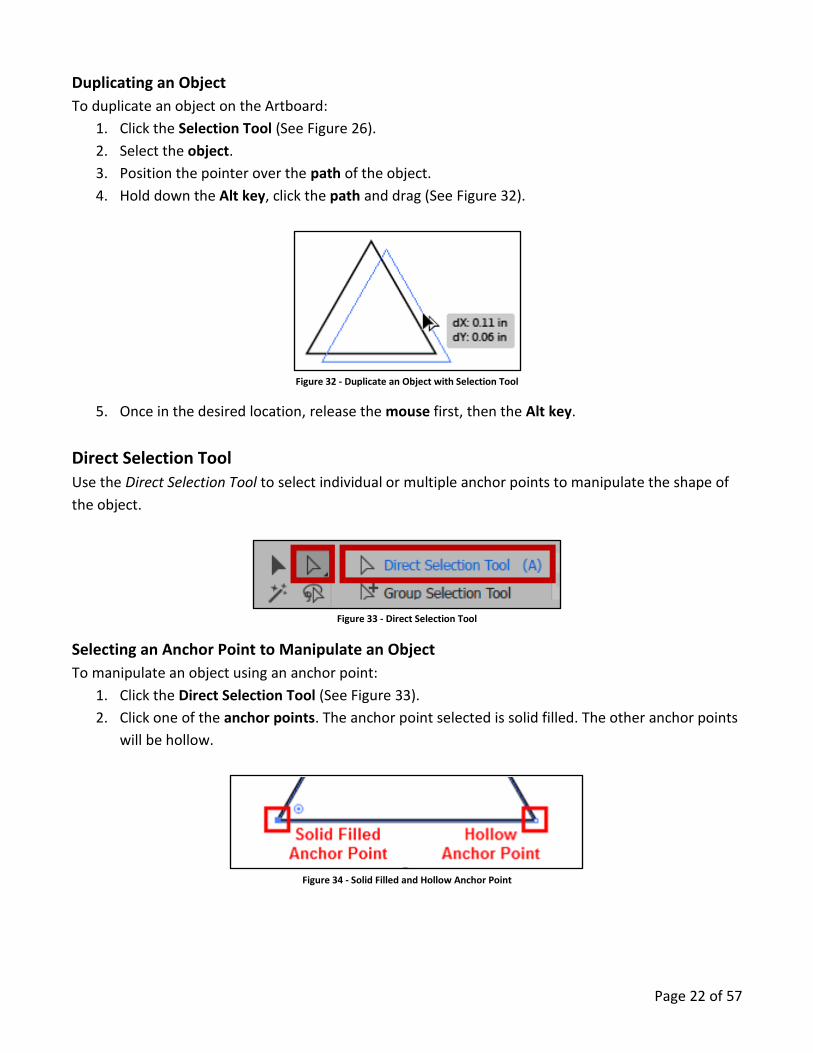
To duplicate an object on the Artboard:
1. Click the Selection Tool (See Figure 26).
2. Select the object.
3. Position the pointer over the path of the object.
4. Hold down the Alt key, click the path and drag (See Figure 32).
Figure 32 - Duplicate an Object with Selection Tool
5. Once in the desired location, release the mouse first, then the Alt key.
Direct Selection Tool
Use the Direct Selection Tool to select individual or multiple anchor points to manipulate the shape of
the object.
Figure 33 - Direct Selection Tool
Selecting an Anchor Point to Manipulate an Object
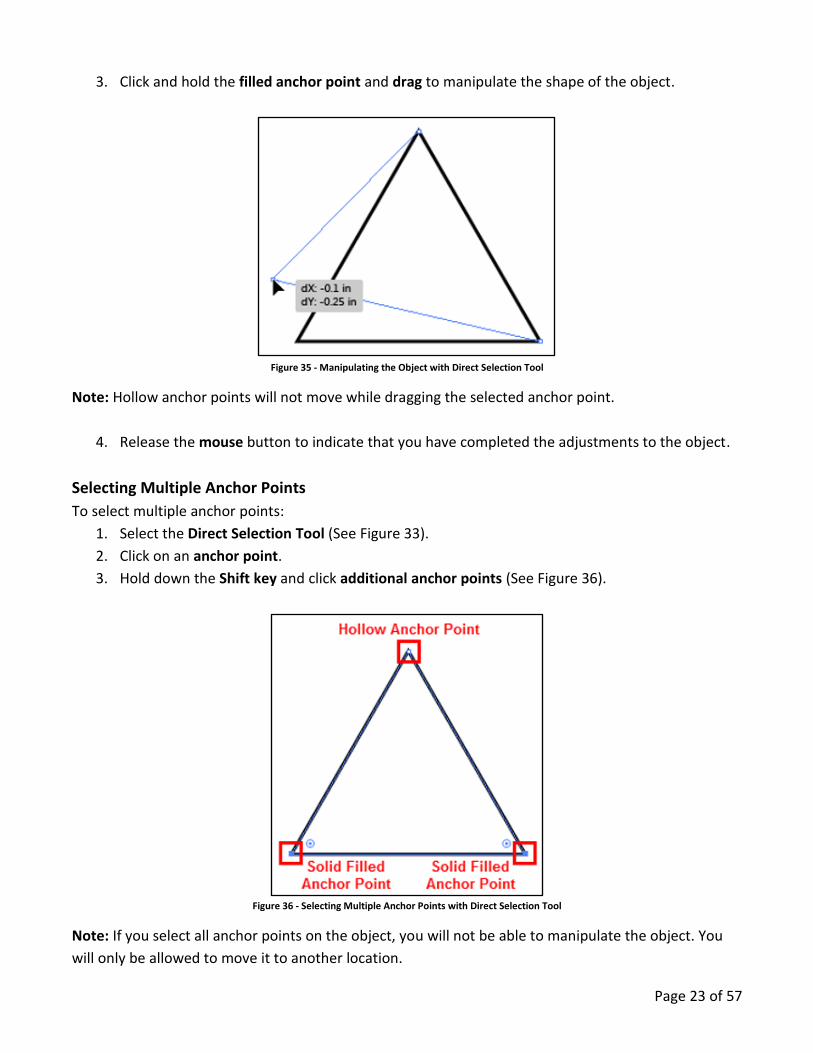
To manipulate an object using an anchor point:
1. Click the Direct Selection Tool (See Figure 33).
2. Click one of the anchor points. The anchor point selected is solid filled. The other anchor points
will be hollow.
Figure 34 - Solid Filled and Hollow Anchor Point
Page 23 of 57
3. Click and hold the filled anchor point and drag to manipulate the shape of the object.
Figure 35 - Manipulating the Object with Direct Selection Tool
Note: Hollow anchor points will not move while dragging the selected anchor point.
4. Release the mouse button to indicate that you have completed the adjustments to the object.
Selecting Multiple Anchor Points
To select multiple anchor points:
1. Select the Direct Selection Tool (See Figure 33).
2. Click on an anchor point.
3. Hold down the Shift key and click additional anchor points (See Figure 36).
Figure 36 - Selecting Multiple Anchor Points with Direct Selection Tool
Note: If you select all anchor points on the object, you will not be able to manipulate the object. You
will only be allowed to move it to another location.

Page 24 of 57
Group Selection Tool
Hidden within the Direct Selection Tool, is the Group Selection Tool. Use this tool to select items within
a group. It adds grouped items as you click objects in the order in which you selected them. This
selection tool becomes more useful to you as you become more familiar with grouping objects in
Illustrator.
Figure 37 - Group Selection Tool
Magic Wand Tool Use the Magic Wand Tool to select objects with like values, such as fill and stroke colors, based on a
tolerance and stroke weight. Following is an example of how to use the Magic Wand Tool:
1. Draw three triangles.
2. Change the fill color and stroke color of all the triangles, making two the same and one
different from the other two.
3. Click the Magic Wand Tool.
Figure 38 - Magic Wand Tool
4. Click on one of the two triangles that are the same. The triangles that are the same are
selected.
Figure 39 - Using the Magic Wand Tool
Note: To change options for selection, double-click the Magic Wand Tool in the Tools Panel.
Page 25 of 57
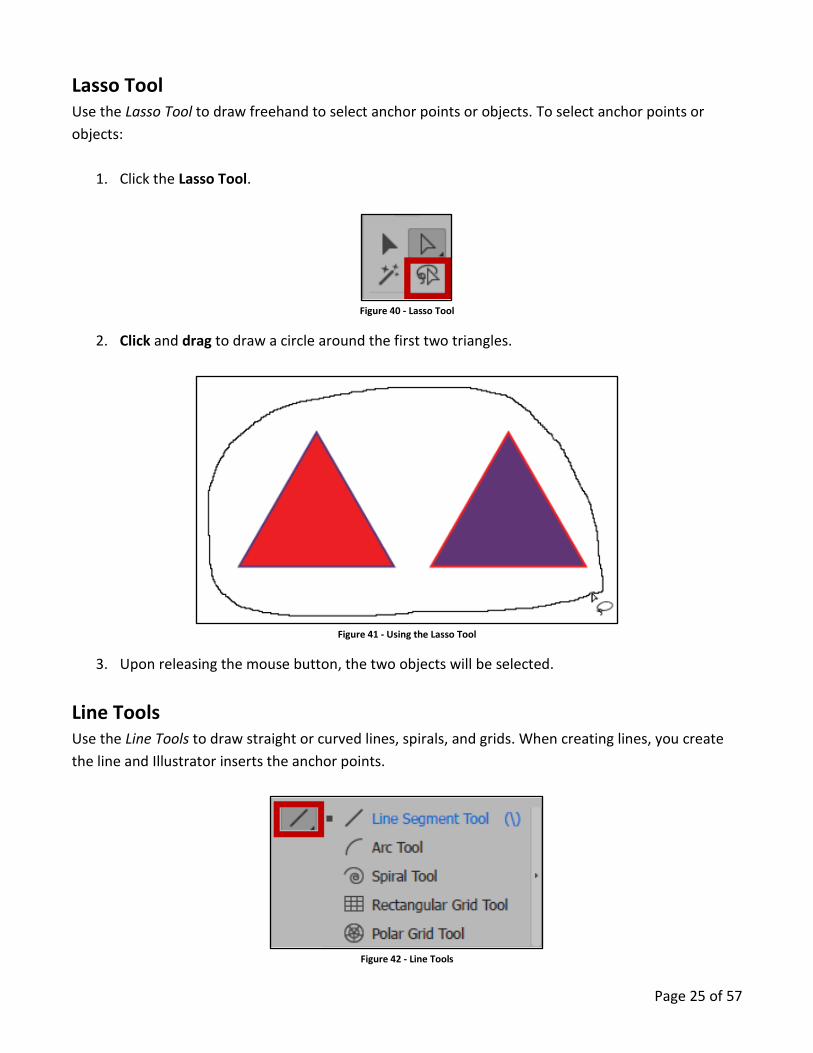
Lasso Tool Use the Lasso Tool to draw freehand to select anchor points or objects. To select anchor points or
objects:
1. Click the Lasso Tool.
Figure 40 - Lasso Tool
2. Click and drag to draw a circle around the first two triangles.
Figure 41 - Using the Lasso Tool
3. Upon releasing the mouse button, the two objects will be selected.
Line Tools Use the Line Tools to draw straight or curved lines, spirals, and grids. When creating lines, you create
the line and Illustrator inserts the anchor points.
Figure 42 - Line Tools
Page 26 of 57
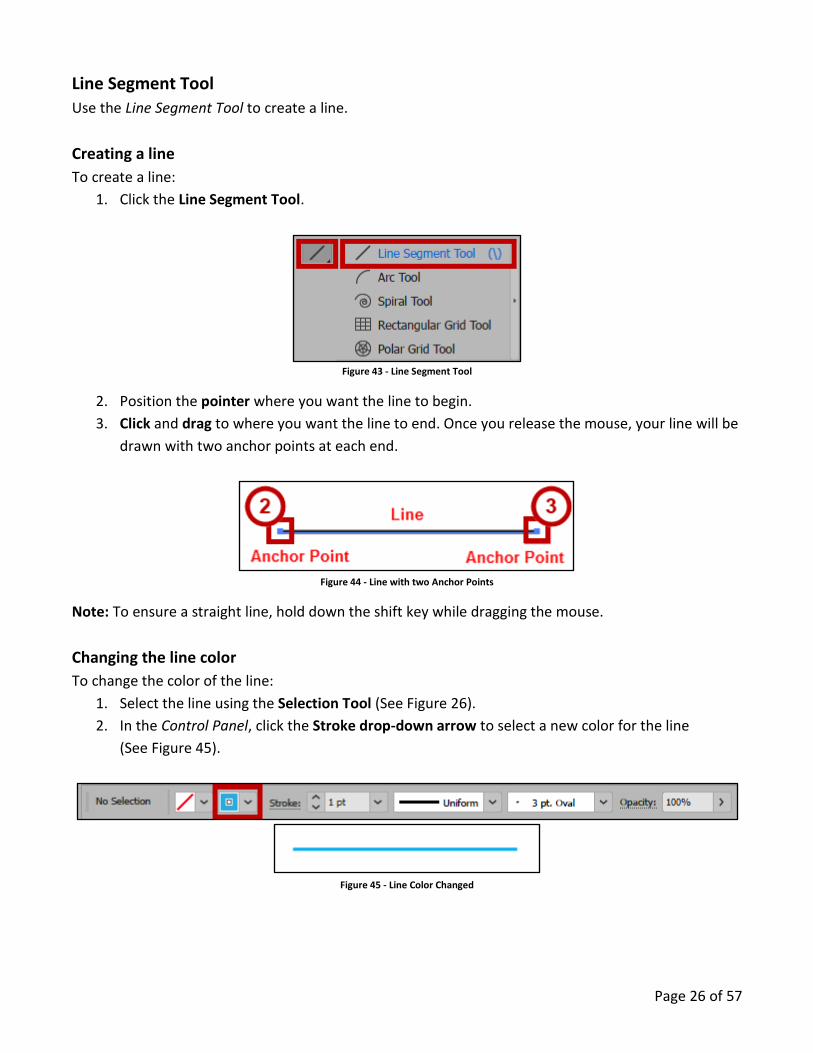
Line Segment Tool
Use the Line Segment Tool to create a line.
Creating a line
To create a line:
1. Click the Line Segment Tool.
Figure 43 - Line Segment Tool
2. Position the pointer where you want the line to begin.
3. Click and drag to where you want the line to end. Once you release the mouse, your line will be
drawn with two anchor points at each end.
Figure 44 - Line with two Anchor Points
Note: To ensure a straight line, hold down the shift key while dragging the mouse.
Changing the line color
To change the color of the line:
1. Select the line using the Selection Tool (See Figure 26).
2. In the Control Panel, click the Stroke drop-down arrow to select a new color for the line
(See Figure 45).
Figure 45 - Line Color Changed
Page 27 of 57
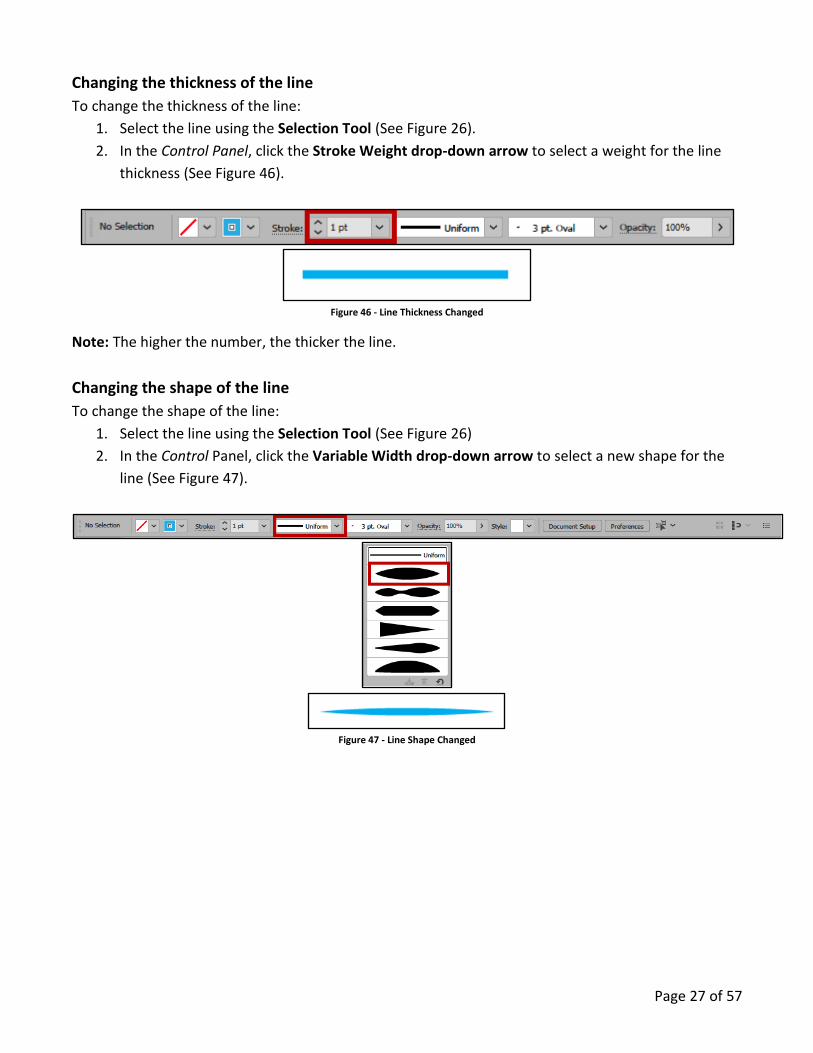
Changing the thickness of the line
To change the thickness of the line:
1. Select the line using the Selection Tool (See Figure 26).
2. In the Control Panel, click the Stroke Weight drop-down arrow to select a weight for the line
thickness (See Figure 46).
Figure 46 - Line Thickness Changed
Note: The higher the number, the thicker the line.
Changing the shape of the line
To change the shape of the line:
1. Select the line using the Selection Tool (See Figure 26)
2. In the Control Panel, click the Variable Width drop-down arrow to select a new shape for the
line (See Figure 47).
Figure 47 - Line Shape Changed
Page 28 of 57
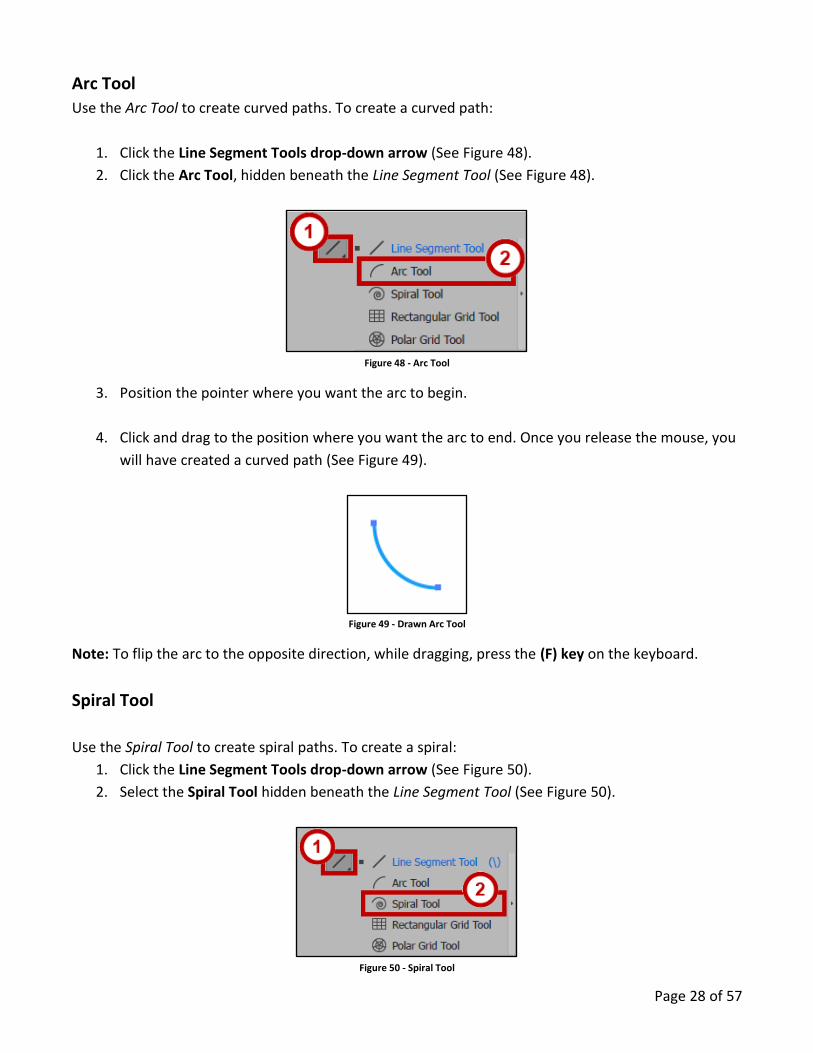
Arc Tool
Use the Arc Tool to create curved paths. To create a curved path:
1. Click the Line Segment Tools drop-down arrow (See Figure 48).
2. Click the Arc Tool, hidden beneath the Line Segment Tool (See Figure 48).
Figure 48 - Arc Tool
3. Position the pointer where you want the arc to begin.
4. Click and drag to the position where you want the arc to end. Once you release the mouse, you
will have created a curved path (See Figure 49).
Figure 49 - Drawn Arc Tool
Note: To flip the arc to the opposite direction, while dragging, press the (F) key on the keyboard.
Spiral Tool
Use the Spiral Tool to create spiral paths. To create a spiral:
1. Click the Line Segment Tools drop-down arrow (See Figure 50).
2. Select the Spiral Tool hidden beneath the Line Segment Tool (See Figure 50).
Figure 50 - Spiral Tool
Page 29 of 57
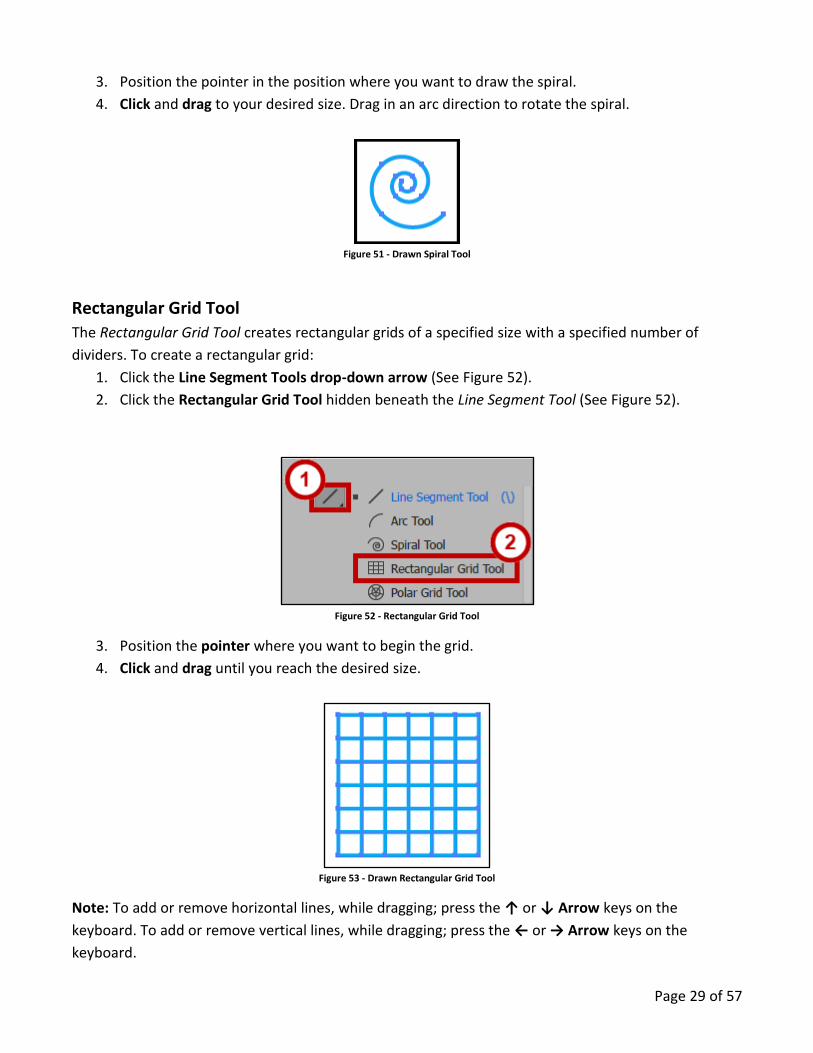
3. Position the pointer in the position where you want to draw the spiral.
4. Click and drag to your desired size. Drag in an arc direction to rotate the spiral.
Figure 51 - Drawn Spiral Tool
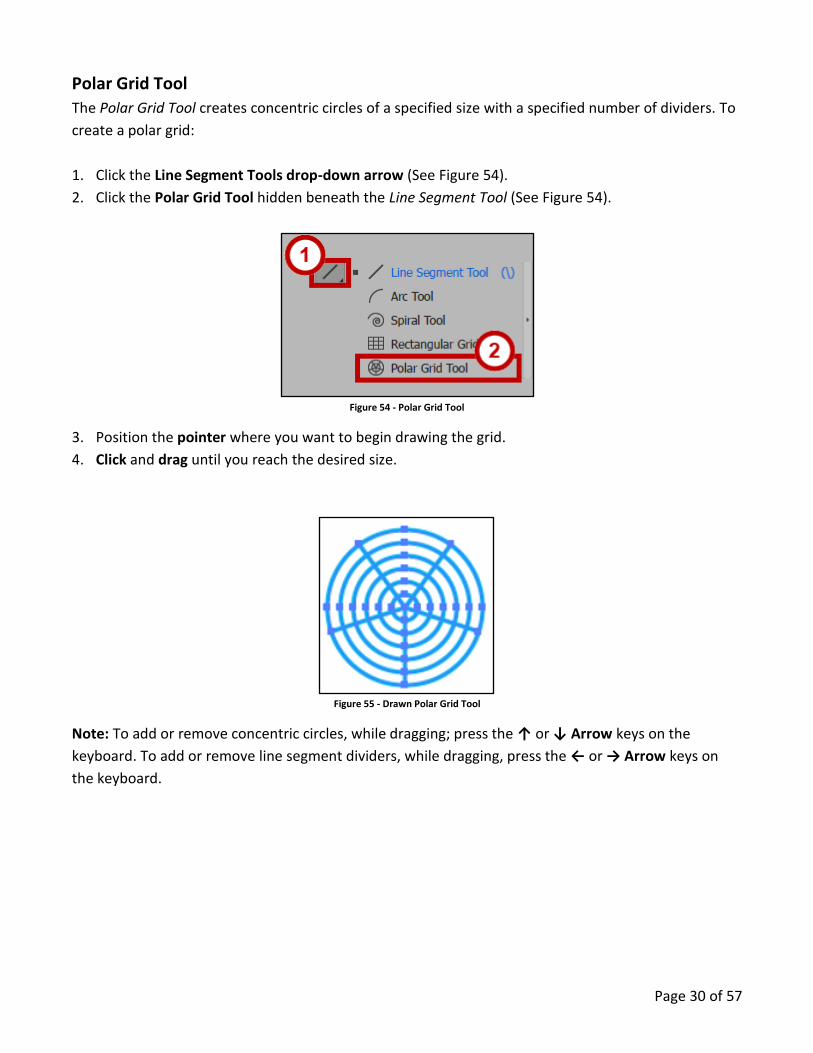
Rectangular Grid Tool
The Rectangular Grid Tool creates rectangular grids of a specified size with a specified number of
dividers. To create a rectangular grid:
1. Click the Line Segment Tools drop-down arrow (See Figure 52).
2. Click the Rectangular Grid Tool hidden beneath the Line Segment Tool (See Figure 52).
Figure 52 - Rectangular Grid Tool
3. Position the pointer where you want to begin the grid.
4. Click and drag until you reach the desired size.
Figure 53 - Drawn Rectangular Grid Tool
Note: To add or remove horizontal lines, while dragging; press the ↑ or ↓ Arrow keys on the
keyboard. To add or remove vertical lines, while dragging; press the ← or → Arrow keys on the
keyboard.
Page 30 of 57
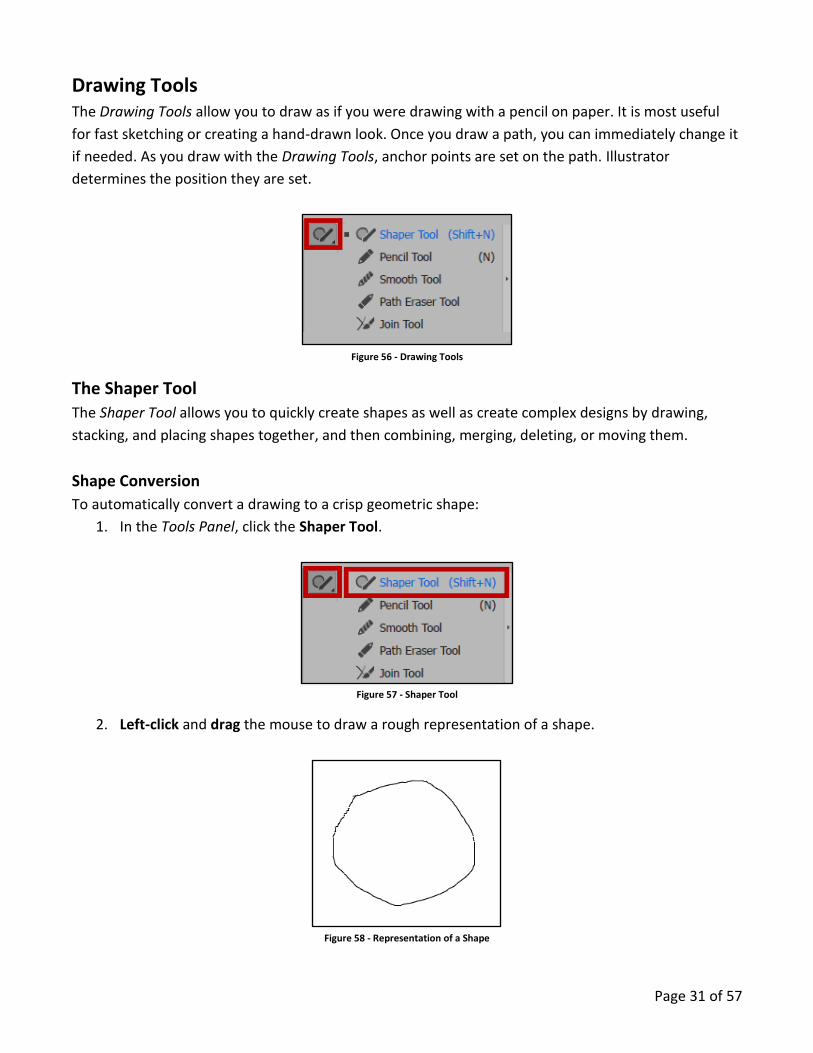
Polar Grid Tool
The Polar Grid Tool creates concentric circles of a specified size with a specified number of dividers. To
create a polar grid:
1. Click the Line Segment Tools drop-down arrow (See Figure 54).
2. Click the Polar Grid Tool hidden beneath the Line Segment Tool (See Figure 54).
Figure 54 - Polar Grid Tool
3. Position the pointer where you want to begin drawing the grid.
4. Click and drag until you reach the desired size.
Figure 55 - Drawn Polar Grid Tool
Note: To add or remove concentric circles, while dragging; press the ↑ or ↓ Arrow keys on the
keyboard. To add or remove line segment dividers, while dragging, press the ← or → Arrow keys on
the keyboard.
Page 31 of 57
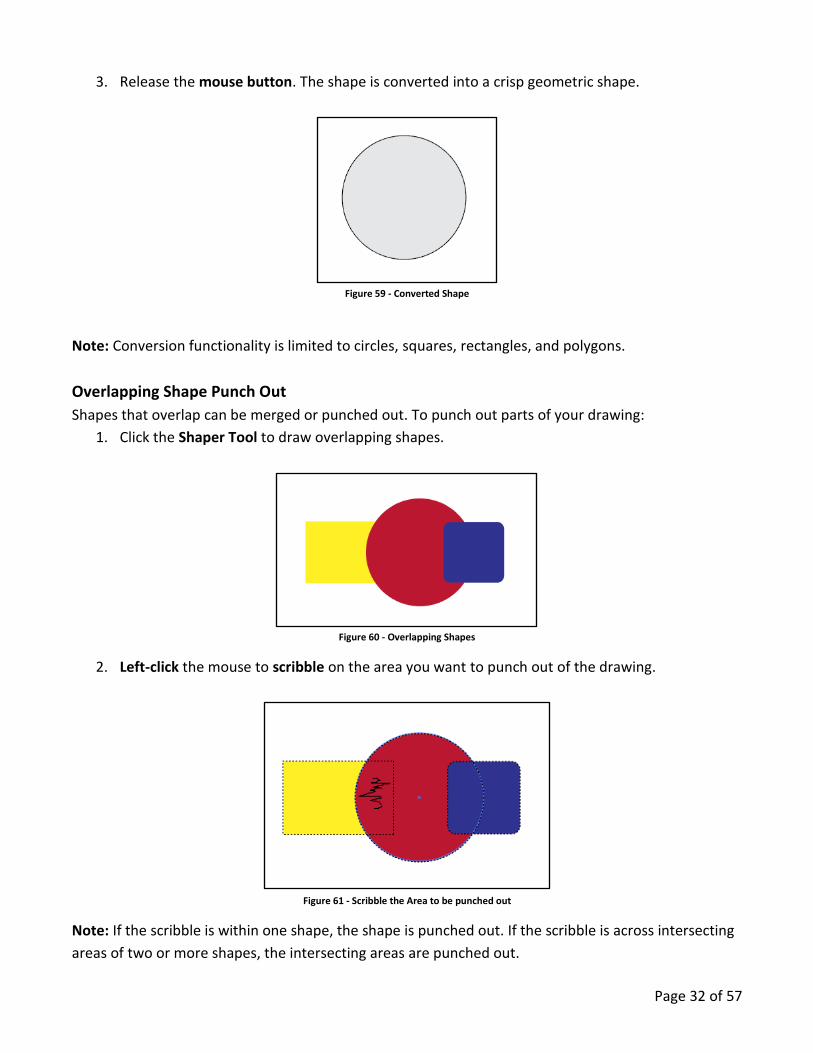
Drawing Tools The Drawing Tools allow you to draw as if you were drawing with a pencil on paper. It is most useful
for fast sketching or creating a hand-drawn look. Once you draw a path, you can immediately change it
if needed. As you draw with the Drawing Tools, anchor points are set on the path. Illustrator
determines the position they are set.
Figure 56 - Drawing Tools
The Shaper Tool
The Shaper Tool allows you to quickly create shapes as well as create complex designs by drawing,
stacking, and placing shapes together, and then combining, merging, deleting, or moving them.
Shape Conversion
To automatically convert a drawing to a crisp geometric shape:
1. In the Tools Panel, click the Shaper Tool.
Figure 57 - Shaper Tool
2. Left-click and drag the mouse to draw a rough representation of a shape.
Figure 58 - Representation of a Shape
Page 32 of 57
3. Release the mouse button. The shape is converted into a crisp geometric shape.
Figure 59 - Converted Shape
Note: Conversion functionality is limited to circles, squares, rectangles, and polygons.
Overlapping Shape Punch Out
Shapes that overlap can be merged or punched out. To punch out parts of your drawing:
1. Click the Shaper Tool to draw overlapping shapes.
Figure 60 - Overlapping Shapes
2. Left-click the mouse to scribble on the area you want to punch out of the drawing.
Figure 61 - Scribble the Area to be punched out
Note: If the scribble is within one shape, the shape is punched out. If the scribble is across intersecting
areas of two or more shapes, the intersecting areas are punched out.

Page 33 of 57
3. Release the mouse button. The area selected is punched out from the shape.
Figure 62 - Punched Out Area
Merging Shapes
To merge shapes, you must scribble across the shapes you want to merge.
1. In the Tool Panel, click the Shaper Tool.
2. Left-click the mouse and scribble across the shapes you want merge.
Figure 63 - Scribble the Shapes to Merge
3. Release the mouse button. The shapes are merged with the color of the merged area being
that of the scribble origin point.
Figure 64 - Merging Shapes

Page 34 of 57
Pencil Tool
The Pencil Tool lets you draw open and closed paths as if you were drawing with a pencil on paper. The
following explains how to draw a freeform open path:
1. In the Tool Panel, click the Shaper Tool drop-down arrow.
2. In the Shaper Tool drop-down box, click the Pencil Tool.
Figure 65 - Pencil Tool
3. Position the tool where you want the path to begin.
4. Click and draw a path. The Pencil Tool will display a small asterisk to indicate that you are
drawing a freeform path.
5. Once you release the mouse, the line will change into a solid line, and Illustrator will insert
anchor points.
Figure 66 - Drawing a Freeform Path with the Pencil Tool
The following explains how to draw a closed path with the Pencil Tool:
1. Click the Pencil Tool.
2. Position the tool where you want the path to begin.
3. After you begin dragging, hold down the Alt key. The Pencil Tool will display a small circle to
indicate that you are drawing a closed path.
4. Once the path is to your desired size and shape, release the mouse button first. Once the path
closes, release the Alt key.
Figure 67 - Drawing a Closed Path with the Pencil Tool
Note: You do not have to position the cursor over the starting point to close the path. If you release
the mouse in another location, the Pencil Tool will close the shape once you release the mouse.

Page 35 of 57
Adding to a Path
To add to a path:
1. Select an existing path using the Selection Tool (See Figure 26).
2. Select the Pencil Tool.
3. Position the Pencil Tool on an endpoint of the path.
Figure 68 - Edit Path with Pencil Tool
Note: You will know that you are positioned on the endpoint, once the asterisk changes to a forward
slash next to the Pencil Tool.
4. Click and drag to continue the path in the desired direction.
Figure 69 - Path Edited with Pencil Tool
Reshape a closed path
To reshape a closed path:
1. Select a closed path using the Selection Tool (See Figure 26).
2. Select the Pencil Tool.
3. Position the Pencil Tool on the path, in the position where you want to begin redrawing.
Note: You will know when you are on the path when the asterisk next the Pencil Tool disappears.
4. Click and drag creating the desired shape.
Figure 70 - Path Reshape with Pencil Tool
Note: In order for the path to remain closed, be sure to release the mouse while hovering over a
different position on the path.
Page 36 of 57
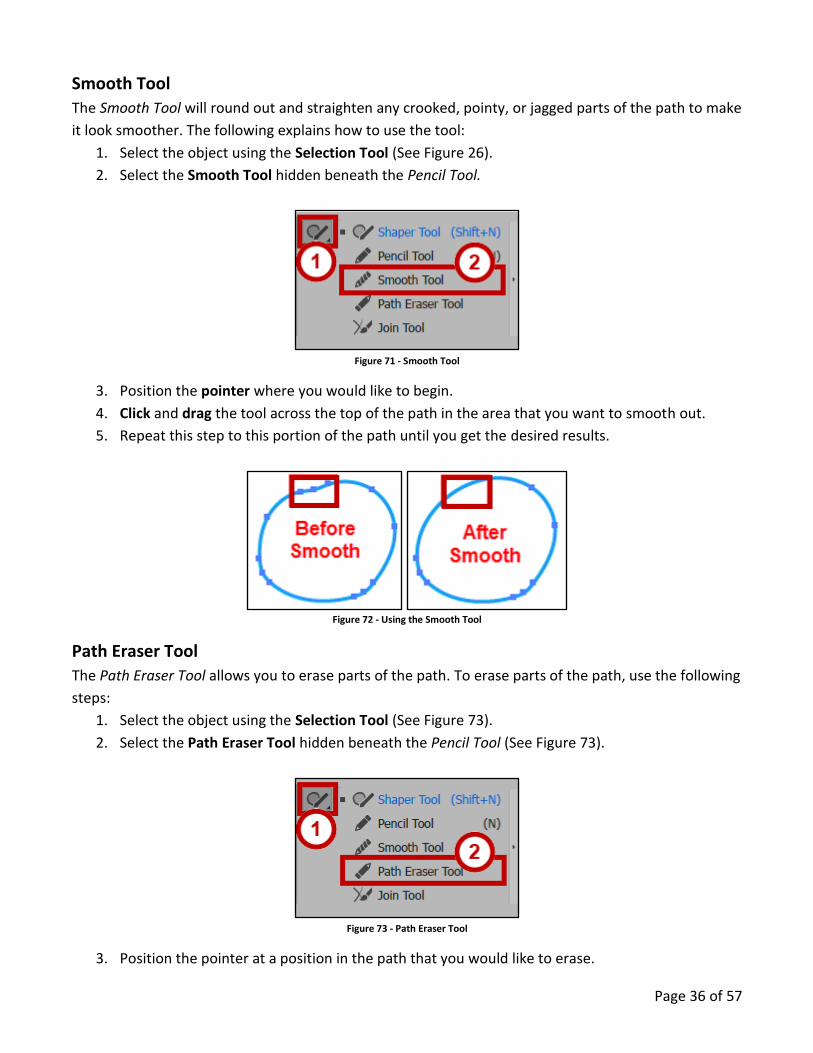
Smooth Tool
The Smooth Tool will round out and straighten any crooked, pointy, or jagged parts of the path to make
it look smoother. The following explains how to use the tool:
1. Select the object using the Selection Tool (See Figure 26).
2. Select the Smooth Tool hidden beneath the Pencil Tool.
Figure 71 - Smooth Tool
3. Position the pointer where you would like to begin.
4. Click and drag the tool across the top of the path in the area that you want to smooth out.
5. Repeat this step to this portion of the path until you get the desired results.
Figure 72 - Using the Smooth Tool
Path Eraser Tool
The Path Eraser Tool allows you to erase parts of the path. To erase parts of the path, use the following
steps:
1. Select the object using the Selection Tool (See Figure 73).
2. Select the Path Eraser Tool hidden beneath the Pencil Tool (See Figure 73).
Figure 73 - Path Eraser Tool
3. Position the pointer at a position in the path that you would like to erase.
Page 37 of 57
4. Click and drag over the area that you would like to erase.
Figure 74 - Using the Path Eraser Tool
Join Tool
The Join Tool allows you to join parts of the path. Following is an example of how to use the join tool:
1. Draw lines using the line segment tool.
2. Click CTRL + A on your keyboard to select all lines (See .
Figure 75 - Click CTRL + A
3. Click the Shaper Tool drop-down arrow (See Figure 76).
4. Click the Join Tool (See Figure 76).
Figure 76 - Join Tool
Page 38 of 57
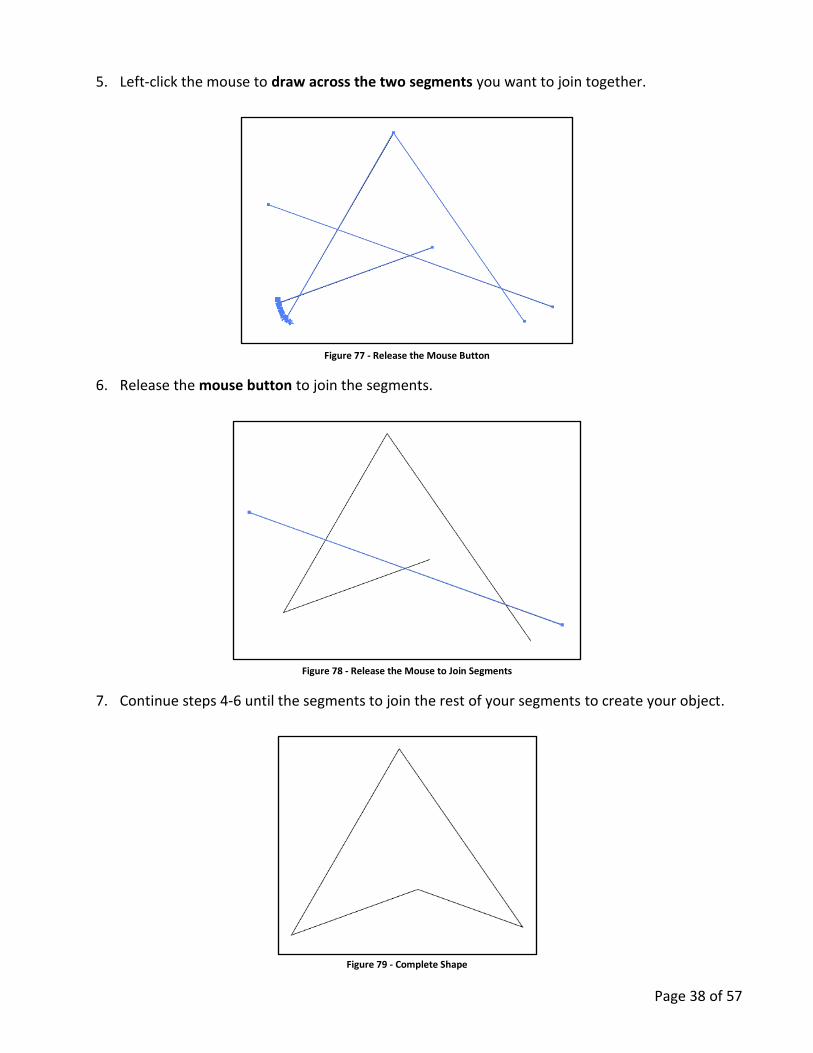
5. Left-click the mouse to draw across the two segments you want to join together.
Figure 77 - Release the Mouse Button
6. Release the mouse button to join the segments.
Figure 78 - Release the Mouse to Join Segments
7. Continue steps 4-6 until the segments to join the rest of your segments to create your object.
Figure 79 - Complete Shape
Page 39 of 57
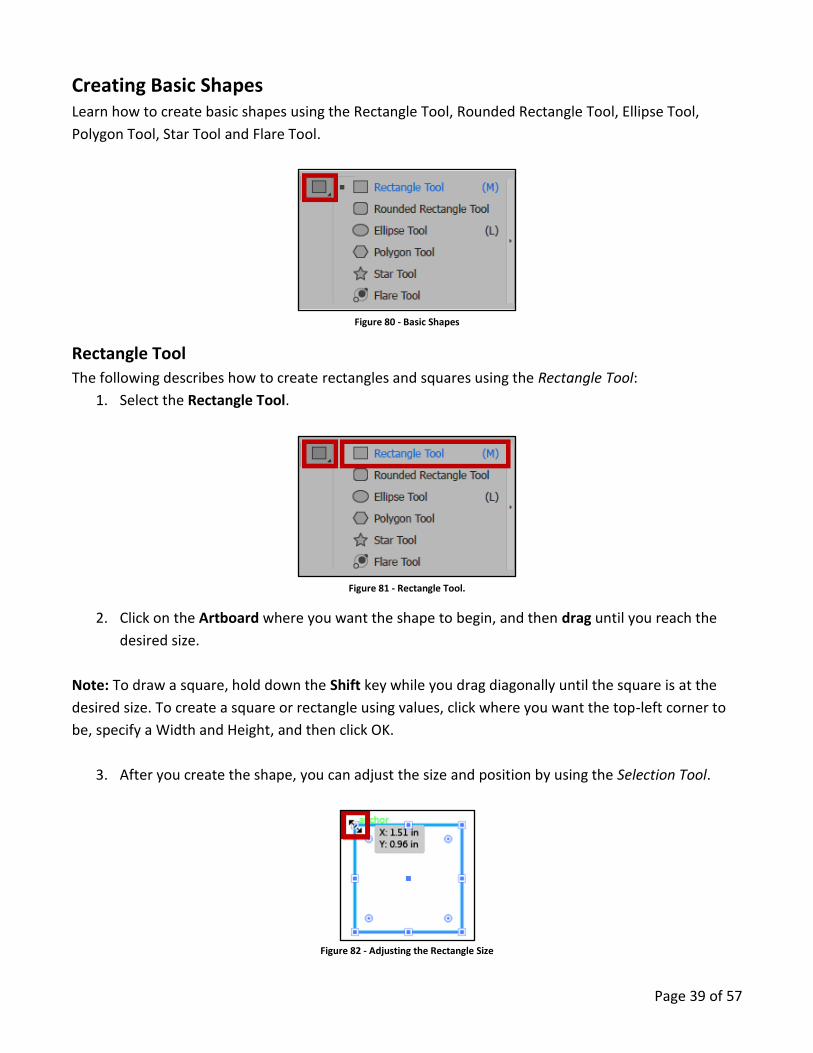
Creating Basic Shapes Learn how to create basic shapes using the Rectangle Tool, Rounded Rectangle Tool, Ellipse Tool,
Polygon Tool, Star Tool and Flare Tool.
Figure 80 - Basic Shapes
Rectangle Tool
The following describes how to create rectangles and squares using the Rectangle Tool:
1. Select the Rectangle Tool.
Figure 81 - Rectangle Tool.
2. Click on the Artboard where you want the shape to begin, and then drag until you reach the
desired size.
Note: To draw a square, hold down the Shift key while you drag diagonally until the square is at the
desired size. To create a square or rectangle using values, click where you want the top-left corner to
be, specify a Width and Height, and then click OK.
3. After you create the shape, you can adjust the size and position by using the Selection Tool.
Figure 82 - Adjusting the Rectangle Size
Page 40 of 57
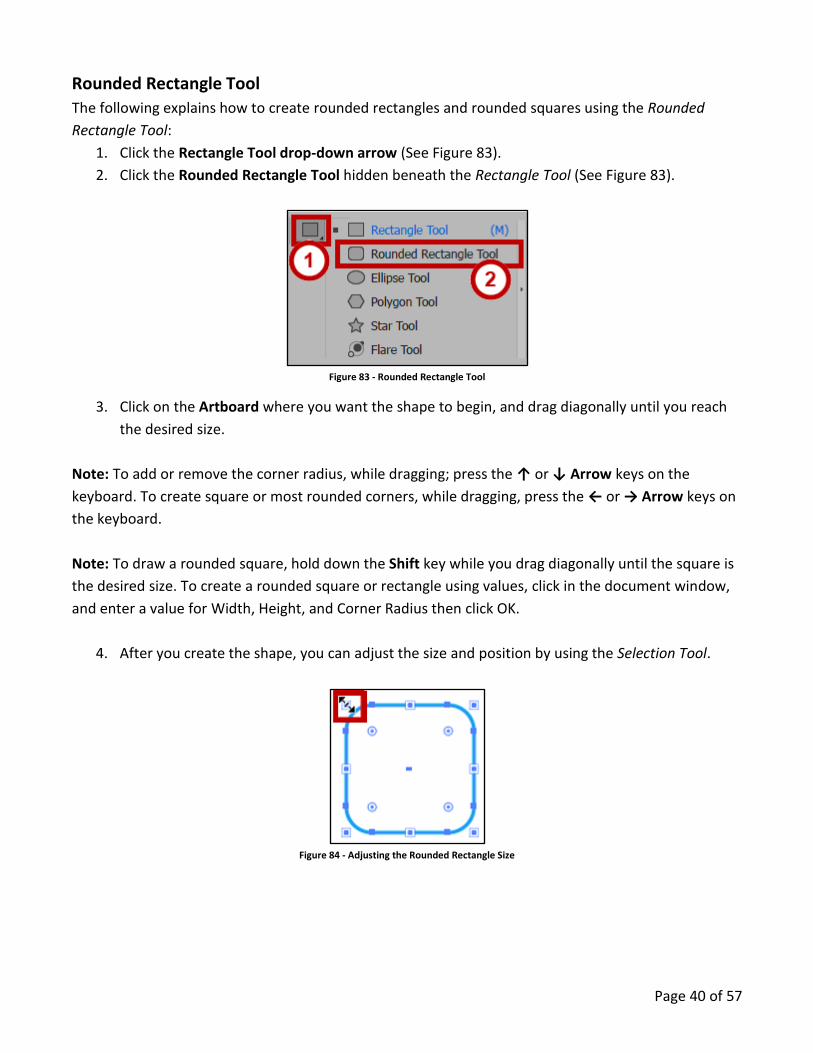
Rounded Rectangle Tool
The following explains how to create rounded rectangles and rounded squares using the Rounded
Rectangle Tool:
1. Click the Rectangle Tool drop-down arrow (See Figure 83).
2. Click the Rounded Rectangle Tool hidden beneath the Rectangle Tool (See Figure 83).
Figure 83 - Rounded Rectangle Tool
3. Click on the Artboard where you want the shape to begin, and drag diagonally until you reach
the desired size.
Note: To add or remove the corner radius, while dragging; press the ↑ or ↓ Arrow keys on the
keyboard. To create square or most rounded corners, while dragging, press the ← or → Arrow keys on
the keyboard.
Note: To draw a rounded square, hold down the Shift key while you drag diagonally until the square is
the desired size. To create a rounded square or rectangle using values, click in the document window,
and enter a value for Width, Height, and Corner Radius then click OK.
4. After you create the shape, you can adjust the size and position by using the Selection Tool.
Figure 84 - Adjusting the Rounded Rectangle Size
Page 41 of 57
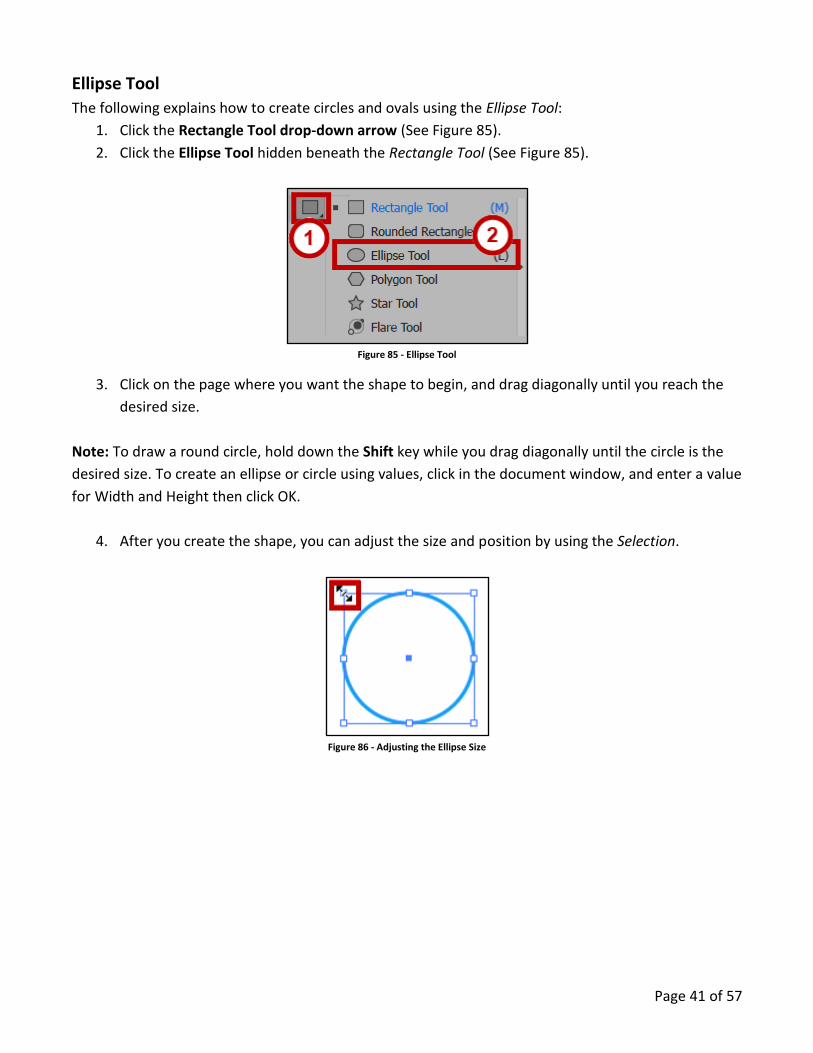
Ellipse Tool
The following explains how to create circles and ovals using the Ellipse Tool:
1. Click the Rectangle Tool drop-down arrow (See Figure 85).
2. Click the Ellipse Tool hidden beneath the Rectangle Tool (See Figure 85).
Figure 85 - Ellipse Tool
3. Click on the page where you want the shape to begin, and drag diagonally until you reach the
desired size.
Note: To draw a round circle, hold down the Shift key while you drag diagonally until the circle is the
desired size. To create an ellipse or circle using values, click in the document window, and enter a value
for Width and Height then click OK.
4. After you create the shape, you can adjust the size and position by using the Selection.
Figure 86 - Adjusting the Ellipse Size
Page 42 of 57
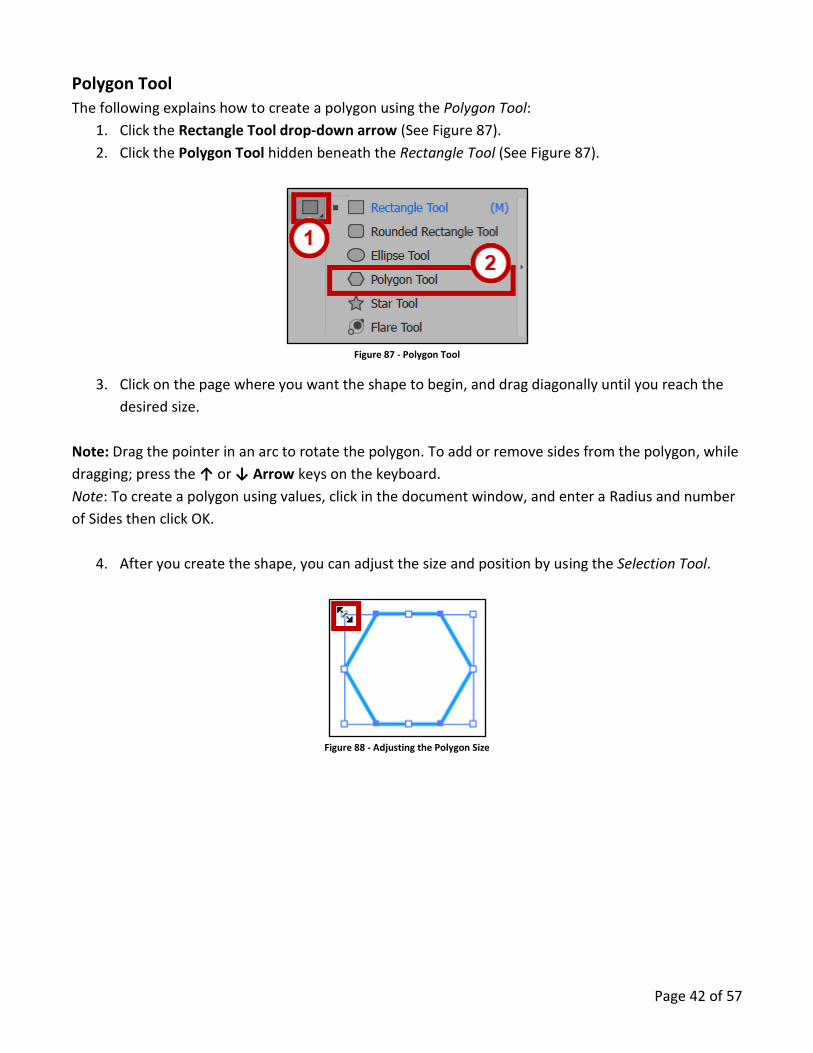
Polygon Tool
The following explains how to create a polygon using the Polygon Tool:
1. Click the Rectangle Tool drop-down arrow (See Figure 87).
2. Click the Polygon Tool hidden beneath the Rectangle Tool (See Figure 87).
Figure 87 - Polygon Tool
3. Click on the page where you want the shape to begin, and drag diagonally until you reach the
desired size.
Note: Drag the pointer in an arc to rotate the polygon. To add or remove sides from the polygon, while
dragging; press the ↑ or ↓ Arrow keys on the keyboard.
Note: To create a polygon using values, click in the document window, and enter a Radius and number
of Sides then click OK.
4. After you create the shape, you can adjust the size and position by using the Selection Tool.
Figure 88 - Adjusting the Polygon Size
Page 43 of 57
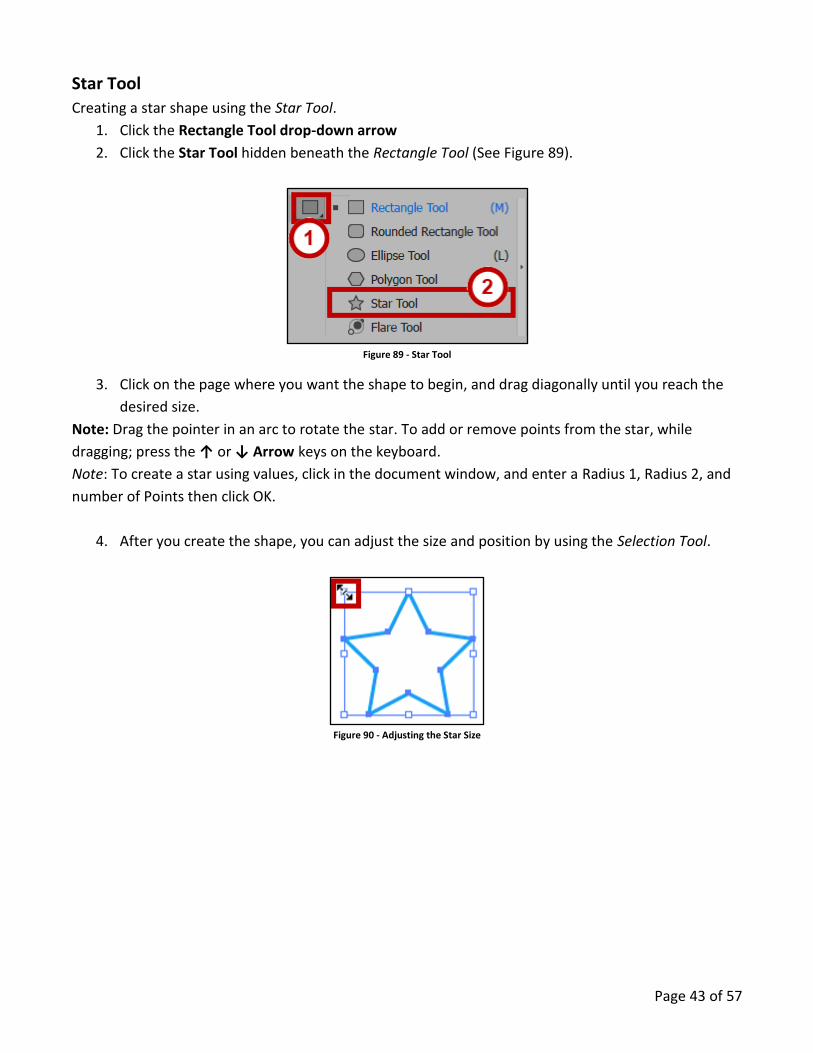
Star Tool
Creating a star shape using the Star Tool.
1. Click the Rectangle Tool drop-down arrow
2. Click the Star Tool hidden beneath the Rectangle Tool (See Figure 89).
Figure 89 - Star Tool
3. Click on the page where you want the shape to begin, and drag diagonally until you reach the
desired size.
Note: Drag the pointer in an arc to rotate the star. To add or remove points from the star, while
dragging; press the ↑ or ↓ Arrow keys on the keyboard.
Note: To create a star using values, click in the document window, and enter a Radius 1, Radius 2, and
number of Points then click OK.
4. After you create the shape, you can adjust the size and position by using the Selection Tool.
Figure 90 - Adjusting the Star Size

Page 44 of 57
The Flare Tool
Use the Flare Tool to create special effects within your drawing. The tool has properties that make it
interact with what is beneath it. It has the effect of a lens flare from a camera, creating flare objects
with a bright center, a halo, and rays and rings. The following explains how to use the tool:
1. Click the Rectangle Tool drop-down arrow (See Figure 89).
2. Click the Flare Tool hidden beneath the Rectangle Tool (See Figure 89).
Figure 91 - Flare Tool
3. Click on the page where you want the shape to begin, and drag diagonally until you reach the
desired size.
4. Flares include a center handle and an end handle. Use the handles to position the flare and its
rings. The center handle is in the bright center of the flare. The flare path begins from this
point.
Figure 92 - Flare Path
Page 45 of 57
Editing Tools The Editing Tools allow you to fine tune your drawings.
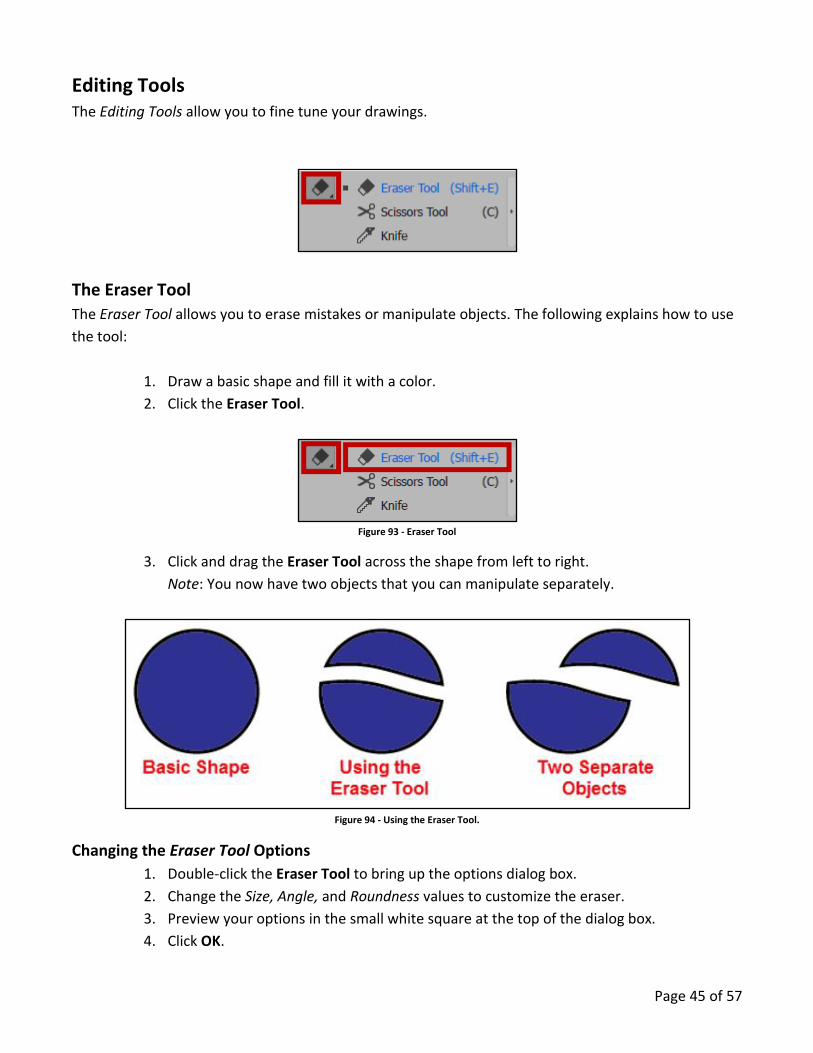
The Eraser Tool
The Eraser Tool allows you to erase mistakes or manipulate objects. The following explains how to use
the tool:
1. Draw a basic shape and fill it with a color.
2. Click the Eraser Tool.
Figure 93 - Eraser Tool
3. Click and drag the Eraser Tool across the shape from left to right.
Note: You now have two objects that you can manipulate separately.
Figure 94 - Using the Eraser Tool.
Changing the Eraser Tool Options
1. Double-click the Eraser Tool to bring up the options dialog box.
2. Change the Size, Angle, and Roundness values to customize the eraser.
3. Preview your options in the small white square at the top of the dialog box.
4. Click OK.

Page 46 of 57
Shape Builder Tool The Shape Builder Tool is an interactive tool for creating complex shapes by the merging and erasing of
simple shapes.
Figure 95 - Shape Builder Tool
1. Create several overlapping shapes.
Figure 96 - Overlapping Shape.
2. Select the shapes that you want to combine with the Selection Tool.
Figure 97 - Select the Shapes with the Selection Tool
3. Select the Shape Builder Tool.
Figure 98 - Shape Builder Tool
Page 47 of 57
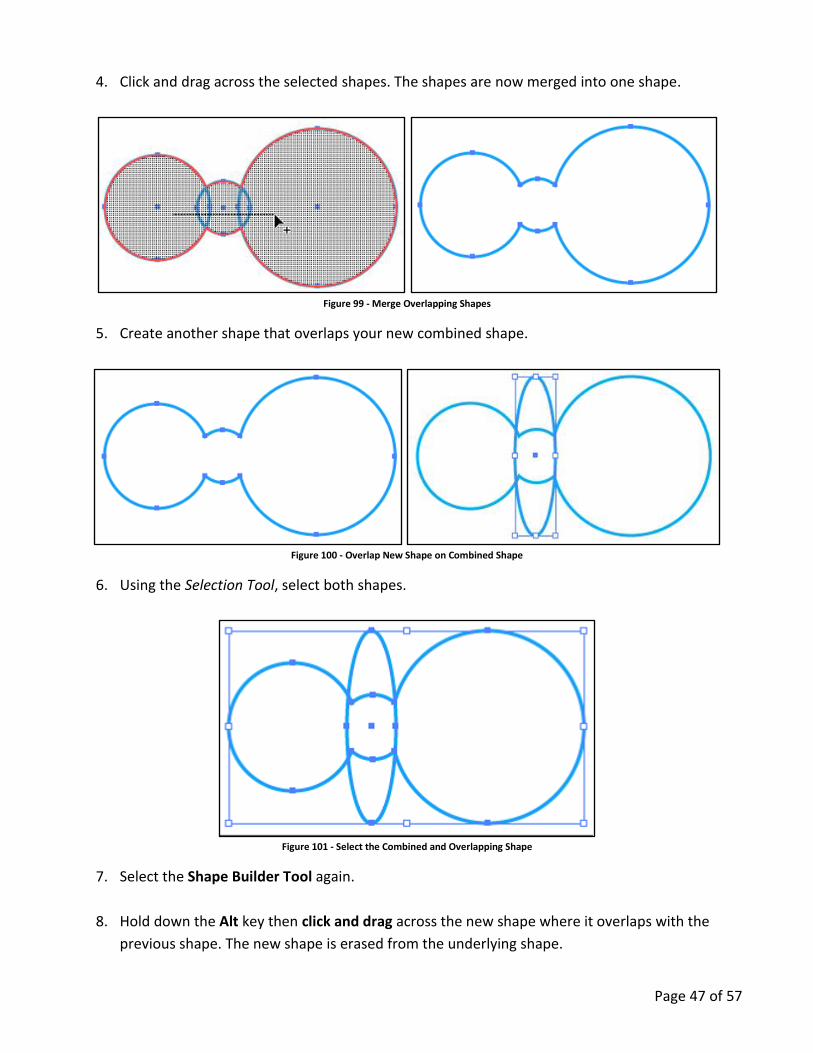
4. Click and drag across the selected shapes. The shapes are now merged into one shape.
Figure 99 - Merge Overlapping Shapes
5. Create another shape that overlaps your new combined shape.
Figure 100 - Overlap New Shape on Combined Shape
6. Using the Selection Tool, select both shapes.
Figure 101 - Select the Combined and Overlapping Shape
7. Select the Shape Builder Tool again.
8. Hold down the Alt key then click and drag across the new shape where it overlaps with the
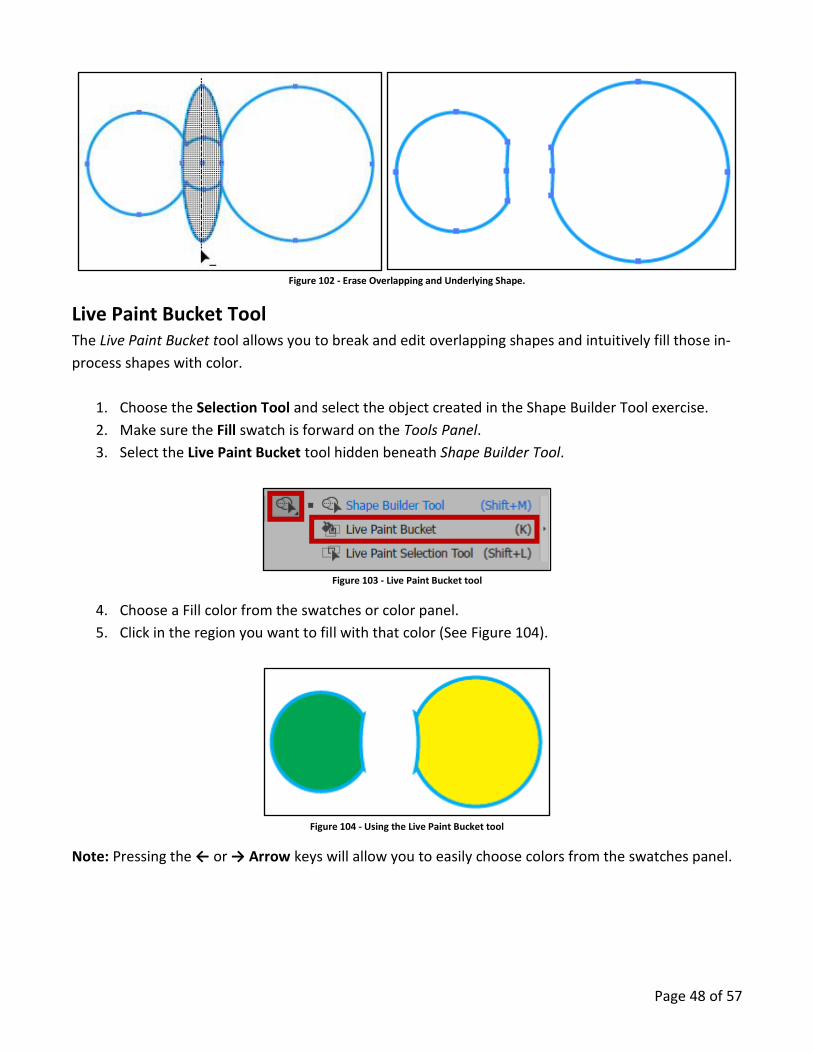
previous shape. The new shape is erased from the underlying shape.
Page 48 of 57
Figure 102 - Erase Overlapping and Underlying Shape.
Live Paint Bucket Tool The Live Paint Bucket tool allows you to break and edit overlapping shapes and intuitively fill those in-
process shapes with color.
1. Choose the Selection Tool and select the object created in the Shape Builder Tool exercise.
2. Make sure the Fill swatch is forward on the Tools Panel.
3. Select the Live Paint Bucket tool hidden beneath Shape Builder Tool.
Figure 103 - Live Paint Bucket tool
4. Choose a Fill color from the swatches or color panel.
5. Click in the region you want to fill with that color (See Figure 104).
Figure 104 - Using the Live Paint Bucket tool
Note: Pressing the ← or → Arrow keys will allow you to easily choose colors from the swatches panel.
Page 49 of 57
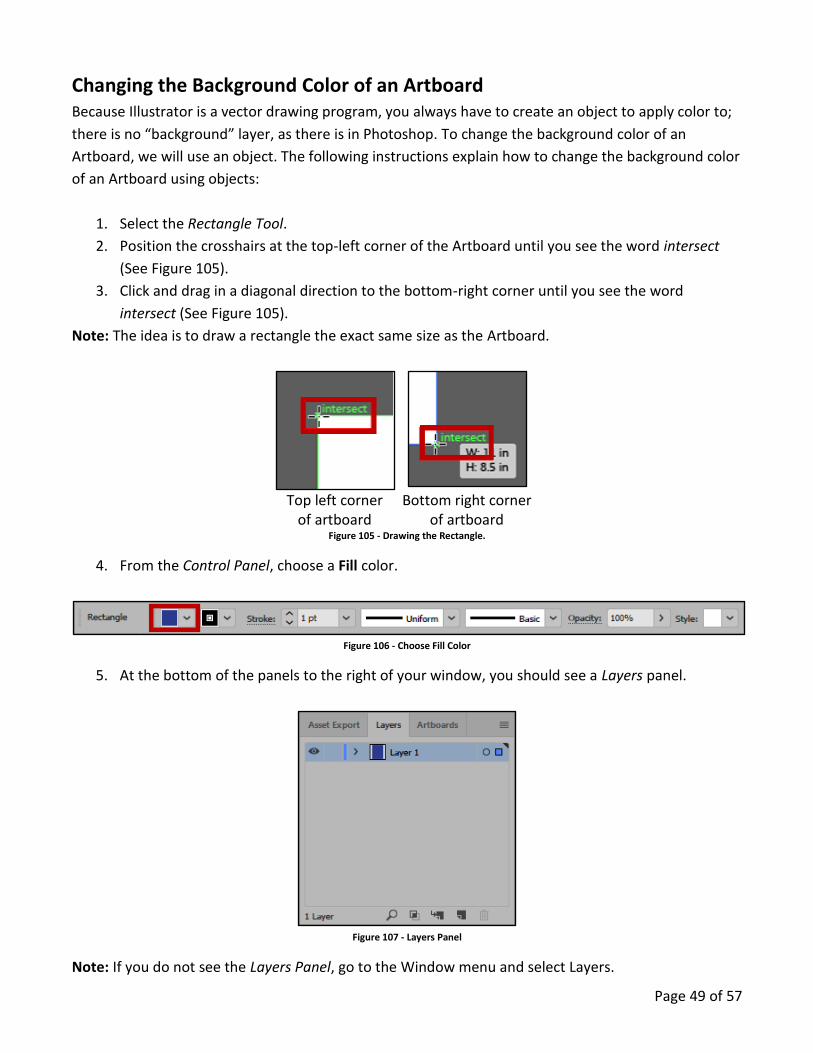
Changing the Background Color of an Artboard Because Illustrator is a vector drawing program, you always have to create an object to apply color to;
there is no “background” layer, as there is in Photoshop. To change the background color of an
Artboard, we will use an object. The following instructions explain how to change the background color
of an Artboard using objects:
1. Select the Rectangle Tool.
2. Position the crosshairs at the top-left corner of the Artboard until you see the word intersect
(See Figure 105).
3. Click and drag in a diagonal direction to the bottom-right corner until you see the word
intersect (See Figure 105).
Note: The idea is to draw a rectangle the exact same size as the Artboard.
Top left corner
of artboard Bottom right corner
of artboard Figure 105 - Drawing the Rectangle.
4. From the Control Panel, choose a Fill color.
Figure 106 - Choose Fill Color
5. At the bottom of the panels to the right of your window, you should see a Layers panel.
Figure 107 - Layers Panel
Note: If you do not see the Layers Panel, go to the Window menu and select Layers.

Page 50 of 57
6. In the Layers Panel, notice Layer 1. To the far left of Layer 1 you will see an open eye. Next to
the eye, there will be an empty square. Click the empty square. A lock will appear, locking this
layer (See Figure 108). If you try to create art on the Artboard now, you will not be able to do
so.
Note: We are locking this layer to prevent it from moving as we create art on the artboard.
Figure 108 - Locked Layer
7. Click the Create New Layer icon at the bottom of the Layers panel, next to the trash can.
Figure 109 - Create New Layer
8. You can now begin creating art on the Artboard.
Note: If you plan on changing the background color of your Artboard, it is recommended that you do
this, before you begin creating art on the Artboard. Changing the background color after you have
created art, may cause your art to be hidden from view.

Page 51 of 57
Figure 110 - Changing the Artboard Background Color
Text There are several types of text that you can add to and Illustrator file. The following instructions will
explain how to apply Point type text and Area type text. The instructions will also explain how to add
text to a path, and how to add text on a closed shape.
Figure 111 - Type Tools

Page 52 of 57
Point Type
Point type is a horizontal or vertical line of text that begins where you click and expands as you enter
characters.
1. Select the Type Tool.
2. Click where you want to begin typing.
Note: Press Enter to start a new line.
Figure 112 - Type Tool Text
Area Type
Area type uses the boundaries of an object to control the flow of characters, either horizontally or
vertically. When the text reaches a boundary, it automatically wraps to fit inside the defined area.
1. Select the Type Tool.
2. Click and drag on the page to create a textbox. This will be the area that your text will be
displayed.
3. Begin typing and continue until you are done. Your text will automatically wrap to the next line
(See Figure 113).
Note: You do not need to press Enter to start a new line. To view the area type options dialog box,
double-click the Type Tool. Enter the desired specification for the textbox, then click OK.
Figure 113 - Area Type Text.

Page 53 of 57
Adding Text to a Path
1. Create a path using the Pen, Line, or Pencil Tool.
2. Select the Type Tool.
3. Hover over the start of the path until your cursor turns into an I-bar with a squiggle, and then
click.
Figure 114 - I Bar Cursor with a Squiggle Line
4. Begin typing. Your text will run along the selected path.
Figure 115 - Adding Text to a Path
Adding Text on a Closed Shape
1. Create a closed shape, a circle or oval for example.
2. Select the Type Tool.
3. Hover over the path of the closed shape until you see the I-bar become rounded
Figure 116 - I Bar Cursor with a Circle on a Closed Shape
4. Hold down the Alt key to change the icon to the squiggle line (See Figure 117).
Figure 117 - I Bar Cursor with a Squiggle Line on a Closed Shape
Page 54 of 57
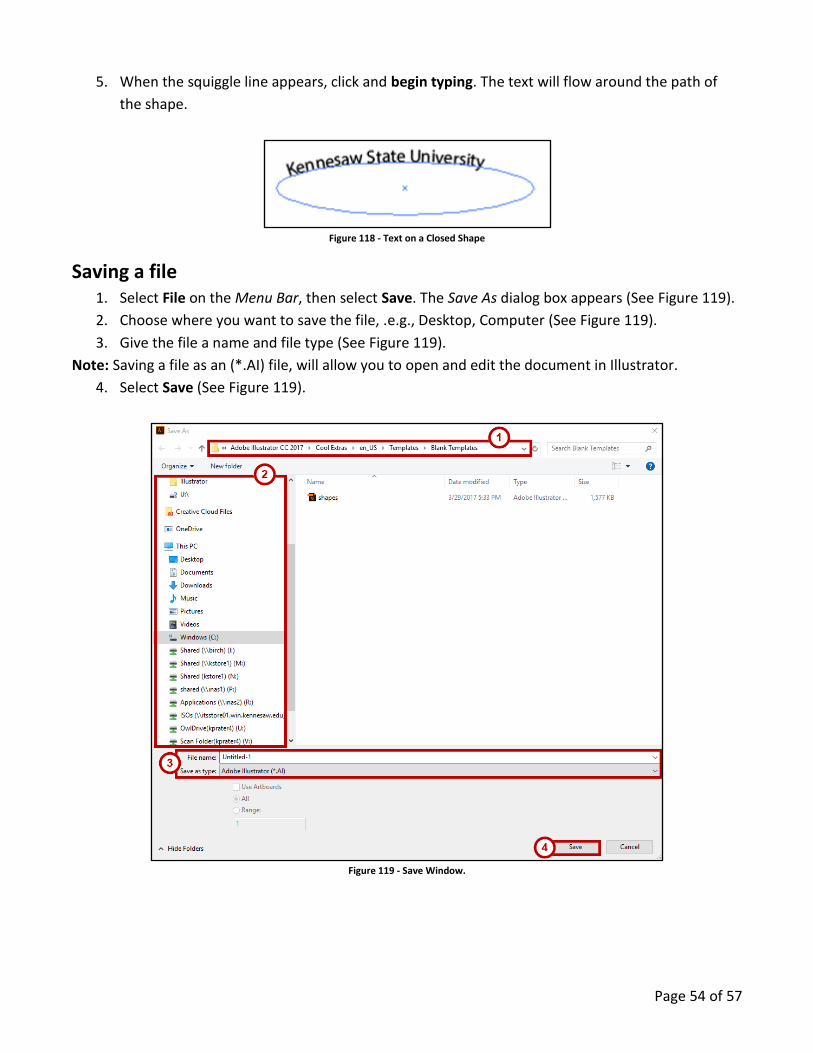
5. When the squiggle line appears, click and begin typing. The text will flow around the path of
the shape.
Figure 118 - Text on a Closed Shape
Saving a file 1. Select File on the Menu Bar, then select Save. The Save As dialog box appears (See Figure 119).
2. Choose where you want to save the file, .e.g., Desktop, Computer (See Figure 119).
3. Give the file a name and file type (See Figure 119).
Note: Saving a file as an (*.AI) file, will allow you to open and edit the document in Illustrator.
4. Select Save (See Figure 119).
Figure 119 - Save Window.
Page 55 of 57
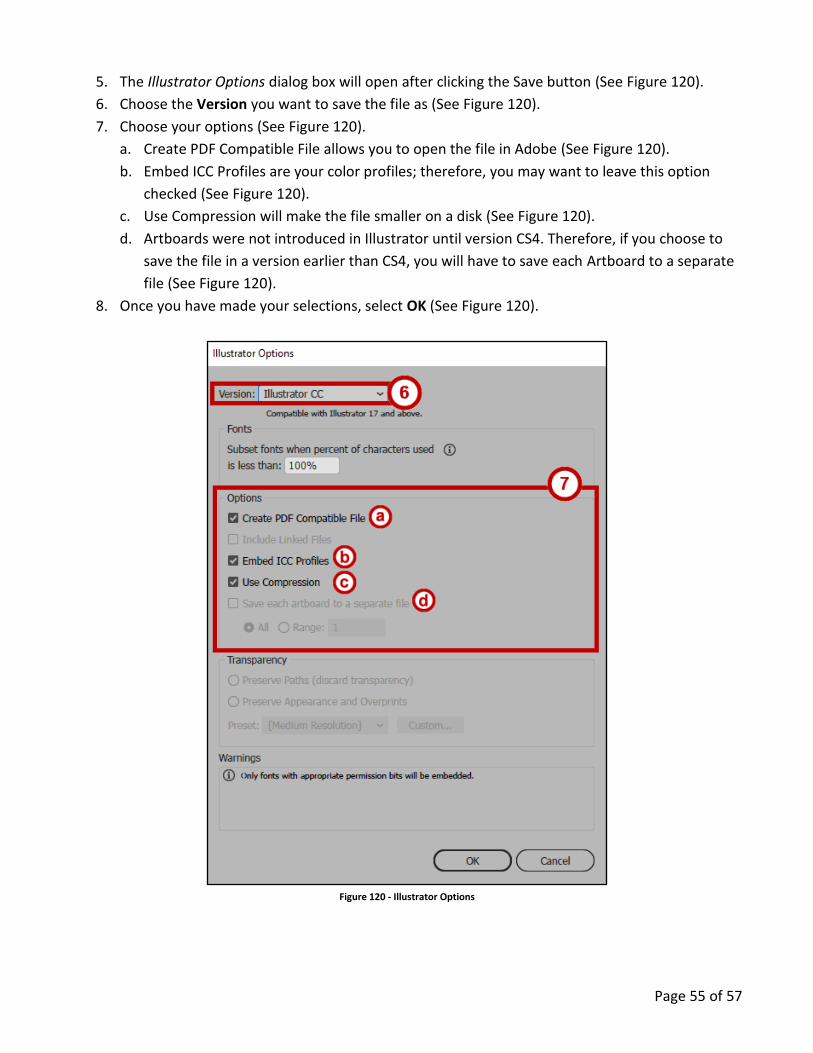
5. The Illustrator Options dialog box will open after clicking the Save button (See Figure 120).
6. Choose the Version you want to save the file as (See Figure 120).
7. Choose your options (See Figure 120).
a. Create PDF Compatible File allows you to open the file in Adobe (See Figure 120).
b. Embed ICC Profiles are your color profiles; therefore, you may want to leave this option
checked (See Figure 120).
c. Use Compression will make the file smaller on a disk (See Figure 120).
d. Artboards were not introduced in Illustrator until version CS4. Therefore, if you choose to
save the file in a version earlier than CS4, you will have to save each Artboard to a separate
file (See Figure 120).
8. Once you have made your selections, select OK (See Figure 120).
Figure 120 - Illustrator Options
Page 56 of 57
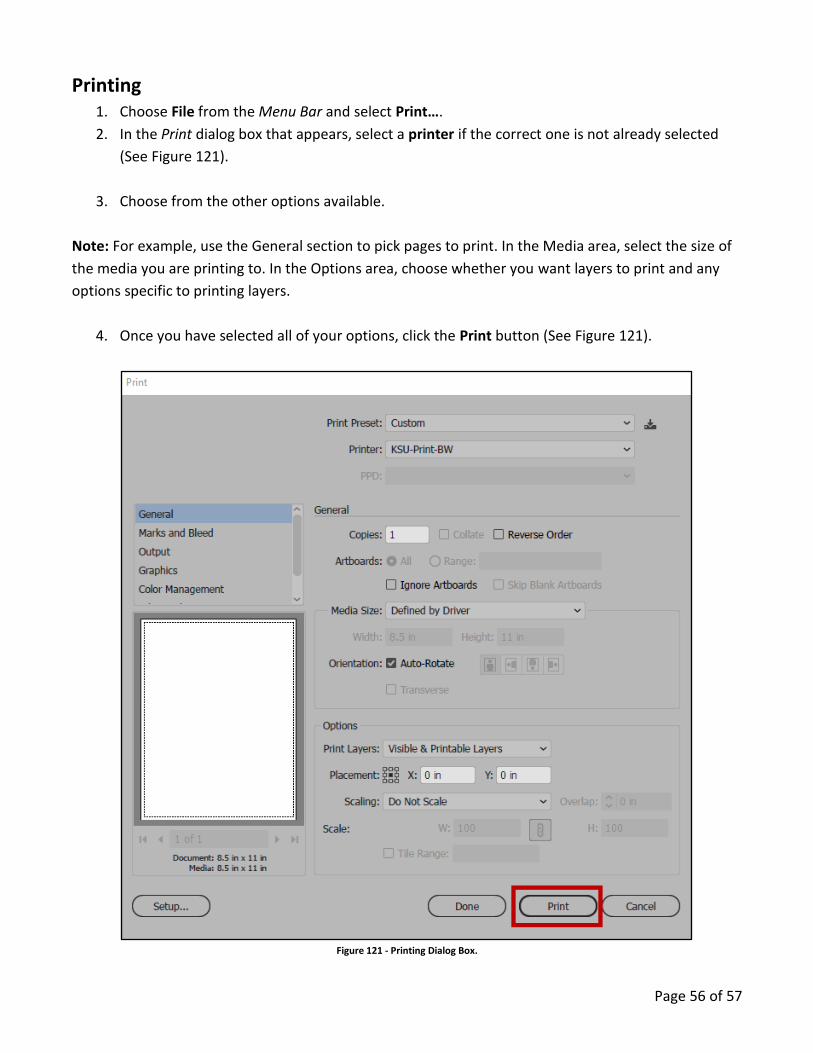
Printing 1. Choose File from the Menu Bar and select Print….
2. In the Print dialog box that appears, select a printer if the correct one is not already selected
(See Figure 121).
3. Choose from the other options available.
Note: For example, use the General section to pick pages to print. In the Media area, select the size of
the media you are printing to. In the Options area, choose whether you want layers to print and any
options specific to printing layers.
4. Once you have selected all of your options, click the Print button (See Figure 121).
Figure 121 - Printing Dialog Box.

Page 57 of 57
Resources OwlTrain has many Illustrator resources available to you on their website:
OwlTrain: http://owltrain.kennesaw.edu/
Additional Help For additional help or installation issues, please contact the KSU Service Desk (Faculty & Staff) or the
KSU Student Help Desk (Students).
KSU Service Desk for Faculty & Staff
Phone: 470-578-6999
Email: [email protected]
Website: http://uits.kennesaw.edu/
KSU Student Help Desk
Phone: 470-578-3555
Email: [email protected]
Website: http://uits.kennesaw.edu/


