Download - Gettingstarted Guide


E-PrimeGETTING STARTED GUIDE
Walter Schneider*, Amy Eschman and Anthony ZuccolottoPsychology Software Tools, Inc.
*Learning Research and Development Center, University of Pittsburgh
E-Prime® Version Copyright © 2007 Psychology Software Tools, Inc.
Publisher: Psychology Software Tools, Inc.2050 Ardmore BoulevardSuite 200Pittsburgh, PA 15221-4610
Printed in the United States of America.
All rights reserved. Except as permitted under the United States Copyright Act of 1976, no part of this publication may be reproduced or distributed in any form or by any means, or stored in a database or retrieval system, without the prior written permission of Psychology Software Tools, Inc.
Software Notice: The enclosed software is provided for use by a single user who has purchased the manual. The software MAY NOT be reproduced or distributed to others. Unauthorized reproduction and/or sales of the enclosed software may result in criminal and civil prosecution. (17 USC 506).
InstallationIf you experience any problems during installation, it is best to uninstall any old versions of E-Prime 2.0 previously installed on your system, then reinstall. To uninstall a previous version:
For Windows XP• Open the Control Panel from the Start menu or from My Computer. • Open Add/Remove Programs. • From the list of installed programs, select E-Prime 2.0, and click the Change/Remove button. • In the InstallShield Wizard dialog, select Remove. Click Next to continue. • Click Yes to remove all components, and then click Finish.
For Windows Vista• Open the Control Panel from the Start menu or from My Computer. • Open Programs and Features. • From the list of installed programs, select E-Prime 2.0, and click the Change button. • Click Continue in the User Account Control dialog. • In the InstallShield Wizard dialog, select Remove. Click Next to continue. • Click Yes when prompted to remove the selected application, and then click Finish.
Reboot your computer before proceeding with the installation.
In Windows Explorer, make a backup copy of any experiments or data you would like to save from previous versions. Then delete the E-Prime 2.0 folder. This folder is located in Program Files(x86)\Pst\E-Prime…folder if running the 64 bit edition of the operating system, and …Program Files\PST\E-Prime if running the 32-bit edition the operating system.
NOTE: Before using E-Prime, you must complete both the Installation and Registration and Validation processes below. Your serial number and hardware key will be required.
Installation:1) Close all Window applications.2) Insert the CD into your CD-ROM drive.3) The Setup program prompts you through the installation process. Click Next to begin installing.4) Please read the License Agreement in full, and accept the terms of use. Click Next to continue.5) Enter or verify your User Name and University/Company Name in the Customer Information dialog, and click Next to continue.6) Select the type of installation, and click Next to continue. You are given the following installation options: Complete, Custom, or Subject Station. If you choose Complete or Subject Station, E-Prime automatically performs the installation. If you choose Custom, you will need to select desired options. Refer to Chapter 1 – Introduction in the E-Prime User’s Guide for a description of installation options.7) Click Install to begin the installation. By default, E-Prime installs to the ...Program Files(x86)\Pst\E-Prime…folder if running the 64 bit edition of the operating system, and …Program Files\PST\E-Prime if running the 32-bit edition the operating system.8) Click Finish. The Setup program launches E-Studio by default, unless you unchecked the “Launch E-Studio” box. This enables you to register your serial number and complete the validation of your license. If your license requires a hardware key, you should have that ready now. Registration and Validation is required before initial use of E-Prime.
Registration and Validation1) Connect the hardware key.2) Launch E-Studio (if not launched automatically by Setup).3) The E-Prime Auto Update screen appears. Click OK. 4) The E-Prime Registration screen appears. Enter your name, institution, and serial number and click OK.
NOTE: A license upgrade requires both the old hardware key (v1.x or 2.0 Standard) and the new v2.0 hardware key to complete the validation. A hardware key may only be used once for validation. Once validation is complete, you will not be prompted to validate again.

E-Prime Resources
Where to find informationCurrently, over 500 pages of documentation are available in various forms. We recommend that you work through the Getting Started Guide in its entirety. This provides the foundation for the learning to use the applications which comprise E-Prime.
Getting Started GuideThe Getting Started Guide (GSG), includes step-by-step tutorials to walk you through the basics of E-Prime.• Tutorial 1 — E-Studio (estimated time to complete: 40 – 60 minutes).• Tutorial 2 — E-Merge (estimated time to complete: 15 minutes).• Tutorial 3 — E-DataAid (estimated time to complete: 15 minutes).• Advanced Tutorials — Modifying basic experiments to use image, sound, and movie stimuli as well as user-written script.
User’s Guide and Reference GuideThe User’s Guide and Reference Guide are included as PDF files on your E-Prime software CD, and are also available for download at the E-Prime Web Support site at www.pstnet.com/e-prime/support. It is extremely useful to have the manuals as a reference point as you work through the system. Each volume contains valuable information that will help you master the applications within E-Prime.
Sample ExperimentsOpen, inspect, and run each program from the Samples folder (default installation C:\My Documents\My Experiments\Samples).• BasicRT - text reaction time experiment• MovieRT - movie reaction time experiment• PictureRT - picture reaction time experiment• SlideRT - slide reaction time experiment• SoundRT - sound reaction time experiment• NestingRT - allows selection of different word lists from different conditions• NestingXRT - using extended responses, borders, colors, and inputs from multiple devices• MultipleDisplayRT- using multiple monitor displays NOTE: The MultipleDisplayRT sample is only available in E-Prime 2.0 Professional.
It is recommended that you inspect and run at least one of the sample experiments. Consider making a simple modification to the program.
Resource Description Format Location
Getting Started Guide (this booklet)
Quick reference for general information, step-by-step tutorials for each application within E-Prime.
PrintedIncluded with E-Prime shipment, on E-Prime software CD, AND part of the E-Prime installation (accessed via the E-Prime 2.0 menu from the Start menu).
User’s Guide Provides technical details about each application. PDF
Included on E-Prime software CD, via the E-Prime 2.0 menu from the Start menu, and from the E-Prime Web Support site.
Reference Guide Fully documents features of each application. PDF
Included on E-Prime software CD, via the E-Prime 2.0 menu from the Start menu, and from the E-Prime Web Support site.
E-Basic Help Fully documents all features of each application.
Windows Help file
Located in the E-Prime 2.0 menu from the Start menu OR in the Help menu within E-Studio.
Application Help Help for individual applications
Windows Help file Accessed through the Help menu within the application.

Working With E-Prime
Create your First Experiment Use one of the sample experiments as a foundation from which to build your first experiment, or start from scratch, using the drag-and-drop method in E-Studio. Since this is your first novel E-Prime experiment, it is important to keep it simple (e.g., only 2 conditions, four stimuli). Once you have the simple version of the experiment running properly, you can add to it and make it more complex (estimated time to complete: 20-90 minutes for simple experiments). For additional assistance, it is recommended that you read Chapter 2 - Using E-Studio in the E-Prime User’s Guide.
Reporting ProblemsE-Prime is very stable, but your feedback when errors occur will greatly aid us in refining the E-Prime system.
The E-Prime Web Support site, which can be found at www.pstnet.com/e-prime/support, provides the latest updates, a Knowledge Base section, samples, downloads, and a personal support interface to communicate with PST support representatives. When reporting problems, it is essential that you minimally report the following information:
• User Information including name, institution, serial number, phone number, and e-mail address.• Machine Information including Windows version, manufacturer/model of your PC, type of CPU, amount of memory, etc. This information is available via the System properties from the Control Panel.• Information about the problem including the name of the application in which the problem occurred (E-Studio, E-Run, etc.), version number of the application, and the text of any error messages you receive. If applicable, please attach a copy of your .ES2 file.
The PST User Forum, found at http://support.pstnet.com/forum/, is a free service provided by PST for end users to shareinformation with each other about any of PST’s products, including E-Prime. We encourage you to participate in the PSTUser forum as a means to share information about E-Prime and obtain assistance from a growing and experienced group ofE-Prime users.
Useful InformationHow to abort an experiment early:Press Ctrl+Alt+Shift to terminate the E-Run program. Click OK in the dialog box verifying whether the experiment should be terminated. Click OK in the dialog box displaying the “Experiment Terminated by User” message. Please note that this feature is used to assist with faster testing or debugging of an experiment. When an experiment is terminated early using this method, no data file is written.
Your Serial Number:You serial number is provided on the Registration Card included with your system. Place the card in an appropriate place so that it is accessible. Additionally, your serial number can be found in the About E-Studio dialog box via the Help menu within E-Studio. DO NOT LOSE THIS INFORMATION. You MUST provide your serial number for technical support.

Table of Contents
Tutorial 1: E-Studio 7 This tutorial will walk you through the creation of your first complete E-Prime experiment.
Tutorial 2: E-Merge 34 This tutorial illustrates how to use the E-Merge application to quickly and easily create a single data file from multiple single session files.
Tutorial 3: E-DataAid 42 This tutorial walks you through the basic steps of viewing, editing and filtering an E-Prime data file. Furthermore, this tutorial illustrates how to create simple descriptive statistical tables and charts as well as export data external packages.
Advanced Tutorials: 50 Four advanced tutorials are available. Do not proceed to the advanced tutorials until you have successfully completed Tutorial 1.
Advanced Tutorial 1: Modifying for image presentation 52
This tutorial uses the experiment created within Tutorial 1: E-Studio and modifies it to use bitmaps as stimuli.
Advanced Tutorial 2: Modifying for simultaneous image and sound presentation 57
This tutorial modifies the experiment created within Tutorial 1: E-Studio so that a wav file is played in conjunction with the text stimuli presentations.
Advanced Tutorial 3: Modifying for movie presentation 66
This tutorial modifies the experiment created within Tutorial 1: E-Studio to present a movie in conjunction with text and sound.
Advanced Tutorial 4: Adding InLine script 72
This tutorial modifies the experiment created within Tutorial 1: E-Studio to add E-Basic script via an InLine Object.
Good Practices, Testing, & Help: 81 This section outlines the preparatory steps involved with creating a successful E-Prime experiment.
Troubleshooting: 83 This section provides assistance on troubleshooting the most common errors new users make. Specifically, this section provides hints on resolving common mistakes like mistyping an object name.
10
E-Prime: Getting Started Guide Tutorial 1: E-Studio
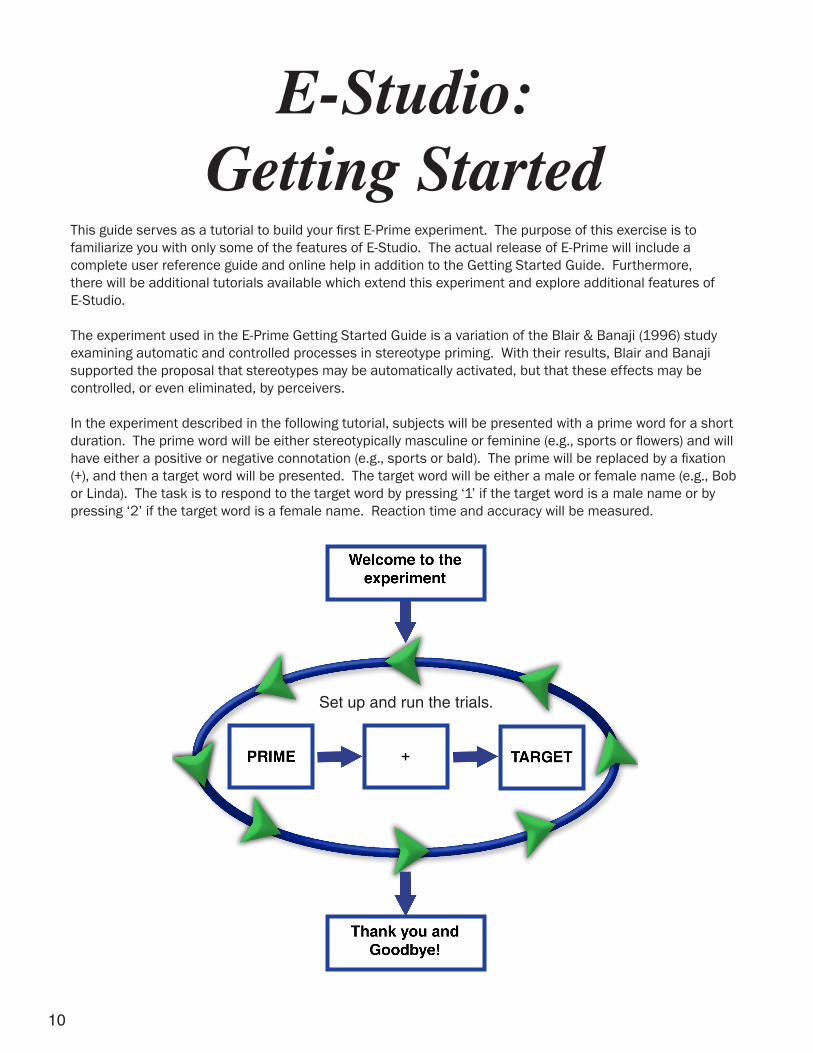
This guide serves as a tutorial to build your first E-Prime experiment. The purpose of this exercise is tofamiliarize you with only some of the features of E-Studio. The actual release of E-Prime will include a complete user reference guide and online help in addition to the Getting Started Guide. Furthermore, there will be additional tutorials available which extend this experiment and explore additional features ofE-Studio.
The experiment used in the E-Prime Getting Started Guide is a variation of the Blair & Banaji (1996) study examining automatic and controlled processes in stereotype priming. With their results, Blair and Banaji supported the proposal that stereotypes may be automatically activated, but that these effects may be controlled, or even eliminated, by perceivers.
In the experiment described in the following tutorial, subjects will be presented with a prime word for a short duration. The prime word will be either stereotypically masculine or feminine (e.g., sports or flowers) and will have either a positive or negative connotation (e.g., sports or bald). The prime will be replaced by a fixation (+), and then a target word will be presented. The target word will be either a male or female name (e.g., Bob or Linda). The task is to respond to the target word by pressing ‘1’ if the target word is a male name or by pressing ‘2’ if the target word is a female name. Reaction time and accuracy will be measured.
E-Studio:Getting Started
Set up and run the trials.

11
E-Prime: Getting Started Guide Tutorial 1: E-Studio
The following is an outline of steps you should take to build your first experiment. It is highly recommended that you proceed through the entire Getting Started Guide in order to learn E-Studio. The purpose of the information on this page is to familiarize you with some terms and schemes used throughout this tutorial.
You are also strongly encouraged to use the figures throughout this document as visual guides. In the figures, you will see various lines and arrows to point out specific areas of interest. Use the table below to interpret the arrows, lines, and terminology.
Click or double click on this object
Drag the object
Double click Press the left mouse button twice in quick succession.
Right click Press and release the right mouse button.
DragPress the left mouse button and hold it as you move the mouse to drag the object to a new location on the screen then release the left mouse button.
DropAfter a drag action as described above, release the left mouse button to place the object in its new location.
Resize window
To resize a window, position the mouse over the edge until the cursor changed to a double-pointed arrow; then drag the window to the desired size. As an alternative, you can use the Window menu (in E-Studio) for quick standardized arrangements.
Select/HighlightClick on the object once or until it is highlighted (i.e., reverse image).
Tab Press the ‘Tab’ key on the keyboard.
The button on the left containing the line will minimize a window. The middle button containing the box will maximize a window. The right button containing the X will close the window.
12
E-Prime: Getting Started Guide Tutorial 1: E-Studio
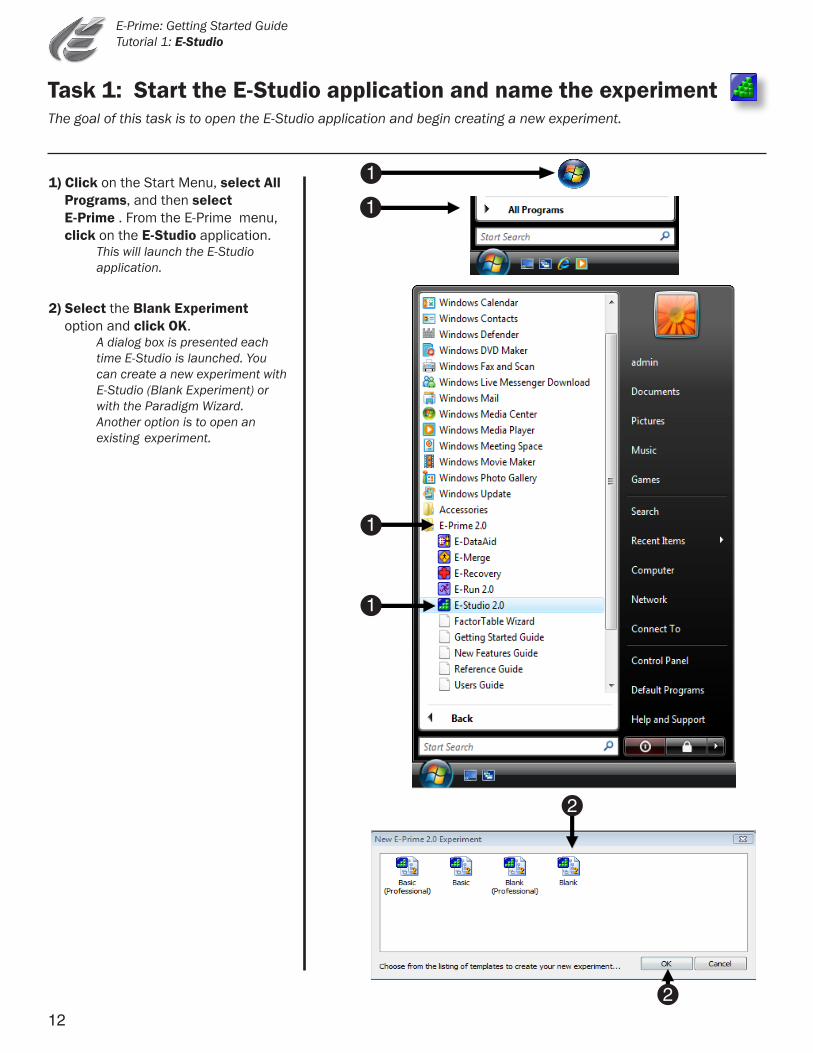
1) Click on the Start Menu, select All Programs, and then select
E-Prime . From the E-Prime menu, click on the E-Studio application.
This will launch the E-Studio application.
2) Select the Blank Experiment option and click OK. A dialog box is presented each time E-Studio is launched. You can create a new experiment with E-Studio (Blank Experiment) or with the Paradigm Wizard. Another option is to open an existing experiment.
The goal of this task is to open the E-Studio application and begin creating a new experiment.
Task 1: Start the E-Studio application and name the experiment
1
1
1
1
2
2
13
E-Prime: Getting Started Guide Tutorial 1: E-Studio
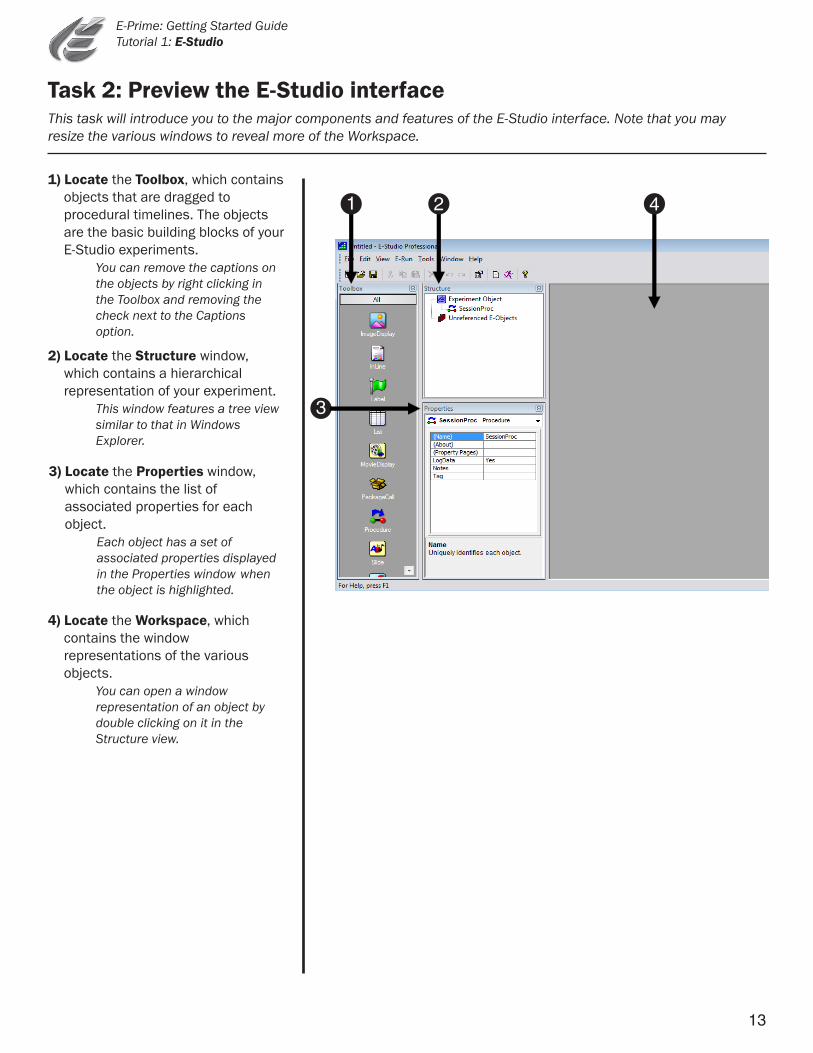
This task will introduce you to the major components and features of the E-Studio interface. Note that you may resize the various windows to reveal more of the Workspace.
Task 2: Preview the E-Studio interface
1) Locate the Toolbox, which contains objects that are dragged to
procedural timelines. The objects are the basic building blocks of your E-Studio experiments.
You can remove the captions on the objects by right clicking in the Toolbox and removing the check next to the Captions option.
2) Locate the Structure window, which contains a hierarchical representation of your experiment.
This window features a tree view similar to that in Windows Explorer.
3) Locate the Properties window, which contains the list of
associated properties for each object. Each object has a set of associated properties displayed
in the Properties window when the object is highlighted.
4) Locate the Workspace, which contains the window representations of the various objects. You can open a window representation of an object by double clicking on it in the Structure view.
3
1
2
4
14
E-Prime: Getting Started Guide Tutorial 1: E-Studio
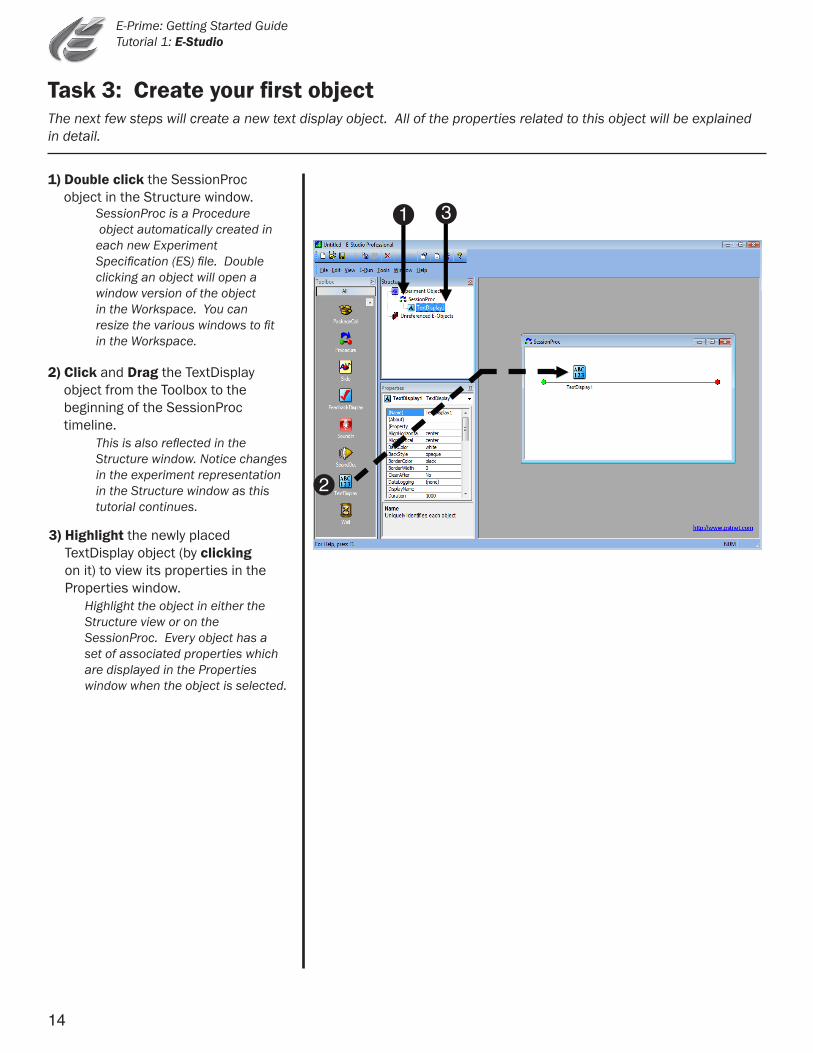
The next few steps will create a new text display object. All of the properties related to this object will be explained in detail.
Task 3: Create your first object
1) Double click the SessionProc object in the Structure window. SessionProc is a Procedure object automatically created in each new Experiment Specification (ES) file. Double clicking an object will open a window version of the object in the Workspace. You can resize the various windows to fit in the Workspace.
2) Click and Drag the TextDisplay object from the Toolbox to the beginning of the SessionProc timeline.
This is also reflected in the Structure window. Notice changes in the experiment representation in the Structure window as this tutorial continues.
3) Highlight the newly placed TextDisplay object (by clicking
on it) to view its properties in the Properties window.
Highlight the object in either the Structure view or on the SessionProc. Every object has a set of associated properties which are displayed in the Properties window when the object is selected.
2
3
1
15
E-Prime: Getting Started Guide Tutorial 1: E-Studio
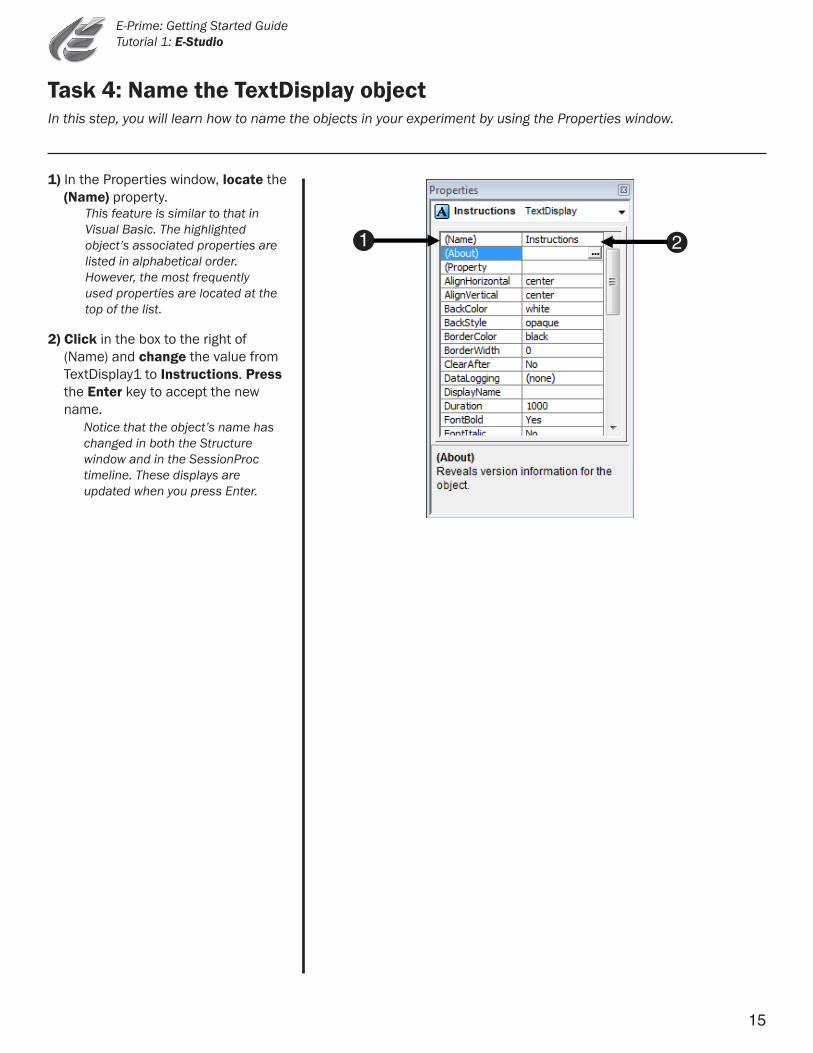
In this step, you will learn how to name the objects in your experiment by using the Properties window.
Task 4: Name the TextDisplay object
1) In the Properties window, locate the (Name) property.
This feature is similar to that in Visual Basic. The highlighted object’s associated properties are listed in alphabetical order. However, the most frequently used properties are located at the top of the list.
2) Click in the box to the right of (Name) and change the value from TextDisplay1 to Instructions. Press the Enter key to accept the new name.
Notice that the object’s name has changed in both the Structure window and in the SessionProc timeline. These displays are updated when you press Enter.
2 1

16
E-Prime: Getting Started Guide Tutorial 1: E-Studio
The goals of this task are to save the experiment and then continue by opening the window representation of the TextDisplay object named “Instructions.”
Task 5: Save the experiment and view the Property Pages
1) From the File menu, select the Save As... command (or press F12). In the My Experiments folder, name the file Tutorial. Click the Save button to dismiss the dialog.
Experiment Specification files receive an .ES extension. The number following the ES indicates the version of E-Studio.
2) Double click the object named Instructions either in the Structure window or the SessionProc timeline.
This will open a window version of the TextDisplay object named Instructions.
3) Click on the Property Pages button in the upper left corner of the Instructions window.
This will open a set of tabbed pages called Property Pages, which will allow you to specify the object’s properties. 2
1
1
3
17
E-Prime: Getting Started Guide Tutorial 1: E-Studio
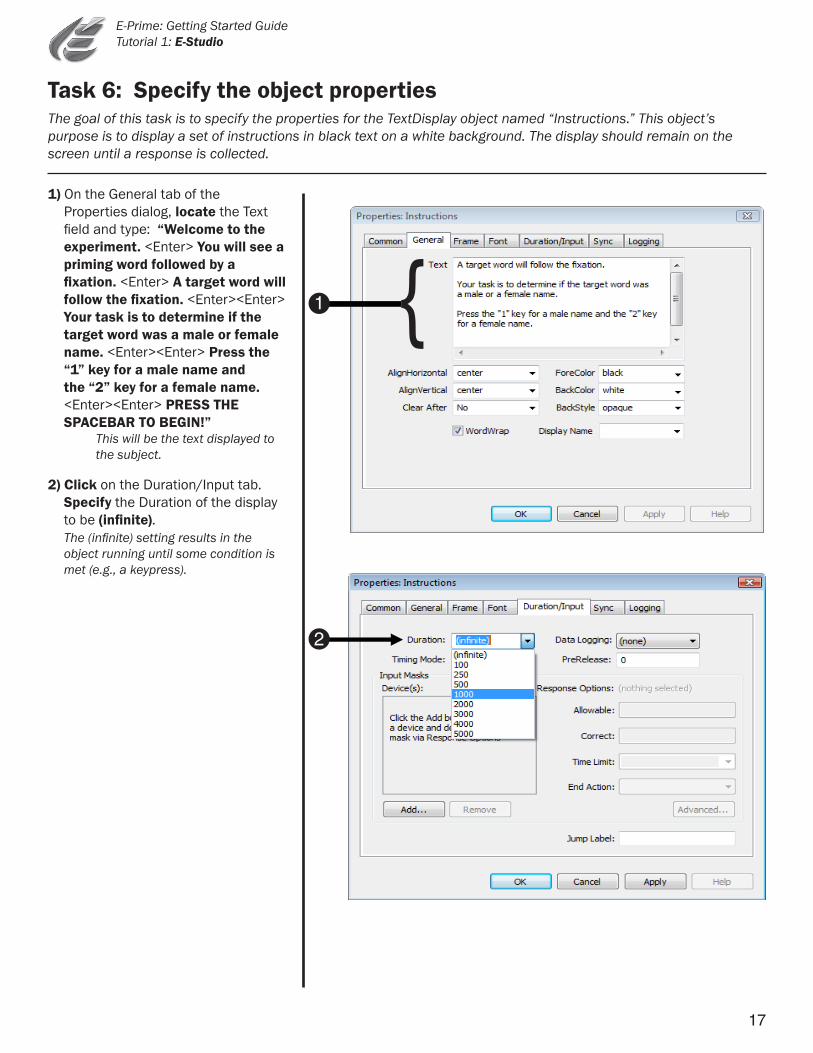
The goal of this task is to specify the properties for the TextDisplay object named “Instructions.” This object’s purpose is to display a set of instructions in black text on a white background. The display should remain on the screen until a response is collected.
Task 6: Specify the object properties
1) On the General tab of the Properties dialog, locate the Text
field and type: “Welcome to the experiment. <Enter> You will see a
priming word followed by a fixation. <Enter> A target word will
follow the fixation. <Enter><Enter> Your task is to determine if the target word was a male or female name. <Enter><Enter> Press the “1” key for a male name and the “2” key for a female name. <Enter><Enter> PRESS THE SPACEBAR TO BEGIN!”
This will be the text displayed to the subject.
2) Click on the Duration/Input tab. Specify the Duration of the display to be (infinite).
The (infinite) setting results in the object running until some condition is met (e.g., a keypress).
{ 1
2
18
E-Prime: Getting Started Guide Tutorial 1: E-Studio
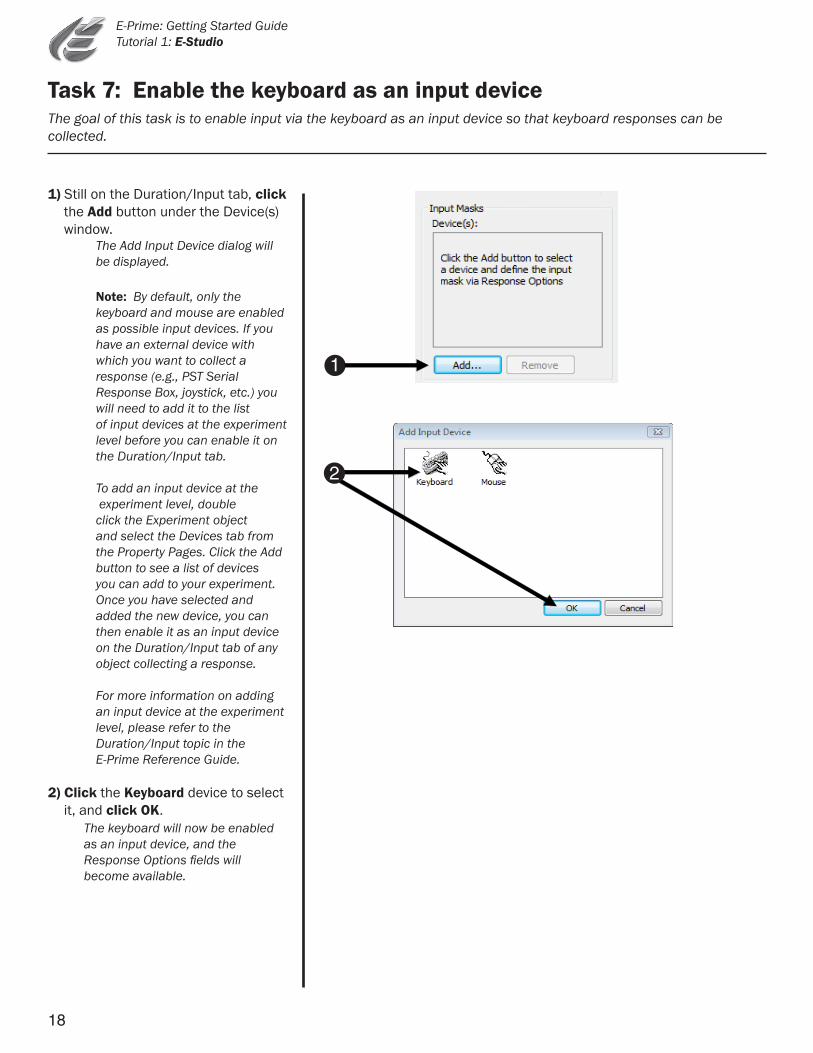
The goal of this task is to enable input via the keyboard as an input device so that keyboard responses can be collected.
Task 7: Enable the keyboard as an input device
1) Still on the Duration/Input tab, click the Add button under the Device(s) window.
The Add Input Device dialog will be displayed.
Note: By default, only the keyboard and mouse are enabled as possible input devices. If you have an external device with which you want to collect a response (e.g., PST Serial Response Box, joystick, etc.) you will need to add it to the list of input devices at the experiment level before you can enable it on the Duration/Input tab.
To add an input device at the experiment level, double click the Experiment object and select the Devices tab from the Property Pages. Click the Add button to see a list of devices you can add to your experiment. Once you have selected and added the new device, you can then enable it as an input device on the Duration/Input tab of any object collecting a response.
For more information on adding an input device at the experiment level, please refer to the Duration/Input topic in the E-Prime Reference Guide.
2) Click the Keyboard device to select it, and click OK.
The keyboard will now be enabled as an input device, and the Response Options fields will become available.
1
2
19
E-Prime: Getting Started Guide Tutorial 1: E-Studio
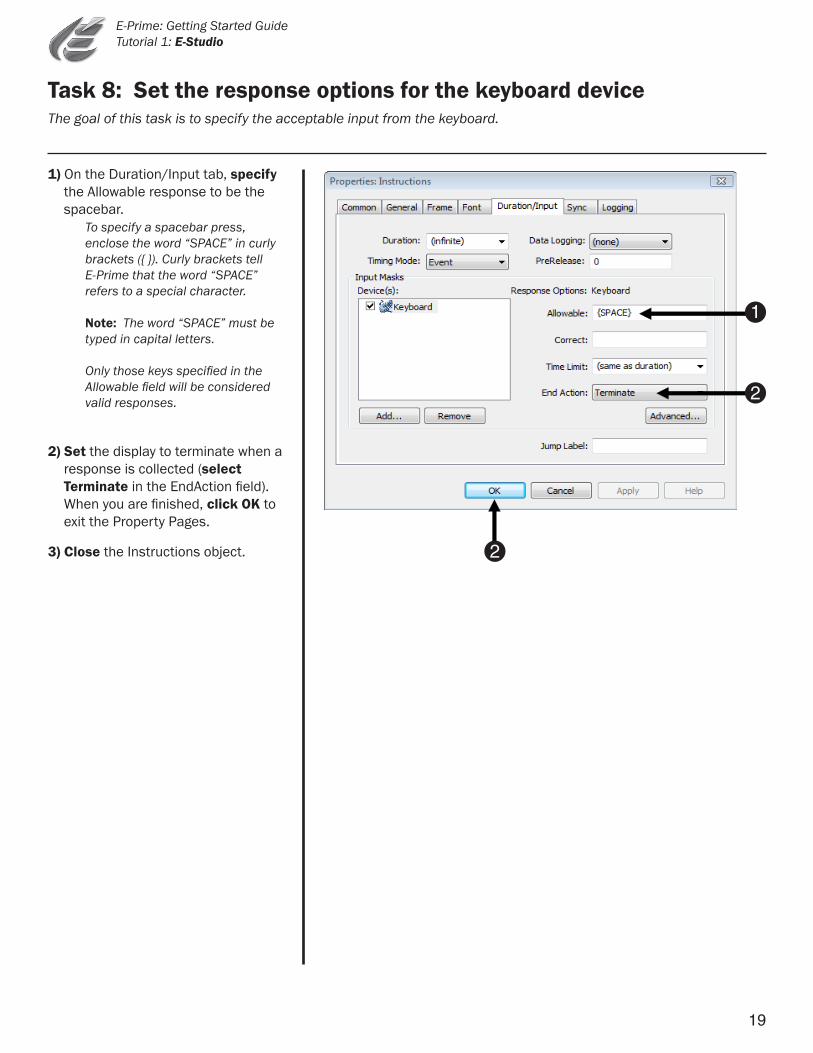
1) On the Duration/Input tab, specify the Allowable response to be the spacebar.
To specify a spacebar press, enclose the word “SPACE” in curly brackets ({ }). Curly brackets tell E-Prime that the word “SPACE” refers to a special character.
Note: The word “SPACE” must be typed in capital letters.
Only those keys specified in the Allowable field will be considered valid responses.
2) Set the display to terminate when a response is collected (select
Terminate in the EndAction field). When you are finished, click OK to exit the Property Pages.
3) Close the Instructions object.
The goal of this task is to specify the acceptable input from the keyboard.
Task 8: Set the response options for the keyboard device
1
2
2
20
E-Prime: Getting Started Guide Tutorial 1: E-Studio
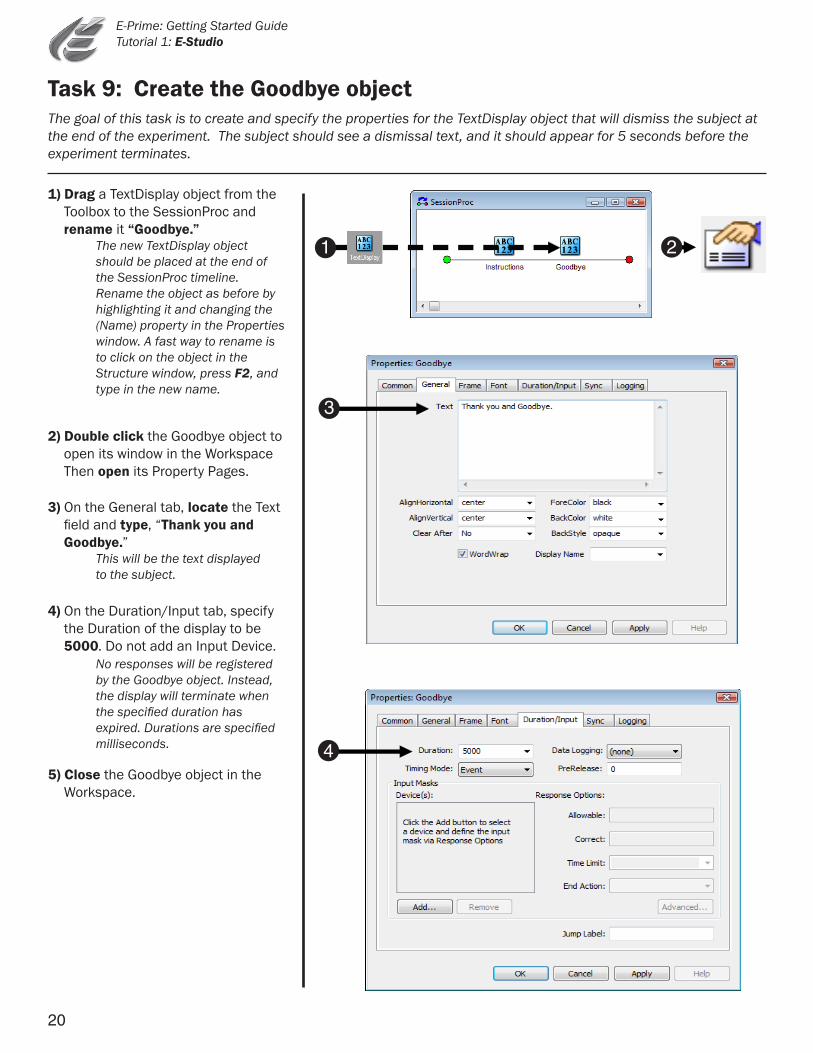
The goal of this task is to create and specify the properties for the TextDisplay object that will dismiss the subject at the end of the experiment. The subject should see a dismissal text, and it should appear for 5 seconds before the experiment terminates.
Task 9: Create the Goodbye object
1) Drag a TextDisplay object from the Toolbox to the SessionProc and rename it “Goodbye.”
The new TextDisplay object should be placed at the end of the SessionProc timeline. Rename the object as before by highlighting it and changing the (Name) property in the Properties window. A fast way to rename is to click on the object in the Structure window, press F2, and type in the new name.
3) On the General tab, locate the Text field and type, “Thank you and
Goodbye.” This will be the text displayed
to the subject.
2) Double click the Goodbye object to open its window in the Workspace
Then open its Property Pages.
4) On the Duration/Input tab, specify the Duration of the display to be 5000. Do not add an Input Device.
No responses will be registered by the Goodbye object. Instead, the display will terminate when the specified duration has expired. Durations are specified milliseconds.
5) Close the Goodbye object in the Workspace.
3
4
1 2
21
E-Prime: Getting Started Guide Tutorial 1: E-Studio
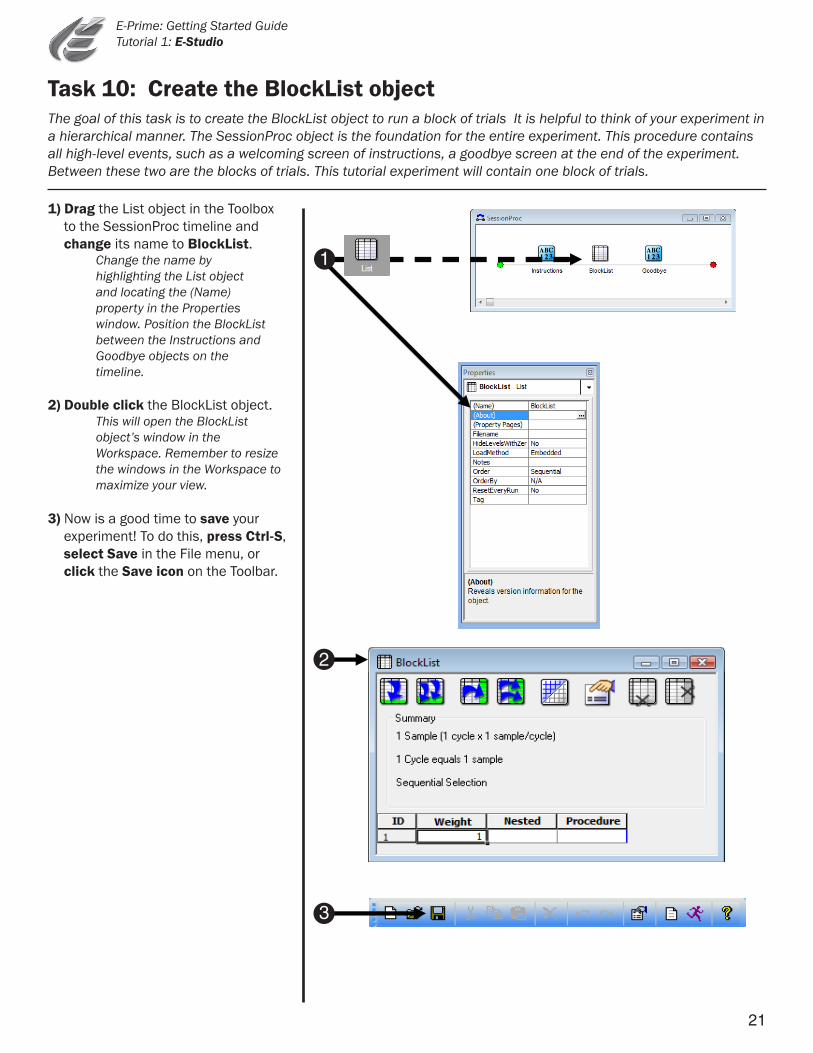
The goal of this task is to create the BlockList object to run a block of trials It is helpful to think of your experiment in a hierarchical manner. The SessionProc object is the foundation for the entire experiment. This procedure contains all high-level events, such as a welcoming screen of instructions, a goodbye screen at the end of the experiment. Between these two are the blocks of trials. This tutorial experiment will contain one block of trials.
Task 10: Create the BlockList object
1) Drag the List object in the Toolbox to the SessionProc timeline and change its name to BlockList.
Change the name by highlighting the List object and locating the (Name) property in the Properties window. Position the BlockList between the Instructions and Goodbye objects on the timeline.
2) Double click the BlockList object. This will open the BlockList object’s window in the Workspace. Remember to resize the windows in the Workspace to maximize your view.
3) Now is a good time to save your experiment! To do this, press Ctrl-S, select Save in the File menu, or click the Save icon on the Toolbar.
3
1
2
22
E-Prime: Getting Started Guide Tutorial 1: E-Studio
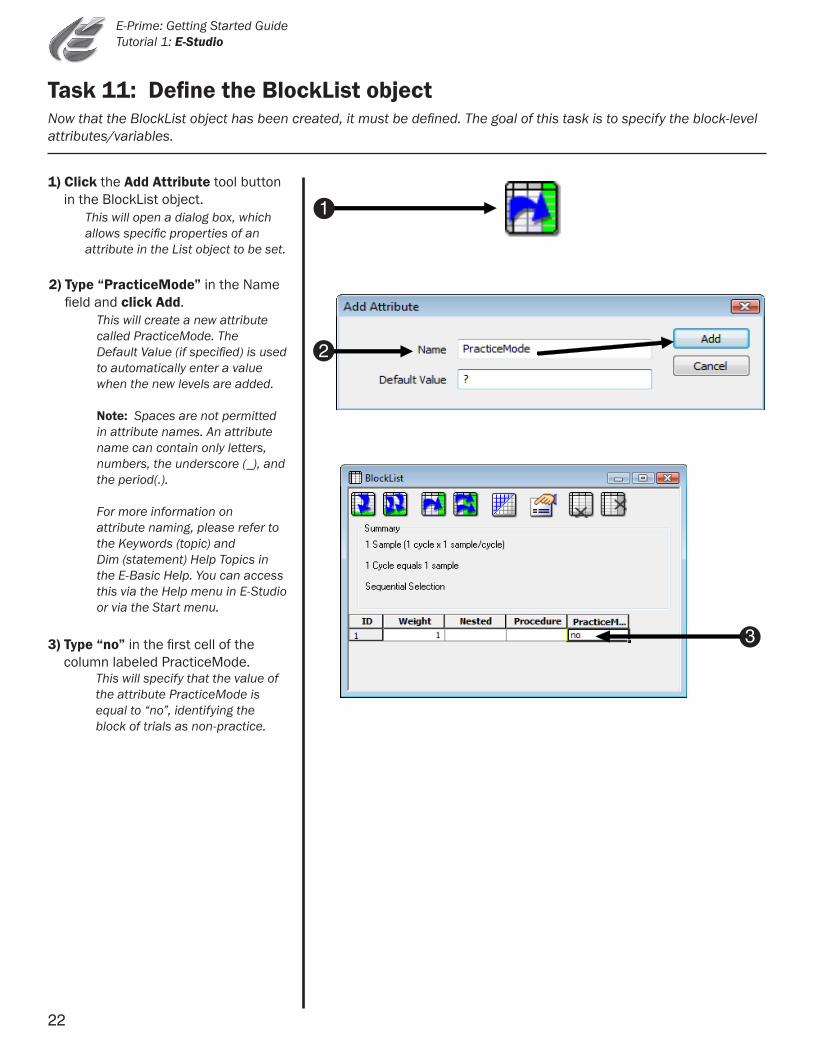
Now that the BlockList object has been created, it must be defined. The goal of this task is to specify the block-level attributes/variables.
Task 11: Define the BlockList object
1) Click the Add Attribute tool button in the BlockList object.
This will open a dialog box, which allows specific properties of an attribute in the List object to be set.
2) Type “PracticeMode” in the Name field and click Add.
This will create a new attribute called PracticeMode. The Default Value (if specified) is used to automatically enter a value when the new levels are added.
Note: Spaces are not permitted in attribute names. An attribute name can contain only letters, numbers, the underscore (_), and the period(.).
For more information on attribute naming, please refer to the Keywords (topic) and Dim (statement) Help Topics in the E-Basic Help. You can access this via the Help menu in E-Studio or via the Start menu.
3) Type “no” in the first cell of the column labeled PracticeMode.
This will specify that the value of the attribute PracticeMode is equal to “no”, identifying the block of trials as non-practice.
3
1
2
23
E-Prime: Getting Started Guide Tutorial 1: E-Studio
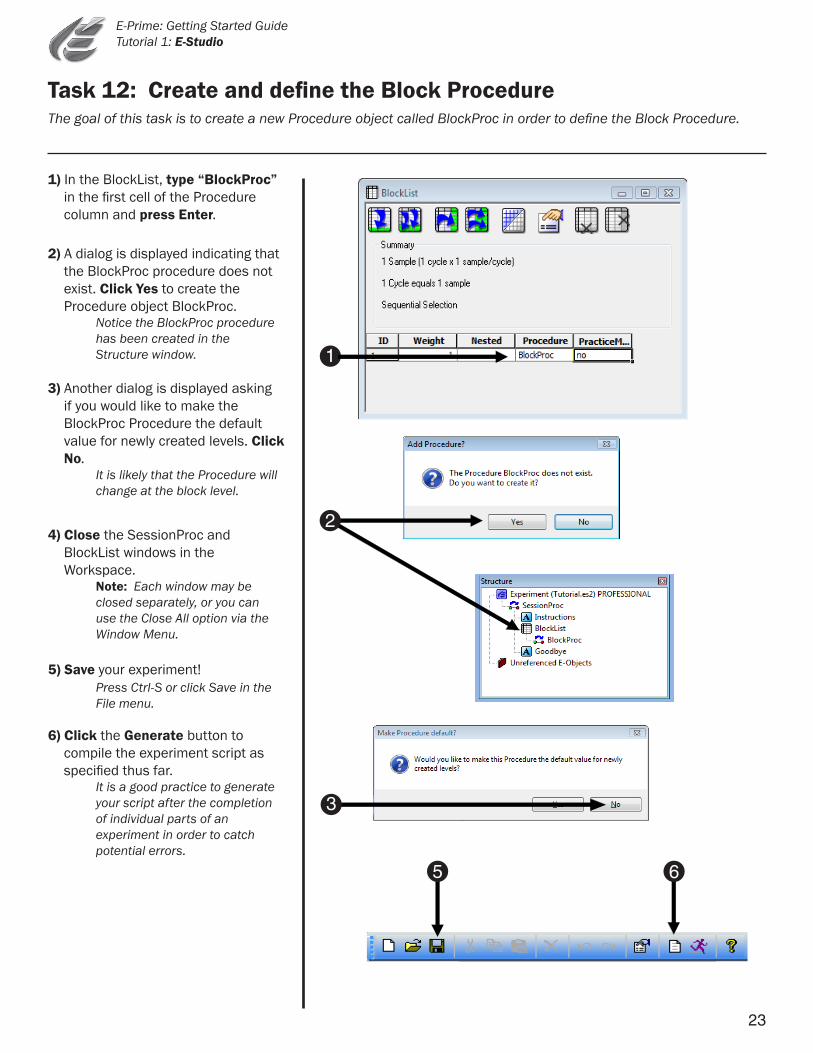
The goal of this task is to create a new Procedure object called BlockProc in order to define the Block Procedure.
Task 12: Create and define the Block Procedure
1) In the BlockList, type “BlockProc” in the first cell of the Procedure column and press Enter.
2) A dialog is displayed indicating that the BlockProc procedure does not exist. Click Yes to create the
Procedure object BlockProc. Notice the BlockProc procedure has been created in the Structure window.
4) Close the SessionProc and BlockList windows in the Workspace. Note: Each window may be closed separately, or you can use the Close All option via the Window Menu.
5) Save your experiment! Press Ctrl-S or click Save in the File menu.
6) Click the Generate button to compile the experiment script as
specified thus far. It is a good practice to generate your script after the completion of individual parts of an experiment in order to catch potential errors.
3) Another dialog is displayed asking if you would like to make the BlockProc Procedure the default value for newly created levels. Click No.
It is likely that the Procedure will change at the block level.
1
2
3
5
6
24
E-Prime: Getting Started Guide Tutorial 1: E-Studio
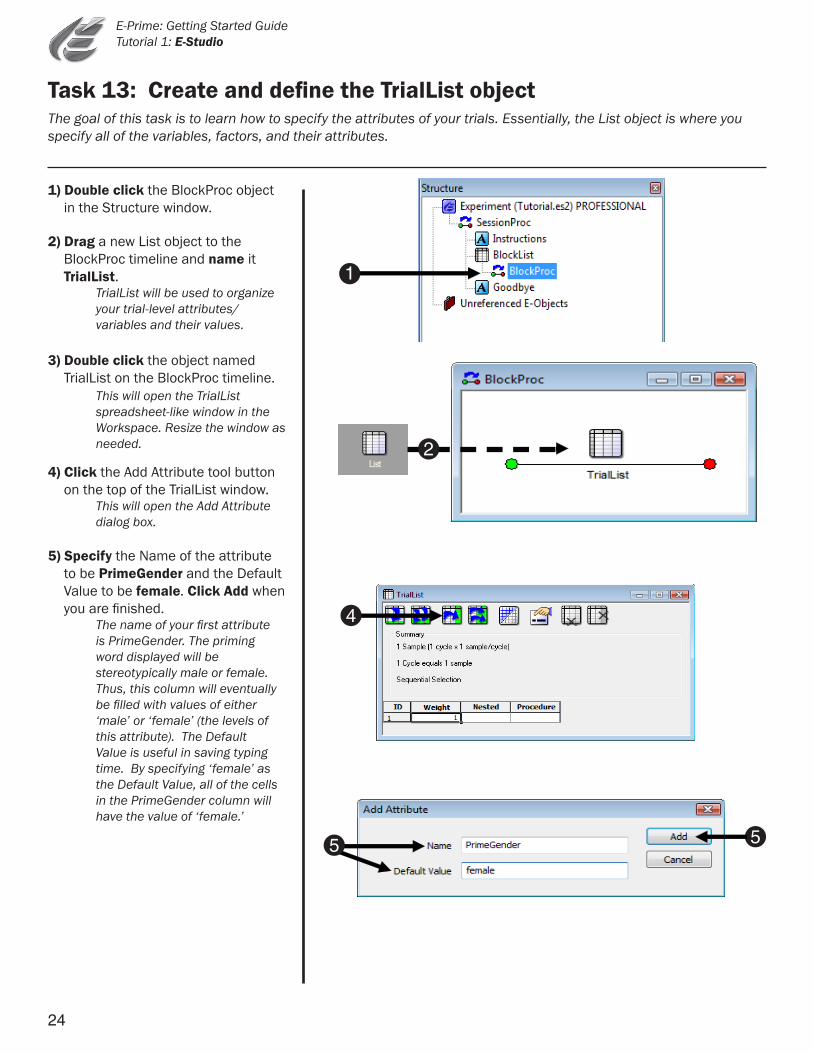
The goal of this task is to learn how to specify the attributes of your trials. Essentially, the List object is where you specify all of the variables, factors, and their attributes.
Task 13: Create and define the TrialList object
1) Double click the BlockProc object in the Structure window.
2) Drag a new List object to the BlockProc timeline and name it TrialList. TrialList will be used to organize your trial-level attributes/ variables and their values.
3) Double click the object named TrialList on the BlockProc timeline.
This will open the TrialList spreadsheet-like window in the Workspace. Resize the window as needed.
4) Click the Add Attribute tool button on the top of the TrialList window.
This will open the Add Attribute dialog box.
5) Specify the Name of the attribute to be PrimeGender and the Default Value to be female. Click Add when you are finished.
The name of your first attribute is PrimeGender. The priming word displayed will be stereotypically male or female. Thus, this column will eventually be filled with values of either ‘male’ or ‘female’ (the levels of this attribute). The Default Value is useful in saving typing time. By specifying ‘female’ as the Default Value, all of the cells in the PrimeGender column will have the value of ‘female.’
3
4
2
1
5
5
25
E-Prime: Getting Started Guide Tutorial 1: E-Studio
The goal of this task is to specify all of the attributes for your trials.
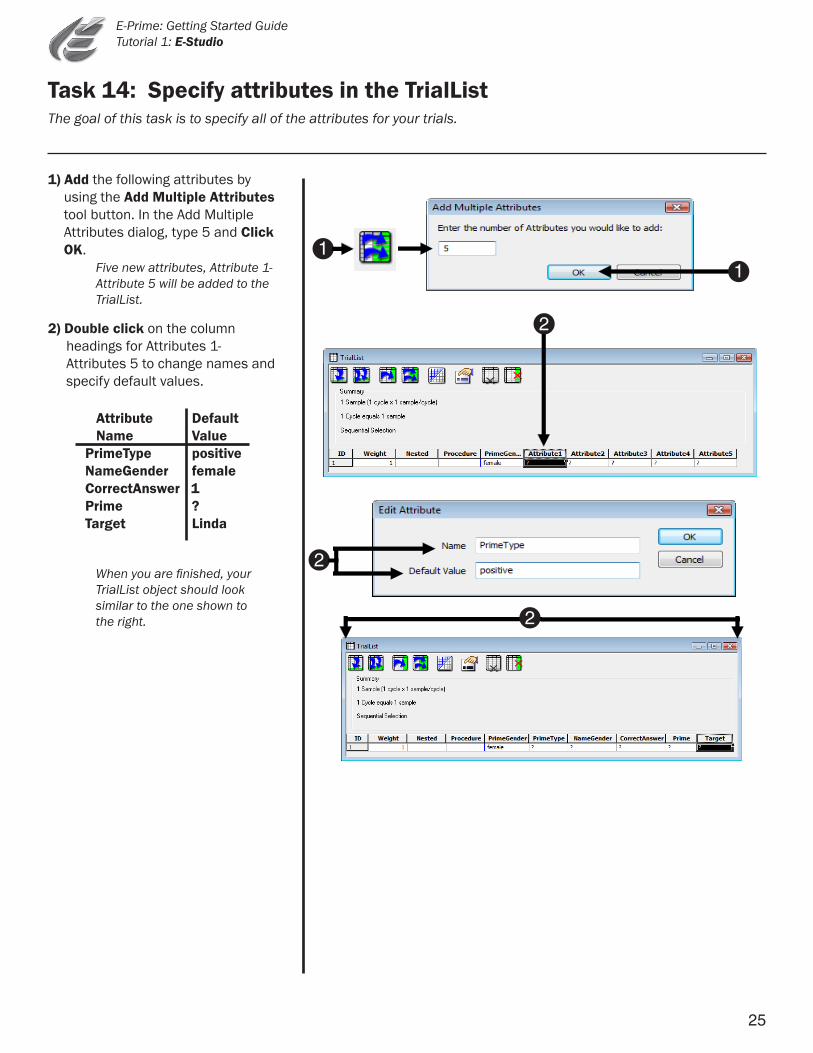
Task 14: Specify attributes in the TrialList
1) Add the following attributes by using the Add Multiple Attributes
tool button. In the Add Multiple Attributes dialog, type 5 and Click
OK. Five new attributes, Attribute 1- Attribute 5 will be added to the TrialList.
2) Double click on the column headings for Attributes 1- Attributes 5 to change names and specify default values.
Attribute Default Name Value PrimeType positive NameGender female CorrectAnswer 1 Prime ? Target Linda
When you are finished, your TrialList object should look similar to the one shown to the right.
2
2
2
1
1
26
E-Prime: Getting Started Guide Tutorial 1: E-Studio
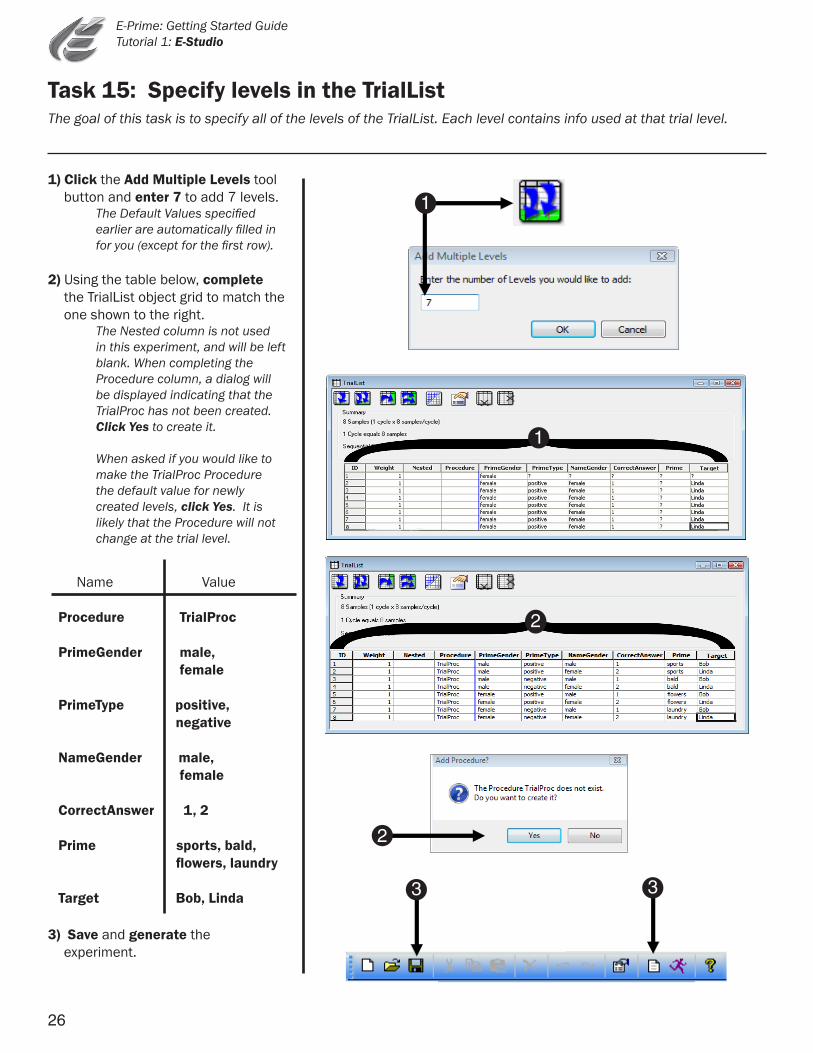
The goal of this task is to specify all of the levels of the TrialList. Each level contains info used at that trial level.
Task 15: Specify levels in the TrialList
1) Click the Add Multiple Levels tool button and enter 7 to add 7 levels. The Default Values specified earlier are automatically filled in for you (except for the first row).
2) Using the table below, complete the TrialList object grid to match the one shown to the right.
The Nested column is not used in this experiment, and will be left blank. When completing the Procedure column, a dialog will be displayed indicating that the TrialProc has not been created. Click Yes to create it.
When asked if you would like to make the TrialProc Procedure the default value for newly created levels, click Yes. It is likely that the Procedure will not change at the trial level.
3) Save and generate the experiment.
Name Value
Procedure TrialProc
PrimeGender male, female
PrimeType positive, negative
NameGender male, female
CorrectAnswer 1, 2
Prime sports, bald, flowers, laundry
Target Bob, Linda
1
2
1
2
3
3
27
E-Prime: Getting Started Guide Tutorial 1: E-Studio
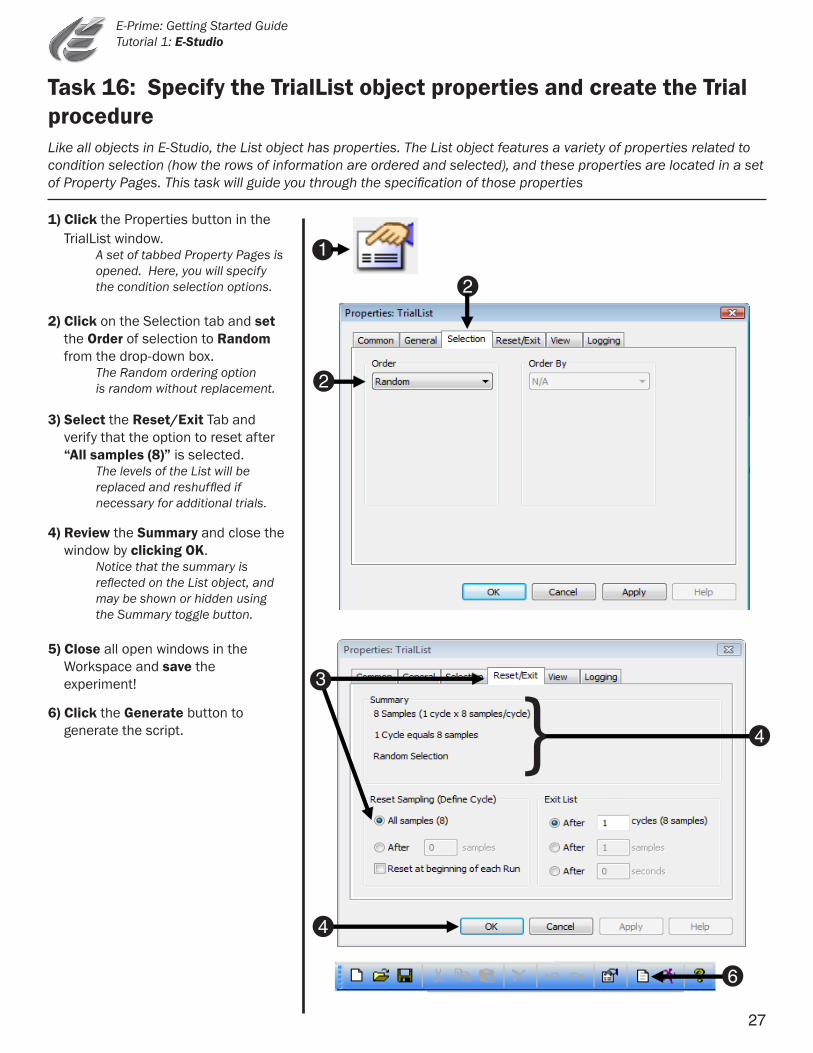
Like all objects in E-Studio, the List object has properties. The List object features a variety of properties related to condition selection (how the rows of information are ordered and selected), and these properties are located in a set of Property Pages. This task will guide you through the specification of those properties
Task 16: Specify the TrialList object properties and create the Trial procedure
1) Click the Properties button in the TrialList window.
A set of tabbed Property Pages is opened. Here, you will specify the condition selection options.
2) Click on the Selection tab and set the Order of selection to Random from the drop-down box.
The Random ordering option is random without replacement.
3) Select the Reset/Exit Tab and verify that the option to reset after
“All samples (8)” is selected. The levels of the List will be replaced and reshuffled if necessary for additional trials.
4) Review the Summary and close the window by clicking OK.
Notice that the summary is reflected on the List object, and may be shown or hidden using the Summary toggle button.
5) Close all open windows in the Workspace and save the experiment!
6) Click the Generate button to generate the script.
1
2
2
3
} 4
4
6

28
E-Prime: Getting Started Guide Tutorial 1: E-Studio
The next few steps will define the procedure named TrialProc. Essentially, you will be defining what constitutes a single trial. In this experiment, a single trial consists of four events, including the presentation of: the Prime, a Fixation display, the Target (where a response is collected from the subject), and Feedback based on the subject’s response.
Task 17: Define the TrialProc
1) Double click the TrialProc object in the Structure window.
2) Drag a TextDisplay object from the Toolbox to the TrialProc. Rename this object Prime.
4) Drag a Slide object from the Toolbox to the TrialProc. Rename this object Target.
A Slide object allows presentation of text, sound, images and movies concurrently.
5) Drag a Feedback Display object from the Toolbox to the TrialProc. Rename this object Feedback.
Feedback is the last of the events of the events of the trial procedure.
3) Drag another TextDisplay object from the Toolbox and to the TrialProc. Rename this object Fixation.
You can also rename objects from a context menu. Access the Context Menu by right clicking the object. 2
2
3
5
4
1
29
E-Prime: Getting Started Guide Tutorial 1: E-Studio
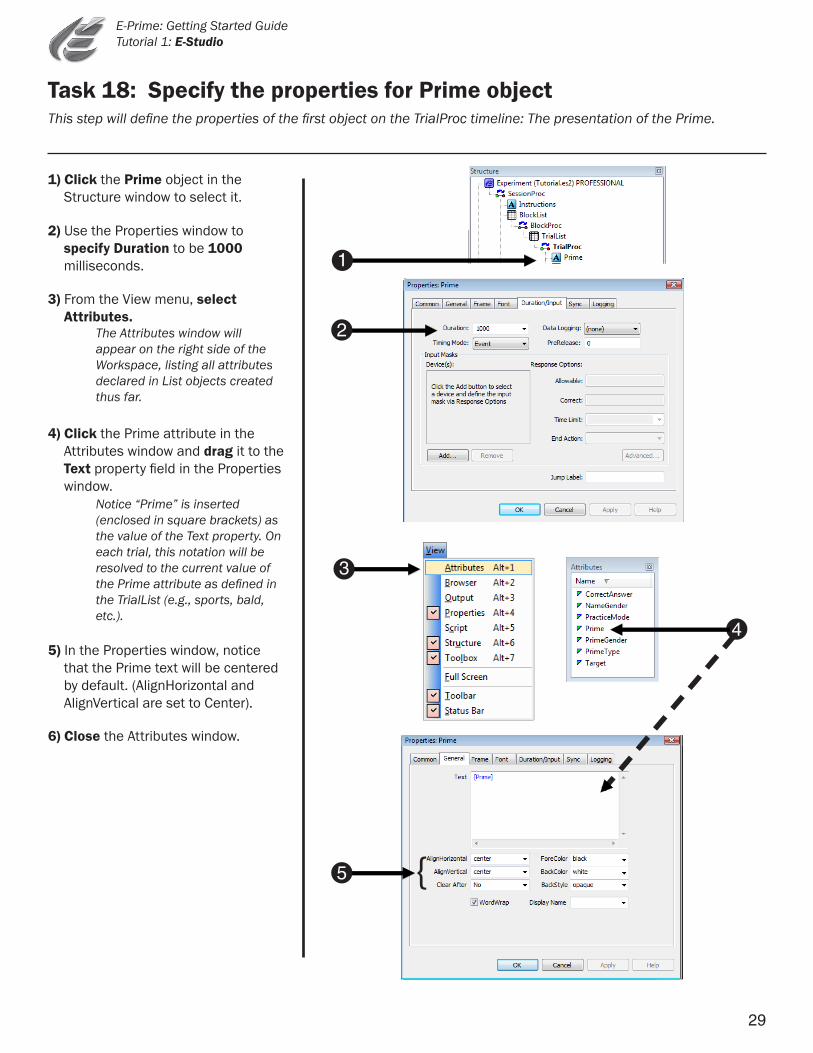
This step will define the properties of the first object on the TrialProc timeline: The presentation of the Prime.
Task 18: Specify the properties for Prime object
1) Click the Prime object in the Structure window to select it.
2) Use the Properties window to specify Duration to be 1000 milliseconds.
3) From the View menu, select Attributes.
The Attributes window will appear on the right side of the Workspace, listing all attributes declared in List objects created thus far.
4) Click the Prime attribute in the Attributes window and drag it to the Text property field in the Properties window.
Notice “Prime” is inserted (enclosed in square brackets) as the value of the Text property. On each trial, this notation will be resolved to the current value of the Prime attribute as defined in the TrialList (e.g., sports, bald, etc.).
5) In the Properties window, notice that the Prime text will be centered by default. (AlignHorizontal and AlignVertical are set to Center).
6) Close the Attributes window.
1
2
5 {
3
4
30
E-Prime: Getting Started Guide Tutorial 1: E-Studio
This step will define the properties of the second object on the TrialProc timeline: the presentation of the Fixation.
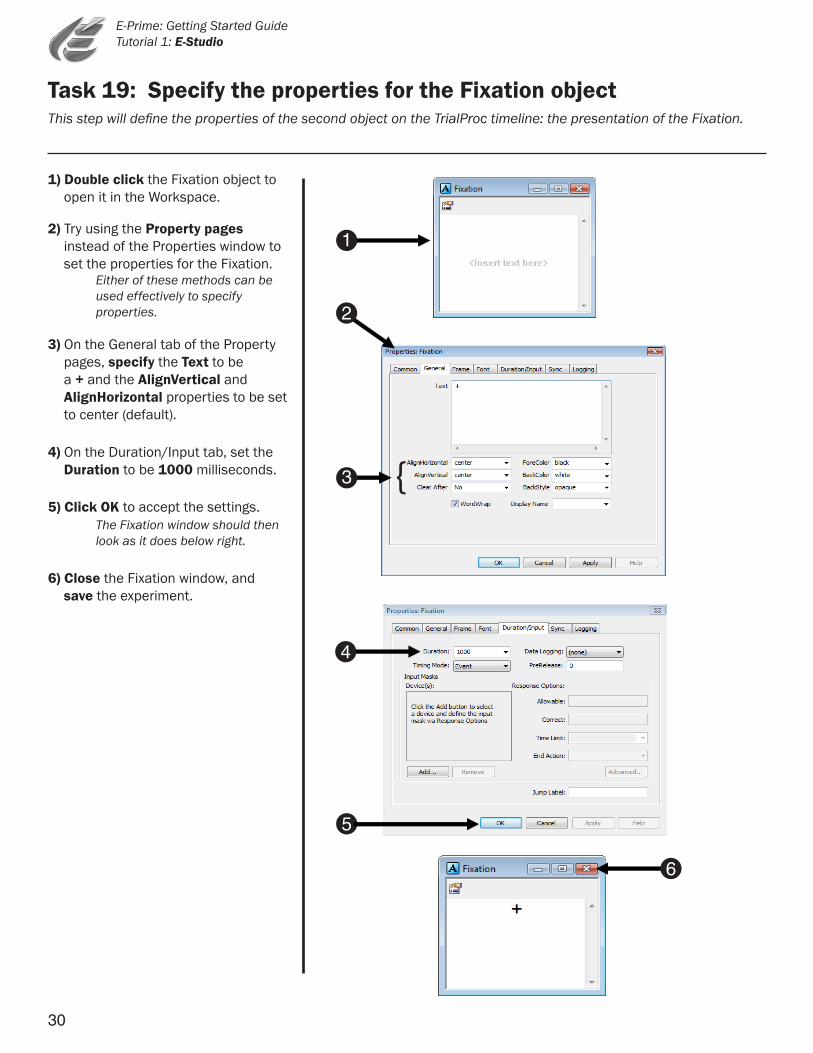
Task 19: Specify the properties for the Fixation object
1) Double click the Fixation object to open it in the Workspace.
2) Try using the Property pages instead of the Properties window to set the properties for the Fixation.
Either of these methods can be used effectively to specify properties.
3) On the General tab of the Property pages, specify the Text to be a + and the AlignVertical and AlignHorizontal properties to be set to center (default).
4) On the Duration/Input tab, set the Duration to be 1000 milliseconds.
5) Click OK to accept the settings. The Fixation window should then look as it does below right.
6) Close the Fixation window, and save the experiment.
2
{ 3
6
1
4
5

31
E-Prime: Getting Started Guide Tutorial 1: E-Studio
Slide objects may be used to present text, sound, images, and movies concurrently. Sub-objects define the type and location of the stimuli composing the Slide. This step will add a text sub-object to the Slide object so that the Target can present text stimuli.
Task 20: Add text to the Target object
1) Open the Target object in the Workspace.
2) Click the SlideText button on the Slide toolbar, then click anywhere within the active Slide window.
A standard text sub-object will appear in the Slide window.
3) Use the drop-down menu on the Slide toolbar to select the text
sub-object. Then click the green Sub-Object Property Pages button on the Slide toolbar.
There may be many sub-objects composing a Slide. Select the desired sub-object to set the appropriate properties.
4) On the General tab, enter [Target] in the Text field to indicate that the text to be displayed will vary according to the Target attribute, which was created earlier in the TrialList.
6) Click OK to accept the settings.
5) On the Frame tab for the text block, set the X- and Y- Position properties to center.
This will center the text in the display.
6
2
3
1
4
{ 5
32
E-Prime: Getting Started Guide Tutorial 1: E-Studio
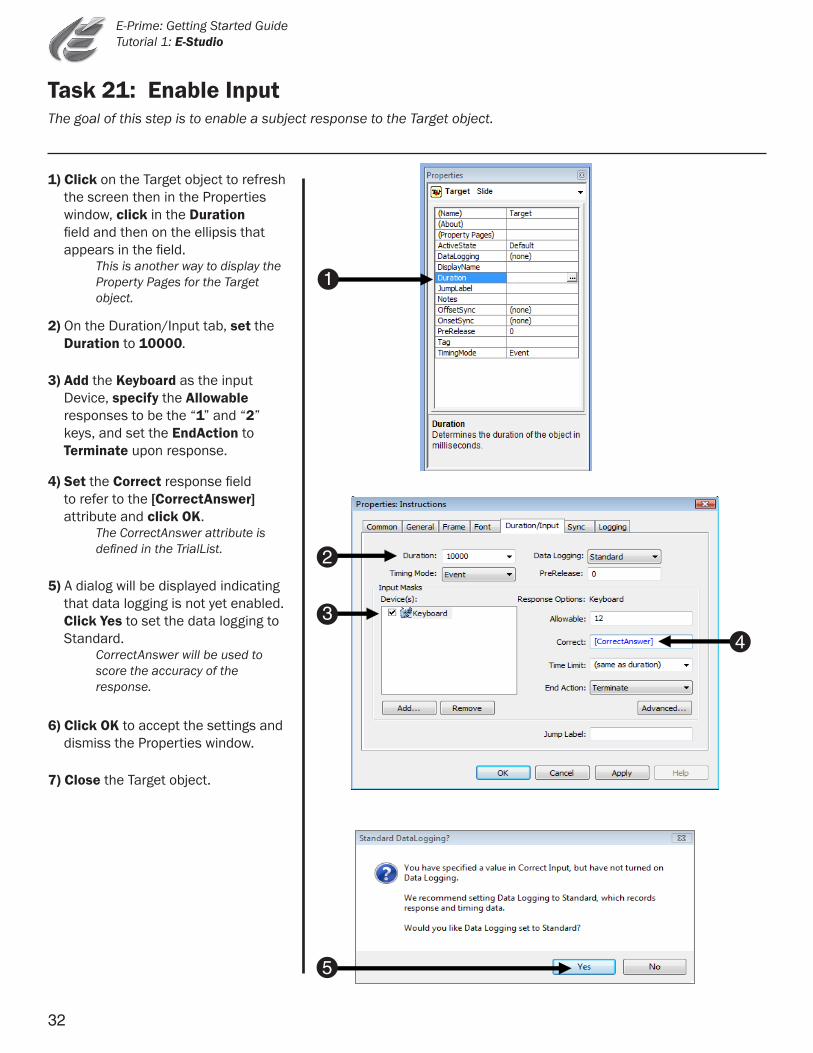
The goal of this step is to enable a subject response to the Target object.
Task 21: Enable Input
1) Click on the Target object to refresh the screen then in the Properties window, click in the Duration field and then on the ellipsis that appears in the field.
This is another way to display the Property Pages for the Target object.
2) On the Duration/Input tab, set the Duration to 10000.
3) Add the Keyboard as the input Device, specify the Allowable responses to be the “1” and “2” keys, and set the EndAction to Terminate upon response.
4) Set the Correct response field to refer to the [CorrectAnswer] attribute and click OK.
The CorrectAnswer attribute is defined in the TrialList.
6) Click OK to accept the settings and dismiss the Properties window.
5) A dialog will be displayed indicating that data logging is not yet enabled. Click Yes to set the data logging to Standard.
CorrectAnswer will be used to score the accuracy of the response.
7) Close the Target object.
1
2
3
4
5
33
E-Prime: Getting Started Guide Tutorial 1: E-Studio
This step will link the Feedback object with the input collected by the Target object.
Task 22: Link the Feedback object to the input object
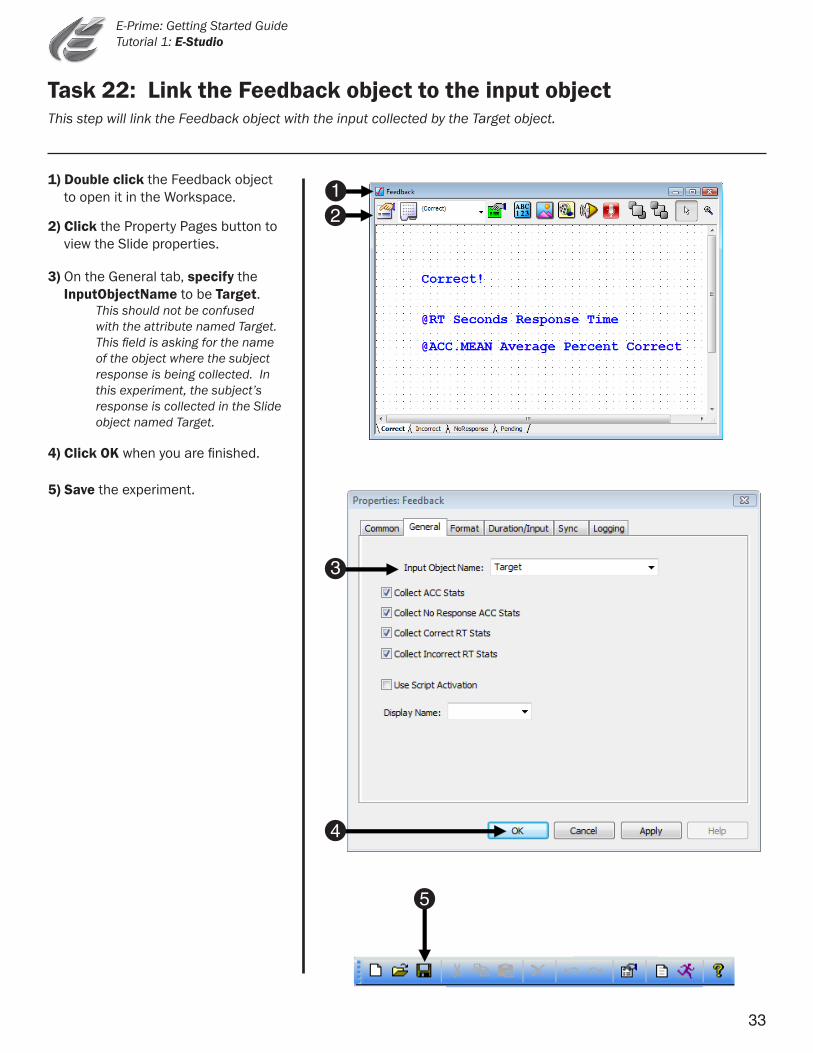
1) Double click the Feedback object to open it in the Workspace.
2) Click the Property Pages button to view the Slide properties.
3) On the General tab, specify the InputObjectName to be Target.
This should not be confused with the attribute named Target. This field is asking for the name of the object where the subject response is being collected. In this experiment, the subject’s response is collected in the Slide object named Target.
4) Click OK when you are finished.
5) Save the experiment.
1 2
5
4
3
34
E-Prime: Getting Started Guide Tutorial 1: E-Studio
The goal of this task is to specify the properties for the various types of feedback presented.
Task 23: Specify the properties for the Feedback object
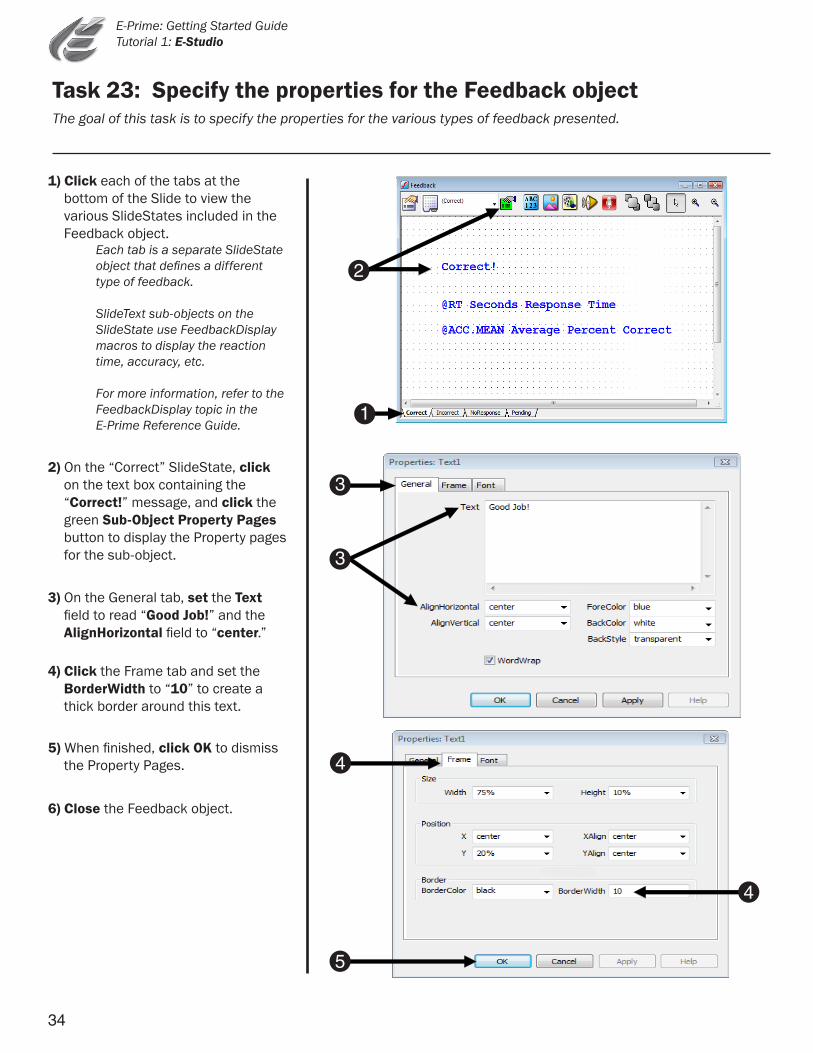
1) Click each of the tabs at the bottom of the Slide to view the various SlideStates included in the Feedback object.
Each tab is a separate SlideState object that defines a different type of feedback.
SlideText sub-objects on the SlideState use FeedbackDisplay macros to display the reaction time, accuracy, etc.
For more information, refer to the FeedbackDisplay topic in the E-Prime Reference Guide.
2) On the “Correct” SlideState, click on the text box containing the “Correct!” message, and click the green Sub-Object Property Pages button to display the Property pages for the sub-object.
3) On the General tab, set the Text field to read “Good Job!” and the AlignHorizontal field to “center.”
4) Click the Frame tab and set the BorderWidth to “10” to create a thick border around this text.
5) When finished, click OK to dismiss the Property Pages.
6) Close the Feedback object.
2
1
3
3
4
4
5
35
E-Prime: Getting Started Guide Tutorial 1: E-Studio
The experiment specification file is complete! Now you only need to generate the script.
Task 24: Generate the Script!
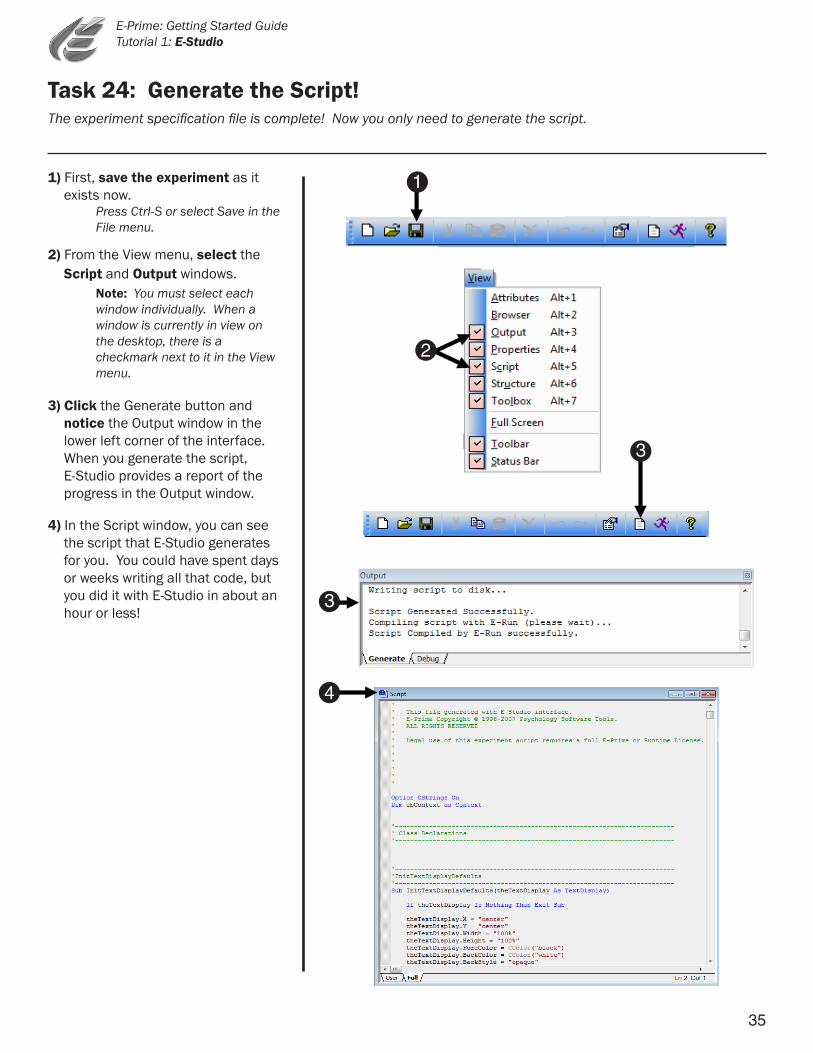
1) First, save the experiment as it exists now.
Press Ctrl-S or select Save in the File menu.
2) From the View menu, select the Script and Output windows.
Note: You must select each window individually. When a window is currently in view on the desktop, there is a checkmark next to it in the View menu.
3) Click the Generate button and notice the Output window in the lower left corner of the interface. When you generate the script, E-Studio provides a report of the progress in the Output window.
4) In the Script window, you can see the script that E-Studio generates for you. You could have spent days or weeks writing all that code, but you did it with E-Studio in about an hour or less! 3
1
2
4
3

36
E-Prime: Getting Started Guide Tutorial 1: E-Studio
Congratulations! You have completed your first experiment in E-Studio! If you specified everything correctly, you should have a functioning experiment.
Task 25: Run your experiment!
1) Review your experiment structure. Compare the structure of your experiment to the diagram included at the beginning of this tutorial to see the implementation of the original experimental design in E-Studio.
2) Click the Run tool button. If the experiment script is generated successfully, the E-Run application will be launched to execute the E-Basic script (EBS) file. If errors are generated, refer to the tutorial on troubleshooting (in this manual) for additional information.
3) At the beginning of each run, several subject initialization and startup dialogs are presented in order to collect subject information. Click OK in each dialog to accept the default settings and begin the experiment!
2
3
1

37
E-Prime: Getting Started Guide Tutorial 1: E-Studio
38
E-Prime: Getting Started Guide Tutorial 2: E-Merge
Merging Data Files
E-Run collects all data as single subject data files. The E-Merge application is used to merge single subject data files into a master file for analysis. This step guides you through the opening of the E-Merge application.
Task 1: Open E-Merge
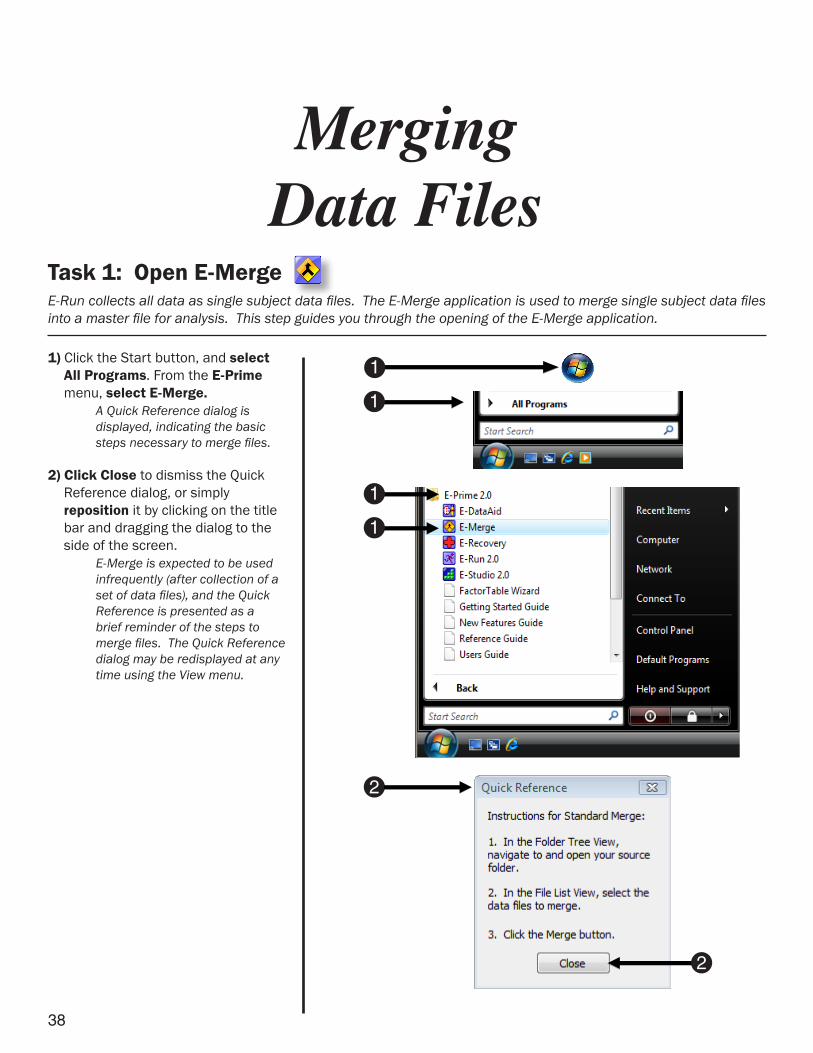
1) Click the Start button, and select All Programs. From the E-Prime
menu, select E-Merge. A Quick Reference dialog is displayed, indicating the basic steps necessary to merge files.
2) Click Close to dismiss the Quick Reference dialog, or simply
reposition it by clicking on the title bar and dragging the dialog to the side of the screen.
E-Merge is expected to be used infrequently (after collection of a set of data files), and the Quick Reference is presented as a brief reminder of the steps to merge files. The Quick Reference dialog may be redisplayed at any time using the View menu.
1
1
1
1
2
2
39
E-Prime: Getting Started Guide Tutorial 2: E-Merge
The Folder Tree window on the left side of the E-Merge display allows you to navigate to the folder containing your data files.
Task 2: Locate your experiment files
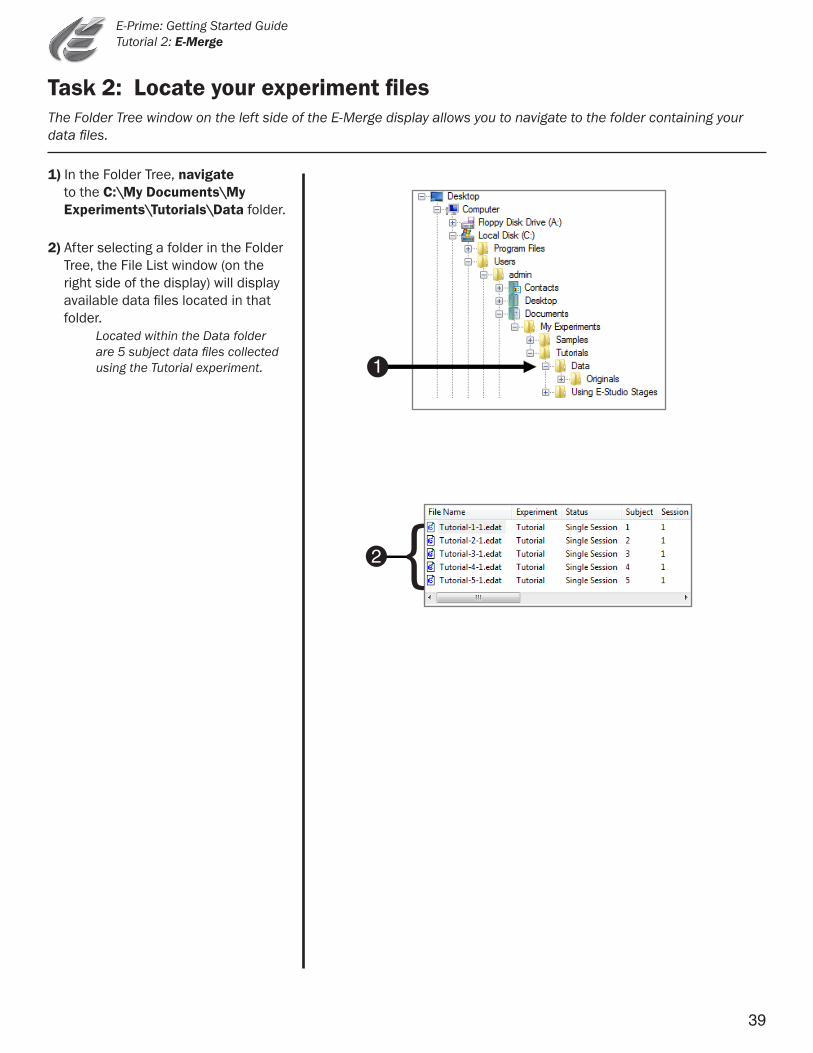
1) In the Folder Tree, navigate to the C:\My Documents\My Experiments\Tutorials\Data folder.
2) After selecting a folder in the Folder Tree, the File List window (on the right side of the display) will display available data files located in that folder.
Located within the Data folder are 5 subject data files collected using the Tutorial experiment. 1
{2
40
E-Prime: Getting Started Guide Tutorial 2: E-Merge
This step will guide you in selecting individual data files to be merged into a target file.
Task 3: Select files to merge
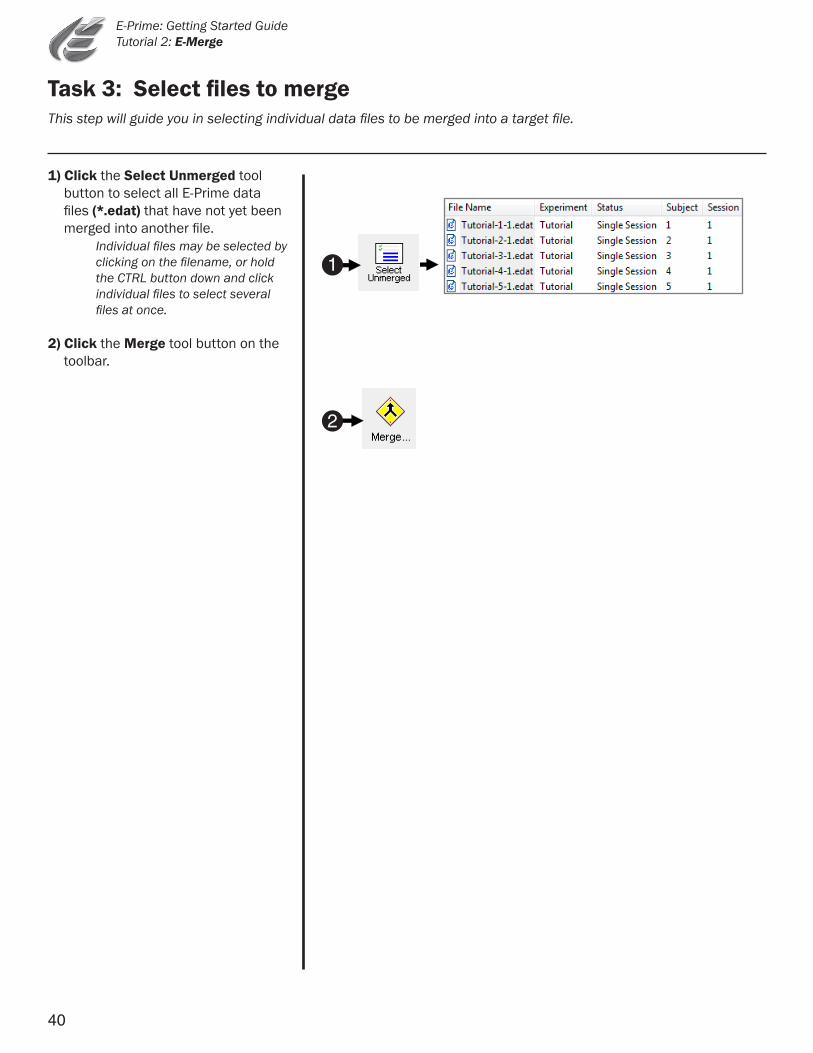
1) Click the Select Unmerged tool button to select all E-Prime data files (*.edat) that have not yet been merged into another file.
Individual files may be selected by clicking on the filename, or hold the CTRL button down and click individual files to select several files at once.
2) Click the Merge tool button on the toolbar.
2
1
41
E-Prime: Getting Started Guide Tutorial 2: E-Merge
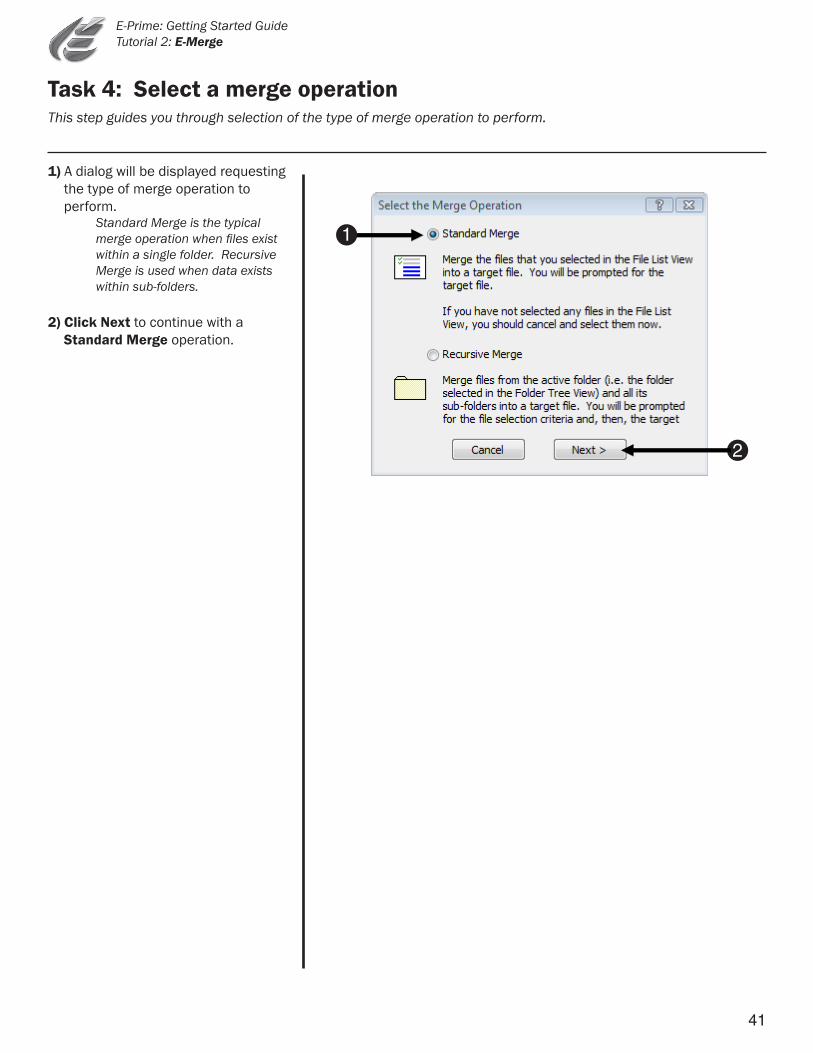
1) A dialog will be displayed requesting the type of merge operation to perform.
Standard Merge is the typical merge operation when files exist within a single folder. Recursive Merge is used when data exists within sub-folders.
2) Click Next to continue with a Standard Merge operation.
This step guides you through selection of the type of merge operation to perform.
Task 4: Select a merge operation
1
2
42
E-Prime: Getting Started Guide Tutorial 2: E-Merge
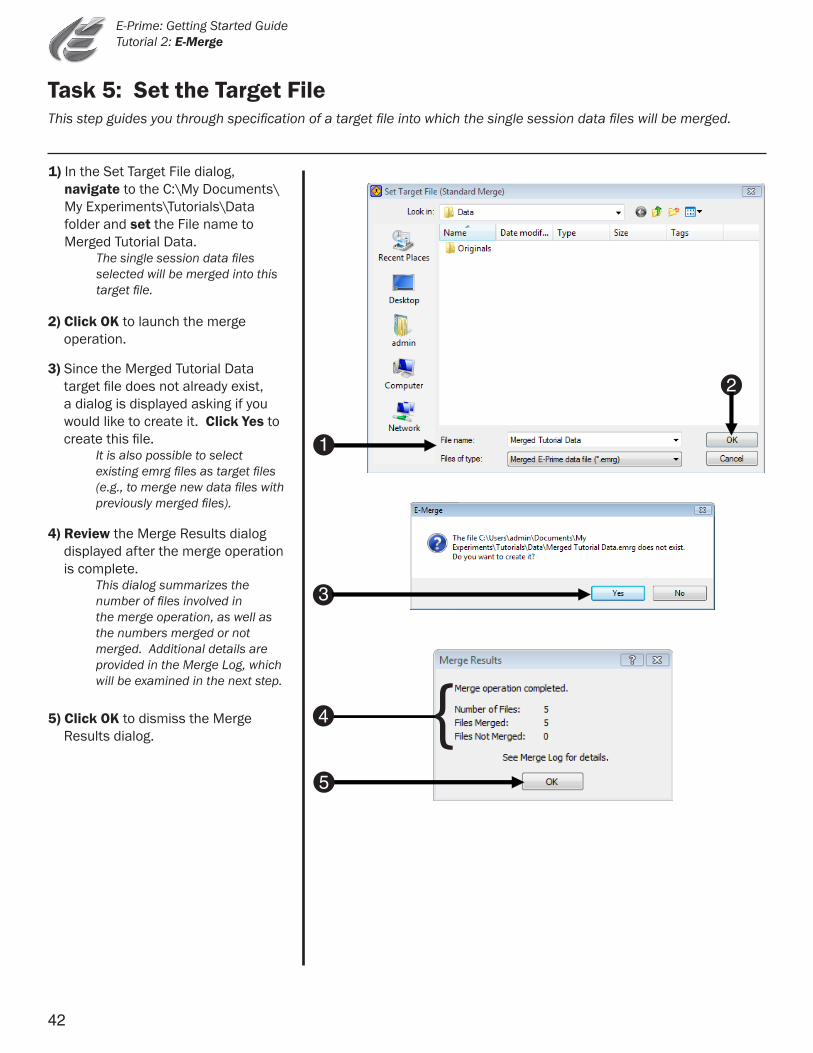
This step guides you through specification of a target file into which the single session data files will be merged.
Task 5: Set the Target File
1) In the Set Target File dialog, navigate to the C:\My Documents\My Experiments\Tutorials\Data folder and set the File name to Merged Tutorial Data.
The single session data files selected will be merged into this target file.
2) Click OK to launch the merge operation.
3) Since the Merged Tutorial Data target file does not already exist, a dialog is displayed asking if you would like to create it. Click Yes to create this file.
It is also possible to select existing emrg files as target files (e.g., to merge new data files with previously merged files).
4) Review the Merge Results dialog displayed after the merge operation is complete.
This dialog summarizes the number of files involved in the merge operation, as well as the numbers merged or not merged. Additional details are provided in the Merge Log, which will be examined in the next step.
5) Click OK to dismiss the Merge Results dialog.
2
1
3
5
{4
43
E-Prime: Getting Started Guide Tutorial 2: E-Merge
This step guides you through selection of the type of merge operation to perform.
Task 6: Examine merge results in the File List
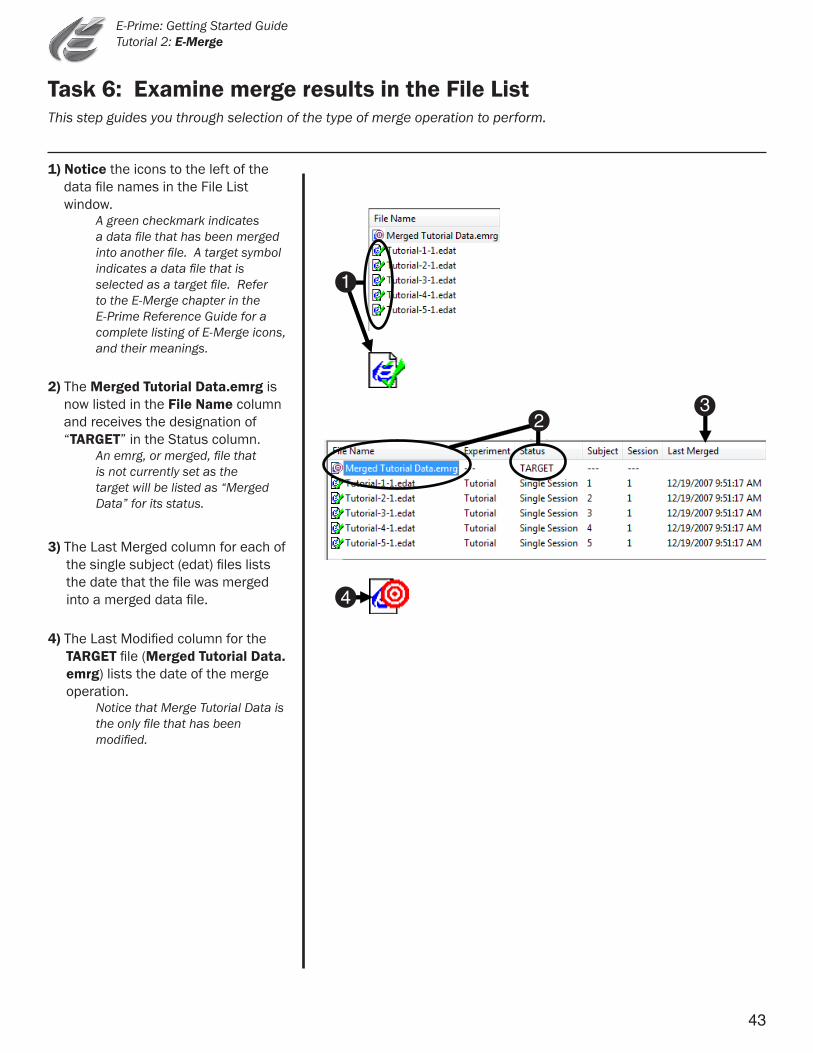
1) Notice the icons to the left of the data file names in the File List window.
A green checkmark indicates a data file that has been merged into another file. A target symbol indicates a data file that is selected as a target file. Refer to the E-Merge chapter in the E-Prime Reference Guide for a complete listing of E-Merge icons, and their meanings.
2) The Merged Tutorial Data.emrg is now listed in the File Name column and receives the designation of “TARGET” in the Status column.
An emrg, or merged, file that is not currently set as the target will be listed as “Merged Data” for its status.
3) The Last Merged column for each of the single subject (edat) files lists the date that the file was merged into a merged data file.
4) The Last Modified column for the TARGET file (Merged Tutorial Data. emrg) lists the date of the merge operation. Notice that Merge Tutorial Data is the only file that has been modified.
1
3
2
4

44
E-Prime: Getting Started Guide Tutorial 2: E-Merge
45
E-Prime: Getting Started Guide Tutorial 3: E-DataAid
Preparing Data for Analysis
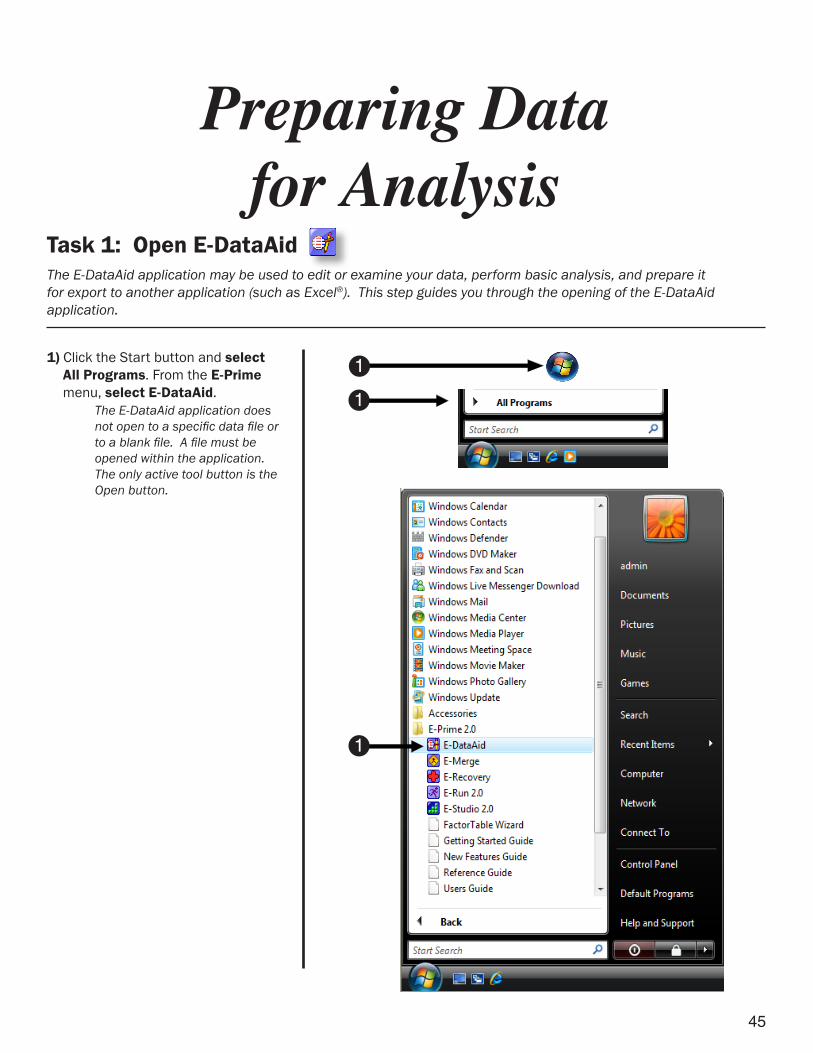
1) Click the Start button and select All Programs. From the E-Prime
menu, select E-DataAid. The E-DataAid application does notopentoaspecificdatafileor toablankfile.Afilemustbe openedwithintheapplication. The only active tool button is the Openbutton.
The E-DataAid application may be used to edit or examine your data, perform basic analysis, and prepare it for export to another application (such as Excel®).ThisstepguidesyouthroughtheopeningoftheE-DataAidapplication.
Task 1: Open E-DataAid
1
1
1
46
E-Prime: Getting Started Guide Tutorial 3: E-DataAid
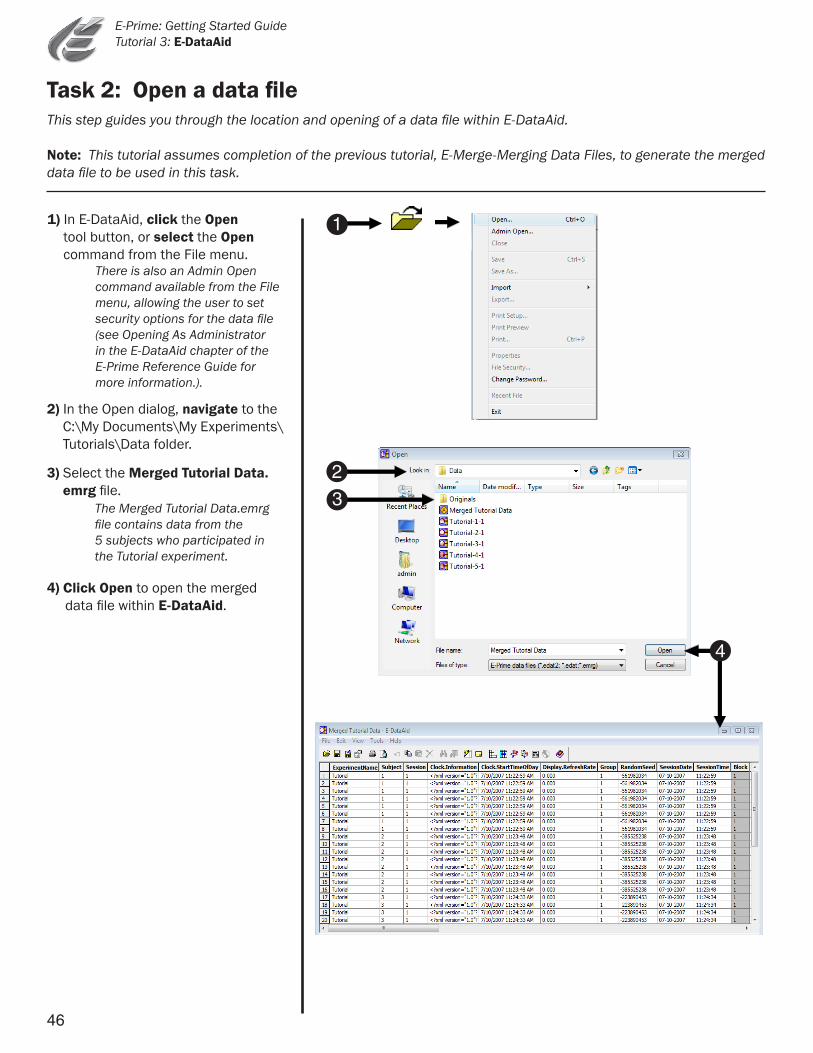
ThisstepguidesyouthroughthelocationandopeningofadatafilewithinE-DataAid.
Note: This tutorial assumes completion of the previous tutorial, E-Merge-Merging Data Files, to generate the merged datafiletobeusedinthistask.
Task 2: Open a data file
1) In E-DataAid, click the Open tool button, or select the Open command from the File menu.
There is also an Admin Open command available from the File menu, allowing the user to set securityoptionsforthedatafile (see Opening As Administrator in the E-DataAid chapter of the E-Prime Reference Guide for moreinformation.).
2) In the Open dialog, navigate to the C:\My Documents\My Experiments\Tutorials\Data folder.
3) Select the Merged Tutorial Data.emrg file.
TheMergedTutorialData.emrg filecontainsdatafromthe 5 subjects who participated in theTutorialexperiment.
4) Click Open to open the merged data file within E-DataAid.
4
2
3
1
47
E-Prime: Getting Started Guide Tutorial 3: E-DataAid
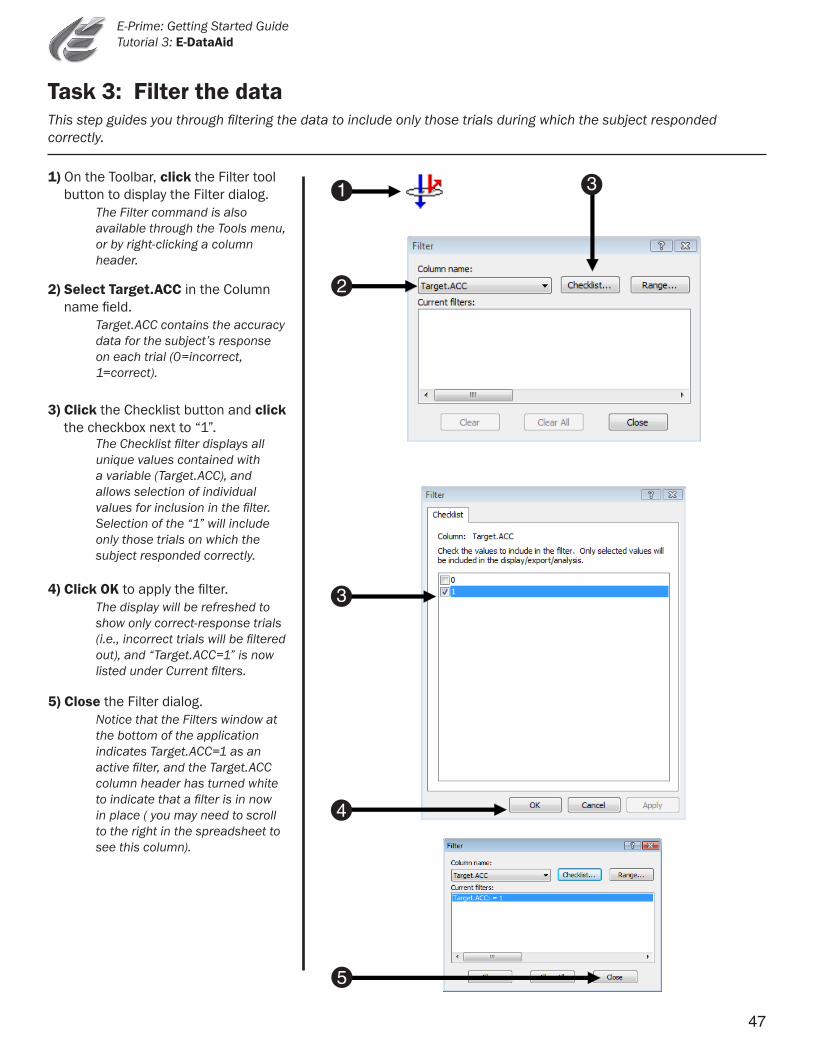
Thisstepguidesyouthroughfilteringthedatatoincludeonlythosetrialsduringwhichthesubjectrespondedcorrectly.
Task 3: Filter the data
1) On the Toolbar, click the Filter tool button to display the Filter dialog.
The Filter command is also available through the Tools menu, or by right-clicking a column header.
2) Select Target.ACC in the Column name field.
Target.ACCcontainstheaccuracy data for the subject’s response on each trial (0=incorrect, 1=correct).
3) Click the Checklist button and click the checkbox next to “1”.
TheChecklistfilterdisplaysall unique values contained with avariable(Target.ACC),and allows selection of individual valuesforinclusioninthefilter. Selection of the “1” will include only those trials on which the subjectrespondedcorrectly.
4) Click OK to apply the filter. The display will be refreshed to show only correct-response trials (i.e.,incorrecttrialswillbefiltered out),and“Target.ACC=1”isnow listedunderCurrentfilters.
5) Close the Filter dialog. Notice that the Filters window at the bottom of the application indicatesTarget.ACC=1asan activefilter,andtheTarget.ACC column header has turned white toindicatethatafilterisinnow in place ( you may need to scroll to the right in the spreadsheet to seethiscolumn).
1
2
3
5
4
3
48
E-Prime: Getting Started Guide Tutorial 3: E-DataAid
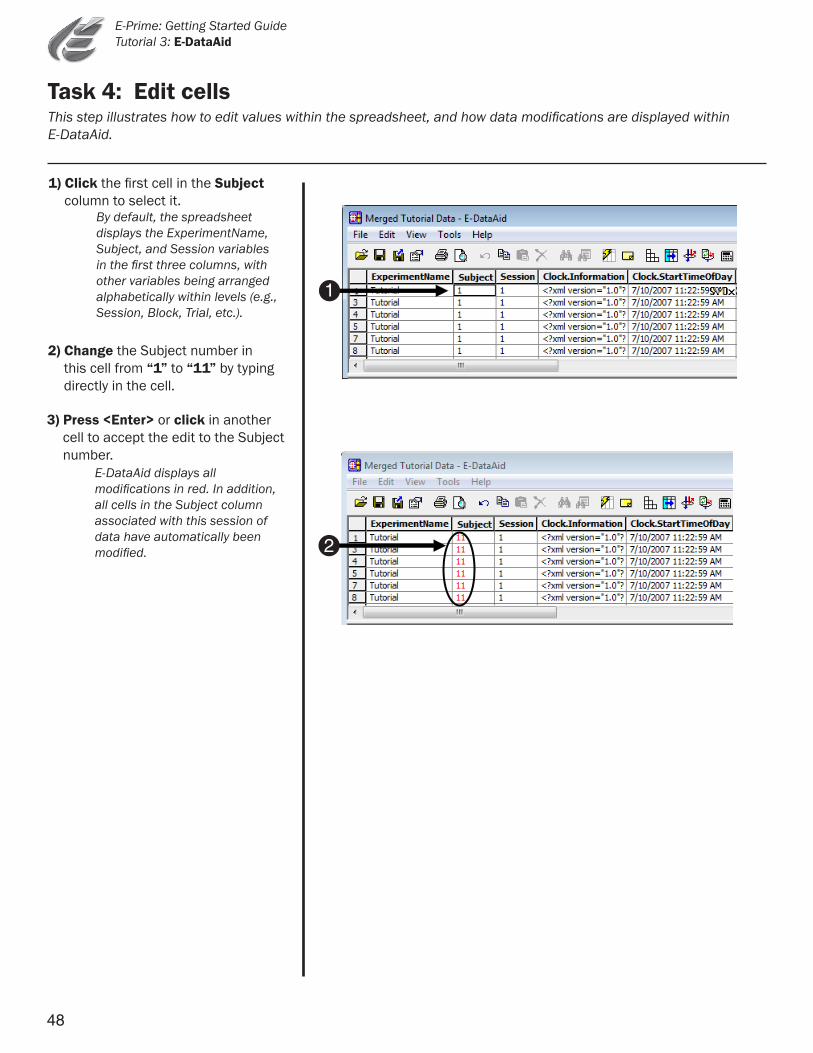
1) Click the first cell in the Subject column to select it.
By default, the spreadsheet displays the ExperimentName, Subject, and Session variables inthefirstthreecolumns,with other variables being arranged alphabeticallywithinlevels(e.g., Session,Block,Trial,etc.).
2) Change the Subject number in this cell from “1” to “11” by typing directly in the cell.
3) Press <Enter> or click in another cell to accept the edit to the Subject number.
E-DataAid displays all modificationsinred.Inaddition, all cells in the Subject column associated with this session of data have automatically been modified.
Thisstepillustrateshowtoeditvalueswithinthespreadsheet,andhowdatamodificationsaredisplayedwithinE-DataAid.
Task 4: Edit cells
1
2
49
E-Prime: Getting Started Guide Tutorial 3: E-DataAid
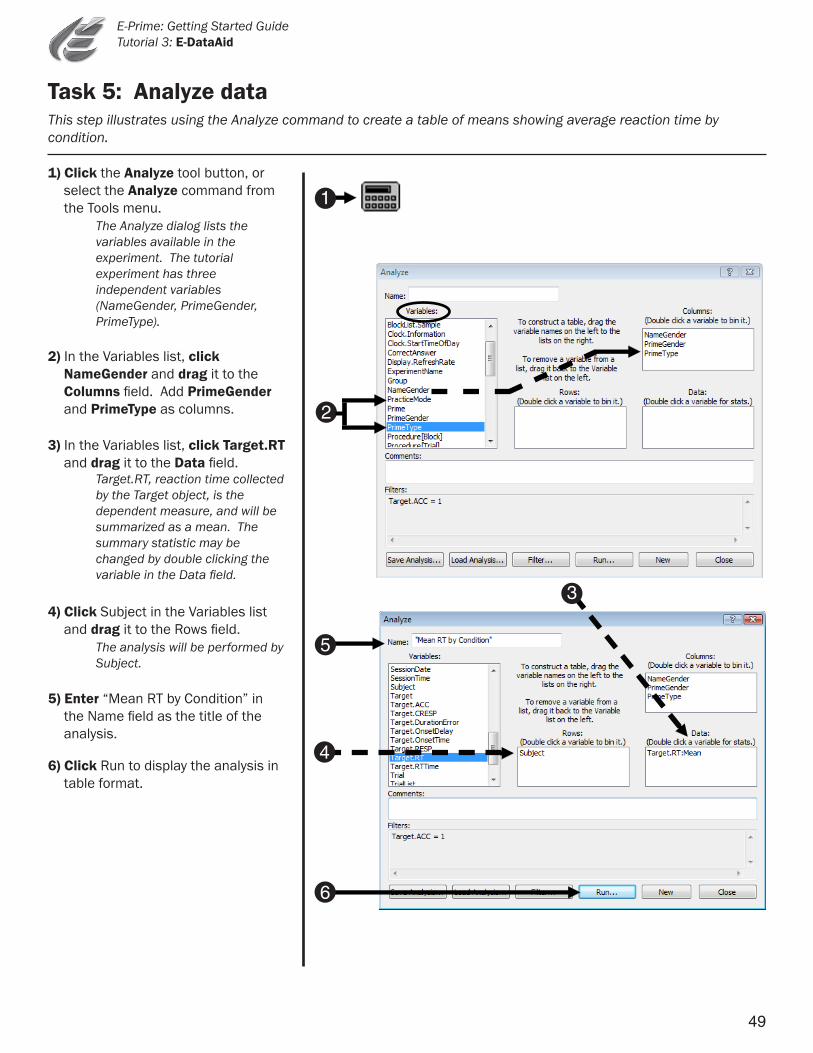
This step illustrates using the Analyze command to create a table of means showing average reaction time by condition.
Task 5: Analyze data
1) Click the Analyze tool button, or select the Analyze command from the Tools menu.
The Analyze dialog lists the variables available in the experiment.Thetutorial experiment has three independent variables (NameGender, PrimeGender, PrimeType).
2) In the Variables list, click NameGender and drag it to the Columns field. Add PrimeGender and PrimeType as columns.
3) In the Variables list, click Target.RT and drag it to the Data field.
Target.RT,reactiontimecollected by the Target object, is the dependent measure, and will be summarizedasamean.The summary statistic may be changed by double clicking the variableintheDatafield.
4) Click Subject in the Variables list and drag it to the Rows field.
The analysis will be performed by Subject.
5) Enter “Mean RT by Condition” in the Name field as the title of the analysis.
6) Click Run to display the analysis in table format.
1
5
6
3
4
2
50
E-Prime: Getting Started Guide Tutorial 3: E-DataAid
This step illustrates how to create a plot in Excel®fromtheanalysistable.
Task 6: Create an Excel® plot
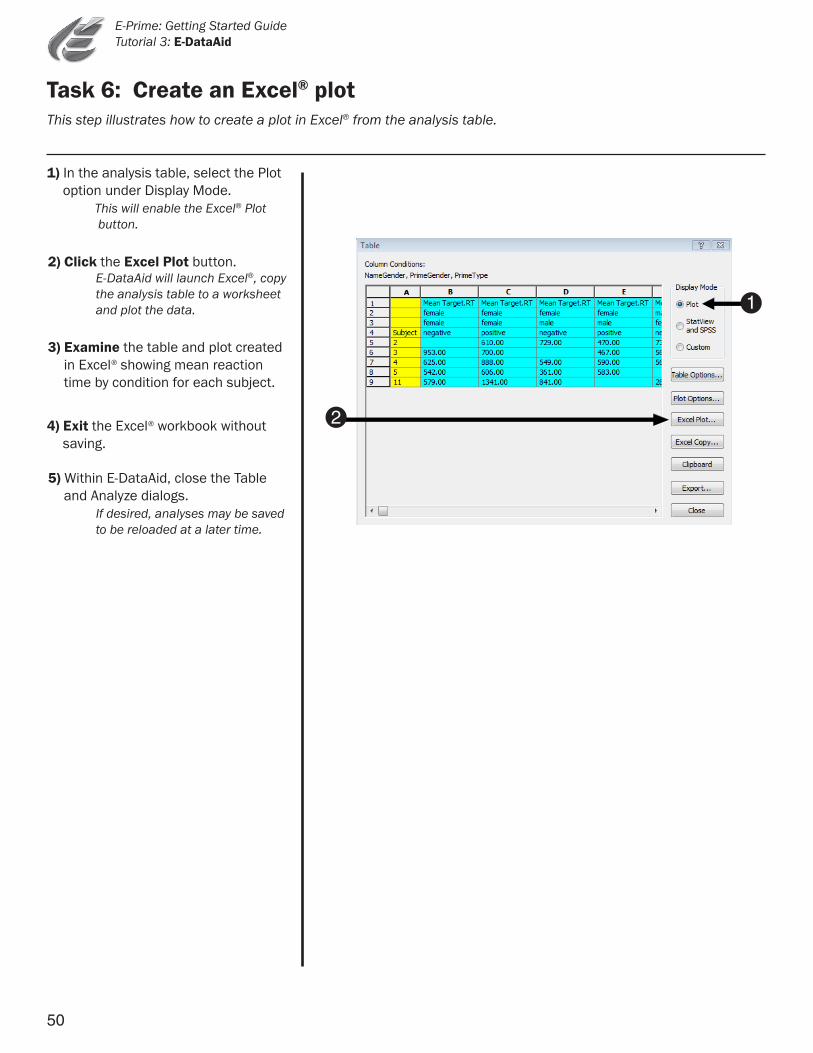
1) In the analysis table, select the Plot option under Display Mode.
This will enable the Excel® Plot button.
4) Exit the Excel® workbook without saving.
2) Click the Excel Plot button. E-DataAid will launch Excel®, copy the analysis table to a worksheet andplotthedata.
3) Examine the table and plot created in Excel® showing mean reaction time by condition for each subject.
5) Within E-DataAid, close the Table and Analyze dialogs.
Ifdesired,analysesmaybesaved tobereloadedatalatertime.
1
2
51
E-Prime: Getting Started Guide Tutorial 3: E-DataAid
Thisstepwillguideyouthroughtheexportofthespreadsheettoatab-delimitedtextfile.
Task 7: Export data
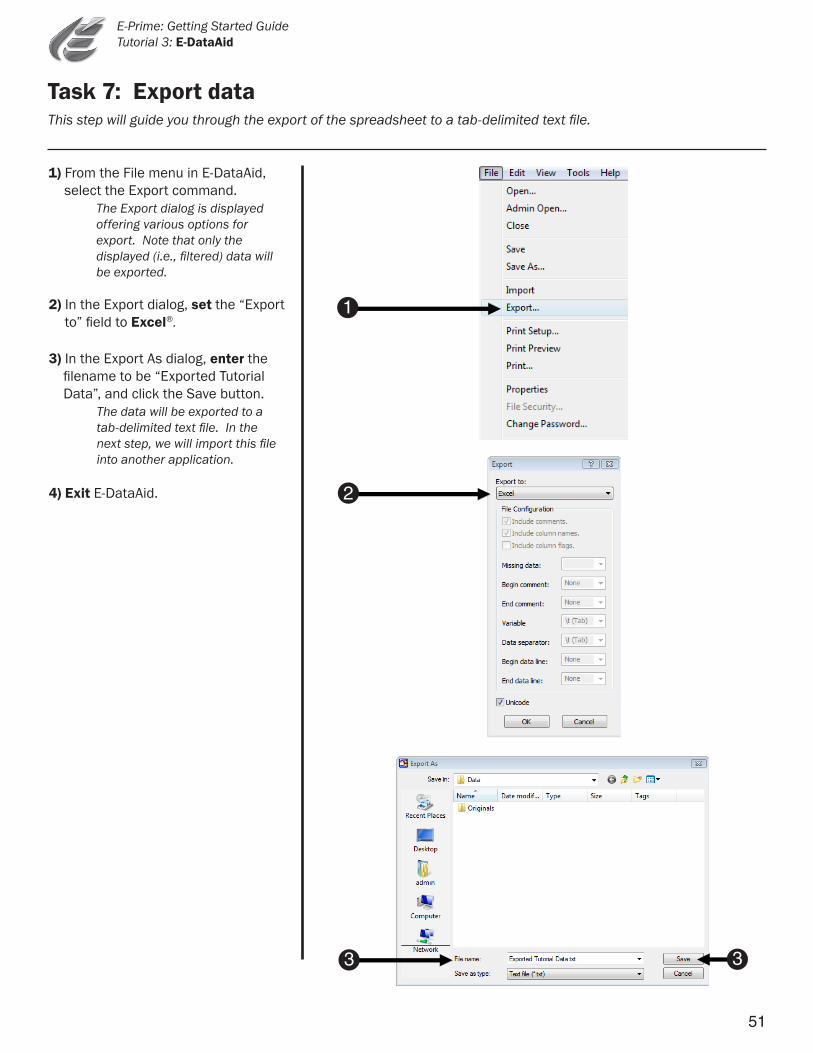
1) From the File menu in E-DataAid, select the Export command.
The Export dialog is displayed offering various options for export.Notethatonlythe displayed(i.e.,filtered)datawill beexported.
2) In the Export dialog, set the “Export to” field to Excel®.
4) Exit E-DataAid.
3) In the Export As dialog, enter the filename to be “Exported Tutorial Data”, and click the Save button. The data will be exported to a tab-delimitedtextfile.Inthe nextstep,wewillimportthisfile intoanotherapplication.
1
2
3
3

52
E-Prime: Getting Started Guide Tutorial 3: E-DataAid
Inthisstep,youwillimportthetab-delimitedtextfilecontainingthemergeddataintoExcel®.
Task 8: Import text file into Excel® or other application
1) Open Excel®.
3) In the Open dialog, navigate to the folder containing your tab-delimited text file (e.g., My Documents\My Experiments\Tutorials\Data).
Be sure to set the “Files of type” fieldtoviewtextfiles.
2) From the File menu in Excel®, select the Open command.
4) Select Exported Tutorial data.txt and click the Open button.
ThiswillbringuptheTextImport Wizard.Thedefaultsinthewizard are set for delimited text separatedbytabs.
5) Step through the Text Import Wizard, accepting the default settings, or simply click Finish.
ExportedTutorialData.txtwill be opened in an Excel® spreadsheet, with header information indicating the locationofthesourcefile,a noticethatthefilecontains edited data, and a list of any activefiltersatthetimethedata wasexported(Target.ACC=1).
6) Exit Excel®.
5
2
4
3
4

53
E-Prime: Getting Started Guide Tutorial 3: E-DataAid

54
E-Prime: Getting Started Guide Advanced Tutorials
Advanced TutorialsThe advanced tutorial exercises will guide you through modification of the experiment created in the E-Studio tutorial in order to introduce some commonly used features of E-Prime. It is recommended that you work through the E-Studio tutorial, as well as all of the advanced tutorials, in order to generate the required experiment files and most effectively learn how to use E-Prime. The pre-created experiment files resulting from each tutorial are also included as part of the E-Prime installation in the My Documents\My Experiments\Tutorials\Data\Originals folder.
In the following set of tutorials, you will learn how to:
• Add user-written script to an existing experiment.
• Modify an existing experiment to use images rather than text stimuli.
• Modify an existing experiment to present sound and text simultaneously.
• Modify an existing experiment to present a movie in conjunction with text and sound.
55
E-Prime: Getting Started Guide Advanced Tutorials
Advanced Tutorial 1: Modify Tutorial.es2 to present picturesThe E-Studio tutorial is designed to introduce various features and capabilities available in E-Studio that will allow you to more effectively use it as an experimental design tool. The Advanced Tutorials build upon the introduction of those basic skills.
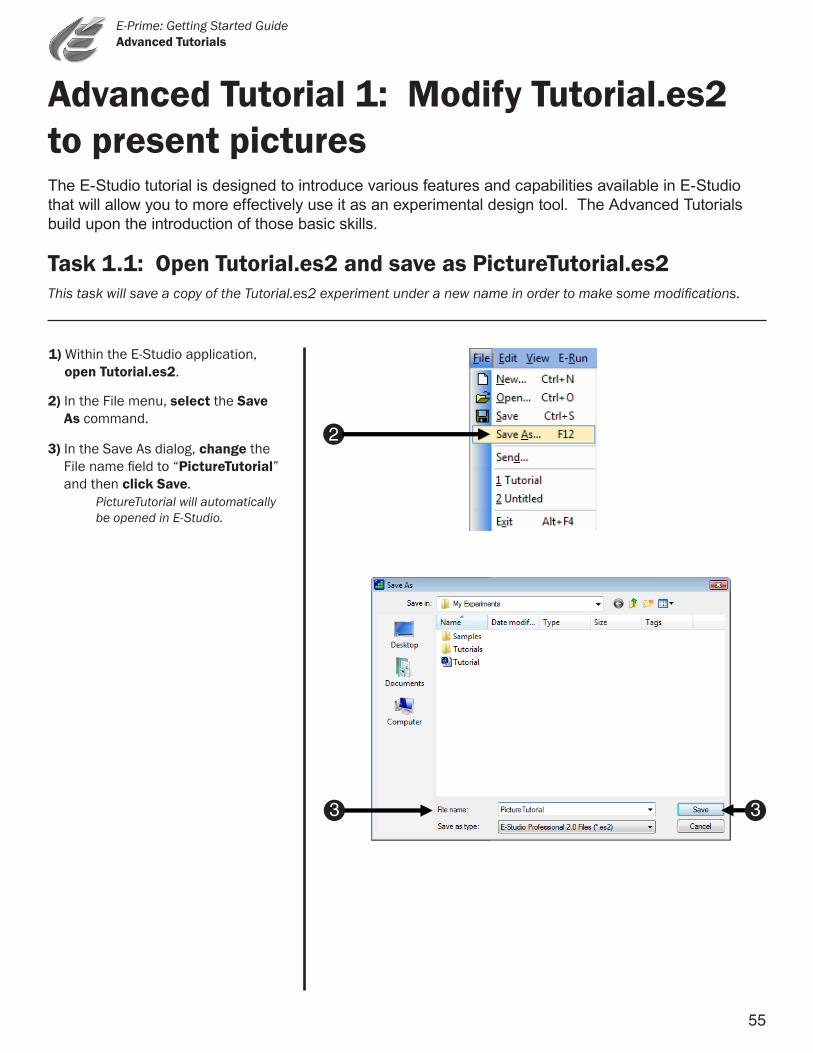
1) Within the E-Studio application, open Tutorial.es2.
2) In the File menu, select the Save As command.
3) In the Save As dialog, change the File name field to “PictureTutorial” and then click Save.
PictureTutorial will automatically be opened in E-Studio.
This task will save a copy of the Tutorial.es2 experiment under a new name in order to make some modifications.
Task 1.1: Open Tutorial.es2 and save as PictureTutorial.es2
2
3
3
56
E-Prime: Getting Started Guide Advanced Tutorials
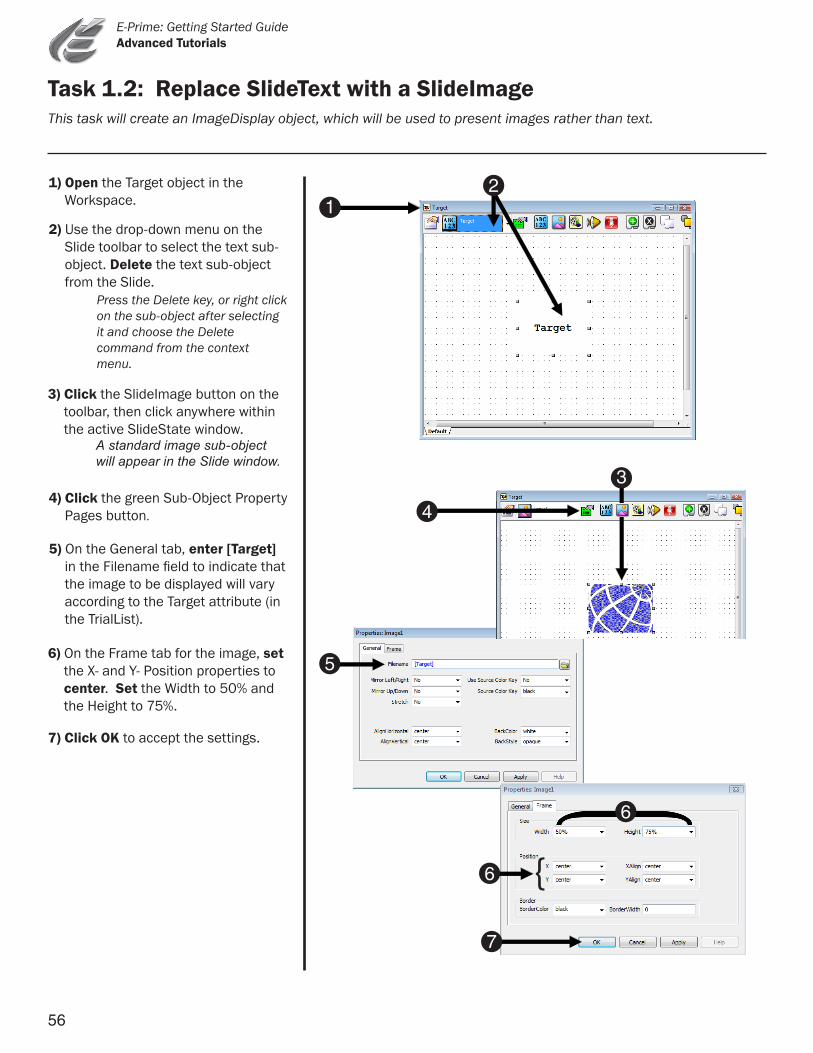
This task will create an ImageDisplay object, which will be used to present images rather than text.
Task 1.2: Replace SlideText with a SlideImage
1) Open the Target object in the Workspace.
2) Use the drop-down menu on the Slide toolbar to select the text sub-object. Delete the text sub-object from the Slide.
Press the Delete key, or right click on the sub-object after selecting it and choose the Delete command from the context menu.
3) Click the SlideImage button on the toolbar, then click anywhere within the active SlideState window.
Astandardimagesub-object willappearintheSlidewindow.
4) Click the green Sub-Object Property Pages button.
5) On the General tab, enter [Target] in the Filename field to indicate that the image to be displayed will vary according to the Target attribute (in the TrialList).
6) On the Frame tab for the image, set the X- and Y- Position properties to center. Set the Width to 50% and the Height to 75%.
7) Click OK to accept the settings.
1
2
5
6
7
{6
4
3
57
E-Prime: Getting Started Guide Advanced Tutorials
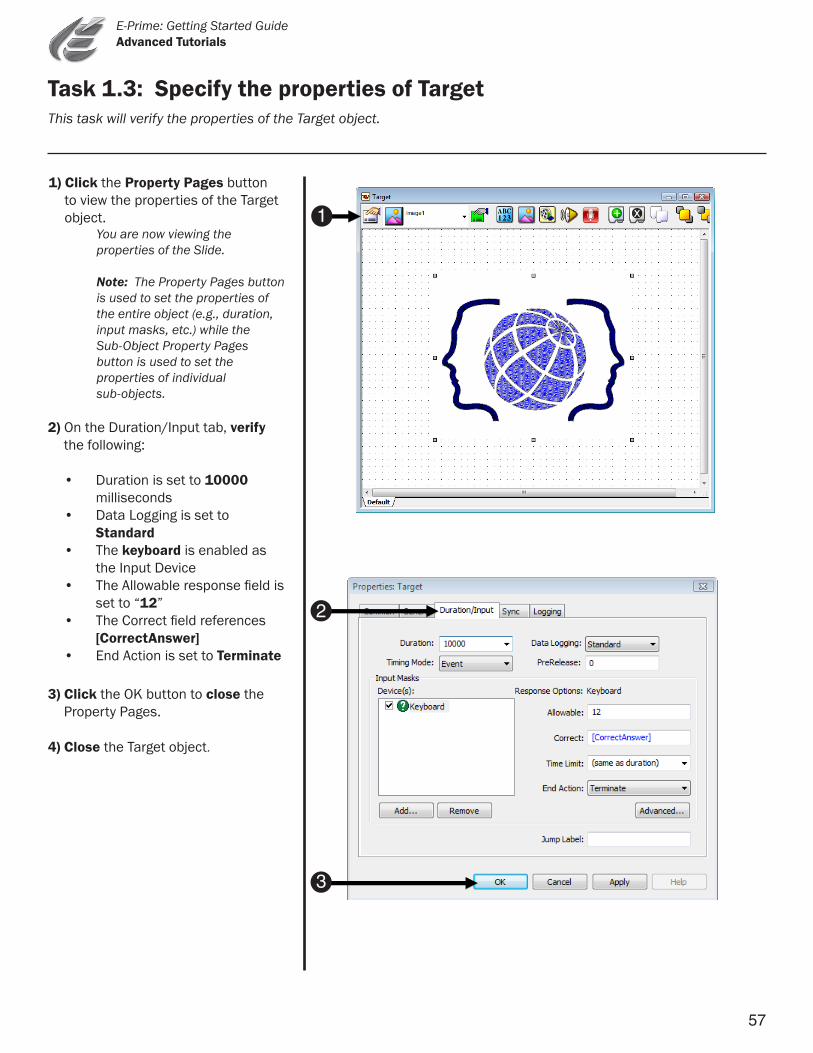
This task will verify the properties of the Target object.
Task 1.3: Specify the properties of Target
1) Click the Property Pages button to view the properties of the Target object.
You are now viewing the properties of the Slide.
Note: The Property Pages button is used to set the properties of the entire object (e.g., duration, input masks, etc.) while the Sub-Object Property Pages button is used to set the properties of individual sub-objects.
2) On the Duration/Input tab, verify the following:
• Duration is set to 10000 milliseconds • Data Logging is set to Standard • The keyboard is enabled as the Input Device • The Allowable response field is set to “12” • The Correct field references [CorrectAnswer] • End Action is set to Terminate
3) Click the OK button to close the Property Pages.
4) Close the Target object.
1
2
3
58
E-Prime: Getting Started Guide Advanced Tutorials
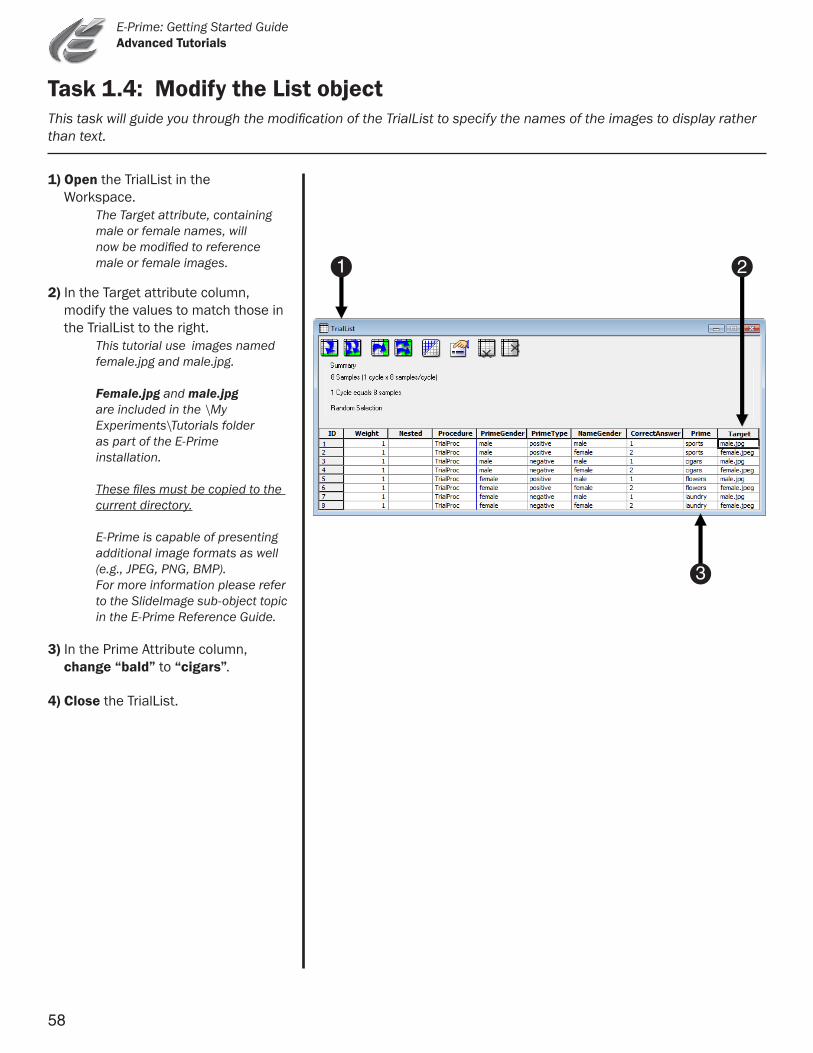
This task will guide you through the modification of the TrialList to specify the names of the images to display rather than text.
1) Open the TrialList in the Workspace. The Target attribute, containing male or female names, will now be modified to reference male or female images.
2) In the Target attribute column, modify the values to match those in the TrialList to the right.
This tutorial use images named female.jpg and male.jpg.
Female.jpg and male.jpg are included in the \My Experiments\Tutorials folder as part of the E-Prime installation.
These files must be copied to the current directory.
E-Prime is capable of presenting additional image formats as well (e.g., JPEG, PNG, BMP). For more information please refer to the SlideImage sub-object topic in the E-Prime Reference Guide.
3) In the Prime Attribute column, change “bald” to “cigars”.
4) Close the TrialList.
Task 1.4: Modify the List object
2
3
1
59
E-Prime: Getting Started Guide Advanced Tutorials
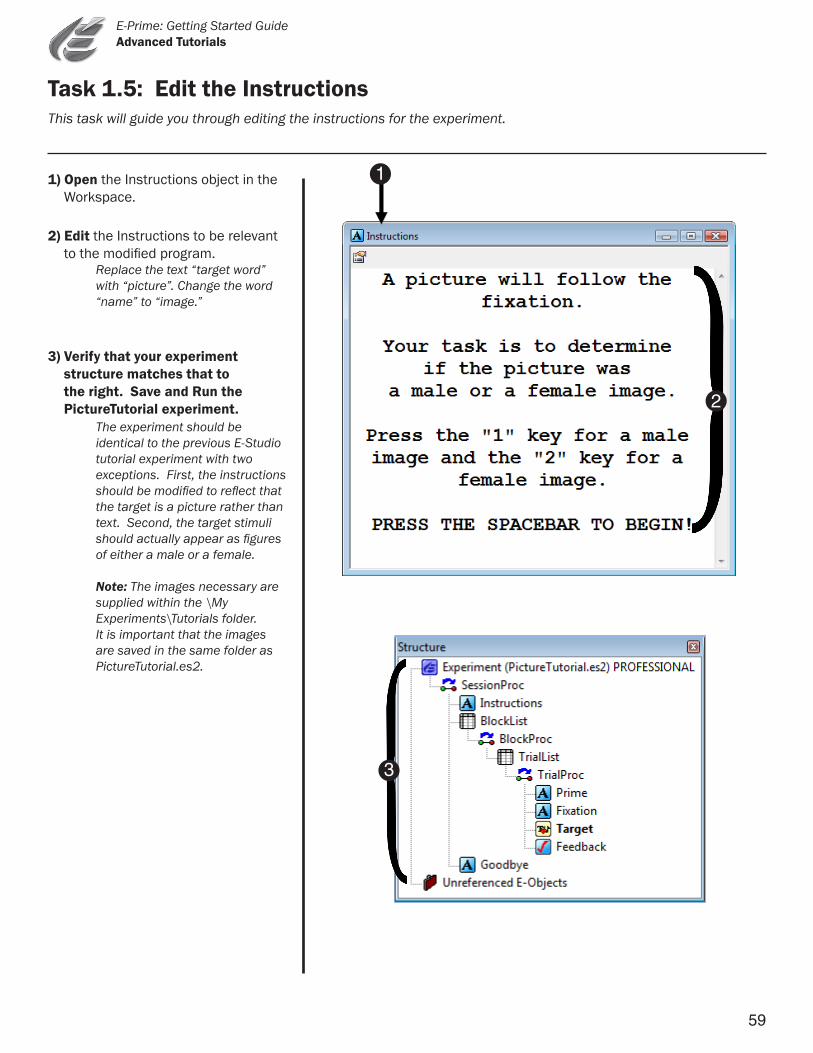
This task will guide you through editing the instructions for the experiment.
Task 1.5: Edit the Instructions
1) Open the Instructions object in the Workspace.
2) Edit the Instructions to be relevant to the modified program.
Replace the text “target word” with “picture”. Change the word “name” to “image.”
3) Verify that your experiment structure matches that to the right. Save and Run the PictureTutorial experiment.
The experiment should be identical to the previous E-Studio tutorial experiment with two exceptions. First, the instructions should be modified to reflect that the target is a picture rather than text. Second, the target stimuli should actually appear as figures of either a male or a female.
Note: The images necessary are supplied within the \My Experiments\Tutorials folder. It is important that the images are saved in the same folder as PictureTutorial.es2.
3
1
2
60
E-Prime: Getting Started Guide Advanced Tutorials
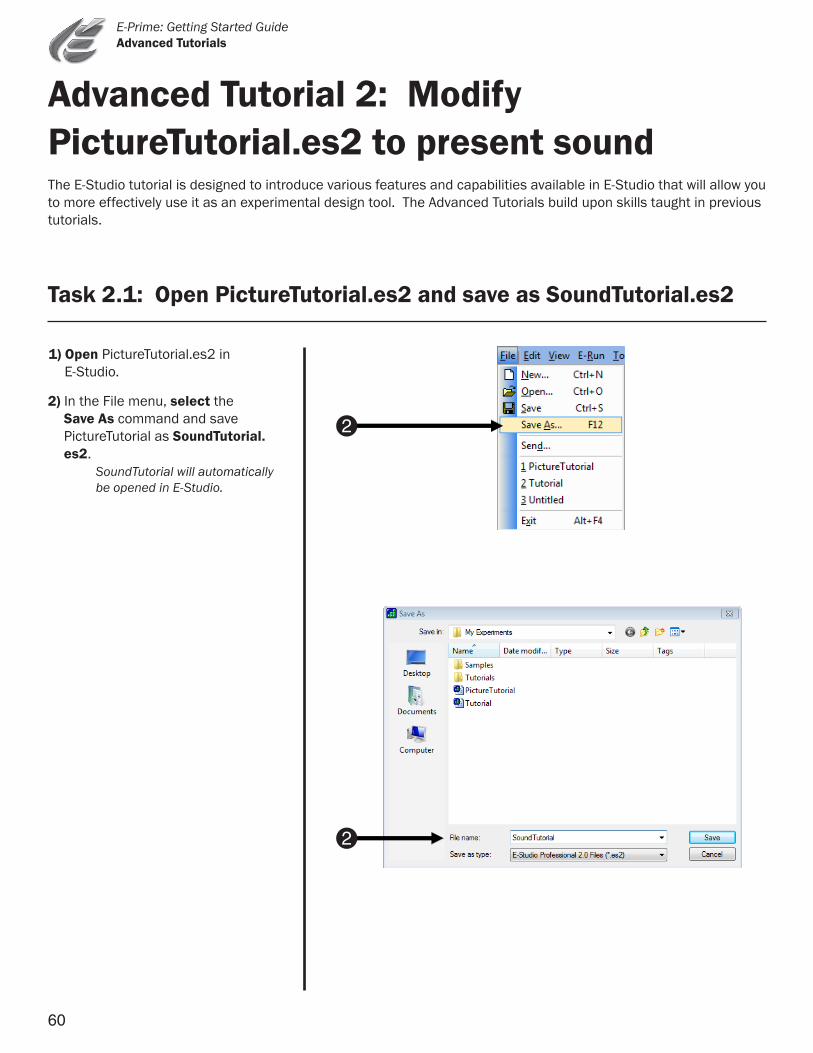
Advanced Tutorial 2: Modify PictureTutorial.es2 to present soundThe E-Studio tutorial is designed to introduce various features and capabilities available in E-Studio that will allow you to more effectively use it as an experimental design tool. The Advanced Tutorials build upon skills taught in previous tutorials.
Task 2.1: Open PictureTutorial.es2 and save as SoundTutorial.es2
1) Open PictureTutorial.es2 in E-Studio.
2) In the File menu, select the Save As command and save PictureTutorial as SoundTutorial.es2.
SoundTutorial will automatically be opened in E-Studio.
2
2
61
E-Prime: Getting Started Guide Advanced Tutorials
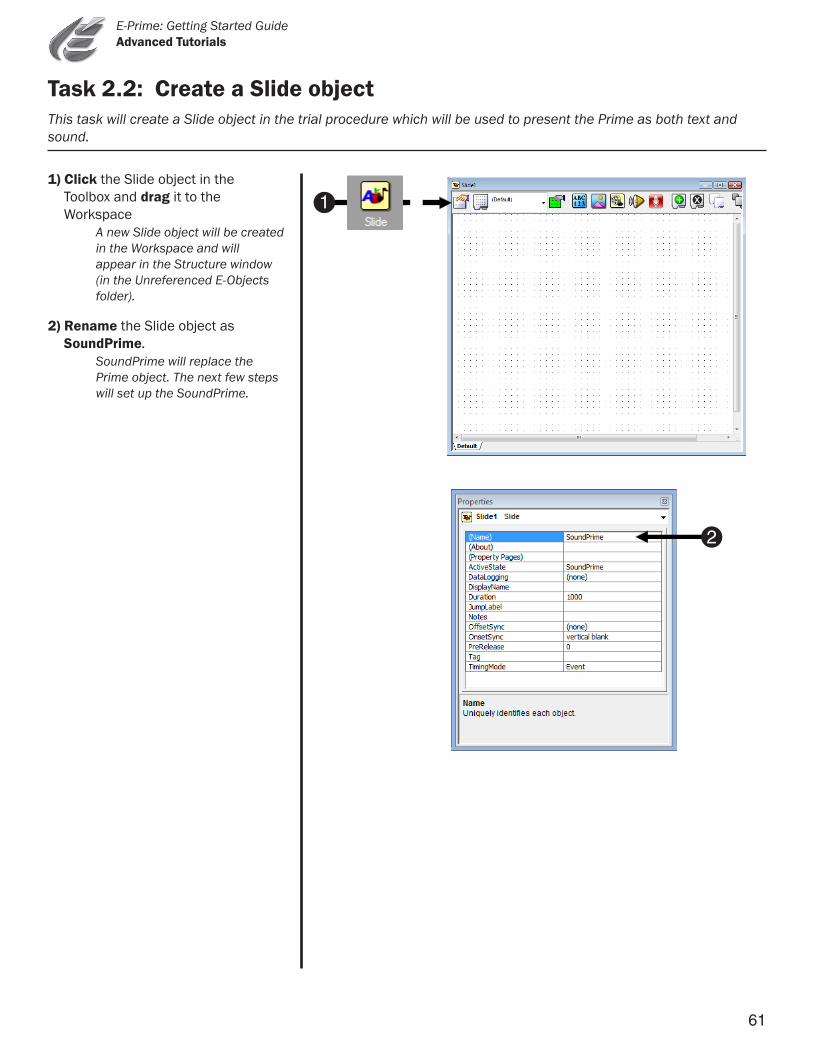
This task will create a Slide object in the trial procedure which will be used to present the Prime as both text and sound.
Task 2.2: Create a Slide object
1) Click the Slide object in the Toolbox and drag it to the Workspace A new Slide object will be created in the Workspace and will appear in the Structure window (in the Unreferenced E-Objects folder).
2) Rename the Slide object as SoundPrime.
SoundPrime will replace the Prime object. The next few steps will set up the SoundPrime.
1
2
62
E-Prime: Getting Started Guide Advanced Tutorials
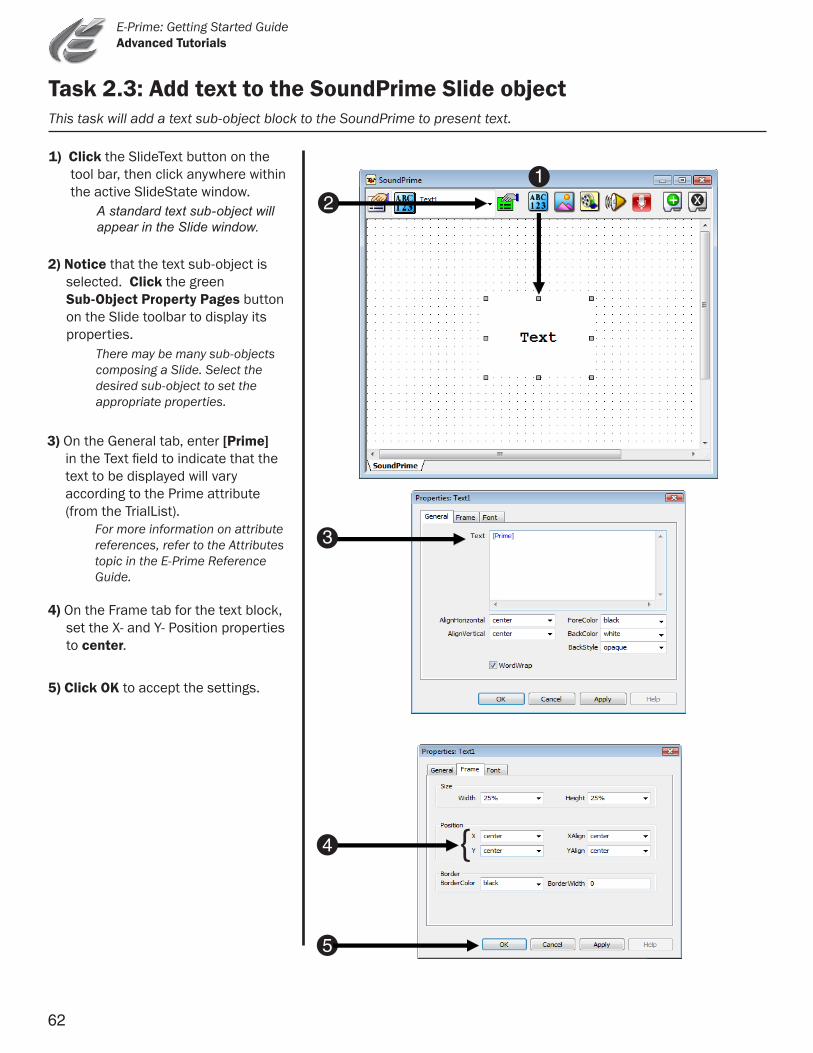
This task will add a text sub-object block to the SoundPrime to present text.
Task 2.3: Add text to the SoundPrime Slide object
1) Click the SlideText button on the tool bar, then click anywhere within the active SlideState window. Astandardtextsub-objectwill appearintheSlidewindow.
2) Notice that the text sub-object is selected. Click the green Sub-Object Property Pages button on the Slide toolbar to display its properties. There may be many sub-objects composing a Slide. Select the desired sub-object to set the appropriate properties.
4) On the Frame tab for the text block, set the X- and Y- Position properties to center.
3) On the General tab, enter [Prime] in the Text field to indicate that the text to be displayed will vary according to the Prime attribute (from the TrialList). For more information on attribute references, refer to the Attributes topic in the E-Prime Reference Guide.
5) Click OK to accept the settings.
3
5
{ 4
1
2
63
E-Prime: Getting Started Guide Advanced Tutorials
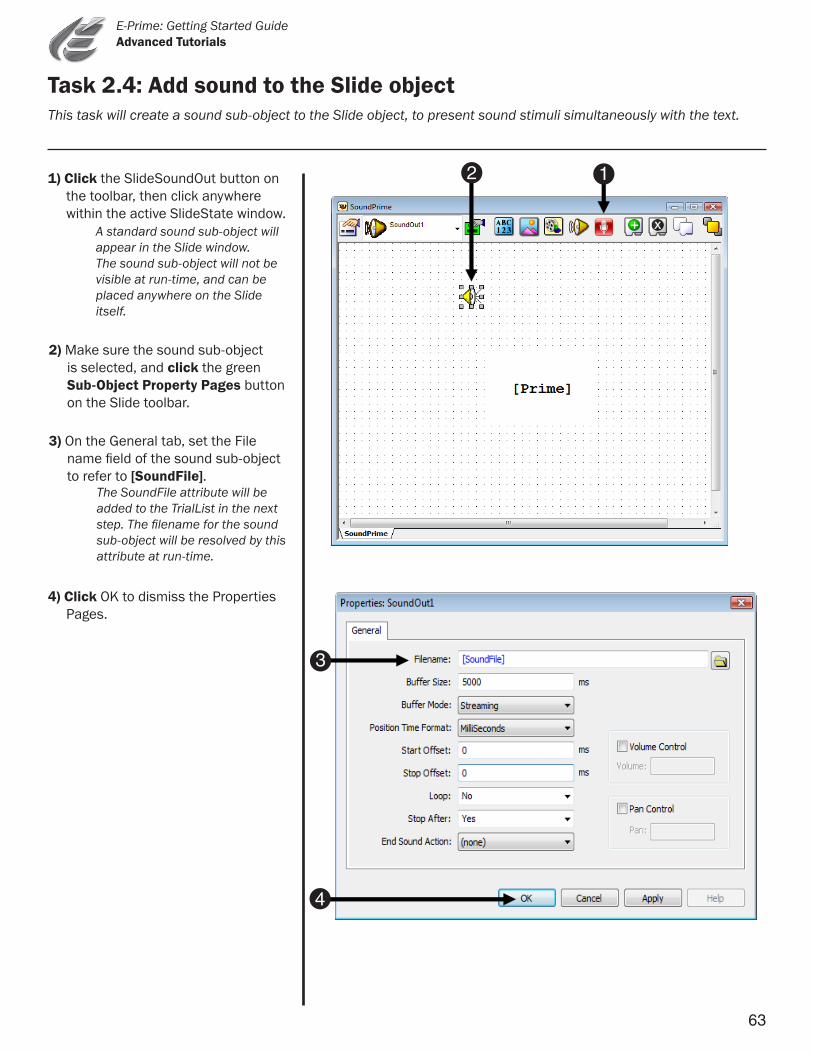
This task will create a sound sub-object to the Slide object, to present sound stimuli simultaneously with the text.
Task 2.4: Add sound to the Slide object
1) Click the SlideSoundOut button on the toolbar, then click anywhere within the active SlideState window. A standard sound sub-object will appear in the Slide window. The sound sub-object will not be visible at run-time, and can be placed anywhere on the Slide itself.
2) Make sure the sound sub-object is selected, and click the green Sub-Object Property Pages button on the Slide toolbar.
4) Click OK to dismiss the Properties Pages.
3) On the General tab, set the File name field of the sound sub-object to refer to [SoundFile]. The SoundFile attribute will be added to the TrialList in the next step. The filename for the sound sub-object will be resolved by this attribute at run-time.
2
1
4
3
64
E-Prime: Getting Started Guide Advanced Tutorials
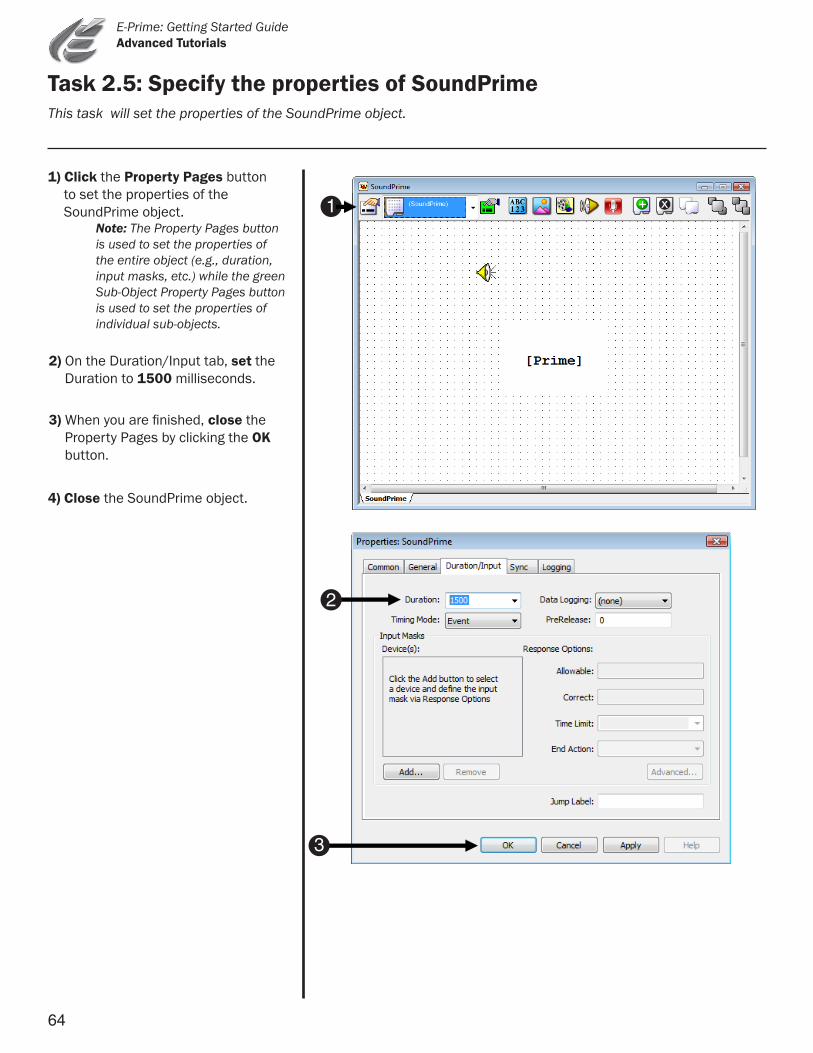
This task will set the properties of the SoundPrime object.
Task 2.5: Specify the properties of SoundPrime
1) Click the Property Pages button to set the properties of the SoundPrime object.
Note: The Property Pages button is used to set the properties of the entire object (e.g., duration, input masks, etc.) while the green Sub-Object Property Pages button is used to set the properties of individual sub-objects.
2) On the Duration/Input tab, set the Duration to 1500 milliseconds.
3) When you are finished, close the Property Pages by clicking the OK button.
4) Close the SoundPrime object.
1
2
3
65
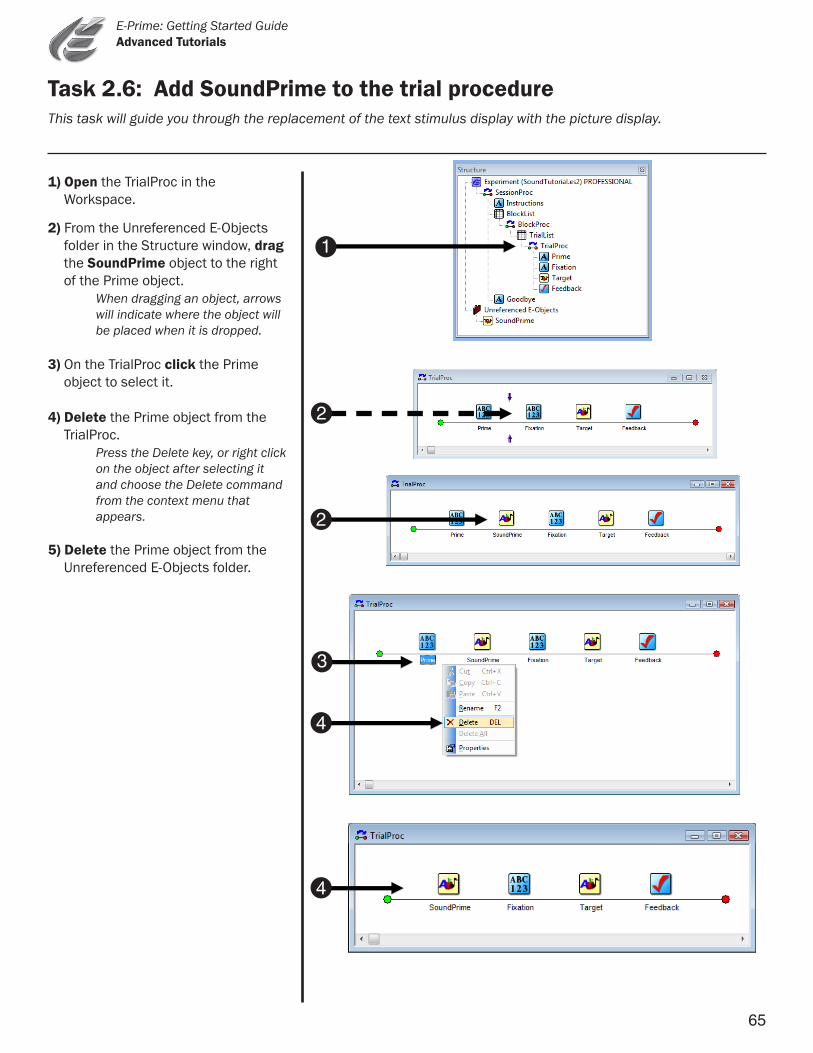
E-Prime: Getting Started Guide Advanced Tutorials
This task will guide you through the replacement of the text stimulus display with the picture display.
Task 2.6: Add SoundPrime to the trial procedure
1
1) Open the TrialProc in the Workspace.
2) From the Unreferenced E-Objects folder in the Structure window, drag the SoundPrime object to the right of the Prime object.
When dragging an object, arrows will indicate where the object will be placed when it is dropped.
4) Delete the Prime object from the TrialProc.
Press the Delete key, or right click on the object after selecting it and choose the Delete command from the context menu that appears.
3) On the TrialProc click the Prime object to select it.
5) Delete the Prime object from the Unreferenced E-Objects folder.
3
4
4
2
2
66
E-Prime: Getting Started Guide Advanced Tutorials
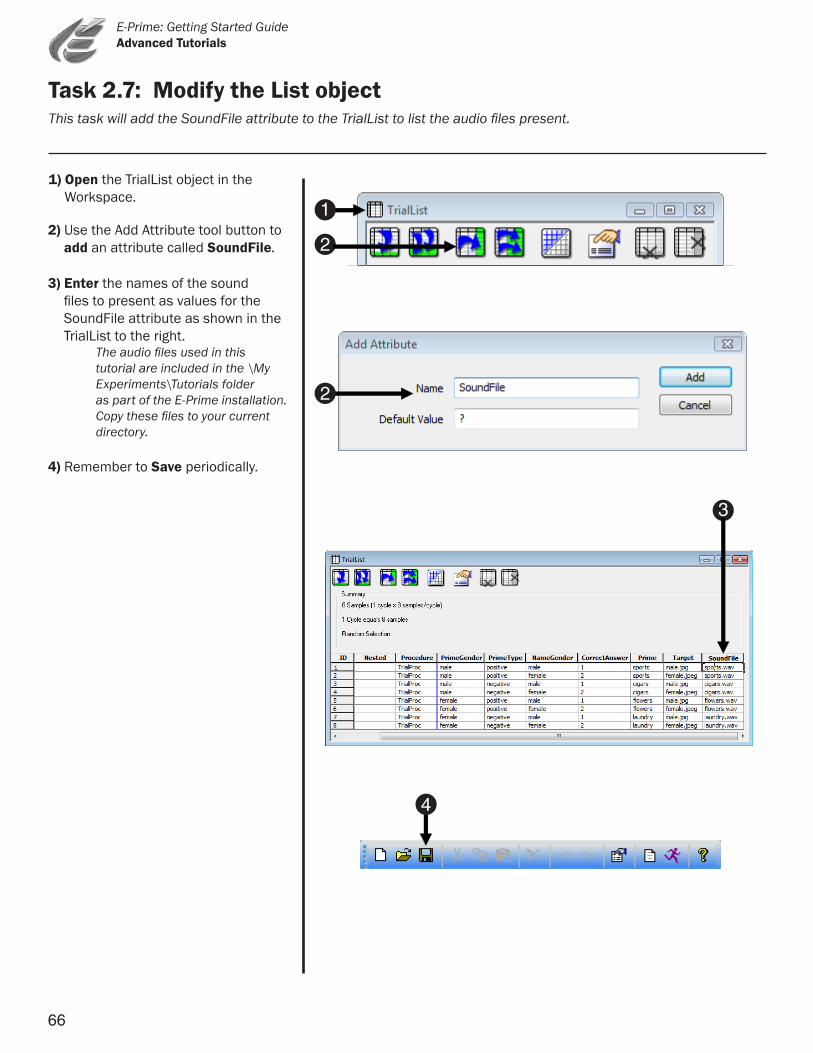
This task will add the SoundFile attribute to the TrialList to list the audio files present.
Task 2.7: Modify the List object
1) Open the TrialList object in the Workspace.
2) Use the Add Attribute tool button to add an attribute called SoundFile.
3) Enter the names of the sound files to present as values for the SoundFile attribute as shown in the TrialList to the right.
The audio files used in this tutorial are included in the \My Experiments\Tutorials folder as part of the E-Prime installation. Copy these files to your current directory.
4) Remember to Save periodically.
1
2
4
2
3
67
E-Prime: Getting Started Guide Advanced Tutorials
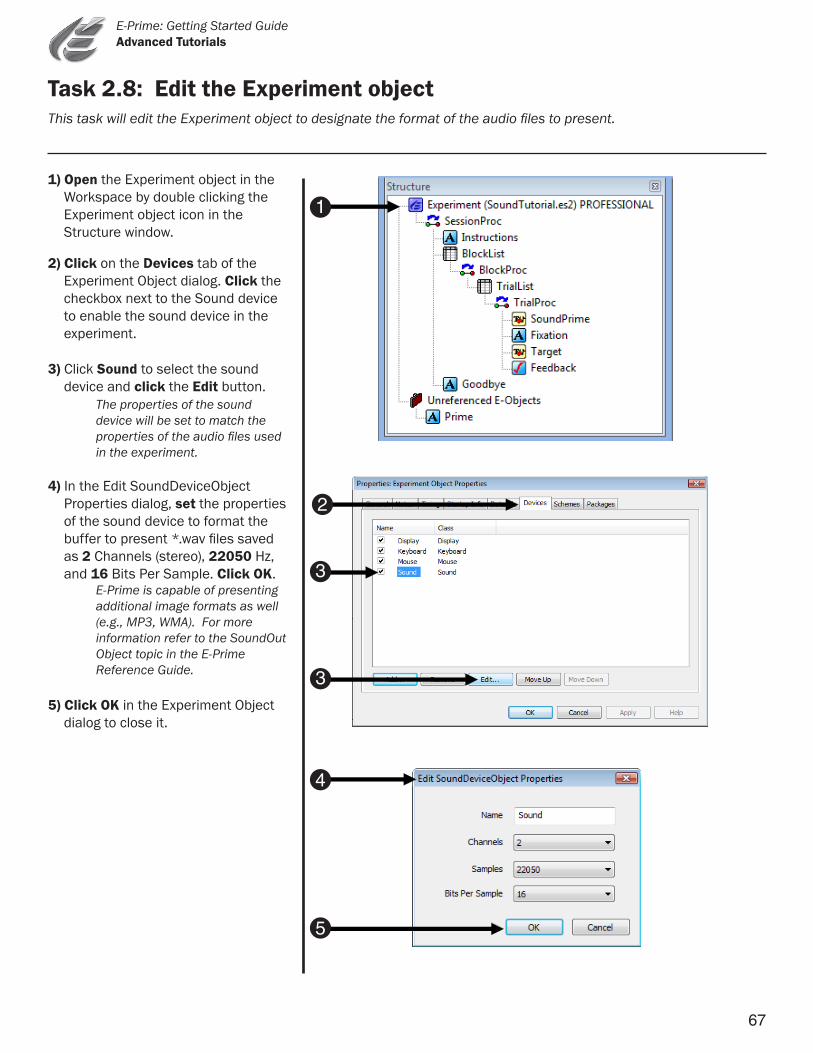
This task will edit the Experiment object to designate the format of the audio files to present.
Task 2.8: Edit the Experiment object
1) Open the Experiment object in the Workspace by double clicking the Experiment object icon in the
Structure window.
2) Click on the Devices tab of the Experiment Object dialog. Click the checkbox next to the Sound device to enable the sound device in the experiment.
4) In the Edit SoundDeviceObject Properties dialog, set the properties
of the sound device to format the buffer to present *.wav files saved as 2 Channels (stereo), 22050 Hz, and 16 Bits Per Sample. Click OK.
E-Prime is capable of presenting additional image formats as well (e.g., MP3, WMA). For more information refer to the SoundOut Object topic in the E-Prime Reference Guide.
5) Click OK in the Experiment Object dialog to close it.
3) Click Sound to select the sound device and click the Edit button.
The properties of the sound device will be set to match the properties of the audio files used in the experiment.
2
3
3
4
5
1
68
E-Prime: Getting Started Guide Advanced Tutorials
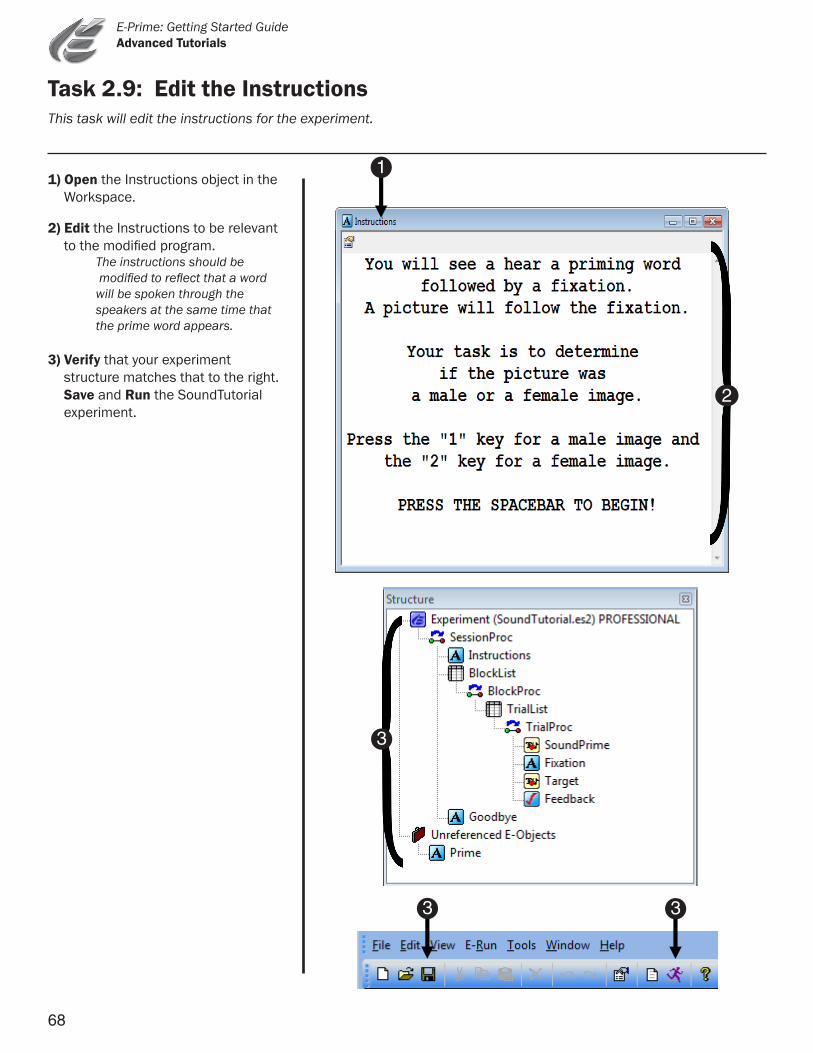
This task will edit the instructions for the experiment.
Task 2.9: Edit the Instructions
1) Open the Instructions object in the Workspace.
2) Edit the Instructions to be relevant to the modified program.
The instructions should be modified to reflect that a word will be spoken through the speakers at the same time that the prime word appears.
3) Verify that your experiment structure matches that to the right. Save and Run the SoundTutorial experiment.
3
2
1
3
3
69
E-Prime: Getting Started Guide Advanced Tutorials
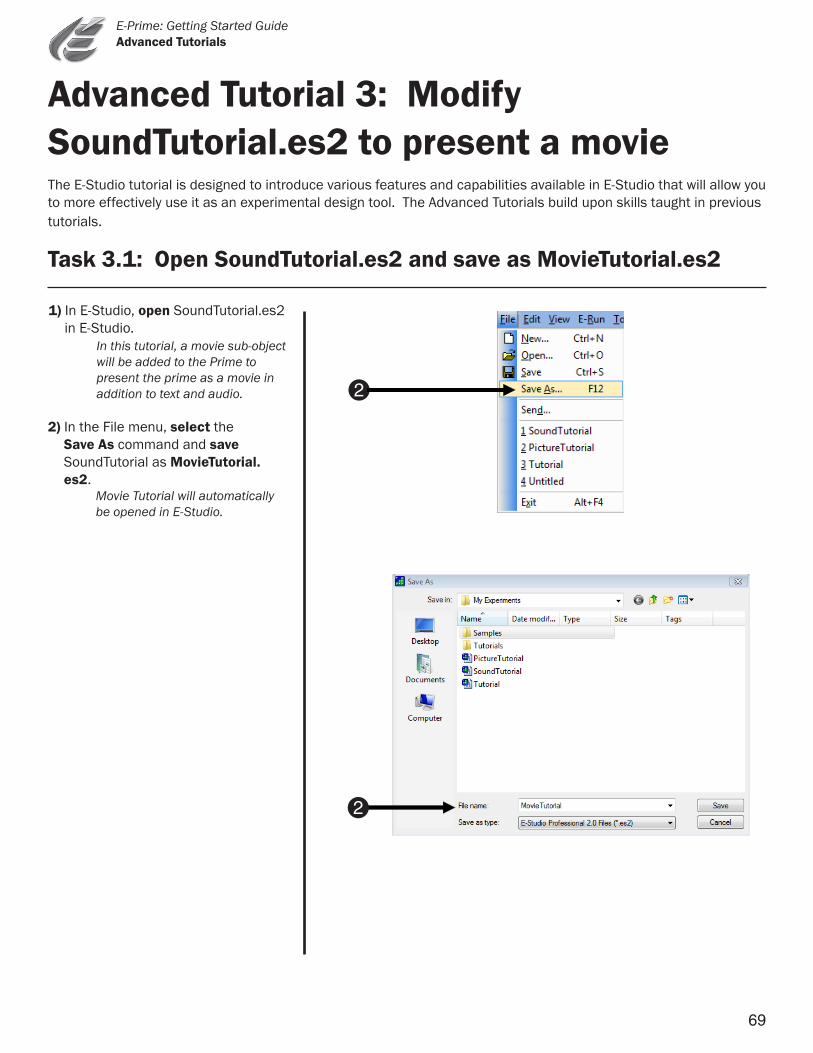
Advanced Tutorial 3: Modify SoundTutorial.es2 to present a movieThe E-Studio tutorial is designed to introduce various features and capabilities available in E-Studio that will allow you to more effectively use it as an experimental design tool. The Advanced Tutorials build upon skills taught in previous tutorials.
1) In E-Studio, open SoundTutorial.es2 in E-Studio.
In this tutorial, a movie sub-object will be added to the Prime to present the prime as a movie in addition to text and audio.
2) In the File menu, select the Save As command and save SoundTutorial as MovieTutorial.es2.
Movie Tutorial will automatically be opened in E-Studio.
Task 3.1: Open SoundTutorial.es2 and save as MovieTutorial.es2
2
2
70
E-Prime: Getting Started Guide Advanced Tutorials
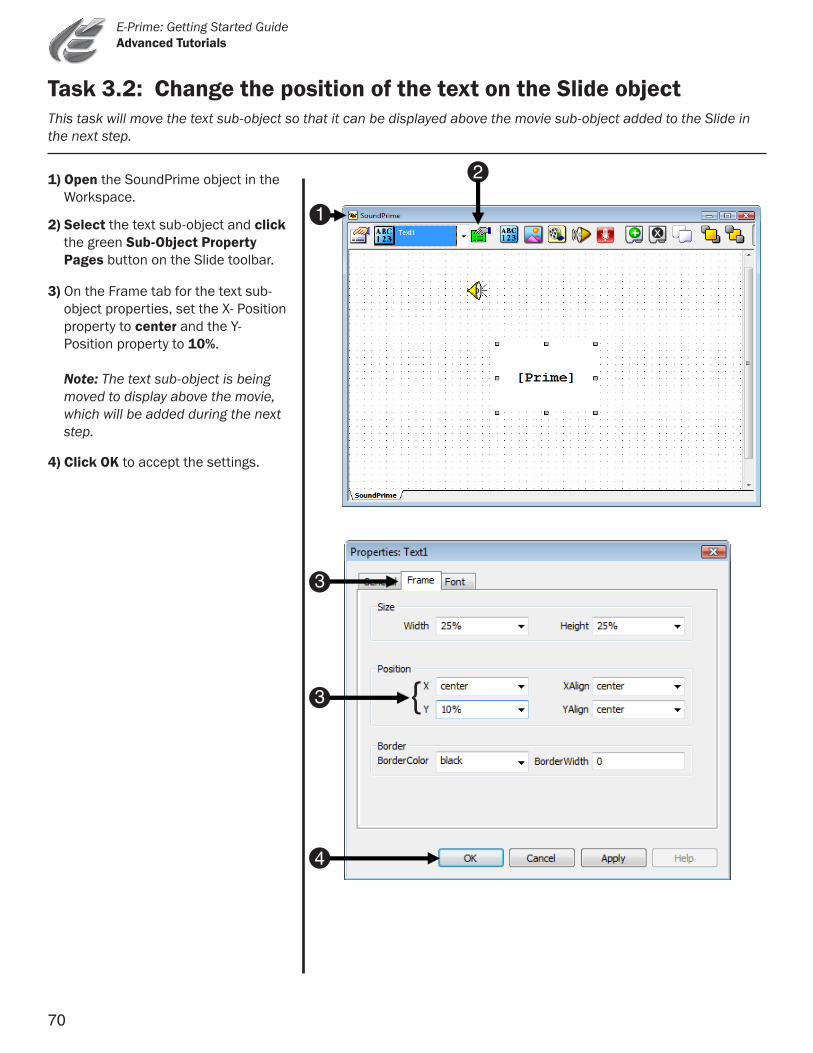
This task will move the text sub-object so that it can be displayed above the movie sub-object added to the Slide in the next step.
Task 3.2: Change the position of the text on the Slide object
1) Open the SoundPrime object in the Workspace.
2) Select the text sub-object and click the green Sub-Object Property Pages button on the Slide toolbar.
3) On the Frame tab for the text sub-object properties, set the X- Position property to center and the Y-Position property to 10%.
Note: The text sub-object is being moved to display above the movie,
which will be added during the next step.
4) Click OK to accept the settings.
1
2
{ 3
3
4

71
E-Prime: Getting Started Guide Advanced Tutorials
This task will add a movie sub-object to the Slide object so that the prime can be presented as a movie along with text and sound.
Task 3.3: Add a movie to the Slide object
1) Rename SoundPrime to MoviePrime.
The object is being renamed MoviePrime to reflect the fact that the prime will now be presented as a movie, along with text and sound. The properties will remain the same.
2) Click the SlideMovie button on the toolbar, then click anywhere within the active SlideState window.
A standard movie sub-object will appear in the Slide window.
3) Select the movie sub-object and click the green Sub-Object Property Pages button on the Slide toolbar.
4) On the General tab, set the Filename field of the movie sub-object to refer to [MovieFile], and set the Stretch property to Yes.
The MovieFile attribute will be added to the TrialList in the next step. The filename for the movie sub-object will be determined at run-time.
5) On the Frame tab for the movie object, set the X- and Y- Position properties to center. Set the Width and Height to 75%.
6) Click OK to accept the settings.
3
1
2
4
6
5
{ 5
72
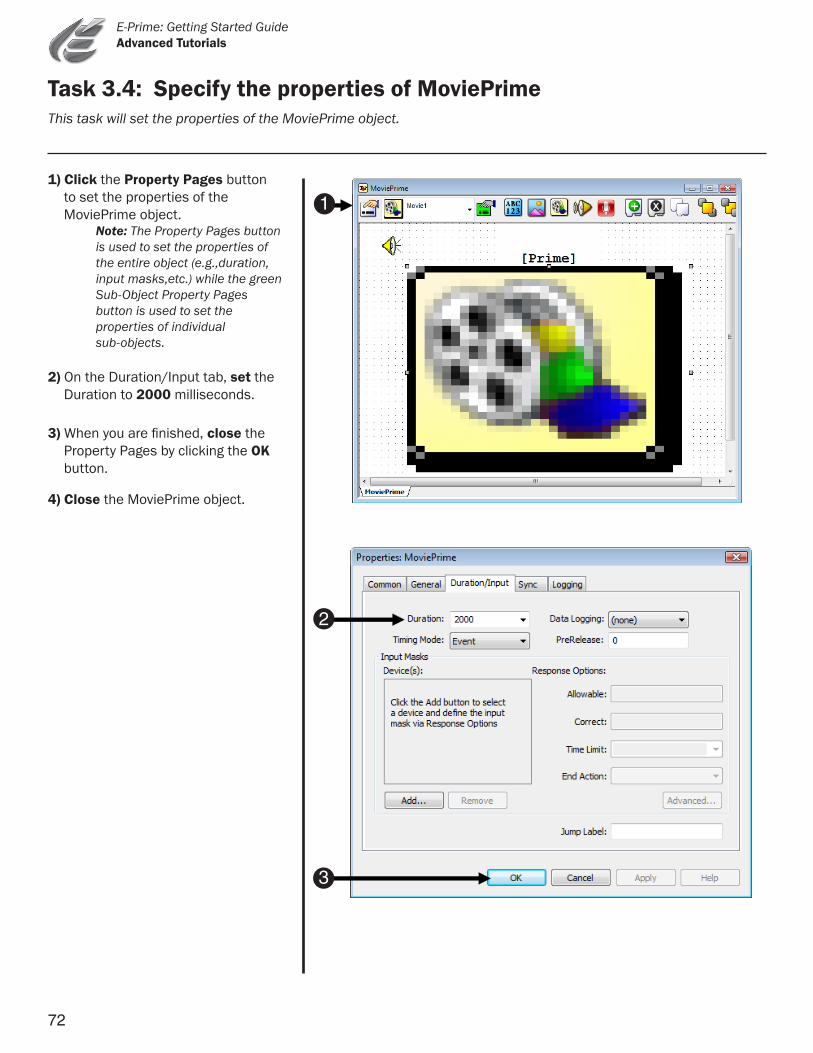
E-Prime: Getting Started Guide Advanced Tutorials
This task will set the properties of the MoviePrime object.
Task 3.4: Specify the properties of MoviePrime
1) Click the Property Pages button to set the properties of the MoviePrime object.
Note: The Property Pages button is used to set the properties of the entire object (e.g.,duration, input masks,etc.) while the green Sub-Object Property Pages button is used to set the properties of individual sub-objects.
2) On the Duration/Input tab, set the Duration to 2000 milliseconds.
3) When you are finished, close the Property Pages by clicking the OK button.
4) Close the MoviePrime object.
1
2
3
73
E-Prime: Getting Started Guide Advanced Tutorials
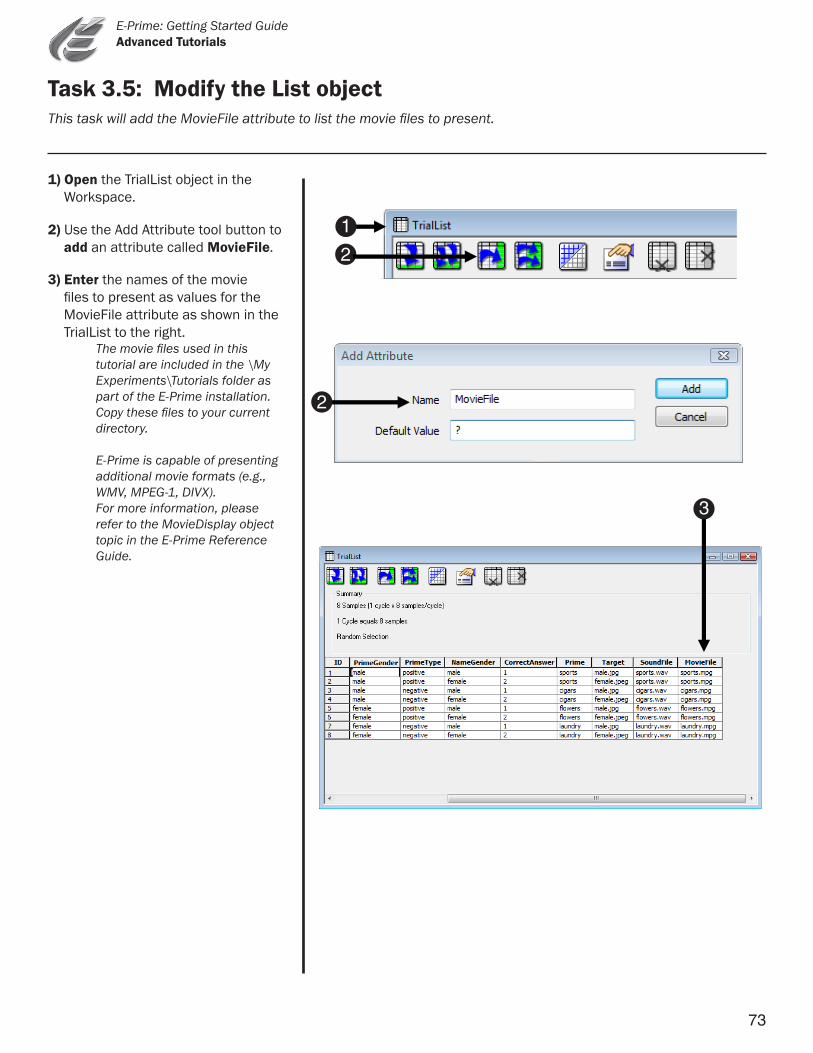
This task will add the MovieFile attribute to list the movie files to present.
Task 3.5: Modify the List object
1) Open the TrialList object in the Workspace.
2) Use the Add Attribute tool button to add an attribute called MovieFile.
3) Enter the names of the movie files to present as values for the MovieFile attribute as shown in the TrialList to the right.
The movie files used in this tutorial are included in the \My Experiments\Tutorials folder as part of the E-Prime installation. Copy these files to your current directory.
E-Prime is capable of presenting additional movie formats (e.g., WMV, MPEG-1, DIVX). For more information, please refer to the MovieDisplay object topic in the E-Prime Reference Guide.
1
2
2
3
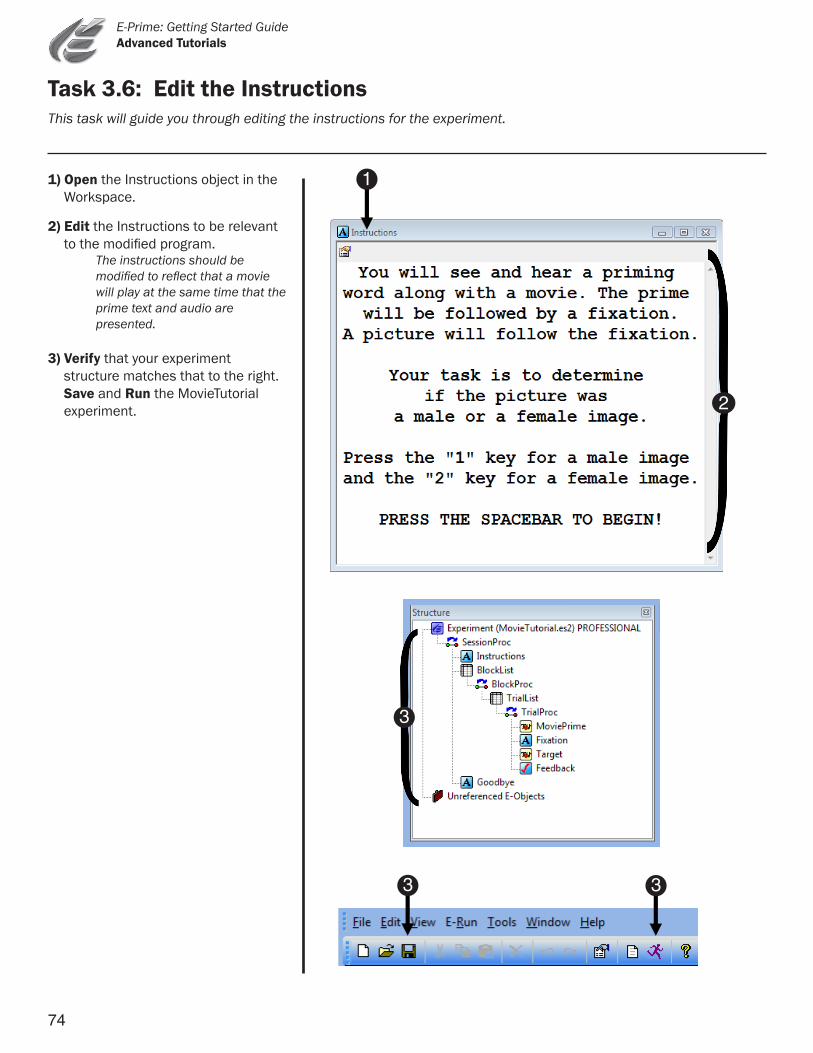
74
E-Prime: Getting Started Guide Advanced Tutorials
This task will guide you through editing the instructions for the experiment.
Task 3.6: Edit the Instructions
1) Open the Instructions object in the Workspace.
2) Edit the Instructions to be relevant to the modified program.
The instructions should be modified to reflect that a movie will play at the same time that the prime text and audio are presented.
3) Verify that your experiment structure matches that to the right. Save and Run the MovieTutorial experiment.
3
2
1
3
3
75
E-Prime: Getting Started Guide Advanced Tutorials
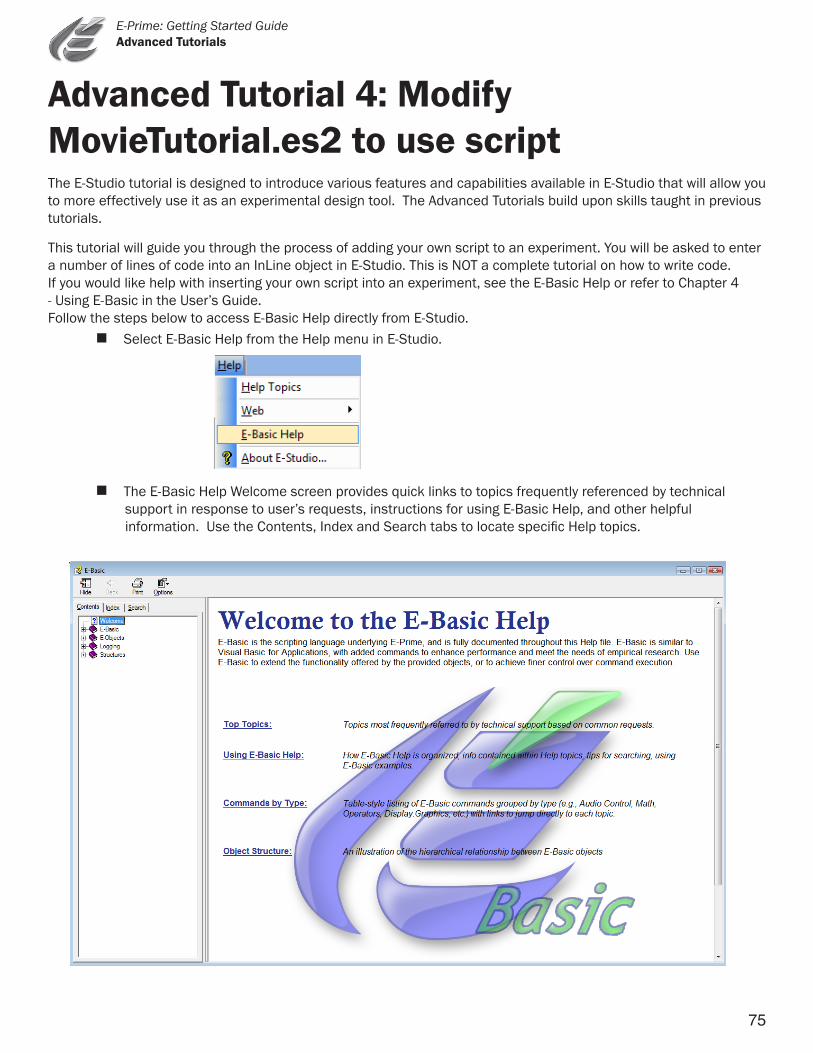
Advanced Tutorial 4: Modify MovieTutorial.es2 to use scriptThe E-Studio tutorial is designed to introduce various features and capabilities available in E-Studio that will allow you to more effectively use it as an experimental design tool. The Advanced Tutorials build upon skills taught in previous tutorials.
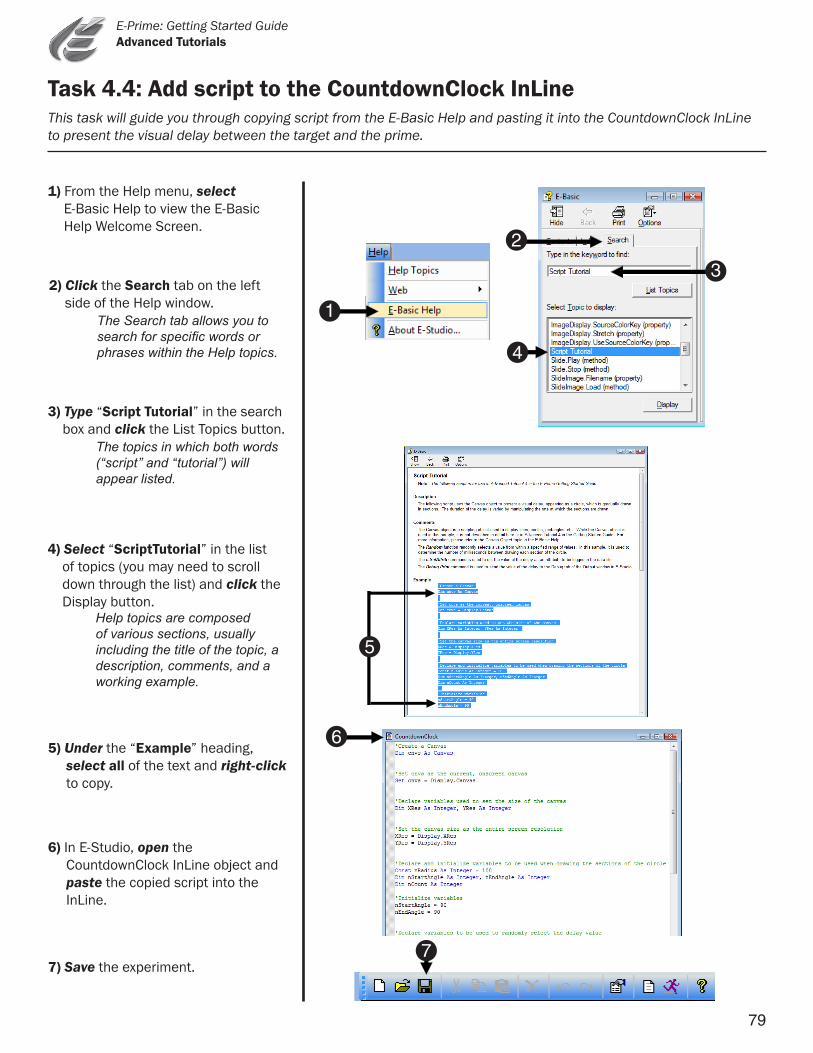
This tutorial will guide you through the process of adding your own script to an experiment. You will be asked to enter a number of lines of code into an InLine object in E-Studio. This is NOT a complete tutorial on how to write code. If you would like help with inserting your own script into an experiment, see the E-Basic Help or refer to Chapter 4 - Using E-Basic in the User’s Guide. Follow the steps below to access E-Basic Help directly from E-Studio. Select E-Basic Help from the Help menu in E-Studio.
The E-Basic Help Welcome screen provides quick links to topics frequently referenced by technical support in response to user’s requests, instructions for using E-Basic Help, and other helpful information. Use the Contents, Index and Search tabs to locate specific Help topics.
76
E-Prime: Getting Started Guide Advanced Tutorials
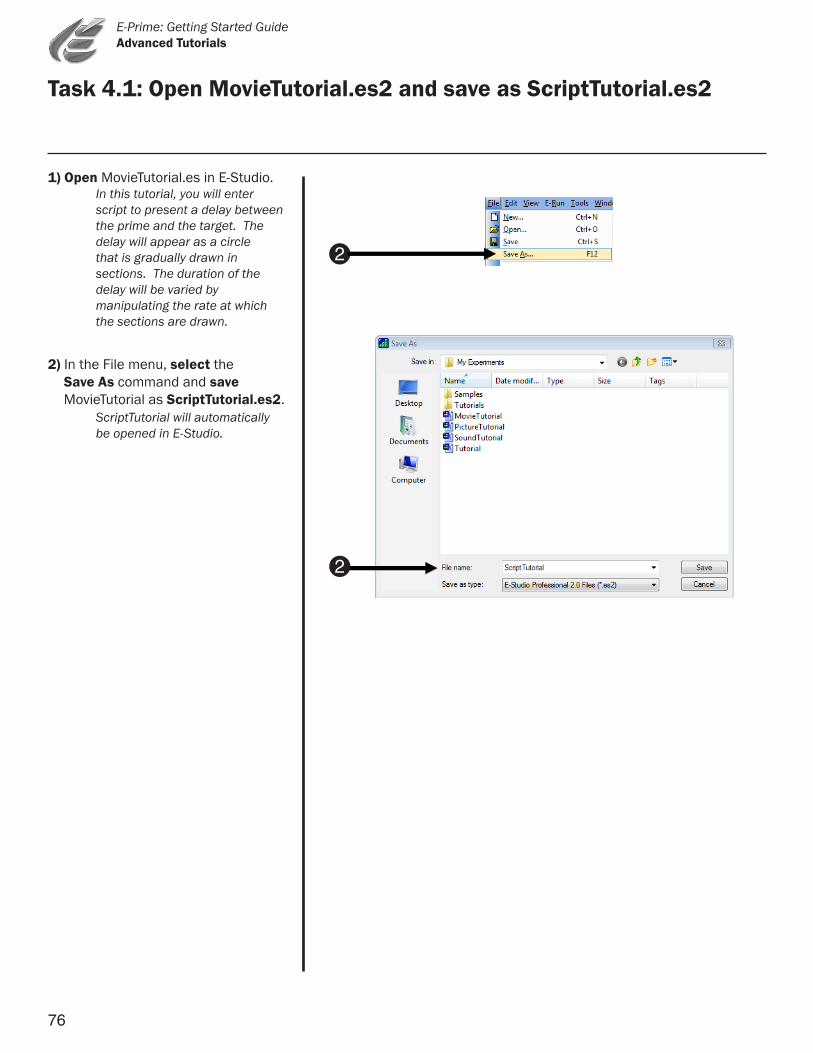
Task 4.1: Open MovieTutorial.es2 and save as ScriptTutorial.es2
1) Open MovieTutorial.es in E-Studio. In this tutorial, you will enter script to present a delay between the prime and the target. The delay will appear as a circle that is gradually drawn in sections. The duration of the delay will be varied by manipulating the rate at which the sections are drawn.
2) In the File menu, select the Save As command and save MovieTutorial as ScriptTutorial.es2.
ScriptTutorial will automatically be opened in E-Studio.
2
2
77
E-Prime: Getting Started Guide Advanced Tutorials
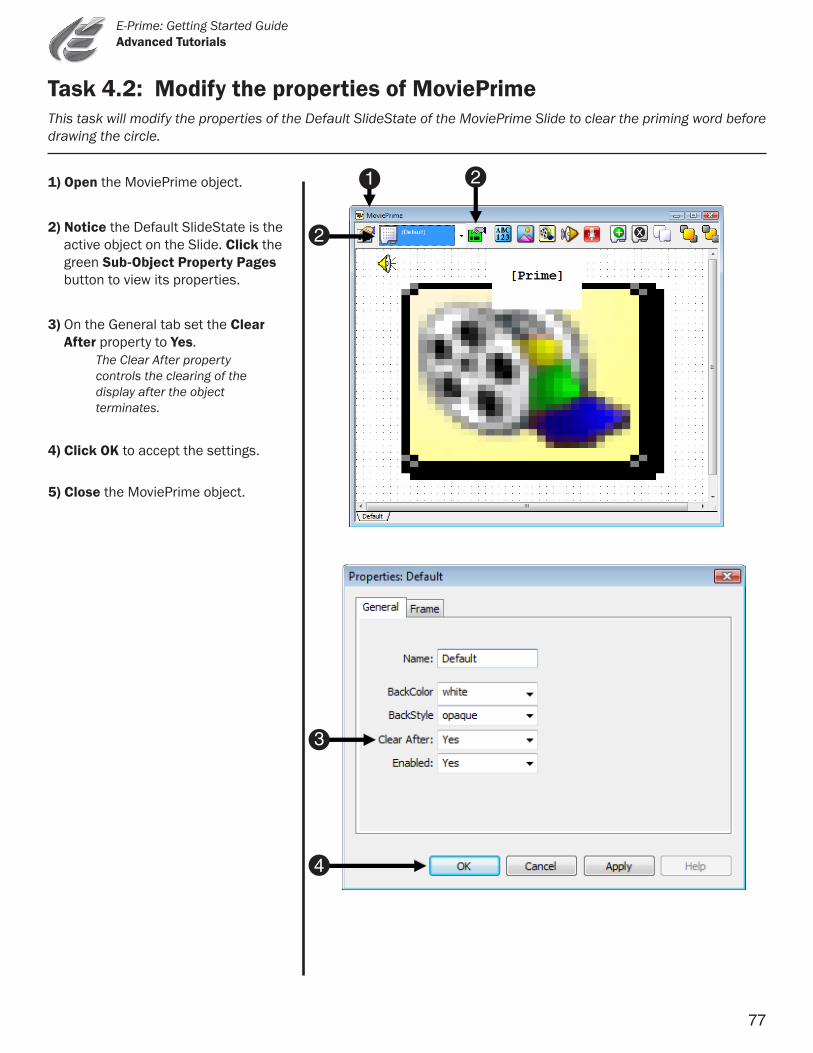
This task will modify the properties of the Default SlideState of the MoviePrime Slide to clear the priming word before drawing the circle.
Task 4.2: Modify the properties of MoviePrime
1) Open the MoviePrime object.
2) Notice the Default SlideState is the active object on the Slide. Click the green Sub-Object Property Pages button to view its properties.
3) On the General tab set the Clear After property to Yes.
The Clear After property controls the clearing of the display after the object terminates.
4) Click OK to accept the settings.
5) Close the MoviePrime object.
1
2
2
4
3
78
E-Prime: Getting Started Guide Advanced Tutorials
This task will create an InLine object for the purpose of presenting a delay between the prime and the target.
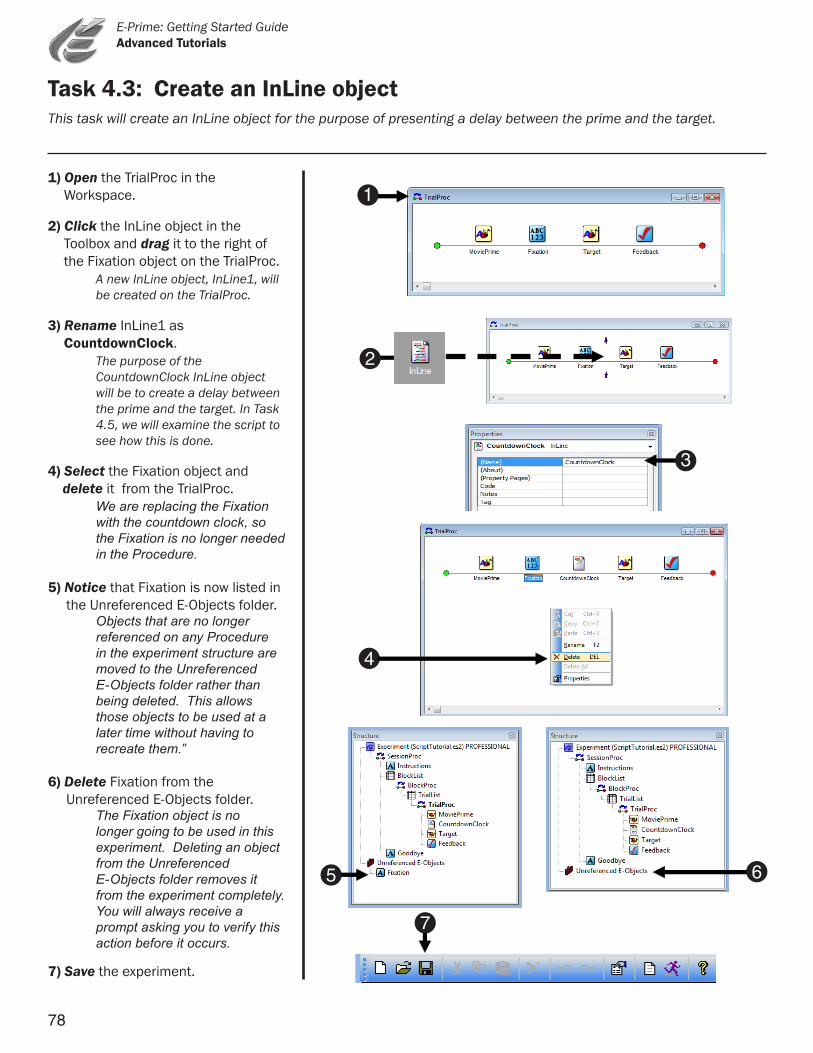
Task 4.3: Create an InLine object
1
4
5
6
7
2) Click the InLine object in the Toolbox and drag it to the right of
the Fixation object on the TrialProc. A new InLine object, InLine1, will be created on the TrialProc.
3) Rename InLine1 as CountdownClock.
The purpose of the CountdownClock InLine object will be to create a delay between the prime and the target. In Task 4.5, we will examine the script to see how this is done.
1) Open the TrialProc in the Workspace.
7) Save the experiment.
5) Notice that Fixation is now listed in the Unreferenced E-Objects folder. Objectsthatarenolonger referencedonanyProcedure intheexperimentstructureare movedtotheUnreferenced E-Objectsfolderratherthan beingdeleted.Thisallows thoseobjectstobeusedata latertimewithouthavingto recreatethem.”
6) Delete Fixation from the Unreferenced E-Objects folder. TheFixationobjectisno longergoingtobeusedinthis experiment.Deletinganobject fromtheUnreferenced E-Objectsfolderremovesit fromtheexperimentcompletely. Youwillalwaysreceivea promptaskingyoutoverifythis actionbeforeitoccurs.
4) Select the Fixation object and delete it from the TrialProc. WearereplacingtheFixation withthecountdownclock,so theFixationisnolongerneeded intheProcedure.
3
2
79
E-Prime: Getting Started Guide Advanced Tutorials
Task 4.4: Add script to the CountdownClock InLineThis task will guide you through copying script from the E-Basic Help and pasting it into the CountdownClock InLine to present the visual delay between the target and the prime.
1
5
6
7
2
3
4
1) From the Help menu, select E-Basic Help to view the E-Basic
Help Welcome Screen.
2) Click the Search tab on the left side of the Help window.
TheSearchtaballowsyouto searchforspecificwordsor phraseswithintheHelptopics.
3) Type “Script Tutorial” in the search box and click the List Topics button. Thetopicsinwhichbothwords (“script”and“tutorial”)will appearlisted.
5) Under the “Example” heading, select all of the text and right-click to copy.
6) In E-Studio, open the CountdownClock InLine object and paste the copied script into the InLine.
7) Save the experiment.
4) Select “ScriptTutorial” in the list of topics (you may need to scroll down through the list) and click the Display button. Helptopicsarecomposed ofvarioussections,usually includingthetitleofthetopic,a description,comments,anda workingexample.
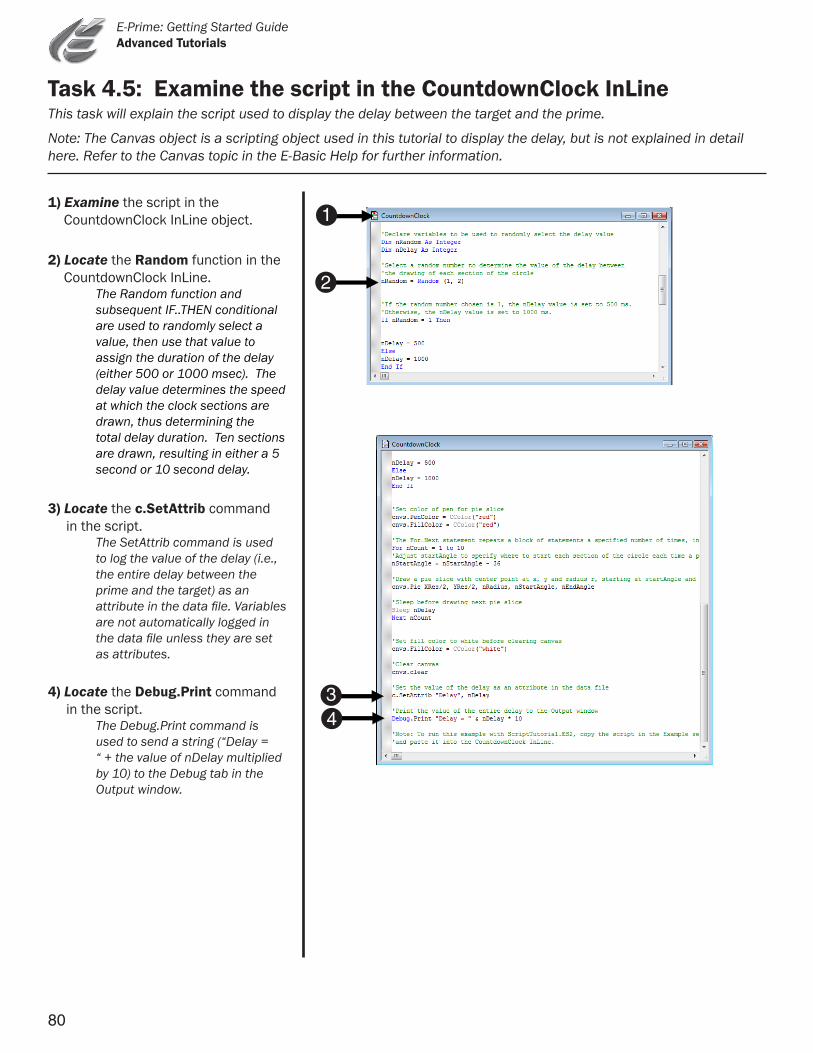
80
E-Prime: Getting Started Guide Advanced Tutorials
Task 4.5: Examine the script in the CountdownClock InLineThis task will explain the script used to display the delay between the target and the prime.
Note: The Canvas object is a scripting object used in this tutorial to display the delay, but is not explained in detail here. Refer to the Canvas topic in the E-Basic Help for further information.
1) Examine the script in the CountdownClock InLine object.
3) Locate the c.SetAttrib command in the script. The SetAttrib command is used to log the value of the delay (i.e., the entire delay between the prime and the target) as an attribute in the data file. Variables are not automatically logged in the data file unless they are set as attributes.
2) Locate the Random function in the CountdownClock InLine.
The Random function and subsequent IF..THEN conditional are used to randomly select a value, then use that value to assign the duration of the delay (either 500 or 1000 msec). The delay value determines the speed at which the clock sections are drawn, thus determining the total delay duration. Ten sections are drawn, resulting in either a 5 second or 10 second delay.
4) Locate the Debug.Print command in the script. The Debug.Print command is used to send a string (“Delay = “ + the value of nDelay multiplied by 10) to the Debug tab in the Output window.
3 4
1
2
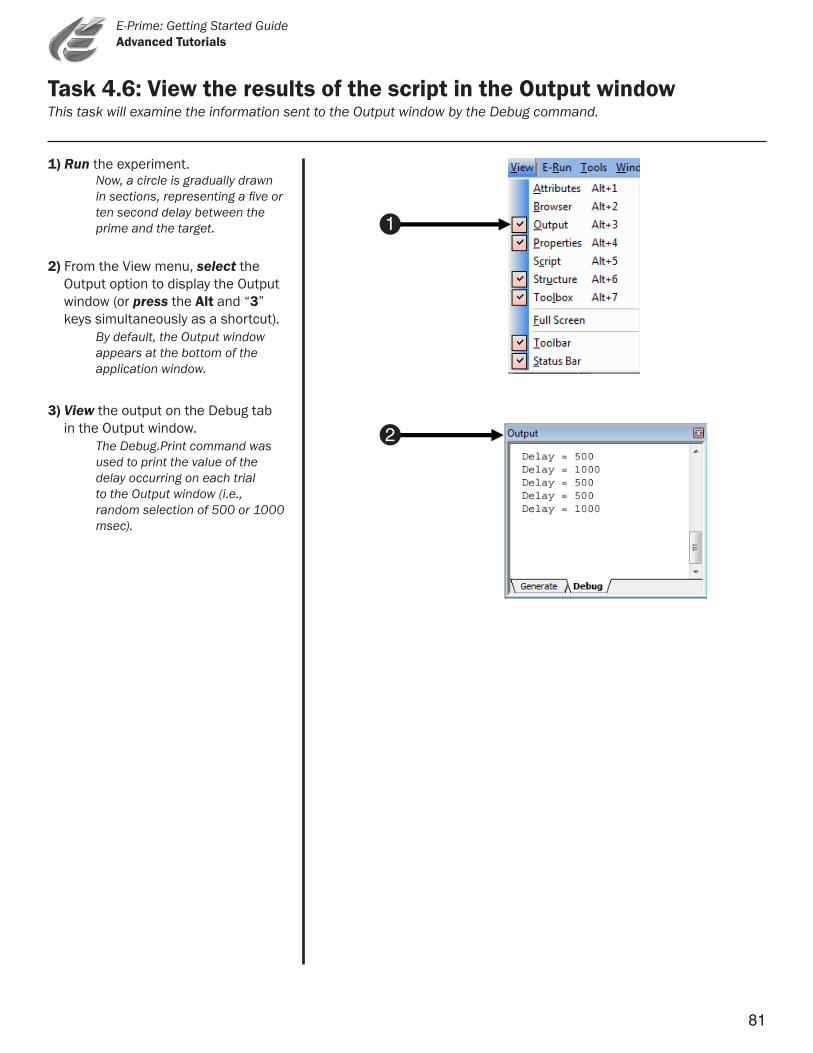
81
E-Prime: Getting Started Guide Advanced Tutorials
Task 4.6: View the results of the script in the Output window
1
2
This task will examine the information sent to the Output window by the Debug command.
2) From the View menu, select the Output option to display the Output window (or press the Alt and “3” keys simultaneously as a shortcut).
By default, the Output window appears at the bottom of the application window.
1) Run the experiment. Now, a circle is gradually drawn in sections, representing a five or ten second delay between the prime and the target.
3) View the output on the Debug tab in the Output window.
The Debug.Print command was used to print the value of the delay occurring on each trial to the Output window (i.e., random selection of 500 or 1000 msec).
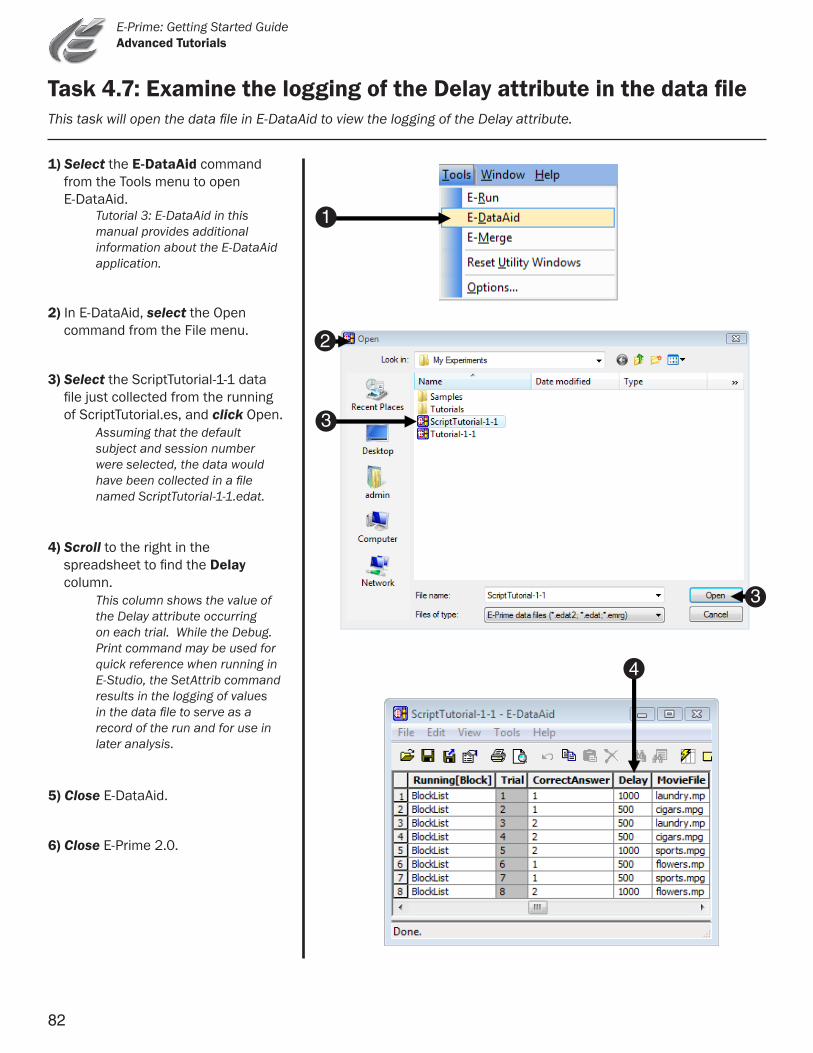
82
E-Prime: Getting Started Guide Advanced Tutorials
Task 4.7: Examine the logging of the Delay attribute in the data file
6) Close E-Prime 2.0.
5) Close E-DataAid.
1) Select the E-DataAid command from the Tools menu to open
E-DataAid. Tutorial 3: E-DataAid in this manual provides additional information about the E-DataAid application.
2) In E-DataAid, select the Open command from the File menu.
4) Scroll to the right in the spreadsheet to find the Delay
column. This column shows the value of the Delay attribute occurring on each trial. While the Debug. Print command may be used for quick reference when running in E-Studio, the SetAttrib command results in the logging of values in the data file to serve as a record of the run and for use in later analysis.
3) Select the ScriptTutorial-1-1 data file just collected from the running of ScriptTutorial.es, and click Open.
Assuming that the default subject and session number were selected, the data would have been collected in a file named ScriptTutorial-1-1.edat.
This task will open the data file in E-DataAid to view the logging of the Delay attribute.
4
1
3
3
2

83
E-Prime: Getting Started Guide Advanced Tutorials
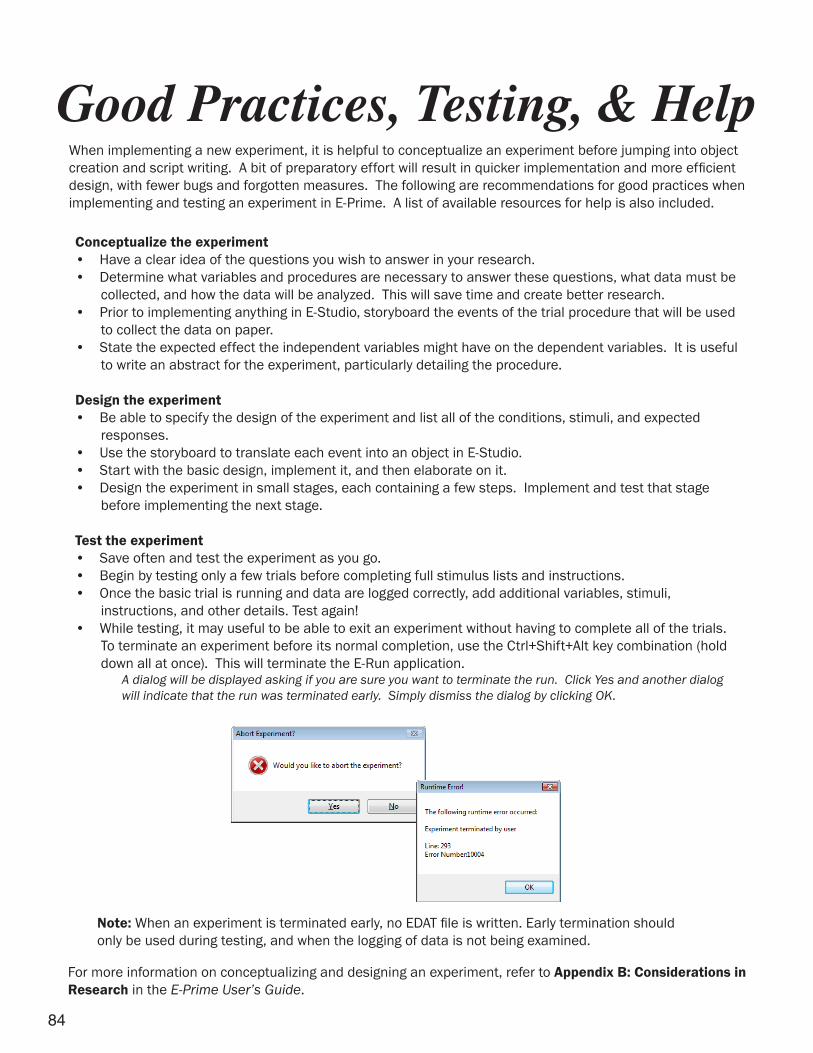
84
E-Prime: Getting Started Guide Good Practices and Troubleshooting
For more information on conceptualizing and designing an experiment, refer to Appendix B: Considerations in Research in the E-Prime User’s Guide.
Note: When an experiment is terminated early, no EDAT file is written. Early termination should only be used during testing, and when the logging of data is not being examined.
Conceptualize the experiment• Have a clear idea of the questions you wish to answer in your research.• Determine what variables and procedures are necessary to answer these questions, what data must be collected, and how the data will be analyzed. This will save time and create better research.• Prior to implementing anything in E-Studio, storyboard the events of the trial procedure that will be used to collect the data on paper.• State the expected effect the independent variables might have on the dependent variables. It is useful to write an abstract for the experiment, particularly detailing the procedure.
Design the experiment• Be able to specify the design of the experiment and list all of the conditions, stimuli, and expected responses.• Use the storyboard to translate each event into an object in E-Studio.• Start with the basic design, implement it, and then elaborate on it.• Design the experiment in small stages, each containing a few steps. Implement and test that stage before implementing the next stage.
Test the experiment• Save often and test the experiment as you go.• Begin by testing only a few trials before completing full stimulus lists and instructions.• Once the basic trial is running and data are logged correctly, add additional variables, stimuli, instructions, and other details. Test again!• While testing, it may useful to be able to exit an experiment without having to complete all of the trials. To terminate an experiment before its normal completion, use the Ctrl+Shift+Alt key combination (hold down all at once). This will terminate the E-Run application. A dialog will be displayed asking if you are sure you want to terminate the run. Click Yes and another dialog will indicate that the run was terminated early. Simply dismiss the dialog by clicking OK.
When implementing a new experiment, it is helpful to conceptualize an experiment before jumping into object creation and script writing. A bit of preparatory effort will result in quicker implementation and more efficient design, with fewer bugs and forgotten measures. The following are recommendations for good practices when implementing and testing an experiment in E-Prime. A list of available resources for help is also included.
Good Practices, Testing, & Help

85
E-Prime: Getting Started Guide Good Practices and Troubleshooting
E-Prime Help & ResourcesThe E-Prime manuals and resources provide valuable information and exercises to learn and make use of the flexibility and power of E-Prime.
E-Prime Manuals• The E-Prime Getting Started Guide, User’s Guide, and Reference Guide are included in the E-Prime installation and are installed as PDF files.• The PDF files may be accessed from the E-Prime menu from the Start menu. They are also available for download via the E-Prime Web Support site (see E-Prime Web Support site below).
E-Basic Help• E-Basic Help topics describe the use of all E-Basic statements, functions, commands, and objects, and the syntax and parameters required for each. Each Help entry addresses any considerations specific to the topic, a working example, and a listing of direct links to related topics.• The E-Basic Help may be accessed from the E-Prime menu via the Start menu or through the Help menu within E-Studio.
E-Prime web site• The E-Prime product web site includes product information, as well as links to FAQs, E-Prime Web Support, and the E-Prime User’s Forum.• Please visit www.pstnet.com and navigate to the E-Prime page.
PST User Forum• The PST User Forum is set up to allow end users of PST products to ask questions and share information, tips, and samples with their peers.• Please visit www.pstnet.com/support and follow the link to the PST User Forum.
E-Prime Web Support site• The E-Prime Web Support site provides the latest updates, a Knowledge Base section, samples, downloads, and a personal support forum to communicate with PST support representatives.• Support for E-Prime is handled via the web only. Please submit your questions as a request on the support site. Visit www.pstnet.com/support and follow the link to E-Prime Web Support.
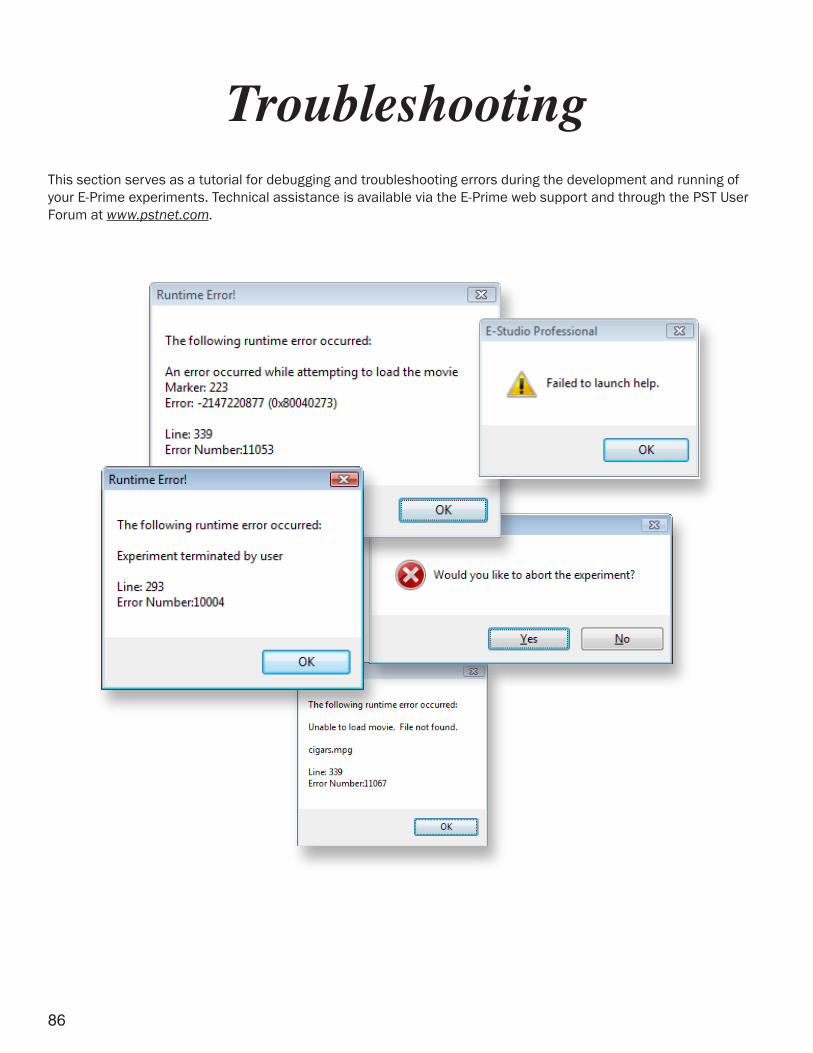
86
E-Prime: Getting Started Guide Good Practices and Troubleshooting
TroubleshootingThis section serves as a tutorial for debugging and troubleshooting errors during the development and running of your E-Prime experiments. Technical assistance is available via the E-Prime web support and through the PST User Forum at www.pstnet.com.
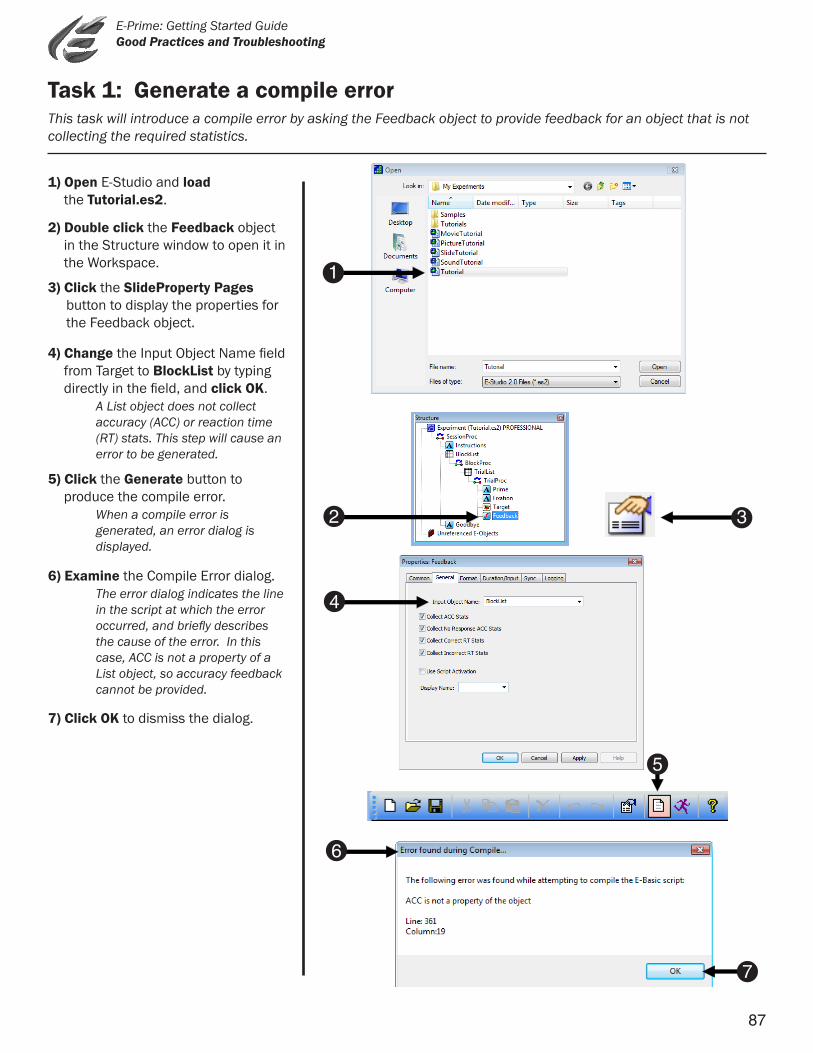
87
E-Prime: Getting Started Guide Good Practices and Troubleshooting
This task will introduce a compile error by asking the Feedback object to provide feedback for an object that is not collecting the required statistics.
Task 1: Generate a compile error
1) Open E-Studio and load the Tutorial.es2.
2) Double click the Feedback object in the Structure window to open it in the Workspace.
3) Click the SlideProperty Pages button to display the properties for the Feedback object.
4) Change the Input Object Name field from Target to BlockList by typing directly in the field, and click OK.
A List object does not collect accuracy (ACC) or reaction time (RT) stats. This step will cause an error to be generated.
5) Click the Generate button to produce the compile error.
When a compile error is generated, an error dialog is displayed.
7) Click OK to dismiss the dialog.
6) Examine the Compile Error dialog. The error dialog indicates the line in the script at which the error occurred,andbrieflydescribes the cause of the error. In this case, ACC is not a property of a List object, so accuracy feedback cannot be provided.
1
2
3
5
6
7
4
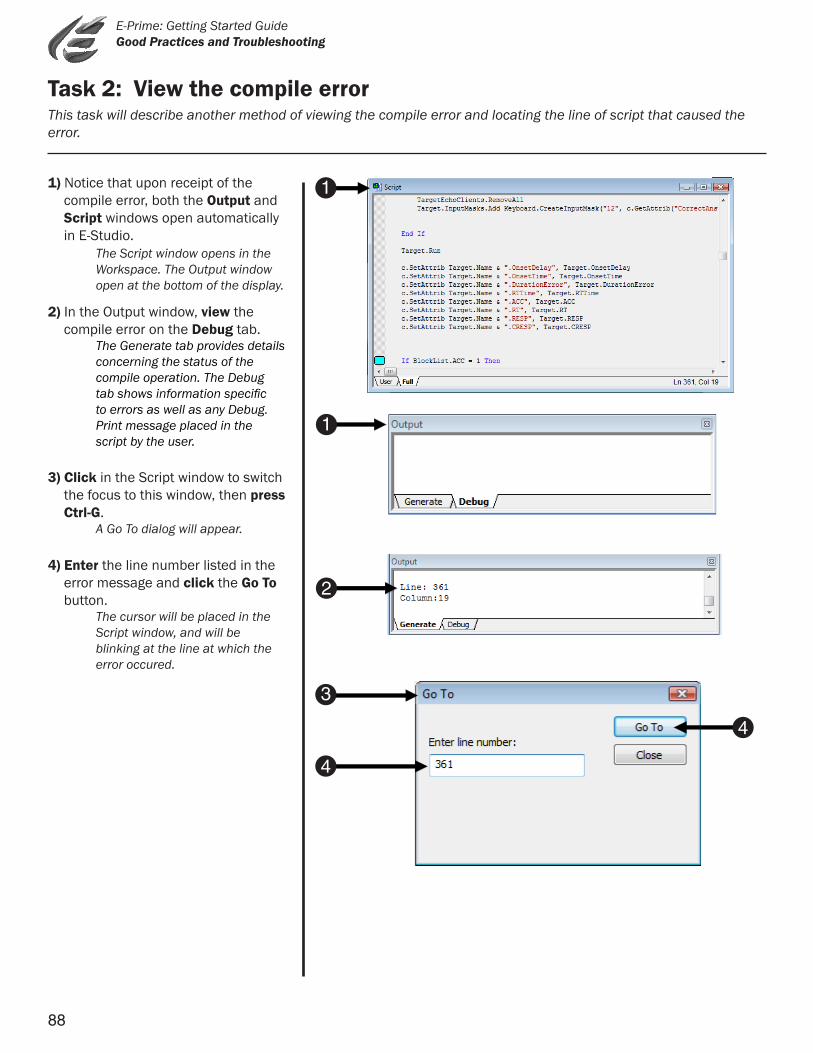
88
E-Prime: Getting Started Guide Good Practices and Troubleshooting
This task will describe another method of viewing the compile error and locating the line of script that caused the error.
Task 2: View the compile error
1) Notice that upon receipt of the compile error, both the Output and Script windows open automatically in E-Studio.
The Script window opens in the Workspace. The Output window open at the bottom of the display.
2) In the Output window, view the compile error on the Debug tab.
The Generate tab provides details concerning the status of the compile operation. The Debug tabshowsinformationspecific to errors as well as any Debug. Print message placed in the script by the user.
3) Click in the Script window to switch the focus to this window, then press Ctrl-G.
A Go To dialog will appear.
4) Enter the line number listed in the error message and click the Go To button.
The cursor will be placed in the Script window, and will be blinking at the line at which the error occured.
1
1
2
4
3
4
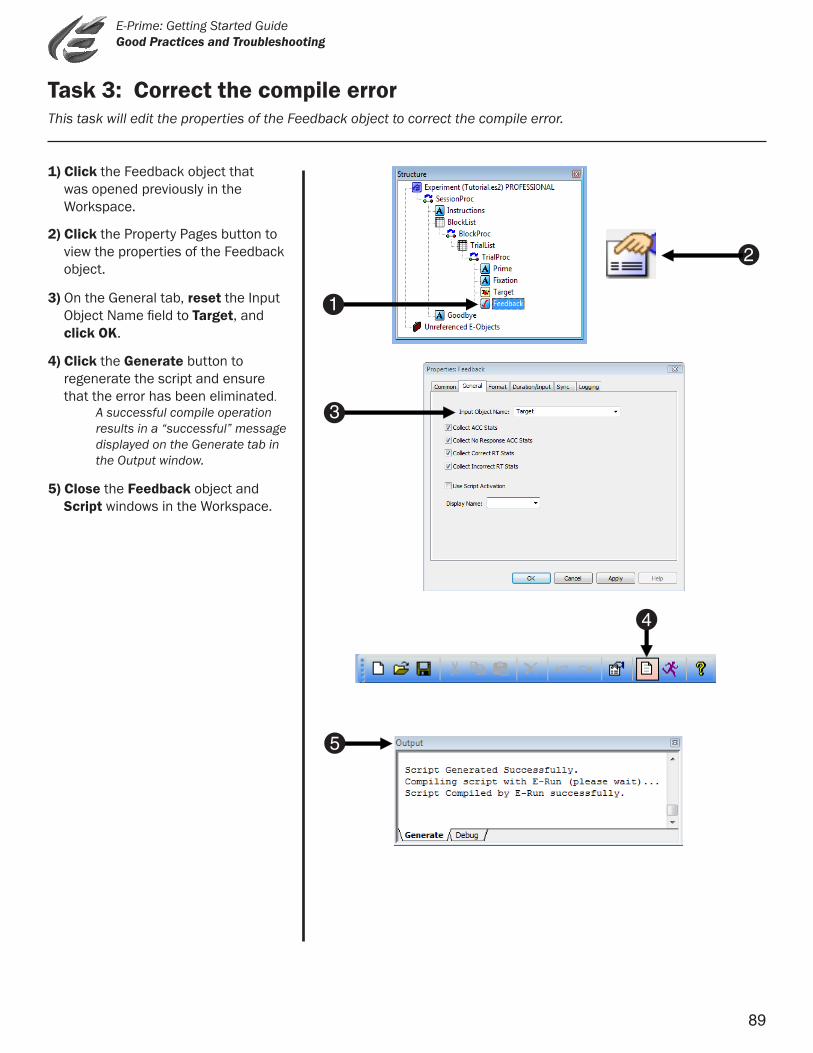
89
E-Prime: Getting Started Guide Good Practices and Troubleshooting
This task will edit the properties of the Feedback object to correct the compile error.
Task 3: Correct the compile error
1) Click the Feedback object that was opened previously in the Workspace.
2) Click the Property Pages button to view the properties of the Feedback object.
3) On the General tab, reset the Input Object Name field to Target, and click OK.
4) Click the Generate button to regenerate the script and ensure that the error has been eliminated.
A successful compile operation results in a “successful” message displayed on the Generate tab in the Output window.
5) Close the Feedback object and Script windows in the Workspace.
2
5
1
3
4
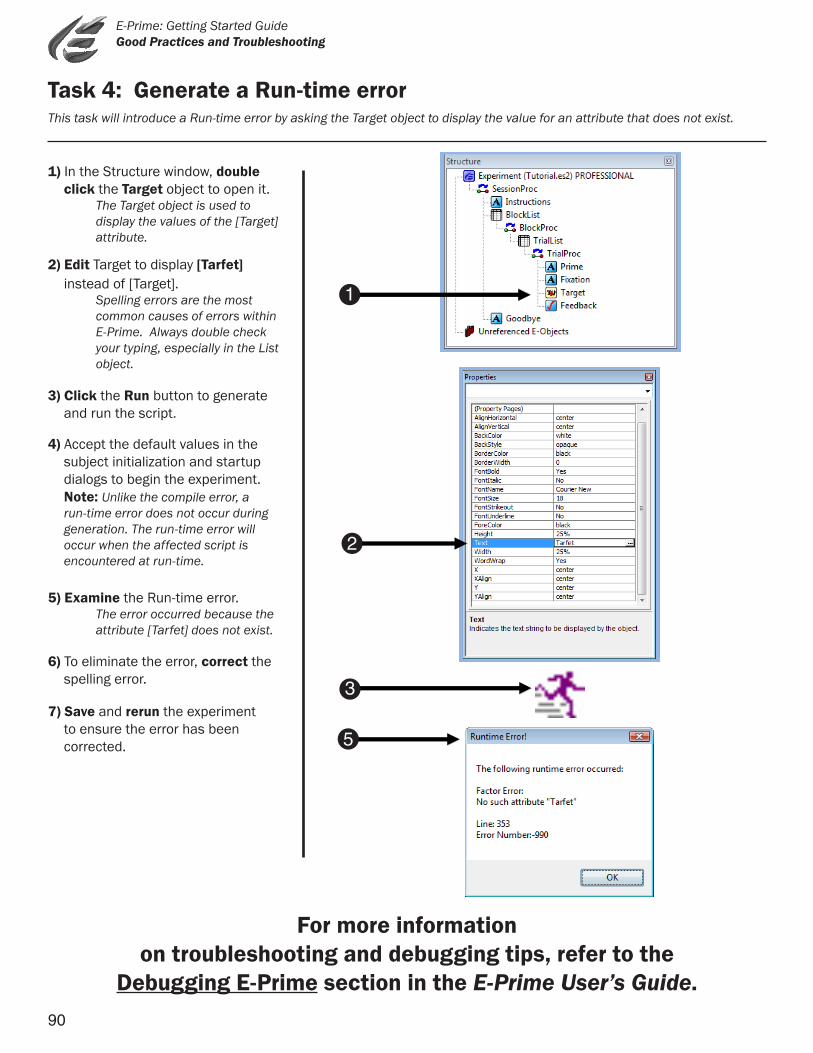
90
E-Prime: Getting Started Guide Good Practices and Troubleshooting
For more information on troubleshooting and debugging tips, refer to the
Debugging E-Prime section in the E-Prime User’s Guide.
This task will introduce a Run-time error by asking the Target object to display the value for an attribute that does not exist.
Task 4: Generate a Run-time error
1) In the Structure window, double click the Target object to open it.
The Target object is used to display the values of the [Target] attribute.
2) Edit Target to display [Tarfet] instead of [Target].
Spelling errors are the most common causes of errors within E-Prime. Always double check your typing, especially in the List object.
3) Click the Run button to generate and run the script.
4) Accept the default values in the subject initialization and startup dialogs to begin the experiment.
Note: Unlike the compile error, a run-time error does not occur during generation. The run-time error will occur when the affected script is encountered at run-time.
5) Examine the Run-time error. The error occurred because the attribute [Tarfet] does not exist.
6) To eliminate the error, correct the spelling error.
7) Save and rerun the experiment to ensure the error has been corrected.
1
5
3
2