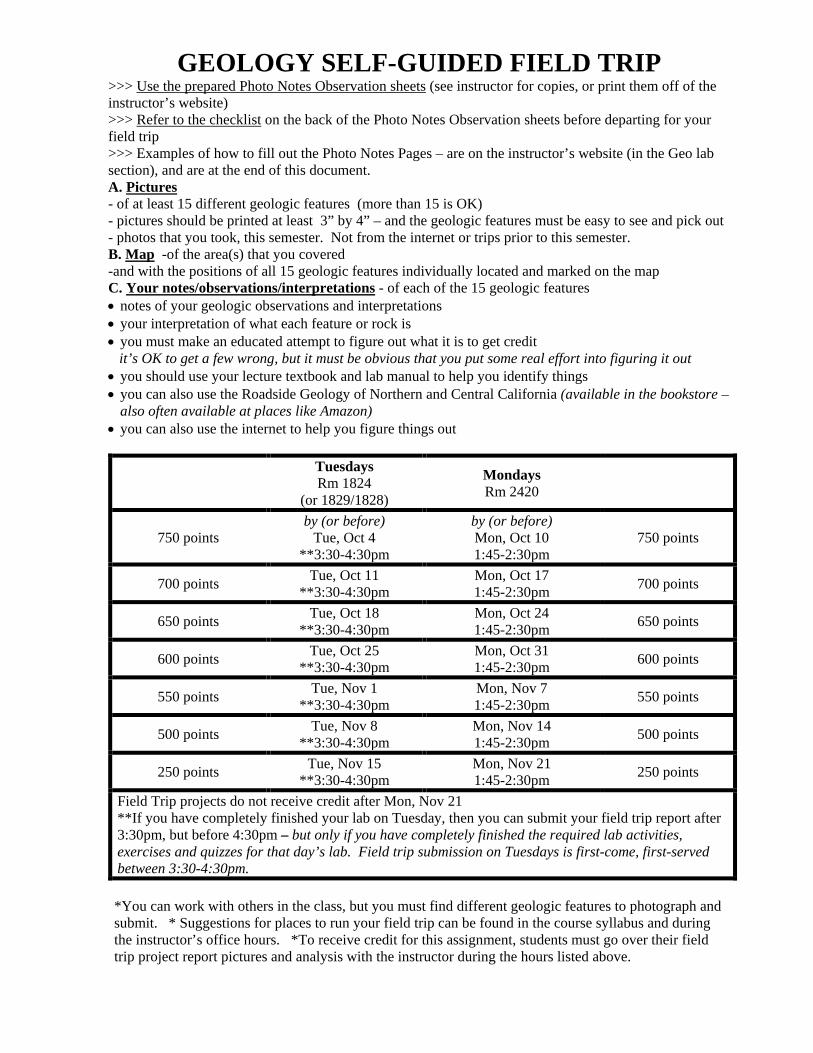
GEOLOGY SELF-GUIDED FIELD TRIP >>> Use the prepared Photo Notes Observation sheets (see instructor for copies, or print them off of the instructor’s website) >>> Refer to the checklist on the back of the Photo Notes Observation sheets before departing for your field trip >>> Examples of how to fill out the Photo Notes Pages – are on the instructor’s website (in the Geo lab section), and are at the end of this document. A. Pictures - of at least 15 different geologic features (more than 15 is OK) - pictures should be printed at least 3” by 4” – and the geologic features must be easy to see and pick out - photos that you took, this semester. Not from the internet or trips prior to this semester. B. Map -of the area(s) that you covered -and with the positions of all 15 geologic features individually located and marked on the map C. Your notes/observations/interpretations - of each of the 15 geologic features • notes of your geologic observations and interpretations • your interpretation of what each feature or rock is • you must make an educated attempt to figure out what it is to get credit it’s OK to get a few wrong, but it must be obvious that you put some real effort into figuring it out • you should use your lecture textbook and lab manual to help you identify things • you can also use the Roadside Geology of Northern and Central California (available in the bookstore –
also often available at places like Amazon) • you can also use the internet to help you figure things out
Tuesdays Rm 1824
(or 1829/1828)
Mondays Rm 2420
750 points by (or before)
Tue, Oct 4 **3:30-4:30pm
by (or before) Mon, Oct 10 1:45-2:30pm
750 points
700 points Tue, Oct 11 **3:30-4:30pm
Mon, Oct 17 1:45-2:30pm 700 points
650 points Tue, Oct 18 **3:30-4:30pm
Mon, Oct 24 1:45-2:30pm 650 points
600 points Tue, Oct 25 **3:30-4:30pm
Mon, Oct 31 1:45-2:30pm 600 points
550 points Tue, Nov 1 **3:30-4:30pm
Mon, Nov 7 1:45-2:30pm 550 points
500 points Tue, Nov 8 **3:30-4:30pm
Mon, Nov 14 1:45-2:30pm 500 points
250 points Tue, Nov 15 **3:30-4:30pm
Mon, Nov 21 1:45-2:30pm 250 points
Field Trip projects do not receive credit after Mon, Nov 21 **If you have completely finished your lab on Tuesday, then you can submit your field trip report after 3:30pm, but before 4:30pm – but only if you have completely finished the required lab activities, exercises and quizzes for that day’s lab. Field trip submission on Tuesdays is first-come, first-served between 3:30-4:30pm. *You can work with others in the class, but you must find different geologic features to photograph and submit. * Suggestions for places to run your field trip can be found in the course syllabus and during the instructor’s office hours. *To receive credit for this assignment, students must go over their field trip project report pictures and analysis with the instructor during the hours listed above.
RL Hanna 2
Geology Field Trip Requirement
• For the Geology lab to transfer appropriately to four-year colleges and universities, there must be a required field trip. The purpose of the field trip assignment is for students to go outside of the classroom setting and actively apply what they have learned in their college geology course to the world around them. The assignment has four basic parts:
1. identifying geologic features (rock types, formations, etc.). Please note that you need to identify geologic features that you have learned in your college geology course. Features that you could have identified before taking the course will not count for credit. Examples of things that count are: composite volcano, sialic rhyolite lava, tower karst topography, braided stream, etc. Examples of things that do not count are: valley, stream, mountain, erosion, river, creek, beach, sand, etc.
2. taking photos and notes while in the field (while you are still standing there) 3. locating the position of each geologic feature (photo) on a map 4. discussion with the instructor during the instructor’s office hours • Examples of proper (and improper) field trip work/forms/maps can be found on the
Geology 1 Lab section of the instructor’s website, and at the end of this document.
• As stated above, for the Geology lab to transfer appropriately to four-year colleges and universities, there must be a required field trip. This requires students to work on the course outside of regularly schedule class times. Please keep in mind that this is not your instructor’s fault – and please do not harass or harangue (whine, moan and complain to) your instructor about the required out-of-class time.
• In the past, I conducted the required field trip just as field trips were conducted when I was a student. That is, I chose a day and time and all students were required to come at that time. This meant that students had to rearrange their work schedules, miss other classes, etc. And that’s how things were when I was a student (yes, eons ago). Over the years that I have been teaching, however, students have become more and more vocal about their dislike of the inconvenience of having to be present on that one particular day (whatever the day of the week was).
• Consequently, I decided to make the field trip options more flexible. → Now, students can run their field trip to whatever geologic destination they find interesting
(checking with the instructor beforehand is strongly advised, however –see the following pages for details and examples).
→ Students can also fit their field trip into (and around) their own personal schedule (as long as they conduct the field trip during the term that they are enrolled in this lab course.) ⇒ Students must submit their completed field trip work to the instructor’s regularly scheduled office hours sometime during the term (refer to the following pages for the point-scale and dates). This field trip work can not be submitted during regularly scheduled lab time (that time is for completing the required lab assignments). Allowing the students to conduct their own field trips, and allowing students to submit their work to any of the instructor’s regularly scheduled office hours greatly increased the flexibility of the field trip assignment – and it allows students to customize the field trip to their own interests and their own schedule.
R.L. Hanna
http://lpc1.clpccd.cc.ca.us/lpc/hanna/index.htm
3 Students must, however, determine when they will bring their completed field trip assignment to the instructor’s office hours. If necessary, students will have to re-arrange their schedules once or twice during the term so that they can attend the instructor’s office hours to submit their work (or ask questions). You will need to plan to spend around 15-20 minutes going over your field trip work with the instructor. If there are other students there ahead of you, then you will have to wait your turn. Plan on at least an hour – if the instructor can get to you and get you done in less time, that’s great; however, you may have to wait while other students work through their field trip with the instructor. You must wait patiently and politely – everyone is busy and no one student is more important than the next. Students should also plan to come to the instructor’s office hours once *before* they run their field trip. If you come and speak with the instructor for 10-15 minutes before you go on your field trip, the instructor will discuss your planned destination and give you recommendations for what to look for and where to go for information. If you do not visit the instructor’s office hours before you conduct your field trip, you must be prepared to deal with the fact that you may not receive full points for your project if you do not complete things appropriately or sufficiently. There are many pages of field trip information in this document, as well as information and brief directions on the Photo Notes Pages. Students who are diligent and careful readers can do a conscientious field trip on their own, but most students find it much easier to come and speak with the instructor before they conduct their trip. Examples of how to fill out the Photo Notes Pages are available on the instructor’s website, and are at the end of this document. If you can’t find the link to the example pages, come to the instructor’s office hours for assistance. The field trip assignment, requirements and dates are presented at the beginning of the term (and here in this document) so that students can plan ahead accordingly. Check your schedule and see if you are going to need to ask for a little time off from work, or if you’re going to need to get a babysitter, or switch shifts with someone, etc. Students are given as much info as possible at the beginning of the term so that they can plan accordingly in order to meet the field trip requirement. In conclusion, students should be grateful for the inherent flexibility in the way that this field trip assignment is configured and available. It does, however, require that students will come to the instructor’s office hours during the term (see the field trip dates on the following pages). --Plan Ahead, take advantage of the field trip flexibility, and don’t take it out on the instructor if you goof up and don’t end up with the time or personal flexibility to complete the assignment. The field trip assignment should be fun – and lots of students *do* have fun with it, and they have a rewarding experience that is worth the time. Aim for being one of those students .
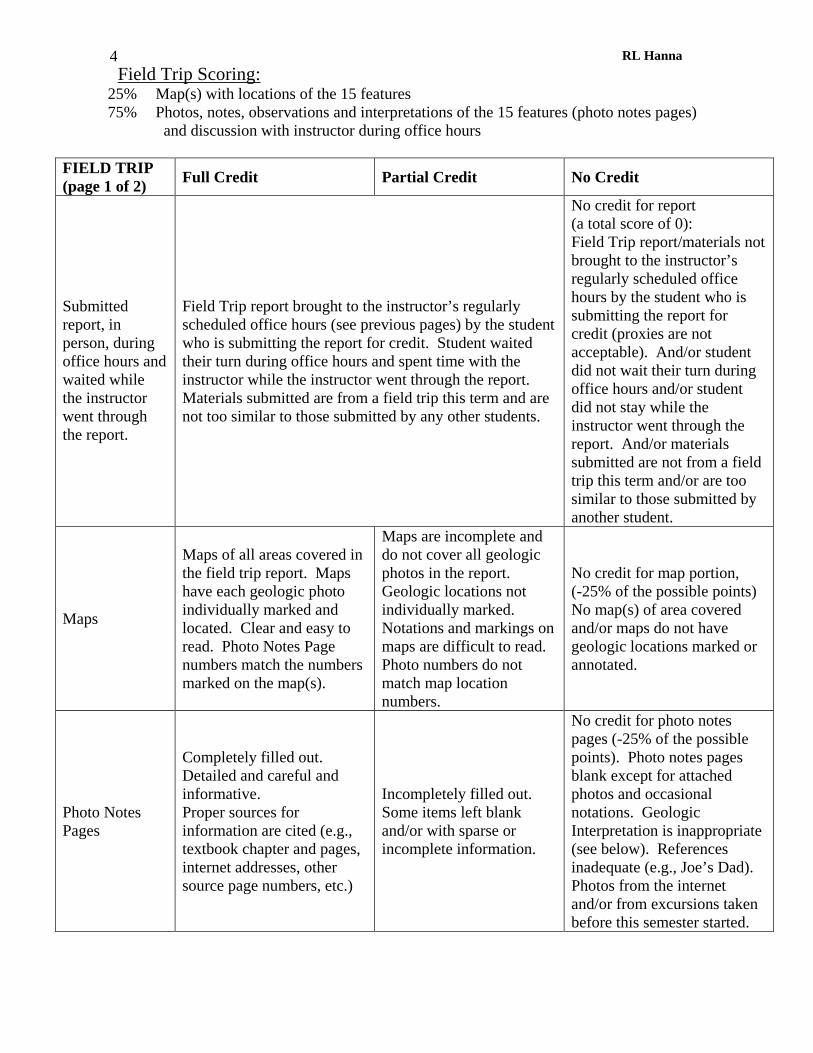
RL Hanna 4 Field Trip Scoring:
25% Map(s) with locations of the 15 features 75% Photos, notes, observations and interpretations of the 15 features (photo notes pages) and discussion with instructor during office hours
FIELD TRIP (page 1 of 2) Full Credit Partial Credit No Credit
Submitted report, in person, during office hours and waited while the instructor went through the report.
Field Trip report brought to the instructor’s regularly scheduled office hours (see previous pages) by the student who is submitting the report for credit. Student waited their turn during office hours and spent time with the instructor while the instructor went through the report. Materials submitted are from a field trip this term and are not too similar to those submitted by any other students.
No credit for report (a total score of 0): Field Trip report/materials not brought to the instructor’s regularly scheduled office hours by the student who is submitting the report for credit (proxies are not acceptable). And/or student did not wait their turn during office hours and/or student did not stay while the instructor went through the report. And/or materials submitted are not from a field trip this term and/or are too similar to those submitted by another student.
Maps
Maps of all areas covered in the field trip report. Maps have each geologic photo individually marked and located. Clear and easy to read. Photo Notes Page numbers match the numbers marked on the map(s).
Maps are incomplete and do not cover all geologic photos in the report. Geologic locations not individually marked. Notations and markings on maps are difficult to read. Photo numbers do not match map location numbers.
No credit for map portion, (-25% of the possible points) No map(s) of area covered and/or maps do not have geologic locations marked or annotated.
Photo Notes Pages
Completely filled out. Detailed and careful and informative. Proper sources for information are cited (e.g., textbook chapter and pages, internet addresses, other source page numbers, etc.)
Incompletely filled out. Some items left blank and/or with sparse or incomplete information.
No credit for photo notes pages (-25% of the possible points). Photo notes pages blank except for attached photos and occasional notations. Geologic Interpretation is inappropriate (see below). References inadequate (e.g., Joe’s Dad). Photos from the internet and/or from excursions taken before this semester started.
R.L. Hanna
http://lpc1.clpccd.cc.ca.us/lpc/hanna/index.htm
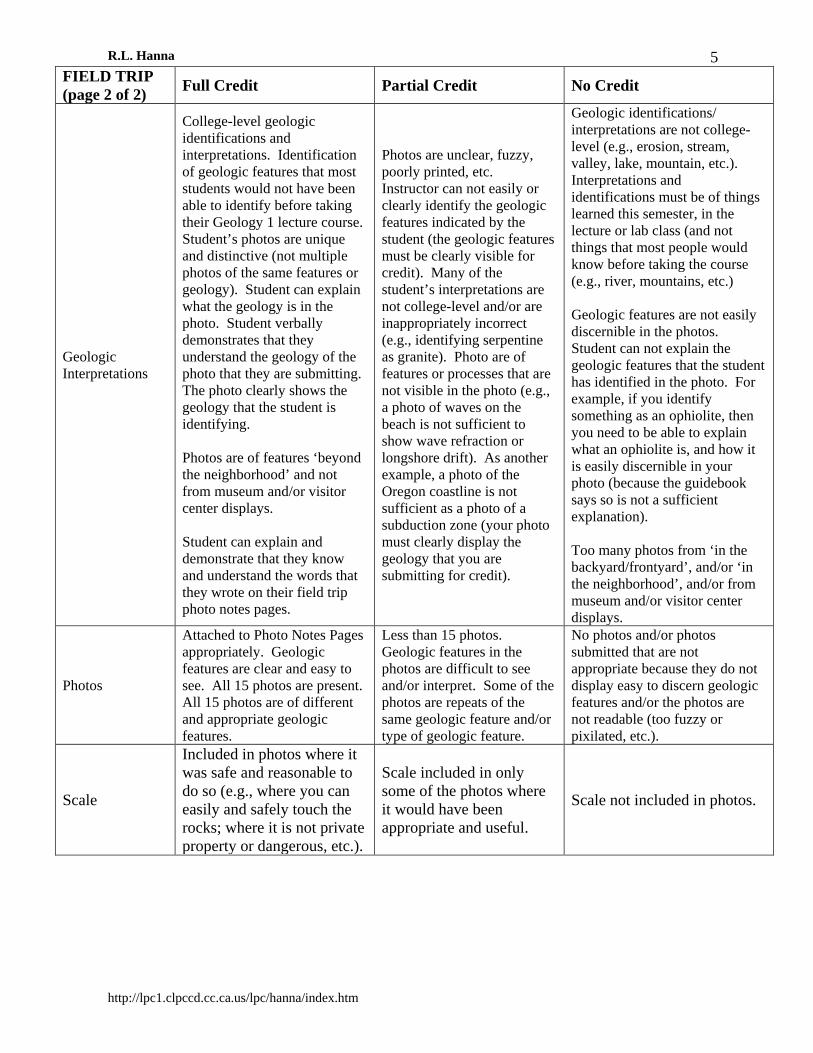
5 FIELD TRIP (page 2 of 2) Full Credit Partial Credit No Credit
Geologic Interpretations
College-level geologic identifications and interpretations. Identification of geologic features that most students would not have been able to identify before taking their Geology 1 lecture course. Student’s photos are unique and distinctive (not multiple photos of the same features or geology). Student can explain what the geology is in the photo. Student verbally demonstrates that they understand the geology of the photo that they are submitting. The photo clearly shows the geology that the student is identifying. Photos are of features ‘beyond the neighborhood’ and not from museum and/or visitor center displays. Student can explain and demonstrate that they know and understand the words that they wrote on their field trip photo notes pages.
Photos are unclear, fuzzy, poorly printed, etc. Instructor can not easily or clearly identify the geologic features indicated by the student (the geologic features must be clearly visible for credit). Many of the student’s interpretations are not college-level and/or are inappropriately incorrect (e.g., identifying serpentine as granite). Photo are of features or processes that are not visible in the photo (e.g., a photo of waves on the beach is not sufficient to show wave refraction or longshore drift). As another example, a photo of the Oregon coastline is not sufficient as a photo of a subduction zone (your photo must clearly display the geology that you are submitting for credit).
Geologic identifications/ interpretations are not college-level (e.g., erosion, stream, valley, lake, mountain, etc.). Interpretations and identifications must be of things learned this semester, in the lecture or lab class (and not things that most people would know before taking the course (e.g., river, mountains, etc.) Geologic features are not easily discernible in the photos. Student can not explain the geologic features that the student has identified in the photo. For example, if you identify something as an ophiolite, then you need to be able to explain what an ophiolite is, and how it is easily discernible in your photo (because the guidebook says so is not a sufficient explanation). Too many photos from ‘in the backyard/frontyard’, and/or ‘in the neighborhood’, and/or from museum and/or visitor center displays.
Photos
Attached to Photo Notes Pages appropriately. Geologic features are clear and easy to see. All 15 photos are present. All 15 photos are of different and appropriate geologic features.
Less than 15 photos. Geologic features in the photos are difficult to see and/or interpret. Some of the photos are repeats of the same geologic feature and/or type of geologic feature.
No photos and/or photos submitted that are not appropriate because they do not display easy to discern geologic features and/or the photos are not readable (too fuzzy or pixilated, etc.).
Scale
Included in photos where it was safe and reasonable to do so (e.g., where you can easily and safely touch the rocks; where it is not private property or dangerous, etc.).
Scale included in only some of the photos where it would have been appropriate and useful.
Scale not included in photos.
RL Hanna 6
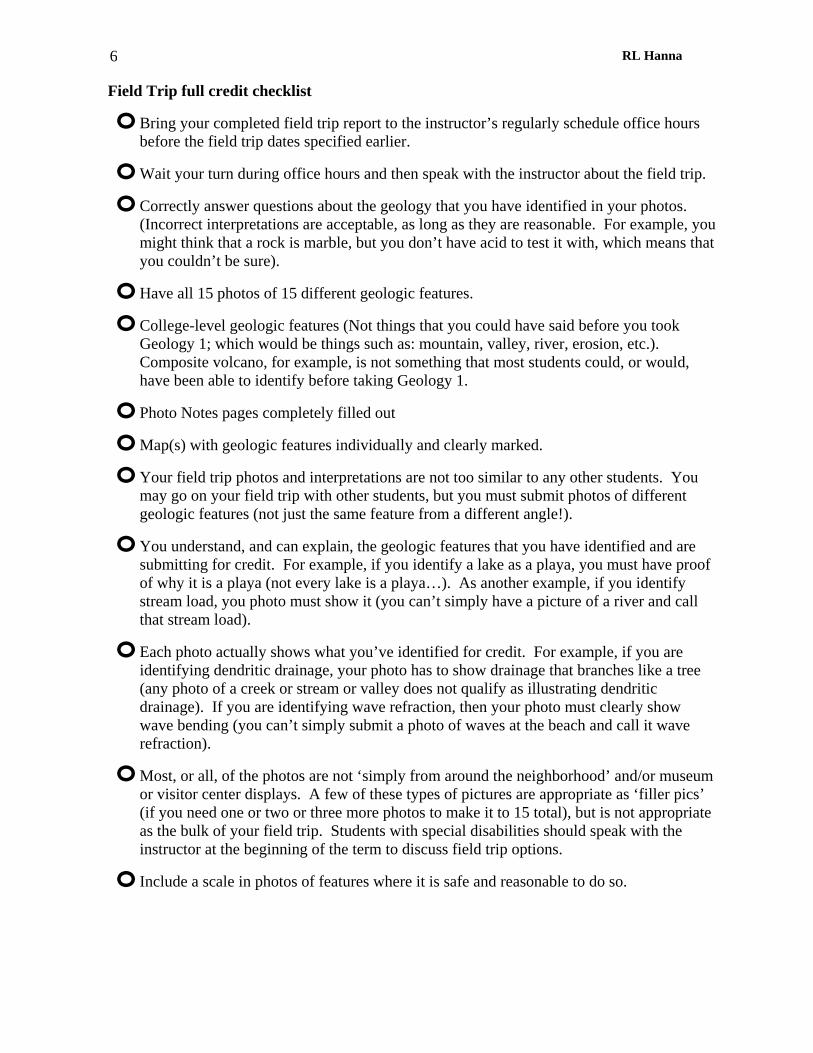
Field Trip full credit checklist
o Bring your completed field trip report to the instructor’s regularly schedule office hours before the field trip dates specified earlier.
o Wait your turn during office hours and then speak with the instructor about the field trip.
o Correctly answer questions about the geology that you have identified in your photos. (Incorrect interpretations are acceptable, as long as they are reasonable. For example, you might think that a rock is marble, but you don’t have acid to test it with, which means that you couldn’t be sure).
o Have all 15 photos of 15 different geologic features.
o College-level geologic features (Not things that you could have said before you took Geology 1; which would be things such as: mountain, valley, river, erosion, etc.). Composite volcano, for example, is not something that most students could, or would, have been able to identify before taking Geology 1.
o Photo Notes pages completely filled out
o Map(s) with geologic features individually and clearly marked.
o Your field trip photos and interpretations are not too similar to any other students. You may go on your field trip with other students, but you must submit photos of different geologic features (not just the same feature from a different angle!).
o You understand, and can explain, the geologic features that you have identified and are submitting for credit. For example, if you identify a lake as a playa, you must have proof of why it is a playa (not every lake is a playa…). As another example, if you identify stream load, you photo must show it (you can’t simply have a picture of a river and call that stream load).
o Each photo actually shows what you’ve identified for credit. For example, if you are identifying dendritic drainage, your photo has to show drainage that branches like a tree (any photo of a creek or stream or valley does not qualify as illustrating dendritic drainage). If you are identifying wave refraction, then your photo must clearly show wave bending (you can’t simply submit a photo of waves at the beach and call it wave refraction).
o Most, or all, of the photos are not ‘simply from around the neighborhood’ and/or museum or visitor center displays. A few of these types of pictures are appropriate as ‘filler pics’ (if you need one or two or three more photos to make it to 15 total), but is not appropriate as the bulk of your field trip. Students with special disabilities should speak with the instructor at the beginning of the term to discuss field trip options.
o Include a scale in photos of features where it is safe and reasonable to do so.

R.L. Hanna
http://lpc1.clpccd.cc.ca.us/lpc/hanna/index.htm
7 Instructor’s grading steps: 1. Map(s) • geologic photos clearly marked? • no maps and/or geologic photos not clearly marked? (-25% of possible points)
2. Photo Notes pages filled out? • completely? references cited? • incompletely? (partial credit) • not at all (no credit)
3. Geologic Interpretations and Photos • talk and discuss with the student • are the photos clear and easy to interpret? • are the geologic features identified easy to see in the photos? • are the geologic identifications/interpretations correct, reasonable and/or college-level? • are the photos unique and not similar to those submitted by any other student? • were the photos taken this term? » Example: a student submits his field trip report without any maps. The maximum that he
can earn is 75% of the points possible. » Example: a student submits a correctly marked map, but only 12 photos with completely
filled-out photo notes pages. %801512 = , therefore the maximum she can earn is 80% of
the points possible. » Example: a student submits 15 photos with a correctly marked map. Of the 15 photos
submitted, one geologic feature was of a river (too generic and not college-level), which did not count, and another was a blurry photo of something indistinct and unidentifiable (other than it was white), and a third photo was identified as longshore transport, but that was not visible in the photo (which was just a picture of the water on a sandy beach). In the end, the student had a total of 12 appropriately identified photos, for a maximum of 80% of the points possible.
» Example: a student submits 12 photos and completely filled-out photo notes pages, but without any correctly marked or annotated maps. First, the missing maps mean that 75% is the maximum possible. Of that he only submitted 80% of the photos, therefore, he would receive 80% of the 75%. Therefore, the maximum he can earn is 60% of the points possible.
» Example: a student completely fills out the map(s) and photo notes pages for 15 geologic features, but does not come to the instructor’s regularly schedule office hours before the timeout dates specified in the syllabus. The student can not earn any points for the field trip report.
Offered to all students: BRING YOUR FIELD TRIP REPORT IN EARLY
and the instructor will give it a go-through while you wait, and tell you what you need to do to bring it up to full credit before the deadline.
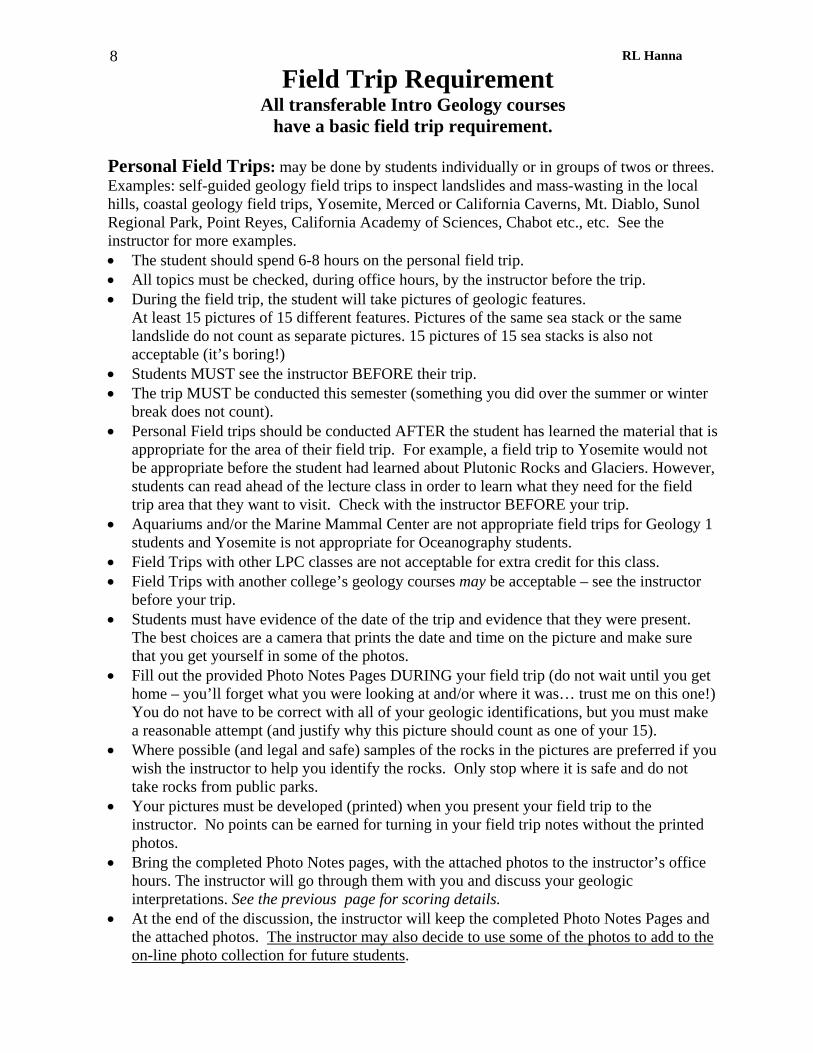
RL Hanna 8 Field Trip Requirement
All transferable Intro Geology courses have a basic field trip requirement.
Personal Field Trips: may be done by students individually or in groups of twos or threes. Examples: self-guided geology field trips to inspect landslides and mass-wasting in the local hills, coastal geology field trips, Yosemite, Merced or California Caverns, Mt. Diablo, Sunol Regional Park, Point Reyes, California Academy of Sciences, Chabot etc., etc. See the instructor for more examples. • The student should spend 6-8 hours on the personal field trip. • All topics must be checked, during office hours, by the instructor before the trip. • During the field trip, the student will take pictures of geologic features.
At least 15 pictures of 15 different features. Pictures of the same sea stack or the same landslide do not count as separate pictures. 15 pictures of 15 sea stacks is also not acceptable (it’s boring!)
• Students MUST see the instructor BEFORE their trip. • The trip MUST be conducted this semester (something you did over the summer or winter
break does not count). • Personal Field trips should be conducted AFTER the student has learned the material that is
appropriate for the area of their field trip. For example, a field trip to Yosemite would not be appropriate before the student had learned about Plutonic Rocks and Glaciers. However, students can read ahead of the lecture class in order to learn what they need for the field trip area that they want to visit. Check with the instructor BEFORE your trip.
• Aquariums and/or the Marine Mammal Center are not appropriate field trips for Geology 1 students and Yosemite is not appropriate for Oceanography students.
• Field Trips with other LPC classes are not acceptable for extra credit for this class. • Field Trips with another college’s geology courses may be acceptable – see the instructor
before your trip. • Students must have evidence of the date of the trip and evidence that they were present.
The best choices are a camera that prints the date and time on the picture and make sure that you get yourself in some of the photos.
• Fill out the provided Photo Notes Pages DURING your field trip (do not wait until you get home – you’ll forget what you were looking at and/or where it was… trust me on this one!) You do not have to be correct with all of your geologic identifications, but you must make a reasonable attempt (and justify why this picture should count as one of your 15).
• Where possible (and legal and safe) samples of the rocks in the pictures are preferred if you wish the instructor to help you identify the rocks. Only stop where it is safe and do not take rocks from public parks.
• Your pictures must be developed (printed) when you present your field trip to the instructor. No points can be earned for turning in your field trip notes without the printed photos.
• Bring the completed Photo Notes pages, with the attached photos to the instructor’s office hours. The instructor will go through them with you and discuss your geologic interpretations. See the previous page for scoring details.
• At the end of the discussion, the instructor will keep the completed Photo Notes Pages and the attached photos. The instructor may also decide to use some of the photos to add to the on-line photo collection for future students.
R.L. Hanna
http://lpc1.clpccd.cc.ca.us/lpc/hanna/index.htm
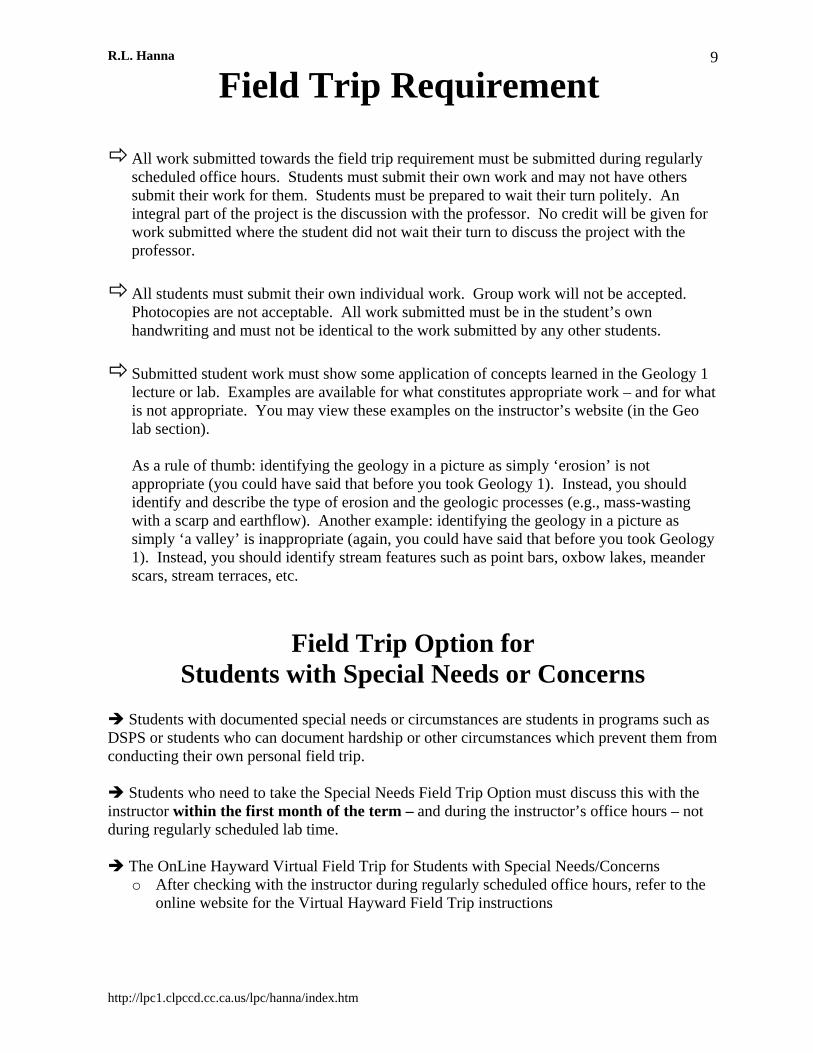
9
Field Trip Requirement All work submitted towards the field trip requirement must be submitted during regularly
scheduled office hours. Students must submit their own work and may not have others submit their work for them. Students must be prepared to wait their turn politely. An integral part of the project is the discussion with the professor. No credit will be given for work submitted where the student did not wait their turn to discuss the project with the professor.
All students must submit their own individual work. Group work will not be accepted.
Photocopies are not acceptable. All work submitted must be in the student’s own handwriting and must not be identical to the work submitted by any other students.
Submitted student work must show some application of concepts learned in the Geology 1
lecture or lab. Examples are available for what constitutes appropriate work – and for what is not appropriate. You may view these examples on the instructor’s website (in the Geo lab section). As a rule of thumb: identifying the geology in a picture as simply ‘erosion’ is not appropriate (you could have said that before you took Geology 1). Instead, you should identify and describe the type of erosion and the geologic processes (e.g., mass-wasting with a scarp and earthflow). Another example: identifying the geology in a picture as simply ‘a valley’ is inappropriate (again, you could have said that before you took Geology 1). Instead, you should identify stream features such as point bars, oxbow lakes, meander scars, stream terraces, etc.
Field Trip Option for Students with Special Needs or Concerns
Students with documented special needs or circumstances are students in programs such as DSPS or students who can document hardship or other circumstances which prevent them from conducting their own personal field trip. Students who need to take the Special Needs Field Trip Option must discuss this with the instructor within the first month of the term – and during the instructor’s office hours – not during regularly scheduled lab time. The OnLine Hayward Virtual Field Trip for Students with Special Needs/Concerns
o After checking with the instructor during regularly scheduled office hours, refer to the online website for the Virtual Hayward Field Trip instructions
RL Hanna 10 Mount Diablo Field Trip
(example of personal field trip) It takes roughly an hour to get to the top. The road is narrow and winding and your speed will be 10-20mph or less. Drive slowly and watch carefully for pedestrians and bicyclists. 1. Summit Visitor’s Center View from the Top! On a clear day, you should be able to see SF Bay, the Golden Gate Bridge, the Bay Bridge, Mt. Tamalpais The Sierra Nevada Mountains, Mt. Lassen, Mt. Shasta The Tri-Valley; Livermore, Pleasanton, Dublin, San Ramon, Danville Inside the Visitor’s Center a. Find and view the short video clip about the geology of Mt. Diablo take notes…. b. Inspect the rock displays and take notes about the different types of rocks on Mt. Diablo – and how you will tell them apart c. Get a copy of the one-page leaflet for the self-guiding Mary Bowerman Trail (ask the ranger at the desk) 2. Mary Bowerman Trail • Walk the Mary Bowerman Trail clockwise
the trail starts just past the lower end of the Summit Parking lot (ask the ranger if you need help finding the trail)
• Take notes and pictures about the geology that you see as you walk around the Mary Bowerman Trail
3. Rock City and the Wind Caves • Take pictures and explore Rock City • What kind of rock? • What caused the Wind Caves?
Hint: it wasn’t the wind…… ask a ranger or search on the internet for “wind caves” of “Mount Diablo” Make sure that you use the quotation marks when searching on the internet…
4. Make sure that you’ve followed and completed all of the items on the previous pages for personal field trips.
R.L. Hanna
http://lpc1.clpccd.cc.ca.us/lpc/hanna/index.htm
11
Field Trip Responsibilities for the Student
• Get the Field Trip Photo Notes Pages completely filled out while you are still at the locations where you took the pictures.
• Mark the location of each picture on your map while you are still standing there!!! Do not wait until you get home- you won’t remember it correctly.
• Bring your geology textbook and lab manual with you on the field trip. Look things up while you are still in the field – do not put it all off for later.
• Make sure that you have read o The field trip instructions here in this syllabus o The Field Trip Photo Notes Pages (both sides) o The online examples of completed Field Trip Photo Notes Pages
• Give yourself plenty of time to complete your field trip – give yourself the entire day
• Do not try to squeeze the field trip into an already overscheduled day – you’ll make
mistakes and forget to do things • Drive safely and conservatively – do not drive aggressively • Do not attempt to take pictures while driving • Pull off only where it is legal and safe to do so • Do not take rocks or samples in public parks or on private land • Be careful • Do not take risks (e.g., don’t climb onto something unstable or undercut) ⇒ Neither the instructor nor the school is responsible for your driving or other behavior while
you are conducting your field trip. Your own insurance must cover your own driving and behavior.
RL Hanna 12
Field Trip
⇒ Identify geology that you couldn’t have before you took this class. • Examples of what is appropriate can be found on my LPC Geology website – if you
can’t find the examples, come to my office hours and I’ll show where to find them. • Not appropriate: – ‘mountain’, ‘valley’, ‘erosion’, etc. – ‘because it looks like it’ – Don’t write something that you could have when you were in grammar school – This isn’t supposed to be a difficult assignment (and it should even be fun, if you’re
willing), but it is a college assignment.
• To get credit you have to show that you put effort into figuring out the geology and that you came up with a plausible, college-level identification that you can support from pages in the textbook or a guidebook or suitable reference.
• Your neighbor ‘said so’ is not sufficient. Your parent ‘said so’ is not sufficient. This is supposed to be your work and your interpretation – not just you saying that someone else told you the answer and you accepted whatever they said.
• Yes, you can get things incorrect; however, you will only receive points if your answer is plausible and reasonable. – For example, if you take a picture of chert and then identify it as granite… you
aren’t going to get any points – granite doesn’t look anything like chert… – For another example, if you take a picture of a fault scarp and then call it earthflow
when there is no evidence of earthflow in your picture, then you won’t get any points. All types of erosion and mass-wasting are not equal or interchangeable. Use your textbook and look at the pictures – don’t get lazy.
– Another example, if you take a picture of something and don’t come up with a reasonable identification of the geologic feature, I’m not going to identify it for you and then give you points for my identification.
– If you take a picture and tell me that it shows hillside creep, you need to be able to show me exactly what feature(s) in the picture demonstrate creep and why. Just a picture of a hillside is not enough to be a picture that demonstrates creep.
– You can’t just take a picture of a mountain and call it a picture of ‘plate tectonics’. That’s way too general and you need specific features in your picture to exemplify plate tectonics (e.g., displaced features along a readily identifiable fault) – again, a picture of a mountain is not sufficient by itself. You need to say something reasonable and justifiable about the rock types that can be seen in the photo and/or the landforms (e.g., landslide scarps, talus piles, etc.).
R.L. Hanna
http://lpc1.clpccd.cc.ca.us/lpc/hanna/index.htm
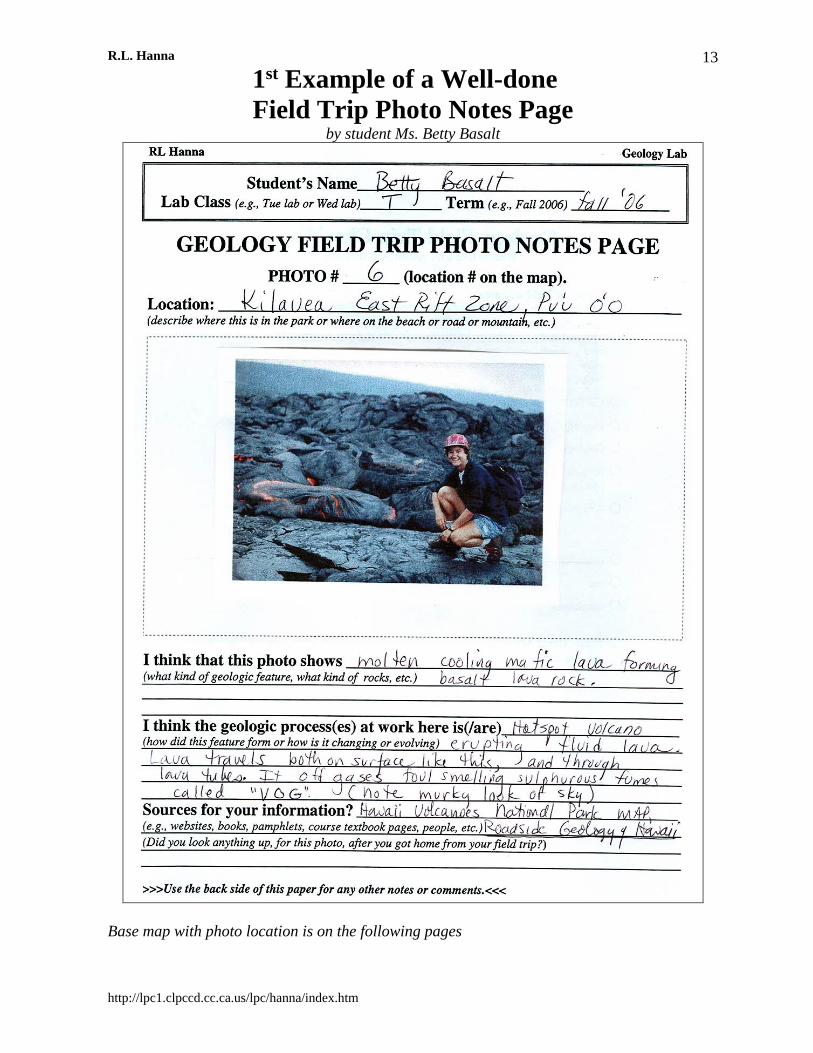
13 1st Example of a Well-done Field Trip Photo Notes Page
by student Ms. Betty Basalt
Base map with photo location is on the following pages
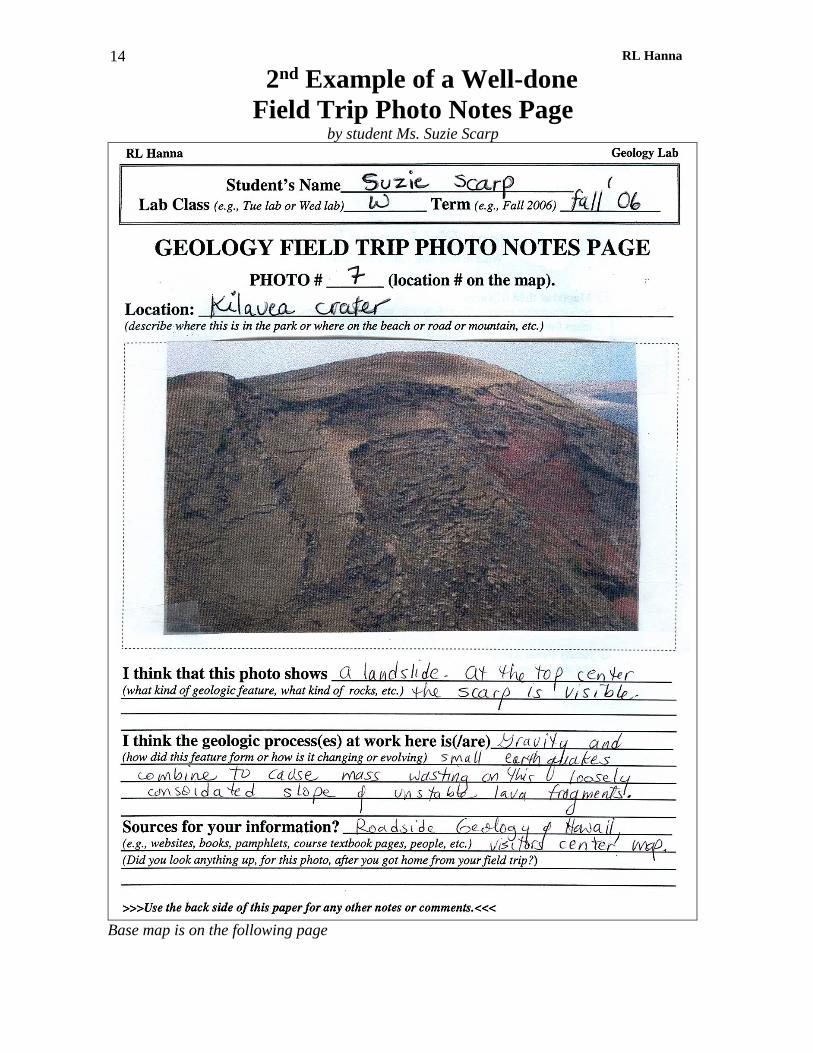
RL Hanna 14 2nd Example of a Well-done
Field Trip Photo Notes Page by student Ms. Suzie Scarp
Base map is on the following page
R.L. Hanna
http://lpc1.clpccd.cc.ca.us/lpc/hanna/index.htm
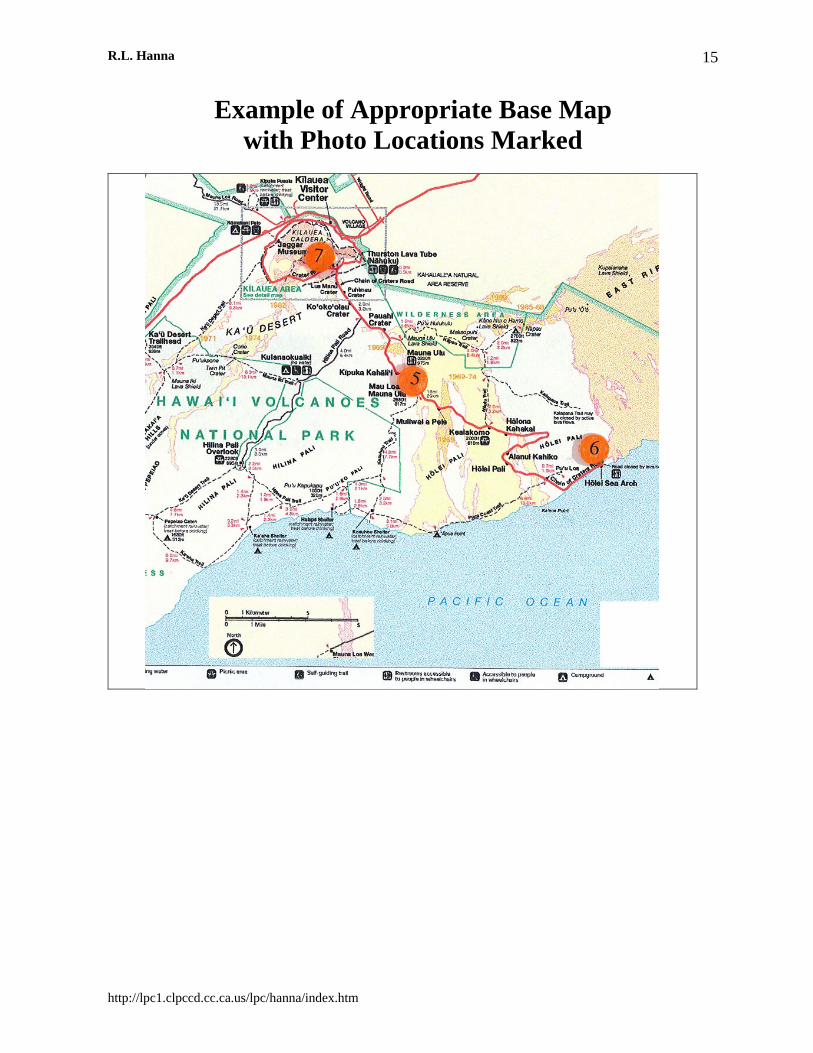
15
Example of Appropriate Base Map with Photo Locations Marked
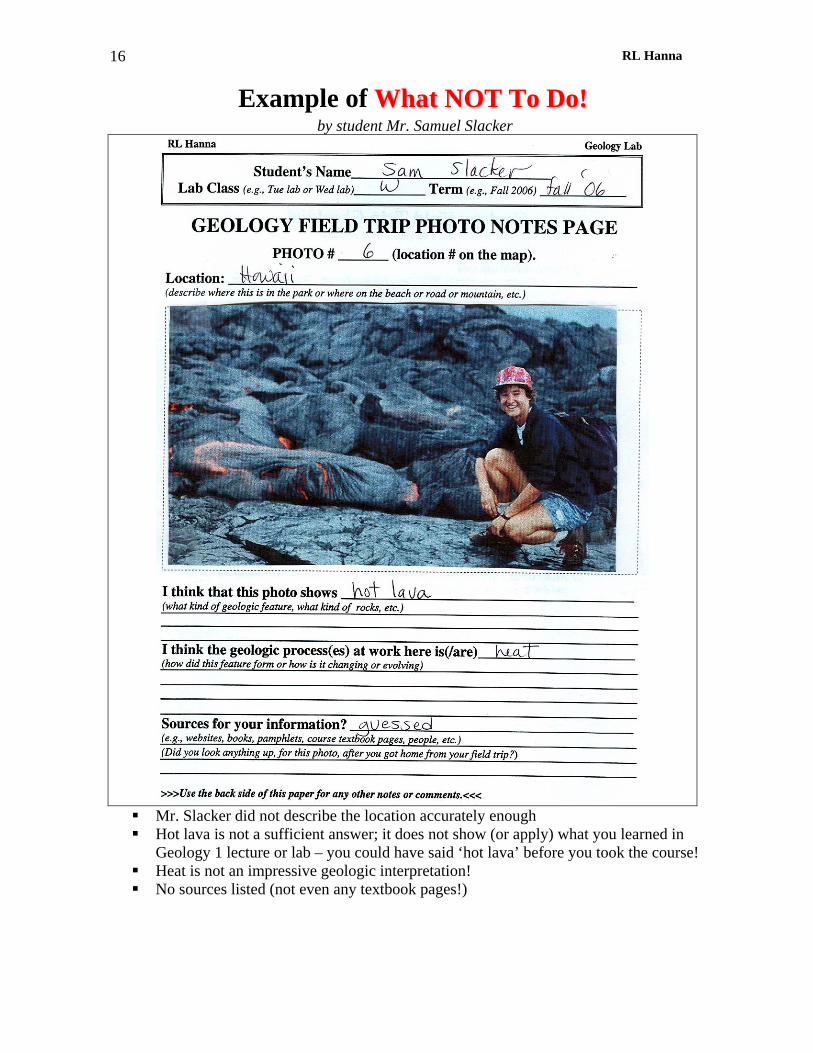
RL Hanna 16
Example of What NOT To Do! by student Mr. Samuel Slacker
Mr. Slacker did not describe the location accurately enough Hot lava is not a sufficient answer; it does not show (or apply) what you learned in
Geology 1 lecture or lab – you could have said ‘hot lava’ before you took the course! Heat is not an impressive geologic interpretation! No sources listed (not even any textbook pages!)


