TheViolin Lesson
by Simon Fischer
EP 72151
A manual forteaching andself-teachingthe violin

Detailed contents ....................................................................... iv
Introduction .............................................................................. xv
General index.......................................................................... 334
Index of musical examples ....................................................... 342
Contents
lesson 1
The tone
production lesson ........... 1
lesson 2
Holding the
violin and bow ............. 27
lesson 3
The intonation
lesson .......................... 55
lesson 4
Background
essentials 1 ................... 93
lesson 5
Setting up the
bow arm .................... 117
lesson 6
Setting up
the left hand ............... 133
lesson 7
Avoiding aches
and pains ................... 163
lesson 8
Background
essentials 2 ................. 205
lesson 9
All about
changing position ....... 231
lesson 10
The vibrato
lesson ........................ 249
lesson 11
Improving key
bow strokes ................ 261
lesson 12
Background
essentials 3 ................. 301
xvIntroduction
Introduction
The idea for The Violin Lesson came one Christmas after going to a concert performance of Puccini’s Madame Butterfly in London. I was sitting quite near to the front and could not help noticing a violinist in the orchestra who was directly in my line of vision, a woman in her early twenties. At first, I thought she was a former student of mine. I later found out that the two women are often mistaken for each other in the London orchestral scene.
I could see in detail how she was playing. The way she was holding the violin, and using the bow, was clearly making things more difficult for her than necessary. I thought of how easy it would be to help her, perhaps because I had seen her ‘twin’ become a much better player by making the same changes that this woman could make.
It seemed sad that all she needed was one or two lessons in which to learn some simple things that she had missed so far – not the whole story of violin playing, from beginning to end, but a few important points and basic principles that would help her greatly.
It would take only a couple of minutes to explain how everything was a question of getting the right proportions (The magic word, page 96), and that she should hold the violin a little more in front of her because of her short arms; or how, if she kept her left fingers closer to the strings her finger action would be easier.
Her bow was constantly too near the fingerboard. I thought of how quickly she could improve her sound and feel for the instrument if she practised the Five essential tone-production exercises (page 11). They take only seconds to demonstrate, almost anybody can do them at once whatever their standard, and the improvement in tone is always immediate.
Yet I had no way of helping her; and solving her problems would not help the many other violinists around the world who were in exactly the same position as her – one or two really quite simple steps away from a very different experience of playing the violin.
The answer seemed clear: if she needed to know only a few basic things, and if just a few lessons would be enough, it should be possible to jot the basic ideas down on only a few sheets of paper. Then she would be able to go away and sort it all out for herself in her own time.
The subjects in the first few chapters of the book immediately fell into a logical order. However, what if the same player returned for another series of lessons? What would the typical subjects be then? What if they came for a whole course of 12 lessons?
The division of The Violin Lesson into 12 is naturally only a starting-point. Working with an advanced student, and in a session that lasts a couple of hours, it is possible to cover much of the material of each ‘lesson’ in a single session. Working with less advanced students, a single point from one of the lessons, or from the Background essentials, may be all that is covered in one actual violin lesson.
The science of violin playing
To develop technique on the violin you have to learn the Science of Violin Playing. But this must not be confused with studying ‘real’ sciences like physics, chemistry, biology, DNA and so on. Any field like these is obviously a lifetime’s work, and however much you know is only ever a tiny speck compared to the amount you do not know – even if you study all day, every day, for 50 years. In comparison, the entire science of violin playing is only the size of a tiny speck.
You cannot study for the rest of your life how to draw a straight bow; or study how to raise and drop the fingers, how to shift, vibrate and so on. There simply isn’t that much to learn. You can study music for the rest of your life – and after fifty years, the amount you know about music will be only a tiny speck compared to what you do not know – but that is a different matter.
xvi Introduction
On a practical, physical level of violin technique, there is not so much to know about. There are all the things you have got to learn to do; and all the things to learn not to do. Yet all this amounts to only a few principles about how to hold the instrument and bow, how to use each hand in all the various ways, and so on. The list of ‘things you need to know and do’ is not endless, and is not even very long.
The Violin Lesson covers the main areas where you can easily and noticeably make a difference. While not every subject is for everyone, The Violin Lesson has something in it for every level and type of player – elementary or advanced, amateur or professional, teacher or student.
Can you improve your playing by reading a book?
No book can replace a teacher or the living, practical experience of playing or listening to music. But gaining information from a book, or gaining that information through having somebody listen to you play and then saying those same things to you, can often be the same thing in the end.
If you want to change the way you play the violin, you have to change the way you think about playing the violin. You can do that by practising or by going to a concert, and by many other means; but reading about, say, tone production, can so change your picture of bowing the string that your whole approach changes immediately and dramatically – even before you have actually put the bow on the string and started to try things out.
Q But the points in a book can only be general ones. In a lesson the teacher deals with
��������� ����������������
Everyone has their own unique set of physical, technical and musical characteristics, their own particular gifts, problems, strengths and weaknesses; yet the same technical and musical points tend to appear again and again, and in the same way, in most players.
��Typical technical points in the left arm include freeing the thumb; moving the fingers freely from the base joints, without partly moving them from the hand or forearm; widening the hand at the base joints, rather than contracting; fingers remaining light without over-pressing; co-ordination, and the fundamentals of vibrato, intonation, shifting and so on.
��Typical technical points in the right arm include the basics of how to make a pure and expressive tone; fundamentals of the bow hold; the mechanics of drawing a straight bow; how to improve key strokes like spiccato or martelé, and so on.
There are actually quite a limited number of technical problems that you can have, and they tend to crop up in the same ways all the time. So the topics and issues that are explored in The Violin Lesson may easily be exactly those that you need to explore yourself.
Suppose your left hand does not feel comfortable. You do not necessarily need someone to look at what you, specifically, are doing, and make suggestions that are tailored only to you. The same principles are going to apply to you as to anyone else.
Building a good left hand position, or strengthening intonation, or developing tone or vibrato, or gaining confidence in shifting, is almost entirely the same process whoever you are, and whatever your age or standard.
I’m too old – you can’t improve at my age
It used to be said that unless you had fully developed your violin technique by the time you were twenty or so, it would be too late. After that, the entire process of learning becomes slow and difficult, it was thought, and you stand little chance of making further progress.
Johann Quantz expressed this in 1752:
He who wishes to distinguish himself in music must not begin the study of it too late. If he sets about it at an age when his energies are no longer vigorous, or when his throat or fingers are no longer flexible, and thus cannot acquire sufficient facility to perform…the passage-work roundly and distinctly, he will not go very far.1
The truth is that you can improve your playing at any age. ‘Improving’ means changing the way you play Everything in violin technique can be described, and the language used to describe it is all about proportions: how much of this, in proportion to how much of that.2
1 Johann Joachim Quantz: Essay of a Method for Playing the Transverse
Flute (Berlin 1752; trans. Edward R. Reilly, London,
1966), 24.
2 See The magic word, page 96
xviiIntroduction
To change the way you play, first you must know what all the different things are that can be measured in proportion to one another. (It is no use knowing only that the recipe for a cake is made up of certain proportions. You need to know what the ingredients are in the first place.)
Then, making every change by altering the proportions of one thing to another, you can build changes into your playing at any age whatsoever.
Q ������������������������������������������ ����������������������� ����������
����������������� ���� ������
To change from banging fingers down onto the string and then pressing the string hard into the fingerboard, and instead to place the fingers gently and to feel the springiness of the string, is something you can introduce into your playing at any age and immediately notice the difference.
��At any age and stage, you can change from playing everything with the bow too near to the fingerboard, to playing a little nearer to the bridge where the string has greater tension
��Or find a new feeling of release and lightness in the left hand by stopping squeezing the neck hard between the fingers and thumb
��Or start to encourage a feeling of forward–forward–forward–forward in the vibrato movement instead of forward–back–forward–back
��Or refine your intonation by tuning all your Gs, Ds, As and Es to the open strings, and by measuring all the sharps from the natural above, and the flats from the natural below
��Or stop extra, unnecessary physical motions that get in the way of everything else; and so on.
All of these changes are perfectly easy to make, and anyone can make them. There is no special aptitude or talent required to feel such things as the difference between the give of the bow at the heel and at the point; or to feel how you can balance the bow in your hand (when appropriate) rather than hold it; or to experiment with a new arrangement of the fingers on the bow; or to do anything else.
You simply need to know exactly what you are doing; what to do and what not to do; make simple changes; and then continue in the new way until the changes become new habits and ‘stick’ without your having to think about them. In just a few lessons or a few days, an adult violinist – amateur, student or professional – can change their playing as much as an unfocused child may do in months or years.
Q But don’t children ���������������������������
Obviously, young children can learn a foreign language without even noticing; their muscles are marvellously soft and responsive; every stage of their learning traces a brand-new path, without conflicts or confusions with previous paths; learning takes place on the deepest level of the psyche, rather than having first to be processed by the intellect.
It is common for a 10-year-old to be able to master difficult virtuosic pieces after playing for five years or less, but not so common for an adult who has taken up the violin at a late age.
Yet in a lot of ways, as an adult, you can learn and improve your playing just as quickly as a child, and in many cases much faster. You are able to measure, which is a skill young children develop only gradually. You have the benefit of the general life experience that the child has not had, so you can make connections that they cannot make; and you have the powers of reason, self-motivation and will.
You can be clear about where you are now, clear about where you want to be in the future, and take steps to move from here to there.
Not just trying harder
Simply trying harder often makes things worse. Everything is a matter of cause and effect, which means that for every specific action there is a specific reaction. If you carry on performing the same actions, you can expect to keep getting the same reactions or results.
In other words, if you carry on doing what you are already doing, you just get more of what you are already getting. Then, if you try harder, you just get even more of what you are already getting. Instead, the answer is always to change something. The slightest change in what you are doing, or how you are doing it, will always bring about a completely new result.1
1 Albert Einstein said: ������������ ������is to do the same thing in the same way, over and over again, and expect a � �������������
����� ����������������commonly used in ��������� �������������business: “Do not work ��������������������!�
See also The importance of making mistakes, page 333
xviii Introduction
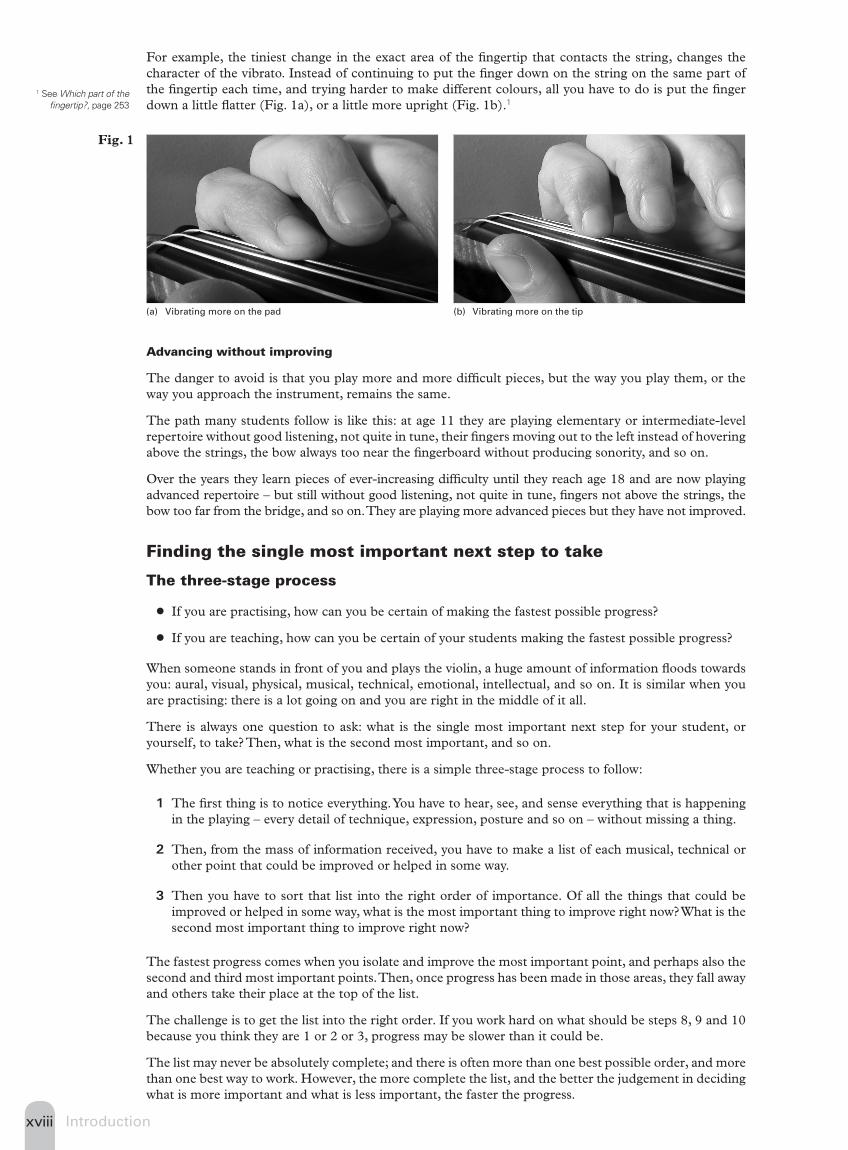
For example, the tiniest change in the exact area of the fingertip that contacts the string, changes the character of the vibrato. Instead of continuing to put the finger down on the string on the same part of the fingertip each time, and trying harder to make different colours, all you have to do is put the finger down a little flatter (Fig. 1a), or a little more upright (Fig. 1b).1
(a) Vibrating more on the pad (b) Vibrating more on the tip
Fig. 1
Advancing without improving
The danger to avoid is that you play more and more difficult pieces, but the way you play them, or the way you approach the instrument, remains the same.
The path many students follow is like this: at age 11 they are playing elementary or intermediate-level repertoire without good listening, not quite in tune, their fingers moving out to the left instead of hovering above the strings, the bow always too near the fingerboard without producing sonority, and so on.
Over the years they learn pieces of ever-increasing difficulty until they reach age 18 and are now playing advanced repertoire – but still without good listening, not quite in tune, fingers not above the strings, the bow too far from the bridge, and so on. They are playing more advanced pieces but they have not improved.
Finding the single most important next step to take
The three-stage process
��If you are practising, how can you be certain of making the fastest possible progress?
��If you are teaching, how can you be certain of your students making the fastest possible progress?
When someone stands in front of you and plays the violin, a huge amount of information floods towards you: aural, visual, physical, musical, technical, emotional, intellectual, and so on. It is similar when you are practising: there is a lot going on and you are right in the middle of it all.
There is always one question to ask: what is the single most important next step for your student, or yourself, to take? Then, what is the second most important, and so on.
Whether you are teaching or practising, there is a simple three-stage process to follow:
1 The first thing is to notice everything. You have to hear, see, and sense everything that is happening in the playing – every detail of technique, expression, posture and so on – without missing a thing.
2 Then, from the mass of information received, you have to make a list of each musical, technical or other point that could be improved or helped in some way.
3 Then you have to sort that list into the right order of importance. Of all the things that could be improved or helped in some way, what is the most important thing to improve right now? What is the second most important thing to improve right now?
The fastest progress comes when you isolate and improve the most important point, and perhaps also the second and third most important points. Then, once progress has been made in those areas, they fall away and others take their place at the top of the list.
The challenge is to get the list into the right order. If you work hard on what should be steps 8, 9 and 10 because you think they are 1 or 2 or 3, progress may be slower than it could be.
The list may never be absolutely complete; and there is often more than one best possible order, and more than one best way to work. However, the more complete the list, and the better the judgement in deciding what is more important and what is less important, the faster the progress.
1 See Which part of the �������, page 253
1Lesson 1: The tone production lesson
The tone lesson production lesson
Working on tone production is often a good first step with new students, if they are able to draw the bow sufficiently parallel to the bridge:
��When you play tone exercises, even if they are only long, sustained bows on one note, you have to play that note with feeling and musical imagination for it to be technically successful. This establishes, from the start, the vital principle that when you work on technique you nearly always have to do it musically and with inspiration, rather than only with detached mental control.
��Tone exercises have an immediate effect, so working on tone is an encouraging and exciting way to start a new course of study.
��As students focus on the different qualities and components of the sound, their listening is immediately alerted and sharpened. Then, because they are listening better, every aspect of playing naturally improves quickly at the same time.
��Starting with tone follows the principle of always beginning with the result you want, and working your way back from there, rather than ‘starting from nowhere’. Always go straight for the tone and the expression, and then find how to do it, rather than the other way round.
��Tone-production exercises are a direct way for the teacher to begin to understand exactly what the pupil is doing with the bow, bow arm, right hand and fingers, and the pupil’s entire musical and technical approach to making the instrument sing.
Knowing the instrument
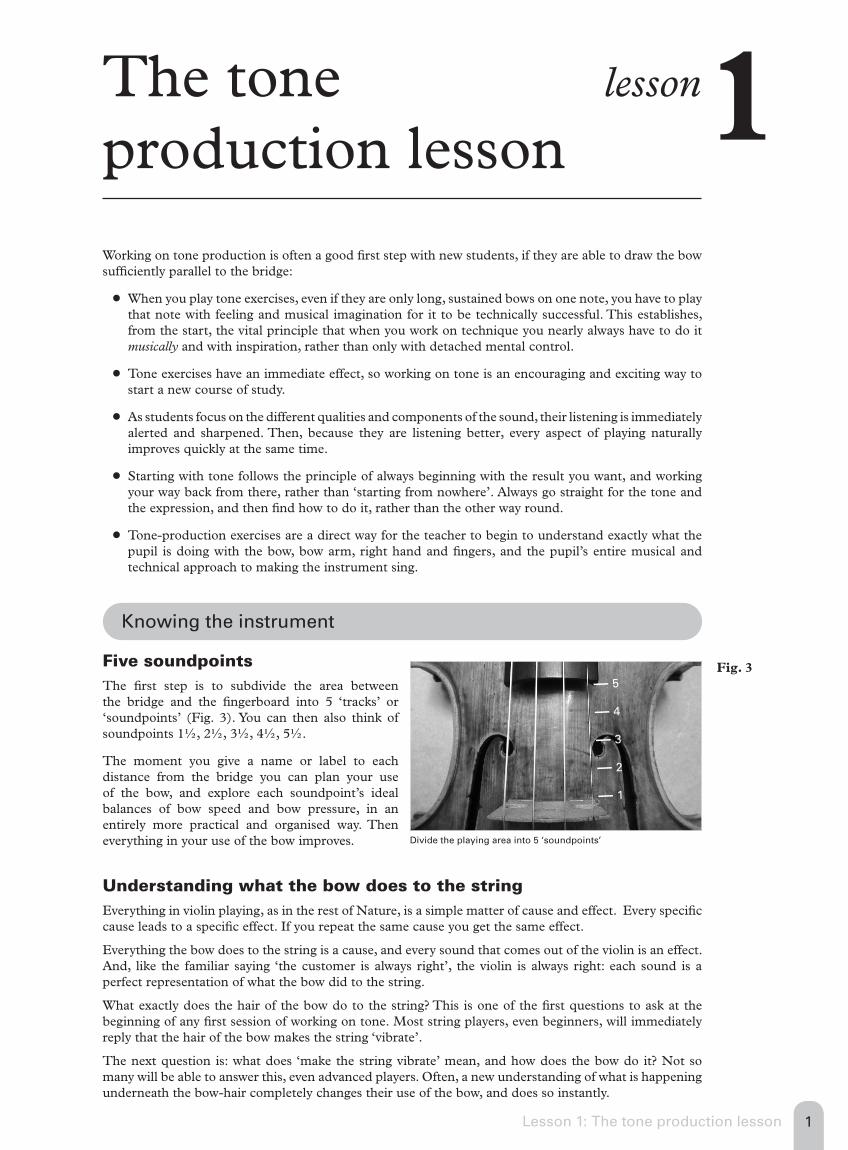
Five soundpointsThe first step is to subdivide the area between the bridge and the fingerboard into 5 ‘tracks’ or ‘soundpoints’ (Fig. 3). You can then also think of soundpoints 1½, 2½, 3½, 4½, 5½.
The moment you give a name or label to each distance from the bridge you can plan your use of the bow, and explore each soundpoint’s ideal balances of bow speed and bow pressure, in an entirely more practical and organised way. Then everything in your use of the bow improves.
Understanding what the bow does to the stringEverything in violin playing, as in the rest of Nature, is a simple matter of cause and effect. Every specific cause leads to a specific effect. If you repeat the same cause you get the same effect.
Everything the bow does to the string is a cause, and every sound that comes out of the violin is an effect. And, like the familiar saying ‘the customer is always right’, the violin is always right: each sound is a perfect representation of what the bow did to the string.
What exactly does the hair of the bow do to the string? This is one of the first questions to ask at the beginning of any first session of working on tone. Most string players, even beginners, will immediately reply that the hair of the bow makes the string ‘vibrate’.
The next question is: what does ‘make the string vibrate’ mean, and how does the bow do it? Not so many will be able to answer this, even advanced players. Often, a new understanding of what is happening underneath the bow-hair completely changes their use of the bow, and does so instantly.
1
Divide the playing area into 5 ‘soundpoints’
Fig. 3 — 5
— 4
— 3
— 2
— 1
2 Lesson 1: The tone production lesson
Knowing the instrument
An instrument of friction
Imagine watching the bow moving along the string in ultra-slow-motion, and magnified through such a strong lens that the string and the hairs of the bow are huge. You can see clearly how the friction of the bow causes the string to swing from side to side.1
On the down bow the hair catches the string and pulls it sideways to the right. As it does so the tension of the string increases. This sideways bending of the string can only continue for so long, before the tension is so great that the string springs back in the opposite direction, to the left. It is then caught again by the hair and pulled to the right again, and the next cycle begins.
The reverse happens on the up bow. The bow-hair pushes the string to the left. Therefore the string moves sideways, backwards and forwards. This sideways movement is called the amplitude.
It looks like a blur around the string and is widest at the middle point between the bridge and the nut (or the bridge and the finger). The wider the amplitude, the more carrying the tone.
The pitch of the note remains the same, however, whatever the amplitude. The note A vibrates (i.e. the string swings from side to side) 440 times each second whether it is played P or F, but the distance the string swings from side to side is narrower in the P and wider in the F:
The violin, working by friction, is a sustaining instrument. The piano, basically a percussion instrument, is an instrument of diminuendo: after the hammer has hit the string, all that can happen is that the vibrations of the string diminish.
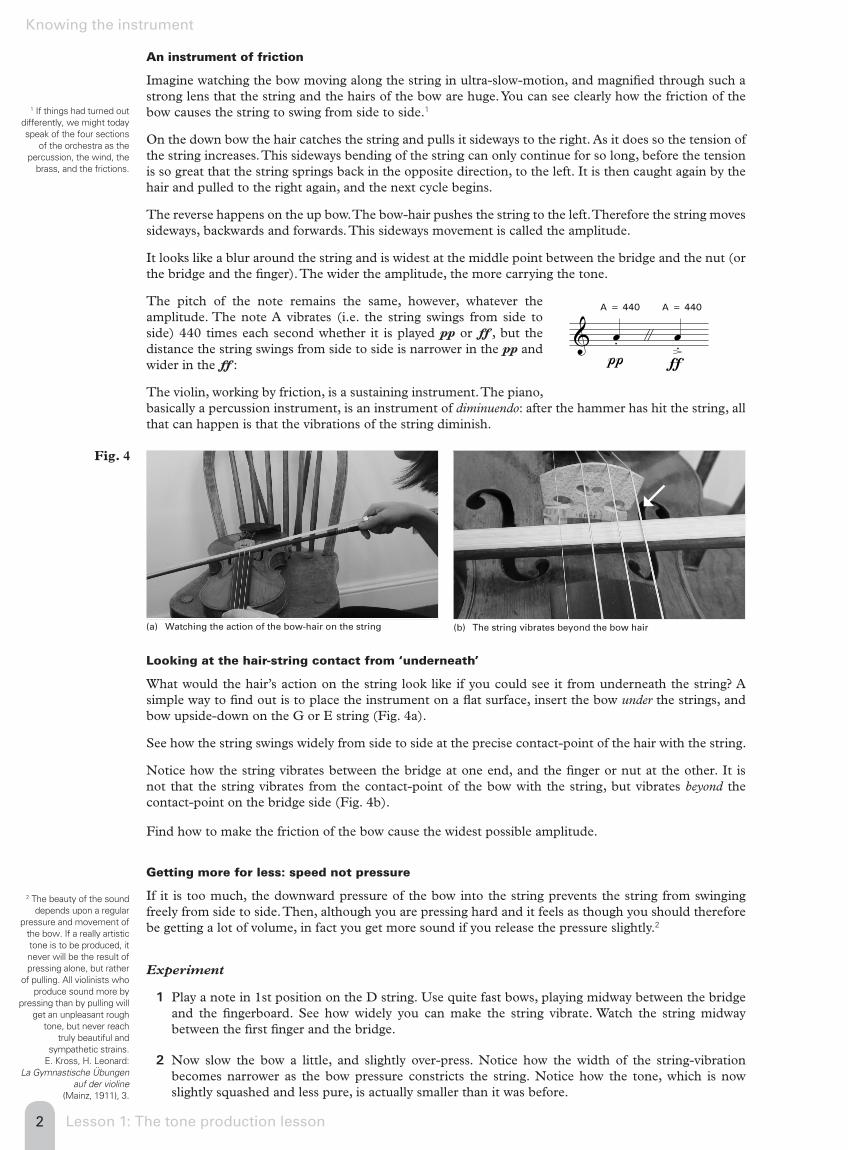
(a) Watching the action of the bow-hair on the string (b) The string vibrates beyond the bow hair
Fig. 4
Looking at the hair-string contact from ‘underneath’
What would the hair’s action on the string look like if you could see it from underneath the string? A simple way to find out is to place the instrument on a flat surface, insert the bow under the strings, and bow upside-down on the G or E string (Fig. 4a).
See how the string swings widely from side to side at the precise contact-point of the hair with the string.
Notice how the string vibrates between the bridge at one end, and the finger or nut at the other. It is not that the string vibrates from the contact-point of the bow with the string, but vibrates beyond the contact-point on the bridge side (Fig. 4b).
Find how to make the friction of the bow cause the widest possible amplitude.
Getting more for less: speed not pressure
If it is too much, the downward pressure of the bow into the string prevents the string from swinging freely from side to side. Then, although you are pressing hard and it feels as though you should therefore be getting a lot of volume, in fact you get more sound if you release the pressure slightly.2
Experiment
1 Play a note in 1st position on the D string. Use quite fast bows, playing midway between the bridge and the fingerboard. See how widely you can make the string vibrate. Watch the string midway between the first finger and the bridge.
2 Now slow the bow a little, and slightly over-press. Notice how the width of the string-vibration becomes narrower as the bow pressure constricts the string. Notice how the tone, which is now slightly squashed and less pure, is actually smaller than it was before.
1�" ��������������������� ����������������������������� ����� �����������
� ����������������������percussion, the wind, the
#������������� ������
& œ. "
π
œflƒ
������� �������
2�����#������� ����������depends upon a regular
��������������������� �����#����" �����������������tone is to be produced, it ���������#�������������� �pressing alone, but rather
� �����������������������produce sound more by
pressing than by pulling will get an unpleasant rough
tone, but never reach ������#���� ������
sympathetic strains. E. Kross, H. Leonard:
La Gymnastische Übungen auf der violine
(Mainz, 1911), 3.
3Lesson 1: The tone production lesson
Knowing the instrument
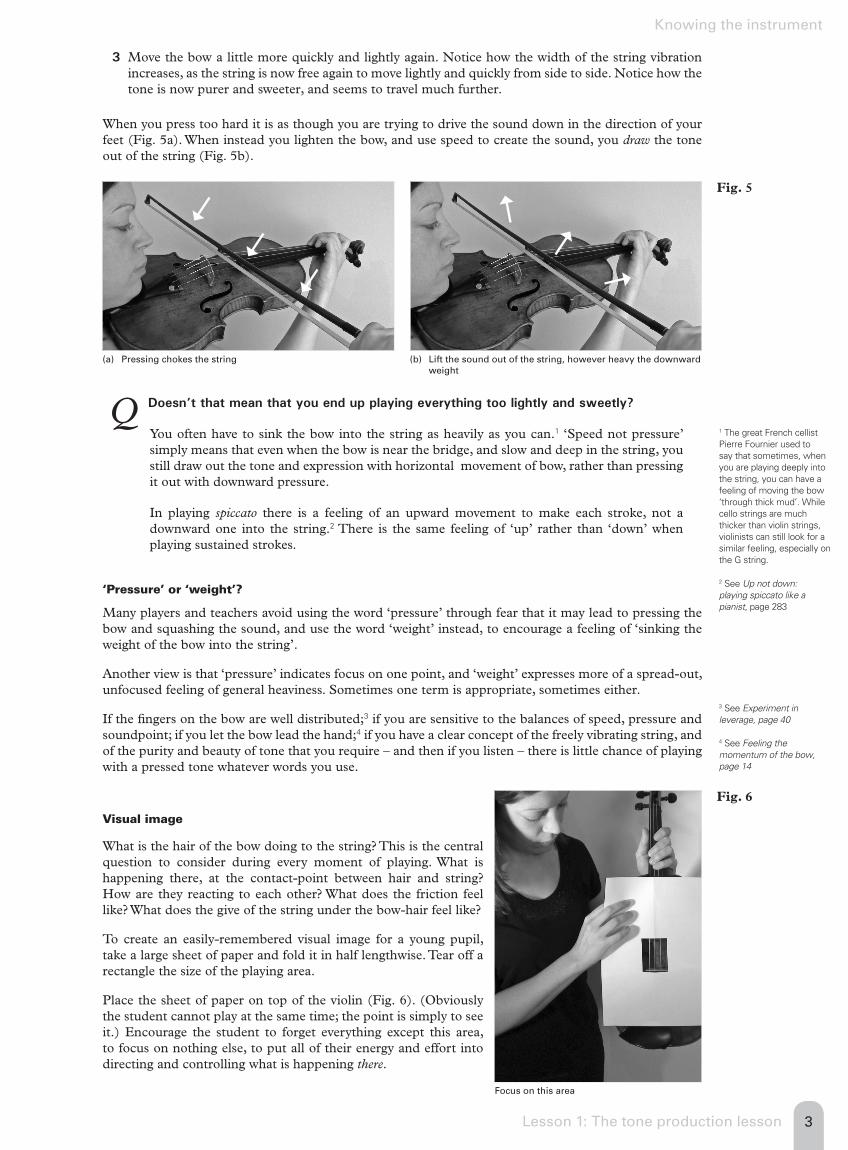
3 Move the bow a little more quickly and lightly again. Notice how the width of the string vibration increases, as the string is now free again to move lightly and quickly from side to side. Notice how the tone is now purer and sweeter, and seems to travel much further.
When you press too hard it is as though you are trying to drive the sound down in the direction of your feet (Fig. 5a). When instead you lighten the bow, and use speed to create the sound, you draw the tone out of the string (Fig. 5b).
(a) Pressing chokes the string (b) Lift the sound out of the string, however heavy the downward weight
Fig. 5
Q ����������������������������������������������������������������������
You often have to sink the bow into the string as heavily as you can.1 ‘Speed not pressure’ simply means that even when the bow is near the bridge, and slow and deep in the string, you still draw out the tone and expression with horizontal movement of bow, rather than pressing it out with downward pressure.
In playing spiccato there is a feeling of an upward movement to make each stroke, not a downward one into the string.2 There is the same feeling of ‘up’ rather than ‘down’ when playing sustained strokes.
‘Pressure’ or ‘weight’?
Many players and teachers avoid using the word ‘pressure’ through fear that it may lead to pressing the bow and squashing the sound, and use the word ‘weight’ instead, to encourage a feeling of ‘sinking the weight of the bow into the string’.
Another view is that ‘pressure’ indicates focus on one point, and ‘weight’ expresses more of a spread-out, unfocused feeling of general heaviness. Sometimes one term is appropriate, sometimes either.
If the fingers on the bow are well distributed;3 if you are sensitive to the balances of speed, pressure and soundpoint; if you let the bow lead the hand;4 if you have a clear concept of the freely vibrating string, and of the purity and beauty of tone that you require – and then if you listen – there is little chance of playing with a pressed tone whatever words you use.
Visual image
What is the hair of the bow doing to the string? This is the central question to consider during every moment of playing. What is happening there, at the contact-point between hair and string? How are they reacting to each other? What does the friction feel like? What does the give of the string under the bow-hair feel like?
To create an easily-remembered visual image for a young pupil, take a large sheet of paper and fold it in half lengthwise. Tear off a rectangle the size of the playing area.
Place the sheet of paper on top of the violin (Fig. 6). (Obviously the student cannot play at the same time; the point is simply to see it.) Encourage the student to forget everything except this area, to focus on nothing else, to put all of their energy and effort into directing and controlling what is happening there.
1 The great French cellist Pierre Fournier used to say that sometimes, when you are playing deeply into the string, you can have a ������ ����������#���‘through thick mud’. While cello strings are much thicker than violin strings, �������������������� ����������� ������������������the G string.
2 See Up not down: playing spiccato like a pianist, page 283
3 See Experiment in leverage, page 40
4 See Feeling the momentum of the bow, page 14
Focus on this area
Fig. 6
4 Lesson 1: The tone production lesson
Knowing the instrument
Image of the cat
When you stroke a cat, it often arches its back up against your hand so that while you push one way, the cat pushes the other. Unless it does not wish to be stroked, the cat is not passive but takes part actively.
In the same way, do not let the violin or string sit passively and inactively while the bow plays on it. Play with an ‘ardent violin’ which rises up to meet the contact of the bow. The amount is so slight that it is imperceptible. If you can see it, it is probably too much; but the difference in the sound and the feel of the bow, between an ‘active’ and a ‘passive’ violin, is striking.
Understanding resonanceThe body of the violin is a ‘resonating box’. If it were made of solid wood rather than being hollow, the sound of the bowed string would be small and thin. The bridge transmits the vibrations down into the resonating box where they are amplified.
��Using your knuckles, gently tap the body of the violin. Listen to the sound of each tap resonating through the instrument.
��Using your fingernail, scratch the top of the bridge between the strings very, very lightly. The sound is amplified greatly by the violin. Make the same scratching movement on a solid tabletop, or the wall, and notice the difference.
��Place the palm of your left hand flat against the underside of the violin and feel the vibrations of the back plate as you bow the open strings.
��Then bow a few notes on each string, listening to the amplification and resonance of the violin.
Listening to the background resonance
Play a short note and listen to the ring that continues on after the end of the bow stroke. The question is, what happens to that ring during a longer note. In other words, what happens to the ring if the sound that produced it continues at the same time?
If you listen carefully you can hear two distinct sounds: the sound of the principal note, and at the same time a continuous background ring which is like a distinct note ringing on its own. You have to listen behind the sound.
The moment you start to focus on the background ring as well as the ‘principal sound’, an entirely new quality comes into the playing.
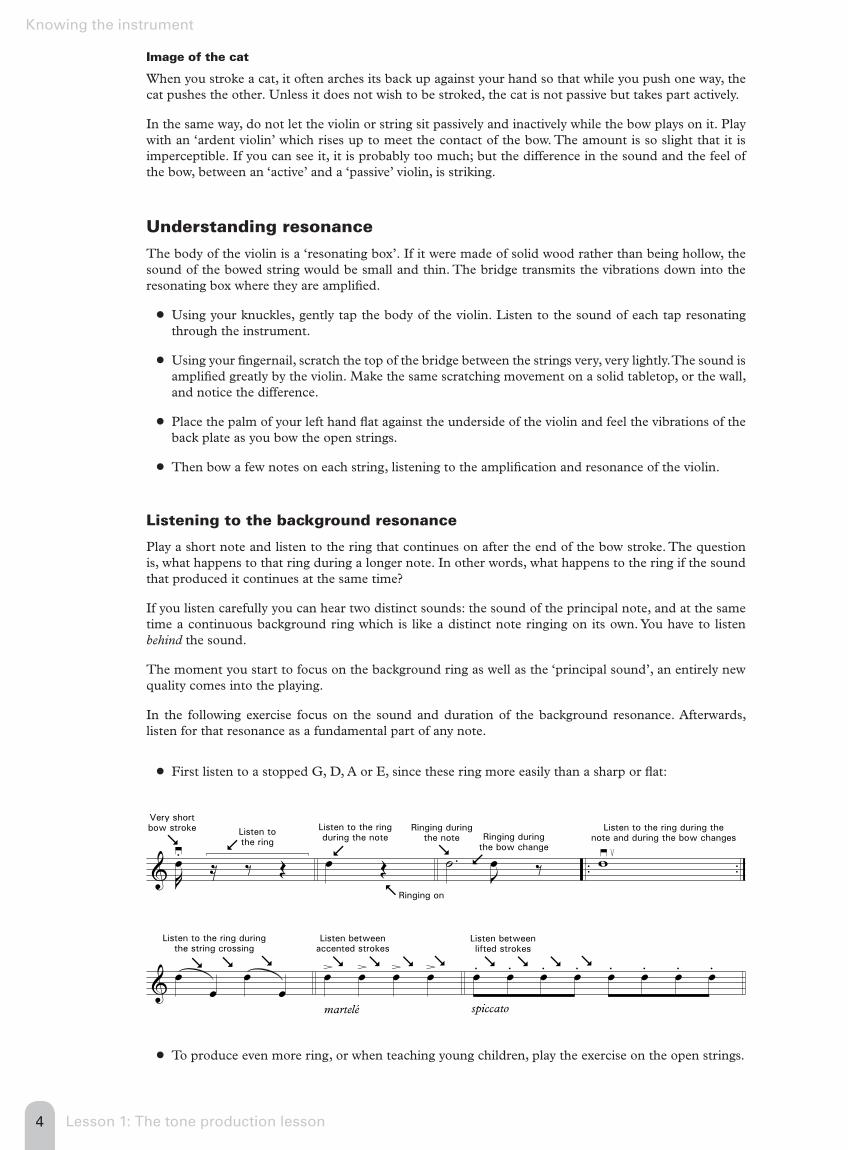
In the following exercise focus on the sound and duration of the background resonance. Afterwards, listen for that resonance as a fundamental part of any note.
��First listen to a stopped G, D, A or E, since these ring more easily than a sharp or flat:
& .. ..J�œ�
≥.≈�
‰ Œ œ� Œ
�
.˙�Jœ� ‰ w≥ ≤
���������
��������
����������
��������
����������
������������������
��������������
������������������� ����������
������� � ��������������������������� �����
������������
�������� �����
��������
&œ
œ
�� œ�
œœ�> œ
�> œ�> œ
�>
martelé
�������������
������� ��������
œ.�
œ.�
œ.�
œ.�
œ. œ. œ. œ.
spiccato
������������������� �����
�������������������
������������
����� ��������
��To produce even more ring, or when teaching young children, play the exercise on the open strings.
93Lesson 4: Background essentials 1
Background lesson
essentials 1
Pitch–sound–rhythm–ease
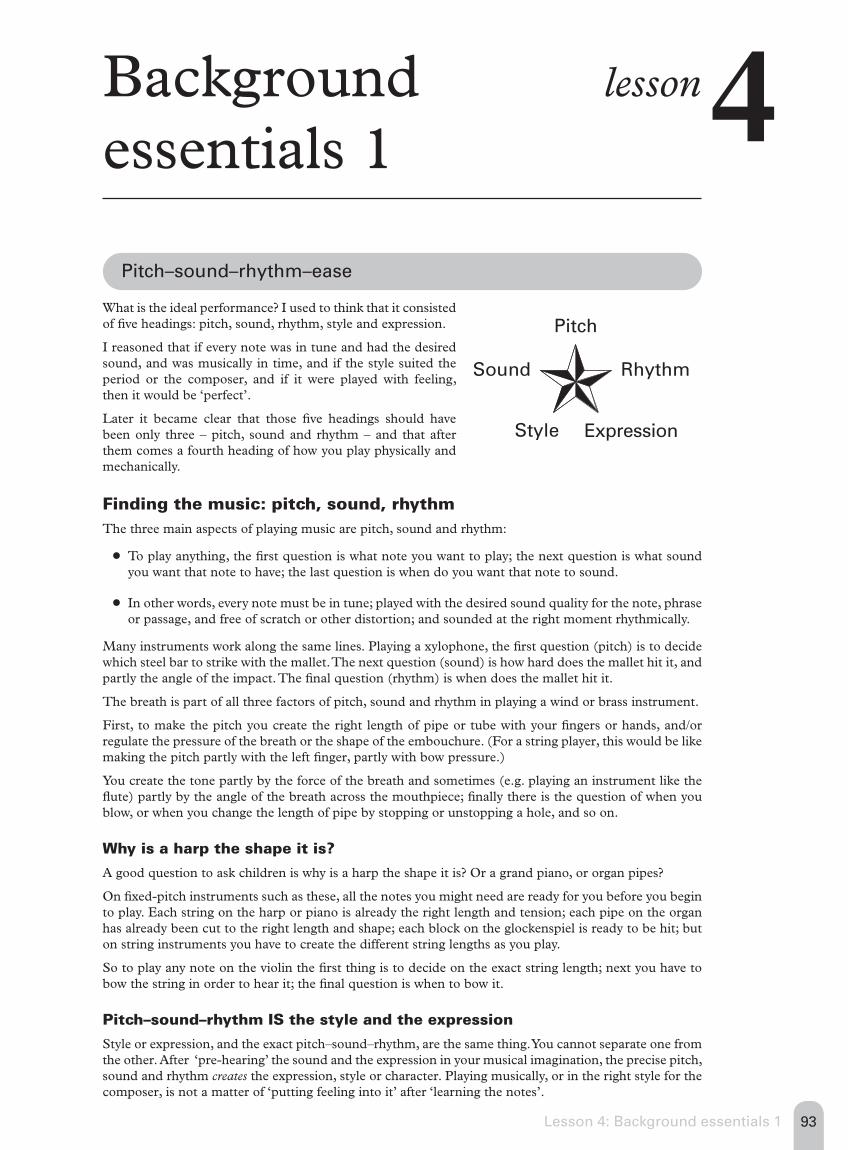
What is the ideal performance? I used to think that it consisted of five headings: pitch, sound, rhythm, style and expression.
I reasoned that if every note was in tune and had the desired sound, and was musically in time, and if the style suited the period or the composer, and if it were played with feeling, then it would be ‘perfect’.
Later it became clear that those five headings should have been only three – pitch, sound and rhythm – and that after them comes a fourth heading of how you play physically and mechanically.
Finding the music: pitch, sound, rhythmThe three main aspects of playing music are pitch, sound and rhythm:
��To play anything, the first question is what note you want to play; the next question is what sound you want that note to have; the last question is when do you want that note to sound.
��In other words, every note must be in tune; played with the desired sound quality for the note, phrase or passage, and free of scratch or other distortion; and sounded at the right moment rhythmically.
Many instruments work along the same lines. Playing a xylophone, the first question (pitch) is to decide which steel bar to strike with the mallet. The next question (sound) is how hard does the mallet hit it, and partly the angle of the impact. The final question (rhythm) is when does the mallet hit it.
The breath is part of all three factors of pitch, sound and rhythm in playing a wind or brass instrument.
First, to make the pitch you create the right length of pipe or tube with your fingers or hands, and/or regulate the pressure of the breath or the shape of the embouchure. (For a string player, this would be like making the pitch partly with the left finger, partly with bow pressure.)
You create the tone partly by the force of the breath and sometimes (e.g. playing an instrument like the flute) partly by the angle of the breath across the mouthpiece; finally there is the question of when you blow, or when you change the length of pipe by stopping or unstopping a hole, and so on.
Why is a harp the shape it is?
A good question to ask children is why is a harp the shape it is? Or a grand piano, or organ pipes?
On fixed-pitch instruments such as these, all the notes you might need are ready for you before you begin to play. Each string on the harp or piano is already the right length and tension; each pipe on the organ has already been cut to the right length and shape; each block on the glockenspiel is ready to be hit; but on string instruments you have to create the different string lengths as you play.
So to play any note on the violin the first thing is to decide on the exact string length; next you have to bow the string in order to hear it; the final question is when to bow it.
Pitch–sound–rhythm IS the style and the expression
Style or expression, and the exact pitch–sound–rhythm, are the same thing. You cannot separate one from the other. After ‘pre-hearing’ the sound and the expression in your musical imagination, the precise pitch, sound and rhythm creates the expression, style or character. Playing musically, or in the right style for the composer, is not a matter of ‘putting feeling into it’ after ‘learning the notes’.
4
Pitch
RhythmSound
Style Expression
94 Lesson 4: Background essentials 1
Pitch–sound–rhythm–ease
��Intonation and expression are inseparable. Expressive intonation, in contrast to neutral ‘piano’ (tempered) intonation, is as much a part of expression as volume or attack. To change the expression you change the tuning, which means you play flatter flats or sharper sharps to get a particular expressive colour into a note (e.g. B-, second note of the Bruch G minor Concerto).
��Sound and expression are inseparable. If the sound is dull, or without the right character or expression, and then you add expression, in doing so you must you change the sound.
In the same way vibrato is expression. If you change the character or expression of the vibrato, you change the width and speed, or the area of the pad or tip that is contacting the string; and if you change those things, you change the expression.
��Rhythm and expression are inseparable. For a particular effect you might play more (or less) metronomically in time, or make a dotted rhythm ever-so-slightly more dotted, or sustain a held note right to the very end rather than ever-so-slightly shorter, and so on. In changing the rhythm you change the expression.
��Style is also not a separate issue. The only way to create style, or to change it, is through changing the exact intonation, sound (type of stroke and vibrato), and rhythm.
Ease: the master formulaMaster musicians, athletes, dancers or acrobats always make what they do look easy, largely because by the time you are that good at something it is ‘easy’.
Every athlete strives to develop greater and greater ‘maximum power and minimum effort’. Imagine putting all your might and effort into hitting a golf ball, but the ball travels only a few metres. Then an expert takes the same golf club that you used and, seemingly without any effort at all, makes the ball travel hundreds of metres.
But suppose you too can hit the ball so that it travels hundreds of metres. Apparently F.M. Alexander was particularly fond of saying this to everyone he worked with:1
When you are pleased with yourself – when you have got there, when you have made it, when you have achieved what you set out to achieve, when you have got the result that you wanted – then try it again and see if you can get the same result, but using less effort. Then, do it yet again and see if you can get the same result with even less effort than that!
This is the Master Formula in any field or activity.
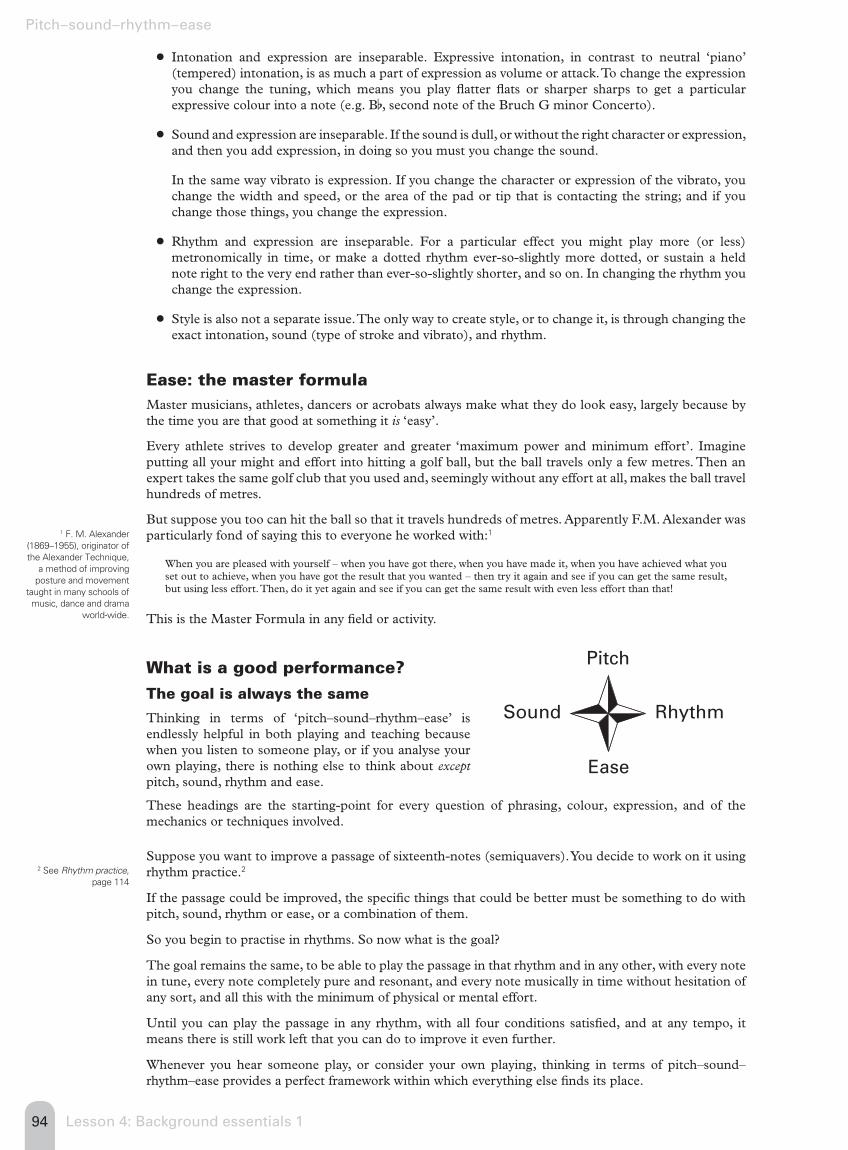
What is a good performance?The goal is always the same
Thinking in terms of ‘pitch–sound–rhythm–ease’ is endlessly helpful in both playing and teaching because when you listen to someone play, or if you analyse your own playing, there is nothing else to think about except pitch, sound, rhythm and ease.
These headings are the starting-point for every question of phrasing, colour, expression, and of the mechanics or techniques involved.
Suppose you want to improve a passage of sixteenth-notes (semiquavers). You decide to work on it using rhythm practice.2
If the passage could be improved, the specific things that could be better must be something to do with pitch, sound, rhythm or ease, or a combination of them.
So you begin to practise in rhythms. So now what is the goal?
The goal remains the same, to be able to play the passage in that rhythm and in any other, with every note in tune, every note completely pure and resonant, and every note musically in time without hesitation of any sort, and all this with the minimum of physical or mental effort.
Until you can play the passage in any rhythm, with all four conditions satisfied, and at any tempo, it means there is still work left that you can do to improve it even further.
Whenever you hear someone play, or consider your own playing, thinking in terms of pitch–sound–rhythm–ease provides a perfect framework within which everything else finds its place.
1 F. M. Alexander $%&'*+%*--/����������� �the Alexander Technique,
���������� ��������posture and movement
��������������������� �music, dance and drama
����������
Pitch
RhythmSound
Ease
2 See Rhythm practice, page 114
122 Lesson 5: Setting up the bow arm
Drawing a straight bow
Building the bow arm
The ideal is to have a feeling of one down-bow movement, and one up-bow movement, rather than having a collection of many individual movements which you try to join together as you play.
David Oistrakh’s bow arm is a classic example. There is no feeling of the different ‘bits’ of the bow arm in his bowing: he simply moves down-bow from the heel to the point, and up-bow from the point to the heel, as one action, with all the individual actions merged into one unit.
Sometimes, the more a student learns about the bow arm or the left hand, the worse it gets. If you start to think about the movement of the arm here, and the action of the fingers there, and during a down-bow from heel to point you try to stick everything together, there may be a danger that ‘conscious interference’ will get in the way of your natural feel for bowing.
Kicking a ball, you do not use your conscious mind to pull the upper leg back, and then consciously push it forward again. You know where you want to kick the ball, and how hard; you keep focused on the result you want; you let yourself kick it at the same time as making it happen.
The idea that somebody might consciously pull the upper leg back, and then add some lower leg movement, may seem absurd; yet many string players try to move the arm exactly like that.
This does not mean that you cannot analyse your bow arm and make changes to certain elements of it. Once the new habit has become unconscious, you can return to the perception of only one natural movement for the down-bow, and one movement for the up-bow.
Forearm rotation
Forearm rotation (the forearm movement of turning a key) is something that many players do naturally, without knowing or ever thinking about it. Others do not automatically have it as part of their bow arm, or sometimes get into a habit of blocking it; but it is an easy and simple process to add forearm rotation back in to the playing.
If it is not part of your bow arm, and then you begin to allow it – or if you play repetitive exercises to encourage it – an immense new feeling of freedom immediately comes into your bow arm.
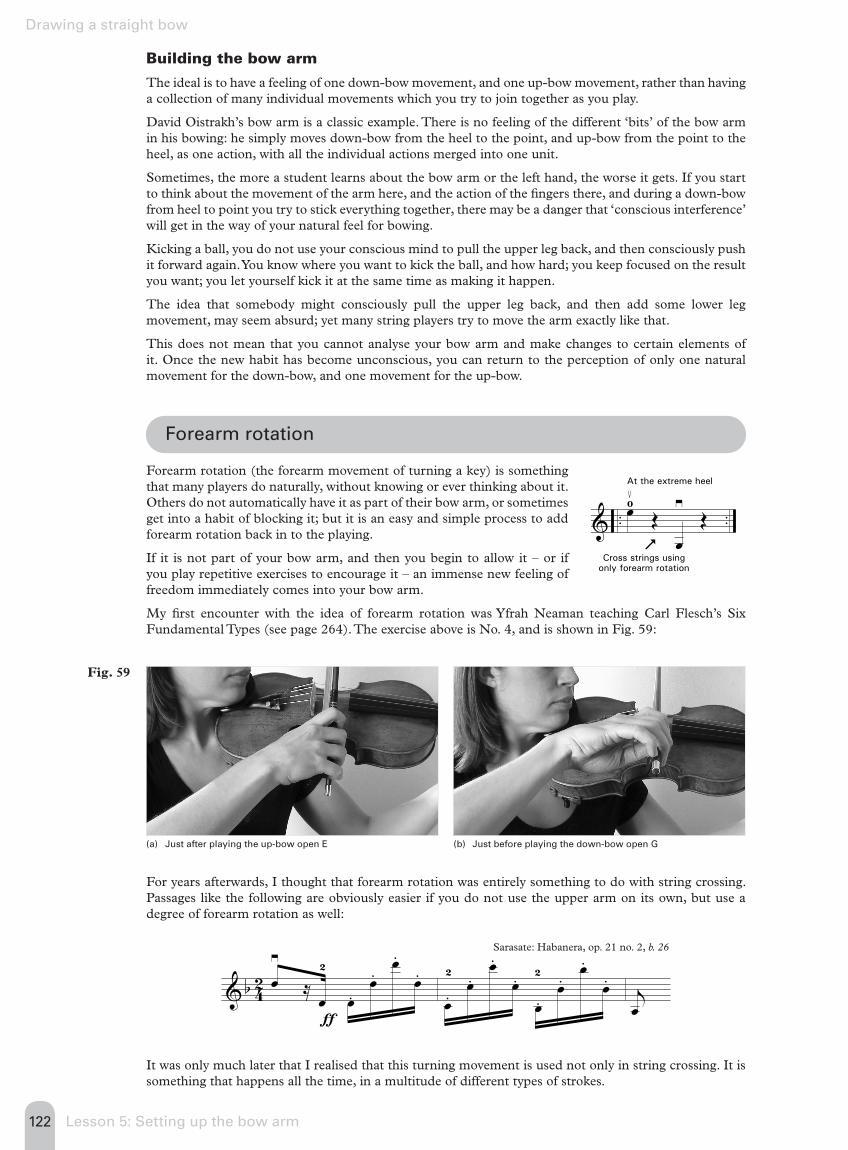
My first encounter with the idea of forearm rotation was Yfrah Neaman teaching Carl Flesch’s Six Fundamental Types (see page 264). The exercise above is No. 4, and is shown in Fig. 59:
(a) Just after playing the up-bow open E (b) Just before playing the down-bow open G
Fig. 59
For years afterwards, I thought that forearm rotation was entirely something to do with string crossing. Passages like the following are obviously easier if you do not use the upper arm on its own, but use a degree of forearm rotation as well:
& b 42 ϳ
≈œ
œ.œ.œ.
œ.
ƒœ.
œ.œ.
œ.
œ.
œ.œ.
œ. jœ
It was only much later that I realised that this turning movement is used not only in string crossing. It is something that happens all the time, in a multitude of different types of strokes.
& .. ..ϲ
�
Œ
œ
≥
Œ
�����������������
��� � ����� �� ���
�������������������
Sarasate: Habanera, op. 21 no. 2, b. 26
123Lesson 5: Setting up the bow arm
Forearm rotation
You can see it even in the simple operation of drawing the bow from the heel – where the hand is more upright (supinated) – to the point, where the hand is more tilted (pronated):
&w≥
�
�
�������
�� �����
��
������������
������������
w≤�
�
��
�����
��
�� �����
�����
��������
������������
œ≥�
��
Obviously the amount of the movement may be so slight as to be imperceptible:
&#C œ# œ œ
≤
œ�
f
˙
S
�œ œ œ œ
����������
���� ���
œ# œ œ œ œ œ# œ œ
jœ#
������
���� ���
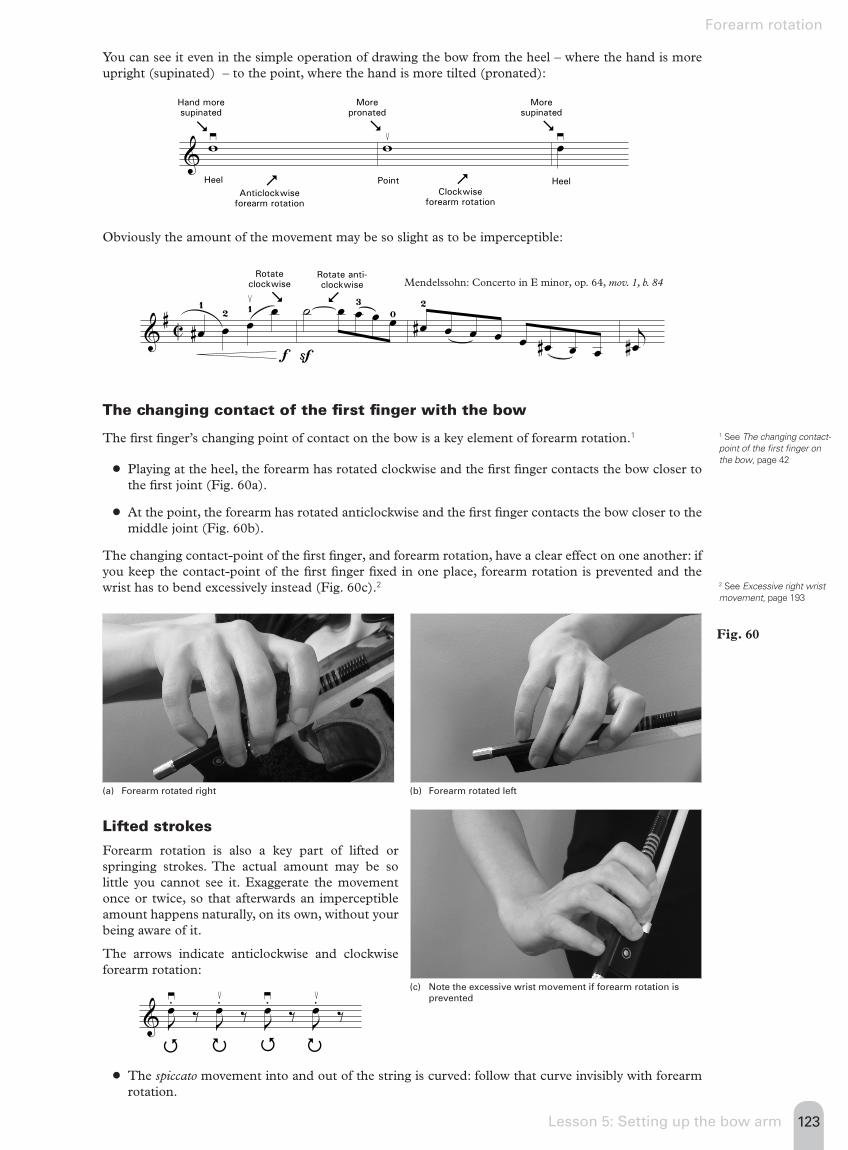
The changing contact of the first finger with the bow
The first finger’s changing point of contact on the bow is a key element of forearm rotation.1
��Playing at the heel, the forearm has rotated clockwise and the first finger contacts the bow closer to the first joint (Fig. 60a).
��At the point, the forearm has rotated anticlockwise and the first finger contacts the bow closer to the middle joint (Fig. 60b).
The changing contact-point of the first finger, and forearm rotation, have a clear effect on one another: if you keep the contact-point of the first finger fixed in one place, forearm rotation is prevented and the wrist has to bend excessively instead (Fig. 60c).2
(a) Forearm rotated right (b) Forearm rotated left
Fig. 60
Lifted strokes
Forearm rotation is also a key part of lifted or springing strokes. The actual amount may be so little you cannot see it. Exaggerate the movement once or twice, so that afterwards an imperceptible amount happens naturally, on its own, without your being aware of it.
The arrows indicate anticlockwise and clockwise forearm rotation:
& Jœ.≥
�
‰ Jœ.≤
�
‰ Jœ.≥
�
‰ Jœ.≤
�
‰
��The spiccato movement into and out of the string is curved: follow that curve invisibly with forearm rotation.
Mendelssohn: Concerto in E minor, op. 64, mov. 1, b. 84
1 See The changing contact-������ �������������������the bow, page 42
2 See Excessive right wrist movement, page 193
(c) Note the excessive wrist movement if forearm rotation is prevented
163Lesson 7: Avoiding aches and pains
Avoiding aches lesson
and pains
The basis of all playing must be balance and physical freedom. All too often we spend our practice time working on problems of the left hand or right, when actually what we need to do first is to find a basic balance and freedom throughout our entire system. Then everything works much more easily in the first place.
General tension throughout the body often begins with the neck and shoulders, and tension there has to spread to the arms and then to the hands and fingers. Then it can become less and less productive to practise problematic passages over and over again, trying to get them sounding well and in tune, if the basis of the playing is not one of freedom.
While it may seem very difficult to find such a basis of freedom if you do not already have it – and if it seems that you already have enough to think about just trying to get around the notes – in fact there are certain key issues which make an enormous difference, and more freedom can be gained very quickly indeed.
Understanding the causes
Listening to your bodyImagine that you are busy practising, and the fire alarm goes off. You do not ignore the alarm, saying, ‘I have important work to do, I can’t stop now.’
Pain is your personal fire alarm going off. Yet many string players, hurting with every note they play, ignore warning signals and carry on playing in the same way. A common approach to practice is this:
First I have to learn how to play this piece; then I will learn how to play it without getting tense.
I know that all these things my teacher tells me about being balanced in my posture, not squeezing my fingers together, relaxing my shoulders, not pulling my chest down, not squeezing my left thumb back, and so on, are all the right things; and one day I will be able to use all this helpful information, and then I will be glad that I learnt it now.
But meanwhile I can’t think about it because if I play in all those relaxed, balanced, non-squeezing ways, I simply cannot play; or if I can, my playing seems boring and uninvolved and unmusical; but if I forget about them, and just play as I have got into the habit of playing, I can play at least quite well.
I can ignore the pain in my left upper arm, and I can still get through the piece even if I am tense. One day, when I can play it and all my worries with it are over, then I will learn how to play it in the way that my teacher is suggesting.
This approach often fails for the simple reason that until you find a way of playing without tension and conflict, you never do reach the stage where you can play it easily anyway.
Forming good associations
From the very beginning of learning a new piece, build good posture, balance and freedom into the musical playing of the notes.
Just as you have a muscle-memory of the feeling of beginning a piece on a down-bow or an up-bow, so that it becomes impossible to begin accidentally on the wrong bow when playing from memory, so do undesirable physical actions (such as tightening) become associated with playing a particular note or phrase. Then that tightening becomes part of how you play that phrase, even if you have got yourself into a generally relaxed state beforehand.
If you form an association of bad posture or tension with the phrase, it becomes more and more difficult to change to a new way of playing without the musical playing suffering. Then you may become reluctant to make the change.
7
178 Lesson 7: Avoiding aches and pains
Freeing the shoulders
Freeing the shoulders
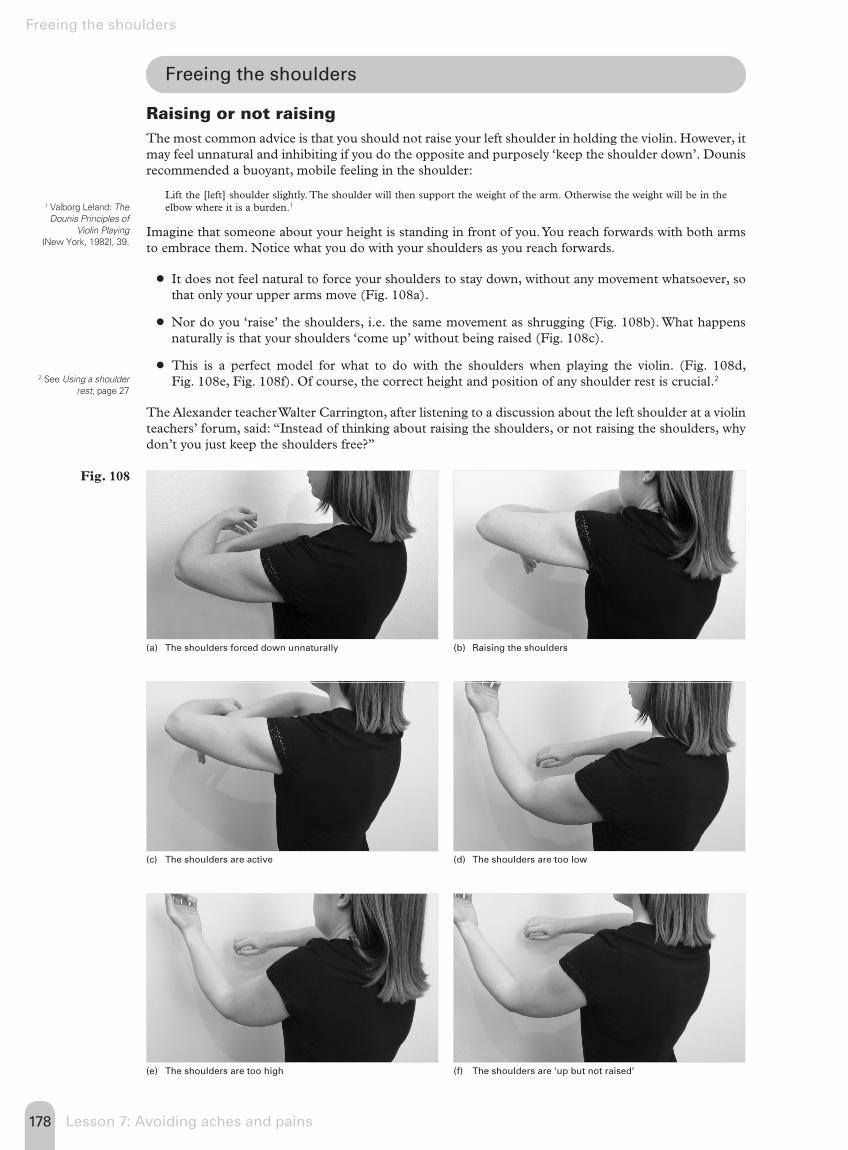
Raising or not raisingThe most common advice is that you should not raise your left shoulder in holding the violin. However, it may feel unnatural and inhibiting if you do the opposite and purposely ‘keep the shoulder down’. Dounis recommended a buoyant, mobile feeling in the shoulder:
Lift the [left] shoulder slightly. The shoulder will then support the weight of the arm. Otherwise the weight will be in the elbow where it is a burden.1
Imagine that someone about your height is standing in front of you. You reach forwards with both arms to embrace them. Notice what you do with your shoulders as you reach forwards.
��It does not feel natural to force your shoulders to stay down, without any movement whatsoever, so that only your upper arms move (Fig. 108a).
��Nor do you ‘raise’ the shoulders, i.e. the same movement as shrugging (Fig. 108b). What happens naturally is that your shoulders ‘come up’ without being raised (Fig. 108c).
��This is a perfect model for what to do with the shoulders when playing the violin. (Fig. 108d, Fig. 108e, Fig. 108f). Of course, the correct height and position of any shoulder rest is crucial.2
The Alexander teacher Walter Carrington, after listening to a discussion about the left shoulder at a violin teachers’ forum, said: “Instead of thinking about raising the shoulders, or not raising the shoulders, why don’t you just keep the shoulders free?”
(a) The shoulders forced down unnaturally (b) Raising the shoulders
Fig. 108
(c) The shoulders are active (d) The shoulders are too low
(e) The shoulders are too high (f) The shoulders are ‘up but not raised’
1 Valborg Leland: The Dounis Principles of
Violin Playing (New York, 1982), 39.
2 See Using a shoulder rest, page 27
179Lesson 7: Avoiding aches and pains
Freeing the shoulders
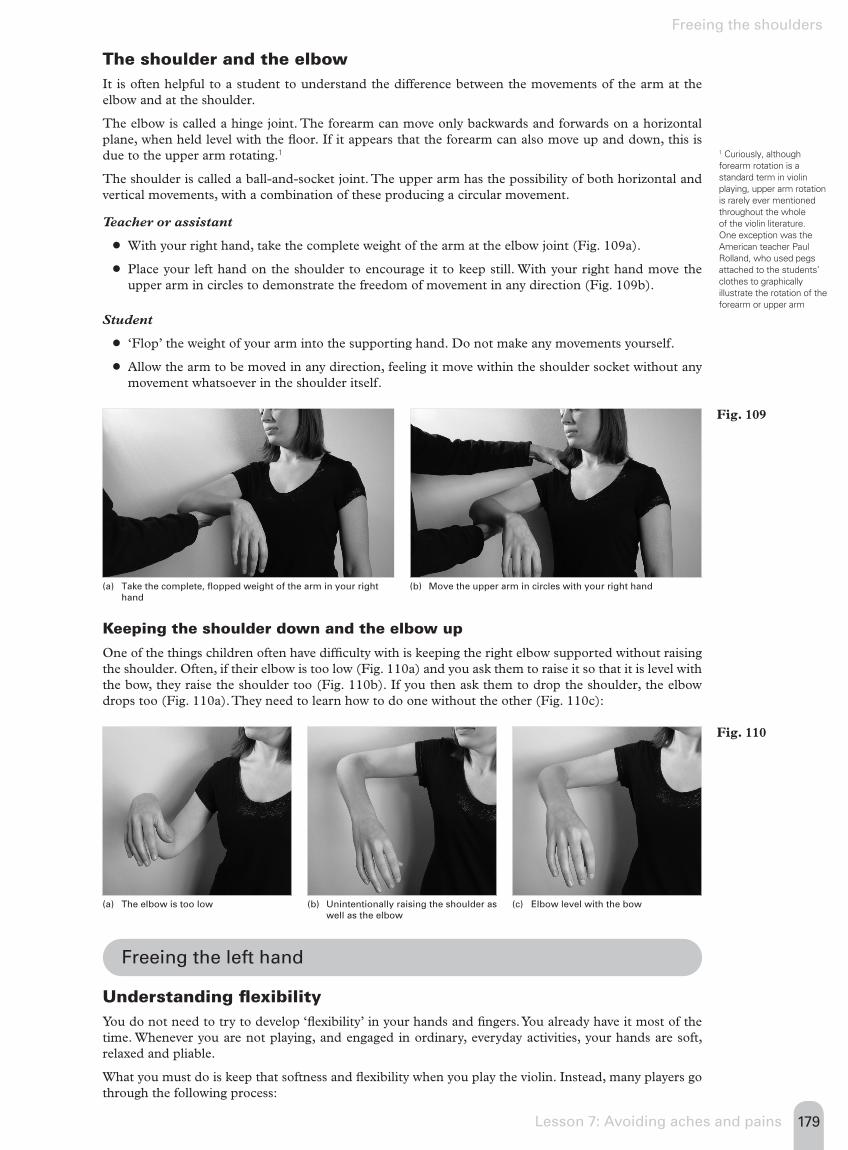
The shoulder and the elbowIt is often helpful to a student to understand the difference between the movements of the arm at the elbow and at the shoulder.
The elbow is called a hinge joint. The forearm can move only backwards and forwards on a horizontal plane, when held level with the floor. If it appears that the forearm can also move up and down, this is due to the upper arm rotating.1
The shoulder is called a ball-and-socket joint. The upper arm has the possibility of both horizontal and vertical movements, with a combination of these producing a circular movement.
Teacher or assistant
��With your right hand, take the complete weight of the arm at the elbow joint (Fig. 109a).
��Place your left hand on the shoulder to encourage it to keep still. With your right hand move the upper arm in circles to demonstrate the freedom of movement in any direction (Fig. 109b).
Student
��‘Flop’ the weight of your arm into the supporting hand. Do not make any movements yourself.
��Allow the arm to be moved in any direction, feeling it move within the shoulder socket without any movement whatsoever in the shoulder itself.
����� ��������� ������������������������� �������������hand
(b) Move the upper arm in circles with your right hand
Fig. 109
Keeping the shoulder down and the elbow up
One of the things children often have difficulty with is keeping the right elbow supported without raising the shoulder. Often, if their elbow is too low (Fig. 110a) and you ask them to raise it so that it is level with the bow, they raise the shoulder too (Fig. 110b). If you then ask them to drop the shoulder, the elbow drops too (Fig. 110a). They need to learn how to do one without the other (Fig. 110c):
(a) The elbow is too low (b) Unintentionally raising the shoulder as well as the elbow
(c) Elbow level with the bow
Fig. 110
Freeing the left hand
Understanding flexibilityYou do not need to try to develop ‘flexibility’ in your hands and fingers. You already have it most of the time. Whenever you are not playing, and engaged in ordinary, everyday activities, your hands are soft, relaxed and pliable.
What you must do is keep that softness and flexibility when you play the violin. Instead, many players go through the following process:
1 Curiously, although ������������������standard term in violin playing, upper arm rotation is rarely ever mentioned throughout the whole � ��������������������One exception was the American teacher Paul Rolland, who used pegs attached to the students’ clothes to graphically ���������������������� ����� �������������������
180 Lesson 7: Avoiding aches and pains
Freeing the left hand
1 Before you pick up the violin and bow, your hands and fingers are soft and flexible, i.e. no muscles in the hands or fingers are in a constant state of contraction.
2 Every time you are just about to play, first you tighten (i.e. contract) the muscles in your hands, fingers, wrists and arms, so that they feel hard and inflexible.
3 You spend many years doing relaxation exercises on the violin, forever trying to build freedom and ease, relaxation and release into your technique and general playing.
Instead of this, why not miss out stages 2 and 3? Your hands are soft and pliable before you pick up the instrument; keep them like that as you go to pick up the violin and bow; then keep them soft and pliable as you move your fingers around the fingerboard and manipulate the bow.
Q But aren’t children’s ��������������������� ����������!���������������� ������������
�����������������������"������������������������������������������������
����������#����������������������������������������������������������������
���������������������������!��������������������
The ‘build-up of tension over the years’ is often an illusion. Tension may feel the same as it did last week and be in the same place, but it is not the same tension. It is more that over the years you build up a long history of being in the habit of contracting certain muscles, i.e. tensing them.
We tend to think: “There is that tight feeling again that is always there,” as though it is the same tension that we had last time and now have to deal with again. In fact contracting the muscles, or allowing them to release and lengthen, is something that happens in the present, in the here-and-now.
Most children do not naturally and automatically hold the bow without tension, or move their fingers on the strings without tension. You can prove this with a simple experiment.
��Ask a young child to stand, without the bow, with their right hand relaxed and ‘floppy’. Very slowly bring a bow towards their hand: in almost every case they will stiffen their hand and fingers (contract the muscles) in preparation as the bow approaches their hand.
��You can do the same thing with their left hand. Ask them to stand with the violin under the chin, but the left hand down and away from the neck of the violin. Make sure their hand is completely soft. As they move their hand towards playing position, notice how in most cases the hand tightens on the way to the neck and arrives in a state of hardness; and that is before they have pressed the string down too hard and counter-pressed with the thumb, which causes even more tension.
As an adult, the difference is that you have self-motivation and will-power at your command, and can guide yourself to the desired result quickly.
Continual moments of release
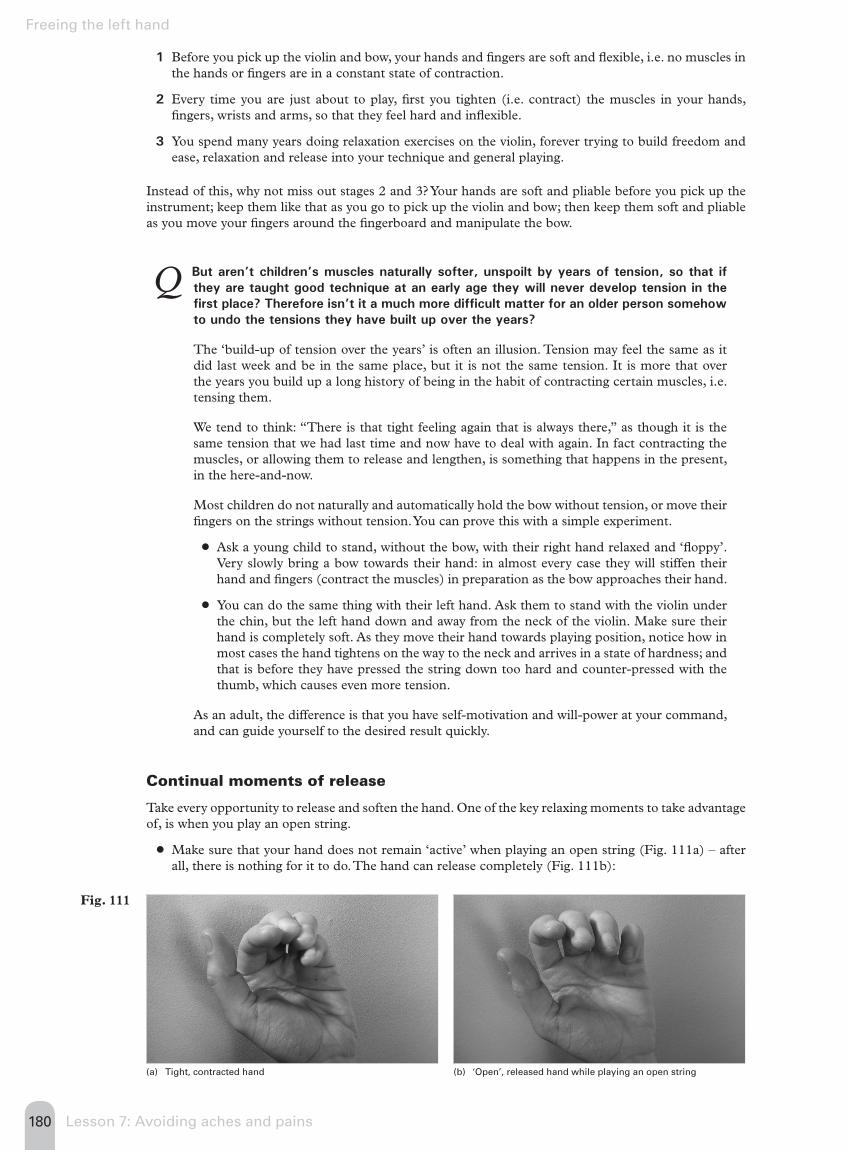
Take every opportunity to release and soften the hand. One of the key relaxing moments to take advantage of, is when you play an open string.
��Make sure that your hand does not remain ‘active’ when playing an open string (Fig. 111a) – after all, there is nothing for it to do. The hand can release completely (Fig. 111b):
(a) Tight, contracted hand (b) ‘Open’, released hand while playing an open string
Fig. 111
249Lesson 10: The vibrato lesson
The vibrato lesson lesson
String players have used vibrato since the earliest times. In 1756 Leopold Mozart’s instructions for playing his first ‘division’ of the bow included to use vibrato:1
For if we strike a slack string or a bell sharply, we hear after the stroke a certain wave-like undulation (ondeggiamento) of the struck note. And this trembling after-sound is called tremolo…Take pains to imitate this natural quivering on the violin, when the finger is pressed strongly down on the string, and one makes a small movement with the whole hand; which however must not move sideways but forwards toward the bridge and backward towards the scroll.
The German violinist Louis Spohr (1784–1859), speaking about vibrato in his Violin School (1831), does not mention changing the width of vibrato, which ‘should only be slight, in order that the deviation from purity of tone [intonation] may scarcely be observed by the ear’.
But he lists four chief speeds of ‘tremolo’: ‘The quick tremolo is indicated , the slow , the gradually accelerating , and the gradually slackening .’ Spohr used vibrato only on selected long or important notes, and marked these symbols over the notes in the music.
A picture of the general use of vibrato in 1908 was given by the Scottish violinist and teacher James Winram.
There should be no close shake [vibrato] in exercises or scales, other than melodic exercises, and it should be judiciously used at all times, as it is quite possible to have too much of a good thing. Beethoven’s music will sound lovely with very little close shake, or if preferred with none at all; whereas Wagner’s will gain rather than lose by its introduction. The character of the music must be taken into consideration, and good taste will surely be a sufficient guide. There are many who contend that the close shake should never be used, but when we consider that the world’s greatest violinists all use it more or less, it surely must have some virtue.2
What should vibrato sound like?
Speed and widthThe two main factors of vibrato are speed and width. By varying only these, without doing anything else, you can already produce a great variety of different colours.
Then, once you add different degrees of finger pressure, different areas of the fingertip or pad, or different degrees of speed within the vibrato (the forward movement of the vibrato is faster than the backward movement, i.e. you stay on the principal note longer) an infinite range of colour contrast opens up.
Q $�����������������!��$������������������!�
You cannot say exactly how vibrato should sound, since no two are the same.3 However, we can hear in the vibrato of the great players that what they have in common is the ability to play a vibrato that is 1) very narrow, and 2) very fast. Of course this is not always musically required, and it is no good if the vibrato sounds ‘nervous’ or neurotic; but still, even the basic, middle-of-the-road vibrato of top players, before they add intensity, is never slow.
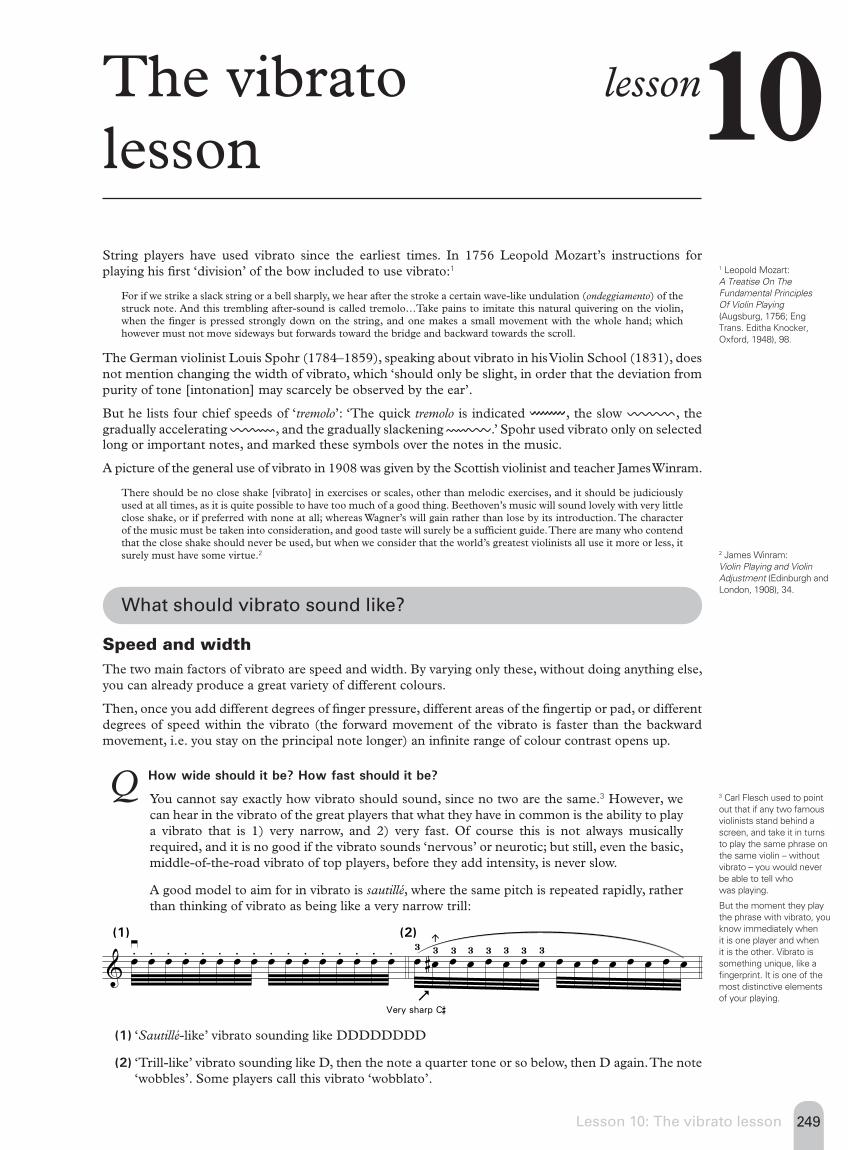
A good model to aim for in vibrato is sautillé, where the same pitch is repeated rapidly, rather than thinking of vibrato as being like a very narrow trill:
&œ.≥
œ. œ. œ. œ. œ. œ. œ. œ. œ. œ. œ. œ. œ. œ. œ.
����������+
��� ���
œ
œ#
�
�
œ
œ
œ
œ
œ
œ
œ œ œ œ œ œ œ œ
(1) ‘Sautillé-like’ vibrato sounding like DDDDDDDD
(2) ‘Trill-like’ vibrato sounding like D, then the note a quarter tone or so below, then D again. The note ‘wobbles’. Some players call this vibrato ‘wobblato’.
10
1 Leopold Mozart: A Treatise On The Fundamental Principles Of Violin Playing (Augsburg, 1756; Eng Trans. Editha Knocker, 0< �����%*=&/��*&�
2 James Winram: Violin Playing and Violin Adjustment (Edinburgh and London, 1908), 34.
3 Carl Flesch used to point ��������� �������� ������violinists stand behind a screen, and take it in turns to play the same phrase on the same violin – without vibrato – you would never be able to tell who was playing.
But the moment they play the phrase with vibrato, you know immediately when it is one player and when it is the other. Vibrato is something unique, like a ���������"�������� �����most distinctive elements � ������������

250 Lesson 10: The vibrato lesson
What should vibrato sound like?
Four basic groups There are four basic groups of vibrato. Elements of all the groups can be found in each player, of course, since nobody has only one vibrato that they use whatever the composer, the phrase, the notes, or the particular finger; but dividing into these groups serves as a useful starting-point for understanding vibrato.
Each of the following examples represents one legato whole-note (semibreve); the note-values represent the movement of the finger as it rocks backwards and forwards on the string in vibrato.
Group 1
This is a vibrato that you can rarely use because it makes it sound as though you are playing out of tune.
In this vibrato, the finger moves around the principal note, above and below it, i.e. moving between a pitch fractionally sharper and one fractionally flatter than the principal note:
&œ�
œ�
�
œ��
œ� œ� œ� œ� œ� œ� œ� œ� œ� œ� œ� œ� œ�
��������
�����
��������
�� ������������
��������
�� ������������
����
�����
The problem with this vibrato is that the audience’s ear catches the upper pitch of a vibrato rather than the lower pitch, and thinks that it is the principal note. So playing, say, D=, which should ordinarily be in tune with the open D, it comes out sounding as though you are playing sharp, even if the finger actually stopping the note is exactly in tune.
Therefore, the rocking movement of the finger should not go above the pitch of the principal note. To an extent you can get away with the sharpening effect of this vibrato when playing sharps or flats because there is often a range of tunings for these notes, sharper or flatter, which are all still in tune.
The test that proved the wrong result
It is often believed that vibrato takes the finger both above and below the pitch of the principal note. There is a story, perhaps apocryphal, that one reason for the myth continuing to flourish is because of a test done in the early 1960s.
Apparently, an experiment was set up using an oscilloscope – a scientific device that looks a bit like a small television screen. When a sound is played into the machine, patterns and sequences of moving lines form on the screen representing that sound.
This experiment satisfactorily proved that the pitch of the vibrato did indeed go above and below the principal note. The only trouble was that they used an operatic bass singer for the test – not a violinist or other string player – and this singer had a vibrato that was about a major second wide. The actual note was somewhere in the middle of it.
This myth persists to the present day. In a recent book on violin technique (1998) the author states the incorrect perception clearly and says: “The width of a vibrato movement should be the same below and above the basic notes.”
Yet there is no doubt that if you vibrate sharp of the note, it will sound as though you are playing sharp. You only have to stop and listen to an in-tune note played without vibrato, and then with vibrato, to know that the vibrato cannot go above the principal note.
Group 2
In this vibrato, the finger rocks between the principal note, and the same note fractionally flattened:
&œ�
œ�
�
œ��
œ� œ� œ� œ� œ� œ� œ� œ� œ� œ� œ� œ� œ�
��������
�����
��������
�� ������������
��������������
������������ ��
�������
����
While clearly better than the too-sharp intonation that the previous vibrato causes, this is still not a vibrato that you can use often. It may sound too ‘wobbly’, because the lower pitch of the rocking movement is as audible as the pitch of the principal note. This is because the rhythm of the forwards and backwards vibrato movement is even, not a dotted movement – see Group 3.
279Lesson 11: Improving key bow strokes
I never know how to start a note
Leading with the vibrato
When you play any sort of accent with the bow, it is usually desirable to make a vibrato accent at the same time; and to feel the start of the vibrato as an impulse that launches the bow.1
Then there is a feeling of the two hands working together as one. You forget about the bow and focus only on the vibrato, and the bow stroke takes care of itself.
In the same way, you can feel the placing of the bow on the string at the point, and the beginning of the vibrato, as if they are one thing.
��Get ready to start by hovering the point of the bow half a centimetre above the string.
��Forget about placing the bow on the string and focus only on beginning the vibrato, and allow the bow to take care of itself and place itself on the string perfectly.
Practising it
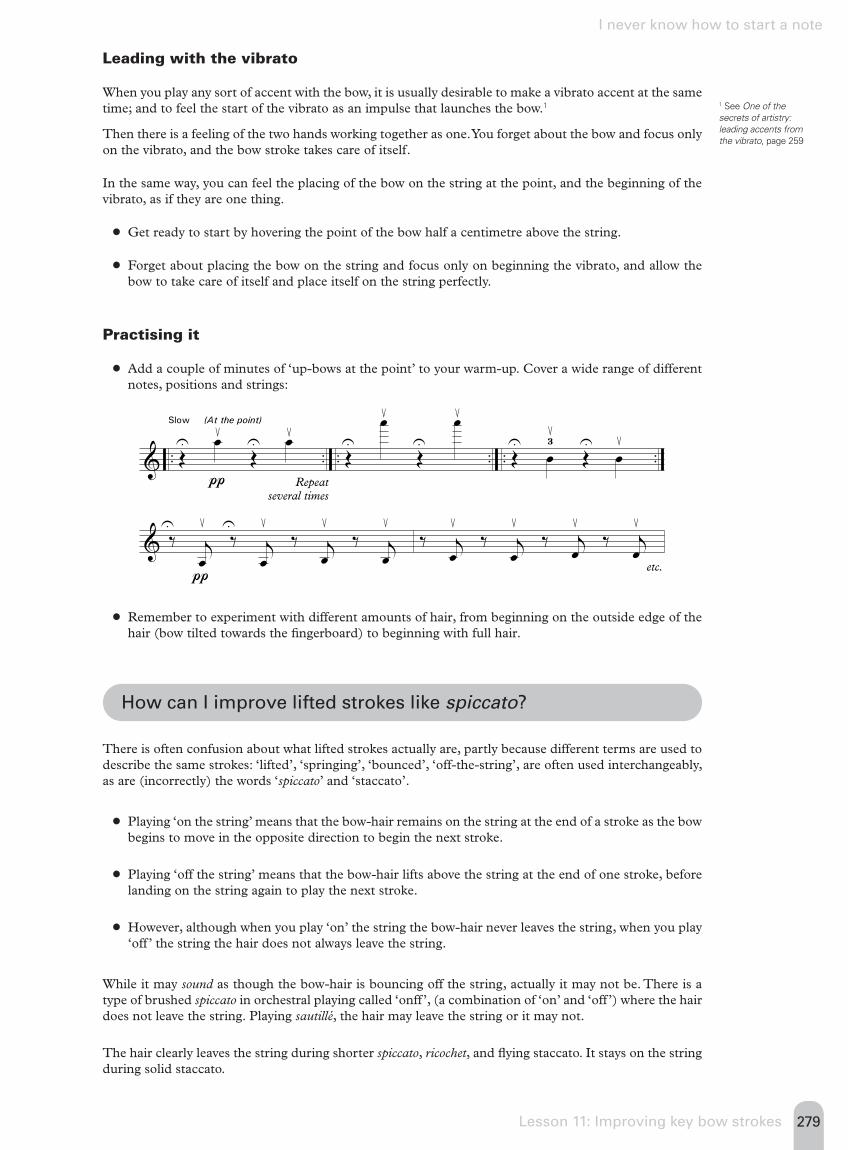
��Add a couple of minutes of ‘up-bows at the point’ to your warm-up. Cover a wide range of different notes, positions and strings:
& .. .. .. .. .. ..ŒU
œ≤ŒU
ϲ
π
ŒU
ϲ
ŒU
ϲ
ŒU
œ
≤
ŒU
ϲ
& ‰U
jœ
≤‰U
jœ
≤‰ j
œ
≤‰ j
œ
≤
π
‰ jœ
≤‰ j
œ
≤‰ j
œ
≤‰ j
œ
≤
etc.
������������
Repeatseveral times
����
��Remember to experiment with different amounts of hair, from beginning on the outside edge of the hair (bow tilted towards the fingerboard) to beginning with full hair.
How can I improve lifted strokes like spiccato?
There is often confusion about what lifted strokes actually are, partly because different terms are used to describe the same strokes: ‘lifted’, ‘springing’, ‘bounced’, ‘off-the-string’, are often used interchangeably, as are (incorrectly) the words ‘spiccato’ and ‘staccato’.
��Playing ‘on the string’ means that the bow-hair remains on the string at the end of a stroke as the bow begins to move in the opposite direction to begin the next stroke.
��Playing ‘off the string’ means that the bow-hair lifts above the string at the end of one stroke, before landing on the string again to play the next stroke.
��However, although when you play ‘on’ the string the bow-hair never leaves the string, when you play ‘off ’ the string the hair does not always leave the string.
While it may sound as though the bow-hair is bouncing off the string, actually it may not be. There is a type of brushed spiccato in orchestral playing called ‘onff ’, (a combination of ‘on’ and ‘off ’) where the hair does not leave the string. Playing sautillé, the hair may leave the string or it may not.
The hair clearly leaves the string during shorter spiccato, ricochet, and flying staccato. It stays on the string during solid staccato.
1 See One of the secrets of artistry: leading accents from the vibrato, page 259
280 Lesson 11: Improving key bow strokes
How can I improve lifted strokes like spiccato?
The bow wants to bounce
Bounced strokes are more natural than sustained strokes
Many players have a thought at the back of their mind that bounced strokes like spiccato are more difficult or complicated than playing on (along) the string.
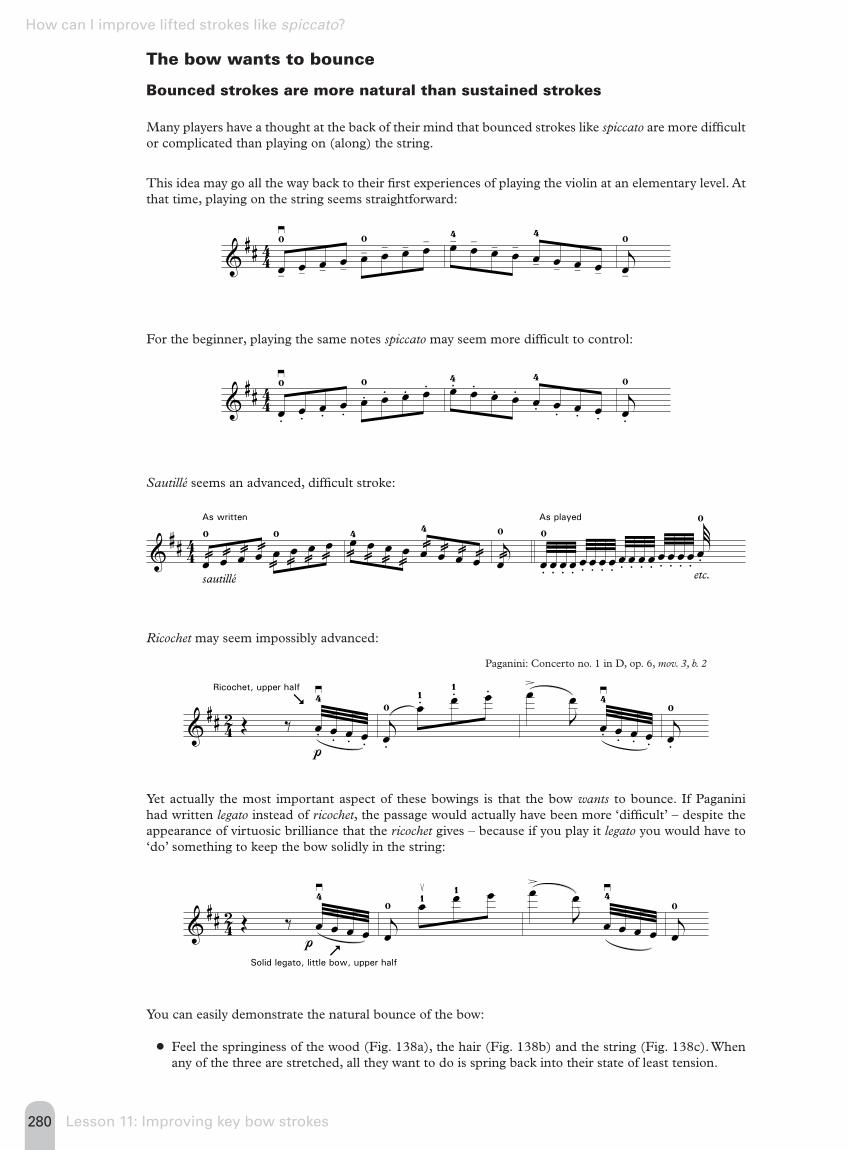
This idea may go all the way back to their first experiences of playing the violin at an elementary level. At that time, playing on the string seems straightforward:
&## 44œ-
≥
œ-œ- œ-
œ-
œ- œ- œ- œ-
œ- œ- œ- œ-
œ- œ- œ-jœ-
For the beginner, playing the same notes spiccato may seem more difficult to control:
&## 44œ
≥
.œ.œ.œ.œ
. œ. œ. œ. œ. œ. œ. œ. œ
. œ. œ. œ.
jœ
.
Sautillé seems an advanced, difficult stroke:
&## 44œ
@ œ@ œ@ œ@ œ
@œ@œ@œ@
��������
sautillé
œ
@œ@œ@œ@œ
@ œ@ œ@ œ@jœ
@ œ.
œ. œ. œ.œ. œ. œ. œ.
œ. œ. œ. œ.œ.œ.œ.œ.
j˚
œ.
����� ��
etc.
Ricochet may seem impossibly advanced:
&## 42 Œ ‰ œ
≥
.
�
œ. œ. œ.
������������ ����
p
jœ.
œ. œ.
œ. œ>
Jœ
œ
≥
. œ. œ. œ.jœ.
Yet actually the most important aspect of these bowings is that the bow wants to bounce. If Paganini had written legato instead of ricochet, the passage would actually have been more ‘difficult’ – despite the appearance of virtuosic brilliance that the ricochet gives – because if you play it legato you would have to ‘do’ something to keep the bow solidly in the string:
&## 42 Œ ‰ œ
≥
œ œ
�
œ
������������������� �������������
pjœ
œ≤ œ œ œ
>
Jœ
œ
≥
œ œ œjœ
You can easily demonstrate the natural bounce of the bow:
��Feel the springiness of the wood (Fig. 138a), the hair (Fig. 138b) and the string (Fig. 138c). When any of the three are stretched, all they want to do is spring back into their state of least tension.
Paganini: Concerto no. 1 in D, op. 6, mov. 3, b. 2
301Lesson 12: Background essentials 3
Background lesson
essentials 3
Scales and arpeggios
Why practise scales?Putting off practising scales as a student
It took me a long time to realise how beneficial it is to be able to play scales and arpeggios as well as if they were part of a concert performance of a concerto, sonata or concert piece. Like most students I always used to put off practising them. Whereas you cannot get away with missing something like your school homework, if you have not practised your scales it is undetectable, especially if you are rarely asked to play them in the violin lesson. So it was all-too-easy to put off practising scales, and of course weeks soon turn into months, which then quickly turn into years.
There were scales in the regular examinations, but like many students I would always leave practising them until the last minute, until I no longer had any choice and simply had to. The scale practice would peak on the day of the exam, and then stop until the next time when again there would no longer be any choice. Then once you have finished studying, nobody ever asks you to play a scale again.
My first ten years of playing and teaching
After I had stopped studying I continued all the work on basic mechanics I had done as a student, i.e. exercises for tone production, shifting, string crossing, intonation, and so on. As part of that work, once or twice a year I would go through a brief phase of practising scales. Each time I was pleased to see that they had improved a lot since the last time, without having practised them at all in-between.
I would find I could play a scale in thirds more in tune, faster, and with a more relaxed hand, than ever before; but all I had done was practise exercises in thirds. Four-octave scales would be far easier than before, but only because I had practised shifting exercises and finger patterns at the top of the G string.
As a teacher at that time I would rarely ask a student to play a scale either. I reasoned that since the scale was made up of specific elements, e.g. moving the fingers freely, changing position lightly and inaudibly, smooth string-crossing, and so on, it made more sense to work on those things directly rather than in a scale – after all, if the student had problems shifting, or had stiff fingers or did not play with a singing tone, how could they play a scale well if it was itself made up of those elements?
So I would work with them on basic technique and only work on scales around the time of their scale exams. Again, I was always pleased with their progress and would marvel at how their scale-playing would improve. The scales always got better on their own. Later, I was delighted to discover that Dounis had had exactly the same approach, and also preferred working on the elements of the scales rather than on the scales themselves.
Getting the best of both worlds
Another support for this approach to scales was that although some players or teachers saw scales as the cornerstone of technique, others doubted whether there was any point in playing them at all.1 So by not practising them, but by improving them anyway, I thought that I was getting the best of both worlds.
There was also the point that even great violinists would not necessarily be excellent at playing scales. In a famous story about Henryk Szeryng going to play to Jascha Heifetz, he turned up to the lesson ready to play a selection of big concertos. But Heifetz was not interested in hearing any of them. First he wanted to hear a three-octave scale. That was the real test.
When I was a student, a friend who had recently won an international competition said to me, ‘If you ask me to play the Brahms Concerto to you I would be perfectly happy; if you asked me to play a three-octave scale in C major I would fall flat on my face!’ She is an excellent violinist, I reasoned; so if I don’t practise my scales it does not mean my career need suffer either.
12
1 I once asked the Austrian pianist �� ����?������������@����heard him play a late Schubert piano sonata ������������ �U&�����superb technical control, how he kept his technique in such excellent condition. Did he practise scales and exercises? No, he said, he had never played scales or exercises ����������� ���Z��practised everything ������������� ������ ����������������������������������make the music sound as he wanted it to, and all the technique came ���������
The Israeli pianist Daniel Barenboim says that practising scales �����������#��� ���you since when you come to a scale in a piece you might play @�����������������������music.
$?�������������� ����� �inner musical tensions and resolutions. I’d bet the same people who ���������������������� ��������������probably play in the same unmusical way, ���� ������������practise scales!)
302 Lesson 12: Background essentials 3
Scales and arpeggios
Exercises–scales–studies–pieces
Finally I began to realise how good it is to practise scales and arpeggios themselves. After all the building work of practising the elements – shifting, intonation, string crossing and so on – the next step is to practise scales and connect everything into a streamlined whole. There is simply nothing to replace what regular scale-practice brings.
All the previous ideas about saving time by practising the elements separately are obviously correct, but what I had not fully realised was the benefit that comes into the whole of your playing when you do practise scales regularly. Practising scales in the same key as the piece you are playing is also one of the best ways to improve overall intonation in the piece, and the evenness of all the playing quickly increases.1
How is a scale when it is played well?While part of the art of scale-playing is to play them musically, at the same time the most important goal is machine-like evenness and regularity. When a scale is played well the three main pillars of music – pitch, sound and rhythm – are all completely even:
��The intonation is even, the same note-names not sharper or flatter in different octaves. The notes are evenly spaced, e.g. in the major scale the whole tone from the first note to the second is not wider (aurally) than from the second note to the third.
��The sound is even. No note is louder or softer than its neighbour, and remains even in tone for however long each note lasts.
��The rhythm is even.
Be extra careful to maintain evenness of tone and rhythm at three crucial places:
1 Before or after a change of bow
2 Before or after a change of string
3 Before or after a change of position.
The top of the E string, where the string becomes short and the bow has to sit close to the bridge (though not too heavily), requires great evenness of bowing.
Extra factors that make rhythm uneven are fingers not being ready for the new string,2 and fingers lifting off too soon when descending.3
Yfrah Neaman used to say that the ideal in melodic playing would be to play on one string, in one position, with one finger, and with one long bow that never comes to an end. Then playing the violin would be like singing, where all that the singer has to do to create a long, seamless line is one thing: exhale.
Playing the same long, seamless line on the violin is more difficult because the line is so easily broken up into little, unmusical bits by all the constant changes that happen – changes of string, position, finger and bow direction.
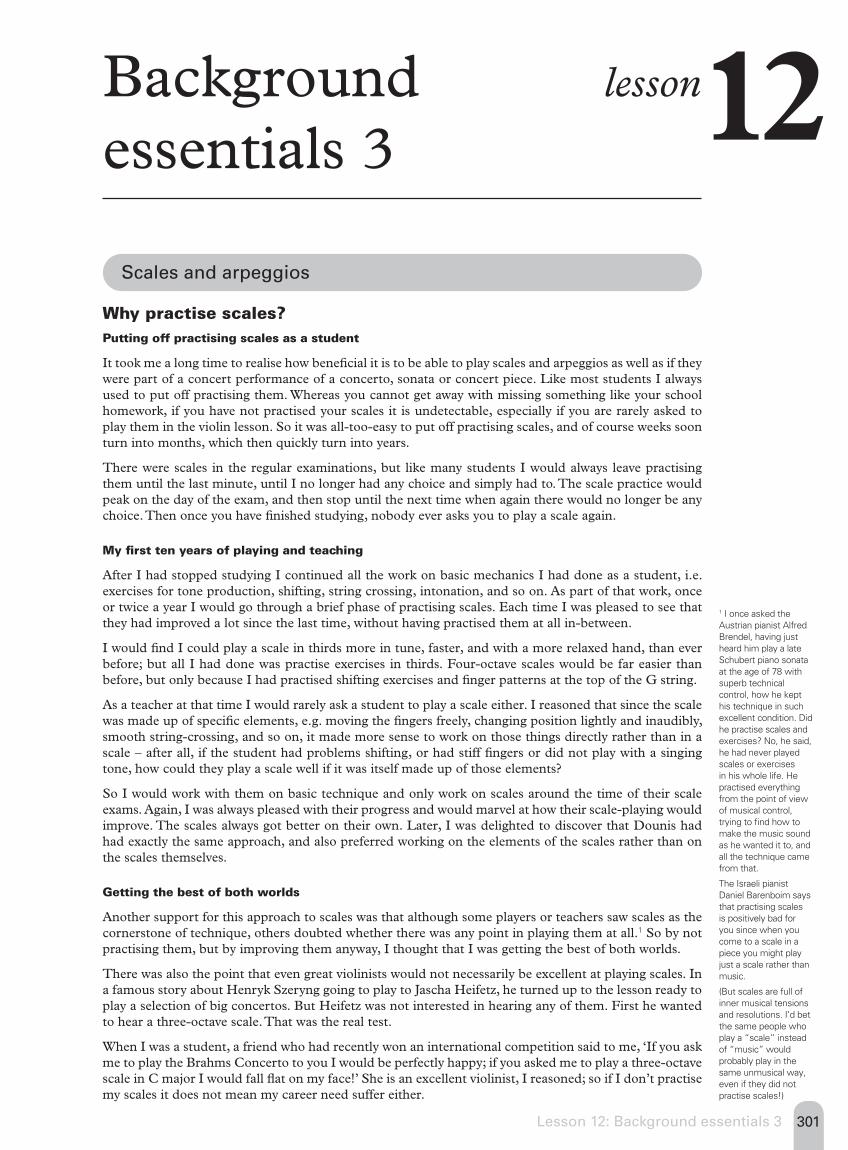
Practising the elements of the scaleHolding down the first and fourth fingers
��Keep the first finger down on the string all the way up to the top of the scale and back down again to the end. The only time you need to lift the first finger is to place it on the next string.
��Ascending, hold down the fourth finger while playing the first finger on the new string.
&###43
œ
œ œ œ
œ
œ œ œ
œ
œ œ
œ œ œ
œ œ œ œ
œ
œ
œ
&###œ
œ œ œ œ œ�
¿
œ œ œ œ œ œ
¿
œ
œ œ
œ œ œ
œ
œ œ œ
���������� ����������������� �����
1�0��� �David Oistrakh’s last concerts
in London was a ��� �������� �����
Beethoven concerto in the Royal Albert Hall.
��������������������at 1.00, but Oistrakh
��������������� ������������� ������
��������������������octave scales and
arpeggios. He wanted to play the concerto in tune, which is not
necessarily easy even ��������������������
his level.
2 See Finger preparation: the secret
of legato, page 145
3 See No. 5, page 219
303Lesson 12: Background essentials 3
Scales and arpeggios
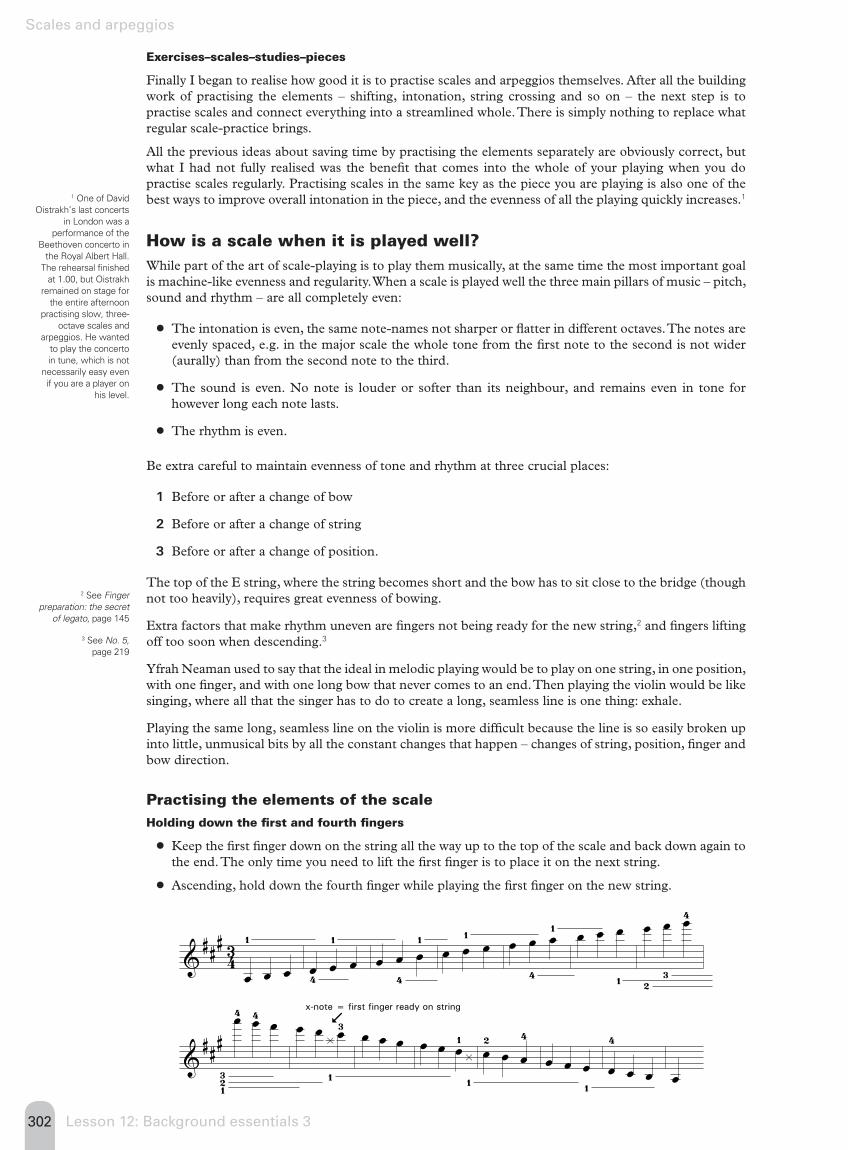
Holding down the fourth is called overlapping. As well as helping to bind the string crossing together smoothly and seamlessly, holding down the fourth also helps in keeping the fingers above and close to the strings, curing any habit of raising them too high or too far away from the neck.
Double stopping string crossing is good for both hands
Make scales both feel and sound very smooth by double stopping the string crossings. This forces the left fingers to prepare, and the bow to move early to the next string – instead of it moving too suddenly and ‘bumping’ on to the string:
& 43œ
≥
œ œœ
œ
œ œ œœ
œ
œ œ œ œ œœ
œ œ œ œ œ
œ œ œ
&
œ œ œ œ œ œ œ œœ
œ œ œ œ œ œ œœ
œ
œ œ œœ
œ
œ .˙
Double stopping the string crossings in arpeggios is helpful for the same reasons. However, it may cause intonation problems if you make the resulting intervals in tune as double stops: the tuning of a note played on its own is often different from how it would be tuned if played as part of a double stop.1
��Tune the notes the same as you would in the normal arpeggio:
&###43
œ
≥
œ
≤
œœ
œ
≥
ϲ
œœ
�
œ≥ œ
≤
ϳ
œœ�
ϲ ϳ
&###œ≤ œ
≥
ϲ
ϳ ϲ
œœ
ϳ
œ
≤
œœ
œ
≥
œœ
œ
≤
œ
≥
������������
������������
In this example none of the double stops are a possible problem except the ones marked in the first line. If the ‘third tones’ of these major thirds were to be in tune, the C+’s would have to be played very low; but that same low pitch for the C+, played on its own in the arpeggio, would sound much too flat and the arpeggios would seem dull and lacking brilliance.
Half of forty-eight is twenty-four: the mumble strategy
The educational reformer John Holt used to show how children use all kinds of tricks and strategies, in the classroom, in their efforts to please their teachers or to stay out of trouble if they do not know something. In How Children Fail he tells a story about Emily, aged nine:
The question arose the other day, ‘What is half of forty-eight?’ In the tiniest whisper she said, ‘Twenty-four’. I asked her to repeat it. She said, loudly, ‘I said,’ then whispered ‘twenty-four’. I asked her to repeat it again, because many couldn’t hear her. Her face showing tension, she said, very loudly, ‘I said that one-half of forty-eight is…’ and then, very softly, ‘twenty-four.’ Still, not many of the students heard. She said, indignantly, ‘O.K., I’ll shout.’ I said that that would be fine. She shouted, in a self-righteous tone, ‘The question is, what is half of forty-eight. Right?’ I agreed. And once again, in a voice scarcely above a whisper, she said, ‘Twenty-four.’ I could not convince her that she had shouted the question but not the answer.
Of course, this is a strategy that often pays off. A teacher who asks a question is tuned to the right answer, ready to hear it, eager to hear it, since it will tell him that his teaching is good and that he can go on to the next topic. He will assume that anything that sounds close to the right answer is meant to be the right answer. So, for a student who is not sure of the answer, a mumble may be his best bet. If he’s not sure whether something is spelled with an a or an o, he writes a letter that could be either one of them.
The mumble strategy is particularly effective in language classes…2
1 See The difference between single-stop and double-stop tuning, page 90
2 John Holt: How Children Fail, (1964)
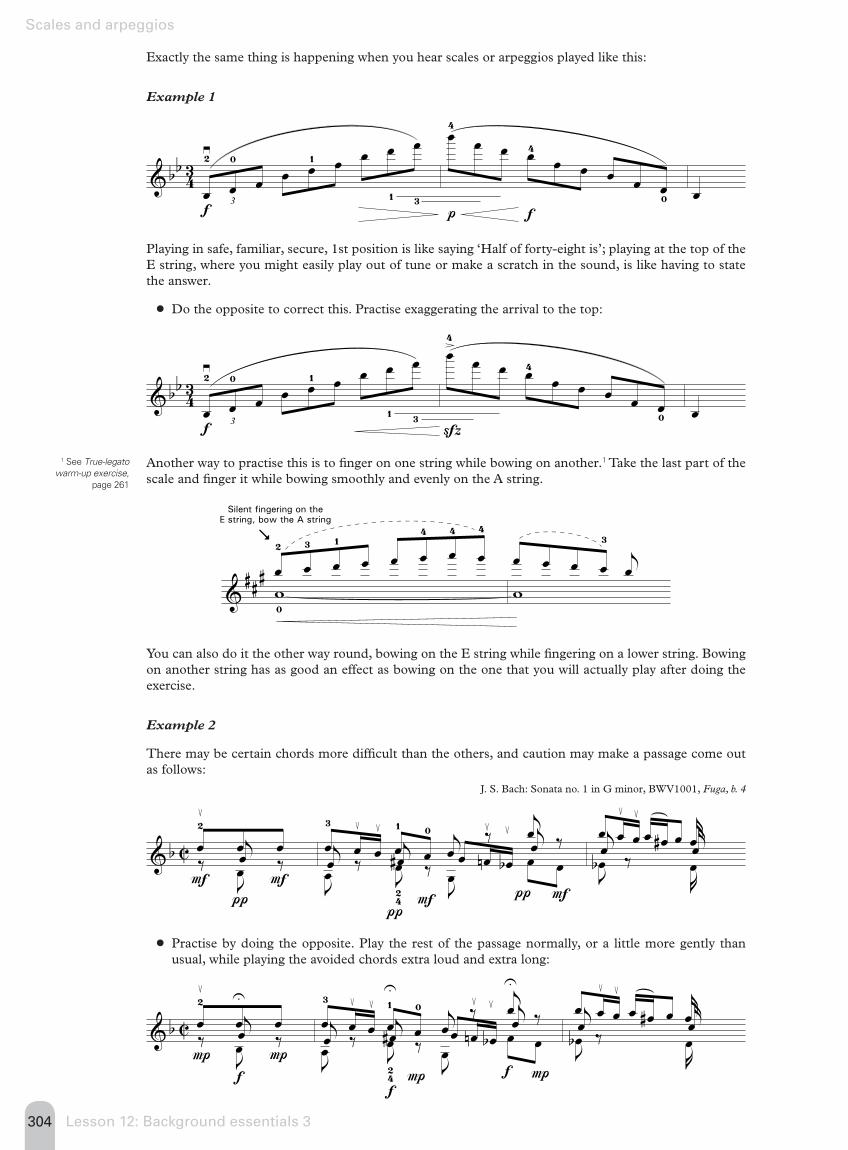
304 Lesson 12: Background essentials 3
Scales and arpeggios
Exactly the same thing is happening when you hear scales or arpeggios played like this:
Example 1
& bb 43
3œ
≥
œ
œ œ œ œ œ œ
œ
f
œ
œ œ œ œ œ œ œ œ
fpœ
Playing in safe, familiar, secure, 1st position is like saying ‘Half of forty-eight is’; playing at the top of the E string, where you might easily play out of tune or make a scratch in the sound, is like having to state the answer.
��Do the opposite to correct this. Practise exaggerating the arrival to the top:
& bb 43
3œ
≥
œ
œ œ œ œ œ œ
œ
f
œ>
œ œ œ œ œ œ œ œ
ߜ
Another way to practise this is to finger on one string while bowing on another.1 Take the last part of the scale and finger it while bowing smoothly and evenly on the A string.
&### œ
�
œ
œ
œ œ œ
œ
œ
w
œ œ œ œ
jœ
w
������������������ �
�������������� ���������
You can also do it the other way round, bowing on the E string while fingering on a lower string. Bowing on another string has as good an effect as bowing on the one that you will actually play after doing the exercise.
Example 2
There may be certain chords more difficult than the others, and caution may make a passage come out as follows:
& b Cœ
≤
œ œ‰
jœ ‰Jœ
Fπ
F
œ
ϲ
ϲ
œ
œ
jœ
‰jœ ‰j
œ ‰jœ# ‰
œ œn
≤
œb
≤ jœ
Jœ J
œ
Jœ
œ œ
πF π F
œ œ≤
ϲ
œ œ# œjœj
œ‰
jœ
Jœb
J�œ
��Practise by doing the opposite. Play the rest of the passage normally, or a little more gently than usual, while playing the avoided chords extra loud and extra long:
& b Cœ
≤
œ
U
œ‰
jœ ‰Jœ
fP P
œ
ϲ
ϲ
œ
U
œ
jœ‰
jœ
U
‰jœ ‰
jœ# ‰
œ œn
≤
œb
≤ jœ
Jœ J
œ
Jœ
œ œ
fP f P
œ œ≤
ϲ
œ œ# œjœj
œ‰
jœ
Jœb
J�œ
1 See True-legato warm-up exercise,
page 261
J. S. Bach: Sonata no. 1 in G minor, BWV1001, Fuga, b. 4

305Lesson 12: Background essentials 3
Scales and arpeggios
Chromatic scales
Slow and fast fingering
While there are many ways of fingering the chromatic scale up or down the E string, in 1st position there are two fingerings: the sliding fingering 1–1, 2–2, 3, 4, and the shifting fingering 1, 2, 1, 2, 3, 4:
&œ œ#
œ
œ#
œ
œ
œ#
œ
œ#
œ
œ#
œ#
œ
œ
œn
œn
œb
œ
œb
œ
œ
œb
œ
œb
jœ
����������
���������
While the sliding fingering is sometimes seen as old-fashioned and the shifting fingering modern, it may be better to call them the slow and the fast fingering. 1–1, 2–2 is more melodic and expressive, and 1, 2, 1, 2 more mechanical and functional.
Example 1
& 44 .. ..
œ œ# œ
œb
œn
œ
œb
œ
œ
œb
œ
œb
œn œ# œn œb œn œ œb œ œ œb œ œb««
����������
���������
If played prestissimo, passages like this feel awkward with the slow fingering.
Example 2
&## c
œ#
≤
œ œb œn œ# œ œ œ# œ œ# œ œn œ# œ œb œn œn œ# œn œ# œ œ#
jœœœ
≤
F
Even a passage as fast as this may be played with the slow fingering, which offers an alternative range of expression to the more straightforward, functional (though equally effective) 1–2–1–2 fingering.
Keeping the thumb in one place
In the fingering 1–2–1–2 the thumb should not change its position on the neck of the violin. Playing the first-finger G+ and second-finger A, the hand is in half position; playing first-finger B- the hand is now in 2nd position; playing second-finger B= the hand is in 1st position again. Keep the thumb in one place so that the hand stays in 1st position throughout. Otherwise the hand can lose its orientation and intonation suffers.
Practice method: missing out the second finger
The two most common fingerings for playing the chromatic scale up the E string are 12, 12, 12 and 123, 123, 123.
Coming down, the usual fingering is 321, 321, 321.
Many players find this 123 or 321 fingering uncomfortable because of the way the hand has to contract. After playing two semitones with this fingering, the first and third fingers are a tone apart in spacing. The usual feel in the fingers is of a minor or major third between the first and third fingers.
Tchaikovsky: Concerto in D, op. 35, mov. 1, b. 40
334
General indexA
Accent practice 116
Accents 208, 213, 215, 259, 269agogic 271playing early 220
Acoustic beat xvii, 57, 58
Acousticsdry and resonant 5
Alexander Technique 164, 173Alexander, F. M. 94inhibition, direction 199
Amplitude 2
Analogiescolour xviiiguitar 197harp 93, 146sport 100, 107, 122, 166, 200
Arm (left)angle of scroll 35hanging 142, 190violin position relative to
length xviii, 33, 117
Arm (right)actions, origins of 49balance 192bowing parallel to the bridge xvii,
14, 34, 102, 117, 118, 221, 227, 294
Eastern European, Flesch, Galamian 49
elbow, opening at 14, 120forwards, backwards 98, 118in and out 121levers 118, 193relaxing into the string 35scroll, correct height of 32shoulder and elbow,
movement at 179square 120suspending in air 169, 197, 276triangle 119violin position 117weight 49
Arpeggios 55, 217, 243finger preparation 146non-diminuendo 304octaves (double-stopped) 313Ševcík sequence 261single-finger 161, 235thinking ahead 112uniform intonation 56
Auer, Leopold 64bow hand 193bow hold 43, 45, 49feet, position of 195intonation 263tone, how to produce 48
B
Bach, C.P.E. 230
Back 30, 195
costal arch 176curve at top of 173lengthening xviii, 28, 29, 173mobility, hyper and hypo 192pain (lower back) 195playing from xix, 131pulling down 176twisting 177
Baillot, Pierre de Sales 328
Balance 89, 192
Barmas, Issay 49
Base joints (left) xiv, xviii, 137, 187moving fingers from 102, 152, 187,
221tension 165too far from neck 157widening xviii, 102, 133, 137, 174,
194, 197
Base joints (right)springiness 46widening 97
Basics exercises 105, 224 See Exercises
Bell, Joshua 174
Blind spots xvii, 58, 265
Bloch, Alexander 199
Blum, David 85
Bowangling to the bridge 24bow-hold or bow-grip xvdistance from bridge xvi, xviidivision 19drifting 24give at the heel and point xv, xix, 15,
19, 124hair 1, 265, 280–281, 295hair, acting on string 2lightness in upper half 46, 49momentum xix, 3, 13, 14,
165, 176, 223movement, horizontal and vertical
xvii, xix, 3, 13, 21, 125–126, 293over-pressing 248playing into wood in upper half 16shaking 194, 323springiness of stick xix, 7, 126,
280, 281stickers 120tilt 37, 213, 264wood, playing into xvii, 126wood, scraping on string 265
Bow change 50
Bow holdbalancing 43, 44bow-hold or bow-grip 43climbing up the bow 43contact-points of fingers 41, 42creases 41, 43fingers, distribution of 39fingers, movement at
heel 263, 264, 266fingers, natural spacing 38first finger See First finger (right)
fist bow-hold 264, 282–283flexibility 44, 51fourth finger
See Fourth finger (right)heel and point position 42leverage 37, 213second finger
See Second finger (right)springiness 50supination, pronation 37–39, 42, 44,
46, 47, 52, 99, 123third finger
See Third Finger (right)thumb See Thumb (right)
Bowingbalance, starting from 276changing bow 22, 102, 112, 128, 263circular movement 128curves 124, 284division 266hair-string contact 3, 14, 265length 6, 268scratch 273
Bow pressure 48, 267describing 9evenness 269excess 2, 84first-finger pressure 46avoiding 47
intonation 84, 248‘Pressure’ or ‘weight’? 3proportions xx, 6, 7, 8, 96, 271–272scratching 13, 19shifting, releasing during 234speed not pressure 3, 49string crossing 294string length 5string vibration 13–14upper half 46–47
Bow speedfaster in upper half 49increasing in middle of bow 14slower nearer bridge 5
Breathlessness 31
Brendel, Alfred 301
Brodsky, Vadim 332
Bronstein, Raphael 39, 71, 207
Bron, Zakhar 121
Brubeck, Dave 218
Bulge notes xvii, 270
Button 31
C
Campagnoli, Bartolmeo 18, 90, 240
Capet, Lucien 18third finger on bow 45
Carrington, Walter 164, 173, 178, 199
Casals, Pablo 103, 208dual-function notes 207dynamics, range of 208
335
gravitational attraction 63intonation 114expressive 63
pressure exercise 18scales tuning-method 85trills 225waves 209–210
Cause and effect xv
Chain reactions 164
Children 13, 93bow arm 119bow hold xxi, 43child prodigies 104elbow and shoulder 179fingertip, leading shifts from 234learning, speed of xvmeasuring xvmomentum, explaining 14muscles 180ring, listening to 4shift, listening 243single-finger scales 236tension 180, 256tones and semitones 80–81tricks and strategies 303vibrato 254, 256
Chin 28, 197chin rest 27, 28, 29–31placement on 98pressing the head into 176
position xviiitailpiece, relative to 117
Chords 49, 109, 297–300, 304, 311bow hold 37fist bow hold 264left-finger pressure 308pizzicato 320, 321, 322soundpoint, changing 6, 297–299timing 203
Chromatic 305
Classical shift See Shifting
Collar bone 27, 31, 164, 182
Collé 130, 284
Combination shift See Shifting
Command–response 105–107, 299
Concentration 325, 333
Co-ordination xviii, 113, 144fingertip, leading bow from 287pizzicato 148, 287practise method 320
prepared fingers 219rhythm 218separate bows 186sixths 312spiccato 203, 287
Costal arch 176–177, 195, 196
Counter-exercising 166
Counterpressure 164, 190, 278
D
Deaf spots See Blind spots
DeLay, Dorothy xvii, xix, 102acoustic beats 58Auer bow hold 45concentration 105concerts, attending 329double-stop tuning 92energy 213
Heifetz, playing faster than 111Heifetz warm-up exercise 155inspiration, playing with 230musical ideas, clarity of 206playing fast 109pressure exercise 18slow arrival speed 246‘time-consuming’ not ‘difficult’ 333trill exercise 152tuning method, scales 85
Détachébow arm 121bow hold, balancing not
gripping 44proportions 97, 271spiccato approach 285
Differential tone 90
Direction (and inhibition) 199
Dont, Jacob 152, 161, 327
Double contact, principle of 183
Double stopsfinger-spacing intervals 318fixed and moveable notes 91mobility exercises 310–311, 314thirds 83
Dounis, Dr D.C. xviipressure exercise 18scales 301shoulder (left) 178spiccato 285
Dynamics 208pitch 2
E
Ear tests 58–60
Effort 125, 133, 166, 198leverage 39–40, 40, 129minimum 94, 95, 111wrist (right) 184
Elbow (left) xix, 197 See also Upper arm (left)
getting stuck 143left, right 97, 99steering under violin 142
Elbow (right) 119–120 See also Upper arm (right)
higher, lower 99, 127–128, 197–198level with bow 128unlocking 192–193
Elman, Mischa 63
Emotional memory 229
Energy 154, 266accents 215bow speed near bridge 24combining high and low 214–215dynamics 209finger action (left) 159, 172, 186finger movement (right) 292finger pressure (left) 189fingers, holding down 151fingers (left), keeping close
to string 215increasing, decreasing 213–214left-finger accents 186localized actions 198–199shifting 215tremolo 297vibrato 193, 251, 256wrist (right) 129
Etudes 105Dont 110Kayser 105Kreutzer 37, 83, 100, 112, 130, 161,
201, 211, 264, 271, 295, 296, 327Sitt 105
Evenness 14–15, 16, 21, 22, 127scales 302
Exchange shift See Shifting
Exercises xx, 99, 102, 104, 105, 122, 124, 145, 147, 180, 194, 214, 224, 269, 326, 330
accents 269base joints (left) 138bowing parallel to bridge 119bow, placing on string 275, 277Brendel, Alfred 301chords, placing fingers 299chromatic scales 305counter-exercising 166–167extensions 162fast drop and lift-off 156fingered octaves 316–317finger preparation 146–149, 202–203finger pressure 189–190Flesch, Carl 264–265fourth finger (left) 157–162hand (left), widening 133–135, 136hand (right), tone 131Heifetz warm-up 155intonation 62, 63, 73–75, 77–78, 236knuckles (right) 157legato 261, 304lift-off, left fingers 154–155mobility, left hand 310–311, 314Mozart, Leopold 140playing musically 1, 225,
225–226, 233resonance 4shifting 232, 234, 239son filé 262–263spiccato 285–286stretching 171tapping 182, 187–188, 225thirds (double stop) 310tone 11–26trills 152vibrato 249, 252, 254, 259wrist (left) 184
Expression xvi, 1, 93, 96, 113Bach, C.P.E. 230bulges 270changing note-by-note 205–206creating musical technique 225creating technique 221, 227drawing out the tone 3expressive physical movements xviiifinger action (left) 189Geminiani, Francesco 95, 230intonation 94Mozart, Leopold 230picturing 9, 13pitch–sound–rhythm 93–94, 95playing in time 220rubato 220scales 228scales and exercises 225–226vibrato 206, 260
‘Expressive intonation’ 63
Extensions 82–83, 104, 162, 232

336
F
‘Fast fingers’ 106, 152–156, 199
Fast passages 108–109
Feet xviii, 192, 195, 196
‘Fifth’ finger 162
Fifthsdouble stop 311–312narrow 92
Fingering 232octaves 316
Finger preparation 145–148, 186, 202–205, 205
Fingerswide and narrow 81
Fingers (left) See also Fingertipactive or passive movement 154–156banging xv, 172, 201Base joints. See Base joints (left)blocks 111chords 299close to strings xiii, xvi, xviii, 137,
139–140, 140, 303counterpressing with thumb 189double contact, principle of 183dropping 205extensions 162, 232fast 172, 213.
See also ‘Fast fingers’finger accents 186holding down 150, 302hovering over strings 103, 236knuckles, angle to fingerboard 144leading bow xviiilevers 193move to the right 200moving from base joint xviii, 152nail joint 193overlapping 303over-pressing 165, 189, 317percussive 188–189, 213placing xv, 186preparation 145–146, 186,
202–203, 205pressure xviii, 102, 148arm-weight, replacing with 190double stops 299, 307–308finger vibrato 255five levels 189localized actions 198–199mobility 176pizzicato 320–321tone 190–191wrist, keeping free 184
pulling string 84reaching back 133, 140, 309, 317rolling 190–191, 255semitone spacing 80–81separation between 82–83shape xviii, 137, 144space between 135, 144speed 152
See also ‘Fast fingers’square and extended xviii, 79–80squeezingfingers and thumb xvfirst- and second-fingers 134neck 183sideways xviii, 97–98, 133, 135,
139, 164–165, 174thumb and first finger 182
tapping 187–188tip or pad 99
too-slow action 165V shape at base joint 133
Fingers (right) 176. See also Base joints (right), Thumb (right), First–Fourth fingers (right)
angle on bow 193bow impulses, sensitivity to 52flexibility 99, 198locked 50pressure 99pronation, supination 99spacing 99springs 50squeezing 43, 164string, playing into 48
Fingertipangle to string xvi, 89, 317fat, thin 81fourth finger (left) 158hand shape xviiileading in shifting 144–145numbness 175placement: left, middle, right 135tingling 145vibrato colour xix
First finger (left)base joint, pulling in 138contact-point with neck 99elbow position 142holding down 203natural direction 77neck of violin, contact with xviiiposition marker 231
First finger (right) 37, 38avoiding pressing 46–47contact-point 99changing 42
crease 41forearm rotation 123leaving stick 52pressing 46–47, 131squashing tone 45thumbdistance from 39–40, 99relative to 40
two functions 43
Fist bow hold 264, 283
Fixes and moveable notes 91
Flesch, Carl xvii, 245bow arm 49bow hold 40, 47chords 298exercises 264finger movement (right) 264first finger, putting weight into 47forearm movement, upper half 121intonation 89pizzicato 320pronation in the upper half 44–45six fundamental types 122, 264son filé 262spiccato 285third finger on bow 45thirds, scales in 309vibrato 249
Flexibility 50–55, 179–180bow change, click at 50
Flow 112–113
Forearmmassaging 170–171
Forearm rotation xix
first finger, changing contact point of 123
left arm 35, 99, 122–123, 137, 179, 197
right arm 42, 123, 193
Fournier, Pierre 3
Fourth finger (left)base joint xviii, 158collapsing 157elbow position 142elementary players 139–140exercises 157–161finger preparation 147holding down 302–303improving 156mental picture 156over-reaching 71straightening 133thirds 141–142tip or pad 139–140, 157, 158vibrato 156, 158
Fourth finger (right) 41, 46balancing 102contact-point 99placement 43playing in upper half 45tip, pad 99working with thumb 53
Fourthsdouble stop 141, 311
Frame 231
Friction 2, 3, 265
G
Galamian, Ivan xvii, 245bow arm 49bow hand 50correlation 105, 106double contact, principle of 183fingertip placement 135frame 231in and out 121practice 328pressure exercise 18shifting 234, 243square and extended 79staccato, bow hand for 289string crossing 294third finger on bow 45triangle position 119–120tuning while practising 89
Geminiani, Francesco 95, 230Geminiani chord 140, 299
Given, Thelma 263
Goals xx, 60
Gravity, force of 164
Groups 109–110
Grumiaux, Arthurfourth finger (left) 156
H
Haendel, Ida 287
Hair See Bow
Hand (left) See also Base joints (left)
balanced 192chain reactions, causes of 165classic shape 133
337
contacting instrument 99, 243contracting 316fingers, keeping near string 236frame 162higher, lower 97keeping free 172massaging 170–171mental rehearsal 323, 325position at top of E string 97proportions 97softening 138, 244, 316tilt 36upper arm, releasing 314upper fingers, based on xviii,
140–141widening at base joints xiv
Hand (right) See also Bow holdchain reactions 164creating weight from 47, 48,
130–131flexibility xix, 20supination, pronation 37, 42, 99, 123
Handsindependence xixsize, large and small 39, 81, 231,
248, 254
Hassid, Joseph 40, 149, 264
Havas, Kató 197
Headangle 29balancing 192‘forward and up’ 29left, right 29, 98movement, excessive 194relaxing the weight 30–31rotating 30
Heifetz, Jascha 16, 45, 266, 301fast playing 111intonation, adjusting 89shifting 32warm-up exercise 155
Hesitation 55before playing 106
High-, low-frequency scratches 13
Hips 176, 193
Hodgson, Percival 8, 44
Holt, John 303
Homeostasis 196
Horowitz, Vladimir 101
Hurwitz, Emanuel 145
Hyper, hypo mobility 192
I
Imagination, musical xviii, 1, 93, 104, 221, 230, 330
Inhibition 199
Inspiration 1, 230, 233
Interference 108, 122, 223, 224, 319
Intermediate notes 235, 239, 240
Intonationadjustment, instant 89, 314–315bow pressure 84checking with open strings 60, 62evenness 302expression through 94finger shapes 80
gravitational attraction 63, 68, 85hesitation 55leading notes 62, 63, 64, 68, 86measuring and relating xv, xx, xxii,
60, 81orchestral sound 221positions, spacing in 71–73proportions 96quarter-tone scales 63reference points 66scales 302semitone spacing 80–81structured and unstructured 55–56sympathetic vibrations xx, 60–61tempered, expressive 63, 71third tone 90timbre 61, 65uniform 74–75
J
Jaw bone 27, 30
Joachim, Joseph 265
K
Kayser, H.E. 105, 152
Keller, Hans 6
Knees 176, 195
Knuckles (left) 38angle to fingerboard xviii, 99,
135, 137
Knuckles (right) xix, 38higher, lower 45–46, 99parallel with bow 42springiness 50
Kreisler, Fritz 253, 260, 329fourth finger (left) 156
Kreutzer, Rodolphe See Etudes
L
Lactic acid 165–166
Lengthening and widening xviii, 168, 173–178
costal arch 176–177
Léonarde, Hubert 150
Leverage xixbow hold 37, 47, 213, 293chin on chin-rest 31elbow (right) 129hand and arm movements 296point, placing on string 277right handfirst finger 39–40first finger and thumb 54second finger 47–48second finger and thumb xixthumb, counterpressure of 278
Listening xvi, xviii, 13, 57, 221acoustic beats 57–58ear tests, sensitizing with 58–60feedback 242improving 9, 57, 330intonation 75pre-hearing 55, 75, 93, 226,
233, 236pressed tone 3quarter-tone scale 63resonance 4sensation, linking sound with 222
shifting 224, 233, 243, 246surface noise 57tilting head 29tone exercises, improved by 1vibrato 252
Localizing 152, 199
M
Martelé xiv, 49, 100, 103, 130, 290–293
bow hold 37, 293curves 124finger movement 292first-finger pressure 46proportions 96–97timing, technical and musical 205vibrato 271
Massage 166
‘Mechanics’ (and ‘Technique’) 221
Mental controlconscious 221, 223detached 1, 23, 225, 227, 233groups, playing in 109–110localization of 199mental block 283
Mental picture 9, 324arm (left) 197arm (right) 118bow hold 43chromatic scale 306finger pressure 189fluency 105fourth finger 156intonation 55perfect result, picturing 224, 323tension in hand 172thumb 53, 181trills 151visualization 156
Mental rehearsal 322, 324–325bow shaking 323left hand 323memory 323
Menuhin, Yehudi 104, 166, 329practice-mute 5single-finger scales 235
Milstein, Nathan 45, 89, 253, 333
Mobility 98, 176, 194–195bow-hold 44costal arch 176elbow (left) 142head 29thumb 182
Momentumbow leading hand xix, 3, 13, 14–15,
165, 176, 223double stops 310spiccato 15violin, raising 29
Moser, Andreas 141
Mozart, Leopold 230, 249, 262expression 230fourth finger (right) in upper half
44–45Geminiani exercise 140–141pressure exercise 18son filé 262sympathetic vibrations 60–61vibrato 249
Mozart, Wolfgang Amadeus 18
338
Musclesactive, passive 168contraction 41, 168fixing 176minimum effort 171minor pectoral 170, 174tightening 89–90zero point 168
Mutter, Anne-Sophie 323
N
Neaman, Yfrah xviii, 122, 229, 264attack, angle of 273finger preparation 145melodic playing 302
Neck 27, 28, 30, 31, 197
Neveu, Ginette 264
O
Octaves (double stop) 313–314fingered 316–317lower note louder 315string-length 318
Oistrakh, David 16, 272bow arm 122first performances 332fourth finger (left) 156scales and arpeggios 302staccato 287
Opposites, pracising by 145
Overlapping 145, 303
P
Pain 163
Partial tones 8
Percentage shots 107–108
Perfect fifths 67, 76, 318
Perfect intervals 66, 85–86, 91–92, 311–312
Perlman, Itzhak 81, 329
Piano 2, 40, 60, 101experiment on 8finger preparation 146flow 112hand position 50intonation 62, 64, 68, 70, 70–71, 86staccato 283timing, technical and musical 205
Pitch–sound–rhythm–ease 94–95, 111, 114–115
Pivot 31string crossing 101, 102, 112, 205,
294, 295thumb (right) 52
Pizzicato (left hand) 154, 203, 228
Pizzicato (right hand) 319–322as a practice method 148‘Bartók’ pizzicato 320
Point-of-balance 14, 46, 119, 120
Positions 231, 236, 238–239
Posture xvi, 192, 204
Pressure 164, 265 See also Bow pressure, Fingers (left)
Progress, fastest possible xvi
Projection 7, 265
Proportions 96arm (right) 119bow, balancing in hand 44bow length and speed 268–269describing xiv–xvgive of the wood and hair 15ricochet 102sounds, describing 9–10Speed–pressure–soundpoint xx, 6, 7,
9, 102, 227, 271–272spiccato 284, 286strings, thickness 6string vibration, widest 14tone from right hand in
upper half 49, 130–131width of hair, string length 265
Pulling down 102
Q
Quantz, Johann xiv, 63, 92, 206
R
Rabin, Michael 5
Recordings 329–330
Resistance, line of least 6–7
Resonance 4, 57, 62, 65, 209
Rhythm 218–221co-ordination 218expression through 94fingers (left) 186orchestral section, sound 221shifting 243–244underlying pulse xx, 112, 218
Rhythm practise 94–95, 114, 116
Ricci, Ruggiero 162
Ricochet 279, 280first finger, experimenting
without 281fist bow-hold 264
Rode, Pierre 265, 327
Rolland, Paul 29, 179
Rolling 190–191, 255, 257
Romantic shift See Shifting
Rostal, Maxbow hold 40vibrato 260
Rubinstein, Artur 220
Rushing 108, 113
S
Sautillé 37, 110, 279bow hold, balancing not gripping 44sweet spot 282
Scales 55, 73, 105, 261, 301–307, 326, 327, 330
Casals 18chromatic scales 305expression 225, 228finger preparation 146fingers, holding down 150fourth finger warm-up exercise 160fourths (double stops) 311non-diminuendo 303–304
octaves in a passage, improving 315–316
perfect fifths (double stops) 311–312pitch–sound–rhythm 302pizzicato 320practice chart 307practising elements of 301quarter-tone scale 63single-finger scales 161, 235–236string crossing 303substitutions 242thinking ahead 112–113thirds 217, 308–309, 309–310tuning 85–89two-octave 75uniform intonation 55–56vibrato 249
Scotoma xvii See also Blind spots
Scrollangle xviiiheight 32higher, lower 6–7, 32, 98left, right 33–34, 98lift, right 32
Second finger (left) 81–82, 139–140double stops, independence in 83half position 71opening between first
and second 133–134, 194practise method for
chromatics 305–306square and extended 79third finger, separation between 82thirds 141V-shape with first finger 133–134
Second finger (right) 131crease, contact-point 41, 43helping first finger 47–48leverage 47–48thumb, not pulling in towards 165thumb, relative to 39, 40tremolo 296
Self-correctionautomatic 313
Semitone 71, 80–81, 85–86
Ševcík, Ottakar 152, 226
Shifting 224classical 191, 235, 238–239, 246, 248combination 238, 240, 248descending 30exchange 239, 241exercises 239–242fingertip 234leading shifting 48
ghost notes 233, 242illusion of string length 247intermediate notes 235listening 243no such thing 232playing musically 113, 233pre-hearing 233, 236romantic 191, 235, 238, 239, 248semitone with one finger 85slow arrival speed 239, 245–247square and extended 80substitution 238, 240sustaining during 234tension 244timing 205, 213, 220,
239, 243–244, 245upper arm 121
Shoulder rest 27, 28, 182
339
position 28too high 30
Shoulders xviii, 131, 176left 165pulling in 28raising 27, 28, 176, 178–179,
195, 200, 233tension 30, 197
Sight-reading 162
Silverstein, Joseph xvii
Sitt, Hans 105, 327
Sixths (double stop) 134, 141–142, 312–313
Slow Arrival Speed 245–246
Slurs 219fast fingers 153–154, 172, 186fingers, dropping not rolling 191
Solar plexus 176, 252
Son filé 262–263
Sound, impurities in xx
Soundpoints 1
Spiccato xiv, 25, 100, 213, 279–280
bow hold 282–283balancing not gripping 44bow moving within hand 37, 52–53fingers on bow 49first finger, experimenting
without 281fist bow-hold 264, 282–283
brushed 279chords, played with spiccato stroke
298co-ordination 148–149, 203, 286curves 123, 284détaché 285Dounis, Dr D.C. 285Flesch, Carl 285flexibility, fingers and thumb 286groups 110, 257–258height and length 285length 285–286momentum 14–15pizzicato practice method 148–149,
287point-of-balance 120proportions 48, 96, 284–285, 293run, end of 289scratches 284, 286–287soundpoints exercise 286speed limits 110string thickness 285thumb flexibility 195tilt of bow 286up not down, like pianist 283–284upward movement 3
Spohr, Louis 27, 249
Square and extended 79–80
Square (right arm) 120
Squeezing 163, 164, 197 See also Fingers (left), Fingers (right)
fingers and thumb (left) xvthumb and first finger (right)
198–199
Staccato 279flying, solid 279perfect result, picturing 324
Stage-fright 323
Stage whisper 208
Stopping before starting 199–200
Stretching 166
Stringvibration, width of 16
String crossing 303clockwise, anticlockwise 106legato xixsmooth 294–295wide 53
Stringscause and effect 1fingers pulling or pushing 84flatter nearer fingerboard 297friction 2, 265further apart at bridge 247gut 6, 45height above shoulder 27–28horizontal xviiilength when stopped 318less flexible closer to bridge 5, 23level with floor 32, 197meeting bow-hair 173short 84springiness xv, 189, 255,
280–281, 315supporting the bow 35swinging from side to side 2sympathetic vibrations.
See Intonationtension xv, xx, 6–7, 23thickness 3, 6, 274vibration, width of 2, 7, 13, 265watching 13
Style 93pitch–sound–rhythm 93–94
Supination, pronation 37, 42, 52, 99
Flesch, Carl 44, 47forearm rotation 123
Supination shift See Shifts
Suzuki, Shin’ichi 197, 321
Sympathetic movements 131, 198, 254
Sympathetic vibrations See Intonation
Szeryng, Henryk 40, 264, 301
Szigeti, Joseph 197
T
Tapping 152, 187–188
Tension 31, 233associations with 163, 172, 180chain-reactions 164forearm, massaging 170–171intonation 75, 89–90left forearm rotation 35left-hand 84, 215minor pectoral 174raising shoulders 27right-hand 44shaking bow 195shifts 244squeezing 133, 164–165thumb (right) 40–41vibrato 183–184, 195fast 256–258
Tenths (double stop)string length 318
Thinking ahead 112–113, 321
Third finger (left) 139over-reaching 71second finger, separation
between 82straightening 133weak in pizzicato 155
Third finger (right)crease 41crease-contact near point 43pad, contact with frog 41, 43pulling in 45thumb, relative to 40–41‘tone finger’ of bow 45
Thirdsdouble stop 141, 308–309interval 82
Third tone 90–91, 303
Thumb (left) 78chromatic scales 305counterpressure 189, 197forward, back 99higher, lower 99how many joints? 181over-pressing 197pivot 182position on neck 176preparation 182, 205rotation 182, 255squeezing xviii, 75, 102, 182tension 195
Thumb (right) 40contact-points 54counterpressure 278curved xxi–xxii, 99flexibility 21giving 53muscle contraction 41pivot 52placement xixplacement on bow, diagonal 39tension 40–41three joints, not two 53tip, pad 53, 99
Timing, technical and musical 205, 219–220, 291
Tone production See also Bow speed
bridge, bowing too far from 6describing 9, 13–14evenness 14excess pressure 2–3, 84impurities, high and
low frequency xx, 13isolating factors 12left-finger pressure 165, 189,
320–321orchestral section sound 221speed–pressure–soundpoint 13string thickness 5–6sustaining evenly 112tilt of bow 265
Tonus 7
Tortelier, Paul 28
Tremolo 296–297sympathetic movements 296
Trills xix, 151, 224finger angles 134
340
models 217
studies, fourth-finger 161
Tuningnarrow fifths 92unisons 57
U
Upper arm (left) See also Elbow (left)
balance 192immobility 28knuckle joints, angle
to fingerboard 144locking 165, 197, 314space 256
Upper arm (right) 120 See also Elbow (right)
rotation 179scroll, height of 32upper half 99
Upper partials 8, 8–9
V
Végh, Sándor 110, 210third finger on bow 45
Vengerov, Maxim 174, 216
Vibrato xiv, 16, 57, 59, 101, 201, 206, 208, 222, 224, 230, 233, 266, 267, 296, 331
accents 259, 279arm 193, 252, 254, 254–255, 256blind-spots xviiibow, shaking 195bulge notes 270chain-reactions 165chords 299colour 205, 207, 221, 249, 253
concept of 225, 252continuous 112, 257, 259–260copying 329direction xv, xixdotted motion 250double-contact, principle of 183exaggeration, practising by 109, 206expression 94, 95, 206, 220fingersholding down 150square and extended 79
fingertip xvi, 158, 249, 253, 254, 256, 331
leading vibrato 48finger-vibrato 252, 255finger, weight of xixfour basic groups 250–251fourth-finger 156, 158, 161, 217groups of eight 257–258hand 193, 252, 254intonation 89, 250–251leading bow with 271, 279listening 330mental picture 156models 217Mozart, Leopold 249nail joint 193pitch xix, 250pizzicato 322‘playing itself ’ 225proportions 96quiet playing 214rolling 257scales 225speed and width 108, 193, 206,
211, 213, 214–215, 249, 251, 253, 256, 259, 331
Spohr, Louis 249string, releasing 251sympathetic movements 254, 296tension 183, 195throb 12, 225, 251, 257
varying 206, 210vibrato ‘trill’ 258violin, holding firmly 30width See speed and widthWinram, James 249‘wrist’ vibrato 48
Viola 6, 92, 173
Violinangle to body xviii, 33flatter without shoulder rest 27gripping xviiilighter, heavier 29neck sloping down 32position on shoulder 34, 98raising 29tilt xviii, 28, 31, 35–37, 144
Viotti, J.B. 265
W
Waves 209–210
Winram, James 249
Wrist (left) 197freeing 184give 176high 131in, out 99locking 165pushing out xviii, 136straight line at 136
Wrist (right) 42, 48excessive movement 193higher, lower 99tilt of bow 265upper half, supporting in 130
Y
Yankelevich, Yuri 100, 189, 331pressure exercises 18
Index of musical examples
Bach, Johann SebastianConcerto no. 2 in E, BWV1042
mov. 1, b. 1 65
Partita no. 3 in E, BWV 1006 Preludio, b. 17 106
Partita no. 2 in D minor, BWV1004 Allemanda, b. 12 83 Fuga, b. 4 304 mov. 1, b. 1 210 mov. 1, b. 4 174
Sonata no. 1 in G minor, BWV1001 mov. 4, b. 1 209
Bartók, BélaFirst Rhapsody
mov. 1, b. 2 108 mov. 1, b. 38 108
Beethoven, Ludwig vanConcerto in D, op. 61
mov. 1, b. 89 107
Sonata in C minor, op. 30 no. 2 mov. 1, b. 19 69
Sonata in E-, op. 12 no. 3 mov. 1, b. 5 271 mov. 1, b. 23 70
Sonata in G, op. 30 no. 3 mov. 1, b. 51 296
Brahms, Johannes
Concerto in D, op. 77 mov. 1, b. 90 107 mov. 3, b. 1 92
Scherzo (Sonatensatz), WoO2 b. 3 101 b. 10 259
Sonata in D minor, op. 108 mov. 1, b. 1 37 mov. 1, b. 61 72
Sonata in G, op. 78 mov. 1, b. 90 176 mov. 1, b. 212 70
Sonata no. 1 in G, op. 78 mov. 1, b. 3 67
Sonata no. 2 in A, op. 100 mov. 2, b. 162 322 mov. 2, b. 162 321
Sonata no. 3 in D minor, op. 108 mov. 1, b. 29 220 mov. 2, b. 1 146 mov. 2, b. 43 216
Britten, BenjaminSimple Symphony
mov. 2, b. 1 319
Bruch, MaxConcerto in G minor, op. 26
mov. 1, b. 6 66 mov. 1, b. 6 276
341
(Concerto in G minor, op. 26) mov. 1, b. 10 276 mov. 1, b. 16 6 mov. 1, b. 16 273 mov. 3, b. 19 112 mov. 1, b. 34 298 mov. 1, b. 37 83 mov. 1, b. 37 260 mov. 3, b. 44 84 mov. 1, b. 45 269
Campagnoli, BartolomeoNew method for the violin
part 4, no. 236 240
Chausson, ErnestPoème, op. 25
b. 117 68
Dont, Jakob24 Etudes and Caprices, op. 35
no. 3, b. 1 110
Dvorák, AntoninRomance, op. 11
b. 43 76
Elgar, ElgarSonata in E minor, op. 82
mov. 1, b. 131 215
Fauré, GabrielSonata in A, op. 13
mov. 1, b. 57 68
Fiocco, Joseph-HectorAllegro, b. 18 145
Franck, CésarSonata in A, op. 26
mov. 1, b. 5 108, 278 mov. 2, b. 48 209 mov. 2, b. 56 206 mov. 2, b. 95 70 mov. 2, b. 168 266
Grieg, EdvardSonata in C minor, op. 45
mov. 1, b. 145 214 mov. 1, b. 254 245
Handel, George FredericSonata no. 4 in D, op. 1 no. 13
mov. 2, b. 24 114
Kabalevsky, DmitriConcerto in C, Op. 48
mov. 1, b. 9 xxii
Kayser, Heinrich ErnstEtudes, op. 20 no. 1 295
Kreisler, FritzCaprice Viennois, op. 2
b. 21 329
Kreutzer, Rodolphe42 Etudes ou caprices
no. 2, b. 1 100 no. 6, b. 1 37 no. 8, b. 1 271 no. 13, b. 1 264 no. 30, b. 11 296 no. 31, b. 20 211
no. 33, b. 1 83 no. 35, b. 12 112 no. 36, b. 1 130 no. 37, b. 1 201
Lalo, Edouard
Symphonie Espagnole, op. 21 b. 37 224
Massenet, Jules
Méditation from Thaïs b. 3 253
Mendelssohn, Felix
Concerto in E minor, op. 64 mov. 1, b. 2 67 mov. 1, b. 84 123 mov. 1, b. 85 296 mov. 2, b. 9 72
Mozart, Wolfgang Amadeus
Concerto no. 3 in G major, K216 mov. 1, b. 51 63 mov. 1, b. 78 213 mov. 2, b. 9 107
Concerto no. 4 in D, K218 mov. 1, b. 42 162 mov. 1, b. 42 194 mov. 1, b. 42 283 mov. 1, b. 45 89 mov. 1, b. 52 72 mov. 1, b. 57 207 mov. 3, b. 23 287
Concerto no. 5 in A, K219 mov. 1, b. 40 69 mov. 1, b. 40 267 mov. 1, b. 40 270
Sonata in B-, K454 mov. 1, b. 1 66 mov. 1, b. 14 284 mov. 1, b. 50 210
Symphony no. 39 in E-, K543 var. 6, b. 1 116
Violin Concerto no. 4 in D, K218 mov. 1, b. 49 80
Paganini, Niccolò
24 Caprices, op. 1 no. 1, b. 1 213 no. 3, b. 2 280 no. 15, b. 15 271 no. 15, b. 19 289 no. 19, b. 1 315 no. 24, var. 6, b. 1 113
Provost, Heinz
Intermezzo, b. 25 116
Pugnani-Kreisler
Praeludium and Allegro Praeludium, b. 21 84, 174 Praeludium, b. 35 51 Allegro, b. 41 77
Rode, Pierre
Concerto no. 7 in A minor, op. 9 mov. 1, b. 4 174
Saint-Saëns, Camille
Concerto no. 3 in B minor, op. 61 mov. 1, b. 20 267
Havanaise, Op. 83 210 b. 48 65
Sarasate, Pablo deCarmen Fantasy, op. 25
Introduction, b. 49 113 Introduction, b. 65 241 Introduction, b. 137 277 Introduction, b. 158 245
Habanera, op. 21 no. 2, b. 26 122
Malagueña, op. 21 no. 1 b. 55 203
Playera, op. 23 no. 1 b. 4 65 b. 4 212 b. 7 222 b. 31 228 b. 88 228
Zigeunerweisen, op. 20, no. 1 b. 98 321
Schnittke, AlfredSuite in the Old Style
Ballet, b. 9 284 Fugue, b. 41 76
Schubert, FranzSonatina in A, op. 137 no. 2
mov. 1, b. 31 108
Sonatina in G minor, op. posth. 137 no. 3, mov. 4, b. 1 261
Sonatine in D, op. 137 no. 1 mov. 1, b. 1 70
Ševcík, OttakarChanges of Position and
Scale Exercises, op. 8 no. 1, b. 1 269
Sibelius, JeanConcerto in D minor, op. 47
mov. 1, b. 4 107 mov. 1, b. 20 272
Tartini-KreislerVariations on a theme by Corelli
var. 1, b. 1 308
Tchaikovsky, Pyotr IlyichConcerto in D, op. 35
mov. 1, b. 23 65 mov. 1, b. 23 150 mov. 1, b. 40 305 mov. 3, b. 416 271
Three Pieces, op. 42 Meditation, b. 20 72 Meditation, b. 34 216
Violin Concerto in D, op. 35 mov. 1, cadenza 276
Vivaldi, AntonioConcerto in G minor, op. 12 no. 1
mov. 1, b. 7 270
Wieniawski, HenrykConcerto no. 2 in D minor, op. 22
mov. 1, b. 68 208
Polonaise brillante, op. 21 b. 23 324 b. 78 313
Scherzo-Tarentelle, op. 16 b. 40 111
w w w.e d i t i o n p e t e r s . c o m
The Violin LessonA manual for teaching and self-teaching the violin
The Violin Lesson offers players of all standards the opportunity to immediately – and dramatically – improve their technique and understanding of violin playing.
Presented in twelve comprehensive and highly accessible lessons filled with more than 500 music examples and over 350 photographs, it provides fresh approaches to neglected aspects of playing whilst covering all the major areas of violin technique, including:
tone productionintonationavoiding aches and pains
changing positionimproving bow strokesvibrato
Whether outlining a basic concept or an advanced technique, each topic is handled with the clarity and attention to detail for which Simon Fischer is so highly regarded. Fundamental exercises, principles and practice methods sit alongside case studies and practical question-and-answer sections to present a truly rounded volume – essential reading for both students and teachers alike.
Simon FischerThrough his extensive research, rich experience and originality, Simon Fischer has gained a worldwide reputation as a powerful and creative spokesman for the principles of modern violin play-ing. His influence is based on the wide appeal of his simple, effec-tive and straight-to-the-point explanations and demonstrations. Having studied the violin with Yfrah Neaman in London and with Dorothy DeLay in New York, he has been able to unite – and develop – the best elements of the Franco-Belgian, Russian and American violin traditions.
His work as a teacher has always been informed by the practical experience of a distinguished playing career. He has given many recitals in the UK and abroad, and for the BBC, and has played as soloist or guest leader with major symphony and chamber orchestras throughout the UK.
His monthly “Basics” articles in The Strad magazine – more than 250 so far – attract great interest and his technique books Basics and Practice, together with his definitive book of Scales, are accepted worldwide as models of teaching and violin study.


