
Cisco Virtual Office – End User Instructions for Cisco 871 and Cisco 881 Router Set Up at Home or Small Office
IntroductionThis document describes the end-user instructions to deploy the Cisco Virtual Office (CVO) for home or small office use.
Cisco Virtual Office (CVO) solution offers a seamless home/small office experience comparable to working in your company’s central office. CVO features support secure, always-on wired and wireless (WLAN) data connectivity, voice services, and video capabilities.
Setup Your CVO HardwareIn this section you will be able to identify the basic hardware configuration needed to install the CVO solution in your home/office. This is a known working configuration to assist you in your initial set-up and is not intended to cover all variations of home/office network environments. This guide is written based on Cisco 871 and Cisco 881 routers.
Ports on the CVO RouterIt is important that you understand which ports on the back of your CVO router are used for what purposes.
• FE0, FE1, FE2, and FE3: LAN Ports FE0 to FE3 are end-user device secure ports. Connect your PC/Mac/Linux/IP phone equipment here.
• FE4: Use the WAN/FE4 port to connect your CVO router to your Internet Service Provider (ISP) device.
Americas Headquarters:Cisco Systems, Inc., 170 West Tasman Drive, San Jose, CA 95134-1706 USA

SETUP YOUR CVO HARDWARE
How to Connect Your EquipmentThis scenario shows an example of your company’s provided devices and the Internet Service Provider (ISP) device (modem/router) properly connected to a CVO 871W router. The same ports should be used to connect to a CVO Cisco 881W or non-wireless router.
For detailed descriptions, see below Step-by-Step Instructions.
Figure 1 End-to-end View of How Your Devices Should Connect Together
2Cisco Virtual Office – End User Instructions for Cisco 871 and Cisco 881 Router Set Up at Home or Small Office
78-18858-01
CONFIGURE YOUR ROUTER
Step-by-Step Instructions Follow these steps to connect your CVO router to the ISP device and to your PC
Step 1 Make sure your ISP device (DSL modem, cable modem, etc) is plugged in and turned on. If your ISP device is already on, power off your ISP device and wait 10 seconds. Remove the cables. Then power it up and wait 30 seconds to complete the reset and reconnect your cables. Plug in your CVO router as shown and power it up. Do not do any type of soft reboot on your ISP devices at this point.
Step 2 Plug the CVO router into the ISP modem/router using an Ethernet cable going from the Ethernet port on the ISP device, to the WAN/FE4 port on the CVO router as shown in Figure 1.
Step 3 Plug your PC into the CVO router using the LAN trusted port FE0 as shown in Figure 1.
Configure Your RouterOnce you have set up your CVO hardware you will need to configure your router so that you can access the Internet and your company’s corporate network.
After the Internet connectivity is established you need to follow the steps that invoke the Secure Device Provisioning (SDP) tool to communicate with your company’s core infrastructure and complete your CVO router's configuration.
Internet ConnectivityThe configuration needed to connect to the Internet is determined by the IP address assignment type.
DHCP Assignment
If you have a DHCP connection, your PC should already be able to access the Internet at this point, no additional work is needed.
Other (PPPoE or Static) Assignment
If your IP address assignment type is anything other than DHCP some additional configuration is needed to access the Internet. You must run the Cisco Configuration Professional Express (CCP Express) tool and follow the steps to get the router connected to the Internet before you can proceed. You must know what type of connectivity your ISP is providing you, typically PPPoE or static IP. Your ISP should be able to give you this information. Go to “Appendix A: CCP Configuration” in this document and follow the instructions to get internet access. Once done, return to the “Corporate Network Connectivity” section and complete the SDP provisioning process.
Corporate Network Connectivity
Step 1 Test your Internet connection.
To double check that your PC is now connected to the Internet, open a browser window and type any Internet website, for example, www.cisco.com.
Step 2 Initiate the Secure Device Provisioning (SDP) Process.
3Cisco Virtual Office – End User Instructions for Cisco 871 and Cisco 881 Router Set Up at Home or Small Office
78-18858-01

CONFIGURE YOUR ROUTER
You will need to complete the process for Secure Device Provisioning (SDP) so that your CVO router can access the corporate network and securely download its configuration.
If you are using Static addressing or PPPoE and used CCP Express for the initial configuration of your router, specifying SDP for provisioning, then CCP Express will automatically direct you to the SDP welcome page, where you have to authenticate using the login username/password that you configured during the CCP Express setup (Figure 2).
Figure 2 SDP Authentication
If you’re using DHCP, to initiate the SDP process, go to the PC which is connected to the CVO router and open a browser window. Then type in the address bar: http://10.10.10.1/ezsdd/welcome. You will be prompted to authenticate, and you must use username/password cisco/cisco.
You will see the screen shown in Figure 3 while the router prepares for the rest of the SDP process.
Figure 3 SDP Screen
4Cisco Virtual Office – End User Instructions for Cisco 871 and Cisco 881 Router Set Up at Home or Small Office
78-18858-01

CONFIGURE YOUR ROUTER
Step 3 Securely download the CVO router configuration.
When the screen refreshes you will notice a field for site URL. Enter the URL provided by your network administrator (Figure 4).
Figure 4 URL Field
After you click Next you will see a Security Request confirmation window; select Yes to proceed.
Step 4 Authenticate yourself.
When the system attempts to connect to the corporate CVO management server, you are prompted to authenticate yourself. You must use the credentials provided by your network administrator (Figure 5).
Figure 5 Connect to SDP Server
When your authentication is accepted you will see the confirmation screen shown in Figure 6.
5Cisco Virtual Office – End User Instructions for Cisco 871 and Cisco 881 Router Set Up at Home or Small Office
78-18858-01

CONFIGURE YOUR ROUTER
Figure 6 Confirmation Screen
Select Next to proceed.
Step 5 CVO router auto-configuration.
You should now see the enrollment window and your CVO router will automatically download the configuration from the CVO management server (Figure 7).
Note Do not select any of the options on this screen. This will interrupt your CVO router configuration.
Please be patient during this process. This can take 5 or more minutes to complete. Any interruption will cause an incomplete deployment.
Figure 7 Enrollment Window
Step 6 Verify that your CVO router has a VPN Light on in the front.
After 5 minutes, your router should have its VPN LED lit solid green.
At this point you need to have your PC register with the new router configuration to renew its IP address. You have two options to renew your IP address:
a. restart your PC – this will automatically renew its IP address
b. (advanced users) right click on your network adaptor icon in the systray and click repair as show in Figure 8:
6Cisco Virtual Office – End User Instructions for Cisco 871 and Cisco 881 Router Set Up at Home or Small Office
78-18858-01

CONFIGURE YOUR ROUTER
Figure 8 Renew IP Address
Once you have a valid IP Address, open your browser and attempt to connect to an external Website. This should be something other than your company’s internal home page; e.g. www.cisco.com.
If this is successful then proceed with testing an internal Website.
Step 7 Verify connectivity to your company’s corporate network.
Once your CVO router’s configuration is complete you will be able to access your company’s internal network via the VPN tunnels that have been created. Before you are allowed to access any internal resources you will have to authenticate in accordance with your company’s corporate policy. Just open a browser in the PC connected to the CVO router and type an internal Website of your company.
Congratulations! You are now ready to begin using your Cisco Virtual Office.
The CVO router will build a direct connection to the corporate network. Once the CVO router is installed and configured, there is no need to run a VPN client or SSLVPN to be connected to your company network.
Please refer to the CVO overview further information about the solution, its architecture, and all of its components.
For more details about the Cisco 800 Series Routers please visit
http://www.cisco.com/en/US/products/hw/routers/ps380/index.html
For additional information about Cisco Configuration Professional (CCP), please visit http://www.cisco.com/en/US/products/ps9422/index.html
Appendix A: CCP Configuration To start configuring the CVO router with Cisco Configuration Professional Express (CCP Express) make sure the PC is physically connected to CVO router on port FE0. Open an Internet browser and type http://10.10.10.1. When prompted for username/password, please enter: cisco/cisco. CCP Express will guide you to remove or configure a new username/password. The Cisco Configuration Professional (CCP) Express wizards will guide you through the process of configuring your CVO router to connect to the Internet, as described next.
1. Figure 9 shows the welcome screen of CCP Express. Click “Next” to start the wizard.
7Cisco Virtual Office – End User Instructions for Cisco 871 and Cisco 881 Router Set Up at Home or Small Office
78-18858-01

CONFIGURE YOUR ROUTER
Figure 9 Welcome Screen
2. Enter the desired login credentials and enable password, as well as the hostname and domain name for the router (Figure 10), then click “Next”.
8Cisco Virtual Office – End User Instructions for Cisco 871 and Cisco 881 Router Set Up at Home or Small Office
78-18858-01

CONFIGURE YOUR ROUTER
Figure 10 Basic Configuration
3. Specify “Secure Device Provisioning” as the method for provisioning the router, as SDP will be used for the bootstrap config (Figure 11), then click “Next”
9Cisco Virtual Office – End User Instructions for Cisco 871 and Cisco 881 Router Set Up at Home or Small Office
78-18858-01

CONFIGURE YOUR ROUTER
Figure 11 SDP for Router Provisioning
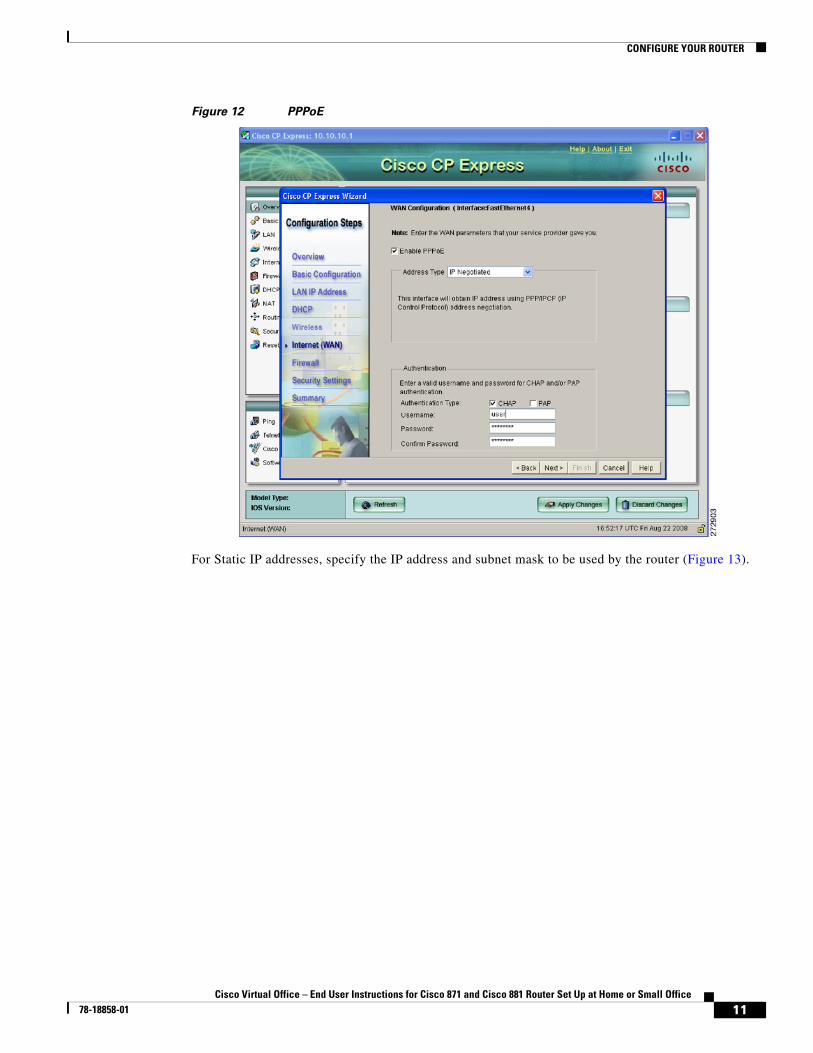
4. Choose the corresponding IP address assignment method (PPPoE or Static).
For PPPoE, select the authentication method (CHAP or PAP), and provide the appropriate credentials provided to you by your ISP (Figure 12)
10Cisco Virtual Office – End User Instructions for Cisco 871 and Cisco 881 Router Set Up at Home or Small Office
78-18858-01
CONFIGURE YOUR ROUTER
Figure 12 PPPoE
For Static IP addresses, specify the IP address and subnet mask to be used by the router (Figure 13).
11Cisco Virtual Office – End User Instructions for Cisco 871 and Cisco 881 Router Set Up at Home or Small Office
78-18858-01

CONFIGURE YOUR ROUTER
Figure 13 Static IP Addresses
5. Choose whether or not to create a default route (Figure 14), then click “Next”.
12Cisco Virtual Office – End User Instructions for Cisco 871 and Cisco 881 Router Set Up at Home or Small Office
78-18858-01

CONFIGURE YOUR ROUTER
Figure 14 Default Route
6. CCP Express displays a summary page of the basic configuration that you setup for the router. Click “Finish” to deliver it to the router (Figure 15 and Figure 16).
13Cisco Virtual Office – End User Instructions for Cisco 871 and Cisco 881 Router Set Up at Home or Small Office
78-18858-01

CONFIGURE YOUR ROUTER
Figure 15 Summary Page PPPoE
14Cisco Virtual Office – End User Instructions for Cisco 871 and Cisco 881 Router Set Up at Home or Small Office
78-18858-01

CONFIGURE YOUR ROUTER
Figure 16 Summary Page Static
Cisco and the Cisco logo are trademarks or registered trademarks of Cisco and/or its affiliates in the U.S. and other countries. To view a list of Cisco trademarks, go to this URL: www.cisco.com/go/trademarks. Third-party trademarks mentioned are the property of their respective owners. The use of the word partner does not imply a partnership relationship between Cisco and any other company. (1110R)
Any Internet Protocol (IP) addresses used in this document are not intended to be actual addresses. Any examples, command display output, and figures included in the document are shown for illustrative purposes only. Any use of actual IP addresses in illustrative content is unintentional and coincidental.
© 2008 Cisco Systems, Inc. All rights reserved.
Printed in the USA on recycled paper containing 10% postconsumer waste.
15Cisco Virtual Office – End User Instructions for Cisco 871 and Cisco 881 Router Set Up at Home or Small Office
78-18858-01

CONFIGURE YOUR ROUTER
16Cisco Virtual Office – End User Instructions for Cisco 871 and Cisco 881 Router Set Up at Home or Small Office
78-18858-01


