Cisco UCS Director EMC Symmetrix VMAX Management Guide,Release 4.0First Published: August 14, 2013
Last Modified: September 19, 2013
Americas HeadquartersCisco Systems, Inc.170 West Tasman DriveSan Jose, CA 95134-1706USAhttp://www.cisco.comTel: 408 526-4000 800 553-NETS (6387)Fax: 408 527-0883
Text Part Number: OL-30146-02
THE SPECIFICATIONS AND INFORMATION REGARDING THE PRODUCTS IN THIS MANUAL ARE SUBJECT TO CHANGE WITHOUT NOTICE. ALL STATEMENTS,INFORMATION, AND RECOMMENDATIONS IN THIS MANUAL ARE BELIEVED TO BE ACCURATE BUT ARE PRESENTED WITHOUT WARRANTY OF ANY KIND,EXPRESS OR IMPLIED. USERS MUST TAKE FULL RESPONSIBILITY FOR THEIR APPLICATION OF ANY PRODUCTS.
THE SOFTWARE LICENSE AND LIMITEDWARRANTY FOR THE ACCOMPANYING PRODUCT ARE SET FORTH IN THE INFORMATION PACKET THAT SHIPPED WITHTHE PRODUCT AND ARE INCORPORATED HEREIN BY THIS REFERENCE. IF YOU ARE UNABLE TO LOCATE THE SOFTWARE LICENSE OR LIMITED WARRANTY,CONTACT YOUR CISCO REPRESENTATIVE FOR A COPY.
The Cisco implementation of TCP header compression is an adaptation of a program developed by the University of California, Berkeley (UCB) as part of UCB's public domain versionof the UNIX operating system. All rights reserved. Copyright © 1981, Regents of the University of California.
NOTWITHSTANDINGANYOTHERWARRANTYHEREIN, ALL DOCUMENT FILES AND SOFTWARE OF THESE SUPPLIERS ARE PROVIDED “AS IS"WITH ALL FAULTS.CISCO AND THE ABOVE-NAMED SUPPLIERS DISCLAIM ALL WARRANTIES, EXPRESSED OR IMPLIED, INCLUDING, WITHOUT LIMITATION, THOSE OFMERCHANTABILITY, FITNESS FORA PARTICULAR PURPOSEANDNONINFRINGEMENTORARISING FROMACOURSEOFDEALING, USAGE, OR TRADE PRACTICE.
IN NO EVENT SHALL CISCO OR ITS SUPPLIERS BE LIABLE FOR ANY INDIRECT, SPECIAL, CONSEQUENTIAL, OR INCIDENTAL DAMAGES, INCLUDING, WITHOUTLIMITATION, LOST PROFITS OR LOSS OR DAMAGE TO DATA ARISING OUT OF THE USE OR INABILITY TO USE THIS MANUAL, EVEN IF CISCO OR ITS SUPPLIERSHAVE BEEN ADVISED OF THE POSSIBILITY OF SUCH DAMAGES.
Any Internet Protocol (IP) addresses and phone numbers used in this document are not intended to be actual addresses and phone numbers. Any examples, command display output, networktopology diagrams, and other figures included in the document are shown for illustrative purposes only. Any use of actual IP addresses or phone numbers in illustrative content is unintentionaland coincidental.
Cisco and the Cisco logo are trademarks or registered trademarks of Cisco and/or its affiliates in the U.S. and other countries. To view a list of Cisco trademarks, go to this URL: http://www.cisco.com/go/trademarks. Third-party trademarks mentioned are the property of their respective owners. The use of the word partner does not imply a partnershiprelationship between Cisco and any other company. (1110R)
© 2013 Cisco Systems, Inc. All rights reserved.

C O N T E N T S
P r e f a c e Preface v
Audience v
Conventions v
Related Documentation vii
Documentation Feedback vii
Obtaining Documentation and Submitting a Service Request vii
C H A P T E R 1 Overview 1
Cisco UCS Director EMC VMAX Management Overview 1
VMAX Reports 1
C H A P T E R 2 Installing EMC Solutions Enabler 3
Installing the EMC Solutions Enabler 3
Adding a Solutions Enabler Account 4
C H A P T E R 3 Managing VMAX 7
Summary of Steps 7
VMAX Management 8
Thin Pools 8
Creating A Thin Pool 9
Data Devices 9
Creating a Data Device 10
Thin Devices 10
Creating a Thin Device 11
Meta Devices 12
Creating a Meta Device 12
Initiator Groups 13
Cisco UCS Director EMC Symmetrix VMAX Management Guide, Release 4.0 OL-30146-02 iii
Creating an Initiator Group 14
Storage Groups 14
Creating an Empty Storage Group 15
Creating a Cascaded Storage Group 16
Port Groups 16
Creating a Port Group 17
Masking Views 17
Creating a Masking View 18
Cisco UCS Director EMC Symmetrix VMAX Management Guide, Release 4.0iv OL-30146-02
Contents

Preface
This preface contains the following sections:
• Audience, page v
• Conventions, page v
• Related Documentation, page vii
• Documentation Feedback, page vii
• Obtaining Documentation and Submitting a Service Request, page vii
AudienceThis guide is intended primarily for data center administrators who use Cisco UCS Director and who haveresponsibilities and expertise in one or more of the following:
• Server administration
• Storage administration
• Network administration
• Network security
ConventionsIndicationText Type
GUI elements such as tab titles, area names, and field labels appear in this font.
Main titles such as window, dialog box, and wizard titles appear in this font.
GUI elements
Document titles appear in this font.Document titles
In a Text-based User Interface, text the system displays appears in this font.TUI elements
Cisco UCS Director EMC Symmetrix VMAX Management Guide, Release 4.0 OL-30146-02 v
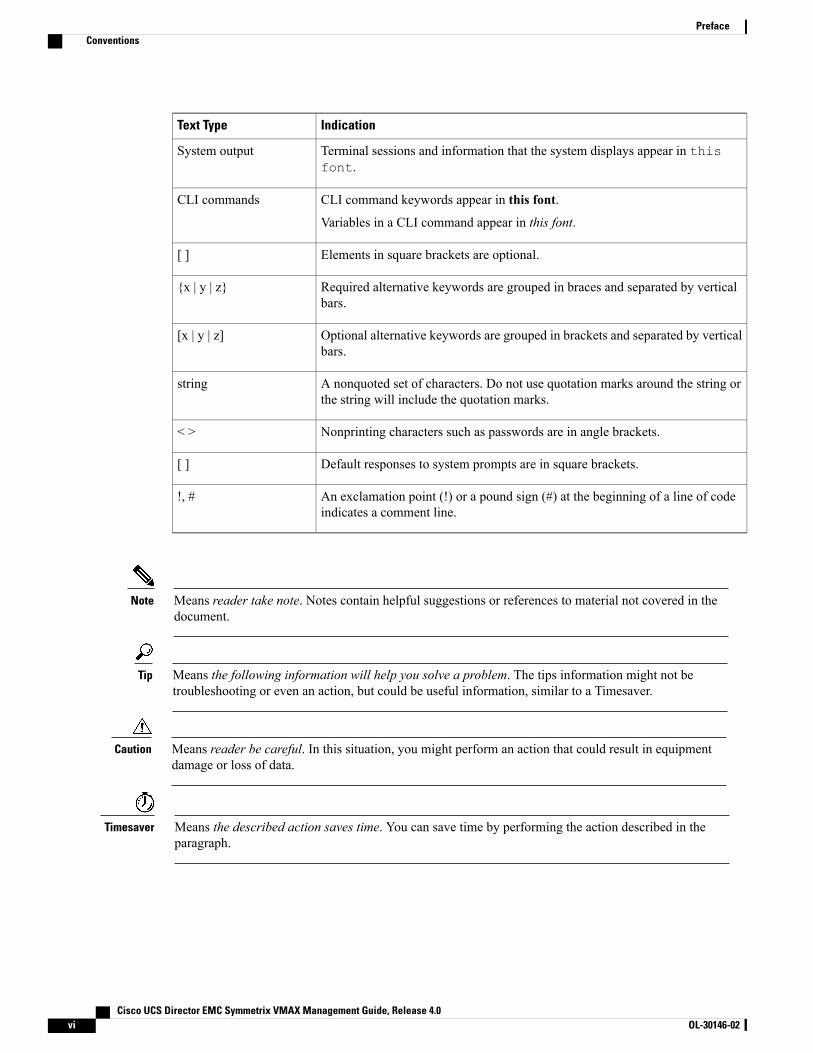
IndicationText Type
Terminal sessions and information that the system displays appear in thisfont.
System output
CLI command keywords appear in this font.
Variables in a CLI command appear in this font.
CLI commands
Elements in square brackets are optional.[ ]
Required alternative keywords are grouped in braces and separated by verticalbars.
{x | y | z}
Optional alternative keywords are grouped in brackets and separated by verticalbars.
[x | y | z]
A nonquoted set of characters. Do not use quotation marks around the string orthe string will include the quotation marks.
string
Nonprinting characters such as passwords are in angle brackets.< >
Default responses to system prompts are in square brackets.[ ]
An exclamation point (!) or a pound sign (#) at the beginning of a line of codeindicates a comment line.
!, #
Means reader take note. Notes contain helpful suggestions or references to material not covered in thedocument.
Note
Means the following information will help you solve a problem. The tips information might not betroubleshooting or even an action, but could be useful information, similar to a Timesaver.
Tip
Means reader be careful. In this situation, you might perform an action that could result in equipmentdamage or loss of data.
Caution
Means the described action saves time. You can save time by performing the action described in theparagraph.
Timesaver
Cisco UCS Director EMC Symmetrix VMAX Management Guide, Release 4.0vi OL-30146-02
PrefaceConventions
IMPORTANT SAFETY INSTRUCTIONS
This warning symbol means danger. You are in a situation that could cause bodily injury. Before youwork on any equipment, be aware of the hazards involved with electrical circuitry and be familiar withstandard practices for preventing accidents. Use the statement number provided at the end of each warningto locate its translation in the translated safety warnings that accompanied this device.
SAVE THESE INSTRUCTIONS
Warning
Related DocumentationCisco UCS Director Documentation Roadmap
For a complete list of Cisco UCS Director documentation, see the Cisco UCS Director DocumentationRoadmap available at the following URL: http://www.cisco.com/en/US/docs/unified_computing/ucs/ucs-director/doc-roadmap/b_UCSDirectorDocRoadmap.html.
Cisco UCS Documentation Roadmaps
For a complete list of all B-Series documentation, see theCiscoUCS B-Series Servers Documentation Roadmapavailable at the following URL: http://www.cisco.com/go/unifiedcomputing/b-series-doc.
For a complete list of all C-Series documentation, see theCiscoUCSC-Series Servers Documentation Roadmapavailable at the following URL: http://www.cisco.com/go/unifiedcomputing/c-series-doc.
Documentation FeedbackTo provide technical feedback on this document, or to report an error or omission, please send your commentsto [email protected]. We appreciate your feedback.
Obtaining Documentation and Submitting a Service RequestFor information on obtaining documentation, submitting a service request, and gathering additional information,see the monthly What's New in Cisco Product Documentation, which also lists all new and revised Ciscotechnical documentation.
Subscribe to theWhat's New in Cisco Product Documentation as a Really Simple Syndication (RSS) feedand set content to be delivered directly to your desktop using a reader application. The RSS feeds are a freeservice and Cisco currently supports RSS version 2.0.
Cisco UCS Director EMC Symmetrix VMAX Management Guide, Release 4.0 OL-30146-02 vii
PrefaceRelated Documentation

Cisco UCS Director EMC Symmetrix VMAX Management Guide, Release 4.0viii OL-30146-02
PrefaceObtaining Documentation and Submitting a Service Request
C H A P T E R 1Overview
This chapter contains the following sections:
• Cisco UCS Director EMC VMAX Management Overview, page 1
• VMAX Reports, page 1
Cisco UCS Director EMC VMAX Management OverviewCisco UCS Director supports EMC Symmetrix VMAX 10K and 20K. A VMAX license supports one engine(2 directors).
Cisco UCS Director connects to EMC VMAX using the EMC Solutions Enabler.
To manage VMAX in Cisco UCS Director, you use a Linux-based SMC or SPA server. We recommend Linuxversion 7.5.1+.
After building the Linux image and installing the EMC Solutions Enabler, you create an EMC VMAXSolutions Enabler account.
VMAX ReportsYou can see at a glance the following VMAX Summary reports:
• System capacity—Free vs. used (GB) pie chart
• System overview—Symmetrix version ID, Enginuity build version, model, Solution Enabler IP address,and number of engines, directors, thin devices, data devices, director ports, and disks.
• Storage—Total capacity, used capacity, and free capacity
Always click Refresh on the Summary tab to see updated information.Note
You can access tabs to create the following VMAX devices, views, pools, and groups. You can drill down toview details for each feature:
Cisco UCS Director EMC Symmetrix VMAX Management Guide, Release 4.0 OL-30146-02 1
• Thin Pools—Name
• Data Devices—Device count, capacity (GB), emulation, configuration, and disk group
• Thin Devices—Device count, capacity (GB), emulation, bind to thin pool (on/off), and option topre-allocate 100%
• Meta Devices—Head thin device selection, meta type, and member selection
• Initiator Groups—Group type (standard or cascaded), group name, type (iSCSI, FCP), and initiatorname. Consistent logical unit number (LUN) can be set to on or off.
• Storage Groups—Group type (empty or cascaded), and group name
• Port Groups—Group name and director port selection (all, none, or selected)
•Masking Views—View name, storage group selection, host LUN ID (specified or autogenerated),initiator group selection, and port group selection
The read-only report detail on VMAX system tabs includes the following information:
• Front EndDirectors—Symmetrix ID, director module, status, type, identification, and number of portsand directors
• Back End Directors—Director module, status, type, identification, and number of ports and directors
• Director Ports—Director module, port, maximum speed, port WWN, and node WWN
• Disks—Report ID, data center, account name, Symmetrix ID, technology, director module, externaldevelopment, hypervolume, disk location, ID, type, service status, disk group, target ID, service state,external WWN, speed, host spare, spindle ID, vendor, disk group name, interface, product, and capacitydata for disk groups
• Features—Name, type, capacity (GB), and Serial Advanced Technology Attachment (SATA) drivecapacity (GB)
• Tiers—Tier name, tier type, emulation, target protection, number of ports and directors, technology,disk location, and type
• Licenses—Feature name, license type, and capacity type
• Initiators—Initiator group, Challenge Handshake Authentication Protocol (CHAP) enablement, userport name, user node name, initiator, type, iSCSI name, common serial number, SPC2 protocol, SCSIsupport, environment, volume set addressing, and other data
• FAST Policies—Policy name, tiers, number of tiers, number of storage groups, and emulation
•Memory—Slot number and capacity
Cisco UCS Director EMC Symmetrix VMAX Management Guide, Release 4.02 OL-30146-02
OverviewVMAX Reports

C H A P T E R 2Installing EMC Solutions Enabler
This chapter contains the following sections:
• Installing the EMC Solutions Enabler, page 3
• Adding a Solutions Enabler Account, page 4
Installing the EMC Solutions EnablerFor the base Linux image, you can use an SMC or SPA server running CentOS, version 5.7 x86 or x86_64.
For an SMC server, allow 20GB of space. For an SPA server, allow at least 120GB.
You can add libraries and legacy libraries to the VM, such as glibc.
You will also need gatekeepers to use for Raw Device Mapping (RDMs). Allow 6-8K for each RDM.
Step 1 Create the base Linux image for the VM you will use.Step 2 Assign a few gatekeepers as RDMs.Step 3 Reboot the Linux VM.Step 4 From the EMC Powerlink site, download the Linux Solutions Enabler package (Version 7.3.1+), and the SMAS package
se7310-Linux-i386-ni.tar.gz.Use MD5 Checksum 9809ac14ed8bfcc19789d7d5671d6015
Step 5 Using SCP, transfer the tar file to your VM.Step 6 At a command prompt, enter the following command to decompress the tar file: [root@smc ~]# tar xzvf
se7310-Linux-i386-ni.tar.gzStep 7 Install the EMC Solutions Enabler by entering the following command: [root@smc ~]# ./se7310_install.sh -install]Step 8 Verify that the emc/symcli bin folder is in the Linux path. For example: /opt/emc/symcli/bin
Cisco UCS Director EMC Symmetrix VMAX Management Guide, Release 4.0 OL-30146-02 3
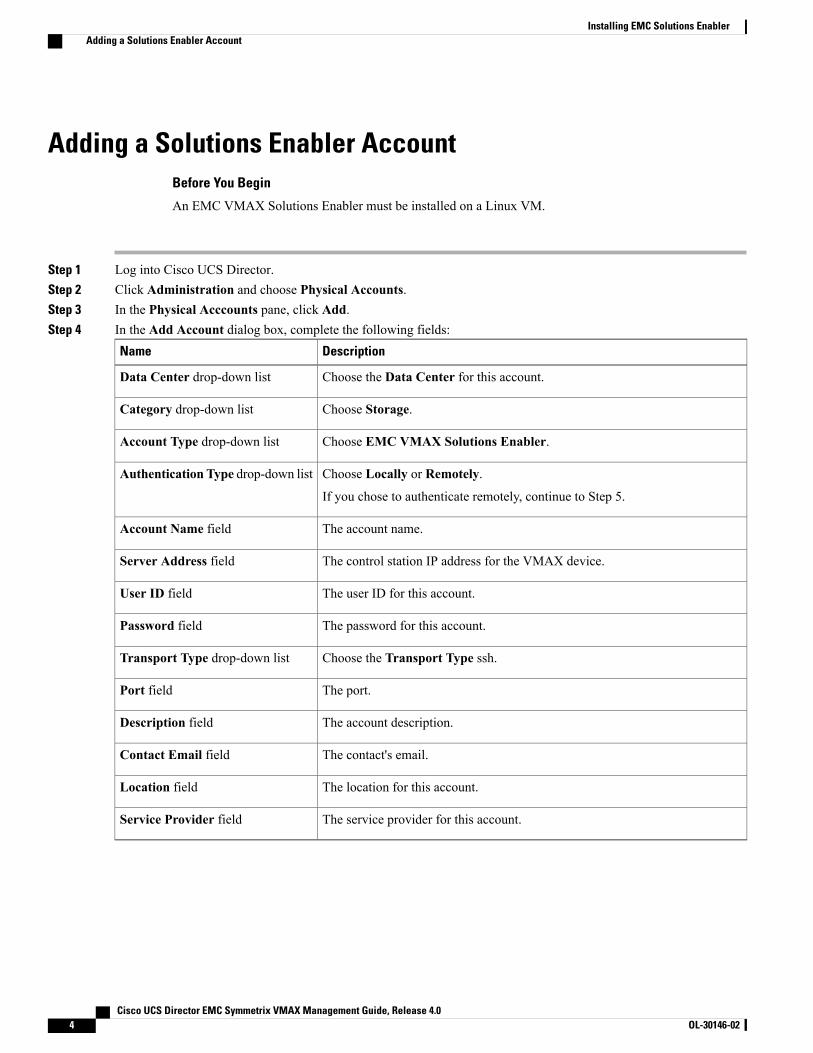
Adding a Solutions Enabler AccountBefore You Begin
An EMC VMAX Solutions Enabler must be installed on a Linux VM.
Step 1 Log into Cisco UCS Director.Step 2 Click Administration and choose Physical Accounts.Step 3 In the Physical Acccounts pane, click Add.Step 4 In the Add Account dialog box, complete the following fields:
DescriptionName
Choose the Data Center for this account.Data Center drop-down list
Choose Storage.Category drop-down list
Choose EMC VMAX Solutions Enabler.Account Type drop-down list
Choose Locally or Remotely.
If you chose to authenticate remotely, continue to Step 5.
Authentication Type drop-down list
The account name.Account Name field
The control station IP address for the VMAX device.Server Address field
The user ID for this account.User ID field
The password for this account.Password field
Choose the Transport Type ssh.Transport Type drop-down list
The port.Port field
The account description.Description field
The contact's email.Contact Email field
The location for this account.Location field
The service provider for this account.Service Provider field
Cisco UCS Director EMC Symmetrix VMAX Management Guide, Release 4.04 OL-30146-02
Installing EMC Solutions EnablerAdding a Solutions Enabler Account
Step 5 For remote authentication, complete the additional field for UCS Authentication Domain.Step 6 Click Add.Step 7 In the Physical Acccounts pane, choose the account.Step 8 Click Test Connection.
Cisco UCS Director EMC Symmetrix VMAX Management Guide, Release 4.0 OL-30146-02 5
Installing EMC Solutions EnablerAdding a Solutions Enabler Account
Cisco UCS Director EMC Symmetrix VMAX Management Guide, Release 4.06 OL-30146-02
Installing EMC Solutions EnablerAdding a Solutions Enabler Account
C H A P T E R 3Managing VMAX
This chapter contains the following sections:
• Summary of Steps, page 7
• VMAX Management, page 8
• Thin Pools, page 8
• Data Devices, page 9
• Thin Devices, page 10
• Meta Devices, page 12
• Initiator Groups, page 13
• Storage Groups, page 14
• Port Groups, page 16
• Masking Views, page 17
Summary of Steps
Step 1 Add the EMC VMAX account(s).After adding your account, you have a populated inventory for all reports, including drill-down reports for maskingviews, thin pools, initiator groups, port groups, storage groups, and devices.
Step 2 Manage the needed pools, groups, devices and views:a) Create the thin pools.b) Create all devices: data devices, thin devices, and meta devices.c) Create the initiator groups.d) Create the storage groups.e) Create the port groups.f) Associate FAST policies with the storage groups.g) Add devices to the storage groups.
Cisco UCS Director EMC Symmetrix VMAX Management Guide, Release 4.0 OL-30146-02 7
h) Create the masking views.
VMAX ManagementIn a Cisco UCS Director EMC VMAX account you manage the following pools, groups, devices, and views:
• Thin pools—Create/delete, expand, bind/unbind, and view details
• Devices—data devices, thin devices, and meta devices
• Initiator groups—Create/delete, rename, add/remove initiator, replace initiator, set override flags, andview details
• Storage groups—Create/delete, rename, add/remove device, associate/disassociate FAST policy, andview details
• Port groups—Create/delete, rename, add/remove port, and view details
• Masking views—Create/delete, rename, and view details
Thin PoolsA new thin pool requires a unique name.
Click buttons on the Thin Pools tab for the following actions:DescriptionButton Name
Create a thin pool.Create
Expand a thin pool.Expand
Bind a thin pool.Bind
Unbind a thin pool.Unbind
View detailed reports on a thin pool.View Details
Delete a thin pool.Delete
Cisco UCS Director EMC Symmetrix VMAX Management Guide, Release 4.08 OL-30146-02
Managing VMAXVMAX Management
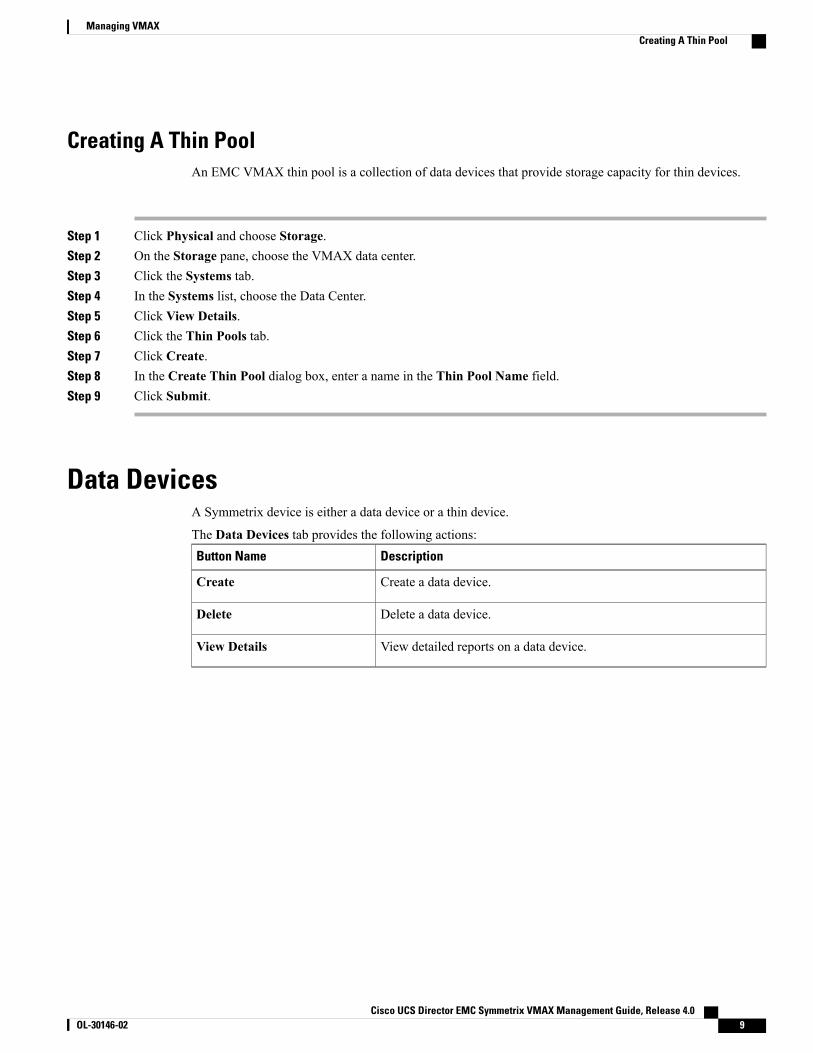
Creating A Thin PoolAn EMC VMAX thin pool is a collection of data devices that provide storage capacity for thin devices.
Step 1 Click Physical and choose Storage.Step 2 On the Storage pane, choose the VMAX data center.Step 3 Click the Systems tab.Step 4 In the Systems list, choose the Data Center.Step 5 Click View Details.Step 6 Click the Thin Pools tab.Step 7 Click Create.Step 8 In the Create Thin Pool dialog box, enter a name in the Thin Pool Name field.Step 9 Click Submit.
Data DevicesA Symmetrix device is either a data device or a thin device.
The Data Devices tab provides the following actions:DescriptionButton Name
Create a data device.Create
Delete a data device.Delete
View detailed reports on a data device.View Details
Cisco UCS Director EMC Symmetrix VMAX Management Guide, Release 4.0 OL-30146-02 9
Managing VMAXCreating A Thin Pool

Creating a Data Device
Step 1 Click Physical and choose Storage.Step 2 On the Storage pane, choose the VMAX system.Step 3 Click the Systems tab.Step 4 In the Systems list, choose the Data Center.Step 5 Click View Details.Step 6 Click the Data Devices tab.Step 7 Click Create.Step 8 In the Create Data Device dialog box, complete the following fields:Step 9 DescriptionName
The data device count.Device Count field
The capacity, in gigabytes.Capacity (GB) field
Choose the Emulation type for the data device.Emulation drop-down list
Choose the Configuration for the data device.Configuration field
The disk group name.Disk Group field
Step 10 Click Submit.
What to Do Next
You can select a device and click View Details to see the drill-down report.
Thin DevicesA Symmetrix device is either a thin device or a data device.
The maximum size of a VMAX thin device (TDEV) is ~240 GB.
If you want to create a TDEV greater than this size, combine TDEVs to form a meta device. Each TDEVcan be part of only one meta device.
Note
The Thin Devices tab provides the following actions:
Cisco UCS Director EMC Symmetrix VMAX Management Guide, Release 4.010 OL-30146-02
Managing VMAXCreating a Data Device
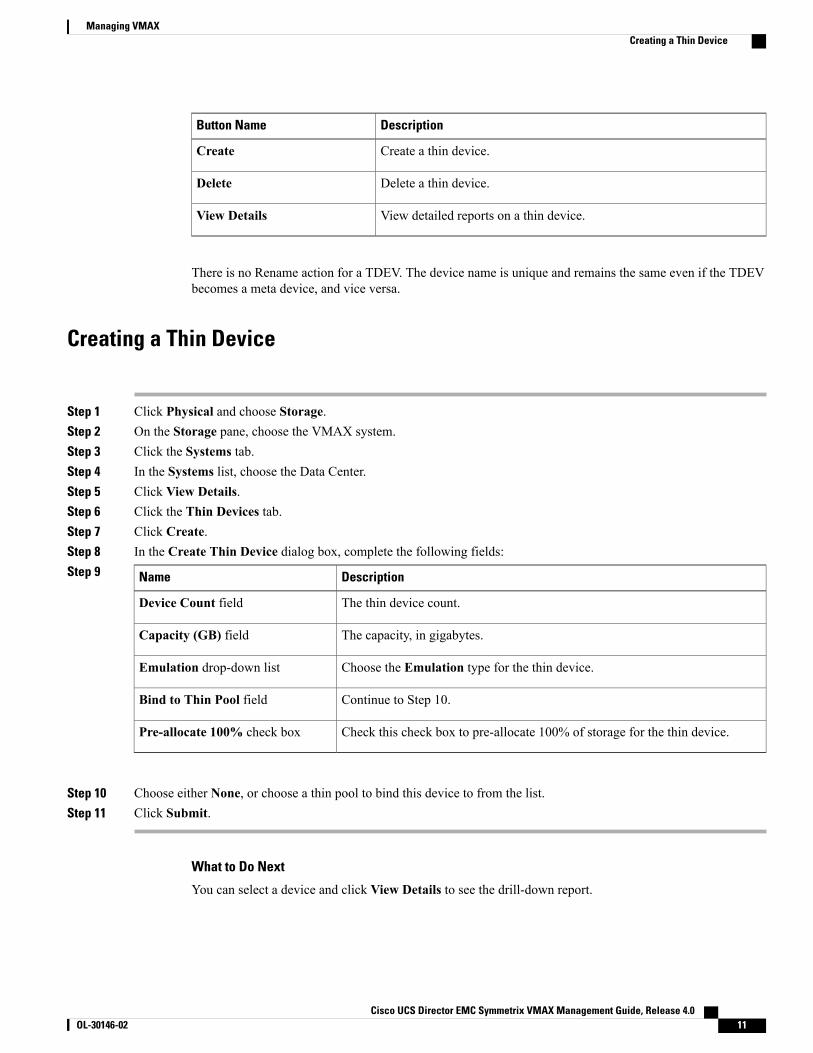
DescriptionButton Name
Create a thin device.Create
Delete a thin device.Delete
View detailed reports on a thin device.View Details
There is no Rename action for a TDEV. The device name is unique and remains the same even if the TDEVbecomes a meta device, and vice versa.
Creating a Thin Device
Step 1 Click Physical and choose Storage.Step 2 On the Storage pane, choose the VMAX system.Step 3 Click the Systems tab.Step 4 In the Systems list, choose the Data Center.Step 5 Click View Details.Step 6 Click the Thin Devices tab.Step 7 Click Create.Step 8 In the Create Thin Device dialog box, complete the following fields:Step 9 DescriptionName
The thin device count.Device Count field
The capacity, in gigabytes.Capacity (GB) field
Choose the Emulation type for the thin device.Emulation drop-down list
Continue to Step 10.Bind to Thin Pool field
Check this check box to pre-allocate 100% of storage for the thin device.Pre-allocate 100% check box
Step 10 Choose either None, or choose a thin pool to bind this device to from the list.Step 11 Click Submit.
What to Do Next
You can select a device and click View Details to see the drill-down report.
Cisco UCS Director EMC Symmetrix VMAX Management Guide, Release 4.0 OL-30146-02 11
Managing VMAXCreating a Thin Device

Meta DevicesA meta device enables you to aggregate thin devices to increase device size.
You can create a meta device with a thin device as the head, and other thin devices as members. The totalmeta device size is the combination of the head size, and all the member device sizes.
There is no Delete action for a meta device. Removing the members from a meta device results in a thindevice.
Note
TheMeta Devices tab provides the following actions:DescriptionButton Name
Create a new meta device.Create Meta
View detailed reports on a meta member device.View Details
Creating a Meta Device
Step 1 Click Physical and choose Storage.Step 2 On the Storage pane, choose the VMAX system.Step 3 Click the Systems tab.Step 4 In the Systems list, choose the Data Center.Step 5 Click View Details.Step 6 Click theMeta Devices tab.Step 7 Click Create Meta.Step 8 In the Create Meta Device dialog box, complete the following fields:Step 9 DescriptionName
Click Select.
Continue to Step 10.
Select Head Thin Device field
Choose theMeta Type type.Meta Type drop-down list
Click Select.
Continue to Step 11.
Select Member Device(s) field
Cisco UCS Director EMC Symmetrix VMAX Management Guide, Release 4.012 OL-30146-02
Managing VMAXMeta Devices
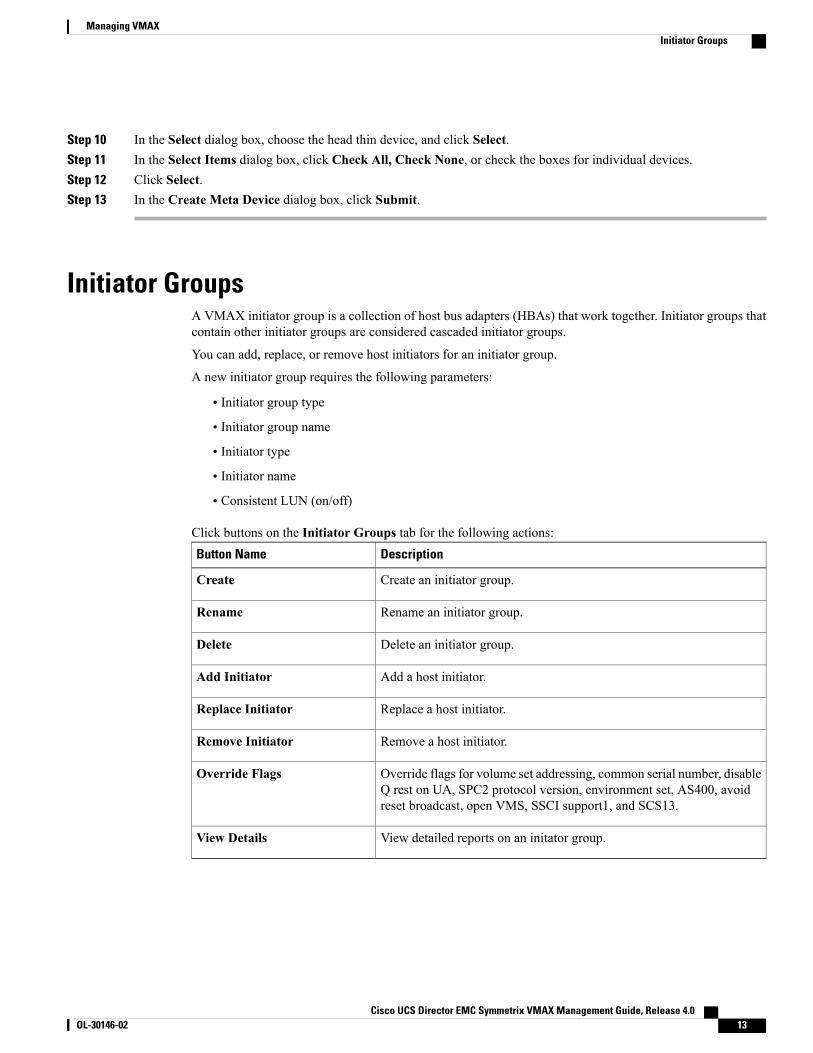
Step 10 In the Select dialog box, choose the head thin device, and click Select.Step 11 In the Select Items dialog box, click Check All, Check None, or check the boxes for individual devices.Step 12 Click Select.Step 13 In the Create Meta Device dialog box, click Submit.
Initiator GroupsA VMAX initiator group is a collection of host bus adapters (HBAs) that work together. Initiator groups thatcontain other initiator groups are considered cascaded initiator groups.
You can add, replace, or remove host initiators for an initiator group.
A new initiator group requires the following parameters:
• Initiator group type
• Initiator group name
• Initiator type
• Initiator name
• Consistent LUN (on/off)
Click buttons on the Initiator Groups tab for the following actions:DescriptionButton Name
Create an initiator group.Create
Rename an initiator group.Rename
Delete an initiator group.Delete
Add a host initiator.Add Initiator
Replace a host initiator.Replace Initiator
Remove a host initiator.Remove Initiator
Override flags for volume set addressing, common serial number, disableQ rest on UA, SPC2 protocol version, environment set, AS400, avoidreset broadcast, open VMS, SSCI support1, and SCS13.
Override Flags
View detailed reports on an initator group.View Details
Cisco UCS Director EMC Symmetrix VMAX Management Guide, Release 4.0 OL-30146-02 13
Managing VMAXInitiator Groups
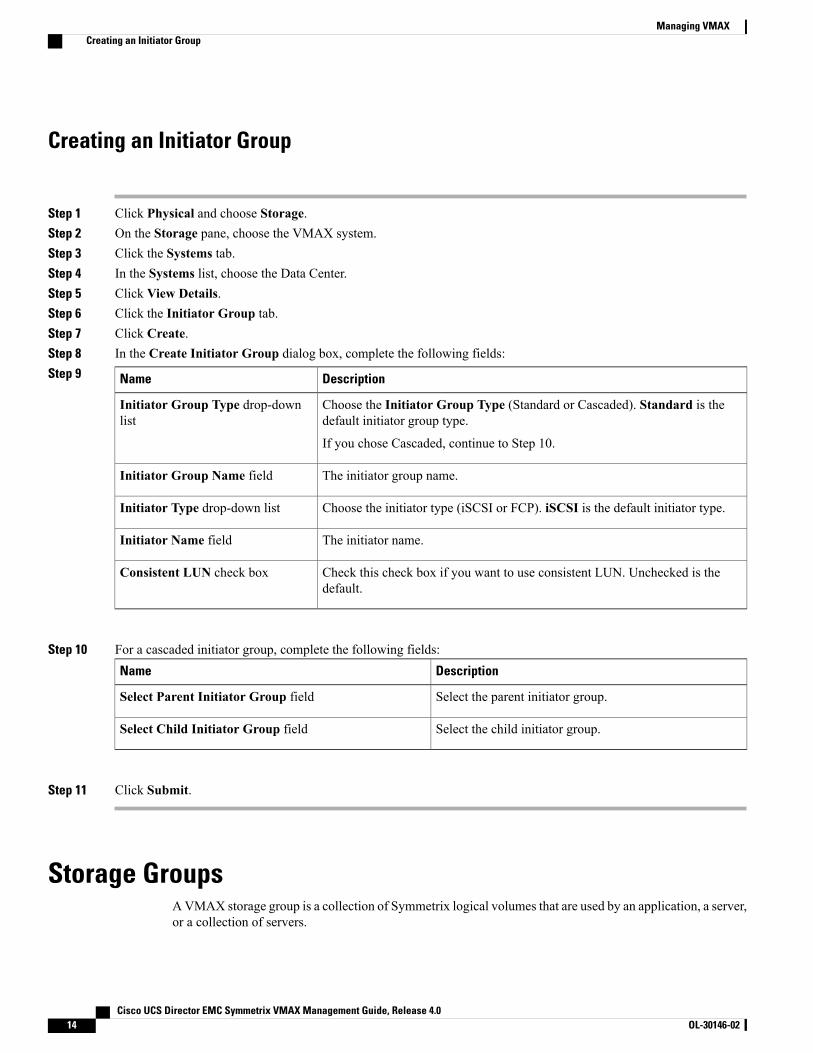
Creating an Initiator Group
Step 1 Click Physical and choose Storage.Step 2 On the Storage pane, choose the VMAX system.Step 3 Click the Systems tab.Step 4 In the Systems list, choose the Data Center.Step 5 Click View Details.Step 6 Click the Initiator Group tab.Step 7 Click Create.Step 8 In the Create Initiator Group dialog box, complete the following fields:Step 9 DescriptionName
Choose the Initiator Group Type (Standard or Cascaded). Standard is thedefault initiator group type.
If you chose Cascaded, continue to Step 10.
Initiator Group Type drop-downlist
The initiator group name.Initiator Group Name field
Choose the initiator type (iSCSI or FCP). iSCSI is the default initiator type.Initiator Type drop-down list
The initiator name.Initiator Name field
Check this check box if you want to use consistent LUN. Unchecked is thedefault.
Consistent LUN check box
Step 10 For a cascaded initiator group, complete the following fields:DescriptionName
Select the parent initiator group.Select Parent Initiator Group field
Select the child initiator group.Select Child Initiator Group field
Step 11 Click Submit.
Storage GroupsAVMAX storage group is a collection of Symmetrix logical volumes that are used by an application, a server,or a collection of servers.
Cisco UCS Director EMC Symmetrix VMAX Management Guide, Release 4.014 OL-30146-02
Managing VMAXCreating an Initiator Group
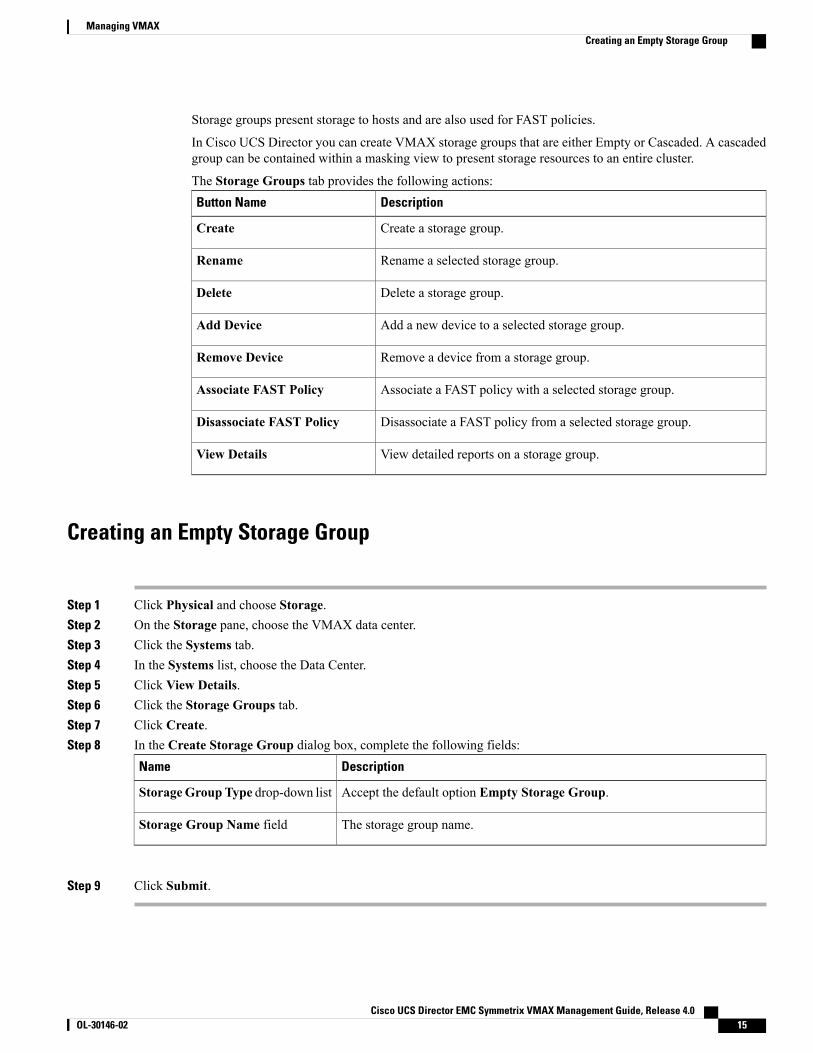
Storage groups present storage to hosts and are also used for FAST policies.
In Cisco UCS Director you can create VMAX storage groups that are either Empty or Cascaded. A cascadedgroup can be contained within a masking view to present storage resources to an entire cluster.
The Storage Groups tab provides the following actions:DescriptionButton Name
Create a storage group.Create
Rename a selected storage group.Rename
Delete a storage group.Delete
Add a new device to a selected storage group.Add Device
Remove a device from a storage group.Remove Device
Associate a FAST policy with a selected storage group.Associate FAST Policy
Disassociate a FAST policy from a selected storage group.Disassociate FAST Policy
View detailed reports on a storage group.View Details
Creating an Empty Storage Group
Step 1 Click Physical and choose Storage.Step 2 On the Storage pane, choose the VMAX data center.Step 3 Click the Systems tab.Step 4 In the Systems list, choose the Data Center.Step 5 Click View Details.Step 6 Click the Storage Groups tab.Step 7 Click Create.Step 8 In the Create Storage Group dialog box, complete the following fields:
DescriptionName
Accept the default option Empty Storage Group.StorageGroupType drop-down list
The storage group name.Storage Group Name field
Step 9 Click Submit.
Cisco UCS Director EMC Symmetrix VMAX Management Guide, Release 4.0 OL-30146-02 15
Managing VMAXCreating an Empty Storage Group
What to Do Next
Add devices and associate FAST policies to the storage group.
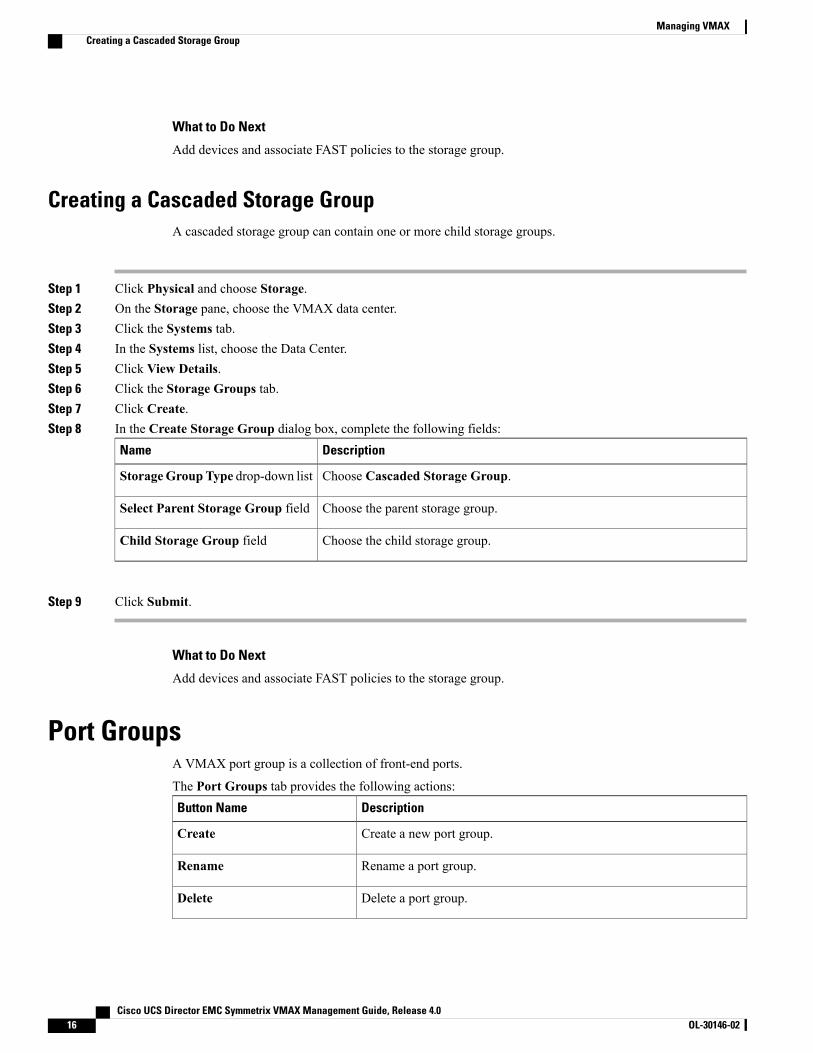
Creating a Cascaded Storage GroupA cascaded storage group can contain one or more child storage groups.
Step 1 Click Physical and choose Storage.Step 2 On the Storage pane, choose the VMAX data center.Step 3 Click the Systems tab.Step 4 In the Systems list, choose the Data Center.Step 5 Click View Details.Step 6 Click the Storage Groups tab.Step 7 Click Create.Step 8 In the Create Storage Group dialog box, complete the following fields:
DescriptionName
Choose Cascaded Storage Group.StorageGroupType drop-down list
Choose the parent storage group.Select Parent Storage Group field
Choose the child storage group.Child Storage Group field
Step 9 Click Submit.
What to Do Next
Add devices and associate FAST policies to the storage group.
Port GroupsA VMAX port group is a collection of front-end ports.
The Port Groups tab provides the following actions:DescriptionButton Name
Create a new port group.Create
Rename a port group.Rename
Delete a port group.Delete
Cisco UCS Director EMC Symmetrix VMAX Management Guide, Release 4.016 OL-30146-02
Managing VMAXCreating a Cascaded Storage Group
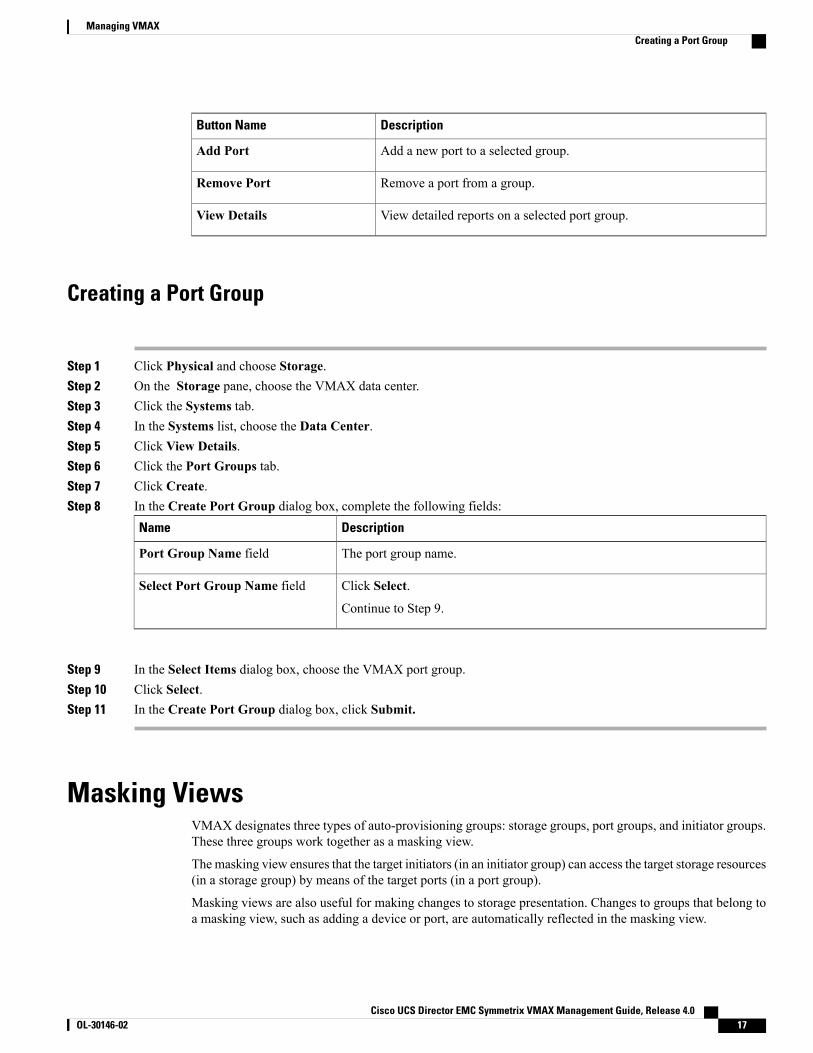
DescriptionButton Name
Add a new port to a selected group.Add Port
Remove a port from a group.Remove Port
View detailed reports on a selected port group.View Details
Creating a Port Group
Step 1 Click Physical and choose Storage.Step 2 On the Storage pane, choose the VMAX data center.Step 3 Click the Systems tab.Step 4 In the Systems list, choose the Data Center.Step 5 Click View Details.Step 6 Click the Port Groups tab.Step 7 Click Create.Step 8 In the Create Port Group dialog box, complete the following fields:
DescriptionName
The port group name.Port Group Name field
Click Select.
Continue to Step 9.
Select Port Group Name field
Step 9 In the Select Items dialog box, choose the VMAX port group.Step 10 Click Select.Step 11 In the Create Port Group dialog box, click Submit.
Masking ViewsVMAX designates three types of auto-provisioning groups: storage groups, port groups, and initiator groups.These three groups work together as a masking view.
The masking view ensures that the target initiators (in an initiator group) can access the target storage resources(in a storage group) by means of the target ports (in a port group).
Masking views are also useful for making changes to storage presentation. Changes to groups that belong toa masking view, such as adding a device or port, are automatically reflected in the masking view.
Cisco UCS Director EMC Symmetrix VMAX Management Guide, Release 4.0 OL-30146-02 17
Managing VMAXCreating a Port Group
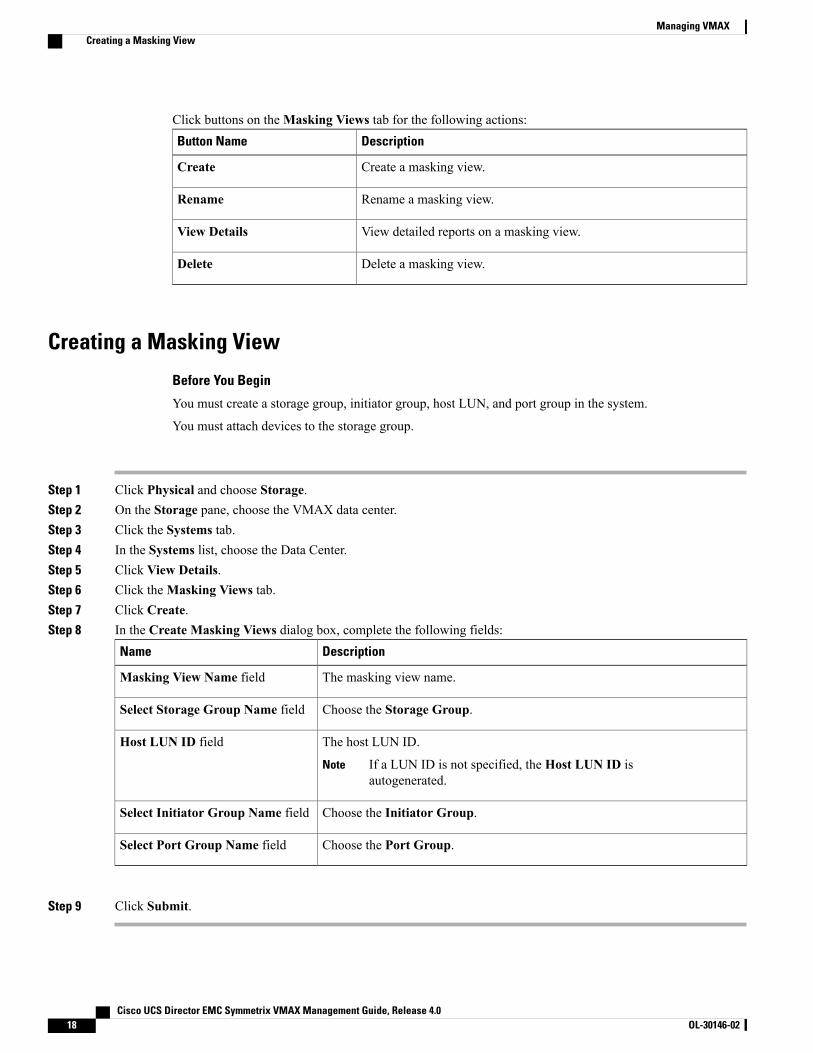
Click buttons on theMasking Views tab for the following actions:DescriptionButton Name
Create a masking view.Create
Rename a masking view.Rename
View detailed reports on a masking view.View Details
Delete a masking view.Delete
Creating a Masking View
Before You Begin
You must create a storage group, initiator group, host LUN, and port group in the system.
You must attach devices to the storage group.
Step 1 Click Physical and choose Storage.Step 2 On the Storage pane, choose the VMAX data center.Step 3 Click the Systems tab.Step 4 In the Systems list, choose the Data Center.Step 5 Click View Details.Step 6 Click theMasking Views tab.Step 7 Click Create.Step 8 In the Create Masking Views dialog box, complete the following fields:
DescriptionName
The masking view name.Masking View Name field
Choose the Storage Group.Select Storage Group Name field
The host LUN ID.
If a LUN ID is not specified, the Host LUN ID isautogenerated.
Note
Host LUN ID field
Choose the Initiator Group.Select Initiator Group Name field
Choose the Port Group.Select Port Group Name field
Step 9 Click Submit.
Cisco UCS Director EMC Symmetrix VMAX Management Guide, Release 4.018 OL-30146-02
Managing VMAXCreating a Masking View

Cisco UCS Director EMC Symmetrix VMAX Management Guide, Release 4.0 OL-30146-02 19
Managing VMAXCreating a Masking View
Cisco UCS Director EMC Symmetrix VMAX Management Guide, Release 4.020 OL-30146-02
Managing VMAXCreating a Masking View


