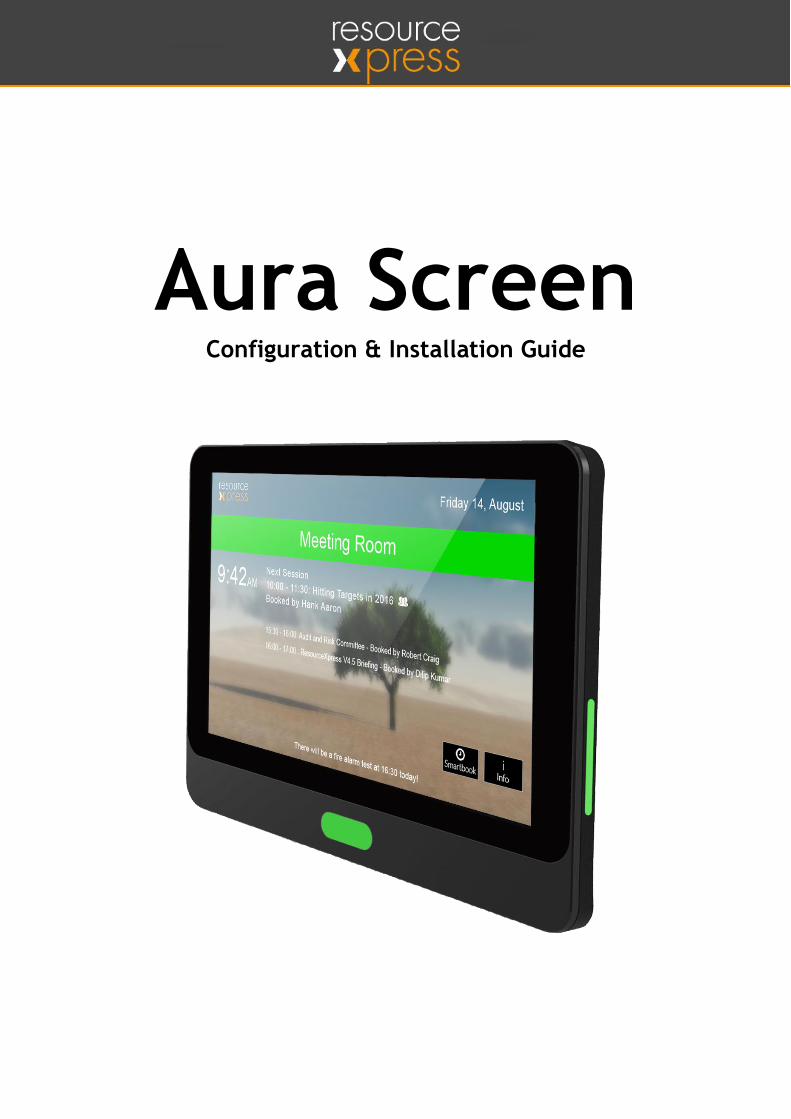
Configuration & Installation Guide
Aura Screen
Smart Resource Booking Technology www.resourcexpress.com 2
Copyright
No part of this publication may be reproduced, transcribed, transmitted, stored in a retrieval
system or translated into any language, in any form or by any means mechanical, manual,
electronic, magnetic, chemical, optical, including photocopying or otherwise without the prior
written permission of QED Advanced Systems Ltd.
Confidentiality
This document is the property of QED Advanced Systems Ltd, and is provided on the understanding
that its use will be confined to the officers of your company and that no part of its contents will
be disclosed to third parties without the prior written consent of QED Advanced Systems Ltd. This
online publication is to be returned to QED Advanced Systems Ltd when it is no longer required
for the agreed purpose.
Version
Document version Date
Acknowledgements
QED Advanced Systems Ltd respectfully acknowledges all trademarks, trade names and other
unique identification symbols, whether implied or explicit, used within this document.
QED Advanced Systems Ltd.
The Hive
Beaufighter Road
Weston-Super-Mare
BS24 8EE
UK
Tel: +44 (0)1934 836960 Email: [email protected]
Web: www.ResourceXpress.com
Version 1.1 Sep 2016

Smart Resource Booking Technology www.resourcexpress.com 3
Contents Package Contents ........................................................................................................................................4
Pre-Requisites ..............................................................................................................................................4
Aura Description ..........................................................................................................................................4
Specification ................................................................................................................................................5
Rear Panel Inputs .................................................................................................................................6
Procedures ..................................................................................................................................................7
Power On .............................................................................................................................................7
Configure Wi-Fi .................................................................................................................................7
Configure Static IP (for Wi-Fi) ............................................................................................................11
Configure Ethernet ............................................................................................................................12
Configure Static IP (For Ethernet) ......................................................................................................14
Configure ResourceXpress URL ..........................................................................................................15
Appendix A: Remote Firmware Update Configuration ..............................................................................18
Schedule daily reboot ........................................................................................................................20
Remote Firmware Update URL ..........................................................................................................21
Preparing Firmware Upgrade Path on Server ....................................................................................22
Add Firmware Upgrade Files ..............................................................................................................23
Appendix B: Changing the Default Security PIN .........................................................................................24
Appendix C: Mounting Instructions ..........................................................................................................25
Appendix D: Safety and Warnings ............................................................................................................26
Smart Resource Booking Technology www.resourcexpress.com 4
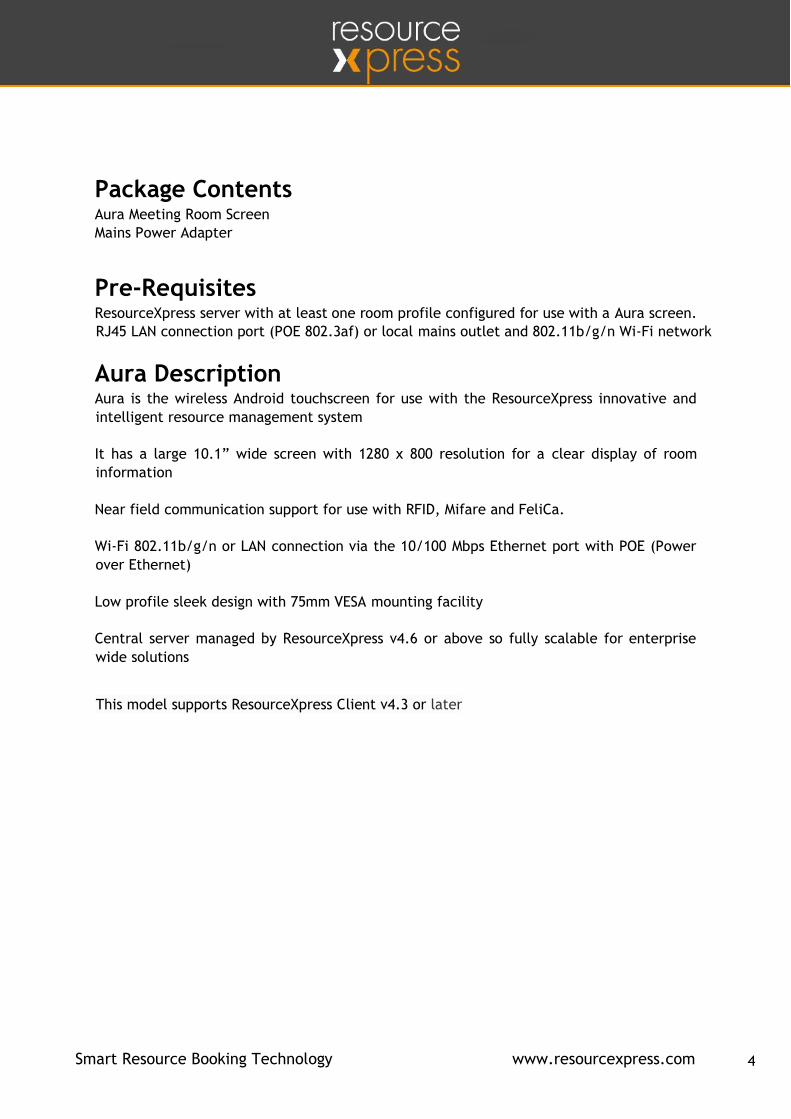
Package Contents Aura Meeting Room Screen
Mains Power Adapter
Pre-Requisites ResourceXpress server with at least one room profile configured for use with a Aura screen.
RJ45 LAN connection port (POE 802.3af) or local mains outlet and 802.11b/g/n Wi-Fi network
Aura Description Aura is the wireless Android touchscreen for use with the ResourceXpress innovative and
intelligent resource management system
It has a large 10.1” wide screen with 1280 x 800 resolution for a clear display of room
information
Near field communication support for use with RFID, Mifare and FeliCa.
Wi-Fi 802.11b/g/n or LAN connection via the 10/100 Mbps Ethernet port with POE (Power
over Ethernet)
Low profile sleek design with 75mm VESA mounting facility
Central server managed by ResourceXpress v4.6 or above so fully scalable for enterprise
wide solutions
This model supports ResourceXpress Client v4.3 or later
Smart Resource Booking Technology www.resourcexpress.com 5
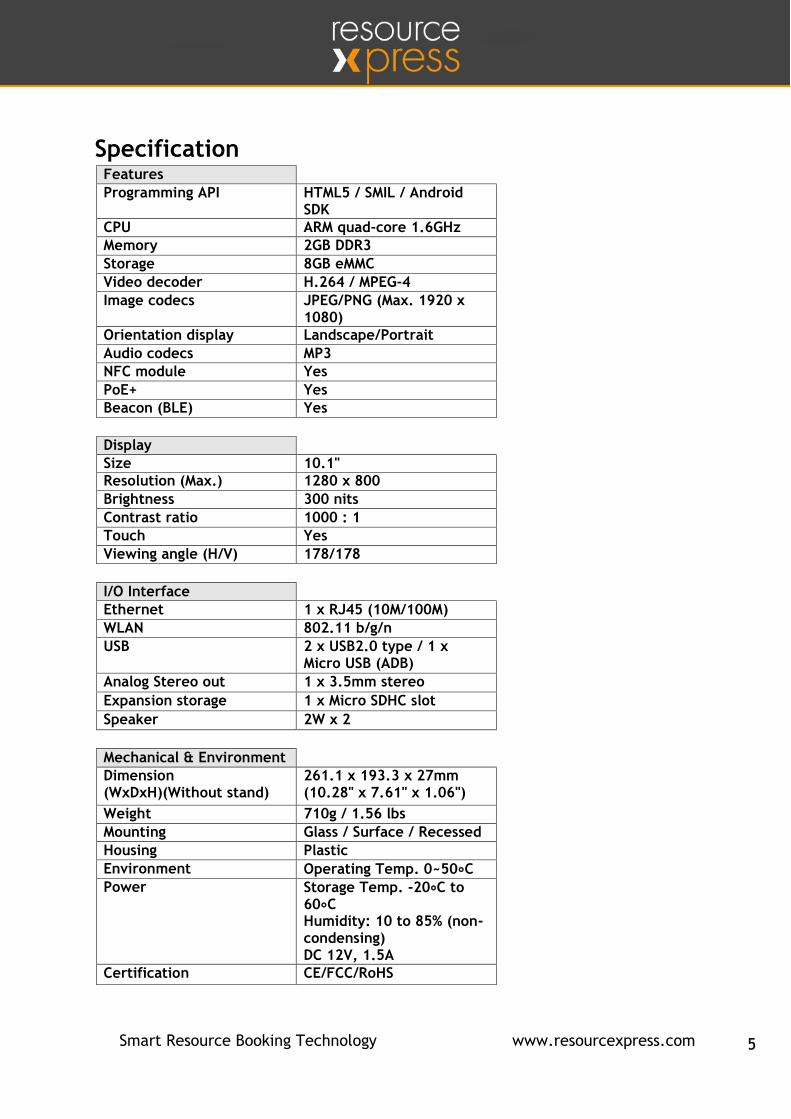
Specification Features
Programming API HTML5 / SMIL / Android SDK
CPU ARM quad-core 1.6GHz
Memory 2GB DDR3
Storage 8GB eMMC
Video decoder H.264 / MPEG-4
Image codecs JPEG/PNG (Max. 1920 x 1080)
Orientation display Landscape/Portrait
Audio codecs MP3
NFC module Yes
PoE+ Yes
Beacon (BLE) Yes
Display
Size 10.1"
Resolution (Max.) 1280 x 800
Brightness 300 nits
Contrast ratio 1000 : 1
Touch Yes
Viewing angle (H/V) 178/178
I/O Interface
Ethernet 1 x RJ45 (10M/100M)
WLAN 802.11 b/g/n
USB 2 x USB2.0 type / 1 x Micro USB (ADB)
Analog Stereo out 1 x 3.5mm stereo
Expansion storage 1 x Micro SDHC slot
Speaker 2W x 2
Mechanical & Environment
Dimension (WxDxH)(Without stand)
261.1 x 193.3 x 27mm (10.28" x 7.61" x 1.06")
Weight 710g / 1.56 lbs
Mounting Glass / Surface / Recessed
Housing Plastic
Environment Operating Temp. 0~50∘C
Power Storage Temp. -20∘C to 60∘C Humidity: 10 to 85% (non-condensing) DC 12V, 1.5A
Certification CE/FCC/RoHS
Smart Resource Booking Technology www.resourcexpress.com 6
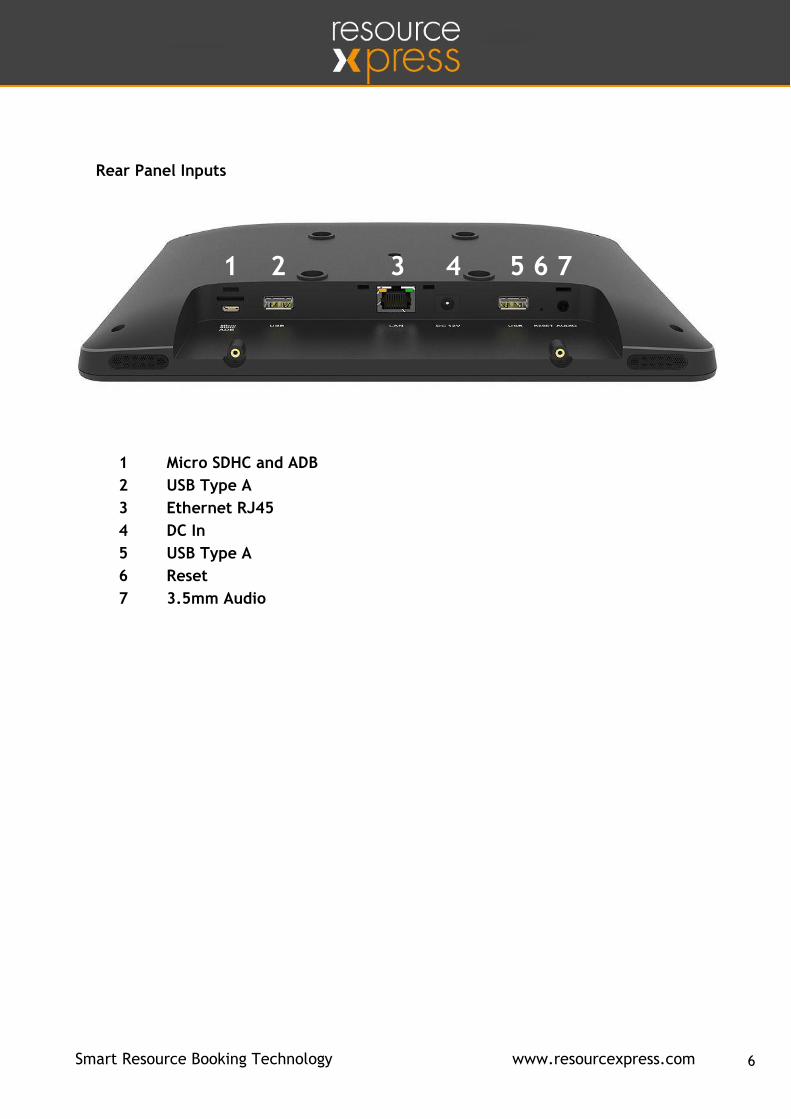
Rear Panel Inputs
1 Micro SDHC and ADB
2 USB Type A
3 Ethernet RJ45
4 DC In
5 USB Type A
6 Reset
7 3.5mm Audio
1 2 3 4 5 6 7
Smart Resource Booking Technology www.resourcexpress.com 7
Procedures Power On
Ensure the screen is connected to a power supply using the provided power cable. During
boot the LED will be lit up on the front of the device and then the screen will turn on.
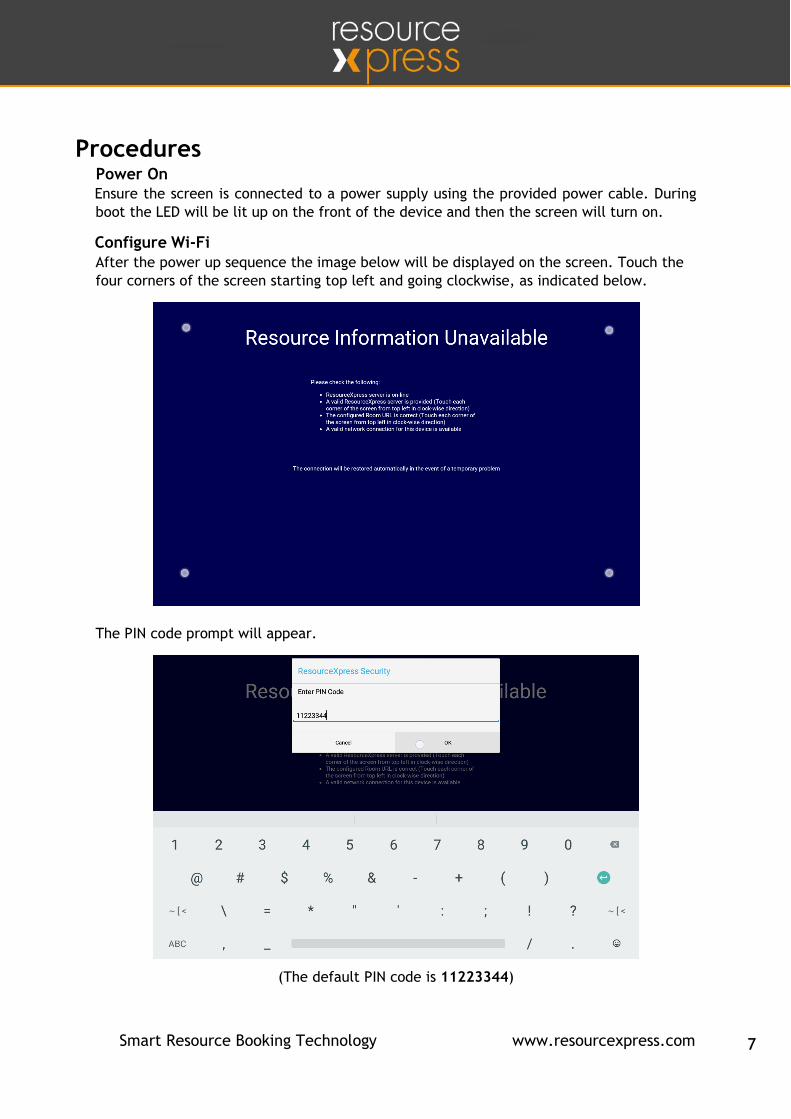
Configure Wi-Fi
After the power up sequence the image below will be displayed on the screen. Touch the
four corners of the screen starting top left and going clockwise, as indicated below.
The PIN code prompt will appear.
(The default PIN code is 11223344)
Smart Resource Booking Technology www.resourcexpress.com 8
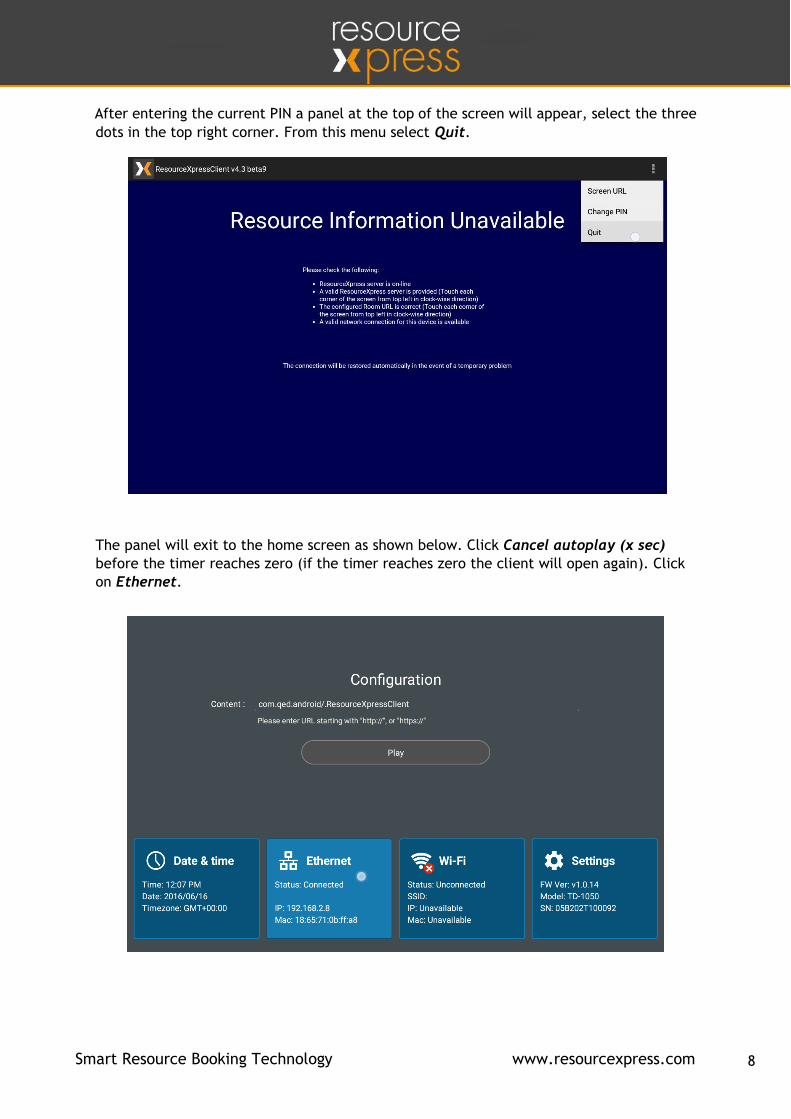
After entering the current PIN a panel at the top of the screen will appear, select the three
dots in the top right corner. From this menu select Quit.
The panel will exit to the home screen as shown below. Click Cancel autoplay (x sec)
before the timer reaches zero (if the timer reaches zero the client will open again). Click
on Ethernet.
Smart Resource Booking Technology www.resourcexpress.com 9
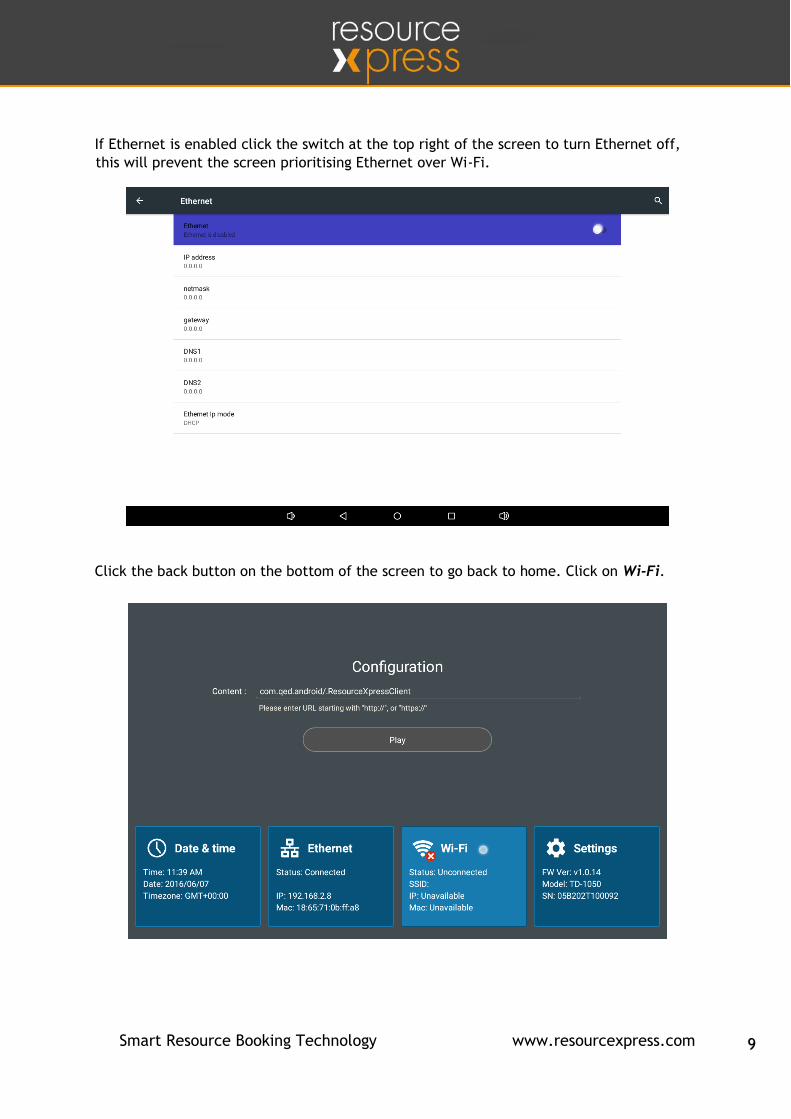
If Ethernet is enabled click the switch at the top right of the screen to turn Ethernet off,
this will prevent the screen prioritising Ethernet over Wi-Fi.
Click the back button on the bottom of the screen to go back to home. Click on Wi-Fi.
Smart Resource Booking Technology www.resourcexpress.com 10
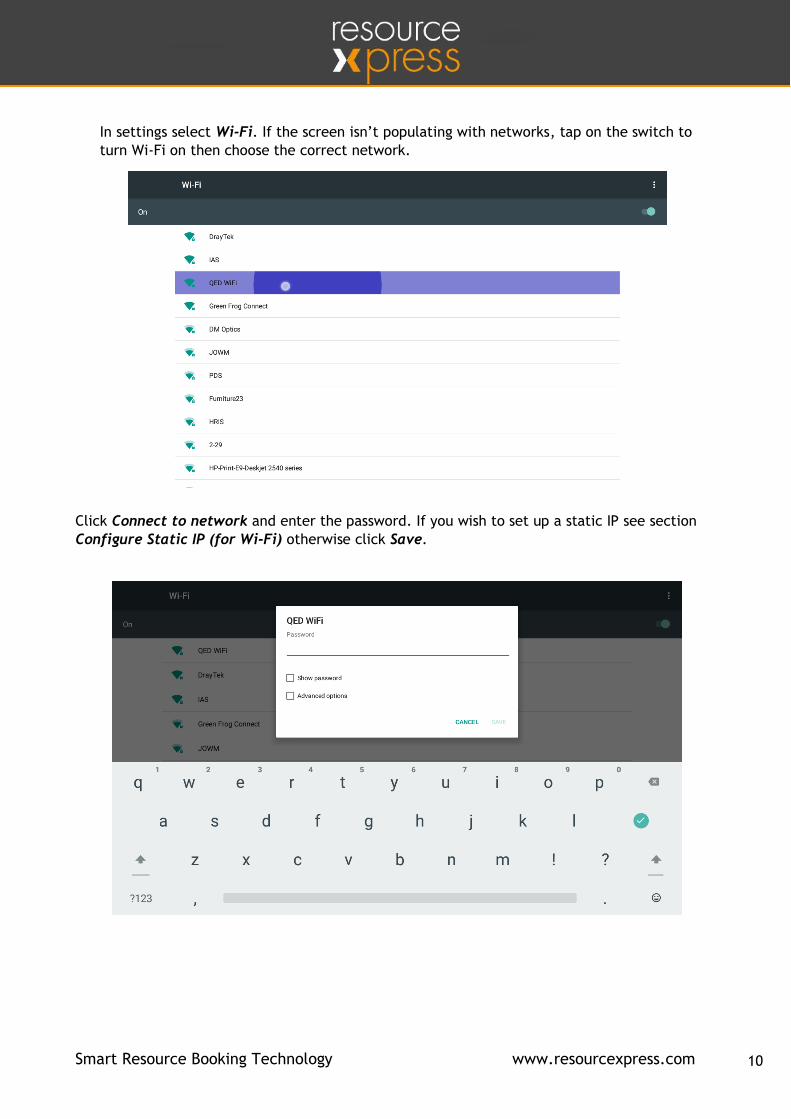
In settings select Wi-Fi. If the screen isn’t populating with networks, tap on the switch to
turn Wi-Fi on then choose the correct network.
Click Connect to network and enter the password. If you wish to set up a static IP see section
Configure Static IP (for Wi-Fi) otherwise click Save.
Smart Resource Booking Technology www.resourcexpress.com 11
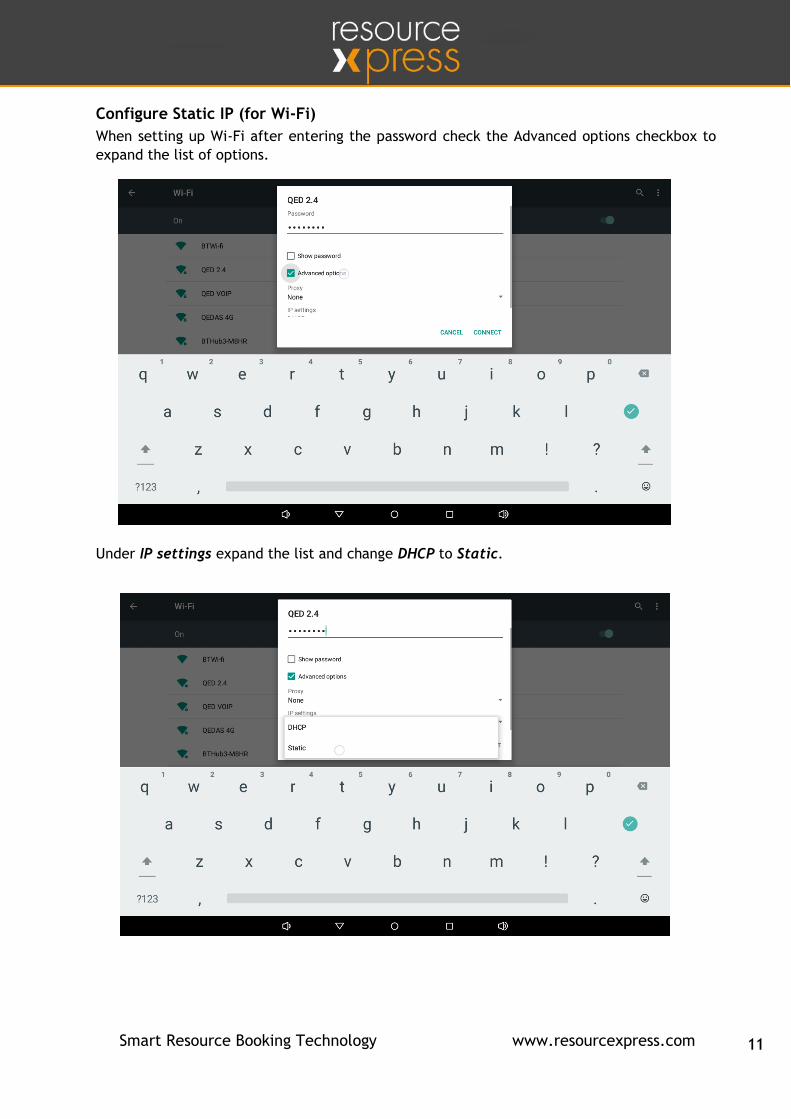
Configure Static IP (for Wi-Fi)
When setting up Wi-Fi after entering the password check the Advanced options checkbox to
expand the list of options.
Under IP settings expand the list and change DHCP to Static.
Smart Resource Booking Technology www.resourcexpress.com 12
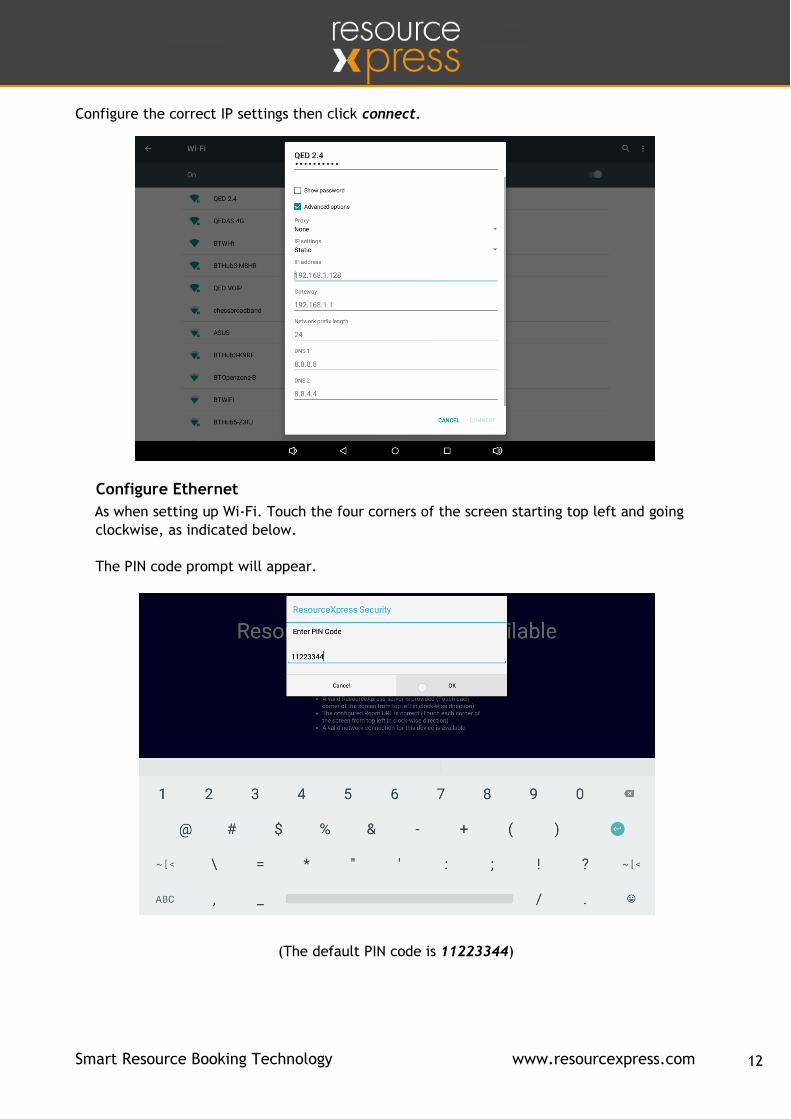
Configure the correct IP settings then click connect.
Configure Ethernet
As when setting up Wi-Fi. Touch the four corners of the screen starting top left and going
clockwise, as indicated below.
The PIN code prompt will appear.
(The default PIN code is 11223344)
Smart Resource Booking Technology www.resourcexpress.com 13
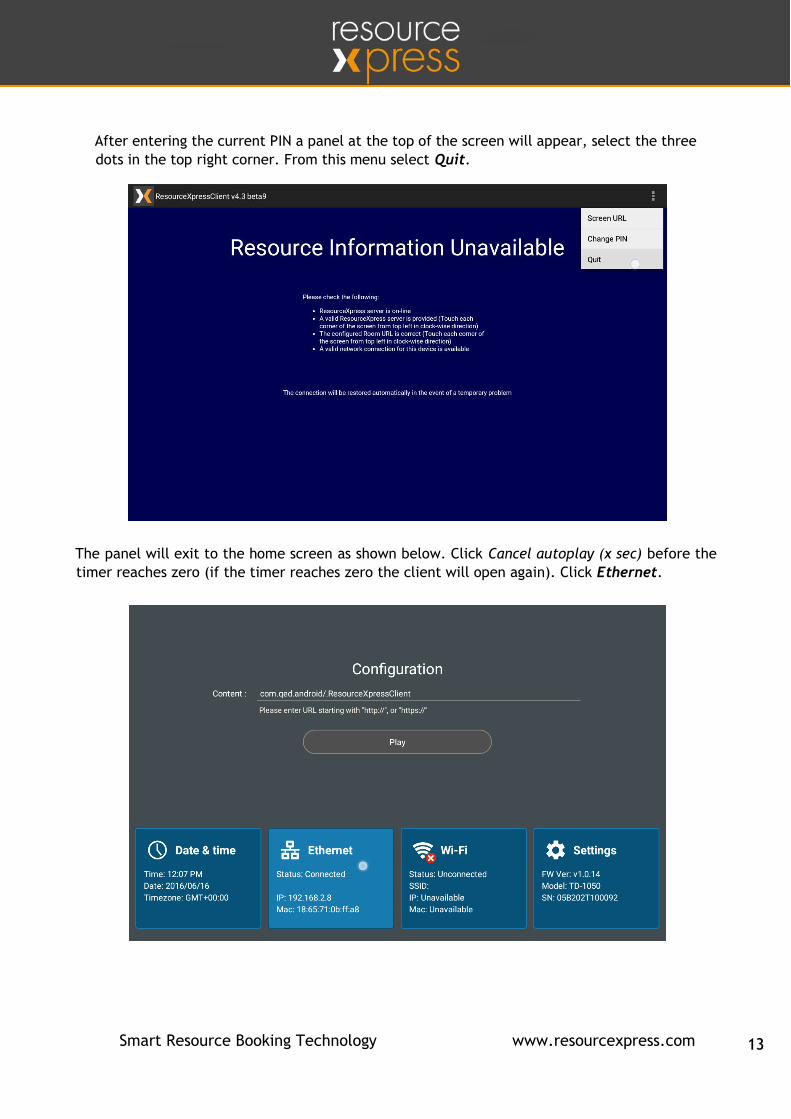
After entering the current PIN a panel at the top of the screen will appear, select the three
dots in the top right corner. From this menu select Quit.
The panel will exit to the home screen as shown below. Click Cancel autoplay (x sec) before the
timer reaches zero (if the timer reaches zero the client will open again). Click Ethernet.
Smart Resource Booking Technology www.resourcexpress.com 14
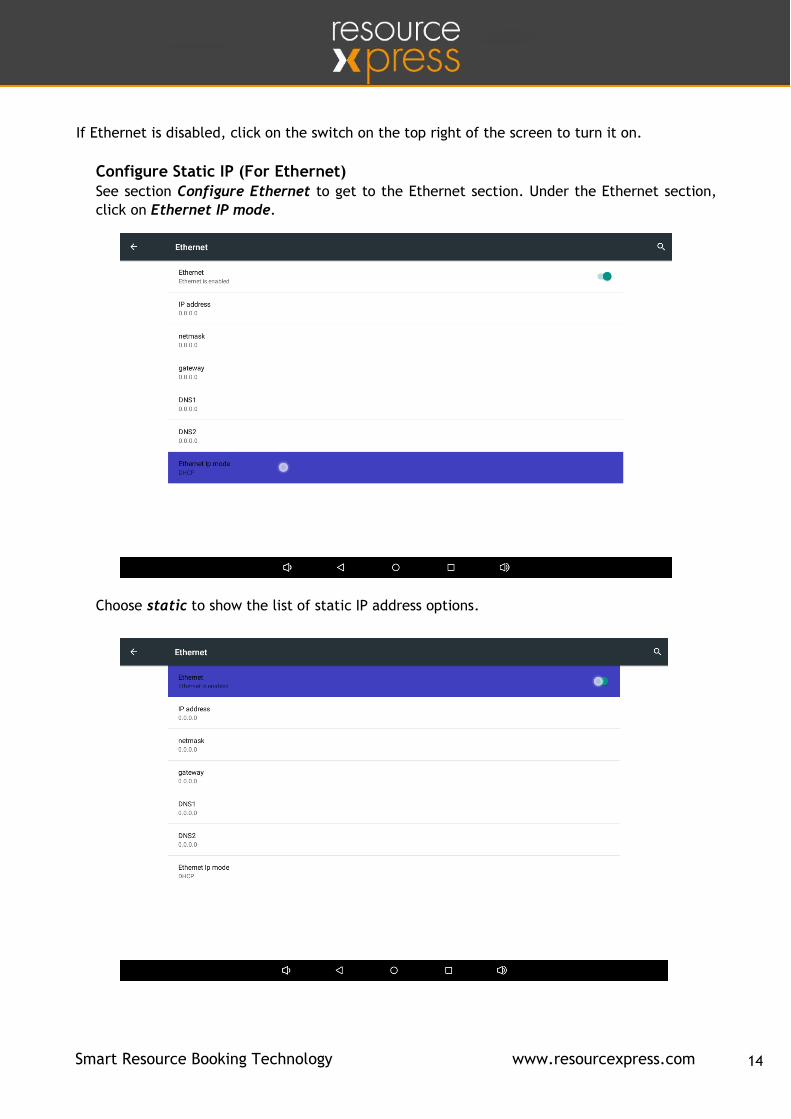
If Ethernet is disabled, click on the switch on the top right of the screen to turn it on.
Configure Static IP (For Ethernet)
See section Configure Ethernet to get to the Ethernet section. Under the Ethernet section,
click on Ethernet IP mode.
Choose static to show the list of static IP address options.
Smart Resource Booking Technology www.resourcexpress.com 15
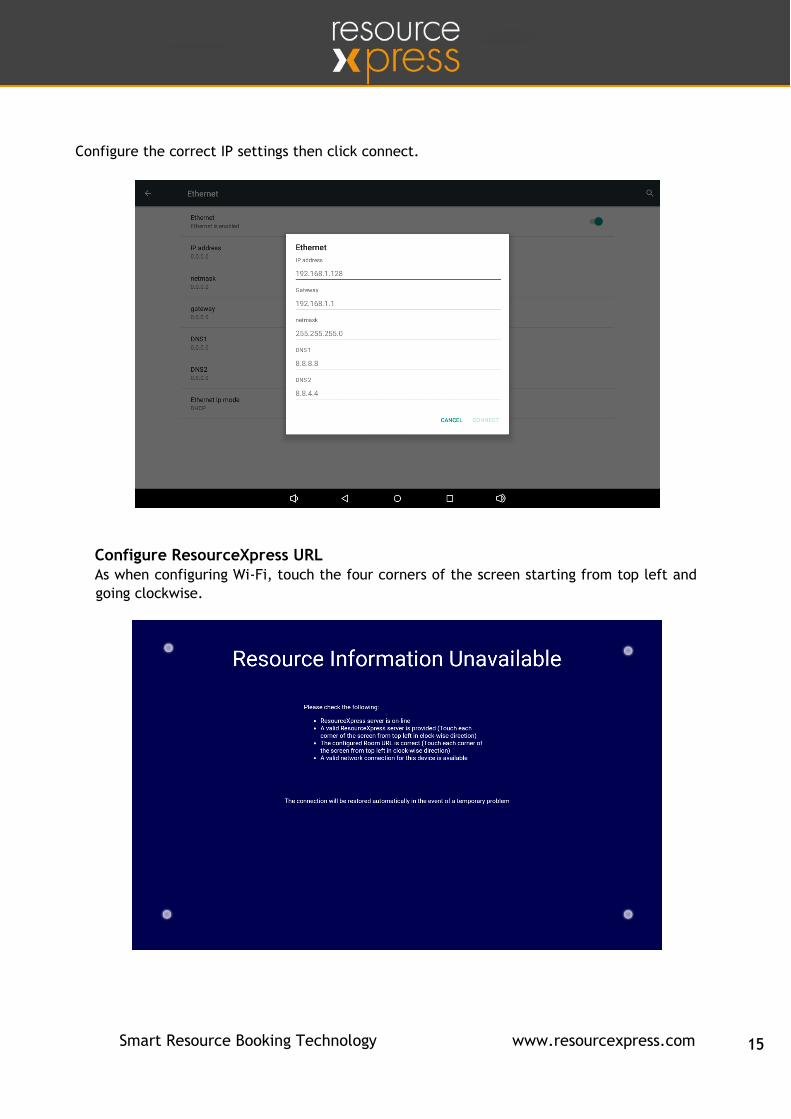
Configure the correct IP settings then click connect.
Configure ResourceXpress URL
As when configuring Wi-Fi, touch the four corners of the screen starting from top left and
going clockwise.
Smart Resource Booking Technology www.resourcexpress.com 16
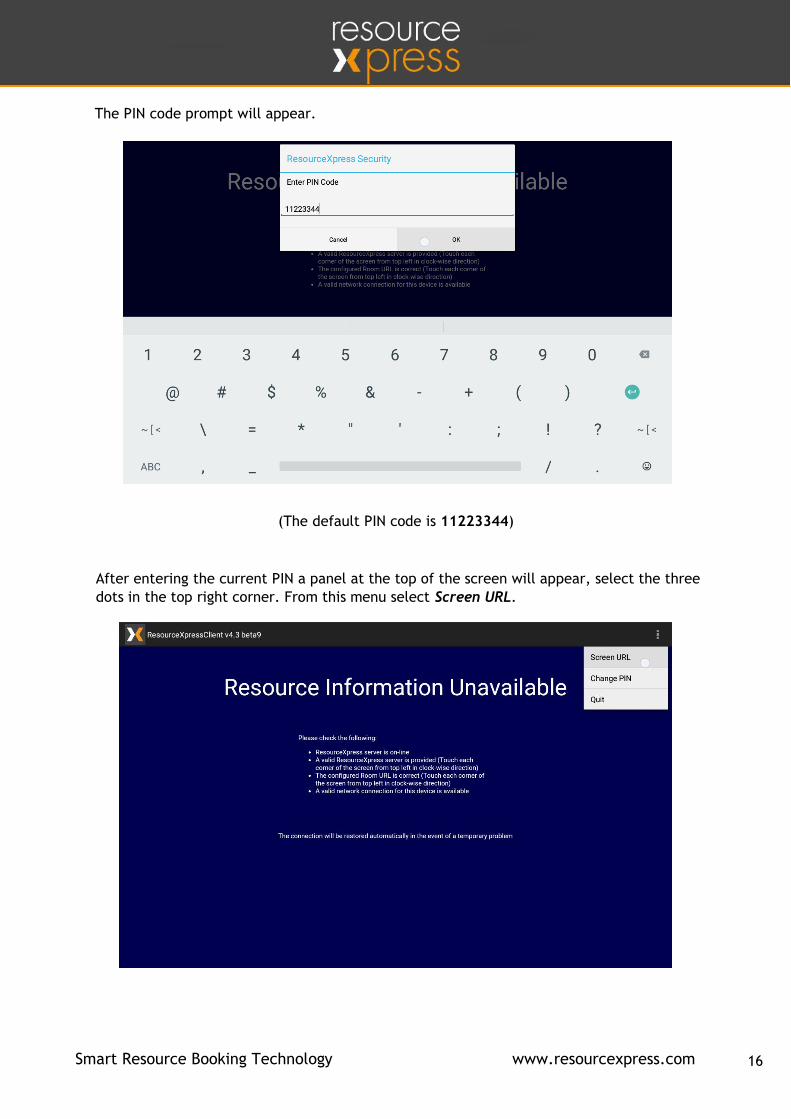
The PIN code prompt will appear.
(The default PIN code is 11223344)
After entering the current PIN a panel at the top of the screen will appear, select the three
dots in the top right corner. From this menu select Screen URL.
Smart Resource Booking Technology www.resourcexpress.com 17
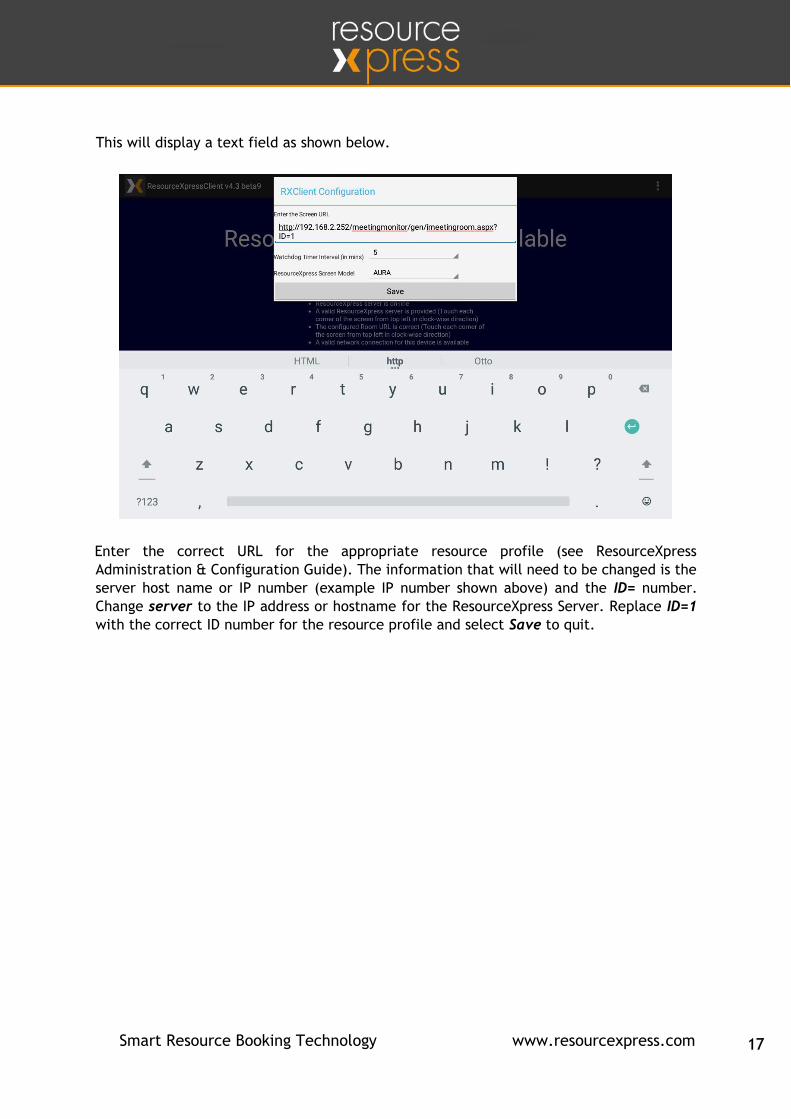
This will display a text field as shown below.
Enter the correct URL for the appropriate resource profile (see ResourceXpress
Administration & Configuration Guide). The information that will need to be changed is the
server host name or IP number (example IP number shown above) and the ID= number.
Change server to the IP address or hostname for the ResourceXpress Server. Replace ID=1
with the correct ID number for the resource profile and select Save to quit.
Smart Resource Booking Technology www.resourcexpress.com 18
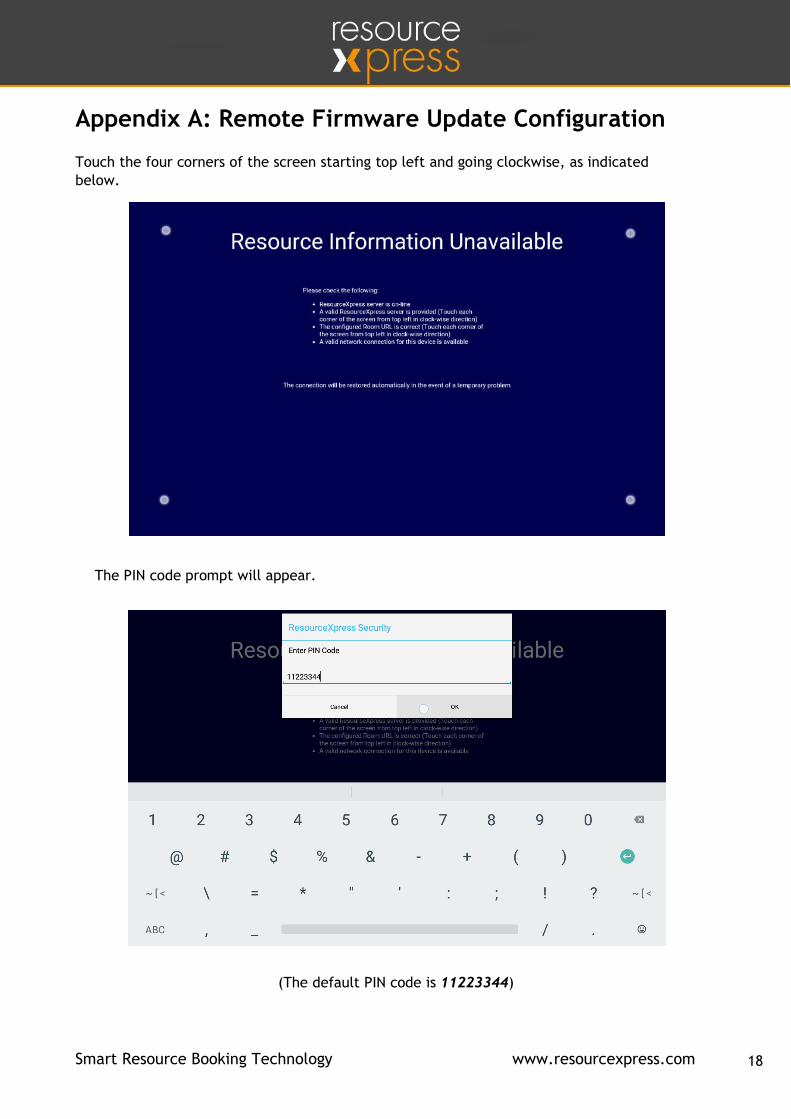
Appendix A: Remote Firmware Update Configuration
Touch the four corners of the screen starting top left and going clockwise, as indicated
below.
The PIN code prompt will appear.
(The default PIN code is 11223344)
Smart Resource Booking Technology www.resourcexpress.com 19
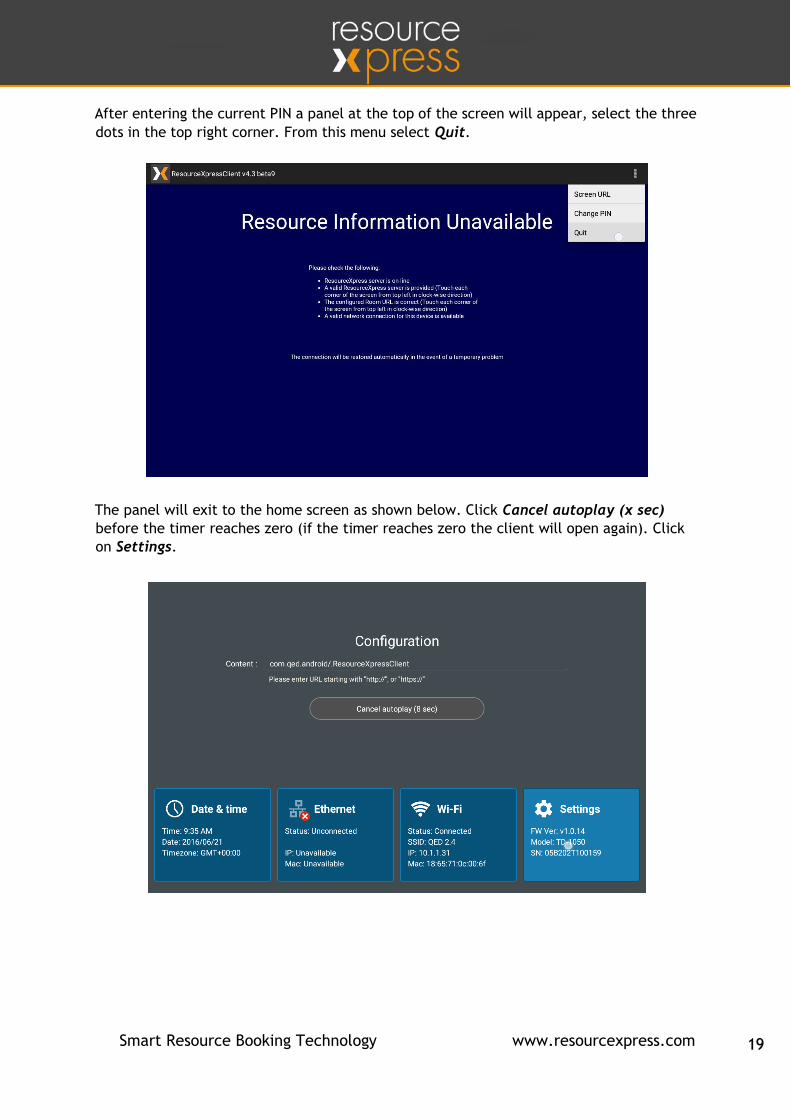
After entering the current PIN a panel at the top of the screen will appear, select the three
dots in the top right corner. From this menu select Quit.
The panel will exit to the home screen as shown below. Click Cancel autoplay (x sec)
before the timer reaches zero (if the timer reaches zero the client will open again). Click
on Settings.
Smart Resource Booking Technology www.resourcexpress.com 20
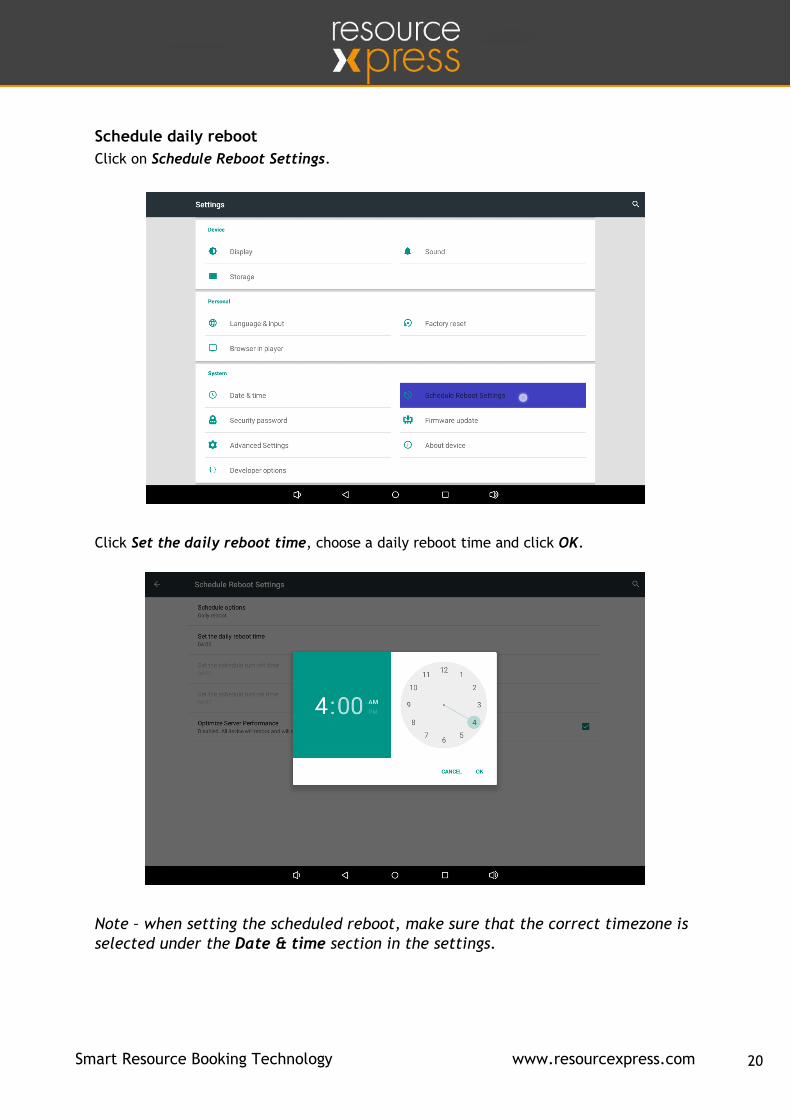
Schedule daily reboot
Click on Schedule Reboot Settings.
Click Set the daily reboot time, choose a daily reboot time and click OK.
Note – when setting the scheduled reboot, make sure that the correct timezone is
selected under the Date & time section in the settings.
Smart Resource Booking Technology www.resourcexpress.com 21
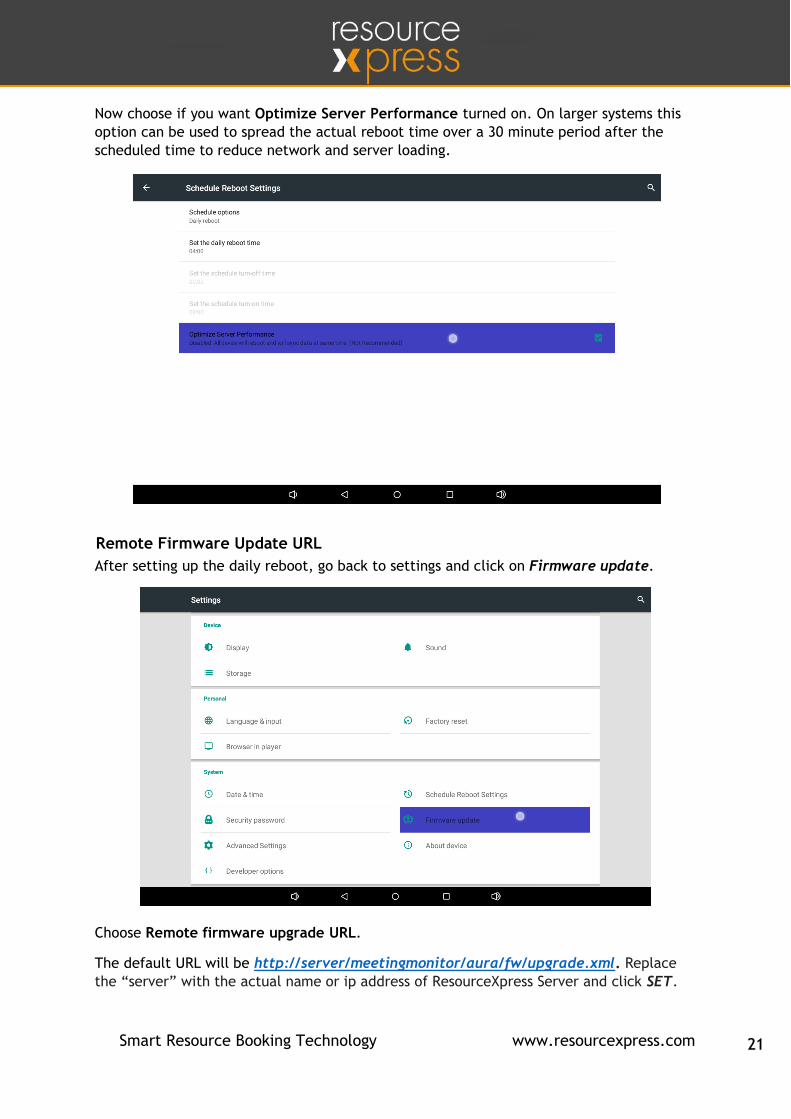
Now choose if you want Optimize Server Performance turned on. On larger systems this
option can be used to spread the actual reboot time over a 30 minute period after the
scheduled time to reduce network and server loading.
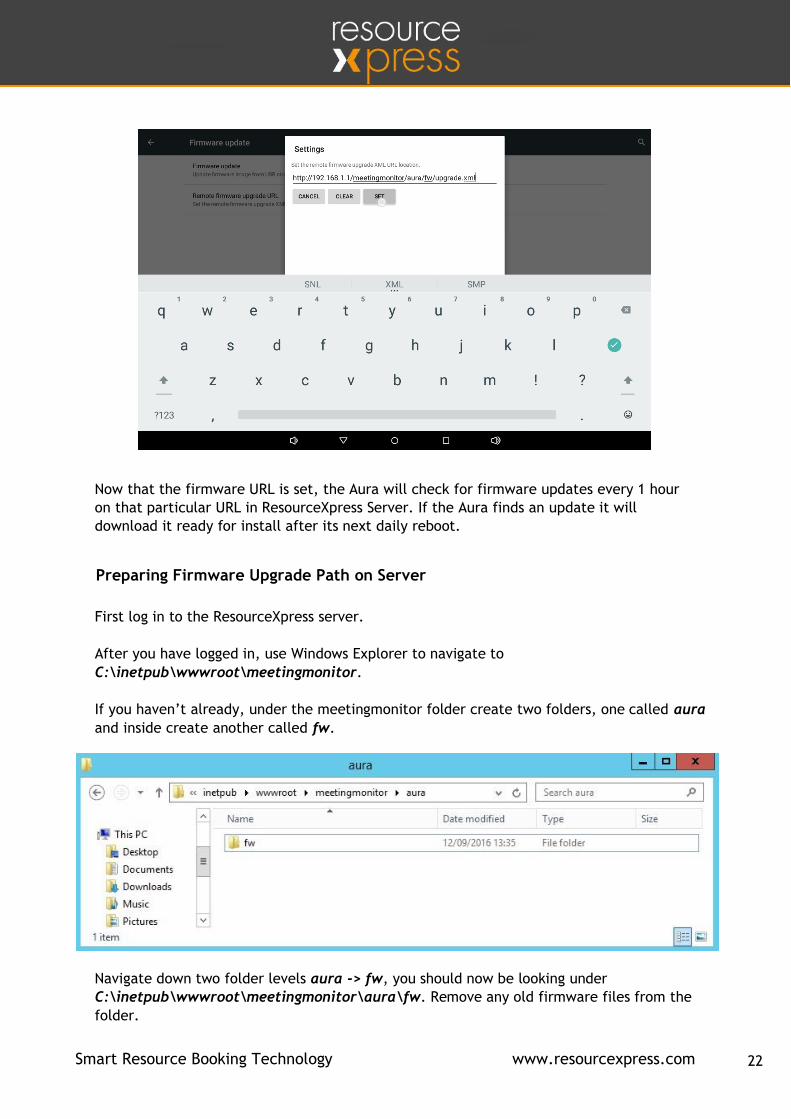
Remote Firmware Update URL
After setting up the daily reboot, go back to settings and click on Firmware update.
Choose Remote firmware upgrade URL.
The default URL will be http://server/meetingmonitor/aura/fw/upgrade.xml. Replace
the “server” with the actual name or ip address of ResourceXpress Server and click SET.
Smart Resource Booking Technology www.resourcexpress.com 22
Now that the firmware URL is set, the Aura will check for firmware updates every 1 hour
on that particular URL in ResourceXpress Server. If the Aura finds an update it will
download it ready for install after its next daily reboot.
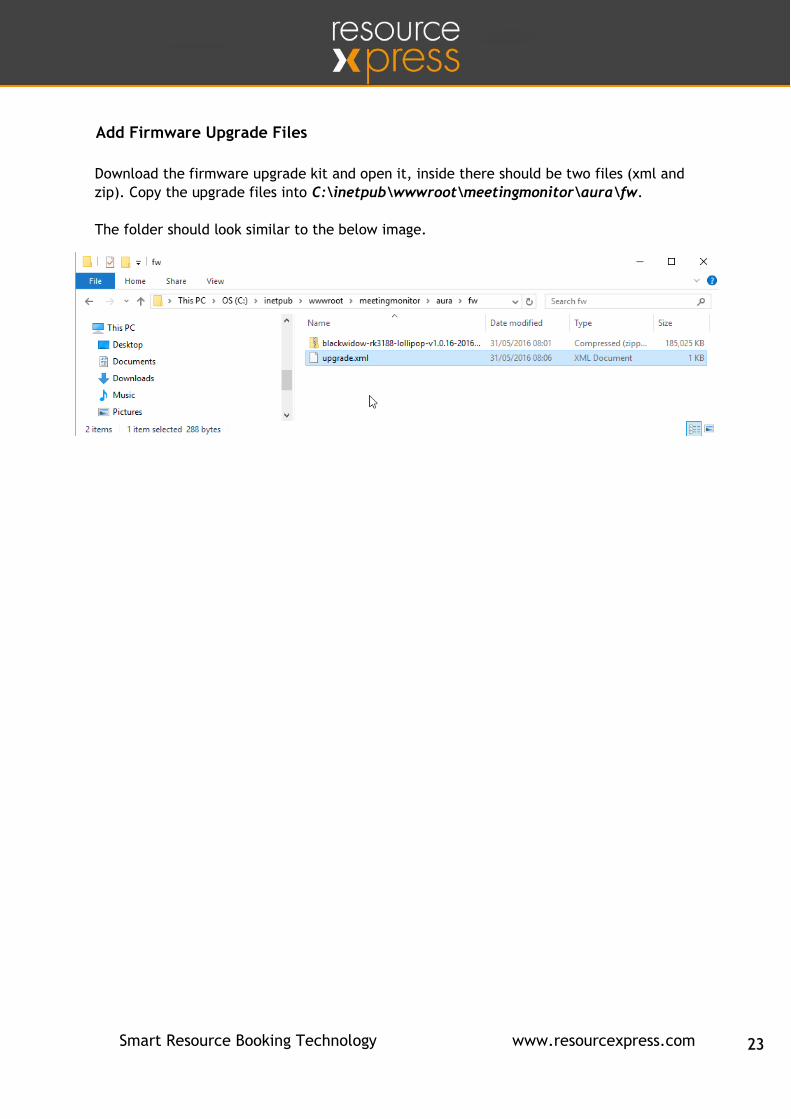
Preparing Firmware Upgrade Path on Server
First log in to the ResourceXpress server.
After you have logged in, use Windows Explorer to navigate to
C:\inetpub\wwwroot\meetingmonitor.
If you haven’t already, under the meetingmonitor folder create two folders, one called aura
and inside create another called fw.
Navigate down two folder levels aura -> fw, you should now be looking under
C:\inetpub\wwwroot\meetingmonitor\aura\fw. Remove any old firmware files from the
folder.
Smart Resource Booking Technology www.resourcexpress.com 23
Add Firmware Upgrade Files
Download the firmware upgrade kit and open it, inside there should be two files (xml and
zip). Copy the upgrade files into C:\inetpub\wwwroot\meetingmonitor\aura\fw.
The folder should look similar to the below image.

Smart Resource Booking Technology www.resourcexpress.com 24
Appendix B: Changing the Default Security PIN
To change the security PIN from the default 11223344, touch the four corners of the screen starting
from the top left and going clockwise (as previously described), a prompt for the current PIN code
will then appear.
After entering the current PIN, a panel at the top of the screen will appear, select the three
dots in the top right corner. Select Change PIN.
Enter the Old PIN and the New PIN and select Save to change (remembering to make a
note of the new PIN).
Smart Resource Booking Technology www.resourcexpress.com 25
Appendix C: Mounting Instructions Detailed mounting instructions provided in each Aura box.
Smart Resource Booking Technology www.resourcexpress.com 26
Appendix D: Safety and Warnings
NOTE
This mark is applied to indicate that the equipment conforms to European safety and
electro-magnetic compatibility standards.
WARNING!
Main supply: This equipment is designed to operate from 100-200Volt, 50/60Hz AC
main supply. The use of other power sources may damage this equipment. Check
that the voltage marked on the rating plate located at the rear of the power adapter
states 100-240V. The manufacturer will NOT accept responsibility for damage or
injury caused by connecting to the wrong voltage.
WARNING!
Main Adapter: The supplied power adapter is compatible with a standard main
socket. NB. If the power adapter or lead gets damaged, it must be replaced by a
qualified service agent with an approved adapter of the same type and rating.
WARNING!
Dangerous voltage constituting a risk of electric shock is present inside this
equipment.
WARNING!
The main plug shall be the main disconnect device and shall remain operable at all
times.
Do not push objects into holes and ventilation slots.
Do not expose this product to dripping or splashing or place any objects filled with
liquids on or near the product.
Do not place a naked flame source, such as lighted candles, on or near this product.
Do not attempt to repair the product yourself. Always use a qualified service agent
to perform adjustments or repairs.
For further information and support, please contact [email protected] or visit our
website at: www.ResourceXpress.com


