Audio 20Operating Instructions

Symbols
$ Warning% Environmental note! Possible vehicle damage+ TipX Action requiredYY Continuation symbol(Y page) Page referenceDisplay Messages in the display
Registered trademarks
RBluetooth® is a registered trademark of Bluetooth SIG Inc.RWindows Media® is a registered trademark of the Microsoft Corporation in the USA and
other countries.
Vehicle dealer
In the USA: In Canada:
Mercedes-Benz USA, LLCOne Mercedes DriveMontvale, NJ 07645-0350www.mbusa.comwww.mbsprinterusa.comCustomer Assistance Center:1-877-762-8267
Mercedes-Benz Canada, Inc.98 Vanderhoof AvenueToronto, ON M4G 4C9www.mercedes-benz.caCustomer Relations Department:1-800-387-0100
Mercedes-Benz USA, LLC and Mercedes-Benz Canada, Inc. are Daimler enterprises.Canada only:"Authorized Sprinter Dealer" is defined as an authorized Mercedes-Benz Sprinter dealer.
Thank you for choosing the new SprinterFamiliarize yourself with your Audio 20system. Read this manual, particularly thesafety and warning notices, before you driveoff. This will allow you to fully enjoy yourAudio 20 system and help you to avoidendangering yourself and others.The features and functions of your Audio 20system may differ according to:RmodelRorderRcountry specificationWe are constantly updating our systems tothe state of the art.We therefore reserve the right to makemodifications in the following areas:RdesignRequipmentRtechnologyTherefore, you cannot base any claims on theillustrations or descriptions in this manual.Please consult an authorised Sprinter Dealerif you have any questions.The Operating Instructions and all othermanuals are an integral part of the vehicle.You should always keep them in the vehicleand pass them on to the new owner if you sellthe vehicle.We wish you safe and pleasant motoring.
0065843881 É00658438811ËÍ

Index ....................................................... 4
Introduction ........................................... 6
At a glance ............................................. 9
System settings .................................. 19
Telephone ............................................ 25
Audio .................................................... 35
Contents 3
1, 2, 3 ...911 emergency call ............................. 27
AAutostore ............................................. 38
BBack button ......................................... 11Balance
Setting ............................................. 16Basic functions .................................... 15Bass
Setting ............................................. 16Bluetooth®
Activating/deactivating ................... 21Authorizing devices .......................... 22Connecting ...................................... 21Interface .......................................... 27Revoking authorization .................... 23Searching for devices ...................... 21Settings ........................................... 20Telephony ........................................ 27
CCall lists ................................................ 33CD
Copy protection ............................... 46Data medium ................................... 46General information ......................... 46Inserting .......................................... 38Mode, switching to .......................... 41Multisession .................................... 44Selecting a medium ......................... 42
Channel presets .................................. 37Character entry ................................... 14Clear button ......................................... 11Copy protection
CD ................................................... 46
DData medium
MP3 ................................................. 44Deleting
Call lists ........................................... 33
DiscEjecting ............................................ 40
Display .................................................. 11Adjusting the brightness .................. 20Selecting the design ........................ 20Switching on/off .............................. 20
EExample of operation .......................... 14
FFader
Setting ............................................. 16Fast forward
CD mode .......................................... 43Frequency input
Manual ............................................. 37
MMenu
Overview .......................................... 12Menu item
Selecting .......................................... 14Mobile phone
External authorization ...................... 22MP3
Bit/sampling rates ........................... 45Copyright ......................................... 45Data medium ................................... 44File systems ..................................... 44Formats ........................................... 45Mode, switching to .......................... 41Notes ............................................... 44Selecting a medium ......................... 42
Multifunction display .......................... 17Multifunction steering wheel ............. 16
Audio ............................................... 46Selecting a track .............................. 46Setting a station .............................. 46
Multisession CDs ................................. 44
OOperating system
Audio 20 .......................................... 10Operation ............................................. 13
4 Index
PPause function ..................................... 42Phone book .......................................... 30
Deleting an entry ............................. 33Making a call to an entry ................. 32
Playback options (CD mode) .............. 44
RRadio mode .......................................... 36
Switching to ..................................... 36Reception problems .............................. 6Redial .................................................... 29Reset .................................................... 24Rewind
CD mode .......................................... 43
SSafety notes
Operating safety ................................ 6Using the telephone ......................... 26
Single callFunctions ......................................... 29
SoundSwitching on/off .............................. 15
Sound settings ..................................... 15Station
Selecting .......................................... 36Storing ............................................. 37
Station list ............................................ 36Station search ..................................... 37Switching on/off ................................. 15System language
Setting ............................................. 23System settings ................................... 20
Menu overview ................................. 13
TTelephone
Accepting/ending a call ................... 28Ending an active call ........................ 29Function restrictions ........................ 27Incoming call ................................... 28Operating using the multifunctionsteering wheel ................................. 34Outgoing call .................................... 28
Redialing .......................................... 29Rejecting/accepting a waitingcall ................................................... 30Sending DTMF tones ........................ 30Setting the reception andtransmission volume ........................ 27Switching the hands-freemicrophone on/off .......................... 29
Telephone bookCalling up ......................................... 31
Telephone modeOperating options ............................ 26
Tone settingsBalance and fader ............................ 16Treble and bass ............................... 16
TrackSelecting .......................................... 43
TrebleSetting ............................................. 16
UUsing the telephone ............................ 28
VV-Cards
Receiving ......................................... 30Volume
Adjusting ......................................... 15Phone calls ...................................... 15
WWaveband
Switching (radio) .............................. 36
Index 5
Operating safety
General notes
G WARNINGYour attention must always be focused on thetraffic conditions. Only operate Audio 20 orthe telephone when traffic conditions permit.Operation of the audio equipment or thetelephone distracts you from the trafficconditions and could cause you to losecontrol of your vehicle and cause an accident.Bear in mind that at a speed of just 30 mph(approximately 50 km/h), your vehicle coversa distance of 44 feet (approximately 14 m)every second.
This device complies with Part 15 of the FCCRules. Operation is subject to the followingtwo conditions:1. This device may not cause harmfulinterference, and2. this device must accept any interferencereceived, including interference that maycause undesired operation.
G WARNINGChange or modification not expresslyapproved by the party responsible forcompliance could void the user's authority tooperate this equipment.
! Note: This equipment has been testedand found to comply with the limits for aClass A digital device, pursuant to Part 15of the FCC Rules. These limits are designedto provide reasonable protection againstharmful interference when the equipmentis operated in a commercial environment.This equipment generates, uses and canradiate radio frequency energy and, if notinstalled and used in accordance with theinstruction manual, may cause harmfulinterference to radio communications.
G WARNINGThis equipment complies with FCC radiationexposure limits set forth for uncontrolled
equipment and meets the FCC radiofrequency (RF) Exposure Guidelines inSupplement C to OET65.This equipment has very low levels of RFenergy that is deemed to comply withoutmaximum permissive exposure evaluation(MPE). But it is desirable that it should beinstalled and operated with at least 8 inches(20 cm) and more between the radiator and aperson's body (excluding extremities: hands,wrists, feet and legs.)
! Electronic devices that you bring into thevehicle yourself can cause significantproblems with the radio reception.
Correct useAlways observe the following when usingAudio 20:Rthe safety notes in this manualRnational road traffic regulations
i Improper work on electronic componentsor systems (e.g. radio, CD changer) andtheir software may result in malfunction orfailure. Even systems that have not beenmodified could be affected because theelectronic systems are connected.Electronic malfunctions can seriouslyjeopardize the operational safety of yourvehicle.
G WARNINGModifications performed on electroniccomponents or software can causemalfunctions. The radio, amplifier, CD driveand telephone are linked together.If one of the components is inoperative or wasnot properly removed or replaced, thefunction of the other components may beimpaired.This could considerably compromise theoperating safety of your vehicle.
6 Introduction
We therefore recommend always havingservice work on electronic componentsperformed at an authorized Sprinter Dealer.
i Protection against theft: this device isequipped with technical provisions toprotect it against theft. Detailedinformation on protection against theft isavailable at your authorized SprinterDealer.
Information on copyright
General information about Bluetooth®
Bluetooth® technology is the standard forshort-range wireless data transmission of upto approximately 10 meters.Bluetooth® is a registered trademark ofBluetooth Special Interest Group (SIG) Inc.
Equipment on your audio devicei These Operating Instructions describe all
the standard and optional equipment ofyour audio device, as available at the timeof going to print. Country-specificdeviations are possible.Please note that your audio device may notbe equipped with all the featuresdescribed.This also applies to safety-relevant systemsand functions. Therefore, the equipment onyour audio device may differ from that inthe descriptions and illustrations. Theoriginal purchase contract documentationfor your vehicle contains a list of all of thesystems in your vehicle.
If you have questions about equipment andoperation, consult any authorized SprinterDealer.
Qualified specialist workshopsi Read the information on qualified
specialist workshops in the vehicleOperator's Manual.
Introduction 7
Z

8
Operating system ............................... 10Operation ............................................. 13Basic functions .................................... 15With the multifunction steeringwheel .................................................... 16Multifunction display .......................... 17
9
At a
gla
nce
Operating system
Overview
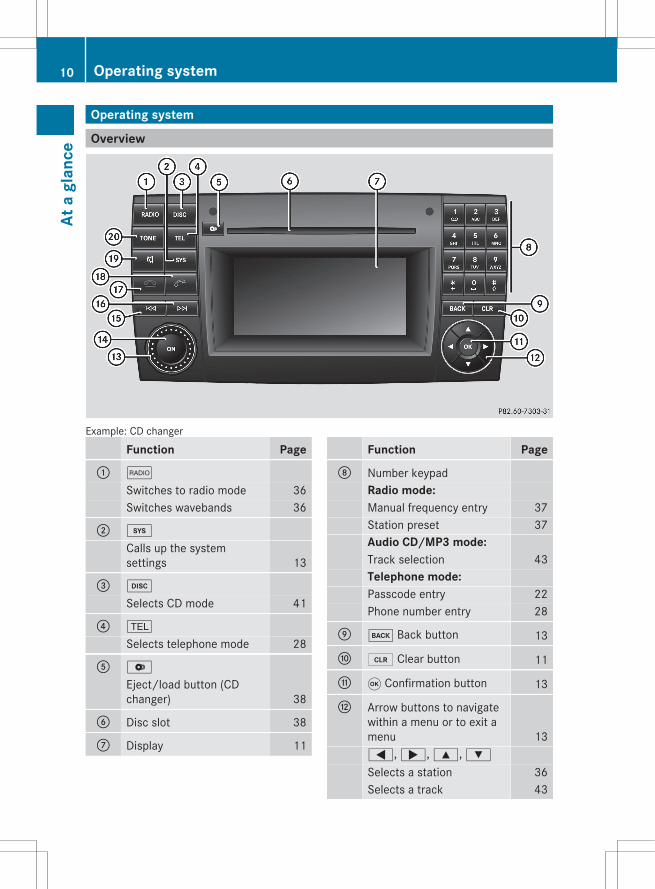
Example: CD changer
Function Page: $
Switches to radio mode 36Switches wavebands 36
; i
Calls up the systemsettings 13
= h
Selects CD mode 41
? %
Selects telephone mode 28
A V
Eject/load button (CDchanger) 38
B Disc slot 38
C Display 11
Function PageD Number keypad
Radio mode:Manual frequency entry 37Station preset 37Audio CD/MP3 mode:Track selection 43Telephone mode:Passcode entry 22Phone number entry 28
E k Back button 13
F 2 Clear button 11
G 9 Confirmation button 13
H Arrow buttons to navigatewithin a menu or to exit amenu 13=, ;, 9, :Selects a station 36Selects a track 43
10 Operating systemAt
a g
lanc
e

Function PageI o Control knob
Adjusts the volume 15
J q Switches on/off 15
K E
Selects a station 36Selects a track 43
L F
Selects a station 36Selects a track 43
M ~
Ends a call 28Rejects a call 28
Function PageN 6
Accepts a call 28Initiates a call 28Redial 29
O 8
Mute 15Pause function 42
P J
Calls up sound settings 15
Back buttonX To move up one menu level: briefly press
the k back button.Audio 20 changes to the next higher menulevel in the current operating mode.
X To switch to the basic menu: press andhold the k back button.Audio 20 changes to the basic menu of thecurrent operating mode.
Clear buttonX To delete individual characters: briefly
press the 2 clear button.
X To delete an entire entry: press and holdthe 2 clear button.
Function overviewYou can use Audio 20 to operate the followingin your vehicle:Raudio functions in radio and disc (audio CD
or MP3) modesRthe telephone
Display
Display overviewThe Audio 20 display shows the functioncurrently selected and its associated menus.The display is divided into three areas:
: Menu bar; Display/selection window= Status bar
The active menu item is highlighted.
Operating system 11
At a
gla
nce
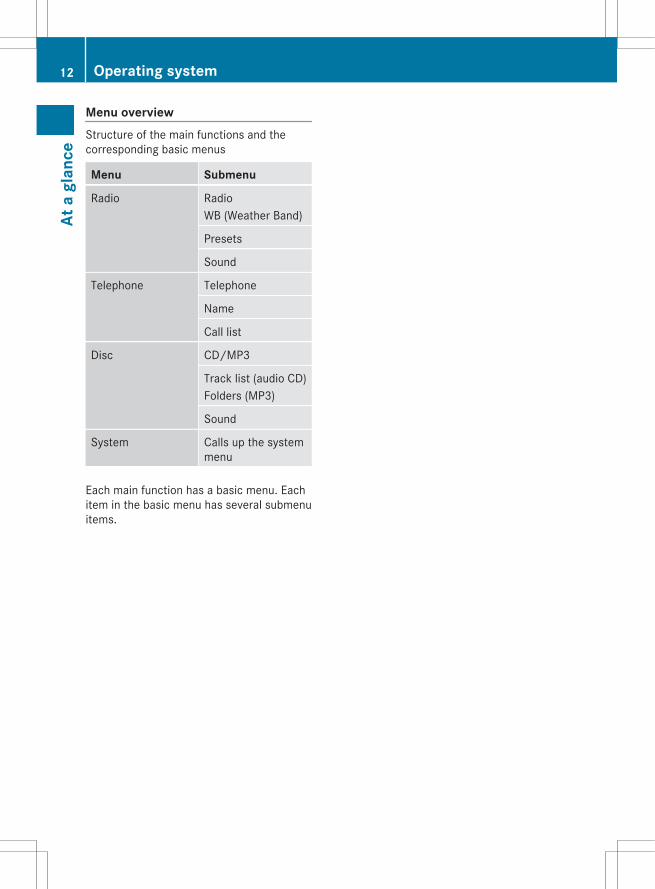
Menu overviewStructure of the main functions and thecorresponding basic menus
Menu Submenu
Radio RadioWB (Weather Band)
Presets
Sound
Telephone Telephone
Name
Call list
Disc CD/MP3
Track list (audio CD)Folders (MP3)
Sound
System Calls up the systemmenu
Each main function has a basic menu. Eachitem in the basic menu has several submenuitems.
12 Operating systemAt
a g
lanc
e
System menu overview
Settings Display off
Setting the language Switching off the display
Display settings
Activating/deactivating Bluetooth®
Restoring the settings (reset)
Operation
General notesThe system can be operated:Rusing the Audio 20 system itselfRusing the multifunction steering wheelYou can also operate many of the Audio 20functions using the buttons on themultifunction steering wheel (Y page 16).The respective Audio 20 functions, e.g. theselected radio station or CD track, are thenshown in the multifunction display providedthat you have selected the correspondingmenu (Y page 17).
Selecting a main functionX Press the $, h or % function
button.The corresponding basic menu appears.
Calling up the menu of a main function
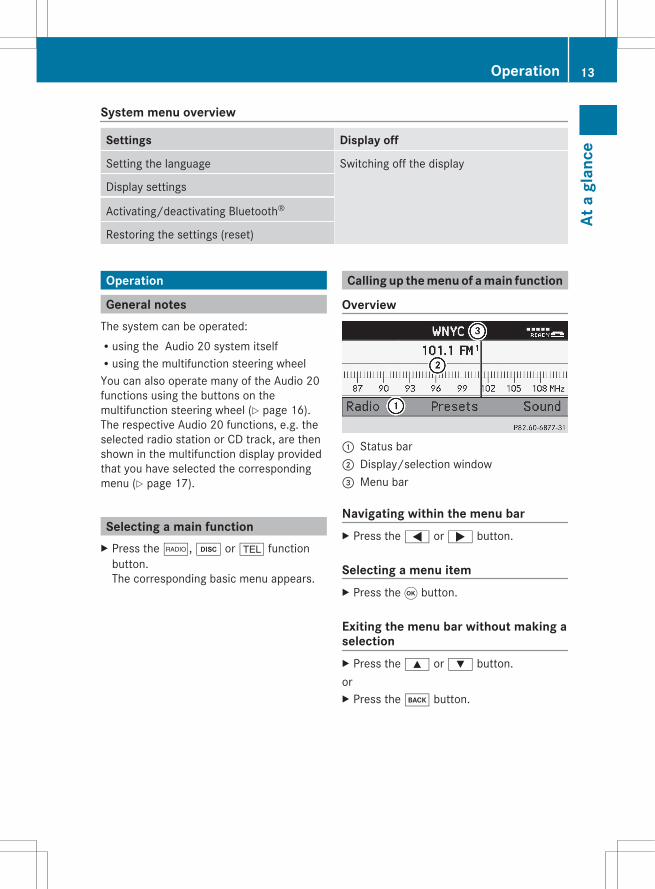
Overview
: Status bar; Display/selection window= Menu bar
Navigating within the menu barX Press the = or ; button.
Selecting a menu itemX Press the 9 button.
Exiting the menu bar without making aselectionX Press the 9 or : button.orX Press the k button.
Operation 13
At a
gla
nce
Selecting a menu item
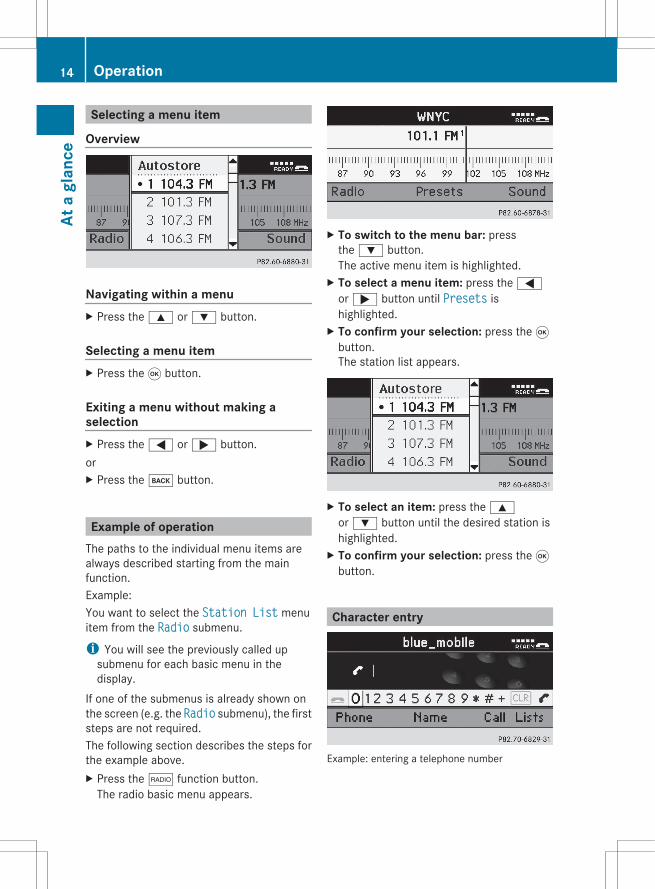
Overview
Navigating within a menuX Press the 9 or : button.
Selecting a menu itemX Press the 9 button.
Exiting a menu without making aselectionX Press the = or ; button.orX Press the k button.
Example of operationThe paths to the individual menu items arealways described starting from the mainfunction.Example:You want to select the Station List menuitem from the Radio submenu.
i You will see the previously called upsubmenu for each basic menu in thedisplay.
If one of the submenus is already shown onthe screen (e.g. the Radio submenu), the firststeps are not required.The following section describes the steps forthe example above.X Press the $ function button.
The radio basic menu appears.
X To switch to the menu bar: pressthe : button.The active menu item is highlighted.
X To select a menu item: press the =or ; button until Presets ishighlighted.
X To confirm your selection: press the 9button.The station list appears.
X To select an item: press the 9or : button until the desired station ishighlighted.
X To confirm your selection: press the 9button.
Character entry
Example: entering a telephone number
14 OperationAt
a g
lanc
e
X To switch to the number bar: press the9 or : button.
X To select a digit: press the = or ;button.
X To confirm your selection: press the 9button.
orX Enter the digits directly using the number
keypad on the Audio 20 control panel.X To delete individual digits: select 2
and press the 9 button.orX Press the 2 button.X To delete an entire entry: press and hold
the 2 button until the entire entry hasbeen deleted.
orX Select 2 and press the 9 button.X To finish digit entry and dial the
number: select ö and press 9.orX Press the 6 button.
Basic functions
General notesi Information about the controls and
operating principles of Audio 20 can befound in the "Operating system" section(Y page 10) and the "Operation" section(Y page 13).
Switching on/offX Press the q control knob.
Audio 20 calls up the previously selectedmenu.
i If you switch off the audio equipment,playback of the current audio source willalso be switched off.
Switching the sound on/off (mute)
Switching the audio source on/offX Press the 8 button.
The sound from the audio source isswitched on or off.
i When the sound is switched off, you willsee the x symbol in the status bar. Ifyou change the audio source or adjust thevolume, the sound is automaticallyswitched on.
Adjusting the volume
Adjusting the volumeX Turn the o control knob.orX Press the W or X button on the
multifunction steering wheel.The volume of the audio source currentlyselected changes.
Adjusting the volume for phone callsYou can adjust the volume for hands-freemode during a telephone call.X Turn the o control knob.orX Press the W or X button on the
multifunction steering wheel.
Adjusting the sound settings
Calling up the sound menuX Press the J sound button on the control
panel.The Sound menu appears.
You can also access the sound menu via thesubmenu in which you wish to changesettings.
Basic functions 15
At a
gla
nce
Example:X Press the $ function button.X Press the : button to switch to the
menu bar.X Press the = or ; button to selectSound and press 9 to confirm.The Sound menu appears.
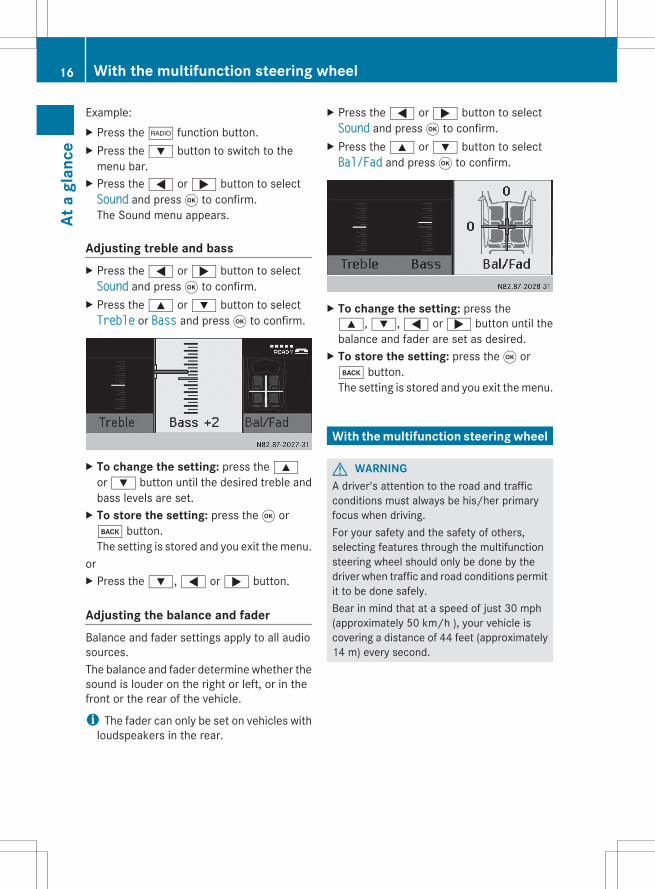
Adjusting treble and bassX Press the = or ; button to selectSound and press 9 to confirm.
X Press the 9 or : button to selectTreble or Bass and press 9 to confirm.
X To change the setting: press the 9or : button until the desired treble andbass levels are set.
X To store the setting: press the 9 ork button.The setting is stored and you exit the menu.
orX Press the :, = or ; button.
Adjusting the balance and faderBalance and fader settings apply to all audiosources.The balance and fader determine whether thesound is louder on the right or left, or in thefront or the rear of the vehicle.
i The fader can only be set on vehicles withloudspeakers in the rear.
X Press the = or ; button to selectSound and press 9 to confirm.
X Press the 9 or : button to selectBal/Fad and press 9 to confirm.
X To change the setting: press the9, :, = or ; button until thebalance and fader are set as desired.
X To store the setting: press the 9 ork button.The setting is stored and you exit the menu.
With the multifunction steering wheel
G WARNINGA driver's attention to the road and trafficconditions must always be his/her primaryfocus when driving.For your safety and the safety of others,selecting features through the multifunctionsteering wheel should only be done by thedriver when traffic and road conditions permitit to be done safely.Bear in mind that at a speed of just 30 mph(approximately 50 km/h ), your vehicle iscovering a distance of 44 feet (approximately14 m) every second.
16 With the multifunction steering wheelAt
a g
lanc
e
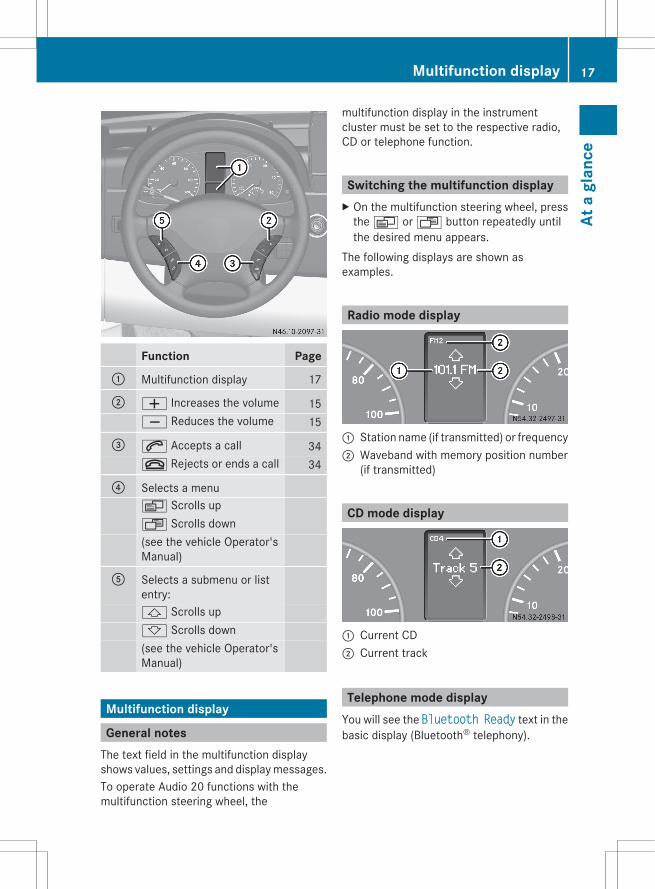
Function Page: Multifunction display 17
; W Increases the volume 15X Reduces the volume 15
= 6 Accepts a call 34~ Rejects or ends a call 34
? Selects a menuV Scrolls upU Scrolls down(see the vehicle Operator'sManual)
A Selects a submenu or listentry:& Scrolls up* Scrolls down(see the vehicle Operator'sManual)
Multifunction display
General notesThe text field in the multifunction displayshows values, settings and display messages.To operate Audio 20 functions with themultifunction steering wheel, the
multifunction display in the instrumentcluster must be set to the respective radio,CD or telephone function.
Switching the multifunction displayX On the multifunction steering wheel, press
the V or U button repeatedly untilthe desired menu appears.
The following displays are shown asexamples.
Radio mode display
: Station name (if transmitted) or frequency; Waveband with memory position number
(if transmitted)
CD mode display
: Current CD; Current track
Telephone mode displayYou will see the Bluetooth Ready text in thebasic display (Bluetooth® telephony).
Multifunction display 17
At a
gla
nce
Z
X To switch from the basic display to the list display: press the 6 button on themultifunction steering wheel.In the list display, you will see one of thelast dialed calls in place of Bluetooth®
ready.
X To return to the basic display: press the~ button on the multifunction steeringwheel.The telephone basic display is now shown.
18 Multifunction displayAt
a g
lanc
e
Audio equipment features ................. 20Display settings .................................. 20Bluetooth® settings ............................ 20System language ................................. 23Reset function ..................................... 24
19
Syst
em s
ettin
gs
Audio equipment features
i These Operating Instructions describe allthe standard and optional equipment ofyour audio device, as available at the timeof going to print. Country specificdifferences are possible.Please note that your vehicle might not beequipped with all the functions describedhere.
Display settings
Setting the brightnessi Audio 20 has a light sensor which detects
brightness; this affects the settingsavailable for this function.
X Press the i function button.The system basic menu appears.
X Press the = or ; button to selectSystem and press 9 to confirm.
X Press the 9 or : button to selectDisplay and press 9 to confirm.
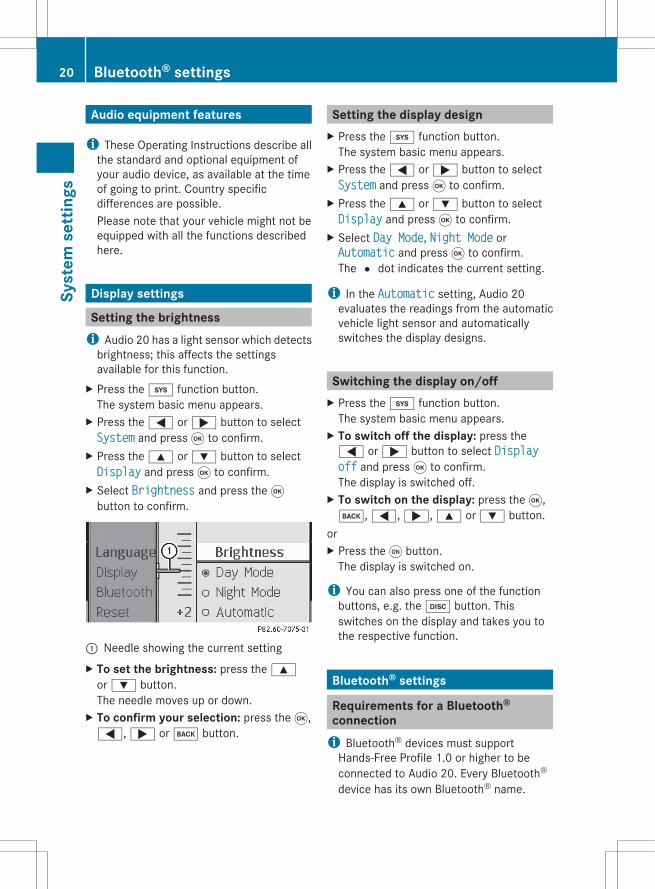
X Select Brightness and press the 9button to confirm.
: Needle showing the current settingX To set the brightness: press the 9
or : button.The needle moves up or down.
X To confirm your selection: press the 9,=, ; or k button.
Setting the display designX Press the i function button.
The system basic menu appears.X Press the = or ; button to selectSystem and press 9 to confirm.
X Press the 9 or : button to selectDisplay and press 9 to confirm.
X Select Day Mode, Night Mode orAutomatic and press 9 to confirm.The # dot indicates the current setting.
i In the Automatic setting, Audio 20evaluates the readings from the automaticvehicle light sensor and automaticallyswitches the display designs.
Switching the display on/offX Press the i function button.
The system basic menu appears.X To switch off the display: press the= or ; button to select Display off and press 9 to confirm.The display is switched off.
X To switch on the display: press the 9,k, =, ;, 9 or : button.
orX Press the q button.
The display is switched on.
i You can also press one of the functionbuttons, e.g. the h button. Thisswitches on the display and takes you tothe respective function.
Bluetooth® settings
Requirements for a Bluetooth®
connectioni Bluetooth® devices must support
Hands-Free Profile 1.0 or higher to beconnected to Audio 20. Every Bluetooth®
device has its own Bluetooth® name.
20 Bluetooth® settingsSy
stem
set
tings
Activating/deactivating Bluetooth®
X Press the i function button.The system basic menu appears.
X Press the = or ; button to selectSystem and press 9 to confirm.
X Press the 9 or : button to selectBluetooth and press 9 to confirm.
X Select Activate Bluetooth and press the9 button to confirm.This switches Bluetooth® on O or off ª.
Connecting Bluetooth® devices
General informationi To connect a Bluetooth® device, the
Bluetooth® function must be activated onAudio 20 and on the device concerned. TheBluetooth® device must also be "visible" toAudio 20 in order for Audio 20 to find anddisplay it. For the setting procedures,please see the operating instructions forthe Bluetooth® device.
It is possible to establish a Bluetooth®
connection between Audio 20 and the mobilephones.
i Bluetooth® mobile phones mustcorrespond to particular profiles to beconnected to Audio 20.
The volume of telephone conversations maychange after the phone has been connected.You can connect up to ten devices toAudio 20.The connection process includes searchingfor the device and its subsequentauthorization.
Searching for Bluetooth® devicesi To call up the Bluetooth® device list, you
must first activate Bluetooth®.
X Press the i function button.The system basic menu appears.
X To call up a list: press the = or ;button to select System and press 9 toconfirm.
X Press the 9 or : button to selectBluetooth and press 9 to confirm.
X Select Bluetooth Device List and press9 to confirm.The device list appears.
X To start a search: select Update and press9 to confirm.Audio 20 starts the search for deviceswithin range. The device list appears aftera short while.
i If you call up the device list again at a latertime, it will contain all devices authorizedso far. In this case, start a new search toupdate the device list.
X To cancel the search: select Cancel andpress 9 to confirm.
The device list can contain the followingdevices:Rall (available) devices detected, whether
authorized or notRall authorized devices, whether they have
been detected (are available) or not
i If the device list already contains 10authorized devices, you must revoke (de-authorize) the authorization for one of theauthorized devices. Then, switch thisdevice off and restart the search.Otherwise, any new devices for which youwish to search will not appear in the list.If you call up the device list again at a latertime, it will contain all devices authorizedso far.
Bluetooth® settings 21
Syst
em s
ettin
gs
Authorizing (registering) a Bluetooth®
deviceX Call up the Bluetooth® device list
(Y page 21).X Press the 9 or : button to selectUpdate and press 9 to confirm.
X Select the device that has not yet beenauthorized (no symbol) and press 9 toconfirm.
X Select Options and press the 9 button toconfirm.
X Select Authorize and press the 9 buttonto confirm.The input menu for the passcode appears.
i The passcode is any one to sixteen-digitnumber which you can set yourself. Somemobile phones require a passcode of atleast four digits. You must enter the samenumber on Audio 20 and the device to beauthorized. Please also note theinformation in the operating instructionsfor your mobile phone.
X To enter the passcode on Audio 20:select the digits one by one.
X To cancel an entry on Audio 20: press thek button.
X To confirm an entry on Audio 20: select¬ or press 9.
X Enter the same passcode on theBluetooth® device (see the operatinginstructions for the device).The device is authorized.
External authorizationIf Audio 20 is unable to detect your mobilephone, this may be due to the securitysettings on your mobile phone. In this case,check whether your mobile phone can locatethe Audio 20 system.The Bluetooth® device name of theAudio 20 system is "VAN Bluetooth".
X In the telephone basic menu: press the= or ; button to select Telephoneand press 9 to confirm.
X Press the 9 or : button to selectBluetooth Phones and press 9 toconfirm.
X Select Update and press 9 to confirm.X Select Options and press 9 to confirm.X Select External Authorization and
press 9 to confirm.X Start the Bluetooth® search on the mobile
phone (see the mobile phone operatinginstructions).
XX Select Audio 20 (VAN Bluetooth) on your
mobile phone.X When requested to do so, enter the
passcode on the mobile phone and then inthe Audio 20 system.
i On some mobile phones it is necessary tore-establish the connection to Audio 20after entering the passcode (see the mobilephone operating instructions). Otherwise,the mobile phone cannot be authorized.
Displaying the details of aBluetooth® deviceX Call up the Bluetooth® device list
(Y page 21).X Select the desired device and press 9 to
confirm.X Press the 9 or : button to selectOptions and press 9 to confirm.
X Select Details and press 9 to confirm.The detailed display for this deviceappears.
X To close the detailed display: press the=, ;, :, 9, k or 9button.
22 Bluetooth® settingsSy
stem
set
tings
Automatic reconnectionAudio 20 always searches for the last mobilephone connected.If no connection can be made to the mostrecently connected mobile phone, the systemsearches for the mobile phone which wasconnected before that one.
Connecting another mobile phoneIf you have authorized more than one mobilephone, you can switch between the individualphones.
i You can only switch to another authorizedphone if you are not currently making a call.
X In the telephone basic menu: press the= or ; button to select Tel andpress 9 to confirm.
X Press the 9 or : button to selectBluetooth Phones and press 9 toconfirm.
X Select the mobile phone from the list andpress 9 to confirm.If the selected mobile phone is withinBluetooth® range and Bluetooth® isactivated, a search is started and the phoneis connected.Only one mobile phone can be connectedat any one time. The currently connectedmobile phone is indicated by the # dot inthe phone list.
De-authorizing (de-registering) aBluetooth® deviceX Call up the Bluetooth® device list
(Y page 21).X Select the authorized device and press 9
to confirm.X Press the 9 or : button to selectOptions and press 9 to confirm.
X Select De-Authorize and press 9 toconfirm.A prompt appears asking whether youreally wish to revoke authorization for thisdevice.
X Select Yes or No and press 9 to confirm.If you select Yes, the authorization for thedevice will be revoked.
i If you revoke authorization for a devicethat has been authorized in the past andthat is not detected in the search, thisdevice will no longer be displayed in thedevice list. Devices that have beenauthorized in the past but that are notdetected in the search are either notswitched on or not in the vehicle.
System language
This function sets the display menu language.X Press the i function button.
The system basic menu appears.X Press the = or ; button to selectSystem and press 9 to confirm.
X Press the 9 or : button to selectLanguage and press 9 to confirm.The list of languages appears. The # dotindicates the current setting.
X To select a language: press the : or9 button.The list scrolls downwards or upwards.
X To confirm your selection: press the 9button.Audio 20 loads the selected language andstores the setting.If you select Synchronize Languages,Audio 20 sets the language to that which isused by the multifunction display.
i The language selection affects the inputoptions in the character bar.
System language 23
Syst
em s
ettin
gs

Reset function
You can reset Audio 20 to the factorysettings. All data is deleted, includingpersonal settings (e.g. station presets).Resetting is recommended before selling ortransferring ownership of your vehicle, forexample.X Press the i function button.
The system basic menu appears.X Press the = or ; button to selectSystem and press 9 to confirm.
X Press the 9 or : button to selectReset and press 9 to confirm.A prompt appears asking whether you wishto reset.
X Select Yes or No and press 9 to confirm.If you select Yes, a prompt will appear againasking whether you really wish to reset.
X Select Yes or No and press 9 to confirm.If you select Yes, a message will be shown.Audio 20 is reset and restarted.
24 Reset functionSy
stem
set
tings

Audio equipment features ................. 26General notes ...................................... 26Bluetooth® interface telephony ......... 27Reception and transmission volume . 27Using the telephone ........................... 28Using the phone book ........................ 30Using call lists ..................................... 33Operating the telephone using themultifunction steering wheel ............. 34
25
Tele
phon
e
Audio equipment features
i These Operating Instructions describe allthe standard and optional equipment ofyour audio device, as available at the timeof going to print. Country specificdifferences are possible.Please note that your vehicle might not beequipped with all the functions describedhere.
General notes
IntroductionWith Audio 20, telephony via the Bluetooth®
interface is available using a Bluetooth®-capable mobile phone. Using the Bluetoothinterface and a suitable mobile phone, youcan use the Audio 20 hands-free function andreceive vCards.Detailed information about suitable mobilephones and connecting Bluetooth®-capablemobile phones to Audio 20 is available at yourauthorized Sprinter Dealer.
Important safety notes
G WARNINGYou must observe the legal requirements forthe country in which you are currently drivingwhen operating mobile communicationsequipment in the vehicle.If it is permitted to operate communicationsequipment while the vehicle is in motion, youmust only operate it when road and trafficconditions permit. You may otherwise bedistracted from the traffic conditions, causean accident and injure yourself and others.
G WARNINGExcessive electromagnetic radiation mayconstitute a health hazard to yourself andothers.
There is scientific discussion surrounding thepossible health risks posed byelectromagnetic fields. You can reduce thisrisk by using an exterior aerial.Therefore, only use mobile communicationequipment if it is connected to the exterioraerial of the vehicle.
G WARNINGTwo-way radios and fax machines withoutexterior antennas may interfere with thevehicle electronics and thereby compromisethe operational safety of the vehicle andthereby your safety as well. Therefore, onlyuse mobile communication equipment if it isconnected to the exterior antenna of thevehicle.
Call disconnection while the vehicle isin motion
A call may be disconnected if:Rthere is insufficient GSM network coverage
in certain areas.Ryou move from one GSM transmitter/
receiver area (GSM cell) into another andno channels are free.Ryou use a SIM card which is not compatible.Ryou are using a mobile phone with
"Twincard" and the mobile phone with thesecond SIM card is already logged into thenetwork.
Operating optionsIf the mobile phone is inserted in the bracket,you can operate the phone in the followingways:Rwith the 9, :, ;, = and 9
buttonsRwith the ~ or 6 button and number
keypad of Audio 20Rwith the multifunction steering wheel
26 General notesTe
leph
one
The descriptions in this section assume thatthe mobile phone is inserted in the bracket.Exceptions to this are expressly stated.
Function restrictionsYou will not be able to use the telephone, oryou may have limited operation, in thefollowing situations:Rif the mobile phone is not switched onRif the mobile phone is not logged into a
mobile phone network The telephoneautomatically tries to log on to a network.If no network is available, you will not beable to make a "911" emergency call. If youattempt to make an outgoing call, the No Service message will appear for a shortwhile.Rif the Bluetooth® function on Audio 20 or
on the mobile phone is switched off.Rif Audio 20 is switched off during a call in
hands-free mode, the call is disconnected.This can be avoided by taking the followingmeasures:Before switching off Audio 20 on the mobilephone, change to "Private Mode" (see theseparate instructions for the mobilephone).
911 emergency callThe following conditions must be fulfilled inorder to make a 911 emergency call:Rthe mobile phone must be switched on.Ra network must be available.If you cannot make an emergency call, youmust arrange rescue measures yourself.The 911 emergency call number is a publicservice. Any misuse is punishable by law.
Bluetooth® interface telephony
Telephone basic menu (Bluetooth®
interface)X In telephone mode, press the k button
repeatedly until the telephone basic menuappears.
If the mobile phone is ready for use, thefollowing display appears:
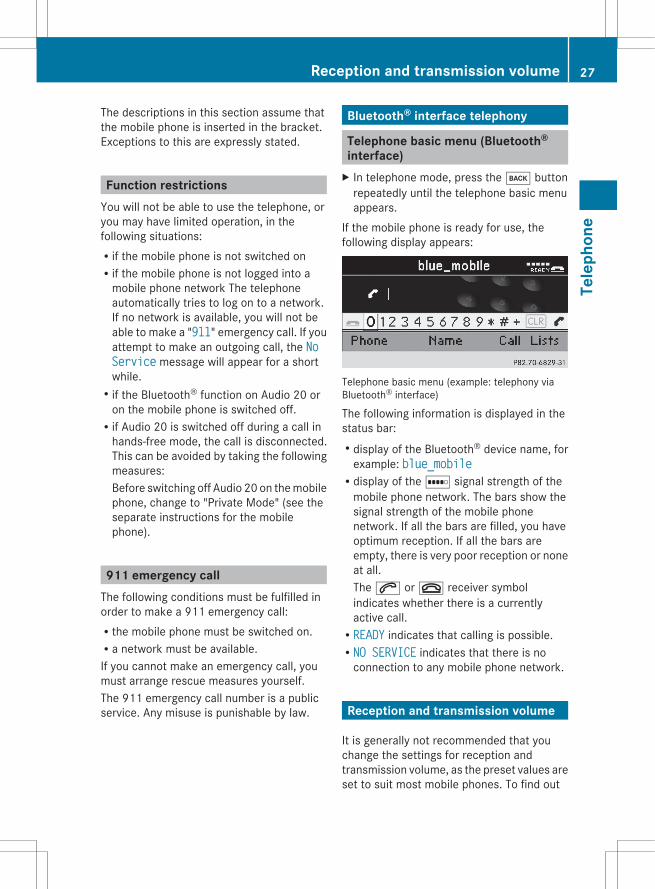
Telephone basic menu (example: telephony viaBluetooth® interface)
The following information is displayed in thestatus bar:Rdisplay of the Bluetooth® device name, for
example: blue_mobileRdisplay of the r signal strength of the
mobile phone network. The bars show thesignal strength of the mobile phonenetwork. If all the bars are filled, you haveoptimum reception. If all the bars areempty, there is very poor reception or noneat all.The 6 or ~ receiver symbolindicates whether there is a currentlyactive call.RREADY indicates that calling is possible.RNO SERVICE indicates that there is no
connection to any mobile phone network.
Reception and transmission volume
It is generally not recommended that youchange the settings for reception andtransmission volume, as the preset values areset to suit most mobile phones. To find out
Reception and transmission volume 27
Tele
phon
e
Z
about the best possible settings, contact yourauthorized Sprinter Dealer.
i The wrong settings may have a seriousimpact on transmission quality.
X Press the % function button.The telephone basic menu appears.
X Press the = or ; button to selectTel and press the 9 button to confirm.
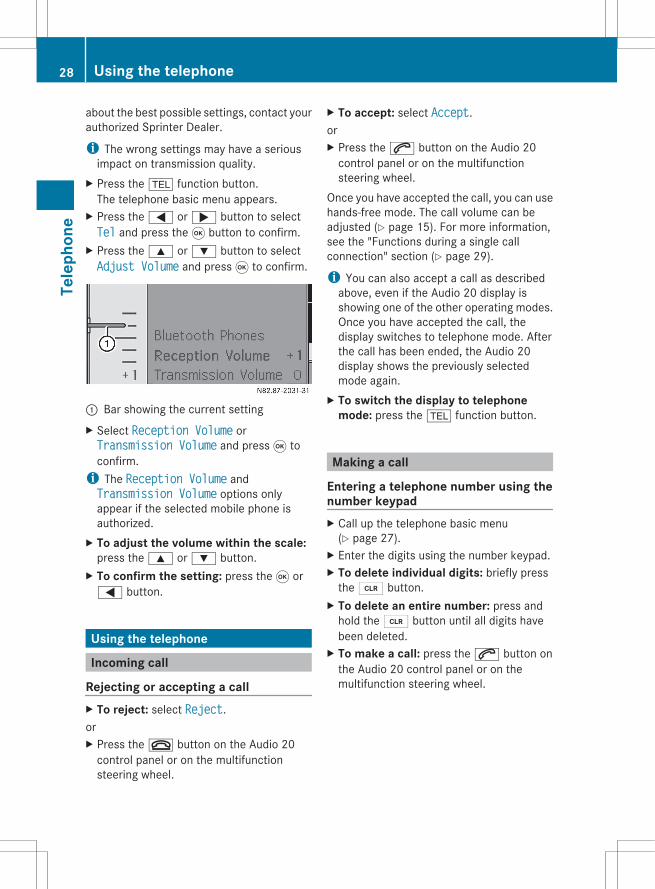
X Press the 9 or : button to selectAdjust Volume and press 9 to confirm.
: Bar showing the current settingX Select Reception Volume orTransmission Volume and press 9 toconfirm.
i The Reception Volume andTransmission Volume options onlyappear if the selected mobile phone isauthorized.
X To adjust the volume within the scale:press the 9 or : button.
X To confirm the setting: press the 9 or= button.
Using the telephone
Incoming call
Rejecting or accepting a callX To reject: select Reject.orX Press the ~ button on the Audio 20
control panel or on the multifunctionsteering wheel.
X To accept: select Accept.orX Press the 6 button on the Audio 20
control panel or on the multifunctionsteering wheel.
Once you have accepted the call, you can usehands-free mode. The call volume can beadjusted (Y page 15). For more information,see the "Functions during a single callconnection" section (Y page 29).
i You can also accept a call as describedabove, even if the Audio 20 display isshowing one of the other operating modes.Once you have accepted the call, thedisplay switches to telephone mode. Afterthe call has been ended, the Audio 20display shows the previously selectedmode again.
X To switch the display to telephone mode: press the % function button.
Making a call
Entering a telephone number using thenumber keypadX Call up the telephone basic menu
(Y page 27).X Enter the digits using the number keypad.X To delete individual digits: briefly press
the 2 button.X To delete an entire number: press and
hold the 2 button until all digits havebeen deleted.
X To make a call: press the 6 button onthe Audio 20 control panel or on themultifunction steering wheel.
28 Using the telephoneTe
leph
one

Entering a telephone number using thetelephone basic menuX Call up the telephone basic menu
(Y page 27).X To enter digits: select the desired digits in
sequence from the number bar.X To delete individual digits: select 2
and briefly press the 9 button.orX Press the 2 button.X To delete an entire phone number:
select 2 and press and hold 9 until thephone number has been deleted.
orX Press and hold the 2 button until the
entry is deleted.X To make a call: select ° on the right-hand
side of the number bar.
RedialingX Call up the telephone basic menu
(Y page 27).X Select °.orX When the telephone basic menu is shown,
press the 6 button on the Audio 20control panel.The list of dialed numbers appears. Themost recently dialed number is at the top.
X To select a call: press the 9 or :button.
X To make a call: press the 9 button.
Making a call to a call list/phone bookentryX Call up a call list and select an entry
(Y page 33).orX Call up the phone book and select an entry
(Y page 31).
X To make a call: press the 9 button.orX Press the 6 button on the Audio 20
control panel.
Functions available during a call
Overview
Example of telephone operation with a single callconnection
Switching the hands-free microphoneon/offi This function is also available during an
active phone call.X Call up the telephone basic menu
(Y page 27).X To switch off: select Mic Off and press
9 to confirm.If the microphone is switched off, the Qsymbol appears in the main area.
X To switch on: select Mic On and press9 to confirm.The Q symbol disappears.
Ending an active callX If necessary, switch the display to
telephone mode (Y page 10).X To end a call: select ¢ and press 9 to
confirm.orX Press the ~ button on the Audio 20
control panel or on the multifunctionsteering wheel.
Using the telephone 29
Tele
phon
e
Z
Rejecting or accepting a waiting calli The call waiting function must be
supported by the network provider and beenabled.
If you have an active call and you receiveanother call, the call waiting display willappear. You also hear a tone.X To reject: select Reject and press 9 to
confirm.orX Press the ~ button on the Audio 20
control panel or on the multifunctionsteering wheel.
X To accept: select Accept and press 9 toconfirm.
orX Press the 6 button on the Audio 20
control panel or on the multifunctionsteering wheel.This ends the active call.
Sending DTMF tonesi This function is not supported by all
mobile phones.You can use DTMF tones to control answeringmachines or other devices, e.g. for remotequery functions.X To send individual characters: during
connection, select the desired charactersand press 9 to confirm each character.
orX Press the corresponding button on the
Audio 20 control panel.Every character selected will betransmitted immediately.
X To send a phone book entry as a string of characters: select Name and press 9to confirm.
X Select the desired phone book entry andpress 9 to confirm.The entry is immediately sent as acharacter string.
X To return to the call display: press thek button.
Using the phone book
IntroductionThe Audio 20 phone book contains importedexternal entries from mobile phones.
i The imported entries are retained even ifyou use another mobile phone withAudio 20. For this reason, you shoulddelete any call lists before handing over orselling the vehicle.
Receiving vCards (via the Bluetooth®
interface)You can import vCards from externalBluetooth®-capable phones into the addressbook. Please bear the following in mind:RBluetooth® must be active on
Audio 20(Y page 22) and on the externalBluetooth®-capable telephone (see theoperating instructions of the respectivemobile phone).Rthe external Bluetooth® phone must be
able to send vCards via Bluetooth® (see theoperating instructions of the respectivemobile phone).Rthe external Bluetooth® phone in the
vehicle is switched on and authorized(Y page 22).
i If you switch to another main functionduring vCard reception, such as the radio,vCard reception is canceled.
30 Using the phone bookTe
leph
one
X Press the % function button.The telephone basic menu appears.
X Press the = or ; button to selectTel and press 9 to confirm.
X Press the 9 or : button to selectImport Contacts and press 9 toconfirm.
X Select Receive Business Card(s) andpress 9 to confirm.The Bluetooth® connection betweenAudio 20 and your active mobile phone isinterrupted. Audio 20 is now ready toreceive vCards from other mobile phones.
X Start data transfer on the externalBluetooth® phone (see the operatinginstructions of the respective mobilephone).The data on the vCards is automaticallytransferred to the address book. Thenumber of vCards received is displayed.
X To end reception: press the 9 button.orX Press the k back button.
Deleting contactsThis function allows you to delete personaldata from the phone book.X Press the % function button.
The telephone basic menu appears.X Press the = or ; button to selectTel and press the 9 button to confirm.
X Press the 9 or : button to selectDelete Contacts and press 9 toconfirm.A query appears: From Mobile Phone,Received Business Cards or Delete All
X Select the contact data to be deleted andpress the 9 button.A prompt appears asking whether the datashould be deleted.
X Select Yes or No and press 9 to confirm.
Calling up the phone book
OverviewX Call up the telephone basic menu
(Y page 27).X Select Name and press 9 to confirm.
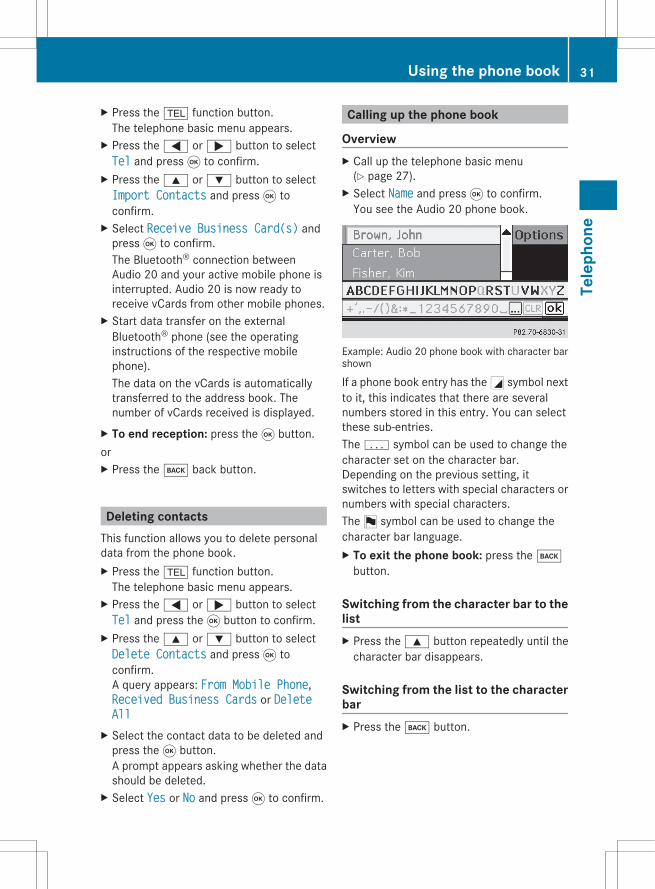
You see the Audio 20 phone book.
Example: Audio 20 phone book with character barshown
If a phone book entry has the G symbol nextto it, this indicates that there are severalnumbers stored in this entry. You can selectthese sub-entries.The p symbol can be used to change thecharacter set on the character bar.Depending on the previous setting, itswitches to letters with special characters ornumbers with special characters.The f symbol can be used to change thecharacter bar language.X To exit the phone book: press the k
button.
Switching from the character bar to thelistX Press the 9 button repeatedly until the
character bar disappears.
Switching from the list to the characterbarX Press the k button.
Using the phone book 31
Tele
phon
e
Z
Searching for a phone book entry
With character bar
SearchingX Switch from the list to the character bar if
necessary.X To enter characters: select the
characters in sequence for the entry youare searching for.
DeletingX To delete individual characters: briefly
press the 2 button.Each time you enter or delete a character,the closest match will be displayed at thetop of the list.
X To delete an entire entry: press and holdthe 2 button until the entry has beendeleted.
Canceling a searchX Switch from the character bar to the list.
The entry at the top of the list isautomatically highlighted.
i The search switches automatically to thelist if the information entered cannotunambiguously match an entry.
Selecting an entry directly from thelist
Selecting main entriesX Switch from the character bar to the list if
necessary.X Press and hold the 9 or : button
until the desired entry is highlighted.X To confirm the selection: press ¬ in
the character bar or press 9.
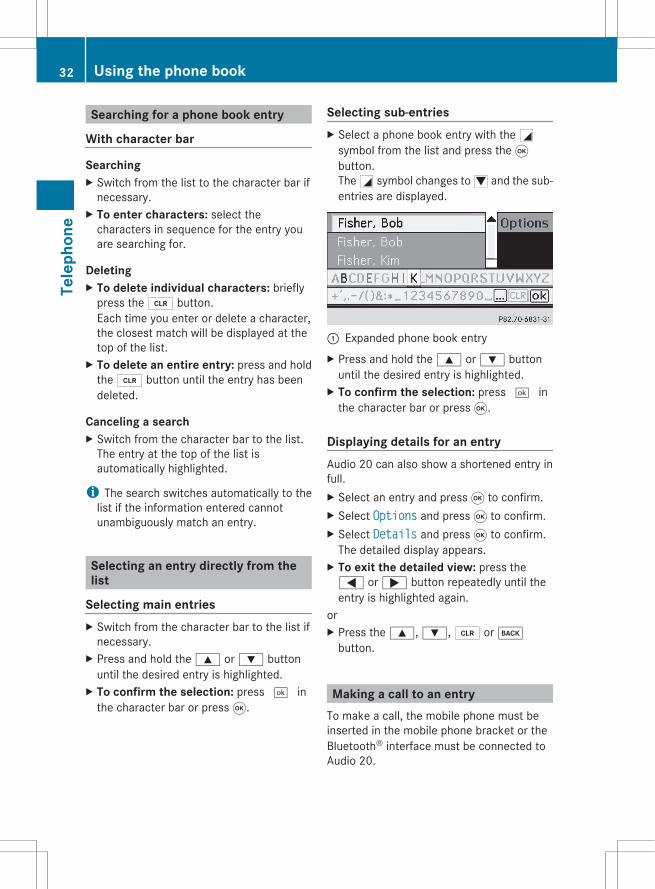
Selecting sub-entriesX Select a phone book entry with the G
symbol from the list and press the 9button.The G symbol changes to I and the sub-entries are displayed.
: Expanded phone book entryX Press and hold the 9 or : button
until the desired entry is highlighted.X To confirm the selection: press ¬ in
the character bar or press 9.
Displaying details for an entryAudio 20 can also show a shortened entry infull.X Select an entry and press 9 to confirm.X Select Options and press 9 to confirm.X Select Details and press 9 to confirm.
The detailed display appears.X To exit the detailed view: press the= or ; button repeatedly until theentry is highlighted again.
orX Press the 9, :, 2 or k
button.
Making a call to an entryTo make a call, the mobile phone must beinserted in the mobile phone bracket or theBluetooth® interface must be connected toAudio 20.
32 Using the phone bookTe
leph
one

X Select an entry.X Press the 9 button.orX Press the 6 button.
A list appears if the entry contains sub-entries.X Select the desired sub-entry.X Press the 9 button again.orX Press the 6 button.
Deleting an entry from the phonebookX To delete: select an entry and press 9 to
confirm.X Press the = or ; button to selectOptions and press 9 to confirm.
X Press the 9 or : button to selectDelete and press 9 to confirm.A prompt appears asking whether the entryshould be deleted.
X Select Yes or No and press 9 to confirm.If you select Yes, the entry is deleted fromthe Audio 20 phone book.
Using call lists
IntroductionAudio 20 shows the calls received (includingmissed calls) during telephone operation andthe previously dialed numbers in twoseparate lists.
i The respective menu item can only beselected if calls have been received ordialed using Audio 20.Calling up the missed calls in theAudio 20 display is not supported for everytype of mobile phone.
i A list of previously dialed numbers isdisplayed in the multifunction display.
Opening the call list and selecting anentryX Press the % function button.
The telephone basic menu appears.X Press the = or ; button to selectCall Lists and press 9 to confirm.
X Press the 9 or : button to selectCalls Received or Calls Dialed andpress 9 to confirm.The corresponding list appears.
i Missed calls that you either could not ordid not want to accept are marked with asymbol before the name or the number.
X To select an entry in the list: press the9 or : button.
X To make a call to the list entry: press the6 or 9 button.
Deleting call listsi The stored call lists are retained even if
you use another mobile phone withAudio 20. For this reason, you shoulddelete any call lists before handing over orselling the vehicle.
X Press the % function button.The telephone basic menu appears.
X Press the = or ; button to selectCall Lists and press 9 to confirm.
Using call lists 33
Tele
phon
e
Z
X Press the 9 or : button to selectDelete Call Lists and press 9 toconfirm.A prompt appears asking whether you wishto delete all call lists.
X Select Yes or No and press 9 to confirm.The call lists will either be deleted or not,depending on your selection.
Operating the telephone using themultifunction steering wheel
Telephone menu
IntroductionBasic information about operation with themultifunction steering wheel can be found inthe "At a glance" section (Y page 16).You can operate the telephone using thefunctions in the Telephone menu if you haveconnected it to the hands-free system.The display in the Telephone menu dependson the status of the telephone.X Switch on the telephone and Audio 20.X Press the V or U button to select theTEL display.
Accepting a callFor an incoming call:X Press the 6 button on the multifunction
steering wheel.
Rejecting or ending a callX Press the ~ button on the multifunction
steering wheel.
Selecting the telephone number fromthe phone bookX Press the V or U button on the
multifunction steering wheel to select theTel menu.
X Press the & or * button on themultifunction steering wheel to selectName.
Selecting an entryX Press and hold the & or * button
until the desired entry is highlighted.
i If you press the & or * button forlonger than a second, the on-boardcomputer shows the names in thetelephone book in rapid scroll. After fourseconds, rapid scroll accelerates andshows only the first entry beginning witheach letter. Rapid scroll stops when yourelease the button again or when the endof the list is reached.
Making a call to an entryX Select an entry and press 6.
If there are several numbers for this name,you see a list of sub-entries.X Press the & or * button on the
multifunction steering wheel to select thedesired number.
X Press the 6 button again.
RedialingX Press the V or U button on the
multifunction steering wheel to select theTel menu.
X Press the 6 button on the multifunctionsteering wheel to open the list of dialednumbers in the multifunction display.
X Press and hold the & or * buttonuntil the desired entry is highlighted.
X Press the 6 button again.
34 Operating the telephone using the multifunction steering wheelTe
leph
one
Audio equipment features ................. 36Radio mode .......................................... 36Audio CD and MP3 mode .................... 38Audio operation using the multi-function steering wheel ..................... 46
35
Audi
o
Audio equipment features
i These Operating Instructions describe allthe standard and optional equipment ofyour audio device, as available at the timeof going to print. Country specificdifferences are possible.Please note that your vehicle might not beequipped with all the functions describedhere.
Radio mode
Introductioni Information about the Audio 20 controls
and basic operation can be found in the "Ata glance" section (Y page 10) and(Y page 13).
Switching to radio modeX Press the $ function button.
The radio display appears. You will hear thelast station played on the last wavebandselected.
By pressing the function button repeatedly,you can switch between different wavebandsin this order: FM (VHF), MW, WB (WeatherBand). Pressing the button again takes youback to FM radio mode.
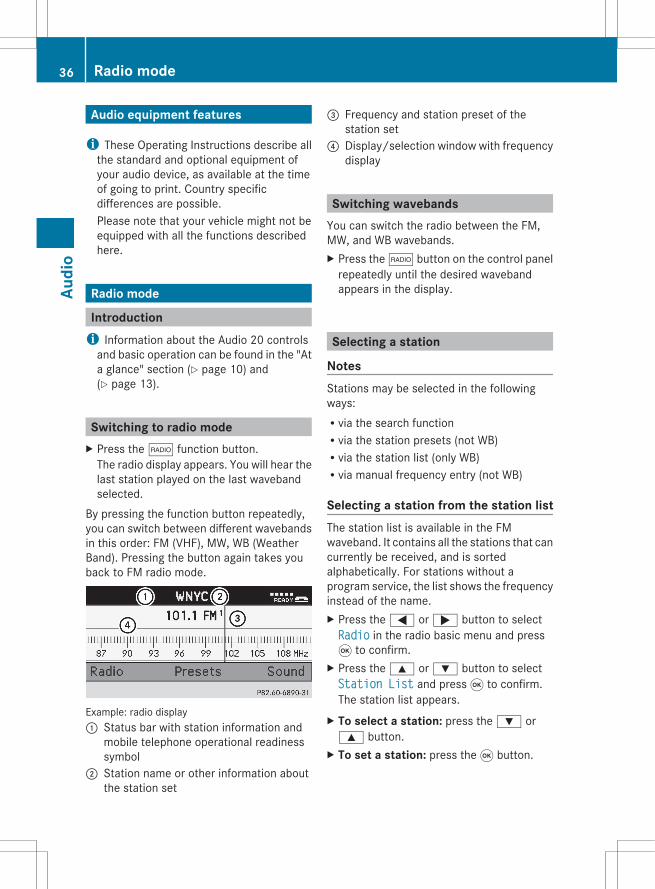
Example: radio display: Status bar with station information and
mobile telephone operational readinesssymbol
; Station name or other information aboutthe station set
= Frequency and station preset of thestation set
? Display/selection window with frequencydisplay
Switching wavebandsYou can switch the radio between the FM,MW, and WB wavebands.X Press the $ button on the control panel
repeatedly until the desired wavebandappears in the display.
Selecting a station
NotesStations may be selected in the followingways:Rvia the search functionRvia the station presets (not WB)Rvia the station list (only WB)Rvia manual frequency entry (not WB)
Selecting a station from the station listThe station list is available in the FMwaveband. It contains all the stations that cancurrently be received, and is sortedalphabetically. For stations without aprogram service, the list shows the frequencyinstead of the name.X Press the = or ; button to selectRadio in the radio basic menu and press9 to confirm.
X Press the 9 or : button to selectStation List and press 9 to confirm.The station list appears.
X To select a station: press the : or9 button.
X To set a station: press the 9 button.
36 Radio modeAu
dio
Setting a station using the stationsearch functionX Press the E or F button.orX Press the = or ; button.
Station search scans up or down and stopsat the next station found.
Selecting a station via the stationpresetsX Press the = or ; button to selectPresets in the radio basic menu and press9 to confirm.The station preset display appears. The# dot in front of a preset positionindicates that the currently selectedstation is stored there.
X To scroll in the list: press the : or9 button.
X To select a station: press the 9 button.orX Once stations have been stored in the
station presets, press a number button,e.g. 4, on the control panel.
Selecting stations by entering thefrequency manuallyX Press the = or ; button to selectRadio in the radio basic menu and press9 to confirm.
X Press the 9 or : button to selectEnter Frequency and press 9 toconfirm.An entry menu appears.
orX Press the l button on the control panel.X To enter a frequency: press the number
buttons on the control panel.Audio 20 sets the frequency entered.
i You can only select currently permittedfrequencies.
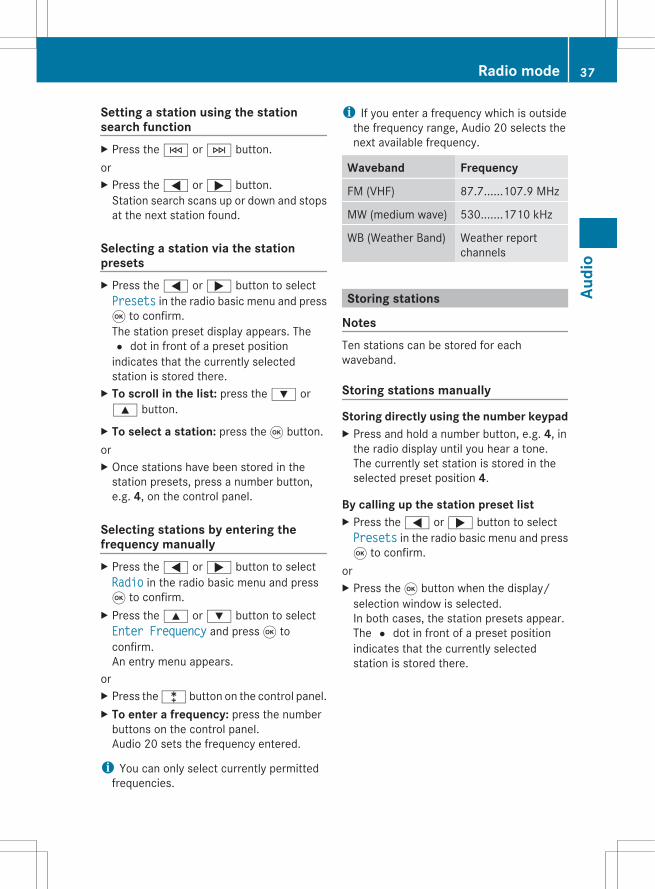
i If you enter a frequency which is outsidethe frequency range, Audio 20 selects thenext available frequency.
Waveband Frequency
FM (VHF) 87.7......107.9 MHz
MW (medium wave) 530.......1710 kHz
WB (Weather Band) Weather reportchannels
Storing stations
NotesTen stations can be stored for eachwaveband.
Storing stations manually
Storing directly using the number keypadX Press and hold a number button, e.g. 4, in
the radio display until you hear a tone.The currently set station is stored in theselected preset position 4.
By calling up the station preset listX Press the = or ; button to selectPresets in the radio basic menu and press9 to confirm.
orX Press the 9 button when the display/
selection window is selected.In both cases, the station presets appear.The # dot in front of a preset positionindicates that the currently selectedstation is stored there.
Radio mode 37
Audi
o
X To select a preset position: press the9 or : button.
X To store the station in the selected preset position: press and hold the 9button until you hear a tone.
orX Press and hold a number button, e.g. 4, in
the radio display until you hear a tone.The station is stored.
Storing stations automaticallyThis function automatically stores receivablestations in order of their reception quality.Any stations stored manually in the presetmemory will be lost.X Press the = or ; button to selectPresets in the radio basic menu and press9 to confirm.
X Press the 9 button to selectAutostore and press 9 to confirm.
i If the process is interrupted by a trafficannouncement, you must repeat it.
X To cancel the storing process: selectCancel and press 9 to confirm.
Audio CD and MP3 mode
Important safety notes
G WARNINGThe CD drive is a class 1 laser product. Thereis a risk of damage to the eyes due toexposure to invisible laser radiation if youopen the casing, or if the casing is faulty ordamaged.You must not open the casing. The unitcontains no parts on which you can carry outmaintenance. For safety reasons, allmaintenance work must be carried out byqualified aftersales technicians.
Notes on handling compact discsROnly hold discs by the edge.RHandle discs carefully to prevent playback
problems.RAvoid getting scratches, fingerprints and
dust on discs.RClean discs from time to time with a
commercially available cleaning cloth.When cleaning CDs, you should wipe instraight lines from the center outwardsrather than in a circular motion.RWhen labeling discs, only use a pen
designed for that purpose.RPlace discs back in their cases after use.RProtect discs from heat and direct sunlight.
Inserting a disc
Notes
G WARNINGInsert discs only when the vehicle isstationary. There is a risk of being distractedfrom the road and traffic conditions if youinsert or eject a disc while the vehicle is inmotion.
i If the disc has a printed side, this mustface upwards when the disc is inserted.If neither side is printed, the side to beplayed should face downwards. The systemmay not be able to play discs with copyprotection.
Inserting discs into the CD changer
OverviewThe CD changer has an integrated magazinewith six trays.
38 Audio CD and MP3 modeAu
dio
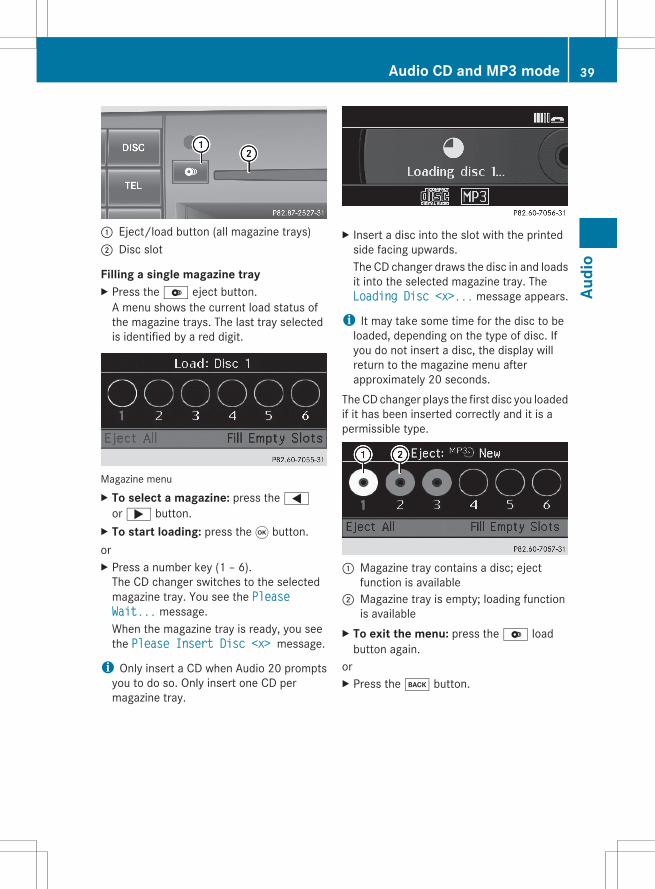
: Eject/load button (all magazine trays); Disc slot
Filling a single magazine trayX Press the V eject button.
A menu shows the current load status ofthe magazine trays. The last tray selectedis identified by a red digit.
Magazine menuX To select a magazine: press the =
or ; button.X To start loading: press the 9 button.orX Press a number key (1 – 6).
The CD changer switches to the selectedmagazine tray. You see the Please Wait... message.When the magazine tray is ready, you seethe Please Insert Disc <x> message.
i Only insert a CD when Audio 20 promptsyou to do so. Only insert one CD permagazine tray.
X Insert a disc into the slot with the printedside facing upwards.The CD changer draws the disc in and loadsit into the selected magazine tray. TheLoading Disc <x>... message appears.
i It may take some time for the disc to beloaded, depending on the type of disc. Ifyou do not insert a disc, the display willreturn to the magazine menu afterapproximately 20 seconds.
The CD changer plays the first disc you loadedif it has been inserted correctly and it is apermissible type.
: Magazine tray contains a disc; ejectfunction is available
; Magazine tray is empty; loading functionis available
X To exit the menu: press the V loadbutton again.
orX Press the k button.
Audio CD and MP3 mode 39
Audi
o
Z
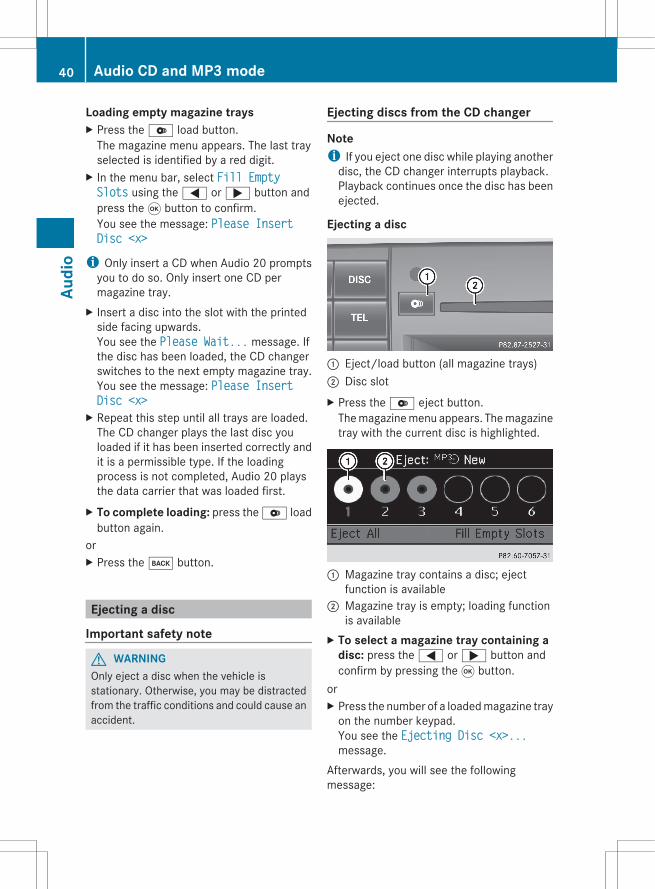
Loading empty magazine traysX Press the V load button.
The magazine menu appears. The last trayselected is identified by a red digit.
X In the menu bar, select Fill Empty Slots using the = or ; button andpress the 9 button to confirm.You see the message: Please Insert Disc <x>
i Only insert a CD when Audio 20 promptsyou to do so. Only insert one CD permagazine tray.
X Insert a disc into the slot with the printedside facing upwards.You see the Please Wait... message. Ifthe disc has been loaded, the CD changerswitches to the next empty magazine tray.You see the message: Please Insert Disc <x>
X Repeat this step until all trays are loaded.The CD changer plays the last disc youloaded if it has been inserted correctly andit is a permissible type. If the loadingprocess is not completed, Audio 20 playsthe data carrier that was loaded first.
X To complete loading: press the V loadbutton again.
orX Press the k button.
Ejecting a disc
Important safety note
G WARNINGOnly eject a disc when the vehicle isstationary. Otherwise, you may be distractedfrom the traffic conditions and could cause anaccident.
Ejecting discs from the CD changer
Notei If you eject one disc while playing another
disc, the CD changer interrupts playback.Playback continues once the disc has beenejected.
Ejecting a disc
: Eject/load button (all magazine trays); Disc slotX Press the V eject button.
The magazine menu appears. The magazinetray with the current disc is highlighted.
: Magazine tray contains a disc; ejectfunction is available
; Magazine tray is empty; loading functionis available
X To select a magazine tray containing a disc: press the = or ; button andconfirm by pressing the 9 button.
orX Press the number of a loaded magazine tray
on the number keypad.You see the Ejecting Disc <x>...message.
Afterwards, you will see the followingmessage:
40 Audio CD and MP3 modeAu
dio
X Take the disc out of the slot.If you do not take the disc out of the slot,Audio 20 will draw it in again automaticallyafter a short while.
Ejecting all discsX Press the V eject button.
The magazine menu appears.X Select Eject All.
The CD changer ejects the last discselected. You see the Ejecting Disc <x>... message.
X Remove the disc from the slot when thismessage appears.The CD changer switches to the nextloaded magazine tray and ejects the disc.
Switching to audio CD or MP3 mode
NotesX Insert a CD (Y page 38).
Audio 20 loads the inserted medium andplayback starts.
orX Press the h function button.
i The function button takes you directly tothe previously set disc mode (audio CD orMP3 CD).
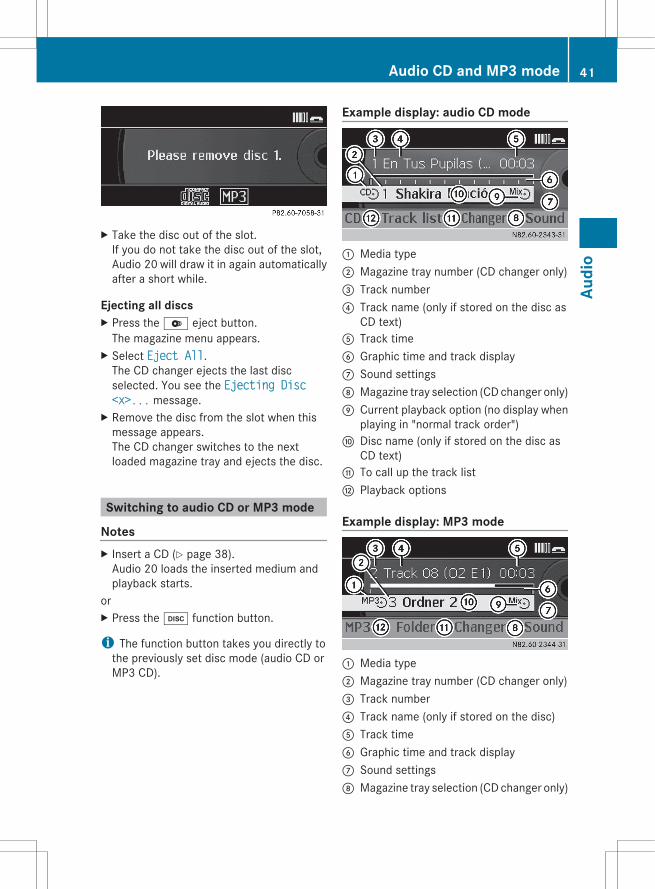
Example display: audio CD mode
: Media type; Magazine tray number (CD changer only)= Track number? Track name (only if stored on the disc as
CD text)A Track timeB Graphic time and track displayC Sound settingsD Magazine tray selection (CD changer only)E Current playback option (no display when
playing in "normal track order")F Disc name (only if stored on the disc as
CD text)G To call up the track listH Playback options
Example display: MP3 mode
: Media type; Magazine tray number (CD changer only)= Track number? Track name (only if stored on the disc)A Track timeB Graphic time and track displayC Sound settingsD Magazine tray selection (CD changer only)
Audio CD and MP3 mode 41
Audi
o
Z
E Current playback option (no display whenplaying in "normal track order")
F Current folderG To call up the folder listH Playback options
Pause function
In audio CD/MP3 modeX To pause playback: briefly press the8 button.The x symbol appears at the top left inthe status bar.
X To continue playback: briefly press the8 button again or turn the volumecontrol briefly.The x symbol disappears.
Selecting an audio CD or MP3 disc
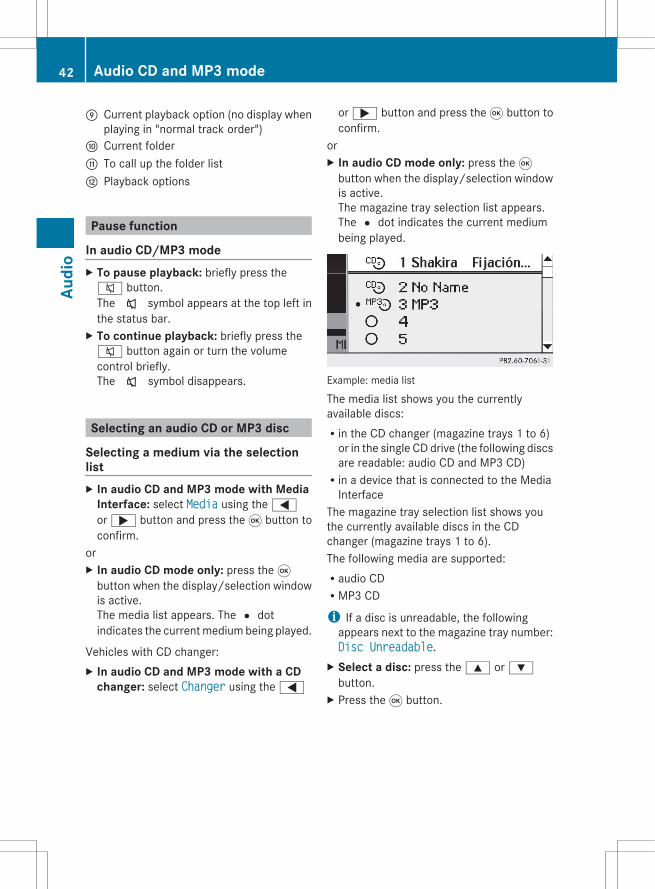
Selecting a medium via the selectionlistX In audio CD and MP3 mode with Media
Interface: select Media using the =or ; button and press the 9 button toconfirm.
orX In audio CD mode only: press the 9
button when the display/selection windowis active.The media list appears. The # dotindicates the current medium being played.
Vehicles with CD changer:X In audio CD and MP3 mode with a CD
changer: select Changer using the =
or ; button and press the 9 button toconfirm.
orX In audio CD mode only: press the 9
button when the display/selection windowis active.The magazine tray selection list appears.The # dot indicates the current mediumbeing played.
Example: media list
The media list shows you the currentlyavailable discs:Rin the CD changer (magazine trays 1 to 6)
or in the single CD drive (the following discsare readable: audio CD and MP3 CD)Rin a device that is connected to the Media
InterfaceThe magazine tray selection list shows youthe currently available discs in the CDchanger (magazine trays 1 to 6).The following media are supported:Raudio CDRMP3 CD
i If a disc is unreadable, the followingappears next to the magazine tray number:Disc Unreadable.
X Select a disc: press the 9 or :button.
X Press the 9 button.
42 Audio CD and MP3 modeAu
dio
Selecting a disc via the number keypadX In audio CD and MP3 mode only: briefly
press number key 0-7 when the display/selection window is active.(0 = Media Interface, 1 – 6 = CD changer,7 = AUX)
X Only in audio CD and MP3 mode with CD changer: briefly press number key 1-6when the display/selection window isactive.The disc in the corresponding magazinetray is selected.
Selecting a track
Selecting by skipping to a trackX To skip forwards or backwards to a
track: press the ; or = button.orX Press the F or E button.
i The skip forward function skips to thenext track. The skip back function skips tothe beginning of the current track if thetrack has been playing for more than eightseconds. If the track has been playing forless than eight seconds, it skips to the startof the previous track.If you have selected the Random Tracks orRandom Folder playback options, thetrack order is random.
Selecting by track listX In audio CD mode: select Tracks using
the = or ; button and press the9 button to confirm.
X In the MP3 mode: select Folder andpress the 9 button to confirm.
or
X Press the 9 button when the display/selection window is active.The track list appears. The # dot indicatesthe current track.
X To select a track: press the 9or : button.
X Press the 9 button.
i In MP3 mode, the list shows all the tracksin alphabetical order.
Selecting a track using the numberkeypadX Press the l button on the number
keypad.A numerical entry field appears. Thenumber of positions offered corresponds tothe number of tracks on the CD. Onlynumbers that correspond to a tracknumber on the CD can be entered.
X Enter the desired track number.i Pressing and holding a number button for
two seconds or more completes entry andthe corresponding track is played. Thismakes the next step (pressing the 9button) unnecessary.
X To complete entry: press the 9 button.The track is played.
Fast forward/rewindX When the display/selection window is
active: press and hold the = or ;button until the desired position is reached.
orX Press and hold the E or F button
until the desired position is reached.
Selecting a folderi This function is only available in MP3
mode.
Audio CD and MP3 mode 43
Audi
o
Z
X Switch to MP3 mode (Y page 41).X Select Folder in the menu bar using the= or ; button and press the 9button to confirm.
orX Press the 9 button when the display/
selection window is active.The folder list appears.
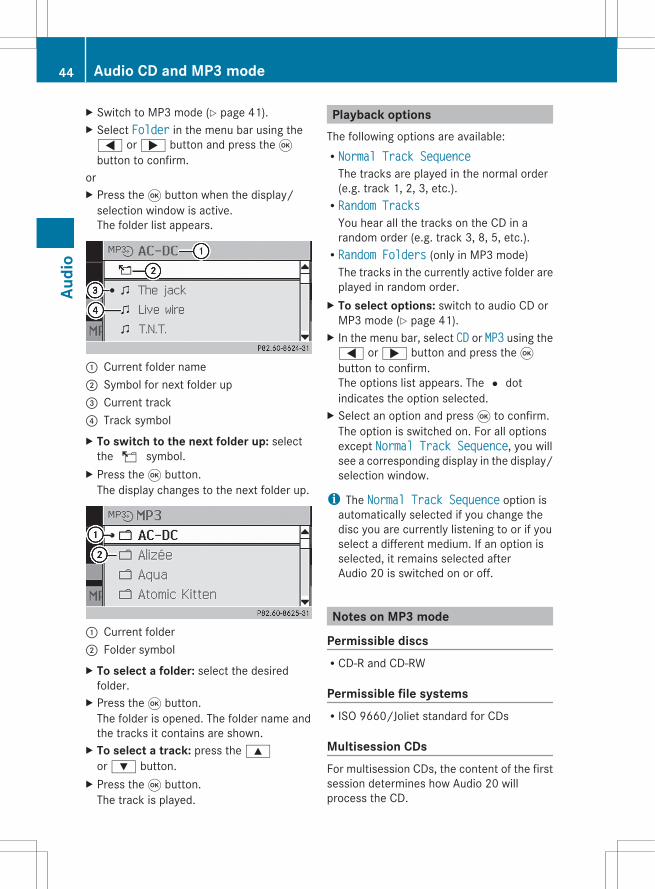
: Current folder name; Symbol for next folder up= Current track? Track symbolX To switch to the next folder up: select
the U symbol.X Press the 9 button.
The display changes to the next folder up.
: Current folder; Folder symbolX To select a folder: select the desired
folder.X Press the 9 button.
The folder is opened. The folder name andthe tracks it contains are shown.
X To select a track: press the 9or : button.
X Press the 9 button.The track is played.
Playback optionsThe following options are available:RNormal Track Sequence
The tracks are played in the normal order(e.g. track 1, 2, 3, etc.).RRandom Tracks
You hear all the tracks on the CD in arandom order (e.g. track 3, 8, 5, etc.).RRandom Folders (only in MP3 mode)
The tracks in the currently active folder areplayed in random order.
X To select options: switch to audio CD orMP3 mode (Y page 41).
X In the menu bar, select CD or MP3 using the= or ; button and press the 9button to confirm.The options list appears. The # dotindicates the option selected.
X Select an option and press 9 to confirm.The option is switched on. For all optionsexcept Normal Track Sequence, you willsee a corresponding display in the display/selection window.
i The Normal Track Sequence option isautomatically selected if you change thedisc you are currently listening to or if youselect a different medium. If an option isselected, it remains selected afterAudio 20 is switched on or off.
Notes on MP3 mode
Permissible discsRCD-R and CD-RW
Permissible file systemsRISO 9660/Joliet standard for CDs
Multisession CDsFor multisession CDs, the content of the firstsession determines how Audio 20 willprocess the CD.
44 Audio CD and MP3 modeAu
dio
If the first session contains data in audio CDformat and the second session contains MP3tracks, Audio 20 will treat the CD as aconventional audio CD. This means that it isnot possible to access the MP3 tracks.If the first session contains MP3 tracks, forexample, and the second session containsdata in audio CD format, Audio 20 will nottreat the disc as a conventional audio CD. Thismeans that it is only possible to access theMP3 tracks.
File structure of a data carrierWhen you create an MP3 disc, the MP3 trackscan be organized in folders. A folder can alsocontain subfolders. A disc can contain amaximum of 255 folders. Each folder cancontain a maximum of 255 tracks and 255subfolders. A disc can contain a maximum of500 tracks. An MP3 CD may contain no morethan eight directory levels. Files insubsequent levels are ignored.
Track and file namesWhen you create an MP3 disc, you can assignnames to the MP3 tracks and folders.Audio 20 uses these names for the display inMP3 mode. Audio 20 does not display filesthat are not supported.If MP3 files are stored in the root directoryitself, the root directory will also be treatedas a folder. Audio 20 will show the name ofthe root directory as the folder name.You must observe the following whenassigning track names:Rtrack names must have at least one
character.Rtrack names must have the extension
"mp3" or "wma".Rthere must be a full stop between the track
name and the extension.Example of a correct track name:Track1.mp3
Audio 20 does not recognize MP3 tracks if:Rthere is not a full stop between the track
name and the extension.Rthe extension is missing.
i Audio 20 does not support ID3 tags.
Permissible formats
MP3 (MPEG1 Audio Layer 3)Audio 20 supports the following types of MP3files:Rfixed and variable bit rates from 32 kbit/s
to 320 kbit/sRsampling rates of 24 kHz to 48 kHz
WMA (Windows Media Audio)Audio 20 supports the following types ofaudio files:Rfixed bit rates of 8 kbit/s up to
384 kbit/sRsampling rates of 8 kHz to 48 kHzAudio 20 does not support the following typesof WMA files:RDRM (Digital Rights Management)
encrypted filesRWMA ProR5.1 Surround
Notes on copyrightMP3 tracks that you create or play back aregenerally subject to copyright protection inaccordance with the applicable internationaland national regulations.In many countries, reproductions, even forprivate use, are not permitted without theprior consent of the copyright holder.Make sure that you know about the applicablecopyright regulations and that you complywith these.If you own these rights yourself, e.g. for yourown compositions and recordings, or if thecopyright holder has granted you permission,these restrictions do not apply.
Audio CD and MP3 mode 45
Audi
o
Z
Notes on compact discsi Discs with copy protection are not
compatible with the audio CD standard.Consequently, it may not be possible toplay them on the Audio 20 system.You may encounter playback problemswhen playing copied discs. There is a widerange of data carriers, disc-writingsoftware and writers available. This varietymeans that there is no guarantee that thesystem will be able to play discs that youhave copied yourself.There may be playback problems if you playCDs that you have copied yourself with astorage capacity of more than 700 MB. CDsof this type do not conform to the currentlyapplicable standards.
! Do not affix stickers or labels to the discs.They could peel off and damage the drive.The drive is designed to hold discs whichcomply with the EN 60908 standard. Forthis reason, you can only use discs with amaximum thickness of 1.3 mm.If you insert thicker discs, e.g. those thatcontain data on both sides (DVD on oneside and audio data on the other), theycannot be ejected and can damage thedrive.Do not use discs with a diameter of 8 cm,even with an adapter. Only use round discswith a diameter of 12 cm.
Audio operation using themultifunction steering wheel
Selecting a radio stationX Switch Audio 20 to radio mode.X Select the radio display using the V orU button on the multifunction steeringwheel.
X Press the & or * button briefly onthe multifunction steering wheel.You will hear the previous or next station inthe station presets.
orX Press and hold the & or * button on
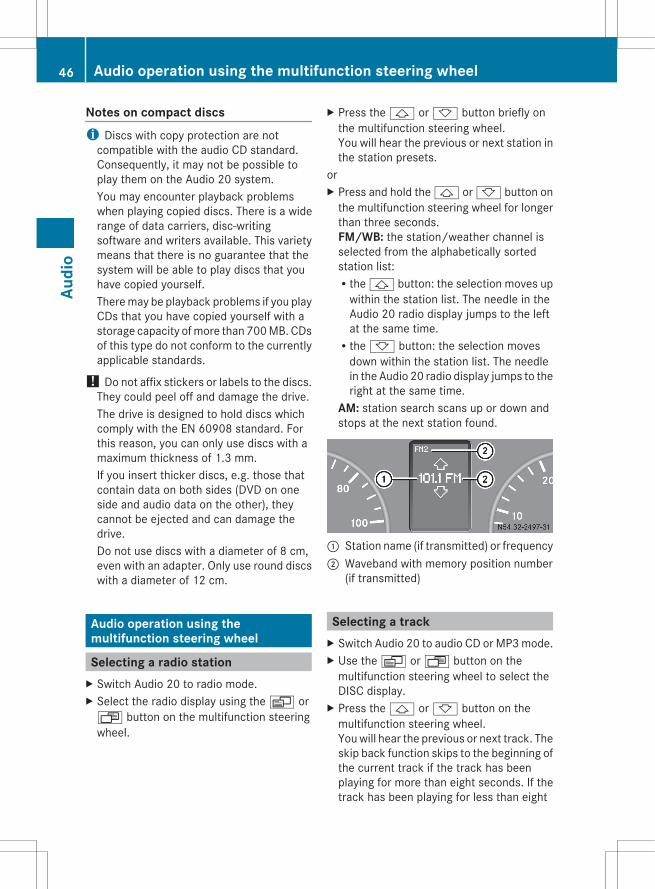
the multifunction steering wheel for longerthan three seconds.FM/WB: the station/weather channel isselected from the alphabetically sortedstation list:Rthe & button: the selection moves up
within the station list. The needle in theAudio 20 radio display jumps to the leftat the same time.Rthe * button: the selection moves
down within the station list. The needlein the Audio 20 radio display jumps to theright at the same time.
AM: station search scans up or down andstops at the next station found.
: Station name (if transmitted) or frequency; Waveband with memory position number
(if transmitted)
Selecting a trackX Switch Audio 20 to audio CD or MP3 mode.X Use the V or U button on the
multifunction steering wheel to select theDISC display.
X Press the & or * button on themultifunction steering wheel.You will hear the previous or next track. Theskip back function skips to the beginning ofthe current track if the track has beenplaying for more than eight seconds. If thetrack has been playing for less than eight
46 Audio operation using the multifunction steering wheelAu
dio
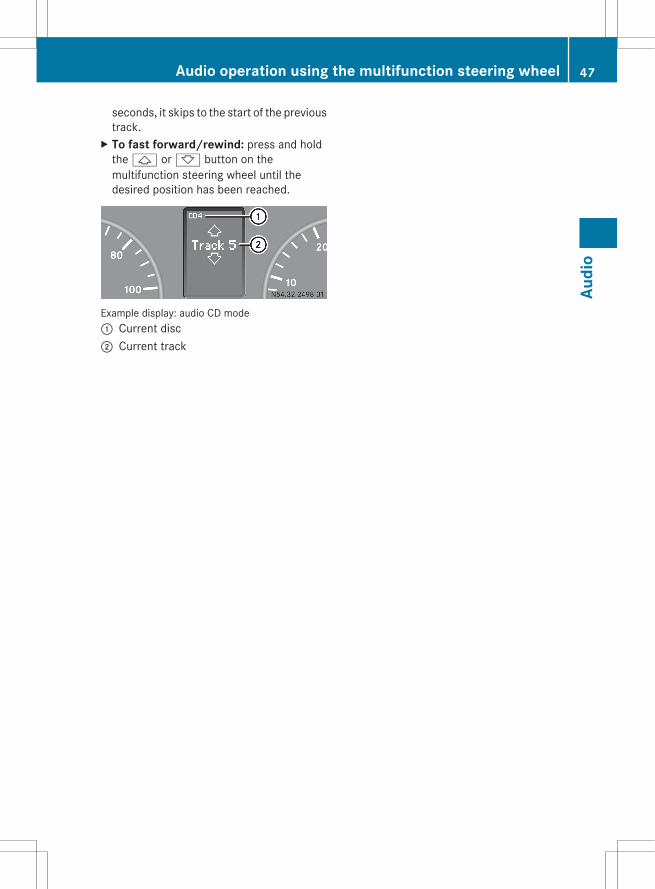
seconds, it skips to the start of the previoustrack.
X To fast forward/rewind: press and holdthe & or * button on themultifunction steering wheel until thedesired position has been reached.
Example display: audio CD mode: Current disc; Current track
Audio operation using the multifunction steering wheel 47
Audi
o
Z

48
Publication detailsInternet
Further information about Mercedes-Benzvehicles can be found online at:www.mercedes-benz.com
Editorial office
Questions or suggestions concerning thisOperator's Manual may be directed to thetechnical documentation team at the addressgiven on the inside of the front cover.© Mercedes-Benz USA, LLC© Mercedes-Benz Canada, Inc.Mercedes-Benz USA, LLC and Mercedes-Benz Canada Inc. are Daimler companies.Not to be reprinted, translated or otherwisereproduced, in whole or in part, withoutwritten permission.Printed in the USA.
As at 25.03.2011

Order no. 6462 2667 76 Part no. 006 584 38 81 Edition C MY 2012 MB
É00658438811ËÍ0065843881


