
Agria 10/17/2012ADOBE TRAINING, PHOTOSHOP CS6 BASICS: IMAGE MANIPULATION - 1
ADOBE TRAINING, PHOTOSHOP CS6
BASICS: IMAGE MANIPULATION
Photoshop has many sophisticated tools to manipulate images for correction and effect. In this tutorial you will
learn to:
• Straighten crooked images
• Use the Liquify Filter (Pucker and Bloat options) to reduce or expand areas in an image
• Move pieces of an image using the Puppet Warp
Straightening Images
Step One: Open the image and select the (1) Crop Tool from the Toolbar
Step Two: From the Tool Options Bar select the (1) Original Ratio (to preserve the photos original ratio) from
the crop menu and choose (2) Straighten by clicking on the "suitcase" straighten icon.

Agria 10/17/2012ADOBE TRAINING, PHOTOSHOP CS6 BASICS: IMAGE MANIPULATION - 2
Step Three: Left-hand click and (1) draw a line on the image in the direction of the desired perspective.
The image will straighten into the crop based on the direction of the line. Double-left click or choose the (1)
checkmark in the upper right to select the crop.

Agria 10/17/2012ADOBE TRAINING, PHOTOSHOP CS6 BASICS: IMAGE MANIPULATION - 3
The final straightened image.
Liquify Filter - Bloat & Pucker
The Liquify Filter can be used to alter images for effects and correction. Bloat will expand or increase an area
while Pucker will retract or pinch an area. These tools are often used in the fashion industry to reduce waist
sizes and elongate necks and legs.
Step One: Open the image and select (1) Filter > Liquify from the Photoshop Menu.
Note: The use of the filter features will be applied to the image layer selected, i.e. they will not create a new
layer. If you want to preserve a copy of your layer without the auto changes, right-hand click on the layer and
select Duplicate Layer....

Agria 10/17/2012ADOBE TRAINING, PHOTOSHOP CS6 BASICS: IMAGE MANIPULATION - 4
Step Two: In the Liquify Filter dialog box, choose the (1) Bloat Tool from the menu.
Step Three: Use the Tool Options to adjust the (1) Brush Size OR use the Left/Right Brackets [ ] keyboard
shortcut.
Tip: Use the Zoom and Hand Tool in the dialog box menu to move around and more easily apply the effect in the
image.

Agria 10/17/2012ADOBE TRAINING, PHOTOSHOP CS6 BASICS: IMAGE MANIPULATION - 5
Step Four: Place the (1) brush on the area of the image you want to Bloat. Left-hand click/hold to apply the
effect to a single point. You can also drag the brush along the image to apply the bloat along an image.
Step Five: Select (1) OK to commit to the changes.
Step Six: Open the image and select (1) Filter > Liquify from the Photoshop Menu.
Note: The use of the filter features will be applied to the image layer selected, i.e. they will not create a new
layer. If you want to preserve a copy of your layer without the auto changes, right-hand click on the layer and
select Duplicate Layer....

Agria 10/17/2012ADOBE TRAINING, PHOTOSHOP CS6 BASICS: IMAGE MANIPULATION - 6
Step Seven: In the Liquify Filter dialog box, choose the (1) Pucker Tool from the menu.
Step Eight: Use the Tool Options to adjust the (1) Brush Size OR use the Left/Right Brackets [ ] keyboard
shortcut.
Tip: Use the Zoom and Hand Tool in the dialog box menu to move around and more easily apply the effect in the
image.
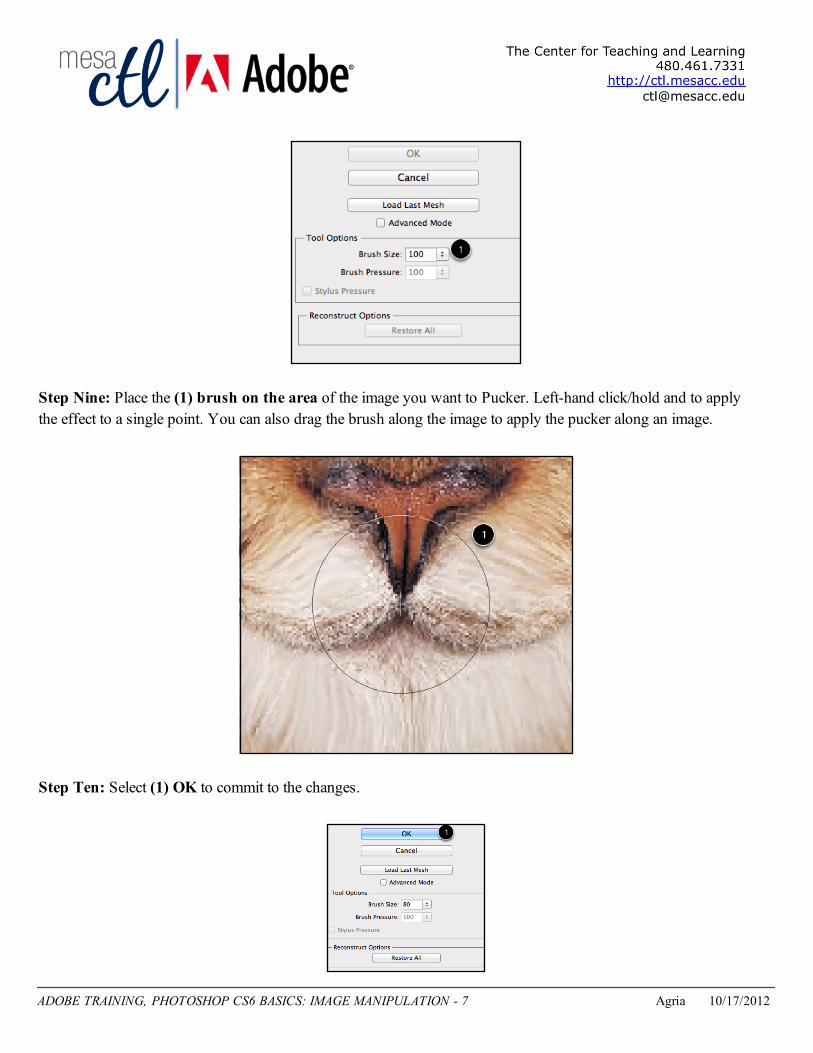
Agria 10/17/2012ADOBE TRAINING, PHOTOSHOP CS6 BASICS: IMAGE MANIPULATION - 7
Step Nine: Place the (1) brush on the area of the image you want to Pucker. Left-hand click/hold and to apply
the effect to a single point. You can also drag the brush along the image to apply the pucker along an image.
Step Ten: Select (1) OK to commit to the changes.

Agria 10/17/2012ADOBE TRAINING, PHOTOSHOP CS6 BASICS: IMAGE MANIPULATION - 8
Here is an example of the Liquify Bloat and Pucker effect applied to a cat's eyes, mouth and nose area.
Here is an example of the Pucker Effect applied to a fashion photo to make the model's legs appear longer.
Puppet Warp with Content Aware Fill
The Puppet Warp can be used to reposition parts of an image to make adjustments or corrections. The tool uses
pins as anchors to stick parts of the image to the workspace while you use other pins to manipulate the image. It
is a great tool for moving the position of arms/hands, the tilt of a head, the angle of a tree branch or as you can
see in this in this tutorial the size of a hair-do. In this tutorial we will use the Puppet Warp with Content Aware
fill to preserve the background image under the object we want to move.

Agria 10/17/2012ADOBE TRAINING, PHOTOSHOP CS6 BASICS: IMAGE MANIPULATION - 9
Step One: Open the image and using the (1) Quick Selection Tool carefully select object you want to
manipulate.
Note: The use of the Puppet features will be applied to the image layer selected, i.e. they will not create a new
layer. If you want to preserve a copy of your layer without the changes, right-hand click on the layer and select
Duplicate Layer....
Use the Tool Options for the Quick Selection Tool, including the (1) Brush sizes, to adjust the effectiveness of
the selection. Use the (2) Refine Edge... option to adjust the feather and the selection area further.
Step Two: From the Photoshop Menu select (1) Layer > New > Layer Via Copy. You will notice a new layer
with only your selection appears in the Layer Panel. Note: Double left-hand click to rename your layer to keep
things organized in the Layers' Pane.

Agria 10/17/2012ADOBE TRAINING, PHOTOSHOP CS6 BASICS: IMAGE MANIPULATION - 10
Step Three: Reactivate the selection by right-hand click on the new layer and choosing (1) Select Pixels.
Step Four: With the pixels selected, return to the original Layer and choose (1) Select > Modify > Expand. In
the dialog box, set the expansion to 5-10 pixels. The selection will expand outside of the original area equally on
all sides.
Step Five: From the Photoshop Menu, select (1) Edit > Fill and in the dialog box choose (2) Content-Aware
from the menu and select (3) OK. This will remove the selection and reveal a Photoshop auto generated newly
constructed background. Note: Creating a new background with Content Aware Fill makes it easier to
manipulate the image without distorting or creating holes in the bottom layer.

Agria 10/17/2012ADOBE TRAINING, PHOTOSHOP CS6 BASICS: IMAGE MANIPULATION - 11
Step Six: On the layer you want to manipulate (in this example the Woman) select (1) Edit > Puppet Warp
from the Photoshop Menu.

Agria 10/17/2012ADOBE TRAINING, PHOTOSHOP CS6 BASICS: IMAGE MANIPULATION - 12
Step Seven: Deselect the checkbox to (1) Show Mesh in the Tool Options Bar unless you want the guides.
Step Eight: Left-hand clicking on the image set anchor points along the base of the area of you want to move.
These points will serve to keep the face or other parts of the image from moving when you begin the adjustments.

Agria 10/17/2012ADOBE TRAINING, PHOTOSHOP CS6 BASICS: IMAGE MANIPULATION - 13
Step Nine: Left-hand clicking on the image set additional points along the edge of the area of you want to move.
These points will serve as the movement anchors.
Step Ten: With the pins set, left-hand click and drag the top (or movement anchor) pins carefully in to lower
and/or move the hair from left to right.
Note: You may have to add more anchor points to stabilize parts the image you do not want to move.

Agria 10/17/2012ADOBE TRAINING, PHOTOSHOP CS6 BASICS: IMAGE MANIPULATION - 14
Step Eleven: Double-left click or choose the (1) checkmark in the upper right to apply the changes.
Additional Resources
Adobe TV Photoshop Tutorials:http://tv.adobe.com/product/photoshop/
Straightening: http://tv.adobe.com/watch/learn-photoshop-cs6/straightening-a-crooked-image/
Liquify: http://tv.adobe.com/watch/dekepod/the-instant-liquid-diet/
Puppet Warp: http://tv.adobe.com/watch/photoshop-hidden-gems/puppet-warp-with-contentaware-fill/


