download (pdf, 10.17 mb)
TRANSCRIPT
STIH)
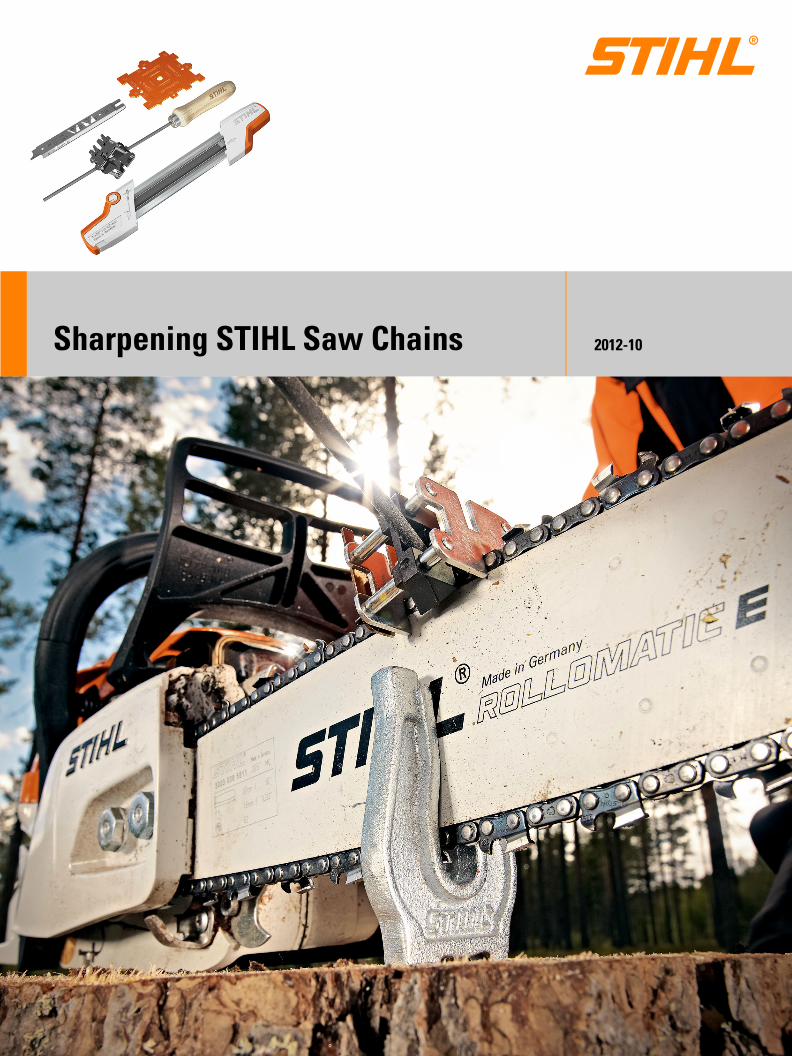
2012-10Sharpening STIHL Saw Chains
0457-181-0121_02.book Seite -1 Donnerstag, 13. Dezember 2012 11:50 11
0457-181-0121_02.book Seite 0 Donnerstag, 13. Dezember 2012 11:50 11
Introduction
STIHL offers every user, from occasional to professional, the right tools for maintaining the cutting attachment.
The cutting attachment consists of the saw chain, guide bar and chain sprocket.
This handbook is intended as a guide to selecting and learning how to use the right tools for servicing your cutting attachment. With a little practice you will be able to sharpen your saw chains like a professional.
Reading and observing the instructions in your chainsaw manual and those for the use of the servicing tools is a precondition for the operations described in this handbook.
Please contact your STIHL dealer if you have any further questions after reading this handbook.
Always wear protective gloves when working on and with the chainsaw and cutting attachment. There is otherwise a risk of injury from the very sharp cutters.
ContentsSTIHL Advanced Technology ..............................................1
Construction of a Saw Chain ...............................................3
Preparing the Saw Chain .....................................................6
Principles – Sharpening Saw Chain ..................................8
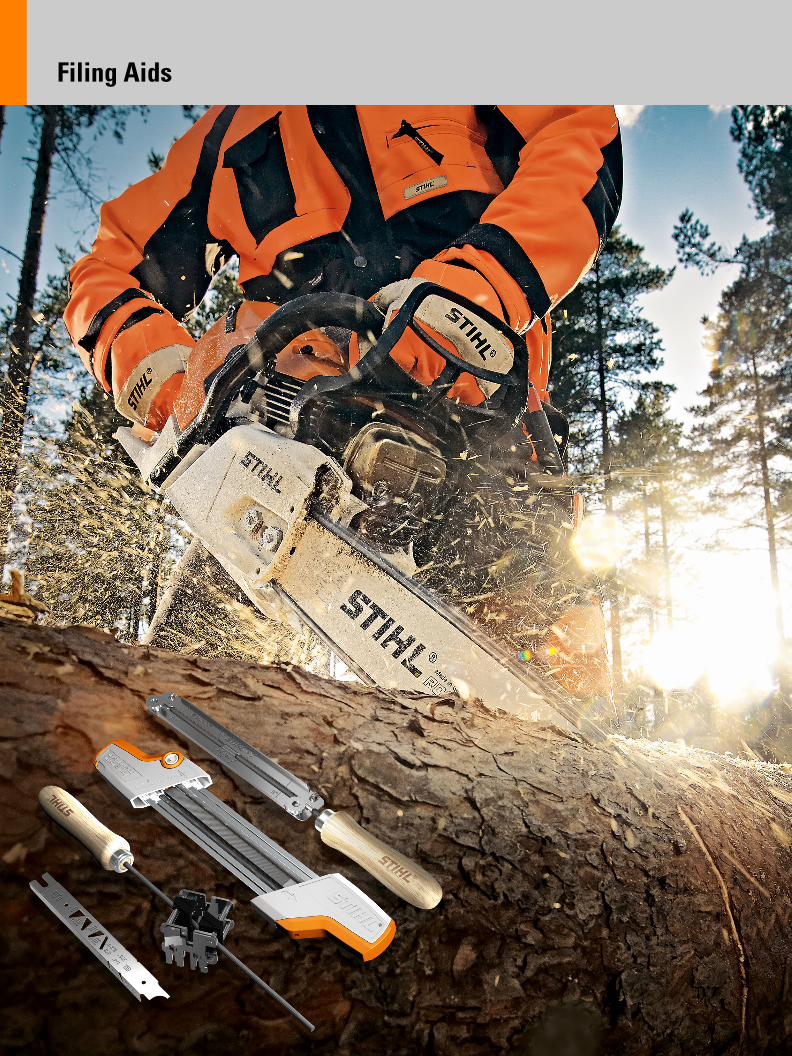
Filing Aids .............................................................................12
Tensioning the Saw Chain .................................................17
Sharpening Errors and Damage ........................................18
Guide Bar Maintenance .....................................................23
Checking the Chain Sprocket ...........................................27
Determining the Correct Cutting Attachment .................28
Check List .............................................................................33
0457-181-0121_02.book Seite 1 Donnerstag, 13. Dezember 2012 11:50 11
STIHL Advanced Technology
Apart from the quality and engine power of the chainsaw, cutting performance depends primarily on the choice of cutting attachment and its condition.
A properly sharpened, well maintained saw chain makes your work easier. It helps prolong the service life of the whole cutting attachment, consisting of the saw chain, guide bar and chain sprocket.
STIHL is the only chainsaw manufacturer in the world to develop and produce its own saw chains and guide bars. STIHL has thus guaranteed since 1926 that the three parts of the cutting attachment are always optimally matched to the chainsaw.
STIHL saw chains and guide bars not only provide outstanding cutting performance on STIHL chainsaws, but also on other brands of chainsaws.
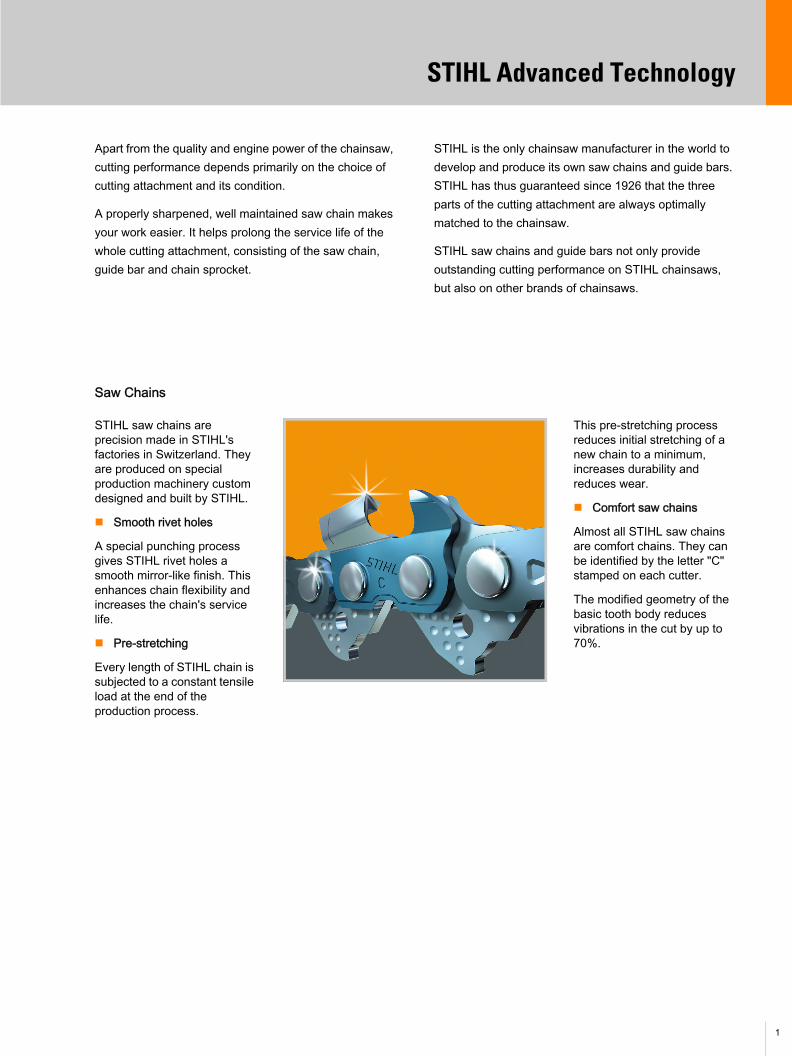
Saw Chains
STIHL saw chains are precision made in STIHL's factories in Switzerland. They are produced on special production machinery custom designed and built by STIHL.
Smooth rivet holes
A special punching process gives STIHL rivet holes a smooth mirror-like finish. This enhances chain flexibility and increases the chain's service life.
Pre-stretching
Every length of STIHL chain is subjected to a constant tensile load at the end of the production process.
This pre-stretching process reduces initial stretching of a new chain to a minimum, increases durability and reduces wear.
Comfort saw chains
Almost all STIHL saw chains are comfort chains. They can be identified by the letter "C" stamped on each cutter.
The modified geometry of the basic tooth body reduces vibrations in the cut by up to 70%.
1

2
0457-181-0121_02.book Seite 2 Donnerstag, 13. Dezember 2012 11:50 11
STIHL Advanced Technology
Guide Bars
STIHL guide bars are optimized in terms of their durability, strength and weight.
Complete symmetry
As they are completely symmetrical, STIHL guide bars can be turned over. This ensures even wear on both sides.
Induction hardened bar rails
Induction hardening makes the bar rails more resilient and wear resistant. The guide bar has a much longer life.
Nose sprocket with encapsulated roller bearing
The standard encapsulated bearing prevents the ingress of dirt and is maintenance free. The lubricant injected into the bearing in the production process is sufficient to last its entire service life.
Oilomatic System of Lubrication
This system ensures less friction and wear and thus extends the useful life of the cutting attachment. Oil flows up through fine oil channels in the drive links to the chain joints and the running faces of the chain links. In addition, chain oil collects in a number of dimples on both sides of the drive links. This ensures an unbroken film of lubricant between the drive links and the bar rails.
STIHL recommends the exclusive use of STIHL chain oils to guarantee the best possible lubrication.
0457-181-0121_02.book Seite 3 Donnerstag, 13. Dezember 2012 11:50 11
Construction of a Saw Chain
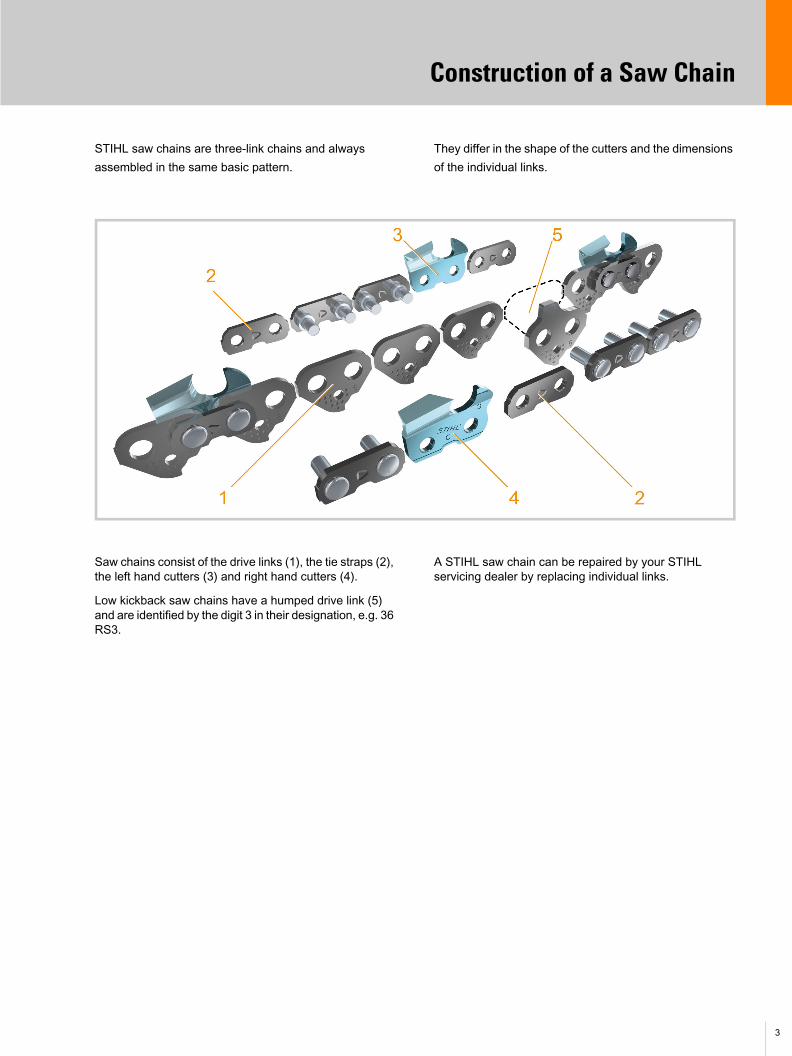
STIHL saw chains are three-link chains and always assembled in the same basic pattern.
They differ in the shape of the cutters and the dimensions of the individual links.
Saw chains consist of the drive links (1), the tie straps (2), the left hand cutters (3) and right hand cutters (4).
Low kickback saw chains have a humped drive link (5) and are identified by the digit 3 in their designation, e.g. 36 RS3.
A STIHL saw chain can be repaired by your STIHL servicing dealer by replacing individual links.
3
4
0457-181-0121_02.book Seite 4 Donnerstag, 13. Dezember 2012 11:50 11
Construction of a Saw Chain
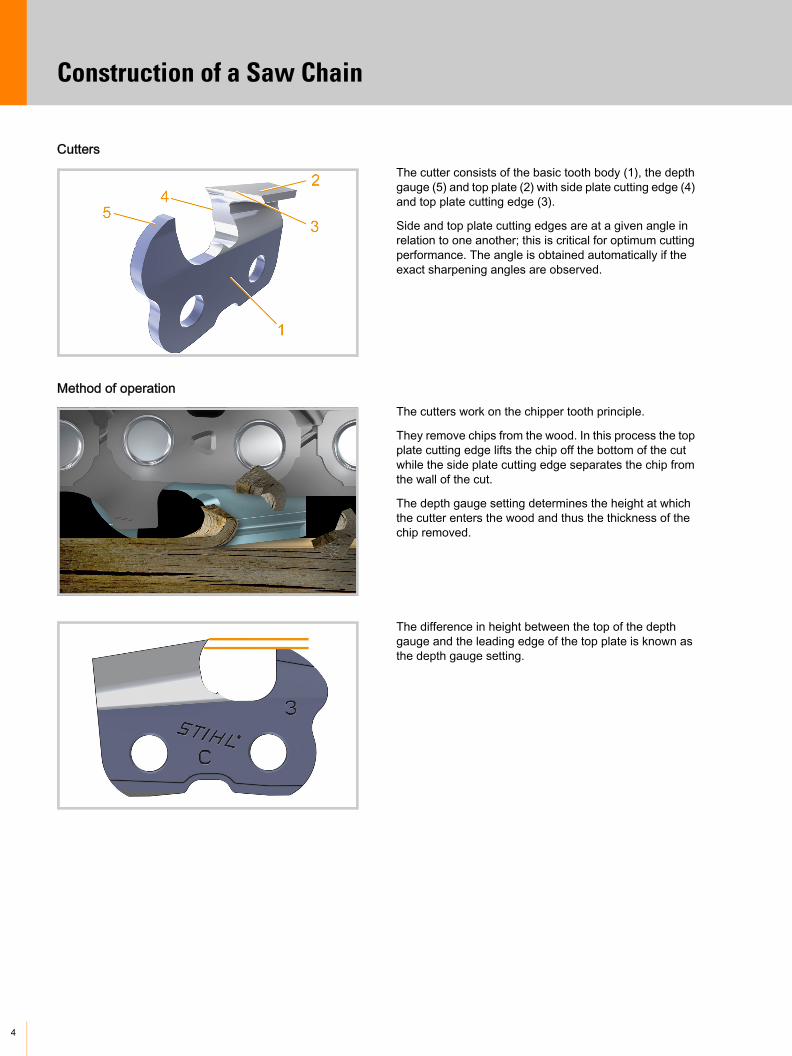
CuttersThe cutter consists of the basic tooth body (1), the depth gauge (5) and top plate (2) with side plate cutting edge (4) and top plate cutting edge (3).
Side and top plate cutting edges are at a given angle in relation to one another; this is critical for optimum cutting performance. The angle is obtained automatically if the exact sharpening angles are observed.
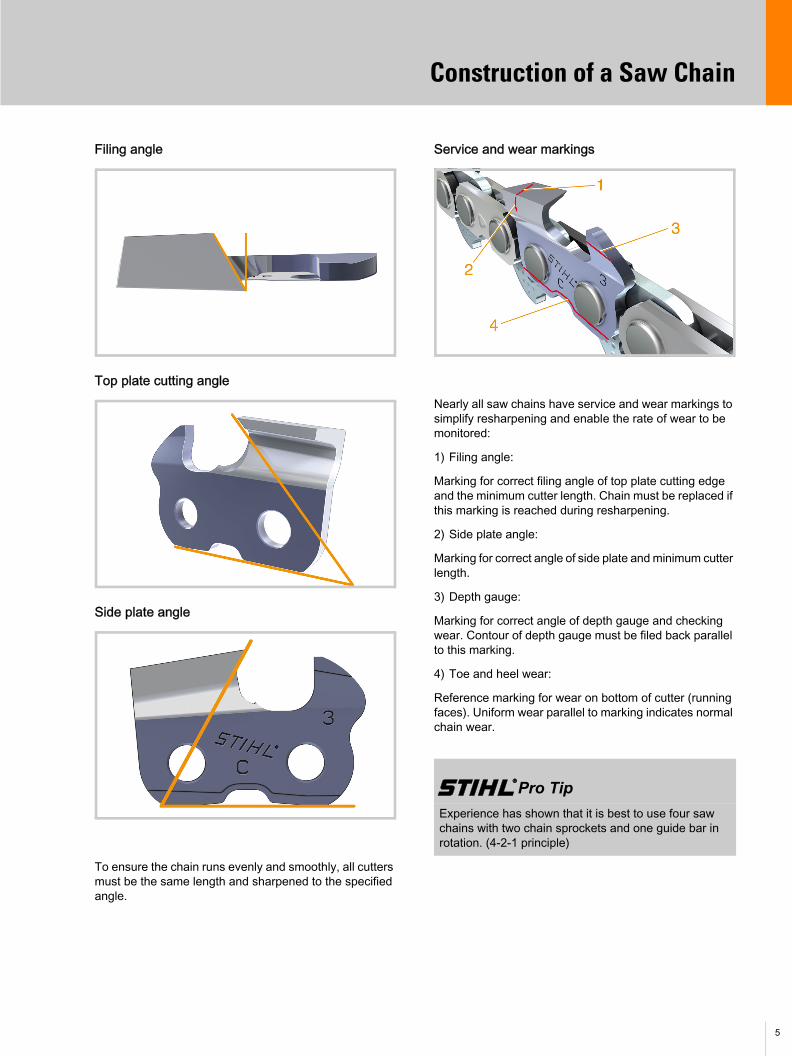
Method of operationThe cutters work on the chipper tooth principle.
They remove chips from the wood. In this process the top plate cutting edge lifts the chip off the bottom of the cut while the side plate cutting edge separates the chip from the wall of the cut.
The depth gauge setting determines the height at which the cutter enters the wood and thus the thickness of the chip removed.
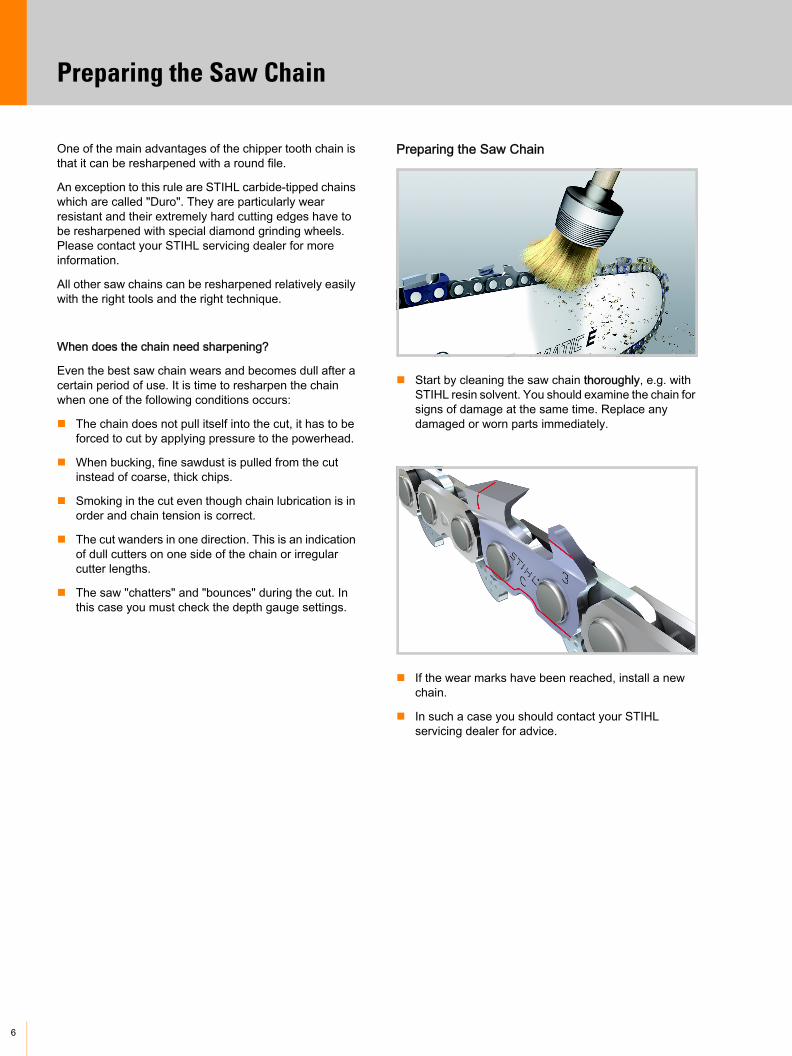
The difference in height between the top of the depth gauge and the leading edge of the top plate is known as the depth gauge setting.
0457-181-0121_02.book Seite 5 Donnerstag, 13. Dezember 2012 11:50 11
Construction of a Saw Chain
Filing angle
Top plate cutting angle
Side plate angle
To ensure the chain runs evenly and smoothly, all cutters must be the same length and sharpened to the specified angle.
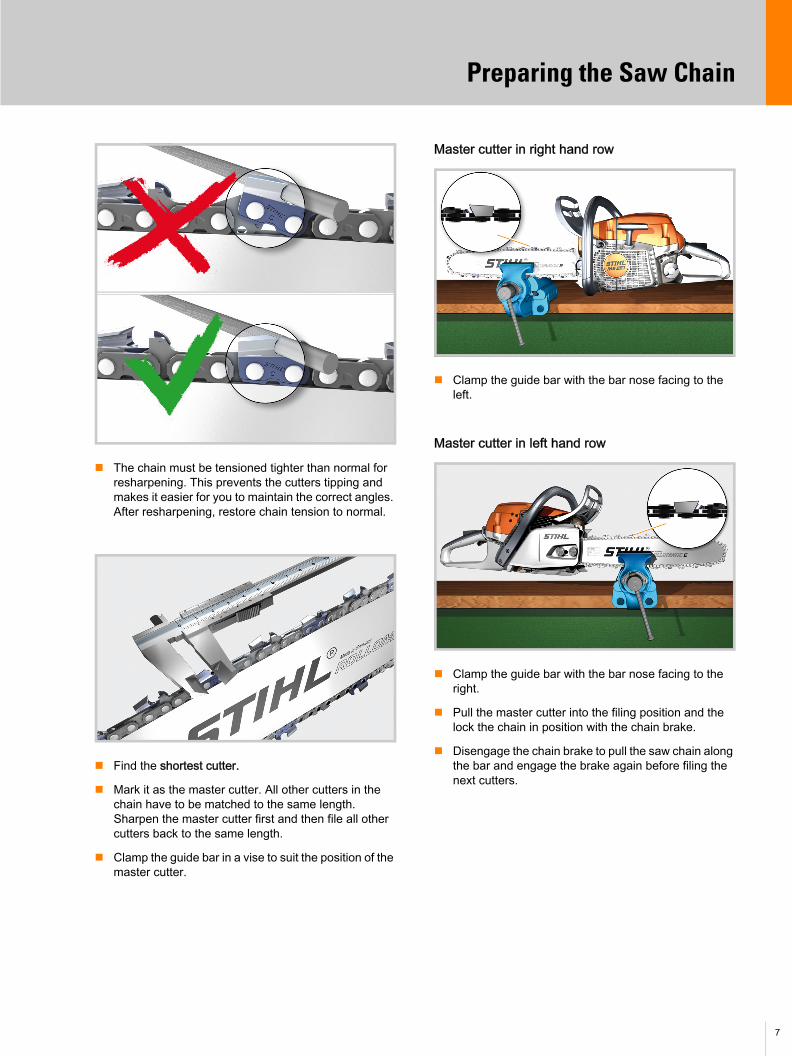
Service and wear markings
Nearly all saw chains have service and wear markings to simplify resharpening and enable the rate of wear to be monitored:
1) Filing angle:
Marking for correct filing angle of top plate cutting edge and the minimum cutter length. Chain must be replaced if this marking is reached during resharpening.
2) Side plate angle:
Marking for correct angle of side plate and minimum cutter length.
3) Depth gauge:
Marking for correct angle of depth gauge and checking wear. Contour of depth gauge must be filed back parallel to this marking.
4) Toe and heel wear:
Reference marking for wear on bottom of cutter (running faces). Uniform wear parallel to marking indicates normal chain wear.
{ Pro Tip
Experience has shown that it is best to use four saw chains with two chain sprockets and one guide bar in rotation. (4-2-1 principle)
ALTES 084 als Kettedargestellt (Kalotten„Golfballoptik“)Hintergrund weg
5
6
0457-181-0121_02.book Seite 6 Donnerstag, 13. Dezember 2012 11:50 11
Preparing the Saw Chain
One of the main advantages of the chipper tooth chain is that it can be resharpened with a round file.
An exception to this rule are STIHL carbide-tipped chains which are called "Duro". They are particularly wear resistant and their extremely hard cutting edges have to be resharpened with special diamond grinding wheels. Please contact your STIHL servicing dealer for more information.
All other saw chains can be resharpened relatively easily with the right tools and the right technique.
When does the chain need sharpening?
Even the best saw chain wears and becomes dull after a certain period of use. It is time to resharpen the chain when one of the following conditions occurs:
The chain does not pull itself into the cut, it has to be forced to cut by applying pressure to the powerhead.
When bucking, fine sawdust is pulled from the cut instead of coarse, thick chips.
Smoking in the cut even though chain lubrication is in order and chain tension is correct.
The cut wanders in one direction. This is an indication of dull cutters on one side of the chain or irregular cutter lengths.
The saw "chatters" and "bounces" during the cut. In this case you must check the depth gauge settings.
Preparing the Saw Chain
Start by cleaning the saw chain thoroughly, e.g. with STIHL resin solvent. You should examine the chain for signs of damage at the same time. Replace any damaged or worn parts immediately.
If the wear marks have been reached, install a new chain.
In such a case you should contact your STIHL servicing dealer for advice.
ALTES 084 als Kettedargestellt Hintergrund weg- ABER HIER ohnePosNummern
0457-181-0121_02.book Seite 7 Donnerstag, 13. Dezember 2012 11:50 11
Preparing the Saw Chain
The chain must be tensioned tighter than normal for resharpening. This prevents the cutters tipping and makes it easier for you to maintain the correct angles. After resharpening, restore chain tension to normal.
Find the shortest cutter.
Mark it as the master cutter. All other cutters in the chain have to be matched to the same length. Sharpen the master cutter first and then file all other cutters back to the same length.
Clamp the guide bar in a vise to suit the position of the master cutter.
Master cutter in right hand row
Clamp the guide bar with the bar nose facing to the left.
Master cutter in left hand row
Clamp the guide bar with the bar nose facing to the right.
Pull the master cutter into the filing position and the lock the chain in position with the chain brake.
Disengage the chain brake to pull the saw chain along the bar and engage the brake again before filing the next cutters.
7
8
0457-181-0121_02.book Seite 8 Donnerstag, 13. Dezember 2012 11:50 11
Principles – Sharpening Saw Chain
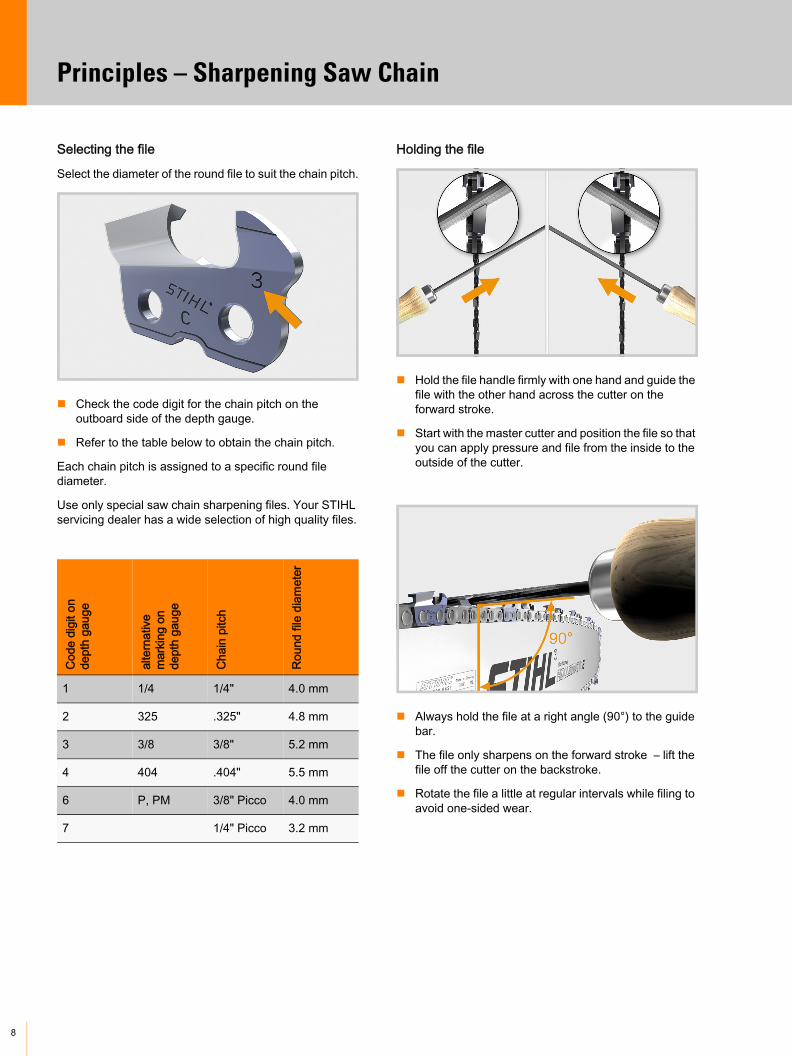
Selecting the file
Select the diameter of the round file to suit the chain pitch.
Check the code digit for the chain pitch on the outboard side of the depth gauge.
Refer to the table below to obtain the chain pitch.
Each chain pitch is assigned to a specific round file diameter.
Use only special saw chain sharpening files. Your STIHL servicing dealer has a wide selection of high quality files.
Holding the file
Hold the file handle firmly with one hand and guide the file with the other hand across the cutter on the forward stroke.
Start with the master cutter and position the file so that you can apply pressure and file from the inside to the outside of the cutter.
Always hold the file at a right angle (90°) to the guide bar.
The file only sharpens on the forward stroke – lift the file off the cutter on the backstroke.
Rotate the file a little at regular intervals while filing to avoid one-sided wear.
Cod
e di
git o
nde
pth
gaug
e
alte
rnat
ive
mar
king
on
dept
h ga
uge
Cha
in p
itch
Rou
nd fi
le d
iam
eter
1 1/4 1/4" 4.0 mm
2 325 .325" 4.8 mm
3 3/8 3/8" 5.2 mm
4 404 .404" 5.5 mm
6 P, PM 3/8" Picco 4.0 mm
7 1/4" Picco 3.2 mm
0457-181-0121_02.book Seite 9 Donnerstag, 13. Dezember 2012 11:50 11
Principles – Sharpening Saw Chain
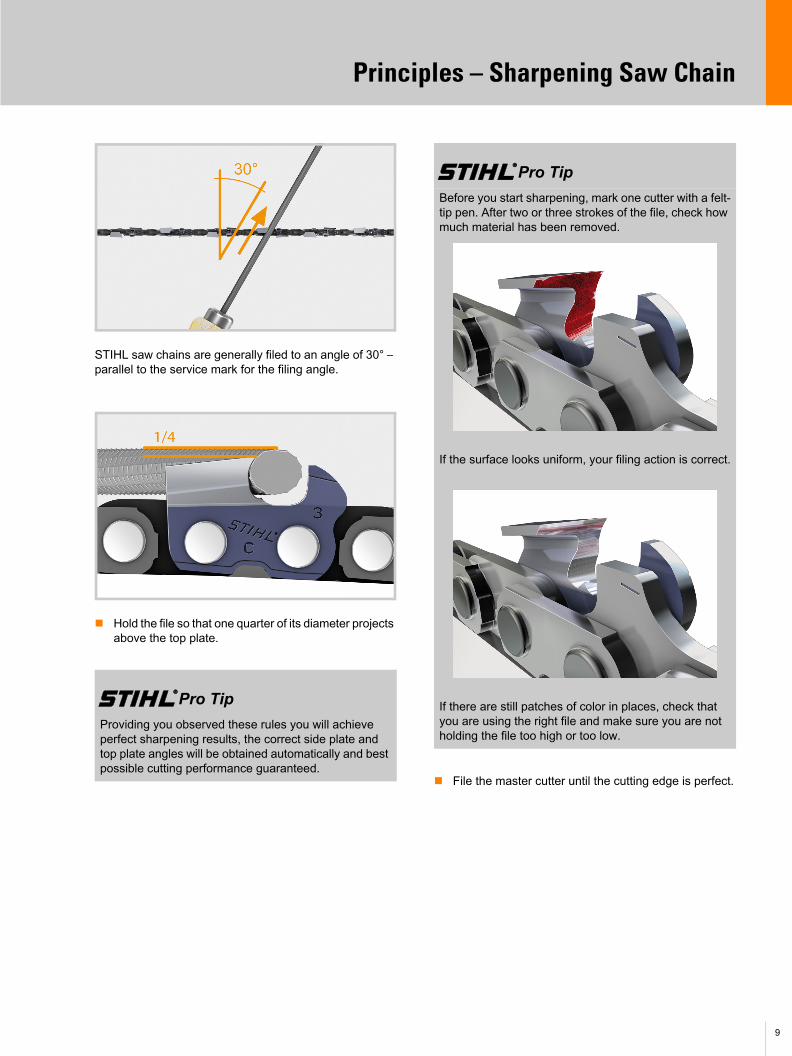
STIHL saw chains are generally filed to an angle of 30° – parallel to the service mark for the filing angle.
Hold the file so that one quarter of its diameter projects above the top plate.
File the master cutter until the cutting edge is perfect.
{ Pro Tip
Providing you observed these rules you will achieve perfect sharpening results, the correct side plate and top plate angles will be obtained automatically and best possible cutting performance guaranteed.
{ Pro Tip
Before you start sharpening, mark one cutter with a felt-tip pen. After two or three strokes of the file, check how much material has been removed.
If the surface looks uniform, your filing action is correct.
If there are still patches of color in places, check that you are using the right file and make sure you are not holding the file too high or too low.
9
10
0457-181-0121_02.book Seite 10 Donnerstag, 13. Dezember 2012 11:50 11
Principles – Sharpening Saw Chain
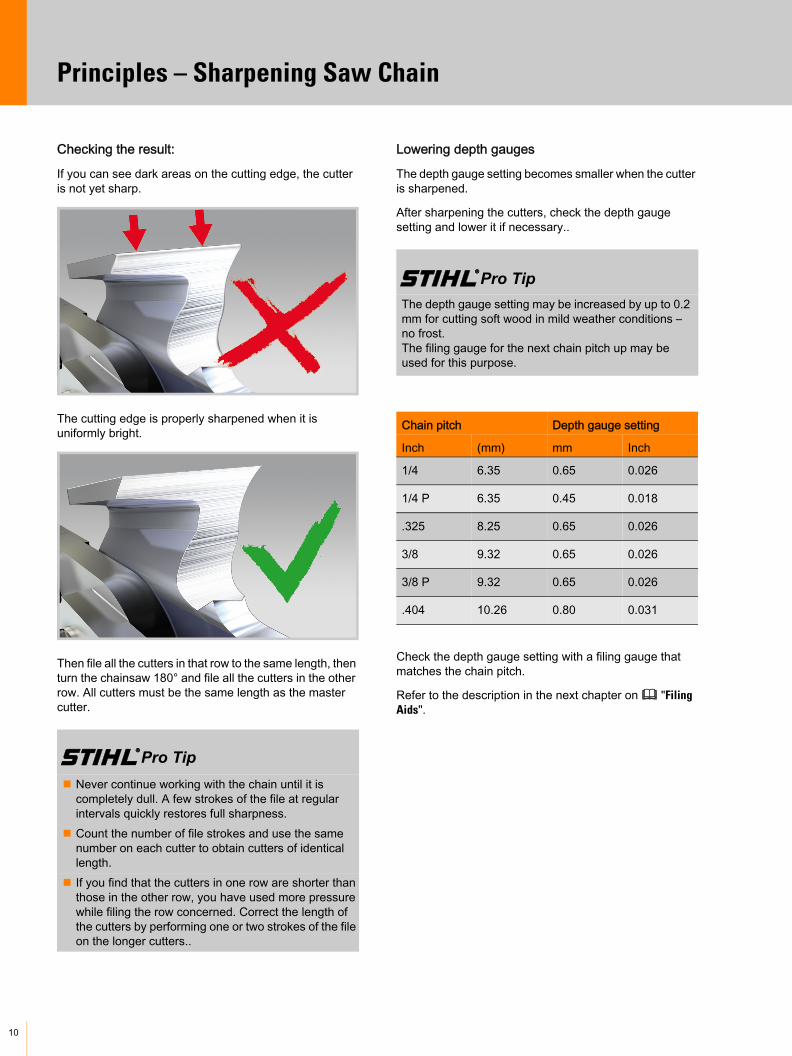
Checking the result:
If you can see dark areas on the cutting edge, the cutter is not yet sharp.
The cutting edge is properly sharpened when it is uniformly bright.
Then file all the cutters in that row to the same length, then turn the chainsaw 180° and file all the cutters in the other row. All cutters must be the same length as the master cutter.
Lowering depth gauges
The depth gauge setting becomes smaller when the cutter is sharpened.
After sharpening the cutters, check the depth gauge setting and lower it if necessary..
Check the depth gauge setting with a filing gauge that matches the chain pitch.
Refer to the description in the next chapter on b "Filing Aids".
{ Pro Tip
Never continue working with the chain until it is completely dull. A few strokes of the file at regular intervals quickly restores full sharpness.
Count the number of file strokes and use the same number on each cutter to obtain cutters of identical length.
If you find that the cutters in one row are shorter than those in the other row, you have used more pressure while filing the row concerned. Correct the length of the cutters by performing one or two strokes of the file on the longer cutters..
{ Pro Tip
The depth gauge setting may be increased by up to 0.2 mm for cutting soft wood in mild weather conditions – no frost.The filing gauge for the next chain pitch up may be used for this purpose.
Chain pitch Depth gauge setting
Inch (mm) mm Inch
1/4 6.35 0.65 0.026
1/4 P 6.35 0.45 0.018
.325 8.25 0.65 0.026
3/8 9.32 0.65 0.026
3/8 P 9.32 0.65 0.026
.404 10.26 0.80 0.031
0457-181-0121_02.book Seite 11 Donnerstag, 13. Dezember 2012 11:50 11
Principles – Sharpening Saw Chain
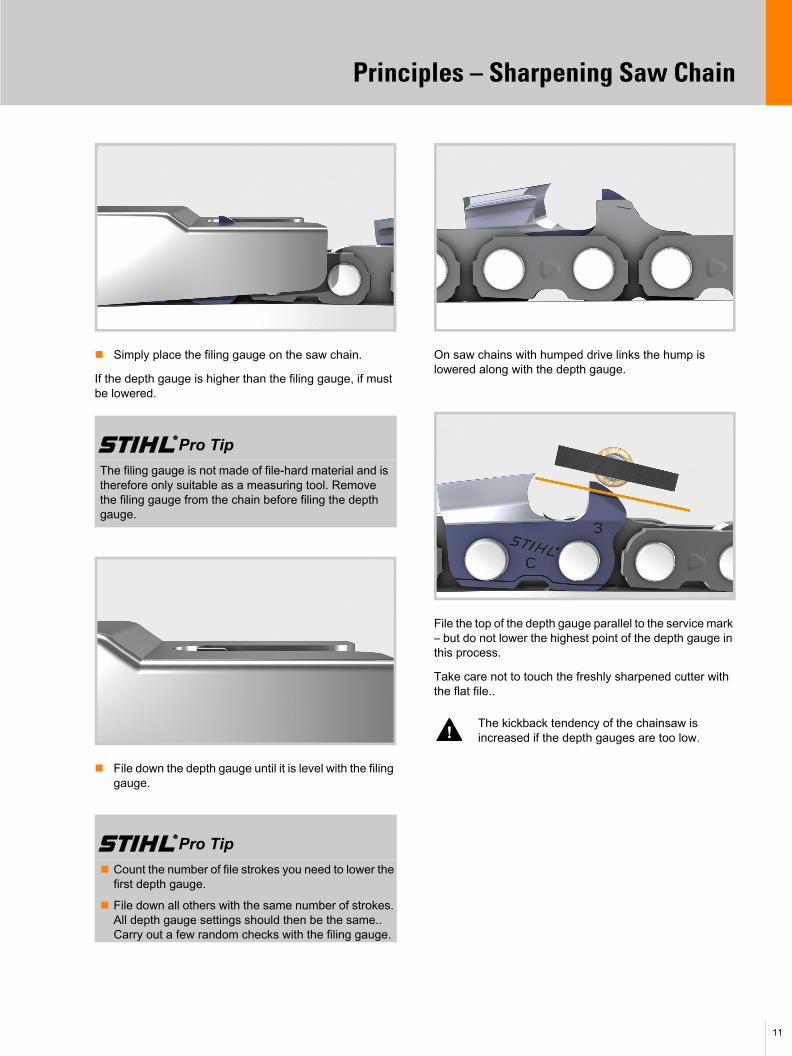
Simply place the filing gauge on the saw chain.
If the depth gauge is higher than the filing gauge, if must be lowered.
File down the depth gauge until it is level with the filing gauge.
On saw chains with humped drive links the hump is lowered along with the depth gauge.
File the top of the depth gauge parallel to the service mark – but do not lower the highest point of the depth gauge in this process.
Take care not to touch the freshly sharpened cutter with the flat file..
{ Pro Tip
The filing gauge is not made of file-hard material and is therefore only suitable as a measuring tool. Remove the filing gauge from the chain before filing the depth gauge.
{ Pro Tip
Count the number of file strokes you need to lower the first depth gauge.
File down all others with the same number of strokes. All depth gauge settings should then be the same.. Carry out a few random checks with the filing gauge.
The kickback tendency of the chainsaw is increased if the depth gauges are too low.
11
12
Filing Aids
0457-181-0121_02.book Seite 12 Donnerstag, 13. Dezember 2012 11:50 11

0457-181-0121_02.book Seite 13 Donnerstag, 13. Dezember 2012 11:50 11
Filing Aids
A lot of experience is required to resharpen saw chain manually with a round file and variations are unavoidable.
Maintaining all the angles and dimensions when filing freehand is very difficult and requires practice. STIHL therefore recommends the use of filing aids and a regular inspection and correction by your STIHL servicing dealer.
STIHL has a line of filing aids to suit the needs of every user.
Filing gauge
1) Cut-out for checking depth gauge setting
2) Sighting edge for filing angle
3) Bar groove cleaner and scale for measuring groove depth
4) Sighting edge for side plate angle
STIHL offers filing gauges for checking the depth gauge settings and tooth angles. Choose the filing gauge that matches the chain pitch and you can then check all necessary angles and dimensions. The filing gauge greatly simplifies the process of checking and lowering the depth gauges.
A filing gauge allows depth gauge settings to be checked quickly and simply and should be used with all the following filing aids, except the 2-in-1 file holder and the FG 4.
Filing template
The STIHL filing template is an easy-to-use tool that helps you maintain the correct filing angle.
It simply attaches to the guide bar by means of two magnets and has raised sighting lines for the correct filing angle.
{ Pro Tip
The filing gauge is not made of file-hard material and is therefore only suitable as a measuring tool. Remove the filing gauge from the depth gauge before filing.
{ Pro Tip
Should you not achieve the desired result using the filing template, STIHL recommends the use of additional tools, e.g. file holder, file holder guide or STIHL filing tools.
13

14
0457-181-0121_02.book Seite 14 Donnerstag, 13. Dezember 2012 11:50 11
Filing Aids
File holder
The STIHL file holder helps you keep the file at the correct height and angle during filing. The file holder must match the chain pitch.
Resting the STIHL file holder properly on the top plate and depth gauge ensures that the file is held at the right height and the correct side plate angle is maintained. A 30° mark on the file holder also helps you maintain the filing angle.
The filing template can be used as an additional optical aid for file alignment.
FF 1 file holder guide
If you don't want to rely on purely optical alignment aids when sharpening the chain, the STIHL file holder guide is the ideal supplement.
Select the file holder guide that matches the chain pitch and place it over the chain on the guide bar at an angle of 30°.
The file holder is held and guided laterally by the file holder guide and lined up at the correct filing angle of 30° to the guide bar.

0457-181-0121_02.book Seite 15 Donnerstag, 13. Dezember 2012 11:50 11
Filing Aids
All you have to do is to slide the file holder through the file holder guide at a right angle to the guide bar.
Once you have sharpened all the cutters, check the depth gauge setting and correct it if necessary.
2-in-1 file holder
STIHL recommends the 2-in-1 file holder if you want to sharpen the cutters and lower the depth gauges in a single operation.
Like the standard file holder, the 2-in-1 file holder keeps the file at the correct height in the cutter. The arrangement of the handles and markings offers you a very good optical guide to maintaining the 30° filing angle.
The illustration shows section through the 2-in-1 file holder.
The cutter is sharpened with the round file (1) and the depth gauge lowered to the right setting with the flat file (2) in a single operation. Both files are optimally positioned by resting the guide rails (3) on the top plates.
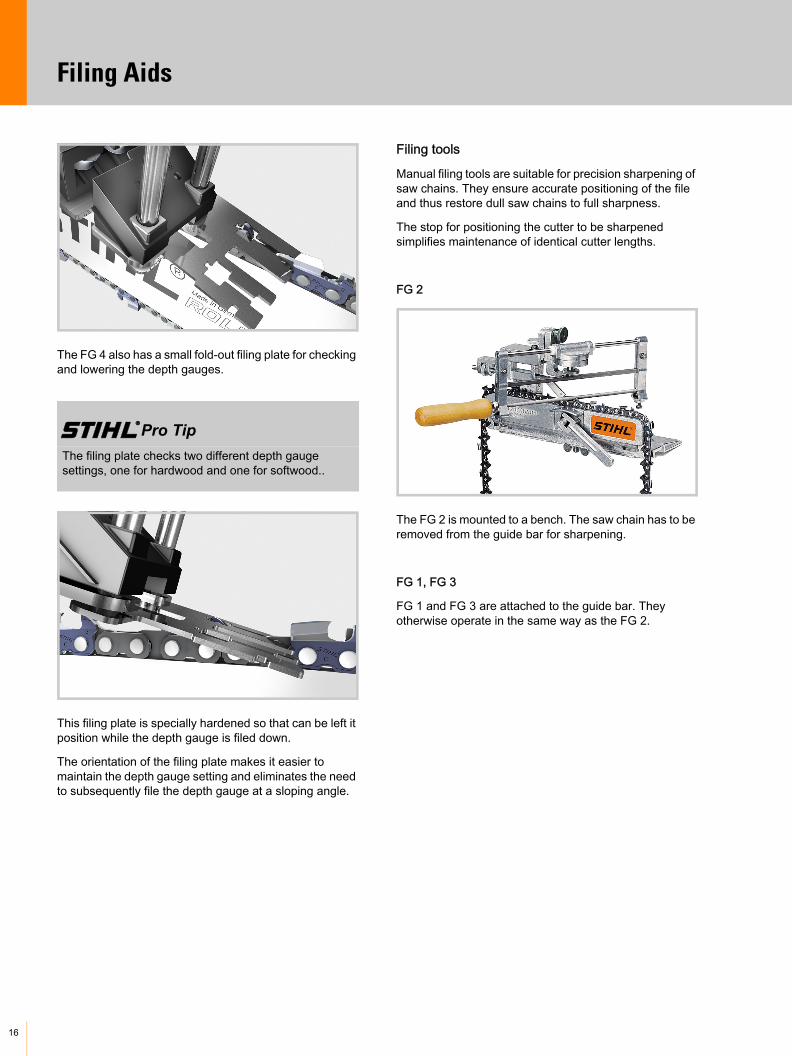
FG 4
The FG 4 roller filing guide is an excellent aid for manual filing.
Select roller filing guide and round file that suit the chain pitch.
The roller filing guide is placed directly over the chain on the guide bar and assists you in positioning the file in all directions.
Place the round file in the roller filing guide.
The alignment of the file is ideal when it glides smoothly and without snagging over the two lower rollers at the correct filing angle.
15
16
0457-181-0121_02.book Seite 16 Donnerstag, 13. Dezember 2012 11:50 11
Filing Aids
The FG 4 also has a small fold-out filing plate for checking and lowering the depth gauges.
This filing plate is specially hardened so that can be left it position while the depth gauge is filed down.
The orientation of the filing plate makes it easier to maintain the depth gauge setting and eliminates the need to subsequently file the depth gauge at a sloping angle.
Filing tools
Manual filing tools are suitable for precision sharpening of saw chains. They ensure accurate positioning of the file and thus restore dull saw chains to full sharpness.
The stop for positioning the cutter to be sharpened simplifies maintenance of identical cutter lengths.
FG 2
The FG 2 is mounted to a bench. The saw chain has to be removed from the guide bar for sharpening.
FG 1, FG 3
FG 1 and FG 3 are attached to the guide bar. They otherwise operate in the same way as the FG 2.
{ Pro Tip
The filing plate checks two different depth gauge settings, one for hardwood and one for softwood..
0457-181-0121_02.book Seite 17 Donnerstag, 13. Dezember 2012 11:50 11
Tensioning the Saw Chain
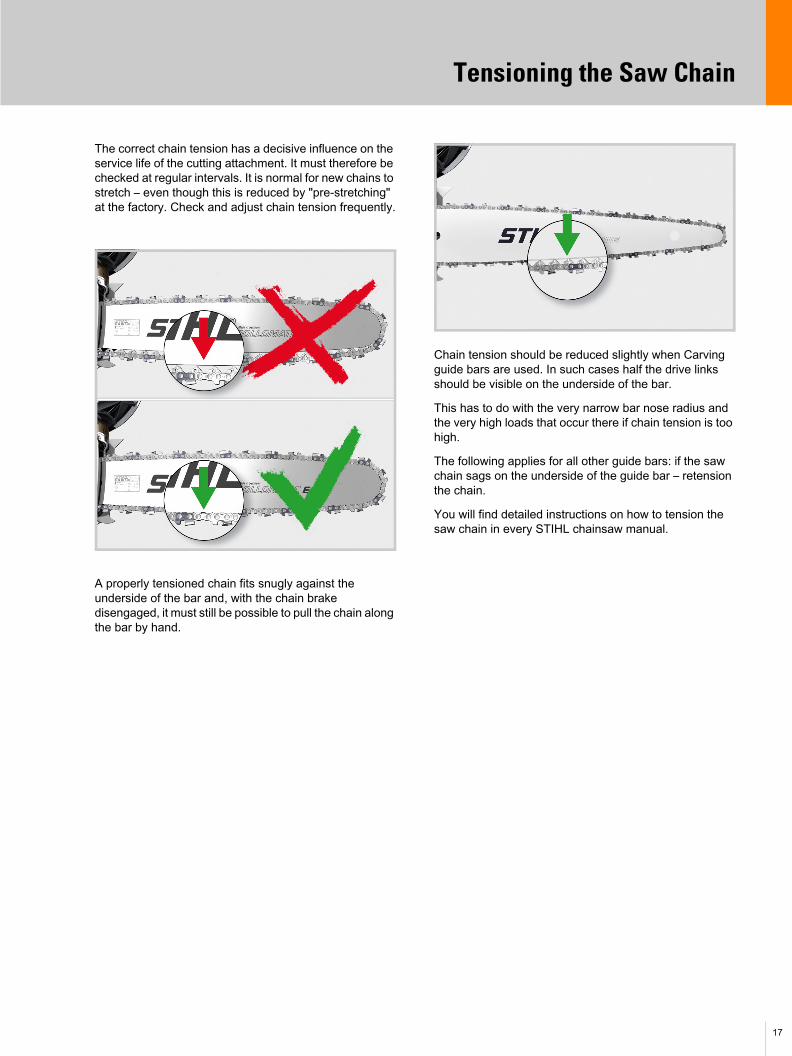
The correct chain tension has a decisive influence on the service life of the cutting attachment. It must therefore be checked at regular intervals. It is normal for new chains to stretch – even though this is reduced by "pre-stretching" at the factory. Check and adjust chain tension frequently.
A properly tensioned chain fits snugly against the underside of the bar and, with the chain brake disengaged, it must still be possible to pull the chain along the bar by hand.
Chain tension should be reduced slightly when Carving guide bars are used. In such cases half the drive links should be visible on the underside of the bar.
This has to do with the very narrow bar nose radius and the very high loads that occur there if chain tension is too high.
The following applies for all other guide bars: if the saw chain sags on the underside of the guide bar – retension the chain.
You will find detailed instructions on how to tension the saw chain in every STIHL chainsaw manual.
17
18
Sharpening Errors and Damage
0457-181-0121_02.book Seite 18 Donnerstag, 13. Dezember 2012 11:50 11
0457-181-0121_02.book Seite 19 Donnerstag, 13. Dezember 2012 11:50 11
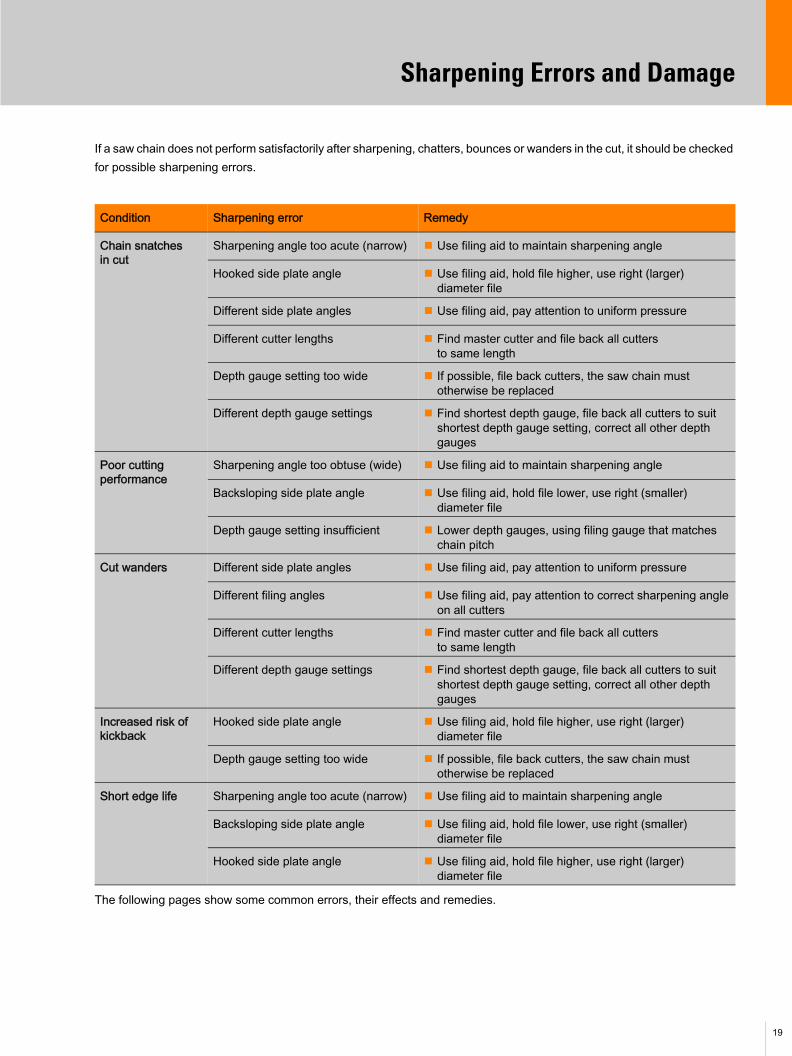
Sharpening Errors and Damage
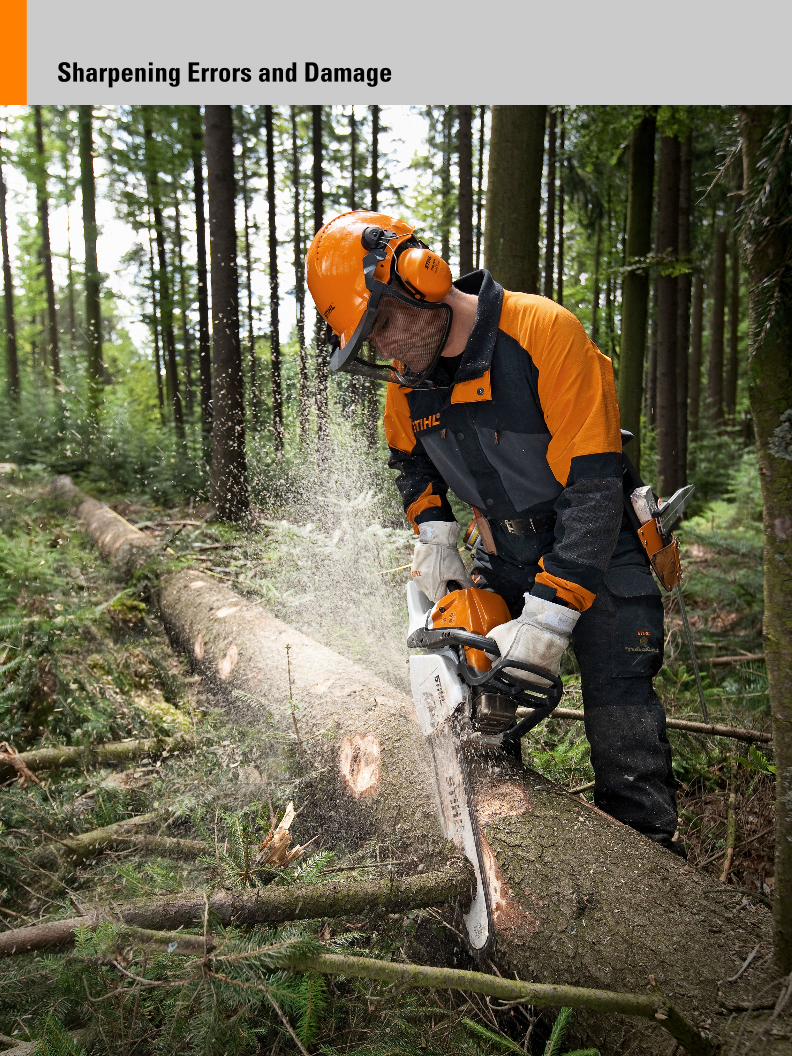
If a saw chain does not perform satisfactorily after sharpening, chatters, bounces or wanders in the cut, it should be checked for possible sharpening errors.
The following pages show some common errors, their effects and remedies.
Condition Sharpening error Remedy
Chain snatches in cut
Sharpening angle too acute (narrow) Use filing aid to maintain sharpening angle
Hooked side plate angle Use filing aid, hold file higher, use right (larger) diameter file
Different side plate angles Use filing aid, pay attention to uniform pressure
Different cutter lengths Find master cutter and file back all cutters to same length
Depth gauge setting too wide If possible, file back cutters, the saw chain must otherwise be replaced
Different depth gauge settings Find shortest depth gauge, file back all cutters to suit shortest depth gauge setting, correct all other depth gauges
Poor cutting performance
Sharpening angle too obtuse (wide) Use filing aid to maintain sharpening angle
Backsloping side plate angle Use filing aid, hold file lower, use right (smaller) diameter file
Depth gauge setting insufficient Lower depth gauges, using filing gauge that matches chain pitch
Cut wanders Different side plate angles Use filing aid, pay attention to uniform pressure
Different filing angles Use filing aid, pay attention to correct sharpening angle on all cutters
Different cutter lengths Find master cutter and file back all cutters to same length
Different depth gauge settings Find shortest depth gauge, file back all cutters to suit shortest depth gauge setting, correct all other depth gauges
Increased risk of kickback
Hooked side plate angle Use filing aid, hold file higher, use right (larger) diameter file
Depth gauge setting too wide If possible, file back cutters, the saw chain must otherwise be replaced
Short edge life Sharpening angle too acute (narrow) Use filing aid to maintain sharpening angle
Backsloping side plate angle Use filing aid, hold file lower, use right (smaller) diameter file
Hooked side plate angle Use filing aid, hold file higher, use right (larger) diameter file
19

20
0457-181-0121_02.book Seite 20 Donnerstag, 13. Dezember 2012 11:50 11
Sharpening Errors and Damage
Sharpening angle too acute (narrow)
Sharpening angle too obtuse (wide)
Hooked side plate angle
Backsloping side plate angle
Error Wrong sharpening angle
Effects Cutters bite too deeply into wood, snag and stick, reduced life, high load on saw chain
Remedy Use filing aid to maintain sharpening angle
Error Wrong sharpening angle
Effects Poor cutting performance, high feed effort required
Remedy Use filing aid to maintain sharpening angle
Error File not held properly, wrong file diameter
Effects Chain snatches in cut, short life, increased risk of kickback
Remedy Use filing aid
Hold file higher
Use right (larger) diameter file
Error File not held properly, wrong file diameter
Effects Poor cutting performance, high feed pressure required, greater physical effort and wear rate
Remedy Use filing aid
Hold file lower
Use right (smaller) diameter file
0457-181-0121_02.book Seite 21 Donnerstag, 13. Dezember 2012 11:50 11
Sharpening Errors and Damage
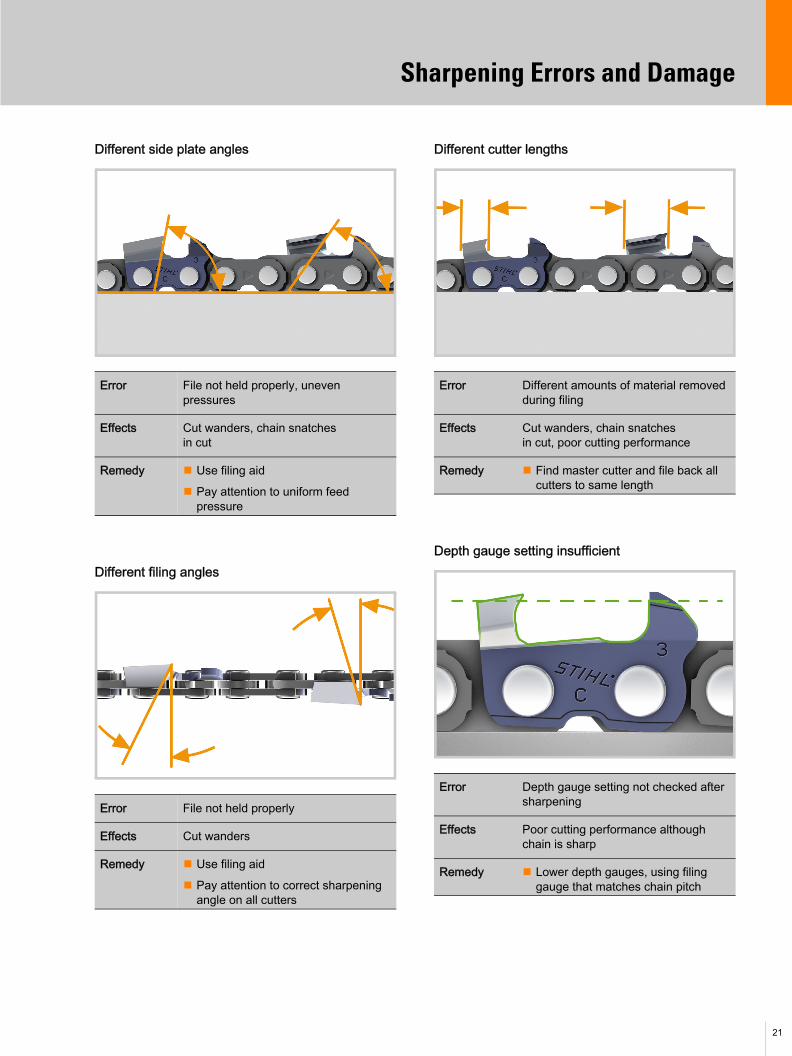
Different side plate angles
Different filing angles
Different cutter lengths
Depth gauge setting insufficient
Error File not held properly, uneven pressures
Effects Cut wanders, chain snatchesin cut
Remedy Use filing aid
Pay attention to uniform feed pressure
Error File not held properly
Effects Cut wanders
Remedy Use filing aid
Pay attention to correct sharpening angle on all cutters
Error Different amounts of material removed during filing
Effects Cut wanders, chain snatches in cut, poor cutting performance
Remedy Find master cutter and file back all cutters to same length
Error Depth gauge setting not checked after sharpening
Effects Poor cutting performance although chain is sharp
Remedy Lower depth gauges, using filing gauge that matches chain pitch
21
22
0457-181-0121_02.book Seite 22 Donnerstag, 13. Dezember 2012 11:50 11
Sharpening Errors and Damage
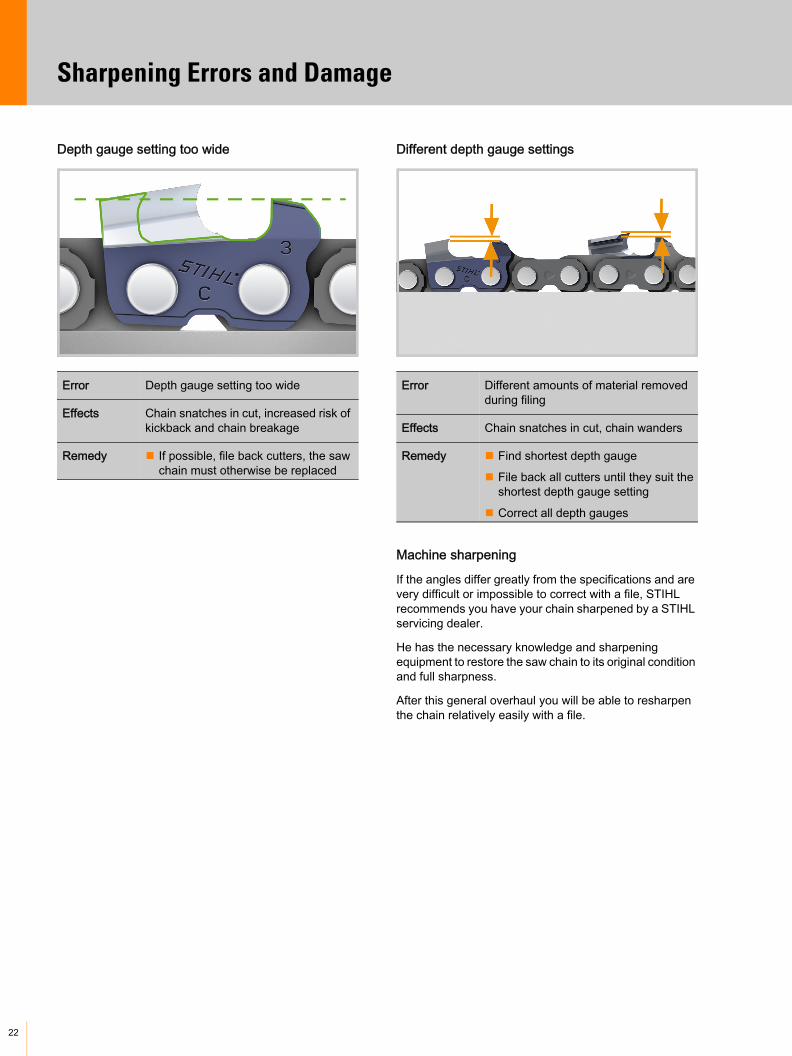
Depth gauge setting too wide Different depth gauge settings
Machine sharpening
If the angles differ greatly from the specifications and are very difficult or impossible to correct with a file, STIHL recommends you have your chain sharpened by a STIHL servicing dealer.
He has the necessary knowledge and sharpening equipment to restore the saw chain to its original condition and full sharpness.
After this general overhaul you will be able to resharpen the chain relatively easily with a file.
Error Depth gauge setting too wide
Effects Chain snatches in cut, increased risk of kickback and chain breakage
Remedy If possible, file back cutters, the saw chain must otherwise be replaced
Error Different amounts of material removed during filing
Effects Chain snatches in cut, chain wanders
Remedy Find shortest depth gauge
File back all cutters until they suit the shortest depth gauge setting
Correct all depth gauges
0457-181-0121_02.book Seite 23 Donnerstag, 13. Dezember 2012 11:50 11
Guide Bar Maintenance
Guide bar wear is highest in the area where most of the cutting is done. That is normally the underside of the bar. On guide bars without a nose sprocket (Duromatic bars) it is the bar nose area that is highly stressed. Before mounting the guide bar and chain:
Clean the oil inlet holes and the bar groove. The groove cleaner on the filing gauge is suitable for this purpose
Check the groove depth
Check the bar rails for burrs and deburr if necessary
Turn the bar over to ensure it wears as evenly as possible on both sides
Groove depth
As the rails wear the bar groove becomes shallower. A minimum depth must be maintained in order to ensure that the drive link tangs do not scrape along the bottom of the groove.
If this happens, the drive link tangs wear very quickly and the running faces of the cutters and tie straps will no longer ride on the bar rails.
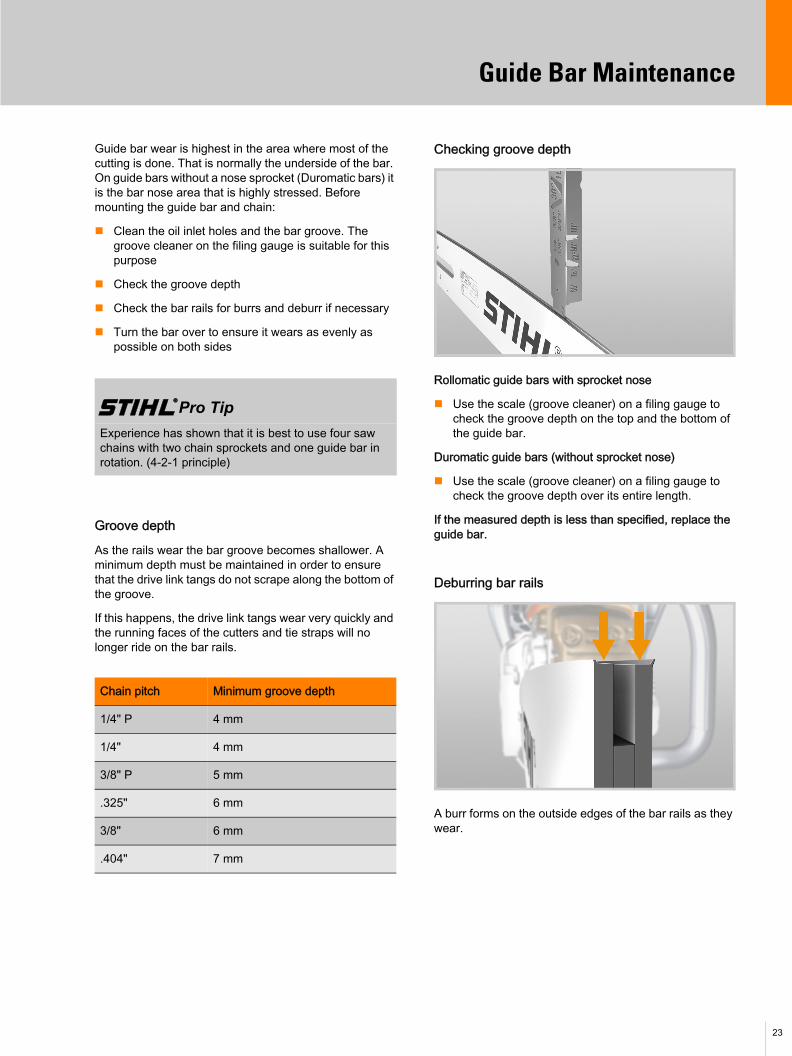
Checking groove depth
Rollomatic guide bars with sprocket nose
Use the scale (groove cleaner) on a filing gauge to check the groove depth on the top and the bottom of the guide bar.
Duromatic guide bars (without sprocket nose)
Use the scale (groove cleaner) on a filing gauge to check the groove depth over its entire length.
If the measured depth is less than specified, replace the guide bar.
Deburring bar rails
A burr forms on the outside edges of the bar rails as they wear.
{ Pro Tip
Experience has shown that it is best to use four saw chains with two chain sprockets and one guide bar in rotation. (4-2-1 principle)
Chain pitch Minimum groove depth
1/4" P 4 mm
1/4" 4 mm
3/8" P 5 mm
.325" 6 mm
3/8" 6 mm
.404" 7 mm
23
24
0457-181-0121_02.book Seite 24 Donnerstag, 13. Dezember 2012 11:50 11
Guide Bar Maintenance
This burr can be removed with a flat file or the STIHL guide bar dressing tool.
If the left and right bar rails have been worn unevenly due to an incorrectly sharpened chain, they can be leveled with the STIHL guide bar dressing tool providing the difference is not too great.
It is important that the required minimum groove depth is maintained after the rails have been leveled.
If the guide bar has more serious damage, contact your STIHL servicing dealer for assistance.
He will assess whether a repair is worthwhile, carry it out if required or replace the guide bar.
Wear on guide bar
A saw chain that has been too loosely tensioned over a prolonged period has particularly negative effects on the condition of the guide bar.
If these effects are identified in good time, measures can be taken to counteract the high rate of wear.
For this reason the guide bar should be checked at regular intervals for signs of abnormal wear.
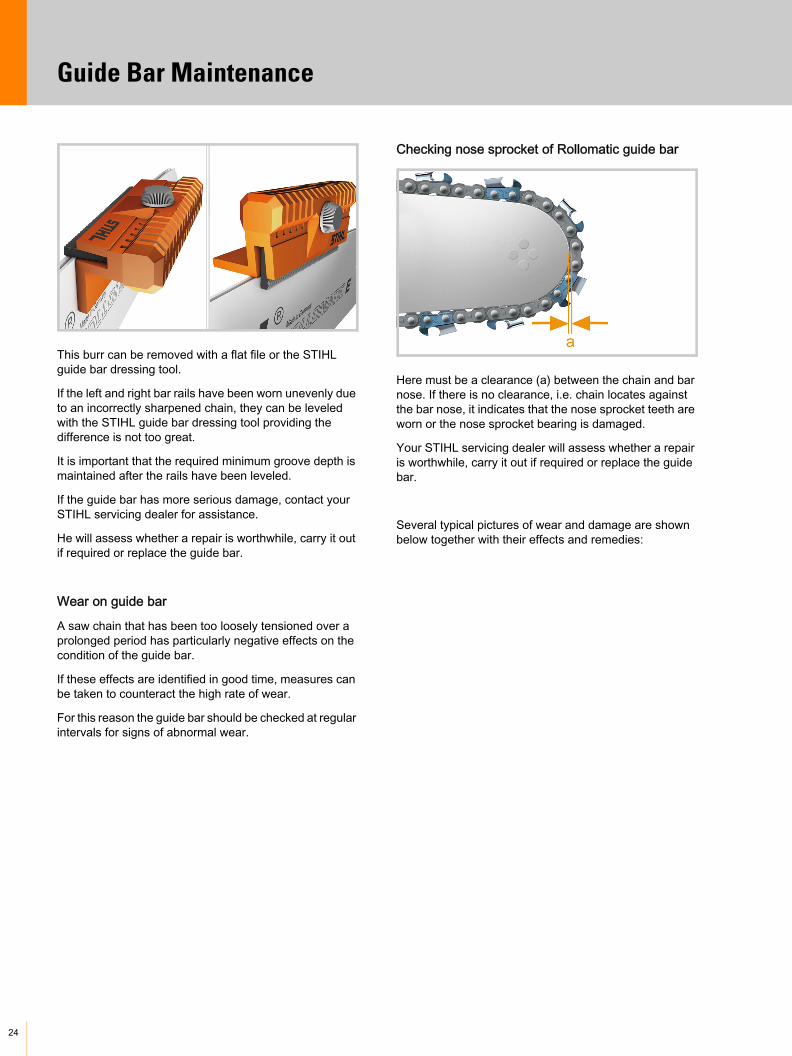
Checking nose sprocket of Rollomatic guide bar
Here must be a clearance (a) between the chain and bar nose. If there is no clearance, i.e. chain locates against the bar nose, it indicates that the nose sprocket teeth are worn or the nose sprocket bearing is damaged.
Your STIHL servicing dealer will assess whether a repair is worthwhile, carry it out if required or replace the guide bar.
Several typical pictures of wear and damage are shown below together with their effects and remedies:

0457-181-0121_02.book Seite 25 Donnerstag, 13. Dezember 2012 11:50 11
Guide Bar Maintenance
Worn guide bar rails
Left: Evenly worn bar rails, minimum depth has been reached, normal wear – replace the whole cutting attachment.
Right: Unevenly worn bar rails.
Battered guide bar rails
Bar rails battered at top in entry area and at bottom behind nose; underside of bar rippled.
Error Unevenly worn bar rails due to incorrectly sharpened chain
Effects Chain tips to one side and does not cut straight
Remedy Level the bar rails and sharpen the chain properly
If minimum groove depth cannot be maintained, replace the cutting attachment.
Error Chain tensioned too loosely for extended period
Effects Chain runs roughly. Using a guide bar in this state will cause it and the chain to wear very quickly.
Remedy Level the bar rails
If damage is too advanced, install a new cutting attachment (chain sprocket, guide bar, chain). If only one of these parts is replaced, it will be quickly worn again by the other defective parts.
25
26
0457-181-0121_02.book Seite 26 Donnerstag, 13. Dezember 2012 11:50 11
Guide Bar Maintenance
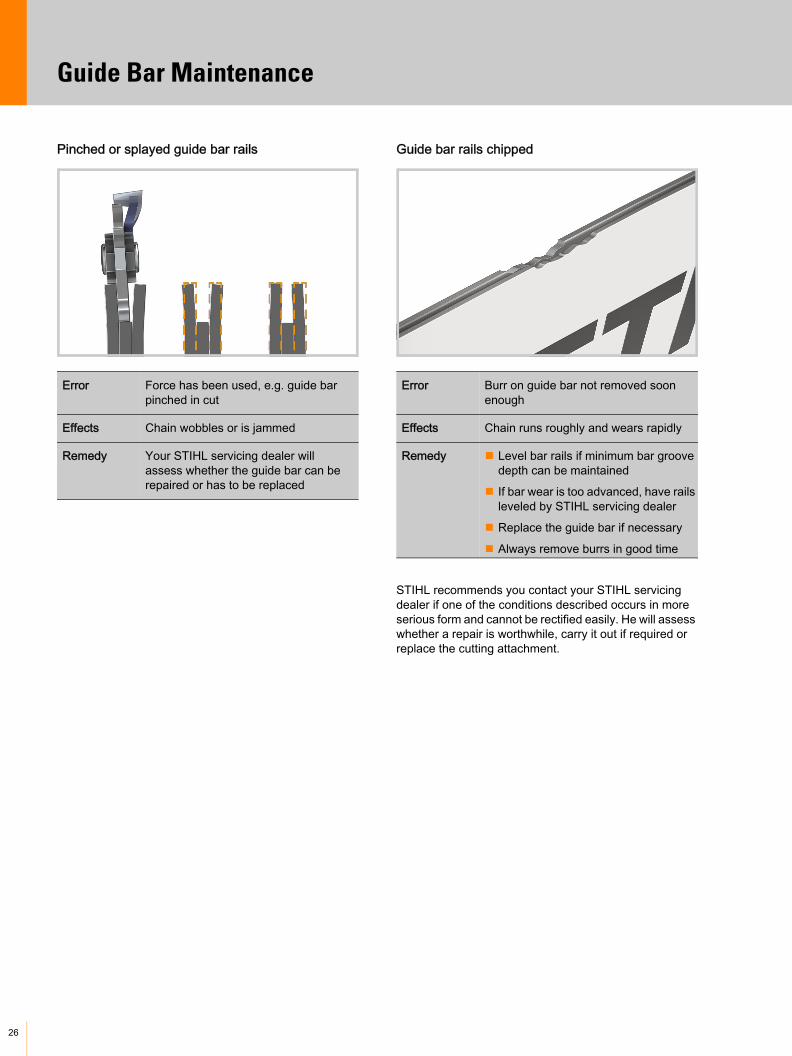
Pinched or splayed guide bar rails Guide bar rails chipped
STIHL recommends you contact your STIHL servicing dealer if one of the conditions described occurs in more serious form and cannot be rectified easily. He will assess whether a repair is worthwhile, carry it out if required or replace the cutting attachment.
Error Force has been used, e.g. guide bar pinched in cut
Effects Chain wobbles or is jammed
Remedy Your STIHL servicing dealer will assess whether the guide bar can be repaired or has to be replaced
Error Burr on guide bar not removed soon enough
Effects Chain runs roughly and wears rapidly
Remedy Level bar rails if minimum bar groove depth can be maintained
If bar wear is too advanced, have rails leveled by STIHL servicing dealer
Replace the guide bar if necessary
Always remove burrs in good time
0457-181-0121_02.book Seite 27 Donnerstag, 13. Dezember 2012 11:50 11
Checking the Chain Sprocket
The chain sprocket is also subject to normal wear. A seriously worn chain sprocket also causes the chain and the guide bar to wear at an increased rate. For this reason the chain sprocket should also be checked at regular intervals.
Checking sprocket wear
The chain sprocket must be replaced if the depth of the wear marks reaches about 0.5 mm, i.e. the wear limit.
This is best checked with the STIHL reference gauge.
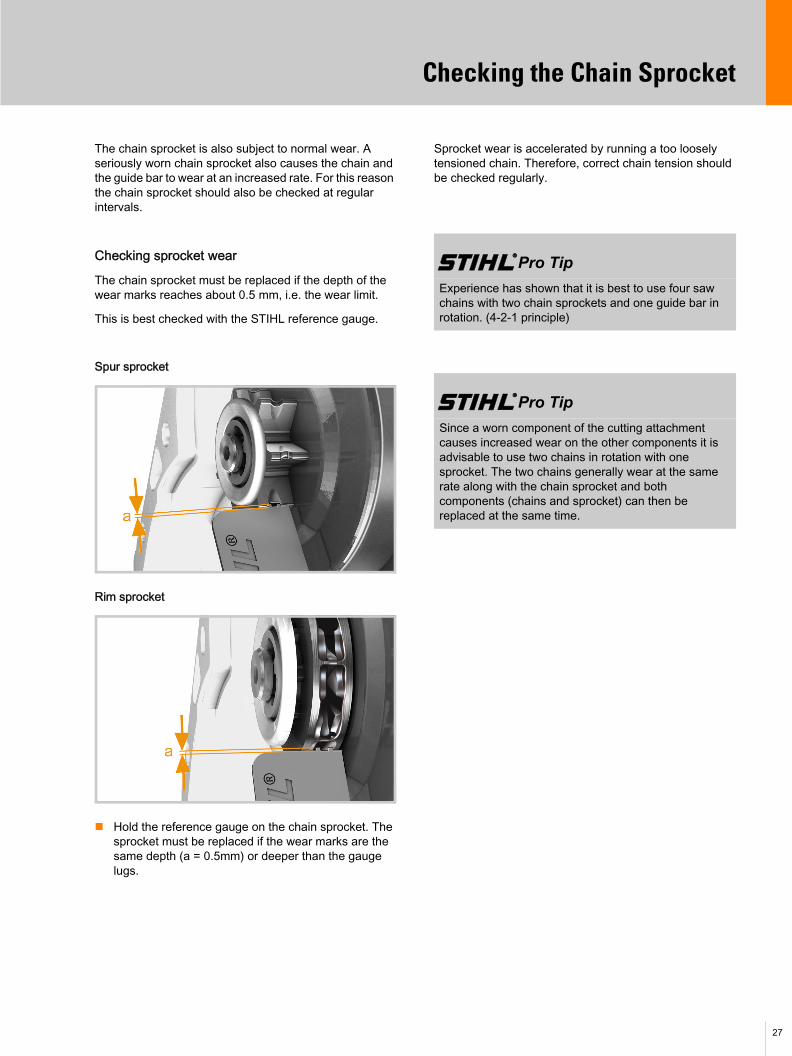
Spur sprocket
Rim sprocket
Hold the reference gauge on the chain sprocket. The sprocket must be replaced if the wear marks are the same depth (a = 0.5mm) or deeper than the gauge lugs.
Sprocket wear is accelerated by running a too loosely tensioned chain. Therefore, correct chain tension should be checked regularly.
{ Pro Tip
Experience has shown that it is best to use four saw chains with two chain sprockets and one guide bar in rotation. (4-2-1 principle)
{ Pro Tip
Since a worn component of the cutting attachment causes increased wear on the other components it is advisable to use two chains in rotation with one sprocket. The two chains generally wear at the same rate along with the chain sprocket and both components (chains and sprocket) can then be replaced at the same time.
27
28
0457-181-0121_02.book Seite 28 Donnerstag, 13. Dezember 2012 11:50 11
Determining the Correct Cutting Attachment
If you need a new cutting attachment or want to equip your chainsaw with a different cutting attachment, the following information will help you select the correct cutting attachment.
The chainsaw instruction manual lists the cutting attachments that are suitable for your specific STIHL saw model.
The following parameters are used to determine the existing saw chain, guide or chain sprocket.
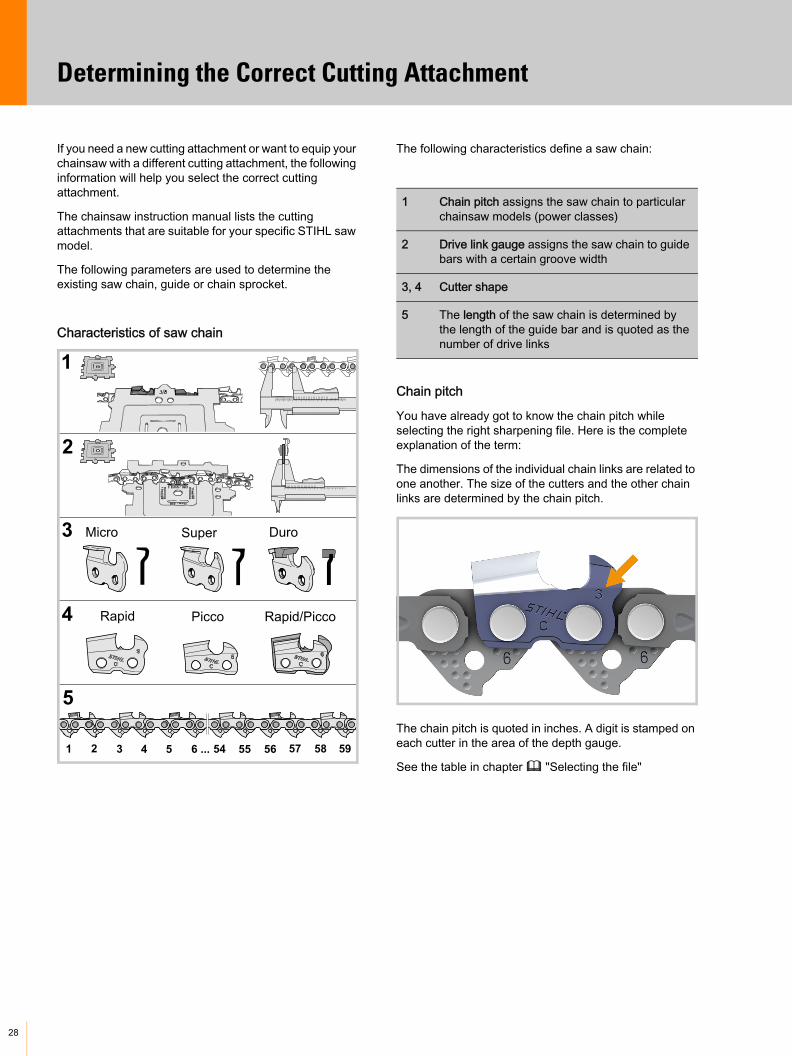
Characteristics of saw chain
The following characteristics define a saw chain:
Chain pitch
You have already got to know the chain pitch while selecting the right sharpening file. Here is the complete explanation of the term:
The dimensions of the individual chain links are related to one another. The size of the cutters and the other chain links are determined by the chain pitch.
The chain pitch is quoted in inches. A digit is stamped on each cutter in the area of the depth gauge.
See the table in chapter b "Selecting the file"
1
2
3
4 Rapid Picco Rapid/Picco
Micro Super Duro
1 2 3 4 5 57 58 59
5
6 ... 565554
1 Chain pitch assigns the saw chain to particular chainsaw models (power classes)
2 Drive link gauge assigns the saw chain to guide bars with a certain groove width
3, 4 Cutter shape
5 The length of the saw chain is determined by the length of the guide bar and is quoted as the number of drive links
0457-181-0121_02.book Seite 29 Donnerstag, 13. Dezember 2012 11:50 11
Determining the Correct Cutting Attachment
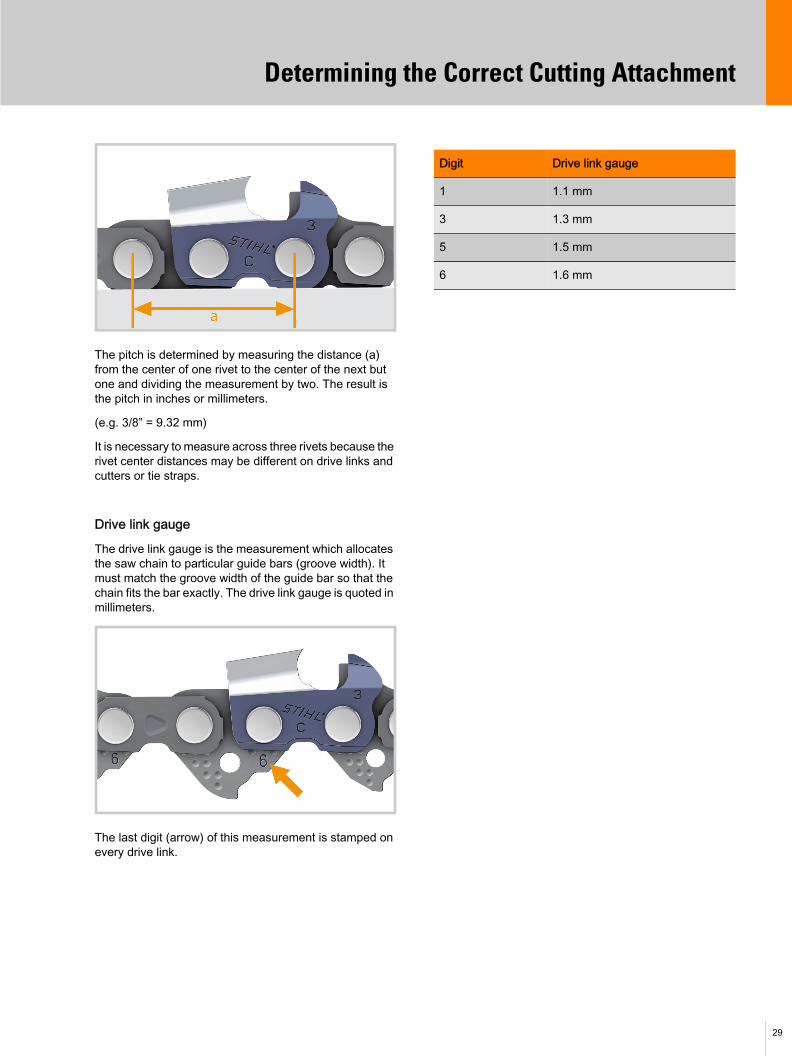
The pitch is determined by measuring the distance (a) from the center of one rivet to the center of the next but one and dividing the measurement by two. The result is the pitch in inches or millimeters.
(e.g. 3/8” = 9.32 mm)
It is necessary to measure across three rivets because the rivet center distances may be different on drive links and cutters or tie straps.
Drive link gauge
The drive link gauge is the measurement which allocates the saw chain to particular guide bars (groove width). It must match the groove width of the guide bar so that the chain fits the bar exactly. The drive link gauge is quoted in millimeters.
The last digit (arrow) of this measurement is stamped on every drive link.
Digit Drive link gauge
1 1.1 mm
3 1.3 mm
5 1.5 mm
6 1.6 mm
29
30
0457-181-0121_02.book Seite 30 Donnerstag, 13. Dezember 2012 11:50 11
Determining the Correct Cutting Attachment
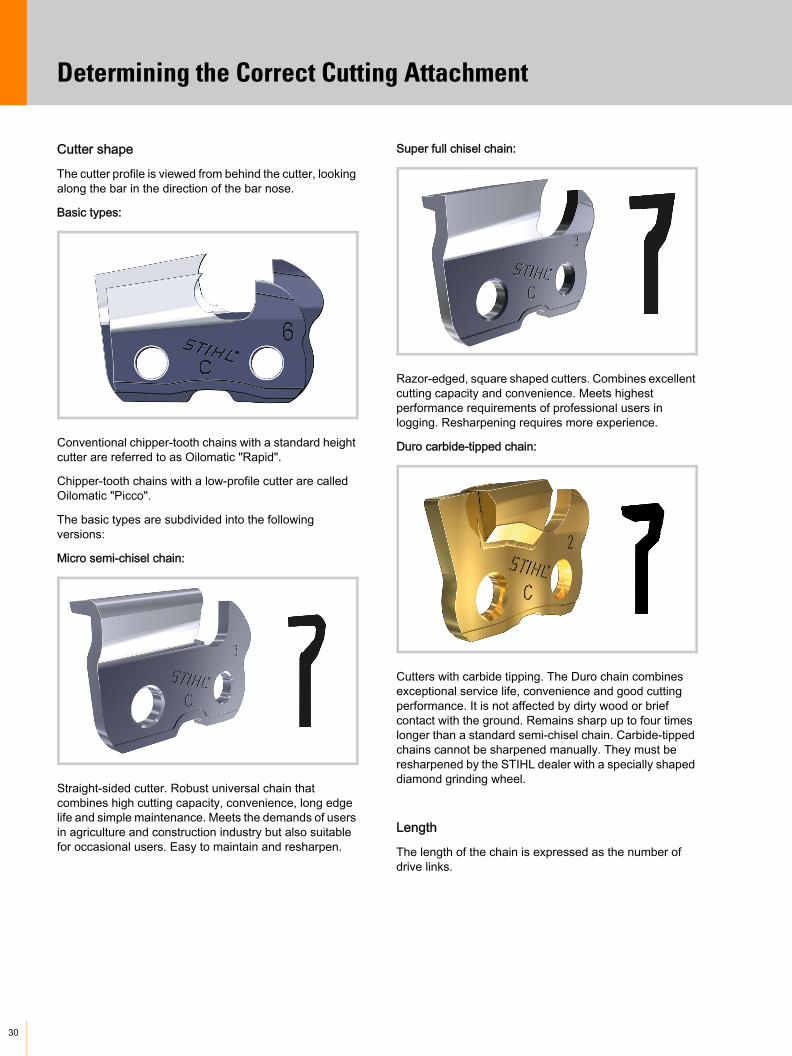
Cutter shape
The cutter profile is viewed from behind the cutter, looking along the bar in the direction of the bar nose.
Basic types:
Conventional chipper-tooth chains with a standard height cutter are referred to as Oilomatic "Rapid".
Chipper-tooth chains with a low-profile cutter are called Oilomatic "Picco".
The basic types are subdivided into the following versions:
Micro semi-chisel chain:
Straight-sided cutter. Robust universal chain that combines high cutting capacity, convenience, long edge life and simple maintenance. Meets the demands of users in agriculture and construction industry but also suitable for occasional users. Easy to maintain and resharpen.
Super full chisel chain:
Razor-edged, square shaped cutters. Combines excellent cutting capacity and convenience. Meets highest performance requirements of professional users in logging. Resharpening requires more experience.
Duro carbide-tipped chain:
Cutters with carbide tipping. The Duro chain combines exceptional service life, convenience and good cutting performance. It is not affected by dirty wood or brief contact with the ground. Remains sharp up to four times longer than a standard semi-chisel chain. Carbide-tipped chains cannot be sharpened manually. They must be resharpened by the STIHL dealer with a specially shaped diamond grinding wheel.
Length
The length of the chain is expressed as the number of drive links.
0457-181-0121_02.book Seite 31 Donnerstag, 13. Dezember 2012 11:50 11
Determining the Correct Cutting Attachment
Characteristics of guide bar
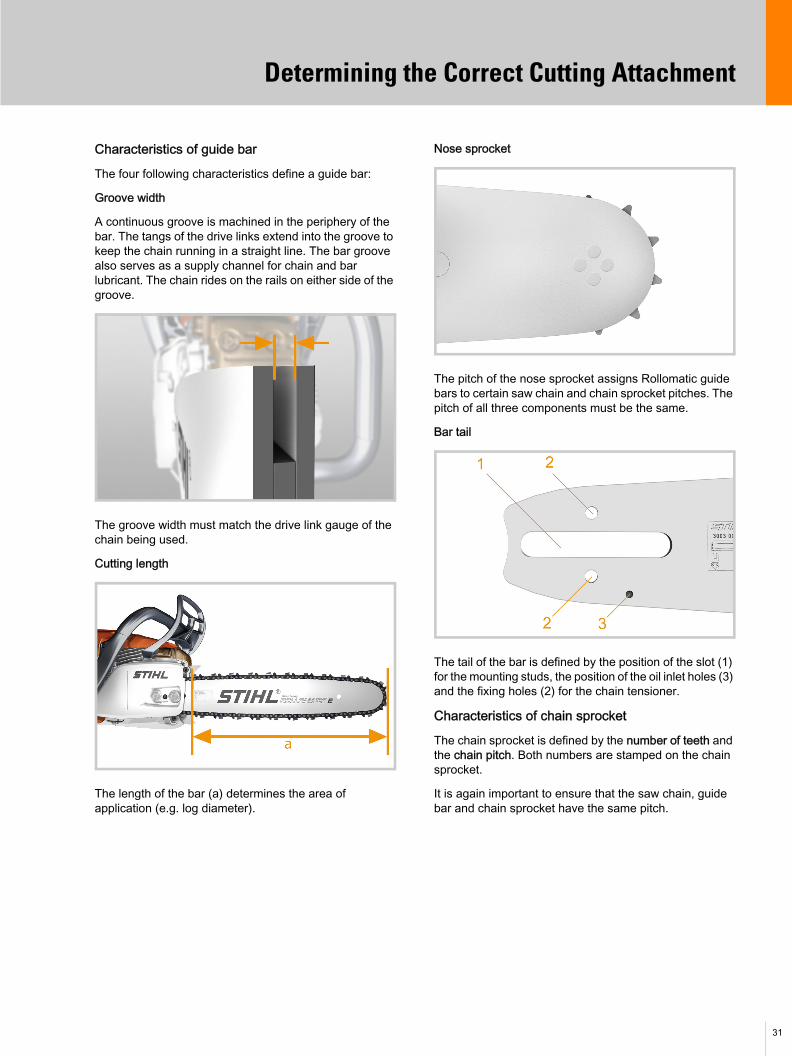
The four following characteristics define a guide bar:
Groove width
A continuous groove is machined in the periphery of the bar. The tangs of the drive links extend into the groove to keep the chain running in a straight line. The bar groove also serves as a supply channel for chain and bar lubricant. The chain rides on the rails on either side of the groove.
The groove width must match the drive link gauge of the chain being used.
Cutting length
The length of the bar (a) determines the area of application (e.g. log diameter).
Nose sprocket
The pitch of the nose sprocket assigns Rollomatic guide bars to certain saw chain and chain sprocket pitches. The pitch of all three components must be the same.
Bar tail
The tail of the bar is defined by the position of the slot (1) for the mounting studs, the position of the oil inlet holes (3) and the fixing holes (2) for the chain tensioner.
Characteristics of chain sprocket
The chain sprocket is defined by the number of teeth and the chain pitch. Both numbers are stamped on the chain sprocket.
It is again important to ensure that the saw chain, guide bar and chain sprocket have the same pitch.
31
32
0457-181-0121_02.book Seite 32 Donnerstag, 13. Dezember 2012 11:50 11
Determining the Correct Cutting Attachment
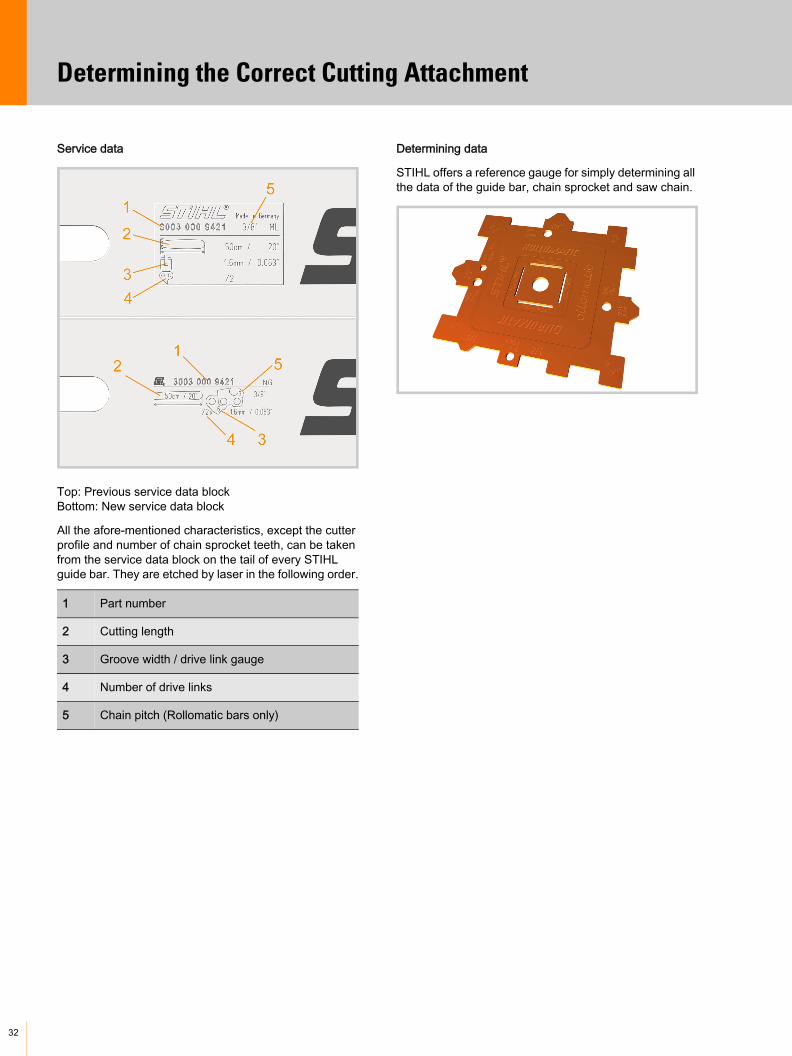
Service data
Top: Previous service data blockBottom: New service data block
All the afore-mentioned characteristics, except the cutter profile and number of chain sprocket teeth, can be taken from the service data block on the tail of every STIHL guide bar. They are etched by laser in the following order.
Determining data
STIHL offers a reference gauge for simply determining all the data of the guide bar, chain sprocket and saw chain.
1 Part number
2 Cutting length
3 Groove width / drive link gauge
4 Number of drive links
5 Chain pitch (Rollomatic bars only)
0457-181-0121_02.book Seite 33 Donnerstag, 13. Dezember 2012 11:50 11
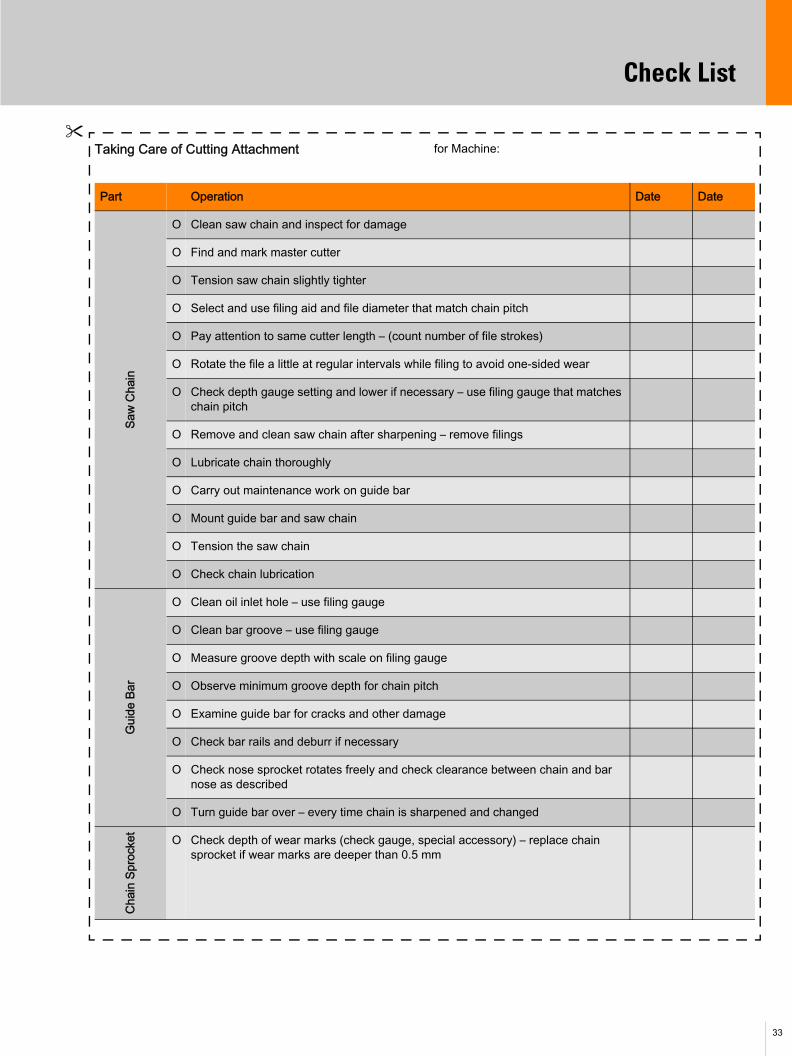
Check List
Taking Care of Cutting Attachment for Machine:
Part Operation Date Date
Saw
Cha
in
Ο Clean saw chain and inspect for damage
Ο Find and mark master cutter
Ο Tension saw chain slightly tighter
Ο Select and use filing aid and file diameter that match chain pitch
Ο Pay attention to same cutter length – (count number of file strokes)
Ο Rotate the file a little at regular intervals while filing to avoid one-sided wear
Ο Check depth gauge setting and lower if necessary – use filing gauge that matches chain pitch
Ο Remove and clean saw chain after sharpening – remove filings
Ο Lubricate chain thoroughly
Ο Carry out maintenance work on guide bar
Ο Mount guide bar and saw chain
Ο Tension the saw chain
Ο Check chain lubrication
Gui
de B
ar
Ο Clean oil inlet hole – use filing gauge
Ο Clean bar groove – use filing gauge
Ο Measure groove depth with scale on filing gauge
Ο Observe minimum groove depth for chain pitch
Ο Examine guide bar for cracks and other damage
Ο Check bar rails and deburr if necessary
Ο Check nose sprocket rotates freely and check clearance between chain and bar nose as described
Ο Turn guide bar over – every time chain is sharpened and changed
Cha
in S
proc
ket
Ο Check depth of wear marks (check gauge, special accessory) – replace chain sprocket if wear marks are deeper than 0.5 mm
33

© ANDREAS STIHL AG & Co. KG, 2012 0457 181 0121. VA3.M12. Printed in Germany
Printed on chlorine-free paper
0457-181-0121_02.book Seite 34 Donnerstag, 13. Dezember 2012 11:50 11