user's guide - epson europe
TRANSCRIPT

User's Guide
NPD6103-01 EN

CopyrightNo part of this publication may be reproduced, stored in a retrieval system, or transmitted in any form or by anymeans, electronic, mechanical, photocopying, recording, or otherwise, without the prior written permission ofSeiko Epson Corporation. No patent liability is assumed with respect to the use of the information containedherein. Neither is any liability assumed for damages resulting from the use of the information herein. Theinformation contained herein is designed only for use with this Epson product. Epson is not responsible for anyuse of this information as applied to other products.
Neither Seiko Epson Corporation nor its affiliates shall be liable to the purchaser of this product or third parties fordamages, losses, costs, or expenses incurred by the purchaser or third parties as a result of accident, misuse, orabuse of this product or unauthorized modifications, repairs, or alterations to this product, or (excluding the U.S.)failure to strictly comply with Seiko Epson Corporation's operating and maintenance instructions.
Seiko Epson Corporation and its affiliates shall not be liable for any damages or problems arising from the use ofany options or any consumable products other than those designated as Original Epson Products or EpsonApproved Products by Seiko Epson Corporation.
Seiko Epson Corporation shall not be held liable for any damage resulting from electromagnetic interference thatoccurs from the use of any interface cables other than those designated as Epson Approved Products by SeikoEpson Corporation.
© 2019 Seiko Epson Corporation
The contents of this manual and the specifications of this product are subject to change without notice.
User's Guide
Copyright
2

Trademarks❏ EPSON® is a registered trademark, and EPSON EXCEED YOUR VISION or EXCEED YOUR VISION is a
trademark of Seiko Epson Corporation.
❏ Epson Scan 2 software is based in part on the work of the Independent JPEG Group.
❏ libtiffCopyright © 1988-1997 Sam LefflerCopyright © 1991-1997 Silicon Graphics, Inc.Permission to use, copy, modify, distribute, and sell this software and its documentation for any purpose ishereby granted without fee, provided that (i) the above copyright notices and this permission notice appear inall copies of the software and related documentation, and (ii) the names of Sam Leffler and Silicon Graphicsmay not be used in any advertising or publicity relating to the software without the specific, prior writtenpermission of Sam Leffler and Silicon Graphics.THE SOFTWARE IS PROVIDED "AS-IS" AND WITHOUT WARRANTY OF ANY KIND, EXPRESS,IMPLIED OR OTHERWISE, INCLUDING WITHOUT LIMITATION, ANY WARRANTY OFMERCHANTABILITY OR FITNESS FOR A PARTICULAR PURPOSE.IN NO EVENT SHALL SAM LEFFLER OR SILICON GRAPHICS BE LIABLE FOR ANY SPECIAL,INCIDENTAL, INDIRECT OR CONSEQUENTIAL DAMAGES OF ANY KIND, OR ANY DAMAGESWHATSOEVER RESULTING FROM LOSS OF USE, DATA OR PROFITS, WHETHER OR NOT ADVISEDOF THE POSSIBILITY OF DAMAGE, AND ON ANY THEORY OF LIABILITY, ARISING OUT OF OR INCONNECTION WITH THE USE OR PERFORMANCE OF THIS SOFTWARE.
❏ QR Code is a registered trademark of DENSO WAVE INCORPORATED in Japan and other countries.
❏ Intel® is a registered trademark of Intel Corporation.
❏ Microsoft®, Windows®, and Windows Vista® are registered trademarks of Microsoft Corporation.
❏ Apple, Macintosh, macOS, OS X, Bonjour, ColorSync, Safari, AirPrint, the AirPrint Logo, iPad, iPhone, iPodtouch, and iTunes are trademarks of Apple Inc., registered in the U.S. and other countries.
❏ Google Cloud Print, Chrome, Chrome OS, Google Play and Android are trademarks of Google LLC.
❏ Adobe and Adobe Reader are either registered trademarks or trademarks of Adobe Systems Incorporated in theUnited States and/or other countries.
❏ General Notice: Other product names used herein are for identification purposes only and may be trademarksof their respective owners. Epson disclaims any and all rights in those marks.
User's Guide
Trademarks
3

Contents
Copyright
Trademarks
About This ManualIntroduction to the Manuals. . . . . . . . . . . . . . . . . . .8Using the Manual to Search for Information. . . . . . . 8Marks and Symbols. . . . . . . . . . . . . . . . . . . . . . . . . 9Descriptions Used in this Manual. . . . . . . . . . . . . . 10Operating System References. . . . . . . . . . . . . . . . . 10
Important InstructionsSafety Instructions. . . . . . . . . . . . . . . . . . . . . . . . . 11
Safety Instructions for Ink. . . . . . . . . . . . . . . . . 11Printer Advisories and Warnings. . . . . . . . . . . . . . 12
Advisories and Warnings for Setting Up thePrinter. . . . . . . . . . . . . . . . . . . . . . . . . . . . . . . .12Advisories and Warnings for Using the Printer. . 12Advisories and Warnings for Transporting orStoring the Printer. . . . . . . . . . . . . . . . . . . . . . . 13Advisories and Warnings for Using thePrinter with a Wireless Connection. . . . . . . . . . . 13Advisories and Warnings for Using the LCDScreen. . . . . . . . . . . . . . . . . . . . . . . . . . . . . . . . 13
Protecting Your Personal Information. . . . . . . . . . . 13
Printer BasicsPart Names and Functions. . . . . . . . . . . . . . . . . . . 14Guide to the Control Panel. . . . . . . . . . . . . . . . . . . 16
Control Panel. . . . . . . . . . . . . . . . . . . . . . . . . . 16Guide to the Home Screen. . . . . . . . . . . . . . . . . 16Entering Characters. . . . . . . . . . . . . . . . . . . . . . 17Viewing Animations. . . . . . . . . . . . . . . . . . . . . .18
Network SettingsNetwork Connection Types. . . . . . . . . . . . . . . . . . 20
Wi-Fi Connection. . . . . . . . . . . . . . . . . . . . . . . 20Wi-Fi Direct (Simple AP) Connection. . . . . . . . . 20
Connecting to a Computer. . . . . . . . . . . . . . . . . . . 21Connecting to a Smart Device. . . . . . . . . . . . . . . . 22
Connecting to a smart device over a wirelessrouter. . . . . . . . . . . . . . . . . . . . . . . . . . . . . . . . 22
Connecting to an iPhone, iPad, or iPod touchusing Wi-Fi Direct. . . . . . . . . . . . . . . . . . . . . . . 22Connecting to Android Devices using Wi-FiDirect. . . . . . . . . . . . . . . . . . . . . . . . . . . . . . . . 26Connecting to Devices other than iOS andAndroid using Wi-Fi Direct. . . . . . . . . . . . . . . . 28
Making Wi-Fi Settings from the Printer. . . . . . . . . .31Making Wi-Fi Settings by Entering the SSIDand Password. . . . . . . . . . . . . . . . . . . . . . . . . . .31Making Wi-Fi Settings by Push Button Setup. . . . 32Making Wi-Fi Settings by PIN Code Setup(WPS). . . . . . . . . . . . . . . . . . . . . . . . . . . . . . . . 33
Checking the Network Connection Status. . . . . . . . 34Network Icon. . . . . . . . . . . . . . . . . . . . . . . . . . .34Printing a Network Connection Report. . . . . . . . 34
Printing a Network Status Sheet. . . . . . . . . . . . . . . 40Replacing or Adding New Wireless Routers. . . . . . . 40Changing the Connection Method to a Computer. . 41Changing the Wi-Fi Direct (Simple AP) Settings. . . 41Disabling Wi-Fi from the Control Panel. . . . . . . . . .42Disconnecting Wi-Fi Direct (Simple AP)Connection from the Control Panel. . . . . . . . . . . . 43Restoring the Network Settings from theControl Panel. . . . . . . . . . . . . . . . . . . . . . . . . . . . 43
Loading PaperPaper Handling Precautions. . . . . . . . . . . . . . . . . . 44Available Paper and Capacities. . . . . . . . . . . . . . . . 45
Genuine Epson Paper. . . . . . . . . . . . . . . . . . . . .45Commercially Available Paper. . . . . . . . . . . . . . 46Paper for Borderless Printing. . . . . . . . . . . . . . . 46Paper for 2-Sided Printing. . . . . . . . . . . . . . . . . 47List of Paper Type. . . . . . . . . . . . . . . . . . . . . . . 47
Loading Paper in the Rear Paper Feed. . . . . . . . . . . 47
Placing OriginalsPlacing Originals on the Scanner Glass. . . . . . . . . . 51
How to Place Various Originals. . . . . . . . . . . . . .52
PrintingPrinting from the Control Panel. . . . . . . . . . . . . . . 55
Printing Lined Paper and Calendars. . . . . . . . . . 55Printing from a Computer. . . . . . . . . . . . . . . . . . . 55
Printing Basics - Windows. . . . . . . . . . . . . . . . . 55
User's Guide
Contents
4

Printing Basics - Mac OS. . . . . . . . . . . . . . . . . . 57Printing on 2-Sides. . . . . . . . . . . . . . . . . . . . . . .59Printing Several Pages on One Sheet. . . . . . . . . . 61Printing to Fit the Paper Size. . . . . . . . . . . . . . . .62Printing Multiple Files Together (forWindows Only). . . . . . . . . . . . . . . . . . . . . . . . . 64Printing One Image on Multiple Sheets toCreate a Poster (for Windows Only). . . . . . . . . . 65Printing Using Advanced Features. . . . . . . . . . . 71
Printing from Smart Devices. . . . . . . . . . . . . . . . . 74Using Epson iPrint. . . . . . . . . . . . . . . . . . . . . . . 74Using Epson Print Enabler. . . . . . . . . . . . . . . . . 75Using AirPrint. . . . . . . . . . . . . . . . . . . . . . . . . . 76
Canceling Printing. . . . . . . . . . . . . . . . . . . . . . . . . 77Canceling Printing - Control Panel. . . . . . . . . . . 77Canceling Printing - Windows. . . . . . . . . . . . . . 77Canceling Printing - Mac OS. . . . . . . . . . . . . . . 77
CopyingCopying Basics. . . . . . . . . . . . . . . . . . . . . . . . . . . 78Copying in Various Layout. . . . . . . . . . . . . . . . . . . 78Menu Options for Copying. . . . . . . . . . . . . . . . . . .79
ScanningScanning Using the Control Panel. . . . . . . . . . . . . .82
Scanning to a Computer. . . . . . . . . . . . . . . . . . . 82Scanning Using WSD. . . . . . . . . . . . . . . . . . . . . 86
Scanning from a Computer. . . . . . . . . . . . . . . . . . .88Scanning Using Epson Scan 2. . . . . . . . . . . . . . . 88
Scanning from Smart Devices. . . . . . . . . . . . . . . . . 95Installing Epson iPrint. . . . . . . . . . . . . . . . . . . . 95Scanning Using Epson iPrint. . . . . . . . . . . . . . . 95
Replacing Ink Cartridges and Other ConsumablesChecking the Status of the Remaining Ink andthe Maintenance Box. . . . . . . . . . . . . . . . . . . . . . . 97
Checking the Status of the Remaining Inkand the Maintenance Box - Control Panel. . . . . . 97Checking the Status of the Remaining Inkand the Maintenance Box - Windows. . . . . . . . . 97Checking the Status of the Remaining Inkand the Maintenance Box - Mac OS X. . . . . . . . . 97
Ink Cartridge Codes. . . . . . . . . . . . . . . . . . . . . . . .98Ink Cartridge Handling Precautions. . . . . . . . . . . . 99Replacing Ink Cartridges. . . . . . . . . . . . . . . . . . . 101Maintenance Box Code. . . . . . . . . . . . . . . . . . . . .104
Maintenance Box Handling Precautions. . . . . . . . 104Replacing a Maintenance Box. . . . . . . . . . . . . . . . 105Temporarily Printing with Black Ink. . . . . . . . . . . 108
Temporarily Printing with Black Ink - Windows 109Temporarily Printing with Black Ink - Mac OS. .110
Conserving Black Ink when the Black Ink IsLow (for Windows Only). . . . . . . . . . . . . . . . . . . 110
Maintaining the PrinterPreventing the Print Head from Drying. . . . . . . . . 112Checking and Cleaning the Print Head. . . . . . . . . 112
Checking and Cleaning the Print Head -Control Panel. . . . . . . . . . . . . . . . . . . . . . . . . .112Checking and Cleaning the Print Head -Windows. . . . . . . . . . . . . . . . . . . . . . . . . . . . . 113Checking and Cleaning the Print Head - MacOS. . . . . . . . . . . . . . . . . . . . . . . . . . . . . . . . . .113
Aligning the Print Head. . . . . . . . . . . . . . . . . . . . 114Aligning the Print Head - Control Panel. . . . . . 114
Cleaning the Paper Path for Ink Smears. . . . . . . . .114Cleaning the Scanner Glass. . . . . . . . . . . . . . . . . .115Cleaning the Translucent Film. . . . . . . . . . . . . . . 115Saving Power. . . . . . . . . . . . . . . . . . . . . . . . . . . . 117
Saving Power - Control Panel. . . . . . . . . . . . . . 118
Menu Options for SettingsMenu Options for Supply Status. . . . . . . . . . . . . . 119
Ink Level:. . . . . . . . . . . . . . . . . . . . . . . . . . . . .119Maintenance Box Service Life:. . . . . . . . . . . . . 119
Menu Options for Maintenance. . . . . . . . . . . . . . 119Nozzle Check:. . . . . . . . . . . . . . . . . . . . . . . . . 119Head Cleaning:. . . . . . . . . . . . . . . . . . . . . . . . 119Print Head Alignment:. . . . . . . . . . . . . . . . . . . 119Ink Cartridge(s) Replacement:. . . . . . . . . . . . . 119Paper Guide Cleaning:. . . . . . . . . . . . . . . . . . . 120
Menu Options for Printer Setup. . . . . . . . . . . . . . 120Paper Source Settings:. . . . . . . . . . . . . . . . . . . 120Quiet Mode:. . . . . . . . . . . . . . . . . . . . . . . . . . 120Power Off Timer:. . . . . . . . . . . . . . . . . . . . . . . 120Power Off Settings:. . . . . . . . . . . . . . . . . . . . . . 120Language:. . . . . . . . . . . . . . . . . . . . . . . . . . . . 121Keyboard. . . . . . . . . . . . . . . . . . . . . . . . . . . . .121Sleep Timer:. . . . . . . . . . . . . . . . . . . . . . . . . . . 121Ink Drying Time:. . . . . . . . . . . . . . . . . . . . . . . 121
Menu Options for Network Settings. . . . . . . . . . . 121Menu Options for Epson Connect Services. . . . . . 122Menu Options for Google Cloud Print Services. . . 122
User's Guide
Contents
5

Menu Options for Guide Functions. . . . . . . . . . . . 123Menu Options for Customer Research. . . . . . . . . . 123Menu Options for Firmware Update. . . . . . . . . . . 123Menu Options for Restore Default Settings. . . . . . 123
Network Service and Software InformationEpson Connect Service. . . . . . . . . . . . . . . . . . . . . 125Application for Configuring Printer Operations(Web Config). . . . . . . . . . . . . . . . . . . . . . . . . . . . 125
Running Web Config on a Web Browser. . . . . . 126Running Web Config on Windows. . . . . . . . . . 126Running Web Config on Mac OS. . . . . . . . . . . .127
Windows Printer Driver. . . . . . . . . . . . . . . . . . . . 127Guide to Windows Printer Driver. . . . . . . . . . . 128Making Operation Settings for the WindowsPrinter Driver. . . . . . . . . . . . . . . . . . . . . . . . . 129
Mac OS Printer Driver. . . . . . . . . . . . . . . . . . . . . 130Guide to Mac OS Printer Driver. . . . . . . . . . . . 131Making Operation Settings for the Mac OSPrinter Driver. . . . . . . . . . . . . . . . . . . . . . . . . 132
Application for Scanning Documents andImages (Epson Scan 2). . . . . . . . . . . . . . . . . . . . . 133
Adding the Network Scanner. . . . . . . . . . . . . . 133Application for Configuring ScanningOperations from the Control Panel (EpsonEvent Manager). . . . . . . . . . . . . . . . . . . . . . . . . . 134Application for Printing Images (Epson Photo+). . 134Software Update Tools (EPSON SoftwareUpdater). . . . . . . . . . . . . . . . . . . . . . . . . . . . . . . 135Installing Applications. . . . . . . . . . . . . . . . . . . . . 135Updating Applications and Firmware. . . . . . . . . . 136
Updating the Printer's Firmware using theControl Panel. . . . . . . . . . . . . . . . . . . . . . . . . .136
Uninstalling Applications. . . . . . . . . . . . . . . . . . . 137Uninstalling Applications - Windows. . . . . . . . .137Uninstalling Applications - Mac OS. . . . . . . . . .138
Solving ProblemsChecking the Printer Status. . . . . . . . . . . . . . . . . .139
Checking Error Codes on the LCD Screen. . . . . 139Checking the Printer Status - Windows. . . . . . . 140Checking the Printer Status - Mac OS. . . . . . . . 140
Checking the Software Status. . . . . . . . . . . . . . . . 141Removing Jammed Paper. . . . . . . . . . . . . . . . . . . 141
Removing Jammed Paper from the RearPaper Feed. . . . . . . . . . . . . . . . . . . . . . . . . . . .141
Removing Jammed Paper from Inside thePrinter. . . . . . . . . . . . . . . . . . . . . . . . . . . . . . .141Removing Jammed Paper from Rear Cover. . . . 143
Paper Does Not Feed Correctly. . . . . . . . . . . . . . . 144Paper Jams. . . . . . . . . . . . . . . . . . . . . . . . . . . .144Paper Feeds at a Slant. . . . . . . . . . . . . . . . . . . . 145Several Sheets of Paper are Fed at a Time. . . . . . 145Paper Out Error Occurs. . . . . . . . . . . . . . . . . . 145Paper is Ejected During Printing. . . . . . . . . . . . 145
Power and Control Panel Problems. . . . . . . . . . . . 145Power Does Not Turn On. . . . . . . . . . . . . . . . . 145Power Does Not Turn Off. . . . . . . . . . . . . . . . . 145Power Turns Off Automatically. . . . . . . . . . . . . 145LCD Screen Gets Dark. . . . . . . . . . . . . . . . . . . 146
Cannot Print from a Computer. . . . . . . . . . . . . . . 146Checking the Connection (USB). . . . . . . . . . . . 146Checking the Connection (Network). . . . . . . . .146Checking the Software and Data. . . . . . . . . . . . 147Checking the Printer Status from theComputer (Windows). . . . . . . . . . . . . . . . . . . .149Checking the Printer Status from theComputer (Mac OS). . . . . . . . . . . . . . . . . . . . .149
When You Cannot Make Network Settings. . . . . . 150Cannot Connect from Devices Even ThoughNetwork Settings are No Problems. . . . . . . . . . 150Checking the SSID Connected to the Printer. . . 152Checking the SSID for the Computer. . . . . . . . .152Wireless LAN (Wi-Fi) Connections BecomeUnstable When Using USB 3.0 Devices on aMac. . . . . . . . . . . . . . . . . . . . . . . . . . . . . . . . .153
Cannot Print from an iPhone, iPad, or iPod touch. 153Printout Problems. . . . . . . . . . . . . . . . . . . . . . . . 154
Printout is Scuffed or Color is Missing. . . . . . . .154Banding or Unexpected Colors Appear. . . . . . . 154Colored Banding Appears at Intervals ofApproximately 2.5 cm. . . . . . . . . . . . . . . . . . . .154Blurry Prints, Vertical Banding, orMisalignment. . . . . . . . . . . . . . . . . . . . . . . . . .155Print Quality is Poor. . . . . . . . . . . . . . . . . . . . .155Paper Is Smeared or Scuffed. . . . . . . . . . . . . . . 156Paper is Smeared During Automatic 2-SidedPrinting. . . . . . . . . . . . . . . . . . . . . . . . . . . . . . 157Printed Photos are Sticky. . . . . . . . . . . . . . . . . 157Images or Photos are Printed in UnexpectedColors. . . . . . . . . . . . . . . . . . . . . . . . . . . . . . . 157Colors Differ from What You See on theDisplay. . . . . . . . . . . . . . . . . . . . . . . . . . . . . . 157Cannot Print Without Margins. . . . . . . . . . . . . 158Edges of the Image are Cropped DuringBorderless Printing. . . . . . . . . . . . . . . . . . . . . .158
User's Guide
Contents
6

The Position, Size, or Margins of the PrintoutAre Incorrect. . . . . . . . . . . . . . . . . . . . . . . . . . 158Printed Characters Are Incorrect or Garbled. . . 159The Printed Image Is Inverted. . . . . . . . . . . . . . 159Mosaic-Like Patterns in the Prints. . . . . . . . . . .159Uneven Colors, Smears, Dots, or StraightLines Appear in the Copied Image. . . . . . . . . . .159Moiré (Cross-Hatch) Patterns Appear in theCopied Image. . . . . . . . . . . . . . . . . . . . . . . . . 160An Image of the Reverse Side of the OriginalAppears in the Copied Image. . . . . . . . . . . . . . 160The Printout Problem Could Not be Cleared. . . 160
Other Printing Problems. . . . . . . . . . . . . . . . . . . 160Printing Is Too Slow. . . . . . . . . . . . . . . . . . . . . 160Printing or Copying Slows DownDramatically During Continuous Operation. . . 161Cannot Cancel Printing from a ComputerRunning Mac OS X v10.6.8. . . . . . . . . . . . . . . . 161
Cannot Start Scanning. . . . . . . . . . . . . . . . . . . . . 161Cannot Start Scanning when Using theControl Panel. . . . . . . . . . . . . . . . . . . . . . . . . .162
Scanned Image Problems. . . . . . . . . . . . . . . . . . . 162Uneven Colors, Dirt, Spots, and so on Appearwhen Scanning from the Scanner Glass. . . . . . . 162The Image Quality Is Rough. . . . . . . . . . . . . . . 162Offset Appears in the Background of Images. . . 163Text is Blurred. . . . . . . . . . . . . . . . . . . . . . . . . 163Moiré Patterns (Web-Like Shadows) Appear. . . 163Cannot Scan the Correct Area on theScanner Glass. . . . . . . . . . . . . . . . . . . . . . . . . .164Cannot Preview in Thumbnail. . . . . . . . . . . . . 164Text is Not Recognized Correctly whenSaving as a Searchable PDF. . . . . . . . . . . . . . . .164Cannot Solve Problems in the Scanned Image. . 165
Other Scanning Problems. . . . . . . . . . . . . . . . . . . 165Scanning Is Too Slow. . . . . . . . . . . . . . . . . . . . 165Scanning Slows Down Dramatically DuringContinuous Scanning. . . . . . . . . . . . . . . . . . . . 166Scanning Stops when Scanning to PDF/Multi-TIFF. . . . . . . . . . . . . . . . . . . . . . . . . . . 166
Other Problems. . . . . . . . . . . . . . . . . . . . . . . . . . 166Slight Electric Shock when Touching thePrinter. . . . . . . . . . . . . . . . . . . . . . . . . . . . . . .166Operation Sounds Are Loud. . . . . . . . . . . . . . . 166Application Is Blocked by a Firewall (forWindows Only). . . . . . . . . . . . . . . . . . . . . . . . 167
AppendixTechnical Specifications. . . . . . . . . . . . . . . . . . . . 168
Printer Specifications. . . . . . . . . . . . . . . . . . . . 168
Scanner Specifications. . . . . . . . . . . . . . . . . . . 169Interface Specifications. . . . . . . . . . . . . . . . . . . 169Network Function List. . . . . . . . . . . . . . . . . . . 170Wi-Fi Specifications. . . . . . . . . . . . . . . . . . . . . 170Security Protocol. . . . . . . . . . . . . . . . . . . . . . . 171Supported Third Party Services. . . . . . . . . . . . . 171Dimensions. . . . . . . . . . . . . . . . . . . . . . . . . . . 171Electrical Specifications. . . . . . . . . . . . . . . . . . 171Environmental Specifications. . . . . . . . . . . . . . 172System Requirements. . . . . . . . . . . . . . . . . . . . 172
Regulatory Information. . . . . . . . . . . . . . . . . . . . 173Standards and Approvals. . . . . . . . . . . . . . . . . 173Restrictions on Copying. . . . . . . . . . . . . . . . . . 173
Transporting and Storing the Printer. . . . . . . . . . . 174Where to Get Help. . . . . . . . . . . . . . . . . . . . . . . . 176
Technical Support Web Site. . . . . . . . . . . . . . . .176Contacting Epson Support. . . . . . . . . . . . . . . . 176
User's Guide
Contents
7

About This Manual
Introduction to the ManualsThe following manuals are supplied with your Epson printer. As well as the manuals, check the various types ofhelp information available from the printer itself or from the Epson software applications.
❏ Start Here (paper manual)Provides you with information on setting up the printer, installing the software, using the printer, solvingproblems, and so on.
❏ User's Guide (digital manual)This manual. Provides overall information and instructions on using the printer, on network settings whenusing the printer on a network, and on solving problems.
You can obtain the latest versions of the above manuals with the following methods.
❏ Paper manualVisit the Epson Europe support website at http://www.epson.eu/Support, or the Epson worldwide supportwebsite at http://support.epson.net/.
❏ Digital manualStart EPSON Software Updater on your computer. EPSON Software Updater checks for available updates ofEpson software applications and the digital manuals, and allows you to download the latest ones.
Related Information
& “Software Update Tools (EPSON Software Updater)” on page 135
Using the Manual to Search for InformationThe PDF manual allows you to search for information you are looking for by keyword, or jump directly to specificsections using the bookmarks. You can also print only the pages you need. This section explains how to use a PDFmanual that has been opened in Adobe Reader X on your computer.
Searching by keyword
Click Edit > Advanced Search. Enter the keyword (text) for information you want to find in the search window,and then click Search. Hits are displayed as a list. Click one of the displayed hits to jump to that page.
User's Guide
About This Manual
8

Jumping directly from bookmarks
Click a title to jump to that page. Click + or > to view the lower level titles in that section. To return to the previouspage, perform the following operation on your keyboard.
❏ Windows: Hold down Alt, and then press ←.
❏ Mac OS: Hold down the command key, and then press ←.
Printing only the pages you need
You can extract and print only the pages you need. Click Print in the File menu, and then specify the pages youwant to print in Pages in Pages to Print.
❏ To specify a series of pages, enter a hyphen between the start page and the end page.Example: 20-25
❏ To specify pages that are not in series, divide the pages with commas.Example: 5, 10, 15
Marks and Symbols
!Caution:
Instructions that must be followed carefully to avoid bodily injury.
cImportant:
Instructions that must be observed to avoid damage to your equipment.
Note:Provides complementary and reference information.
User's Guide
About This Manual
9

Related Information
& Links to related sections.
Descriptions Used in this Manual❏ Screenshots of the printer driver and the Epson Scan 2 (scanner driver) screens are from Windows 10 or macOS
Mojave. The content displayed on the screens varies depending on the model and situation.
❏ Illustrations used in this manual are examples only. Although there may be slight differences depending on themodel, the method of operation is the same.
❏ Some of the menu items on the LCD screen vary depending on the model and settings.
❏ You can read the QR code using dedicated app.
Operating System References
Windows
In this manual, terms such as "Windows 10", "Windows 8.1", "Windows 8", "Windows 7", "Windows Vista", and"Windows XP" refer to the following operating systems. Additionally, "Windows" is used to refer to all versions.
❏ Microsoft® Windows® 10 operating system
❏ Microsoft® Windows® 8.1 operating system
❏ Microsoft® Windows® 8 operating system
❏ Microsoft® Windows® 7 operating system
❏ Microsoft® Windows Vista® operating system
❏ Microsoft® Windows® XP operating system
❏ Microsoft® Windows® XP Professional x64 Edition operating system
Mac OS
In this manual, "Mac OS" is used to refer to macOS Mojave, macOS High Sierra, macOS Sierra, OS X El Capitan,OS X Yosemite, OS X Mavericks, OS X Mountain Lion, Mac OS X v10.7.x, and Mac OS X v10.6.8.
User's Guide
About This Manual
10

Important Instructions
Safety InstructionsRead and follow these instructions to ensure safe use of this printer. Make sure you keep this manual for futurereference. Also, be sure to follow all warnings and instructions marked on the printer.
❏ Some of the symbols used on your printer are to ensure safety and proper use of the printer. Visit the followingWeb site to learn the meaning of the symbols.http://support.epson.net/symbols
❏ Use only the power cord supplied with the printer and do not use the cord with any other equipment. Use ofother cords with this printer or the use of the supplied power cord with other equipment may result in fire orelectric shock.
❏ Be sure your AC power cord meets the relevant local safety standard.
❏ Never disassemble, modify, or attempt to repair the power cord, plug, printer unit, scanner unit, or options byyourself, except as specifically explained in the printer's manuals.
❏ Unplug the printer and refer servicing to qualified service personnel under the following conditions:The power cord or plug is damaged; liquid has entered the printer; the printer has been dropped or the casingdamaged; the printer does not operate normally or exhibits a distinct change in performance. Do not adjustcontrols that are not covered by the operating instructions.
❏ Place the printer near a wall outlet where the plug can be easily unplugged.
❏ Do not place or store the printer outdoors, near excessive dirt or dust, water, heat sources, or in locationssubject to shocks, vibrations, high temperature or humidity.
❏ Take care not to spill liquid on the printer and not to handle the printer with wet hands.
❏ Keep the printer at least 22 cm away from cardiac pacemakers. Radio waves from this printer may adverselyaffect the operation of cardiac pacemakers.
❏ If the LCD screen is damaged, contact your dealer. If the liquid crystal solution gets on your hands, wash themthoroughly with soap and water. If the liquid crystal solution gets into your eyes, flush them immediately withwater. If discomfort or vision problems remain after a thorough flushing, see a doctor immediately.
Safety Instructions for Ink❏ Be careful when you handle used ink cartridges, as there may be some ink around the ink supply port.
❏ If ink gets on your skin, wash the area thoroughly with soap and water.
❏ If ink gets into your eyes, flush them immediately with water. If discomfort or vision problems continue aftera thorough flushing, see a doctor immediately.
❏ If ink gets into your mouth, see a doctor right away.
❏ Do not disassemble the ink cartridge and the maintenance box; otherwise ink may get into your eyes or on yourskin.
❏ Do not shake ink cartridges too vigorously and do not drop them. Also, be careful not to squeeze them or teartheir labels. Doing so may cause ink leakage.
❏ Keep ink cartridges and maintenance box out of the reach of children.
User's Guide
Important Instructions
11

Printer Advisories and WarningsRead and follow these instructions to avoid damaging the printer or your property. Make sure you keep thismanual for future reference.
Advisories and Warnings for Setting Up the Printer❏ Do not block or cover the vents and openings in the printer.
❏ Use only the type of power source indicated on the printer's label.
❏ Avoid using outlets on the same circuit as photocopiers or air control systems that regularly switch on and off.
❏ Avoid electrical outlets controlled by wall switches or automatic timers.
❏ Keep the entire computer system away from potential sources of electromagnetic interference, such asloudspeakers or the base units of cordless telephones.
❏ The power-supply cords should be placed to avoid abrasions, cuts, fraying, crimping, and kinking. Do not placeobjects on top of the power-supply cords and do not allow the power-supply cords to be stepped on or run over.Be particularly careful to keep all the power-supply cords straight at the ends and the points where they enterand leave the transformer.
❏ If you use an extension cord with the printer, make sure that the total ampere rating of the devices plugged intothe extension cord does not exceed the cord's ampere rating. Also, make sure that the total ampere rating of alldevices plugged into the wall outlet does not exceed the wall outlet's ampere rating.
❏ If you plan to use the printer in Germany, the building installation must be protected by a 10 or 16 amp circuitbreaker to provide adequate short-circuit protection and over-current protection for the printer.
❏ When connecting the printer to a computer or other device with a cable, ensure the correct orientation of theconnectors. Each connector has only one correct orientation. Inserting a connector in the wrong orientationmay damage both devices connected by the cable.
❏ Place the printer on a flat, stable surface that extends beyond the base of the printer in all directions. The printerwill not operate properly if it is tilted at an angle.
❏ Allow space above the printer so that you can fully raise the document cover.
❏ Leave enough space in front of the printer for the paper to be fully ejected.
❏ Avoid places subject to rapid changes in temperature and humidity. Also, keep the printer away from directsunlight, strong light, or heat sources.
Advisories and Warnings for Using the Printer❏ Do not insert objects through the slots in the printer.
❏ Do not put your hand inside the printer during printing.
❏ Do not touch the white flat cable inside the printer.
❏ Do not use aerosol products that contain flammable gases inside or around the printer. Doing so may cause fire.
❏ Do not move the print head by hand; otherwise, you may damage the printer.
❏ Be careful not to trap your fingers when closing the scanner unit.
❏ Do not press too hard on the scanner glass when placing the originals.
User's Guide
Important Instructions
12

❏ Always turn the printer off using the P button. Do not unplug the printer or turn off the power at the outletuntil the P light stops flashing.
❏ If you are not going to use the printer for a long period, be sure to unplug the power cord from the electricaloutlet.
Advisories and Warnings for Transporting or Storing the Printer❏ When storing or transporting the printer, avoid tilting it, placing it vertically, or turning it upside down;
otherwise ink may leak.
❏ Before transporting the printer, make sure that the print head is in the home (far right) position.
Advisories and Warnings for Using the Printer with a WirelessConnection❏ Radio waves from this printer may negatively affect the operation of medical electronic equipment, causing
them to malfunction. When using this printer inside medical facilities or near medical equipment, followdirections from the authorized personnel representing the medical facilities, and follow all posted warnings anddirections on the medical equipment.
❏ Radio waves from this printer may negatively affect the operation of automatically controlled devices such asautomatic doors or fire alarms, and could lead to accidents due to malfunction. When using this printer nearautomatically controlled devices, follow all posted warnings and directions on these devices.
Advisories and Warnings for Using the LCD Screen❏ The LCD screen may contain a few small bright or dark spots, and because of its features it may have an uneven
brightness. These are normal and do not indicate that it is damaged in any way.
❏ Only use a dry, soft cloth for cleaning. Do not use liquid or chemical cleaners.
❏ The exterior cover of the LCD screen could break if it receives a heavy impact. Contact your dealer if thescreen's surface chips or cracks, and do not touch or attempt to remove the broken pieces.
Protecting Your Personal InformationWhen you give the printer to someone else or dispose of it, erase all the personal information stored in the printer'smemory by selecting Settings > Restore Default Settings > All Settings on the control panel.
User's Guide
Important Instructions
13

Printer Basics
Part Names and Functions
A Rear paper feed Loads paper.
B Paper support Supports loaded paper.
C Edge guide Feeds the paper straight into the printer. Slide to the edges of the paper.
D Feeder guard Prevents foreign substance from entering the printer.
Usually keep this guard closed.
E Output tray Holds the ejected paper.
F Stopper Prevents printouts from falling from the output tray.
A Document cover Blocks external light while scanning.
B Scanner glass Place the originals.
C Control panel Indicates the printer's status and allows you to make print settings.
User's Guide
Printer Basics
14

A Scanner unit support Supports the scanner unit.
B Scanner unit Scans placed originals. Open when replacing ink cartridges or removingjammed paper inside the printer.
C Ink cartridge holder Install the ink cartridges. Ink is ejected from the print head nozzles.
A Maintenance box cover Remove when replacing the maintenance box. The maintenance box is acontainer that collects a very small amount of surplus ink during cleaning orprinting.
B Rear cover Remove when removing jammed paper.
C AC inlet Connects the power cord.
D USB port Connects a USB cable to connect with a computer.
Related Information
& “Control Panel” on page 16
User's Guide
Printer Basics
15

Guide to the Control Panel
Control Panel
A Turns the printer on or off.
Unplug the power cord after checking that the power light is off.
B Displays the home screen.
C Displays menus and messages. Use buttons on the control panel to select a menu or to make settings.
D Displays the solutions when you are in trouble.
E Use the u d l r buttons to select a menu, and then press the OK button to enter the selected menu.
F Stops the current operation.
G Starts an operation such as printing or copying.
H Applies to a variety of functions depending on the situation.
I Returns to the previous screen.
Guide to the Home Screen
User's Guide
Printer Basics
16

A Icons that show the network status are displayed.
Indicates that a wireless (Wi-Fi) network is disabled, or that the printer is processing a wirelessnetwork connection.
Indicates a problem with the printer's wireless (Wi-Fi) network connection, or that the printer issearching for a wireless (Wi-Fi) network connection.
Indicates that the printer is connected to a wireless (Wi-Fi) network.
The number of bars indicates the signal strength of the connection. The more bars there are,the stronger the connection.
Indicates that Wi-Fi Direct (Simple AP) is enabled.
Indicates that Wi-Fi Direct (Simple AP) is disabled.
B When l and r are displayed, you can scroll right or left by pressing the l or r button.
C Function icons and names are displayed as menu icons.
Select an icon by pressing the u d l r buttons, and then press the OK button to enter the menu.
Scan Allows you to scan a document or a photo.
Copy Allows you to copy a document.
Smartphoneconnect
Allows you to connect the printer directly to your smart device without a wireless router.
Quiet Mode Displays Quiet Mode setting that allows you to reduce the noise the printer makes. However,enabling this may reduce print speed. Depending on the paper type and print quality settingsyou selected, there may be no difference in the printer's noise level.
This is a shortcut to the following menu.
Settings > Printer Setup > Quiet Mode
PersonalStationery
Offers you various printing features such as printing ruled paper or calendars.
Settings Allows you to make settings related to maintenance, printer setup, and network settings.
Maintenance Displays the menus recommended to improve the quality of your printouts such as un-clogging nozzles by printing a nozzle check pattern and performing head cleaning, andimproving blurring or banding in your printouts by aligning the print head. This is a shortcut tothe following menu.
Settings > Maintenance
Wi-Fi Setup Allows you to set up the printer for use on a wireless network. This is a shortcut to the followingmenu.
Settings > Network Settings > Wi-Fi Setup
D Available buttons are displayed. In this example, you can proceed to the selected menu by pressing the OK button.
Entering Characters
To enter characters and symbols for network settings from the control panel, use the u, d, l, and r buttons andthe software keyboard on the LCD screen. Press the u, d, l, or r button to select a character or function button
User's Guide
Printer Basics
17

on the keyboard, and then press the OK button. When you have finished entering characters, select OK, and thenpress the OK button.
Function button Descriptions
l r Moves the cursor to the left or right.
A 1 # Switches the character type. You can enter alphanumerics or symbols.
You can also switch them by using the button.
Enters a space.
Deletes a character to the left (backspace).
OK Enters the selected characters.
Viewing AnimationsYou can view animations of operating instructions such as loading paper or removing jammed paper on the LCDscreen.
❏ Press button: Displays the help screen. Select How To and then select the items that you want to view.
❏ Select How to at the bottom of the operation screen: Displays the context-sensitive animation.
A Indicates your progress through the current step. The animation repeats when the progress bar reaches the end.
User's Guide
Printer Basics
18

B Press l button to return to the previous step.
C Indicates the total number of steps and the current step number.
In the example above, it shows step 2 from 3 steps.
D Press r button to move to the next step.
User's Guide
Printer Basics
19

Network Settings
Network Connection TypesYou can use the following connection methods.
Wi-Fi ConnectionConnect the printer and the computer or smart device to the wireless router. This is the typical connection methodfor home or office networks where computers are connected by Wi-Fi through the wireless router.
Related Information
& “Connecting to a Computer” on page 21& “Connecting to a smart device over a wireless router” on page 22& “Making Wi-Fi Settings from the Printer” on page 31
Wi-Fi Direct (Simple AP) ConnectionUse this connection method when you are not using Wi-Fi at home or at the office, or when you want to connectthe printer and the computer or smart device directly. In this mode, the printer acts as an wireless router and you
User's Guide
Network Settings
20

can connect the devices to the printer without having to use a standard wireless router. However, devices directlyconnected to the printer cannot communicate with each other through the printer.
The printer can be connected by Wi-Fi and Wi-Fi Direct (Simple AP) connection simultaneously. However, if youstart a network connection in Wi-Fi Direct (Simple AP) connection when the printer is connected by Wi-Fi, theWi-Fi is temporarily disconnected.
Related Information
& “Connecting to an iPhone, iPad, or iPod touch using Wi-Fi Direct” on page 22& “Connecting to Android Devices using Wi-Fi Direct” on page 26& “Connecting to Devices other than iOS and Android using Wi-Fi Direct” on page 28
Connecting to a ComputerWe recommend using the installer to connect the printer to a computer. You can run the installer using one of thefollowing methods.
❏ Setting up from the websiteAccess the following website, and then enter the product name. Go to Setup, and then start setting up.http://epson.sn
❏ Setting up using the software disc (only for the models that come with a software disc and users with Windowscomputers with disc drives.)Insert the software disc into the computer, and then follow the on-screen instructions.
Selecting the Connection Methods
Follow the on-screen instructions until the following screen is displayed, and then select the connection method ofthe printer to the computer.
User's Guide
Network Settings
21

Select the connection type and then click Next.
Follow the on-screen instructions.
Connecting to a Smart Device
Connecting to a smart device over a wireless routerYou can use the printer from a smart device when you connect the printer to the same Wi-Fi network (SSID) as thesmart device. To use the printer from a smart device, set up from the following website. Access to the website fromthe smart device that you want to connect to the printer.
http://epson.sn > Setup
Note:If you want to connect a computer and a smart device to the printer at the same time, we recommend setting up from thecomputer first by using the installer.
Related Information
& “Printing from Smart Devices” on page 74
Connecting to an iPhone, iPad, or iPod touch using Wi-Fi DirectThis method allows you to connect the printer directly to an iPhone, iPad, or iPod touch without a wireless router.The following conditions are required to connect using this method. If your environment does not match these
User's Guide
Network Settings
22

conditions, you can connect by selecting Other OS Devices. See "Related Information" below for details onconnecting.
❏ iOS 11 or later
❏ Using the standard camera application to scan the QR code
❏ Epson iPrint version 7.0 or later
Epson iPrint is used to print from a smart device. Install Epson iPrint on the smart device in advance.
Note:You only need to make these settings for the printer and the smart device that you want to connect to once. Unless youdisable Wi-Fi Direct or restore the network settings to their defaults, you do not need to make these settings again.
1. Select Smartphone connect on the home screen using the l r buttons, and then press the OK button.
2. Check the message, and then press the OK button to proceed.
3. Check the message, and then press the OK button to proceed.
4. Select iOS using the l r buttons, and then press the OK button.
User's Guide
Network Settings
23

5. Check the message, and then press the OK button to proceed.
The QR code is displayed on the printer's control panel.
6. On your iPhone, iPad, or iPod touch, start the standard Camera app, and then scan the QR code displayed onthe printer's control panel in PHOTO mode.
Use the Camera app for iOS 11 or later. You cannot connect to the printer using the Camera app for iOS 10 orearlier. Also, you cannot connect using an app for scanning QR codes. If you cannot connect, press the lbutton. See "Related Information" below for details on connecting.
7. Tap the notification displayed on the screen of the iPhone, iPad, or iPod touch.
8. Tap Join.
User's Guide
Network Settings
24

9. On the printer's control panel, press the OK button.
10. On the iPhone, iPad, or iPod touch, start Epson printing app.
Examples of Epson printing apps
11. On the Epson printing app screen, tap Printer is not selected..
12. Select the printer that you want to connect to.
See the information displayed on the printer's control panel to select the printer.
13. On the printer's control panel, press the OK button.
For smart devices that have been connected to the printer before, select the network name (SSID) on the smartdevice's Wi-Fi screen to connect them again.
User's Guide
Network Settings
25

Related Information
& “Connecting to Devices other than iOS and Android using Wi-Fi Direct” on page 28& “Printing from Smart Devices” on page 74
Connecting to Android Devices using Wi-Fi DirectThis method allows you to connect the printer directly to your Android device without a wireless router. Thefollowing conditions are required to use this function.
❏ Android 4.4 or later
❏ Epson iPrint version 7.0 or later
Epson iPrint is used to print from a smart device. Install Epson iPrint on the smart device in advance.
Note:You only need to make these settings for the printer and the smart device that you want to connect to once. Unless youdisable Wi-Fi Direct or restore the network settings to their defaults, you do not need to make these settings again.
1. Select Smartphone connect on the home screen using the l r buttons, and then press the OK button.
2. Check the message, and then press the OK button to proceed.
3. Select Android using the l r buttons, and then press the OK button.
User's Guide
Network Settings
26

4. On the iPhone, iPad, or iPod touch, start Epson iPrint.
5. On the Epson iPrint screen, tap Printer is not selected..
6. Select the printer that you want to connect to.
See the information displayed on the printer's control panel to select the printer.
Note:Printers may not been displayed depending on the Android device. If printers are not displayed, connect by selectingOther OS Devices. See "Related Information" below for connecting.
7. When the device connection approval screen is displayed, select Approve.
8. On the printer's control panel, press the OK button.
For smart devices that have been connected to the printer before, select the network name (SSID) on the smartdevice's Wi-Fi screen to connect them again.
Related Information
& “Connecting to Devices other than iOS and Android using Wi-Fi Direct” on page 28
User's Guide
Network Settings
27

& “Printing from Smart Devices” on page 74
Connecting to Devices other than iOS and Android using Wi-FiDirectThis method allows you to connect the printer directly to smart devices without a wireless router.
Note:You only need to make these settings for the printer and the smart device that you want to connect to once. Unless youdisable Wi-Fi Direct or restore the network settings to their defaults, you do not need to make these settings again.
1. Select Smartphone connect on the home screen using the l r buttons, and then press the OK button.
2. Check the message, and then press the OK button to proceed.
3. Select Other OS Devices using the l r buttons, and then press the OK button.
The Network Name and Password for Wi-Fi Direct for the printer are displayed.
User's Guide
Network Settings
28

4. On the smart device's Wi-Fi screen, select the Network Name shown on the printer's control panel, and thenenter the password.
The screenshot is an example on iPhone.
5. On the printer's control panel, press the OK button.
User's Guide
Network Settings
29

6. On the smart device, start Epson printing app.
Examples of Epson printing apps
7. On the Epson printing app screen, tap Printer is not selected..
8. Select the printer that you want to connect to.
See the information displayed on the printer's control panel to select the printer.
9. On the printer's control panel, press the OK button.
For smart devices that have been connected to the printer before, select the network name (SSID) on the smartdevice's Wi-Fi screen to connect them again.
User's Guide
Network Settings
30

Related Information
& “Printing from Smart Devices” on page 74
Making Wi-Fi Settings from the PrinterYou can make network settings from the printer's control panel in several ways. Choose the connection methodthat matches the environment and conditions that you are using.
If you know the information for the wireless router such as SSID and password, you can make settings manually.
If the wireless router supports WPS, you can make settings by using push button setup.
After connecting the printer to the network, connect to the printer from the device that you want to use (computer,smart device, tablet, and so on.)
Related Information
& “Making Wi-Fi Settings by Entering the SSID and Password” on page 31& “Making Wi-Fi Settings by Push Button Setup” on page 32& “Making Wi-Fi Settings by PIN Code Setup (WPS)” on page 33
Making Wi-Fi Settings by Entering the SSID and PasswordYou can set up a Wi-Fi network by entering the information necessary to connect to a wireless router from theprinter's control panel. To set up using this method, you need the SSID and password for a wireless router.
Note:If you are using an wireless router with its default settings, the SSID and password are on the label. If you do not know theSSID and password, contact the person who set up the wireless router, or see the documentation provided with the wirelessrouter.
1. Select Wi-Fi Setup on the home screen.
To select an item, use the u d l r buttons, and then press the OK button.
2. Select Wi-Fi (Recommended).
3. Press the OK button to proceed.
4. Select Wi-Fi Setup Wizard.
User's Guide
Network Settings
31

5. Select the SSID for the wireless router from printer's control panel, and then press the OK button.
Note:❏ If the SSID you want to connect to is not displayed on the printer's control panel, press the button to update the
list. If it is still not displayed, select Other SSIDs, and then enter the SSID directly.
❏ If you do not know the SSID, check if it is written on the label of the wireless router. If you are using the wirelessrouter with its default settings, use the SSID written on the label.
6. Enter the password.
Select whether or not you print a network connection report after finishing the settings.
Note:❏ The password is case-sensitive.
❏ If you do not know the network name (SSID) check if the information is written on the label of the wireless router. Ifyou are using the wireless router with its default settings, use the SSID on the label. If you cannot find anyinformation, see the documentation provided with the wireless router.
7. When you have setup finished, and then press the button.
Note:If you fail to connect, load paper, and then press the button to print a network connection report.
Related Information
& “Entering Characters” on page 17& “Checking the Network Connection Status” on page 34& “When You Cannot Make Network Settings” on page 150
Making Wi-Fi Settings by Push Button SetupYou can automatically set up a Wi-Fi network by pressing a button on the wireless router. If the followingconditions are met, you can set up by using this method.
❏ The wireless router is compatible with WPS (Wi-Fi Protected Setup).
❏ The current Wi-Fi connection was established by pressing a button on the wireless router.
1. Select Wi-Fi Setup on the home screen.
To select an item, use the u d l r buttons, and then press the OK button.
2. Select Wi-Fi (Recommended).
3. Press the OK button to proceed.
4. Select Push Button Setup (WPS).
User's Guide
Network Settings
32

5. Hold down the [WPS] button on the wireless router until the security light flashes.
If you do not know where the [WPS] button is, or there are no buttons on the wireless router, see thedocumentation provided with your wireless router for details.
6. Press the OK button on the printer's control panel. Follow the on-screen instruction hereafter.
Note:If connection fails, restart the wireless router, move it closer to the printer, and try again. If it still does not work, print anetwork connection report and check the solution.
Related Information
& “Checking the Network Connection Status” on page 34& “When You Cannot Make Network Settings” on page 150
Making Wi-Fi Settings by PIN Code Setup (WPS)You can automatically connect to an wireless router by using a PIN code. You can use this method to set up if anwireless router is capable of WPS (Wi-Fi Protected Setup). Use a computer to enter a PIN code into the wirelessrouter.
1. Select Wi-Fi Setup on the home screen.
To select an item, use the u d l r buttons, and then press the OK button.
2. Select Wi-Fi (Recommended).
3. Press the OK button to proceed.
4. Select Others.
5. Select PIN Code (WPS).
6. Use your computer to enter the PIN code (an eight digit number) displayed on the printer's control panel intothe wireless router within two minutes.
Note:See the documentation provided with your wireless router for details on entering a PIN code.
User's Guide
Network Settings
33

7. Press the OK button on the printer.
Setup is complete when the setup completion message is displayed.
Note:If connection fails, restart the wireless router, move it closer to the printer, and try again. If it still does not work, print aconnection report and check the solution.
Related Information
& “Checking the Network Connection Status” on page 34& “When You Cannot Make Network Settings” on page 150
Checking the Network Connection StatusYou can check the network connection status in the following way.
Network IconYou can check the network connection status and strength of the radio wave using the network icon on theprinter's home screen.
Related Information
& “Guide to the Home Screen” on page 16
Printing a Network Connection ReportYou can print a network connection report to check the status between the printer and the wireless router.
1. Load papers.
2. Select Settings on the home screen, and then press the OK button.
To select an item, use the u d l r buttons, and then press the OK button.
3. Select Network Settings > Connection Check.
The connection check starts.
4. Press the x button to print the network connection report.
If an error has occurred, check the network connection report, and then follow the printed solutions.
User's Guide
Network Settings
34

Related Information
& “Messages and Solutions on the Network Connection Report” on page 35
Messages and Solutions on the Network Connection Report
Check the messages and error codes on the network connection report, and then follow the solutions.
a. Error code
b. Messages on the Network Environment
Related Information
& “E-1” on page 36& “E-2, E-3, E-7” on page 36& “E-5” on page 37& “E-6” on page 37& “E-8” on page 37& “E-9” on page 38& “E-10” on page 38& “E-11” on page 38& “E-12” on page 39
User's Guide
Network Settings
35

& “E-13” on page 39& “Message on the Network Environment” on page 40
E-1
Solutions:
❏ Make sure the Ethernet cable is securely connected to your printer and to your hub or other network device.
❏ Make sure your hub or other network device is turned on.
❏ If you want to connect the printer by Wi-Fi, make Wi-Fi settings for the printer again because it is disabled.
E-2, E-3, E-7
Solutions:
❏ Make sure your wireless router is turned on.
❏ Confirm that your computer or device is connected correctly to the wireless router.
❏ Turn off the wireless router. Wait for about 10 seconds, and then turn it on.
❏ Place the printer closer to your wireless router and remove any obstacles between them.
❏ If you have entered the SSID manually, check if it is correct. Check the SSID from the Network Status part onthe network connection report.
❏ If an wireless router has multiple SSIDs, select the SSID that is displayed. When the SSID is using a non-compliant frequency, the printer does not display them.
❏ If you are using push button setup to establish a network connection, make sure your wireless router supportsWPS. You cannot use push button setup if your wireless router does not support WPS.
❏ Makes sure your SSID uses only ASCII characters (alphanumeric characters and symbols). The printer cannotdisplay an SSID that contains non-ASCII characters.
❏ Makes sure you know your SSID and password before connecting to the wireless router. If you are using awireless router with its default settings, the SSID and password are located on a label on the wireless router. Ifyou do not know your SSID and password, contact the person who set up the wireless router, or see thedocumentation provided with the wireless router.
❏ If you are connecting to an SSID generated from a tethering smart device, check for the SSID and password inthe documentation provided with the smart device.
❏ If your Wi-Fi connection suddenly disconnects, check for the conditions below. If any of these conditions areapplicable, reset your network settings by downloading and running the software from the following website.http://epson.sn > Setup
❏ Another smart device was added to the network using push button setup.
❏ The Wi-Fi network was set up using any method other than push button setup.
Related Information
& “Connecting to a Computer” on page 21& “Making Wi-Fi Settings from the Printer” on page 31
User's Guide
Network Settings
36

E-5
Solutions:
Make sure the wireless router’s security type is set to one of the following. If it is not, change the security type onthe wireless router, and then reset the printer’s network settings.
❏ WEP-64 bit (40 bit)
❏ WEP-128 bit (104 bit)
❏ WPA PSK (TKIP/AES)*
❏ WPA2 PSK (TKIP/AES)*
❏ WPA (TKIP/AES)
❏ WPA2 (TKIP/AES)
* WPA PSK is also known as WPA Personal. WPA2 PSK is also known as WPA2 Personal.
E-6
Solutions:
❏ Check if MAC address filtering is disabled. If it is enabled, register the printer’s MAC address so that it is notfiltered. See the documentation provided with the wireless router for details. You can check the printer’s MACaddress from the Network Status part on the network connection report.
❏ If your wireless router is using shared authentication with WEP security, make sure the authentication key andindex are correct.
❏ If the number of connectable devices on the wireless router is less than the number of network devices that youwant to connect, make settings on the wireless router to increase the number of connectable devices. See thedocumentation provided with the wireless router to make settings.
Related Information
& “Connecting to a Computer” on page 21
E-8
Solutions:
❏ Enable DHCP on the wireless router if the printer’s Obtain IP Address setting is set to Auto.
❏ If the printer’s Obtain IP Address setting is set to Manual, the IP address you manually set is invalid due to outof range (for example: 0.0.0.0). Set a valid IP address from the printer’s control panel or by using Web Config.
Related Information
& “Printing a Network Status Sheet” on page 40
User's Guide
Network Settings
37

E-9
Solutions:
Check the following.
❏ Devices are turned on.
❏ You can access the Internet and other computers or network devices on the same network from the devices youwant to connect to the printer.
If still does not connect your printer and network devices after confirming the above, turn off the wireless router.Wait for about 10 seconds, and then turn it on. Then reset your network settings by downloading and running theinstaller from the following website.
http://epson.sn > Setup
Related Information
& “Connecting to a Computer” on page 21
E-10
Solutions:
Check the following.
❏ Other devices on the network are turned on.
❏ Network addresses (IP address, subnet mask, and default gateway) are correct if you have set the printer’sObtain IP Address to Manual.
Reset the network address if they are incorrect. You can check the IP address, subnet mask, and default gatewayfrom the Network Status part on the network connection report.
If DHCP is enabled, change the printer’s Obtain IP Address setting to Auto. If you want to set the IP addressmanually, check the printer’s IP address from the Network Status part on the network connection report, and thenselect Manual on the network settings screen. Set the subnet mask to [255.255.255.0].
If still does not connect your printer and network devices, turn off the wireless router. Wait for about 10 seconds,and then turn it on.
Related Information
& “Printing a Network Status Sheet” on page 40
E-11
Solutions:
Check the following.
❏ The default gateway address is correct if you set the printer’s TCP/IP Setup setting to Manual.
❏ The device that is set as the default gateway is turned on.
Set the correct default gateway address. You can check the default gateway address from the Network Status parton the network connection report.
User's Guide
Network Settings
38

Related Information
& “Printing a Network Status Sheet” on page 40
E-12
Solutions:
Check the following.
❏ Other devices on the network are turned on.
❏ The network addresses (IP address, subnet mask, and default gateway) are correct if you are entering themmanually.
❏ The network addresses for other devices (subnet mask and default gateway) are the same.
❏ The IP address does not conflict with other devices.
If still does not connect your printer and network devices after confirming the above, try the following.
❏ Turn off the wireless router. Wait for about 10 seconds, and then turn it on.
❏ Make network settings again using the installer. You can run it from the following website.http://epson.sn > Setup
❏ You can register several passwords on a wireless router that uses WEP security type. If several passwords areregistered, check if the first registered password is set on the printer.
Related Information
& “Printing a Network Status Sheet” on page 40& “Connecting to a Computer” on page 21
E-13
Solutions:
Check the following.
❏ Network devices such as a wireless router, hub, and router are turned on.
❏ The TCP/IP Setup for network devices has not been set up manually. (If the printer’s TCP/IP Setup is setautomatically while the TCP/IP Setup for other network devices is performed manually, the printer’s networkmay differ from the network for other devices.)
If it still does not work after checking the above, try the following.
❏ Turn off the wireless router. Wait for about 10 seconds, and then turn it on.
❏ Make network settings on the computer that is on the same network as the printer using the installer. You canrun it from the following website.http://epson.sn > Setup
❏ You can register several passwords on a wireless router that uses the WEP security type. If several passwords areregistered, check if the first registered password is set on the printer.
User's Guide
Network Settings
39

Related Information
& “Printing a Network Status Sheet” on page 40& “Connecting to a Computer” on page 21
Message on the Network Environment
Message Solution
The Wi-Fi environment needs to beimproved. Turn the wireless router off andthen turn it on. If the connection does notimprove, see the documentation for thewireless router.
After moving the printer closer to the wireless router and removing anyobstacles between them, turn off the wireless router. Wait for about 10seconds, and then turn it on. If it still does not connect, see thedocumentation supplied with the wireless router.
*No more devices can be connected.Disconnect one of the connected devices ifyou want to add another one.
Computer and smart devices that can be connected simultaneously areconnected in full in the Wi-Fi Direct (Simple AP) connection. To add anothercomputer or smart device, disconnect one of the connected devices orconnect it to the other network first.
You can confirm the number of wireless devices which can be connectedsimultaneously and the number of connected devices by checking thenetwork status sheet or the printer’s control panel.
The same SSID as Wi-Fi Direct exists in theenvironment. Change the Wi-Fi Direct SSIDif you cannot connect a smart device to theprinter.
On the printer’s control panel, go to Wi-Fi Direct Setup screen and select themenu to change the setting. You can change the network name followingafter DIRECT-XX-. Enter within 32 characters.
Printing a Network Status SheetYou can check the detailed network information by printing it.
1. Load papers.
2. Select Settings on the home screen.
To select an item, use the u d l r buttons, and then press the OK button.
3. Select Network Settings > Print Status Sheet.
4. Press the x button.
The network status sheet is printed.
Replacing or Adding New Wireless RoutersIf the SSID changes due to the replacement of a wireless router, or a wireless router is added and a new networkenvironment is established, re-set the Wi-Fi settings.
User's Guide
Network Settings
40

Related Information
& “Changing the Connection Method to a Computer” on page 41
Changing the Connection Method to a ComputerUsing the installer and re-set up in a different connection method.
❏ Setting up from the websiteAccess the following website, and then enter the product name. Go to Setup, and then start setting up.http://epson.sn
❏ Setting up using the software disc (only for the models that come with a software disc and users with Windowscomputers with disc drives.)Insert the software disc into the computer, and then follow the on-screen instructions.
Selecting Change the Connection Methods
Follow the on-screen instructions until the following screen is displayed.
Select Set up Printer connection again (for new network router or changing USB to network, etc.) on the InstallSoftware screen, and then click Next.
Changing the Wi-Fi Direct (Simple AP) SettingsWhen a Wi-Fi Direct (Simple AP) connection is enabled, you can change the Wi-Fi Direct settings such as thenetwork name and the password.
User's Guide
Network Settings
41

1. Select Wi-Fi Setup on the home screen.
To select an item, use the u d l r buttons, and then press the OK button.
2. Select Wi-Fi Direct.
3. Press the OK button to proceed.
4. Press the OK button to proceed.
5. Press the d button to display the setting screen.
6. Select the menu item that you want to change.
You can select the following menu items.
❏ Change Network NameChange the Wi-Fi Direct (simple AP) network name (SSID) used for connecting to the printer to yourarbitrary name. You can set the network name (SSID) in ASCII characters that is displayed on the softwarekeyboard on the control panel.When changing the network name (SSID), all connected devices are disconnected. Use the new networkname (SSID) if you want to re-connect the device.
❏ Change PasswordChange the Wi-Fi Direct (simple AP) password for connecting to the printer to your arbitrary value. Youcan set the password in ASCII characters that is displayed on the software keyboard on the control panel.When changing the password, all connected devices are disconnected. Use the new password if you want tore-connect the device.
❏ Disable Wi-Fi DirectDisable Wi-Fi Direct (simple AP) settings of the printer. When disabling it, all devices connected to theprinter in Wi-Fi Direct (Simple AP) connection are disconnected.
❏ Restore Default SettingsRestore all Wi-Fi Direct (simple AP) settings to their defaults.The Wi-Fi Direct (simple AP) connection information of the smart device saved to the printer is deleted.
7. Follow the on-screen instruction.
Disabling Wi-Fi from the Control PanelWhen Wi-Fi is disabled, the Wi-Fi connection is disconnected.
1. Select Wi-Fi Setup on the home screen.
To select an item, use the u d l r buttons, and then press the OK button.
2. Select Wi-Fi (Recommended).
3. Press the OK button to proceed.
4. Select Others.
5. Select Disable Wi-Fi.
User's Guide
Network Settings
42

6. Check the message, and then press the OK button.
Disconnecting Wi-Fi Direct (Simple AP) Connectionfrom the Control PanelThere are two methods available to disable a Wi-Fi Direct (Simple AP) connection; you can disable all connectionsby using the printer's control panel, or disable each connection from the computer or the smart device. Thissection explains how to disable all connections.
cImportant:
When Wi-Fi Direct (Simple AP) connection disabled, all computers and smart devices connected to the printer inWi-Fi Direct (Simple AP) connection are disconnected.
Note:If you want to disconnect a specific device, disconnect from the device instead of the printer. Use one of the followingmethods to disconnect the Wi-Fi Direct (Simple AP) connection from the device.
❏ Disconnect the Wi-Fi connection to the printer's network name (SSID).
❏ Connect to another network name (SSID).
1. Select Wi-Fi Setup on the home screen.
To select an item, use the u d l r buttons, and then press the OK button.
2. Select Wi-Fi Direct.
3. Press the OK button to proceed.
4. Press the OK button to proceed.
5. Press the d button to display the setting screen.
6. Select Disable Wi-Fi Direct.
7. Check the message, and then press the OK button.
Restoring the Network Settings from the ControlPanelYou can restore all network settings to their defaults.
1. Select Settings on the home screen.
To select an item, use the u d l r buttons, and then press the OK button.
2. Select Restore Default Settings > Network Settings.
3. Check the message, and then press the OK button.
User's Guide
Network Settings
43

Loading Paper
Paper Handling Precautions❏ Read the instruction sheets supplied with the paper.
❏ Fan and align the edges of the paper before loading. Do not fan or curl photo paper. Doing so may damage theprintable side.
❏ If the paper is curled, flatten it or curl it slightly in the opposite direction before loading. Printing on curledpaper may cause paper jams and smears on the printout.
❏ Do not use paper that is wavy, torn, cut, folded, damp, too thick, too thin, or paper that has stickers stuck to it.Using these types of paper causes paper jams and smears on the printout.
❏ Fan and align the edges of the envelopes before loading. When the stacked envelopes are puffed up with air,press them down to flatten them before loading.
❏ Do not use envelopes that are curled or folded. Using these envelopes causes paper jams and smears on theprintout.
❏ Do not use envelopes with adhesive surfaces on the flaps or window envelopes.
❏ Avoid using envelopes that are too thin, as they may curl during printing.
Related Information
& “Printer Specifications” on page 168
User's Guide
Loading Paper
44

Available Paper and CapacitiesNote:The paper size displayed differs depending on the driver.
Genuine Epson PaperEpson recommends using genuine Epson paper to ensure high-quality printouts.
Note:The availability of paper varies by location. For the latest information on paper available in your area, contact Epsonsupport.
Paper suitable for printing documents
Media Name Size Loading Capacity (Sheets)
Epson Bright White Ink Jet Paper A4 Up to the line indicated by the trianglesymbol on the edge guide.
Paper suitable for printing documents and photos
Media Name Size Loading Capacity (Sheets)
Epson Matte Paper-Heavyweight A4 20
Epson Photo Quality Ink Jet Paper A4 80
Paper suitable for printing photos
Media Name Size Loading Capacity(Sheets)
Epson Ultra Glossy Photo Paper A4, 13×18 cm (5×7 in.), 10×15 cm (4×6 in.) 20*
Epson Premium Glossy Photo Paper A4, 13×18 cm (5×7 in.), 10×15 cm (4×6 in.) 20*
Epson Premium Semigloss Photo Paper A4, 13×18 cm (5×7 in.), 10×15 cm (4×6 in.) 20*
Epson Photo Paper Glossy A4, 13×18 cm (5×7 in.), 10×15 cm (4×6 in.) 20*
* Load one sheet of paper at a time if the paper does not feed correctly or if the printout has uneven colors or smears.
Related Information
& “Paper for Borderless Printing” on page 46& “Paper for 2-Sided Printing” on page 47
User's Guide
Loading Paper
45

Commercially Available Paper
Plain papers
Media Name Size Loading Capacity (Sheets)
Plain paper
Copy paper
Letterhead*2
Letter, A4, B5, 16K (195×270 mm), A5, A6,B6
Up to the line indicated by the triangle symbolon the edge guide.*1
Legal, 8.5×13 in., Indian-Legal 1
User Defined (mm)
54×86 to 215.9×1200
1
*1 Load one sheet of paper at a time if the paper does not feed correctly or if the printout has uneven colors or smears.
*2 Paper on which information such as the sender's name or corporation name are pre-printed in the header. There must be amargin of 3 mm or more at the top of the paper. 2-sided printing and borderless printing are not available for letterheadpaper.
Envelopes
Media Name Size Loading Capacity (Envelopes)
Envelope Envelope #10, Envelope DL, Envelope C6 10
Related Information
& “Paper for Borderless Printing” on page 46& “Paper for 2-Sided Printing” on page 47
Paper for Borderless Printing
Genuine Epson Paper
❏ Epson Bright White Ink Jet Paper
❏ Epson Photo Quality Ink Jet Paper
❏ Epson Matte Paper-Heavyweight
❏ Epson Ultra Glossy Photo Paper
❏ Epson Premium Glossy Photo Paper
❏ Epson Premium Semigloss Photo Paper
❏ Epson Photo Paper Glossy
Commercially Available Paper
Plain paper, Copy paper (A4, Letter, User Defined*)* For borderless printing, 89×86 to 215.9×1200 mm size paper is available.
User's Guide
Loading Paper
46

Paper for 2-Sided Printing
Genuine Epson Paper
Epson Bright White Ink Jet Paper
Commercially Available Paper
Plain paper, Copy paper*
* For automatic 2-sided printing, you can use Letter, A4, B5, 16K, and User Defined (182 x 257 to 215.9 x 297 mm) paper sizes.
List of Paper TypeTo obtain optimum printing results, select the paper type that suits the paper.
Media Name Media Type
Control Panel Printer Driver
Epson Bright White Ink Jet Paper Plain paper Plain paper
Epson Ultra Glossy Photo Paper Ultra Glossy Epson Ultra Glossy
Epson Premium Glossy Photo Paper Prem. Glossy Epson Premium Glossy
Epson Premium Semigloss Photo Paper Prem. Semigloss Epson Premium Semigloss
Epson Photo Paper Glossy Glossy Photo Paper Glossy
Epson Matte Paper-Heavyweight Matte Epson Matte
Epson Photo Quality Ink Jet Paper Photo Quality Ink Jet Epson Photo Quality Ink Jet
Loading Paper in the Rear Paper Feed1. Open the feeder guard and pull out the paper support.
User's Guide
Loading Paper
47

2. Slide the edge guides.
3. Load paper at the center of the paper support with the printable side facing up.
cImportant:
❏ Do not load more than the maximum number of sheets specified for the paper. For plain paper, do not loadabove the line just under the d symbol inside the edge guide.
❏ Load paper short edge first. However, when you have set the long edge as the width of the user defined size,load paper long edge first.
❏ EnvelopeLoad envelopes with the flap on the left side.
❏ Long PapersWhen loading paper longer than legal size, store the paper support, and then flatten the leading edge of thepaper.
User's Guide
Loading Paper
48

❏ Pre-punched paper
Note:❏ Load a single sheet of defined size plain paper with binding holes at the left or right.
❏ Adjust the print position of your file to avoid printing over the holes.
❏ Automatic 2-sided printing is not available for pre-punched paper.
4. Slide the edge guides to the edges of the paper, and then close the feeder guard.
cImportant:
Do not place objects on the feeder guard. Doing so may prevent paper from feeding.
5. On the control panel, set the size and type of the paper you loaded in the rear paper feed.
To select an item, use the u d l r buttons, and then press the OK button.
Note:❏ You can also display the paper size and paper type settings screen by selecting Settings > Printer Setup > Paper
Source Settings > Paper Setup.
❏ For letterhead paper, select Letterhead as the paper type.
❏ For letterhead paper, if you print on paper that is smaller than the setting in the printer driver, the printer may printbeyond the edges of the paper which can lead to ink smears on your printouts and excess ink building up inside theprinter. Make sure you select the correct paper size setting.
❏ 2-sided printing and borderless printing are not available for letterhead paper. Also, the print speed may be slower.
User's Guide
Loading Paper
49

6. Slide out the output tray.
Note:Return the remaining paper to its package. If you leave it in the printer, the paper may curl or the print quality maydecline.
Related Information
& “Paper Handling Precautions” on page 44& “Available Paper and Capacities” on page 45
User's Guide
Loading Paper
50

Placing Originals
Placing Originals on the Scanner Glass
cImportant:
When placing bulky originals such as books, prevent exterior light from shining directly onto the scanner glass.
1. Open the document cover.
2. Remove any dust or stains on the surface of the scanner glass using a soft, dry, clean cloth.
Note:If there is any trash or dirt on the scanner glass, the scanning range may expand to include it, so the image of theoriginal may be displaced or reduced.
3. Place the original face-down and slide it to the corner mark.
Note:A range of 1.5 mm from the corner of the scanner glass is not scanned.
User's Guide
Placing Originals
51

4. Close the cover gently.
cImportant:
Do not apply too much force to the scanner glass or the document cover. Otherwise, they may be damaged.
5. Remove the originals after scanning.
Note:If you leave the originals on the scanner glass for a long time, they may stick to the surface of the glass.
How to Place Various Originals
Placing Originals for 2-Up Layout
User's Guide
Placing Originals
52

Placing a Double-Page Spread for 2-Up Layout
Placing an ID Card for Copying
Place an ID card 5 mm away from the corner mark of the scanner glass.
Placing Multiple Photos for Scanning at the Same Time
You can scan multiple photos at the same time and save each image, using Photo Mode in Epson Scan 2. Place thephotos 4.5 mm away from the horizontal and vertical edges of the scanner glass, and place them at least 20 mmapart from each other. The photos should be larger than 15×15 mm.
User's Guide
Placing Originals
53

Note:Enable the Thumbnail check box at the top of the preview window.
User's Guide
Placing Originals
54

Printing
Printing from the Control Panel
Printing Lined Paper and CalendarsYou can easily print lined paper and calendars using the Personal Stationery menu.
1. Load paper in the printer.
2. Select Personal Stationery on the home screen.
To select an item, use the u d l r buttons, and then press the OK button.
3. Select a menu item.
4. Follow the on-screen instructions to print.
Related Information
& “Loading Paper in the Rear Paper Feed” on page 47& “List of Paper Type” on page 47
Printing from a Computer
Printing Basics - WindowsNote:❏ See the online help for explanations of the setting items. Right-click an item, and then click Help.
❏ Operations differ depending on the application. See the application's help for details.
User's Guide
Printing
55

1. Load paper in the printer.
2. Open the file you want to print.
3. Select Print or Print Setup from the File menu.
4. Select your printer.
5. Select Preferences or Properties to access the printer driver window.
6. Make the following settings.
❏ Document Size: Select the paper size you loaded in the printer.
❏ Borderless: Select to print with no margins around the image.In borderless printing, the print data is enlarged slightly more than the paper size so that no margins areprinted around the edges of the paper. Click Settings to select the amount of enlargement.
❏ Orientation: Select the orientation you set in the application.
❏ Paper Type: Select the type of paper you loaded.
❏ Quality: Select the print quality.Selecting High provides higher quality printing, but the printing speed may be slower.
❏ Color: Select Grayscale when you want to print in black or shades of gray.
Note:When printing on envelopes, select Landscape as the Orientation setting.
7. Click OK to close the printer driver window.
8. Click Print.
Related Information
& “Available Paper and Capacities” on page 45
User's Guide
Printing
56

& “Loading Paper in the Rear Paper Feed” on page 47& “Guide to Windows Printer Driver” on page 128& “List of Paper Type” on page 47
Printing Basics - Mac OSNote:Explanations in the section use TextEdit as an example. Operations and screens differ depending on the application. See theapplication's help for details.
1. Load paper in the printer.
2. Open the file you want to print.
3. Select Print from the File menu or another command to access the print dialog.
If necessary, click Show Details or d to expand the print window.
4. Make the following settings.
❏ Printer: Select your printer.
❏ Presets: Select when you want to use the registered settings.
❏ Paper Size: Select the paper size you loaded in the printer.When printing with no margins, select a "borderless" paper size.
❏ Orientation: Select the orientation you set in the application.
Note:❏ If the above setting menus are not displayed, close the print window, select Page Setup from the File menu, and then
make settings.
❏ When printing on envelopes, select landscape orientation.
User's Guide
Printing
57

5. Select Print Settings from the pop-up menu.
Note:On OS X Mountain Lion or later, if the Print Settings menu is not displayed, the Epson printer driver has not beeninstalled correctly.
Select System Preferences from the menu > Printers & Scanners (or Print & Scan, Print & Fax), remove theprinter, and then add the printer again. See the following to add a printer.
http://epson.sn
6. Make the following settings.
❏ Media Type: Select the type of paper you loaded.
❏ Print Quality: Select the print quality.Selecting Fine provides higher quality printing, but the printing speed may be slower.
❏ Expansion: Available when selecting a borderless paper size.In borderless printing, the print data is enlarged slightly more than the paper size so that no margins areprinted around the edges of the paper. Select the amount of enlargement.
❏ Grayscale: Select to print in black or shades of gray.
7. Click Print.
Related Information
& “Available Paper and Capacities” on page 45& “Loading Paper in the Rear Paper Feed” on page 47
User's Guide
Printing
58

& “Guide to Mac OS Printer Driver” on page 131& “List of Paper Type” on page 47
Printing on 2-SidesYou can use either of the following methods to print on both sides of the paper.
❏ Automatic 2-sided printing
❏ Manual 2-sided printing (for Windows only)When the printer has finished printing the first side, flip the paper over to print on the other side.
You can also print a booklet that can be created by folding the printout. (For Windows only)
Note:❏ This feature is not available for borderless printing.
❏ If you do not use paper that is suitable for 2-sided printing, the print quality may decline and paper jams may occur.
❏ Depending on the paper and the data, ink may bleed through to the other side of the paper.
Related Information
& “Available Paper and Capacities” on page 45
Printing on 2-Sides - Windows
Note:❏ Manual 2-sided printing is available when EPSON Status Monitor 3 is enabled. If EPSON Status Monitor 3 is disabled,
access the printer driver, click Extended Settings on the Maintenance tab, and then select Enable EPSON StatusMonitor 3.
❏ Manual 2-sided printing may not be available when the printer is accessed over a network or is used as a shared printer.
1. Load paper in the printer.
2. Open the file you want to print.
3. Access the printer driver window.
User's Guide
Printing
59

4. Select Auto (Long-edge binding), Auto (Short-edge binding), Manual (Long-edge binding), or Manual(Short-edge binding) from 2-Sided Printing on the Main tab.
5. Click Settings, make the appropriate settings, and then click OK.
Note:To print a folded booklet, select Booklet.
6. Click Print Density, select the document type from Select Document Type, and then click OK.
The printer driver automatically sets the Adjustments options for that document type.
Note:❏ Printing may be slow depending on the combination of options selected for Select Document Type in the Print
Density Adjustment window and for Quality on the Main tab.
❏ For manual 2-sided printing, the Print Density Adjustment setting is not available.
7. Set the other items on the Main and More Options tabs as necessary, and then click OK.
8. Click Print.
For manual 2-sided printing, when the first side has finished printing, a pop-up window is displayed on thecomputer. Follow the on-screen instructions.
Related Information
& “Loading Paper in the Rear Paper Feed” on page 47& “Printing Basics - Windows” on page 55
Printing on 2-Sides - Mac OS
1. Load paper in the printer.
2. Open the file you want to print.
3. Access the print dialog.
4. Select Two-sided Printing Settings from the pop-up menu.
5. Select the bindings in Two-sided Printing.
6. Select the type of original in Document Type.
Note:❏ Printing may be slow depending on the Document Type setting.
❏ If you are printing high-density data such as photos or graphs, select Text with Photo or Photo as the DocumentType setting. If scuffing occurs or the image bleeds through to the reverse side, adjust the print density and ink dryingtime by clicking the arrow mark next to Adjustments.
7. Set the other items as necessary.
8. Click Print.
User's Guide
Printing
60

Related Information
& “Loading Paper in the Rear Paper Feed” on page 47& “Printing Basics - Mac OS” on page 57
Printing Several Pages on One SheetYou can print two or four pages of data on a single sheet of paper.
Printing Several Pages on One Sheet - Windows
Note:This feature is not available for borderless printing.
1. Load paper in the printer.
2. Open the file you want to print.
3. Access the printer driver window.
4. Select 2-Up or 4-Up as the Multi-Page setting on the Main tab.
5. Click Page Order, make the appropriate settings, and then click OK to close the window.
6. Set the other items on the Main and More Options tabs as necessary, and then click OK.
7. Click Print.
Related Information
& “Loading Paper in the Rear Paper Feed” on page 47& “Printing Basics - Windows” on page 55
User's Guide
Printing
61

Printing Several Pages on One Sheet - Mac OS
1. Load paper in the printer.
2. Open the file you want to print.
3. Access the print dialog.
4. Select Layout from the pop-up menu.
5. Set the number of pages in Pages per Sheet, the Layout Direction (page order), and Border.
6. Set the other items as necessary.
7. Click Print.
Related Information
& “Loading Paper in the Rear Paper Feed” on page 47& “Printing Basics - Mac OS” on page 57
Printing to Fit the Paper SizeYou can print to fit the paper size you loaded in the printer.
Printing to Fit the Paper Size - Windows
Note:This feature is not available for borderless printing.
1. Load paper in the printer.
2. Open the file you want to print.
3. Access the printer driver window.
4. Make the following settings on the More Options tab.
❏ Document Size: Select the paper size you set in the application.
User's Guide
Printing
62

❏ Output Paper: Select the paper size you loaded in the printer.Fit to Page is selected automatically.
Note:If you want to print a reduced image at the center of the page, select Center.
5. Set the other items on the Main and More Options tabs as necessary, and then click OK.
6. Click Print.
Related Information
& “Loading Paper in the Rear Paper Feed” on page 47& “Printing Basics - Windows” on page 55
Printing to Fit the Paper Size - Mac OS
1. Load paper in the printer.
2. Open the file you want to print.
3. Access the print dialog.
4. Select the size of the paper you set in the application as the Paper Size setting.
5. Select Paper Handling from the pop-up menu.
6. Select Scale to fit paper size.
7. Select the paper size you loaded in the printer as the Destination Paper Size setting.
8. Set the other items as necessary.
9. Click Print.
Related Information
& “Loading Paper in the Rear Paper Feed” on page 47& “Printing Basics - Mac OS” on page 57
User's Guide
Printing
63

Printing Multiple Files Together (for Windows Only)Job Arranger Lite allows you to combine several files created by different applications and print them as a singleprint job. You can specify the print settings for combined files, such as layout, print order, and orientation.
1. Load paper in the printer.
2. Open the file you want to print.
3. Access the printer driver window.
4. Select Job Arranger Lite on the Main tab.
5. Click OK to close the printer driver window.
6. Click Print.
The Job Arranger Lite window is displayed and the print job is added to the Print Project.
7. With the Job Arranger Lite window opened, open the file that you want to combine with the current file, andthen repeat steps 3 to 6.
Note:❏ If you close the Job Arranger Lite window, the unsaved Print Project is deleted. To print later, select Save from the
File menu.
❏ To open a Print Project saved in Job Arranger Lite, click Job Arranger Lite on the printer driver's Maintenancetab. Next, select Open from the File menu to select the file. The extension of the saved files is "ecl".
8. Select the Layout and Edit menus in Job Arranger Lite to edit the Print Project as necessary. See the help ofJob Arranger Lite for details.
9. Select Print from the File menu.
Related Information
& “Loading Paper in the Rear Paper Feed” on page 47& “Printing Basics - Windows” on page 55
User's Guide
Printing
64

Printing One Image on Multiple Sheets to Create a Poster (forWindows Only)This feature allows you to print one image on multiple sheets of paper. You can create a larger poster by tapingthem together.
Note:This feature is not available for borderless printing.
1. Load paper in the printer.
2. Open the file you want to print.
3. Access the printer driver window.
4. Select 2x1 Poster, 2x2 Poster, 3x3 Poster, or 4x4 Poster from Multi-Page on the Main tab.
5. Click Settings, make the appropriate settings, and then click OK.
Note:Print Cutting Guides allows you to print a cutting guide.
6. Set the other items on the Main and More Options tabs as necessary, and then click OK.
7. Click Print.
Related Information
& “Loading Paper in the Rear Paper Feed” on page 47& “Printing Basics - Windows” on page 55
User's Guide
Printing
65

Making Posters Using Overlapping Alignment Marks
Here is an example of how to make a poster when 2x2 Poster is selected, and Overlapping Alignment Marks isselected in Print Cutting Guides.
1. Prepare Sheet 1 and Sheet 2. Cut off the margins of Sheet 1 along the vertical blue line through the center ofthe top and bottom cross marks.
User's Guide
Printing
66

2. Place the edge of Sheet 1 on top of Sheet 2 and align the cross marks, then temporarily tape the two sheetstogether from the back.
3. Cut the taped sheets in two along the vertical red line through the alignment markers (this time, the line to theleft of the cross marks).
User's Guide
Printing
67

4. Tape the sheets together from the back.
5. Repeat steps 1 to 4 to tape Sheet 3 and Sheet 4 together.
6. Cut off the margins of Sheet 1 and Sheet 2 along the horizontal blue line through the center of the left and rightside cross marks.
User's Guide
Printing
68

7. Place the edge of Sheet 1 and Sheet 2 on top of Sheet 3 and Sheet 4 and align the cross marks, and thentemporarily tape them together from the back.
User's Guide
Printing
69

8. Cut the taped sheets in two along the horizontal red line through the alignment markers (this time, the lineabove the cross marks).
9. Tape the sheets together from the back.
User's Guide
Printing
70

10. Cut off the remaining margins along the outer guide.
Printing Using Advanced FeaturesThis section introduces a variety of additional layout and printing features available on the printer driver.
Related Information
& “Windows Printer Driver” on page 127& “Mac OS Printer Driver” on page 130
Adding a Printing Preset to Print Easily
If you create your own preset of frequently used print settings on the printer driver, you can print easily byselecting the preset from the list.
User's Guide
Printing
71

Windows
To add your own preset, set items such as the Document Size and Paper Type on the Main or More Options tab,and then click Add/Remove Presets in Printing Presets.
Note:To delete an added preset, click Add/Remove Presets, select the preset name you want to delete from the list, and then deleteit.
Mac OS
Access the print dialog. To add your own preset, set items such as the Paper Size and Media Type, and then savethe current settings as the preset in the Presets setting.
Note:To delete an added preset, click Presets > Show Presets, select the preset name you want to delete from the list, and thendelete it.
Printing a Reduced or Enlarged Document
You can reduce or enlarge the size of a document by a specific percentage.
Windows
Note:This feature is not available for borderless printing.
Set the Document Size on the More Options tab. Select Reduce/Enlarge Document, Zoom to, and then enter apercentage.
Mac OS
Note:Operations differ depending on the application. See the application's help for details.
Select Page Setup (or Print) from the File menu. Select the printer from Format For, select the paper size, andthen enter a percentage in Scale. Close the window, and then print following the basic printing instructions.
Adjusting the Print Color
You can adjust the colors used in the print job. These adjustments are not applied to the original data.
PhotoEnhance produces sharper images and more vivid colors by automatically adjusting the contrast, saturation,and brightness of the original image data.
Note:PhotoEnhance adjusts the color by analyzing the location of the subject. Therefore, if you have changed the location of thesubject by reducing, enlarging, cropping, or rotating the image, the color may change unexpectedly. Selecting the borderlesssetting also changes the location of the subject resulting in changes in color. If the image is out of focus, the tone may beunnatural. If the color is changed or becomes unnatural, print in a mode other than PhotoEnhance.
Windows
Select the method of color correction from Color Correction on the More Options tab.
If you select Automatic, the colors are automatically adjusted to match the paper type and print quality settings. Ifyou select Custom and click Advanced, you can make your own settings.
User's Guide
Printing
72

Mac OS
Access the print dialog. Select Color Matching from the pop-up menu, and then select EPSON Color Controls.Select Color Options from the pop-up menu, and then select one of the available options. Click the arrow next toAdvanced Settings and make the appropriate settings.
Printing a Watermark (for Windows Only)
You can print a watermark such as "Confidential" on your printouts. You can also add your own watermark.
Note:This feature is not available with borderless printing.
Click Watermark Features on the More Options tab, and then select a watermark. Click Settings to change detailssuch as the density and position of the watermark.
Printing a Header and Footer (for Windows Only)
You can print information such as a user name and printing date as headers or footers.
Click Watermark Features in the More Options tab, and then select Header/Footer. Click Settings and selectnecessary items from the drop-down list.
Printing Clear Bar Codes (for Windows Only)
You can print a bar code clearly and make it easy to scan. Only enable this feature if the bar code you printedcannot be scanned.
You can use this feature under the following conditions.
❏ Paper: Plain paper, Copy paper, Letterhead, or Envelope
❏ Quality: StandardThe print quality may be changed when printing. The print speed may become slower and print density maybecome higher.
User's Guide
Printing
73

Note:Deblurring may not always be possible depending on the circumstances.
On the printer driver's Maintenance tab, click Extended Settings, and then select Barcode mode.
Printing from Smart Devices
Using Epson iPrintEpson iPrint is an application that allows you to print photos, documents, and web pages from a smart device suchas a smartphone or tablet. You can use local print, printing from a smart device that is connected to the samewireless network as your printer, or remote print, printing from a remote location over the Internet. To use remoteprint, register your printer in the Epson Connect service.
If you start Epson iPrint when the printer is not connected to the network, a message is displayed instructing youto connect to the printer. Follow the instructions to complete the connection. See the URL below for the operatingconditions.
http://epson.sn
Related Information
& “Epson Connect Service” on page 125
Installing Epson iPrint
You can install Epson iPrint on your smart device from the following URL or QR code.
http://ipr.to/a
Printing Using Epson iPrint
Start Epson iPrint from your smart device and select the item you want to use from the home screen.
User's Guide
Printing
74

The following screens are subject to change without notice. The contents may vary depending on the product.
A Home screen displayed when the application is started.
B Displays information on how to setup the printer and a FAQ.
C Displays the screen where you can select the printer and make printer settings. Once you have selected theprinter, you do not need to select it again from the next time.
D Select what you want to print such as photos and documents.
E The print photos screen displayed when the photo menu is selected.
F Displays the screen to make print settings such as paper size and paper type.
G Displays the paper size. When this is displayed as a button, tap it to display the paper settings currently seton the printer.
H Displays photos and documents you selected.
I Starts printing.
Note:To print from the document menu using iPhone, iPad, and iPod touch running iOS, start Epson iPrint after transferring thedocument you want to print using the file sharing function in iTunes.
Using Epson Print EnablerYou can wirelessly print your documents, emails, photos, and web pages right from your Android phone or tablet(Android v4.4 or later). With a few taps, your Android device will discover an Epson printer that is connected tothe same wireless network.
Note:Operations may differ depending on the device.
1. Load paper in the printer.
User's Guide
Printing
75

2. Set up your printer for wireless printing.
3. On your Android device, install the Epson Print Enabler plug-in from Google Play.
4. Connect your Android device to the same wireless network as your printer.
5. Go to Settings on your Android device, select Connected devices > Printing, and then enable Epson PrintEnabler.
6. From an Android application such as Chrome, tap the menu icon and print whatever is on the screen.
Note:If you do not see your printer, tap All Printers and select your printer.
Using AirPrintAirPrint enables instant wireless printing from iPhone, iPad, and iPod touch with the latest version of iOS, andMac with the latest version of OS X or macOS.
Note:If you disabled paper configuration messages on your product control panel, you cannot use AirPrint. See the link below toenable the messages, if necessary.
1. Load paper in your product.
2. Set up your product for wireless printing. See the link below.
http://epson.sn
3. Connect your Apple device to the same wireless network that your product is using.
4. Print from your device to your product.
Note:For details, see the AirPrint page on the Apple website.
Related Information
& “Menu Options for Printer Setup” on page 120
User's Guide
Printing
76

Canceling PrintingNote:❏ In Windows, you cannot cancel a print job from the computer once it has been completely sent to the printer. In this case,
cancel the print job by using the printer's control panel.
❏ When printing several pages from Mac OS, you cannot cancel all of the jobs by using the control panel. In this case, cancelthe print job from the computer.
❏ If you have sent a print job from Mac OS X v10.6.8 through the network, you may not be able to cancel printing from thecomputer. In this case, cancel the print job by using the printer's control panel.
Canceling Printing - Control Panel
Press the y button on the printer's control panel to cancel the print job in progress.
Canceling Printing - Windows
1. Access the printer driver window.
2. Select the Maintenance tab.
3. Click Print Queue.
4. Right-click on the job you want to cancel and then select Cancel.
Related Information
& “Windows Printer Driver” on page 127
Canceling Printing - Mac OS
1. Click the printer icon in the Dock.
2. Select the job you want to cancel.
3. Cancel the job.
❏ OS X Mountain Lion or later
Click next to the progress meter.
❏ Mac OS X v10.6.8 to v10.7.xClick Delete.
User's Guide
Printing
77

Copying
Copying Basics1. Load paper in the printer.
2. Place the originals.
3. Enter Copy from the home screen using the l or r button, and then press the OK button.
4. Set the number of copies using the u or d button.
5. Select color copy or monochrome copy using the l or r button, and then press the OK button.
6. Select Print Settings using the l or r button, and then press the OK button. To change the settings, press thed button, select the setting items using the u or d button, and then change the settings using the l or rbutton. When you have finished, press the OK button.
Note:If you want to copy by reducing or enlarging the size of a document by a specific percentage, select Custom Size as theReduce/Enlarge setting, press the d button, and then press the l or r button to specify a percentage. You can changethe percentage in increments of 10% by holding down the l or r button.
7. Press the x button.
Note:The color, size, and border of the copied image are slightly different from the original.
Related Information
& “Loading Paper” on page 44& “Placing Originals” on page 51& “Menu Options for Copying” on page 79
Copying in Various LayoutYou can copy easily by selecting a menu for your purpose such as copying two facing pages of a book onto a singlesheet of paper.
1. Load paper in the printer.
2. Enter Copy from the home screen using the l or r button, and then press the OK button.
3. Press the OK button to proceed to copy menu.
User's Guide
Copying
78

4. Select a copy menu using the l or r button, and then press the OK button.
❏ ID Card CopyScans both sides of an ID card and copies onto one side of A4 size paper.
❏ Book copyCopies two A4 facing pages of a book and so on onto a single sheet of paper.
❏ Borderless CopyCopies without margins around the edges. The image is enlarged a little to remove margins from the edgesof the paper.
5. Place the originals.
For Book copy, you still need not place the original. Skip this procedure.
6. Set the number of copies using the u or d button.
7. Select color copy or monochrome copy using the l or r button, and then press the OK button.
8. Check the copy settings.
To change the settings, press the d button, select the setting items using the u or d button, and then changethe settings using the l or r button. When you have finished, press the OK button.
Note:Available items vary depending on the copy menu.
9. Press the x button.
Note:The color, size, and border of the copied image are slightly different from the original.
10. For Book copy, follow the on-screen instructions to copy the page of the originals.
Menu Options for CopyingNote:Available menus vary depending on the layout you selected.
The number of copies:
Enter the number of copies.
Color:
Copies the original in color.
B&W:
Copies the original in black and white (monochrome).
2-Sided:
❏ 1→1-SidedCopies one side of an original onto a single side of paper.
User's Guide
Copying
79
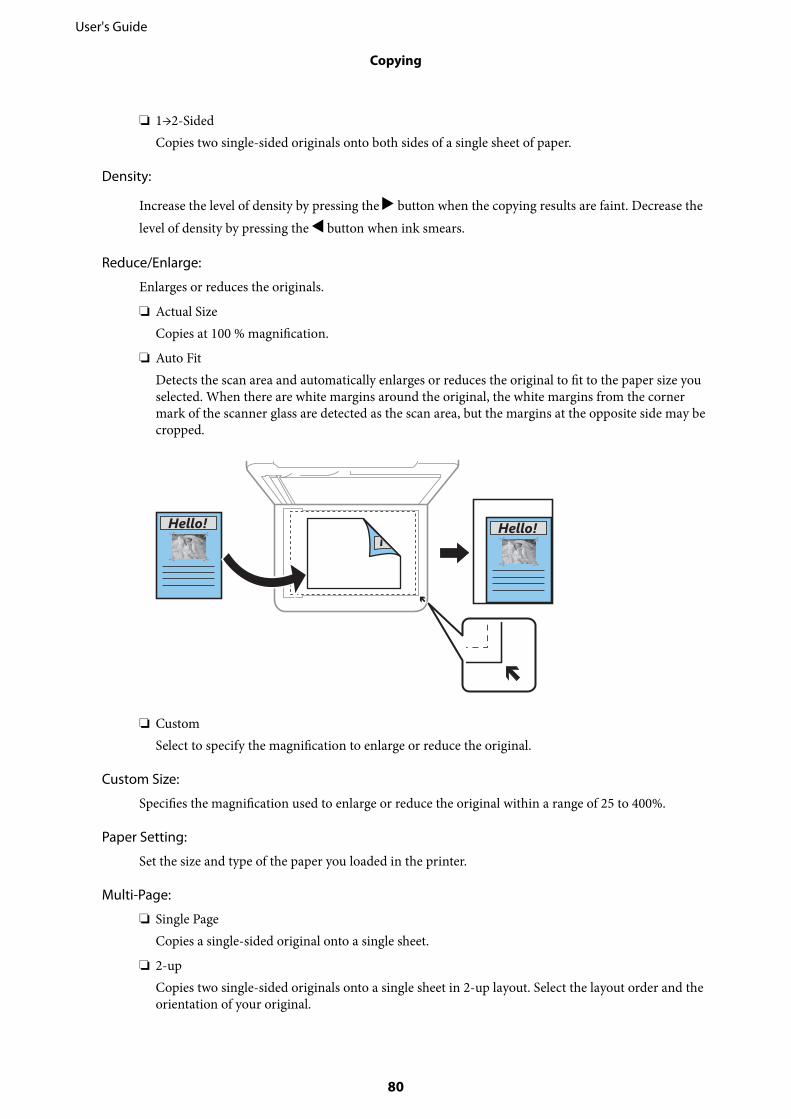
❏ 1→2-SidedCopies two single-sided originals onto both sides of a single sheet of paper.
Density:
Increase the level of density by pressing the r button when the copying results are faint. Decrease thelevel of density by pressing the l button when ink smears.
Reduce/Enlarge:
Enlarges or reduces the originals.
❏ Actual SizeCopies at 100 % magnification.
❏ Auto FitDetects the scan area and automatically enlarges or reduces the original to fit to the paper size youselected. When there are white margins around the original, the white margins from the cornermark of the scanner glass are detected as the scan area, but the margins at the opposite side may becropped.
❏ CustomSelect to specify the magnification to enlarge or reduce the original.
Custom Size:
Specifies the magnification used to enlarge or reduce the original within a range of 25 to 400%.
Paper Setting:
Set the size and type of the paper you loaded in the printer.
Multi-Page:
❏ Single PageCopies a single-sided original onto a single sheet.
❏ 2-upCopies two single-sided originals onto a single sheet in 2-up layout. Select the layout order and theorientation of your original.
User's Guide
Copying
80

Quality:
Select the print quality. Selecting Best provides higher quality printing, but the printing speed may beslower.
For users in Western Europe, the draft mode is not available.
Expansion:
With borderless copying, the image is enlarged a little to remove borders from the edges of the paper.Select how much to enlarge the image.
User's Guide
Copying
81

Scanning
Scanning Using the Control Panel
Scanning to a ComputerYou can save the scanned image to a computer.
cImportant:
Make sure you have installed Epson Scan 2 and Epson Event Manager on your computer before using this feature.
1. Place the originals.
2. Enter Scan from the home screen using the l or r button, and then press the OK button.
3. Select how to save the scanned image to a computer from the following menus using the l or r button, andthen press the OK button.
❏ To Computer (JPEG): Saves the scanned image in JPEG format.
❏ To Computer (PDF): Saves the scanned image in PDF format.
❏ To Computer (Email): Starts the email client on your computer, and then automatically attaches it to anemail.
❏ To Computer (Custom): Saves the scanned image using the settings on the Epson Event Manager. You canchange the scan settings such as the scanning size, folder to save to, or save format.
4. Select the computer to which you want to save the scanned images.
Note:❏ You can change the scan settings such as the scanning size, folder to save, or save format, by using Epson Event
Manager.
❏ When the printer is connected to a network, you can select the computer to which you want to save the scannedimage. Up to 20 computers can be displayed on the printer's control panel.
❏ When the computer to which you want to save the scanned images is detected on the network, the initial 15characters of the computer name are displayed on the control panel. If you set Network Scan Name(Alphanumeric) on Epson Event Manager, it is displayed on the control panel.
5. Press the x button.
Note:The color, size, and border of the scanned image will not be exactly the same as the original.
Related Information
& “Placing Originals” on page 51
User's Guide
Scanning
82

Making Custom Settings in Epson Event Manager
You can set the scan settings for To Computer (Custom) in Epson Event Manager.
See the Epson Event Manager help for details.
1. Start Epson Event Manager.
2. Make sure that your scanner is selected as the Scanner on the Button Settings tab on the main screen.
User's Guide
Scanning
83

3. Click Make Job Settings.
User's Guide
Scanning
84

4. Make scan settings on the Job Settings screen.
❏ Edit Job Settings: Select Custom Action.
❏ Setting: Scan using the best settings for the selected type of original. Click Detailed Settings for Scanningto set the items such as the resolution or the color for saving the scanned image.
❏ Target Folder: Select the save folder for the scanned image.
❏ Filename (Prefix + Start Number): Change the settings for the file name you want to save.
❏ File Format: Select the save format.
❏ Launch Action: Select the action when scanning.
❏ Test Settings: Starts test scanning using current settings.
5. Click OK to return to the main screen.
User's Guide
Scanning
85

6. Make sure that the Custom Action is selected on the Custom Action list.
7. Click Close to close Epson Event Manager.
Scanning Using WSDNote:❏ This feature is only available for computers running English version of Windows 10/Windows 8.1/Windows 8/Windows 7/
Windows Vista.
❏ If you are using Windows 7/Windows Vista, you need to setup your computer in advance using this feature.
1. Place the originals.
2. Enter Scan from the home screen using the l or r button, and then press the OK button.
3. Select To WSD using the l or r button, and then press the OK button.
4. Select a computer.
5. Press the x button.
Note:The color, size, and border of the scanned image will not be exactly the same as the original.
Related Information
& “Placing Originals” on page 51
User's Guide
Scanning
86

Setting Up a WSD Port
This section explains how to set up a WSD port for Windows 7/Windows Vista.
Note:For Windows 10/Windows 8.1/Windows 8, the WSD port is set up automatically.
The following is necessary to set up a WSD port.
❏ The printer and the computer are connected to the network.
❏ The printer driver is installed on the computer.
1. Turn the printer on.
2. Click start, and then click Network on the computer.
3. Right-click the printer, and then click Install.
Click Continue when the User Account Control screen is displayed.
Click Uninstall and start again if the Uninstall screen is displayed.
Note:The printer name you set on the network and model name (EPSON XXXXXX (XX-XXXX)) are displayed on thenetwork screen. You can check the printer's name set on the network from the printer's control panel or by printing anetwork status sheet.
User's Guide
Scanning
87

4. Click Your device is ready to use.
5. Check the message, and then click Close.
6. Open the Devices and Printers screen.
❏ Windows 7Click start > Control Panel > Hardware and Sound (or Hardware) > Devices and Printers.
❏ Windows VistaClick start > Control Panel > Hardware and Sound > Printers.
7. Check that an icon with the printer's name on the network is displayed.
Select the printer name when using with WSD.
Scanning from a Computer
Scanning Using Epson Scan 2You can scan by using the scanner driver "Epson Scan 2". See the Epson Scan 2 help for an explanation of eachsetting item.
Related Information
& “Application for Scanning Documents and Images (Epson Scan 2)” on page 133
Scanning Documents (Document Mode)
Using Document Mode in Epson Scan 2, you can scan originals using detailed settings that are suitable for textdocuments.
User's Guide
Scanning
88

1. Place the originals.
2. Start Epson Scan 2.
3. Select Document Mode from the Mode list.
4. Make the following settings on the Main Settings tab.
❏ Document Size: Select the size of the original you placed.
❏ / (Original orientation) buttons: Select the set orientation of the original you placed.Depending on the size of the original, this item may be set automatically and cannot be changed.
❏ Image Type: Select the color for saving the scanned image.
❏ Resolution: Select the resolution.
Note:❏ The Document Source setting is fixed as Scanner Glass. You cannot change this setting.
❏ If you set Add or edit pages after scanning, you can scan additional originals after scanning the original. Inaddition, if you set the Image Format as PDF or Multi-TIFF, you can save the scanned images as one file.
5. Make other scan settings if necessary.
❏ You can preview the scanned image by clicking the Preview button. The preview window opens, and thepreviewed image is displayed.
User's Guide
Scanning
89

❏ On the Advanced Settings tab, you can make detailed image adjustment settings that are suitable for textdocuments, such as the following.
❏ Remove Background: Remove the background of the originals.
❏ Text Enhancement: You can make blurred letters in the original clear and sharp.
❏ Auto Area Segmentation: You can make letters clear and images smooth when performing black andwhite scanning for a document that contains images.
❏ Color Enhance: You can enhance the color specified for the scanned image, and then save it in grayscaleor black and white.
❏ Brightness: You can adjust the brightness for the scanned image.
❏ Contrast: You can adjust the contrast for the scanned image.
❏ Gamma: You can adjust the gamma (brightness of the intermediate range) for the scanned image.
❏ Threshold: You can adjust the border for monochrome binary (black and white).
❏ Unsharp Mask: You can enhance and sharpen the outlines of the image.
❏ Descreening: You can remove moiré patterns (web-like shadows) that appear when scanning printedpapers such as a magazine.
❏ Edge Fill: You can remove the shadow created around the scanned image.
❏ Dual Image Output (Windows Only): You can scan once and save two images with different outputsettings at the same time.
Note:The items may not be available depending on other settings you made.
User's Guide
Scanning
90

6. Set the file saving settings.
❏ Image Format: Select the save format from the list.You can make detailed settings for each save format except BITMAP and PNG. Select Options from the listafter selecting the save format.
❏ File Name: Confirm the save file name displayed.You can change settings for the file name by selecting Settings from the list.
❏ Folder: Select the save folder for the scanned image from the list.You can select another folder or create a new folder by selecting Select from the list.
7. Click Scan.
Related Information
& “Placing Originals” on page 51
Scanning Photos or Pictures (Photo Mode)
Using Photo Mode in Epson Scan 2, you can scan originals with wide variety of image adjustment features that aresuitable for photos or pictures.
1. Place the originals.
By placing multiple originals on the scanner glass, you can scan them all at the same time. Make sure there is agap of at least 20 mm between the originals.
User's Guide
Scanning
91

2. Start Epson Scan 2.
3. Select Photo Mode from the Mode list.
4. Make the following settings on the Main Settings tab.
❏ Image Type: Select the color for saving the scanned image.
❏ Resolution: Select the resolution.
Note:The Document Source setting is fixed as Scanner Glass, and the Document Type setting is fixed as Reflective.(Reflective means originals which are not transparent, for example ordinary papers or photos.) You cannot change thesesettings.
User's Guide
Scanning
92

5. Click Preview.
The preview window opens, and the previewed images are displayed as thumbnails.
Note:To preview the entire scanned area, clear the Thumbnail check box at the top of the preview widow.
6. Confirm the preview, and make image adjustment settings on the Advanced Settings tab if necessary.
User's Guide
Scanning
93

You can adjust the scanned image using detailed settings that are suitable for photos or pictures, such as thefollowing.
❏ Brightness: You can adjust the brightness for the scanned image.
❏ Contrast: You can adjust the contrast for the scanned image.
❏ Saturation: You can adjust the saturation (color vividness) for the scanned image.
❏ Unsharp Mask: You can enhance and sharpen the outlines of the scanned image.
❏ Color Restoration: You can correct images that have faded to return them to their original colors.
❏ Backlight Correction: You can lighten scanned images that are dark due to backlight.
❏ Descreening: You can remove moiré patterns (web-like shadows) that appear when scanning printed paperssuch as a magazine.
❏ Dust Removal: You can remove dust on the scanned image.
Note:❏ The items may not be available depending on other settings you made.
❏ Depending on the original, the scanned image may not be adjusted correctly.
❏ When multiple thumbnails are created, you can adjust the image quality for each thumbnail. Depending on theadjustment items, you can adjust the quality of scanned images all together by selecting multiple thumbnails.
7. Set the file saving settings.
❏ Image Format: Select the save format from the list.You can make detailed settings for each save format except BITMAP and PNG. Select Options from the listafter selecting the save format.
❏ File Name: Confirm the save file name displayed.You can change settings for the file name by selecting Settings from the list.
User's Guide
Scanning
94

❏ Folder: Select the save folder for the scanned image from the list.You can select another folder or create a new folder by selecting Select from the list.
8. Click Scan.
Related Information
& “Placing Originals” on page 51
Scanning from Smart DevicesEpson iPrint is an application that allows you to scan photos and documents from a smart device, such as asmartphone or tablet, that is connected to the same wireless network as your printer. You can save the scanneddata on a smart device or to Cloud services, send it by email, or print it.
If you start Epson iPrint when the printer is not connected to the network, a message is displayed instructing youto connect to the printer. Follow the instructions to complete the connection. See the URL below for the operatingconditions.
http://epson.sn
Installing Epson iPrintYou can install Epson iPrint on your smart device from the following URL or QR code.
http://ipr.to/a
Scanning Using Epson iPrintStart Epson iPrint from your smart device and select the item you want to use from the home screen.
User's Guide
Scanning
95

The following screens are subject to change without notice.
A Home screen displayed when the application is started.
B Displays information on how to setup the printer and a FAQ.
C Displays the screen where you can select the printer and make printer settings. Once you have selected theprinter, you do not need to select it again from the next time.
D Displays the scanning screen.
E The scanning screen displayed when the scan menu is selected.
F Displays the screen where you can make scan settings such as resolution.
G Displays scanned images.
H Starts scanning.
I Displays the screen where you can save scanned data to a smart device or Cloud services.
J Displays the screen where you can send scanned data by email.
K Displays the screen where you can print scanned data.
User's Guide
Scanning
96

Replacing Ink Cartridges and OtherConsumables
Checking the Status of the Remaining Ink and theMaintenance BoxYou can check the approximate ink levels and the approximate service life of the maintenance box from the controlpanel or the computer.
Note:You can continue printing while the ink low message is displayed. Replace the ink cartridges when required.
Checking the Status of the Remaining Ink and the Maintenance Box- Control Panel
1. Select Settings >Supply Status on the home screen.
To select an item, use the u d l r buttons, and then press the OK button.
2. Do one of the following.
❏ To check the ink level, select Ink Level .
❏ To check the remaining service life of the maintenance box, select Maintenance Box Service Life.
Checking the Status of the Remaining Ink and the Maintenance Box- Windows
1. Access the printer driver window.
2. Click EPSON Status Monitor 3 on the Maintenance tab.
Note:If EPSON Status Monitor 3 is disabled, click Extended Settings on the Maintenance tab, and then select EnableEPSON Status Monitor 3.
Checking the Status of the Remaining Ink and the Maintenance Box- Mac OS X
1. Start the printer driver utility:
❏ Mac OS X v10.6.x to v10.9.x
Select System Preferences from the menu > Printers & Scanners (or Print & Scan, Print & Fax) andthen select the printer. Click Options & Supplies > Utility > Open Printer Utility.
User's Guide
Replacing Ink Cartridges and Other Consumables
97

❏ Mac OS X v10.5.8
Select System Preferences from the menu > Print & Fax, and then select the printer. Click Open PrintQueue > Utility.
2. Click EPSON Status Monitor.
Ink Cartridge CodesThe following are the codes for genuine Epson ink cartridges.
Note:❏ Ink cartridge codes may vary by location. For the correct codes in your area,contact Epson support.
❏ Although the ink cartridges may contain recycled materials, this does not affect printer function or performance.
❏ Specifications and appearance of the ink cartridge are subject to change without prior notice for improvement.
For Europe
Icon BK: Black C: Cyan M: Magenta Y: Yellow
Starfish 603
603XL*
603
603XL*
603
603XL*
603
603XL*
* "XL" indicates a large cartridge.
Note:For users in Europe, visit the following website for information on Epson's ink cartridge yields.
http://www.epson.eu/pageyield
For Australia and New Zealand
BK: Black C: Cyan M: Magenta Y: Yellow
212
212XL*
212
212XL*
212
212XL*
212
212XL*
* "XL" indicates a large cartridge.
Epson recommends the use of genuine Epson ink cartridges. Epson cannot guarantee the quality or reliability ofnon-genuine ink. The use of non-genuine ink may cause damage that is not covered by Epson’s warranties, andunder certain circumstances, may cause erratic printer behavior. Information about non-genuine ink levels maynot be displayed.
Related Information
& “Technical Support Web Site” on page 176
User's Guide
Replacing Ink Cartridges and Other Consumables
98

Ink Cartridge Handling PrecautionsRead the following instructions before replacing ink cartridges.
Storing precautions for ink
❏ Keep the ink cartridges out of direct sunlight.
❏ Do not store the ink cartridges in high or freezing temperatures.
❏ Epson recommends using the ink cartridge before the date printed on the package.
❏ For best results, use up ink cartridge within six months of opening the package.
❏ For best results, store ink cartridge packages with their bottom down.
❏ After bringing an ink cartridge inside from a cold storage site, allow it to warm up at room temperature for atleast three hours before using it.
❏ Do not open the ink cartridge package until you are ready to install it in the printer. The cartridge is vacuumpacked to maintain its reliability. If you leave a cartridge unpacked for a long time before using it, normalprinting may not be possible.
Handling precautions for replacing ink cartridges
❏ Be careful not to break the hooks on the side of the ink cartridge when you remove it from the package.
❏ You must remove the yellow tape from the cartridge before installing it; otherwise, print quality may decline oryou may not be able to print. Do not remove or tear the label on the cartridge; this can cause leakage.
User's Guide
Replacing Ink Cartridges and Other Consumables
99

❏ Do not remove the transparent seal from the bottom of the cartridge; otherwise, the cartridge may becomeunusable.
❏ Do not touch the sections shown in the illustration. Doing so may prevent normal operation and printing.
❏ Install all ink cartridges; otherwise you cannot print.
❏ Do not replace ink cartridges with the power off. Do not move the print head by hand; otherwise, you maydamage the printer.
❏ Do not turn off the printer during ink charging. If the ink charging is incomplete, you may not be able to print.
❏ Do not leave the printer with the ink cartridges removed or do not turn off the printer during cartridgereplacement. Otherwise, ink remaining in the print head nozzles will dry out and you may not be able to print.
❏ If you need to remove an ink cartridge temporarily, make sure you protect the ink supply area from dirt anddust. Store the ink cartridge in the same environment as the printer, with the ink supply port facing down orsideways. Do not store ink cartridges with the ink supply port facing up. Because the ink supply port isequipped with a valve designed to contain the release of excess ink, there is no need to supply your own coversor plugs.
❏ Removed ink cartridges may have ink around the ink supply port, so be careful not to get any ink on thesurrounding area when removing the cartridges.
❏ This printer uses ink cartridges equipped with a green chip that monitors information such as the amount ofremaining ink for each cartridge. This means that even if the cartridge is removed from the printer before it isexpended, you can still use the cartridge after reinserting it back into the printer. However, when reinserting acartridge, some ink may be consumed to guarantee printer performance.
❏ For maximum ink efficiency, only remove an ink cartridge when you are ready to replace it. Ink cartridges withlow ink status may not be used when reinserted.
❏ To ensure you receive premium print quality and to help protect your print head, a variable ink safety reserveremains in the cartridge when your printer indicates to replace the cartridge. The yields quoted for you do notinclude this reserve.
User's Guide
Replacing Ink Cartridges and Other Consumables
100

❏ Do not disassemble or remodel the ink cartridge, otherwise you may not be able to print normally.
❏ You cannot use the cartridges that came with the printer for the replacement.
Ink consumption
❏ To maintain optimum print head performance, some ink is consumed from all cartridges during maintenanceoperations. Ink may also be consumed when you replace ink cartridge or turn the printer on.
❏ When printing in monochrome or grayscale, color inks instead of black ink may be used depending on thepaper type or print quality settings. This is because a mixture of color inks is used to create black.
❏ The ink in the ink cartridges supplied with your printer is partly used during initial setup. In order to producehigh quality printouts, the print head in your printer will be fully charged with ink. This one-off processconsumes a quantity of ink and therefore these cartridges may print fewer pages compared to subsequent inkcartridges.
❏ Quoted yields may vary depending on the images that you are printing, the paper type that you are using, thefrequency of your prints and environmental conditions such as temperature.
Replacing Ink Cartridges
!Caution:
Be careful not to trap your hand or fingers when opening or closing the scanner unit. Otherwise you may be injured.
Note:If you replace the ink cartridges while copying, the originals may move out of place. Press the y button to cancel and replacethe originals.
1. Do one of the following.
To select an item, use the u d l r buttons, and then press the OK button.
❏ When prompted to replace ink cartridgesCheck which ink cartridge needs to be replaced, and then press the OK button. Confirm the message, selectReplace now on the home screen.
❏ When replacing ink cartridges before they are expendedSelect Maintenance > Ink Cartridge(s) Replacement on the home screen.
User's Guide
Replacing Ink Cartridges and Other Consumables
101

2. When replacing the black ink cartridge, gently shake the new black ink cartridge four or five times and thenremove it from its package. When replacing other color cartridges, remove the new color cartridges from theirpackage without shaking.
cImportant:
Do not shake cartridges after opening the package, as they may leak.
3. Remove only the yellow tape.
cImportant:
Do not touch the sections shown in the illustration. Doing so may prevent normal operation and printing.
User's Guide
Replacing Ink Cartridges and Other Consumables
102

4. Open the scanner unit with the document cover closed.
5. Squeeze the tab on the ink cartridge and pull it straight up. If you cannot remove the ink cartridge, pull itfirmly.
6. Insert the new ink cartridge, and then press it down firmly.
User's Guide
Replacing Ink Cartridges and Other Consumables
103

7. Close the scanner unit.
For safety, the scanner unit is closed in two steps.
Note:The scanner unit cannot be opened from the position shown below. Close it completely before opening it.
8. Press the x button.
Ink charging starts.
cImportant:
Do not turn off the printer during ink charging. If the ink charging is incomplete, you may not be able to print.
Related Information
& “Ink Cartridge Codes” on page 98& “Ink Cartridge Handling Precautions” on page 99
Maintenance Box CodeEpson recommends the use of a genuine Epson maintenance box.
Maintenance box code: C9344
cImportant:
Once a maintenance box has been installed in a printer it cannot be used with other printers.
Maintenance Box Handling PrecautionsRead the following instructions before replacing the maintenance box.
User's Guide
Replacing Ink Cartridges and Other Consumables
104

❏ Do not touch the sections shown in the illustration. Doing so may prevent normal operation and you may getsmeared with ink.
❏ Do not drop the maintenance box or subject it to strong shocks.
❏ Do not replace the maintenance box during printing; otherwise, ink may leak.
❏ Do not remove the maintenance box and its cover except when replacing the maintenance box; otherwise inkmay leak.
❏ When the cover cannot be reattached, the maintenance box may not be installed correctly. Remove themaintenance box, and re-install it.
❏ Do not tilt the used maintenance box until after it is sealed in the plastic bag; otherwise ink may leak.
❏ Do not touch the openings in the maintenance box as you may get smeared with ink.
❏ Do not reuse a maintenance box which has been removed and left detached for a long period. Ink inside the boxwill have solidified and no more ink can be absorbed.
❏ Keep the maintenance box out of direct sunlight.
❏ Do not store the maintenance box in high or freezing temperatures.
Replacing a Maintenance BoxIn some print cycles a very small amount of surplus ink may be collected in the maintenance box. To prevent inkleakage from the maintenance box, the printer is designed to stop printing when the absorbing capacity of themaintenance box has reached its limit. Whether and how often this is required will vary according to the numberof pages you print, the type of material that you print and the number of cleaning cycles that the printer performs.Replace the maintenance box when you are promoted to do so. The Epson Status Monitor, your LCD, or lights onthe control panel will advise you when this part needs replacing. The need for replacement of the box does notmean that your printer has ceased to operate in accordance with its specifications. The Epson warranty does notcover the cost of this replacement. It is a user-serviceable part.
User's Guide
Replacing Ink Cartridges and Other Consumables
105

Note:❏ When the maintenance box is full, you cannot print and clean the print head until it is replaced to avoid ink leakage.
However, you can perform operations that do not use ink such as scanning.
❏ When the following screen is displayed, the part cannot be replaced by users. Contact Epson support.
1. Remove the new maintenance box from its package.
cImportant:
Do not touch the green chip on the side of the maintenance box. Doing so may prevent normal operation andprinting.
Note:A transparent bag for the used maintenance box is provided with the new maintenance box.
2. Loosen the screw with a flat-head screwdriver, and then remove the cover.
User's Guide
Replacing Ink Cartridges and Other Consumables
106

3. Remove the used maintenance box.
cImportant:
Do not touch the sections shown in the illustration. Doing so may prevent normal operation and you may getsmeared with ink.
4. Put the used maintenance box in the transparent bag that came with the new maintenance box and seal thebag shut.
User's Guide
Replacing Ink Cartridges and Other Consumables
107

5. Insert the new maintenance box all the way into the printer. Make sure you insert the box in the correctdirection.
6. Reattach the cover.
7. Check the message, and then press the OK button.
Temporarily Printing with Black InkWhen color ink is expended and black ink still remains, you can use the following settings to continue printing fora short time using only black ink.
❏ Type of paper: plain papers, Envelope
❏ Color: B&W or Grayscale
❏ Borderless: Not selected
❏ EPSON Status Monitor 3: Enabled (When printing from the printer driver on Windows.)
Because this feature is only available for approximately five days, replace the expended ink cartridge as soon aspossible.
Note:❏ If EPSON Status Monitor 3 is disabled, access the printer driver, click Extended Settings on the Maintenance tab, and
then select Enable EPSON Status Monitor 3.
❏ The available period varies depending on the usage conditions.
User's Guide
Replacing Ink Cartridges and Other Consumables
108

Temporarily Printing with Black Ink - WindowsDo one of the following.
❏ When the following window is displayed, select Print in Black.
❏ When the following window is displayed, cancel printing. And then, printing again.
Note:If you cannot cancel printing from the computer, cancel using the printer's control panel.
Follow the steps below when printing again.
1. Access the printer driver window.
2. Clear Borderless on the Main tab.
3. Select plain papers or Envelope as the Paper Type setting on the Main tab.
4. Select Grayscale.
5. Set the other items on the Main and More Options tabs as necessary, and then click OK.
User's Guide
Replacing Ink Cartridges and Other Consumables
109

6. Click Print.
7. Click Print in Black in the window displayed.
Temporarily Printing with Black Ink - Mac OSNote:To use this feature through a network, connect with Bonjour.
1. Click the printer icon in the Dock.
2. Cancel the job.
Note:If you cannot cancel printing from the computer, cancel using the printer's control panel.
3. Select System Preferences from the menu > Printers & Scanners (or Print & Scan, Print & Fax), andthen select the printer. Click Options & Supplies > Options (or Driver).
4. Select On as the Permit temporary black printing setting.
5. Access the print dialog.
6. Select Print Settings from the pop-up menu.
7. Select any paper size except for a borderless size as the Paper Size setting.
8. Select plain papers or Envelope as the Media Type setting.
9. Select Grayscale.
10. Set the other items as necessary.
11. Click Print.
Conserving Black Ink when the Black Ink Is Low (forWindows Only)When black ink is running low and there is enough color ink remaining, you can use a mixture of color inks tocreate black. You can continue printing while preparing a replacement black ink cartridge.
This feature is only available when you select the following settings in the printer driver.
❏ Paper Type: plain papers
❏ Quality: Standard
❏ EPSON Status Monitor 3: Enabled
User's Guide
Replacing Ink Cartridges and Other Consumables
110

Note:❏ If EPSON Status Monitor 3 is disabled, access the printer driver, click Extended Settings on the Maintenance tab, and
then select Enable EPSON Status Monitor 3.
❏ Composite black looks slightly different from pure black. In addition, the print speed is reduced.
❏ To maintain the quality of the print head, black ink is also consumed.
Options Description
Yes Select to use a mixture of color inks to create black. This window is displayed the next timeyou print a similar job.
No Select to continue using the remaining black ink. This window is displayed the next timeyou print a similar job.
Disable this feature Select to continue using the remaining black ink. This window is not displayed until youreplace the black ink cartridge and it runs low again.
User's Guide
Replacing Ink Cartridges and Other Consumables
111

Maintaining the Printer
Preventing the Print Head from DryingAlways use the power button when turning the printer on and off.
Check that the power light is off before you disconnect the power cord.
The ink itself can dry out if it is not covered. Just like placing a cap on a fountain pen or an oil pen to prevent itfrom drying, make sure the print head is capped properly to prevent the ink from drying.
When the power cord is unplugged or a power outage occurs while the printer is in operation, the print head maynot be capped properly. If the print head is left as it is, it will dry out causing nozzles (ink outlets) to clog.
In these cases, turn the printer on and off again as soon as possible to cap the print head.
Checking and Cleaning the Print HeadIf the nozzles are clogged, the printouts become faint, there is visible banding, or unexpected colors appear. Whenprint quality has declined, use the nozzle check feature and check if the nozzles are clogged. If the nozzles areclogged, clean the print head.
cImportant:
❏ Do not open the scanner unit or turn off the printer during head cleaning. If the head cleaning is incomplete, youmay not be able to print.
❏ Because print head cleaning uses some ink, clean the print head only if quality declines.
❏ When ink is low, you may not be able to clean the print head.
❏ If print quality has not improved after repeating nozzle check and head cleaning about four times, wait for atleast six hours without printing, and then run the nozzle check again and repeat the head cleaning if necessary.We recommend to turn off the printer. If print quality has still not improved, contact Epson support.
❏ To prevent the print head from drying out, do not unplug the printer while the power is on.
Checking and Cleaning the Print Head - Control Panel
1. Load A4-size plain paper in the printer.
2. Select Maintenance on the home screen.
To select an item, use the u d l r buttons, and then press the OK button.
3. Select Nozzle Check.
4. Follow the on-screen instructions to print the nozzle check pattern.
5. Examine the printed pattern.
❏ If you cannot see any broken lines or missing segments as in the following "OK" pattern, the nozzles are notclogged. Select No to close the nozzle check feature. No further steps are necessary.
User's Guide
Maintaining the Printer
112

❏ If there are broken lines or missing segments as shown in the "NG" pattern, the print head nozzles may beclogged. Go to the next step.
6. Select Yes, and then follow the on-screen instructions to clean the print head.
7. When cleaning is finished, print the nozzle check pattern again. Repeat cleaning and printing the pattern untilall lines are printed completely.
Related Information
& “Loading Paper in the Rear Paper Feed” on page 47
Checking and Cleaning the Print Head - Windows
1. Load A4-size plain paper in the printer.
2. Access the printer driver window.
3. Click Nozzle Check on the Maintenance tab.
4. Follow the on-screen instructions.
Related Information
& “Loading Paper in the Rear Paper Feed” on page 47& “Windows Printer Driver” on page 127
Checking and Cleaning the Print Head - Mac OS
1. Load A4-size plain paper in the printer.
2. Select System Preferences from the menu > Printers & Scanners (or Print & Scan, Print & Fax), andthen select the printer.
3. Click Options & Supplies > Utility > Open Printer Utility.
4. Click Nozzle Check.
5. Follow the on-screen instructions.
User's Guide
Maintaining the Printer
113

Related Information
& “Loading Paper in the Rear Paper Feed” on page 47
Aligning the Print HeadIf print results contain the following problems, align the print head to improve the printouts.
❏ Vertical lines look misaligned or the printouts look blurry
❏ Horizontal banding occurs at regular intervals
Aligning the Print Head - Control Panel
1. Select Maintenance on the home screen.
To select an item, use the u d l r buttons, and then press the OK button.
2. Select Print Head Alignment.
3. Select the adjustment menu you want to adjust to improve the printouts according to the status of the printresults.
❏ Vertical lines look misaligned or the printouts look blurry : Select Vertical Alignment.
❏ Horizontal banding occurs at regular intervals: Select Horizontal Alignment.
4. Follow the on-screen instructions.
Related Information
& “Loading Paper in the Rear Paper Feed” on page 47
Cleaning the Paper Path for Ink SmearsWhen the printouts are smeared or scuffed, clean the roller inside.
cImportant:
Do not use tissue paper to clean the inside of the printer. The print head nozzles may be clogged with lint.
1. Load A4-size plain paper in the printer.
2. Select Maintenance on the home screen.
To select an item, use the u d l r buttons, and then press the OK button.
3. Select Paper Guide Cleaning.
4. Follow the on-screen instructions to clean the paper path.
Note:Repeat this procedure until the paper is not smeared with ink.
User's Guide
Maintaining the Printer
114

Related Information
& “Loading Paper in the Rear Paper Feed” on page 47
Cleaning the Scanner GlassWhen the copies or scanned images are smeared, clean the scanner glass.
cImportant:
Never use alcohol or thinner to clean the printer. These chemicals can damage the printer.
1. Open the document cover.
2. Use a soft, dry, clean cloth to clean the surface of the scanner glass.
cImportant:
❏ If the glass surface is stained with grease or some other hard-to-remove material, use a small amount ofglass cleaner and a soft cloth to remove it. Wipe off all remaining liquid.
❏ Do not press the glass surface too hard.
❏ Be careful not to scratch or damage the surface of the glass. A damaged glass surface can decrease the scanquality.
Cleaning the Translucent FilmWhen the printout is not improved after aligning the print head or cleaning the paper path, the translucent filminside the printer may be smeared.
Items required:
❏ Cotton swabs (several)
❏ Water with a few drops of detergent (2 to 3 drops of detergent in 1/4 cup of tap water)
❏ Light for checking smears
User's Guide
Maintaining the Printer
115

cImportant:
Do not use cleaning liquid other than water with a few drops of detergent.
1. Turn off the printer by pressing the P button.
2. Open the scanner unit.
3. Check if the translucent film is smeared. Smears are easier to see if you use a light.
If there are smears (such as finger marks or grease) on the translucent film (A), go to the next step.
A: Translucent film
B: Rail
User's Guide
Maintaining the Printer
116

cImportant:
Be careful not to touch the rail (B). Otherwise, you may not be able to print. Do not wipe off the grease on therail, because this is necessary for operations.
4. Moisten a cotton swab with the water with a few drops of detergent so that it is not dripping water, and thenwipe the smeared part.
cImportant:
Wipe off the smear gently. If you press the cotton swab too hard to the film, the springs of the film may bedislocated and the printer may be damaged.
5. Use a new dry cotton swab to wipe the film.
cImportant:
Do not leave any fibers on the film.
Note:To prevent the smear from spreading, frequently replace the cotton swab with a new one.
6. Repeat steps 4 and 5 until the film is not smeared.
7. Visually check that the film is not smeared.
Saving PowerThe printer enters sleep mode or turns off automatically if no operations are performed for a set period. You canadjust the time before power management is applied. Any increase will affect the product's energy efficiency. Pleaseconsider the environment before making any change.
Depending on the location of purchase, the printer may have a feature that turns it off automatically if it is notconnected to the network for 30 minutes.
User's Guide
Maintaining the Printer
117

Saving Power - Control Panel
1. Select Settings on the home screen.
To select an item, use the u d l r buttons, and then press the OK button.
2. Select Printer Setup.
3. Do one of the following.
Note:Your product may have the Power Off Settings or Power Off Timer feature depending on the location of purchase.
❏ Select Sleep Timer or Power Off Settings > Power Off If Inactive or Power Off If Disconnected, and thenmake settings.
❏ Select Sleep Timer or Power Off Timer, and then make settings.
User's Guide
Maintaining the Printer
118

Menu Options for SettingsSelect Settings on the home screen of the printer to make various settings.
Menu Options for Supply StatusSelect the menu on the control panel as described below.
Settings > Supply Status
Ink Level:
Displays the approximate levels of the ink cartridges. When is displayed, the ink cartridge is
running low. When is displayed, the ink cartridge is expended.
You can replace ink cartridges from this screen.
Maintenance Box Service Life:
Displays the approximate service life of the maintenance box. When is displayed, the
maintenance box is nearly full. When is displayed, the maintenance box is full.
Menu Options for MaintenanceSelect the menus on the control panel as described below.
Settings > Maintenance
Nozzle Check:
Select this feature to check if the print head nozzles are clogged. The printer prints a nozzle checkpattern.
Head Cleaning:
Select this feature to clean clogged nozzles in the print head.
Print Head Alignment:
Select this feature to adjust the print head to improve print quality.
❏ Vertical AlignmentSelect this feature if your printouts look blurry or text and lines are misaligned.
❏ Horizontal AlignmentSelect this feature if horizontal banding appears at regular intervals in your printouts.
Ink Cartridge(s) Replacement:
Use this feature to replace the ink cartridge before the ink is expended.
User's Guide
Menu Options for Settings
119

Paper Guide Cleaning:
Select this feature if there are ink stains on the internal rollers. The printer feeds paper to clean theinternal rollers.
Related Information
& “Checking and Cleaning the Print Head” on page 112& “Replacing Ink Cartridges” on page 101& “Cleaning the Paper Path for Ink Smears” on page 114
Menu Options for Printer SetupSelect the menus on the control panel as described below.
Settings > Printer Setup
Paper Source Settings:
Paper Setup:
Select the paper size and paper type you loaded in the paper source.
Paper Setup Auto Display:
Select On to display the Paper Setup screen when loading paper in the paper source. If youdisable this feature, you cannot print from an iPhone, iPad, or iPod touch using AirPrint.
Quiet Mode:
Your product may not have this feature depending on the location of purchase.
Select On to reduce noise during printing, however, this may lower the print speed. Depending onthe paper type and print quality settings you selected, there may be no difference in the printer's noiselevel.
Power Off Timer:
Your product may have this feature or the Power Off Settings feature depending on the location ofpurchase.
Select this setting to turn the printer off automatically when it is not used for a specified period oftime. You can adjust the time before power management is applied. Any increase will affect theproduct’s energy efficiency. Please consider the environment before making any change.
Power Off Settings:
Your product may have this feature or the Power Off Timer feature depending on the location ofpurchase.
❏ Power Off If InactiveSelect this setting to turn the printer off automatically if it is not used for a specified period oftime. Any increase will affect the product’s energy efficiency. Please consider the environmentbefore making any change.
User's Guide
Menu Options for Settings
120

❏ Power Off If DisconnectedSelect this setting to turn the printer off after 30 minutes when all ports including the USB port aredisconnected. This feature may not be available depending on your region.
Language:
Select the language used on the LCD screen.
Keyboard
Change the layout of the keyboard on the LCD screen.
Sleep Timer:
Adjust the time period to enter a sleep mode (energy saving mode) when the printer has notperformed any operations. The LCD screen turns black when the setting time passes.
Ink Drying Time:
Select the ink drying time you want to use when performing 2-sided printing. The printer prints theother side after printing one side. If your printout is smeared, increase the time setting.
Related Information
& “Saving Power - Control Panel” on page 118& “Entering Characters” on page 17
Menu Options for Network SettingsSelect the menus on the control panel as described below.
Settings > Network Settings
Print Status Sheet:
Prints a network status sheet.
Wi-Fi Setup:
Set up or change wireless network settings. Choose the connection method from following and thenfollow the instructions on the control panel.
❏ Wi-Fi (Recommended)
❏ Wi-Fi Direct
Connection Check:
Checks the status of the network connection and prints the network connection report. If there are anyproblems with the connection, see the check report to solve the problem.
Related Information
& “Making Wi-Fi Settings by Entering the SSID and Password” on page 31& “Making Wi-Fi Settings by Push Button Setup” on page 32& “Making Wi-Fi Settings by PIN Code Setup (WPS)” on page 33
User's Guide
Menu Options for Settings
121

& “Wi-Fi Direct (Simple AP) Connection” on page 20& “Printing a Network Status Sheet” on page 40& “Checking the Network Connection Status” on page 34
Menu Options for Epson Connect ServicesSelect the menus on the control panel as described below.
Settings > Epson Connect Services
Register/Delete:
Register or delete the printer to or from the Epson Connect services.
For usage guides, see the following portal website.
https://www.epsonconnect.com/
http://www.epsonconnect.eu (Europe only)
Suspend/Resume:
Select whether to suspend or resume Epson Connect services.
Email Address:
Check the printer's email address that is registered to the Epson Connect services.
Status:
Check whether or not the printer is registered and connected to the Epson Connect services.
Menu Options for Google Cloud Print ServicesSelect the menus on the control panel as described below.
Settings > Google Cloud Print Services
Suspend/Resume:
Select whether to suspend or resume the Google Cloud Print services.
Unregister:
Unregister the Google Cloud Print services.
Status:
Check whether or not the printer is registered and connected to the Google Cloud Print services.
For registration and usage guides, see the following portal website.
https://www.epsonconnect.com/
http://www.epsonconnect.eu (Europe only)
User's Guide
Menu Options for Settings
122

Menu Options for Guide FunctionsSelect the menus on the control panel as described below.
Settings > Guide Functions
Paper Mismatch
Displays a warning if the paper settings (print settings) for the print job do not match the printer'spaper settings made when you loaded the paper. This setting prevents misprinting. When Paper SetupAuto Display is disabled in the following menu, the paper setting screen is not displayed. In thissituation, you cannot print from an iPhone, iPad, or iPod touch using AirPrint.
Settings > Printer Setup > Paper Source Settings
Menu Options for Customer ResearchSelect the menus on the control panel as described below.
Settings > Customer Research
Select Approve to provide product usage information such as the number of prints to Seiko Epson Corporation.
Menu Options for Firmware UpdateSelect the menus on the control panel as described below.
Settings > Firmware Update
Update:
Checks if the latest version of the firmware has been uploaded to the network server. If an update isavailable, you can select whether or not to start updating.
Current Version:
Displays the current firmware version of your printer.
Notification:
Checks for firmware updates periodically and notifies you if an update is available.
Menu Options for Restore Default SettingsSelect the menus on the control panel as described below.
Settings > Restore Default Settings
Network Settings:
Resets the network settings to their defaults.
User's Guide
Menu Options for Settings
123

All except Network:
Resets all settings except for network settings to their defaults.
All Settings:
Resets all settings to their defaults.
User's Guide
Menu Options for Settings
124

Network Service and SoftwareInformationThis section introduces the network services and software products available for your printer from the Epsonwebsite or the supplied software disc.
Epson Connect ServiceBy using Epson Connect service available on the Internet, you can print from your smartphone, tablet PC, orlaptop, anytime and practically anywhere.
The features available on the Internet are as follows.
Email Print Epson iPrint remote print Scan to Cloud Remote Print Driver
✓ ✓ – ✓
See the Epson Connect portal website for details.
https://www.epsonconnect.com/
http://www.epsonconnect.eu (Europe only)
Application for Configuring Printer Operations (WebConfig)Web Config is an application that runs in a web browser, such as Internet Explorer and Safari, on a computer orsmart device. You can confirm the printer status or change the network service and printer settings. To use theWeb Config, connect the printer and the computer or device to the same network.
The following browsers are supported.
OS Browser
Windows XP SP3 or later Microsoft Edge, Internet Explorer 8 or later, Firefox*, Chrome*
Mac OS X v10.6.8 or later Safari*, Firefox*, Chrome*
iOS* Safari*
Android 2.3 or later Default browser
Chrome OS* Default browser
* Use the latest version.
User's Guide
Network Service and Software Information
125

Running Web Config on a Web Browser
1. Check the printer's IP address.
Select Settings > Network Settings > Connection Check from the control panel to start the connection check.Press the x button or the OK button to print the network connection report. Check the printer's IP addresson the printed network connection report.
2. Launch a Web browser from a computer or smart device, and then enter the printer's IP address.
Format:
IPv4: http://the printer's IP address/
IPv6: http://[the printer's IP address]/
Examples:
IPv4: http://192.168.100.201/
IPv6: http://[2001:db8::1000:1]/
Note:Using the smart device, you can also run Web Config from the maintenance screen of Epson iPrint.
Related Information
& “Printing a Network Connection Report” on page 34& “Using Epson iPrint” on page 74
Running Web Config on WindowsWhen connecting a computer to the printer using WSD, follow the steps below to run Web Config.
1. Open the printer list on the computer.
❏ Windows 10Click on the start button, and then select Windows System > Control Panel > View devices and printers inHardware and Sound.
❏ Windows 8.1/Windows 8Select Desktop > Settings > Control Panel > View devices and printers in Hardware and Sound (orHardware).
❏ Windows 7Click the start button, and select Control Panel > View devices and printers in Hardware and Sound.
❏ Windows VistaClick the start button, and select Control Panel > Printers in Hardware and Sound.
2. Right-click on your printer and select Properties.
3. Select the Web Service tab and click the URL.
User's Guide
Network Service and Software Information
126

Running Web Config on Mac OS
1. Select System Preferences from the menu > Printers & Scanners (or Print & Scan, Print & Fax), andthen select the printer.
2. Click Options & Supplies> Show Printer Webpage.
Windows Printer DriverThe printer driver controls the printer according to the commands from an application. Making settings on theprinter driver provides the best printing results. You can also check the status of the printer or keep it in topoperating condition using the printer driver utility.
Note:You can change the language of the printer driver. Select the language you want to use from the Language setting on theMaintenance tab.
Accessing the printer driver from applications
To make settings that apply only to the application you are using, access from that application.
Select Print or Print Setup from the File menu. Select your printer, and then click Preferences or Properties.
Note:Operations differ depending on the application. See the application's help for details.
Accessing the printer driver from the control panel
To make settings that apply to all of the applications, access from the control panel.
❏ Windows 10Click on the start button, and then select Windows System > Control Panel > View devices and printers inHardware and Sound. Right-click on your printer, or press and hold it and then select Printing preferences
❏ Windows 8.1/Windows 8Select Desktop > Settings > Control Panel > View devices and printers in Hardware and Sound. Right-clickon your printer, or press and hold it and then select Printing preferences.
❏ Windows 7Click the start button, and select Control Panel > View devices and printers in Hardware and Sound. Right-click on your printer and select Printing preferences.
❏ Windows VistaClick the start button, and select Control Panel > Printers in Hardware and Sound. Right-click on your printerand select Select printing preferences.
❏ Windows XPClick the start button, and select Control Panel > Printers and Other Hardware > Printers and Faxes. Right-click on your printer and select Printing preferences.
Accessing the printer driver from the printer icon on the task bar
The printer icon on the desktop task bar is a shortcut icon allowing you to quickly access the printer driver.
If you click the printer icon and select Printer Settings, you can access the same printer settings window as the onedisplayed from the control panel. If you double-click this icon, you can check the status of the printer.
User's Guide
Network Service and Software Information
127

Note:If the printer icon is not displayed on the task bar, access the printer driver window, click Monitoring Preferences on theMaintenance tab, and then select Register the shortcut icon to the taskbar.
Starting the utility
Access the printer driver window. Click the Maintenance tab.
Guide to Windows Printer DriverHelp is available in the printer driver for Windows. To view explanations of the setting items, right-click on eachitem, and then click Help.
Main Tab
You can make basic settings for printing, such as paper type or paper size.
You can also make settings for printing both sides of the paper or printing multiple pages on one sheet.
User's Guide
Network Service and Software Information
128

More Options Tab
You can select additional layout and printing options such as changing the size of a printout or making colorcorrections.
Maintenance Tab
You can run maintenance features such as nozzle check and print head cleaning, and by starting EPSON StatusMonitor 3, you can check printer status and error information.
Making Operation Settings for the Windows Printer DriverYou can make settings such as enabling EPSON Status Monitor 3.
User's Guide
Network Service and Software Information
129

1. Access the printer driver window.
2. Click Extended Settings on the Maintenance tab.
3. Make the appropriate settings, and then click OK.
See the online help for explanations of the setting items.
Mac OS Printer DriverThe printer driver controls the printer according to the commands from an application. Making settings on theprinter driver provides the best printing results. You can also check the status of the printer or keep it in topoperating condition using the printer driver utility.
Accessing the printer driver from applications
Click Page Setup or Print on the File menu of your application. If necessary, click Show Details (or d) to expandthe print window.
Note:Depending on the application being used, Page Setup may not be displayed in the File menu, and the operations fordisplaying the print screen may differ. See the application's help for details.
Starting the utility
Select System Preferences from the menu > Printers & Scanners (or Print & Scan, Print & Fax), and thenselect the printer. Click Options & Supplies > Utility > Open Printer Utility.
User's Guide
Network Service and Software Information
130

Guide to Mac OS Printer Driver
Print dialog
Switch the pop-up menu on the center of the screen to show more items.
Pop-up Menu Descriptions
Layout You can select a layout for printing several pages on one sheet or select to print a border.
Color Matching You can adjust the colors.
Paper Handling You can reduce or enlarge the size of the print job to automatically fit the paper size youloaded.
Cover Page You can select a cover for your documents. Select Cover Page Type to set the contents to beprinted on the cover.
Print Settings You can make the basic print settings such as paper type and print quality.
Color Options When you select EPSON Color Controls from the Color Matching menu, you can select acolor correction method.
Two-sided PrintingSettings
You can select a binding direction for 2-sided printing or select a document type.
Note:On OS X Mountain Lion or later, if Print Settings menu is not displayed, Epson printer driver has not been installedcorrectly.
Select System Preferences from the menu > Printers & Scanners (or Print & Scan, Print & Fax), remove the printer,and then add the printer again. Access the following website, and then enter the product name. Go to Support, and then seeTips.
http://epson.sn
User's Guide
Network Service and Software Information
131

Epson Printer Utility
You can run a maintenance feature such as nozzle check and print head cleaning, and by starting EPSON StatusMonitor, you can check printer status and error information.
Making Operation Settings for the Mac OS Printer Driver
Accessing the Operation Settings Window of the Mac OS Printer Driver
Select System Preferences from the menu > Printers & Scanners (or Print & Scan, Print & Fax), and thenselect the printer. Click Options & Supplies > Options (or Driver).
Operation Settings of the Mac OS Printer Driver
❏ Skip Blank Page: Avoids printing blank pages.
❏ Quiet Mode: Prints quietly. However, the print speed may be slower.
❏ Permit temporary black printing: Prints only with black ink temporarily.
❏ High Speed Printing: Prints when the print head moves in both directions. The print speed is faster, but thequality may decline.
❏ Output documents for filing: Feed the paper so that it is easy to file when printing landscape data or 2-sidedprinting. Envelope printing is not supported.
❏ Remove white borders: Removes unnecessary margins during borderless printing.
❏ Warning Notifications: Allows the printer driver to display warning notifications.
❏ Establish bidirectional communication: Usually, this should be set to On. Select Off when acquiring the printerinformation is impossible because the printer is shared with Windows computers on a network or for any otherreason.
User's Guide
Network Service and Software Information
132

Application for Scanning Documents and Images(Epson Scan 2)Epson Scan 2 is an application for controlling scanning. You can adjust the size, resolution, brightness, contrast,and quality of the scanned image. You can also start Epson Scan 2 from a TWAIN-compliant scanning application.See the application's help for details.
Starting on Windows
❏ Windows 10Click the start button, and then select EPSON > Epson Scan 2.
❏ Windows 8.1/Windows 8Enter the application name in the search charm, and then select the displayed icon.
❏ Windows 7/Windows Vista/Windows XPClick the start button, and then select All Programs or Programs > EPSON > Epson Scan 2> Epson Scan 2.
Starting on Mac OS
Note:Epson Scan 2 does not support the Mac OS fast user switching feature. Turn off fast user switching.
Select Go > Applications > Epson Software > Epson Scan 2.
Related Information
& “Scanning Documents (Document Mode)” on page 88& “Installing Applications” on page 135
Adding the Network ScannerBefore using Epson Scan 2, you need to add the network scanner.
1. Start the software, and then click Add on the Scanner Settings screen.
Note:❏ If Add is grayed out, click Enable Editing.
❏ If the main screen of Epson Scan 2 is displayed, it has already been connected to the scanner. If you want to connectto another network, select Scanner > Settings to open the Scanner Settings screen.
2. Add the network scanner. Enter the following items, and then click Add.
❏ Model: Select the scanner you want to connect to.
❏ Name: Enter the scanner name within 32 characters.
❏ Search for Network: When the computer and the scanner are on the same network, the IP address isdisplayed. If it is not displayed, click the button. If the IP address is still not displayed, click Enteraddress, and then enter the IP address directly.
3. Select the scanner on the Scanner Settingsscreen, and then click OK.
User's Guide
Network Service and Software Information
133

Application for Configuring Scanning Operationsfrom the Control Panel (Epson Event Manager)Epson Event Manager is an application that allows you to manage scanning from the control panel and save imagesto a computer. You can add your own settings as presets, such as the document type, the save folder location, andthe image format. See the application's help for details.
Starting on Windows
❏ Windows 10Click the start button, and then select Epson Software > Event Manager.
❏ Windows 8.1/Windows 8Enter the application name in the search charm, and then select the displayed icon.
❏ Windows 7/Windows Vista/Windows XPClick the start button, and then select All Programs or Programs > Epson Software > Event Manager.
Starting on Mac OS
Go > Applications > Epson Software > Event Manager.
Related Information
& “Installing Applications” on page 135
Application for Printing Images (Epson Photo+)Epson Photo+ is an application that allows you to easily print images with a variety of layouts. You can alsoperform image correction and adjust the position while viewing a preview of your document. You can alsobrighten up your images by adding text and stamps wherever you like. When printing on genuine Epson photopaper, the ink performance is maximized creating a beautiful finish with excellent coloring.
See the application's help for details.
Note:To use this application the printer driver for this printer must be installed.
Starting
❏ Windows 10Click the start button, and then select Epson Software > Epson Photo+.
❏ Windows 8.1/Windows 8Enter the application name in the search charm, and then select the displayed icon.
❏ Windows 7/Windows Vista/Windows XPClick the start button, and select All Programs or Programs > Epson Software > Epson Photo+.
Starting on Mac OS
Select Go > Applications > Epson Software > Epson Photo+.
User's Guide
Network Service and Software Information
134

Related Information
& “Installing Applications” on page 135
Software Update Tools (EPSON Software Updater)EPSON Software Updater is an application that checks for new or updated software on the internet and installs it.You can also update the printer's firmware and manual.
Installing Method
Download EPSON Software Updater from the Epson website.
If you are using a Windows computer and cannot to download it from the website, you can install it from thesupplied software disc.
http://www.epson.com
Starting on Windows
❏ Windows 10Click the start button, and then select Epson Software > EPSON Software Updater.
❏ Windows 8.1/Windows 8Enter the application name in the search charm, and then select the displayed icon.
❏ Windows 7/Windows Vista/Windows XPClick the start button, and then select All Programs or Programs > Epson Software > EPSON SoftwareUpdater.
Note:You can also start EPSON Software Updater by clicking the printer icon on the task bar on the desktop, and then selectingSoftware Update.
Starting on Mac OS
Select Go > Applications > Epson Software > EPSON Software Updater.
Installing ApplicationsConnect your computer to the network and install the latest version of applications from the website.
Note:❏ Log on to your computer as an administrator. Enter the administrator password if the computer prompts you.
❏ When reinstalling an application, you need to uninstall it first.
1. Quit all running applications.
2. When installing the printer driver or Epson Scan 2, disconnect the printer and the computer temporarily.
Note:Do not connect the printer and the computer until you are instructed to do so.
User's Guide
Network Service and Software Information
135

3. Access to the following website, and then enter the product name.
http://epson.sn
4. Select Setup, and then click Download.
5. Click or double-click the downloaded file, and then follow the on-screen instructions.
Note:If you are using a Windows computer and you cannot download applications from the website, install them from thesoftware disc that came with the printer.
Related Information
& “Software Update Tools (EPSON Software Updater)” on page 135& “Uninstalling Applications” on page 137
Updating Applications and FirmwareYou may be able to clear certain problems and improve or add functions by updating the applications and thefirmware. Make sure you use the latest version of the applications and firmware.
1. Make sure that the printer and the computer are connected, and the computer is connected to the internet.
2. Start EPSON Software Updater, and update the applications or the firmware.
cImportant:
Do not turn off the computer or the printer until the update is complete; otherwise, the printer maymalfunction.
Note:If you cannot find the application you want to update in the list, you cannot update using the EPSON SoftwareUpdater. Check for the latest versions of the applications from your local Epson website.
http://www.epson.com
Updating the Printer's Firmware using the Control PanelIf the printer is connected to the Internet, you can update the printer's firmware using the control panel. You canalso set the printer to regularly check for firmware updates and notify you if any are available.
1. Select Settings on the home screen.
To select an item, use the u d l r buttons, and then press the OK button.
2. Select Firmware Update > Update.
Note:Enable Notification to set the printer to regularly check for available firmware updates.
3. Check the message displayed on the screen and press the OK button to start searching for available updates.
User's Guide
Network Service and Software Information
136

4. If a message is displayed on the LCD screen informing you that a firmware update is available, follow the on-screen instructions to start the update.
cImportant:
❏ Do not turn off or unplug the printer until the update is complete; otherwise, the printer may malfunction.
❏ If the firmware update is not completed or is unsuccessful, the printer does not start up normally and"Recovery Mode" is displayed on the LCD screen the next time the printer is turned on. In this situation, youneed to update the firmware again using a computer. Connect the printer to the computer with a USB cable.While "Recovery Mode" is displayed on the printer, you cannot update the firmware over a networkconnection. On the computer, access your local Epson website, and then download the latest printerfirmware. See the instructions on the website for the next steps.
Uninstalling ApplicationsLog in to your computer as an administrator. Enter the administrator password if the computer prompts you.
Uninstalling Applications - Windows
1. Press the P button to turn off the printer.
2. Quit all running applications.
3. Open Control Panel:
❏ Windows 10Click on the start button, and then select Windows System > Control Panel.
❏ Windows 8.1/Windows 8Select Desktop > Settings > Control Panel.
❏ Windows 7/Windows Vista/Windows XPClick the start button and select Control Panel.
4. Open Uninstall a program (or Add or Remove Programs):
❏ Windows 10/Windows 8.1/Windows 8/Windows 7/Windows VistaSelect Uninstall a program in Programs.
❏ Windows XPClick Add or Remove Programs.
5. Select the application you want to uninstall.
You cannot uninstall the printer driver if there is any print jobs. Delete or wait to be printed the jobs beforeuninstalling.
6. Uninstall the applications:
❏ Windows 10/Windows 8.1/Windows 8/Windows 7/Windows VistaClick Uninstall/Change or Uninstall.
User's Guide
Network Service and Software Information
137

❏ Windows XPClick Change/Remove or Remove.
Note:If the User Account Control window is displayed, click Continue.
7. Follow the on-screen instructions.
Uninstalling Applications - Mac OS
1. Download the Uninstaller using EPSON Software Updater.
Once you have downloaded the Uninstaller, you do not need to download it again each time you uninstall theapplication.
2. Press the P button to turn off the printer.
3. To uninstall the printer driver, select System Preferences from the menu > Printers & Scanners (or Print& Scan, Print & Fax), and then remove the printer from the enabled printers list.
4. Quit all running applications.
5. Select Go > Applications > Epson Software > Uninstaller.
6. Select the application you want to uninstall, and then click Uninstall.
cImportant:
The Uninstaller removes all drivers for Epson inkjet printers on the computer. If you use multiple Epson inkjetprinters and you only want to delete some drivers, delete all of them first, and then install the necessary printerdriver again.
Note:If you cannot find the application you want to uninstall in the application list, you cannot uninstall using theUninstaller. In this situation, select Go > Applications > Epson Software, select the application you want to uninstall,and then drag it to the trash icon.
Related Information
& “Software Update Tools (EPSON Software Updater)” on page 135
User's Guide
Network Service and Software Information
138

Solving Problems
Checking the Printer Status
Checking Error Codes on the LCD ScreenA code is displayed on the LCD screen if there is an error or information that requires your attention. If a code isdisplayed, follow the solutions below to solve the problem.
Code Situation Solutions
E-01 A printer error has occurred. Open the scanner unit and remove any paper or protective materialinside the printer. Turn the power off and on again.
E-02 A scanner error has occurred. Turn the power off and on again.
E-12 A borderless printing ink pad needsto be replaced.
Contact Epson or an authorised Epson service provider to replace theborderless printing ink pad*. It is not a user-serviceable part.
Borderless printing is not available, but printing with a border isavailable.
W-01 A paper jam has occurred. Remove the paper from the printer and press the button displayed onthe bottom of the LCD screen to clear the error. In some cases, youneed to turn the power off and on again.
W-12 Ink cartridges are installedincorrectly.
Press the ink cartridge down firmly.
W-13 The ink cartridge displayed on theLCD screen has not beenrecognized.
Replace the ink cartridge. Epson recommends the use of genuineEpson ink cartridges.
W-14 A borderless printing ink pad isnearing the end of its service life.
Contact Epson or an authorised Epson service provider to replace theborderless printing ink pad*. It is not a user-serviceable part. Themessage will be displayed until the ink pad is replaced.
Press the x button to resume printing.
I-22 Set Wi-Fi from the Push Button(WPS).
Push the access point button. If there is no button on the accesspoint, open the access point setting window, and then click thebutton displayed in the software.
I-23 Set Wi-Fi from the PIN Code (WPS). Enter the PIN code displayed on the LCD screen into the access pointor computer within two minutes.
I-31 Set Wi-Fi from the Wi-Fi AutoConnect.
Install the software on your computer, and then press the OK buttonwhen Wi-Fi setup starts.
I-41 Paper Setup Auto Display isdisabled. Some functions cannot beused.
If Paper Setup Auto Display is disabled, you cannot use AirPrint.
I-60 Your computer may not supportWSD (Web Services for Devices).
The scan to computer (WSD) feature is only available for computersrunning English versions of Windows 10, Windows 8.1, Windows 8,Windows 7 or Windows Vista. Make sure that the printer is correctlyconnected to the computer.
User's Guide
Solving Problems
139

Code Situation Solutions
RecoveryMode
The printer has started in recoverymode because the firmware updatefailed.
Follow the steps below to try to update the firmware again.
1. Connect the computer and the printer with a USB cable. (Duringrecovery mode, you cannot update the firmware over a networkconnection.)
2. Visit your local Epson website for further instructions.
* In some print cycles a very small amount of surplus ink may be collected in the ink pad. To prevent ink leakagefrom the pad, the printer is designed to stop printing when the pad has reached its limit. Whether and how oftenthis is required will vary according to the number of pages you print using the borderless print option. The needfor replacement of the pad does not mean that your printer has ceased to operate in accordance with itsspecifications. The printer will advise you when the pad requires replacing and this can only be performed by anauthorised Epson Service provider. The Epson warranty does not cover the cost of this replacement.
Related Information
& “Removing Jammed Paper” on page 141& “Contacting Epson Support” on page 176& “Installing Applications” on page 135
Checking the Printer Status - Windows
1. Access the printer driver window.
2. Click EPSON Status Monitor 3 on the Maintenance tab.
Note:❏ You can also check the printer status by double-clicking the printer icon on the taskbar. If the printer icon is not
added to the taskbar, click Monitoring Preferences on the Maintenance tab, and then select Register the shortcuticon to the taskbar.
❏ If EPSON Status Monitor 3 is disabled, click Extended Settings on the Maintenance tab, and then select EnableEPSON Status Monitor 3.
Related Information
& “Windows Printer Driver” on page 127
Checking the Printer Status - Mac OS
1. Select System Preferences from the menu > Printers & Scanners (or Print & Scan, Print & Fax), andthen select the printer.
2. Click Options & Supplies > Utility > Open Printer Utility.
3. Click EPSON Status Monitor.
You can check the printer status, ink levels, and error status.
User's Guide
Solving Problems
140

Checking the Software StatusYou may be able to clear the problem by updating the software to the latest version. To check the software status,use the software update tool.
Related Information
& “Software Update Tools (EPSON Software Updater)” on page 135& “Installing Applications” on page 135
Removing Jammed PaperCheck the error displayed on the control panel and follow the instructions to remove the jammed paper includingany torn pieces. Next, clear the error.
cImportant:
Remove the jammed paper carefully. Removing the paper vigorously may cause damage to the printer.
Removing Jammed Paper from the Rear Paper FeedRemove the jammed paper.
Removing Jammed Paper from Inside the Printer
!Caution:
❏ Be careful not to trap your hand or fingers when opening or closing the scanner unit. Otherwise you may beinjured.
❏ Never touch the buttons on the control panel while your hand is inside the printer. If the printer starts operating,it could cause an injury. Be careful not to touch the protruding parts to avoid injury.
User's Guide
Solving Problems
141

1. Open the scanner unit with the document cover closed.
2. Remove the jammed paper.
cImportant:
Do not touch the white flat cable or translucent film inside the printer. Doing so may cause a malfunction.
User's Guide
Solving Problems
142

3. Close the scanner unit.
For safety, the scanner unit is closed in two steps.
Note:The scanner unit cannot be opened from the position shown below. Close it completely before opening it.
Removing Jammed Paper from Rear Cover
1. Remove the rear cover.
2. Remove the jammed paper.
User's Guide
Solving Problems
143

3. Remove jammed paper from the rear cover.
4. Insert the rear cover in the printer.
Paper Does Not Feed CorrectlyCheck the following points, and then take the appropriate actions to solve the problem.
❏ Place the printer on a flat surface and operate in the recommended environmental conditions.
❏ Use paper supported by this printer.
❏ Follow the paper handling precautions.
❏ Do not load more than the maximum number of sheets specified for the paper. For plain paper, do not loadabove the line indicated by the triangle symbol on the edge guide.
❏ Make sure the paper size and paper type settings match the actual paper size and paper type loaded in theprinter.
❏ Do not place objects on the feeder guard.
Related Information
& “Environmental Specifications” on page 172& “Paper Handling Precautions” on page 44& “Available Paper and Capacities” on page 45& “List of Paper Type” on page 47
Paper Jams❏ Load paper in the correct direction, and slide the edge guides against the edges of the paper.
❏ Load one sheet of paper at a time if you have loaded several sheets of paper.
Related Information
& “Removing Jammed Paper” on page 141& “Loading Paper in the Rear Paper Feed” on page 47
User's Guide
Solving Problems
144

Paper Feeds at a SlantLoad paper in the correct direction, and slide the edge guides against the edges of the paper.
Related Information
& “Loading Paper in the Rear Paper Feed” on page 47
Several Sheets of Paper are Fed at a Time❏ Load one sheet of paper at a time.
❏ When several sheets of paper are fed at a time during manual 2-sided printing, remove any paper which isloaded in the printer before you reload the paper.
Paper Out Error OccursWhen a paper out error occurs although paper is loaded in the rear paper feed, reload paper in the center of therear paper feed.
Paper is Ejected During PrintingWhen you load letterhead paper (paper on which information such as the sender's name or corporation name arepre-printed in the header), select Letterhead as the paper type setting.
Power and Control Panel Problems
Power Does Not Turn On❏ Make sure the power cord is securely plugged in.
❏ Hold down the P button for a little longer.
Power Does Not Turn Off
Hold down the P button for a little longer. If you still cannot turn off the printer, unplug the power cord. Toprevent the print head from drying out, turn the printer back on and turn it off by pressing the P button.
Power Turns Off Automatically❏ Select Power Off Settings in Settings, and then disable the Power Off If Inactive and Power Off If
Disconnected settings.
❏ Disable the Power Off Timer setting in Settings.
User's Guide
Solving Problems
145

Note:Your product may have the Power Off Settings or Power Off Timer feature depending on the location of purchase.
LCD Screen Gets DarkThe printer is in sleep mode. Press any button on the control panel to return the LCD screen to its former state.
Cannot Print from a Computer
Checking the Connection (USB)❏ Connect the USB cable securely to the printer and the computer.
❏ If you are using a USB hub, try to connect the printer directly to the computer.
❏ If the USB cable cannot be recognized, change the port, or change the USB cable.
❏ If the printer cannot print using a USB connection, try the following.Disconnect the USB cable from the computer. Right-click on the printer icon displayed on the computer, andthen select Remove Device. Next, connect the USB cable to the computer and try a test print.Re-set the USB connection by following the steps in this manual for changing the connection method to acomputer. See the related information link below for details.
Related Information
& “Changing the Connection Method to a Computer” on page 41
Checking the Connection (Network)❏ When you have changed your wireless router or provider, try making network settings for the printer again.
Connect the computer or smart device to the same SSID as the printer.
❏ Turn off the devices you want to connect to the network. Wait for about 10 seconds, and then turn on thedevices in the following order; wireless router, computer or smart device, and then printer. Move the printer andcomputer or smart device closer to the wireless router to help with radio wave communication, and then try tomake network settings again.
User's Guide
Solving Problems
146

❏ Print the network connection report. See the related information link below for details. If the report shows thatthe network connection failed, check the network connection report and then follow the printed solutions.
❏ If the IP address assigned to the printer is 169.254.XXX.XXX, and the subnet mask is 255.255.0.0, the IP addressmay not be assigned correctly. Restart the wireless router or reset the network settings for the printer. If thisdoes not solve the problem, see the documentation for the wireless router.
❏ Try accessing any website from your computer to make sure that your computer's network settings are correct.If you cannot access any website, there is a problem on the computer. Check the network connection of thecomputer.
Related Information
& “Connecting to a Computer” on page 21& “Printing a Network Connection Report” on page 34
Checking the Software and Data❏ Make sure that a genuine Epson printer driver is installed. If a genuine Epson printer driver is not installed, the
available functions are limited. We recommend using a genuine Epson printer driver. See the relatedinformation link below for details.
❏ If you are printing a large data size image, the computer may run out of memory. Print the image at a lowerresolution or a smaller size.
Related Information
& “Checking for Genuine Epson Printer Drivers” on page 147& “Installing Applications” on page 135
Checking for Genuine Epson Printer Drivers
You can check if a genuine Epson printer driver is installed on your computer by using one of the followingmethods.
Windows
Select Control Panel > View devices and printers (Printers, Printers and Faxes), and then do the following toopen the print server properties window.
❏ Windows 10/Windows 8.1/Windows 8/Windows 7Click the printer icon, and then click Print server properties at the top of the window.
❏ Windows VistaRight-click on the Printers folder, and then click Run as administrator > Server Properties.
❏ Windows XPFrom the File menu, select Server Properties.
User's Guide
Solving Problems
147

Click the Driver tab. If your printer name is displayed in the list, a genuine Epson printer driver is installed onyour computer.
Mac OS
Select System Preferences from the menu > Printers & Scanners (or Print & Scan, Print & Fax), and thenselect the printer. Click Options & Supplies, and if the Options tab and Utility tab are displayed on the window, agenuine Epson printer driver is installed on your computer.
Related Information
& “Installing Applications” on page 135
User's Guide
Solving Problems
148

Checking the Printer Status from the Computer (Windows)Click Print Queue on the printer driver's Maintenance tab, and then check the following.
❏ Check if there are any paused print jobs.If unnecessary data remains, select Cancel all documents from the Printer menu.
❏ Make sure the printer is not offline or pending.If the printer is offline or pending, clear the offline or pending setting from the Printer menu.
❏ Make sure the printer is selected as the default printer from the Printer menu (there should be a check mark onthe menu item).If the printer is not selected as the default printer, set it as the default printer. If there are multiple icons inControl Panel > View devices and printers (Printers, Printers and Faxes), see the following to select the icon.Example)USB connection: EPSON XXXX SeriesNetwork connection: EPSON XXXX Series (network)If you install the printer driver multiple times, copies of printer driver may be created. If copies such as "EPSONXXXX Series (copy 1)" are created, right-click the copied driver icon, and then click Remove Device.
❏ Make sure the printer port is selected correctly in Property > Port from the Printer menu as follows.Select "USBXXX" for a USB connection, or "EpsonNet Print Port" for a network connection.
Checking the Printer Status from the Computer (Mac OS)Make sure the printer status is not Pause.
Select System Preferences from the menu > Printers & Scanners (or Print & Scan, Print & Fax), and thendouble-click the printer. If the printer is paused, click Resume (or Resume Printer).
User's Guide
Solving Problems
149

When You Cannot Make Network Settings❏ Turn off the devices you want to connect to the network. Wait for about 10 seconds, and then turn on the
devices in the following order; wireless router, computer or smart device, and then printer. Move the printer andcomputer or smart device closer to the wireless router to help with radio wave communication, and then try tomake network settings again.
❏ Select Settings > Network Settings > Connection Check, and then print the network connection report. If anerror has occurred, check the network connection report and then follow the printed solutions.
Related Information
& “Printing a Network Connection Report” on page 34& “Messages and Solutions on the Network Connection Report” on page 35
Cannot Connect from Devices Even Though Network Settings areNo ProblemsIf you cannot connect from the computer or smart device to the printer even though the network connectionreport does not show any problems, see the following.
❏ When you are using multiple wireless routers at the same time, you may not be able to use the printer from thecomputer or smart device depending on the settings of the wireless routers. Connect the computer or smartdevice to the same wireless router as the printer.Disable the tethering function on the smart device if it is enabled.
User's Guide
Solving Problems
150

❏ You may not be able to connect to the wireless router when the wireless router has multiple SSIDs and devicesare connected to different SSIDs on the same wireless router. Connect the computer or smart device to the sameSSID as the printer.
❏ A wireless router that is compliant with both IEEE802.11a and IEEE802.11g has SSIDs of 2.4 GHz and 5 GHz. Ifyou connect the computer or smart device to a 5 GHz SSID, you cannot connect to the printer because theprinter only supports communication over 2.4 GHz. Connect the computer or smart device to the same SSID asthe printer.
❏ Most wireless routers have a privacy separator feature that blocks communication between connected devices. Ifyou cannot communicate between the printer and the computer or smart device even if they are connected tothe same network, disable the privacy separator on the wireless router. See the manual provided with thewireless router for details.
User's Guide
Solving Problems
151

Related Information
& “Checking the SSID Connected to the Printer” on page 152& “Checking the SSID for the Computer” on page 152
Checking the SSID Connected to the PrinterYou can check the SSID by printing a network connection report, network status sheet, or on Web Config.
Related Information
& “Printing a Network Connection Report” on page 34& “Printing a Network Status Sheet” on page 40
Checking the SSID for the Computer
Windows
Click in the task tray on the desktop. Check the name of the connected SSID from the list displayed.
User's Guide
Solving Problems
152

Mac OS
Click the Wi-Fi icon at the top of the computer screen. A list of SSIDs is displayed and the connected SSID isindicated with a check mark.
Wireless LAN (Wi-Fi) Connections Become Unstable When UsingUSB 3.0 Devices on a MacWhen you connect a device to the USB 3.0 port on a Mac, radio frequency interference may occur. Try thefollowing if you cannot connect to wireless LAN (Wi-Fi) or if operations become unstable.
❏ Place the device that is connected to the USB 3.0 port further away from the computer.
❏ If the printer supports the 5 GHz frequency range, connect to the SSID for the 5 GHz range.
Related Information
& “Wi-Fi Specifications” on page 170
Cannot Print from an iPhone, iPad, or iPod touch❏ Connect the iPhone, iPad, or iPod touch to the same network (SSID) as the printer.
❏ Enable Paper Setup Auto Display in the following menus.Settings > Printer Setup > Paper Source Settings > Paper Setup Auto Display
❏ Enable the AirPrint setting on Web Config.
Related Information
& “Connecting to a Smart Device” on page 22& “Application for Configuring Printer Operations (Web Config)” on page 125
User's Guide
Solving Problems
153

Printout Problems
Printout is Scuffed or Color is MissingIf you have not used the printer for a long time, the print head nozzles may be clogged and ink drops may not bedischarged. Perform a nozzle check, and then clean the print head if any of the print head nozzles are clogged.
Related Information
& “Checking and Cleaning the Print Head” on page 112
Banding or Unexpected Colors Appear
The print head nozzles may be clogged. Perform a nozzle check to check if the print head nozzles are clogged.Clean the print head if any of the print head nozzles are clogged.
Related Information
& “Checking and Cleaning the Print Head” on page 112
Colored Banding Appears at Intervals of Approximately 2.5 cm
❏ Select the appropriate paper type setting for the type of paper loaded in the printer.
❏ Align the print head using the Horizontal Alignment feature.
❏ When printing on plain paper, print using a higher quality setting.
User's Guide
Solving Problems
154

Related Information
& “List of Paper Type” on page 47& “Aligning the Print Head” on page 114
Blurry Prints, Vertical Banding, or Misalignment
Align the print head using the Vertical Alignment feature.
Related Information
& “Aligning the Print Head” on page 114
Print Quality Does Not Improve Even After Aligning the Print Head
During bidirectional (or high speed) printing, the print head prints while moving in both directions, and verticallines may be misaligned. If print quality does not improve, disable the bidirectional (or high speed) setting.Disabling this setting may slow down printing speed.
❏ WindowsClear High Speed on the printer driver’s More Options tab.
❏ Mac OS
Select System Preferences from the menu > Printers & Scanners (or Print & Scan, Print & Fax), and thenselect the printer. Click Options & Supplies > Options (or Driver). Select Off as the High Speed Printingsetting.
Print Quality is PoorCheck the following if the print quality is poor due to blurry prints, banding, missing colors, faded colors, andmisalignment in the prints.
Checking the printer
❏ Perform a nozzle check, and then clean the print head if any of the print head nozzles are clogged.
❏ Align the print head.
Checking the paper
❏ Use paper supported by this printer.
❏ Do not print on paper that is damp, damaged, or too old.
User's Guide
Solving Problems
155

❏ If the paper is curled or the envelope is puffed up, flatten it.
❏ Do not stack the paper immediately after printing.
❏ Dry the printouts completely before filing or displaying them. When drying the printouts, avoid direct sun light,do not use a dryer, and do not touch the printed side of paper.
❏ When printing images or photos, Epson recommends using genuine Epson paper rather than plain paper. Printon the printable side of the genuine Epson paper.
Checking the print settings
❏ Select the appropriate paper type setting for the type of paper loaded in the printer.
❏ Print using a higher quality setting.
Checking the ink cartridge
❏ Epson recommends using the ink cartridge before the date printed on the package.
❏ For best results, use up ink cartridge within six months of opening the package.
❏ Try to use genuine Epson ink cartridges. This product is designed to adjust colors based on the use of genuineEpson ink cartridges. The use of non-genuine ink cartridges may cause print quality to decline.
Related Information
& “Checking and Cleaning the Print Head” on page 112& “Aligning the Print Head” on page 114& “Available Paper and Capacities” on page 45& “List of Paper Type” on page 47& “Paper Handling Precautions” on page 44
Paper Is Smeared or Scuffed❏ When horizontal banding appears or the top or bottom of the paper is smeared, load paper in the correct
direction and slide the edge guides to the edges of the paper.
❏ When vertical banding appears or the paper is smeared, clean the paper path.
User's Guide
Solving Problems
156

❏ Place the paper on a flat surface to check if it is curled. If it is, flatten it.
❏ When performing manual 2-sided printing, make sure that the ink is completely dry before reloading the paper.
Related Information
& “Loading Paper in the Rear Paper Feed” on page 47& “Cleaning the Paper Path for Ink Smears” on page 114
Paper is Smeared During Automatic 2-Sided PrintingWhen using the automatic 2-sided printing feature and printing high density data such as images and graphs, setthe print density to lower and the drying time to longer.
Related Information
& “Menu Options for Printer Setup” on page 120
Printed Photos are StickyYou may be printing on the wrong side of the photo paper. Make sure you are printing on the printable side.
When printing on the wrong side of the photo paper, you need to clean the paper path.
Related Information
& “Cleaning the Paper Path for Ink Smears” on page 114
Images or Photos are Printed in Unexpected ColorsWhen printing from the Windows printer driver, the Epson auto photo adjustment setting is applied by defaultdepending on the paper type. Try change the setting.
On the More Options tab, select Custom in Color Correction, and then click Advanced. Change the SceneCorrection setting from Auto Correct to any other option. If changing the setting does not work, use any colorcorrection method other than PhotoEnhance in Color Management.
Related Information
& “Adjusting the Print Color” on page 72
Colors Differ from What You See on the Display❏ Display devices such as computer screens have their own display properties. If the display is unbalanced, the
image are not displayed with proper brightness and colors. Adjust the properties of the device.
❏ Light shining into the display has an effect on how the image is seen on the display. Avoid direct sunlight andconfirm the image where an appropriate illuminance is assured.
❏ Colors may differ from what you see on smart devices such as smart phones or tablets with high-resolutiondisplays.
User's Guide
Solving Problems
157

❏ Colors on a display are not quite identical to those on paper because the display device and the printer have adifferent process of producing colors.
Cannot Print Without MarginsMake borderless setting in the print settings. If you select a paper type that does not support borderless printing,you cannot select Borderless. Select a paper type that supports borderless printing.
Related Information
& “Menu Options for Copying” on page 79& “Printing Basics - Windows” on page 55& “Printing Basics - Mac OS” on page 57
Edges of the Image are Cropped During Borderless PrintingDuring borderless printing, the image is slightly enlarged and the protruding area is cropped. Select a smallerenlargement setting.
❏ Control panelChange the Expansion setting.
❏ WindowsClick Settings next to the Borderless checkbox on the printer driver's Main tab, and then change the settings.
❏ Mac OSChange the Expansion setting from the print dialog's Print Settings menu.
Related Information
& “Menu Options for Copying” on page 79
The Position, Size, or Margins of the Printout Are Incorrect❏ Load paper in the correct direction, and slide the edge guides against the edges of the paper.
❏ When placing the originals on the scanner glass, align the corner of the original with the corner indicated by asymbol on the frame of the scanner glass. If the edges of the copy are cropped off, move the original slightlyaway from the corner.
❏ When placing the originals on the scanner glass, clean the scanner glass and the document cover using a dry,soft, clean cloth. If there is dust or stains on the glass, the copy area may extend to include the dust or stains,resulting in the wrong copying position or small images.
❏ Select the appropriate paper size setting.
User's Guide
Solving Problems
158

❏ Adjust the margin setting in the application so that it falls within the printable area.
Related Information
& “Loading Paper in the Rear Paper Feed” on page 47& “Placing Originals on the Scanner Glass” on page 51& “Cleaning the Scanner Glass” on page 115& “Printable Area” on page 168
Printed Characters Are Incorrect or Garbled❏ Connect the USB cable securely to the printer and the computer.
❏ Cancel any paused print jobs.
❏ Do not put the computer manually into the Hibernate mode or the Sleep mode while printing. Pages of garbledtext may be printed next time you start the computer.
❏ If you use the printer driver you had previously used, printed characters may be garbled. Make sure that theprinter driver you are using is for this printer. Check the printer name on the top of the printer driver window.
The Printed Image Is InvertedClear any mirror image settings in the printer driver or the application.
❏ WindowsClear Mirror Image on the printer driver's More Options tab.
❏ Mac OSClear Mirror Image from the print dialog's Print Settings menu.
Mosaic-Like Patterns in the PrintsWhen printing images or photos, print using high-resolution data. Images on websites are often low resolutionalthough they look good enough on the display, and so print quality may decline.
Uneven Colors, Smears, Dots, or Straight Lines Appear in the CopiedImage❏ Clean the paper path.
❏ Clean the scanner glass.
❏ Do not press too hard on the original or the document cover when you are placing the originals on the scannerglass.
❏ When the paper is smeared, lower the copy density setting.
Related Information
& “Cleaning the Paper Path for Ink Smears” on page 114
User's Guide
Solving Problems
159

& “Cleaning the Scanner Glass” on page 115& “Menu Options for Copying” on page 79
Moiré (Cross-Hatch) Patterns Appear in the Copied ImageChange the reduce and enlarge setting or place the original at a slightly different angle.
An Image of the Reverse Side of the Original Appears in the CopiedImage❏ For a thin original, place the original on the scanner glass and then place a piece of black paper over it.
❏ Lower the copy density setting on the control panel.
Related Information
& “Menu Options for Copying” on page 79
The Printout Problem Could Not be ClearedIf you have tried all of the solutions and have not solved the problem, try uninstalling and then reinstalling theprinter driver.
Other Printing Problems
Printing Is Too Slow❏ Close any unnecessary applications.
❏ Lower the quality setting. High quality printing slows down the printing speed.
❏ Enable the bidirectional (or high speed) setting. When this setting is enabled, the print head prints whilemoving in both directions, and the printing speed increases.
❏ WindowsSelect High Speed on the printer driver's More Options tab.
❏ Mac OS
Select System Preferences from the menu > Printers & Scanners (or Print & Scan, Print & Fax), andthen select the printer. Click Options & Supplies > Options (or Driver). Select On as the High SpeedPrinting setting.
User's Guide
Solving Problems
160

❏ Disable quiet mode. This feature slows down the printing speed.
❏ Control Panel
Select on the home screen, and then disable Quiet Mode.
❏ WindowsSelect Off as the Quiet Mode setting on the printer driver's Main tab.
❏ Mac OS
Select System Preferences from the menu > Printers & Scanners (or Print & Scan, Print & Fax), andthen select the printer. Click Options & Supplies > Options (or Driver). Select Off as the Quiet Modesetting.
Printing or Copying Slows Down Dramatically During ContinuousOperationPrinting or Copying slows down to prevent the printer mechanism from overheating and being damaged.However, you can continue operation. To return to normal speed, leave the printer idle for at least 30 minutes. Thespeed does not return to normal if the power is off.
Cannot Cancel Printing from a Computer Running Mac OS X v10.6.8If you want to stop printing from your computer, make the following settings.
Run Web Config, and then select Port9100 as the Top Priority Protocol setting in AirPrint Setup. Select SystemPreferences from the menu > Printers & Scanners (or Print & Scan, Print & Fax), remove the printer, andthen add the printer again.
Cannot Start Scanning❏ Connect the USB cable securely to the printer and the computer. If you are using a USB hub, try to connect the
printer directly to the computer.
❏ If you scan at a high resolution over a network, a communication error may occur. Lower the resolution.
❏ Make sure that the correct printer (scanner) is selected on Epson Scan 2.
Check whether or not the printer is recognized when using Windows
In Windows, make sure the printer (scanner) is displayed in Scanner and Camera. The printer (scanner) should bedisplayed as "EPSON XXXXX (printer name)". If the printer (scanner) is not displayed, uninstall and then re-install Epson Scan 2. See the following to access Scanner and Camera.
❏ Windows 10Click on the start button, and then select Windows System > Control Panel, enter "Scanner and Camera" in thesearch charm, click View scanners and cameras, and then check if the printer is displayed.
❏ Windows 8.1/Windows 8Select Desktop > Settings > Control Panel, enter "Scanner and Camera" in the search charm, click ShowScanner and Camera, and then check if the printer is displayed.
User's Guide
Solving Problems
161

❏ Windows 7Click the start button and select Control Panel, enter "Scanner and Camera" in the search charm, click Viewscanners and cameras, and then check if the printer is displayed.
❏ Windows VistaClick the start button, select Control Panel > Hardware and Sound > Scanners and Cameras, and then checkif the printer is displayed.
❏ Windows XPClick the start button, select Control Panel > Printers and Other Hardware > Scanner and Cameras, and thencheck if the printer is displayed.
Related Information
& “Uninstalling Applications” on page 137& “Installing Applications” on page 135
Cannot Start Scanning when Using the Control Panel❏ Make sure Epson Scan 2 and Epson Event Manager are installed correctly.
❏ Check the scanning setting assigned in Epson Event Manager.
Scanned Image Problems
Uneven Colors, Dirt, Spots, and so on Appear when Scanning fromthe Scanner Glass❏ Clean the scanner glass.
❏ Remove any trash or dirt that adheres to the original.
❏ Do not press with too much force on the original or the document cover. If you press with too much force,blurring, smudges, and spots may occur.
Related Information
& “Cleaning the Scanner Glass” on page 115
The Image Quality Is Rough❏ Set the Mode in Epson Scan 2 according to the original you want to scan. Scan using the settings for documents
in Document Mode, and the settings for photos in Photo Mode.
❏ In Epson Scan 2, adjust the image using items on the Advanced Settings tab, and then scan.
❏ If the resolution is low, try increasing the resolution and then scanning.
User's Guide
Solving Problems
162

Related Information
& “Scanning Using Epson Scan 2” on page 88
Offset Appears in the Background of ImagesImages on the back of the original may appear in the scanned image.
❏ In Epson Scan 2, select the Advanced Settings tab, and then adjust the Brightness.This feature may not be available depending on the settings on the Main Settings tab > Image Type or othersettings on the Advanced Settings tab.
❏ In Document Mode in Epson Scan 2, select the Advanced Settings tab, and then Image Option > TextEnhancement.
❏ When scanning from the scanner glass, place black paper or a desk pad over the original.
Related Information
& “Placing Originals” on page 51
Text is Blurred❏ In Document Mode in Epson Scan 2, select the Advanced Settings tab, and then Image Option > Text
Enhancement.
❏ Select Document Mode as the Mode in Epson Scan 2. Scan using the settings for documents in DocumentMode.
❏ In Document Mode in Epson Scan 2, when Image Type on the Main Settings tab is set to Black & White,adjust Threshold on the Advanced Settings tab. When you increase the Threshold, the black color areabecomes larger.
❏ If the resolution is low, try increasing the resolution and then scanning.
Related Information
& “Scanning Documents (Document Mode)” on page 88
Moiré Patterns (Web-Like Shadows) AppearIf the original is a printed document, moiré patterns (web-like shadows) may appear in the scanned image.
❏ On the Advanced Settings tab in Epson Scan 2, set Descreening.
❏ Change the resolution, and then scan again.
User's Guide
Solving Problems
163

Related Information
& “Scanning Using Epson Scan 2” on page 88
Cannot Scan the Correct Area on the Scanner Glass❏ Make sure the original is placed correctly against the alignment marks.
❏ If the edge of the scanned image is missing, move the original slightly away from the edge of the scanner glass.
❏ When placing multiple originals on the scanner glass, make sure there is a gap of at least 20 mm (0.79 in.)between the originals.
❏ When scanning from the control panel and selecting the auto scan area cropping function, remove any trash ordirt from the scanner glass and document cover. If there is any trash or dirt around the original, the scanningrange expands to include it.
Related Information
& “Placing Originals” on page 51& “Cleaning the Scanner Glass” on page 115
Cannot Preview in Thumbnail❏ When placing multiple originals on the scanner glass, make sure there is a gap of at least 20 mm (0.79 in.)
between the originals.
❏ Check that the original is placed straight.
❏ Depending on the original, previewing may not be performed in Thumbnail. In this situation, clear theThumbnail check box at the top of the preview widow to preview the entire scanned area, and then createmarquees manually.
Related Information
& “Scanning Using Epson Scan 2” on page 88
Text is Not Recognized Correctly when Saving as a Searchable PDF❏ On the Image Format Options window in Epson Scan 2, check that Text Language is set correctly on the Text
tab.
❏ Check that the original is placed straight.
❏ Use an original with clear text. Text recognition may decline for the following types of originals.
❏ Originals that have been copied a number of times
❏ Originals received by fax (at low resolutions)
❏ Originals on which the letter spacing or line spacing is too small
❏ Originals with ruled lines or underlining over the text
❏ Originals with hand-written text
❏ Originals with creases or wrinkles
User's Guide
Solving Problems
164

❏ In Document Mode in Epson Scan 2, when Image Type on the Main Settings tab is set to Black & White,adjust Threshold on the Advanced Settings tab. When you increase the Threshold, black becomes stronger.
❏ In Document Mode in Epson Scan 2, select the Advanced Settings tab, and then Image Option > TextEnhancement.
Related Information
& “Scanning Documents (Document Mode)” on page 88
Cannot Solve Problems in the Scanned ImageIf you have tried all of the solutions and have not solved the problem, initialize the Epson Scan 2 settings usingEpson Scan 2 Utility.
Note:Epson Scan 2 Utility is an application that comes with Epson Scan 2.
1. Start Epson Scan 2 Utility.
❏ Windows 10Click the start button, and then select EPSON > Epson Scan 2 Utility.
❏ Windows 8.1/Windows 8Enter the application name in the search charm, and then select the displayed icon.
❏ Windows 7/Windows Vista/Windows XPClick the start button, and then select All Programs or Programs > EPSON > Epson Scan 2 > Epson Scan2 Utility.
❏ Mac OSSelect Go > Applications > Epson Software > Epson Scan 2 Utility.
2. Select the Other tab.
3. Click Reset.
Note:If initialization does not solve the problem, uninstall and re-install Epson Scan 2.
Related Information
& “Uninstalling Applications” on page 137& “Installing Applications” on page 135
Other Scanning Problems
Scanning Is Too SlowLower the resolution.
User's Guide
Solving Problems
165

Related Information
& “Scanning Using Epson Scan 2” on page 88
Scanning Slows Down Dramatically During Continuous ScanningScanning slows down to prevent the printer mechanism from overheating and being damaged. However, you cancontinue scanning. To return to normal scanning speed, leave the printer idle for at least 30 minutes. Scanningspeed does not return to normal if the power is off.
Scanning Stops when Scanning to PDF/Multi-TIFF❏ When scanning using Epson Scan 2, you can continuously scan up to 999 pages in PDF format and up to 200
pages in Multi-TIFF format.
❏ When scanning large volumes, we recommend scanning in grayscale.
❏ Increase the free space on the computer's hard disk. Scanning may stop if there is not enough free space.
❏ Try scanning at a lower resolution. Scanning stops if the total data size reaches the limit.
Related Information
& “Scanning Using Epson Scan 2” on page 88
Other Problems
Slight Electric Shock when Touching the PrinterIf many peripherals are connected to the computer, you may feel a slight electric shock when touching the printer.Install a ground wire to the computer that is connected to the printer.
Operation Sounds Are LoudIf operations sounds are too loud, enable Quiet Mode. Enabling this feature may reduce printing speed.
❏ Control panel
Select on the home screen, and then enable Quiet Mode.
❏ Windows printer driverEnable Quiet Mode on the Main tab.
❏ Mac OS printer driver
Select System Preferences from the menu > Printers & Scanners (or Print & Scan, Print & Fax), and thenselect the printer. Click Options & Supplies > Options (or Driver). Select On as the Quiet Mode setting.
User's Guide
Solving Problems
166

Application Is Blocked by a Firewall (for Windows Only)Add the application to the Windows Firewall allowed program in security settings on the Control Panel.
User's Guide
Solving Problems
167

Appendix
Technical Specifications
Printer Specifications
Print Head Nozzle Placement Black ink nozzles: 180
Color ink nozzles: 59 for each color
Weight of Paper* Plain Paper 64 to 90 g/m2(17 to 24lb)
Envelopes Envelope #10, DL, C6: 75 to 90 g/m2 (20 to 24 lb)
* Even when the paper thickness is within this range, the paper may not feed in the printer or the print quality may declinedepending on the paper properties or quality.
Printable Area
Printable Area for Single Sheets
Print quality may decline in the shaded areas due to the printer's mechanism.
Printing with borders
A 3.0 mm (0.12 in.)
B 3.0 mm (0.12 in.)
C 41.0 mm (1.61 in.)
D 37.0 mm (1.46 in.)
Borderless printing
A 44.0 mm (1.73 in.)
B 40.0 mm (1.57 in.)
User's Guide
Appendix
168

Printable Area for Envelopes
Print quality may decline in the shaded areas due to the printer's mechanism.
A 3.0 mm (0.12 in.)
B 5.0 mm (0.20 in.)
C 18.0 mm (0.71 in.)
D 41.0 mm (1.61 in.)
Scanner Specifications
Scanner Type Flatbed
Photoelectric Device CIS
Maximum Document Size 216×297 mm (8.5×11.7 in.)
A4, Letter
Resolution 1200 dpi (main scan)
2400 dpi (sub scan)
Color Depth Color
❏ 48 bits per pixel internal (16 bits per pixel per color internal)
❏ 24 bits per pixel external (8 bits per pixel per color external)
Grayscale
❏ 16 bits per pixel internal
❏ 8 bits per pixel external
Black and white
❏ 16 bits per pixel internal
❏ 1 bits per pixel external
Light Source LED
Interface Specifications
For Computer Hi-Speed USB
User's Guide
Appendix
169

Network Function List
Network Functions and IPv4/IPv6
Functions Supported Remarks
Network Printing EpsonNet Print (Windows) IPv4 ✓ -
Standard TCP/IP (Windows) IPv4, IPv6 ✓ -
WSD Printing (Windows) IPv4, IPv6 ✓ Windows Vista orlater
Bonjour Printing (Mac OS) IPv4, IPv6 ✓ -
IPP Printing (Windows, MacOS)
IPv4, IPv6 ✓ -
UPnP Printing IPv4 - Informationappliance
PictBridge Printing (Wi-Fi) IPv4 - Digital camera
Epson Connect (Email Print,Remote Print)
IPv4 ✓ -
AirPrint (iOS, Mac OS) IPv4, IPv6 ✓ iOS 5 or later, MacOS X v10.7 or later
Google Cloud Print IPv4, IPv6 ✓ -
Network Scanning Epson Scan 2 IPv4, IPv6 ✓ -
Event Manager IPv4 ✓ -
Epson Connect (Scan toCloud)
IPv4 - -
AirPrint (Scan) IPv4, IPv6 ✓ OS X Mavericks orlater
Fax Send a fax IPv4 - -
Receive a fax IPv4 - -
AirPrint (Faxout) IPv4, IPv6 - -
Wi-Fi Specifications
Standards IEEE802.11b/g/n*1
Frequency Range 2.4 GHz
Maximum Radio-Frequency PowerTransmitted
20 dBm (EIRP)
Coordination Modes Infrastructure, Wi-Fi Direct (Simple AP)*2*3
Wireless Securities*4 WEP (64/128bit), WPA2-PSK (AES)*5
User's Guide
Appendix
170

*1 IEEE802.11n is only available for the HT20.
*2 Not supported for IEEE 802.11b.
*3 Simple AP mode is compatible with a Wi-Fi connection (infrastructure).
*4 Wi-Fi Direct supports WPA2-PSK (AES) only.
*5 Complies with WPA2 standards with support for WPA/WPA2 Personal.
Security Protocol
SSL/TLS HTTPS Server/Client, IPPS
Supported Third Party Services
AirPrint Print iOS 5 or later/Mac OS X v10.7.x or later
Scan OS X Mavericks or later
Google Cloud Print
Dimensions
Dimensions Storage
❏ Width: 375 mm (14.8 in.)
❏ Depth: 300 mm (11.8 in.)
❏ Height: 170 mm (6.7 in.)
Printing
❏ Width: 375 mm (14.8 in.)
❏ Depth: 578 mm (22.8 in.)
❏ Height: 242 mm (9.5 in.)
Weight* Approx. 4.3 kg (9.5 lb)
* Without the ink cartridges and the power cord.
Electrical Specifications
Model 100 to 240 V Model 220 to 240 V Model
Rated Frequency Range 50 to 60 Hz 50 to 60 Hz
Rated Current 0.4 to 0.2 A 0.2 A
User's Guide
Appendix
171

Power Consumption (with USB Con-nection)
Standalone copying: Approx. 12.0 W(ISO/IEC24712)
Ready mode: Approx. 5.0 W
Sleep mode: Approx. 0.8 W
Power off: Approx. 0.3 W
Standalone copying: Approx. 12.0 W(ISO/IEC24712)
Ready mode: Approx. 5.0 W
Sleep mode: Approx. 0.8 W
Power off: Approx. 0.3 W
Note:❏ Check the label on the printer for its voltage.
❏ For European users, see the following Website for details on power consumption.http://www.epson.eu/energy-consumption
Environmental Specifications
Operation Use the printer within the range shown in the following graph.
Temperature: 10 to 35°C (50 to 95°F)
Humidity: 20 to 80% RH (without condensation)
Storage Temperature: -20 to 40°C (-4 to 104°F)*
Humidity: 5 to 85% RH (without condensation)
* You can store for one month at 40°C (104°F).
Environmental Specifications for Ink Cartridges
Storage Temperature -30 to 40 °C (-22 to 104 °F)*
Freezing Temperature -16 °C (3.2 °F)
Ink thaws and is usable after approximately 3 hours at 25 °C (77 °F).
* You can store for one month at 40 °C (104 °F).
System Requirements❏ Windows 10 (32-bit, 64-bit)/Windows 8.1 (32-bit, 64-bit)/Windows 8 (32-bit, 64-bit)/Windows 7 (32-bit, 64-
bit)/Windows Vista (32-bit, 64-bit)/Windows XP SP3 or later (32-bit)/Windows XP Professional x64 Edition SP2or later
❏ macOS Mojave/macOS High Sierra/macOS Sierra/OS X El Capitan/OS X Yosemite/OS X Mavericks/OS XMountain Lion/Mac OS X v10.7.x/Mac OS X v10.6.8
User's Guide
Appendix
172

Note:❏ Mac OS may not support some applications and features.
❏ The UNIX File System (UFS) for Mac OS is not supported.
Regulatory Information
Standards and Approvals
Standards and Approvals for European Model
For European users
Hereby, Seiko Epson Corporation declares that the following radio equipment model is in compliance withDirective 2014/53/EU. The full text of the EU declaration of conformity is available at the following website.
http://www.epson.eu/conformity
C636A
For use only in Ireland, UK, Austria, Germany, Liechtenstein, Switzerland, France, Belgium, Luxemburg,Netherlands, Italy, Portugal, Spain, Denmark, Finland, Norway, Sweden, Iceland, Croatia, Cyprus, Greece,Slovenia, Malta, Bulgaria, Czech, Estonia, Hungary, Latvia, Lithuania, Poland, Romania, and Slovakia.
Epson cannot accept responsibility for any failure to satisfy the protection requirements resulting from a non-recommended modification of the products.
Standards and Approvals for Australian Model
EMC AS/NZS CISPR32 Class B
Epson hereby declares that the following equipment Models are in compliance with the essential requirements andother relevant provisions of AS/NZS4268:
C636A
Epson cannot accept responsibility for any failure to satisfy the protection requirements resulting from a non-recommended modification of the products.
Restrictions on CopyingObserve the following restrictions to ensure the responsible and legal use of the printer.
Copying of the following items is prohibited by law:
❏ Bank bills, coins, government-issued marketable securities, government bond securities, and municipalsecurities
❏ Unused postage stamps, pre-stamped postcards, and other official postal items bearing valid postage
User's Guide
Appendix
173

❏ Government-issued revenue stamps, and securities issued according to legal procedure
Exercise caution when copying the following items:
❏ Private marketable securities (stock certificates, negotiable notes, checks, etc.), monthly passes, concessiontickets, etc.
❏ Passports, driver’s licenses, warrants of fitness, road passes, food stamps, tickets, etc.
Note:Copying these items may also be prohibited by law.
Responsible use of copyrighted materials:
Printers can be misused by improperly copying copyrighted materials. Unless acting on the advice of aknowledgeable attorney, be responsible and respectful by obtaining the permission of the copyright holder beforecopying published material.
Transporting and Storing the PrinterWhen you need to transport the printer to move or for repairs, follow the steps below to pack the printer.
!Caution:
Be careful not to trap your hand or fingers when opening or closing the scanner unit. Otherwise you may be injured.
cImportant:
❏ When storing or transporting the printer, avoid tilting it, placing it vertically, or turning it upside down;otherwise ink may leak.
❏ Leave the ink cartridges installed. Removing the cartridges can dry out the print head and may prevent theprinter from printing.
1. Turn off the printer by pressing the P button.
2. Make sure the power light turns off, and then unplug the power cord.
cImportant:
Unplug the power cord when the power light is off. Otherwise, the print head does not return to the homeposition causing the ink to dry, and printing may become impossible.
User's Guide
Appendix
174

3. Disconnect all cables such as the power cord and USB cable.
4. Remove all of the paper from the printer.
5. Make sure there are no originals on the printer.
6. Open the scanner unit with the document cover closed. Secure the ink cartridge holder to the case with tape.
7. Close the scanner unit.
For safety, the scanner unit is closed in two steps.
Note:The scanner unit cannot be opened from the position shown below. Close it completely before opening it.
User's Guide
Appendix
175

8. Prepare to pack the printer as shown below.
9. Pack the printer in its box, using the protective materials.
When you use the printer again, make sure you remove the tape securing the ink cartridge holder. If print qualityhas declined the next time you print, clean and align the print head.
Related Information
& “Part Names and Functions” on page 14& “Checking and Cleaning the Print Head” on page 112& “Aligning the Print Head” on page 114
Where to Get Help
Technical Support Web SiteIf you need further help, visit the Epson support website shown below. Select your country or region and go to thesupport section of your local Epson website. The latest drivers, FAQs, manuals, or other downloadables are alsoavailable from the site.
http://support.epson.net/
http://www.epson.eu/Support (Europe)
If your Epson product is not operating properly and you cannot solve the problem, contact Epson support servicesfor assistance.
Contacting Epson Support
Before Contacting Epson
If your Epson product is not operating properly and you cannot solve the problem using the troubleshootinginformation in your product manuals, contact Epson support services for assistance. If Epson support for your areais not listed below, contact the dealer where you purchased your product.
Epson support will be able to help you much more quickly if you give them the following information:
User's Guide
Appendix
176

❏ Product serial number(The serial number label is usually on the back of the product.)
❏ Product model
❏ Product software version(Click About, Version Info, or a similar button in the product software.)
❏ Brand and model of your computer
❏ Your computer operating system name and version
❏ Names and versions of the software applications you normally use with your product
Note:Depending on the product, network settings may be stored in the product’s memory. Due to breakdown or repair of aproduct, settings may be lost. Epson shall not be responsible for the loss of any data, for backing up or recovering settingseven during a warranty period. We recommend that you make your own backup data or take notes.
Help for Users in Europe
Check your Pan-European Warranty Document for information on how to contact Epson support.
Help for Users in Australia
Epson Australia wishes to provide you with a high level of customer service. In addition to your product manuals,we provide the following sources for obtaining information:
Internet URL
http://www.epson.com.au
Access the Epson Australia World Wide Web pages. Worth taking your modem here for the occasional surf! Thesite provides a download area for drivers, Epson contact points, new product information and technical support (e-mail).
Epson Helpdesk
Phone: 1300-361-054
Epson Helpdesk is provided as a final backup to make sure our clients have access to advice. Operators on theHelpdesk can aid you in installing, configuring and operating your Epson product. Our Pre-sales Helpdesk staffcan provide literature on new Epson products and advise where the nearest dealer or service agent is located. Manytypes of queries are answered here.
We encourage you to have all the relevant information on hand when you ring. The more information you prepare,the faster we can help solve the problem. This information includes your Epson product manuals, type ofcomputer, operating system, application programs, and any information you feel is required.
Transportation of Product
Epson recommends retaining product packaging for future transportation.
User's Guide
Appendix
177

Help for Users in New Zealand
Epson New Zealand wishes to provide you with a high level of customer service. In addition to your productdocumentation, we provide the following sources for obtaining information:
Internet URL
http://www.epson.co.nz
Access the Epson New Zealand World Wide Web pages. Worth taking your modem here for the occasional surf!The site provides a download area for drivers, Epson contact points, new product information and technicalsupport (e-mail).
Epson Helpdesk
Phone: 0800 237 766
Epson Helpdesk is provided as a final backup to make sure our clients have access to advice. Operators on theHelpdesk can aid you in installing, configuring and operating your Epson product. Our Pre-sales Helpdesk staffcan provide literature on new Epson products and advise where the nearest dealer or service agent is located. Manytypes of queries are answered here.
We encourage you to have all the relevant information on hand when you ring. The more information you prepare,the faster we can help solve the problem. This information includes your Epson product documentation, type ofcomputer, operating system, application programs, and any information you feel is required.
Transportation of Product
Epson recommends retaining product packaging for future transportation.
User's Guide
Appendix
178