kentucky 4-h woodworking program
TRANSCRIPT

KENTUCKY 4-H WOODWORKING PROGRAM
LEVEL 1 YOUTH PROJECT GUIDE
Visit the 4-H Woodworking webpage at https://4-h.ca.uky.edu/woodworking for additional information.
The Kentucky 4-H Woodworking Program engages 4-H members in a variety of
hands-on activities and experiences that foster an increased understanding and
appreciation for wood sciences and woodworking.
The Level 1 Youth Project Guide includes the following wood science (WS) projects:
WS101 Note Holder
WS102 Magazine Rack
WS103 Picture Frame
WS104 Bed for Cat or Small Dog
WS105 Necktie or Towel Holder
WS106 Nest for Robins and Phoebes
WS107 Tin Can Flower Pot
WS108 Pet Lunch Counter
WS109 Door Stop
WS110 Planter
WS111 Sandpaper Block
WS112 Pencil Holder
WS113 Small Flag Holder
WS114 Knife Rack
WS115 Ice Cream Stick Frame
WS116 4-H Bookends
WS117 Belt and Necktie Rack
WS118 Airplane and Stand
WS119 Log Cabin
WS120 Hurricane Lamp
WS121 Trivet (Hot Pot Support)
WS122 Launch Pad Napkin Holder
WS123 Half Shelf
WS124 Bunk House Serving Tray
Note: In this Project Guide inch is abbreviated as in or “.
Revised by George Duncan, Teri Dowdy and Joyce Peel, Biosystems and Agr. Engr. Dept., Oct. 2003, from original material by George Turner, et. al. Reviewed by Lloyd Saylor, Ext. Agent for 4-H Youth Development, Butler Co., Ray Wilson, Extension Agent for Ag. & Nat. Resources, Leslie Co., Frank Hicks, Ext. Agent for Ag. & Nat. Resources, Clark Co. Re-typing of text by Carla Humphrey, student assistant, 4-H Y. D. Dept.; Reviewed by Patrick Allen, Extension Agent for 4-H Youth Development, Scott County and re-formatted by Ashley Osborne, Extension Specialist for 4-H Youth Development, May 2020.

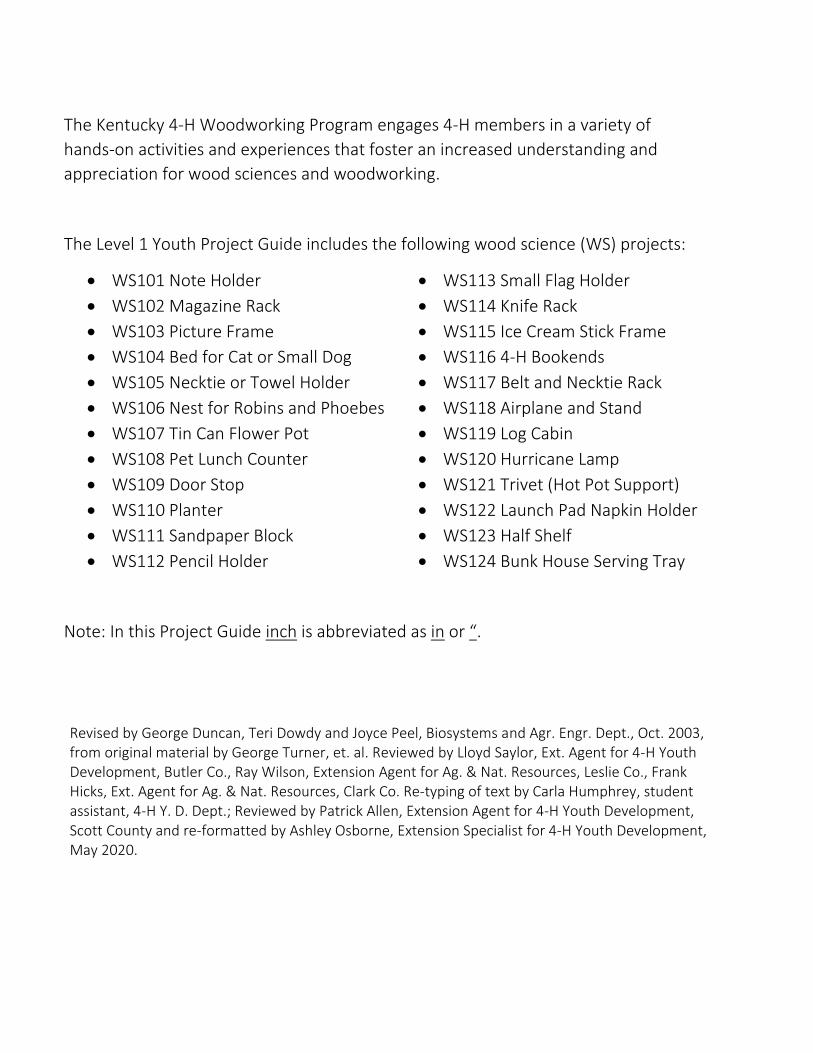
Note Holder WS101
MATERIALS NEEDED:
1 piece wood - ¾ in x 2 in x 2 in
1 piece wood - ¾ in x 3 in x 3½ in
1 wooden spring-type clothespin
2 - 1½ in nails
1 - ½ in woodscrew
Wood glue
Shellac
TOOLS NEEDED:
Saw
Drill - 1 8⁄ in bit
Sandpaper
Brush
Hammer
Screwdriver
Shellac, varnish or other finish
INSTRUCTIONS:
1. Cut pieces to size.
2. Sand pieces smooth.
3. Glue the ¾ in x 2 in x 2 in wood piece to the ¾ in x 3 in x 3½ in wood piece and nail from the
bottom into the top piece. The assembly should be centered on the base and flush with the
back. Wipe away any glue from the edges.
4. Glue the clothespin to the top of the ¾ in x 2 in x 2 in wood piece and secure with the
screw.
5. When the glue dries, apply a coat of shellac, varnish or other finish.

Magazine Rack WS102
MATERIALS NEEDED:
1 piece wood - ¼ in x 12 in x 12 in – back
1 piece wood - ¼ in x 12 in x 7½ in – front
2 pieces wood - ½ in x 12 in x 5 in – sides
1 piece wood - ½ in x 11 in x 5 in – bottom
Wood glue
2d finishing nails
TOOLS NEEDED:
Jig saw
Hammer
4d finishing nails
Sandpaper
Paint or shellac
INSTRUCTIONS:
1. Cut pieces to size, cut curves on sides and
front.
2. Glue and nail back to sides.
3. Glue and nail bottom in place.
4. Glue and nail front in place.
5. Sand and finish.


?….
Picture Frame WS103
MATERIALS NEEDED:
½ in x ¾ in wood – length will be 1½ in longer than
picture.
Heavy cardboard – size will be 1½ in larger than
picture.
Glue
4 -1¼ in finishing nails
TOOLS NEEDED:
Hammer
Saw
Utility knife
Sandpaper
Stain and varnish
INSTRUCTIONS:
1. Cut cardboard 1½ in longer and 1½ in wider than the
picture to be framed.
2. Cut two pieces of wood the same length as the cardboard. Cut two more pieces whose
length is equal to the width of the picture.
3. Glue and nail frame together.
4. Sand and finish.
5. Glue picture to cardboard leaving ¾ in margin all around.
6. Glue frame to cardboard.
NOTE: A piece of string may be glued or fastened on small tacks in back of picture to hang on
wall. (Tacks should be put into frame).

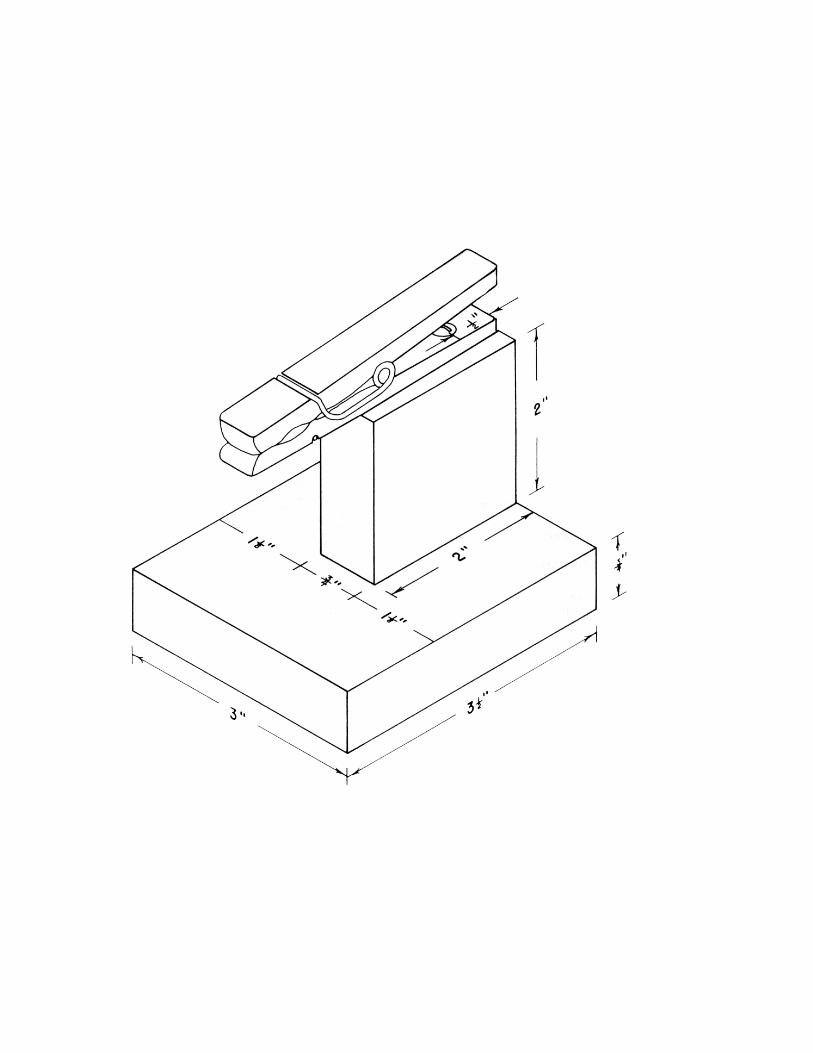
Bed for Cat or Small Dog WS104
MATERIALS NEEDED:
All wood may be ¾ in dressed boards. A 1 x 8 board is assumed which is actually ¾ in x 7 ½
in or less. If any other thickness is used, dimensions will have to be changed accordingly.
1 piece wood - 7 ½ in x 18 in - back
2 pieces wood - 7½ in x 11¾ in - ends
1 piece wood - 7½ in x 10 in - front
1 piece wood - 2 in x 7¾ in - front
2 pieces wood - 2 in x 171516⁄ in - floor supports (cut approx. 1
16⁄ in short to allow easy fit)
1 piece ½ in plywood 11 in x 18 in - floor (cut slightly undersize to allow easy fit)
4d and 6d finishing nails
TOOLS NEEDED:
Saw
Hammer
Sandpaper
Shellac or paint
INSTRUCTIONS:
1. Cut pieces to size.
2. Nail floor support to back with equal spacing at each end, flush at bottom edge. Use 4d
nails.
3. Nail ends to back. Use 6d nails.
4. Nail front pieces to ends. Use 6d nails. Be careful of splitting the narrow piece.
5. Set box on edge with front face down, put front
floor support in place, align and nail with 4d nails
into front pieces.
6. Put floor in place and nail floor to supports with 4d
nails.
NOTE: If pet is larger or smaller, dimensions can be
changed accordingly.


Necktie or Towel Holder WS105
MATERIALS NEEDED:
1 piece wood – ¼ in x 258 ⁄ in x 18 in – back
2 pieces wood – 1 in x 2 in x 2 in – ends
1 piece ¼ in dowel - 18 in long
Glue
4 – ¾ in brads
2 – No. 6 x ¾ in
round head wood
screws
TOOLS NEEDED:
Saw
Hammer
Drill with ¼ in and
1/8 in bits
Sandpaper
Paint or stain and
varnish
INSTRUCTIONS:
1. Cut pieces to size.
2. Drill holes in end
pieces.
3. Drill holes in back.
4. Glue dowel in one end piece. Set against back and glue dowel in other end so back sides of
end pieces will be in line.
5. Glue and nail ends to back.
6. Sand and finish.


Nest for Robins and Phoebes WS106
MATERIALS NEEDED:
2 pieces wood – 1 in x 5½ in x 4¼ in – middle pieces
1 piece wood – 1 in x 5½ in x 9 in – back
1 piece wood – 1 in x 158 ⁄ in x 9 in – front
8 – 6d finishing nails
TOOLS NEEDED:
Saw
Hammer
Drill with 18 ⁄ in bit
Sandpaper
Paint and shellac (or outdoor protective coating of some type)
INSTRUCTIONS:
1. Cut pieces to size.
2. Drill mounting holes in back.
3. Nail middle pieces to back.
4. Nail front to middle pieces.
5. Sand and finish as desired.


Tin Can Flower Pot WS107
MATERIALS NEEDED:
1 tin can with paper wrapper
Enough ice cream sticks to go around can
Glue
TOOLS NEEDED:
Sandpaper
Paint or stain and varnish
INSTRUCTIONS:
1. Leaving paper wrapper on the can, glue sticks in place, one at a time, letting each one dry
before gluing another one on.
2. Sand and finish as desired.


Pet Lunch Counter WS108
MATERIALS NEEDED:
1 piece wood ¾ in x 4 in x 9 in – bottom
2 pieces wood ¾ in x 4 in x 5 in – ends
2 pieces wood ½ in x 3 in x 10½ in – sides
1 piece wood ¾ in x 4 in x 1¾ in – divider
Glue
4d finishing nails
2 plastic refrigerator dishes
TOOLS NEEDED:
Saw Hammer Sandpaper
Paint or varnish (stain optional)
INSTRUCTIONS:
1. Cut pieces to size.
2. Glue and nail ends to bottom.
3. Glue and nail sides to ends.
4. Glue divider between sides and nail through sides into ends of divider.
5. Sand, paint or varnish
6. Put a plastic dish in each side. One will be for water, the other for food.


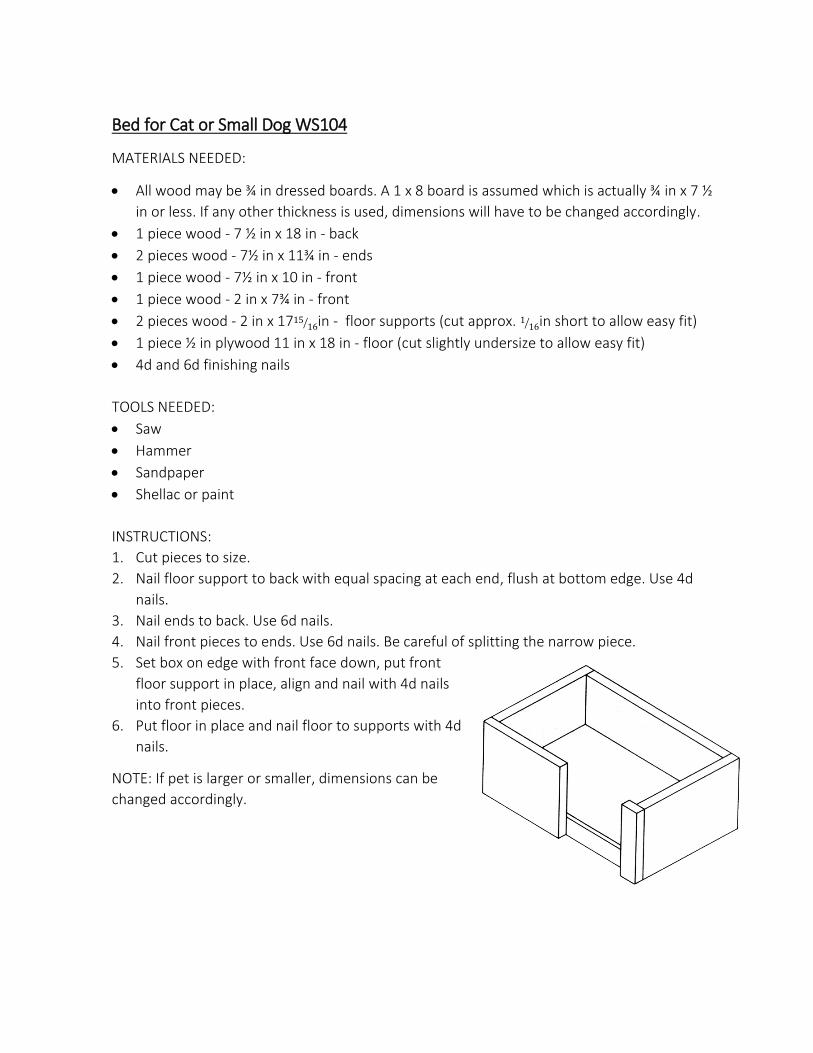
Door Stop WS109
MATERIALS NEEDED:
1 piece wood - ¾ in x 2 in x 7 in
1 piece wood - ¾ in x 2 in x 5 in
2 - No. 8 x 1½ in flathead wood screws
TOOLS NEEDED:
Saw
Screwdriver
Drill, 18⁄ in bit
INSTRUCTIONS:
1. Make the angled cuts on the ¾ in x 2 in x 7 in pieces as shown in the diagram. Do the same
for the ¾ in x 2 in x 5 in piece.
2. Drill two holes through the back into the longer piece with a 18⁄ in bit. The holes should be ½
in from top and bottom as shown.
3. Screw the back onto the stop.
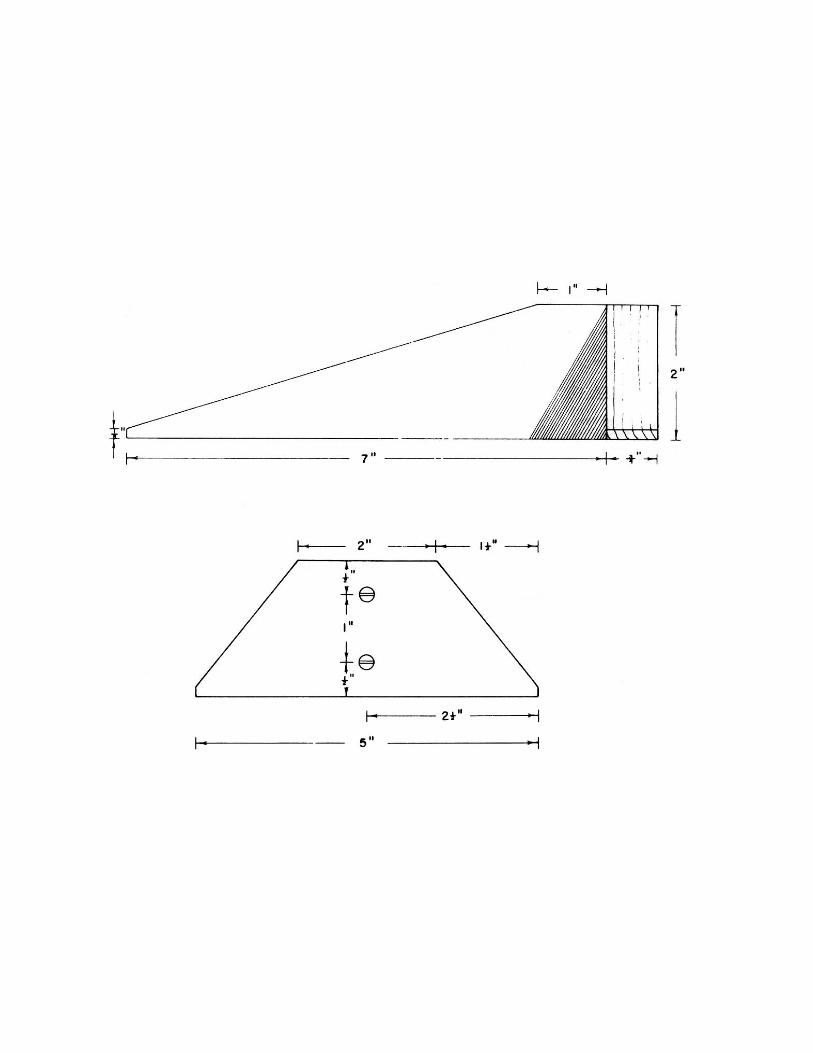
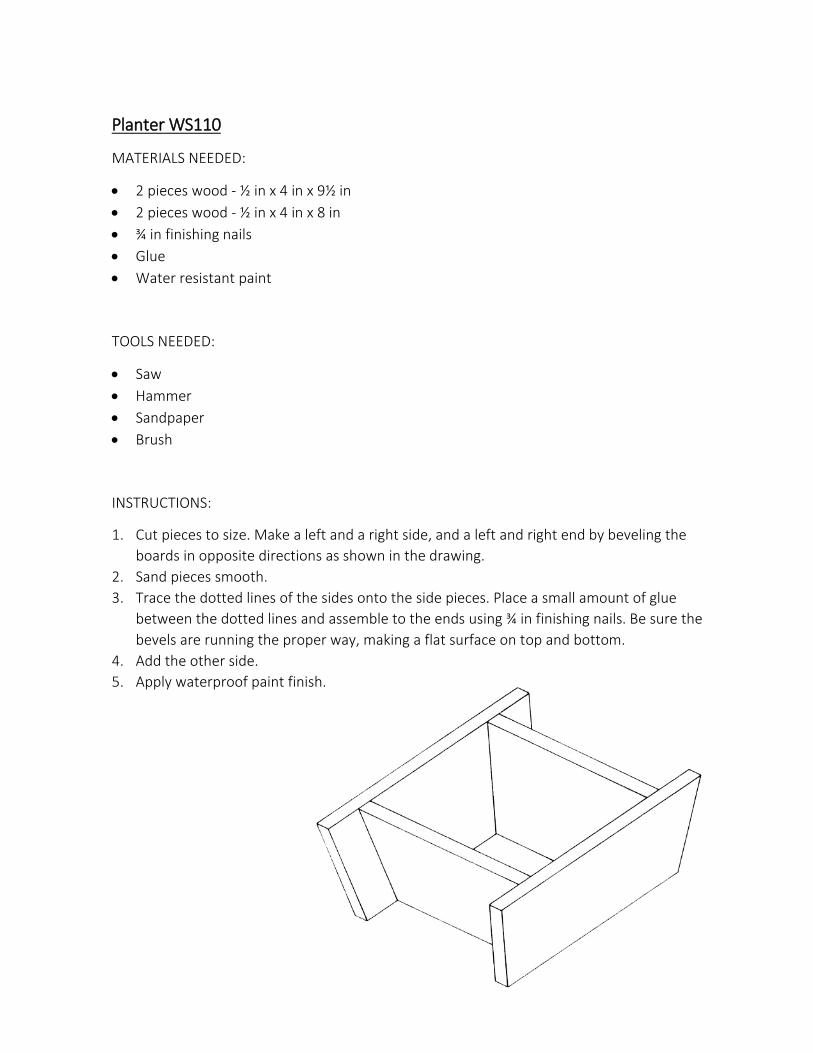
Planter WS110
MATERIALS NEEDED:
2 pieces wood - ½ in x 4 in x 9½ in
2 pieces wood - ½ in x 4 in x 8 in
¾ in finishing nails
Glue
Water resistant paint
TOOLS NEEDED:
Saw
Hammer
Sandpaper
Brush
INSTRUCTIONS:
1. Cut pieces to size. Make a left and a right side, and a left and right end by beveling the
boards in opposite directions as shown in the drawing.
2. Sand pieces smooth.
3. Trace the dotted lines of the sides onto the side pieces. Place a small amount of glue
between the dotted lines and assemble to the ends using ¾ in finishing nails. Be sure the
bevels are running the proper way, making a flat surface on top and bottom.
4. Add the other side.
5. Apply waterproof paint finish.


Sandpaper Block WS111
MATERIALS NEEDED:
1 piece wood - 1½ in x 4 in x 5 in
2– 1¾ in roundhead wood screws
TOOLS NEEDED:
Table saw with tilting blade
Screwdriver
Drill with 18⁄ in bit
Sandpaper
INSTRUCTIONS:
1. Cut block to size.
2. Set table saw on 60˚ and cut out V-notch. (Save waste)
3. Set scrap in V-notch and drill 2 holes for screws.
4. Insert screws.
5. To use, remove filler piece, wrap sandpaper around block and tuck edges in to V-groove,
insert filler piece and tighten with screws.


Pencil Holder WS112
MATERIALS NEEDED:
2 pieces wood ¾ in x 3 in x 6 in (hardwood) or one piece 1½ in x 3 in x 6 in
Glue (if two pieces used)
Varnish
TOOLS NEEDED:
Wood clamp
Drill - 5 16 ⁄ in bit
Sandpaper
Brush
Saw
INSTRUCTIONS:
1. Cut pieces to size.
2. For two pieces, glue the two pieces together forming a 1½ in x 3 in x 6 in block. Be sure to
clamp the block securely and wipe off the excess glue. When block is dry remove clamp.
3. On the 3 in x 6 in face draw a 1 in grid. At the intersection points, drill 5 16 ⁄ in holes, 1 in
deep. You should have 10 holes all 1 in apart.
4. Sand smooth and round the long edges on the top face.
5. Apply a coat of clear varnish or other finish.


Small Flag Holder WS113
MATERIALS NEEDED:
1 piece wood ½ in x 4 in x 10 in
3 pieces wood ½ in x ¾ in x 4 in
¾ in finishing nails
Glue
Varnish
TOOLS NEEDED:
Saw
Drill
Round file
Sandpaper
Brush
INSTRUCTIONS:
1. Cut pieces to size.
2. With a round file make a ¼ in groove 178 ⁄ in from either end of both end flag supports.
3. Drill a hole the size of the flag staff in the center of the middle support.
4. Glue and nail the end supports to the ends of the base with the grooves down and to the
inside, and the wider ¾ in surface on the base.
5. Glue and nail the middle support down.
6. Sand smooth and varnish.
7. Use ¼ in flag staffs and tie them together with string or a rubber band about 8 in from the
bottom. Place the middle flag securely in the center position, and the other two in the
angled grooves.


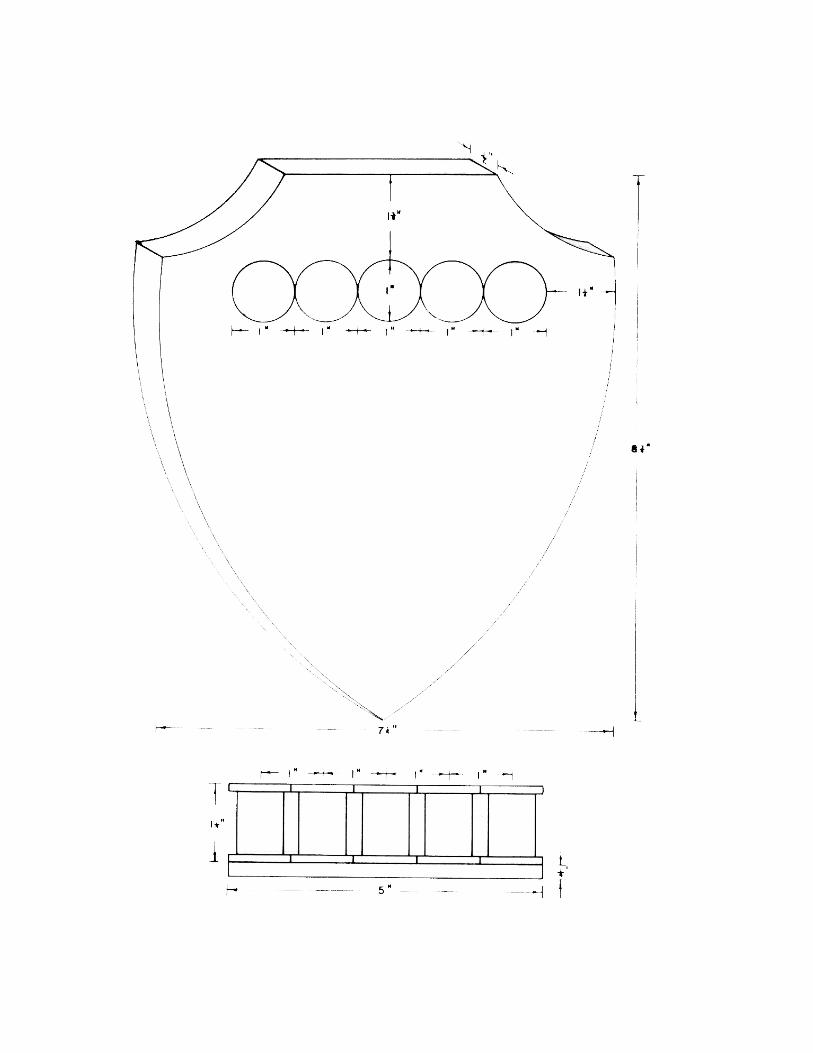
Knife Rack WS114
MATERIALS NEEDED:
1 piece wood - ½ in or ¾ in x 7¼ in x 8¾ in
1 piece wood - ¼ in x 1 in x 5 in
5 – 1 in or larger spools
Varnish or other finish
¾ in finishing nails
Glue
TOOLS NEEDED:
Hammer
Band, jig or coping saw
Sandpaper
Brush
INSTRUCTIONS:
1. Cut pieces to size.
2. Trace the pattern drawing’s face. Draw this on the 7¼ in x 8¾ in board. Cut out pattern
using the band, jig or coping saw.
3. Sand all edges smooth.
4. Using the pattern again, mark off the spool spacing on the shield.
5. Glue the spools to the ¼ in x 1 in x 5 in piece.
6. Glue and nail the spool assembly, using ¾ in finishing nails from the back side.
7. Complete sanding and apply finish.

Ice Cream Stick Frame WS115
MATERIALS NEEDED:
Ice cream sticks
Cardboard (size of picture)
Picture (smaller than length of sticks)
Glue
TOOLS NEEDED:
Varnish
INSTRUCTIONS:
1. Cut cardboard to size of picture.
2. Glue picture to cardboard.
3. Glue sticks along edge of cardboard to make frame.
4. Apply varnish to frame.


4-H Book Ends WS116
MATERIALS NEEDED:
1 piece wood 2 in x 6 in x 10 in
1 piece sheet metal 558⁄ in x 14 in
Varnish
6 – ½ in round head wood screws
2 – 2½ in fabricated plastic letters (4-H)
TOOLS NEEDED:
Saw
Sandpaper
Screwdriver
Drill - 18 ⁄ in bit
Brush
Hack saw
INSTRUCTIONS:
1. Cut pieces to size including appropriate bevels on the wood blocks.
2. Cut the sheet metal with a hack saw.
3. Sand pieces smooth.
4. Drill 3 holes in the sheet metal ¾ in from the 5 58 ⁄ in side and every 17
8 ⁄ in along this edge.
Bend 1½ in of this edge with the holes 90 degrees.
5. Screw the metal sheet to the edge of the book ends with the bottoms flush. The bend
allows the screw heads to fasten the metal but keep from scratching the shelving if they
were on the bottom.
6. Apply 2 coats of clear varnish.
7. Attach adhesive letters.

1½ in edge bent and
screw attachment

Belt and Necktie Rack WS117
MATERIALS NEEDED:
1 piece wood - ½ in or ¾ in x 2 in x 18 in for mount
16 L-shaped hooks 1¼ in to 1½ in long
2 - #6 x 1 in flat head screws for ½ in wood or 1½ in for ¾ in wood
TOOLS NEEDED:
Saw
Drill with 132 ⁄ in and 1
8⁄ in bits
Sandpaper
Paint or stain and varnish
INSTRUCTIONS:
1. Cut wood mount to size
2. Mark holes for hooks, drill pilot holes with 132⁄ in bits.
3. Mark and drill mounting holes with 18⁄ in bit.
4. Sand and finish.
5. Insert hooks.
6. Mount in closet, on wall or door.

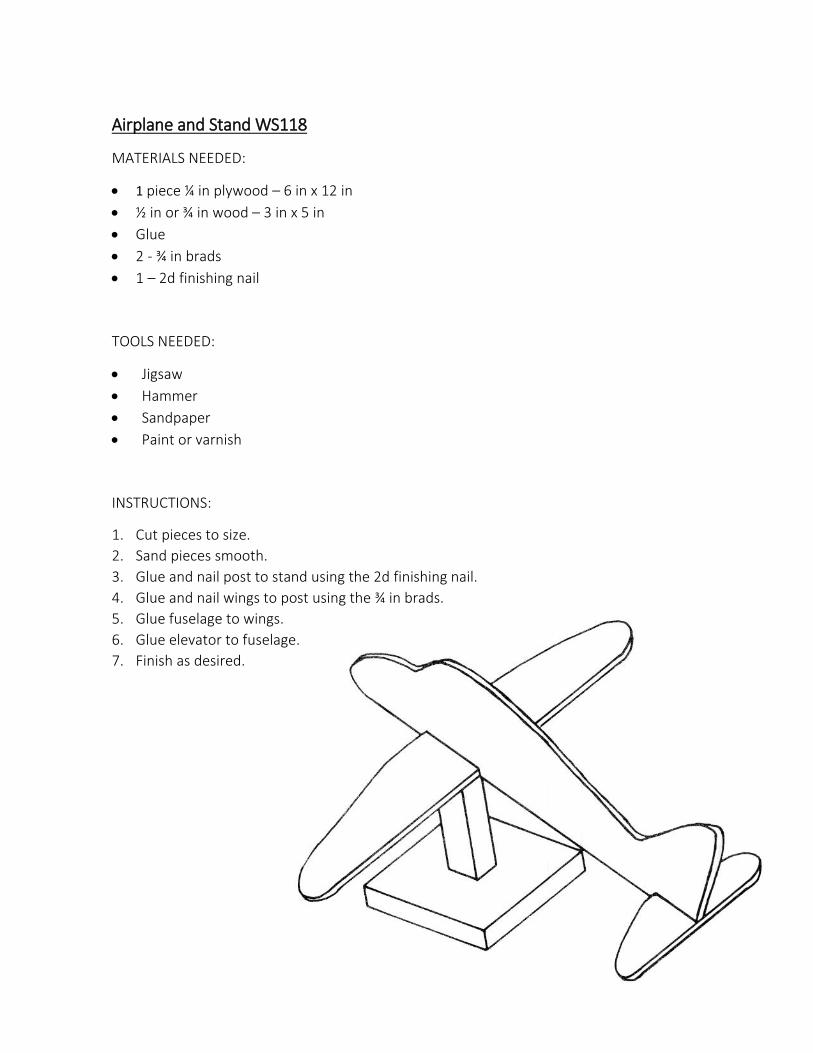
Airplane and Stand WS118
MATERIALS NEEDED:
1 piece ¼ in plywood – 6 in x 12 in
½ in or ¾ in wood – 3 in x 5 in
Glue
2 - ¾ in brads
1 – 2d finishing nail
TOOLS NEEDED:
Jigsaw
Hammer
Sandpaper
Paint or varnish
INSTRUCTIONS:
1. Cut pieces to size.
2. Sand pieces smooth.
3. Glue and nail post to stand using the 2d finishing nail.
4. Glue and nail wings to post using the ¾ in brads.
5. Glue fuselage to wings.
6. Glue elevator to fuselage.
7. Finish as desired.


Log Cabin WS119
MATERIALS NEEDED:
Poster board or heavy cardboard
Old file folder
30 ice cream sticks
1 piece wood 1 in x 2 in x 4¼ in
Glue
Masking tape
TOOLS NEEDED:
Jigsaw
Xacto knife or utility knife (to cut cardboard)
Paints (brown for logs, black for roof, brick red or gray for chimney)
INSTRUCTIONS:
1. Cut two pieces of poster board or heavy cardboard 2½ in x 3½ in for sides and two pieces 3¾ in x 3½
in for ends.
2. Cut opening in one side for door.
3. Saw off the rounded ends of 10 sticks so that each stick is 3½ in long.
4. Glue one of these 3½ in sticks to the bottom edge of the back side and glue one of the sticks which
hasn’t been cut to the bottom edge of each end.
5. Saw out four pieces with square ends 138 ⁄ in long and four pieces 17
8 ⁄ in long with one rounded end.
Glue these to the front side on either side of the door starting with the square end pieces.
6. After the sticks that are glued to the lower edge of each end and side are dry, glue up the others
alternating round end, square end. There will be six “logs” up to the gable end of the cabin.
7. Saw out three sticks for each gable by marking them from the piece. Glue these in place on the
ends.
8. Let all pieces dry and then fasten the four sections, which interlock, together with angle braces
about 2 in long cut from old file folder.
9. Make the door by gluing two sticks, squared on the ends, about 11116 ⁄ in long, to a piece of cardboard
¾ in x 11116 ⁄ in and hang it from the inside with tape hinges.
10. Make the roof from two pieces of cardboard 3¾ in x 2¼ in. Cut an opening for the chimney and
fasten the two pieces together with tape.
11. Cut out chimney shape and glue to end of cabin.
12. Paint cabin as desired.


Hurricane Lamp WS120
MATERIALS NEEDED:
1 piece wood - 58 ⁄ in x 6 in x 8 in
Glue
Lamp chimney
1 in brads
TOOLS NEEDED:
Jigsaw or coping saw
Hammer
Sandpaper
Stain and varnish
INSTRUCTIONS:
1. Cut pieces to size. (1 – 5 in disk and 4-triangles)
2. Sand all pieces.
3. Set chimney on disk and mark a circle around the bottom. Glue triangles around circle and
nail from bottom.
4. Apply finish.
5. Take a candle and melt wax on the disk, push candle into soft wax and let harden.
6. Place chimney over candle and fit into wedges.


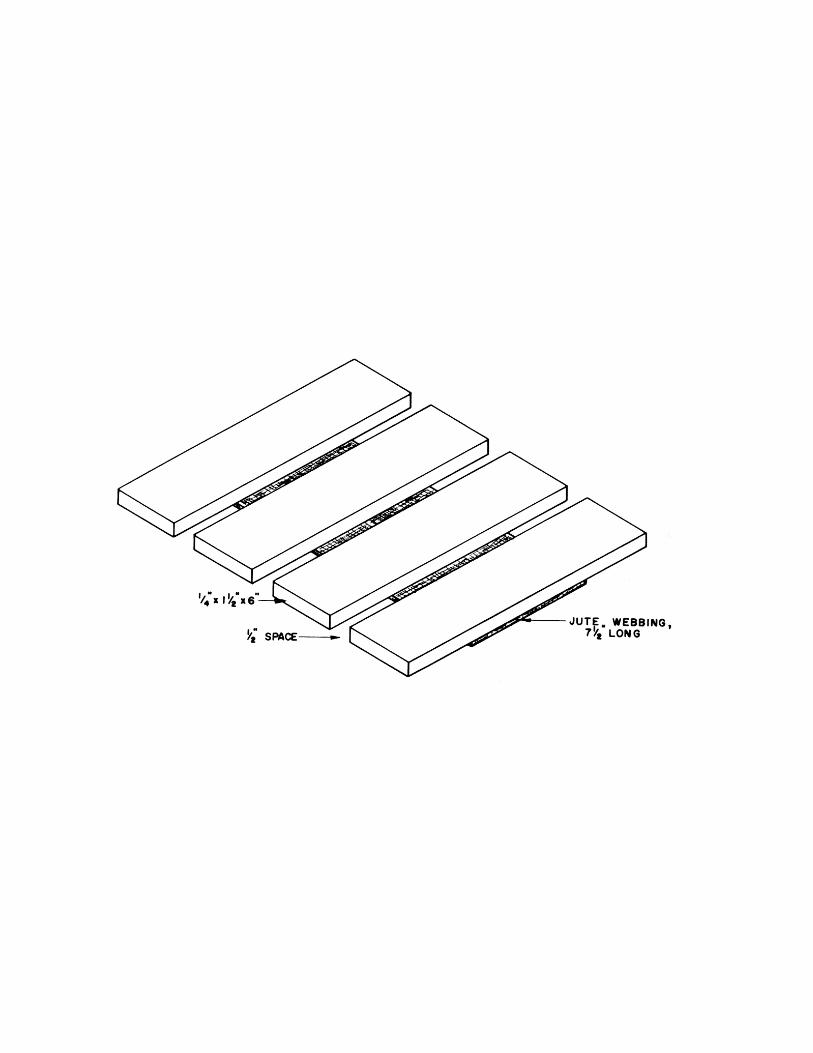
Trivet (Hot Pot Support) WS121
MATERIALS NEEDED:
4 pieces wood - ¼ in x 1½ in x 6 in - slats
Jute webbing - 7 ½ in long (approximately 3 in wide)
Glue
TOOLS NEEDED:
Saw
Sandpaper
Stain and varnish (heat resistant)
INSTRUCTIONS:
1. Cut pieces to size
2. Sand slats, finish except where it glues to webbing.
3. Glue slats to webbing, leaving ½ in space between them.

Launch Pad Napkin Holder WS122
MATERIALS NEEDED:
1 piece wood - ½ in x 4 in x 8 in - base
1 piece wood - ½ in x 4 in x 5 in - rockets and braces
Glue
TOOLS NEEDED:
Jigsaw
Sandpaper
Paint or stain and varnish
INSTRUCTIONS:
1. Cut pieces to size. Cut out rockets and braces.
2. Glue rockets to base (in position indicated on drawing).
3. Glue braces to base and rockets as shown on drawing.
4. Sand and finish.


Half Shelf WS123
MATERIALS NEEDED:
1 piece wood – 1 in x 6 in x length of your preference up to width of cabinet (Caution: Board
longer than 24 in cannot be loaded very heavily due to bending)
2 pieces wood 1 in x 6 in x 6 in
4 angle brackets (if shelf is over 16 in long)
4 – #8 flathead wood screws 1½ in long for each angle bracket
Glue
4d finishing nails
Note: Wider boards may be used for wider and stronger shelf. Actual board thickness may be only
¾ in.
TOOLS NEEDED:
Saw Hammer
Screwdriver (optional)
Sandpaper
Paint or stain, varnish to match cabinet
INSTRUCTIONS:
1. Cut pieces to size.
2. Glue and nail ends to shelf. If longer than 16 in, add angle brackets.
3. Sand and finish.


Bunk House Serving Tray WS124
MATERIALS NEEDED:
1 piece wood – 1 in x 12 in x 18 in
9 foot – 6 in rope (approximately ¼ in diameter)
1 in brads
TOOLS NEEDED:
Saw
Hammer
Razor blade
Wood rasp
Metal file
Sandpaper
Stain or varnish
INSTRUCTIONS:
1. Cut piece to size. (Figure A)
2. Round corners with wood rasp, sand both faces and all edges.
3. Nail rope to edge, overlapping ends as in Figure B. Nails protruding on other side should be filed flat
with the metal file.
4. Cut through both overlapping ends as in Figure C, and nail down, making a perfect joint (Figure D).
5. Turn board over and nail leftover piece of rope to back as in Figure E.
6. Finish tray. Wood may be stained and varnished before or after nailing down rope.
