dpm-1/2/4 - nogueira
TRANSCRIPT
DPM-1/2/4
Disintegrator, chopper and grinderDesintegradores, picadores y moledores
Instructions Manual Manual de Instrucciones


Dear Owner,
Congratulations on your purchase of the DPM Nogueira Shredder, Chopper and Grinder. This product is the highest quality, specially designed to meet your
needs.This manual contains operating instructions and when properly abided by assures good operation, safety, and durability of your DPM Nogueira. We recommend carefully reading it before beginning to operate the machine.
The manufacturing serial number is engraved on the machine housing; write this number on the guarantee certificate in the end of this manual.
This information is very important for identifying your machine when technical support or part replacement are needed.
Nogueira S/A is always at your disposition, ready to answer any question, request for information, and supply efficient and permanent technical support.
The images displayed in this manual are only for illustrative purposes. Thus to facilitate your viewing, the images show cutaway or the safety shielding removed to display it more clearly.
Do not operate the machine under any circumstances without these respective protective shields. The reproduction of this manual is not permitted without previous authorization in
writing from Indústria e Comércio de Implementos e Máquinas Agrícolas S/A.
3DPM-1/2/4
En
gli
sh

4 Instructions Manual
Index
Note:
1- Nogueira máquinas aims its products to be constantly getting upgraded and improved in addition to having its own right to introduce changes in its components and accessories without prior notice.
2- Illustrations in this manual are merely illustrative.
Introduction 03Environmental conservation 05Safety 05Safety adhesive labels 08Introducing the shredder, chopper and grinder 09Application 10Actuation 10Operation 10Assembly driven by electric motors 11Assembly driven by diesel or gasoline motors 13Assembly on the stand extension 14Cyclone assembly 16Assembly as a tractor accessory 17Operation 18Maintenance 20Lubrication 22Technical characteristics 23Production (kg/hour) 23Drive pulley (actuated by electric motor) 24Drive pulley (actuated by motors) 24Belts (actuated by electric motor) 24Pulley and belts (actuation by tractor) 25Belts (actuation by diesel / gasoline motor) 25Pulley and belts (actuation by tractor) 26Practical guide 27Additional information 28Technical assistance 29Warranty certificate 30Warranty control 31

5
Environmental conservation
Nogueira is continually concerned with the environmental conservation, in the development phase, as well in the utilization of processes and materials ecologically appropriate in its production and its products.
PROTECT AND RESPECT THE ENVIRONMENT, remember that conservation is the social responsibility of everyone. These concepts include compliance with legally defined disposal of used lubrication products and fluids, old tires, and packaging. Never dispose of these products or empty packaging in swamplands, lakes, rivers, puddles etc. Share these recommendations with others and make other people aware of the importance of conserving the environment.
Safety
Nogueira is concerned about the safety of people involved in operating and performing maintenance procedures on the machine. In developing this design, we have considered every detail in order to avoid unexpected accidents while operating it.We have developed safety shielding and eliminated dangerous situations. Remember, keeping people healthy and their physical integrity must always be considered to the upmost.
We have prepared this manual to make you familiar with your machine and, so that you can use it correctly and safety.We recommend carefully reading it before operating the machine the first time. If you have any doubts or questions, please get in touch with us at your Nogueira reseller or our technical support department.
SAFETY WARNINGS
SAFETY WARNINGS SYMBOL
Safety warnings alert on situations that can be dangerous in some away. They are accompanied by instructions for protecting the operator and other users.
DANGER Warnings!
These warning refer to dangerous situations, which may result in serious accident and be life threatening, if the instructions are not strictly abided by.
CAUTION Warninhs!
This type warns on dangerous situations and informs on necessary precautions in order to avoid any possible accidents.
DPM-500/1/2/4
En
gli
sh

6 Instructions Manual
Safety
- Read the instruction manual before turning on the machine. Pay close attention and respect all the operating and safety recommendations while operating. SHARE THIS INFORMATION WITH OTHER USERS.
- Do not operate the machine while of after drinking alcoholic beverages or medications which affect your normal condition. Pay attention to what you are doing and use good sense. Any lack of attention while operating the machine can result in a serious accident.
- Turn off the motor before adjusting, lubricating, or performing any maintenance job on the machine. Never try to perform any repairs when machines are on. Always pay attention!
- Check to see if there are any tools or objects on it, before turning on the machine.
- Look around the machine before turning it on. Keep animal and spectators at a safe distance, away from eating areas. Be especially careful of children.
- Wear personal protective equipment - PPE when operating the machine. Prolonged exposure to noise can cause hearing damage or loss. Wear hearing protectors and safety glasses.
- Dress appropriately when operating the machine. Tie back long hair and do not wear clothing which is too loose. Remove rings, chains, and other elements, which could get stuck in the moving parts or mechanisms.
- Never try to open the machine when it is operating.
- Never touch the pulleys or belts when the machine is turned on. Keep your distance from moving parts.
- Keep the safety adhesive labels in good condition and legible. Replace them whenever necessary.
- Keep all the protective shielding in its proper places and do not operate the machine without it being installed.
- People must not remain on any part of the machine when it is operating.
- Turn off the motor and wait until all the parts are completely motionless, whenever, it is necessary to get on the machine to perform any adjustment or repair.
- Never try to clean or remove remaining products, straw etc., when the machine is turned on. Turn off the motor and wait for all the parts to stop moving before cleaning any part of the machine.
- Never leave the machine operating and leave the area. Always turn off the motor before leaving the working area.
- Keep the surrounding areas free and unobstructed, so the operator can move safety around the machine and the product being processed.
- Lower the machine completely to the ground before performing any maintenance, lubrication, or adjustments. If it is necessary work on the machine when it is lifted hydraulically, make sure it is supported securely. Hydraulic mechanisms can move without any warning or due to leakage and cause an accident.
- Never place the machine on cement blocks, hollow bricks, or other supports which can be crushed from the effects of loads during long periods of time.
- Never work under a hoisted machine raised just on a jack, always put a secure support under it.
- If you notice any abnormal operation: vibrations, strange noises etc., immediately turn off the machine. Check and eliminate the cause, before turning it on again.
SAFETY PRECAUTIONS

7
Safety
- Moveable parts and components, due to inertia, they continue moving after the machine stops operating.Before touching any part, disconnect the actuation source, look, and listen to see of there is any evidence of movement. Only touch a part if you are sure if is motionless. Always pay close attention!
- Before starting the electrical installation of the motor, make sure the local electricity is turned off.
- The installation of electric motors must be performed by a qualified electrician. The dimensioning of the cables and the utilization of starting devices must comply with currently applicable safety standards.
- There must be enough space around the machine for circulation to keep it permanently unobstructed and to allow for safe movement of the operator and the product being processed.
- We recommend installing the machine in a flat location, free of oil, grease, holes, protected from the sun and rain. Contact with water increases the hazard of electrical shock.
- Never operate the machine inside closed locations and without ventilation, the gases released from the motor (diesel or gasoline) are toxic and highly harmful to health.
- Be prepared in case of an accident. Keep a first-aid kit on hand and easily accessible. Know how to use it.
- Do not use this equipment for applications which are not mentioned and considered unacceptable in the manual and not authorized by the manufacturer. Making adaptations or using after-market parts can compromise the operation, be dangerous to the safety of the operator, and invalidate the guarantee.
- Follow the safety recommendations and pay attention. Lack of attention while operating can cause accidents.
DPM-500/1/2/4
En
gli
sh

8 Instructions Manual
Safety adhesive labels
Read the instruction manual before turning on the machine. Pay close attention to all the operating and safety recommendations, in order to avoid any unexpected accidents that may occur while operating the machine.
Before performing any maintenance, adjustment or lubrication in the machine, turn off the engine and disconnect the power plug.Risk of injury from moving parts. Failure to follow this instruction may result in serious accidents.
With the machine on, never insert your hands in the spouts to try to remove remnants of products or push them inside. Failure to follow this instruction may result in serious accidents.
When operating the harvester, wear personal protective equipment (PPE). Prolonged exposure to noise, without noise protection can cause hearing loss.

9
Introducing the shredder, chopper and grinder
DPM-500/1/2/4
En
gli
sh

10 Instructions Manual
Application
Actuation
Operation
The Nogueira shredder, chopper and grinder can be used for dried products as well as for fresh products.Thus, for such products as sugarcane, grasses, branches, roots, tubers and forages used for daily animal feed, as well as for shredding dry products, as corn kernels, corn with the leaves and cob, dried rice plants, corn stalks, dried cereals, cereal straw, and others, used for preparing animal feed and foods.
“Using this machine for products, such as soybeans and rice, will wear out the components prematurely, due to their abrasive nature. So, for this reason, if the user using the machine for such products then the user will lose the guarantee and then, the user will be liable for the results”.
The Nogueira DPM can be driven by motors (Electric, Diesel or Gasoline) and by Tractors.The accessories for coupling include the stands, pulleys and belts, and are supplied when ordered by the customer.
DRY PRODUCTS:The product, such as grains or cereals, is placed in the intake chute or in the hopper, and drains into the blades, which crack them and then it flows inside of the machine, where it os hit by the hammers. The it is filtered through the sieve.The granulation of the product depends on the sieve used.This product can leave the machine through a cyclone or just by draining into the lower outlet.
FRESH PRODUCTS:The product is placed in the intake chute and drained until it comes to the blades, which are responsible for cutting it.The product can come out from the lower chute as well as the upper outlet.

11
Assembly driven by electric motors
The Nogueira DPM requires some accessories for coupling to electric motors, such as bases, pulleys and belts.
The machine and the motor are installed on a one-piece base.The Nogueira stand is equipped with special rubber feet which do away for the need of any other base.
1- Electric installation for the power source:This must be done based on the technical specifications, considering such factors as:- Distance, correct cabling distance, as well as breaker switches and safety devices.
2- Electric motor installation:This must comply with the technical requisites based on the motor specifications. For motors over 5 HP power, we recommend installing a triangle-star switch for turning on the actuation.
ASSEMBLY OF THE MOTOR ON THE BASE
DPM-500/1/2/4
En
gli
sh

12 Instructions Manual
INSTALLING THE MACHINE AND THE MOTOR ON THE BASE:
The base is already prepared with specific places for placing the machine and supporting it, as well as moveable rails for fastening the motor. Once the machine and the motor are placed on the base, then it is necessary to proceed in aligning the pulleys.Following that, install the base feet for the machine and the motor. Then place the belts and stretch them adequately, using the lever on the base.
The machine must operate at the correct rotation speed. Therefore, we recommend using the pulleys and belts as defined on the tables on this manual.
13
Assembly driven by diesel or gasoline motors
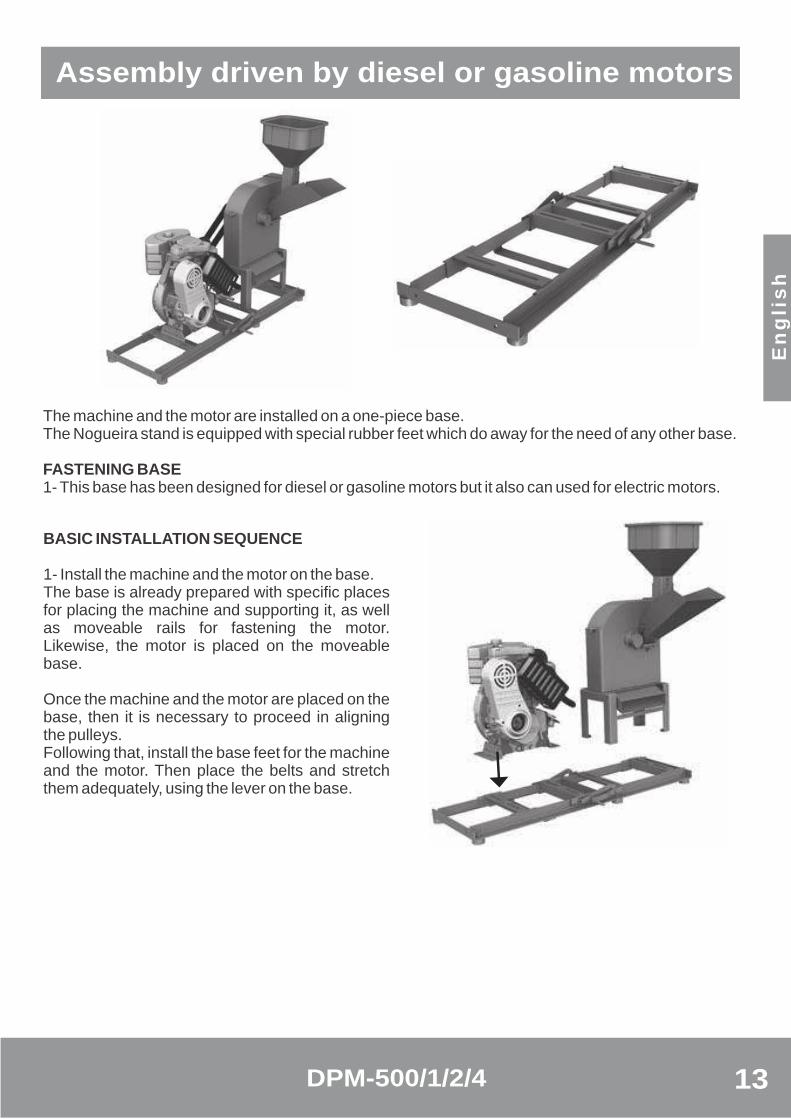
The machine and the motor are installed on a one-piece base.The Nogueira stand is equipped with special rubber feet which do away for the need of any other base.
FASTENING BASE1- This base has been designed for diesel or gasoline motors but it also can used for electric motors.
BASIC INSTALLATION SEQUENCE
1- Install the machine and the motor on the base.The base is already prepared with specific places for placing the machine and supporting it, as well as moveable rails for fastening the motor. Likewise, the motor is placed on the moveable base.
Once the machine and the motor are placed on the base, then it is necessary to proceed in aligning the pulleys.Following that, install the base feet for the machine and the motor. Then place the belts and stretch them adequately, using the lever on the base.
DPM-500/1/2/4
En
gli
sh
14 Instructions Manual
Assembly on the stand extension
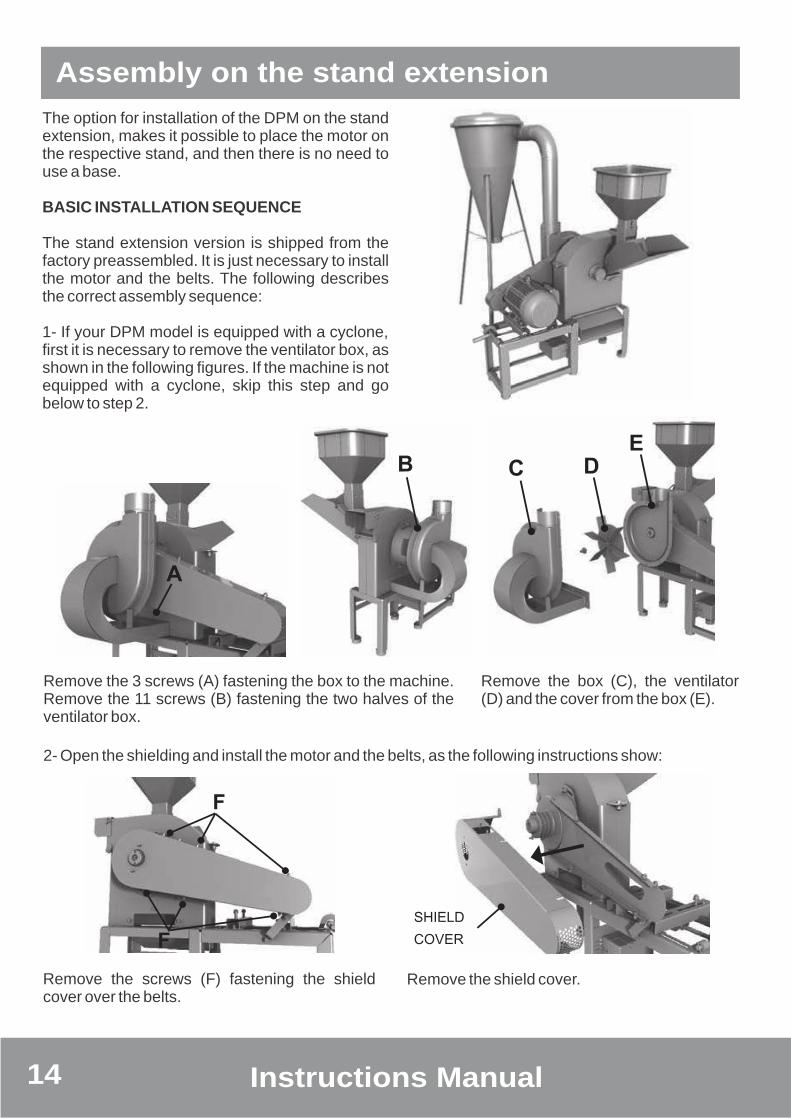
The option for installation of the DPM on the stand extension, makes it possible to place the motor on the respective stand, and then there is no need to use a base.
BASIC INSTALLATION SEQUENCE
The stand extension version is shipped from the factory preassembled. It is just necessary to install the motor and the belts. The following describes the correct assembly sequence:
1- If your DPM model is equipped with a cyclone, first it is necessary to remove the ventilator box, as shown in the following figures. If the machine is not equipped with a cyclone, skip this step and go below to step 2.
Remove the 3 screws (A) fastening the box to the machine. Remove the 11 screws (B) fastening the two halves of the ventilator box.
Remove the screws (F) fastening the shield cover over the belts.
Remove the shield cover.
2- Open the shielding and install the motor and the belts, as the following instructions show:
Remove the box (C), the ventilator (D) and the cover from the box (E).

15
Fasten the motor on the stand rails, then install the pulley and the belts.
Stretch the belts using the existing stretcher on the stand. Use the nuts on the stretcher for adjustment (G).
Place the shield cover (F), the cover (E) and the ventilator (D). Install the ventilator box again (H).
Place the rubber ring (J) in the outlet from the ventilator box and insert the curved tube in the cyclone (K).
3- Assemble the cyclone on the machine (if the model is not equipped with the cyclone, ignore the following instruction):
DPM-500/1/2/4
En
gli
sh

16 Instructions Manual
Cyclone assembly
The cyclone is optional equipment, supplied when ordered. When it is purchased disassembled and packaged. Follow these instructions for assembly:
Insert the curved tube in the opening of the cyclone.
Insert the three feet in the existing slots on the body of the cyclone.
Screw the end of the threaded rod to the cyclone foot. Pass the other end through the existing hole in the opening and put on the nut. See the position of the nut and the locknut in the above figure.
Do not forget to insert the rubber ring before installing the curved tube in the machine (A).

17
Assembly as a tractor accessory
The Nogueira factory also supplies a special accessory for installing as a tractor accessory.
BASIC INSTALLATION SEQUENCE
1- Complete set:If the order is for the complete set, the machine will be shipped completely assembled from the factory. In this case, the installation only includes the coupling to the tractor to the accessory, using the three-point linkage from the hydraulic system, following that the respective installation of the driveshaft (power take-off).
2- Separate orders:If the accessory orders and the machine were ordered separately, the assembly of the set components will be as follows:a) Place the machine on the accessory;b) Install the pulley on the machine;c) Align the pulley on the machine to the accessory pulley, which is assembled on it;d) Fasten the machine on the accessory;e) Install the belts and the safety shield;f) Stretch the belts correctly using the stretcher device;g) Couple the assembly to the tractor, using the three-point linkage from the hydraulic system;h) Finally the respective installation of the driveshaft (power take-off).
DPM-500/1/2/4
En
gli
sh

18 Instructions Manual
Operation
Before operating the machine, check the following:
See if there are no tools, equipment, or objects on the motor, or on the machine, especially inside the intake chute.- See if there any people or objects near the pulleys or belts;- See if the rotation direction is correct;- See if the machine cover is latched;- See if the machine is properly lubricated;- See if the counter-blade is properly adjusted to the blades;- If it is not see the item on adjusting the counter-blade;- See if the machine is prepared for the product which will be processed.
GRINDING DRY PRODUCTS WITH THE CYCLONES
1- Place the box inner cover (1);2- Place the type of sieve based on the desired finished product (2). Insert the more curved part first.3- Place the moveable cover of the intake chute (3);4- Remove the vacuum isolator (4);5- Place the back closure (5).
The product placed in the intake chute or hopper and comes out the cyclone.

19
GRINDING DRY PRODUCTS WITHOUT USING THE CYCLONE1- Place the vacuum isolator (4) - if the machine is equipped with the cyclone;2- Place the box inner cover (1);3- Place the sieve based on the type of final product (2) insert the most curved part first;4- Place the moveable cover on the intake chute (3);5- Remove the back closure (5).
1- Place the smooth belt - cutting closure (2);2- Remove the inner cover (1);3- Remove the moveable cover of the intake chute (3);4- Remove the back closure (5);5- Place the vacuum isolator (4) - if the machine is equipped with the cyclone;6- Open the blast stopper (6).
The product is placed in the intake chute or hopper and comes out from the lower chute.
The product is placed in the intake chute and comes out the upper outlet.
CUTTING FRESH PRODUCTS
DPM-500/1/2/4
En
gli
sh

20 Instructions Manual
CUTTING ROOTS AND TUBERS
The product is placed in the intake chute and comes out the lower chute.
1- Remove the smooth belt / sieve (2);2- Place the inner cover (1);3- Remove the moveable cover of the intake chute (3);4- Remove the back closure (5);5- Place the vacuum isolator (4) - if the machine is equipped with a cyclone.
Maintenance
Your DPM requires a minimum of maintenance in order to guarantee the maximum yield and durability. Then, some essential routine procedures are indispensable:- Keep the blades well-sharpened;- Keep the counter-blade adjusted to the position of the blades;- Lubricate the bearing periodically;- Keep the belts stretched and replace them when they are worn or dried and cracked;- Replace the set of blades or hammers, when they are damaged or worn;- Never operate the machine when hammers or blades are missing.
Using after-market parts or accessories can cause accidents, damage to equipment, and decrease the performance of its operation, as well as canceling the factory guarantee.
Turn off the machine before performing any type of adjustments, lubrication, or any maintenance job.When replacing screws and nut, always use the same factory specifications as the original parts.Pull all the shields back in place before turning on the machine.
Important!

21
REMOVING THE BLADESTo remove the blades (A), just remove the screws (B), together with their respective washers.
NOTE:The counter-blade must be replaced when worn and retighten it periodically.
SHARPENING THE BLADES1- The blades must always be sharpened when their cutting edge is dull;2- Only one side of the cutting edge must be sharpened and the same as the original cutting edge;3- Try to remove the same amount of material as to not affect the balancing of the blade;4- The blades must be replaced whenever it is impossible to sharpen them as necessary.
ADJUSTING THE COUNTER-BLADEProceed as follows to adjust the counter-blade:1- Loosen the nuts on the two screws (C);2- Move the counter-blade (D) until the blade and the counter-blade are at the specified distance shown below in the figure (measurement M) about 0.5 mm;3- Retighten the nuts (C).
DPM-500/1/2/4
En
gli
sh

22 Instructions Manual
CHANGING THE HAMMERSThere are 4 toothed surfaces on the hammers (A) which can be repositioned as each one becomes worn.Proceed as follows to change the hammer surface or to replace the entire hammer:1- Cut the locks (B) on the hammer pins.2- Remove the hammer pins (C), make sure the position of the rings is correct in the spacer rings, and be careful not to mix the sets of hammers, as this will interfere with the balancing of the machine, causing vibrations.
Lubrication
1- The only places where lubrication is necessary are the bearing housings (D).2- Lubrication must be weekly.
Lubricate the bearing housings with a grease gun (D), using special grease for bearings, lithium soap base, NLGI 2 EP classification. An example of this type of grease is: LUBRAX LITH-2.
Before lubricating, clean the grease fittings well, in order to avoid contamination from the grease.Replace damaged grease fittings.The most efficient time to lubricate is at the end of the working period, as the grease will flow better while the machine is still hot.

23
Technical characteristics
Production (kg/hour)
NOTE:The rotation is in the clockwise direction, when looking from the intake chute direction (picture beside).
NOTE:The above productions are only reference values, obtained from test conditions, but these values may vary based on the humidity of the product, specific weight, and opertaing conditions.
DPM-500/1/2/4
En
gli
sh

24 Instructions Manual
Drive pulley (Actuated by electric motor)
Belts (Actuated by electric motor)
Drive pulley (Actuated by motors)

25
Pulley and belts (Actuation by tractor)
Belts (Actuation by diesel / gasoline motor)
DPM-500/1/2/4
En
gli
sh

26 Instructions Manual
Pulley and belts (Actuation by tractor)
DPM-1 DPM-2 DPM-4
Weight (with stand) (kg) 60 80 122
Space occupied by the machine (m) 0,70 x 0,50 0,90 x 0,55 0,95 x 0,70
Space occupied by the machine w.o. cyclone - w. base (m)
0,80 x 1,40 0,95 x 1,40 0,95 x 1,40
Space occupied by the cyclone and the base (m) 1,40 x 1,90 1,40 x 2,10 1,40 x 2,10
Machine height (w. stand) (m) 1,12 1,00 1,25
Cyclone height (m) 1,90 1,90 1,90

27
Practical guide
Machine is jammed Due excessive intake, the motor cannot maintain the required rotation and the product accumulates inside the machine
Stop the motor, clean the excess product, start operating again but ow control the intake to the machine, so that it does not exceed the recommended capacity
Low production Not enough intake to the machine
The intake must be continual, but not excessive, which can cause jamming
Machine rotation is below recommended
If the rotation of the machine is below the recommended, the hammers will take too long to shred the product and due to this, the production will drop. Therefore, it is necessary to maintain the recommended rotation of the machine
The product is damp If the products are very damp, the holes in the sieve can become blocked. Therefore, shredding must be done only on dry products
The machine adjustment is incompatible with the product being processed
It is necessary to check if the sieve being used is compatible with the desired final product
Uneven product cutting The blade cutting edge is not sharp
Sharpen the blades again as recommended in the item on Sharpening blades
The counter-blade is worn or not well adjusted
Proceed as recommended in the item on Counter-blade adjustment
It is difficult to grind dry products
The hammers are worn or damaged
Change the sides of the hammers or change or new ones, proceed as recommended in the item on Changing hammers
Hammers are stuck Wash the chutes, blades and hammers, using water after chopping fresh products, especially when not used for extended periods of time
It is difficult to start the actuation
Excessive product inside the machine
Operate the machine until all the product comes out
DPM-500/1/2/4
En
gli
sh

Key gauge table
Torque table
N.m Torque unit
Additional information
28 Instructions Manual

The DPM is identified by a serial number which is located in the plate (1) that is attached in the carcass of the machine.
Write down your machine serial number:
When communicating or requiring Nogueira technical assistance, you must always inform your serial number and machine type, both are identified in the plate that is attached.
When replacing parts, you should always use original Nogueira items. Only the original parts are produced in accordance with the designs, materials and project specifications, undergoing a strict quality assurance process.
1
Technical assistance
29DPM-500/1/2/4
En
gli
sh


32 Instructions Manual
Essential in the field

3DPM-500/1/2/4
Sr. Propietário
Felicitaciones por la adquisición del desintegrador, picador y moledora Nogueira. Un producto de la más alta calidad, especialmente desarrollado
para atender a sus necesidades.
Este manual contiene instrucciones de operación y mantenimiento que, debidamente observadas, serán la garantía de buen funcionamiento,
seguridad y durabilidad de su DPM Nogueira. Recomendamos su lectura atenta, antes de poner la máquina en funcionamiento.
Se encuentra grabado en la carcasa de la máquina el número de serie de fabricación, anótelo en el certificado de garantía, en este manual. Esta información será muy importante para la identificación de su máquina
encaso de asistencia o reposición de piezas.
Nogueira S/A estará siempre a su disposición para responder a cualquier consulta, ofreciéndole asistencia técnica eficaz y permanente.
Las imágenes presentadas en este manual son de carácter meramente ilustrativo. Para facilitar la visualización, pueden mostrar protecciones de seguridad abiertas o
desmontadas. En ninguma hipótesis, utilice la máquina sin las respectivas protecciones.La reproducción de este manual no es permitida sin la previa autorización por escrito de
Nogueira Indústria e Comércio de Implementos e Máquinas Agrícolas S.A.
Es
pa
ño
l

4 Manual de instrucciones
Indice
Notas:1- Nogueira tiene como objetivo la constante actualización y perfeccionamiento de sus productos, reservándose el derecho de introducir modificacines en sus componentes y accesorios sin aviso previo.
2- Las ilustraciones contenidas en este manual son meramente ilustrativas. Todas las instrucciones de seguridad deberán ser tenidas en cuenta para ambas configuraciones de la máquina.
Introducción 03Medio ambiente 05Seguridad 05Adhesivos de seguridad 08Conociendo el desintegrador, picador y moledora 09Aplicación 10Accionamiento 10Funcionamiento 10Montaje con motores eléctricos 11Montaje con motores a diesel o gasolina 13Montaje con caballete prolongado 14Montaje de la centrífuga 16Montaje con accesorio para tractor 17Operación 18Mantenimiento 20Lubricación 22Características técnicas 23Producción (kg/hora) 23Polea del motor (accionamiento con motor eléctrico) 24Polea de la máquina (accionamiento con motores) 24Correas (accionamiento con motor eléctrico) 24Poleas y correas (accionamiento con tractor) 25Correas (accionamiento con motor diesel/gasolina) 25Pesos y dimensiones 26Guía práctico 27Informaciones adicionales 28Asistencia técnica 29Certificado de garantía 30Control de garantía 31

5
Medio ambiente
Nogueira tiene preocupación constante con la preservación del medio ambiente, tanto en el desarrollo, como en la utilización de procesos y materiales ecológicamente apropiados en la producción de sus productos.
PROTEJA Y RESPETE EL MEDIO AMBIENTE, recordando que su preservación es responsabilidad social de todos. De a productos lubricantes y fluidos usados, neumáticos viejos, embalajes etc., el destino previsto en ley. Nunca arroje restos de productos o embalajes vacíos en manantiales, lagos, ríos, pozos etc. Transmita estos consejos, concientice a otras personas sobre la importancia de la preservación del medio ambiente.
Seguridad
Nosotros, de Nogueira, nos preocupamos por la seguridad de las personas involucradas en la operación y mantenimiento del desintegrador, picador y moledora.En el desarrollo del proyecto, pensamos en cada detalle para evitar que accidentes inesperados ocurran durante su utilización. Desarrollamos protecciones de seguridad y eliminamos situaciones de riesgo. Recordamos que la preservación de la salud y de la integridad física de las personas debe venir siempre em primer lugar.Preparamos este manual para que usted conozca su DPM y, así, pueda utilizarlo de la manera más correcta y segura.Recomendamos que lo lea atentamente antes de utilizar la máquina por primera vez. Si ocurre cualquier duda, por favor, entre en contacto con nosotros a través de su revendedor Nogueira o de nuestro Departamento de asistencia técnica.
AVISOS DE SEGURIDAD
SÍMBOLO ALERTA DE SEGURIDAD
Los avisos de seguridad alertan sobre situaciones que pueden ofrecer algún tipo de riesgo. Están acompañados por instrucciones destinadas a resguardar la seguridad del operador y demás usuarios.
Aviso de PELIGRO!
Alerta sobre situaciones de riesgo, que pueden resultar en accidente grave, con riesgo de vida, si las instrucciones no fueren rigurosamente seguidas.
Aviso de CUIDADO!
Alerta sobre situaciones de riesgo y orienta con las precauciones necesarias para evitar que accidentes puedan ocurrir.
DPM-500/1/2/4
Es
pa
ño
l

6 Manual de instrucciones
Seguridad
- Lea el manual de instrucciones antes de encender la máquina. Manténgase atento y respete todas las recomendaciones de uso y seguridad durante la operación. TRANSMITA LAS INFORMACIONES A LOS DEMÁS USUARIOS.
- No opere la máquina si ha ingerido bebidas alcohólicas o medicamentos que alteren su estado normal. Manténgase atento a lo que está haciendo y procure actuar con sentido común. Un momento de desatención mientras opera una máquina puede resultar en un grave accidente.
- Apague el motor antes de regular, lubricar o realizar cualquier servicio de mantenimiento en la máquina. Nunca intente efectuar reparaciones con la máquina encendida. Esté siempre atento!
- Antes de encender la máquina, verifique si no hay herramientas u otros objetos sobre la misma.
- Observe los alrededores de la máquina antes de ponderla en funcionamiento. Mantenga animales y espectadores a una distancia segura, alejados del área de alimentación, tenga especial cuidado con los niños.
- Use equipo de protección individual - EPI - al operar la máquina. La exposición prolongada al ruido puede causar daño o pérdida de la audición. Use protectores auriculares y gafas de seguridad.
- Vistase apropiadamente para operar la máquina. Prenda cabellos largos y no use ropas demasiado largas. Retire anillos, cadenas y demás elementos que puedan prenderse en las piezas o mecanismos en movimiento.
- Nunca intente abrir la máquina en funcionamiento.
- Nunca toque las poleas o correas con la máquina encendida. Mantenga las manos distantes de los componentes en movimiento.
- Mantenga los adhesivos de seguridad conservados y legibles. Substitúyalos siempre que necesario.
- Mantenga todos los blindados y protecciones en sus debidos lugares y no haga funcionar la máquina sin las mismas.
- Está prohibida la permanencia de personas sobre cualquier parte de la máquina en funcionamiento.
- Siempre que fuere necesario subir a la máquina para realizar cualquier regulado o reparación, apague el motor y aguarde hasta que los componentes estén completamente sin movimiento.
- Nunca intente limpiar o remover restos de productos, paja etc., con la máquina encendida. Apague el motor y aguarde que cesen los movimientos antes de limpiar cualquier parte de la máquina.
- Nunca deje la máquina funcionando al ausentarse. Siempre apague el motor antes de alejarse del lugar de trabajo.
- Mantenga el área alrededor de la máquina libre y desobstruida para permitir el movimiento seguro del operador y del producto que será procesado.
- Baje totalmente la máquina antes de realizar mantenimiento, lubricación o ajustes. Si fuere necesario trabajar en la máquina suspendida por el hidráulico, se debe apoyarla de forma segura. Los mecanismos hidráulicos pueden arriarse por sí mismos o debido a pérdidas y resultar en accidente.
- No apoye la máquina sobre bloques de cemento, ladrillos huecos u otros soportes que puedan desmoronarse bajo el efecto de cargas prolongadas.
PRECAUCIONES DE SEGURIDAD

7
Seguridad
- Nunca trabaje debajo de una máquina soportada solo por un cricket, utilice siempre un apoyo seguro.
- Si observa cualquier anormalidad en el funcionamiento: vibraciones, ruidos diferentes etc., apague la máquina inmediatamente. Verifique y elimine la causa, antes de encenderla nuevamente.
- Componentes móviles, debido a la inercia, continúan en movimiento por algún tiempo después que la máquina es apagada. Antes de tocar cualquier componente, apague la fuente de accionamiento, mire y escuche si no existen evidencias de movimiento. Solamente toque un componente si está seguro de que está parado. Esté siempre atento!
- Antes de iniciar la instalación eléctrica del motor, certifíquese de que la energía eléctrica local está apagada.
- La instalación de motores eléctricos debe ser hecha por un electricista habilitado. El dimensionamiento de los cables y la utilización de dispositivos de arranque y parada deben estar en conformidad con las normas de seguridad vigentes.
- Debe haber en torno de la máquina, área de c i r c u l a c i ó n y e s p a c i o p e r m a n e n t e desobstruidos y que permitan el movimiento seguro del operador y del producto que será procesado.
- Se recomienda instalar la máquina en un lugar plano, limpio, libre de aceite, grasa, astillas, protegido del sol y de la lluvia. El contacto con el agua aumenta el riesgo de descarga eléctrica.
- Nunca haga funcionar la máquina dentro de ambientes cerrados y sin ventilación, los gases liberados por el motor (diesel o gasolina) son tóxicos y altamente nocivos a la salud.
- Esté preparado si ocurre un accidente. Mantenga un kit de primeros auxilios en un lugar de fácil acceso. Sepa cómo utilizarlo.
- La utilización de este equipamiento en aplicaciones no mencionadas en este manual, es tenida como trabajo no admisible y no está autorizada por este fabricante. Adaptaciones o uso de piezas no originales comprometen el funcionamiento, ponen en riesgo la seguridad del operador y causan la pérdida de la garantía ofrecida.
- Observe las recomendaciones de seguridad y manténgase atento. La falta de atención durante la operación podrá resultar en accidentes.
DPM-500/1/2/4
Es
pa
ño
l
8 Manual de instrucciones
Adhesivos de seguridad
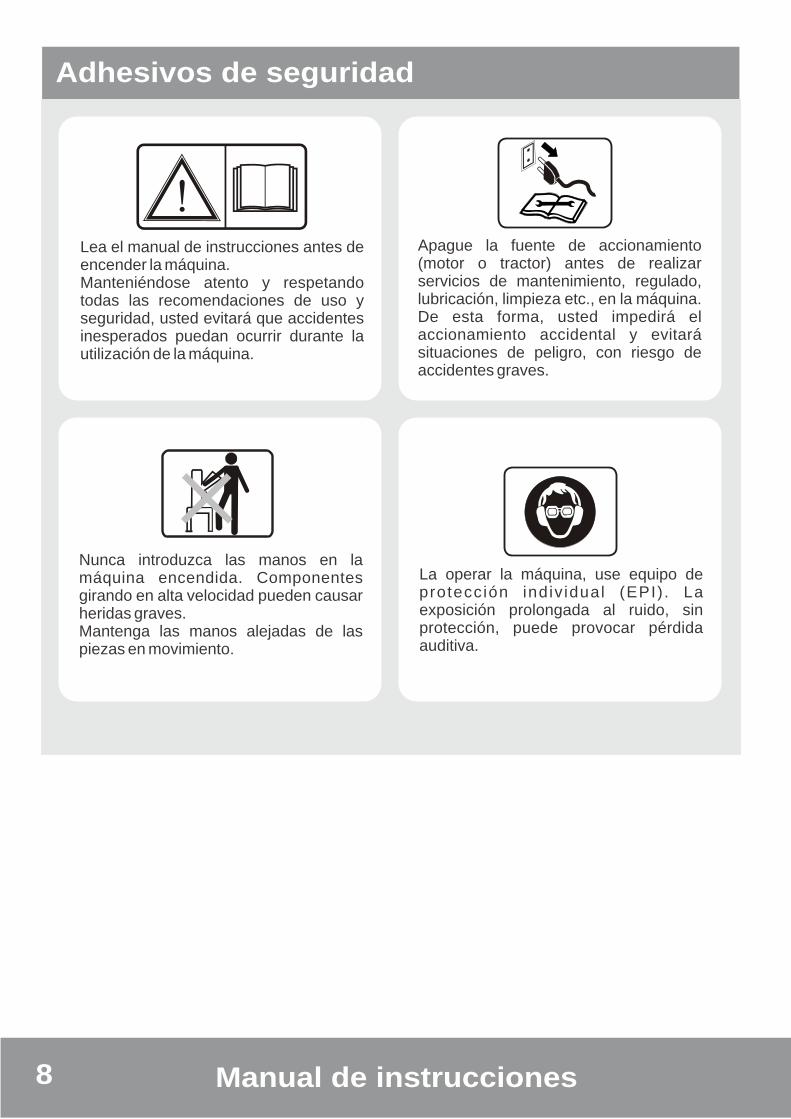
Lea el manual de instrucciones antes de encender la máquina.Manteniéndose atento y respetando todas las recomendaciones de uso y seguridad, usted evitará que accidentes inesperados puedan ocurrir durante la utilización de la máquina.
Apague la fuente de accionamiento (motor o tractor) antes de realizar servicios de mantenimiento, regulado, lubricación, limpieza etc., en la máquina. De esta forma, usted impedirá el accionamiento accidental y evitará situaciones de peligro, con riesgo de accidentes graves.
Nunca introduzca las manos en la máquina encendida. Componentes girando en alta velocidad pueden causar heridas graves.Mantenga las manos alejadas de las piezas en movimiento.
La operar la máquina, use equipo de protección indiv idual (EPI) . La exposición prolongada al ruido, sin protección, puede provocar pérdida auditiva.

9
Conociendo el desintegrador, picador y moledora
CENTRÍFUGA
TOLVA
PICO DEALIMENTACIÓN
FILTRO
CABALLETE
CARCASA
CAJA DEL VENTILADOR
CABALLETEPROLONGADO MARTILLO
* motor suministrado mediante pedido.
CUCHILLA
FONDODE CORTE
PICO DESALIDAINFERIOR
DPM-500/1/2/4
Es
pa
ño
l

10 Manual de instrucciones
Aplicación
Accionamiento
Funcionamiento
El desintegrador, picador y moledora Nogueira puede ser usado tanto para productos secos como para productos verdes.Así, tanto corta productos verdes como caña, pasturas, ramas, raíces, tubérculos y forrajes, utilizados en la alimentación diaria de los animales, como también tritura productos secos, como maíz en grano, maíz con paja y sabugo, paja de arroz, caña de maíz, cereales secos, cascaras y pajas de cereales y otros, utilizados en la preparación de pienso y alimentos.
“El uso en esta máquina de productos como soja y arroz, desgasta prematuramente los componentes internos, en función de ser abrasivos. Por tal motivo si el uso de tales productos fueren constatados, la responsabilidad será exclusiva del usuario”.
El DPM Nogueira podrá ser accionado por motores (eléctrico, diesel o gasolina) y por tractores.Los accesorios para estos acoplamientos son constituidos por bases, poleas y correas y son suministrados a pedido del cliente.
PRODUCTOS SECOS:El producto es colocado en el pico de alimentación o en la tolva. Si se trata de granos, es encaminado hacia las cuchillas que se encargan de quebrarlo y arrojarlo dentro de la máquina, donde es golpeado por los martillos y entonces, arrojado contra el filtro.El producto resultante depende del filtro utilizado. Este producto podrá salir por medio de una centrífuga o simplesmente por la salida inferior.
PRODUCTOS VERDES:El producto es colocado en el pico de alimentación y conducido hacia las cuchillas, las cuales se encargan de cortarlo.El producto podrá ser lanzado tanto por la salida inferior como por la salida superior.

11
Montaje con motores eléctricos
Para ser acoplado con motores eléctricos, el DPM Nogueira necesita algunos accesorios que son constituidos por bases, poleas y correas.
La máquina y el motor son instalados sobre una única base.La base Nogueira posee soportes especiales de goma, que eliminan la necesidad del asentamiento.
1- Instalación eléctrica de alimentación:Deberá ser hecha de acuerdo con las especificaciones técnicas teniéndose en cuenta factores tales como: distancia, dimensionamiento correcto de los cables, así como llaves y dispositivos de seguridad.
2- Instalación eléctrica del motor:Deberá obedecer a los requisitos técnicos de acuerdo con las especificaciones del motor. Para motores de más de 5 hp de potencia, se recomienda el uso de la llave estrella-triangulo para arranque del accionamiento.
MONTAJE DE LA BASE PARA MOTOR
DPM-500/1/2/4
Es
pa
ño
l
12 Manual de instrucciones
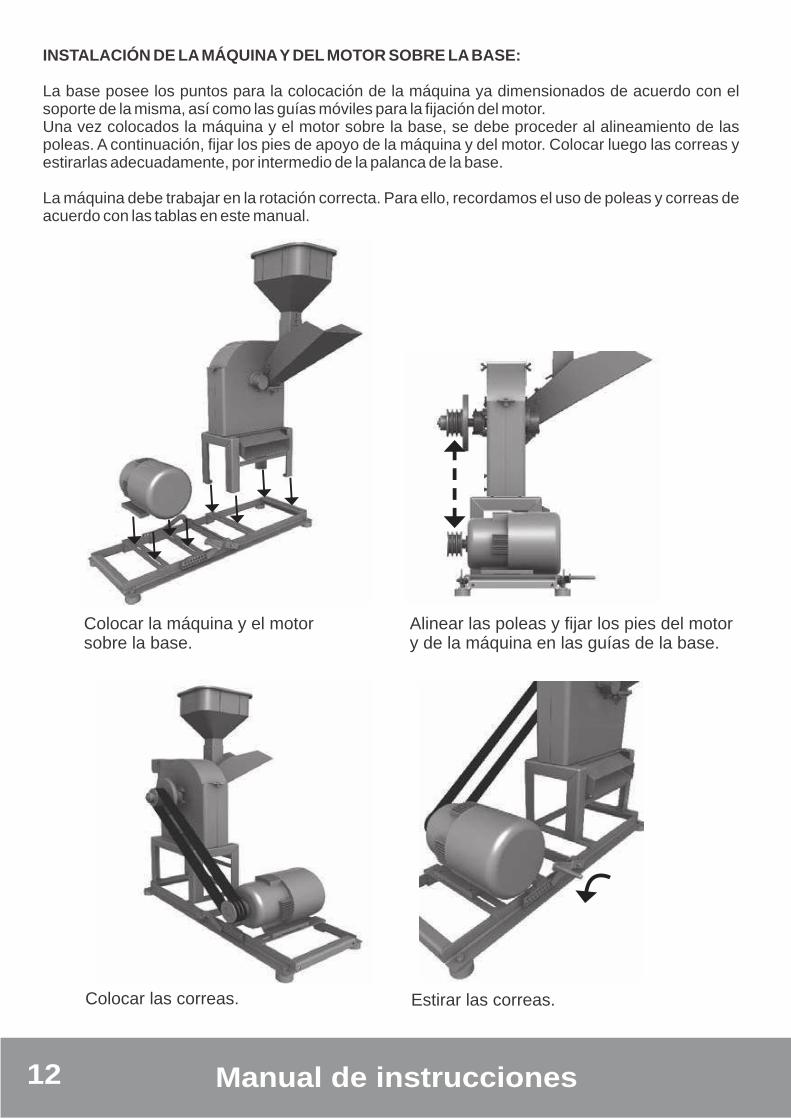
INSTALACIÓN DE LA MÁQUINA Y DEL MOTOR SOBRE LA BASE:
La base posee los puntos para la colocación de la máquina ya dimensionados de acuerdo con el soporte de la misma, así como las guías móviles para la fijación del motor.Una vez colocados la máquina y el motor sobre la base, se debe proceder al alineamiento de las poleas. A continuación, fijar los pies de apoyo de la máquina y del motor. Colocar luego las correas y estirarlas adecuadamente, por intermedio de la palanca de la base.
La máquina debe trabajar en la rotación correcta. Para ello, recordamos el uso de poleas y correas de acuerdo con las tablas en este manual.
Colocar la máquina y el motorsobre la base.
Alinear las poleas y fijar los pies del motory de la máquina en las guías de la base.
Colocar las correas. Estirar las correas.

13
Montaje con motores a diesel o gasolina
La máquina y el motor son instalados sobre una única base.La base Nogueira posee soportes especiales de goma, que eliminan la necesidad del asentamiento.
BASE DE FIJACIÓN1- Esta base fue proyectada para motores a diesel o a gasolina pero también podrá ser usada para motores eléctricos.
SECUENCIA BÁSICA PARA INSTALACIÓN
1- Instalación de la máquina y del motor sobre la base. La base posee los puntos para la colocación de la máquina de acuerdo con el soporte de la misma, que corresponde a la parte fija de la misma.De la misma forma, el motor es colocado en la parte móvil de la base.Después de colocados la máquina y el motor sobre la base, se debe proceder al alineamiento de las poleas. Luego, fijar los pies de apoyo de la máquina y del motor.Colocar luego las correas y estirarlas adecuadamente, por intermedio de la palanca de la base.
DPM-500/1/2/4
Es
pa
ño
l

14 Manual de instrucciones
Montaje con caballete prolongado
La opción de DPM con caballete prolongado posibilita la colocación del motor en el propio caballete, sin la necesidad de utilización de una base.
SECUENCIA BÁSICA PARA LA INSTALACIÓN
La versión con caballete prolongado sale de fábrica premontada, faltando solo la colocación del motor y de las correas. A continuación, describimos la secuencia de montaje correcta:
1- Si el modelo de su DPM posee centrífuga, primero se debe remover la caja del ventilador, conforme muestran las figuras abajo. Si la máquina no posee centrífuga, salte esta etapa y continúe con el paso 2 a continuación.
Remueva los 3 tornillos (A) que prenden la caja en la máquina. Remueva los 11 tornillos (B) que prenden las dos mitades de la caja del ventilador.
Remueva los tornillos (F) que prenden la capa del blindado de las correas.
Remueva la capa del blindado.
2- Abra el blindado y coloque el motor y las correas, conforme instrucciones abajo:
Retire la caja (C), el ventilador (D) y la tapa de la caja (E).
CAPA DELBLINDADO

15
Prenda el motor en las guías del caballete, a continuación, coloque la polea y las correas.
Estire las correas utilizando el tensor existente en el caballete. Para regular el tensor gire las tuercas (G).
Coloque la capa del blindado (F), la tapa (E) y el ventilador (D).Coloque la caja del ventilador (H).
Colocar el anillo de goma (J) en la salida de la caja del ventilador y encajar el tubo curvado en la centrífuga (K).
3- Monte la centrífuga en la máquina (si el modelo utilizado no está equipado con centrífuga, desconsidere la instrucción abajo):
ESTIRADOR
DPM-500/1/2/4
Es
pa
ño
l

16 Manual de instrucciones
Montaje de la centrífuga
La centrífuga es equipamiento opcional, suministrado mediante pedido. Cuando adquirido, viene desmontado y embalado. Para su montaje, observe las instrucciones a continuación:
Encaje el tubo curvado en la boca de entrada de la centrífuga.
Encaje los tres pies en los rebajos existentes en el cuerpo de la centrífuga.
Enrosque una punta del asta en el pie de la centrifuga. Pase la otra punta por el orifício existente en la boca y coloque tuerca. Observe en la figura arriba la posición de la tuerca y de la contratuerca.
Al acoplar la centrífuga en la maquina, recuerde colocar el anillo de goma (A).
ASTA
TUERCA CONTRATUERCA
PIE DE LACENTRÍFUGA

17
Montaje con accesorio para tractor
Nogueira fabrica también un accesorio especial para instalación de la máquina a ser accionada por tractor.
SECUENCIA BÁSICA PARA LA INSTALACIÓN
1- Conjunto completo:
Si el pedido fuere hecho para el conjunto completo, la máquina saldrá lista de fábrica. En este caso, la instalación se resume solo al acoplamiento del conjunto al tractor, por intermedio de los tres puntos de acople del sistema hidráulico del mismo, seguida por la colocación del respectivo eje cardán.
2- Pedidos aislados:
Si los pedidos del accesorio y de la máquina fueren hechos separadamente, el montaje del conjunto deberá ser hecho de la siguiente forma:
a- Colocar la máquina sobre el accesorio;b- Colocar la polea en la máquina;c- Alinear la polea de la máquina con la polea del accesorio, la cual ya está montada en el mismo;d- Fijar la máquina sobre el accesorio;e- Colocar las correas y el blindado de protección;f- Tensionar correctamente las correas, a través del dispositivo estirador;g- Acoplar el conjunto al tractor, a través de los tres puntos del sistema hidráulico;h- Colocar el respectivo eje cardán.
ACCESORIOPARA TRACTOR
DPM-500/1/2/4
Es
pa
ño
l

18 Manual de instrucciones
Operación
Antes de poner la máquina en funcionamiento, se debe verificar:
Si no hay herramientas, pertrechos u objetos sobre el motor, o sobre la máquina, principalmente dentro del pico de alimentación:- Si no hay personas u objetos cerca de las poleas y correas;- Si el sentido de rotación está correcto;- Si la tapa de la máquina está trabada;- Si la máquina está debidamente lubricada;- Si la contracuchilla está debidamente regulada en relación a las cuchillas;- Si esto no ocurre, verificar el item “Regulado de la contracuchilla”;- Si la máquina está debidamente preparada para el producto que será procesado.
PARA MOLER PRODUCTOS SECOS CON CENTRÍFUGA
1- Colocar la contratapa (1);2- Colocar el filtro conforme el producto que se desea obtener (2) introduciendo la parte más curva primero;3- Colocar la tapa móvil del pico de alimentación (3);4- Retirar el aislador de aspiración (4);5- Colocar el cierra fondo (5).
El producto es colocado en el pico de alimentación o tolva y sale por la centrífuga.

19
PARA MOLER PRODUCTOS SECOS SIN UTILIZAR CENTRÍFUGA1- Colocar el aislador de aspiración (4) - si la máquina está equipada con centrífuga;2- Colocar la contratapa (1);3- Colocar el filtro conforme el producto que se desea obtener (2) introduciendo la parte más curva primero;4- Colocar la tapa móvil del pico de alimentación (3).5- Retirar el cierra-fondo (5).
1- Colocar la cinta lisa - fonde de corte (2);2- Retirar la contratapa (1);3- Retirar la tapa móvil del pico de alimentación (3);4- Retirar el cierra-fondo (5);5- Colocar el aislador de aspiración (4) - si la máquina está equipada con centrífuga;6- Abrir el rompe chorro (6).
El producto es colocado en el pico de alimentación o tolva y sale por el pico inferior.
El producto es colocado en el pico de alimentación y sale por la boca superior.
PARA CORTAR PRODUCTOS VERDES
DPM-500/1/2/4
Es
pa
ño
l
20 Manual de instrucciones
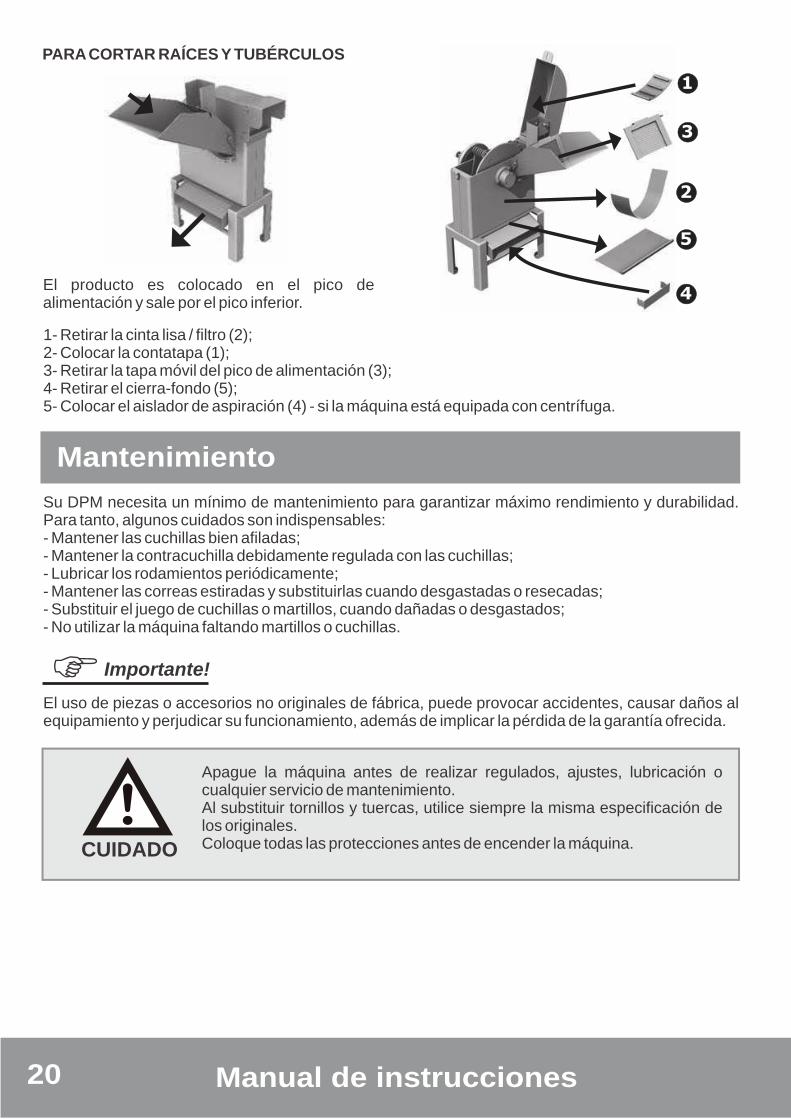
PARA CORTAR RAÍCES Y TUBÉRCULOS
El producto es colocado en el pico de alimentación y sale por el pico inferior.
1- Retirar la cinta lisa / filtro (2);2- Colocar la contatapa (1);3- Retirar la tapa móvil del pico de alimentación (3);4- Retirar el cierra-fondo (5);5- Colocar el aislador de aspiración (4) - si la máquina está equipada con centrífuga.
Mantenimiento
Su DPM necesita un mínimo de mantenimiento para garantizar máximo rendimiento y durabilidad. Para tanto, algunos cuidados son indispensables:- Mantener las cuchillas bien afiladas;- Mantener la contracuchilla debidamente regulada con las cuchillas;- Lubricar los rodamientos periódicamente;- Mantener las correas estiradas y substituirlas cuando desgastadas o resecadas;- Substituir el juego de cuchillas o martillos, cuando dañadas o desgastados;- No utilizar la máquina faltando martillos o cuchillas.
El uso de piezas o accesorios no originales de fábrica, puede provocar accidentes, causar daños al equipamiento y perjudicar su funcionamiento, además de implicar la pérdida de la garantía ofrecida.
Apague la máquina antes de realizar regulados, ajustes, lubricación o cualquier servicio de mantenimiento.Al substituir tornillos y tuercas, utilice siempre la misma especificación de los originales.Coloque todas las protecciones antes de encender la máquina.
Importante!
CUIDADO

21
REMOCIÓN DE LAS CUCHILLASPara remover las cuchillas (A), basta retirar los tornillos (B), junto con las respectivas arandelas.
NOTA:Se debe substituir la contracuchilla cuando estuviere gastada y reajustarla periódicamente.
AFILADO DE LAS CUCHILLAS1- El afilado de las cuchillas debe ocurrir siempre que el corte estuviere gastado;2- Debe ser hecha solo de un lado del corte de la cuchilla, procurándose mantener la misma inclinación del corte original;3- Se debe procurar retirar la misma cantidad de material en cada cuchilla, para no perjudicar el balanceo;4- Las cuchillas deberán ser substituídas cuando no posibilitaren más afilado.
REGULADO DE LA CONTRACUCHILLAPara regular la contracuchilla, proceder de la siguiente manera:1- Soltar las tuercas de los dos tornillos (C);2- Desplazer la contracuchilla (D) hasta que la distancia entre cuchilla y contracuchilla (medida M de la figura abajo) sea de aproximadamente 0,5 mm.3- Reajustar las tuercas (C).
DPM-500/1/2/4
Es
pa
ño
l

22 Manual de instrucciones
CAMBIO DE LOS MARTILLOS
Los martillos (A) poseen 4 caras dentadas para ser cambiadas a medida que se desgastan.Para cambiar la cara o substituirlos, proceder de la siguiente manera:1- Cortar las trabas (B) de los bujes de los martillos;2- Retirar los bujes de los martillos (C), observando el posicionamiento correcto de los anillos separadores, y tomándose el cuidado de no mezclar los juegos de martillos, pues eso perjudicaría el balanceo de la máquina, provocando vibraciones.
Lubricación
1- Los únicos puntos de lubricación son los cojinetes de rodamientos (D);2- La lubricación debe ser hecha semanalmente.
Lubricar con el auxilio de una engrasadora los rodamientos de los cojinetes (D), con grasa especial para rodamientos, a base de jabón de lítio, clasificación NLGI 2 EP. Ejemplo de grasa: LUBRAX LITH-2.
Antes de lubricar, limpie bien las engrasadoras para evitar la contaminación de la grasa.Substituya engrasadoras dañadas.La lubricación es más eficiente cuando es hecha al final del período de trabajo, pues la grasa fluye mejor mientras la máquina todavía está caliente.

23
Características técnicas
Producción (kg/hora)
NOTA:El sentido de rotación es el del reloj, cuando mirado desde el pico de alimentación (fig. al lado).
NOTA:Las produciones arriba son valores de referencia, obtenidos en condiciones de test, pudiendo variar de acuerdo con el grado de humedad del producto, peso específico y condiciones de trabajo.
POTENCIA NECESARIA (HP)
MotorEléctrico
Maíz con payay sabugo
Filtro Cinta lisa
Maíz desgranado
Raíces y tubérculosPasto y caña de azúcar
Motora gasolina
Motora diesel
N° demartillos
N° decuchillas
RPM
5.0 a 7.5 7.0 a 9.0 7.0 a 8.0 20 2 4100
7.5 a 10.0 9.0 a 10.5 8.0 a 10.0 20 2 3700
10.0 a 12.5 12.5 a 15.0 10.0 a 13.0 20 2 3300
N° DE CUCHILLAS Y MARTILLOS ROTACIÓN
PRODUCTOS SECOS PRODUCTOS VERDES
DPM-500/1/2/4
Es
pa
ño
l
24 Manual de instrucciones
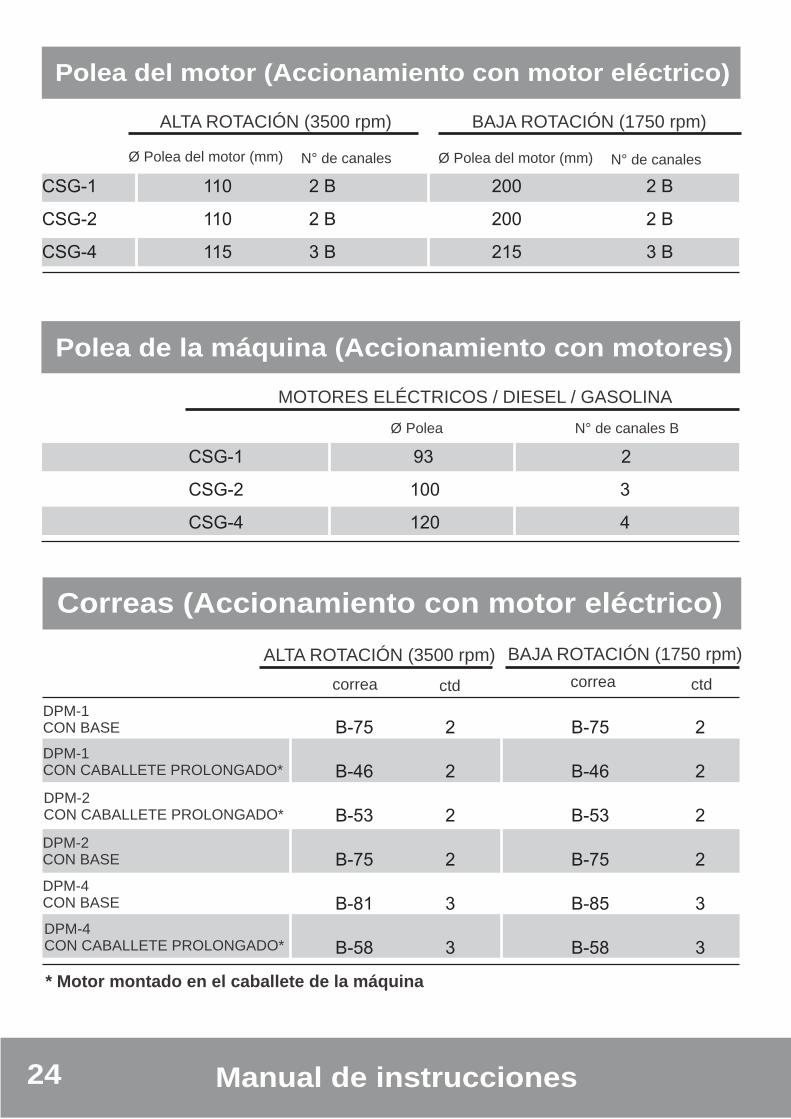
Polea del motor (Accionamiento con motor eléctrico)
Correas (Accionamiento con motor eléctrico)
Polea de la máquina (Accionamiento con motores)
ALTA ROTACIÓN (3500 rpm)
MOTORES ELÉCTRICOS / DIESEL / GASOLINA
ALTA ROTACIÓN (3500 rpm) BAJA ROTACIÓN (1750 rpm)
BAJA ROTACIÓN (1750 rpm)
Ø Polea del motor (mm)
* Motor montado en el caballete de la máquina
correa correactd ctd
Ø Polea
Ø Polea del motor (mm)N° de canales
N° de canales B
N° de canales
DPM-1CON BASE
DPM-1CON CABALLETE PROLONGADO*
DPM-2CON CABALLETE PROLONGADO*
DPM-2CON BASE
DPM-4CON BASE
DPM-4CON CABALLETE PROLONGADO*

25
Poleas y correas (Accionamiento con tractor)
Correas (Accionamiento con motor diesel/gasolina)
Poleas Ø (mm) Correas
máquina accesorio cantidad
cantidadcorrea
DPM-500/1/2/4
Es
pa
ño
l

26 Manual de instrucciones
Pesos y dimensiones
DPM-1 DPM-2 DPM-4
Peso (con caballete) (kg) 60 80 122
Espacio ocupado por la máquina (m) 0,70 x 0,50 0,90 x 0,55 0,95 x 0,70
Espacio ocupado por la máquina sin centrífuga - con base (m)
0,80 x 1,40 0,95 x 1,40 0,95 x 1,40
Espacio ocupado con centrífuga e con base (m) 1,40 x 1,90 1,40 x 2,10 1,40 x 2,10
Altura de la máquina (con caballete) (m) 1,12 1,00 1,25
Altura de la centrífuga (m) 1,90 1,90 1,90

27
Guía práctico
Trabado de la máquina Debido al exceso de alimentación, el motor no consigue mantener la rotación necesaria y el producto se acumula dentro de la máquina
Parar el motor, limpiar el exceso de producto, arrancar nuevamente y controlar la alimentación de la máquina de manera que no exija más que la capacidad indicada
Baja producción Alimentación insuficiente de la máquina
La alimentación debe ser continua, aunque no en exceso, pues puede causar trabado
Rotación de la máquina debajo de la indicada
Si la rotación de la máquina estuviere debajo de la indicada, los martillos tardarán más para triturar el producto y con eso, caerá la produción. Por tanto, se debe mantener la rotación indicada para la máquina
Producto húmedo Si los productos estuvieren muy húmedos, los orificios de los filtros podrán quedar bloqueados. Por tanto, se deben triturar solo productos secos
Regulado de la máquina incompatible con el producto a ser obtenido
Se debe verificar si el filtro usado es compatible con el producto a ser obtenido
Corte irregular del producto
Falta de filo en las cuchillas Afilar nuevamente las cuchillas conforme indicado en el ítem “Afilado de las cuchillas”
Contracuchilla gastada o desregulada
Proceder conforme indicado en el ítem Regulado de la contracuchilla
Deficiencia al moler productos secos
Martillos gastados o dañados Cambiar los lados de los martillos o por nuevos, procediendo conforme indicado en el ítem Cambio de martillos
Martillos presos Lavar los picos, cuchillas y martillos con agua después de picar productos verdes principalmente antes de paradas prolongadas
Dificultad de arranque del accionamiento
Exceso de producto dentro de la máquina
Al terminar el trabajo, dejar a máquina en funcionamiento, hasta la salida completa del producto
DPM-500/1/2/4
Es
pa
ño
l

28 Manual de instrucciones
Informaciones Adicionales
Tabla de medidas de las llaves
Tabla de Torques
Unidad de par de apriete en N.m

El DPM Nogueira es identificado por un número de serie, grabado en una plaqueta (1), localizada en la carcasa de la máquina.
Anote aquí el número de serie de la máquina:
Al enviar comunicaciones o requerir auxilio de la asistencia técnica Nogueira, siempre informe el número de serie y el modelo de la máquina, presentes en la plaqueta de identificación.
Al substituir piezas, utilice siempre artículos originales Nogueira. Solamente las piezas originales son fabricadas de acuerdo con los diseños, materiales y especificaciones de proyecto, pasando por un estricto estándar de calidad.
1
Asistencia técnica
29DPM-500/1/2/4
Es
pa
ño
l
Nogueira Máquinas Agrícolas garantiza la máquina aquí caracterizada contra defectos de fabricación debidamente comprobados por la fábrica, dentro de las siguientes condiciones:
1- La garantía es válida durante los primeros 12 (doce) meses, contados a partir de la fecha de emisión de la factura de venta al primer propietario / consumidor, siendo:
03 (tres) primeros meses - garantía legal; 09 (nueve) últimos meses - garantía adicional concedida por Nogueira Máquinas
Agrícolas.2- Consiste en la presente garantía, en el compromiso de Nogueira en reparar o sumi-
nistrar gratuitamente, en su fábrica, las piezas que a su exclusivo juicio presentan defectos de fabricación. La garantía cubre exclusivamente defectos de material y / o fabricación, mientras que la mano de obra, fl ete y otros gastos no están cubiertos por este certifi cado.
3- No son garantizadas por Nogueira piezas defectuosas por uso indebido, desgaste de-rivado de uso normal, uso en desacuerdo con el manual de instrucciones o causadas por agentes de la naturaleza o accidentes;
4. La presente garantía se invalidará íntegramente en los siguientes casos: 4.1- Aplicación inadecuada de la máquina, en desacuerdo con el Manual de
Instrucciones; 4.2- Uso de lubricantes no recomendados en el Manual de instrucciones; 4.3- Modifi caciones, adaptaciones y / o reparaciones realizadas por personas no auto-
rizadas por el fabricante; 4.4- Empleo de piezas o componentes no originales; 4.5- Uso de tractor con potencia superior a la máxima recomendada en el Manual de
Instrucciones; 4.6- Presentación de Notas Fiscales de compra rasuradas o adulteradas.5- Las reclamaciones sobre eventuales defectos durante el período de la garantía deberán
ser presentadas a los revendedores locales, que las encaminar a la fábrica junto con la pieza defectuosa, que será sustituida, si se reconoce el defecto. En caso de ocurrir el desplazamiento de cualquier Técnico o Mecánico para la atención en la propiedad, éste será de responsabilidad del Propietario de la máquina;
6- Sólo se cumplen las cláusulas del presente Certifi cado de Garantía, si el TÉRMINO DE RECIBO es debidamente rellenado y enviado a Nogueira en el momento de la entrega de la máquina (ver ‘INSTRUCCIONES DE ENVÍO PARA LA FÁBRICA’ en el TÉRMINO DE RECIBO);
7- El fabricante se reserva el derecho de efectuar modifi caciones en sus productos sin que ello asegure en ninguna obligación de aplicarlas a los productos anteriormente fabricados.
¡IMPORTANTE! Esta máquina debe ser operada exclusivamente por persona debidamente capacitada para este fi n.Nogueira ofrece regularmente cursos de capacitación operacional para toda su línea de máquinas. Para mayor información, consulte el sitio: www.nogueira.com.br o póngase en contacto con el Servicio de Atención al Cliente a través del teléfono +55 19 3813 9226.
CERTIFICADO DE GARANTÍA

Propietario:
Dirección:
Ciudad: Estado:
Teléfono: Móvil:
Modelo de la Máquina: Nº de serie:
Declaro haber recibido la máquina arriba citada en perfectas condiciones, acompañada del Manual de Instrucciones, elementos sueltos, instrucciones de uso, mantenimiento y seguridad necesarias y el Certifi cado de Garantía.Declaro ser consciente de que el equipo recibido sólo puede ser utilizado por un operador de-bidamente capacitado.
Firma del Propietario Fecha de entrega
¡IMPORTANTE! Esta máquina debe ser operada exclusivamente por persona debidamente capacitada para este fi n.Nogueira ofrece regularmente cursos de capacitación operacional para toda su línea de máquinas. Para mayor información, consulte el sitio: www.nogueira.com.br o póngase en contacto con el Servicio de Atención al Cliente a través del teléfono +55 19 3813 9226.
TÉRMINO DE RECIBO
INSTRUCCIONES PARA EL REGISTRO EN EL SITIO:1. Llene el TÉRMINO DE RECIBO con la información solicitada y fi rme;2. Dispare el TÉRMINO DE RECIBO completado y la factura de venta;3. Acceder al sitio www.nogueira.com.br y haga clic en la pestaña “TÉRMINO DE
RECIBO” o acceda nogueira.industriasnb.com/entrega;4. Rellene la información solicitada en el sitio;5. Añada las fotos del TÉRMINO DE RECIBO y de la factura y haga clic en ‘ENVIAR’.
¡IMPORTANTE!La garantía de este equipo sólo tendrá validez si este TÉRMINO DE RECIBO y la factura de venta están registrados en el sitio web de Nogueira, conforme a las siguientes instrucciones:

32
Esencial en el campo
Manual de instrucciones


NOGUEIRA Ind. Com. Impl. Máquinas Agrícolas S.A.St./R: Fernando de Souza, 533 - Distrito Industrial - CEP 13877-775Tel/Phone.: (19) 3638.1500 - Fax: (19) [email protected] - www.nogueira.com.brCNPJ: 08.510.974/0001-27
VE
RS
ÃO
14071027