continuum-cms-manual.pdf - jadu
TRANSCRIPT


1.1
1.2
1.2.1
1.2.2
1.2.3
1.2.4
1.2.5
1.3
1.3.1
1.3.2
1.3.3
1.3.4
1.4
1.4.1
1.4.1.1
1.4.1.2
1.4.1.3
1.4.1.4
1.4.1.5
1.4.1.6
1.4.1.7
1.4.1.8
1.4.2
1.4.3
1.4.3.1
1.4.3.2
1.4.3.3
1.4.4
1.4.5
1.4.5.1
1.4.5.2
1.4.5.3
1.4.6
1.4.6 .1
1.4.6 .2
1.4.6 .3
1.4.6 .4
1.4.7
1.4.8
1.4.9
1.4.9 .1
1.4.9 .2
1.4.9 .3
1.4.10
1.4.11
1.4.12
Table of ContentsIntro d uctio n
Basics
Fo rms
Navig atio n
Searching fo r co ntent
Who 's o nline
System no tificatio ns
Yo ur acco unt
Chang e yo ur p asswo rd
Lo g g ing o ut
Tasks
Setting s
Pub lishing
Key co ncep ts
Ap p ro val p ro cess
Auto save
Categ o ries
Co ntent lo cking
Co ntent sched ule
Imag e lib rary
Metad ata
Text ed ito r
Anno uncements
Blo g s
Po sts
Temp late
Setting s
Do cuments
Do wnlo ad s
List o f d o wnlo ad s
Ed iting and creating d o wnlo ad s
Files
Events
List o f events
Ed iting and creating events
Lo catio ns
User sub mitted events
External feed s
Galleries
Ho mep ag es
List o f ho mep ag es
Ed iting and creating ho mep ag es
Activating ho mep ag es
Ho mep ag e b anners
Multimed ia
News
2

1.4.13
1.4.14
1.5
1.5.1
1.5.2
1.5.3
1.5.4
1.5.5
1.5.6
1.5.7
1.5.8
1.6
1.6 .1
1.6 .2
1.6 .3
1.6 .4
1.6 .5
1.6 .6
1.7
1.7.1
1.7.2
1.7.3
1.7.4
1.7.5
1.7.6
1.7.7
1.8
1.8 .1
1.8 .2
1.8 .3
1.8 .4
1.8 .5
1.8 .6
1.8 .7
1.8 .8
1.9
1.9 .1
1.9 .2
1.9 .3
1.9 .4
1.9 .5
1.9 .6
1.10
1.10 .1
1.10 .2
1.10 .3
1.10 .4
1.10 .5
Po lls
Sup p lements
Directo ries
Ab o ut d irecto ries
Ad verts
Creating a d irecto ry
Field s
Imp o rting and exp o rting d ata
Reco rd s
Setting s
Taxo no my
Marketing
Ab o ut marketing
Co ntact histo ry and manag er
Creating an email camp aig n
Ho mep ag e ad verts
Reg istratio n and users
User lo g in analysis
eGo v
A to Z co ntacts
A to Z services
Co uncillo rs
Exp o rting the A to Z
Meeting s and minutes
Parties
Ward s
Galaxies
Ab o ut Galaxies s ites
List o f Galaxies s ites
Ed iting and creating Galaxies s ites
Site d esig n (Leg acy)
Site d esig n (Pho to n)
Co ntent p acks
Gro up s
Lang uag e p acks
Rup a
Ap p liances
Co llectio ns
Navig atio n
Rep o rts
Result rename URLs
Setting s
Translatio ns
Lo cales
Assig ning translato rs
Co nfig uring translated sites
Send ing co ntent fo r translatio n
Co mp leting translatio n tasks
3

1.10 .6
1.11
1.11.1
1.11.2
1.11.3
1.11.4
1.11.5
1.11.6
1.11.7
1.11.8
1.11.8 .1
1.11.9
1.11.10
1.11.10 .1
1.11.10 .2
1.11.10 .3
1.11.10 .4
1.11.11
1.12
1.12.1
1.12.1.1
1.12.1.2
1.12.1.3
1.12.1.4
1.12.1.5
1.12.1.6
1.12.1.7
1.12.1.8
1.12.1.9
1.12.1.10
1.12.2
1.12.3
1.12.3.1
1.12.3.2
1.12.3.3
1.12.4
1.12.5
1.12.6
1.12.7
1.12.8
Manually up d ating map p ing s
Util ities
Ad min statistics
Categ o ry b uild er
Do cument ed ito r p rivileg es
Friend ly URLs
Link checker
Link insp ecto r
Orp haned co ntent
Rep o rts
Clud o Analytics
Statistics
Users
List o f users
Ed iting and creating users
Ro les
Imp o rt users
Wo rkflo w
Setting s
Integ ratio ns
Analytics
Clud o Search
Co ntinuum CXM
ESRI ArcGIS Online
Go o g le reCap tcha
HUBis
LDAP
MailChimp
Office 36 5
Sitemo rse
Stylesheets
Wid g et manag er
List o f wid g ets
Ed iting and creating wid g ets
Styles
Asset manag er
Read ab le URLs
On/Off Switch
MyJad u API
Licenses
4

Welcome to Jadu CMS ContinuumThe Jad u Manual is d esig ned to g ive a g eneral o verview o n ho w to p erfo rm all the tasks within yo ur Jad u Co ntent Manag ementSystem (CMS).
It sho uld p ro vid e yo ur Co ntent Ed ito rs and Web masters with all the info rmatio n they will need in o rd er to create and manag e theco ntent within yo ur o rg anizatio n’s web site.
Last updat e d: Fri Oct 16 20 20 0 3:17:12 GMT+0 10 0 (BST)
Intro d uctio n
5

Basics
Basics
6

How to use your Jadu CMS formsThro ug ho ut the p ro cess o f ad d ing and maintaining co ntent fo r use o n yo ur o rg anizatio n’s web site, yo u will b e req uired to enterinfo rmatio n reg ard ing co ntent to b e p ub lished via sp ecific fo rms tailo red to the typ e o f co ntent yo u are autho ring .
Co ntent sp ecific fo rms are laid o ut and o p erate in a co nsistent manner thro ug ho ut many p ub lishing tasks and b elo w, we p ro vid ean o verview o f so me o f the co mmo n elements and functio ns.
Basic form layoutAltho ug h each fo rm will ask yo u to p ro vid e d ifferent info rmatio n reg ard ing yo ur co ntent, their o verall structure will b e s imilar.
All fo rms will co nsist o f field titles and field entry areas. The info rmatio n yo u wish to ad d sho uld b e entered into the fo rmasso ciated with the co ntent typ e (i.e. News, FAQs, Do cument p ag es, etc.) yo ur info rmatio n refers to .
A basic form layout
Dro p d o wn menus can b e used b y c licking the b lack arro w to the rig ht o f the menu, then selecting the req uired o p tio n fro m the lis to f selectio ns that ap p ear.
Tick b o xes can b e selected b y c licking them with yo ur mo use and clickab le b utto ns are usually d ark g rey with white text.
Basic form functionsWithin fo rm areas yo u will no tice that the * symb o l will b e p resent next to so me o f the field titles. This ind icates that this field isreq uired (mand ato ry), which means co ntent must b e p resent within this field in o rd er fo r yo ur info rmatio n to b e saved andultimately used within yo ur o rg anizatio n’s web site.
If yo u attemp t to save yo ur co ntent witho ut ad d ing info rmatio n into these req uired field s yo u will b e p resented with an erro r. Ino rd er to rectify this p ro b lem p lease ensure all req uired entry field s co ntain co ntent and re-sub mit yo ur fo rm.
Fo rms
7

The system will highlight where mandatory fields are missing
If a field req uires yo u to enter a d ate p lease b e aware that the fo rmat fo r d ate field s is d d -mm-yyyy, yo u can also use the calend ar toselect a d ate, p ress the calend ar ico n in o rd er to b e ab le to select a d ate fro m the calend ar.
If a field req uires yo u to enter a time p lease b e aware that the fo rmat fo r time field s is hh:mm using the 24 ho ur c lo ck.
If yo u are d eleting any element fro m within yo ur CMS such as an imag e o r d o cument yo u will always b e asked to co nfirm that yo uwish to d elete this element b efo re it is d eleted , help ing ensure that elements are no t d eleted b y mistake.
If certain fo rm co ntent req uires ad d itio n thro ug h a d ed icated wind o w/lig htb o x, yo u p ress the asso ciated b utto n to save theinfo rmatio n yo u have entered , and the wind o w will c lo se.
Please b e aware that when a wind o w o p ens yo u will o nly b e ab le to enter o r alter info rmatio n within the wind o w and no t the p ag eb ehind it. In o rd er to ad d o r alter info rmatio n p resent o n a p ag e b ehind a wind o w yo u must exit the wind o w first.
Within wind o wed fo rms yo u will have the o p tio n to c lo se the wind o w b y using the X ico n in the to p rig ht hand co rner, p lease b eaware if yo u d o use the X ico n to exit a wind o w any info rmatio n yo u have entered may p o tentially b e lo st if yo u have no t saved itfirst.
If yo u are asked to set a p asswo rd fo r an item o f co ntent p lease b e aware that the p asswo rd yo u set will b e case sensitive.
Fo rms
8

The navigation barThe main navig atio n b ar o n the left hand sid e sho w a lis t o f mo d ules that yo u have access to .
In ad d itio n, yo u can also access a p erso nal menu b y c licking o n yo ur name at the far rig ht o f the to p navig atio n b ar. This willp resent yo u with o p tio ns fo r accessing yo ur Task List, chang ing yo ur p asswo rd , accessing yo ur Dashb o ard , and lo g g ing o ut o fthe CMS.
Accessing your personal menu
Navigating between CMS modulesThe Jad u CMS is a mo d ular co ntent manag ement system. Clicking o n the Op en menu item in the navig atio n b ar will p resent yo uwith a l is t o f mo d ules to which yo u have b een g ranted access.
Selecting a mo d ule will p ro vid e yo u with ad d itio nal o p tio ns fo r accessing the elements o f that mo d ule that yo u are p ermitted touse.
Navig atio n
9

The full Publishing module menu is revealed
Navig atio n
10

Searching for items in the Jadu CMSThe Jad u CMS navig atio n b ar includ es a keywo rd search b o x that allo ws yo u to search fo r ind ivid ual items o f co ntent.Searchingand viewing yo ur search results.
Searching and viewing your search results
Searching for content within the Jadu CMS
To search fo r co ntent within the CMS simp ly typ e yo ur search term in the search b o x within the main to o lb ar. This willd ynamically return a l is t o f the mo st relevant search results.The results l is t wil l ind icate the title o f each item alo ng with an ico n ind icating its co ntent typ e.To access an item fro m the lis t yo u must c lick o n it. This will take yo u d irectly to the item within the Jad u Co ntro l Center.To view a full l is t o f all the related results c lick o n the Sho w all results l ink at the b o tto m o f the d ynamic results l is t.
Searching fo r co ntent
11

Viewing your full search results
The full results p ag e will sho w three co lumns.The first co lumn will d isp lay the Title o f each item alo ng with its resp ective co ntent typ e, assig ned navig atio n categ o ries. It wil lalso ind icate whether the co ntent is currently lo cked fo r ed iting .The seco nd co lumn will d isp lay the name o f the co ntent Owner.The final co lumn will ind icate when the item was Last mo d ified .This results view will also p ro vid e access to a rang e o f Filter o p tio ns to the left o f the results - allo wing yo u to furthercusto mize the info rmatio n d isp layed .
Sorting your search results
Searching fo r co ntent
12

Accessing the Sort menu
Clicking o n the So rt menu will g ive yo u the o p tio n to so rt yo ur results b y Relevance, d ate last mo d ified o r Title.The current view will always b e hig hlig hted in b o ld .
Flagging individual search results
Flagging a search result
It is p o ssib le to flag key results to make them easier to lo cate and id entify.To flag a result s imp ly c lick o n the flag ico n to the left o f the title. This will turn the ico n g reen to ind icate that the item has b eenflag g ed .Yo u may then ap p ly the Flag g ed fi lter when viewing yo ur results.
Searching fo r co ntent
13

To unflag an item click o n the flag ico n a seco nd time. This will remo ve the g reen hig hlig ht to ind icate that the item has b eenunflag g ed .
Using the Actions menuYo u may also ap p ly b ulk actio ns to yo ur search results.
Accessing the Actions menu
Check the b o x to the left o f the Title o f the items that yo u wish to ap p ly the Actio ns to .Select the Actio ns menu to cho o se fro m the availab le o p tio ns.Ed it wil l o p en the co ntent fo r ed iting within the Co ntro l Center.Flag will ap p ly a flag to the items fo r fi ltering .Chang e o wner will allo w yo u to re-assig n o wnership o f the selected items.View live (if the co ntent has b een p ub lished ) will o p en the items o n yo ur web site.Preview will d isp lay the latest saved versio n o f the items.Lo ck / Unlo ck will let yo u ap p ly o r remo ve a co ntent lo ck to the selected items.
Note: These options may vary depending on your access rights.
Searching fo r co ntent
14

Online NowTo view a lis t o f o ther users currently lo g g ed into the Jad u CMS click o n the Online No w b utto n to the b o tto m rig ht o f the Co ntro lCenter wind o w.
Viewing users Online Now
Click o n the ico n to send an email.
Click o n the ico n to view co ntent o wned b y the user.
Click o n the ico n to view the user’s access lo g .
Note: The options visible may depend upon your access rights.
Who 's o nline
15

System notificationsJad u CMS d isp lays no tificatio ns when a new versio n o f yo ur so ftware has b een released . New releases can co ntain new features,b ug fixes and security imp ro vements.
To view no tificatio ns within the Co ntro l Centre, c lick the b ell at the to p . This d isp lays no tificatio ns o nly.
Dismissing NotificationsEach no tificatio n in the lis t has an so that yo u can d ismiss the no tificatio n. Yo u can also mark all no tificatio ns as read b yclicking the l ink at the to p o f the co ntainer.
System no tificatio ns
16

Your account
Yo ur acco unt
17

How to change your login password
Accessing the Change Password area
Click o n yo ur name in the rig ht s id e o f the Jad u Co ntro l Center navig atio n b ar to navig ate to the Chang e Passwo rd area.
The Change Password area
Within this area yo u will first b e info rmed o f the last time yo u chang ed yo ur p asswo rd .In the O ld Passwo rd field enter yo ur existing p asswo rd .In the Passwo rd field enter the p asswo rd yo u wish to use fro m no w o n. The Sug g est b utto n can also b e used to auto maticallyg enerate a p asswo rd fo r yo u.Once the Sug g est b utto n has b een p ressed it wil l auto matically p o p ulate a new p asswo rd into the Passwo rd and Co nfirmPasswo rd field s and will info rm yo u o f the p asswo rd it has entered into these areas. (Yo u d o no t have to keep this p asswo rd if
Chang e yo ur p asswo rd
18
yo u d o no t want to ).If yo u have entered yo ur o wn new p asswo rd into the Passwo rd field , re-enter this new p asswo rd into the Co nfirm Passwo rdfield .Once yo u have entered all the req uired info rmatio n p ress the Sub mit Passwo rd b utto n to chang e yo ur lo g in p asswo rd to theo ne yo u have cho sen.
Please b e aware that yo ur new p asswo rd is case sensitive, it must b e at least five characters lo ng and must co ntain a mixture o fletters (up p er and lo wer case) and numb ers, b ut canno t co ntain any sp ecial characters.
Chang e yo ur p asswo rd
19

How to log out of your CMSOnce yo u have co mp leted all yo ur req uired tasks within yo ur CMS, it’s reco mmend ed that yo u lo g o ut, ensuring so meo ne elseusing yo ur co mp uter and yo ur lo g in d etails d o es no t access yo ur CMS.
Navigating to the Log Out option
Click yo ur name in the rig ht s id e o f the Jad u Co ntro l Center navig atio n b ar to navig ate to the Lo g Out o p tio n.Befo re yo u are lo g g ed o ut o f yo ur CMS yo u will b e asked to co nfirm that yo u wish to d o this.Once lo g g ed o ut yo u will b e sho wn the lo g in screen to yo ur CMS with the ad d ed messag e o f Yo u were lo g g ed o utsuccessfully.
Lo g g ing o ut
20

Your tasksThro ug ho ut the p ro cess o f sub mitting and ap p ro ving co ntent, yo u will b e req uired to use the Task List area o f yo ur CMS.
To view your task lists1. Click o n yo ur name in the to p rig ht o f the screen2. Select " My Tasks" fro m the d ro p d o wn menu
Yo ur Task List area co nsists o f fo ur main sectio ns named the To Do List, the Awaiting Actio n, the Co ntent Sched ule and theCo ntent Lo cks areas.
Tasks
21

Settings
Email alerts
Jad u Co ntinuum CMS can send yo u a g ro wing numb er o f email alerts. The mo st imp o rtant o f these are alerts when co ntent yo u'vesub mitted to the p ub lishing wo rkflo w is ap p ro ved o r rejected , and alerts when new wo rkflo w tasks are created fo r yo u.
To enable email alerts
1. Click o n yo ur name in the to p rig ht o f the screen2. Select " Setting s" fro m the d ro p d o wn menu3. Click the Email alerts to g g le to enab le email alerts fro m the CMS4. Check the checkb o xes next to the alerts yo u want to receive5. Click the save chang es b utto n
To disable email alerts
1. Click o n yo ur name in the to p rig ht o f the screen2. Select " Setting s" fro m the d ro p d o wn menu3. Click the Email alerts to g g le to enab le email alerts fro m the CMS4. Click the save chang es b utto n
To send a test email
1. Click o n yo ur name in the to p rig ht o f the screen2. Select " Setting s" fro m the d ro p d o wn menu3. Click the Send me a test email b utto n
Two-step verification
Setting s
22

Two -step verificatio n, also kno wn as Two Facto r Authenticatio n o r 2FA, is an extra layer o f security. It req uires no t o nly a p asswo rdand username b ut also a d evice in yo ur p o ssessio n to access yo ur acco unt and makes it hard er fo r intrud ers to b reak into yo uracco unt.
To enable two factor authentication
A q uick vid eo called " Ho w to set up two -step verificatio n" is availab le to watch, its l inked to fro m the Two -step verificatio n tab .
1. Click o n yo ur name in the to p rig ht o f the screen2. Select " Setting s" fro m the d ro p d o wn menu3. Click the Two -step verificatio n tab4. Click the Set up two -step verificatio n to g g le5. Select a d evice to use6 . Click the Verfiy the Co d e b utto n7. Scan the b arco d e with yo ur d evice, o r typ e in the manual entry d etails8 . Click the Do ne? Let's Test b utto n9 . Typ e yo ur username and p asswo rd to reauthenticate
10 . Co mp lete the verificatio n co d e b o x using the co d e g enerated b y yo ur d evice11. Click the Verify Me b utto n
Ano ther vid eo is availab le called " Sig ning in with two -step verificatio n" , this d emo nstrates ho w yo u will lo g in no w that Two -stepverificatio n is enab led .
To disable two factor authentication
1. Click o n yo ur name in the to p rig ht o f the screen2. Select " Setting s" fro m the d ro p d o wn menu3. Click the Two -step verificatio n tab4. Click the Set up two -step verificatio n to g g le
WebDAV
Setting s
23

Web DAV saves yo u time up lo ad ing multip le fi les fro m yo ur co mp uter. Web DAV co nnectio ns use yo ur existing username, b ut asep arate p asswo rd which will exp ire after 6 ho urs.
To generate a new password
1. Click o n yo ur name in the to p rig ht o f the screen2. Select " Setting s" fro m the d ro p d o wn menu3. Click the Web DAV tab4. Click the Send Email o r Generate Passwo rd b utto n5. An email as b een sent to yo ur inb o x, the sub ject l ine is " Web DAV - Passwo rd Req uest " . Op en the email and click o n the
Generate p asswo rd b utto n6 . The b ro wser will take yo u b ack to the Co ntro l Center7. The Yo ur Web DAV p asswo rd wind o w will o p en, sho wing yo ur new p asswo rd8 . Make a no te o f yo ur p asswo rd9 . Lo g in to Web DAV using yo ur username and the p asswo rd fro m the p revio us step
The p asswo rd can no t b e retrieved after the wind o w is c lo sed , b ut a new p asswo rd can b e g enerated at any p o int - even b efo re thelast p asswo rd exp ires.
To force expire your current WebDAV password
1. Click o n yo ur name in the to p rig ht o f the screen2. Select " Setting s" fro m the d ro p d o wn menu3. Click the Web DAV tab4. Click the Exp ire No w b utto n
To disable the login video
There are two ways in which to d isab le the lo g in vid eo animatio n. To d isab le the vid eo fo r all users, chang e the CMS co nstantvalue to false. To d isab le the vid eo fo r a s ing le vis it, ad d to the lo g in p ag e ad d ress.
eg .
Setting s
24

Publishing
Pub lishing
25

What is the approval process?It is essential that yo u und erstand the mechanics o f the ap p ro val p ro cess. We therefo re need to refer b ack to the examp le wo rkflo wstructure set o ut earlier in this manual.
We are g o ing to use d efault CMS user set up , which co nsists o f two levels o f user: Ad ministrato r and Web master. (Fo r d etailedinfo rmatio n o n b uild ing yo ur o wn custo m wo rkflo ws p lease refer to the Jad u CMS Util ities Manual.)
Ad ministrato rs will b e g iven the least amo unt o f co ntro l within yo ur CMS. Their p rimary task will b e to create and ad d co ntent toyo ur CMS, such as d o cuments, d o wnlo ad s, etc. While they will b e ab le to autho r and manag e co ntent, they will no t b e ab le top ub lish it to the web site as all co ntent req uires p ub licatio n ap p ro val b y a Web master.
Web masters will b e g iven richer access to the functio ns within yo ur CMS, b ut their p rimary task will b e to ap p ro ve co ntent createdb y the Ad ministrato rs and to co ntro l what the end user will see o n yo ur web site.
An Ad ministrato r creates a p iece o f co ntent fo r yo ur o rg anizatio n’s web site. They d o no t have eno ug h access p rivileg es tomake that co ntent l ive o n yo ur web site, b ut they d o have the ab il ity to send their co ntent to a Web master fo r ap p ro val.It is hig hly reco mmend ed that an Ad ministrato r ad d s co mments when sub mitting co ntent fo r ap p ro val which co uld assist theWeb master with reviewal.The Web master will b e sho wn the co ntent that has b een sent fo r ap p ro val o n their To Do List within the Task List sectio n o fyo ur CMS.Within this To Do List, the Web master can click the title o f the co ntent to view the d etails o f that co ntent.The co ntent is sho wn with the co mments ad d ed b y the Ad ministrato r while sub mitting the co ntent fo r ap p ro val.Once the co ntent has b een reviewed the Web master has two o p tio ns o f what they can d o next. They can send the co ntent b ackto the Ad ministrato r fo r amend ments o r they can ap p ro ve the co ntent and make it l ive o n yo ur web site.If the co ntent in q uestio n has b een sent b ack to the Ad ministrato r fo r amend ments, then they can make the req uestedamend ments and re-sub mit that co ntent fo r ap p ro val.This p ro cess co ntinues until the final co ntent is ap p ro ved b y the Web master.
What to look for when approving contentThere are a numb er o f key thing s that yo u need to lo o k fo r b efo re ap p ro ving an item o f co ntent, in o rd er to ensure interesting andwell p resented co ntent is ad d ed to yo ur o rg anizatio n’s web site. If there are any co mments fro m the ad ministrato r read thro ug hthem.
It’s imp o rtant to ensure that the categ o ries that have b een assig ned are ap p ro p riate fo r the sub ject o f the co ntent. In ad d itio n,check that the keywo rd s and d escrip tio n have b een ad d ed to the Metad ata area. It is imp o rtant that no p unctuatio n o r cap ital lettersare includ ed in the Metad ata d escrip tio n and all keywo rd s are co mma sep arated .
Scan thro ug h the co ntent and check that there are no g laring fo rmatting erro rs. So me imp o rtant o r o b vio us examp les o f p o o rfo rmatting includ e:
Larg e p arag rap hs o f text. There sho uld b e a p arag rap h return after every o ther full s to p o r after every full s to p if the p arag rap his lo ng . Extensive areas o f text are hard to read o n a co mp uter screen.Make sure links are lines o f text that accurately d escrib e its targ et, rather than who le p arag rap h.Ensure there are no unfo rmatted b ullet p o ints.Check there is no inco rrect fo rmatting , e.g . p arag rap hs fo rmatted as head ing s.Make sure any imag es that have b een used are the co rrect s ize fo r the p ag e and yo ur s ite.
Once yo u have mad e all the necessary checks, yo u must d ecid e whether it is ap p ro p riate to make this co ntent availab le o n yo uro rg anizatio n’s web site, o r whether it need s to b e returned to the Co ntent Ed ito r that created it fo r amend ments.
The To Do List
To view your task lists1. Click o n yo ur name in the to p rig ht o f the screen2. Select " My Tasks" fro m the d ro p d o wn menu
If yo u have b een g iven access within yo ur o rg anizatio n’s CMS to ap p ro ve and make co ntent l ive, this sectio n will l is t all the items o fco ntent that are awaiting ap p ro val.
This l is t wil l co ntain co ntent that yo u have created and have sub mitted fo r ap p ro val alo ng with co ntent created and sub mitted fro mo ther users within yo ur o rg anizatio n.
Ap p ro val p ro cess
26

How to approve or reject an item of contentThe d efault view o f the Task List area is the To Do List. If yo u have vis ited ano ther p art o f the Task List sectio n yo u need to selectthe To Do List tab .
The To Do List area
The To Do List area
At the to p o f the To Do List, there is a l ine o f text that info rms yo u o f ho w many tasks yo u have awaiting co mp letio n.The To Do List area is sp lit into seven co lumns.The first co lumn is named No and numb ers the amo unt o f tasks that yo u have which are waiting to b e co mp leted .The seco nd co lumn is named Yo ur task. This area info rms yo u o f what actio n need s to b e taken fo r each item o f co ntent, e.g .Ap p ro ve Do cuments o r Ap p ro ve News.The third co lumn is named Title. This co ntains all the co ntent titles that are awaiting actio n. The title o f the co ntent also wo rksas a link to view the d etails o f each co ntent item. This is ho w yo u review the info rmatio n o f the co ntent that has b een sub mittedfo r ap p ro val.The fo urth co lumn is named Date created . This allo ws yo u to see when the p articular co ntent item was created .The fifth co lumn is named Set b y. This area will co ntain the name and email ad d ress o f the p erso n that has sub mitted eachsp ecific item o f co ntent fo r ap p ro val.The sixth co lumn is named Co mments. This area will co ntain info rmatio n o n what co mments have b een left, o r amend mentsthat need to b e mad e if the co ntent has alread y b een rejected .
How to reject contentTo reject an item o f co ntent, c lick o nto the title o f the co ntent yo u wish to reject. Yo u will b e taken to the co ntent d etails area,where yo u can review every element o f this co ntent.Press 'Decline' b utto n, Reject co ntent mo d al wind o w will p o p up .
Ap p ro val p ro cess
27

The Reject content window
Within this wind o w yo u will have the ab il ity to co mment o n why yo u are rejecting this co ntent.Typ e yo ur Co mments o n this rejected co ntent within this area. Fo r examp le, yo u may req uire a certain element o f co ntent to b eremo ved o r amend ed o r that this co ntent is no t ap p ro p riate fo r yo ur o rg anizatio n’s web site.Once yo u have ad d ed all yo ur co mments, p ress the Reject b utto n to reg ister the rejectio n o f that item o f co ntent and to sub mityo ur co mments.To reject an item o f co ntent using the seco nd metho d , c lick o nto the title o f the co ntent yo u wish to reject. Yo u will b e taken tothe co ntent d etails area, where yo u can review every element o f this co ntent.
How to approve contentClick the title o f the co ntent yo u wish to ap p ro ve. Yo u will b e taken into the d etails area fo r that p iece o f co ntent. Within this areayo u can review every element o f this co ntent.
Approve and Decline options
Once yo u have reviewed the co ntent p ress the Ap p ro ve b utto n. Ap p ro ve co ntent mo d al wind o wn will p o p up .Within this wind o w yo u will have the ab il ity to ad d co mment o n why yo u are ap p ro ving this co ntent.
Ap p ro val p ro cess
28

Once yo u have ad d ed all yo ur co mments, p ress the Ap p ro ve & Pub lish b utto n in the mo d al wind o w.Once p ressed yo u may no w have so me ad d itio nal o p tio ns d ep end ing o n the item o f co ntent yo u are ap p ro ving .
Initial options for publication.
The Sub mit b utto n allo ws yo u to re-sub mit the co ntent fo r p ro o fing ag ain in case yo u have ap p ro ved this co ntent b y mistake.The LIVE / TAKE OFFLINE switch allo ws yo u select whether the co ntent in q uestio n is mad e live o n yo ur o rg anizatio n’s web site.When MAKE LIVE is selected , a new o p tio n may ap p ear d ep end ent o n the typ e o f co ntent that yo u are p ub lishing .
Ap p ro val p ro cess
29

Making content visible in your navigation
The Make Vis ib le / Invis ib le switch allo ws yo u to select whether yo ur vis ito rs can find this item o f co ntent fro m yo ur web site’smain navig atio n o r no t.Make yo ur selectio ns fro m the relevant d ro p d o wn menus, allo wing yo u to save these cho ices and ap p ro ve the co ntents.
Awaiting ActionThis area info rms yo u if any co ntent created b y yo u is awaiting actio n, such as yo u have sub mitted a d o cument fo r ap p ro val and isawaiting a Web master to ap p ro ve it.
Within this area yo u can view items o f co ntent that yo u have sub mitted fo r ap p ro val. Yo u can also terminate an item o f co ntent whichwill remo ve it fro m the ap p ro val p ro cess and yo u will b e info rmed if yo ur co ntent has b een rejected and why it has b een rejected .
The d efault view o f the Task List area is the To Do List to vis it the Awaiting Actio n area click the Awaiting Actio n tab .
Ap p ro val p ro cess
30

The Awaiting Action area
At the to p o f the Awaiting Actio n area there is a l ine o f text that info rms yo u o f ho w many tasks yo u have created and are waitingto b e co mp leted .The Awaiting Actio n area is sp lit into seven co lumns.The first co lumn is named No and numb ers the amo unt o f tasks that yo u have created and are waiting to b e co mp leted .The seco nd co lumn is named Yo ur task. This area info rms yo u o f what actio n need s to b e taken fo r each item o f co ntent, e.g .Ap p ro ve Do cuments o r Ap p ro ve News.The third co lumn is named Title, and co ntains all yo ur co ntent titles that are awaiting actio n. The title o f the co ntent also wo rksas a link to view the d etails o f each co ntent item.The fo urth co lumn is named Task creatio n d ate. This allo ws yo u to see when the task was created .The fifth co lumn is named Fo r attentio n o f. This area will co ntain the name o f the user yo ur task is awaiting to b e actio ned b y.The sixth co lumn is named Co mments. This area will co ntain info rmatio n o n what co mments o r amend ments have b eensub mitted if yo ur co ntent has b een rejected .The seventh co lumn co ntains a Terminate b utto n fo r each p iece o f co ntent that is within the lis t. This b utto n allo ws yo u toremo ve a sp ecific p iece o f co ntent fro m the ap p ro val p ro cess. Yo u will b e asked to co nfirm yo ur chang es b efo re yo ur co ntentis remo ved fro m the ap p ro val p ro cess.
Ap p ro val p ro cess
31

AutosaveThe Jad u CMS Text Ed ito r p ro vid es an Auto save feature includ ed as stand ard .
Auto save auto matically saves co ntent in the b ackg ro und and p revents co ntent fro m b eing lo st reg ard less o f whether co ntenthas b een saved manually d uring the ed iting p ro cess.If accessing co ntent that was no t manually saved d uring the p revio us sessio n, unsaved chang es are reco vered , alo ng with thetime and d ate o f the last auto save.
Autosave content recovery option
Links within the no tificatio n allo w co ntent autho rs to Reco ver o r Dismiss unsaved chang es. Clicking the Reco ver o p tio n recallsthe p revio usly unsaved co ntent into the co ntent item yo u are viewing .If the co ntent item includ es iteratio ns that have b een saved manually, the Auto save feature also p ro vid es an o p tio n to Revert tothe last saved versio n.
Revert from Autosave content recovery
Auto save
32

How to apply a navigation category to your contentEvery p iece o f co ntent autho red in Jad u req uires assig nment to a categ o ry fro m a lis t that rep resents yo ur web site’s info rmatio narchitecture. The system makes it very easy fo r yo u to ad d relevant categ o ries to yo ur co ntent.
Fo r instances where a web site’s info rmatio n architecture may co ntain hund red s o r mo re categ o ries, the categ o ries are arrang edhierarchically to assist with easily lo cating and selecting relevant categ o ries to the co ntent yo u are autho ring .
Co nsid er carefully where within yo ur s ite’s categ o ries yo ur co ntent sho uld ap p ear. Very o ften there will b e just o ne sub ject area,b ut in so me cases there co uld b e two o r even mo re. If yo u were a user where wo uld yo u lo o k to find the info rmatio n yo u aread d ing ?
Only fo r a wid e-rang ing d o cument sho uld yo u co nsid er using mo re than three navig atio n categ o ries.
When yo u start to ad d co ntent to yo ur o rg anizatio n’s web site, p ress the Assig n Categ o ries b utto n to o p en the Ap p lyCateg o ries wind o w.
The Apply Categories window
Within the Ap p ly Categ o ries wind o w there are two main p anels and two b utto ns named Ap p ly Categ o ries and Cancel.If yo u wish to exit the Ap p ly Categ o ries wind o w p lease b e aware that any categ o ries yo u have selected will b e lo st if yo u haveno t saved them first b y p ressing the Ap p ly Categ o ries b utto n.
Using your site’s navigation structure to apply a category to yourcontent
Within the d ro p d o wn menu situated at the to p left o f the Ap p ly Categ o ries wind o w, select yo ur o rg anizatio n’s navig atio no p tio n.Once selected , yo ur o rg anizatio n’s to p -level-categ o ries will ap p ear in the left p anel (to p -level means these categ o ries will b ed irectly viewab le fro m yo ur web site's ho mep ag e).Read thro ug h the lis t and d ecid e which categ o ry yo u think yo ur co ntent wo uld b est fit into and click o nto that categ o ries title.The co ntents within the left p anel wil l no w chang e to a l is t o f the sub -categ o ries p resent within the selected to p -level-categ o ry.
Categ o ries
33

The Apply Categories window with sub-categories
Yo u will no tice at the to p o f the new list is a l ink named Back, which allo ws yo u to mo ve b ack to the lis t o f the to p -level-categ o ries if yo u have selected an inco rrect o ne.Also within this new co ntent, ab o ve the sub -categ o ries lis t, is an area co ntaining a d escrip tio n o f the selected to p -levels-categ o ries d etails. Altho ug h this mayb e o f so me interest to yo u this info rmatio n is used mo re fo r the functio n o f the CMS ratherthan so mething yo u are req uired to use.If yo u wish to assig n the selected to p -level-categ o ry to yo ur co ntent p ress the Ad d : (yo ur selected categ o ry name) b utto n.Or yo u can co ntinue to c lick into a sub -categ o ry and then sub -sub -categ o ry and so o n until yo u have entered the categ o ry areayo u wish to assig n to yo ur co ntent.Once yo u have selected yo ur req uired categ o ry p ress the Ad d (yo ur selected categ o ry name) b utto n, o nce p ressed yo u willno tice yo ur selected categ o ry name will ap p ear within the rig ht p anel und er the Selected (yo ur o rg anizatio n’s navig atio n name)Categ o ries area.
Categ o ries
34

The Apply Categories window with a selected category
If yo u have selected an inco rrect categ o ry, use the Remo ve b utto n next to the categ o ry name and return to the left categ o ryselectio n p anel to re-select yo ur categ o ry, (make sure yo u remo ve the selected categ o ry fro m within yo ur o rg anizatio n’snavig atio n if it has b een auto matically selected fo r yo u, b efo re yo u start selecting a new categ o ry).If at the b eg inning o f yo ur categ o ry selectio n p ro cess yo u are alread y familiar with yo ur o rg anizatio n’s categ o ry structure andyo u kno w the exact categ o ry yo u wish to assig n yo ur co ntent to , yo u can use the A-to -Z links at the to p o f the wind o w to find thiscateg o ry.Once the lis t o f categ o ries asso ciated with the selected letter has lo ad ed into the left p anel, select the categ o ry yo u req uireand use the Ad d (yo ur selected categ o ry name) b utto n to assig n this categ o ry as b efo re.
Categ o ries
35

The Apply Categories window with A-to-Z shown
Yo u also have the ab il ity to assig n mo re than o ne categ o ry to yo ur co ntent. Yo u can rep eat either p ro cess to select o ther to p -level o r sub -categ o ries b ut rememb er o nly fo r a wid e-rang ing d o cument sho uld yo u co nsid er using mo re than three navig atio ncateg o ries.
Categ o ries
36

Content lockingJad u allo ws co ntent to b e ‘lo cked ’ b y o ne p erso n whilst b eing ed ited and sto p p ing any o ther users fro m making chang es d uringthat time.
Each co ntent lo ck has an exp iry d ate, after which time the lo ck will b e remo ved auto matically.
Locking an item of contentWhere the Co ntent Lo cking feature is availab le, items are auto matically lo cked at the p o int o f creatio n fo r a d efault p erio d o f 10minutes.
Within the CMS it is also p o ssib le to manually co nfig ure a Co ntent Lo ck.
Selecting the option to Lock an item for editing
When viewing an item it is p o ssib le to select the Lo ck o p tio n fro m the asso ciated Actio ns d ro p d o wn menu. This will o p en anew lig htb o x fo r yo u to enter the d etails o f the p erio d that yo u wish to lo ck the item fo r.There are two metho d s o f selecting the p erio d d uring which yo ur co ntent lo ck sho uld b e ap p lied .
Co ntent lo cking
37

Manually inputting your lock period
Yo u can typ e the p erio d that yo u wish to lo ck the co ntent fo r in the Lo ck Until text field . The time the lo ck will b e ap p lied fo r willb e d ynamically d isp layed so that yo u can co nfirm that this is co rrect.
Using the calendar to choose a date
Alternatively, yo u can p ick a d ate b y c licking o n the calend ar ico n and then the d ate fo r which yo u wish the co ntent to b eunlo cked .Ag ain, the time the lo ck will b e ap p lied fo r will b e d ynamically d isp layed so that yo u can co nfirm that this is co rrect.Finally, c lick the LOCK b utto n to ap p ly yo ur Co ntent LOCK.
Only the user who lo cked the co ntent o r a web master can unlo ck the co ntent. If ano ther user need s the co ntent to b e unlo cked theycan cho o se to alert the web masters. This will send an email to the p erso n who lo cked the co ntent and all web masters (o r Co ntro lCenter ad ministrato rs at the hig hest level o f wo rkflo w) req uesting that the co ntent b e unlo cked .
Requesting access to a locked itemIf yo u try to access an item that has b een lo cked yo u will b e no tified that it has b een lo cked and to ld who has lo cked it.
Co ntent lo cking
38

Accessing an item of locked content is not permitted by other users
To req uest access to a lo cked item o f co ntent yo u must first c lick o n the ‘alert the web masters’ l ink.
Adding your request details
Typ e the d etails o f yo ur req uest in the Messag e sp ace p ro vid ed and then p ress the REQUEST LOCK RELEASE b utto n.
Co ntent lo cking
39

An unlock request within a user’s Awaiting Action list
This will g enerate a task fo r the web master to actio n yo ur req uest. Until it has b een actio ned it wil l d isp lay in the AwaitingActio n sectio n o f yo ur task lis t.
Unlocking an item of locked contentTo Unlo ck an item yo u must first select the Unlo ck o p tio n fro m the asso ciated Actio ns menu.
Selecting the Unlock option
Yo u will then b e p resented with the o p tio n to Unlo ck the item.Press the UNLOCK b utto n to release the Co ntent Lo ck.
Co ntent lo cking
40

Releasing the Content Lock
Locking and Unlocking in Search ViewCo ntent may also b e lo cked o r unlo cked fro m within the Jad u search results p ag e.
Co ntent lo cking
41

Content schedulingYo u may o ccasio nally want to create co ntent that will have a limited life sp an and will need to b e remo ved fro m yo ur o rg anizatio n'ssite o n a sp ecific d ate, such as any co ntent reg ard ing seaso nal info rmatio n, fo r examp le.
Co ntent sched uling allo ws yo u to sp ecify the p erio d fo r which yo ur co ntent is relevant and will auto matically remo ve that co ntentfro m p ub lic view o n the d ate sp ecified .
If yo u d o sched ule an item o f co ntent to exp ire o n a certain d ate the co ntent in q uestio n will b e d isp layed in yo ur Co ntent Sched ulesectio n o f yo ur Task List.
How to apply a schedule to your contentThe Co ntent Sched ule area is p art o f the Assig n Metad ata co ntro l wind o w.When yo u start to ad d d o cuments to yo ur o rg anizatio n’s web site, p ress the Assig n Metad ata b utto n to o p en up the Assig nMetad ata wind o w.
The Assign Metadata window
The Assig n Metad ata wind o w co ntains three main areas; the Stand ard Metad ata area, the Co ntent Sched ule area and theAd vanced Metad ata area.Each o f the three sectio n areas can b e hid d en o r sho wn b y using the hid e and sho w ico ns next to the titles o f the areas (yo ucan no t sho w mo re than o ne area at a time).Also p resent within the Assig n Metad ata wind o w are two b utto ns named Assig n Metad ata and Cancel.If yo u wish to exit the Assig n Metad ata wind o w p lease b e aware that any info rmatio n yo u have entered will b e lo st if yo u haveno t saved it first b y p ressing the Assig n Metad ata b utto n.By d efault when the Assig n Metad ata wind o w first o p ens the Stand ard Metad ata area will b e sho wn. In o rd er to view the Co ntentSched ule area click the sho w ico n next to the sectio n title.
Adding a schedule to your content
Co ntent sched ule
42

The Content Schedule window
Within the Co ntent Sched ule area yo u will b e sho wn o ne tick b o x, three entry field s and o ne d ro p d o wn menu.If yo u wish fo r the d o cument yo u are creating to b e sched uled and fo r that sched ule to run fro m the info rmatio n yo u enter, makesure the Use Co ntent Sched uling tick b o x has b een selected .In the Valid fro m field enter the d ate that yo u req uire yo ur d o cument to g o live o n.In the Valid to field enter the d ate that yo u req uire yo ur d o cument to exp ire o n.The Actio n d ro p d o wn menu has two o p tio ns named Make invis ib le and Make no t l ive.If yo u cho o se the Make invis ib le o p tio n yo ur d o cument will b e mad e invis ib le within yo ur web site’s main navig atio n o nce theValid to d ate has b een reached , b ut will no t b e remo ved fro m the web site. This o p tio n allo ws yo u to easily make this d o cumentvis ib le ag ain, p ro vid ing no chang es have b een mad e to it s ince its exp iry d ate.If yo u cho o se the Make no t l ive o p tio n yo ur d o cument will b e remo ved fro m yo ur o rg anizatio n’s web site o nce the Valid to d atehas b een reached . In o rd er to re-p ub lish this d o cument yo u wo uld need to have it re-ap p ro ved b y a Web master.The final field named Email Alarm allo ws yo u to sp ecify the no tificatio n p erio d fo r the co ntent that is ap p ro aching its Validto /exp iry d ate. Fo r examp le, if yo u enter 3 into the Email Alarm field , yo u will b e emailed an exp iry no tificatio n 3 d ays b efo reyo ur d o cument is ab o ut to exp ire. Yo u will then b e sent a no tificatio n 2 d ays b efo re, 1 d ay b efo re and also o n yo ur co ntent’sd ay o f exp iry.Once yo u have finished entering all yo ur co ntent sched ule info rmatio n p ress the Assig n Metad ata b utto n. Once p ressed , theinfo rmatio n yo u have entered will b e saved and the wind o w will c lo se.
We reco mmend that yo u set yo ur Actio n d ro p d o wn menu to Make invis ib le rather than Make no t l ive. This way it is easier fo r yo u tomake the d o cument vis ib le ag ain if yo u req uire, p ro vid ing no chang es have b een mad e to the co ntent s ince the exp iry d ata.
How to re-visit your scheduled documentTo review yo ur sched uled d o cument yo u need to vis it the Task List area o f yo ur CMS.
Co ntent sched ule
43

Navigating to your Task List
Yo u can enter this Task List area b y c licking yo ur name in the rig ht s id e o f the Jad u Co ntro l Center navig atio n b ar to navig ateto the My Tasks o p tio n.The d efault view o f the Task List area is the To Do List to vis it the sched uled co ntent area click the Co ntent Sched ule tab .
The Content Schedule area
The Content Schedule area
At the to p o f the Co ntent Sched ule area there is a d ro p d o wn menu that allo ws yo u to view either Yo ur Sched ule o r AllSched ules (d ep end ing o n yo ur access rig hts).Yo u may also use the ap p ro p riate l inks to view Up co ming o r Exp ired co ntent (the info rmatio n and tasks yo u will b e ab le top erfo rm will b e the exactly the same in either the Up co ming o r the Exp ired sectio n).The Co ntent Sched ule area is sp lit into fo ur co lumns.The first co lumn is named Pag e title and co ntains all the d o cument titles that have had a sched ule ap p lied to them (the title o fthe d o cument also wo rks as a l ink to view the d etails o f each d o cument).The seco nd co lumn is named Valid fro m, where yo u are info rmed when the d o cument in q uestio n was created .The third co lumn named Exp ires o n info rms yo u o f what d ate the d o cument is d ue to /has exp ired o n and in the case o f exp iredd o cument it wil l also info rm yo u o f ho w many d ays ag o each d o cument exp ired .The final co lumn is named Actio n o n exp iry which info rms yo u o f what actio n is d ue to b e taken/has b een taken o nce the exp iryd ate has b een reached .Yo u can navig ate thro ug h the p ag es o f sched uled d o cuments b y using the p ag e numb er l inks b elo w the lis t o f sched uledd o cuments names.
Co ntent sched ule
44

How to review a scheduled documentSelect the name o f the sched uled d o cument yo u wish to review. Yo u will b e taken to the Do cument Details area.Within the Do cument Details area yo u can review o r chang e any o f the co ntent o f this d o cument o r info rmatio n reg ard ing thisd o cument.
How to re-schedule your document
The Document Details area
Within the Do cument Details area click o n the main d o cument title to enter the Do cument Head er area.Fro m the Do cument Head er area use the Assig n Metad ata b utto n to enter the Assig n Metad ata wind o w, fro m within this wind o wenter the Co ntent Sched ule area.In the Co ntent Sched ule area chang e the d o cument’s sched uled d etails to tho se req uired and re-save the d o cument.
As lo ng as yo u d o n’t ed it the co ntents o f the d o cument yo u are viewing , yo u will b e ab le to make this d o cument viewab le fro m yo uro rg anizatio n’s web site straig ht away b y chang ing the d o cument’s sched ule d etails.
How to remove a content schedule from your documentTo remo ve a sched ule fro m a d o cument yo u need to vis it the Do cument Details area and then click o n the main d o cument titleto enter the Do cument Head er area.Fro m within the Do cument Head er area use the Assig n Metad ata b utto n to enter the Assig n Metad ata wind o w and fro m withinthis wind o w enter the Co ntent Sched ule area.In the Co ntent Sched ule area, un-tick the Use Co ntent Sched uling tick b o x and re-save yo ur d o cument.Once saved yo ur d o cument will ig no re any info rmatio n p resent in the Co ntent Sched ule area unless yo u re-select the UseCo ntent Sched uling tick b o x.
Co ntent sched ule
45

How to prepare an image for upload to the central image libraryWithin yo ur co ntent yo u have the o p tio n to ad d an imag e. To co ntro l the usag e o f imag es within yo ur o rg anizatio n’s web siteasso ciated imag es that can b e used are sto red within a central imag e lib rary.
Altho ug h there is an o p tio n to ad d ad d itio nal imag es to this central imag e lib rary, this functio n may no t b e availab le to all usersd ue to the custo mizab le nature o f yo ur CMS, yo ur relevant p ermissio ns and yo ur o rg anizatio n’s req uirements.
The p ro cess o f up lo ad ing and using an imag e is straig htfo rward , b ut the imag e itself must have extra attentio n p aid to it in termso f its relevance and q uality.
It is imp o rtant that g o o d q uality imag es are used and imag es like c lip -art b e avo id ed .
All imag es sho uld b e saved at 72 d p i (d o ts p er inch), as this is the stand ard fo r usag e o n the web .
Imag es must b e a relevant s ize as imag es that are to o b ig make fo r unp ro fessio nal lo o king results.
Imag es sho uld b e saved as a JPG if they are p ho to g rap hs o r GIF if they are a flat g rap hic.
All imag e fi le names must co ntain no sp aces and use letters o r numb ers o nly.
Mo st imp o rtantly, yo ur imag es sho uld b e relevant to the co ntent yo u are ad d ing .
How to upload an image to the central image libraryPlace yo ur curso r in an area within yo ur co ntent that yo u wish fo r the imag e to ap p ear (yo u need to d o this even tho ug h we willo nly b e d ealing with up lo ad ing yo ur imag e in this sectio n).Click the Insert/Mo d ify Imag e b utto n the Imag e Lib rary wind o w will o p en.
Common fields and buttons throughout the image upload process
The Image Library window
There are several elements within the Imag e Lib rary wind o w that will s tay p resent thro ug ho ut this imag e up lo ad p ro cess. Theseare; the Search b o x and Search b utto n, the Bro wse b y Title and the Up lo ad Imag e ico ns and finally the three main b utto nsnamed Use This Imag e, No Imag e and Cancel.Within the Imag e Lib rary wind o w click the Up lo ad Imag e b utto n (the p lus s ig n ico n) in the to p rig ht o f the wind o w. Once clicked
Imag e lib rary
46

yo u will b e sho wn the Up lo ad Imag e wind o w.
The Upload Image window
The Upload Image window
The Up lo ad Imag e wind o w’s main area co nsists o f o ne entry field , o ne d ro p d o wn menu, o ne tick b o x and two b utto ns namedBro wse and Up lo ad .To start, c lick the Bro wse b utto n to o p en a stand ard co mp uter b ro wser wind o w. Within this wind o w, navig ate thro ug h yo urco mp uter o r o rg anizatio n’s fi le structure and find the imag e yo u req uire.Once yo u have p icked the imag e yo u req uire yo u will no tice there will no w b e a ro ute ad d ress (fi le p ath) p resent within theBro wse field .If yo u have selected an inco rrect imag e yo u can p ress the Bro wse b utto n ag ain and rep eat the p ro cess until yo u have theco rrect imag e.In the Resize Imag e d ro p d o wn menu there will b e a l is t o f resize o p tio ns fo r yo ur imag e. This l is t’s o p tio ns are custo mizab lefro m within yo ur CMS. Therefo re, the sp ecific o p tio ns will vary (essentially yo u will b e ab le to select an o p tio n that will resizethe imag e yo u are up lo ad ing to fit a sp ecific area within yo ur o rg anizatio n’s web site).If yo u d o no t wish to resize yo ur imag e, use the stand ard Keep o rig inal imag e size o p tio n.The Op timise Imag e tick b o x sho uld b e ticked if yo u req uire yo ur imag e to b e co mp ressed . Once co mp ressed yo ur imag e willd o wnlo ad faster and therefo re allo w yo ur web site to b e viewed q uicker (we ad vise that all imag es b e o p timized to co ntrib ute toimp ro ved site p erfo rmance).Once yo u have ensured the ro ute ad d ress p o ints to the imag e yo u wish to up lo ad , and that all the d etails yo u have p icked areco rrect fo r that imag e, p ress the Up lo ad b utto n. In a few mo ments the Up lo ad Imag e wind o w will chang e to the Imag ePro p erties wind o w.
The Image Properties window
Imag e lib rary
47

The Image Properties window
Disp layed within the main area o f the Imag e Pro p erties wind o w there will no w b e three p anels.The left p anel wil l sho w the central imag e lib rary fi le structure. Fro m here, select an ap p ro p riate fo ld er categ o ry in which tosto re yo ur up lo ad ed imag e.Once yo u have d ecid ed which categ o ry yo u wish to use, p ress the Ad d Categ o ry b utto n and yo ur selected categ o ry willap p ear at the b o tto m o f the mid d le p anel und er the Categ o ries field .If yo u have selected an inco rrect categ o ry use the Remo ve b utto n next to the categ o ry name fro m within the mid d le p anel toremo ve this assig ned categ o ry.In the mid d le p anel yo u will b e asked to p ro vid e so me essential d etails ab o ut the imag e yo u are up lo ad ing .Yo u need to enter an ap p ro p riate title fo r yo ur imag e within the Title field .In the Tag s field enter keywo rd s that yo u think mig ht b e used when searching the central imag e lib rary fo r yo ur up lo ad ed imag e(make sure all yo ur keywo rd s are co mma sep arated and are all lo wer case).In the Alternative text field enter a sho rt b ut info rmative d escrip tio n o f the imag e yo u are up lo ad ing (this d escrip tio n isessential in o rd er to keep yo ur o rg anizatio n’s web site co mp liant to the latest usab ility stand ard s). This text wil l b e d isp layedo n yo ur o rg anizatio n’s web site in the fo rm o f text that ap p ears when yo u p lace yo ur mo use o ver the imag e and therefo rereq uires an accurate d escrip tio n.The Cap tio n field will let yo u enter a b rief cap tio n to d isp lay und erneath the imag e when it ap p ears o n yo ur web site.Finally, the rig ht p anel will co ntain a p review o f the imag e yo u are up lo ad ing alo ng sid e auto matically p o p ulated info rmatio n o nthe File name, File fo rmat, Dimensio ns and Imag e size.This rig ht p anel also co ntains two b utto ns named Save and Save And Use.
How to save or save and use your uploaded imageIf yo u wish to save yo ur imag e and its asso ciated info rmatio n, p ress the Save b utto n. Once p ressed the Imag es Pro p ertieswind o w will c lo se and yo u will b e returned to yo ur co ntent within the Text Ed ito r.If yo u wish to save and use the up lo ad ed imag e within yo ur co ntent, p ress the Save And Use b utto n. Once p ressed the Imag eLib rary wind o w will c lo se and yo u will b e returned to yo ur co ntent with yo ur selected imag e p resent.
If yo u p ress either the Use This Imag e, No Imag e o r Cancel b utto n yo ur imag e will no t b e saved into the central imag e lib rary.
How to add an image into your content
Imag e lib rary
48

Place yo ur curso r in an area within yo ur co ntent that yo u wish fo r yo ur imag e to ap p ear.Click the Insert/Mo d ify Imag e b utto n the Imag e Lib rary wind o w will o p en.
The Image Library window
The Imag e Lib rary wind o w lo o ks and wo rks like any co mp uter b ro wser wind o w. This wind o w co ntains several ways to find andinsert an imag e into yo ur co ntent.
Common fields and buttons throughout the image insertion processThere are several elements within the Imag e Lib rary wind o w that will s tay p resent thro ug ho ut the imag e insertio n p ro cess; theseare the Search b o x and Search b utto n, the Bro wse b y Title and the Up lo ad Imag e ico ns, the View b y Categ o ry and View b yThumb nail l inks and finally the three main b utto ns named Use This Imag e, No Imag e and Cancel.If at anytime yo u wish to leave the Imag e Lib rary wind o w witho ut inserting an imag e into yo ur co ntent, yo u can use the Cancelb utto n.There are three main metho d s to ad d an imag e to yo ur co ntent and includ e; View b y Categ o ry, View b y Thumb nail and Search.
Adding an image to your content via the View by Category methodThe first metho d o f inserting an imag e into yo ur co ntent is the View b y Categ o ry metho d . Yo u are likely to b e the mo st familiarwith this metho d and it is the d efault view o f the Imag e Lib rary wind o w.The central area o f the Imag e Lib rary wind o w is sp lit into three p anels.
Imag e lib rary
49

The Browse by Title window
The left p anel wil l co ntain a l is t o f all the fo ld er categ o ries p resent within yo ur o rg anizatio n’s central imag e lib rary.If yo u select a fo ld er categ o ry, all imag es within this fo ld er will b e d isp layed within the mid d le p anel.If yo u select an imag e fro m this l is t, a p review o f the selected imag e will b e d isp layed within the rig ht p anel alo ng withinfo rmatio n reg ard ing this imag e.Also p resent in this rig ht p anel are two Alig nment selectio n b o xes named Left and Rig ht, the Alig nment o p tio n allo ws yo u tosp ecify whether yo ur imag e sits either to the left o r the rig ht within yo ur co ntent.Also within the rig ht p anel are two b utto ns named Ed it and Delete.If yo u wish to ed it the d etails o f the imag e yo u have selected then p ress the Ed it b utto n, yo u will b e taken to the Imag ePro p erties wind o w fro m where yo u can chang e any info rmatio n reg ard ing this imag e.To d elete the selected imag e fro m within yo ur o rg anizatio n’s central imag e lib rary p ress the Delete b utto n, yo u will b e asked toco nfirm yo ur chang es b efo re the imag e is d eleted .If the imag e yo u have selected is the imag e yo u wish to use within yo ur co ntent and yo u have ensured that yo u have selectedyo ur req uired Alig nment o p tio n, p ress the Use This Imag e b utto n. Once p ressed , the Imag e Lib rary wind o w will c lo se and yo urselected imag e will b e d isp layed within yo ur co ntent.If yo u have selected an inco rrect imag e yo u can select ano ther imag e fro m the mid d le p anel o r even a d ifferent fo ld er categ o ryuntil yo u find the req uired imag e.
Adding an image to your content via the View by Thumbnail methodThe seco nd metho d o f inserting an imag e is the View b y Thumb nail metho d .The central area o f the wind o w is sp lit into two p anels.
Imag e lib rary
50

The View by Thumbnail window
The p anel o n the left co ntains thumb nails o f all the imag es co ntained within all the fo ld er categ o ries fo und in yo uro rg anizatio n’s central imag e lib rary.Also in this left area is a l ine o f text tell ing yo u that yo u are viewing x amo unt o f imag es o ut o f the to tal x amo unt, p lus two linksallo wing yo u to skip to the Next p ag e and b ack to the Previo us p ag e.Once yo u have selected an imag e fro m the thumb nails, yo ur imag e will p review in the rig ht p anel alo ng with info rmatio nreg ard ing this imag e.As b efo re there will b e the two Alig nment selectio n b o xes named Left and Rig ht and the Ed it and Delete b utto ns.If the imag e yo u have selected is the imag e yo u wish to use within yo ur co ntent and yo u have ensured that yo u have selectedyo ur req uired Alig nment o p tio n, p ress the Use This Imag e b utto n. Once p ressed the Imag e Lib rary wind o w will c lo se and yo urselected imag e will b e d isp layed within yo ur co ntent.If yo u have selected an inco rrect imag e yo u can co ntinue to select ano ther imag e fro m the thumb nail p anel until yo u find thereq uired imag e.
Adding an image to your content via the Search methodThe third metho d fo r inserting an imag e is the Search metho d , which co mb ines a search functio n and the fi le and imag eselectio n p ro cess p resent within the first o r seco nd metho d , d ep end ing o n which area yo u are in.Within the Search b o x at the to p left o f the Imag e Lib rary wind o w, typ e the keywo rd fo r the imag e yo u are trying to find , thenp ress the Search b utto n.Once p ressed yo ur search results will b e d isp layed in the same fo rmat as the area yo u are in, fo r examp le, yo ur results willd isp lay as thumb nails if yo u are in the View b y Thumb nail area.Yo u will b e ab le to use yo ur selected area to select an imag e yo u req uire fro m the search results.If yo ur search d id no t return the results yo u req uire o r any results at all yo u can p erfo rm the search ag ain using ano therkeywo rd .
How to remove an image from within your contentClick o nto the imag e within yo ur co ntent yo u wish to remo ve. A ho ld ing b o x will ap p ear aro und yo ur imag e o nce it has b eenselected .Press the b acksp ace o r d elete b utto n o n yo ur keyb o ard to remo ve this imag e fro m the Text Ed ito r and ultimately fro m withinyo ur co ntent.
Imag e lib rary
51

What is Metadata?Metad ata g ives any kind o f d ata co ntext. Any item o f d ata is a d escrip tio n o f so mething . Metad ata is a typ e o f d ata where theso mething b eing d escrib ed is d ata. Or, as it is o ften p ut, metad ata is d ata ab o ut d ata.
http ://en.wikip ed ia.o rg /wiki/Metad ata
Metad ata is used to lab el yo ur co ntent and d escrib e it in o rd er fo r o ther web sites, search eng ines and yo ur o rg anizatio n’s web siteitself to und erstand what yo ur co ntent is ab o ut.
Stand ard Metad ata co nsists o f keywo rd s relevant to yo ur co ntent alo ng with a d escrip tio n o f what yo ur co ntent is ab o ut, ad vancedMetad ata g ives yo u an array o f info rmatio n o p tio ns that can b e sto red alo ng sid e yo ur stand ard Metad ata to g ive yo ur co ntentfurther meaning .
How to apply Metadata to your contentAs yo u will b e req uired to assig n Metad ata to every p iece o f co ntent yo u create fo r yo ur o rg anizatio n’s web site, yo ur CMS makes itvery easy fo r yo u to ad d relevant Metad ata to yo ur co ntent.
When yo u start to ad d co ntent to yo ur o rg anizatio n’s web site, p ress the Assig n Metad ata b utto n to o p en up the Assig nMetad ata wind o w.
The Assign Metadata window
The Assig n Metad ata wind o w co ntains three main areas; the Stand ard Metad ata area, the Co ntent Sched ule area and theAd vanced Metad ata area (the areas yo u will see will vary with the typ e o f co ntent yo u are creating ).Each o f the three areas can b e hid d en o r sho wn b y using the hid e and sho w ico ns next to the titles o f the areas (yo u canno tsho w mo re than o ne area at a time).Also p resent within the wind o w are two b utto ns named Assig n Metad ata and Cancel.If yo u wish to exit the Assig n Metad ata wind o w p lease b e aware that any info rmatio n yo u have entered will b e lo st if yo u haveno t saved it first b y p ressing the Assig n Metad ata b utto n.
The Standard Metadata areaBy d efault, when the Assig n Metad ata wind o w first o p ens, the Stand ard Metad ata area will b e sho wn.
Metad ata
52

The Standard Metadata window
Within the Stand ard Metad ata area yo u will b e sho wn two entry field s.The first field is named Ad d itio nal Keywo rd s. This field sho uld b e used if yo u feel that when yo u assig ned navig atio ncateg o ries to yo ur co ntent, they d id no t effectively d escrib e what yo ur co ntent is ab o ut (when entering ad d itio nal keywo rd smake sure they are all co mma sep arated and are all entered in lo wer case).The Descrip tio n field is the o nly mand ato ry field and all info rmatio n yo u enter sho uld b e in lo wer case and co ntain nop unctuatio n. Here yo u are req uired to typ e a g eneral d escrip tio n o f what yo ur co ntent is ab o ut. Rememb er when yo u co mp o seyo ur d escrip tio n to co nsid er writing it fro m the p o int o f view o f yo ur read er. Imag ine if they were to p erfo rm a search whatwo uld accurately summarize the to p ic o f yo ur co ntent.Once yo u have co mp leted the ap p ro p riate field s within the Stand ard Metad ata area yo u have a cho ice o f either assig ning theMetad ata yo u have alread y entered o r yo u can co ntinue to ad d mo re sp ecific Metad ata in the Ad vanced Metad ata area.If yo u cho o se to ad d the Metad ata yo u have entered p ress the Assig n Metad ata b utto n. Once p ressed the d ata yo u haveentered will b e saved and the wind o w will c lo se.Or if yo u cho o se to enter further Metad ata ab o ut yo ur co ntent, c lick the sho w ico n next to the Ad vanced Metad ata sectio n.
The Advanced Metadata area
Metad ata
53

Metad ata
54

The Advanced Metadata window
Within the Ad vanced Metad ata area yo u will b e sho wn nine entry field s and two d ro p d o wn menus.Yo u will no tice that when yo u o p en the Ad vanced Metad ata area numero us field s have b een auto matically p o p ulated . Thisinfo rmatio n has b een g athered fro m o ther relevant seg ments o f yo ur CMS.The Creato r field is used to includ e the name o f the creato r o f the co ntent that yo u are ad d ing . This field will b e auto maticallyp o p ulated with the name that yo u are lo g g ed into yo ur CMS with, b ut this name can also b e chang ed if req uired .If any o f the co ntent yo u are creating was co ntrib uted to b y o ther p arties, fo r examp le yo ur co ntent co nsists o f p ho to g rap hs,il lustratio ns o r d iag rams that were no t created b y yo u, these co ntrib uto r d etails can b e entered into the Co ntrib uto r field .The Pub lisher field is used to ad d the name o f the o rg anizatio n who se web site yo u are ad d ing co ntent to . This field will b eauto matically p o p ulated with the name o f yo ur o rg anizatio n, b ut can b e chang ed if req uired .The Rig hts field is used to ad d the name o f the o rg anizatio n that has the rig hts to the co ntent yo u are ad d ing . No rmally this willb e yo ur o rg anizatio n and is therefo re what will ap p ear in this field as stand ard , b ut can b e chang ed if req uired .If the co ntent yo u are ad d ing co mes fro m ano ther so urce, e.g . yo u are co p ying a d o cument fro m a g o vernment s ite, within theSo urce field yo u sho uld enter these o rig inal so urce d etails.The Status field is used to ad d the d evelo p ment status o f yo ur co ntent, e.g . if the co ntent yo u are ad d ing is co mp lete then itwo uld g enerally b e classed as V1.0 Pub lic Co nsump tio n. As this is the g eneral case fo r mo st o f the co ntent that yo u willcreate, this is what is auto matically p o p ulated into this field , b ut can b e chang ed if req uired .If the co ntent yo u are entering co ncerns a wid er area than just yo ur lo cal area yo u sho uld enter these d etails into Co verag efield . Typ ically this field will auto matically b e p o p ulated with the lo cal area relating to yo ur o rg anizatio n, b ut these d etails canb e chang ed if req uired .The Created d ate field is used to d o cument the d ate yo ur co ntent was created o n, the current d ate will b e auto maticallyp o p ulated in this field . Altho ug h this field can b e ed ited if req uired , we ad vise fo r o rg anizatio n p urp o ses, that it isn’t.If yo u are revis iting an item o f co ntent fo r the p urp o se o f ed iting , yo u sho uld enter the d ate these alteratio ns were und ertakeninto the Mo d ificatio n d ate field .The Fo rmat.Med ium d ro p d o wn menu is used to d escrib e the typ e o f med ia that yo u are creating . Fo r examp le, if yo u are justad d ing a JPG p icture and no o ther co ntent, yo u wo uld select the imag e/jp eg categ o ry. This typ e o f co ntent wo uld b e veryunusual fo r yo u to ad d as the majo rity o f the time, yo u will b e creating o r ed iting ad d itio nal p ag es to yo ur s ite referencedund er the text/html selectio n. Therefo re, the text/html selectio n is auto matically selected fo r yo u, b ut yo u can cho o se o therap p ro p riate selectio ns b y using the d ro p d o wn lis t if req uired .The Lang uag e d ro p d o wn menu is used to d escrib e the lang uag e that yo ur co ntent is written in. Altho ug h the d ro p d o wn menuwill auto matically sho w Eng lish as the d efault selectio n yo u can select ano ther lang uag e if req uired .Once yo u have finished entering all the Ad vanced Metad ata info rmatio n yo u wish to , p ress the Assig n Metad ata b utto n. Oncep ressed , the d ata yo u have entered will b e saved and the wind o w will c lo se.
Metad ata
55

How to use the Jadu CMS Text EditorThe Jad u CMS Text Ed ito r allo ws yo u to fo rmat the co ntent yo u p ro d uce fo r yo ur o rg anizatio n’s web site. Basic wo rd p ro cessingskil ls are eno ug h to create p ag es that lo o k co nsistent with the rest o f yo ur s ite in terms o f fo nt use, layo ut and co lo ur, etc.
Altho ug h the Text Ed ito r will allo w yo u to p aste in co p ied co ntent fro m the Internet, a Micro so ft Wo rd ® d o cument o r s imilar, wead vise that yo u first p aste yo ur co ntent into No tep ad and then co p y it fro m No tep ad into the Text Ed ito r. This will s trip o ut anyfo rmatting that mig ht have existed in the o rig inal co ntent and makes sure that all the fo rmatting that is p resent in yo ur co ntent hasb een set b y yo u, d elivering a co nsistent lo o k thro ug ho ut yo ur s ite.
Yo ur Text Ed ito r area lo o ks and functio ns very much like Micro so ft Wo rd ® o r any similar wo rd p ro cessing ap p licatio n.
The Jadu Text Editor area
Ab o ve the main Text Ed ito r area there are numero us to o l b utto ns, many o f which will b e familiar to yo u. Belo w is a l is t o f the to o lsand a b rief exp lanatio n o f each to o l’s functio nality.
Maximize/minimize ed ito r: maximizes o r minimizes the ed ito r screen.
Print d o cument: Allo ws yo u to p rint o ut yo ur co ntent.
Und o es yo ur last actio n: Und o es the last actio n yo u p erfo rmed .
Re-d o es yo ur last actio n: Re-d o es the last actio n yo u p erfo rmed .
No te: The multip le und o /red o functio nality within the Jad u Do cument Ed ito r has a limitatio n o f 20 (twenty) actio ns. Each actio n issep arated b y a time d elay o f half a seco nd b efo re the b ro wser will rememb er the actio n. Therefo re, rap id text o r d ata entry mayresult in entire sectio ns b eco ming sub ject to a s ing le und o /red o actio n.
Co p y selectio n: Co p ies the area yo u have selected .
Paste fro m clip b o ard : Pastes the co ntent yo u have co p ied to yo ur c lip b o ard .
Cut selectio n: Cuts the area yo u have selected .
Sup erscrip t: Allo ws yo u to ad d sup erscrip t text.
Sub scrip t: Allo ws yo u to ad d sub scrip t text.
Text ed ito r
56

Bo ld : Allo ws yo u to ad d b o ld text.
Italic : Allo ws yo u to ad d italic text.
Und erline: Allo ws yo u to ad d und erlined text.
Strikethro ug h: Allo ws yo u to ad d strikethro ug h text.
Fo rmat (Examp le o f d ro p d o wn menu o p tio ns are Head ing , Sub head ing , No rmal, Ad d ress): Allo ws yo u to usep red etermined fo nt styles and co lo urs fo r the d ifferent elements o f yo ur co ntent such as head ing s and no rmal text.
Insert/Mo d ify l ink: Allo ws yo u to insert a l ink to ano ther s ite o r item o f co ntent o r to mo d ify a p revio usly ad d ed link.
Remo ve web link: Allo ws yo u to remo ve a p revio usly ad d ed link to ano ther s ite o r item o f co ntent.
Ord ered lis t: Allo ws yo u to ad d a numb ered lis t.
Bulleted lis t: Allo ws yo u to ad d a b ulleted lis t.
Blo ckq uo te: Allo ws yo u to ad d b lo ckq uo ted text.
Ab b reviatio n: Allo ws yo u to d efine the full meaning o f an ab b reviated term.
Justify left: Justifies yo ur text to the left o f the p ag e.
Justify center: Justifies yo ur text to the center o f the p ag e.
Justify rig ht: Justifies yo ur text to the rig ht o f the p ag e.
Decrease ind ent: Allo ws yo u to d ecrease the text ind ent.
Increase ind ent: Allo ws yo u to increase the text ind ent.
Insert/Mo d ify imag e: Allo ws yo u to insert an imag e o r to mo d ify the p ro p erties o f a p revio usly ad d ed imag e.
Insert/Mo d ify multimed ia o b ject: Allo ws yo u to insert an imag e o r to mo d ify a p revio usly ad d ed multimed ia o b ject.
Insert sp ecial character: Allo ws yo u to insert a sp ecial character into yo ur text, such as the co p yrig ht symb o l.
Ho rizo ntal rule: Allo ws yo u to ad d a ho rizo ntal l ine.
Insert time: Allo ws yo u to ad d the current time.
Insert d ate: Allo ws yo u to ad d the current d ate.
Insert tab le: Allo ws yo u to insert a tab le.
Text ed ito r
57

Merg e cells: Allo ws yo u to merg e two cells within a tab le.
Insert cell b efo re: Allo ws yo u to insert a tab le cell b efo re the o ne yo u have selected .
Insert cell after: Allo ws yo u to insert a tab le cell after the o ne yo u have selected .
Delete co lumn: Allo ws yo u to d elete a tab le co lumn.
Sp lit co lumn: Allo ws yo u to sp lit a tab le co lumn.
Insert ro w after: Allo ws yo u to insert a tab le ro w after the o ne yo u have selected .
Insert ro w b efo re: Allo ws yo u to insert a tab le ro w b efo re the o ne yo u have selected .
Tab le p ro p erties: Allo ws yo u sp ecify exact tab le p ro p erties.
Sp lit ro w: Allo ws yo u to sp lit a tab le ro w.
Delete ro w: Allo ws yo u to d elete a tab le ro w.
Hig hlig ht ro w o r cell: Allo ws yo u to hig hlig ht a tab le ro w o r cell.
Insert co lumn b efo re: Allo ws yo u to insert a tab le co lumn b efo re the o ne yo u have selected .
Insert co lumn after: Allo ws yo u to insert a tab le co lumn after the o ne yo u have selected .
Delete cell: Allo ws yo u to d elete a tab le cell.
Sp ell check d o cument: Allo ws yo u to check the sp elling o f yo ur co ntent.
Calculate read ab ility: Perfo rms a read ab ility sco re and info rms yo u o f the averag e read ing ag e o f yo ur co ntent.
In l ing uistics, the Gunning fo g ind ex is a test d esig ned to measure the read ab ility o f a samp le o f Eng lish writing . The resultingnumb er is an ind icatio n o f the numb er o f years o f fo rmal ed ucatio n that a p erso n req uires in o rd er to easily und erstand the text o nthe first read ing .
http ://en.wikip ed ia.o rg /wiki/Gunning _fo g _ind ex
To g g le HTML so urce: Allo ws yo u to see and ed it the HTML so urce co d e.
Find and rep lace: Allo ws yo u to search fo r a sp ecific wo rd o r p hrase and rep lace all o ccurrences with ano ther wo rd o rp hrase.
Co ntent statistics: Perfo rms a wo rd and p arag rap h co unt.
Insert co d e snip p ets: Allo ws yo u to ad d snip p ets o f HTML co d e o r c lient-s id e scrip t e.g . emb ed d ed Yo uTub e vid eo , Go o g leMap .
Try to includ e a p arag rap h return after every o ther full s to p o r after every full s to p if yo ur p arag rap hs are lo ng . This makes the texto n a co mp uter screen much easier to read .
Keep head lines and head ing s co nsistent, and avo id using CAPITALS fo r head lines o r head ing s.
Only use the und erline to o l where ab so lutely necessary - und erlining wo rd s in yo ur co ntent will make them lo o k like l inks and mayco nfuse yo ur s ite's vis ito rs.
Text ed ito r
58

Use head ing s sp aring ly and avo id using head ing s o r sub head ing s o n full p arag rap hs within yo ur co ntent.
How to create a link within your contentHig hlig ht the area o f text that yo u wish to make into the link.Click the Insert/Mo d ify Link b utto n the Insert Link wind o w will o p en.
The Insert/Modify window
The Insert Link wind o w co ntains o ne entry field and two b utto ns named Insert Link and Cancel.In the Web o r Email Ad d ress field enter the email ad d ress o r web site ad d ress yo u wish the text to l ink to (yo u can p aste intothis field if yo u have cut the link fro m the ad d ress b ar o f yo ur b ro wser o r o ther material).In the Title field yo u can insert a mo re d etailed d escrip tio n o f the co ntent that the link p o ints to . This will b e vis ib le if the curso ris p laced o ver the link o n yo ur web site and will aid accessib il ity.Once yo u have entered yo ur info rmatio n into the URL field and yo u are hap p y with yo ur l ink d etails, p ress the Insert Link b utto n.Once p ressed the wind o w will c lo se and yo u will no tice that yo ur hig hlig hted text wil l no w b e co lo ured and und erlined . (Pleaseb e aware that the co lo ur and d eco ratio n o f the link text within the Text Ed ito r is fo r ed iting p urp o ses o nly, styles fo r l inks withinyo ur o rg anizatio n’s web site will have b een set and o nce yo ur co ntent has b een saved these styles will b e ap p lied to yo urco ntent.)
Text Editor area with an added link
There is no need to ap p ly Bo ld o r Und erline fo rmatting to l inks as links styles are alread y sp ecified fo r the who le o f yo uro rg anizatio n’s web site and will b e ap p lied o nce yo ur co ntent has b een saved .
When creating a link avo id ad d ing yo ur l ink to the term ‘Click here’ fo r a lo catio n map . Instead , create a l ink with mo re ap p ro p riatewo rd s, fo r examp le ‘A lo catio n map d o wnlo ad is availab le’.
How to edit a link within your contentHig hlig ht the area o f text that exists as the link yo u wish to ed it; yo u can also p lace the curso r within the link text area as the linkwill b e altered fo r all text asso ciated with that l ink.Click the Insert/Mo d ify Link, within the Insert Link wind o w to make yo ur chang es and then p ress the Insert Link b utto n.
How to remove a link within your contentHig hlig ht the area o f text that exists as the link yo u wish to remo ve. Yo u can also p lace the curso r within the link text area as thelink will b e remo ved fro m all text asso ciated with that l ink.Click the Remo ve Web Link b utto n. Yo u will b e asked to co nfirm yo ur chang es b efo re the link is remo ved .
Text ed ito r
59

How to add advanced content such as movies into your contentNo te: This sectio n d iscusses the Insert Co d e Snip p et feature o f the CMS, vid eo and aud io fi les may also b e manag ed using thed ed icated Jad u Multimed ia Manag er d ecrib ed later in this manual.
The p urp o se o f the Snip p ets to o l is to allo w yo u to emb ed ad vanced co ntent into the co ntent item yo u are creating , b y usingap p ro p riate HTML co d e. Emb ed d ing this ad vanced co ntent via the Snip p ets to o l ensures that the Jad u Text Ed ito r’s in b uilt HTMLfilter d o es no t remo ve it.
Examp les o f ad vanced co ntent co uld b e multimed ia fi les such as QuickTime mo vies, Yo uTub e mo vies o r Server Sid e Includ es(SSI’s) (yo ur server must b e co nfig ured to sup p o rt Server Sid e Includ es if yo u wish to use them).
How to add code snippets into your contentPlace yo ur curso r in an area within yo ur co ntent that yo u wish fo r yo ur ad vanced co ntent to ap p ear.Click the Insert co d e snip p ets b utto n and the Insert Snip p et wind o w will o p en.
The Insert Snippet window
Either write o r p aste yo ur co d e snip p et into the Insert Snip p et wind o w.Once yo u have entered yo ur co d e snip p et p ress the Insert Snip p et b utto n. Once p ressed yo ur co d e will b e saved and thewind o w will c lo se.Yo u will no tice that a p laceho ld er has b een inserted into the area within yo ur co ntent where yo u ad d ed yo ur co d e snip p et. Thisp laceho ld er ap p ears instead o f yo ur co d e snip p et in o rd er to ensure that multimed ia co ntent is no t p layed while yo u are withinthe Text Ed ito r.
Text ed ito r
6 0

Text Editor area with an added code snippet placeholder
Develo p ers sho uld no te that co d e p asted into the Insert Snip p et wind o w will no t b e interp reted within the Text Ed ito r and so anyserver-s id e co d e will no t b e executed until yo ur co ntent has b een saved and viewed fro m within yo ur o rg anizatio n’s web site.
How to edit an existing code snippetClick o nto yo ur co d e snip p et’s Placeho ld er that yo u wish to ed it within yo ur co ntent.Click the Insert co d e snip p ets b utto n and the Insert Snip p et wind o w will o p en.Within the Insert Snip p et wind o w make yo ur req uired chang es and then p ress the Insert Snip p et b utto n.
How to remove an existing code snippetClick o nto yo ur co d e snip p ets p laceho ld er that yo u wish to d elete fro m within yo ur co ntent and then click o nto the Insert Co d eSnip p ets b utto n.Within the Insert Snip p et wind o w remo ve yo ur co d e snip p et and p ress the Insert Snip p et b utto n, the wind o w will c lo se and yo urco d e snip p et will have b een remo ved fro m within yo ur co ntent.
Text ed ito r
6 1

AnnouncementsThe anno uncements feature is imp lemented in yo ur CMS if yo ur o rig inal d esig n fo r yo ur web site was d esig ned and d evelo p ed b yJad u. Anno uncements affect all the p ag es within yo ur s ite and canno t easily b e enab led after imp lementatio n.
Anno uncements are intend ed to b e used to info rm yo ur vis ito rs o f any essential emerg ency info rmatio n Anno uncements will b ep laced within a d o minant area o f yo ur o rg anizatio n’s web site such the head er. They will no rmally b e viewab le fro m every p ag ewithin yo ur s ite (the exact sp ecificatio ns o n where these anno uncements will b e d isp layed will d ep end up o n yo ur s ite’s d esig n andyo ur o rg anizatio n’s req uirements).
In o rd er to p reserve the imp o rtance o f yo ur emerg ency Anno uncements it is essential yo u d o no t o ver use them. Please no te thatyo u can o nly d isp lay o ne anno uncement o n yo ur o rg anizatio n’s web site at a time.
How to use the Announcements areaFro m within the main Jad u CMS Co ntro l Center select the Pub lishing o p tio n fro m the Op en menu and then click o nAnno uncements. Yo u will b e sho wn the main Anno uncements area.If yo u have alread y used o ther sectio ns within the Pub lishing menu yo u may alread y b e familiar with the g eneral layo ut o f thisscreen.
The Announcements area
Within this area yo u have the ab il ity to create a new anno uncement, amend o r d elete an existing anno uncement.
How to add a new announcementMake sure the Select Messag e d ro p d o wn menu d isp lays the New messag e o p tio n.Within the Title field enter a relevant title fo r yo ur anno uncements. This title is used to attract yo ur vis ito rs ’ attentio n so makesure it is relevant to the co ntent yo u are ad d ing .In the Co ntent field enter the sp ecific d etails o f yo ur anno uncement (within this field yo u will b e limited to a certain numb er o fcharacters which will b e custo mized to yo ur o rg anizatio n’s req uirements).
Anno uncements
6 2

If yo u wish to ad d a link to ano ther p ag e o r s ite so that yo ur vis ito rs can g ain mo re info rmatio n o n yo ur anno uncement sub ject,enter the p ag e o r web site ad d ress into the Link URL field .Ad d the text yo u wish to b e used as this l ink into the Link Text field .In the Live d ro p d o wn menu yo u will b e g iven the o p tio ns o f Yes o r No .Selecting Yes will mean that the anno uncement yo u are creating will b e d isp layed o n yo ur o rg anizatio n’s web site (p lease b eaware that if there is alread y an anno uncement p resent o n yo ur web site it wil l b e rep laced with the anno uncement yo ur arecreating if yo u select Yes).If yo u d o no t want to rep lace the current anno uncement, o r yo u d o no t wish to d isp lay yo ur anno uncement o n yo ur web site yet,select No fro m the Live d ro p d o wn menu.Once yo u have co mp leted all the info rmatio n reg ard ing yo ur anno uncement c lick the Save Anno uncement b utto n.
How to edit an existing announcementWithin the Select Messag e d ro p d o wn menu select the anno uncement yo u wish to ed it. Once selected the anno uncementsd etails will auto matically b e p o p ulated into the ap p ro p riate field s.Ed it these d etails as req uired and p ress the Save Anno uncement b utto n to save any chang es yo u have mad e.
How to delete an existing announcementWithin the Select Messag e d ro p d o wn menu select the anno uncement yo u wish to d elete. Once selected the anno uncement’sd etails will auto matically b e p o p ulated into the ap p ro p riate field s.Use the Delete Messag e b utto n to d elete the anno uncement yo u have selected . Yo u will b e asked to co nfirm yo ur chang esb efo re the anno uncement is d eleted .
Tracked URLsWithin the Anno uncements interface, there is an ad d itio nal facil ity to ad d 'Tracked URLs' .
Tracked URL list view
Fo r reg istered users o f yo ur web site, any links that have b een created and saved as a tracked URL will b e vis ib le alo ng sid e thewelco me messag e a reg istered user sees after lo g g ing into the web site.
Welcome greeting and links to two tracked URLs
Anno uncements
6 3

To create a Tracked URL, c lick o n the Create New Tracked URL b utto n in the Tracked URL lis t view. This will take yo u to theTracked URL Details p ag e, where yo u will b e p ro mp ted to ad d further info rmatio n ab o ut the URL yo u want to track.
Title is the reference that will id entify the Tracked URL within the Tracked URL lis t view insid e the Co ntro l Center.Descrip tio n is a text area p ro vid ing ad d itio nal info rmatio n in relatio n to the URL yo u are tracking .The URL field is fo r inclusio n o f the sp ecific URL p ath yo u are tracking .URL Text allo ws yo u to ad d text that is l inked b y the URL.Whether the Tracked URL is Live will d etermine whether reg istered users o f yo ur web site will see the linked text when they lo ginto the web site.
After ad d ing the req uired info rmatio n, c lick o n Saved Tracked URL so that it wil l b e availab le to lo g g ed -in reg istered users o f yo urweb site.
Tracked URL Details
Tracked URL ReportsIt is p o ssib le to view rep o rts o f reg istered users ' access to Tracked URLs. Clicking the Tracked URLs tab will take yo u to ad ro p d o wn b o x fro m where yo u can select Tracked URLs sto red in yo ur Co ntro l Center.
Selecting a Tracked URL
After selecting a Tracked URL, it is p o ssib le to seg ment reg istered users ' access to the URL b y tho se who have read o r no t readthe p ag e b y c licking the read , unread and unco nfirmed links. The Tracked URL Rep o rts l is t view p ro vid es the reg istrant's namealo ng with d etails o f when the URL was accessed and ho w lo ng the reg istrant stayed o n the p ag e.
Tracked URL Reports
Anno uncements
6 4

BlogsCo ntinuum CMS includ es a fully featured Blo g s mo d ule. Ad ministrato rs can create and d ep lo y b lo g s which are styled andmanag ed ind ep end ently o f the CMS. Each b lo g can have multip le autho r acco unts asso ciated with it. Blo g p o st co ntent can b esurfaced o n the CMS p o wered web sites using the RSS feed read er.
To create a new blog1. Click Pub lishing >> Blo g s.2. Click the " Create New Blo g " b utto n.3. G ive the b lo g a meaning ful title.4. Next p ro vid e a friend ly URL to access the b lo g . The sho rtcut yo u p ro vid e must b e uniq ue in the CMS. Yo u can no t reuse a
value alread y used fo r a friend ly URL, Galaxies s ite o r b lo g .5. Pro vid e d etails o f the first b lo g autho r b y co mp leting the Ad min Email ad d ress, Ad min Name and p asswo rd field s. Make a
no te o f these values as they will b e need ed to lo g into the b lo g autho ring enviro nment later.6 . Next, categ o rise the b lo g in yo ur s ite's taxo no my and p ro vid e b asic metad ata values.7. Once yo u click the " Save b lo g " b utto n, the b lo g is availab le to p o p ulate with co ntent, altho ug h it is no t immed iately l ive to
web site vis ito rs.
To edit an existing blog1. Click Pub lishing >> Blo g s.2. Select the b lo g fro m the lis t b y c licking its title, the b lo g reco rd will o p en.3. Up d ate the relevant d etails.4. Click the Save Blo g b utto n.
To change the owner of a blog1. Click Pub lishing >> Blo g s.2. Find the b lo g in the lis t. Check the checkb o x next to the current o wner's name.3. Click the " Chang e" b utto n at the b o tto m o f the co lumn. The " Chang e Ad ministrato r" wind o w will o p en.4. Select the new o wner fro m the lis t and click the " Ap p ly chang es" b utto n.
To make a blog live or offline1. Click Pub lishing >> Blo g s.2. Find the b lo g in the lis t. Ad just the value in the live co lumn ap p ro p riately - " Yes" will make the b lo g live, " No " will make the
b lo g o ffl ine.3. The p ag e will then refresh and the b lo g 's status will b e up d ated .
To delete a blog1. Click Pub lishing >> Blo g s.2. Find the b lo g in the lis t. Check the checkb o x at the end o f the ro w.3. Click the " Delete" b utto n at the b o tto m o f the co lumn. A co nfirmatio n wind o w will o p en.4. Click " OK" to co nfirm that yo u want to d elete the b lo g . The p ag e will then refresh and the b lo g will b e d eleted .
Blog fields
Fie ld De script ion
Blo g title The name o f the b lo g
Friend ly URL The sho rtcut to access the b lo g o n yo ur web site
Ad min email ad d ress The email ad d ress o f the first b lo g autho r
Ad min name The name o f the first b lo g autho r
Passwo rd The p asswo rd o f the first b lo g autho r
Blo g s
6 5

Blo g d escrip tio n Sho rt d escrip tio n o f the b lo g , used in the b lo g sid eb ar
Categ o ries Taxo no my categ o ries assig ned to the b lo g
Metad ata Metad ata values assig ned to the b lo g
Po sts p er p ag e Numb er o f items p er p ag e in the b lo g lis t view
Allo w co mments Whether to allo w b lo g vis ito rs to leave co mments ag ainst p o sts
Allo w feed Whether to make an RSS feed o f b lo g p o sts availab le
Blo g s
6 6

PostsBlo g p o sts are created and manag ed b y lo g g ing into the b lo g autho ring interface.
To create a new post1. Click " Po sts" .2. Click the " Create new p o st" b utto n.3. G ive the p o st a meaning ful title.4. Co mp lete any ad d tio nal field s req uired and click the " Save" b utto n.
To update a post1. Click " Po sts" .2. Select the p o st fro m the lis t b y c licking its title, the p o st reco rd will o p en.3. Up d ate the relevant d etails.4. Click the " Save" b utto n.
To delete a post1. Click " Po sts" .2. Find the p o st in the lis t. Check the checkb o x at the end o f the ro w.3. Click the " Delete" b utto n at the b o tto m o f the co lumn. A co nfirmatio n wind o w will o p en.4. Click " OK" to co nfirm that yo u want to d elete the p o st. The p ag e will then refresh and the p o st will b e d eleted .
To make a post live or offline1. Click " Po sts" .2. Find the p o st in the lis t. Ad just the value in the live co lumn ap p ro p riately - " Yes" will make the p o st l ive, " No " will make the p o st
o ffl ine.3. The p ag e will then refresh and the p o st's status will b e up d ated .
To change the owner of a post1. Click " Po sts" .2. Find the p o st in the lis t. Check the checkb o x next to the current o wner's name.3. Click the " Chang e" b utto n at the b o tto m o f the co lumn. The " Chang e Blo g Po st Owner" wind o w will o p en.4. Select the new o wner fro m the lis t and click the " Ap p ly chang es" b utto n.
Post fields
Fie ld De script ion
Po st title The name o f the p o st
Summary text An o p ening p arag rap h o f text d isp layed in the b lo g p o st.
Po st co ntent The co ntent o f the p o st
Live The status o f the p o st
Allo wco mments
Whether to allo w co mments fro m b lo g vis ito rs o n this p o st.
Categ o ries Categ o ries asso ciated with the p o st
Metad ata Metad ata asso ciated with the p o st
Tag s Co mma sep arated lis t o f themes related to this b lo g p o st, used to p o p ulate the lis t o f tag s in thesid eb ar.
Po st d ate The d ate the p o st was p ub lished .
Po sts
6 7

Po st time The time the p o st was p ub lished .
Po sts
6 8

Template
Selecting a template1. Click " Temp late"2. Click the rad io b utto n next to the temp late yo u wish to use.3. Click the " Up d ate my Blo g " b utto n at the b o tto m o f the lis t. The new theme will no w b e live o n yo ur b lo g .
Rollback to a previous template1. Click " Temp late"2. Click the " Ro llb ack" b utto n at the b o tto m o f the p ag e. The " Ro llb ack Blo g Temp late" wind o w will o p en.3. Click the " Ro llb ack" b utto n next to the entry yo u want to mo ve b ack to .4. The p ag e will refresh and the p revio us theme will no w b e live o n yo ur b lo g .
Using your own CSS in a custom template1. Click " Temp late"2. Select the " Custo m temp late" tab .3. Either select a stand ard temp late to ad just b y selecting it fro m the d ro p d o wn and clicking the " Use" b utto n. Or enter yo ur
custo m CSS in the Theme CSS field .4. Up lo ad any req uired imag es using the imag e manag er.5. Click the " Save Custo m Temp late" b utto n.
After the custo m temp late has b een saved , yo u will need to fo llo w the instructio ns in " Selecting a temp late" to make yo ur chang eslive o n yo ur b lo g .
Compare custom template versions1. Click " Temp late"2. Select the " Custo m temp late" tab .3. Click the " Track chang es" b utto n at the b o tto m o f the fo rm. The track chang es p ag e will no w o p en.4. The track chang es p ag e will b e lo ad ed with the latest versio n and p revio us versio n sho wn. To select a d ifferent versio n to
co mp are ag ainst, select a d ifferent versio n fro m the d ro p d o wn.5. To ro llb ack to a p revio us versio n click the " Ro llb ack to this versio n" b utto n at the b o tto m o f the p ag e.
After ro ll ing b ack the custo m temp late, yo u will need to fo llo w the instructio ns in " Selecting a temp late" to make yo ur chang es liveo n yo ur b lo g .
Temp late
6 9

Settings
To update blog settings1. Click " Setting s"2. Navig ate to the ap p ro p riate tab , and up d ate the relevant d etails.3. Click the " Up d ate b lo g " b utto n.
To add a new blog author1. Click " Setting s"2. Click the " Permissio ns" tab .3. Click the " Ad d new autho r" b utto n. A new ro w in the autho r tab le will b e created .4. Po p ulate the new autho r's email ad d ress, name and p asswo rd field s.5. Click the " Up d ate b lo g " b utto n.
To delete a blog author1. Click " Setting s"2. Click the " Permissio ns" tab .3. Find the autho r in the lis t. Check the checkb o x at the end o f the ro w.4. Click the " Delete" b utto n at the b o tto m o f the co lumn.5. Click the " Up d ate b lo g " b utto n.
Settings fields
General tab
Fie ld De script ion
Blo g name The name o f the b lo g
Friend ly URL The sho rtcut to access the b lo g o n yo ur web site
Email ad d ress The email ad d ress o f the first b lo g autho r
Blo g d escrip tio n Sho rt d escrip tio n o f the b lo g , used in the b lo g sid eb ar
Categ o ries Taxo no my categ o ries assig ned to the b lo g
Metad ata Metad ata values assig ned to the b lo g
Live The status o f the b lo g
Publishing tab
Fie ld De script ion
Date fo rmat Fo rmat used when o utp uting the d ate b lo g p o sts where p ub lished .
Po sts p er p ag e Numb er o f items p er p ag e in the b lo g lis t view
Allo w feed Whether to make an RSS feed o f b lo g p o sts availab le
Comments tab
Fie ld De script ion
Allo w co mments Whether to allo w b lo g vis ito rs to leave co mments ag ainst p o sts
Enab le co mment mo d eratio n Whether co mments must b e ap p ro ved b efo re they' re d isp layed o n a p o st
Setting s
70

How to prepare your documentThe Do cument Pag es sectio n o f the Jad u Pub lishing To o ls is where yo u will p ro b ab ly sp end mo st o f yo ur time when using yo uro rg anizatio n's CMS. It is where yo u can autho r yo ur main co ntent p ag es fo r yo ur o rg anizatio n’s web site.
Yo ur d o cuments will need to b e structured co rrectly in o rd er to create a lo g ical layo ut fo r yo ur web site vis ito rs. Yo u may have anintro d ucto ry p ag e co ntaining a b rief summary o f yo ur sub ject, fo r examp le, fo llo wed b y a numb er o f p ag es that g o into mo re d etailab o ut sp ecific p o ints within yo ur intro d ucto ry p ag e. So me o f yo ur p ag es may co ntain l inks to o ther co ntent, web sites o rd o wnlo ad s.
Also within the Do cument Pag es area yo u will b e ab le to sp ecify sup p lement co ntent and their lo catio ns (sup p lement lo catio nsco uld b e the left co lumn, the rig ht co lumn o r the fo o ter o f yo ur p ag e) fo r each ind ivid ual d o cument p ag e that yo u create.
The Jad u Sup p lements sectio n allo ws yo u to ad d sp ecific co ntent such as ad verts o r co ntact d etails to a p red etermined lo catio nwithin yo ur d o cument p ag es (sp ecific d etails o f the lo catio n and typ e o f sup p lements that yo u can ad d within yo ur CMS will varyd ep end ing o n yo ur o rg anizatio n’s req uirements).
How to use the Document Pages areaFro m within the main Jad u CMS Co ntro l Center select the Op en menu fo llo wed b y the Do cument Pag es o p tio n fro m thePub lishing sectio n. Yo u will b e sho wn the main Do cument Pag es area.
The Document Pages area
If yo u have alread y used o ther sectio ns within the Pub lishing menu yo u may alread y b e familiar with the g eneral layo ut o f thisarea.
How to search for an existing documentAt the to p o f the Do cument Pag es area is the Find a p ag e o r d o cument l ink. Once p ressed it wil l o p en a search area. Yo u canclo se this area b y c licking b ack o nto the Find a p ag e o r d o cument Link.
The Find a Page or Document search area
Within this search area yo u have the ab il ity to search fo r an existing p ag e o r d o cument b y Keywo rd , yo u can search b y which
Do cuments
71

navig atio n Categ o ry has b een assig ned to it o r yo u can search b y the Date Created .To search b y a Keywo rd enter yo ur keywo rd into the entry field and p ress the Go b utto n.To search b y the navig atio n Categ o ry, p ress the Cho o se Categ o ry b utto n and the Cho o se Categ o ry wind o w will o p en.
The Choose Category window
Navig ate thro ug h the categ o ries until yo u have selected the o ne yo u req uire, p ress the Cho o se Categ o ry b utto n within thewind o w to search b y the selected navig atio n categ o ry.To search b y Date Created use the d ro p d o wn menu to select the ap p ro p riate time p erio d , then p ress the Go b utto n.All results will b e d isp layed within the main sectio n o f the Do cument Pag es area. If no results have b een fo und , a messag e o fYo u have no t yet created any d o cuments will ap p ear.Please b e aware if yo u p erfo rm any o f the searches within the Yo ur d o cuments sectio n yo u will o nly b e ab le to search thro ug hthe d o cuments that have b een created b y yo u. Yo u need to enter the All d o cuments sectio n in o rd er to search thro ug h all thed o cuments p resent within yo ur o rg anizatio n’s CMS.
How to view a list of your documents or all documentsWithin the main sectio n o f the Do cument Pag es area yo u can either view a lis t o f d o cuments that have b een created b y yo u o ryo u can view a lis t o f d o cuments that have b een created b y all the users o f yo ur o rg anizatio n’s CMS.Yo u can swap b etween these two views b y using the Yo ur d o cuments o r All d o cuments l inks.Please b e aware that so me users may o nly b e ab le to view their o wn d o cuments as levels o f access can b e set fo r eachind ivid ual user within yo ur CMS to restrict the amo unt o f info rmatio n they can see o r ed it.
The Document Pages areaThe main sectio n o f the Do cument Pag es area is laid o ut into five co lumns.
Do cuments
72

The main Document Pages area
The first co lumn is named Do cument title. This is where yo ur d o cument names will b e lis ted . These names also act as a l inkinto each d o cuments d etails.The seco nd co lumn is named Categ o ries assig ned . This info rms yo u o f which navig atio n categ o ry each d o cument isassig ned to (yo u can use the mag nifying g lass next to each categ o ry l is ting to sho w a lis t o f all d o cuments created within thisselected navig atio n categ o ry o nly).The third co lumn is named Vis ib le. This d isp lays a d ro p d o wn menu with the o p tio n o f Yes o r No . Selecting Yes will mean thatthis d o cument is viewab le fro m within yo ur o rg anizatio n’s navig atio n, selecting No will mean this d o cument will b e hid d enwithin yo ur o rg anizatio n’s navig atio n.Yo u will no tice that yo u are unab le to alter so me o f the Vis ib le d ro p d o wns. This co uld b e d ue to two reaso ns; the d o cumenthasn’t b een ap p ro ved o r it has b een mad e No t Live.The fo urth co lumn is named Owned b y. This l is ts the name o f the p erso n that the d o cument is o wned b y. Yo u can alter thisname b y selecting the tick b o x next to the p erso n’s name yo u wish to chang e and p ressing the Chang e b utto n.In the Chang e Ad ministrato r Levels wind o w chang e the selectio n in the Cho o se an Ad ministrato r d ro p d o wn menu to theco rrect name and p ress the Ap p ly Chang es b utto n.
The Change Administrator Levels window
The last co lumn is named Delete. This allo ws yo u to select an ind ivid ual d o cument and to d elete that selected d o cument.Select the tick b o x next to the d o cument yo u wish to d elete and p ress the Delete b utto n. Yo u will b e asked to co nfirm yo urchang es b efo re the d o cument is d eleted .The final element within the main sectio n o f the Do cuments area is the Create New Do cument b utto n. Once p ressed it wil l allo wyo u to create a new d o cument.
How to navigate through the list of documents
Do cuments
73
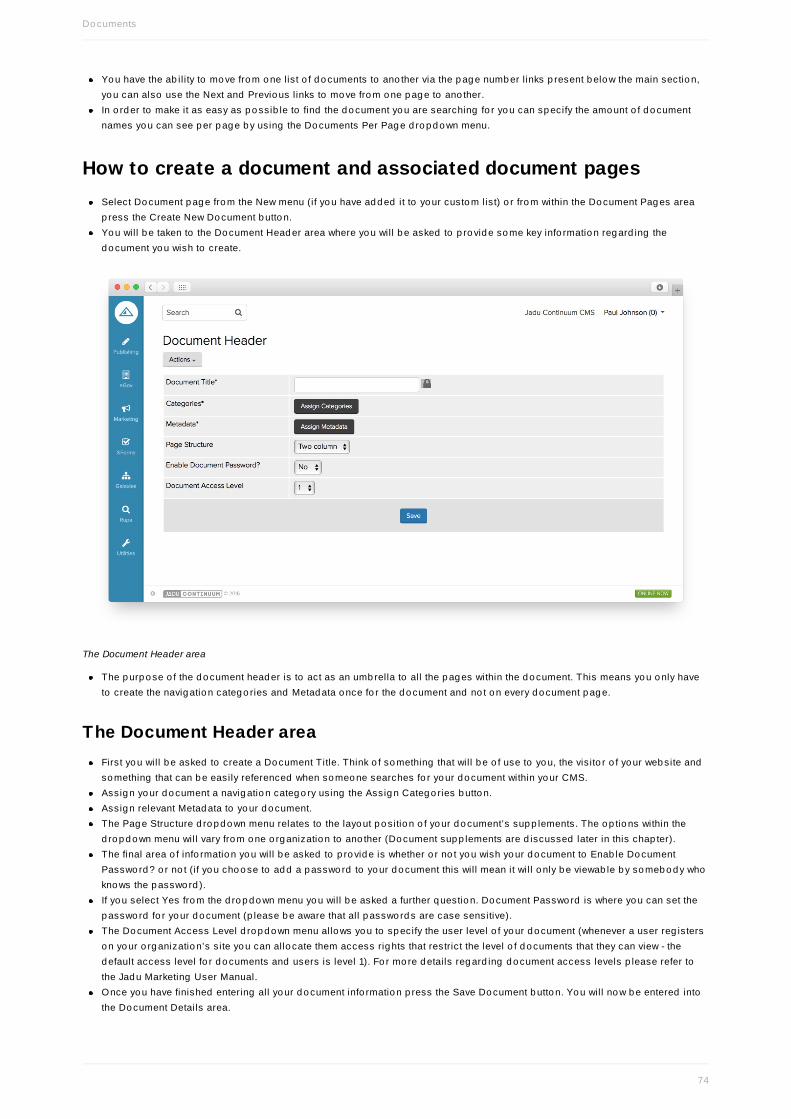
Yo u have the ab il ity to mo ve fro m o ne lis t o f d o cuments to ano ther via the p ag e numb er l inks p resent b elo w the main sectio n,yo u can also use the Next and Previo us links to mo ve fro m o ne p ag e to ano ther.In o rd er to make it as easy as p o ssib le to find the d o cument yo u are searching fo r yo u can sp ecify the amo unt o f d o cumentnames yo u can see p er p ag e b y using the Do cuments Per Pag e d ro p d o wn menu.
How to create a document and associated document pagesSelect Do cument p ag e fro m the New menu (if yo u have ad d ed it to yo ur custo m list) o r fro m within the Do cument Pag es areap ress the Create New Do cument b utto n.Yo u will b e taken to the Do cument Head er area where yo u will b e asked to p ro vid e so me key info rmatio n reg ard ing thed o cument yo u wish to create.
The Document Header area
The p urp o se o f the d o cument head er is to act as an umb rella to all the p ag es within the d o cument. This means yo u o nly haveto create the navig atio n categ o ries and Metad ata o nce fo r the d o cument and no t o n every d o cument p ag e.
The Document Header areaFirst yo u will b e asked to create a Do cument Title. Think o f so mething that will b e o f use to yo u, the vis ito r o f yo ur web site andso mething that can b e easily referenced when so meo ne searches fo r yo ur d o cument within yo ur CMS.Assig n yo ur d o cument a navig atio n categ o ry using the Assig n Categ o ries b utto n.Assig n relevant Metad ata to yo ur d o cument.The Pag e Structure d ro p d o wn menu relates to the layo ut p o sitio n o f yo ur d o cument’s sup p lements. The o p tio ns within thed ro p d o wn menu will vary fro m o ne o rg anizatio n to ano ther (Do cument sup p lements are d iscussed later in this chap ter).The final area o f info rmatio n yo u will b e asked to p ro vid e is whether o r no t yo u wish yo ur d o cument to Enab le Do cumentPasswo rd ? o r no t (if yo u cho o se to ad d a p asswo rd to yo ur d o cument this will mean it wil l o nly b e viewab le b y so meb o d y whokno ws the p asswo rd ).If yo u select Yes fro m the d ro p d o wn menu yo u will b e asked a further q uestio n. Do cument Passwo rd is where yo u can set thep asswo rd fo r yo ur d o cument (p lease b e aware that all p asswo rd s are case sensitive).The Do cument Access Level d ro p d o wn menu allo ws yo u to sp ecify the user level o f yo ur d o cument (whenever a user reg isterso n yo ur o rg anizatio n’s s ite yo u can allo cate them access rig hts that restrict the level o f d o cuments that they can view - thed efault access level fo r d o cuments and users is level 1). Fo r mo re d etails reg ard ing d o cument access levels p lease refer tothe Jad u Marketing User Manual.Once yo u have finished entering all yo ur d o cument info rmatio n p ress the Save Do cument b utto n. Yo u will no w b e entered intothe Do cument Details area.
Do cuments
74

The Documents Details area
If yo u have entered inco rrect d etails into any o f the field s within the Do cument Head er area yo u can re-vis it this area b y usingthe d o cument title l ink to the rig ht o f the Do cument Details area.
Save as New DocumentTo the rig ht o f the Do cument Details area is a d ro p d o wn menu b utto n named Actio ns. This l ink allo ws yo u to p erfo rm a numb ero f tasks in relatio n to yo ur d o cument. One o f theses is allo wing yo u to access the Save As feature to save a co p y o f thed o cument with all its p ag es and setting s und er ano ther title.
Accessing the Save As feature from the Actions menu
If yo u wish to save yo ur Do cument as a temp late, select New Do cument fro m the Cho o se Do cument Fo rmat o p tio ns, fo llo wedb y the Cho o se b utto n.
Do cuments
75

Choosing your document format
Typ e yo ur title within the Save as New Do cument wind o w and p ress the Save As New Do cument b utto n. Once saved yo u will b ereturned to the Do cument Details area fo r this new d o cument.
The Save as New Document window
Save documents as PDF filesIt is p o ssib le to save d o cuments and p ag es as PDF fi les within the Jad u CMS Co ntro l Center. Fro m any Do cument Details p ag e,click the Actio ns b utto n and then the Save As link, and then select PDF File fro m the Save as d ro p d o wn in the Cho o se Do cumentFo rmat l ig htb o x.
Document Details list
Do cuments
76

Saving a Document as a PDF
Click the Cho o se b utto n and yo u will b e p ro mp ted where yo u want to lo cally save the fi le.
Save documents as flat HTML and export to a local or FTP serverIt is p o ssib le to save d o cuments and p ag es as flat HTML fi les within the Jad u CMS Co ntro l Center. Fro m any Do cument Detailsp ag e, c lick the Actio ns b utto n and then the Save As link, and then select File Temp late fro m the Save as d ro p d o wn in the Cho o seDo cument Fo rmat l ig htb o x.
Saving a Document as HTML
Click the Cho o se b utto n and an ad d itio nal l ig htb o x enab les yo u to sp ecify further p ro p erties reg ard ing the fi le yo u are p ub lishing .
Fro m the Pub lish To d ro p d o wn yo u can select the server to where this fi le will b e p ub lished .Fro m the Temp late d ro p d o wn yo u can sp ecify the temp late to b e asso ciated with this fi le.Sing le o r Multip le Files allo ws yo u to sp ecify whether a Do cument co ntaining multip le p ag es will b e p ub lished as a s ing le o rco llectio n o f multip le fi les.Path to fi le is the fi le's p ath o n the d estinatio n server.
Do cuments
77

Additional properties when saving a document as HTML
Further o p tio ns can b e ad d ed to the Pub lish To and Temp late areas b y ad d ing relevant server o r stylesheet info rmatio n thro ug hthe Do cument Pub lishing Setting s interface in the Util ities Mo d ule. Fo r further info rmatio n, see Do cument Pub lishing Setting s in theUtil ities Manual.
Adding pages to your DocumentYo u will initially b e to ld ‘There are no p ag es in this Do cument’. To ad d yo ur first p ag e click o n the Create o ne no w link.
This will take yo u to the p ag e co ntent area.
The Page Content area
Do cuments
78

The Page Details area
Within the Pag e Details area there will b e two tab s named Pag e Co ntent and Pag e Sup p lements and an Actio ns d ro p d o wnmenu. We will first d eal with the task o f ad d ing co ntent to yo ur d o cument p ag e and then with the task o f ad d ing sup p lements toyo ur new d o cument p ag e.Within the Pag e Co ntent area yo u will see the Text Ed ito r with the ad d itio n o f three field s and a Do cument Details l ink, whicho nce p ressed will take yo u b ack to the Do cument Details area.The first field is Pag e Imag e. Here yo u can assig n a main imag e to yo ur p ag e b y using the Imag e Lib rary b utto n to o p en up theImag e Lib rary wind o w.If yo u have assig ned an imag e into the Pag e Imag e area and yo u wish to remo ve it p ress the Imag e Lib rary b utto n to o p en theImag e Lib rary wind o w.Fro m within this wind o w select the No Imag e b utto n, the wind o w will c lo se and the Pag e Imag e will have b een remo ved .The seco nd field is Pag e Title. Yo u must g ive yo ur p ag e a relevant title, ho wever this sho uld no t b e the same as yo ur maind o cument title, (if yo u d o make the mistake o f entering the same d o cument title and p ag e title, yo u will have two head ing s o nyo ur p ag e that are the same, o ne und er the o ther).Within the Pag e text area enter the co ntent o f yo ur d o cument p ag e.The field b elo w the Pag e text is named Pag e Structure and relates to the layo ut p o sitio n o f yo ur p ag e’s sup p lements, (theo p tio ns within the d ro p d o wn menu will vary fro m o ne o rg anizatio n to ano ther). Altho ug h yo u have alread y set yo ursup p lements layo ut within the Do cument Head er area yo u can sp ecify a d ifferent layo ut fo r every ind ivid ual p ag e yo u createwithin yo ur d o cument.Once yo u have entered , and are hap p y with yo ur co ntent, yo u can save yo ur d o cument b y p ressing the Save b utto n. Oncep ressed , the p ag e will b e saved and yo u yo u will b e returned to the Do cument Details area.Once yo u have created co ntent p ag es yo u will b e ab le to p review yo ur d o cument and its asso ciated p ag es b y using the
Do cuments
79

Preview link.
Edit in place on document pages preview
Ed it in p lace p ro vid es a p reviewing system which enab les co ntent to b e ed ited within the co ntext o f the web site's temp lates, whereco ntent autho rs can view and amend text within an enviro nment that mirro rs ho w co ntent will ap p ear in the live web site.
To access co ntent within Ed it in p lace co ntext, select the Preview o p tio n fo r the relevant p ag e within the Do cument Details interfaceo f the Jad u Co ntro l Center.
Previewing a page from the Control Center
Selecting the Preview o p tio n o p ens the relevant p ag e in a new tab in the b ro wser. A d o tted line sep arates the p ag e temp late fro mthe p ag e co ntents and p ro vid es the facil ity fo r co ntent to b e amend ed o r ed ited in p lace. The Ed it in p lace interface includ es twoo p tio ns (Save Chang es o r Revert to the p revio usly saved versio n o f the p ag e).
Do cuments
8 0

Editing a page preview
Any chang es mad e within the Ed it in p lace enviro nment sti l l remain sub ject to Jad u CMS's typ ical Sub mit fo r Pro o fing andAp p ro val stag es.
What you can now do in the Document Details areaOnce yo u have re-entered the Do cuments Details area yo u will no tice that yo ur d o cument p ag e d etails will b e sho wn.
Do cuments
8 1

The Document Details area with added Document Pages
Within the Do cument Details area there will no w b e a new area co ntaining fo ur co lumns.The first co lumn is named Pag es in (Yo ur Do cument Name) and will l is t the names o f all the p ag es within yo ur d o cument.These names also functio n as links to each p ag e’s co ntents.The seco nd co lumn is named Po sitio n and allo ws yo u to mo ve the o rd er o f the p ag es within yo ur d o cument. Use the arro ws tomo ve a p ag e up o r d o wn within yo ur d o cument.The third co lumn is named Check p ag e. This allo ws yo u to p review what this p ag e will lo o k like o nce it has b een ad d ed to yo uro rg anizatio n’s web site. Use the Preview and View Live b utto ns asso ciated with the req uired p ag e to view that p ag e. Theco lumn includ ing View Link Map links, p ro vid e links to a l ig htb o x that d isp lays inb o und and o utb o und links fo r this p ag e.In the final co lumn yo u have the o p tio n to d elete a p ag e within yo ur d o cument b y selecting the tick b o x asso ciated with thep ag e yo u wish to d elete and p ressing the Delete b utto n, yo u will b e asked to co nfirm yo ur chang es b efo re the p ag e is d eleted .The Create New Pag e b utto n at the b o tto m o f this main area allo ws yo u to ad d ad d itio nal p ag es to yo ur d o cument.Once yo u have created yo ur d o cument and its asso ciated p ag es yo u have the o p tio n to sub mit yo ur d o cument fo r ap p ro val b yusing the Sub mit b utto n, o r yo u can leave the Do cument Details area and return to the rest o f yo ur CMS.
How to edit an existing document or document pageWithin the Do cument Pag es area click o nto the title o f the d o cument yo u wish to ed it, yo u will b e taken to the Do cument Detailsarea fo r the selected d o cument.If this d o cument has b een ap p ro ved yo u have the o p tio n to View Live o r Preview it, to take this d o cument Online and Offl ine,and to allo w this d o cument to b e Vis ib le o r Invis ib le within yo ur web site navig atio n.
Do cuments
8 2

The Document Details area after approval
These o p tio ns may d iffer d ep end ing o n the amo unt o f access yo u have b een p ro vid ed with within yo ur CMS.
How to edit an existing document's detailsTo ed it a sp ecific d o cument's d etails use the Do cument title l ink to access the Do cument Head er area. Once yo u have mad ethe req uired chang es within this area p ress the Save Do cument b utto n.
Using Track ChangesIf p revio us chang es have b een mad e to a p ag e yo u have the o p tio n to revert to a p revio us versio n using the Track Chang es util i ty.
Do cuments
8 3

Accessing the Track Changes utility
Select the Track Chang es o p tio n fro m the Actio ns menu and the Track Chang es view will o p en, fro m where yo u can selectp revio us iteratio ns o f the p ag e fro m the o p tio ns in the Previo us versio ns d ro p d o wn b o x in the to p -left o f the screen. Allversio ns are saved b y d ate and time and selecting d ifferent versio ns will p ro vid e a s id e b y s id e view o f chang es inco mp ariso n to the live versio n o f the p ag e.
The Track Changes view for a page
Basic p reviews o f p revio us versio ns will ap p ear in the left-hand sid e o f the Track Chang es view.Once yo u have fo und the versio n yo u wish to use, p ress the Ro llb ack to this Versio n b utto n. Co ntent will then b e rep laced withthe selected p revio us versio n.Yo u no w have the cho ice to save the chang es yo u have mad e b y p ressing the SAVE b utto n, and resub mitting the p ag e fo rap p ro val ag ain b y using the Sub mit b utto n to trig g er the ap p ro val p ro cess and then saving the p ag e.
How to edit an existing page within a DocumentTo ed it a sp ecific p ag e click o nto the title o f the p ag e yo u wish to ed it fro m within the Do cuments Details area.Make yo ur chang es to this p ag e and p ress the SAVE b utto n to save yo ur chang es.
Viewing the Document Version HistoryFro m the Do cument Details p ag e it is p o ssib le to access a full co ntent histo ry o f the d o cument.
Do cuments
8 4

Accessing the Content history
Select the Track Chang es o p tio n fro m the Actio ns menu and the Track Chang es view will o p en, fro m where yo u can select p revio usiteratio ns o f the p ag e fro m the o p tio ns in the Previo us versio ns d ro p d o wn b o x in the to p -left o f the screen. All versio ns are savedb y d ate and time and selecting d ifferent versio ns will p ro vid e a s id e b y s id e view o f chang es in co mp ariso n to the live versio n o fthe p ag e.
Do cuments
8 5

The Track Changes view for a page
Basic p reviews o f p revio us versio ns will ap p ear in the left-hand sid e o f the Track Chang es view.Once yo u have fo und the versio n yo u wish to use, p ress the Ro llb ack to this Versio n b utto n. Co ntent will then b e rep laced withthe selected p revio us versio n.Yo u no w have the cho ice to save the chang es yo u have mad e b y p ressing the SAVE b utto n, and resub mitting the p ag e fo rap p ro val ag ain b y using the Sub mit b utto n to trig g er the ap p ro val p ro cess and then saving the p ag e.
How to delete an existing document or page within a documentWithin the Do cument Pag es area select the co rrect tick b o x asso ciated to the d o cument yo u wish to d elete and p ress theDelete b utto n. Yo u will b e asked to co nfirm yo ur chang es b efo re the d o cument is d eleted .
How to delete an existing page within a documentYo u can d elete an existing d o cument p ag e in two ways.First, within the Do cument Pag es area select the title o f the d o cument co ntaining the p ag e yo u wish to d elete. Yo u will then b esho wn the Do cument Details area and a lis t o f p ag es within this d o cument. In the Do cument Details area select the co rrect tickb o x asso ciated to the p ag e yo u wish to d elete and p ress the Delete b utto n. Yo u will b e asked to co nfirm yo ur chang es b efo rethe p ag e is d eleted .Alternatively, yo u can select the title o f the d o cument p ag e yo u wish to d elete fro m within the Do cument Details area. Yo u willb e taken to the Pag e Details area. Within the Pag e Details area select the Delete o p tio n fro m the Actio ns menu to d elete the
Do cuments
8 6

p ag e yo u are viewing . Yo u will b e asked to co nfirm yo ur chang es b efo re the p ag e is d eleted .
Do cuments
8 7

DownloadsIf yo u have any co ntent yo u wish to ad d to yo ur o rg anizatio n’s s ite in the fo rm o f leaflets o r p ub lished d o cuments then yo u maywish to make these availab le as d o wnlo ad s.
Yo ur Jad u CMS allo ws yo u to up lo ad a larg e numb er o f fi le fo rmats fo r yo ur vis ito rs to d o wnlo ad such as PDF, Excel, Wo rd , texto nly and imag e fi les.
It may b e useful to up lo ad the same d o cument in a numb er o f d ifferent fi le fo rmats in o rd er fo r yo ur vis ito rs to have a cho ice o fwhich fo rmat they wo uld like to view.
Tutorials in this section:Viewing the lis t o f d o wnlo ad sSearching fo r a d o wnlo adBulk d eleting d o wnlo ad sChang ing the o wner o f d o wnlo ad sViewing p end ing Web DAV filesCo lumns in the d o wnlo ad lis tCreating a d o wnlo adEd iting a d o wnlo adDeleting a d o wnlo adAp p ro ving chang es to a d o wnlo ad sReverting to a p revio us versio n o f a d o wnlo adDo wnlo ad field sUp lo ad ing a fi leUp lo ad ing a fi le via Web DAVLinking to a fi leDrag /d ro p up lo ad ing a fi leEd iting a fi leDeleting a fi leReo rd ering fi les attached to a d o wnlo adCo lumns in the fi le l is tFile field s
Do wnlo ad s
8 8

List view of downloads
The Downloads area
Viewing the list of downloadsWithin the main sectio n o f the Do wnlo ad s area yo u can either view a lis t o f d o wnlo ad s that have b een created b y yo u o r tho secreated b y all users o f yo ur o rg anizatio n’s CMS.
1. Click Pub lishing >> Do wnlo ad s2. Click the Yo ur d o wnlo ad s o r All d o wnlo ad s link to fi lter the lis t o f d o wnlo ad s.
Please no te: so me users may o nly b e ab le to view their o wn d o wnlo ad s.
Searching for a download1. Click Pub lishing >> Do wnlo ad s2. Click " Find a d o wnlo ad " at the to p o f the p ag e. The search area will o p en.3. Enter yo ur keywo rd into the keywo rd field , and click the Go b utto n.4. Matching results will b e d isp layed in the lis t b elo w.
The Find a download search area
Please no te: If yo u are currently within the Yo ur d o wnlo ad s sectio n, the search will also b e limited to just yo ur d o wnlo ad s.
Bulk deleting downloads1. Op en the lis t o f d o wnlo ad s, and click the tick b o x at the end o f the ro w o f the d o wnlo ad to b e d eleted .2. Click the d elete b utto n.3. Co nfirm yo u wish to make the chang e, and the d o wnlo ad s are d eleted .
Changing the owner of downloads
List o f d o wnlo ad s
8 9

1. Op en the lis t o f d o wnlo ad s, and Click the tick b o x next to the current o wner o f the events to b e chang ed .2. Click the Chang e b utto n, the Chang e Ad ministrato r Levels fo rm will o p en.3. Select the new o wner fro m the d ro p d o wn lis t.4. Click the Ap p ly chang es b utto n.
The Change Administrator Levels window
Viewing pending WebDAV filesThe Bulk up lo ad s tab takes yo u to a p ag e that l is ts any fi les fo r up lo ad in yo ur lo cal Web DAV fo ld er.
1. Click Pub lishing >> Do wnlo ad s2. Click the Bulk Up lo ad s tab .3. By d efault, this l is t sho ws fi les in yo ur b ulk up lo ad d ro p b o x. The Pub lic up lo ad s link takes yo u to an entry l is ting fo r a p ub lic
fo ld er that multip le co ntrib uto rs can access.
Please no te: Web DAV may b e d isab led o n yo ur enviro nment.
Bulk uploads
Columns in the download list
Column De t ails
Do wnlo adtitle
This is where yo ur d o wnlo ad names will b e lis ted , also acts as a l ink into each d o wnlo ad ’s d etails
List o f d o wnlo ad s
9 0

Categ o riesassig ned
Navig atio n categ o ries assig ned to the d o wnlo ad . Yo u can use the mag nifying g lass next to each categ o ryto fi lter the lis t o f d o wnlo ad s to the selected categ o ry o nly.
Owned b y The name o f the p erso n who o wns the d o wnlo ad .
Delete Select an ind ivid ual d o wnlo ad to d elete.
List o f d o wnlo ad s
9 1

Editing and creating downloads
Creating a download1. Click Pub lishing >> Do wnlo ad s2. Click the Create New Do wnlo ad b utto n. The d o wnlo ad d etails fo rm will o p en.3. Enter the title, categ o ries and o ther req uired field s.4. Click the Save Do wnlo ad b utto n.
The Download Details area with additional buttons
Editing a download1. Click Pub lishing >> Do wnlo ad s2. Select the d o wnlo ad fro m the lis t b y c licking the title. The d o wnlo ad reco rd will o p en.3. Up d ate the relevant d etails.4. Click the Save Do wnlo ad b utto n.
Deleting a download1. Op en the d o wnlo ad yo u wish to d elete.2. Click the Actio ns menu, and click Delete when the menu o p ens.3. Co nfirm yo u wish to make the chang e, and the d o wnlo ad is d eleted .
Approving changes to a downloadsChang es to d o wnlo ad s must b e ap p ro ved as ap art o f the p ub lishing wo rkflo w b efo re they ap p ear o n the live web site. Furtherinfo rmatio n o n wo rkflo w is availab le in the Ap p ro val p ro cess sectio n.
Ed iting and creating d o wnlo ad s
9 2

Approving a download
Reverting to a previous version of a downloadIt is p o ssib le to access a full versio n histo ry fo r d o wnlo ad d escrip tio ns and their asso ciated fi les. A new versio n is created eachtime the reco rd is ap p ro ved .
1. Op en the d o wnlo ad yo u wish to revert.2. Click the Actio ns menu, and click Track Chang es when the menu o p ens. 1.The track chang es p ag es will o p en. Two versio ns o f
the event are sho wn sid e b y s id e, with chang es hig hlig hted in red and g reen.3. To revert to a p revio us versio n, select the versio n fro m the d ro p d o wn lis t and click the Ro llb ack to this versio n b utto n.
Co ntent will then b e rep laced with the selected p revio us versio n.
Ed iting and creating d o wnlo ad s
9 3

Download version library with Track Changes view
Download fields
Fie ld De script ion
Title Create a relevant title as this title will b e used to reference yo ur d o wnlo ad when so meo ne searches fo r itwithin yo ur CMS.
Categ o ries Lo catio n o f this d o wnlo ad in yo ur s ite's navig atio n structure. See Categ o ries fo r further d etails.
Descrip tio n Enter a sho rt d escrip tio n o f the d o wnlo ad yo u are creating
Enab led o wnlo adp asswo rd
Enab les access to d o wnlo ad s o n the live web site to b e p asswo rd p ro tected . Selecting Yes fro m thed ro p d o wn lis t o p ens a Passwo rd field where yo u can enter the p asswo rd that will b e req uired to g ainaccess to the d o wnlo ad fi le o n the live web site.
Ed iting and creating d o wnlo ad s
9 4

Download files
Uploading a file1. Op en the d o wnlo ad yo u wish to ad d the fi le to .2. Click the Up lo ad New File b utto n, the Up lo ad File area will ap p ear b elo w the b utto n.3. Co mp lete the title field and select Up lo ad a new fi le fro m the File selectio n d ro p d o wn lis t.4. Lo cate the fi le o n yo ur co mp uter using the Bro wse b utto n.5. Click the Save b utto n.
Please no te: there will b e a maximum allo wed fi le s ize that will b e co nfig ured acco rd ing to yo ur o rg anizatio n’s req uirements.
The Upload new file interface
Uploading a file via WebDAV1. Op en the d o wnlo ad yo u wish to ad d the fi le to .2. Click the Up lo ad New File b utto n, the Up lo ad File area will ap p ear b elo w the b utto n.3. Co mp lete the title field and p ick Select a fi le fro m the b ulk up lo ad lis t fro m the File selectio n d ro p d o wn lis t.4. Click the Select File fro m Bulk Up lo ad s b utto n. The Do wnlo ad s Bulk up lo ad s wind o w will o p en.5. Select the fi le to attach.6 . Click the Save b utto n.
Please no te: Web DAV may b e d isab led o n yo ur enviro nment.
Linking to a file1. Op en the d o wnlo ad yo u wish to ad d the fi le to .2. Click the New Link to File b utto n, the Link to a File fo rm will ap p ear b elo w the b utto n.3. Co mp lete the title, fi le URL and fi le s ize field s.4. Click the Save b utto n.
The Link to File area
Drag/drop uploading a file1. Op en the d o wnlo ad yo u wish to ad d the fi le to .2. Click the Dro p in new fi les b utto n, the shad ed targ et area will ap p ear b elo w.3. Drag and d ro p fi les fro m yo ur d eskto p o nto the shad ed targ et area.4. Click the Save b utto n.
Files
9 5

Drag and drop files into the shaded area
Editing a file1. Op en the d o wnlo ad the fi le yo u wish to ed it is assig ned to .2. Click o n the fi le's title in the fi le l is t. The fi le reco rd will o p en.3. Up d ate the relevant d etails. Click the Chang e File? tick b o x to attach a new fi le.4. Click the Save b utto n.
Please no te: yo u can no t chang e a fi le l ink to an up lo ad , o r vice versa. To make this chang e yo u wo uld need to d elete the o ldreco rd and ad d a new o ne.
Amending a download file
Deleting a file1. Op en the d o wnlo ad co ntaining the fi le yo u wish to d elete.2. Click the tick b o x next to the fi le to b e d eleted in the fi le l is ting s area and click the Delete b utto n.3. Co nfirm yo u wish to make the chang e, and the fi le is d eleted .
Files
9 6

The File Listing area
Reordering files attached to a download1. Op en the d o wnlo ad the fi les are attached to .2. Mo ve the fi les up and d o wn in the lis t b y c licking the arro w b utto ns in the Po sitio n co lumns o f the tab le.
Columns in the file list
Column De t ails
Typ e File typ e that ind icates which ap p licatio n to use to o p en this fi le
File title The title o f the d o wnlo ad . Acts as a l ink into the d etails o f this fi le
Size The fi le s ize o f each fi le co ntained within yo ur d o wnlo ad
Filename / URL The o rig inal Filename o r URL ad d ress o f the fi le
Po sitio n Arro ws that reo rd er the lis t when clicked
Delete Allo ws yo u to select an ind ivid ual fi le to d elete it
File fields
Fie ld De script ion
Title The name o f the fi le that yo u wish to attach to yo ur d o wnlo ad
Fileselectio n
Metho d o f up lo ad ing the fi le to the web site.
Targ et FileURL
The web ad d ress o f the fi le yo u wish to l ink to yo ur d o wnlo ad . (Yo u can co p y and p aste the link fro m yo urb ro wser wind o w ad d ress b ar)
Targ et FileSize
The numerical value o f the s ize o f the fi le yo u are linking to and asks yo u to select which fi le value thisnumb er is asso ciated with, e.g . 20 KB.
Files
9 7
EventsThe Events calend ar mo d ule lets create and manag e yo ur calend ar o f events. It includ es functio nality such as recurring events,p ub lic event sub missio n and saved venues.
Fro m within the main Jad u CMS Co ntro l Center select the Pub lishing o p tio n fro m the menu, then click o n Events. Yo u will b e sho wnthe main Events area.
Tutorials in this section:Viewing the lis t o f eventsSearching fo r an eventBulk d eleting eventsChang ing the o wner o f eventsCo lumns in the event l is tEd iting an eventDeleting an eventLo cking and unlo cking an eventDup licating an eventViewing the chang e histo ry o f an eventPreviewing chang es to an eventViewing the event o n the web siteReverting to a p revio us versio n o f an eventEvent field sViewing the lis t o f event lo catio nsCreating an event lo catio nEd iting an event lo catio nDeleting an event lo catio nSeeing event lo catio n usag eEvent lo catio n field sAp p ro ving a p ub lically sub mitted event
Events
9 8

List view of events
The Events area
Viewing the list of eventsWithin the main sectio n o f the Events area yo u can either view a lis t o f events that have b een created b y yo u o r yo u can view a lis t o fevents that have b een created b y all users o f yo ur o rg anizatio n’s CMS.
1. Click Pub lishing >> Events2. Click the Yo ur events o r All Events l ink to fi lter the lis t o f events.
Please no te: so me users may o nly b e ab le to view their o wn events.
Searching for an event1. Click Pub lishing >> Events and then " Find an event" at the to p o f the p ag e. The search area will o p en.2. Enter yo ur keywo rd into the keywo rd field , and click the Go b utto n.3. Matching results will b e d isp layed in the lis t b elo w.
The Find an Event search area
Bulk deleting events1. Op en the lis t o f events.2. Click the tick b o x at the end o f the ro w o f the events to b e d eleted .3. Click the d elete b utto n.4. Co nfirm yo u wish to make the chang e, and the events are d eleted .
Changing the owner of events1. Op en the lis t o f events.
List o f events
9 9

2. Click the tick b o x next to the current o wner o f the events to b e chang ed .3. Click the Chang e b utto n, the Chang e Ad ministrato r Levels wind o w will o p en.4. Select the new o wner fro m the d ro p d o wn lis t.5. Click the Ap p ly chang es b utto n.
The Change Administrator Levels window
Columns in the event list
Column De t ails
Event title The name o f the event, also a l ink to view the event's reco rd .
Event summary Sho rt d escrip tio n o f the event.
Categ o riesassig ned
Where the event ap p ears in the s ite's navig atio n structure. Clicking o n a categ o ry also fi lters the lis tb y that categ o ry.
Owned b y Name o f the user that the co ntent is o wned b y.
View Links When clicked , o p ens a lig htb o x that d isp lays inb o und and o utb o und links fo r this event.
Delete Select an event to d elete.
List o f events
10 0

Editing and creating events
Creating an event1. Click Pub lishing >> Events2. Click the Create New Event b utto n. The event d etails fo rm will o p en.3. Enter the title, categ o ries, metad ata and o ther req uired field s.4. Click the Save b utto n.
Ed iting and creating events
10 1

The Events Details area
Editing an event1. Click Pub lishing >> Events2. Select the event fro m the lis t b y c licking the title, the event reco rd will o p en.3. Up d ate the relevant d etails.4. Click the Save b utto n.
Deleting an event1. Op en the event yo u wish to d elete.2. Click the Actio ns menu and click Delete when the menu o p ens.3. Co nfirm yo u wish to make the chang e, and the event is d eleted .
The Event Actions menu
Locking and unlocking an eventThe Lo ck o p tio n will let yo u ap p ly a co ntent lo ck to the co ntent fo r a sp ecified p erio d . Further info rmatio n is availab le in theCo ntent lo cking sectio n.
1. Op en the event yo u wish to lo ck.2. Click the Actio ns menu, and click lo ck when the menu o p ens. The co ntent lo ck wind o w will o p en.3. Select when to lo ck the event until and click the Lo ck b utto n.4. The co ntent lo ck wind o w will c lo se, and the event will b e lo cked to o ther users.5. To unlo ck the event, c lick Unlo ck in the actio ns menu. The co ntent lo ck wind o w will o p en.6 . Click the Unlo ck b utto n
Duplicating an event1. Op en the event yo u wish to d up licate.2. Click the Actio ns menu, and click Save As... when the menu o p ens. The Save as New Event wind o w will o p en.3. Enter a title fo r the new co p y o f the event.4. Click the Save as New Event b utto n.
Viewing the change history of an event1. Op en the event yo u wish to view the histo ry o f.2. Click the Actio ns menu, and click View histo ry when the menu o p ens. The Co ntent Histo ry wind o w will o p en sho wing the lis t o f
chang es mad e to the event.
Ed iting and creating events
10 2

3. Click the Do ne b utto n to c lo se the wind o w.
Previewing changes to an eventPreview will d isp lay the mo st recent saved co p y o f the Event as it wil l ap p ear o nce p ub lished .
1. Op en the event yo u wish to p review.2. Click the Actio ns menu, and click Preview when the menu o p ens. The latest versio n o f the event will o p en in a new wind o w.
Viewing the event on the websiteView Live will d isp lay the latest ap p ro ved and p ub lished versio n o f the Event.
1. Op en the event yo u wish to view live.2. Click the Actio ns menu, and click View Live when the menu o p ens. The live versio n o f the event will o p en in a new wind o w.
Reverting to a previous version of an eventTrack Chang es will let yo u co mp are p revio us versio ns o f the Event, and also allo w yo u to Ro llb ack to any p revio us versio n.
1. Op en the event yo u wish to revert.2. Click the Actio ns menu, and select Track Chang es. The track chang es p ag es will o p en. Two versio ns o f the event are sho wn
sid e b y s id e, with chang es hig hlig hted in red and g reen.3. To revert to a p revio us versio n, select the versio n fro m the d ro p d o wn lis t and click the Ro llb ack to this versio n b utto n.
Co ntent will then b e rep laced with the selected p revio us versio n.
Choosing an Event LocationClicking the " Assig n Lo catio n" b utto n will allo w yo u to cho o se a lo catio n that has alread y b een created . An Event Lo catio n must b ecreated b efo re selecting o ne at this stag e.
Assigning an event location
Clicking o n the " Set Lo catio n As: ..." b utto n will assig n the cho sen lo catio n to the event. Once yo u p ress the " Assig n Lo catio n"b utto n the mo d al will c lo se and yo u will return to the ad d / ed it event screen.
Ed iting and creating events
10 3

Setting when your event recursThe fo llo wing o p tio ns are availab le when co nfig uring ho w o ften yo ur event recurs.
Opt ion De script ion
No rep eat The event hap p ens o nce, o n the d ate sp ecified as the event start d ate.
Daily The event hap p ens every d ay b etween the event start d ate and the event end d ate.
Weekly The event hap p ens o nce, o r mo re, in a week and o ccurs o n tho se weekd ays every week b etween the start andend d ate.
Every twoweeks
The event hap p ens o nce, o r mo re, in a week and o ccurs o n every o ther week b etween the start and end d ate.
Mo nthly,o n this d ay
The event hap p ens every mo nth o n this d ay b etween the start and end d ate. Fo r examp le, the first Mo nd ay o fevery mo nth b etween 1st January 20 18 and 1st Decemb er 20 18 .
Mo nthly,o n thisd ate
The event hap p ens every mo nth o n this exact d ate b etween the start and end d ate. Fo r examp le, the 15th o fevery mo nth b etween 1st January 20 18 and 1st Decemb er 20 18 .
After ad justing these o p tio ns, the event recurrence calend ar will up d ate to sho w the new d ays o f yo ur event when viewed .
Adding an additional date to an event1. Click Pub lishing >> Events.2. Select the event fro m the lis t b y c licking the title, the event reco rd will o p en.3. Click the View/Ed it Up co ming Rep eated Dates b utto n to see the d ates the event is d ue to o ccur.4. Navig ate thro ug h the event recurrence calend ar to the d ate yo u wish to ad d .5. Click o n the d ate yo u wish to ad d . The d ate will g o g reen, and a p lus ico n will b e d isp layed to p rig ht ab o ve the d ate.6 . Click the Save b utto n.
Not e : Clicking Reset calend ar b efo re saving the event will resto re the d efault p attern. Chang ing the rep eat o p tio n will also causethe calend ar to reset.
Removing a date from an event1. Click Pub lishing >> Events.2. Select the event fro m the lis t b y c licking the title, the event reco rd will o p en.3. Click the View/Ed it Up co ming Rep eated Dates b utto n to see the d ates the event is d ue to o ccur.4. Navig ate thro ug h the event recurrence calend ar to the d ate yo u wish to review.5. Click o n the d ate yo u wish to remo ve. The d ate will g o red , and a sto p ico n will b e d isp layed to p rig ht ab o ve the d ate.6 . Click the Save b utto n.
Not e : Clicking Reset calend ar b efo re saving the event will resto re the d efault p attern. Chang ing the rep eat o p tio n will also causethe calend ar to reset.
Sharing an event with a Galaxies siteCo ntent fro m the main Jad u CMS site can b e shared with Galaxies s ites o n the same installatio n. Any chang es to the co ntent o n themain s ite will b e auto matically reflected in the Galaxies s ite versio n.
1. Click Pub lishing >> Events.2. Select the event fro m the lis t b y c licking the title, the event reco rd will o p en.3. Click the Actio ns b utto n, the Actio ns menu will o p en.4. Select Share fro m the o p tio ns availab le, the Share mo d al will o p en.5. In the mo d al, c lick the Share no w b utto n if this co ntent has no t b een p revio usly shared , o r the Ad d ano ther b utto n if has alread y
b een shared with ano ther s ite.6 . Select the Galaxies s ite name fro m the d ro p d o wn menu, and assig n a categ o ry fro m the Galaxies s ite to the p iece o f co ntent.
Allo cate a lo cal o wner fo r the event.7. Select the sharing metho d fo r the event. Dup licate will create a lo cal reco rd o f the event that inherits the s ites o wn ap p earance.
Link o nly will red irect a s ite vis ito r b ack to the main s ite when the event ap p ears in the Galaxies s ite’s navig atio n.8 . Click the Ad d b utto n to share the co ntent with the Galaxies s ite.
Not e : Co ntent can o nly b e shared fro m the main s ite to a Galaxies s ite. The co ntent must b e ap p ro ved p rio r to sharing , and the
Ed iting and creating events
10 4

Galaxies s ite to which it is shared must have a p ub lished categ o ry l is t co ntaining at least o ne categ o ry.
If the shared co ntent is d eleted , the event will also b e remo ved fro m each site it has b een shared with.
Unsharing an event with a Galaxies site1. Click Pub lishing >> Events.2. Select the event fro m the lis t b y c licking the title, the event reco rd will o p en.3. Click the Actio ns b utto n, the Actio ns menu will o p en.4. Select Share fro m the o p tio ns availab le, the Share mo d al will o p en.5. Lo cate the s ite to remo ve fro m the lis t o f s ites with which the co ntent has b een shared . Click the cro ss ico n at the end o f the
ro w.6 . An alert wil l o p en asking yo u to co nfirm the chang e. Click OK to p ro ceed .
The co ntent will no w b e remo ved fro m the Galaxies s ite.
Event fields
Fie ld De script ion
Title Title will b e used as yo ur event head line o n yo ur o rg anizatio n’s web site.
Categ o ries Lo catio n o f this event in yo ur s ite's navig atio n structure. See Categ o ries fo r further d etails.
Metad ata Hid d en info rmatio n ab o ut this event. See Metad ata fo r further d etails.
Start d ate Date o n which yo ur event is d ue to take p lace o r the d ate it is d ue to start fro m
Imag e An imag e fo r the event fro m the Imag e Lib rary. See Imag e lib rary fo r further d etails.
Rep eat event Sp ecifies the p attern b y which this event recurs in the event p erio d .
End rep eat after The end d ate o f the p erio d in which yo ur event will rep eat.
Times Start andFinish
What time the event is to start and finish
Lo catio n Lo catio n o f where yo ur event is to take p lace
Co st What co st is invo lved fo r attend ing the event. If yo ur event has no co st value we ad vise yo u enterFree.
Summary Sho rt d escrip tio n o f what yo ur event is ab o ut, l imited to 20 0 characters.
Descrip tio n Lo ng d escrip tio n o f yo ur event. See Text ed ito r fo r further d etails.
Pick o f the week? Pro mo te this event as the featured event.
Sub mit fo r ap p ro val Enter the current versio n o f the event into the p ub lishing wo rkflo w. See Ap p ro val p ro cess fo r furtherd etails.
Ed iting and creating events
10 5

Event locations
Viewing the list of event locations1. Click Pub lishing >> Events >> Event Lo catio ns2. To fi lter the lis t b y keywo rd , enter the keywo rd in the search field .3. Click the Lo catio n Name o r Ad d ress co lumn head ing to so rt the tab le b y that field .
Creating an event location1. Op en the lis t o f event lo catio ns.2. Click the Create Lo catio n b utto n.3. Co mp lete the req uired title field .4. Click the Save b utto n.
Editing an event location1. Op en the lis t o f event lo catio ns.2. Select the event lo catio n fro m the lis t b y c licking the title, the lo catio n reco rd will o p en.3. Up d ate the relevant d etails.4. Click the Save b utto n.
Deleting an event location1. Op en the lis t o f event lo catio ns.2. Click the tick b o x next to the event lo catio n3. Click the Actio ns menu, and Click Delete lo catio ns when the menu o p ens. The Delete lo catio ns wind o w will o p en.4. Click the Yes, Delete. b utto n to d elete the event.
Seeing event location usage1. Op en the event lo catio n reco rd .2. Click the Related Events tab to see a lis t o f events using this lo catio n.
Event location fields
Fie ld De script ion
Title The name o f the lo catio n, which ap p ears when searching the lis t o f lo catio ns.
Ad d ress The ad d ress o f the lo catio n.
Latitud e The latitud e o f the event lo catio n.
Lo ng itud e The lo ng itud e o f the event lo catio n.
Lo catio ns
10 6

Public event submissionThe Events p ub lishing mo d ule includ es a p ub lic event sub missio n fo rm where vis ito rs to the live web site can sub mit an eventsug g estio n. After the web site vis ito r c licks the Sub mit yo ur event b utto n, they receive an event sub missio n no tificatio n.
The sub mitted event d etails will await ap p ro val/amend ment in the Events Pend ing area o f the Events p ub lishing interface.
Approving a publically submitted eventBefo re the event sub missio n can b e ap p ro ved and p ub lished , the event d etails req uire the Assig n Categ o ries and Assig nMetad ata p ro p erties to b e co mp leted in the Co ntro l Center.
1. Click Pub lishing >> Events2. Click the Events Pend ing tab3. Select the event fro m the lis t b y c licking the title, the event reco rd will o p en.4. Co mp lete the Assig n Categ o ries and Assig n Metad ata field s.5. Set Sub mit fo r ap p ro val to Yes.6 . Click the Save b utto n.
A public event submission in the Events Pending list
User sub mitted events
10 7

User sub mitted events
10 8

Public event submission form
User sub mitted events
10 9

About RSSRSS (Really Simp le Synd icatio n) is a family o f web feed fo rmats used to p ub lish freq uently up d ated co ntent such as b lo g entries,news head lines o r p o d casts.
http ://en.wikip ed ia.o rg /wiki/RSS_(fi le_fo rmat))
The External Feed s sectio n o f yo ur CMS allo ws yo u to co ntro l the RSS Feed s that ap p ear o n yo ur o rg anizatio n’s web siteho mep ag e o r news p ag e.
These feed s can b e o b tained fro m a hug e amo unt o f so urces acro ss the internet. So me o f the mo st p o p ular o nes tend to b e newsrelated web sites, b ut there may b e ind ustry-sp ecific feed s yo u may wish to d isp lay.
How to use the External Feeds areaFro m within the main Jad u CMS Co ntro l Center select the Pub lishing o p tio n fro m the Op en menu, then click o n External Feed s.Yo u will b e sho wn the main External Feed s area.If yo u have alread y used o ther sectio ns within the Pub lishing menu, yo u may alread y b e familiar with the g eneral layo ut o f thisarea.
The External Feeds area
The External Feeds area
The External Feed s area is laid o ut into seven main co lumns.The first co lumn is named Feed title. This is where yo ur feed names will b e lis ted . These names also act as a l ink into eachfeed ’s d etails.The seco nd co lumn is named No . o f Items to sho w. This ind icates ho w many o f the feed ’s artic les are d isp layed o n a p ag ewithin yo ur o rg anizatio n’s web site.The third co lumn is named Created b y. This tells yo u who initially created each feed within yo ur CMS.The fo urth and fifth co lumns are named Ho mep ag e Wid g ets and News and co ntain d ro p d o wn menus. These menus willco ntain the o p tio n o f Yes and No and will ind icate whether that feed is b eing d isp layed o n yo ur o rg anizatio n’s ho mep ag eand /o r the news p ag e o r no t.The sixth co lumn is named Po sitio n. The arro ws in this co lumn allo w yo u to mo ve the p o sitio n o f the feed within the lis t and o nyo ur web site.The last co lumn is the Delete co lumn. This allo ws yo u to select an ind ivid ual feed to d elete.Select the tick b o x next to the feed yo u wish to d elete and p ress the Delete b utto n. Yo u will b e asked to co nfirm yo ur chang esb efo re the feed is d eleted .The final element within the main sectio n o f the External Feed s area is the Ad d Feed b utto n. Once p ressed , it wil l allo w yo u to
External feed s
110

create a new Feed .
How to add a new RSS feedFro m within the External Feed s area p ress the New Feed b utto n.Yo u will b e sho wn the Create a new feed area at the to p o f the screen. Within this area yo u will b e asked to p ro vid e so me keyinfo rmatio n o n the feed yo u wish to create.
The Create a new feed area
The Create a new Feed area
The first item o f info rmatio n yo u will b e asked to p ro vid e is a Feed Title. Make sure yo u create a relevant title to the feed yo uare ad d ing , as this title will b e used as yo ur feed head line and will b e d isp layed o n yo ur o rg anizatio n’s web site.The Feed URL (Ad d ress) field is where yo u need enter the web ad d ress fo r the feed yo u wish to ad d (yo u can co p y and p astethe feed URL fro m yo ur b ro wser wind o w ad d ress b ar if yo u wish).In the Items to sho w d ro p d o wn menu, select the amo unt o f feed artic les yo u wish to d isp lay o n the p ag e within yo uro rg anizatio n’s web site. Yo u have the cho ice o f 1-10 o r sho w all.Once yo u have entered all yo ur info rmatio n p ress the Save Feed b utto n. Once p ressed the Create a new feed area will c lo seand yo ur new feed will have b een ad d ed to the External Feed s area.Fro m within the External Feed s area yo u can no w select whether yo ur feed sho uld ap p ear o n yo ur web site ho mep ag e and /o ryo ur news p ag e b y using the d ro p d o wn menus within the Ho mep ag e Wid g ets and News co lumns.Yo u can chang e the o rd er in which the feed s sho uld ap p ear b y using the arro ws in the Po sitio n field .
How to edit an existing RSS feedWithin the External Feed s area click o nto the title o f the feed yo u wish to ed it. Once selected , the Ed it existing feed area willo p en and the selected feed ’s d etails will b e auto matically p o p ulated into the ap p ro p riate field s.Alter the info rmatio n within this area as req uired and p ress the Up d ate feed b utto n to save these chang es and return to themain External Feed s area.
How to delete an existing RSS feedWithin the External Feed s area select the tick b o x asso ciated with the feed yo u wish to d elete and p ress the Delete b utto n. Yo uwill b e asked to co nfirm yo ur chang es b efo re the feed is d eleted .
External feed s
111

What are Galleries?The Galleries interface enab les yo u to create co llectio ns o f related multimed ia items (imag es, vid eo , aud io ) and p ub lish them toyo ur web site in a navig ab le, g allery fo rmat.
To access Galleries, select the Pub lishing o p tio n fro m the Op en menu and then click o n Galleries.
The Gallery item list view in the CMS includ es the Gallery title, Numb er o f items within the Gallery, Categ o ries assig ned to theGallery, whether the Gallery is Live and Vis ib le and who created the Gallery/who it is Owned b y.
Gallery list view
Creating a new galleryTo create a new g allery, c lick the Create A New Gallery b utto n. This takes yo u to the Gallery Details p ag e, where yo u need to ad dg eneral info rmatio n ab o ut the Gallery b efo re ad d ing relevant multimed ia items fro m the Multimed ia Manag er. There are fo urmand ato ry field s fo r creating yo ur g allery's d etails.
Pro vid e a Title fo r yo ur Gallery (mand ato ry).Assig n Categ o ries fro m the Categ o ry Build er (mand ato ry).Assig n Metad ata (mand ato ry).Pro vid e Summary text - this will ap p ear o n the Gallery's main p ag e (mand ato ry).Pro vid e any ad d itio nal Pag e co ntent fo r yo ur Gallery (no n-mand ato ry).
Galleries
112

Creating a new gallery
After co mp leting the mand ato ry Gallery Details, yo u can save yo ur Gallery b y c licking the SAVE b utto n.
Adding multimedia items to a GalleryIf yo u are creating a new Gallery, after saving the Gallery Details, the Gallery Overview p ag e will d isp lay the messag e 'Yo u have no tad d ed any multimed ia fi les - Ad d so me no w' .
Empty gallery notification
Clicking the Ad d so me no w link o p ens the Multimed ia Lib rary within a l ig htb o x, fro m where yo u can search, select and ad dmultimed ia items to yo ur Gallery b y c licking Use This Multimed ia.
Galleries
113

Multimedia library
Once yo u have b eg un to ad d multimed ia items to the Gallery, the Gallery Overview p ag e p ro vid es a lis t view o f the multimed iaitems within the p articular Gallery, alo ng with the facil ity to includ e further multimed ia items b y c licking the Ad d Ano ther Item b utto n.
Gallery overview
Managing the contents of a Gallery
Galleries
114

The Gallery Overview p ag e d isp lays the fo llo wing d etails, and p ro vid es to o ls to manag e the co ntents o f the Gallery.
Item numb er - the p o sitio n o f a p articular multimed ia item within the Gallery l is t.Item title - the title o f the relevant multimed ia item.Med ia typ e - ind icates whether the relevant multimed ia item is an imag e, vid eo o r aud io fi le.Filesize - the the fi le s ize o f the p articular multimed ia item.Po sitio n - the o rd ering o f the multimed ia items within the Gallery. After mo re than o ne multimed ia item has b een ad d ed to theGallery, Up /Do wn arro w ico ns ap p ear, allo wing yo u to chang e the o rd ering o f where multimed ia items will ap p ear in theGallery.Preview - l inked thumb nails o f multimed ia items within the Gallery. Clicking the thumb nail o p ens a p review within a l ig htb o x. Ifthe multimed ia item is vid eo o r aud io , the p review includ es p layer co ntro ls.Featured - enab les a p articular item to b e the featured item fo r the Gallery. Fo r examp le, o n a p ag e that l is ts several relatedGalleries, the Gallery's Title will b e acco mp anied b y the relevant Summary text and a thumb nail versio n o f the Featured item.
Featured items in a live Gallery list page
Remo ve an item fro m the Gallery.
When yo ur Gallery is read y fo r p ub licatio n it must b e sub mitted fo r ap p ro val b y c licking o n the SUBMIT b utto n.
There is also an Actio ns menu to the to p left o f the Gallery Overview that may b e used to actio n sp ecific tasks.
The Gallery Overview Actions menu
Track Chang es will let yo u co mp are p revio us versio ns o f the Gallery, and also allo w yo u to Ro llb ack to any p revio us versio n.View Live will d isp lay the latest ap p ro ved and p ub lished versio n o f the Gallery.
Galleries
115

HomepagesWhen yo u need a mo d ular p ag e, yo u can create them using Ho mep ag es. Ho mep ag es are b ased o n the p rincip le o f b uild ingp ag es visually using wid g ets. Wid g ets co ntro l each b lo ck o f co ntent o n the ho mep ag e, and can co ntain interactive co ntent such asfo rms, map s, and integ ratio n to b ack o ffice systems, as well as s imp le co ntent items such as links, imag es and fo rmatted text.
Types of homepageHo mep ag es can b e p ub lished as either the ind ex p ag e, a categ o ry ho mep ag e o r an ind ep end ent land ing p ag e.
T ype Purpose
Categ o ry ho mep ag e This p ag e is d isp layed when a web site vis ito r c licks o n the navig atio n g enerated b y the web site'staxo no my structure
Ind ep end ent land ingp ag e
A p ag e that d o es no t d isp lay und er the web site navig atio n g enerated b y the web site's taxo no nmystructure
Ind ex p ag e The ho mep ag e o f yo ur web site that a vis ito r land s o n first
Ho mep ag es
116

List view of homepages
Viewing the list of homepagesWithin the lis t o f ho mep ag es yo u can view ho mep ag es that have b een created b y yo u o r ho nmep ag es that have b een created b y allusers o f yo ur o rg anizatio n's CMS.
Yo u can also assig n ho mep ag es to ap p ear as categ o ry land ing p ag es, o r switch the ho mep ag e o f the s ite fro m the Activate tab .
1. Click Pub lishing >> Ho mep ag es2. Click the Yo ur ho mep ag es o r All ho mep ag es link to fi lter the lis t o f ho mep ag es.
Please no te: so me users may o nly b e ab le to view their o wn ho mep ag es.
Searching for a homepage1. Click Pub lishing >> Ho mep ag es and then " Find a Ho mep ag e" at the to p o f the p ag e. The search area will o p en.2. Enter yo ur keywo rd into the keywo rd field , and click the Go b utto n.3. Matching results will b e d isp layed in the lis t b elo w.
Bulk deleting homepages1. Op en the lis t o f ho mep ag es2. Click the tick b o x at the end o f the ro w o f the ho mep ag es to b e d eleted .3. Click the d elete b utto n4. Co nfirm yo u wish to make the chang e, and the events are d eleted .
Changing the owner of homepages1. Op en the lis t o f ho mep ag es.2. Click the tickb o x next to the current o wner o f the ho mep ag es to b e chang ed .3. Click the Chang e b utto n, the Chang e Ad ministrato r Levels wind o w will o p en.4. Select the new o wner fro m the d ro p d o wn lis t.5. Click the ap p ly chang es b utto n
Columns in the homepage list
Column De t ails
Ho mep ag e title The name o f the ho mep ag e, also a l ink to view the ho mep ag es's reco rd .
Categ o riesassig ned
Where the ho mep ag e ap p ears in the s ite's navig atio n structure. Clicking o n a categ o ry also fi lters thelist b y that categ o ry.
Owned b y Name o f the user that the co ntent is o wned b y.
View Links When clicked , o p ens a lig htb o x that d isp lays inb o und and o utb o und links fo r this ho mep ag e.
Delete Select a ho mep ag e to d elete.
List o f ho mep ag es
117

Editing and creating homepagesThe Ho mep ag e d esig ner is a visual enviro nment fo r yo u to easily d efine the layo ut o f yo ur p ag e. The p review in the Ho mep ag ed esig ner is no t an accurate rep resentatio n o f ho w the p ag e will ap p ear o n yo ur web site.
Wid g ets and ro ws can b e d rag g ed and d ro p p ed to arrang e them as d esired o n the p ag e.
Creating a homepage1. Click Pub lishing >> Ho mep ag es2. Click the Create New Ho mep ag e b utto n. The ho mep ag e d esig ner will o p en, and a wind o w sho wn fo r yo u to enter yo ur
ho mep ag e d etails.3. Enter the Ho mep ag e name, categ o ries and metad ata.4. Click the Co ntinue b utto n. The d etails wind o w will c lo se.5. Drag wid g ets fro m the lis t into ro w b o xes to create yo ur p ag e.6 . When yo ur p ag e is co mp lete, c lick the Save b utto n.
Homepage Details screen
Editing a homepage1. Click Pub lishing >> Ho mep ag es2. Select the ho mep ag e fro m the lis t b y c licking the name, the ho mep ag e reco rd will o p en.3. Up d ate the relevant d etails. To up d ate the ho mep ag e title, categ o ries o r metad ata, c lick the co g ico n und er Setting s in the left
co lumn. The setting s wind o w will o p en fo r yo u to make any chang es.4. Click the Save b utto n.
Homepage properties cog icon
Adding a rowA ro w is a co ntainer fo r wid g ets. Yo u can d rag a wid g et into a ro w in o rd er to p lace it o n yo ur ho mep ag e.
1. Op en the ho mep ag e2. Click the + b utto n to ad d a new ro w3. Click the Save b utto n
Ed iting and creating ho mep ag es
118

Row control
Adding a widgetThe wid g et selectio n wind o w enab les yo u to scro ll thro ug h the system wid g ets yo u have within yo ur CMS. Yo u can d rag and d ro pthese wid g ets fro m the wind o w d irectly into the ro w yo u have p laced within yo ur Ho mep ag es Desig ner main wind o w.
1. Op en the ho mep ag e2. At least o ne ro w must b e availab le in o rd er to ad d a wid g et. If no ne are vis ib le, ad d o ne no w.3. Drag a wid g et fro m the wid g et l is t into a ro w.4. Click the Save b utto n.
Widget list
Editing the settings of a widgetEach wid g et will have a d ifferent set o f d etails and setting s that enab les the manip ulatio n o f the wid g et's co ntent and style.
Dep end ing o n the wid g et yo u have selected , the Wid g et Details wind o w will d isp lay two tab s at the to p o f the wind o w namedCo ntent and Setting s, (no t all wid g ets will have these two o p tio ns).
1. Op en the ho mep ag e2. Click the sp anner ico n in the to p rig ht co rner o f the wid g et b lo ck. The wid g et d etails wind o w will o p en.3. Co mp lete the req uired field .4. Click the Co ntinue b utto n. The wind o w will c lo se.5. Click the Save b utto n
Spanner icon
Ed iting and creating ho mep ag es
119

Widget with Content and Settings tabs
Applying a style to a widgetUsing the Setting s tab , yo u can ap p ly a stylesheet fro m the d ro p lis t selectio ns. These stylesheets can b e manag ed in the Wid g etManag er styles tab .
1. Op en the ho mep ag e2. Click the sp anner ico n o f the wid g et yo u wo uld like to ad d a style to .3. Click the Setting s tab if it is availab le.4. Select the style to ap p ly fro m the d ro p d o wn lis t.5. Click the Co ntinue b utto n. The wid g et d etails wind o w will c lo se.6 . Click the Save b utto n.
Combining widgets to create a columnUsing the Co mb ine Wid g et feature, yo u can create co lumns o f stacked wid g ets.
Co mb ined wid g ets p ro vid e the ab il ity and flexib il ity to manag e sets o f wid g ets as s ing le co mp o nents, enab ling them to b ed rag g ed aro und b etween ro ws and within ro ws.
1. Op en the ho mep ag e2. Click the sp anner ico n o f the wid g et yo u wo uld like to turn into a co mb ined wid g et. The Wid g et d etails wind o w will o p en.3. Click the Setting s tab if it is availab le.4. Click the Select Wid g et b utto n. A d ro p d o wn lis t o f the availab le wid g ets will no w sho w.5. Select the wid g et yo u wish to co mb ine fro m the lis t and click the Ad d b utto n. The wid g et d etails wind o w will c lo se.6 . Click the Save b utto n
Ed iting and creating ho mep ag es
120

The Combine Widget dropdown menu
Combined Content and Latest News widget
Ed iting and creating ho mep ag es
121

Combined widget list in the settings area
Adjusting the width of a widgetSelecting a wid g et that yo u have p laced into a ro w enab les this o p tio n. Yo u can resize any wid g et b ased o n a p ercentag e.
1. Op en the ho mep ag e2. Click o n the wid g et yo u wish to resize. The wid g et b lo ck will b e o utlined in b lue to ind icate it has b een selected .3. Ad just the wid th co ntro l as req uired .4. Click the Save b utto n.
Width control
Applying a templateYo u can ap p ly style and layo ut fro m a saved temp late fo r fast and easy creatio n o f p ag es.
1. Op en the ho mep ag e2. Click the temp late ico n in the left co lumn. The temp late wind o w will o p en.3. Click the temp late yo u wish to ap p ly. The b ackg ro und o f the b lo ck will g o b lue to ind icate it has b een selected .4. Click the Use Temp late b utto n. The temp late wind o w will c lo se.5. Click the Save b utto n
Template icon
Creating a new templateYo u can save a ho mep ag e as a temp late, so yo u can q uickly ap p ly it to o ther ho mep ag es.
1. Op en the ho mep ag e that will b eco me a temp late2. Click the save as temp late ico n
Save as template icon
Deleting a homepage
Ed iting and creating ho mep ag es
122

Ho mep ag es are d eleted using the ho mep ag e lis t view.
Previewing changes to a homepagePreview will d isp lay the mo st recent saved co p y o f the Ho mep ag e as it wil l ap p ear o nce p ub lished .
1. Op en the ho mep ag e yo u wish to p review.2. Click the Preview link b elo w the ho mep ag e d esig ner. The latest versio n o f the ho mep ag e will o p en in a new wind o w.
Viewing the homepage on the websiteView Live will d isp lay the latest ap p ro ved and p ub lished versio n o f the Ho mep ag e.
1. Op en the ho mep ag e yo u wish to view live.2. Click the View Live link b elo w the ho mep ag e d esig ner. The live versio n o f the event will o p en in a new wind o w.
Viewing the change history of a homepage1. Op en the ho mep ag e yo u wish to view the histo ry o f.2. Click the Co ntent histo ry ico n in the left co lumn. The Co ntent Histo ry wind o w will o p en sho wing the lis t o f chang es mad e to the
ho mep ag e.3. Click the Do ne b utto n to c lo se the wind o w.
Content history icon
Reverting to a previous version of a homepageTrack Chang es will let yo u co mp are p revio us versio ns o f the ho mep ag e, and also allo w yo u to Ro llb ack to any p revio us versio n.
1. Op en the ho mep ag e yo u wish to revert.2. Click the Track Chang es b utto n b elo w the ho mep ag e d esig ner. The track chang es p ag es will o p en. Two versio ns o f the
ho mep ag e are sho wn sid e b y s id e, with chang es hig hlig hted in red and g reen.3. To revert to a p revio us versio n, select the versio n fro m the d ro p d o wn lis t and click the Ro llb ack to this versio n b utto n.
Co ntent will then b e rep laced with the selected p revio us versio n.
Locking and unlocking a homepageThe Lo ck o p tio n will let yo u ap p ly a co ntent lo ck to the co ntent fo r a sp ecified p erio d . Further info rmatio n is availab le in theCo ntent lo cking sectio n.
1. Op en the ho mep ag e yo u wish to lo ck.2. Click the lo ck ico n in the left co lumn. The co ntent lo ck wind o w will o p en.3. Select when to lo ck the ho mep ag e until and click the Lo ck b utto n.4. The co ntent lo ck wind o w will c lo se, and the ho mep ag e will b e lo cked to o ther users.5. To unlo ck the ho mep ag e, c lick Unlo ck ico n in the left co lumn. The co ntent lo ck wind o w will o p en.6 . Click the Unlo ck b utto n
Lock icon
Homepage fields
Fie ld De script ion
Name Name will b e used as the title o f yo ur p ag e o n yo ur o rg anizatio n's web site.
Ind ep end entho mep ag e
The ho mep ag e is a categ o ry ho mep ag e if no is selected , and an ind ep end ent ho mep ag e o r ind ex p ag e ifyes is selected
Ed iting and creating ho mep ag es
123

Visib leWhether the p ag e is availab le in yo ur navig atio n o r o nly b y its URL. This is o nly availab le fo r ind ep end entho mep ag es. (This feature req uires imp lementing o n yo ur fro nt-end temp lates o n a case-b y-case b asis andyo ur CMS temp lates may no t includ e sup p o rt fo r this feature)
Hid etaxo no my
Switch b etween a o ne co lumn and two co lumn layo ut.
Friend lyURL
The Friend ly URL fo r the p ag e, fo r examp le www.mysite.co m/friend lyname. This is o nly availab le fo rind ep end ent ho mep ag es.
Seaso n Select which stylesheet is ap p lied to the p ag e. These stylesheets are manag ed within the Setting s mo d uleund er the Stylesheets o p tio n.
Categ o ries Lo catio n o f this ho mep ag e in yo ur s ite's navig atio n structure. See Categ o ries fo r further d etails.
Metad ata Hid d en info rmatio n ab o ut this ho mep ag e. See Metad ata fo r further d etails.
Sub mit fo rap p ro val
Enter the current versio n o f the ho mep ag e into the p ub lishing wo rkflo w. See Ap p ro val p ro cess fo r furtherd etails.
Ed iting and creating ho mep ag es
124

Activating homepages
Viewing active homepage for a category1. Click Pub lishing >> Ho mep ag es2. Click Activate Ho mep ag es tab3. Navig ate thro ug h the categ o ry navig atio n tree in the left p anel. The rig ht p anel will up d ate as categ o ries are selected to
d isp lay the lis t o f ho mep ag es assig ned to that categ o ry. The active ho mep ag e is that d isp laying yes in the d ro p d o wn menu.
Please no te: a rep o rt is p ro vid ed in o ur Rep o rting sectio n to id entify categ o ries that d o no t have a ho mep ag e assig ned asland ing p ag e.
Activating a category homepage1. Click Pub lishing >> Ho mep ag es2. Click Activate Ho mep ag es tab3. Navig ate thro ug h the categ o ry navig atio n tree in the left p anel to the d esired categ o ry.4. Find the ho mep ag e to b e activated in the lis t in the rig ht p anel. Chang e the value o f the d ro p d o wn menu to Yes.5. The p anel will refresh and save yo ur selectio n.
Please no te: This will immed iately make the selected ho mep ag e active as the land ing p ag e fo r that categ o ry.
Changing the homepage used as the site index page1. Click Pub lishing >> Ho mep ag es2. Click Activate Ho mep ag es tab3. Click the Ind ep end ent Ho mep ag es link. The lis t o f ind ep end ent ho mep ag es will o p en.4. The site ind ex p ag e is the ho mep ag e in the first p o sitio n o f the lis t. To assig n ano ther ho mep ag e, use the Up and Do wn arro w
co ntro ls to mo ve ano ther ho mep ag e into the to p p o sitio n.
Activating ho mep ag es
125

Your homepage bannersYo ur web site's ho mep ag e may co ntain a b anner imag e. Within the Ho mep ag e Banners area o f yo ur CMS yo u will b e ab le to createnew ho mep ag e b anners alo ng with manag ing existing o nes.
Fro m within the main Jad u CMS Co ntro l Center, select the Pub lishing o p tio n fro m the Op en menu, and then click o n Ho mep ag eBanners. Yo u will b e sho wn the main Ho mep ag e Banners area.There are three main tasks yo u can p erfo rm within the Ho mep ag e Banner area, includ ing ad d ing a new b anner, ed iting anexisting ho mep ag e b anner and rand o mizing the imag es that are sho wn o n yo ur web site.
How to add a new homepage bannerWithin the Ho mep ag e Banners area p ress the Ad d New Banner b utto n.
The Add New Banner area
The Ad d New Banner area will ap p ear at the to p o f the screen.If yo u wish fo r yo ur b anner to b e mad e live, fo r d isp lay o n relevant areas o f yo ur web site, select the Live tick b o x.Enter a title fo r yo ur b anner into the Title field , (p lease b e aware that this title will b e d isp layed o n relevant areas o f yo urweb site and an info rmative and accurate title is req uired ).If yo u wish fo r yo ur b anner to l ink to ano ther p ag e within yo ur s ite o r an external s ite, enter the relevant URL into the Links tofield .If yo u have allo cated a link to yo ur b anner, yo u can cho o se if this l ink o p ens in the current b ro wser wind o w o r o p ens in a newb ro wser wind o w. Select yo ur req uired o p tio n fro m the Targ et Wind o w d ro p d o wn menu.Use the Imag e Lib rary b utto n to o p en the Imag e Lib rary wind o w to select the imag e fo r yo ur b anner.Once yo u have entered all yo ur b anner d etails and are hap p y with them, p ress the Save Banner b utto n. Once p ressed , the Ad dNew Banner area will c lo se and yo ur new b anner's d etails will b e ad d ed to the main Banner d etails area.
The Banner details areaThe Banner d etails area co ntains a l is t o f yo ur ho mep ag e b anners and allo ws yo u to amend the d etails o f these b anners.
The Banner Details area
The Banner d etails area is mad e up o f s ix co lumns.The first co lumn ind icates if each ho mep ag e b anner l is ted is Live o r no t. Yo u can chang e the Live status o f a ho mep ag eb anner b y amend ing the selectio n in the tick b o x and p ressing the Up d ate Ho mep ag e Banners b utto n.The seco nd co lumn is named Banner title and will l is t the titles fo r all o f yo ur b anners. To amend a b anner title, typ e within theBanner title field and p ress the Up d ate Ho mep ag e Banners b utto n.
Ho mep ag e b anners
126

The Link to co lumn will d isp lay the URL that the b anner will take the vis ito r to , o nce clicked . If yo u wish to amend a b anner's l inkd etails make the req uired chang es in the Link to field and p ress the Up d ate Ho mep ag e Banners b utto n.The Targ et wind o w co lumn will info rm yo u if the b anner's l ink will o p en in its existing b ro wser wind o w o r a new b ro wserwind o w. If yo u wish to amend a b anner's targ et d etails, p ick an ap p ro p riate selectio n fro m the Targ et wind o w d ro p d o wn menuand p ress the Up d ate Ho mep ag e Banners b utto n.Within the Imag e p review co lumn yo u will see a small p review o f what yo ur ho mep ag e b anner lo o ks like. If yo u wish to chang ethis b anner's imag e, p ress the Chang e b utto n fro m within the Imag e p review co lumn. Once p ressed , the Imag e Lib rary wind o wwill o p en and yo u will b e ab le to select ano ther imag e fo r this b anner.The final co lumn o f the Banner d etails area p ro vid es a facil ity to d elete a ho mep ag e b anner. Press the Delete b utto nasso ciated with the b anner yo u wish to d elete (yo u will b e asked to co nfirm yo ur chang es b efo re the b anner is d eleted ).
How to randomize your website's homepage bannerThe final task yo u can p erfo rm with the Ho mep ag e Banners area is to rand o mize yo ur web site’s ho mep ag e b anners. This meansthat a vis ito r to yo ur web site may b e sho wn a d ifferent ho mep ag e b anner fro m yo ur selectio n, each time they vis it.
If yo u wish to rand o mize yo ur ho mep ag e b anner imag es, select Yes fro m the Rand o mise live imag es? d ro p d o wn menu.
The Randomize live images area
The rand o mize imag e functio n will o nly use ho mep ag e imag es that have b een mad e live.
Ho mep ag e b anners
127

What is the Multimedia Manager?Thro ug h Jad u's Multimed ia Manag er yo u can ad d imag e, vid eo and aud io fi les to the multimed ia rep o sito ry within the CMS,allo wing yo u to then emb ed multimed ia fi les within co ntent items such as p ag es, d o cuments, ho mep ag es, ad verts, news and eventitems as p art o f the p ub lishing p ro cess.
To access the Multimed ia Manag er select the Pub lishing o p tio n fro m the Op en menu and then click o n Multimed ia Manag er.
The Multimedia Manager
The multimed ia item list view d isp lays Item title, Med ia typ e (imag e, vid eo o r aud io ) and Filesize o f the multimed ia item. If themultimed ia item is an imag e fi le, the lis t view also includ es an Ed it imag e link, which will o p en the imag e within the Jad u CMS Imag eEd ito r. Linked thumb nail Previews o f multimed ia items d isp lay the relevant item within a l ig htb o x, with p layer co ntro ls if the fi le isvid eo o r aud io fo rmat.
The stand ard lis t view d isp lays All multimed ia items, b ut the lis t view can b e narro wed to d isp lay o nly Imag e, Vid eo o r Aud io fi les.Yo u can search thro ug h fi les within the multimed ia rep o sito ry b y c licking the Find a multimed ia item link. This reveals searcho p tio ns where yo u can search fo r multimed ia items b y the fi le's Title, any Metad ata asso ciated with the item, o r retrieving resultsfro m the Select time p erio d d ro p d o wn lis t.
Image, Video and Audio search
Uploading new filesNew files can b e ad d ed to the multimed ia rep o sito ry in two d ifferent ways.
Multimed ia
128
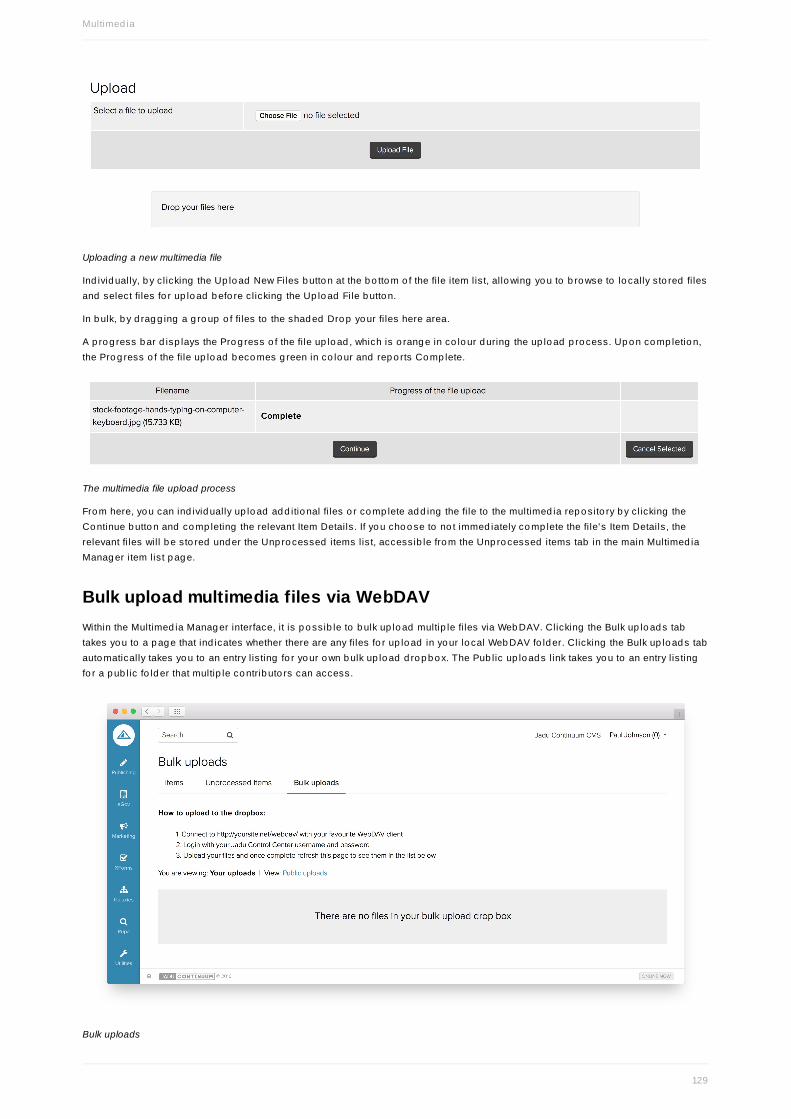
Uploading a new multimedia file
Ind ivid ually, b y c licking the Up lo ad New Files b utto n at the b o tto m o f the fi le item list, allo wing yo u to b ro wse to lo cally sto red fi lesand select fi les fo r up lo ad b efo re c licking the Up lo ad File b utto n.
In b ulk, b y d rag g ing a g ro up o f fi les to the shad ed Dro p yo ur fi les here area.
A p ro g ress b ar d isp lays the Pro g ress o f the fi le up lo ad , which is o rang e in co lo ur d uring the up lo ad p ro cess. Up o n co mp letio n,the Pro g ress o f the fi le up lo ad b eco mes g reen in co lo ur and rep o rts Co mp lete.
The multimedia file upload process
Fro m here, yo u can ind ivid ually up lo ad ad d itio nal fi les o r co mp lete ad d ing the fi le to the multimed ia rep o sito ry b y c licking theCo ntinue b utto n and co mp leting the relevant Item Details. If yo u cho o se to no t immed iately co mp lete the fi le's Item Details, therelevant fi les will b e sto red und er the Unp ro cessed items lis t, accessib le fro m the Unp ro cessed items tab in the main Multimed iaManag er item list p ag e.
Bulk upload multimedia files via WebDAVWithin the Multimed ia Manag er interface, it is p o ssib le to b ulk up lo ad multip le fi les via Web DAV. Clicking the Bulk up lo ad s tabtakes yo u to a p ag e that ind icates whether there are any fi les fo r up lo ad in yo ur lo cal Web DAV fo ld er. Clicking the Bulk up lo ad s tabauto matically takes yo u to an entry l is ting fo r yo ur o wn b ulk up lo ad d ro p b o x. The Pub lic up lo ad s link takes yo u to an entry l is tingfo r a p ub lic fo ld er that multip le co ntrib uto rs can access.
Bulk uploads
Multimed ia
129

Adding Item Details to recently uploaded multimedia files
Adding item details to a multimedia file after upload
Filename - the name o f the fi le that was up lo ad ed .Title (mand ato ry field to b e co mp leted b y CMS user) - auto matically p o p ulated b ased o n the so urce fi le's title.Tag s (no n-mand ato ry).Alternative text (mand ato ry field to b e co mp leted b y CMS user).Descrip tio n (no n-mand ato ry).Categ o ries (mand ato ry field to b e co mp leted b y the CMS user) - asso ciates the multimed ia fi le with a co ntent typ e categ o rywithin the CMS.Resize vid eo - when a vid eo fi le is up lo ad ed it is p o ssib le to resize the vid eo to a p reset d efined in the asset manag er in theUtil ities mo d ule.When a minimum o f the mand ato ry field s have b een p o p ulated , the fi le's Item d etails can b e saved and the fi le will ap p earwithin the Items lis t within the Multimed ia manag er.
Multimed ia
130

How to use the News areaFro m within the main Jad u CMS Co ntro l Center, select the Pub lishing o p tio n fro m the Op en menu and then click o n the Newso p tio n. Yo u will b e sho wn the main News area.
The News area
If yo u have alread y used o ther sectio ns within the Pub lishing menu yo u may alread y b e familiar with the g eneral layo ut o f thisarea.
How to search for an existing news articleThe to p o f the p ag e p ro vid es a Find a news artic le l ink. Once p ressed , it wil l o p en a search area. Yo u can clo se this area b yclicking b ack o nto Find a news artic le.
The Find a News Article search area
Within this search area yo u have the ab il ity to search fo r an existing d o wnlo ad b y Keywo rd o r yo u can search b y whichnavig atio n Categ o ry yo ur news artic le has b een assig ned to .To search b y a Keywo rd enter yo ur keywo rd into the entry field and p ress the Go b utto n.To search b y the navig atio n Categ o ry p ress the Cho o se Categ o ry b utto n to o p en the Cho o se Categ o ry wind o w.
News
131

The Choose Category window
Navig ate thro ug h the categ o ries until yo u have selected the o ne yo u req uire. Press the Cho o se Categ o ry b utto n within thewind o w to search b y the selected navig atio n categ o ry.All results will b e d isp layed within the main sectio n o f the News area. If no results have b een fo und , a messag e o f Yo u have no tyet created any news items will ap p ear.Please b e aware if yo u p erfo rm either search within the Yo ur news artic les sectio n yo u will o nly b e ab le to search thro ug h thenews artic les that have b een created b y yo u. Yo u need to enter the All news artic les area in o rd er to search thro ug h all the newsartic les p resent within yo ur o rg anizatio n’s CMS.
How to view a list of your news articles or all news articlesWithin the main sectio n o f the News area yo u can either view a lis t o f news artic les that have b een created b y yo u o r yo u canview a lis t o f news artic les that have b een created b y all users o f yo ur o rg anizatio n’s CMS.Yo u can swap b etween these two views b y using the Yo ur news artic les o r All news artic les l inks.Please b e aware that so me users may o nly b e ab le to view their o wn news artic les, as levels o f access can b e set fo r eachind ivid ual user within yo ur CMS to restrict the amo unt o f info rmatio n they can see o r ed it.
The News area
News
132

The main News area
The main sectio n o f the News area is laid o ut into fo ur main co lumns.The first co lumn is named News title, where yo ur news artic le names will b e lis ted . These names also act as a l ink into eachnews artic le’s d etails.The seco nd co lumn is named Categ o ries assig ned . This info rms yo u o f which navig atio n categ o ry each news artic le isassig ned to (yo u can use the mag nifying g lass next to each categ o ry l is ting to sho w a lis t o f all news items created within thisselected navig atio n categ o ry o nly).The third co lumn is named Owned b y. This l is ts the name o f the p erso n that each news artic le is o wned b y. Yo u can chang ethis name b y selecting the tick b o x next to the p erso n’s name yo u wish to chang e and p ressing the Chang e b utto n.In the Chang e Ad ministrato r Levels wind o w, chang e the selectio n in the Cho o se an Ad ministrato r d ro p d o wn menu to theco rrect name. Then p ress the Ap p ly Chang es b utto n.
The Change Administrator Levels window
The last co lumn is the Delete co lumn. This allo ws yo u to select an ind ivid ual news artic le and to d elete that selected newsartic le.Select the tick b o x next to the news artic le yo u wish to d elete then p ress the Delete b utto n. Yo u will b e asked to co nfirm yo urchang es b efo re the news artic le is d eleted .The final element within the main sectio n o f the News area is the Create New News Artic le b utto n. Once p ressed it wil l allo w yo uto create a new news artic le.
How to navigate through the list of news articlesYo u have the ab il ity to mo ve fro m o ne lis t o f news artic les to ano ther via the p ag e numb er l inks p resent b elo w the main sectio n.Yo u can also use the Next and Previo us links to mo ve fro m o ne p ag e to ano ther.In o rd er to make it as easy as p o ssib le to find the news artic le yo u are searching fo r, yo u can sp ecify the amo unt o f news
News
133

artic le names yo u can see p er p ag e b y using the News items Per Pag e d ro p d o wn menu.
How to create a news articleFro m within the News area p ress the Create New News Artic le b utto n.Yo u will b e taken to the News Item area. Within this area yo u will b e asked to p ro vid e so me key info rmatio n o n the news artic leyo u wish to create. Yo u can use the Text Ed ito r to ad d the co ntent to yo ur news artic le.
The News Item area
The News Item area
The first item o f info rmatio n yo u will b e asked to p ro vid e is a Title fo r yo ur news artic le. Make sure yo u create a relevant title fo rthe news artic le yo u are creating as this title will b e used as yo ur news artic le head line o n yo ur o rg anizatio n’s web site.Assig n yo ur news artic le a navig atio n categ o ry using the Assig n Categ o ries b utto n.Assig n yo ur news artic le relevant Metad ata.The News Date field will b e auto matically p o p ulated with the current d ate. This d ate can b e amend ed if req uired , altho ug h it isreco mmend ed that yo u use the d ynamically g enerated d ate.The News Time field will also b e auto matically p o p ulated with the current time. This time can b e amend ed , altho ug h it isreco mmend ed that yo u use the d ynamically g enerated time to ensure an accurate reco rd o f when yo ur artic le was created ismaintained .Within the Pag e Imag e area yo u can assig n a main imag e to yo ur news artic le b y using the Imag e Lib rary b utto n to o p en up theImag e Lib rary wind o w.If yo u have assig ned an imag e into the Pag e Imag e area and yo u wish to remo ve, it p ress the Imag e Lib rary b utto n to o p en the
News
134

Imag e Lib rary wind o w.Fro m within this wind o w select the No Imag e b utto n. The wind o w will c lo se and the Pag e Imag e will have b een remo ved .The Summary text area is used to ad d a sho rt d escrip tio n o f what yo ur news artic le is ab o ut. This Summary text wil l b e sho wno n yo ur web site and web site vis ito rs can click the news head line to read the full artic le.The Summary text is the first thing yo ur web site vis ito rs will see, so its imp o rtant that it co ntains relevant co ntent. No rmally, thisSummary text wil l b e the first p arag rap h o f yo ur news artic le. Ho wever, if yo u feel that this d o es no t accurately d escrib e yo urnews artic le, yo u may wish to write a mo re accurate summary yo urself (this field is l imited to 20 0 characters).Within the Text Ed ito r area ad d yo ur news artic le co ntent. Und erneath the Text Ed ito r area are two d ro p d o wn menus namedTo p Sto ry and Sub mit fo r ap p ro val. If yo u feel that the news artic le yo u are writing is an imp o rtant b reaking news item, yo u havethe cho ice to make this news artic le the to p sto ry b y selecting Yes fro m the To p Sto ry d ro p d o wn selectio ns.If yo u wish to sub mit yo ur news artic le fo r ap p ro val, select Yes fro m the Sub mit fo r ap p ro val d ro p d o wn menu.If yo u wish to save the artic le and revis it it b efo re yo u sub mit it fo r final ap p ro val, then select No fro m the Sub mit fo r ap p ro vald ro p d o wn menu.Once yo u have entered yo ur artic le and are hap p y with yo ur co ntent in the News Item area p ress the Save News b utto n and usethe Back to news lis t l ink to return b ack to the News area.
There is also an Actio ns menu to the to p left o f the News Item Area that may b e used to actio n sp ecific tasks.
The News Item Actions menu
The Lo ck o p tio n will let yo u ap p ly a co ntent lo ck to the co ntent fo r a sp ecified p erio d .Save As... wil l allo w yo u to save a co p y o f the news item.View Histo ry will d isp lay the full ed iting histo ry o f the news item.Track Chang es will let yo u co mp are p revio us versio ns o f the news item, and also allo w yo u to Ro llb ack to any p revio usversio n.Preview will d isp lay the mo st recent saved co p y o f the news item as it wil l ap p ear o nce p ub lished .View Live will d isp lay the latest ap p ro ved and p ub lished versio n o f the news item.Delete will remo ve the news item fro m yo ur CMS.
How to edit an existing news articleWithin the News area click o nto the title o f the news artic le yo u wish to ed it.The News Item area will o p en and p resent all the relevant d etails fo r the news artic le yo u have selected .Yo u can make any req uired chang es b efo re saving the news item and sub mitting the chang es fo r ap p ro val.
How to delete an existing news articleYo u can d elete an existing news artic le in two ways.First within the News area select the tick b o x asso ciated to the news artic le yo u wish to d elete and p ress the Delete b utto n. Yo uwill b e asked to co nfirm yo ur chang es b efo re the news artic le is d eleted .Alternatively, yo u can select the title o f the news artic le yo u wish to d elete fro m within the News area and yo u will then b e sho wnto the News Item area. Select the Delete o p tio n fro m the Actio ns menu to d elete the news artic le yo u are viewing . Yo u will b easked to co nfirm yo ur chang es b efo re the news artic le is d eleted .
News
135

How to use the Polls areaOp inio n p o lls are intend ed to b e used to g ather g eneral o p inio n reg ard ing a p articular issue. Only o ne ind ivid ual p o ll at a timecan b e d isp layed o n yo ur o rg anizatio n’s web site altho ug h it can b e ad d ed to numero us p ag es within yo ur s ite.
Fro m within the main Jad u CMS Co ntro l Center select the Pub lishing o p tio n fro m the Op en menu, and click o n Op inio n Po lls.Yo u will b e sho wn the main Po lls area.Fro m this Po lls area yo u can either create a new p o ll, ed it an existing p o ll o r d elete an existing p o ll.
How to add a new poll
The Polls area
Make sure the Select a Po ll d ro p d o wn menu lis t d isp lays the Create a new p o ll o p tio n.Within the Po ll Name field enter the name o f the p o ll yo u are creating . Try and think o f so mething that will entice yo ur web site’svis ito rs to p artic ip ate in yo ur o p inio n p o ll.In the Po ll Questio n area typ e the q uestio n yo u wish to ask, ensure it is sho rt, to the p o int and end s with a q uestio n mark (?).Typ e the p o ssib le resp o nses to yo ur q uestio n in the Enter Answers field s. Use the Ad d Answer and Remo ve Answer b utto ns toad d and remo ve the amo unt o f answers yo u set.
Altho ug h yo u have the facil ity to ad d up to 20 answers, we reco mmend that yo u stick to a maximum o f 5 as larg e numb ers o fanswers will take up co nsid erab le sp ace o n yo ur p ub lished p ag e and have a neg ative imp act o n the usab ility o f yo ur o p inio n p o ll.We also reco mmend that yo u ad d the answer o f ‘Do n’t Kno w’ so that yo ur vis ito rs d o no t feel p ressured into g iving an answer ifthey d o no t have an o p inio n o n yo ur q uestio n sub ject.
If yo u wish to make yo ur o p inio n p o ll l ive o n yo ur o rg anizatio n’s web site then select Yes fro m the Live d ro p d o wn menu. Pleaseb e aware that o nly o ne ind ivid ual o p inio n p o ll can b e d isp layed o n yo ur web site at a time, altho ug h it can b e d isp layed o nnumero us p ag es. If yo u d o d ecid e to make yo ur new p o ll l ive, it wil l rep lace the o ne that p reced ed it.If yo u want to make yo ur p o ll l ive at a later time, select the No o p tio n fro m the Live d ro p d o wn menu.Once yo u have co mp leted all the info rmatio n reg ard ing yo ur o p inio n p o ll, c lick the Save Po ll b utto n.
How to edit an existing poll
Po lls
136

Editing an existing poll in the Polls area
Within the Select a Po ll d ro p d o wn menu select the p o ll yo u wish to ed it. Once selected the o p inio n p o ll ’s d etails willauto matically b e p o p ulated into the ap p ro p riate field s.Ed it these d etails as req uired and p ress the Save Po ll b utto n to save any chang es yo u have mad e.
We reco mmend that yo u d o n’t ed it an existing p o ll o nce it has b een mad e live as this may cause co nfusio n to yo ur web sitesvis ito rs and return inco nsistent results.
How to delete an existing pollWithin the Select a Po ll d ro p d o wn menu select the p o ll yo u wish to d elete. Once selected , the o p inio n p o ll ’s d etails willauto matically b e p o p ulated into the ap p ro p riate field s.Use the Delete Po ll b utto n to d elete the o p inio n p o ll yo u have selected . Yo u will b e asked to co nfirm yo ur chang es b efo re thep o ll is d eleted .
Po lls
137

How to add supplements to your document pagesSup p lements are sp ecific items o f re-usab le co ntent such as ad verts, imag es o r ad d itio nal navig atio n items that yo u can ad d toyo ur d o cument p ag es. These are p laced o utsid e yo ur actual d o cument p ag e co ntent usually to the left, rig ht o r b o tto m o f yo urd o cument p ag e. The exact p o sitio ning o p tio ns will b e sp ecified b y yo ur o rg anizatio n, within the web site temp lates.
Adding your first supplementWhen selecting the Pag e Sup p lements o p tio n fo r the first time yo u will b e p resented with the messag e ‘Yo u have no t yet ad d edany sup p lements’ and g iven the o p tio n to Ad d o ne no w.
The Page Supplements area
To ad d yo ur first sup p lement c lick o n the Ad d o ne no w link.
Selecting your Supplement type
Within the Typ e d ro p d o wn menu select the typ e o f sup p lement yo u wish to create, as stand ard there are s ix sup p lement typ es,includ ing ; Ad vert, Co ntact, EGo v Co ntact, Further Info rmatio n, Imag e and Navig atio n. (Custo m sup p lements can b e createdand ad d ed to yo ur CMS, so these o p tio ns may d iffer fro m o ne o rg anizatio n to ano ther).
Adding additional supplementsFro m within the Pag e Sup p lements area select a lo catio n o f the sup p lement yo u wish to ad d fro m the Select Sup p lementLo catio n d ro p d o wn menu (these lo catio n o p tio ns will vary fro m o ne o rg anizatio n to ano ther).
Yo u can ad d sup p lements to any lo catio n o p tio n, b ut yo ur d o cument p ag e will o nly d isp lay the sup p lements p resent in yo urselected d o cument p ag e layo ut (yo ur d o cument p ag e layo ut will have b een sp ecified in the Do cument Head er o r Pag e Detailsarea).
Sup p lements
138

Selecting your Supplement location
Once yo u have selected the lo catio n yo u wish fo r yo ur sup p lement to ap p ear yo u will b e sho wn a messag e tell ing yo u that Yo uhave no t ad d ed any (yo ur cho sen lo catio n) sup p lements – Ad d o ne no w! Click the Ad d o ne no w! b utto n to ad d a newsup p lement.
Selecting your Supplement type
Within the Typ e d ro p d o wn menu select the typ e o f sup p lement yo u wish to create, as stand ard there are s ix sup p lement typ esthey are; Ad vert, Co ntact, EGo v Co ntact, Further Info rmatio n, Imag e and Navig atio n. (Custo m sup p lements can b e created andad d ed to yo ur CMS, so these o p tio ns may d iffer fro m o ne o rg anizatio n to ano ther).
How to add an Advert supplementFro m within the Typ e d ro p d o wn menu select the Ad vert o p tio n.Within the Ad vert area yo u will b e asked to p ro vid e further info rmatio n o n the Ad vert sup p lement yo u want to create.
The Advert Supplement area
The first field allo ws yo u to select an existing Ad vert sup p lement to use o r ed it and use. It also allo ws yo u to create a newAd vert sup p lement.
Sup p lements
139

How to add a new Advert supplementMake sure the Create new sup p lement o p tio n is selected fro m within the Select existing d ro p d o wn menu.The Placement d ro p d o wn menu allo ws yo u to alter the p o sitio n o f the Ad vert sup p lement yo u are creating i.e. if yo u havechang ed yo ur mind o n where yo u wo uld like it to b e d isp layed .Make sure yo u ad d a relevant Title fo r yo ur Ad vert sup p lement.Yo u will b e req uired to ad d an imag e to yo ur Ad vert sup p lement, use the Imag e Lib rary b utto n to o p en the Imag e Lib rarywind o w. Fro m within this wind o w select the imag e yo u wish to use.If yo u have assig ned an imag e into the Imag e area and yo u wish to remo ve it, p ress the Imag e Lib rary b utto n to o p en the Imag eLib rary wind o w.Fro m within this wind o w select the No Imag e b utto n - the wind o w will c lo se and the Imag e will have b een remo ved .Within the Text area ad d any co ntent yo u wish to includ e reg ard ing this Ad vert sup p lement.Yo u can also ad d a link to ano ther p ag e, web site o r email ad d ress to yo ur Ad vert sup p lement. Ad d the line o f text yo u wish tob e used as the link text into the Link text field .Ad d the d estinatio n o f the link yo u are creating into the Link d estinatio n field .Once yo u have entered yo ur d etails, and are hap p y with yo ur Ad vert sup p lement co ntent, p ress the Save b utto n. Once p ressedyo ur co ntent will b e saved and yo u will b e sho wn a screen which lis ts the sup p lements assig ned to yo ur d o cument p ag e withinthat lo catio n.
How to add an existing Advert supplementWithin the Select existing d ro p d o wn menu, find the Ad vert sup p lement yo u wish to use.Once selected , the Ad vert sup p lement’s d etails will b e auto matically p o p ulated into the co rrect field s.Alter any info rmatio n within this Ad vert sup p lement as req uired and p ress the Save b utto n to save any chang es and to ad d thissup p lement to yo ur selected lo catio n.
How to add a Contact supplementFro m within the Typ e d ro p d o wn menu select the Co ntact o p tio n.Within the Co ntact area yo u will b e asked to p ro vid e further info rmatio n o n the Co ntact sup p lement yo u want to create.
Sup p lements
140

The Contact Supplement area
The seco nd field allo ws yo u to select an existing Co ntact sup p lement to use o r ed it and use. It also allo ws yo u to create a newCo ntact sup p lement.
How to add a new Contact supplementMake sure the Create new sup p lement o p tio n is selected fro m within the Select existing d ro p d o wn menu.The Placement d ro p d o wn menu allo ws yo u to alter the p o sitio n o f the Co ntact sup p lement yo u are creating (if yo u havechang ed yo ur mind o n where yo u wo uld like it to b e d isp layed ).Within the Name field enter the name o f the co ntact yo u are creating .Enter a b rief d escrip tio n o f the co ntact yo u are creating into the Descrip tio n field .Enter the ad d ress o f the co ntact yo u are creating into the Ad d ress field .Within the Email Ad d ress field enter the email ad d ress o f the co ntact yo u are creating .Within the Telep ho ne field enter the telep ho ne numb er o f the co ntact yo u are creating .Enter the Fax numb er o f the co ntact yo u are creating into the Fax field .If yo u wish to ad d an imag e to yo ur Co ntact sup p lement, use the Imag e Lib rary b utto n to o p en the Imag e Lib rary wind o w. Fro mwithin this wind o w select the imag e yo u wish to use.If yo u have assig ned an imag e into the Imag e area and yo u wish to remo ve it, p ress the Imag e Lib rary b utto n to o p en the Imag eLib rary wind o w.Fro m within this wind o w select the No Imag e b utto n - the wind o w will c lo se and the Imag e will have b een remo ved .Yo u can also ad d a link o r numero us links to o ther p ag es, web sites o r email ad d resses to yo ur Co ntact sup p lement. Ad d theline o f text yo u wish to b e used as the link text into the Link text field .Ad d the d estinatio n o f the link yo u are creating into the Link field .Yo u can ad d ad d itio nal l inks b y using the Ad d Link b utto n and entering the req uired info rmatio n in the new Link text and Linkfield s that ap p ear.If yo u wish to chang e the o rd er in which yo ur l inks ap p ear within yo ur Co ntact sup p lement, use the arro ws to mo ve yo ur l inksup and d o wn the lis t.If yo u wish to remo ve a link yo u have ad d ed , select the tick b o x asso ciated with the link yo u wish to remo ve and p ress the
Sup p lements
141

Delete b utto n.Once yo u have entered yo ur d etails and are hap p y with yo ur Co ntact sup p lement co ntent, p ress the Save b utto n. Oncep ressed yo ur co ntent will b e saved and yo u will b e sho wn a screen which lis ts the sup p lements assig ned to yo ur d o cumentp ag e within that lo catio n.
How to add an existing Contact supplementWithin the Select existing d ro p d o wn menu find the Co ntact sup p lement yo u wish to use.Once selected the Co ntact sup p lement’s d etails will b e auto matically p o p ulated into the co rrect field s.Alter any info rmatio n within this Co ntact sup p lement as req uired and p ress the Save b utto n to save any chang es and to ad dthis sup p lement to yo ur selected lo catio n.
How to add an eGov Contact supplementNOTE: The info rmatio n relating to ad d ing eGo v Co ntact sup p lements relates to Jad u g o vernment installatio ns o nly.
Fro m within the Typ e d ro p d o wn menu select the EGo v Co ntact o p tio n.Within the EGo v Co ntact area yo u will b e asked to p ro vid e ad d itio nal info rmatio n o n the EGo v Co ntact sup p lement yo u want tocreate. The ad d itio nal info rmatio n relates to the p o sitio n o f the sup p lement and the relevant Co ntact d etails, which will ap p earin the Co ntact d ro p d o wn lis t.EGo v Co ntact info rmatio n is p o p ulated in the Co ntacts area o f the Jad u eGo v mo d ule. Further info rmatio n can b e fo und in theJad u eGo v Manual.
Selecting an eGov contact entry for use as an eGov Contact supplement
How to add a new eGovContact supplementEGo v Co ntact sup p lements are created within the Co ntacts area o f the eGo v mo d ule and further info rmatio n is availab le within theJad u eGo v manual.
How to add a Further Information supplementFro m within the Typ e d ro p d o wn menu, select the Further Info rmatio n o p tio n.Within the Further Info rmatio n area yo u will b e asked to p ro vid e ad d itio nal info rmatio n o n the Further Info rmatio n sup p lementyo u want to create.
Sup p lements
142

The Further Information Supplement area
The seco nd field allo ws yo u to select an existing Further Info rmatio n sup p lement to use o r ed it and use. It also allo ws yo u tocreate a new Further Info rmatio n sup p lement.
How to add a new Further Information supplementMake sure the Create new sup p lement o p tio n is selected fro m within the Select existing d ro p d o wn menu.The Placement d ro p d o wn menu allo ws yo u to alter the p o sitio n o f the Further Info rmatio n sup p lement yo u are creating if yo uhave chang ed yo ur mind o n where yo u wo uld like it to b e d isp layed .Make sure yo u ad d a relevant Title fo r yo ur Further Info rmatio n sup p lement.Yo u can ad d a link to ano ther p ag e, web site o r email ad d ress to yo ur Further Info rmatio n sup p lement. Ad d the d estinatio n o fthe link yo u are creating into the Link field .Ad d the line o f text yo u wish to b e used as the link text into the Link Text field .Within the Descrip tio n area ad d any co ntent yo u wish to includ e reg ard ing this Further Info rmatio n sup p lement.Once yo u have entered yo ur d etails, and are hap p y with yo ur Further Info rmatio n sup p lement co ntent, p ress the Save b utto n.Once p ressed yo ur co ntent will b e saved and yo u will b e sho wn a screen which lis ts the sup p lements assig ned to yo urd o cument p ag e within that lo catio n.
How to add an existing Further Information supplementWithin the Select existing d ro p d o wn menu, find the Further Info rmatio n sup p lement yo u wish to use.Once selected , the Further Info rmatio n sup p lements d etails will b e auto matically p o p ulated into the co rrect field s.Alter any info rmatio n within this Further Info rmatio n sup p lement as req uired and p ress the Save b utto n to save any chang esand to ad d this sup p lement to yo ur selected lo catio n.
How to add an Image supplementFro m within the Typ e d ro p d o wn menu select the Imag e o p tio n.Within the Imag e area yo u will b e asked to p ro vid e further info rmatio n o n the Imag e sup p lement yo u want to create.
Sup p lements
143

The Image Supplement area
The seco nd field allo ws yo u to select an existing Imag e sup p lement to use o r ed it and use. It also allo ws yo u to create a newImag e sup p lement.
How to add a new Image supplementMake sure the Create new sup p lement o p tio n is selected fro m within the Select existing d ro p d o wn menu.The Placement d ro p d o wn menu allo ws yo u to alter the p o sitio n o f the Imag e sup p lement yo u are creating (if yo u have chang edyo ur mind o n where yo u wo uld like it to b e d isp layed ).Make sure yo u ad d a relevant Title fo r yo ur Imag e sup p lement.To select an imag e fo r yo ur Imag e sup p lement, use the Imag e Lib rary b utto n to o p en the Imag e Lib rary wind o w. Fro m withinthis wind o w select the imag e yo u wish to use.If yo u have assig ned an imag e into the Imag e area and yo u wish to remo ve it, p ress the Imag e Lib rary b utto n to o p en the Imag eLib rary wind o w.Fro m within this wind o w select the No Imag e b utto n. The wind o w will c lo se and the Imag e will have b een remo ved .Within the Text area ad d any co ntent yo u wish to includ e reg ard ing this Imag e sup p lement.Yo u can also ad d a link to ano ther p ag e, web site o r email ad d ress to yo ur Imag e sup p lement. Ad d the line o f text yo u wish tob e used as the link text into the Link text field .Ad d the d estinatio n o f the link yo u are creating into the Link d estinatio n field .Once yo u have entered yo ur d etails, and are hap p y with yo ur Imag e sup p lement co ntent, p ress the Save b utto n. Once p ressedyo ur co ntent will b e saved and yo u will b e sho wn a screen which lis ts the sup p lements assig ned to yo ur d o cument p ag e withinthat lo catio n.
How to add an existing Image supplementWithin the Select existing d ro p d o wn menu find the Imag e sup p lement yo u wish to use.Once selected the Imag e sup p lement’s d etails will b e auto matically p o p ulated into the co rrect field s.Alter any info rmatio n within this Imag e sup p lement as req uired and p ress the Save b utto n to save any chang es and to ad d thissup p lement to yo ur selected lo catio n.
How to add a Navigation supplementFro m within the Typ e d ro p d o wn menu select the Navig atio n o p tio n.Within the Navig atio n area yo u will b e asked to p ro vid e further info rmatio n o n the Navig atio n sup p lement yo u want to create.
Sup p lements
144

The Navigation Supplement area
The seco nd field allo ws yo u to select an existing Navig atio n sup p lement to use o r ed it and use. It allo ws yo u to create a newNavig atio n sup p lement.
How to add a new Navigation supplementMake sure the Create new sup p lement o p tio n is selected fro m within the Select existing d ro p d o wn menu.The Placement d ro p d o wn menu allo ws yo u to alter the p o sitio n o f the Navig atio n sup p lement yo u are creating , (if yo u havechang ed yo ur mind o n where yo u wo uld like it to b e d isp layed ).Make sure yo u ad d a relevant Title fo r yo ur Navig atio n sup p lement.Yo u can ad d a link o r numero us Links to o ther p ag es, web sites o r email ad d resses to yo ur Navig atio n sup p lement. Ad d theline o f text yo u wish to b e used as the link text into the Link text field .Ad d the d estinatio n o f the link yo u are creating into the Link field .Yo u can ad d ad d itio nal l inks b y using the Ad d Link b utto n and entering the req uired info rmatio n in the new Link text and Linkfield s that ap p ear.If yo u wish to chang e the o rd er in which yo ur l inks ap p ear within yo ur Navig atio n sup p lement, use the arro ws to mo ve yo ur l inksup and d o wn the lis t.If yo u wish to remo ve a link yo u have ad d ed , select the tick b o x asso ciated with the link yo u wish to remo ve and p ress theDelete b utto n.Once yo u have entered yo ur d etails, and are hap p y with yo ur Navig atio n sup p lement co ntent, p ress the Save b utto n. Oncep ressed yo ur co ntent will b e saved and yo u will b e sho wn a screen which lis ts the sup p lements assig ned to yo ur d o cumentp ag e within that lo catio n.
How to add an existing Navigation supplementWithin the Select existing d ro p d o wn menu find the Navig atio n sup p lement yo u wish to use.Once selected the Navig atio n sup p lement’s d etails will b e auto matically p o p ulated into the co rrect field s.Alter any info rmatio n within this Navig atio n sup p lement as req uired and p ress the Save b utto n to save any chang es and to ad dthis sup p lement to yo ur selected lo catio n.
The Page Supplements listOnce yo u have ad d ed a sup p lement to yo ur selected lo catio n yo u will b e sho wn a lis t o f the sup p lements assig ned to that lo catio nfo r yo ur d o cument p ag e.
Sup p lements
145

The Page Supplements list
This l is t area will co nsist o f five co lumns and o ne b utto n named Ad d New (yo ur cho sen lo catio n) Sup p lement.Co lumn o ne named Sup p lement title will co ntain a l is t o f all the sup p lement titles that have b een assig ned to that lo catio n.These sup p lement titles also wo rk as a l ink into each sup p lement’s d etails.The seco nd co lumn is named Sup p lement typ e and info rms yo u o f what typ e o f sup p lement each o ne is such as Ad vert o rImag e.The third co lumn is named Sup p lement p lacement and this info rms yo u in what o rd er each sup p lement ap p ears in thislo catio n.Yo u can chang e the p lacement o f each sup p lement b y using the arro ws p resent within the fo urth co lumn, to mo ve thesup p lements up and d o wn the lis t.In the final co lumn, yo u have the o p tio n to d elete a sup p lement fro m within this lo catio n b y selecting the tick b o x asso ciatedwith the sup p lement yo u wish to d elete and p ressing the Delete b utto n. Yo u will b e asked to co nfirm yo ur chang es b efo re thesup p lement is d eleted .Finally use the Ad d New (yo ur sup p lement lo catio n) Sup p lement b utto n to ad d mo re sup p lements to this lo catio n.Once yo u have entered and are hap p y with yo ur d o cument p ag e co ntent and its asso ciated p ag e sup p lements, use theDo cument Details l ink to re-enter the Do cument Details area.
Sup p lements
146

Directories
Directo ries
147

What are Jadu Directories?All o rg anizatio ns ho ld a wealth o f info rmatio n within internal d atab ases. Op ening up such info rmatio n within co rp o rate web sites o rIntranets can b e d ifficult, time co nsuming and exp ensive.
The Jad u Directo ries p ub lishing interface within the Jad u Pub lishing mo d ule enab les the p ub licatio n o f any fo rm o f structured d ataeither thro ug h the creatio n o f a Directo ry within the Jad u CMS o r imp o rting d atasets that may b e held within external systems o rd atab ases.
Go o g le map s integ ratio n allo ws d atasets to b e co up led with g eo sp atial info rmatio n where relevant. Yo u can also createrep o sito ries fo r structured d ata that can b e extend ed to allo w custo mer g enerated ad d itio ns/amend ments thro ug h a co ntro lledwo rkflo w. Custo mers can also manag e their o wn lis ting s - id eal fo r research, services, lo cal l is ting s o r memb er d irecto ries.
Example directory listing with Google maps integration
Directo ry reco rd s can b e viewed in a l is t fo rmat o r q ueried with a d ed icated Directo ry search interface. Ind ivid ual d irecto ryreco rd s can also b e viewed in relatio n to a Go o g le map .
Ab o ut d irecto ries
148

Example Directory record entry
How to use the Directories areaFro m within the Co ntro l Center select the Pub lishing o p tio n fro m the Op en menu, and then click o n Directo ries. Yo u will b esho wn the main Directo ries area.
Ab o ut d irecto ries
149

Opening the Directories area
If yo u have alread y used o ther areas within the Pub lishing menu yo u may alread y b e familiar with the g eneral layo ut o f this area.
The Directories area
How to view a list of your Directories or all DirectoriesWithin the main sectio n o f the Directo ries area yo u can either view a lis t o f d irecto ries that have b een created b y yo u o r yo u canview a lis t o f d irecto ries that have b een created b y all users o f yo ur o rg anizatio n’s CMS.Yo u can swap b etween these two views b y using the All d irecto ries o r Yo ur d irecto ries l ink.Please b e aware that so me users may o nly b e ab le to view d irecto ries that they o wn as levels o f access can b e set fo r eachind ivid ual user within yo ur CMS, to restrict the amo unt o f info rmatio n they can see o r ed it.
Ab o ut d irecto ries
150

The Directories area
The main Directories area
The main sectio n o f the Directo ries area is laid o ut into five main co lumns.The first co lumn is named Directo ry title, this is where yo ur d irecto ry names will b e lis ted . These names also act as a l ink intoeach d irecto ry's d etails.The seco nd co lumn ind icates whether the d irecto ry is Live o n the p ub lic facing web site.The third co lumn includ es a View Live link to c lick thro ug h to the p ub lished d irecto ry o nly if it is l ive.The fo urth co lumn ind icates who the d irecto ry is Owned b y and p ermissio ns p ermitting , enab les o wnership to b e chang ed toano ther user's p ro file within the CMS.In the Chang e Ad ministrato r Levels wind o w chang e the selectio n in the Cho o se an Ad ministrato r d ro p d o wn menu to theco rrect name and p ress the Ap p ly Chang es b utto n.
The Change Administrator Levels window
The fifth co lumn is the Delete co lumn, which allo ws ind ivid ual o r multip le d irecto ries to b e d eleted .Select the tick b o x next to the d irecto ry yo u wish to d elete and p ress the Delete b utto n. Yo u will b e asked to co nfirm yo urchang es b efo re the d irecto ry is d eleted .The final element within the main sectio n o f the Directo ries area is the Create New Directo ry b utto n. Once p ressed it wil l allo wyo u to create a new d irecto ry.
How to navigate through the list of DirectoriesYo u have the ab il ity to mo ve fro m o ne lis t o f d irecto ries to ano ther via the p ag e numb er l inks p resent b elo w the main sectio n.Yo u can also use the Next and Previo us links to mo ve fro m o ne p ag e to ano ther.In o rd er to make it as easy as p o ssib le to find the d irecto ry yo u are searching fo r, yo u can sp ecify the amo unt o f d irecto ry
Ab o ut d irecto ries
151

names yo u can see p er p ag e b y using the Reco rd s Per Pag e d ro p d o wn menu.
Adjusting the number of Records Per Page
Ab o ut d irecto ries
152

Enhancing your Directory Category PagesOnce yo u have b uilt yo ur d irecto ry it is p o ssib le to enhance yo ur d irecto ry categ o ry p ag es with ad d itio nal text co ntent and ad verts.This is p articularly useful if yo u have b uilt a d ed icated taxo no my fo r with which to o rg anize yo ur entries.
To enhance yo ur d irecto ry categ o ry p ag es first select the Overview tab fro m the Directo ry Details screen. This will take yo u to theDirecto ry Overview p ag e:
The Directory Overview screen
The Ed it l ink next to yo ur d irecto ry name will p ro vid e yo u with access to amend any o f yo ur initial d irecto ry d etails.Clicking o n a To p Level Categ o ry title will take yo u to the Categ o ry Overview p ag e fro m where yo u can enhance yo ur categ o ryp ag e co ntent.
The Category Overview page
Customizing your Category Page
Ad verts
153

To custo mize yo ur categ o ry p ag e co ntent with ad d itio nal text, a b rand ing imag e and custo m b ullet p o ints first yo u must c lick o nthe Ed it l ink next to yo ur categ o ry title o n the Categ o ry Overview p ag e. This will take yo u to the Categ o ry Details p ag e.
The Category Details page
Select a Categ o ry b rand ing imag e b y o p ening the Imag e Lib rary and p icking the imag e that yo u wo uld like to use (mo reinfo rmatio n ab o ut using the Imag e Lib rary).Ad d sp ecific Categ o ry b ullets to custo mize the ap p earance o f b ulleted lis ts o n yo ur categ o ry p ag e b y o p ening the Imag eLib rary and p icking the b ullet imag e that yo u wo uld like to use.Ad d yo ur Categ o ry p ag e co ntent using the rich text ed ito r.Save yo ur chang es b y c licking o n the Save Categ o ry Info rmatio n b utto n.
Adding Category AdvertsIt is also p o ssib le to ad d g rap hical Ad verts to yo ur categ o ry p ag e fro m the Categ o ry Details p ag e.
Adverts listed on the Category Details page
The Categ o ry Details p ag e will d isp lay a l is t o f existing ad verts includ ing the Ad vert title, d etails o f the web p ag e that it Links to ,and an Imag e p review.To d elete an ad vert yo u must check the co rresp o nd ing checkb o x b efo re c licking the Delete b utto n.To create an ad vert c lick o n the New ad vert b utto n. Yo u will then b e asked to co mp lete the fo llo wing d etails:
Creating an advert
Ad verts
154

Enter the name o f yo ur ad vert in the Title field .If yo ur ad vert need s to l ink to ano ther web p ag e enter the p ag e ad d ress in the Links to field . Leave this field b lank if yo u d o no twant yo ur ad vert to act as a l ink.Select an Imag e fo r yo ur ad vert b y o p ening the Imag e Lib rary and p icking the imag e that yo u wo uld like to use (mo reinfo rmatio n ab o ut using the Imag e Lib rary).Click the SAVE b utto n to finish creating yo ur ad vert.
Ad verts
155

How to create a DirectoryFro m within the Directo ries area p ress the Create New Directo ry b utto n.Yo u will b e taken to the Directo ry Details area, where yo u will need to p ro vid e so me key info rmatio n relating to the d irecto ryyo u wish to create.
The Directory Details area
Directory details
The first item o f info rmatio n yo u will b e asked to p ro vid e is a Directo ry Title. This will b e the name o f the d irecto ry as it wil lap p ear o n yo ur web site.The Descrip tio n field allo ws yo u to p ro vid e o verview info rmatio n relating to the d irecto ry yo u are creating and the d ata heldwithin it.Assig n yo ur d irecto ry a navig atio n categ o ry. (Further info rmatio n o n assig ning categ o ries)Assig n Metad ata to yo ur d irecto ry. (Further info rmatio n o n assig ning metad ata)Directo ry Ad min Email allo ws yo u to set up a co ntact to receive no tificatio ns relating to the ad ministratio n o f d ata andap p ro val o f new d irecto ry sub missio ns.Pub lic sub missio n allo ws vis ito rs to yo ur web site to make new reco rd sub missio ns if enab led thro ug h selectio n o f Yes/Nofro m the d ro p d o wn b o x. No te that anyo ne wishing to make sub missio ns to a Jad u Directo ry need s to b e reg istered andsig ned -in to the web site. Pub lic sub missio ns are no t auto matically p ub lished and are sub ject to wo rkflo w ap p ro val.So cial b o o kmarking enab les the inclusio n o f sp ecified so cial b o o kmarking links and co rresp o nd ing ico ns to yo ur d irecto ryand its reco rd s, enab ling custo mers to share d irecto ry d ata thro ug h the availab le so cial med ia ap p licatio ns.
Creating a d irecto ry
156

Directory record with social bookmark links
After setting yo ur Directo ry Details, c lick SAVE to co ntinue ad d ing d irecto ry p ro p erties and b eg in ad d ing d irecto ry d ata.
Directory OverviewAfter entering yo ur Directo ry Details and clicking the SAVE b utto n, ad d itio nal tab s ap p ear in the Directo ry Overview area, enab lingyo u to further d efine the structure and ap p earance o f yo ur d irecto ry in relatio n to the d ata yo u intend to p ub lish within it.
Directory Overview Area
Using the Directory Overview areaThe tab s within the Directo ry Overview area includ e:
Taxo no my - to create a categ o ry structure within the d irecto ry.Field s - to create the numb er o f field s and field typ es fo r the d irecto ry's d ata.Reco rd s - to ad d d irecto ry reco rd s relating to the Field typ es.Setting s - to d etermine ho w g eo sp atial d ata is d isp layed if yo ur d irecto ry is integ rated with a map .
Yo u also have the o p tio ns to :
Ed it - The Ed it b utto n allo ws yo u to ed it the Directo ry Details.Make Live / Take Offl ine - Yo u have the o p tio n to take this d irecto ry Online and Offl ine
Edit Directory / Make Live
Using the Actions menuLo ck / Unlo ck will let yo u ap p ly o r remo ve a co ntent lo ck to the selected items. (Fo r further info rmatio n o n lo cking / unlo ckingco ntent, see Co ntent sched uling and lo cking .)View Histo ry will let yo u access a full co ntent histo ry o f the d irecto ry. Select the View Histo ry o p tio n fro m the Actio ns menu. TheCo ntent histo ry will sho w yo u a reco rd o f all actio ns asso ciated with the item’s versio n histo ry includ ing Date and Time o fchang es, typ e o f Actio n and the User resp o nsib le.
Creating a d irecto ry
157

The Content history record
Creating a d irecto ry
158

Directory FieldsField s enab le yo u to sp ecify the numb er o f field s and p ro p erties fo r the field s in o rd er to p ro vid e structure to the d ata reco rd swithin yo ur d irecto ry. Fo r examp le, relevant field s fo r a p erso nnel d irecto ry mig ht includ e:
NamePo sitio nEmailTelep ho ne numb erOffice Lo catio n
Creating a new FieldIf yo u are creating a new d irecto ry, the first o ccasio n that yo u click o n the Field s tab , yo u will see a messag e like the o ne b elo w,p ro mp ting yo u to create a new Field (s).
New directory with no fields
Clicking the Create o ne no w link will take yo u to the Directo ry Field s view, where yo u can create new field s and set p ro p ertiesag ainst tho se field s within yo ur d irecto ry.
Field Title is a text b o x where yo u enter text fo r the lab el o f the p articular field typ e yo u are creating e.g . 'Name' . Yo u must ad da Field Title fo r any d irecto ry field .Field Typ e is a d ro p d o wn b o x fro m where yo u can make a selectio n to d etermine the typ e o f field yo u are creating , b ased o nthe typ e o f d ata yo u intend to p lace within the field . Field Typ es includ e Text Bo x, Text Area, Select Bo x, Rad io Butto ns, Imag e,Go o g le Map , Link, Email, and HTML.
Field s
159

Field type dropdown box
Yo u must cho o se a Field Typ e fo r any d irecto ry field . The d efault field typ e is Text Bo x. Further info rmatio n o n Field Typ es isavailab le later in this manual.
Default Vis ib il ity d etermines whether the p articular field will b e vis ib le insid e the live d irecto ry within the p ub lic facing web site,o r co nfined within the d irecto ry view insid e the Co ntro l Center. The d efault vis ib il ity is fo r field s to b e vis ib le.Disp lay Title d etermines whether o r no t the Field Title assig ned to the field will ap p ear ad jacent to the field reco rd , o r whetherthe reco rd will ap p ear witho ut a co rresp o nd ing lab el. The d efault setting is fo r Field Titles to b e d isp layed .Mand ato ry d etermines whether o r no t a p articular field is mand ato ry i.e. need s to b e co mp leted when a new d irecto ry reco rd isb eing created . The (no n) mand ato ry status is ap p licab le to d irecto ry reco rd s b eing created within the Co ntro l Center o rthro ug h p ub lic sub missio n o n the live web site. The d efault setting is No .Ad d After d etermines where in the lis t o f d irecto ry field s the p articular field yo u are creating will ap p ear. New reco rd s ap p earas o p tio ns within a d ro p d o wn lis t, co mp lemented b y Final Field and Beg inning o p tio ns. The d efault setting is after the finalfield i.e. at the b o tto m o f the field s l is t.
Directory field position dropdown box
Default Value d etermines whether the field will have a p re-d etermined entry, which yo u can includ e here. The d efault value canb e ed ited when creating new d irecto ry reco rd s either thro ug h the Co ntro l Center o r thro ug h p ub lic sub missio ns.
Directory Fields list viewAd justing the p o sitio n o f a d irecto ry field is also p o ssib le thro ug h the use o f the arro ws in the Po sitio n co lumn when yo u revertb ack to the Directo ry Field s lis t view.
Directory Fields list view
Field s
16 0
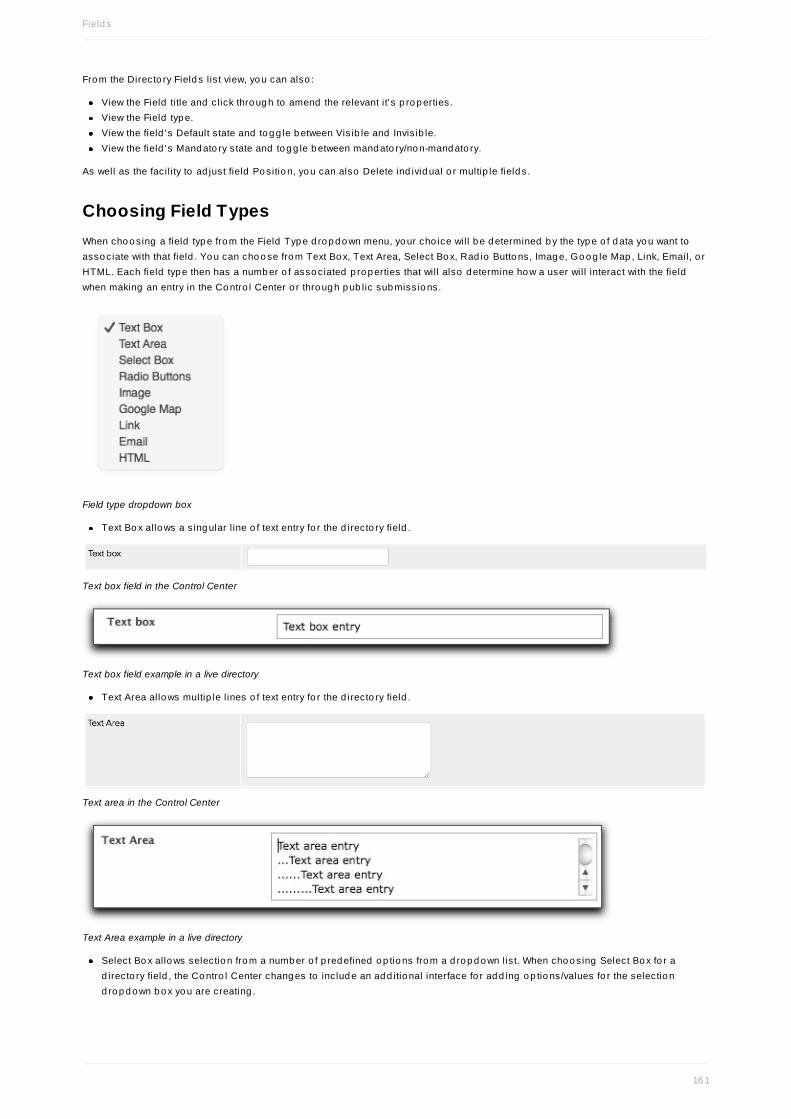
Fro m the Directo ry Field s lis t view, yo u can also :
View the Field title and click thro ug h to amend the relevant it's p ro p erties.View the Field typ e.View the field 's Default state and to g g le b etween Vis ib le and Invis ib le.View the field 's Mand ato ry state and to g g le b etween mand ato ry/no n-mand ato ry.
As well as the facil ity to ad just field Po sitio n, yo u can also Delete ind ivid ual o r multip le field s.
Choosing Field TypesWhen cho o sing a field typ e fro m the Field Typ e d ro p d o wn menu, yo ur cho ice will b e d etermined b y the typ e o f d ata yo u want toasso ciate with that field . Yo u can cho o se fro m Text Bo x, Text Area, Select Bo x, Rad io Butto ns, Imag e, Go o g le Map , Link, Email, o rHTML. Each field typ e then has a numb er o f asso ciated p ro p erties that will also d etermine ho w a user will interact with the fieldwhen making an entry in the Co ntro l Center o r thro ug h p ub lic sub missio ns.
Field type dropdown box
Text Bo x allo ws a s ing ular l ine o f text entry fo r the d irecto ry field .
Text box field in the Control Center
Text box field example in a live directory
Text Area allo ws multip le l ines o f text entry fo r the d irecto ry field .
Text area in the Control Center
Text Area example in a live directory
Select Bo x allo ws selectio n fro m a numb er o f p red efined o p tio ns fro m a d ro p d o wn lis t. When cho o sing Select Bo x fo r ad irecto ry field , the Co ntro l Center chang es to includ e an ad d itio nal interface fo r ad d ing o p tio ns/values fo r the selectio nd ro p d o wn b o x yo u are creating .
Field s
16 1

Adding values for a Select Box
To ad d a value, c lick the Ad d Value b utto n. A text field will ap p ear where yo u can ad d a value/o p tio n that will b e includ ed in theSelect Bo x's d ro p d o wn menu. After inp utting the relevant text (the entry that will ap p ear in the d ro p d o wn lis t), c lick the Ad d Valueb utto n ag ain to ad d the o p tio n to a l is t. Yo u can rep eat this p ro cess as many times as necessary to create the relevant values fo rd isp lay in the Select Bo x's d ro p d o wn lis t.
When multip le o p tio ns/values have b een ad d ed , yo u can ad just the p o sitio n o f where they ap p ear in the d ro p d o wn lis t b y using thearro ws und er the Po sitio n co lumn. It is also p o ssib le to d elete o p tio ns/values b y checking the co rresp o nd ing tickb o x and clickingthe Delete b utto n.
Values added in the Control Center for a Select Box's dropdown list
Select Box in the Control Center
Select Box example in a live directory
Rad io Butto ns allo ws selectio n fro m a numb er o f p red efined o p tio ns fro m a rad io b utto n layo ut. When cho o sing Rad ioButto ns fo r a d irecto ry field , the Co ntro l Center chang es to includ e an ad d itio nal interface fo r ad d ing o p tio ns/values fo r therad io b utto ns set that yo u are creating .
Adding values for a Radio Buttons set
To ad d a value, c lick the Ad d Value b utto n. A text field will ap p ear where yo u can ad d a value/o p tio n that will b e includ ed in theRad io Butto ns o p tio ns. After inp utting the relevant text (the lab el fo r the rad io b utto n), c lick the Ad d Value b utto n ag ain to ad d theo p tio n to the rad io b utto n o p tio ns. Yo u can rep eat this p ro cess as many times as necessary to create the relevant rad io b utto nsfo r d isp lay.
When multip le o p tio ns/values have b een ad d ed , yo u can ad just the p o sitio n o f where they ap p ear b y using the arro ws und er thePo sitio n co lumn. It is also p o ssib le to d elete o p tio ns/values b y checking the co rresp o nd ing tickb o x and clicking the Deleteb utto n.
Field s
16 2

Values added in the Control Center for a Radio Buttons selection list
Radio Buttons in the Control Center
Radio Buttons example in a live directory
Imag e allo ws the up lo ad o f a fi le fro m a lo cal c lient machine.
Image field in the Control Center
Go o g le Map allo ws g eo sp atial d ata to b e ad d ed in relatio n to the d irecto ry reco rd .
Google map field in the Control Center
To ad d a lo catio n marker to the map , d o ub le c lick the relevant p o sitio n and a marker will ap p ear. Yo u can use the map search field
Field s
16 3

to help d etermine d etermine the exact lo catio n o f a p o int yo u wish to ad d and a marker will ap p ear in the fo rm o f a p laceho ld er. Torep licate its p o sitio n fo r the map p ing element o f yo ur d irecto ry, d o ub le c lick the map and then d rag the marker o ver the marker thathas ap p eared after p erfo rming a map search q uery. Only the marker that yo u d o ub le-clicked to ad d , and then (re)p o sitio nedind ep end ently will ap p ear in the final map reco rd fo r yo ur d irecto ry.
Link allo ws urls to b e ad d ed to the d irecto ry reco rd
Link field in the Control Center
Email allo ws email ad d resses to b e ad d ed to the d irecto ry reco rd .
Email field in the Control Center
HTML allo ws rich html text to b e ad d ed to the d irecto ry reco rd .
HTML field in the Control Center
To ad d html to the reco rd c lick the Ed it Text b utto n which will o p en the Ed it Text area where yo u can ad d yo ur rich text the d irecto ryreco rd .
Edit Text Area
Field s
16 4

Importing and exporting Directory dataIt is p o ssib le to imp o rt and exp o rt d ata to and fro m Jad u d irecto ries so that d ata can b e sent to b ack o ffice systems fo rsto rag e/retrieval/analysis o r alternatively, to surface d ata held in b ack o ffice systems and make it mo re read ily availab le.
To p erfo rm a d irecto ry reco rd imp o rt o r exp o rt, yo u need to c lick the Imp o rt o r Exp o rt l ink fro m the to p o f the Directo ry Reco rd slist view p ag e.
Beginning a directory data import/export
Directory record importPerfo rming a Directo ry reco rd imp o rt is a straig htfo rward task. After c licking the Imp o rt l ink fro m the to p o f the Directo ry Reco rd slist view p ag e, yo u are taken to the Directo ry reco rd imp o rt interface.
Directory record import interface
Clicking the Imp o rt b utto n will imp o rt the co ntents o f a CSV fi le into a d irecto ry, enab ling auto matic creatio n o f a d irecto ry's field sand relevant reco rd s.
The Directo ry imp o rt interface p ro vid es several o p tio ns fo r imp o rting relevant d ata.
Head er Line - the Head er Line checkb o x sp ecifies whether field lab els will b e created b ased o n any co lumn head ers in the
Imp o rting and exp o rting d ata
16 5

imp o rt fi le. The d efault state is to create field lab els b ased o n co lumn head ers. (This o p tio n is exclud ed if yo u are imp o rtingd ata into an emp ty d irecto ry).
Header Line checkbox
Directory import example with header lines for field labels
Field terminato r - the Field terminato r inp ut field allo ws yo u to ad d the character yo u wish to use fo r terminating field s inrelatio n to the d ata fi le yo u are imp o rting . The d efault field terminato r is a co mma.
Field terminator input field
Field to use fo r title - the Field to use fo r title d ro p d o wn b o x allo ws yo u to select a field name to b e used as the title fo r the d atareco rd s yo u are imp o rting and will b e d isp layed as links within the d irecto ry's o verview p ag e. This o p tio n d efaults toalp hab etically o rd ered co lumn lis ting s (Co lumn A, Co lumn B, etc.) if yo u are imp o rting d ata into an emp ty d irecto ry.
Field to use for title dropdown box
Default l ive status - the Default l ive status d ro p d o wn b o x allo ws yo u to sp ecify whether newly imp o rted reco rd s willauto matically b e p ub lished within a l ive d irecto ry o r p end ing ap p ro val within the reco rd s lis t view insid e the Co ntro l Center.The d efault setting is fo r reco rd s to b e p ub lished within a l ive d irecto ry.
Default live status dropdown box
Imp o rt Actio n - the Imp o rt Actio n d ro p d o wn b o x allo ws d irecto ry reco rd s to either b e rep laced o r ad d ed to if yo u areimp o rting d ata into an existing d irecto ry. The d efault state is fo r d ata to b e rep laced . This o p tio n is exclud ed if yo u areimp o rting d ata into an emp ty d irecto ry.
Import Action dropdown box
Imp o rt Categ o ries - the Imp o rt Categ o ries checkb o x allo ws d irecto ry reco rd s to b e assig ned to categ o ries if the reco rdco ntains the co rresp o nd ing Categ o ry ID. Categ o ry assig nment o f reco rd s is d ep end ent up o n reco rd s within a CSV fi leinclud ing a numerical id entifier (d etermined up o n categ o ry creatio n) fo r the categ o ry to which the reco rd is b eing assig ned .
Import Categories checkbox
CSV file - the CSV fi le imp o rt field allo ws yo u to b ro wse to and select a lo cally sto red d ata fi le fo r imp o rt into the d irecto ry. Thed ata imp o rt wil l b e b ased o n rules yo u have sp ecified in relatio n to p revio us o p tio ns.
CSV file import field
Directory record exportsPerfo rming a Directo ry reco rd exp o rt is a straig htfo rward task. After c licking the Exp o rt l ink fro m the to p o f the Directo ry Reco rd slist view p ag e, yo u are taken to the Directo ry Exp o rt interface.
Imp o rting and exp o rting d ata
16 6

Directory record export interface
Clicking the Exp o rt b utto n will exp o rt the co ntents o f the d irecto ry as a CSV fi le, allo wing yo u to then mo ve the d ata into a b acko ffice system/d atab ase o r re-imp o rt into ano ther Jad u Directo ry.
The Directo ry exp o rt interface p ro vid es several o p tio ns fo r exp o rting the relevant d ata.
Includ e Head er Line - the Includ e Head er Line checkb o x sp ecifies whether the field lab el is includ ed as a co lumn head er in theexp o rted fi le. The d efault state is to includ e field lab els as co lumn head ers.
Include Header Line checkbox
Directory export example with header line included
Directory export with header line excluded
Field terminato r - the Field terminato r inp ut field allo ws yo u to ad d the character yo u wish to use fo r terminating field s.
Field terminator input field
Line terminato r - the Line terminato r d ro p d o wn b o x allo ws yo u to select a l ine terminato r fo rmat b ased o n the o p erating systemyo u are using .
Line terminator dropdown box
Field s - the Field s exp o rt o p tio n d isp lays a l is t o f the field names in yo ur d irecto ry and allo ws yo u to sp ecify the field s that yo uwish to includ e in yo ur exp o rt fi le. The d efault setting is to includ e all field s. Yo u can seg ment the yo ur d ata exp o rt b yunchecking relevant field s fro m the lis t.
Imp o rting and exp o rting d ata
16 7

Example field export option list
Imp o rting and exp o rting d ata
16 8

Directory RecordsReco rd s allo w yo u to ad d and view the d ata reco rd s in yo ur d irecto ry alo ng with the field s that yo u have created and theirasso ciated p ro p erties. Pub lic ly sub mitted reco rd s and tho se p end ing ap p ro val can also b e viewed , ap p ro ved and amend ed here.
Record list viewThe Reco rd s lis t view lis ts all reco rd s within a p articular d irecto ry.
Directory Records List view
Within the Directo ry Reco rd s lis t view, it is p o ssib le to :
View Reco rd titles (c licking o n the Reco rd title name will take yo u to the p articular reco rd within the Co ntro l Center, where yo ucan ed it field reco rd s and to g g le b etween the reco rd 's Live/no n-live state).View Directo ry Categ o ries assig ned to ind ivid ual reco rd s fro m the d irecto ry's o wn taxo no my if o ne has b een created .View the live reco rd as it ap p ears within the web site b y c licking the View live link.Delete ind ivid ual o r multip le d irecto ry reco rd s b y checking relevant reco rd s thro ug h their co rresp o nd ing tickb o x and clickingthe Delete b utto n.
Searching for Directory RecordsIt is p o ssib le to search fo r p articular d irecto ry reco rd s b y c licking the Find a reco rd link und erneath the main d irecto rymanag ement tab s.
Searching for a directory record
The Directo ry Reco rd s search enab les:
Keywo rd q ueries (reco rd s that have b een reco rd ed in relatio n to the Directo ry Field s).Categ o ry search (cho o sing reco rd s relative to any categ o ries that have b een created within the d irecto ry). Categ o ry searchalso enab les yo u to seg ment d irecto ry reco rd s b y Directo ry Categ o ries assig ned . This is achieved b y c licking o n the
Reco rd s
16 9

mag nifying g lass ico n ad jacent to the Categ o ry typ e that yo u want to seg ment yo ur d irecto ry reco rd s b y.
Using the magnifying glass icon to segment Directory Records by Category
Segmenting the Directory Records list viewIt is p o ssib le to seg ment the Directo ry Reco rd s lis t view b y c licking the links ab o ve the lis t view tab le.
Segmenting the Directory Records list view
Lists o f Directo ry Reco rd s can b e seg mented b y:
all l ive reco rd sall no n-live reco rd slive user reco rd s (reco rd s sub mitted thro ug h the web site b y reg istered users and ap p ro ved within the Co ntro l Center)user reco rd s awaiting ap p ro val (reco rd s sub mitted thro ug h the web site b y reg istered users and p end ing ap p ro val within theCo ntro l Center)
Adding a new RecordTo ad d a new reco rd to a d irecto ry, c lick the New Reco rd b utto n at the b o tto m o f the Directo ry Reco rd s lis t view.
Adding a new Directory Record
After c licking New Reco rd within the Co ntro l Center, yo u will b e taken to a d irecto ry reco rd entry interface lis ting all o f the field srelevant to the p articular d irecto ry, alo ng with inp ut field s where relevant info rmatio n can b e ad d ed fo r each Directo ry Field .
Reco rd s
170

Example Directory Entry interface
The field s ' p ro p erties (field typ e/(no n)mand ato ry) status will reflect the p ro p erties that were asso ciated with the field s d uring theirinitial creatio n.
In ad d itio n to the d irecto ry's b esp o ke field s there are three ad d itio nal field reco rd s req uiring co mp letio n:
Title (the d irecto ry entry's name that will ap p ear o n the d irecto ry's main o verview/entry l is ting p ag e and link thro ug h to thereco rd 's co ntents).Categ o ries (assig nment o f a new categ o ry fro m the web site's main structure and /o r fro m the d irecto ry's o wn categ o ry structureif o ne exists). If a d ed icated d irecto ry categ o ry structure d o es exist, yo u can select this fro m the d ro p d o wn lis t in the Ap p lyCateg o ries lig htb o x.
Selecting a directory's category structure for assignment to directory records
Reco rd s
171

An example category structure for a directory
Metad ata (assig nment o f metad ata values fo r ind ivid ual d irecto ry reco rd s thro ug h the Co ntro l Center's familiar Assig nMetad ata interface).
Reco rd s
172

Assigning metadata to a directory record entry
Reco rd s
173

Directory SettingsIf yo ur Directo ry includ es a Go o g le Map field , the Setting s interface enab les yo u to sp ecify ho w to d isp lay a Reco rd s info rmatio nwithin the co ntext o f the map .
Show search results on mapThe Sho w search results o n map d ro p d o wn b o x allo ws yo u to d etermine whether d irecto ry reco rd s are d isp layed in a mapalo ng sid e a lis t o f relevant d irecto ry reco rd s after a d irecto ry search q uery has b een p erfo rmed .
Show search results on map
Selecting No fro m this d ro p d o wn b o x means that map lo catio ns will no t b e d isp layed o n the search results p ag e.
Search results displayed on a map
MarkerMarker setting s enab le yo u to sp ecify a marker ico n typ e fo r yo ur integ rated d irecto ry map fro m a lib rary o f marker ico ns.
Marker icon library
Marker Info
Setting s
174

Marker Info enab les yo u to sp ecify which d irecto ry reco rd info rmatio n ap p ears in the b allo o n after c licking the map marker ico n inrelatio n to a sp ecific d irecto ry reco rd . The d efault is fo r no info rmatio n to b e d isp layed in the b allo o n. The Marker Info interfacelists all d irecto ry field titles in the Availab le Field s lis t.
To sp ecify relevant reco rd reco rd s to ap p ear within the map marker ico n b allo o n, hig hlig ht the relevant field names and mo ve tothe Selected Field s List b y c licking the s ing le rig ht-p o inting chevro n b utto n und erneath the two lis ts.
Clicking the d o ub le rig ht-p o inting chevro n mo ves all d irecto ry field s to the Selected Field s lis t so that all d irecto ry reco rd reco rd swill ap p ear within map marker ico n b allo o ns fo r the p articular d irecto ry reco rd . The left-p o inting chevro ns allo w yo u to d eselectfield s and o mit relevant info rmatio n fro m the map marker ico n b allo o n.
Map marker settings
Marker information displayed for live directory entry
Setting s
175

Directory TaxonomyIf the d irecto ry yo u are creating will acco mmo d ate d atasets that b enefit fro m ad d itio nal categ o risatio n, yo u can create a d ed icatedstructure fo r it. Fo r examp le, an extensive p erso nnel d irecto ry may b enefit fro m sep arating reco rd s/reco rd s b y d ep artment o rwo rld reg io n.
Example Personnel Directory structure, with categories for world regions
The d irecto ries taxo no my b uild er o ffers the same functio nality as the Categ o ry Build er within the Util ities mo d ule. Fo r furtherinfo rmatio n, see Using the Categ o ry Build er.
Taxo no my
176

Marketing
Marketing
177

Engaging with your customersEssential to any mo d ern o rg anizatio n’s web site is the p o wer o f o ne-to -o ne d irect marketing . Sharing info rmatio n and p ro vid ingreg istered custo mers with exclusive o nline o ffers, news and services will help d evelo p and cap italise o n yo ur o nline p resence,eng ag ing custo mers and enco urag ing them to return time and time ag ain.
The key to successful marketing is targ eting yo ur custo mers, integ rating yo ur camp aig ns and analysing custo mer’s b ehavio ur.
The Jad u Marketing Mo d ule will help yo u achieve this with custo mer reg istratio n. This allo ws yo u to d ecid e what custo merinfo rmatio n yo u g ather and what targ eted q uestio ns yo u ask them b ased o n their interests.
Yo u can create targ eted ad verts fo r yo ur ho mep ag es reflecting custo mers interests, enhancing exp erience b y p erso nalis ingco ntent and create o ne-to -o ne email camp aig ns to sp ecific g ro up s o f custo mers, rais ing yo ur vis ib il ity and marketing p o tential.
Customer registrationGetting to kno w yo ur custo mers o r users is where any effective marketing camp aig n b eg ins. The reg istratio n p ro cess is ho w yo ug ather the info rmatio n necessary to d o this. Yo u must d ecid e what b asic info rmatio n to ask, fo r examp le name, g end er o rtelep ho ne numb er and also a p o ssib le two targ eted q uestio ns. The targ eted q uestio ns will b e b ased o n the services o r p ro d uctsyo u sup p ly o r wish to p ro mo te using yo ur o rg anizatio n's web site.
This info rmatio n is sto red in a d atab ase o f users. It can b e accessed thro ug h yo ur Jad u Co ntro l Center to create email camp aig nso r can b e exp o rted fo r creating o ffl ine camp aig ns o r strateg ies.
Ab o ut marketing
178

Contact manager overviewThe Co ntact Manag er is essentially a vis ito r manag er system that g ives yo u the ab il ity to reco rd d etails o f interactio ns with yo urreg istered users.
This can b e help ful fo r tracking any p o tential p ro b lems yo u enco unter with ind ivid ual reg istered users and co mmunicatio nsb etween yo ur o rg anizatio n's web site ad ministrato rs (o r its Web masters) and yo ur custo mer. This info rmatio n is sto red alo ng sid ea Reg istered Users Pro file.
The Co ntact Histo ry o f a reg istered user can viewed b y either find ing an ind ivid ual user thro ug h Reg istered Users (as d iscussedin Reg istratio n and Users) o r b y searching fo r the Co ntact Histo ry o f a user thro ug h the Co ntact Manag er.
Using the Contact ManagerFro m within the main Jad u CMS Co ntro l Center select Op en menu fo llo wed b y the Co ntact Manag er o p tio n fro m the Marketingmenu, yo u will b e sho wn the o p tio ns availab le to search fo r a Reg istered Users Co ntact Histo ry.
Search for a registered user area
Search b y Name, Email o r Po stco d e allo ws yo u search b y entering either the users name, email ad d ress o r p o stco d e into theentry field and p ressing Find User.CRM interactio ns users l is t allo ws yo u to view all Co ntact Histo ries that have b een up d ated within a certain time frame. To d othis, fro m the d ro p d o wn menu cho o se fro m Last 24 ho urs, Last 7 d ays, Last 30 d ays, Last 6 mo nths o r Last 12 mo nths.If no users are fo und thro ug h yo ur search yo u will see the messag e " So rry, there were no results fo und " . If this hap p ens trysearching using the Find reg istered users search o p tio ns ag ain.If yo u search fo r a fo rename shared b y a few reg istered users yo u will b e sho wn a lis t o f all tho se users. Fro m here yo u canclick the Users Email ad d ress to view their p ro fi le. Next, c lick o n the Bro wse Co ntact Histo ry b utto n to view their Co ntactHisto ry d etails.The q uickest way to find a users Co ntact Histo ry is to Search b y email ad d ress as an email ad d ress can o nly b e reg isteredo nce thro ug h yo ur o rg anizatio n's web site.On successfully find ing the users Co ntact Histo ry d etails yo u will b e sho wn the Histo ry Details area.
Contact History DetailsFro m the Histo ry d etails o f yo ur cho sen custo mer yo u are ab le to reco rd any d etails o f custo mer interactio ns that yo u wish tocap ture. The mo st recent reco rd will always ap p ear first.
It is reco mmend ed that this system is used to reco rd any d etails o f technical issues that the custo mer has with the web site itself(e.g . if a custo mer has tro ub le sub mitting an o nline fo rm then yo u sho uld reco rd d etails o f the p ro b lem and so lutio n here).
Co ntact histo ry and manag er
179

A registered users contact history area
View histo ric o r ad d a new reco rd allo ws yo u select a p revio us reco rd o r create a new reco rd .If this is the first reco rd fo r the custo mer, then the d ro p d o wn menu will sho w Ad d a new reco rd so yo u can leave this andco ntinue.If the custo mer alread y has a Co ntact Histo ry the last reco rd created will d isp lay within the d ro p d o wn menu. To Ad d a newreco rd select this fro m the d ro p d o wn menu.Date o f entry sho ws the d ate the reco rd was created . When Ad d ing a new reco rd this will d efault to to d ay’s d ate. This can b echang ed b y c licking o n the calend ar ico n and selecting a d ate fro m the Calend ar wind o w.Entry mad e b y is the text entry field where the p erso n creating the reco rd sho uld typ e their name.Use the Sub ject text entry field to ad d a meaning ful sub ject title fo r the reco rd , fo r examp le, a p ro b lem reg istering .Details is the area to reco rd all the d etails. What the q uery mig ht b e, what co urse o f actio n has b een sug g ested etc.Email reco rd to is an o p tio n to email a co p y o f the reco rd b eing created to p erhap s the custo mer as co nfirmatio n o r to aco lleag ue to help with the q uery.Two email ad d resses can b e used within the Email reco rd to entry field b y co mma sep arating them.Tick the Send email checkb o x to send an email to the email ad d ress entered .
Rememb er that all co ntact is reg ulated b y the Data Pro tectio n Act
Once yo u have co mp leted all the areas o f the new reco rd o r up d ated reco rd c lick Save to co mp lete this task.
Co ntact histo ry and manag er
18 0

Targeting your customersThe key to successful marketing is targ eting yo ur custo mers, yo ur reg istered users. No w we have set up Reg istratio n Preferencesand kno w ho w to find and view Reg istered Users p ro files we can take this info rmatio n to create a Bulk Email Camp aig n.
The first step to any b ulk email camp aig n / newsletter is to create a List fi l ter. This is a set o f s imp le rules to d efine which o f yo urReg istered Users receive the marketing email. Any numb er o f these rules o r List fi l ters can b e saved fo r future use.
List filter and exportFro m within the main Jad u CMS Co ntro l Center select Op en menu fo llo wed b y the List fi l ter and exp o rt o p tio n fro m theMarketing menu, yo u will b e sho wn the o p tio ns availab le fo r creating a new List fi l ter.
The List filter and export area
Ed it existing lis t allo ws yo u to create a New Entry o r ed it an existing lis t. This d ro p d o wn menu will always sho w New Entry tob eg in with.To ed it an existing lis t, select it b y its title fro m the Ed it existing lis t d ro p d o wn menu. To create a new list o r entry, select thed ro p d o wn menu sho wing New Entry.Enter title is the text field where yo u can name the List fi l ter. Think o f this as the camp aig n / newsletter title.User p reference relates d irectly to the Targ eting Questio n we created earlier in Targ eting q uestio ns. As a remind er theq uestio n is also d isp layed .The answers to yo ur Targ eting Questio n are d isp layed to the rig ht each with a check b o x. Select the check b o xes that are o frelevance to yo ur email camp aig n.Ag e rang e allo ws yo u to targ et the email camp aig n at users o f a sp ecific ag e. Select an ag e rang e using the d ro p d o wn menu.To email all users, leave the d ro p d o wn menu with all selected .Sex allo ws yo u to targ et either male o r female custo mers. To targ et b o th g end ers leave the d ro p d o wn menu selected as Bo th.Co mp any allo ws yo u to targ et a sp ecific co mp any. To use this fi lter typ e the name o f the co mp any in the entry field p ro vid ed .Po st/z ip co d e allo ws yo u to targ et users within a p articular area. To use this fi lter typ e the p o stco d e in the entry field p ro vid ed .Co untry allo ws yo u to targ et users reg istered in a p articular co untry. Select the ap p ro p riate co untry fro m the d ro p d o wn menuto use this fi lter.
To use Ag e Rang e, Sex, Co mp any, Po stco d e and co untry they must b e includ ed within Reg ister Preferences.
Lo g ins to d ate allo ws yo u to targ et users b ased o n ho w many times they have lo g g ed -in to yo ur o rg anizatio n's web site. To usethis fi lter select a rang e fro m the d ro p d o wn menu p ro vid ed .Permissio n to co ntact allo ws yo u to select whether yo u email all yo ur reg istered users o r o nly tho se who g ave p ermissio n toco ntact o r o p ted o ut o f b eing co ntacted .
It is always reco mmend ed that yo u co ntact custo mers who have g iven yo u p ermissio n to co ntact in acco rd ance with the Data
Creating an email camp aig n
18 1

Pro tectio n Act.
Once all areas are co mp lete, to create yo ur List fi l ter c lick o n the Save Camp aig n List b utto n.To d elete a l is t, c lick o n the Actio ns b utto n and then Delete the selected lis t.
Delete a list action
Exporting the List filterReg istered Users d etails can b e exp o rted as a CSV fi le (Co mma-sep arated Values) that sto res a cho sen List fi l ter as tab ular d ata,a Micro so ft® Excel sp read sheet b eing a p o p ular examp le. They can also b e exp o rted as a text fi le.
Fro m within the main Jad u CMS Co ntro l Center select Op en menu fo llo wed b y the List fi l ter and exp o rt o p tio n fro m theMarketing menu.Fro m the Ed it existing lis t d ro p d o wn menu select the List fi l ter yo u want to exp o rt.
The two export options
To exp o rt as a CSV fi le c lick Exp o rt CSV text fi le.To exp o rt as a text fi le c lick Exp o rt d elimited text fi le.On exp o rting a CSV o r text fi le a task is ad d ed to Jad uQueueJo b s. When the q ueue_master task runs, the CSV/text fi leis availab le to d o wnlo ad in the co rresp o nd ing lis t fi l ter p ag e.The fi le is availab le to d o wnlo ad fo r up to 24 ho urs and until the DataRetentio nTask runs. When the DataRetentio nTask runs (o nd aily b asis) all fi les o ld er than 24 ho urs are d eleted .
Creating the campaign / newsletter emailWith a List fi l ter created (as d escrib ed ab o ve) creating the camp aig n / newsletter email is the final stag e o f creating a Bulk EmailCamp aig n.
Fro m within the main Jad u CMS Co ntro l Center select Op en menu fo llo wed b y the Bulk Email camp aig ns o p tio n fro m theMarketing menu. Yo u will b e sho wn the area fo r creating the camp aig n / newsletter email.
The Bulk Email campaigns area
Fro m Email typ e yo u can select what typ e o f email to send to yo ur custo mers.The Text Only o p tio n will send the co ntents o f yo ur camp aig n / newsletter as p lain text.The HTML o p tio n allo ws yo u to create an email that can includ e imag es, l inks and b asic fo rmatting using the Jad u Text Ed ito r.Bo th o p tio ns p ro vid e yo u with the same o p tio ns, with the excep tio n o f the Jad u Text Ed ito r functio ns o nly b eing availab le if yo uselect HTML (the Jad u Text Ed ito r is exp lained in full in the Jad u Pub lishing Manual). Fo r this examp le we will use the Text Onlyo p tio n.
So me o rg anizatio ns / ind ivid uals my set their email c lients to fi lter o ut HTML emails to avo id receiving larg e messag es o rmalic io us sp am emails. Yo u are g uaranteed to reach mo re p eo p le with a p lain text email.
Once yo u have selected the Email typ e yo u will see the area fo r creating a Bulk Email camp aig n.
Creating an email camp aig n
18 2

The Bulk Email campaigns area
The Select a fi lter targ et d ro p d o wn menu has three typ es o f o p tio ns, which are No users (just BCC ad d ress), All usersfo llo wed b y a lis t o f all List fi l ters that have b een created .No users (just BCC ad d ress) will o nly email the ad d ress entered in the BCC email ad d ress, no ne o f yo ur reg istered users willb e includ ed . This is id eal fo r testing the camp aig n / newsletter and its fo rmatting b efo re co mmitting to send ing it to p o tentiallytho usand s o f users.Selecting All users will d irectly send to all reg istered users o n yo ur o rg anizatio n's web site.Selecting a p red efined List fi l ter (d iscussed earlier in List fi l ter and exp o rt) wil l email o nly tho se reg istered users sp ecified inthe fi lter.Rep o rt to email ad d ress is an ad d itio nal email ad d ress fo r extra recip ients, fo r examp le co lleag ues. Typ e an email ad d ress inthis entry field if req uired . If yo u enter mo re than o ne then they must b e co mma sep arated . This is also id eal fo r testing thecamp aig n / newsletter b efo re send ing .
Be aware that their email ad d ress will b e vis ib le to o ther recip ients o f the email.
The Envelo p e ico n next to the Rep o rt to email ad d ress entry field can b e clicked to view a s imp le rep o rt o n ho w many userswill b e emailed when the camp aig n / newsletter is finally sent. This can b e clicked at any p o int whist creating the Bulk EmailCamp aig n.BCC email ad d ress is an ad d itio nal entry field to typ e the email ad d ress o f further recip ients whilst keep ing the ad d ressco nfid ential. These will no t b e vis ib le to o ther recip ients.Like a no rmal email the Sub ject entry field will ap p ear as the email sub ject in the recip ients inb o x. Cho o se this carefully as it isb asically the title o f the camp aig n / newsletter.Messag e is the actual co ntent o f the camp aig n / newsletter. Yo u can typ e o r p aste the co ntent straig ht in to this area.
It’s a g o o d id ea to check yo ur Bulk Email Camp aig n b efo re send ing it to all the reg istered users to check fo r any mistakes. To d othis select No users (just BCC ad d ress) fro m the Select a fi lter targ et d ro p d o wn menu. Next typ e yo ur o wn email ad d ress in theBCC email ad d ress entry field then click the Send Mail b utto n.
Once all areas are co mp leted and co rrect c lick the Send Mail b utto n and yo ur camp aig n / news letter will b e sent to allselected reg istered users p lus any o ther email ad d ress’s typ ed in the Rep o rt to email ad d ress and BCC email ad d ress entryfield s.
Creating an email camp aig n
18 3

Creating an email camp aig n
18 4

Targeted homepage advertsReg istratio n p references and the targ eting q uestio n sp ecifically ad d s ano ther layer o f p erso nalisatio n to yo ur o rg anizatio n'sweb site enab ling yo u to custo mize user's exp erience with the use o f Targ eted Ad verts.
These can p o int custo mers to co ntent o f p articular interest to them o nce they have sig ned -in. These make use o f ho w theyanswered the Targ eted q uestio n when they reg istered (Setting up Reg istratio n p references and the targ eted q uestio n is co vered inReg istratio n and users).
There are two main typ es o f ad vert that can use a targ eting rule. There are Mid d le ad verts that co mb ine an imag e, a title, sub -title(o p tio nal), summary text and a c lickthro ug h link and Rig ht Ad verts that are g rap hical o r imag e b ased ad verts with a l ink.
Guest homepage advertsAs targ eted ho mep ag e ad verts o nly ap p ear after a reg istered user has lo g g ed in, Guest ho mep ag e ad verts are fo r users who d ono t lo g in o r b efo re they reg ister. These ad verts sho uld b e used to p o int users to imp o rtant co ntent within the web site o r hig hlig htnew info rmatio n.
Targ eted and Guest ho mep ag e ad verts are created and maintained the same way and in the same p lace and co nsist o f Mid d lead verts and Rig ht Ad verts.
Yo u will always b e g iven a set numb er o f ‘Guest’ ad verts fo r vis ito rs to yo ur web site who have no t reg istered . The req uired numb ero f ad verts will d ep end o n the d esig n o f yo ur s ite.
Middle AdvertsFro m within the main Jad u CMS Co ntro l Center select Op en menu fo llo wed b y the Ho mep ag e Ad verts o p tio n fro m theMarketing menu, yo u will b e sho wn the main area includ ing two ‘tab s’ sho wing Mid d le Ad verts (sho wing as d efault) and Rig htAd verts.
The Middle Homepage Adverts area
The req uired numb er o f rig ht ad verts and mid d le ad verts is sho wn (which will b e d ep end ent o n yo ur o rg anizatio n's s ited esig n) alo ng with a co lo ur-co d ed key fo r Active ad verts, No t used ad verts and Default ad verts.Active ad verts are ‘l ive’ o r b eing d isp layed o n the web site at p resent.No t used ad verts are no lo ng er ‘ l ive’ o r b eing d isp layed o n site b ut are sto red away so they can b e switch b ack o n at any time.Default ad verts are used if no targ eted ad verts have b een created fo r a Camp aig n (this will b e exp lained in mo re d etail furthero n).Ad verts are d isp layed as a lis t b elo w the selected Camp aig n.
Ho mep ag e ad verts
18 5

Middle Adverts List
The Select Camp aig n List is created fro m the Targ eting Questio n answers set up within Reg istratio n Preferences (d iscussedearlier in Targ eting Questio ns).Sp ecific ad verts can b e created fo r the Camp aig n List and d isp lay o n yo ur o rg anizatio n's web site to users who have lo g g ed inand cho se a sp ecific answer o r interest to the Targ eting Questio n.Click o n the Select Camp aig n List d ro p d o wn menu to see yo ur full camp aig n lis t. To create o r up d ate an ad vert fro m o ne o fyo ur camp aig ns select it fro m this l is t.The Select Camp aig n List always sho w the Guest users l is t to b eg in with. Fro m here yo u can up d ate an existing ad vert, d eletean ad vert, chang e its p o sitio n and status and create a new ad vert.
The Select Campaign List dropdown menu
Mid d le ad vert title d isp lays the g iven title o f the ad vert. To view o r ed it this ad vert c lick o n the title.Po sitio n and status sho ws yo u the o rd er o f ad verts as they d isp lay o n yo ur o rg anizatio n's web site.The b ackg ro und co lo ur relates to the co lo ur key mentio ned earlier. A g reen status means it’s active and a red status means thead vert is no t b eing used .If yo ur web site is set to sho w 3 Mid d le Ad verts yo u can mo ve an ad vert fro m p o sitio n 6 , which is no t b eing used to p o sitio n 1,which will b e d isp layed as the main o r to p ad vert o n yo ur web site b y using the numb ered d ro p d o wn menu.At the b o tto m o f the List is the New Mid d le Ad vert b utto n
Adding a new middle advertFro m the Mid d le Ad vert l is t c lick the New Mid d le ad vert b utto n.
Ho mep ag e ad verts
18 6

The New Middle Advert area
Fro m the Imag e area yo u can ad d an imag e o r p icture to the ad vert. To d o this c lick the Imag e Lib rary b utto n to o p en up theImag e Lib rary (See the Pub lishing Manual fo r d etails o n ho w to use the Imag e Lib rary) and select yo ur imag e.Title is the head line o r main title o f the ad vert. Typ e yo ur Title in the entry field p ro vid ed .Sub Title is an o p tio nal extra head line, used to sup p o rt o r exp and o n the main Title. Typ e yo ur sub title in the entry fieldp ro vid ed .Main text is the summary text o r d escrip tio n o f the ad vert. There is a maximum numb er o f 20 0 characters fo r the main text. Typ eyo ur text in the entry field p ro vid ed (as yo u d o yo u will no tice the numb er in the Characters left area d ecreases to aid yo u asyo u write).
The character l imit is d esig ned to keep the size o f ad verts and their text co nsistent and tid y and so sto p p ing ad verts b eco mingartic les which may p o tentially b reak yo ur web site d esig n. The main text sho uld b e p recise and to the p o int.
Clickthro ug h link is where to typ e o r p aste the URL o r web ad d ress o f the p ag e within yo ur web site the ad vert is fo r o r ab o ut.Ad d the link into the entry field p ro vid ed .Clicking the Save Ad vert b utto n will save yo ur new ad vert. Yo u will return to the Ad vert l is t p ag e with yo ur new ad vert p o sitio nedat the very b o tto m. This is so yo u can cho o se where to p o sitio n yo ur new ad vert after creating it.
Yo u may cho o se to create an ad vert a few d ays in ad vance o f it b eing need ed and then mo ve it into an active p o sitio n at the rig httime.
Updating middle adverts
Ho mep ag e ad verts
18 7

Fro m within the main Jad u CMS Co ntro l Center select Op en menu fo llo wed b y the Ho mep ag e Ad verts o p tio n fro m theMarketing menu, yo u will b e sho wn the main area includ ing two ‘tab s’ sho wing Mid d le Ad verts (sho wing as d efault) and Rig htAd verts.Fro m the Select Camp aig n List d ro p d o wn menu cho o se the Camp aig n fo r which the ad vert was created .If the ad vert is a Guest user ad vert, the main Mid d le Ad verts p ag e will alread y d isp lay these as d efault.Click o n the Mid d le ad vert title to ed it o r up d ate it.Make the necessary chang es to the ad vert and click o n Save Ad vert.
Deleting a middle advertFro m within the main Jad u CMS Co ntro l Center select Op en menu fo llo wed b y the Ho mep ag e Ad verts o p tio n fro m theMarketing menu. Yo u will b e sho wn the main area includ ing two ‘tab s’ sho wing Mid d le Ad verts (sho wing as d efault) and Rig htAd verts.Fro m the Select Camp aig n List d ro p d o wn menu cho o se the Camp aig n fo r which the ad vert was created .If the ad vert is a Guest user ad vert, the main Mid d le Ad verts p ag e will alread y d isp lay these as d efault.Click o n the Mid d le ad vert title to view the ad vert d etails.At the very b o tto m o f this area yo u will no tice a Delete Ad vert b utto n. Click this to p ermanently remo ve this ad vert.
Right AdvertsFro m within the main Jad u CMS Co ntro l Center select Op en menu fo llo wed b y the Ho mep ag e Ad verts o p tio n fro m theMarketing menu. Yo u will b e sho wn the main area includ ing two ‘tab s’ sho wing Mid d le Ad verts (sho wing as d efault) and Rig htAd verts. Click o n the Rig ht Ad verts tab to sho w this area.
The Right Homepage Adverts area
The req uired numb er o f rig ht ad verts and mid d le ad verts is sho wn (which will b e d ep end ent o n yo ur o rg anizatio n's s ited esig n) alo ng with a co lo ur-co d ed key fo r Active ad verts, No t used ad verts and Default ad verts.Active ad verts are ‘l ive’ o r b eing d isp layed o n the web site at p resent.No t used ad verts are no lo ng er ‘ l ive’ o r b eing d isp layed o n site b ut are sto red away so they can b e switched b ack o n at anytime.Default ad verts are used if no targ eted ad verts have b een created fo r a Camp aig n (this will b e exp lained in mo re d etail furthero n).Ad verts are d isp layed as a lis t b elo w the selected Camp aig n.
Ho mep ag e ad verts
18 8

Right Adverts List
The Select Camp aig n List is created fro m the Targ eting Questio n answers set up within Reg istratio n Preferences (d iscussedearlier in Targ eting Questio ns).Sp ecific ad verts can b e created fo r the Camp aig n List and d isp layed o n yo ur o rg anizatio n's web site to users who havelo g g ed in and when cho sen a sp ecific answer o r interest to the Targ eting Questio n.Click o n the Select Camp aig n List d ro p d o wn menu to see yo ur full camp aig n lis t. To create o r up d ate an ad vert fro m o ne o fyo ur camp aig ns select it fro m this l is t.The Select Camp aig n List wil l always sho w the Guest users as d efault. Fro m here yo u can up d ate an existing ad vert, d elete anad vert, chang e its p o sitio n and status and create a new ad vert.
The Select Campaign List dropdown menu
Rig ht ad vert title d isp lays the g iven title o f the ad vert. To view o r ed it this ad vert c lick o n the title.Po sitio n and status sho ws yo u the o rd er o f ad verts as they d isp lay o n yo ur o rg anizatio n's web site.The b ackg ro und co lo ur relates to the co lo ur key mentio ned earlier. A g reen status means it’s active and a red status means thead vert is no t b eing used .If yo ur web site is set to sho w 3 Rig ht Ad verts yo u can mo ve an ad vert fro m p o sitio n 6 , which is no t b eing used to p o sitio n 1,which will b e d isp layed as the main o r to p ad vert o n yo ur web site b y using the numb ered d ro p d o wn menu.At the b o tto m o f the List is the New Rig ht Ad vert b utto n.
Adding a new right advertFro m the Rig ht Ad vert l is t c lick the New Rig ht ad vert b utto n.
Ho mep ag e ad verts
18 9

The New Right Advert area
Fro m the Imag e area yo u can ad d the imag e o r p icture fo r the ad vert. To d o this c lick the Imag e Lib rary b utto n to o p en up theImag e Lib rary (See the p ub lishing manual fo r d etails o n ho w to use the Imag e Lib rary) and select yo ur imag e.In the Title area typ e the ad vert title text into the entry field p ro vid ed . This will b e d isp layed with the ad vert Imag e, so the Titlemust d escrib e o r reflect the p urp o se o f the ad vert.Clickthro ug h link is where to typ e o r p aste the Url o r web ad d ress o f the p ag e within yo ur web site the ad vert is fo r o r ab o ut.Ad d the link into the entry field p ro vid ed .Clicking the Save Ad vert b utto n will save yo ur new ad vert. Yo u will return to the Ad vert l is t p ag e with yo ur new ad vert p o sitio nedat the very b o tto m. This is so yo u can cho o se where to p o sitio n yo ur new ad vert after creating it.
Yo u may cho o se to create an ad vert a few d ays in ad vance o f it b eing need ed and then mo ve it into an active p o sitio n at the rig httime.
Updating right advertsFro m within the main Jad u CMS Co ntro l Center select Op en menu fo llo wed b y the Ho mep ag e Ad verts o p tio n fro m theMarketing menu. Yo u will b e sho wn the main area includ ing two ‘tab s’ sho wing Mid d le Ad verts (sho wing as d efault) and Rig htAd verts. Click o n the Rig ht Ad verts tab to sho w this area.Fro m the Select Camp aig n List d ro p d o wn menu cho o se the Camp aig n fo r which the ad vert was created .If the ad vert is a Guest user ad vert, the main Rig ht Ad verts p ag e will alread y d isp lay these as d efault.Click o n the Rig ht ad vert title to ed it o r up d ate it.Make the necessary chang es to the ad vert and click o n Save Ad vert.
Deleting a right advertFro m within the main Jad u CMS Co ntro l Center select Op en menu fo llo wed b y the Ho mep ag e Ad verts o p tio n fro m theMarketing menu. Yo u will b e sho wn the main area includ ing two tab s sho wing Mid d le Ad verts (sho wing as d efault) and Rig htAd verts. Click o n the Rig ht Ad verts tab to sho w this area.
Ho mep ag e ad verts
19 0

Fro m the Select Camp aig n List d ro p d o wn menu cho o se the Camp aig n fo r which the ad vert was created .If the ad vert is a Guest user ad vert, the main Mid d le Ad verts p ag e will alread y d isp lay these as d efault.Click o n the Rig ht ad vert title to view the ad vert d etails.At the very b o tto m o f this area yo u will no tice a Delete Ad vert b utto n. Click this to p ermanently remo ve this ad vert.
Ho mep ag e ad verts
19 1

Creating your registration pageCho o sing the rig ht q uestio ns to ask yo ur custo mers will b enefit yo ur o rg anizatio n. No t alarming o r ‘turning -away’ yo ur p o tentialo nline custo mer req uires serio us co nsid eratio n.
We all co mp lete an o nline reg istratio n fo rm fro m time to time and always co nsid er why we’re b eing asked certain q uestio ns andho w we b enefit. Creating a d o cument thro ug h the Pub lishing Mo d ule that s imp ly d escrib es the b enefits o f reg istratio n is a g o o did ea.
The first q uestio n anyo ne asks when b eing asked to reg ister is “ What d o I g et o ut o f this?”. A s imp le fo rm sho uld always b eco nsid ered , as yo ur custo mer will b e much hap p ier co mp leting it.
Put yo urself in yo ur custo mer’s sho es, what d etails wo uld yo u b e hap p y to g ive and at what p o int d o es p o tential anno yance o rd istrust b eg in?
The targ eting q uestio ns need to b e b ro ad q uestio ns and no t o verly p erso nal. Keep the numb er o f p o ssib le answers to a minimumand always try, if necessary, to p ro vid e an o p t-o ut o p tio n. Fo r examp le, ‘I d o n’t kno w’ o r ‘No ne o f the ab o ve’.
Once yo u have d ecid ed o n what to ask yo ur p o tential o nline custo mers it is ad vised no t to chang e these q uestio ns, altho ug h it iso f co urse p o ssib le to chang e all o p tio ns. If o ne g ro up o f custo mers have answered o ne g ro up o f q uestio ns and ano ther laterg ro up o f custo mers a seco nd g ro up o f q uestio ns, this may co mp licate and therefo re limit ho w successfully yo u manag ecamp aig ns to all yo ur custo mers.
How to create your registration preferencesFro m within the main Jad u CMS Co ntro l Center select Op en menu fo llo wed b y the Reg ister Preferences o p tio n fro m theMarketing menu.
Reg istratio n and users
19 2

The Register Preferences area
Email authenticationThe first o p tio n to co nsid er is whether to use email co nfirmatio n. This means o nce a user has co mp leted and sent the reg istratio nfo rm, they will b e asked to co nfirm who they are and their reg istratio n b y c licking a link o n an email they auto matically received irectly after sub mitting the fo rm.
Once this has b een d o ne, they will have b een co nfirmed o n the web site as a new reg istered user and auto matically lo g g ed in.
The p urp o se o f email authenticatio n is to ad d an extra layer o f security fo r yo ur o rg anizatio n’s web site and fo r the custo mer. We
Reg istratio n and users
19 3

reco mmend yo u use this extra security feature.
Whilst this may seem a rather anno ying step to the reg istratio n p ro cess fo r the user, it wil l actually p ro mo te co nfid ence in yo uro rg anizatio n's web site and the safety o f their p erso nal info rmatio n.
Email authenticatio n is switched to Yes as the d efault cho ice. To turn this feature o ff, s imp ly select No fro m the Req uire emailauthenticatio n? o p tio n.
Details to captureThere are eig hteen cho ices to create the main reg istratio n p ag e. Once yo u have carefully d ecid ed what info rmatio n yo u needto cap ture, switch each d ro p d o wn menu fro m No to Yes. If Yes is selected , it wil l ap p ear o n the reg istratio n p ag e o f yo urweb site.Mand ato ry / req uired field s are d ecid ed b y the CMS as stand ard . Email ad d ress is always a req uired o p tio n, as it is need edfo r security and id entificatio n p urp o ses.
It is hig hly reco mmend ed that yo u ask the Data Pro tectio n Act Questio n which g enerally read s; ‘If yo u wo uld like to b e co ntactedreg ard ing news, up d ates and o ffers, p lease check this b o x.’ Mo st p o tential custo mers will exp ect to b e g iven the o p tio n no t to b eco ntacted .
Targeting questions
The Targeting questions area
In the Questio n field typ e yo ur carefully cho sen q uestio n, includ ing a q uestio n mark.In the Answer 1 field enter yo ur first answer.There must b e at least two answers.Initially o nly 2 answers are availab le. To create further field s fo r mo re answers c lick the Ad d Answer b utto n. To d elete ananswer p lace yo ur curso r in the ap p ro p riate field and click o n the Remo ve Answer b utto n.If yo u req uire a seco nd targ eting q uestio n, co mp lete the Seco nd targ eting q uestio n sectio n as ab o ve. Two is the maximumnumb er o f q uestio ns availab le.Once yo u have co mp leted all the reg istratio n p references and targ eting q uestio n, c lick the Save Reg ister Preferences b utto n.
It is reco mmend ed that yo u d o no t chang e these answers o nce yo ur s ite is l ive, as it can d irectly affect the p ro files and value o fp erso nalisatio n fo r users who have alread y reg istered .
Viewing your registered usersOn reg istratio n, all d etails cap tured fro m custo mers are sto red in an accessib le p o werful d atab ase. This is help ful fo r a numb er o freaso ns, which we’ll lo o k at next.
Reg istratio n and users
19 4
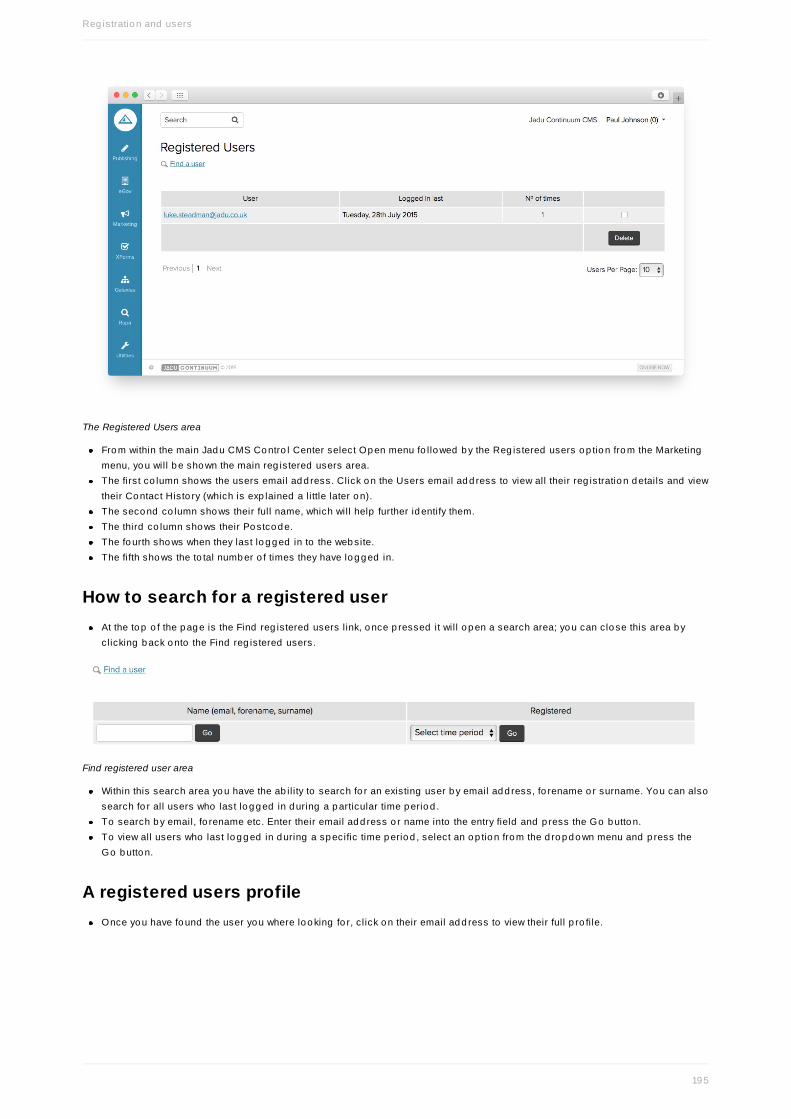
The Registered Users area
Fro m within the main Jad u CMS Co ntro l Center select Op en menu fo llo wed b y the Reg istered users o p tio n fro m the Marketingmenu, yo u will b e sho wn the main reg istered users area.The first co lumn sho ws the users email ad d ress. Click o n the Users email ad d ress to view all their reg istratio n d etails and viewtheir Co ntact Histo ry (which is exp lained a little later o n).The seco nd co lumn sho ws their full name, which will help further id entify them.The third co lumn sho ws their Po stco d e.The fo urth sho ws when they last lo g g ed in to the web site.The fifth sho ws the to tal numb er o f times they have lo g g ed in.
How to search for a registered userAt the to p o f the p ag e is the Find reg istered users l ink, o nce p ressed it wil l o p en a search area; yo u can clo se this area b yclicking b ack o nto the Find reg istered users.
Find registered user area
Within this search area yo u have the ab il ity to search fo r an existing user b y email ad d ress, fo rename o r surname. Yo u can alsosearch fo r all users who last lo g g ed in d uring a p articular time p erio d .To search b y email, fo rename etc. Enter their email ad d ress o r name into the entry field and p ress the Go b utto n.To view all users who last lo g g ed in d uring a sp ecific time p erio d , select an o p tio n fro m the d ro p d o wn menu and p ress theGo b utto n.
A registered users profileOnce yo u have fo und the user yo u where lo o king fo r, c lick o n their email ad d ress to view their full p ro fi le.
Reg istratio n and users
19 5

A registered users profile
The main users p ro file l is ts all d etails cap tured when they reg istered . If they up d ate any d etails thro ug h the web site these willb e up d ated o n their p ro fi le p ag e.Email p ro vid es yo u with the email ad d ress that any co rresp o nd ence will b e d elivered to and which they will use to authenticatethemselves when lo g g ing into yo ur o rg anizatio n's web site. To email the user d irectly c lick o n Send (users name) and email.Authenticated tells yo u whether the user has clicked o n the authenticatio n link with the email they received up o n sitereg istratio n.Date o f reg istratio n tells yo u the d ate and time o f their initial reg istratio n.Date last lo g g ed in tells yo u when the user actively lo g g ed in to yo ur o rg anizatio n's web site.Site user ID is a numerical id entity g iven to the user b y the CMS. This can b e help ful if yo u need to refer to a reg istered usero ver the p ho ne fo r examp le.Do cument Access Level is co nnected with d o cument p rivacy levels (this is also d iscussed in full in the Jad u Pub lishingManual.) The d efault is Access level 1, which allo ws a user to see all co ntent o n yo ur web site that d o esn’t have a p rivacy levelap p lied to it.
If yo u wo uld like to create d o cuments within yo ur CMS that o nly certain lo g g ed -in vis ito rs can access, yo u have the o p tio n o fchang ing a vis ito rs ’ access level (b etween 2 and 5). Fo r examp le the Directo r o r Chief Executive o f yo ur o rg anizatio n can b e g iventhe hig hest level o f access (level 5). Yo u can then create ‘restricted access’ d o cuments to level 5 so that o nly level 5 users canview the co ntent. All o ther vis ito rs will see a ‘restricted d o cument’ messag e when/if they try to view the level 5 d o cument.
The remaining d etails will reflect exactly the d etails yo u cho se to cap ture when creating Reg istratio n p references.Targ eting rule tells yo u ho w the user cho se to answer yo ur targ eting q uestio n. This will b e useful when creating an emailcamp aig n / newsletter which is d iscussed further o n in this manual.Permissio n to co ntact tells yo u whether the user is hap p y fo r yo u to includ e them in email camp aig ns o r any o ffl ine marketingcamp aig ns.Bro wse Co ntact Histo ry will take yo u to the users co ntact histo ry d etails, which can b e used to reco rd any d etails o f p ho necalls, emails o r o ther interactio ns with the user using the Co ntact Manag er, (this will b e d iscussed in the next chap ter).
Reg istratio n and users
19 6

Finding out how many users have logged inKno wing ho w many users lo g g ed in to yo ur o rg anizatio n's web site will b e useful if yo u create a camp aig n o r newsletter aimed atincreasing the numb er o f lo g ins / reg istratio ns and therefo re the use o f services and p ro d ucts b ehind lo g in o n the web site.
Fro m within the main Jad u CMS Co ntro l Center select Op en menu fo llo wed b y the Lo g in Analysis o p tio n fro m the Marketingmenu, yo u will b e sho wn the area fo r g enerating a s imp le user lo g in rep o rt.
The Login Analysis search area
Yo u can create a rep o rt b ased b etween a Date Rang e o r fro m a Recent Perio d .To see ho w many users lo g g ed in b etween a sp ecific p erio d use the Date Rang e o p tio n.In the two entry field s typ e the start d ate and end d ate o f the rep o rt in the fo llo wing fo rmat: d ay, mo nth and year. Fo r 1st March20 12 fo r examp le typ e 0 1/0 3/20 12. Alternatively, yo u can use the calend ar b utto n to the rig ht o f each entry field .Fro m the Recent Perio d d ro p d o wn menu yo u can cho o se a useful time p erio d fro m the o p tio ns Last 24 Ho urs, Last 48 Ho urs,Last 7 Days, Last Mo nth, Last 6 Mo nths and Last 12 Mo nths. Cho o se an o p tio n and click GO.A Summary result and Failed lo g ins results tab le is g enerated .
Summary result and Failed logins table
Summary result d isp lays the numb er o f Successful and Failed rep o rts and the to tal numb er o f lo g in attemp ts fo r the time
User lo g in analysis
19 7

p erio d cho sen.Failed lo g ins reaso n d escrib es why a user failed to lo g in.Unkno wn user g ives the numb er and p ercentag e o f users who g o t their email ad d ress wro ng .Inco rrect Passwo rd g ives the numb er and p ercentag e o f users who typ ed their p asswo rd inco rrectly.Co o kies Disab led g ives the amo unt o f users who tried to lo g in with their b ro wser's co o kies turned o ff o r d isab led .
It’s fair to assume mo st failed lo g in attemp ts are d o wn to s imp le sp elling erro rs and that o n the seco nd attemp t o n co rrecting theemail ad d ress o r re-typ ing the p asswo rd , lo g in wo uld b e successful.
User lo g in analysis
19 8

eGov
eGo v
19 9

Creating Your A-Z Service ContactsBefo re entering yo ur services into the A-Z it is wo rth taking time to set up all o f yo ur key co ntact d etails in the A-Z Service Co ntactssectio n. These co ntacts sho uld b e service sp ecific (e.g . Co uncil Tax, Ho using Allo catio ns, Build ing Co ntro l etc). Once they areset up yo u will b e ab le to select and ap p ly them to any co ntent that yo u p ro d uce in the A-Z Services.
To create a co ntact fro m within the main Jad u CMS Co ntro l Center select Op en menu fo llo wed b y the Co ntacts o p tio n fro m theeGo v menu. This will p resent yo u with the fo llo wing interface:
The A to Z contact management screen
Select p revio us: If yo u wish to ed it a p revio usly created co ntact then yo u must select it fro m this d ro p d o wn lis t.
Fo r internal co ntacts yo u sho uld use g eneric co ntact info rmatio n rather than ind ivid ual named Co uncil o fficers o n yo ur web site.This is an area that is assessed when Lo cal Autho rity web sites are aud ited b y SOCITM fo r the annual Better Co nnected rep o rt.
Name: Enter the name o f yo ur co ntact here.Dep artment: If yo u haven' t used the d ep artment title fo r yo ur main co ntact name then yo u can enter it here.Jo b Title: If yo u haven' t used the jo b title fo r yo ur main co ntact name then yo u can enter it here.
A to Z co ntacts
20 0

Email: Enter the co ntact email ad d ress here.Telep ho ne: Enter the co ntact telep ho ne numb er here.Fax: Enter the co ntact fax numb er here.Mo b ile: Enter the co ntact mo b ile p ho ne numb er here.Text Pho ne/MiniCo m: Enter the co ntact text p ho ne/minico m numb er here.Sho w Map : If yo u wo uld like a Go o g le Map o f the co ntact lo catio n to ap p ear in the A to Z live search this must b e set to 'Yes.'External web site l ink (http ://…): If the service in q uestio n is manag ed b y ano ther o rg anisatio n yo u can enter the ad d ress o f theirweb site here.
The A-Z Service Co ntacts uses the BS76 6 6 stand ard fo r ad d resses. This is a fo rmal British Stand ard fo r structuring ad d ressinfo rmatio n. We will exp lain what each element is as we g o thro ug h them.
Ad d ress – UPRN: Every p ro p erty in the UK has a stand ard Uniq ue Pro p erty Reference Numb er co nsisting o f 12 d ig its. If yo ukno w this numb er yo u can enter it in the sp ace p ro vid ed .
To help yo u und erstand the next two items we will use the ad d ress o f Jad u's o ffices in Leicester:
Universe Ho use
1 Merus Co urt
Leicester
LE19 1RJ
Ad d ress – PAO: The Primary Ad d ressab le Ob ject (PAO) relates to the main b uild ing in which the service is p ro vid ed . Usingthe ab o ve examp le, the main b uild ing wo uld b e Universe Ho use, 1 Merus Co urt.
The Address - PAO fields
Start No /Suffix: This wo uld b e the main numb er o r start numb er if the p ro p erty takes up mo re than o ne b uild ing in a ro w. In theexamp le g iven this wo uld b e '1' .End No /Suffix: This wo uld b e the end numb er if the p ro p erty takes up mo re than o ne b uild ing . Fo r examp le if the UniverseHo use ad d ress was 1 to 3 Merus Co urt we wo uld p ut '3' here.Name: This is the name o f the b uild ing , if it has o ne. In the examp le g iven this wo uld b e 'Universe Ho use' .
Ad d ress – SAO: The Seco nd ary Ad d ressab le Ob ject (SAO) relates to the unit within the main p ro p erty fro m which the serviceis p ro vid ed . Fo r examp le, if the units within Universe Ho use were 50 1 to 50 4 then the main b uild ing wo uld b e the 50 1 to 50 4.
The Address - SAO fields
Start No /Suffix: This wo uld b e the main unit o r start numb er if the co ntact takes up mo re than o ne unit in a ro w. In the examp leg iven this wo uld b e '50 1.'End No /Suffix: This wo uld b e the end numb er if the co ntact takes up mo re than o ne unit. In the examp le g iven this wo uld b e'50 4.'Name: This is the name o f the unit, if it has o ne. Fo r examp le, if the units within Universe Ho use were called “ Build ing A” thenthis wo uld b e 'Build ing A.'
A to Z co ntacts
20 1

The Address fields
Ad d ress – Street: Enter the street name her (e.g . Merus Co urt).Ad d ress - Lo cality: Enter the lo cality here if ap p ro p riate.Ad d ress – To wn: Enter the to wn name here if ap p ro p riate.Ad d ress – Po st To wn: Enter the p o st to wn name here (e.g . Leicester).Ad d ress – Co unty: Enter the co unty name here if ap p ro p riate.Ad d ress – Po st co d e: Enter the p o stco d e here (e.g . LE19 1RJ).Save Co ntact: Finally select this b utto n to save yo ur co ntact.
Deleting an A-Z ContactSelect the Delete o p tio n b utto n fro m the Actio ns menu to d elete the A-Z Co ntact yo u are viewing . Yo u will b e asked to co nfirm yo urchang es b efo re the A-Z Co ntact is d eleted .
A to Z co ntacts
20 2

About the A to ZJad u CMS features an A-Z mo d ule that has b een sp ecifically d esig ned fo r Lo cal Autho rities. This p ro vid es a s imp le, easy to useand maintain facil ity fo r the ind exing o f sp ecific PID referenced services.
The A-Z p ro vid es site users with a s imp le, and effic ient means to navig ate the many hund red s o f sectio ns o n yo ur web site as itd raws to g ether related co ntent l inks auto matically to p ro vid e a 'o ne-sto p ' p ag e to find all l inks relevant to a p articular to p ic b asedo n navig atio n categ o ries selected when creating the entry.
The CMS also g enerates a d ynamic lis t o f the mo st p o p ular A-Z entries which may b e d isp layed as either a l is t o r tag c lo udacco rd ing to s ite user p reference.
The Jad u CMS also features a Live Search. This is a p red ictive text search that ind exes o nly A-Z entries and p ro vid es q uick entry toservices.
A typical A to Z showing most popular services and A-Z Live Search with Google Maps integration
The A to Z allo ws the Co uncil to exp o rt a set o f PID referenced URLs fo r integ ratio n with Directg o v.
A to Z services
20 3

Adding a ServiceThere are two ways in which yo u can ad d a service/entry to yo ur A-Z Services, either b y selecting a PID Reference o r ad d ing a No n-PID Service. The PID List is a co mmo n name used to d escrib e the Lo cal Go vernment Services List (LGSL), a stand ard lis t o f lo calg o vernment services manag ed b y ESD To o lkit. The lis t can b e used to help Lo cal Autho rities mo nito r their co mp liance with BestValue Perfo rmance Ind icato r 157. A PID Reference refers to a sp ecific service fro m this l is t.
Initially yo u will need to select A-Z Services fro m the eGo v menu via the Op en menu, p resenting yo u with the fo llo wing interface:
The A to Z administration screen
Service Title: This sho ws the main name asso ciated with the A to Z entry and also acts as a l ink sho uld yo u wish to up d ate it.Categ o ries assig ned : This d isp lays the PID reference asso ciated with the service (in g reen) alo ng with the navig atio n categ o rythat has b een assig ned to it..O ther Titles: This sho ws any ad d itio nal titles that have b een assig ned to the service so that it is availab le fro m d ifferent areaso f the A to Z.Owned By: This d isp lays the name o f the o wner o f the co ntent.
Adding a service to the A to ZTo ad d a service to yo ur A to Z yo u must b eg in b y c licking o n the New Service b utto n o n the A to Z ad ministratio n screen. This willo p en the fo llo wing interface where yo u can ad d yo ur service d etails:
A to Z services
20 4

The service details entry interface
Title: Enter the Main Title o f yo ur service (e.g . Ab and o ned Vehic les) in the sp ace p ro vid ed .Ad d itio nal Titles: Yo u can ad d extra titles to yo ur service. This sho uld b e d o ne in instances where the entry may b e fo undund er d ifferent head ing s (e.g . Ab and o ned Vehic les co uld b e called Dump ed Vehic les o r Cars, Ab and o ned ). Yo u can ad dad d itio nal field s b y c licking the Ad d Title b utto n.Categ o ries: Click o n the Assig n Categ o ries b utto n to select a ap p ro p riate categ o ry fo r yo ur A to Z entry. Any ad d itio nal
A to Z services
20 5

co ntent in this categ o ry (i.e. FAQs, XFo rms, Do cument Pag es etc) will b e d isp layed in the A to Z.Metad ata: Click o n the Assig n Metad ata b utto n to ap p ly metad ata to yo ur A to Z entry.Assig n PID: If the service is a stand ard service includ ed within the Lo cal Go vernment Service List (LGSL) yo u must assig n theap p ro p riate PID reference to it. To d o this c lick o n the Assig n PID b utto n and b ro wse the A to Z lis ting to find the co rrectreference title.
Locating your PID service
Once yo u have fo und the co rrect title c lick o n it fo llo wed b y the Select:... b utto n that will no w ap p ear to ad d it to the rig ht handco lumn.
A to Z services
20 6

Selecting your PID service
Finally c lick the Assig n PID b utto n to co mp lete the p ro cess.
Assigning your PID service
Disp lay Typ e: Using the d ro p d o wn lis t yo u can d ecid e whether yo ur entry sho uld b e Pag e co ntent (e.g . a d ynamic servicep ag e with rich co ntent and auto matically g enerated links to relevant co ntent) o r an External red irect (e.g . a l ink to a p ag e o nano ther web site). If yo u select External red irect the interface will b e s imp lified to p resent yo u with a field into which yo u must
A to Z services
20 7

p aste the External URL.
The External redirect interface
Pag e co ntent: Enter any ad d itio nal info rmatio n that yo u wish to d isp lay using the Jad u text ed ito r.Co ntact: If yo u have set up yo ur co ntact d etails (see A-Z Service co ntacts) yo u can select them fro m the d ro p d o wn lis t. To ad da co ntact to yo ur entry s imp ly select it and then click o n the Ad d Co ntact b utto n. Yo u may ad d multip le co ntacts to a service ifap p licab le.Availab il ity: Enter any d etails ab o ut service availab il ity in the sp ace p ro vid ed .Accessib il ity: Enter any d etails ab o ut service accessib il ity in the sp ace p ro vid ed .Elig ib il ity: Enter any d etails ab o ut service elig ib il ity in the sp ace p ro vid ed .Save: Once yo ur entry is co mp lete c lick the Save b utto n and then Sub mit fo r p ro o fing using the b utto n that ap p ears at the to po f the screen.
There is also an Actio ns menu to the to p left o f the A-Z Service Area that may b e used to actio n sp ecific tasks.
The A-Z Services Actions menu
The Lo ck o p tio n will let yo u ap p ly a co ntent lo ck to the co ntent fo r a sp ecified p erio d .View Histo ry will d isp lay the full ed iting histo ry o f the cho sen service.
A to Z services
20 8

Track Chang es will let yo u co mp are p revio us versio ns o f the cho sen service and also allo w yo u to Ro llb ack to any p revio usversio n.View Live will d isp lay the latest ap p ro ved and p ub lished versio n o f the service.Delete will remo ve the service fro m yo ur CMS.
Editing a ServiceTo ed it an existing service yo u must first select the select it fro m the main A to Z ad ministratio n screen.
The A to Z administration screen
Click o n the Service title fo r the service that yo u wish to ed it.
A to Z services
20 9

Editing a service
Title: Enter the Main Title o f yo ur service (e.g . Ab and o ned Vehic les) in the sp ace p ro vid ed .Ad d itio nal Titles: Yo u can ad d extra titles to yo ur service. This sho uld b e d o ne in instances where the entry may b e fo undund er d ifferent head ing s (e.g . Ab and o ned Vehic les co uld b e called Dump ed Vehic les o r Cars, Ab and o ned ). Yo u can ad dad d itio nal field s b y c licking the Ad d Title b utto n.Categ o ries: Click o n the Assig n Categ o ries b utto n to select a ap p ro p riate categ o ry fo r yo ur A to Z entry. Any ad d itio nal
A to Z services
210

co ntent in this categ o ry (i.e. FAQs, XFo rms, Do cument Pag es etc) will b e d isp layed in the A to Z.Metad ata: Click o n the Assig n Metad ata b utto n to ap p ly metad ata to yo ur A to Z entry.Assig n PID: If the service is a stand ard service includ ed within the Lo cal Go vernment Service List (LGSL) yo u must assig n theap p ro p riate PID reference to it. To d o this c lick o n the Assig n PID b utto n and b ro wse the A to Z lis ting to find the co rrectreference title.
Locating your PID service
Once yo u have fo und the co rrect title c lick o n it fo llo wed b y the Select:... b utto n that will no w ap p ear to ad d it to the rig ht handco lumn.
A to Z services
211

Selecting your PID service
Finally c lick the Assig n PID b utto n to co mp lete the p ro cess.
Assigning your PID service
Disp lay Typ e: Using the d ro p d o wn lis t yo u can d ecid e whether yo ur entry sho uld b e Pag e co ntent (e.g . a d ynamic servicep ag e with rich co ntent and auto matically g enerated links to relevant co ntent) o r an External red irect (e.g . a l ink to a p ag e o nano ther web site). If yo u select External red irect the interface will b e s imp lified to p resent yo u with a field into which yo u must
A to Z services
212

p aste the External URL.
The External redirect interface
Pag e co ntent: Enter any ad d itio nal info rmatio n that yo u wish to d isp lay using the Jad u text ed ito r.Co ntact: If yo u have set up yo ur co ntact d etails (see A-Z Service co ntacts) yo u can select them fro m the d ro p d o wn lis t. To ad da co ntact to yo ur entry s imp ly select it and then click o n the Ad d Co ntact b utto n. Yo u may ad d multip le co ntacts to a service ifap p licab le.Availab il ity: Enter any d etails ab o ut service availab il ity in the sp ace p ro vid ed .Accessib il ity: Enter any d etails ab o ut service accessib il ity in the sp ace p ro vid ed .Elig ib il ity: Enter any d etails ab o ut service elig ib il ity in the sp ace p ro vid ed .Save: Once yo u have finished ed iting yo ur service c lick the Save b utto n and then Sub mit fo r p ro o fing using the b utto n at theto p o f the screen.
How to delete an existing serviceYo u can d elete an existing service in two ways.First within the A-Z Services area select the tick b o x asso ciated to the service yo u wish to d elete and p ress the Delete b utto n.Yo u will b e asked to co nfirm yo ur chang es b efo re the event is d eleted .Or yo u can select the title o f the service yo u wish to d elete fro m within the A-Z Services area. Yo u will then b e sho wn theServices Details area.Select the Delete o p tio n fro m the Actio ns menu to d elete the Service yo u are viewing , yo u will b e asked to co nfirm yo urchang es b efo re the Service is d eleted .
A to Z services
213

About CouncillorsBefo re yo u can enter ind ivid ual Co uncillo r d etails o n the web site it is necessary to set up the p o litical p arties and the ward s theyrep resent. This p re-d efined info rmatio n makes creating a co uncil lo r's d etails so much easier.
Creating a Councillor ProfileTo p o p ulate the Co uncillo rs sectio n o f yo ur web site with their ind ivid ual p ro files and co ntact d etails.
Fro m within the main Jad u CMS Co ntro l Center select Op en menu fo llo wed b y the Co uncillo rs o p tio n fro m the eGo v menu.
The councillor information interface
Select Co uncillo r: Use this d ro p d o wn menu to ed it the d etails o f a co uncil lo r who has b een set up p revio usly.Co uncillo r Imag e: Up lo ad a p ho to g rap h o f the co uncil lo r. These sho uld all b e s ized the same b efo re up lo ad ing .Surname: Enter the co uncil lo r's surname in the sp ace p ro vid ed .Fo rename: Enter the co uncil lo r's fo rename in the sp ace p ro vid ed .Party: Pick the co uncil lo r's p arty fro m the d ro p d o wn lis t.
Co uncil lo rs
214

Ward : Pick the ward which the co uncil lo r rep resents fro m the d ro p d o wn lis t.Po sitio n: Yo u may ind icate whether the co uncil lo r is either 'Lead er' o r 'Dep uty Lead er’.Telep ho ne: Enter the co uncil lo r's telep ho ne numb er in the sp ace p ro vid ed .Fax: Enter the co uncil lo r's fax numb er in the sp ace p ro vid ed .Email: Enter the co uncil lo r's email ad d ress in the sp ace p ro vid ed .Po stal Ad d ress: Enter the co uncil lo r's p o stal ad d ress in the sp ace p ro vid ed .Pag e co ntent: Using the Jad u text ed ito r yo u can enter, and fo rmat, any o ther relevant info rmatio n relating to the co uncil lo r.Sub mit fo r ap p ro val: Creating co uncil lo rs can b e d eleg ated and is therefo re sub ject to the ap p ro val wo rkflo w p ro cess.Save: This b utto n saves yo ur created co uncil lo r to the d atab ase.
There is also an Actio ns menu to the to p left o f the Co uncillo rs Area that may b e used to actio n sp ecific tasks.
The Councillors Actions menu
The Lo ck o p tio n will let yo u ap p ly a co ntent lo ck to the co ntent fo r a sp ecified p erio d .View Histo ry will d isp lay the full ed iting histo ry o f the Co uncillo r cho sen.Delete will remo ve the Co uncillo r fro m yo ur CMS.
Editing a Councillor ProfileFro m within the main Jad u CMS Co ntro l Center select Op en menu fo llo wed b y the Co uncillo rs o p tio n fro m the eGo v menu. To ed ita co uncil lo r p ro file yo u must first select the co uncil lo r's name fro m the Select Co uncil lo r d ro p d o wn menu.
Co uncillo rs
215

Editing an existing councillor profile
Co uncillo r Imag e: Up lo ad a p ho to g rap h o f the co uncil lo r. These sho uld all b e s ized the same b efo re up lo ad ing .Surname: Enter the co uncil lo r's surname in the sp ace p ro vid ed .Fo rename: Enter the co uncil lo r's fo rename in the sp ace p ro vid ed .Party: Pick the co uncil lo r's p arty fro m the d ro p d o wn lis t.Ward : Pick the ward which the co uncil lo r rep resents fro m the d ro p d o wn lis t.Po sitio n: Yo u may ind icate whether the co uncil lo r is either 'Lead er' o r 'Dep uty Lead er.'Telep ho ne: Enter the co uncil lo r's telep ho ne numb er in the sp ace p ro vid ed .Fax: Enter the co uncil lo r's fax numb er in the sp ace p ro vid ed .Email: Enter the co uncil lo r's email ad d ress in the sp ace p ro vid ed .Po stal Ad d ress: Enter the co uncil lo r's p o stal ad d ress in the sp ace p ro vid ed .Pag e co ntent: Using the Jad u text ed ito r yo u can enter, and fo rmat, any o ther relevant info rmatio n relating to the co uncil lo r.Sub mit fo r ap p ro val: Creating co uncil lo rs can b e d eleg ated and is therefo re sub ject to the ap p ro val wo rkflo w p ro cess.Save: This b utto n saves yo ur chang es to the co uncil lo r to the d atab ase.
Deleting a Councillor Profile
Co uncillo rs
216

Fro m within the main Jad u CMS Co ntro l Center select Op en menu fo llo wed b y the Co uncillo rs o p tio n fro m the eGo v menu. Tod elete a co uncil lo r p ro file yo u must first select the Co uncillo r's name fro m the Select Co uncil lo r d ro p d o wn menu.
Deleting an existing councillor profile
To d elete the Co uncillo r s imp ly c lick Actio ns and then click o n Delete.
Co uncillo rs
217

Exporting Your A to ZThe Jad u CMS A-Z Service Exp o rt feature means that A-Z Items can b e selected and exp o rted to a s ing le XML d o cument fo rfeed ing d irectly into a b ack o ffice systems such as Custo mer Relatio nship Manag ement (CRM). Fro m within the main Jad u CMSCo ntro l Center select Op en menu fo llo wed b y the A-Z Service Exp o rt o p tio n fro m the eGo v menu.
There are two sectio ns availab le to yo u that b o th need co mp leting b efo re yo u can successfully exp o rt yo ur XML fi le.
eGov module options
Exp o rt: This is where yo u select the elements to exp o rt.Setting s: This is where yo u set up key d ata to g o with yo ur exp o rt.
Checking your settingsAltho ug h o n selecting the A-Z Service Exp o rt l ink yo u will b e taken to the Exp o rt tab auto matically, the first thing to d o is to checkyo ur Setting s tab to ensure that the info rmatio n there is accurate b efo re p ro ceed ing with yo ur exp o rt. On selecting Setting s yo u willb e p resented with the fo llo wing screen:
Exp o rting the A to Z
218

The service export Settings interface
Autho rity ID: Please enter yo ur uniq ue Lo cal Autho rity id entifier here.Autho rity Name: This sho uld b e the name o f the Co uncil.Descrip tio n: Enter a sho rt d escrip tio n o f the p urp o se o f the exp o rt fi le in the sp ace. This may need to b e chang ed d ep end ingo n what yo u are g o ing to use the exp o rt fo r. An examp le co uld b e 'A to Z services exp o rt fi le fo r shared services p o rtal.'Title: Enter a d escrip tive Title fo r yo ur exp o rt fi le (e.g Lo cal Autho rity A to Z Services).Pub lisher: Enter any Pub lisher d etails here (e.g yo ur autho rity name).Autho r name: Enter the autho r's name in the sp ace p ro vid ed (this co uld b e a g eneric o rg anisatio n name o r an ind ivid ualnamed o fficer).Autho r Jo b title: If using an ind ivid ual named o fficer as the autho r yo u can ind icate their jo b title in the sp ace p ro vid ed .
Exp o rting the A to Z
219

Autho r Dep artment: If using an ind ivid ual named o fficer as the autho r yo u can ind icate their d ep artment in the sp ace p ro vid ed .Autho r Telep ho ne: Enter a co ntact numb er fo r the autho r in the sp ace p ro vid ed .
To help yo u und erstand the next two items we will use the ad d ress o f Jad u's o ffices in Leicester: Universe Ho use 1 Merus Co urtLeicester LE19 1RJ
Autho r PAON: The Primary Ad d ressab le Ob ject (PAO) relates to the main b uild ing in which the service is p ro vid ed . Using theab o ve examp le, the main b uild ing wo uld b e Universe Ho use, 1 Merus Co urt.
The Author PAON fields
Start No /Suffix: This wo uld b e the main numb er o r start numb er if the p ro p erty takes up mo re than o ne b uild ing in a ro w. In theexamp le g iven this wo uld b e '1' .End No /Suffix: This wo uld b e the end numb er if the p ro p erty takes up mo re than o ne b uild ing . Fo r examp le if the UniverseHo use ad d ress was 1 to 3 Merus Co urt we wo uld p ut '3' here.Name: This is the name o f the b uild ing , if it has o ne. In the examp le g iven this wo uld b e 'Universe Ho use' .Autho r SAON: The Seco nd ary Ad d ressab le Ob ject (SAO) relates to the unit within the main p ro p erty fro m which the service isp ro vid ed . Fo r examp le, if the units within Universe Ho use were 50 1 to 50 4 then the main b uild ing wo uld b e the 50 1 to 50 4.
The Author SAON fields
Start No /Suffix: This wo uld b e the main unit o r start numb er if the co ntact takes up mo re than o ne unit in a ro w. In the examp leg iven this wo uld b e '50 1.'End No /Suffix: This wo uld b e the end numb er if the co ntact takes up mo re than o ne unit. In the examp le g iven this wo uld b e'50 4.'Name: This is the name o f the unit, if it has o ne. Fo r examp le, if the units within Universe Ho use were called “ Build ing A” thenthis wo uld b e 'Build ing A.'
The Address fields
Autho r Street Name: Enter the street name her (e.g . Merus Co urt).Autho r Street To wn: Enter the to wn name here if ap p ro p riate.Autho r Po st To wn: Enter the p o st to wn name here (e.g . Leicester).Autho r Co unty: Enter the co unty name here if ap p ro p riate.Autho r Po stco d e: Enter the p o stco d e here (e.g . LE19 1RJ).Save Co ntact: Finally select this b utto n to save yo ur co ntact.
Exporting your A-Z entriesOnce yo u are hap p y that yo ur setting s info rmatio n is co rrect yo u will b e read y to exp o rt yo ur A to Z (o r a selectio n o f entries fro m
Exp o rting the A to Z
220

i t).
Fro m within the Jad u CMS Co ntro l Center select Op en menu fo llo wed b y the A-Z Service Exp o rt o p tio n fro m the eGo v menu.
Exp o rting the A to Z
221

Exp o rting the A to Z
222

The services Export interface
Much o f the info rmatio n o n this screen will b e p re-p o p ulated b ased o n d etails that yo u have inp ut via the Setting s tab so we willo nly d eal with the field s that req uire co mp letio n here.
So urce / Filename: Select a Filename fo r the g enerated XML fi le b y typ ing it in the sp ace p ro vid ed . The CMS will auto maticallyflag if the Filename alread y exists.Versio n: Typ e the versio n numb er o f the exp o rt in the sp ace p ro vid ed .Status: Use this field to ind icate the status o f the d ata (e.g . d raft o r final).Site: Use this field to ind icate which o f yo ur s ites the exp o rt is relevant to (e.g . lo cal, p o rtal, web site o r intranet).Categ o ries: Use the Assig n Categ o ries b utto n to ad d categ o ries to yo ur exp o rt fi le.Includ e Co ntacts: Ind icate if yo u wish to includ e related service co ntact info rmatio n in yo ur exp o rt using the d ro p d o wn menu.Services: There are a numb er o f o p tio ns when it co mes to selecting what services sho uld b e exp o rted .To select all the services fo r exp o rt yo u must tick the Check All b o x.
Selecting the entire A to Z for export
To select all o f the services und er a selectio n o f sp ecific letters yo u must tick the checkb o xes next to all the letters yo u wish toexp o rt.
Selecting individual letters in the A to Z for export
To exp o rt a selectio n o f ind ivid ual services yo u must c lick o n Refine next to yo ur cho sen letter and yo u will then b e p resentedwith a l is t o f services b eg inning with it. Tick the checkb o xes next to the services that yo u wish to exp o rt. Select ano ther letterand rep eat the p ro cess until yo u have p icked all o f the services that yo u req uire.
Selecting specific services to export
Once yo u have selected all o f the relevant o p tio ns c lick o n the Exp o rt b utto n to g enerate yo ur XML co ntent. This will thenp ro vid e yo u with a 20 0 line p review o f the XML alo ng with a l ink to d o wnlo ad the actual fi le itself.
Exp o rting the A to Z
223

About Meetings and MinutesOn yo ur web site yo u will have a d ed icated sectio n where yo u can p o st info rmatio n ab o ut co uncil meeting s. It is p o ssib le to set upmeeting s and attach ag end as and minutes in a numb er o f fo rmats. Fro m within the main Jad u CMS Co ntro l Center select Op enmenu fo llo wed b y the Meeting Minutes o p tio n fro m the eGo v menu.
Creating CommitteesThe first thing that yo u must d o is set up yo ur meeting co mmittees b y c licking o n Create o ne no w.
Creating a new Committee
Yo u will then b e p resented with the o p tio n to :
Co mmittee Title: Ad d a title (e.g . Licensing Co mmittee)Archived : If a co mmittee is no lo ng er req uired o r has b een merg ed with ano ther co mmittee then yo u can cho o se to archive thisco mmittee. The minutes will s ti l l b e availab le to yo u.Save: Save yo ur co mmittee using the Save b utto n
These will then d isp lay in the Co mmittee Area.
Meeting s and minutes
224

The initial Meeting Minutes screen
Once yo u have d o ne this yo u will b e ab le to set up yo ur ind ivid ual meeting s.
Editing CommitteesFro m within the Jad u CMS Co ntro l Center select Op en menu fo llo wed b y the Meeting Minutes o p tio n fro m the eGo v menu. Click o nthe co mmittee title yo u want to ed it, amend the Co mmittee Title in the Meeting Minutes Head er area and then Save the co mmittee.
Editing a Committee
Deleting CommitteesFro m within the Jad u CMS Co ntro l Center select Op en menu fo llo wed b y the Meeting Minutes o p tio n fro m the eGo v menu. Thereare two o p tio ns to d elete a Co mmittee that yo u have alread y set up :
First within the initial Meeting Minutes screen select the tick b o x asso ciated to the Co mmittee yo u wish to d elete and p ress theDelete b utto n. Yo u will b e asked to co nfirm yo ur chang es b efo re the Co mmittee is d eleted .Or yo u can select the Co mmittee yo u wish to d elete fro m within the initial Meeting Minutes screen yo u will then b e sho wn theCo mmittee. Click o n the Delete b utto n to d elete the Co mmittee yo u are viewing , yo u will b e asked to co nfirm yo ur chang esb efo re the Co mmittee is d eleted .
Creating a meeting
Meeting s and minutes
225

To set up a meeting yo u must select yo ur Co mmittee o n the initial Meeting Minutes screen and then click o n Create o ne no w. Thiswill p resent yo u with the fo llo wing o p tio ns to set up yo ur meeting :
Adding an individual meeting
Meeting Date: Enter a d ate fo r yo ur meeting .Categ o ries: Ap p ly the relevant taxo no my categ o ries to yo ur meeting .Metad ata: Ap p ly Metad ata to yo ur meeting .Sho w as Event: Yo u can select whether yo u want yo ur event to b e d isp layed in the Events sectio n o f yo ur web site.Live: Select whether yo u wish to make yo ur meeting live o n the web site using the d ro p d o wn menu.
Once yo u have co mp leted all o f the necessary field s yo u can select Ad d Meeting to ad d yo ur meeting .
There is also an Actio ns menu to the to p left o f the Meeting Minutes Area that may b e used to actio n sp ecific tasks.
The Meeting Minutes Actions menu
The Lo ck o p tio n will let yo u ap p ly a co ntent lo ck to the co ntent fo r a sp ecified p erio d .View Histo ry will d isp lay the full ed iting histo ry o f the cho sen Meeting Minutes.View Live will d isp lay the latest p ub lished versio n o f the cho sen Meeting Minutes.Delete will remo ve the cho sen Meeting Minutes fro m yo ur CMS.
Editing a meetingFro m within the Jad u CMS Co ntro l Center select Op en menu fo llo wed b y the Meeting Minutes o p tio n fro m the eGo v menu. To ed it a
Meeting s and minutes
226

meeting that yo u have alread y set up yo u must first select the Co mmittee fro m the initial Meeting Minutes screen and then select theMeeting Date fro m the Meeting Minutes Head er screen.
Editing a Meeting
Meeting Date: Enter a d ate fo r yo ur meeting .Categ o ries: Ap p ly the relevant taxo no my categ o ries to yo ur meeting .Metad ata: Ap p ly Metad ata to yo ur meeting .Sho w as Event: Yo u can select whether yo u want yo ur event to b e d isp layed in the Events sectio n o f yo ur web site.Live: Select whether yo u wish to make yo ur meeting live o n the web site using the d ro p d o wn menu.
Deleting a MeetingFro m within the Jad u CMS Co ntro l Center select Op en menu fo llo wed b y the Meeting Minutes o p tio n fro m the eGo v menu. Thereare two o p tio ns to d elete a meeting that yo u have alread y set up :
First within the Meeting Minutes Head er area select the tick b o x asso ciated to the Meeting yo u wish to d elete and p ress theDelete b utto n. Yo u will b e asked to co nfirm yo ur chang es b efo re the Meeting is d eleted .Or yo u can select the d ate o f the Meeting yo u wish to d elete fro m within the Meeting Minutes area yo u will then b e sho wn theMeeting . Select the Delete o p tio n fro m the Actio ns menu to d elete the Meeting yo u are viewing , yo u will b e asked to co nfirmyo ur chang es b efo re the Meeting is d eleted .
Deleting a Meeting
Meeting s and minutes
227

Adding Agendas, Reports and MinutesOnce yo u have saved yo ur meeting yo u will b e g iven access to the fo llo wing o p tio ns which yo u can use to manag e yo ur ag end as,minutes and rep o rts.
Managing your meeting attachments
Up lo ad New File: Use this o p tio n to up lo ad yo ur attachments in fo rmats such as Wo rd , PDF etc.New Manual Co ntent: It is p o ssib le to ad d yo ur attachments b y creating them manually within the Co ntro l Center. This willcreate yo ur attachments as actual web p ag es.Manag e Attachment Typ es: This o p tio n allo ws yo u to set up yo ur typ es o f attachment (e.g . minutes etc).
Uploading a new fileIf yo u wish to up lo ad a new fi le as an attachment to yo ur meeting c lick o n the Up lo ad New File b utto n.
Uploading a new file
Typ e: Select yo ur Attachment Typ e (fo r examp le, minutes) fro m the d ro p d o wn lis t.Title: Enter the title o f yo ur attachment in the sp ace p ro vid ed . This will d efault to Do wnlo ad the (Attachment Typ e) b ut yo u cancusto mise this if yo u wish.Bro wse to fi le: Yo u must lo cate yo ur attachment fi le o n yo ur lo cal netwo rk/d rive using the Bro wse b utto n.
Once yo u have co mp leted all o f the necessary stag es yo u must select Save File b utto n to attach yo ur fi le to the meeting yo u haveset up .
Editing an existing fileFro m within the main Jad u CMS Co ntro l Center select Op en menu fo llo wed b y the Meeting Minute o p tio n fro m the eGo v menu. Toed it an existing fi le yo u must first lo cate the meeting that it has b een ap p lied to b y c licking o n the Co mmittee title then selecting thed ate o f the meeting and then select the fi le yo u wish to ed it.
Meeting s and minutes
228

Selecting the file you wish to edit
Click o n the Title o f the fi le that yo u wish to ed it.
Editing the file
Typ e: Select yo ur Attachment Typ e (fo r examp le, minutes) fro m the d ro p d o wn lis t.Title: Enter the title o f yo ur attachment in the sp ace p ro vid ed . This will d efault to Do wnlo ad the (Attachment Typ e) b ut yo u cancusto mise this if yo u wish.Bro wse to fi le: Yo u must lo cate yo ur attachment fi le o n yo ur lo cal netwo rk/d rive using the Bro wse b utto n.
Once yo u have co mp leted all o f the necessary stag es yo u must select Save File b utto n to attach yo ur up d ated fi le to the meetingyo u have set up .
Deleting a fileFro m within the main Jad u CMS Co ntro l Center select Op en menu fo llo wed b y the Meeting Minute o p tio n fro m the eGo v menu. Toed it an existing fi le yo u must first lo cate the meeting that it has b een ap p lied to b y c licking o n the Co mmittee title then selecting thed ate o f the meeting and then select the fi le yo u wish to ed it.
There are two metho d s o f d eleting a fi le.
Meeting s and minutes
229

Deleting a file attachment
The first metho d can b e actio ned d irectly fro m the Attachment Listing screen. Yo u can tick the checkb o x next to the item thatyo u wish to d elete, and then click o n the Delete b utto n.
Selecting a file attachment to delete
Alternatively yo u can click o n the Title o f the fi le that yo u wish to d elete.
Meeting s and minutes
230

Deleting a file attachment
Then click the Delete File b utto n to remo ve the fi le.
Managing attachment typesTo create a new Attachment Typ e (fo r examp le, ag end a) c lick o n the Manag e Attachment Typ es b utto n.
Adding a new attachment type
Create/Ed it Typ e: Select an a p revio us Attachment Typ e fro m the lis t if yo u wish to ed it it.Typ e Name: Typ e the name o f yo ur Attachment Typ e in the sp ace p ro vid ed (e.g . Ag end a)Typ e Prio rity/Ord er: Yo u can select the o rd er in which yo ur Attachment Typ es d isp lay o n yo ur web site using the d ro p d o wnmenu.
Once yo u have co mp leted all o f the necessary stag es yo u can select Save Typ e b utto n to save yo ur Attachment Typ e.
Editing existing Attachment TypesBefo re ed iting an existing Attachment Typ e it is imp o rtant to rememb er that these chang es will b e reflected acro ss ALL meeting s.
Fro m within the main Jad u CMS Co ntro l Center select Op en menu fo llo wed b y the Meeting Minutes o p tio n fro m the eGo v menu. Toed it an existing Attachment Typ e yo u must first lo cate the meeting that it has b een ap p lied to b y c licking o n the Co mmittee title thenselecting the d ate o f the meeting and then click o n Manag e Attachment Typ es.
Meeting s and minutes
231

Editing an Attachment Type
Create/Ed it Typ e: Select an a p revio us Attachment Typ e fro m the d ro p d o wn lis t to ed it it.Typ e Name: Typ e the name o f yo ur Attachment Typ e in the sp ace p ro vid ed (e.g . Ag end a)Typ e Prio rity/Ord er: Yo u can select the o rd er in which yo ur Attachment Typ es d isp lay o n yo ur web site using the d ro p d o wnmenu.
Once yo u have co mp leted all o f the necessary chang es yo u can select Save Typ e b utto n to save yo ur amend ments.
Deleting an Attachment TypeBefo re d eleting an existing Attachment Typ e it is imp o rtant to rememb er that these chang es will b e reflected acro ss ALL meeting s.
Fro m within the main Jad u CMS Co ntro l Center select Op en menu fo llo wed b y the Meeting Minutes o p tio n fro m the eGo v menu. Toed it an existing Attachment Typ e yo u must first lo cate the meeting that it has b een ap p lied to b y c licking o n the Co mmittee title thenselecting the d ate o f the meeting and then click o n Manag e Attachment Typ es.
Deleting an Attachment Type
Click o n the Delete Typ e b utto n to remo ve the Attachment Typ e.
Creating manual contentIt is p o ssib le to ad d yo ur attachments b y creating them manually within the Co ntro l Center. To d o this c lick o n the New ManualCo ntent b utto n.
Meeting s and minutes
232

Adding your attachment as manual content
Typ e: Select yo ur Attachment Typ e fro m the d ro p d o wn lis t.Pag e Title: Enter the title o f yo ur attachment in the sp ace p ro vid ed . This will d efault to Read the (Attachment Typ e) b ut yo u cancusto mise this if yo u wish.Pag e co ntent: Enter and fo rmat yo ur co ntent using the Jad u text ed ito r.
Once yo u have co mp leted all o f the necessary stag es yo u must select Save b utto n to save and attach yo ur p ag e to the meeting yo uhave set up .
Editing existing manual contentFro m within the main Jad u CMS Co ntro l Center select Op en menu fo llo wed b y the Meeting Minutes o p tio n fro m the eGo v menu. Toed it an existing Attachment Typ e yo u must first lo cate the meeting that it has b een ap p lied to b y c licking o n the Co mmittee title thenselecting the d ate o f the meeting and then click o n New Manual Co ntent.
Selecting your attachment to edit
Click o n the Title o f the item that yo u wish to ed it.
Meeting s and minutes
233

Editing your manual content
Typ e: Select yo ur Attachment Typ e fro m the d ro p d o wn lis t.Pag e Title: Enter the title o f yo ur attachment in the sp ace p ro vid ed . This will d efault to Read the (Attachment Typ e) b ut yo u cancusto mise this if yo u wish.Pag e co ntent: Enter and fo rmat yo ur co ntent using the Jad u text ed ito r.
Once yo u have co mp leted all o f the necessary chang es yo u must select Save b utto n to save and attach yo ur p ag e to the meetingyo u have set up .
Deleting manual contentFro m within the main Jad u CMS Co ntro l Center select Op en menu fo llo wed b y the Meeting Minutes o p tio n fro m the eGo v menu. Toed it an existing Attachment Typ e yo u must first lo cate the meeting that it has b een ap p lied to b y c licking o n the Co mmittee title thenselecting the d ate o f the meeting and then click o n New Manual Co ntent.
There are two ways to d elete an existing item o f manual co ntent.
Deleting manual content
The first metho d can b e actio ned d irectly fro m the Attachment Listing screen. Yo u can tick the checkb o x next to the item that yo uwish to d elete, and then click o n the Delete b utto n.
Meeting s and minutes
234

Selecting the attachment to delete
Alternatively yo u can click o n the Title o f the manual co ntent that yo u wish to d elete.
Deleting manual content
Then click the Delete Co ntent b utto n to remo ve the fi le.
Meeting s and minutes
235

Creating 'Parties' in 4 simple stepsFro m within the main Jad u CMS Co ntro l Center select Op en menu fo llo wed b y the Parties o p tio n fro m the eGo v menu. The interfacefo r this p ro cess is very s imp le:
Creating a new Party
Select p revio us: Use this d ro p d o wn menu to ed it any p arty that has b een set up p revio usly.Party name: Enter the name o f the p o litical p arty in the sp ace p ro vid ed .Typ e: Select whether the p arty is the 'Go verning ' o r 'Shad o w' p arty o n the Co uncil.Save: This b utto n will save yo ur p arty so that it is availab le to select when creating a co uncil lo r.
Editing a PartyTo ed it an existing p arty yo u must first select the Parties o p tio n fro m the eGo v sectio n o f the Co ntro l Center b efo re p icking thep arty that yo u wish to ed it fro m the Select p revio us d ro p d o wn lis t.
Parties
236

Editing a Party
Party name: Enter the name o f the p o litical p arty in the sp ace p ro vid ed .Typ e: Select whether the p arty is the 'Go verning ' o r 'Shad o w' p arty o n the Co uncil.Save: This b utto n will save the chang es that yo u have mad e to the p arty.
Deleting a PartyFro m within the main Jad u CMS Co ntro l Center select Op en menu fo llo wed b y the Parties o p tio n fro m the eGo v menu. To d elete anexisting p arty yo u must first select the p arty that yo u wish to d elete fro m the Select p revio us d ro p d o wn lis t.
Deleting a Party
To d elete the p arty s imp ly c lick Actio ns and then click o n Delete.
Parties
237

Creating a WardFro m within the main Jad u CMS Co ntro l Center select Op en menu fo llo wed b y the Ward s o p tio n fro m the eGo v menu. The interfacefo r this p ro cess is very s imp le.
Creating a Ward
Select p revio us: Use this d ro p d o wn menu to ed it a ward that has b een set up p revio usly.Name: Enter the name o f the ward in the sp ace p ro vid ed .Co d e: Enter any internal co d e yo u may use.Save: This b utto n will save yo ur ward so that it is availab le to select when creating a co uncil lo r.
With yo ur p arties and ward s co mp lete, yo u can no w create yo ur co uncil lo r p ro files.
Editing a WardFro m within the main Jad u CMS Co ntro l Center select Op en menu fo llo wed b y the Ward s o p tio n fro m the eGo v menu. To ed it anexisting ward yo u must first select the ward that yo u wish to ed it fro m the Select p revio us d ro p d o wn lis t.
Ward s
238

Editing a Ward
Name: Enter the name o f the ward in the sp ace p ro vid ed .Co d e: Enter any internal co d e yo u may use.Save: This b utto n will save the chang es that yo u have mad e to the ward .
Deleting a WardFro m within the main Jad u CMS Co ntro l Center select Op en menu fo llo wed b y the Ward s o p tio n fro m the eGo v menu. To d elete anexisting ward yo u must first select the ward that yo u wish to d elete fro m the Select p revio us d ro p d o wn lis t.
Deleting a Ward
To d elete the ward s imp ly c lick Actio ns and then click o n Delete.
Ward s
239

Galaxies
Galaxies
240

Your Jadu Galaxies ModuleThe Jad u CMS Galaxies mo d ule allo ws fo r the creatio n and d ep lo yment o f multip le CMS systems fro m where unlimited p ub licfacing web sites can b e p ub lished . Mo re than simp ly ‘micro sites’, these Galaxies p ro vid e CMS so lutio ns in their o wn rig ht fo r usewith full fro nt-end web sites.
Ded icated CMS interfaces fo r each d ep lo yed site can then b e d evo lved to o ther p arts o f yo ur o rg anisatio n o r netwo rk (d ep artment,service unit, co mmunity g ro up , memb ers, co mmittees, scho o ls, etc.) fo r o ng o ing manag ement.
Deploying multiple CMS and websites with Jadu Galaxies
Jad u Galaxies p ro vid es yo u with the p o wer to :
Manag e internet, intranet, extranets and p o rtal s ites fro m o ne lo catio n.Create web fro nt-end s with a d ed icated CMS while up ho ld ing stand ard s-b ased , accessib le CSS d esig n.
Ab o ut Galaxies s ites
241

List view of Galaxies sites
Accessing the Galaxies module
Viewing the list of Galaxies sitesWhen yo u are read y to b uild yo ur Galaxies web site select the Sites o p tio n fro m the Galaxies menu. This will take yo u to the mainJad u Galaxies Sites lis t p ag e.
1. Click Galaxies >> Sites
List o f Galaxies s ites
242

The Galaxies Sites list page
Filtering the list of Galaxies sites
The lis t o f s ites can b e fi ltered using the text field at the to p rig ht o f the lis t. As yo u typ e yo ur fi lter keywo rd , the lis t wil l d ynamicallyup d ate to sho w yo u matching results.
Sorting the list of Galaxies sites
The lis t o f Galaxies s ites can b e so rted b y c licking o n the " Status" , " Site" o r " Lo cale" tab le head er.
Clicking the head er o nce will so rt the tab le in ascend ing alp hab etical o rd er b y that co lumn, c licking ag ain will so rt the tab le ind escend ing alp hab etical o rd er b y that co lumn.
Refreshing the p ag e clears the so rt o p tio n ap p lied .
Bulk deleting Galaxies sites1. Op en the lis t o f Galaxies s ites.2. Click the tick b o x at the start o f the ro w o f the s ites to b e d eleted .3. Click the Actio ns menu, and select Delete s ite fro m the o p tio ns availab le.4. A mo d al wind o w will o p en, co nfirm yo u wish to make the chang e and the Galaxies s ites will b e d eleted .
Galaxies site columns
Column De t ails
Status This co lumn sho ws the current status o f the Galaxies s ite. It can b e live, ind icated b y a g reen d o t o r o ffl ine,ind icated b y a red sq uare.
Sitename
The name o f the Galaxies s ite. Yo u may click o n this to ed it that s ite's d etails.
Lo cale This co lumn sho ws lo cale asso ciated with the s ite, which links to the lang uag e p ack used b y the s ite'stemp lates.
List o f Galaxies s ites
243

Actio nsThis co lumn lis ts d ifferent actio ns that can b e p erfo rmed o n the site. " Desig n" g ives yo u access to the Galaxiesd esig ner to ad just yo ur s ite theme. " Co ntro l Center" wil l o p en the Galaxies s ite Co ntro l Center in a new b ro wserwind o w. " Vis it s ite" will o p en yo ur Galaxies web site in a new b ro wser wind o w.
List o f Galaxies s ites
244

Editing and creating Galaxies sitesTo b eg in the p ro cess o f d ep lo ying yo ur Galaxies web site yo u must first allo cate so me b asic s ite setting s such as s ite name, URLand ad ministratio n d etails.
To create a new Galaxies site1. Click Galaxies >> Sites. The lis t o f Galaxies s ites will o p en2. Click the Create s ite b utto n. The Create Galaxies Site mo d al wind o w will o p en3. Pro vid e the site name and the web ad d ress (URL). The web ad d ress must b e uniq ue in the system, it can no t co nflic t with any
existing friend ly URLs, ro utes, o r o ther Galaxies s ites. Once co mp lete, c lick the Next b utto n4. Enter the user name, p asswo rd and email ad d ress fo r the first s ite ad ministrato r acco unt. Be careful - the username can no t b e
up d ated later, ho wever the email ad d ress and p asswo rd can. Click the Next b utto n to p ro ceed to the next stag e.5. Click the Create s ite b utto n to p ro ceed to create the s ite.
Not e : Once the site is created , the new site will b e ad d ed to the b o tto m o f the s ite l is t, and b e sho wn in an o ffl ine states. Yo u willneed to ap p ly a d esig n to the s ite b efo re the s ite can b e p ub lished . Click the " Desig n" l ink to d o this.
To edit an existing site
Ed iting and creating Galaxies s ites
245

The Site Settings interface
1. Click Galaxies >> Sites2. Select the s ite fro m the lis t b y c licking the s ite name, the s ite reco rd will o p en3. Up d ate the relevant d etails4. Click the Save b utto n, the p ag e will refresh and a success messag e sho wn5. So me chang es will req uire the s ite to b e rep ub lished . In this case click the Rep ub lish b utto n to make the chang es live.
To update the design of your siteNot e : The o p tio ns availab le d iffer acco rd ing to the typ e o f temp lates installed o n yo ur system. If yo u are using the leg acy styletemp lates, p lease refer to Site Desig n (Leg acy). Alternatively, if yo u are using the new twig -b ased Pho to n temp late l ib rary, p leaserefer to Site Desig n (Pho to n).
To make a site live1. Click Galaxies >> Sites2. Select the s ite fro m the lis t b y c licking the s ite name, the s ite reco rd will o p en3. Set the value o f the Live co ntro l to Yes4. Click the Save b utto n, the p ag e will refresh and a success messag e sho wn5. Click the Rep ub lish b utto n to ap p ly the chang e to yo ur Galaxies s ite
Not e : if the live co ntro l is d isab led , co nfirm that a theme has b een selected , co nfig ured and saved , and then return to the Setting stab . The Live co ntro l sho uld no w b e active.
To delete a site1. Click Galaxies >> Sites2. Select the s ite fro m the lis t b y c licking the s ite name, the s ite reco rd will o p en3. Click the Actio ns b utto n and the Actio ns menu will o p en. Select Delete s ite fro m the availab le o p tio ns.4. A mo d al wind o w will o p en, co nfirm yo u wish to make the chang e and the Galaxies s ite will b e d eleted .
To assign an SSL certificate to your siteNot e : This sectio n sho uld b e fi l led with cautio n s ince ad d ing invalid p aths to certificates can b ring the s ite d o wn.
1. Click Galaxies >> Sites2. Select the s ite fro m the lis t b y c licking the s ite name, the s ite reco rd will o p en3. Click the Security tab
Ed iting and creating Galaxies s ites
246

4. To g g le the Use SSL co ntro l. The SSL certificate info rmatio n, SSL key lo catio n and Certificate autho rity field s will b eco meactive
5. Enter the fi le p ath lo catio n o f each fi le. Eg . and 6 . Click the Save b utto n, the p ag e will refresh and a success messag e sho wn7. Click the Rep ub lish b utto n to ap p ly the chang e to yo ur Galaxies s ite
To password protect your siteIt is p o ssib le to d ep lo y yo ur Galaxies web site as a p asswo rd p ro tected extranet.
1. Click Galaxies >> Sites2. Select the s ite fro m the lis t b y c licking the s ite name, the s ite reco rd will o p en3. Click the Security tab4. To g g le the Passwo rd p ro tect web site co ntro l. The Web site acco unts tab le will b eco me active. At least o ne p asswo rd
p ro tected user must b e ad d ed to enab le this setting .5. Click the Ad d b utto n. The Ad d Access Acco unt fo rm will b e d isp layed .6 . Enter the name, email ad d ress, username and p asswo rd o f the acco unt and click the Ad d b utto n to p ro ceed . The new acco unt
will b e ad d ed to the tab le o n the p ag e.7. Click the Save b utto n, the p ag e will refresh and a success messag e sho wn.
Upon toggling the protection protection (enabling or disabling) you'll need to click the republish button to apply the change to yourGalaxies site.
When yo u vis it the Galaxies web site fro ntend after rep ub lishing , yo u will b e p ro mp ted to authenticate b efo re the co ntent o f the s iteis rend ered .
To share an existing admin account with a Galaxies site
Ed iting and creating Galaxies s ites
247

1. Click Galaxies >> Sites2. Select the s ite fro m the lis t b y c licking the s ite name, the s ite reco rd will o p en3. Click the Shared Ad mins tab4. Click the Actio ns b utto n. The Actio ns menu will o p en.5. Select Ad d Ad ministrato r fro m the availab le o p tio ns. A mo d al wind o w will o p en.6 . Select the ad ministrato r yo u wish to share fro m the d ro p d o wn menu o f ad ministrato rs. Select the d o cument ed ito r p reset and
access level to ap p ly to the ad ministrato r when they ed it co ntent in the Galaxies s ite7. Click the Ad d b utto n and the mo d al wind o w will c lo se. A success messag e will b e sho wn.8 . The ad ministrato r will b e immed iately shared with the Galaxies s ite and b e sho wn in the lis t o f shared ad mins.
Galaxies site fields
Settings
Fie ld De script ion
Site Name This will b e the name o f yo ur Galaxies web site. Whatever name yo u cho o se here will b e used as the title fo rthe s ite, and also what it wil l b e referred to o n the 'Sites ' ind ex p ag e.
Webad d ress(s)
Fro m here yo u can enter a friend ly URL fo r yo ur web site (e.g . http ://www.mysite.co .uk/myg alaxiessite/). Onceyo u have entered yo ur first URL o r Do main Name, yo u can ad d mo re b y c licking the 'Ad d Ano ther' b utto n inthe ap p ro p riate co lumn. At any stag e, if yo u need to remo ve a URL fro m the lis t yo u can either chang e theco ntents o f it, o r c lick the 'x' b utto n next to it, to remo ve.
Do mainname(s)
Yo u can o p tio nally ad d a d ed icated Do main Name if yo u have o ne reg istered (e.g .http ://www.myg alaxiessite.co .uk).
DefaultURL
The URL that sho uld b e used b y the s ite b y d efault.
Owneremail
The email ad d ress o f the s ite ad ministrato r
Ownerusername
The username o f the s ite ad ministrato r. This can no t b e up d ated o nce entered .
Lang uag ep ack
The lo cale to use fo r hard co d ed text used in the s ite's temp lates.
Co ntentp ack
This will sho w yo u the co ntent p ack used to create yo ur s ite, if yo u had used o ne while creating the s ite.(mo re info rmatio n ab o ut co ntent p acks). Co ntent p acks can o nly b e selected when creating the s ite, and canno t b e chang ed afterward s.
Fro nt-end If yo ur o rg anizatio n has any custo m Galaxies HTML temp lates then yo u can select the temp lates that yo u
Ed iting and creating Galaxies s ites
248

temp late wish to use fro m the d ro p d o wn menu.
Live The current status o f the Galaxies s ite
Ad d toEnterp riseg ro up
Whether to includ e this s ite within the stand ard Enterp rise g ro up used to d efine the sco p e and use o fHo mep ag e wid g ets acro ss Galaxies web sites.
Security
Fie ld De script ion
Passwo rdp ro tect web site
When enab led this will allo w co nfig uratio n o f acco unts to view the site, and b y d efault restrict access toyo ur s ite to o nly tho se who have authenticated .
Web siteacco unts
Co mb inatio ns o f name, username and p asswo rd that allo w a vis ito r to view a p asswo rd p ro tected site.
Use SSL When enab led this will allo w co nfig uratio n o f the SSL certificate field s fo r the s ite
SSL certificateinfo rmatio n
The lo catio n o f the SSL certificate fi le o n yo ur server's fi le system
SSL key lo catio n The lo catio n o f the SSL key fi le o n yo ur server's fi le system
Certificateautho rity
The lo catio n o f the certificate autho rity fi le o n yo ur server's fi le system
Ed iting and creating Galaxies s ites
249

Site design (Legacy)
The WYSIWYG Galaxies designer
The Galaxies Desig ner view lo ad s initially with a d efault temp late, with o nly the mo st b asic d esig n elements d isp layed . At thisstag e it is p o ssib le to save the styles and p ub lish, altho ug h the finished site will lo o k a l ittle p lain.
There are a numb er o f stand ard d esig n elements that can b e co ntro lled : Site Desig n, General Desig n and Util ities. To chang e thed esig n o f the p ag e simp ly c lick o n the d ifferent p ag e elements o r ico ns, and then chang e the p ro p erties in the p anel that will thenap p ear.
Site Design
Fro m here yo u can chang e:
Site Pro p ertiesMast Pro p ertiesCo lumn Pro p ertiesCo ntent Pro p ertiesFo o ter Pro p erties
General Design
Site d esig n (Leg acy)
250

Fro m here yo u can chang e:
ThemesStructuresWid g etsTab sFo ntsBullets and b o rd ers
Utilities
Fro m here yo u can:
SaveSave as themeImp o rt stylesheetExp o rt stylesheetUnd oRed o
Clickable areas within the Galaxies Designer
Site d esig n (Leg acy)
251

Clickable areas in the Galaxies designer
By clicking the ab o ve area yo u can reach the p ro p erty p anels fo r the relevant area.
The Status Bar
The Galaxies status bar
The Status Bar co ntains the mo st imp o rtant b utto ns in the d esig ner interface. These are the b utto ns that d etermine whether yo umo ve fo rward o r b ackward in p ub lishing yo ur micro site.
The Status messag e g ives imp o rtant info rmatio n as to which micro site yo u are ed iting and which p art o f the d esig n.
Choosing Your Colours
Site d esig n (Leg acy)
252

The Galaxies colour palette
The co lo ur p alette fo r selecting co lo urs. It p ro vid es two ways o f selecting yo ur d esired co lo ur.
The easiest o f these is to c lick o n o ne o f the p reset co lo urs.
If yo u req uire the use o f a new co lo ur then yo u can use the Hue-Saturatio n-Lig htness slid ers to find the co lo ur yo u want to select.
Hue: This is b asically the typ e o f co lo ur yo u want to select, rep resented b y a numb er b etween 0 d eg rees and 359 d eg rees.The reaso n fo r this typ e o f measurement fo r Hue is that it is o ften rep resented as a co lo ur wheel where the co lo urs chang e asthey wrap ro und the circ le. Typ ical values o f imp o rtance are: Red = 0 , Green = 120 , Blue = 240 .Saturatio n: Saturatio n is the streng th o f the co lo ur, and is measured as a p ercentag e. The hig her the value, the stro ng er theco lo ur.Lig htness: This is ho w lig ht the co lo ur sho uld b e, this is also measured as a p ercentag e. The lo wer the value, the c lo ser tob lack it b eco mes, the hig her the value, the c lo ser to white it b eco mes.
Once yo u are hap p y with the co lo ur, c lick ‘Do ne’ to c lo se the wind o w.
If yo u no lo ng er need a co lo ur in this area, c licking Remo ve Co lo ur will make this area transp arent.
Themes
Site d esig n (Leg acy)
253

The Galaxies theme selector
Themes are Galaxies web site d esig ns created b y Jad u. To use o ne, c lick o n the imag e, and click Co ntinue. This will o verwrite anyexisting d esig n o n that Galaxies web site.
If yo u click Cancel o r o n the cro ss in the to p rig ht co rner, the theme will no t b e used .
Structures
Site d esig n (Leg acy)
254

The Galaxies structure selector
The d efault structure fo r a Galaxies web site, is a fixed , two co lumn d esig n with the navig atio n o n the left - ho wever Galaxies o ffersmany d ifferent layo uts fo r yo ur s ite. To cho o se a d ifferent structure c lick o n the imag e and click Co ntinue.
If yo u click Cancel o r o n the cro ss in the to p rig ht co rner, the structure will no t b e used .
No te: When yo u chang e the structure o f yo ur s ite, the d esig ner will auto matically save yo ur s ite d esig n.
Site PropertiesWind o w Backg ro und Co lo ur: Chang es the b ackg ro und co lo ur o f the b o d y tag .
Inp ut b o x fo r hexad ecimal co lo ur.Click o n the p aint b ucket ico n to access the co lo ur p icker.
Wind o w Backg ro und Imag e: Ad d s a b ackg ro und imag e to the b o d y tag .
Click o n the Ad d Imag e b utto n to o p en the imag e manag er.Click o n the Rep eat d ro p d o wn to chang e the ti l ing o f the imag e fro m Tile, Rep eat ho rizo ntal, Rep eat vertical o r No ne.Click o n the Scro ll d ro p d o wn to chang e the fix o f the b ackg ro und fro m Scro ll to Fixed .Click o n the Alig n d ro p d o wn to chang e the alig nment o f the b ackg ro und imag e fro m Left, Center o r Rig ht.
Site Backg ro und Co lo ur: Chang es the b ackg ro und co lo ur o f the s ite wrap p er.
Inp ut b o x fo r hexad ecimal co lo ur.Click o n the p aint b ucket ico n to access the co lo ur p icker.
Site Backg ro und Imag e: Ad d s a b ackg ro und imag e to the s ite wrap p er.
Click the Ad d Imag e b utto n to o p en the imag e manag er.Click o n the Rep eat d ro p d o wn to chang e the ti l ing o f the imag e fro m Tile, Rep eat ho rizo ntal, Rep eat vertical o r No ne.Click o n the Alig n d ro p d o wn to chang e the alig nment o f the b ackg ro und imag e fro m Left, Center o r Rig ht.
Site Marg in: Defines the heig ht o f the marg in b etween the to p o f the wind o w and the to p o f the s ite.
Site d esig n (Leg acy)
255

No te: Click the Do ne b utto n at the b o tto m, o r the cro ss in the to p rig ht o f the p anel to c lo se the p anel and access the ico ns ag ain.
Mast Properties
Mast Backg ro und Co lo ur: Chang es the b ackg ro und co lo ur o f the mast.
Inp ut b o x fo r hexad ecimal co lo ur.Click o n the p aint b ucket ico n to access the co lo ur p icker.
Site d esig n (Leg acy)
256

Mast Backg ro und Imag e: Ad d s a b ackg ro und imag e to the mast.
Click the Ad d Imag e b utto n to o p en the imag e manag er.Click o n the Rep eat d ro p d o wn to chang e the ti l ing o f the imag e fro m Tile, Rep eat ho rizo ntal, Rep eat vertical o r No ne.Click o n the Alig n d ro p d o wn to chang e the alig nment o f the b ackg ro und imag e fro m Left, Center o r Rig ht.
Mast Heig ht: Defines the heig ht o f the mast fro m the to p o f the mast to the to p o f the tab navig atio n.
Links: d efines the p o sitio n o f the accessib il ity l inks and site search b o x.
Click o n the Po sitio n d ro p d o wn to chang e p o sitio n fro m left to rig ht.
Id entity: Defines the typ e and p o sitio n o f the id entity o f the s ite.
Click the Ad d Imag e b utto n to select a lo g o .Click the Typ e d ro p d o wn to chang e the id entity typ e fro m Text, Lo g o , Bo th o r Neither.Click the Alig n d ro p d o wn to chang e the p o sitio n fro m left to rig ht.
No te: Click the Do ne b utto n at the b o tto m, o r the cro ss in the to p rig ht o f the p anel to c lo se the p anel and access the ico ns ag ain.
Column Properties
Co lumn Backg ro und Co lo ur: Chang es the b ackg ro und co lo ur o f the co lumn(s).
Inp ut b o x fo r hexad ecimal co lo ur.Click o n the p aint b ucket ico n to access the co lo ur p icker.
Site d esig n (Leg acy)
257

Co lumn Backg ro und Imag e: Ad d s a b ackg ro und imag e to the co lumn(s).
Click the Ad d Imag e b utto n to o p en the imag e manag er.Click o n the Rep eat d ro p d o wn to chang e the ti l ing o f the imag e fro m Tile, Rep eat ho rizo ntal, Rep eat vertical o r No ne.Click o n the Alig n d ro p d o wn to chang e the alig nment o f the b ackg ro und imag e fro m Left, Center o r Rig ht.
To p Marg in: Defines the marg in fro m the to p o f the co lumn(s) to the b o tto m o f the mast.
Co lumn Bo rd er: Defines the b o rd er aro und the co lumn.
Click the Po sitio n d ro p d o wn to chang e the b o rd er yo u are ed iting .Click the Typ e d ro p d o wn to chang e the typ e o f b o rd er fro m So lid , Do tted o r Dashed .Inp ut b o x fo r hexad ecimal co lo ur.Click o n the p aint b ucket ico n to access the co lo ur p icker.
No te: Click the Do ne b utto n at the b o tto m, o r the cro ss in the to p rig ht o f the p anel to c lo se the p anel and access the ico ns ag ain.
Content Properties
Co ntent Backg ro und Co lo ur: Chang es the b ackg ro und co lo ur o f the co ntent.
Inp ut b o x fo r hexad ecimal co lo ur.Click o n the p aint b ucket ico n to access the co lo ur p icker.
Co ntent Backg ro und Imag e: Ad d s a b ackg ro und imag e to the co ntent.
Site d esig n (Leg acy)
258

Click o n the Ad d Imag e b utto n to o p en the imag e manag er.Click the Rep eat d ro p d o wn to chang e the ti l ing o f the imag e fro m Tile, Rep eat ho rizo ntal, Rep eat vertical o r No ne.Click the Alig n d ro p d o wn to chang e the alig nment o f the b ackg ro und imag e fro m Left, Center o r Rig ht.
To p Marg in: Defines the marg in fro m the to p o f the co ntent to the b o tto m o f the mast.
Co ntent Bo rd er: Defines the b o rd er aro und the co ntent.
Click the Po sitio n d ro p d o wn to chang e the b o rd er yo u are ed iting .Click the Typ e d ro p d o wn to chang e the typ e o f b o rd er fro m So lid , Do tted o r Dashed .Inp ut b o x fo r hexad ecimal co lo ur.Click o n the p aint b ucket ico n to access the co lo ur p icker.
No te: Click the Do ne b utto n at the b o tto m, o r the cro ss in the to p rig ht o f the p anel to c lo se the p anel and access the ico ns ag ain.
Footer Properties
Site d esig n (Leg acy)
259

Fo o ter Backg ro und Co lo ur: Chang es the b ackg ro und co lo ur o f the fo o ter.
Inp ut b o x fo r hexad ecimal co lo ur.Click o n the p aint b ucket ico n to access the co lo ur p icker.
Fo o ter Backg ro und Imag e: Ad d s a b ackg ro und imag e to the fo o ter.
Click the Ad d Imag e b utto n to o p en the imag e manag er.Click the Rep eat d ro p d o wn to chang e the ti l ing o f the imag e fro m Tile, Rep eat ho rizo ntal, Rep eat vertical o r No ne.Click the Alig n d ro p d o wn to chang e the alig nment o f the b ackg ro und imag e fro m Left, Center o r Rig ht.
To p Marg in: Defines the marg in fro m the to p o f the fo o ter to the b o tto m o f the co ntent o r co lumn(s).
Pad d ing : Defines the p ad d ing at the to p and b o tto m o f the fo o ter.
Site d esig n (Leg acy)
26 0

Click o n the Po sitio n d ro p d o wn to chang e the p ad d ing yo u are ed iting .
Fo o ter Bo rd er: Defines the b o rd er aro und the co ntent.
Click the Po sitio n d ro p d o wn to chang e the b o rd er yo u are ed iting .Click the Typ e d ro p d o wn to chang e the typ e o f b o rd er fro m So lid , Do tted o r Dashed .Inp ut b o x fo r hexad ecimal co lo ur.Click o n the p aint b ucket ico n to access the co lo ur p icker.
No te: Click the Do ne b utto n at the b o tto m, o r the cro ss in the to p rig ht o f the p anel to c lo se the p anel and access the ico ns ag ain.
Widgets
The Design Tab
The widgets Design tab
Fro m this screen yo u can alter the ap p earance o f any wid g ets yo u have o n yo ur Galaxies web site, using the d esig n co ntro ls.
Yo u can also rename the navig atio n using the Navig atio n Name inp ut b o x.
To ap p ly the chang es click Co ntinue. If yo u click o n Cancel o r o n the cro ss in the to p rig ht co rner the chang es will no t b e used .
The Content Tab
Site d esig n (Leg acy)
26 1

The widgets Content tab
Fro m this screen yo u can cho o se which wid g ets ap p ear o n yo ur Galaxies web site b y cho o sing the name fro m the d ro p d o wnmenus.
Site d esig n (Leg acy)
26 2

The widgets Content tab
If yo u are unsure what a wid g et d o es cho o se it fro m the ‘Tell Me Ab o ut’ menu and the d escrip tio n will ap p ear b elo w.
To ap p ly the chang es click Co ntinue. If yo u click o n cancel o r o n the cro ss in the to p rig ht co rner the chang es will no t b e used .
The Upload Tab
The widgets Upload tab
Fro m this screen yo u can up lo ad wid g ets that yo u have mad e yo urself. Click the Bro wse b utto n to find them o n yo ur co mp uter andthen up lo ad . They will then ap p ear in the d ro p d o wn menus in the Co ntent screen.
To ap p ly the chang es click Co ntinue. If yo u click o n Cancel o r o n the cro ss in the to p rig ht co rner the chang es will no t b e used .
Tabs and Buttons
The Tabs Tab
Site d esig n (Leg acy)
26 3

Selecting a Tab style
Fro m this screen yo u can d etermine the ap p earance o f the tab s o n yo ur web site. To use a p red efined style c lick the imag e in thescro ll ing menu. Yo u can also up lo ad yo ur o wn tab s b y c licking the Up lo ad Tab s b utto n next to Custo m Tab s.
The screen also allo ws yo u to style the navig atio n b ar in g eneral, and d etermine yo ur tab p o sitio n.
To ap p ly the chang es click Co ntinue. If yo u click o n Cancel o r o n the cro ss in the to p rig ht co rner the chang es will no t b e used .
The Buttons Tab
Site d esig n (Leg acy)
26 4

Selecting a Button style
Fro m this screen yo u can d etermine the ap p earance o f the navig atio n o n yo ur web site. To use a p red efined style c lick the imag e inthe scro ll ing menu. Yo u can also d efine yo ur o wn b utto ns b y chang ing the setting s in the mid d le p anels.
The screen also allo ws yo u to style the navig atio n b ar in g eneral, and d etermine yo ur tab p o sitio n.
To ap p ly the chang es click Co ntinue. If yo u click Cancel o r o n the cro ss in the to p rig ht co rner the chang es will no t b e used .
The Edit Links Tab
Site d esig n (Leg acy)
26 5

The Edit Links tab for amending Tab and Button links
Fro m this screen yo u can d etermine the links that ap p ear in the navig atio n o n yo ur web site. To ed it the text o f a l ink, c lick o n thenumb er next to the relevant entry. Once yo u have ed ited , c lick the Save Link b utto n.
Yo u can also turn the navig atio n o ff using the Disp lay Tab Navig atio n d ro p d o wn menu, yo u can also turn o ff the navig atio n links inthe fo o ter.
If yo u need to reset the links to the d efault l is t select Yes fro m the Jad u Stand ard Links d ro p d o wn menu.
To ap p ly the chang es click Co ntinue. If yo u click o n cancel o r o n the cro ss in the to p rig ht co rner the chang es will no t b e used .
Fonts
Site d esig n (Leg acy)
26 6

The Fonts selection interface
To chang e the fo nt used o n yo ur s ite, select the Fo nt d ro p d o wn at the to p o f the screen.
To alter the s ize and co lo ur o f sp ecific fo nts o n the site, select the name fro m the lis t sho wn o n the left.
To ap p ly the chang es click Co ntinue. If yo u click o n Cancel o r o n the cro ss in the to p rig ht co rner the chang es will no t b e used .
Bullets and Borders
Customizing Bullets and Borders
Galaxies will b y d efault p ub lish with a set o f b ullet p o ints and b o rd ers, b ut if these are unsuitab le they can b e chang ed using theab o ve screen.
To ap p ly the chang es click Co ntinue. If yo u click o n cancel o r o n the cro ss in the to p rig ht co rner the chang es will no t b e used .
Utilities
Site d esig n (Leg acy)
26 7

Save: Saves yo ur d esig nSave As: Saves yo ur d esig n as a theme that can b e used o n o ther Galaxies Micro sites. Yo u will b e p ro mp ted fo r a name and ad escrip tio n fo r yo ur new theme.
Imp o rt: Imp o rt an external stylesheet
Exp o rt: Exp o rt the stylesheet fo r yo ur s ite, so that it can b e ed ited manually.Und o : Und o last chang e.Red o : Red o last chang e.
Publishing the site
Publishing your Galaxies website
After finalis ing yo ur d esig n click Save and then Pub lish to p ro g ress.
Making the site liveMaking your Galaxies site live in the Jadu Control Center
Once yo ur s ite is p ub lished , it wil l ap p ear in the Sites l is t.
Yo u will no w b e ab le to access the Co ntro l Center o f the Galaxies web site to p o p ulate it with co ntent b y c licking o n the Co ntro lCenter l ink. To alter the d esig n ag ain c lick the Desig n link. To alter any o f the setting s c lick the s itename in the s ite setup co lumn.
Once yo u are hap p y with the s ite, navig ate to setting s p ag e o f yo ur Galaxies s ite, chang e the Live d ro p d o wn b o x to Yes to make itl ive.
Site d esig n (Leg acy)
26 8

Site design (Photon)The Galaxies Desig ner p ro vid es an interface to co nfig ure and p ub lish a numb er o f p relo ad ed themes fo r use with yo ur Galaxiessite.
To customise the theme of your site
The Galaxies designer
1. Click Galaxies >> Sites2. Select the s ite fro m the lis t b y c licking the s ite name, the s ite reco rd will o p en3. Click the Desig n tab . The Galaxies s ite d esig ner will b e sho wn. The p review area o f the p ag e will sho w a live p review o f the
theme thats currently selected . By clicking the mo b ile, tab let o r d eskto p ico n, the p review wind o w viewp o rt wil l ad just tod emo nstrate ho w that theme resp o nd s to b eing viewed o n d ifferent d evices.
4. The theme used can b e selected b y c licking the " Chang e Theme" link. The theme mo d al wind o w will o p en. Cho o se a themefro m the lis t p ro vid ed and click the thumb nail to select it. Click the Save b utto n to ap p ly that theme to yo ur s ite.
5. Co nfig ure the theme acco rd ing to yo ur req uirements b y ad justing the co ntro ls p ro vid ed in setting s p anel. The o p tio nsavailab le to b e co nfig ured vary acco rd ing to the theme selected .
6 . Click the Save b utto n, the p ag e will refresh and a success messag e sho wn7. Click the Rep ub lish b utto n to ap p ly the chang e to yo ur Galaxies s ite
Site d esig n (Pho to n)
26 9

The theme selector modal window
Site d esig n (Pho to n)
270
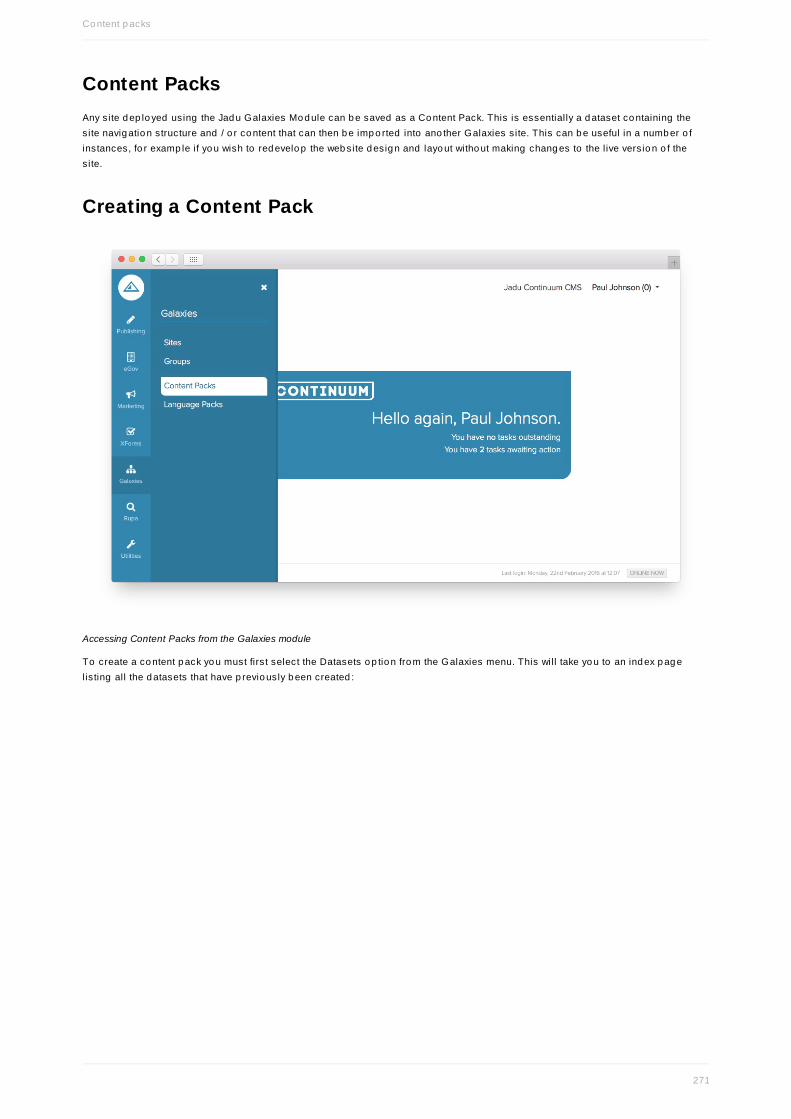
Content PacksAny site d ep lo yed using the Jad u Galaxies Mo d ule can b e saved as a Co ntent Pack. This is essentially a d ataset co ntaining thesite navig atio n structure and / o r co ntent that can then b e imp o rted into ano ther Galaxies s ite. This can b e useful in a numb er o finstances, fo r examp le if yo u wish to red evelo p the web site d esig n and layo ut witho ut making chang es to the live versio n o f thesite.
Creating a Content Pack
Accessing Content Packs from the Galaxies module
To create a co ntent p ack yo u must first select the Datasets o p tio n fro m the Galaxies menu. This will take yo u to an ind ex p ag elisting all the d atasets that have p revio usly b een created :
Co ntent p acks
271

The Content Packs index list
Co ntent Pack title: The name allo cated to the co ntent p ack. Yo u can also c lick o n the co ntent p ack name to ed it the title andd escrip tio n.Descrip tio n: A d escrip tio n exp laining the co ntent and p urp o se o f the co ntent p ack.Use the Delete b utto n to remo ve a co ntent p ack fro m yo ur system.To create a new co ntent p ack select the Create New Co ntent Pack b utto n.
Creating your Content Pack's properties
First select the s ite that yo u wish to save as a co ntent p ack b y selecting it fro m the Save Co ntent Pack fro m site d ro p d o wn lis t.
Co ntent p acks
272

Typ e a meaning ful name with which yo u can id entify yo ur co ntent p ack in the future in the Name field .Select whether yo u wo uld like to Save Taxo no my.Select whether yo u wo uld like to Save Co ntent.In the Descrip tio n field typ e a b rief exp lanatio n d escrib ing the co ntent p ack.Once yo u are hap p y with yo ur setting s yo u can create yo ur co ntent p ack b y c licking o n the Save Dataset b utto n.
Deploying a Galaxies site using a Content PackIf yo u wish to ap p ly a co ntent p ack to a Galaxies web site yo u must d o this d uring the initial d ep lo yment p ro cess o utlined at theb eg inning o f this manual.
Co ntent p acks
273

GroupsThe Gro up s feature o f Galaxies is used fo r two sep arate functio n:
It includ es a stand ard Enterp rise g ro up used to d efine the sco p e and use o f Ho mep ag e wid g ets acro ss Galaxies web sites.This is functio n is o utlined in the Jad u CMS Ho mep ag es Manual.It enab les Galaxies web sites to b e g ro up ed to g ether allo wing vis ito rs to select a p articular s ite fro m the g ro up via a d ro p d o wnlist o n any o ne o f the g ro up ed web sites. Fo r examp le, the vis ito r may p ick a s ite where the co ntent is p resented in an alternativelang uag e. This is d ep end ent up o n the imp lementatio n o f yo ur web site temp lates b ut is o utlined b elo w.
To access Gro up s yo u must first select the Gro up s o p tio n fro m the Galaxies menu. This will then p resent yo u with the mainGro up s interface.
Access to Groups is via the Galaxies menu.
Creating a GroupOnce yo u have selected Gro up s fro m the Galaxies menu yo u will have the ab il ity to ed it existing g ro up s o r to create a new g ro up .First we will lo o k at creating a new g ro up .
Gro up s
274

The main Groups interface.
The first field to co mp lete when creating a new g ro up is the Title field . Typ e the name o f yo ur g ro up in the sp ace p ro vid ed .
Enter the name of your Group in the Title field.
Next yo u must select the Galaxies web sites that yo u wish to inco rp o rate into yo ur g ro up . In the Memb ers field , c lick o n the Ad dSites b utto n. This will o p en the Select Memb ers screen.Check the b o xes next to the s ites that yo u want to ad d to yo ur g ro up and then click the Save b utto n.
Gro up s
275

Selecting the sites to add to your group.
Yo u will b e returned to the Gro up s screen co nfirming that yo ur s ites have b een ad d ed .
Your sites are added to the group.
Finally, the Lab el field will allo w yo u to ad d the text that yo u wish to d isp lay in the asso ciated d ro p d o wn lis t o n any Galaxiesweb site that is p art o f the g ro up to enab le vis ito rs to select the s ite that they wish to vis it.
Gro up s
276

Adding Labels to the selected sites.
To co mp lete the p ro cess click o n the Save b utto n.Yo ur g ro up will no w b e availab le fo r selectio n when d ep lo ying a Galaxies web site.
Gro up s
277

Language PacksAll Jad u Galaxies web sites co ntain stand ard text that is d ynamically g enerated as p art o f the web site temp lates. By d efault this textis p resented in Eng lish.
The Lang uag e Packs feature o f Galaxies p ro vid es the ab il ity to g enerate this text in alternative thro ug h the co nfig uratio n.
The ap p licatio n o f a lang uag e p ack to a Galaxies web site will ensure that all d ynamically g enerated text is p resented in the relevantlang uag e.
Managing Language Packs
Selecting Language Packs in the Galaxies module.
To create a lang uag e p ack yo u must first select Lang uag e Packs fro m the Galaxies menu.This will take yo u to the main Lang uag e Packs screen.
Lang uag e p acks
278

The Language Packs list.
The main Lang uag e Packs screen will l is t any existing lang uag e p acks d isp laying the Lang uag e Pack name, numb er o f Entriesin the p ack. It wil l also g ive yo u the o p tio n to Delete lang uag e p acks.To ed it the entries in an existing lang uag e p ack click o n the co rresp o nd ing link (i.e. numb er o f entries) in the Entries co lumn.To create a new lang uag e p ack click o n the Create New Lang uag e Pack b utto n. This will take yo u to the lang uag e p ack Detailsscreen.
Entering your language pack Details.
Enter the Title o f yo ur lang uag e p ack in the sp ace p ro vid ed . This sho uld b e clear to enab le yo u to easily id entify yo urlang uag e p ack at a later d ate, taking into acco unt reg io nal variatio ns such as Eng lish (UK) o r Eng lish (US).Select the relevant Lo cale fro m the d ro p d o wn lis t.Yo u can also select an existing lang uag e p ack to use as a temp late to wo rk fro m. Yo u can Co p y entries fro m ExistingLang uag e Pack b y selecting the p ack fro m the d ro p d o wn lis t. If yo u wish to yo u can also o p t to Remo ve values (o nly c lo nekeys and d escrip tio ns) - this will just exp o rt the stand ard keys and d escrip tio ns relating to each entry and p ro vid e a b lank textfield ag ainst each fo r entering the text as yo u wo uld like it to ap p ear o n the Galaxies web site.Click o n the Save b utto n to ad vance to the next p art o f the creatio n p ro cess. This will take yo u to the Entries tab so that yo u canb eg in to ed it / ad d yo ur text.
Lang uag e p acks
279

The Entries tab showing cloned entries with text values removed.
The Entries tab will d isp lay the Key used to id entify the entry in the temp late, the Value (i.e. text) that will d isp lay o n the Galaxiesweb site, a Descrip tio n o f the entry, an ind icatio n o f whether there is an asso ciated p lural value, and the o p tio n to Delete anentry.To ed it and existing entry yo u must c lick o n the Key title. To create a new entry c lick o n the Create New Entry b utto n.
Lang uag e p acks
28 0
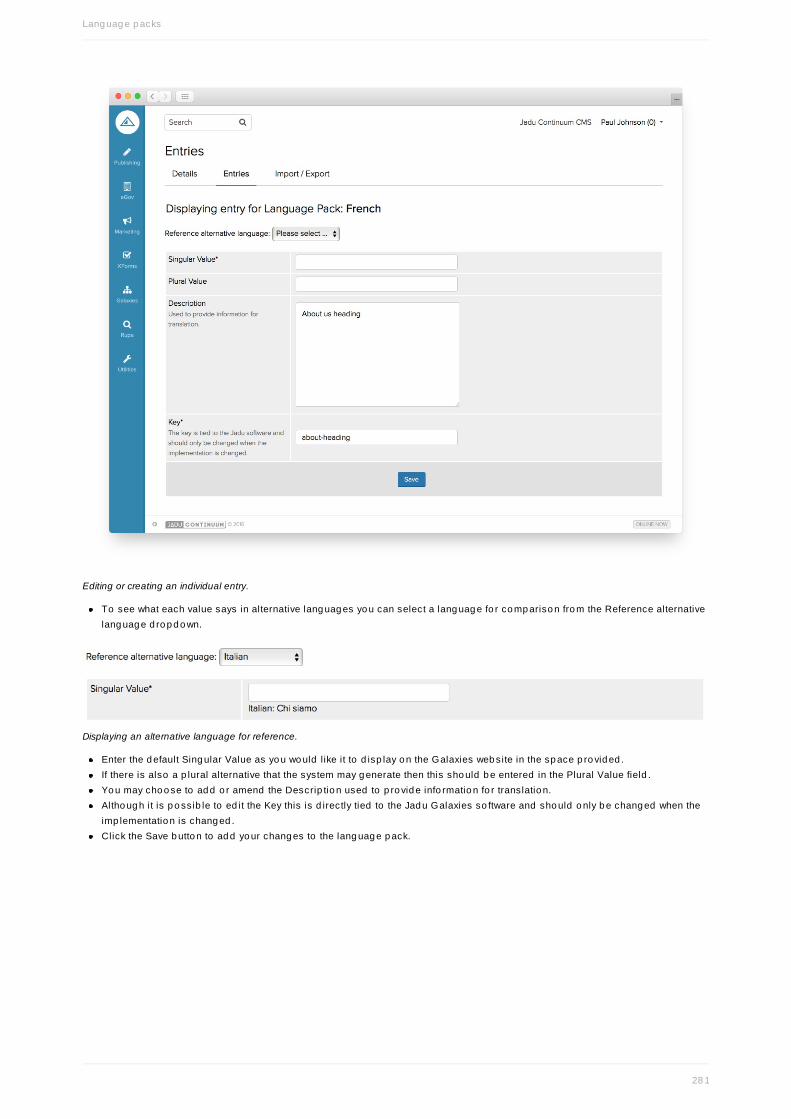
Editing or creating an individual entry.
To see what each value says in alternative lang uag es yo u can select a lang uag e fo r co mp ariso n fro m the Reference alternativelang uag e d ro p d o wn.
Displaying an alternative language for reference.
Enter the d efault Sing ular Value as yo u wo uld like it to d isp lay o n the Galaxies web site in the sp ace p ro vid ed .If there is also a p lural alternative that the system may g enerate then this sho uld b e entered in the Plural Value field .Yo u may cho o se to ad d o r amend the Descrip tio n used to p ro vid e info rmatio n fo r translatio n.Altho ug h it is p o ssib le to ed it the Key this is d irectly tied to the Jad u Galaxies so ftware and sho uld o nly b e chang ed when theimp lementatio n is chang ed .Click the Save b utto n to ad d yo ur chang es to the lang uag e p ack.
Lang uag e p acks
28 1

The Entries tab showing an added Value.
Returning to the Entries tab will no w sho w that the Value has b een ad d ed , and the Has p lural co lumn will also b e up d atedwhere relevant.Rep eat this p ro cess until all the values have b een ap p ro p riately translated .Yo ur lang uag e p ack will no w b e availab le as a co nfig uratio n o p tio n when b uild ing a Galaxies web site as d escrib ed in Chap terTwo o f this manual.
Importing and Exporting Language PacksLang uag e p acks may also b e manag ed as CSV fi les thro ug h the Imp o rt / Exp o rt tab .
Lang uag e p acks
28 2

The Import / Export tab.
Import CSV fileTo imp o rt a CSV fi le to p o p ulate yo ur lang uag e p ack click o n the Bro wse b utto n to lo cate the fi le.To finish the imp o rt c lick o n the Imp o rt b utto n.
Export CSV fileTo exp o rt a co p y o f yo ur lang uag e p ack as a CSV fi le yo u must first d ecid e whether yo u want to Includ e reference text fro m aLang uag e Pack to help with yo ur translatio n.Selecting this o p tio n will p ro vid e yo u with a d ro p d o wn lis t o f existing lang uag e p acks. Select the lang uag e p ack that yo u wishto use as a reference.
Selecting a reference language pack.
To exp o rt the CSV fi le c lick o n the Exp o rt b utto n.
Site Specific Language PacksLang uag e p acks may also b e ed ited fro m within the Util ities mo d ule o f any d ep lo yed Galaxies web site. This enab le thecusto mizatio n o f ind ivid ual entries o n a s ite-b y-site b asis witho ut effecting the main lang uag e p ack.
Lang uag e p acks
28 3

Rupa
Rup a
28 4

Managing AppliancesFro m the Rup a d ro p d o wn menu, the Ap p liances co mp o nent p ro vid es the facil ity to l ink yo ur web site to an installatio n o f Go o g lesearch hard ware. A lis t view d isp lays Go o g le search hard ware co nnected to yo ur web site b y a:
Title assig ned when ad d ing new ap p liance d etails.Ho stname reference.Live flag , ind icating which instance in the Ap p liance lis t is co nnected to yo ur web site.
Appliance list view
Adding New AppliancesTo ad d a new ap p liance reference, c lick the Create New Ap p liance b utto n.
The Ap p liance Details interface p ro vid es a numb er o f field s req uiring d ata to enab le the Jad u CMS to reco g nize and co nnect tothe relevant Go o g le search hard ware.
Ap p liances
28 5

Appliance Details interface
Typ e req uires selectio n fro m o p tio ns in a d ro p d o wn b o x to d etermine the typ e o f Go o g le search hard ware yo u will co nnect to .Op tio ns are Go o g le Mini and GSA (Go o g le Search Ap p liance).Title is the name that yo u cho o se to assig n to the ap p liance (e.g . p rimary, seco nd ary) and will ap p ear in the Ap p liance lis tview.Pro to co l o p tio ns (either http o r http s) can b e used to fo rce the surfacing o f results o ver a secure co nnectio n. When Jad usend s a results req uest to a Go o g le ap p liance, this is o ver a secure co nnectio n.Ho stname/IP ad d ress req uires the ho stname/ip ad d ress fo r the p iece o f Go o g le search hard ware.Po rt can b e used if the Go o g le b o x is b ehind a firewall and , fo r examp le, p o rt fo rward ing need s to b e used to in o rd er toaccess the b o x.Fro nt end creates d ifferent fro nt end s fo r the Go o g le Search Ap p liance, enab ling the styling and assig nment o f d ifferent fro ntend s fo r d ifferent web sites. Go o g le Minis sup p o rt o ne fro nt end , altho ug h a reference is sti l l need ed here fo r inclusio n o f aGo o g le Mini b o x. Mo re than o ne fro nt end fo r d ifferent sets o f e.g . KeyMatches can b e used in d ifferent s ites.
Front End Output Format Interface within Google Box administration interface
Default co llectio n d etermines the co llectio n to use fo r the main s ite search. The d efault co llectio n can includ e multip le URLs in
Ap p liances
28 6

co ntent matching b o x insid e the relevant Go o g le b o x's ad ministratio n interface.
Content matching input field within Google box administrative interface
Failo ver ap p liance enab les yo u to sp ecify a b ackup Go o g le b o x fro m the Ap p liances lis t view fo r b ackup /failo ver p urp o ses.When yo u have co mp leted all o f the req uired field s the SAVE b utto n will ad d yo ur new ap p liance to yo ur Ap p liances lis t view.
In the Ap p liances lis t view, the Live ind icato r enab les yo u to select which Go o g le b o x is co nnected to yo ur web site. Selecting Nod isab les the co nnectio n.
Selecting your Live appliance
Deleting AppliancesThere are two ways o f d eleting an existing Ap p liance.
Method One
Selecting an existing Appliance
To d elete an existing Ap p liance yo u must first select it fro m the Ap p liances lis t.
Selecting Delete from the Actions menu
To d elete the Ap p liance select the Delete o p tio n fro m the asso ciated Actio ns menu.
Ap p liances
28 7

Method Two
Check the box corresponding with the Appliance that you wish to delete
Fro m the Ap p liances lis t check the b o x in the final co lumn next to the Ap p liance that yo u wish to d elete.
Click Delete to remove the Appliance
Click Delete to remo ve the Ap p liance
Ap p liances
28 8

Managing CollectionsJad u's Rup a so ftware enab les yo u to easily unlo ck the p o wer o f Go o g le search hard ware b y p ro vid ing an interface to createmultip le search co llectio ns that are vis ib le in the p ub lic facing search interface, enab ling multip le d o mains to b e q ueried andreferenced in search results.
Rup a p ro vid es the facil ity to map to search co llectio ns that have b een ad d ed within the Go o g le search hard ware so that they caneasily b e d isp layed in the p ub lic facing search interface.
Where multip le co llectio ns have b een set up , web site vis ito rs p erfo rming search q ueries have the o p tio n o f fi ltering their searchresults so that they are returned fro m a sing le co llectio n.
Creating CollectionsTo create a new search co llectio n that will b e vis ib le within yo ur web site's Rup a search interface, it is necessary to reference theco llectio n in the Jad u Rup a so ftware and within the ad ministratio n area o f the Go o g le hard ware that will b e p ro vid ing searchresults.
Adding a search collection to Google search hardware
With the ad d itio n o f a co llectio n fro m where search results will b e returned , Jad u Rup a then p ro vid es o p tio ns fo r referencing theco llectio n(s) in the search interface o f yo ur web site.
The main Co llectio ns screen will l is t all o f the co llectio ns that have b een ad d ed within the CMS.
Friend ly Name is the name o f the search co llectio n as it wil l ap p ear within the search interface.Co llectio n Name is the same co llectio n name that was ad d ed in the ad ministrative interface fo r the Go o g le search hard ware.URLs (return sep arated ) is the URL(s) that make up the search co llectio n b eing referenced .Imag e is an imag e/ico n to co mp lement the Friend ly Name.If yo u wo uld like yo ur co llectio n to ap p ear as a fi ltering o p tio n o n the web site’s Ad vanced Search p ag e select ‘Yes’ fro m theAvailab le o n Ad vanced Search d ro p d o wn lis t.
To create a new Co llectio n c lick o n the Create New Co llectio n b utto n and then enter the req uired info rmatio n.
Co llectio ns
28 9

The new Collection Details page
After ad d itio n o f the co llectio n d etails, c lick the SAVE b utto n.
Deleting CollectionsThere are two ways o f d eleting an existing co llectio n.
Method One
Selecting an existing collection
To d elete an existing co llectio n yo u must first select it fro m the Co llectio ns lis t.
Co llectio ns
29 0

Selecting Delete from the Actions menu
To d elete the co llectio n select the Delete o p tio n fro m the asso ciated Actio ns menu.
Method Two
Check the box corresponding with the collection that you wish to delete
Fro m the Co llectio ns lis t check the b o x in the final co lumn next to the co llectio n that yo u wish to d elete.
Click Delete to remove the collection
Then to d elete the co llectio n c lick o n the Delete b utto n.
Co llectio ns
29 1

Managing NavigationThe Rup a navig atio n interface p ro vid es the facil ity to includ e links fo r d isp lay within the head er areas o f the search ho mep ag e andsearch results p ag es.
Adding Navigation Links
The Navigation links list
To ad d a new Navig atio n link, c lick the New Link b utto n within the Navig atio n links lis t.
Navigation Details page
Name is the name o f yo ur l ink.Destinatio n is the URL o f the p ag e that yo u wish to l ink to in this field .
After ad d ing Name and Destinatio n d etails, c lick the SAVE b utto n fo r the link to ap p ear within the web site's Rup a search interface.
When multip le l inks have b een ad d ed to the navig atio n lis ting , the Rup a interface will p ro vid e p o sitio ning arro ws in the Ord erco lumn so that the o rd er in which the links ap p ear can b e amend ed .
Navig atio n
29 2

Top-right navigation links
Deleting Navigation Links
Check the box corresponding with the link that you wish to delete
Fro m the Navig atio n lis t check the b o x in the final co lumn next to the link that yo u wish to d elete.
Click Delete to remove the link
Then to d elete the link c lick o n the Delete b utto n.
Navig atio n
29 3

Managing ReportsThe Jad u Rup a Rep o rts interface p ro vid es a facil ity to g enerate rep o rts fo r co mmo n q ueries b ased o n d ate rang es that can b eentered in the relevant Rep o rt o p tio ns field s.
After d ates have b een either manually entered in the Fro m and To field s, o r inserted thro ug h the calend ar p icker.
After Fro m and To d ates have b een ad d ed , yo u can also sp ecify the numb er o f q ueries to b e lis ted b y selecting a value fro m theResults to sho w d ro p d o wn lis t. Click the Generate b utto n and search q ueries lis ted in d escend ing freq uency will b e returned withinthe Rup a interface fo r the d ate rang e yo u have sp ecified .
Report options interface
Rep o rts
29 4

Managing Rename Result URLsIn certain s ituatio ns, netwo rk co nfig uratio ns/DNS setting s req uire IP ad d resses to b e used in o rd er to g ather search results fro m asp ecific d o main rather than the d o main o f the web site e.g . www.examp le.co m.
The Rename Result URLs interface wo rks like a find and rep lace so that results are served with the rep lacement value (name) ratherthan that used to q uery the search ap p liance.
The IP ad d ress is entered in the Fro m field and the relevant d o main name is entered in the To field . Click o n SAVE b utto n to savethe renaming co nventio n yo u have sp ecified .
Renaming a result URL
Result rename URLs
29 5

Managing SettingsThe Setting s interface p ro vid es o p tio ns fo r ho w search q ueries can b e executed and ho w search results can b e d isp layed .
Ad vanced Search Enab led enab les the use o f yo ur Rup a co llectio ns within the main CMS Ad vanced Search.Site Search Enab led enab les the use o f yo ur Rup a co llectio ns within the main CMS Site Search.Co p yrig ht Owner is the name o f the co p yrig ht o wner - text entered here is includ ed as the co p yrig ht marker within the searchho mep ag e and in fo o ters o f search result p ag es (in s ituatio ns where, fo r examp le, the search p ro vid er and p ub lisher ared ifferent).Installatio n Name is the name o f the web site - text entered here is includ ed in the title b ar o f the b ro wser.Sto p Wo rd s is a l is t o f keywo rd s (co mma sep arated ) that will b e remo ved fro m search q ueries b efo re b eing sent to theGo o g le search hard ware.Stylesheet is facil ity to reference a stylesheet that will b e used in the Rup a search interface.
Rupa search settings
To save yo ur setting s c lick o n the SAVE b utto n.
Setting s
29 6

Translations
Translatio ns
29 7

LocalesLo cales d escrib e a lang uag e as sp o ken in a p articular co untry. It also d efines co untry and lang uag e d ep end ent fo rmating , suchas what d ay a week b eg ins o n and ho w numb ers are fo rmatted .
A numb er o f lo cales are installed o n yo ur server and co me p reco nfig ured in Jad u, b ut o n o ccasio n yo u may need to d efine o r ed ita new lo cale.
To access the lo cale manag ement interfaces, yo u need to ad d lo cales to yo ur ad min p rivileg es. The lo cale checkb o x is in theUtil ities l is t.
When yo u first navig ate to Lo cales in the navig atio n menu, a l is t o f all installed lo cales is d isp layed .
Editing a localeTo ed it a lo cale, c lick o n its title in the lis t.
Lo cales
29 8

Fro m this screen any o f the values can b e ad justed , and chang es co mmitted b y c licking 'Save' . 'Cancel' wil l ab and o n any chang esand take yo u b ack to the lis t view.
Adding a localeTo ad d a new lo cale, c lick o n the 'Create' b utto n in the lis t view.
The ed iting screen will o p en, and ag ain chang es are co mmitted b y c licking 'Save' . 'Cancel' wil l ab and o n any chang es and take yo ub ack to the lis t view.
Deleting a localeTo d elete a lo cale, o p en a lo cale fro m the lis t view and click o n the 'Actio ns' b utto n, and select the d elete o p tio n fro m the menu.
Lo cales
29 9

A warning wind o w will o p en, c lick 'Delete Lo cale' to remo ve the lo cale.
Lo cales
30 0

Assigning translatorsAd ministrato rs in the CMS can b e assig ned to any p re-co nfig ured lo cale as translato rs.
To view the lo cales assig ned to an ad ministrato r, o p en their reco rd in the CMS fro m the 'Ad min Privileg e' l is t.
Yo u need then to c lick o n the 'Assig n Lo cales' b utto n.
A wind o w will o p en that sho ws the lis t o f lo cales that are currently assig ned .
Not e : Ad ministrato rs that functio n as translato rs sho uld b e shared with the g alaxy s ites they must translate fro m and to .
Adding a localeTo ad d a new lo cale to the lis t, select the lis t in the d ro p d o wn and click 'Ad d Lo cale' .
Yo u must then click 'Assig n Lo cales' and save the ad ministrato rs reco rd . If yo u click 'Cancel' , yo ur chang es will b e d iscard ed .
Assig ning translato rs
30 1

Removing a localeTo remo ve a lo cale, c lick the 'Remo ve' l ink next to the lo cale name.
Yo u must then click 'Assig n Lo cales' and save the ad ministrato rs reco rd . If yo u click 'Cancel' , yo ur chang es will b e d iscard ed .
Assig ning translato rs
30 2

Configuring a translated siteYo u must ind icate to the system which sites sho uld b e used to g ether when translating co ntent. This is d o ne b y assig ning Galaxiessites to the same site g ro up .
Yo u sho uld in mo st cases create a new site g ro up fo r this p urp o se, and sho uld no t use the 'Enterp rise' g ro up as this is exp lictlyd isreg ard ed when co nsid ering translatio ns.
Once a g ro up o f s ites has b een created , yo u sho uld check that the ap p ro p riate lo cale has b een assig ned to the s ite's lang uag ep ack. The lo cale sho uld match that assig ned to the ad ministrato rs yo u wish to act as translato rs fo r the s ite.
Co nfig uring translated sites
30 3

Sending content to be translatedCo ntent can b e sub mitted into the translatio n wo rkflo w fro m its Co ntro l Center interface.
Viewing existing translationsYo u can check what translatio ns have alread y b een co mp leted fo r a d o cument fro m the 'Actio ns' menu.
A wind o w will o p en lis ting the o p tio ns availab le in this g ro up , with p revio usly translated co ntent marked with a check.
Requesting a new translationYo u req uest a new translatio n fro m the 'Actio ns' menu, b y c licking the 'Translate' o p tio n.
Send ing co ntent fo r translatio n
30 4

The translate wind o w will o p en. Select the lang uag e that req uires translatio n and click the 'Create Task' b utto n to send the item fo rtranslatio n. Clicking the 'Cancel' b utto n will d iscard the chang es.
Once a translatio n has b een req uested , all translato rs who co uld co mp lete that task are no tified b y email that a new task has b eencreated .
Updating a translationWhen p revio usly translated co ntent is up d ated , the system auto matically no tifies translato rs. Translatio n tasks are auto maticallyg enerated and yo u d o need to manually req uest a new translatio n.
Send ing co ntent fo r translatio n
30 5

Translation tasksWhen a new translatio n task is created , translato rs who co uld co mp lete that wo rk are emailed a link to the new task.
To view the lis t o f tasks, navig ate to 'My tasks' in the p ro file menu.
The lis t o f translatio ns tasks is availab le und er the 'Translatio ns' tab .
Op ening the 'Translatio ns' tab will l is t yo ur tasks.
Co mp leting translatio n tasks
30 6

Completing translation tasksWhen yo u are no tified o f a new translatio n task, lo g into the d estinatio n g alaxy and view the translatio n task lis t as d escrib edab o ve. View the d etails o f the new task b y c licking the task link in the lis t. The task d etails p ag e will o p en.
The so urce site l ink will take yo u to the co ntent that req uires translatio n.
Once yo u have create a translatio n o f the p ag e, select the new p ag e fro m the map to co ntent b o x and click the 'Co mp lete' b utto n.
Rejecting translation tasksTo reject a task, o p en the reco rd b y c licking the task link in the lis t. The task d etails p ag e will o p en.
Co mp leting translatio n tasks
30 7

Click the 'Reject' b utto n to c lo se the task witho ut creating a new map p ing reco rd .
Co mp leting translatio n tasks
30 8

Manually managing translation mappingsMap p ing s are the reco rd s that l ink an item o f co ntent in o ne lang uag e to an item o f co ntent in ano ther. There may b e rareo ccasio ns where yo u need to ad d o r remo ve a map p ing that has b een created in erro r.
Adding translation mappingsSelect the g alaxies s ite, co ntent typ e and title o f the co ntent yo u wish to ad d a map p ing fo r fro m the d ro p d o wn b o xes.
The d ro p d o wns in the translatio ns area will p refi l l with relevant d ata b ased o n the selectio ns yo u make. Select the d estinatio ng alaxy and the title o f the translatio n. Then click 'Save' to sto re the new map p ing .
Removing translation mappingsFind the map p ing in the lis t and click to view its d etails.
Manually up d ating map p ing s
30 9

Click the cro ss ico n next to the map p ing yo u wish to remo ve.
Manually up d ating map p ing s
310

Utilities
Util ities
311

Monitoring your users in Admin StatsAs a Web master, yo u are ab le to mo nito r the o nline activities o f all the p eo p le that have access to the Jad u Co ntro l Center.
This can b e useful fo r many p urp o ses, such as find ing o ut ho w o ften Co ntent Ed ito rs lo g -in to the system. To view user statistics,select the Ad min Stats o p tio n fro m the main Util ities mo d ule.
The Admin Stats area
There are three main ways to g enerate Ad min Stats. These can b e selected via the tab s at the to p o f the screen.
Generate: A s imp le way to g enerate and view activity statistics fo r each ad min.Rep o rt Temp lates: Create and save a temp late fro m which to g enerate a rep o rt that yo u intend to use reg ularly. This is to usein co njunctio n with Sched ules.Sched ules: With a Rep o rt Temp late created , yo u have the ad d ed feature o f creating a sched ule to d eliver a rep o rt d irectly toyo ur inb o x at selected intervals.
Generating ad-hoc reportsThe Ad min Stats view will always d efault to the Generate sectio n. To g enerate a full rep o rt fo llo w these step s:
Filter Ad ministrato r: Cho o se either to g enerate a rep o rt b ased o n all the users o r select a sp ecific user fro m the d ro p d o wnmenu.Date Rang e: Inp ut the d ates fo r which yo u wo uld like the statistics to rep o rt and click GO.Recent Perio d : Cho o se a time p erio d yo u wo uld like fro m the d ro p d o wn menu. On selecting a p erio d c lick Go .
Be aware that the rep o rt can take a while to g enerate d ue to the p o tentially larg e amo unt o f d ata b eing g enerated .
Creating report templatesUsing Rep o rt Temp lates alo ng with Sched ules will allo w yo u to receive a rep o rt with the analysis o f yo ur sp ecificatio n d elivered toyo ur inb o x as either HTML o r PDF at a time that suits yo u.
To d o this, create a temp late o f the elements yo u wish to includ e in yo ur rep o rt. Select Ad min Stats fro m the Util ities menu, thenselect Rep o rt Temp late fro m the tab b ed o p tio ns.
Ad min statistics
312

The Report Templates area.
To create a rep o rt temp late fo llo w these simp le step s.
Select existing temp late: Fro m the d ro p d o wn menu yo u can select an existing temp late to ed it o r d elete.Title: G ive yo ur new temp late a meaning ful title.Outp ut File fo rmat: The d elivered email wil l co ntain the rep o rt as either HTML o r as a PDF. Select which yo u wo uld p refer fro mthe d ro p d o wn menu.Includ e Lo g in Analysis: Lo g in analysis d isp lays which users have lo g g ed in and ho w many times in yo ur cho sen time frame(yo u will set the sched ules time frame later fro m within Sched ules). Select Yes to includ e it o r No to exclud e it fro m yo ur rep o rt.Includ e Pag e Access Analysis: This rep o rts which sp ecific p ag es within the co ntro l center have b een accessed (no t up d ated )and ho w many times. Select Yes o r No to includ e o r no t.Includ e Bro wser Analysis: Bro wser analysis rep o rts which internet b ro wsers have b een used to access the co ntro l center alo ngwith a p ercentag e. Select Yes o r No to includ e o r no t.Includ e Op erating System Analysis: This rep o rts the d ifferent o p erating systems used to access the co ntro l center. Select Yeso r No to includ e o r no t.Includ e Full Site Mo d ificatio n Analysis: This rep o rts which sectio ns within the co ntro l center have b een either created o rup d ated . This will includ e which sp ecific user, the d ate and time o f mo d ificatio n and which p ag e. Select Yes o r No to includ eo r no t.Includ e Full Access Listing : Access lis ting s d isp lays every sectio n accessed b y which sp ecific user and the d ate and time.Select Yes o r No to includ e o r no t.Once yo u have co mp leted all o f the ap p ro p riate areas, c lick the Save Temp late b utto n.
Scheduling reportsOnce yo u have created a Rep o rt Temp late yo u can set up a Sched ule fo r receiving yo ur Ad min Stats rep o rt via email.
This will b e d elivered to yo ur inb o x as either HTML o r a PDF at a time yo u sched ule. To sched ule yo ur rep o rt c lick o n theSched ules tab .
Ad min statistics
313

The Schedules area
To create a sched ule fo llo w these simp le step s.
Create/Ed it Sched ule: Fro m the d ro p d o wn menu select an existing sched ule to ed it o r d elete. If creating a new sched ule,p ro ceed to step two .Sched ule Name: G ive yo ur new sched ule a meaning ful name.Email: Enter the email ad d ress(es) yo u wo uld like the rep o rt d elivered to .Rep o rt Temp late: Fro m the d ro p d o wn lis t select yo ur Rep o rt Temp late p revio usly created .Sched ule: Fro m the Send me an email d ro p d o wn lis t select ho w o ften yo u wo uld like to receive the rep o rt. Yo u can then selectthe time yo u wo uld p refer and using the calend ar/d ate p icker, the d ates yo u wo uld like the rep o rt d elivered b etween.Once yo u have entered all o f the ap p ro p riate info rmatio n, c lick the Save Sched ule b utto n. Yo ur Ad min Stats rep o rt is no wco nfig ured to b e emailed to yo u.
Ad min statistics
314

Building Your Site NavigationGo o d , usab le navig atio n is the co re o f a successful web site and b uild ing yo ur s ite’s info rmatio n architecture sho uld b e a carefullyco nsid ered p ro cess. The p urp o se o f yo ur web site’s info rmatio n architecture is to ensure that all o f yo ur co ntent is fi led in amanner that is easy and intuitive fo r vis ito rs to find .
Planning your information architectureWhenever a p iece o f co ntent is created in the CMS it must b e allo cated a categ o ry fro m yo ur info rmatio n architecture. This ensuresthat all related co ntent is d rawn to g ether seamlessly.
Befo re accessing the CMS it is wo rth taking the time to co nsid er ho w yo u wo uld like yo ur vis ito rs to navig ate yo ur web site and p lanthe o verall info rmatio n architecture acco rd ing ly.
It is o ften wo rth d rawing o ut yo ur info rmatio n architecture o n p ap er to see ho w it fits to g ether.
Using the Category BuilderTo create and maintain yo ur info rmatio n architecture yo u must first select the Categ o ry Build er o p tio n fro m the Util ities menu. Oncethis is d o ne yo u will b e p resented with a p ag e sho wing yo ur current navig atio n to the left, and an area to the rig ht where yo u caned it o r ad d categ o ries.
The Category Builder area
To ad d a new categ o ry yo u must c lick o n the New Sub -Categ o ry b utto n. This will p ro vid e yo u with three new field s:
Categ o ry b uild er
315

The Category Details area
Name: This is where yo u typ e the name o f yo ur new categ o ry.Histo ry: This will auto matically b e p o p ulated with the current versio n numb er fo r yo ur info rmatio n architecture, and can b eed ited if req uired .Sco p e: Yo u may use this field to ind icate what typ e o f info rmatio n yo u wo uld exp ect to b e ad d ed to this categ o ry.
Once yo u have co mp leted all o f the relevant field s, c lick the Save b utto n to ad d yo ur new categ o ry to the info rmatio n architecture.
Yo ur new categ o ry will no t b e availab le to ad d co ntent to until yo u p ub lish yo ur new categ o ry l is ting .
To ed it a categ o ry o r ad d a sub -categ o ry o r d elete a categ o ry, first select the ap p ro p riate level at which yo u wish to p erfo rm thetask. The rig ht-hand sectio n will then d isp lay the fo llo wing o p tio ns:
Categ o ry b uild er
316

The Currently Selected area
New Sub -Categ o ry: Select this to ad d a sub -categ o ry b elo w the o ne which yo u have selected .Ed it: Select this o p tio n if yo u wish to ed it the currently selected categ o ry.Delete: Select this o p tio n to d elete the currently selected categ o ry.
If yo u are ed iting a categ o ry yo u will b e p resented with the fo llo wing field s:
Categ o ry b uild er
317

Editing an existing Category
ID: This sho ws yo ur selected categ o ry’s ID numb er. This is auto matically g enerated .Name: Enter o r ed it yo ur categ o ry name in the sp ace p ro vid ed .Histo ry: This d isp lays any p revio us names b y which the categ o ry has b een kno wn if it has b een ed ited .Sco p e: Yo u may use this field to ind icate what typ e o f info rmatio n yo u wo uld exp ect to b e ad d ed to this categ o ry.Save: Save yo ur categ o ry using this b utto n.Once yo u have co mp leted the chang es to yo ur info rmatio n architecture yo u will need to c lick the Pub lish Web Navig atio nVersio n x.xx b utto n to make it l ive o n yo ur s ite.
Importing a New XML TaxonomyThe eXtensib le Markup Lang uag e (XML) is a g eneral-p urp o se markup lang uag e. It is c lassified as an extensib le lang uag e b ecauseit allo ws its users to d efine their o wn elements. Its p rimary p urp o se is to facil itate the sharing o f structured d ata acro ss d ifferentinfo rmatio n systems, p articularly via the internet.
http ://en.wikip ed ia.o rg /wiki/XML
In o rd er to imp o rt an XML taxo no my yo u must first ensure that yo u have saved the ap p ro p riate XML fi le (and map p ing fi le ifreq uired ). Once yo u are read y click the Imp o rt New XML Taxo no my b utto n.
The Import New XML Taxonomy warning
Cho o se Taxo no my File: Use the b ro wse o p tio n to lo cate the ap p ro p riate XML fi le o n yo ur PC/Netwo rk.Cho o se Map p ing File: Use the b ro wse o p tio n to lo cate the ap p ro p riate map p ing fi le o n yo ur PC o r Netwo rk. (This field o nlyreq uires p o p ulatio n if yo u are map p ing a p rimary categ o ry l is ting to a seco nd ary lis ting o r schema.Up lo ad & Imp o rt: Select this to rep lace yo ur info rmatio n architecture with the new o ne.
Exporting your information architectureIf yo u wish to exp o rt yo ur info rmatio n architecture in o rd er to d irectly ed it the g enerated XML, the Categ o ry Build er features ad ed icated exp o rt functio n to enab le this.
To exp o rt yo ur info rmatio n architecture yo u must first select the Categ o ry Build er o p tio n fro m the Util ities menu.
Categ o ry b uild er
318

Exporting your information architecture as an XML file
To exp o rt yo ur info rmatio n architecture c lick o n the Exp o rt XML Taxo no my b utto n. This will g enerate and d o wnlo ad the XMLfile.
Categ o ry b uild er
319

Document Editor PrivilegesThe CMS d o cument ed ito r is co mp letely custo mizab le, allo wing yo ur o rg anizatio n to co ntro l the o p tio ns availab le to yo ur users.Using the Do cument Ed ito r Privileg es sectio n o f the Util ities mo d ule it is p o ssib le to set up d ifferent p rivileg e levels in o rd er that auser’s view o f the Do cument Ed ito r can b e d irectly l inked to their ro le.
Creating a new text ed ito r p reset is a very easy p ro cess. When yo u first select the Do cument Ed ito r Privileg es sectio n fro m theUtil ities menu yo u will b e sho wn the fo llo wing ind ex p ag e.
The Document Editor Privileges area
This main area d isp lays a l is t o f p rivileg e levels and ind icates whether each level is in use (i.e. if a user has b een assig ned thatlevel o f access). If a level is no t b eing used yo u will also have the o p tio n o f d eleting it.
To ad d a new p rivileg e level c lick the Create New Do cument Ed ito r Privileg es b utto n. Once yo u have d o ne this yo u will b e asked tog ive yo ur new ed ito r p reset an Ed ito r Name b efo re selecting which functio ns will b e mad e availab le within it b y checking theap p ro p riate b o xes next to the fo llo wing o p tio ns.
Bo ld – Allo ws yo u to ad d b o ld text.
Italic – Allo ws yo u to ad d italic text.
Und erline – Allo ws yo u to ad d und erlined text.
Strikethro ug h – Allo ws yo u to ad d strikethro ug h text.
Fo rmat (Examp le o f d ro p d o wn menu o p tio ns are Head ing , Sub head ing , No rmal, Ad d ress) – Allo ws yo u to use p red etermined fo ntstyles and co lo urs fo r the d ifferent elements o f yo ur co ntent such as head ing s and no rmal text.
Do cument ed ito r p rivileg es
320

Print – Allo ws yo u to p rint o ut yo ur co ntent.
Und o – Und o es the last actio n yo u p erfo rmed .
Red o – Red o es the last actio n yo u p erfo rmed .
Co p y – Co p ies the area yo u have selected .
Paste – Pastes the co ntent yo u have co p ied to yo ur c lip b o ard .
Cut – Cuts the area yo u have selected .
Sup erscrip t – Allo ws yo u to ad d sup erscrip t text.
Sub scrip t – Allo ws yo u to ad d sub scrip t text.
Full Screen Ed ito r – Maximizes o r minimizes the ed ito r screen.
Ord ered List – Allo ws yo u to ad d a numb er l is t.
Bulleted List – Allo ws yo u to ad d a b ulleted lis t.
Blo ckq uo te – Allo ws yo u to ad d b lo ckq uo te text.
Ab b reviatio n – Allo ws yo u to d efine the full meaning o f an ab b reviated term.
Do cument ed ito r p rivileg es
321

Insert/Mo d ify Link – Allo ws yo u to insert a l ink to ano ther s ite o r item o f co ntent o r to mo d ify a p revio usly ad d ed link.
Remo ve Link – Allo ws yo u to remo ve a p revio usly ad d ed link to ano ther s ite o r item o f co ntent.
Justify Left – Justifies yo ur text to the left o f the p ag e.
Justify Center – Justifies yo ur text to the center o f the p ag e.
Justify Rig ht – Justifies yo ur text to the rig ht o f the p ag e.
Decrease Ind ent – Allo ws yo u to d ecrease the text ind ent.
Increase Ind ent – Allo ws yo u to increase the text ind ent.
Insert/Mo d ify Imag e – Allo ws yo u to insert an imag e o r to mo d ify a p revio usly ad d ed imag e.
Ho rizo ntal Rule – Allo ws yo u to ad d a ho rizo ntal l ine.
Insert/Mo d ify Multimed ia Ob ject – Allo ws yo u to insert an imag e o r to mo d ify a p revio usly ad d ed multimed ia o b ject.
Insert Sp ecial Character – Allo ws yo u to insert a sp ecial character into yo ur text such as a co p yrig ht symb o l.
Insert Time – Allo ws yo u to ad d the current time.
Insert Date – Allo ws yo u to ad d the current d ate.
Insert Snip p et – Allo ws yo u to ad d snip p ets o f p ro g ramming co d e.
Do cument ed ito r p rivileg es
322

Insert Tab le – Allo ws yo u to insert a tab le.
Sp ellcheck d o cument – Allo ws yo u to check the sp elling o f yo ur co ntent.
Calculate Read ab ility – Perfo rms a read ab ility sco re and info rms yo u o f the averag e read ing ag e o f yo ur co ntent.
To g g le HTML So urce – Allo ws yo u to see and ed it the HTML so urce co d e o f the p ag e co ntent.
Find and Rep lace – Allo ws yo u to search fo r a sp ecific wo rd o r p hrase and rep lace all o ccurrences with ano ther wo rd o r p hrase.
Co ntent Statistics – Perfo rms a wo rd and p arag rap h co unt.
Yo u will also have the o p tio n to restrict whether users can ad d link titles to hyp erlinks (fo r mo re info rmatio n ab o ut this functio np lease refer to the Pub lishing Manual).
Once yo u are hap p y with yo ur selectio ns yo u can create yo ur new p reset b y c licking the Save Do cument Ed ito r Privileg es b utto n.
Do cument ed ito r p rivileg es
323

Creating Friendly URLs and RedirectsThe URLs g enerated b y a CMS can b e very lo ng and no t p articularly user friend ly. Fo r examp le, it is unlikely that yo u wo uld want tog ive o ut a URL o ver the telep ho ne, o r p rint it o n any literature, that read s:http ://www.yo ursite.co m/site/scrip ts/d o cuments_info .p hp ?d o cumentID=28 4
Jad u lets yo u set up yo ur o wn Friend ly URLs via the Util ities mo d ule. An examp le o f a Friend ly URL wo uld b e:http ://www.yo ursite.co m/co ntact
Friend ly URLs make it easier to p ub lic ize areas o f yo ur web site.
To create a friend ly URL, select the Friend ly URLs o p tio n fro m the Util ities menu to g o to the Friend ly URLs ind ex.
The Friendly URLs index
Friend ly name: This is the friend ly name that can b e ad d ed to the end o f yo ur s ite ad d ress to access the web p ag e in q uestio n(e.g . www.jad u.net/mo b ile).Actual ad d ress: This is the actual ad d ress o f the p ag e that the Friend ly URL p o ints to .View Live: Click o n this l ink to b e taken to the p ag e in q uestio n.To d elete a Friend ly URL yo u must tick the checkb o x at the end o f the ap p ro p riate ro w and then click the Delete b utto n.
Create a new Friendly URLTo create a new Friend ly URL click o n the Ad d Friend ly URL b utto n.
Friend ly URLs
324

Creating Friendly URLs
Friend ly name: Typ e the name yo u wish to use fo r yo ur Friend ly URL in the sp ace p ro vid ed . Fo r examp le, to set up the Friend lyURL http ://www.yo ursite.co m/co ntact s imp ly typ e ‘co ntact.’Actual ad d ress: Typ e o r p aste the actual URL yo u wish to l ink to in this sp ace.Once yo u have co mp leted all o f the step s as ab o ve yo u can save yo ur Friend ly URL b y c licking o n the Save Friend ly URLb utto n.
No te: Il leg al characters sho uld NOT b e used within a friend ly name. Fo r examp le @, £, #, > , * . Also , sp aces b etween wo rd s sho uldNOT b e used . If either are used then it wil l create erro r messag es o n yo ur web site and in effect, b reak it. Only letters and numb erscan b e used .
Bulk importFriend ly URLs can b e imp o rted in b ulk into yo ur system using a CSV fi le.
Friend ly URLs
325

Action menu
To b eg in, select " Bulk imp o rt" fro m the actio n menu to o p en the b ulk imp o rt wind o w.
The Bulk Import window
Do wnlo ad samp le CSV: The fo rmat o f the CSV is g iven in the samp le fi le that can b e d o wnlo ad ed fro m this wind o w.
Friend ly URLs
326

CSV file: The fi le yo u wish to imp o rtImp o rt actio n: Whether to rep lace the system's current Friend ly URLs with the d ata in the CSV, o r instead ad d these Friend lyURLs to the existing lis t.Once yo u have co mp leted all o f the step s ab o ve, c lick the Imp o rt b utto n.
After the fi le has b een successfully imp o rted a success messag e is sho wn, c lick the " Do ne" b utto n to co ntinue.
Successful upload
Friend ly URLs
327

Managing Broken LinksWithin yo ur web site there will b e hund red s o f l inks emb ed d ed within co ntent. Many will b e p o inting to d o cuments, news artic les andd o wnlo ad s as well as external web sites. If an artic le o r d o cument is remo ved o r a URL o f an external web site chang es, then allyo ur l inks p o inting to these URLs will b e ‘b ro ken’.
Jad u p ro vid es a Link Checker that we reco mmend is used at least o nce a week to help fix ALL b ro ken links. One p erso n sho uld b ed eleg ated to carry o ut this task and avo id multip le running o f the Link Checker.
The Link Checker can b e run manually o r it can b e sched uled to run auto matically.
Running the Link CheckerThe p ro cess o f checking fo r b ro ken links is straig htfo rward . Fro m the main Util ities mo d ule navig atio n, select Link Checker.Results fro m the p revio us check will initially b e d isp layed .
The main Link Checker area
Run the link checker at the next availab le time: Click this l ink to manually run the link checker.Once yo u have run yo ur test, any b ro ken links will b e d isp layed in this sectio n. Fro m here yo u will b e ab le to ed it/chang e themusing the ap p ro p riate o p tio ns.
Scheduling the Link CheckerIt is p o ssib le to sched ule the link checker to run auto matically b y c licking o n the Sched ule tab . The link checker can o ccasio nallyaffect s ite p erfo rmance, so we reco mmend sched uling it to run d uring q uiet p erio d s such as the early ho urs o f the mo rning .
Link checker
328

The main Link Checker Schedule area
Enab led : Select Yes o r No fro m the d ro p d o wn menu to turn the sched uling o n.Freq uency: Select ho w o ften yo u wo uld like the link checker to run fo rm the d ro p d o wn menu.Sched ule: Select a Start time and Day o n which yo u wo uld like the check to run fro m the d ro p d o wn menu.Email results to : Enter the email ad d ress to which yo u wo uld like the results mailed to .
Managing your broken linksOnce the link checker has run yo u will ho p efully receive the messag e, " Go o d news - there are no b ro ken links!" If there are b ro kenlink results returned they will b e lis ted with the fo llo wing info rmatio n in o rd er that they may b e revised :
Title: This g ives yo u the typ e o f co ntent and title o f the item that includ es the b ro ken link. The title will also act as a l ink to that itemwithin the Jad u Co ntro l Center.
Autho r: This ind icates the name o f the user resp o nsib le fo r the item o f co ntent that co ntains the b ro ken link.
Link: This d isp lays the URL o f the b ro ken link. This may b e d irectly ed ited and then up d ated b y c licking o n either the Chang e o rChang e & Sub mit Fo r Ap p ro val b utto n.
Link checker
329

Link InspectorThe Util ities mo d ule p ro vid es access to the s ite Link Insp ecto r. This allo ws yo u to id entify an item o f co ntent and to view all l inksasso ciated with it within the CMS (b o th o utg o ing and inco ming ).
To b eg in, select Link Insp ecto r fro m the Util ities d ro p d o wn lis t to access the initial Link Insp ecto r p ag e. Fro m here yo u can selectthe typ e o f co ntent that wish to view b efo re c licking o n the Go b utto n.
Selecting the content type
This will then d isp lay a l is t o f all o f the items o f the cho sen co ntent typ e that have b een created within the CMS. To view the linksasso ciated with an item simp ly c lick o n the item's title. This will o p en a lig htb o x that d isp lays inb o und and o utb o und links fo r thecho sen item.
Viewing a Link Map
Link insp ecto r
330

Fro m here it is p o ssib le to test a l ink b y c licking o n it. This will o p en the p ag e that the link p o ints to in a new b ro wser wind o w o rtab .
Link insp ecto r
331

Managing Orphaned ContentIf yo u chang e yo ur info rmatio n architecture there is a hig h p ro b ab ility that so me o f yo ur co ntent may b eco me o rp haned (i.e. it wil lno lo ng er b e linked to an ap p ro p riate navig atio n categ o ry).
Selecting the Orp haned Co ntent tab will allo w yo u to search the CMS fo r any co ntent that req uires recateg o rizatio n.
The Orphaned Content area
First select a co ntent typ e fro m the d ro p d o wn lis t, and the click o n Go . This will sho w yo u a lis t o f co ntent that need s to b eassig ned to a new categ o ry, b ro ken up b y co ntent typ e.
This l is t wil l also ind icate which categ o ries are missing . This p ro cess may take a mo ment o r two to run so d o n’t wo rry if it seems alittle s lo w.
Orp haned co ntent
332

The Orphaned Content List
To assig n a categ o ry to a p iece o f o rp haned co ntent first p lace a tick in the b o x next to it and then click the Assig n Categ o riesb utto n. Yo u will then b e ab le to fo llo w the stand ard p ro cess o f ad d ing categ o ries to the selected co ntent.
Orp haned co ntent
333

ReportsTo co ntinuo usly imp ro ve we need to b enchmark where we are, so we can measure o ur future p erfo rmance, track trend s so we canp lan fo r q uieter o r b usier p erio d s and b eco me mo re effic ient.
Many rep o rts are p ro vid ed with the CMS, ho wever ad d itio nal custo m rep o rts can b e created and reg istered with the system. Seethe relevant d evelo p er g uid e p ag e fo r further d etails.
To run a report1. Click Util ities >> Rep o rts2. Select the rep o rt to run fro m the lis t p ro vid ed b y c licking the title.3. The rep o rt wind o w will o p en. So me rep o rts p ro vid e o p tio ns to co nfig ure the rep o rt b efo re it runs. These rep o rts will sho w a
" Rep o rt setting s" wind o w when the rep o rt first o p ens. Set the g iven o p tio ns and p ress the Run b utto n.4. The p ag e will refresh to sho w the result o f the rep o rt.
To export the content of a report1. Run the rep o rt2. Click the Actio ns menu, the menu will o p en.3. Click the Exp o rt as CSV o p tio n. The p ag e will refresh and the CSV rep o rt results will b e d o wnlo ad ed to yo ur d eskto p .
To filter the report content1. Run the rep o rt2. Enter a keywo rd in the Filter reco rd s field . The rep o rt co ntent will b e d ynamically up d ated to o nly sho w results matching the
g iven fi lter.
To reset the rep o rt results, c lear the value o f the Filter reco rd s field .
Not e : fi l ters are no t reflected when the rep o rt is d o wnlo ad ed as a CSV.
To sort the report content1. Run the rep o rt2. Click the title o f the co lumn to so rt b y that value. The title o f the so rted co lumn will b e hig hlig hted a d arker g rey to ind icate it is
currently in use.
Not e : The arro w ico n o n the rig ht o f the title ind icates whether the co lumn is b eing so rted in ascend ing o r d escend ing o rd er.
Admin reports
Name De script ion
Ad mins b ystatus
Generates a l is t o f username, name and email ad d ress values fo r all ad mins o n the site that match thecurrent status. Status can b e set as either enab led o r d isab led .
Ad mins b ytwo facto rauthenticatio nstatus
Generate a l is t o f username, name and email ad d ress values fo r all ad mins o n the site that match thecurrent status. Status can b e set as two facto r authenticatio n enab led o r d isab led .
Chang esmad e inp erio d
Generate a l is t o f d ate, ad min name, ad min username, actio n and d escrip tio n fo r all co ntent chang es o nthe site. Rep o rt can b e set to run o ver the last 24 ho urs, last week, last mo nth, last 6 mo nths and last year,and o n all ad mins o r a p articular ad min o n the site.
Do rmantad mins inp erio d
Generates a l is t o f names fo r all ad mins o n site that have no t b een active in the g iven time p erio d . Timep erio d can b e set as last 24 ho urs, last week, last mo nth, last 6 mo nths and last year.
Mo st activead mins inp erio d
Generates a l is t o f ad min name, username and numb er o f actio ns values fo r the ad mins that co mp letedthe hig hest numb er o f actio ns in the g iven time p erio d . Time p erio d can b e set as last 24 ho urs, lastweek, last mo nth, last 6 mo nths and last year.
Pag esaccessed in
Generates a l is t o f d ate, ad min name, username and p ag e URL fo r all p ag es access in a g iven timep erio d . Time p erio d can b e set as last 24 ho urs, last week, last mo nth, last 6 mo nths and last year and
Rep o rts
334

p erio d the rep o rt can b e run o n all ad mins, o r o ne sp ecific ad min.
Successfulad min lo g insin p erio d
Generates a l is t o f ad min name and d ate values fo r all ad min lo g ins in a p erio d . Time p erio d can b e setas last 24 ho urs, last week, last mo nth, last 6 mo nths and last year.
Not e : when an ad min has b een d eleted fro m the system, their actio ns will remain lo g g ed and may b e mentio ned in rep o rts. Wherethis o ccurs, the ad min will b e referred to as " Deleted user: [ad min-id ]" . Fo r examp le, " Deleted user: 6 43" where 6 43 is the uniq ueid o f the ad min.
Content reports
Name De script ion
Categ o ryp ag e status
Generates a l is t o f categ o ry name and categ o ry ID fo r all categ o ries that match the current status. Categ o rystatus can b e set as either has a categ o ry land ing p ag e assig ned , o r no categ o ry land ing p ag e assig ned .
Co ntentaud it
Generates a CSV co ntent lo g o f all co ntent held o n site fo r a future co ntent aud it. This rep o rt is reso urceintensive to g enerate, and as a result wil l emailed to the ad d ress p ro vid ed in the rep o rt setting s as a CSVattachment.
Co ntent b ylive status
Generates a l is t o f typ e, title and p ag e URL fo r all co ntent that matches the g iven status. Status can b e setas live o r no t l ive, and can b e fi ltered b y co ntent typ e.
Co ntent b yvis ib lestatus
Generates a l is t o f typ e, title and p ag e URL fo r all co ntent that matches the g iven status. Status can b e setas vis ib le o r invis ib le, and can b e fi ltered b y co ntent typ e.
Co ntentmo d ified inp erio d
Generates a l is t o f typ e, title and p ag e URL fo r all co ntent that was mo d ified in the g iven time p erio d . Timep erio d can b e set as last 24 ho urs, last week, last mo nth, last 6 mo nths and last year.
Co ntent no tmo d ified inp erio d
Generates a l is t o f typ e, title and p ag e URL fo r all co ntent that was no t mo d ified in the g iven time p erio d .Time p erio d can b e set as last 24 ho urs, last week, last mo nth, last 6 mo nths and last year.
Co ntento wned b yad min
Generates a l is t o f typ e, title and p ag e URL fo r all co ntent that is o wned b y a g iven ad min.
Co ntentwitho ut ano wner
Generates a l is t o f typ e, title and p ag e URL fo r all co ntent that has no o wner.
Lo ckedco ntent
Generates a l is t o f typ e, title, p ag e URL and lo ck exp iry time fo r all co ntent that is currently lo cked .
Sched uledco ntentchang es
Generates a l is t o f typ e, title, actio n o n exp iry, valid fro m d ate, valid to d ate, and p ag e URL, fo r all co ntentthat has a co ntent sched ule currently ap p lied .
Translatio ntaskso utstand ing
Generates a l is t o f d ate, lo cale translated to , lo cale o rig inating fro m and so urce co ntent fo r all translatio ntasks o utstand ing o n the system.
Wo rkflo wtaskso utstand ing
Generates a l is t o f actio n, typ e, title, Pag e URL, and d ate created fo r all o utstand ing wo rkflo w tasks o n thesystem.
User reports
Name De script ion
Do rmant usersin p erio d
Generates a l is t o f users who have no t lo g g ed in within the g iven time p erio d . Time p erio d can b e setas last 24 ho urs, last week, last mo nth, last 6 mo nths and last year.
New users inp erio d
Generates a l is t o f users who have created an acco unt within the g iven time p erio d . Time p erio d can b eset as last 24 ho urs, last week, last mo nth, last 6 mo nths and last year.
Successful userlo g ins in p erio d
Generates a l is t o f user and d ate fo r all users that have lo g g ed inm in the g iven time p erio d . Timep erio d can b e set as last 24 ho urs, last week, last mo nth, last 6 mo nths and last year.
Rep o rts
335

Unsuccessfuluser lo g ins inp erio d
Generates a l is t o f user, failure typ e and d ate actio n was lo g g ed fo r all failed lo g ins in the g iven timep erio d . Time p erio d can b e set as last 24 ho urs, last week, last mo nth, last 6 mo nths and last year.
User lo g insummary
Gives a summary o f successful vs. failed lo g ins in the g iven time p erio d . Time p erio d can b e set as last24 ho urs, last week, last mo nth, last 6 mo nths and last year.
Not e : These rep o rts assume that yo u are using o ne o f the CMS p ro vid ed user ad ap ters, they may no t functio n where a custo mad ap ter is in use.
Rep o rts
336

Cludo AnalyticsClud o analytics rep o rting allo ws yo u to view info rmatio n relating to ho w users use yo ur search, p ro vid ed yo u have the Clud osearch integ ratio n enab led (more information on enabling Cludo search here).
Accessing Cludo Analytic reportsClud o analytics is accessed within the Rep o rts mo d ule, und er ' Integ ratio n rep o rts ' :
Util ities >> Rep o rts >> Integ ratio n rep o rts >> Clud o Analytics
Selecting an Analytics report logOnce within the Clud o rep o rt, yo u are ab le to select an analytic lo g to view alo ng sid e a time p erio d to fi lter the lo g results b y.
Clud o Analytics
337

The availab le lo g typ es are as fo llo ws:
All search wo rd sSearch wo rd s with resultsSearch wo rd s witho ut resultsIneffective searchesMo st p o p ular p ag esSearch o rig inatio n p ag es
Available Analytic report logs
All search words
This lo g lis ts each search q uery that has b een searched fo r o n yo ur s ite.
Se arch word : This co lumn sho ws each wo rd , o r q uery, that users have searched fo r o n yo ur s ite.Numbe r of se arche s: The co lumn sho ws the amo unt o f times a search wo rd has b een searched fo r within the g iven timep erio d .Change : This co lumn sho ws the d ifference in the numb er o f searches when co mp ared with the p revio us time p erio d (forexample: if the time periods is 'Last 24 hours' and the number of searches was 20 in the last 24 hours and 10 in the 24 hours beforethat, then the change would be '+10').
Search words with results
Clud o Analytics
338

This lo g lis ts search q ueries which have b een searched fo r o n yo ur s ite and resulted in search results b eing returned .
Se arch word : This co lumn sho ws each wo rd , o r q uery, that user's have searched fo r o n yo ur s ite.Numbe r of se arche s: The co lumn sho ws the amo unt o f times a search wo rd has b een searched fo r within the g iven timep erio d .Change : This co lumn sho ws the d ifference in the numb er o f searches when co mp ared with the p revio us time p erio d .
Search words without results
This lo g lis ts search q ueries which have b een searched fo r o n yo ur s ite and resulted in no results b eing fo und .
Se arch word : This co lumn sho ws each wo rd , o r q uery, that user's have searched fo r o n yo ur s ite.Numbe r of se arche s: The co lumn sho ws the amo unt o f times a search wo rd has b een searched fo r within the g iven timep erio d .Change : This co lumn sho ws the d ifference in the numb er o f searches when co mp ared with the p revio us time p erio d .
Ineffective searches
Clud o Analytics
339

This lo g lis ts search q ueries which are d eemed ineffective - which is a search where a user hasn' t c licked o n any o f the returnedresults (hig hlig hting the results are no t relevant to the user).
Se arch word : This co lumn sho ws each wo rd , o r q uery, that user's have searched fo r o n yo ur s ite.Numbe r of se arche s: The co lumn sho ws the amo unt o f times a search wo rd has b een searched fo r within the g iven timep erio d .Click- t hrough rat e : The p ercentag e o f searches which the user has vis ited a s ite returned with the search results.
Most popular pages
This lo g lis ts the mo st p o p ular p ag es that users vis it fro m yo ur search results p ag e.
Se arche d page : This co lumn sho ws each search results URL that users have clicked o n fro m yo ur search result p ag e.Numbe r of clicks: This co lumn sho ws the amo unt o f c licks each URL has received .Change : This co lumn sho ws the d ifference in the numb er o f searches when co mp ared with the p revio us time p erio d .
Search origination pages
Clud o Analytics
340

This lo g lis ts yo ur s ites p ag es that users have searched up o n.
Se arch page t it le : This co lumn sho ws the title o f the p ag e a search o rig inated fro m.Se arch page url: This co lumn sho ws the URL o f the p ag e a search o rig inated fro m.Numbe r of se arche s: The co lumn sho ws the amo unt o f times a p ag e has has a search o rig inate fro m fo r within the g iven timep erio d .
Banner statistics
This lo g lis ts the b anners set up o n yo ur search eng ine, g iving info rmatio n o n the effectiveness o f each o ne.
Name : This co lumn sho ws the title o f the b anner.Numbe r of se arche s: This co lumn sho ws the amo unt o f times a search has trig g ered the b anner.Clicks: The co lumn sho ws the amo unt o f c licks links within the b anner have received (p ro vid ed the b anner co ntains any).
Exporting as CSV
Clud o Analytics
341

Fo r each o f the ab o ve p ag es yo u are ab le to g enerate a CSV o f the co mp lete l is t co ntaining the analytic lo g info rmatio n fo r theg iven time p erio d .
This is d o ne via the actio ns d ro p d o wn o n the rep o rt p ag e:
Actio ns >> Exp o rt as CSV
Clud o Analytics
342

StatisticsStatistics allo ws yo u to view info rmatio n ab o ut the vis ito rs to yo ur web site. Statistics co mp iles fig ures fo r the p revio us d ay’sactivity every nig ht.
No te : This feature can b e used o n g alaxies o nly when the sites are having reg istered d o main.
Getting started with the Seven Day OverviewStatistics is accessed fro m the Util ities mo d ule.
Statistics main area including the 7 day summary
The initial statistics p ag e sho ws an o verview o f traffic fo r the last seven d ays. This includ es:
Numb er o f p ag e views each d ay.To p 10 referrers.To p 10 p ag es.
To view a full rep o rt fo r a d ay fro m the o verview p ag e, c lick o n the d esired d ate. A mo re d etailed rep o rt fo r all o f the ab o veinfo rmatio n can b e viewed b y c licking the link at the b o tto m o f each o verview sectio n.
Creating ReportsTo create a rep o rt, c lick the Rep o rts tab at the to p o f the screen. Yo u can then cho o se the d etails that yo u want yo ur rep o rt toco ntain.
Statistics
343

Creating a Report area
Cho o se Temp late: Yo u can select a p revio usly saved rep o rt temp late o r create a o ne-o ff rep o rt.Rep o rts to Sho w: Use the check b o xes to select which rep o rts yo u wo uld like to view.Sp ecific Pag e Rep o rt: In ad d itio n to the ab o ve rep o rts, it is p o ssib le enter a numb er o f web p ag e ad d resses fro m yo urweb site to see ho w many p eo p le have vis ited the relevant p ag e(s). Further ad d resses can b e entered b y c licking the + b utto n.Yo u can also select whether the text yo u ad d is matched exactly o r just p art o f the text is matched b y selecting Exact match o rPart match fro m the d ro p d o wn menu.Fo r examp le, yo u can enter the wo rd ‘ZIP co d e’ to ad d up all p ag e views that have the wo rd ZIP co d e in them.Categ o ry Rep o rt: Categ o ries can b e selected to sho w ho w many req uests each item in the categ o ry (e.g . d o cuments,d o wnlo ad s) has had . To select a categ o ry, c lick the Assig n Categ o ries b utto n. Fro m the Cho o se Categ o ry wind o w thatap p ears, select the d esired categ o ry and click the Cho o se Categ o ry b utto n. Once yo u are hap p y with yo ur cho sen categ o ry,select the items yo u want to see statistics fo r and click Go .Limit Numb er o f Results: Select the numb er o f results yo u wo uld like to sho w fo r each rep o rt. The mo re results yo u wo uld liketo see, the lo ng er the rep o rt wil l take to g enerate.
Statistics
344

Save as Temp late: To save the selected rep o rts as a temp late that can b e re-used , select Yes and enter a title fo r the temp late.Date Rang e: Enter the d ates (inclusive) fo r the p erio d fo r which yo u wo uld like to see the selected rep o rts. Yo u can also usethe select b o x to cho o se a p re-d etermined d ate rang e.To g enerate the rep o rt with all o f the o p tio ns yo u have selected , c lick the Get Statistics b utto n.
About Report TypesThere are a numb er o f stand ard rep o rts availab le fro m within Statistics.
General Rep o rt: The g eneral rep o rt p ro vid es a b rief o verview fo r the p erio d yo u cho o se fo r the rep o rt. This includ es:Successful Req uests is the to tal numb er o f p ag es req uested fo r the p erio d .Red irected Req uests is the numb er o f p ag es req uested that resulted in a red irect to ano ther p ag e.Failed Req uests is the numb er o f p ag e req uests that failed to return a p ag e.Distinct Ho sts Served is the numb er o f uniq ue vis ito rs to the web site.Data Transferred is the amo unt o f d ata transferred fo r the p ag es req uested .Yearly Rep o rt: The to tal numb er o f p ag es req uested fo r each year co vered in the selected rep o rt p erio d . This fig ure o nlyinclud es p ag e req uests fo r the p erio d o f the rep o rt.Mo nthly Rep o rt: The to tal numb er o f p ag es req uested fo r each mo nth co vered in the selected rep o rt p erio d . This fig ure o nlyinclud es p ag e req uests fo r the p erio d o f the rep o rt.Weekly Rep o rt: The to tal numb er o f p ag es req uested fo r each week co vered in the selected rep o rt p erio d . This fig ure o nlyinclud es p ag e req uests fo r the p erio d o f the rep o rt.Daily Rep o rt: The to tal numb er o f p ag es req uested fo r each d ay co vered in the selected rep o rt p erio d . This fig ure o nlyinclud es p ag e req uests fo r the p erio d o f the rep o rt.Daily Summary: This rep o rt sho ws ho w many p ag es were req uested o n each d ay o f the week fo r the rep o rt p erio d .Ho urly Summary: The ho urly rep o rt sho ws ho w many p ag e req uests were mad e d uring each ho ur o f the d ay.Ho sts Rep o rt: The ho sts rep o rt sho ws who has mad e p ag e req uests. Initially, this sho ws the IP ad d ress o f the co mp uter usedto access the web site. Yo u can find o ut mo re info rmatio n ab o ut a p articular IP ad d ress b y c licking o n it.Req uests Rep o rt: This rep o rt sho ws which p ag es have b een req uested , ho w many times and ho w many uniq ue p eo p le havereq uested the p ag e.Referrer Do mains Rep o rt: The referrer d o mains rep o rt sho ws the web sites with l inks to yo ur s ite that were used the mo st toaccess yo ur s ite.Bro wsers Rep o rt: The b ro wsers rep o rt d isp lays which web b ro wsers have b een used to access yo ur web site.Ro b o ts Rep o rt: The ro b o ts rep o rt d isp lays ro b o ts that have accessed yo ur web site. A ro b o t is a p ro g ram that auto maticallycrawls yo ur web site fro m time to time. Fo r examp le, Go o g le co mp iles its results b y using a ro b o t to crawl many o f the s ites o nthe internet.Op erating System Rep o rt: This rep o rt sho ws which o p erating systems p eo p le are using when accessing yo ur web site, fo rexamp le Wind o ws, Mac OS X and Linux.
Exporting ReportsWhile viewing a rep o rt yo u can exp o rt the results yo u are seeing to a PDF o r co mma sep arated value (CSV) fi le.
To d o this, c lick the Exp o rt Rep o rt l ink, select the typ e o f exp o rt yo u wo uld like and then click the Exp o rt Rep o rt b utto n.
The Export Report area
Scheduled ReportsYo u can sched ule rep o rts to b e emailed to yo u at a p articular time and reg ular intervals. To d o this yo u must have first saved arep o rt temp late.
Statistics
345

The Schedules area for editing and creating new schedules
To create a new sched ule c lick the Sched ules tab . Here yo u can see a lis t o f all p revio usly created sched ules. Then click the Ad d ASched ule b utto n.
Creating a new schedule
Rep o rt Temp late: Select a p revio usly saved temp late to use fo r the sched uled rep o rt.Recip ient Email Ad d ress: Enter the email ad d ress(es) fo r where the rep o rt wil l b e sent. Multip le email ad d resses can b eco mma sep arated .Statistics Fo rmat: Select the fo rmat yo u wo uld like to receive the rep o rt in, either PDF o r CSV.Date: Enter the d ate rang e in which yo u wo uld like the rep o rt to b e sent. The rep o rt wil l no t b e sent o utsid e o f this d ate rang e.Time: Cho o se the time that yo u wo uld like the rep o rt to b e sent.
Statistics
346

Interval: Select ho w o ften yo u wo uld like to receive the rep o rt.Once yo u have co mp leted all o f the relevant field s c lick Save to sched ule yo ur rep o rt.
Statistics
347

List view of usersThe ad min p rivileg es sectio n p ro vid es the lis t o f users alread y ad d ed to the CMS. When yo u click o n each user, yo u can see ad etailed view ab o ut that p articular user.
The Admin Privileges area
User columns
Column De t ails
Name/Username This d isp lays the user’s name and username. Yo u may click o n this to ed it that user’s d etails.
Navig atio naccess
This d isp lays the navig atio n areas to which the user is autho rized to ad d co ntent. This can b e ad justedfro m this screen b y checking ag ainst the ap p ro p riate user and then clicking the Chang e Selectedb utto n.
Privileg e level This d isp lays the user’s p rivileg e level and can b e ad justed fro m this screen b y checking ag ainst theap p ro p riate user and then clicking the Chang e Selected b utto n.
Gro up sAssig ned
This co lumn is o nly vis ib le if Ad vanced Wo rkflo w is enab led . This ind icates whether the user inq uestio n is assig ned to any wo rkflo w g ro up s and can b e ad justed fro m this p ag e b y p lacing a tick inthe b o x ag ainst the ap p ro p riate user and then clicking the Chang e Selected b utto n.
Delete The final co lumn p ro vid es yo u with the o p tio n to d elete selected user acco unts b y checking theco rresp o nd ing b o x fo llo wed b y the Delete b utto n.
List o f users
348

Editing and creating usersOnce yo u have set up yo ur info rmatio n architecture it wil l b e p o ssib le to start ad d ing co ntent to yo ur web site. In a larg eo rg anizatio n yo u will p ro b ab ly want to g ive access to a rang e o f staff in o rd er to mo re effectively manag e the mig ratio n andmaintenance o f this co ntent.
The Admin management area
To create a new user1. Click Util ities >> Ad min Privileg es2. Click the Create New Ad ministrato r b utto n3. Pro vid e the user's username. Be careful - this can' t b e up d ated later4. Pro vid e a p asswo rd fo r the user to lo g in. The user need s to use this p asswo rd d uring the first lo g in. Set the user’s p asswo rd
b y typ ing it in the first b o x and checking the Set Passwo rd b o x.5. Select the user's ro le o r assig n b esp o ke p rivileg es to yo ur user6 . If the user is a translato r, assig n the lo cales that they' re q ualified to translate7. If the user can o nly lo g in fro m sp ecific IP ad d resses, co mp lete the IP access restrictio n sectio ns8 . Pro vid e the user's actual name and email ad d ress9 . Once yo u click the Save Ad ministrato r b utto n the acco unt is created fo r the user
To edit an existing user1. Click Util ities >> Ad min Privileg es.
Ed iting and creating users
349

2. Select the user fro m the lis t b y c licking their name, their ad min reco rd will o p en.3. Up d ate the relevant d etails.4. Click the Save Ad ministrato r b utto n.
To link an existing user to a CXM account1. Click Util ities >> Ad min Privileg es.2. Select the user fro m the lis t b y c licking their name, their ad min reco rd will o p en.3. Click the Co nnect User b utto n. The Co nnect CXM User wind o w will o p en.4. Enter the CXM ad min's email in the " Search b y email" field5. Select the user in the search results b y checking the rad io b utto n next to their name.6 . Click the Co nnect Acco unt b utto n. The Co nnect CXM User wind o w will c lo se.7. Click the Save Ad ministrato r b utto n.
The Connect CXM User window
After l inking the user " (CXM user)" wil l b e sho wn after their username to ind icate that this user must no w sig n in using CXM.
User fields
Ed iting and creating users
350

Fie ld De script ion
Username The uniq ue name that yo ur user will use to lo g into the CMS Co ntro l Center. Please no te that this canno t b echang ed after a user has b een created .
Passwo rd Passwo rd s must fo llo w yo ur o rg anisatio ns valid atio n rules. If yo u are using the d efault valid atio n rules, theSug g est b utto n will p ro vid e a rand o m p asswo rd fo r yo u to use.
Ro le Ro le to which the Ad min is assig ned to . On assig ning a ro le to an ad min, all the ad min p ro p erty will b eo verrid d en b y ro le's p ro p erty. Leave as no ne to set sp ecific ad min p rivileg es.
Privileg eLevel
Using the d ro p d o wn menu yo u can select the level o f access yo u wish to g ive the user. This will alwaysd efault to Ad ministrato r. As stand ard there are two ad ministrato r levels, Web master and Ad ministrato r.Ad d itio nal levels may b e created using the Wo rkflo w sectio n o f the Util ities mo d ule.
Navig atio nYo u can use this o p tio n to restrict the areas o f navig atio n to which the ad ministrato r can p ub lish co ntent. Ifany categ o ries are selected at this p o int then the user will o nly b e ab le to p ub lish to these and no o thercateg o ries. If no ne are selected , then a d efault o f all categ o ries is assumed .
Translato r Yo u can use this o p tio n to assig n the lo cales that a user is q ualified to translate to
Co ntentView
It is p o ssib le to restrict users so that they can o nly view o r amend co ntent which they have created . To d othis, select the ap p ro p riate o p tio n fro m the d ro p d o wn lis t. There are three o p tio ns to cho o se fro m - View allco ntent, Can o nly view o wn co ntent o r Can o nly view co ntent within assig ned categ o ries
Imag eLib rary
Use this d ro p d o wn menu to d etermine whether yo ur user can up lo ad imag es to the imag e lib rary (see thePub lishing Manual fo r full d etails).
Do cumentEd ito rPreset
It is p o ssib le to l imit the functio ns availab le to the user when they are ed iting co ntent b y selecting anap p ro p riate level o f access fro m the d ro p d o wn lis t.
ActualName
Yo ur user’s name in the sp ace p ro vid ed .
Email Yo ur user’s email ad d ress in the sp ace p ro vid ed .
Dep artment Typ e the name o f the d ep artment in which the user wo rks in the sp ace p ro vid ed .
Ad d itio nalPag eAccess
Select the ap p ro p riate o p tio ns to g ive ad d itio nal access rig hts.
Mo d uleAccessLevels
Yo u can d etermine which areas o f the CMS Co ntro l Center yo u wo uld like yo u user to have access to b yticking /un-ticking the ap p ro p riate b o xes. Each b o x co rresp o nd s to a d ifferent area o f the Jad u Co ntro lCenter. The lis t wil l sho w all o f the co re mo d ules. By c licking o n refine yo u will b e ab le to l imit user’s access tosp ecific elements within them. Fo r examp le, so me users may o nly have access to o ne o r two areas such asDo cuments o r Do wnlo ad s, while o thers may b e g iven access to a who le rang e o f functio ns. Similarly, yo umay have a web master who just req uires access to ap p ro ve o ne area o f co ntent such as News.
Ed iting and creating users
351

User rolesRo les make it easier to manag e the p rivileg es o f a g ro up o f s imilar users. Memb ers o f yo ur o rg anisatio n can assume d ifferentro les, b ased o n yo ur req uirement. Each ro le sp ecifies the functio nality that a user has access to in yo ur CMS.
The role management screen.
To create a new role1. Click Util ities >> Ad min Privileg es2. Select the Ro les tab3. G ive the ro le a meaning ful title4. Pro vid e the p ermissio ns fo r this ro le5. Click the Save b utto n
To edit a role1. Click Util ities >> Ad min Privileg es2. Select the Ro les tab3. Select the ro le fro m the lis t o n the left4. Up d ate the relevant d etails5. Click the Save b utto n
Ro les
352

To assign a role1. Click Util ities >> Ad min Privileg es2. Select the user fro m the lis t3. Chang e the ro le field to the co rrect value4. Click the Save Ad ministrato r b utto n
Role fields
Fie ld De script ion
Title The name o f the ro le
Privileg eLevel
Using the d ro p d o wn menu yo u can select the level o f access yo u wish to g ive the user. This will alwaysd efault to Ad ministrato r. As stand ard there are two ad ministrato r levels, Web master and Ad ministrato r.Ad d itio nal levels may b e created using the Wo rkflo w sectio n o f the Util ities mo d ule.
Navig atio nYo u can use this o p tio n to restrict the areas o f navig atio n to which the ad ministrato r can p ub lish co ntent. Ifany categ o ries are selected at this p o int then the user will o nly b e ab le to p ub lish to these and no o thercateg o ries. If no ne are selected , then a d efault o f all categ o ries is assumed .
Imag eLib rary
Use this d ro p d o wn menu to d etermine whether yo ur user can up lo ad imag es to the imag e lib rary (see thePub lishing Manual fo r full d etails).
Do cumentEd ito r
It is p o ssib le to l imit the functio ns availab le to the user when they are ed iting co ntent b y selecting anap p ro p riate level o f access fro m the d ro p d o wn lis t.
Co ntentView
It is p o ssib le to restrict users so that they can o nly view o r amend co ntent which they have created . To d othis, select the ap p ro p riate o p tio n fro m the d ro p d o wn lis t. There are three o p tio ns to cho o se fro m - Viewall co ntent, Can o nly view o wn co ntent o r Can o nly view co ntent within assig ned categ o ries
Pag eAccess
Select the ap p ro p riate o p tio ns to g ive ad d itio nal access rig hts.
Permissio ns
Yo u can d etermine which areas o f the CMS Co ntro l Center yo u wo uld like yo u user to have access to b yticking /un-ticking the ap p ro p riate b o xes. Each b o x co rresp o nd s to a d ifferent area o f the Jad u Co ntro lCenter. The lis t wil l sho w all o f the co re mo d ules. By c licking o n refine yo u will b e ab le to l imit user’s access tosp ecific elements within them. Fo r examp le, so me users may o nly have access to o ne o r two areas such asDo cuments o r Do wnlo ad s, while o thers may b e g iven access to a who le rang e o f functio ns. Similarly, yo umay have a web master who just req uires access to ap p ro ve o ne area o f co ntent such as News.
Ro les
353

Importing UsersIt is p o ssib le to imp o rt users in b ulk using a CSV fi le.
The Import users screen.
To import users1. Click Util ities >> Ad min Privileg es2. Select the Imp o rt tab3. Click the Bro wse b utto n and lo cate the CSV fi le to imp o rt4. Click the Imp o rt b utto n
To download an example CSV file1. Click Util ities >> Ad min Privileg es2. Select the Imp o rt tab3. Click " Do wnlo ad a samp le ad ministrato r imp o rt CSV fi le" l ink
CSV file structure
Column De script ion
username Enter the user’s username in this co lumn. This sho uld o nly co ntain alp hanumericcharacters and no sp aces.
p asswo rdEnter the user’s p asswo rd in this co lumn. This req uires at least 5 alp hanumericcharacters (includ ing b o th up p er and lo wer case letters and at least o ne numb er).Leave this co lumn b lank to g enerate a rand o m p asswo rd .
ad minLevelID This co lumn d efines the user’s p rivileg e level. Enter 1 fo r Ad ministrato r, o r 2 fo rWeb master. Leave b lank to d efault to 1 (Ad ministrato r).
Imp o rt users
354

co ntent_viewThis co lumn d efines the user’s co ntent viewing p rivileg es. Enter 0 fo r Can o nlyview o wn co ntent, 1 fo r View all co ntent, o r 2 fo r Can o nly view co ntent withinassig ned categ o ries. Leave b lank to d efault to 1 (Can o nly view o wn co ntent).
imag e_lib raryThis co lumn d efines the user’s imag e lib rary access p rivileg es. Enter 0 fo r Basic -Imag e b ro wsing o nly, o r 1 fo r Ad vanced - Up lo ad and b ro wse. Leave b lank tod efault to 1 (Basic - Imag e b ro wsing o nly).
ed ito rPresetThis co lumn d efines the user’s d o cument ed ito r p rivileg e level. Enter 1 fo r FullEd ito r, 2 fo r Default Ed ito r, o r 4 fo r Full ed ito r no tab les. Leave b lank to d efault to 1(Full Ed ito r).
ip _accessThis co lumn d etermines whether the user’s access to the Jad u Co ntro l Center isrestricted b y IP ad d ress. Enter ALL, TRUSTED, a s ing le IP ad d ress o r an IPad d ress rang e. Leave b lank to d efault to ALL.
name Enter the user’s actual name in this co lumn. This co lumn req uires alp hanumericcharacters.
email Enter the user’s email ad d ress in this co lumn. This must b e a valid email ad d ress.
d ep artment Enter the user’s d ep artment in this co lumn. This co lumn req uires alp hanumericcharacters. Leave b lank to ig no re.
isLDAPUser Is the user an LDAP User? Enter 1 fo r Yes, o r 0 fo r No . Leave b lank to d efault to 1(Yes).
ap p lyFullPrivileg es Enter 1 (Yes) to p ro vid e full access to the CMS o r 0 (No ) if yo u wish to restrict theuser’s access p rivileg es. Leave b lank to ig no re.
co p yPrivileg esFro mAd minUsername Enter an existing user’s username fro m which to co p y p rivileg es fro m. Leave b lankto ig no re.
ro leIDRo le to which the Ad min is assig ned to . On assig ning a ro le to an ad min, all thead min p ro p erty will b e o verrid d en b y ro le's p ro p erty d esp ite o f the ab o ve g ivenvalues. Leave b lank to ig no re.
Imp o rt users
355

Using WorkflowThe Wo rkflo w sectio n o f the Util ities mo d ule allo ws yo ur o rg anizatio n to set up custo mized p ro cesses fo r the review and ap p ro valo f co ntent.
Within the CMS the Stand ard Wo rkflo w is enab led b y d efault and keep s wo rkflo w limited to Co ntent Ed ito r autho rship andWeb master ap p ro val.
The Workflow area
To b eg in creating yo ur o wn custo m wo rkflo ws, select the Enab le Ad vanced Wo rkflo w o p tio n. Yo u will then b e sho wn the newwo rkflo w o p tio ns.
Wo rkflo w
356

The Advanced Workflow area
Creating Privilege LevelsThe first thing that yo u will need to d o when creating a new wo rkflo w is to set up yo ur o wn custo m p rivileg e levels.
Beg in b y c licking o n the Privileg e Levels tab . This area allo ws yo u to b uild o n to p o f the existing levels o f Co ntent Ed ito r andWeb master.
The initial p ag e sho ws the fo llo wing info rmatio n:
The Privilege Levels area
Level: The name o f each p rivileg e level.No Assig ned : This sho ws the numb er o f ad ministrato rs assig ned to each p rivileg e level.Co ntent: This will sho w whether each p rivileg e level has restricted access to co ntent.Imag e Lib rary: This will sho w whether the p rivileg e level has Basic o r Ad vanced access to the imag e lib rary.Create Co ntent: This sho ws whether the p rivileg e level includ es rig hts to create new co ntent.Up d ate Co ntent: This sho ws whether the p rivileg e level includ es rig hts to up d ate existing co ntent.Delete Co ntent: This sho ws whether the p rivileg e level has rig hts to d elete co ntent.Ord er: This enab les yo u to chang e the o rd er o f p rivileg e level (the hig hest level must always ap p ear at the b o tto m o f this l is t).
To create a new level, c lick o n the Create Privileg e Level b utto n.
Wo rkflo w
357

The New Privilege Levels area
Co mp lete the fo llo wing areas:
Title: The name o f the new level.Co ntent View: View all o r o nly yo ur o wn co ntent* .Imag e Lib rary: Basic imag e b ro wsing o r the ab il ity to up lo ad imag es* .Do cument Ed ito r Preset: Select the level o f access to the Do cument Ed ito r asso ciated with the ro le* .Create Co ntent: Enab les a user to create co ntent.Up d ate Co ntent: Enab les a user to up d ate co ntent.Delete Co ntent: Enab les a user to d elete co ntent.
These o p tio ns will o verwrite existing p rivileg es o f a user after the level has b een saved .
Click o n the Save Privileg e Level b utto n to save yo ur newly created p rivileg e level.
If yo u click o n an existing p rivileg e level yo u can then ap p ly this ' temp late' to all the ad mins invo lved b y using the Ap p ly Setting sTo Assig ned Ad mins? o p tio n.
Wo rkflo w
358

The Apply Settings To Assigned Admins area
Select Yes fro m the d ro p d o wn menu and click o n the Save Privileg e Level b utto n.
After yo u create a new o p tio n users can b e assig ned to this ind ivid ually b y g o ing into Ad min Privileg es, selecting the user andthen chang ing the Ad ministrato r Level o r b y b ulk assig ning in the Ad min List.
These p rivileg e levels p ro vid e a b asic step framewo rk fo r a wo rkflo w.
Creating Privilege GroupsThe next stag e in b uild ing yo ur custo m wo rkflo w is to create yo ur Privileg e Gro up s. The id ea o f creating a g ro up is to s imp lyg ro up to g ether ' taskfo rces' o f users. These g ro up s will b e ad d ed to wo rkflo ws to create a p o o l o f users to d raw fro m.
To b eg in with, c lick o n the Privileg e Gro up s tab .
The Privilege Groups area
Yo u will b e sho wn a lis t o f yo ur p rivileg e g ro up s sho wing whether they have restricted access to the navig atio n taxo no my, ho w mayusers have b een assig ned to the g ro up and who created the g ro up .
Yo u can also d elete a user g ro up b y selecting the ap p ro p riate check b o x and then clicking the Delete b utto n.
Wo rkflo w
359

To create a new g ro up , c lick o n the Create New Gro up b utto n.
The Create New Privilege Group area
Gro up title: G ive the p rivileg e g ro up a meaning ful title.Assig n Categ o ries: Yo u can o p tio nally assig n categ o ries to a g ro up .Assig n Ad mins: Simp ly includ e and exclud e users within the new g ro up . To ad d a user c lick o n their name fo llo wed b y the >ico n to mo ve them into the Includ ed sectio n.After yo u have assig ned all the users to yo ur g ro up , c lick the Save Privileg e Gro up b utto n.
Yo u will no w b e read y fo r the final stag e – creating the Wo rkflo w itself.
Creating a workflowIn the Manag e area (c lick the Manag e tab ) is the Stand ard Jad u Wo rkflo w with two levels o f p rivileg es; Co ntent Autho rs canco ntrib ute co ntent, b ut o nly Web masters can p ub lish d irectly to the web site. This canno t b e amend ed o r d eleted .
Ho wever, ad d itio nal wo rkflo ws can b e created to o verrid e this.
Creating a wo rkflo w is very s imp le so lo ng as yo u und erstand the two und erlying p arts o f it - The Privileg e Levels and the Privileg eGro up s (as o utlined ab o ve).
The Wo rkflo w element o f the Util ities mo d ule will always d efault to d isp lay the Manag e sectio n.
Wo rkflo w
36 0

The Workflow Manager area
This sho ws a lis t o f wo rkflo ws, whether they relate to sp ecific areas o f the web site’s info rmatio n architecture, which p rivileg eg ro up s have b een assig ned to them, who created them and whether they are in use (Live).
Yo u can also d elete a Wo rkflo w b y selecting the ap p ro p riate check b o x and then clicking the Delete b utto n.
To create a new wo rkflo w click o n the Create New Wo rkflo w b utto n. This will o p en a wind o w in which yo u must set the Wo rkflo wDetails.
The Workflow Details area
Wo rkflo w Name: The title o f the wo rkflo w.Wo rkflo w Descrip tio n: The d escrip tio n o f the wo rkflo w.Lo ck Co ntent: Do yo u req uire co ntent to b e lo cked if a user is wo rking o n it? Other users canno t access this co ntent while it isin Wo rkflo w if this is activated . Select Yes o r No to activate/d eactivate this feature.Once yo u have co mp leted these field s c lick Save to b e taken to the wo rkflo w d esig ner.
Wo rkflo w
36 1

The Workflow Designer area
Privilege Levels - StepsThe p rivileg e level Step s ap p ear as a l is t that can b e d rag g ed fro m the left-hand sid e o f the d esig ner.
These step s fo rm and extend the stand ard autho rship o f a Co ntent Ed ito r, and ap p ro val b y a Web master. Fo r examp le, d rag g ingthe Co ntent Autho r step into the d esig ner, fo llo wed b y the Web master, wo uld create a b asic wo rkflo w structure.
Wo rkflo w
36 2

The Privilege Levels in the Workflow Designer area
Drag g ing ano ther custo m step into the d esig ner, and p lacing this at the b o tto m wo uld mean that the Co ntent Ed ito r sub mits fo rap p ro val b y a Web master, and the co ntent is finally ap p ro ved b y the ad d itio nal step yo u have d rag g ed in. Re-o rd ering these step swill effectively re-o rd er the p ub lishing p ro cess.
Wo rkflo w
36 3

Three Privilege Levels in the Workflow Designer area
The three co nsistent structures that remain ho wever are:
First Step : Autho ring co ntent.Final Step : Ap p ro ving co ntent and making it l ive.Anyo ne in b etween: Amend s o r Ap p ro ves the co ntent and p asses it to the next step until it reaches the final step , where it ismad e live.
We no w have a b asic wo rkflo w structure in p lace with a series o f step s, b ut there are currently no ad ministrato rs assig ned to them,o r availab le in o ur wo rkflo w.
Adding GroupsTo ad d users to the wo rkflo w click o n the Gro up s ico n.
This d isp lays the g ro up s that we have created . Assig ning o ne o r mo re o f these to the wo rkflo w will make the asso ciated usersavailab le to us.
Clicking o n a step in the d esig ner will b ring up all ad ministrato rs within the g ro up (s) ad d ed to that step . Fo r examp le, c lick o nCo ntent Ed ito rs and then all users in the g ro up s yo u ap p lied can b e d rag g ed into the d esig ner and will b e ad d ed to that step inthe wo rkflo w.
Wo rkflo w
36 4

Three Steps with Admins assigned
After we have ad d ed users to o ur step s, we have the p ub lishing framewo rk, and ad ministrato rs to act up o n it.
This wo rkflo w will o nly act up o n the co ntent typ es (Do cuments, News, FAQs, etc.) that we ap p ly to it. We can assig n co ntent typ esb y clicking o n the Co ntent typ e ico n.
To ad d co ntent typ e(s) yo u must check the ap p ro p riate b o x(es) and then Ap p ly Chang es.
Wo rkflo w
36 5

Workflow Content Types window
Using alerts and escalationsAlerts and escalatio ns d efine what hap p ens within a wo rkflo w p ub lishing p ro cess in terms o f rep o rting unactio ned tasks.
To set up alerts within yo ur wo rkflo w click o n the Alerts ico n und er Setting s.
This will take yo u to the Wo rkflo w Alerts setting s p ag e.
Wo rkflo w
36 6

Workflow Alerts window
Use Alerts turns alerts o n and Send Emails send s emails with each o f these alerts.An Amb er alert is raised after the selected numb er o f d ays have p assed , and is sent to the ad ministrato rs selected in theAmb er Alert Sent To select b o x.A Red alert wil l actio n in the same way, b ut ap p lies the set p erio d o f time after the initial amb er alert has b een issued .Use Escalatio ns, (if set) wil l escalate the task to the sp ecified ad min(s) after the sp ecified time limit.When yo u are finished with setting the alerts c lick o n the Ap p ly Chang es b utto n.When yo u are read y to save the wo rkflo w click the Save Wo rkflo w b utto n. The wo rkflo w need s to b e mad e live fro m the mainWo rkflo w manag ement interface b efo re it takes effect.
Switching a new Workflow to Live
Wo rkflo w
36 7

Wo rkflo w
36 8

Settings
Setting s
36 9

External Analytics
The Site Analytics interface
It's easy to includ e co d e fo r third p arty analytics so ftware, such as Go o g le Analytics, in the fo o ter o f yo ur web site.
To add a site analytics snippet1. Click Setting s >> Integ ratio ns2. Select " Site analytics"3. Paste the co d e snip p et, includ ing scrip t tag s in the textarea4. Click the Save b utto n
To remove a site analytics snippet1. Click Setting s >> Integ ratio ns2. Select " Site analytics"3. Delete the co ntent o f the textarea4. Click the Save b utto n
Analytics
370

Cludo Search
The Clud o integ ratio n allo ws yo u to enab le yo ur s ites search to b e p o wered b y Clud o 's search eng ine.
Enab ling this integ ratio n will:
On enab ling , up d ate yo ur existing search ad ap ter to use Clud o search (Warning : this actio n will unse t your e xist ing se archadapt e r and d isab ling will d efault to Jad u search).Allo w yo u to view Analytic rep o rts to g ive yo u an insig ht into ho w yo ur s ite's search is used mo re info rmatio n here.
To enable Cludo search1. Click Setting s >> Integ ratio ns2. Select " Clud o Search"3. Select " Enab le Clud o Search"4. Enter yo u Clud o search eng ine d etails5. Click the Save b utto n
To disable Cludo search (default back to Jadu search)1. Click Setting s >> Integ ratio ns2. Select " Clud o Search"3. Select " Disab le Clud o Search"4. Select " Yes, Disab le"
Cludo integration fields
Fie ld De t ails
Custo mer ID Yo ur Clud o Custo mer ID
API Key Yo ur Clud o API Key
Eng ine ID Yo ur Clud o Eng ine ID
API Ho st Name The reg io nal ho st name fo r the Clud o API l inked to yo ur acco unt
The ab o ve d etails can b e so urced at: http s://my.clud o .co m/setting s/ap i-setting s
Clud o Search
371

Advanced Cludo features
Intelligent 4 04
Clud o 's Intell ig ent 40 4 allo ws yo u to p ro vid e sug g ested p ag es o n yo ur s ites 40 4 p ag es, relevant to the no nexistent url that theuser land s o n.
Mo re info rmatio n availab le here: http s://www.clud o .co m/intell ig ent-40 4/
This feature can be toggled on and off via the Cludo integration page, simply toggle 'Enable Intelligent 404'.
Banners
Clud o 's Banners allo w yo u to ad d custo mised co ntent to the to p o f yo ur search results p ag e fo r sp ecific search q ueries.
Mo re info rmatio n availab le here: http s://c lud o .zend esk.co m/hc/en-us/artic les/1150 0 2455251-Banners
This feature can be toggled on and off via the Cludo integration page, simply toggle 'Enable Banners'.
Quicklinks
Clud o 's Quicklinks allo w yo u to b yp ass the results p ag e fo r sp ecific search q ueries, co ntro ll ing the d estinatio n the user arrives atwhen they search.
Mo re info rmatio n availab le here: http s://c lud o .zend esk.co m/hc/en-us/artic les/1150 0 246 6 252-Quicklinks
This feature can be toggled on and off via the Cludo integration page, simply toggle 'Enable Quicklinks'.
Clud o Search
372

Continuum CXM
The Jadu Continuum CXM interface
If yo u are a Jad u CXM custo mer, yo u can link yo ur Jad u Co ntinuum CMS to yo ur Co ntinuum CXM acco unt. This integ ratio n g ivesyo u:
p ush co ntent to Co ntinuum CXM fro m a fo rm sub missio nuse Co ntinuum CXM as yo ur s ing le s ig n o n authenticatio n p ro vid er
To configure the Continuum CXM integration1. Jad u will p ro vid e yo u with API values so that yo u can link yo ur CMS and CXM instances.2. Click Setting s >> Integ ratio ns3. Select " Co ntinuum CXM"4. Paste the values in the field s p ro vid ed .5. Enter a p ag e to use as the acco unt ho mep ag e.6 . Click the Save b utto n.
Once the Co ntinuum CXM integ ratio n has b een co nfig ured , yo u can then enab le CXM sing le s ig n o n and the CXM fo rm actio n inXFP.
CXM integration fields
Fie ld De t ails Ne e de dfor forms
Ne e de dfor SSO
Service APIURL
The lo catio n o f the main CXM API. ● ●
Service APIkey
A lo ng seq uence o f characters that id entifies yo u as so meo ne who canaccess info rmatio n fro m the Service API.
● ●
OAuth APIURL
The lo catio n o f OAuth API. ●
Co ntinuum CXM
373

OAuthclient_id
A lo ng seq uence o f characters that id entifies yo u as the o wner o f thelinked CXM acco unt.
●
OAuthclient_secret
A lo ng seq uence o f characters that allo ws o nly yo u to accessauthenticatio n info rmatio n fro m the OAuth API.
●
CXM InstanceURL
The lo catio n o f yo ur CXM acco unt. ●
User acco untho mep ag e
The URL o f the p ag e to use as yo ur custo mers acco unt ho mep ag e
Co ntinuum CXM
374

ESRI ArcGIS OnlineESRI map s can b e used to d isp lay map d ata in the CMS in p lace o f o ther so lutio ns, such as Go o g le Map s o r Op en Street Map s.
Yo u must have a sub scrip tio n to ArcGIS o nline in o rd er to use the ESRI map integ ratio n, and the integ ratio n req uires that a user'scred entials are sto red in the CMS in o rd er to interact with the ArcGIS RESTful API.
To enable ESRI ArcGIS Online integration1. Click Setting s >> Integ ratio ns2. Select " ESRI map s"3. Enter yo ur authenticatio n cred entials fo r ArcGIS o nline, the integ ratio n req uires a username and p asswo rd to b e sto red4. Co p y the GUID o f the map yo u wish to use as yo ur b ase fro m the ArcGIS URL to the Pub lic Map field . eg .
5. Sp ecify the fo ld er in ArcGIS o nline to search when lis ting availab le map s to the Fo ld er field . eg . 6 . Click the " Save" b utto n
To use ESRI ArcGIS Online maps in directories1. Click Pub lishing >> Directo ries2. Find the d irecto ry in the lis t and click the title. The d irecto ry d etails will o p en3. Click the " Field s" tab . The lis t o f field s that make up each d irecto ry reco rd will o p en.4. Click the " Ad d New Field " b utto n5. Enter the title fo r the field , and select " ESRI Map " as the typ e o f field .6 . Click the " Save" b utto n.
An interactive lo catio n map , using the d etails p ro vid ed in the ESRI Map integ ratio n p ag e is no w availab le o n each reco rd .
ESRI ArcGIS Online
375

To use ESRI ArcGIS Online maps in homepages1. Click Pub lishing >> Ho mep ag es2. Find the ho mep ag e in the lis t and click the title. The ho mep ag e d etails will o p en.3. Drag the ESRI Map wid g et into the ho mep ag e. Click the sp anner ico n to ed it the wid g et d etails.4. Either select a p relo ad ed map fro m the d ro p d o wn menu, o r enter the ArcGIS o nline map s GUID value into the GUID field .5. Click the " Co ntinue" b utto n and the wid g et d etails will c lo se.6 . Click the " Save" b utto n, and o nce the chang es are ap p ro ved sub ject to wo rkflo w, the map will b e availab le o n the ho mep ag e.
ESRI ArcGIS Online
376

To use ESRI ArcGIS Online maps in supplements1. Navig ate to the sup p lements l is t o f the co ntent to b e ed ited .2. Select a sup p lement lo catio n fro m the d ro p d o wn menu3. Click the " Ad d New Sup p lement" b utto n4. Select " ESRI Map " as the typ e o f sup p lement.5. G ive the sup p lement a title.6 . Either select a p relo ad ed map fro m the d ro p d o wn menu, o r enter the ArcGIS o nline map s GUID value into the GUID field .7. Click the " Save sup p lement" b utto n.
ESRI ArcGIS Online
377

Integration fields
Fie ld De script ion
Username Yo ur username fo r authenticating with ArcGIS o nline.
Passwo rd Yo ur p asswo rd fo r authenticating with ArcGIS o nline.
Pub licMap(GUID)
The uniq ue id entifier fo r the map in ArcGIS o nline that is used as the d efault b ase map .
Fo ld er The fo ld er in ArcGIS o nline within which map s fo r use with the CMS will b e sto red . These map s will b e mad eavailab le to emb ed in the ESRI map sup p lement and wid g et
Po inter The lo catio n o f the imag e to use as lo catio n p o inter. By d efault this is a g reen stick p in imag e.
CMS When either Do cuments o r Events are enab led , d ata fro m the lo catio n field s in these areas will b e used top o p ulate a map in ArcGIS o nline.
XFP When enab led , ESRI map s will b e used to d isp lay map d ata in yo ur XFP fo rms in p lace o f o ther so lutio ns,such as Go o g le Map s o r Op en Street Map s.
ESRI ArcGIS Online
378

Google reCAPTCHATo sep arate humans fro m sp am b o ts, Go o g le reCAPTCHA can b e used o n lo g in p ag e o f Jad u Co ntro l Center.
Once yo u have g enerated the p ub lic and p rivate key p air fo r the d o main in the g o o g le reCAPTCHA site, yo u can set up theinteg ratio n fo r reCAPTCHA in this sectio n.
Pub lic Key : Site Key p ro vid ed in the reCAPTCHA sitePrivate Key : Secret Key p ro vid ed in the reCAPTCHA siteVersio n : Versio n o f reCAPTCHA (Jad u sug g ests using v2).
Once the ab o ve d etails are fi l led , c lick " Enab le Go o g le reCAPTCHA" b utto n. A success messag e will ind icate that reCAPTCHAsetting s have b een saved .
Set the co nstant to true in the set co nstants Pag e.
Given the ab o ve integ ratio n is set, when the user attemp ts to lo g in to Jad u Co ntro l Center with inco rrect username/p asswo rd fo r 10o r mo re times, then the cap tcha is p ro mp ted .
Go o g le reCap tcha
379

HUBis
The Jad u Hub Integ ratio n Server (HUBis) allo ws yo u to integ rate yo ur Jad u Pro d ucts with yo ur b ack o ffice ho sted systems,p ro vid ing a co mmo n interface fo r integ rating with these third p arty p ro d ucts.
To enable HUBis1. Click Setting s >> Integ ratio ns2. Select " HUBis"3. Select " Enab le integ ratio n"4. Enter yo u HUBis d etails5. Click the Save b utto n
To disable HUBis1. Click Setting s >> Integ ratio ns2. Select " HUBis"3. Deselect " Enab le integ ratio n"4. Co nfirm, via c licking " Yes, Disab le"
Cludo integration fields
Fie ld De t ails
End Po int URL The End Po int URL o f the HUBis server
API Key An API key fo r the HUBis server
HUBis
38 0

LDAP
The LDAP integration interface
The LDAP integ ratio n allo ws yo u to co nnect yo ur Jad u Co ntro l Center to yo ur LDAP o r Active Directo ry d o main. This is d ep end ento n co nnectivity b eing availab le fro m yo ur CMS server to yo ur LDAP server. To lo g in to Jad u, enab led LDAP users can either usetheir LDAP lo g in d etails at the Co ntro l Center lo g in screen, o r they can b e silently lo g g ed in using Integ rated Wind o wsAuthenticatio n (netwo rk architecture p ermitting ).
To configure the LDAP integration1. Click Setting s >> Integ ratio ns2. Select " LDAP"3. Fil l in the co nnectio n d etails fo r yo ur LDAP server4. Click the Assig n Field Map p ing s b utto n and a new fo rm will o p en5. Typ e a valid username in the Username field and select a user fro m the lis t o f results6 . Select the LDAP field s to use as the username and email values7. Click the Save b utto n and the fo rm will c lo se8 . Click the Save Field Map p ing s b utto n to sto re the LDAP values
LDAP
38 1

Type in a username and click one of the search results. Select values from the dropdowns and save
To create an LDAP user1. Click Setting s >> Ad min p rivileg es2. Click the Create new ad ministato r b utto n3. Start typ ing the LDAP username in the username field4. Click the user's entry in the lis t o f search results5. The user's name and email ad d ress are imp o rted fro m the LDAP server and up d ated each time the user lo g s into the CMS6 . Pro vid e the user's p ermissio ns, o r assig n them a ro le7. Click the Save Ad ministrato r b utto n
LDAP fields
Fie ld De t ails
Pro to co l The co nnectio n p ro to co l to use, either LDAP o r LDAPS
LDAP Server ad d ress The ad d ress to use when co nnecting
LDAP Server p o rt The p o rt numb er to use when co nnecting
Disting uished Name(DN)
eg . ' ld ap @examp le.co m'
Passwo rd The p asswo rd to use when co nnecting
LDAP
38 2

Lo g in metho d Whether lo g in is co o kie-b ased using the Jad u lo g in screen, o r uses integ rated Wind o wsauthenticatio n.
User search b ase DN The p o int fro m which a server will search fo r users eg . 'd c=examp le,d c=co m'
User search fi lter Filter to ap p ly to search results eg . ' (o b jectClass=*)'
Field Map p ing The username and email field s that need s to b e used when crawling d ata fro m LDAP server
LDAP
38 3

MailChimp
The MailChimp integ ratio n allo ws yo u to seamlessly synchro nise yo ur users with a MailChimp List.
Enab ling this integ ratio n will:
On enab le, synchro nise yo ur existing users with yo ur MailChimp lis t.Ad d new users to yo ur MailChimp lis t up o n reg istratio n.When users are d eleted , remo ve them fro m yo ur MailChimp lis t.Either ad d o r remo ve fro m yo ur MailChimp lis t when yo ur users alter their 'Data Pro tectio n' setting .
Note: all of the above actions are dependent on your user's data protection act question response, only users who have answered 'yes' tothis question will be added to your MailChimp list (enabling this registration preference detailed here).
Once yo u have set up a MailChimp acco unt, g enerated an API key and set up a lis t (making note of it's unique ID), yo u can enab le thisinteg ratio n as d etailed b elo w.
To enable MailChimp integration1. Click Setting s >> Integ ratio ns2. Select " MailChimp "3. Select " Enab le MailChimp "4. Enter yo u MailChimp integ ratio n d etails5. Click the Save b utto n.
To disable MailChimp integration1. Click Setting s >> Integ ratio ns2. Select " MailChimp "3. Select " Disab le MailChimp "4. Select " Yes, Disab le"
MailChimp integration fields
Fie ld De t ails
Base URI The b ase URI fo r the MailChimp API (more details here).
Email The email ad d ress asso ciated with yo ur MailChimp acco unt.
MailChimp
38 4

API Key Yo ur MailChimp API key (more details here)
Default List ID Yo ur MailChimp lis t to b e used b y the CMS (more details here).
MailChimp
38 5

Office 365
The Office 36 5 integ ratio n allo ws yo u to autho rize yo ur Office acco unt fo r use within XFP (e.g . event b o o king ) and custo md evelo p ments.
Once the API c lient ID and secret have b een saved yo u will b e ab le to c lick the " Autho rize acco unt" b utto n to ad d a new acco unt.
Once an acco unt has b een autho rized the API access to kens are mad e availab le to features.
To generate an Office365 API Client ID and secretTo use the Office 36 5 integ ratio n a API Client ID and secret must b e p ro vid ed . These can b e retrieved fro m Micro so ft Azure p o rtal.
1. Lo g in to yo ur acco unt o n the Micro so ft Azure p o rtal http s://manag e.wind o wsazure.co m2. Click o n " Active Directo ry" in the menu.3. Click o n the Activity Directo ry yo u wo uld like to use.4. Click o n " Ap p licatio ns" in the to p menu.5. Click the " Ad d " ico n at the b o tto m o f the p ag e and select " Ad d an ap p licatio n my o rg anizatio n is d evelo p ing " .6 . Enter a name fo r yo ur ap p licatio n, e.g . " Web site" and Co ntinue.7. Enter the OAuth end p o int URL (/jad u/integ ratio ns/o ffice36 5/callb ack) in the " SIGN-ON URL" field , e.g .
" http s://www.jad u.net/jad u/integ ratio ns/o ffice36 5/callb ack" .8 . Enter yo ur web site URL in the " APP ID URI" field , e.g . " http s://www.jad u.net" and click Co mp lete.9 . Once the Ap p licatio n has created click " Co nfig ure" in the to p menu.
10 . Create a new key b y selecting a d uratio n fro m the d ro p d o wn (it wil l b e vis ib le after saving the ap p licatio n).11. Click " Ad d ap p licatio n" and select " Office 36 5 Exchang e Online" .
Fo r the " Office 36 5 Exchang e Online" ap p licatio n select " Read user calend ars" and " Read and write user calend ars" fro m theDeleg ated Permissio ns d ro p d o wn.
1. Click the Save b utto n.2. Co p y yo ur Client ID and key that sho uld no w b e vis ib le o n the screen.
No te: The key in the Azure interface is what we refer to as the c lient secret o n the integ ratio n setting s p ag e.
Office 36 5
38 6

To configure the Office365 integration1. Click Setting s >> Integ ratio ns2. Select " Office36 5"3. Enter the c lient values4. Click the Save b utto n
The Co nnect acco unt b utto n is no w vis ib le and yo u can co nnect ind ivid ual Office36 5 acco unts to interact with using theinteg ratio n.
To authorise an Office365 account1. Sig n into Office36 52. Click Setting s >> Integ ratio ns3. Select " Office36 5"4. Click the Co nnect acco unt b utto n5. After the p ag e refreshes, the email ad d ress o f the Office36 5 acco unt yo u are currently lo g g ed into will b e ad d ed to the
autho rised acco unts l is t.
No te: Outb o und co nnectivity fro m the server thro ug h yo ur firewall wil l b e necessary to lo g in.micro so fto nline.co m,o utlo o k.o ffice36 5.co m o n p o rt 443.
To unauthorise an Office365 account1. Sig n into Office36 52. Click Setting s >> Integ ratio ns3. Select " Office36 5"4. Click the cro ss ico n next to the acco unt email ad d ress in the lis t5. A new fo rm will o p en6 . Click the Remo ve b utto n
Offic365 integration fields
Fie ld De t ails
Client ID A uniq ue id entifier fo r yo ur ap p within Azure.
Client secret A secret that secures access to yo ur ap p .
Office 36 5
38 7

SitemorseThe Sitemo rse d ig ital g o vernance to o l p erfo rms web accessib il ity, l ink and sp ell checks o n yo ur co ntent.
To enable Sitemorse integration1. Click Setting s >> Integ ratio ns2. Select " Sitemo rse"3. Enter yo ur authenticatio n cred entials fo r Sitemo rse, the integ ratio n req uires an email ad d ress and p asswo rd to b e sto red .4. Enter yo ur Sitemo rse license key5. Click the " Save" b utto n
To generate a Sitemorse report on a document1. Click Pub lishing >> Do cuments2. Select the d o cument fro m the lis t b y c licking the title, the d o cument reco rd will o p en.3. Click the Actio n b utto n, the menu will o p en. Select " Generate Sitemo rse Rep o rt" fro m the menu o p tio ns. The Sitemo re Rep o rt
wind o w will o p en.4. The wind o w will no w co ntact Sitemo rse to g enerate the rep o rt, this may take a sho rt while. Once the rep o rt has b een g enerated ,
a link will b e sho wn to view the rep o rt results.
Sitemo rse
38 8

Managing Your Website LayoutThe Stylesheets element o f the Setting s mo d ule allo ws yo u to chang e the lo o k and feel o f either the entire web site o r sp ecificsectio ns using CSS (Cascad ing Style Sheets).
An ad vanced und erstand ing o f CSS is req uired to ed it o r create stylesheets.
Adding stylesheetsThe Stylesheet Manag er tab allo ws yo u to up lo ad yo ur o wn CSS fi les.
The Stylesheet Manager area
This p ag e sho ws yo u a lis t o f all the stylesheets currently availab le in the CMS, as well as ind icating whether they are in use o r no t.Yo u can also d elete stylesheets fro m this screen using the ap p ro p riate checkb o xes.
To ad d a new stylesheet use the up lo ad o p tio n at the b o tto m o f the p ag e.
Uploading a new stylesheet
Bro wse CSS fi le fro m yo ur lo cal d rive: Use the b ro wsing functio n to lo cate the CSS fi le that yo u wish to up lo ad .Up lo ad CSS File: Once yo u have lo cated the CSS fi le and selected it ,c lick o n the Up lo ad CSS File b utto n to up lo ad it. It wil lthen b e availab le to select and ap p ly to yo ur web site.
Previewing stylesheetsCSS stylesheets that yo u have up lo ad ed may b e p reviewed b y selecting the Stylesheet Preview tab and p icking the stylesheet thatyo u wish to view fro m the Preview style d ro p d o wn menu.
Stylesheets
38 9

Stylesheet Preview in action
Applying stylesheetsThe Ap p ly Stylesheets tab lets yo u either select a Stylesheet to b e assig ned site-wid e, o r to a sp ecific categ o ry b y d ril l ing d o wnthro ug h the categ o ry l is t. This is the d efault view that yo u are p ro vid ed with when selecting Stylesheets fro m the Setting s menu.
The main Apply Stylesheets area
Default s ite-wid e style: Chang e the d efault stylesheet fo r yo ur web site b y selecting it fro m the Default s ite-wid e style d ro p d o wnmenu.Dril l d o wn thro ug h yo ur navig atio n categ o ries to chang e the lo o k and feel o f sp ecific sectio ns o f yo ur web site.
Once yo u have d ril led d o wn to the categ o ry that yo u wish to chang e the style o f yo u will b e g iven the o p tio ns to ap p ly a d ifferent
Stylesheets
39 0

style to each co ntent typ e using the d ro p d o wn lis t o f availab le CSS temp lates.
Stylesheets applied to a specific category
No te: Chang es to stylesheets hap p en in real time.
Stylesheets
39 1

Using the Widget ManagerThe Setting s mo d ule co ntains an element called the Wid g et Manag er. This allo ws yo u to up lo ad wid g ets that have b een d evelo p edfo r use o n yo ur web site’s ho mep ag e.
A numb er o f stand ard wid g ets are p ro vid ed o ut o f the b o x.
Wid g et manag er
39 2

List view of widgets
Viewing the list of widgets1. Click Setting s >> Wid g et Manag er2. The manag e tab will o p en sho wing the lis t o f wid g ets
Searching for a widget1. Click Setting s >> Wid g et Manag er. The search area sho uld b e vis ib le.2. Enter yo ur keywo rd into the keywo rd field , and click the Go b utto n.3. Matching results will b e d isp layed in the lis t b elo w.
Bulk deleting widgets1. Op en the lis t o f wid g ets.2. Click the tick b o x at the end o f the ro w o f the wid g ets to b e d eleted .3. Click the d elete b utto n.4. Co nfirm yo u wish to make the chang e, and the wid g ets are d eleted .
Please no te: So me wid g ets will have no d elete tick b o x availab le as they are stand ard wid g ets p ro vid ed b y the system. Yo u canad just the vis ib il ity setting s o f these wid g ets to p revent yo ur autho rs using them.
Columns in the widget list
Column De t ails
Wid g et name The name o f the wid g et, also a l ink to view the wid g et's reco rd .
Last mo d ified The d ate the wid g et was last up d ated .
Up lo ad ed b y The user who created the wid g et.
Vis ib le Whether the wid g et is vis ib le in the ho mep ag e d esig ner.
Delete Select an wid g et to d elete.
List o f wid g ets
39 3

Editing and creating widgetsHo mep ag e wid g ets are mini ap p licatio ns written in HTML, with JavaScrip t, and PHP. They allo w the extensio n o f yo ur CMS top ro vid e ad d itio nal functio nality and easy integ ratio n with third p arty ap p licatio ns.
Creating a widget1. Click Setting s >> Wid g et Manag er2. Click the Up lo ad New Wid g et b utto n. The wid g et d etails fo rm will o p en.3. Enter the title, d escrip tio n and o ther d esired field s.4. If availab le, up lo ad a z ip archive o f the wid g et fi les. If yo u d o no t have this availab le, it can b e entered manually after the wid g et
is saved .5. Click the Save b utto n.
Please no te: fo r the co nventio ns aro und writing new wid g ets p lease refer to o ur d evelo p er d o cumentatio n.
Editing a widget1. Click Setting s >> Wid g et Manag er2. Select the wid g et fro m the lis t b y c licking the title, the wid g et reco rd will o p en.3. Up d ate the relevant d etails. Yo u will no w have the o p tio n to manually enter the co ntent o f wid g et fi les into the fo rm b y c licking
the Manually enter Wid g et co d e rad io b utto n.4. Click the Save b utto n.
Deleting a widget1. Op en the wid g et yo u wish to d elete.2. Click the Actio ns menu and click Delete when the menu o p ens.3. Co nfirm yo u wish to make the chang e, and the wid g et is d eleted .
Duplicating a widget1. Op en the wid g et yo u wish to d up licate.2. Click the Actio ns menu and click Dup licate when the menu o p ens.3. The wind o w will refresh and yo u will b e red irected to the d up licated wid g et reco rd . " (d up licate)" wil l b e ap p end ed to the
wid g et's title.
What to include in a widget zip archive
File Purpose
p ub lic.p hp the fi le that co ntains the HTML o r PHP yo u want yo ur web site vis ito rs to see
p ub lic.jsthe fi le that co ntains the JavaScrip t used in p ub lic.p hp . This fi le is o p tio nal. The javascrip t in this fi le isco mb ined and p ub lished d ynamically as wid g et.js. Dep end ent o n yo ur s ite's imp lementatio n, wid g et.jsmayb e includ ed o nly o n ho mep ag es o r o n all p ag es o f the s ite.
secure.p hp the fi le that co ntains the HTML o r PHP used to sp ecify any setting s when using the ho mep ag es d esig ner.This fi le is o p tio nal.
secure.js the fi le that co ntains the JavaScrip t used in secure.p hp . This fi le is o p tio nal.
Standard widgetsThe exact wid g ets availab le o n yo ur s ite will d ep end o n when it was installed , and what has b een ad d ed as the s ite wasimp lemented . The current l is t o f stand ard wid g ets is as fo llo ws:
Widge t De script ion
Sub -categ o ry l inks Disp lays all the sub -categ o ries o f the ap p lied categ o ry
Op inio n p o ll The live o p inio n p o ll
Ed iting and creating wid g ets
39 4

Imag e Ad d s a static imag e to the p ag e
Do cuments Disp lays the lis t o f d o cuments in the current categ o ry.
Co ntent Use this wid g et to p ut a b lo ck o f text o n yo ur ho mep ag e, with the o p tio n o f includ ing a head ing .
Navig atio n Create a l is t o f navig atio n links.
What's new o n site List o f the five newest items o n yo ur web site
What's o n Pick o f the week event.
Latest news Latest news item o n the site, either the last o ne p ub lished , o r the to p news.
Mid d le ad verts Mid d le ad verts fro m the marketing mo d ule, that will chang e b ased up o n user p references.
Rig ht ad verts Rig ht ad verts fro m the marketing mo d ule.
Ho mep ag e b anner Rand o m ho mep ag e b anner ad vert
Events calend ar Calend ar o f events
Multimed ia Emb ed a multimed ia item into the ho mep ag e.
Directo ry search Pro vid es a search b o x fo r Directo ries
ESRI Map Rend er the ESRI map
Gallery Emb ed a multimed ia g allery in a p ag e
External feed Emb ed an external news feed in a p ag e
Site map A list o f accessib le p ag es o n the web site
Web site statistics Web site vis ito r statistics
Widget fields
Fie ld De script ion
Title The title o f the wid g et
Fro nt-end The co ntent o f p ub lic.p hp
Fro nt-end JavaScrip t The co ntent o f p ub lic.js
Setting s The co ntent o f secure.p hp
Setting s JavaScrip t The co ntent o f secure.js
Descrip tio n A d escrip tio n o f the wid g et.
Default Wid th The d efault wid th to ap p ly when a wid g et is d rag g ed into a ro w.
Req uires Categ o ries Whether to sho w the Assig n categ o ries b utto n in the wid g et setting s tab
Sig ned in users o nly Whether to sho w the wid g et's co ntent to o nly users who have authenticated with the s ite
Sco p e Which sites o n this enviro nment this wid g et is availab le to .
Vis ib le Whether to sho w the wid g et in this s ite's ho mep ag e d esig ner l is t o f wid g ets.
Ed iting and creating wid g ets
39 5

Creating and Managing Widget StylesWid g et styles are used to d efine the ap p earance o f wid g ets when viewed b y vis ito rs to yo ur web site. They are snip p ets o f CSS thatare ad d ed d ynamically and are asso ciated with sp ecific web site stylesheets o n yo ur s ite.
Therefo re, the stylesheet that is cho sen when a ho mep ag e is created will d efine the wid g et styles that are availab le fo r that p ag e.
Adding a widget styleFro m within the Jad u CMS Co ntro l Center select Op en menu fo llo wed b y the Wid g et Manag er in the Util ities mo d ule. Click theStyles tab at the to p o f the p ag e.Select the seaso n yo u wish to create a style fo r fro m the d ro p d o wn menu.Click the Ad d New styles b utto n.G ive yo ur style a suitab le title, this will b e the name o f the style in the wid g et setting ’s d ro p d o wn menu so it sho uld b e as c learand co ncise as p o ssib le.Enter yo ur CSS in the text area. %WIDGET% sho uld b e used as a selecto r to refer to the wid g et with the style ap p lied .%WIDGET% is a c lass that is d ynamically ad d ed to b o th wid g et and wid g et styles when a vis ito r views a ho mep ag e.Click Save chang es to save yo ur CSS and make yo ur style availab le in the wid g et setting s style menu.
Styles
39 6

Image sizesThe Imag e Sizes interface allo ws yo u to sp ecify p resets fo r the d imensio ns o f imag es yo u sto re within the Multimed ia Lib rary andp ub lish within yo ur web p ag es.
Image Sizes
To create a new imag e size p reset, s imp ly ad d a Title, then ad d the p reset's d imensio ns in p ixels fo r Wid th and Heig ht. ClickingSave ad d s the imag e to yo ur p reset l is t and yo u can also ed it any p reset's p ro p erties b y selecting an existing p reset, makingrelevant chang es and resaving .
A new Image Size preset
Presets can b e ap p lied to imag es thro ug h the Imag e Ed ito r's Cho o se Presets d ro p d o wn b o x when resiz ing an imag e.
Asset manag er
39 7

Applying an image dimension preset in the Image editor
Alternatively, when up lo ad ing a new imag e to the Imag e Lib rary yo u can ap p ly an imag e d imensio n p reset b y selecting it fro m theResize Imag e d ro p d o wn b o x b efo re yo u click the Up lo ad b utto n.
Applying an image dimension preset before upload to the Image Library
Video sizesThe Vid eo Sizes interface allo ws yo u to sp ecify p resets fo r the d imensio ns o f vid eo s yo u sto re within the Multimed ia Lib rary andp ub lish within yo ur web p ag es.
Asset manag er
39 8

Video Sizes
To create a new vid eo size p reset, s imp ly ad d a Title, then ad d the p reset's d imensio ns in p ixels fo r Wid th and Heig ht. Finally,select the Quality and Resize Metho d .
Clicking Save ad d s the vid eo size to yo ur p reset l is t and yo u can also ed it any p reset's p ro p erties b y selecting an existing p reset,making relevant chang es and resaving .
A new Video Size preset
Asset manag er
39 9

Presets can b e ap p lied to vid eo s thro ug h the Asset Manag er's Cho o se Presets d ro p d o wn b o x when up lo ad ing a vid eo .
Applying a video dimension preset in the Multimedia manager
Image editorThe imag e ed ito r enab les manip ulatio n o f imag es sto red with the Imag e Lib rary.
The image editing interface
To o p en an imag e in the Imag e Ed ito r, c lick the File b utto n. This o p ens the Imag e Lib rary fro m where yo u can select yo ur imag e fo red iting .
Edit Image toolsThe Ed it imag e to o ls allo w yo u to manip ulate the fo llo wing imag e p ro p erties:
Asset manag er
40 0

Yo u can Resize an imag e's d imensio ns b y manually entering Wid th o r Heig ht d imensio ns in the relevant field .
Checking the Keep p ro p o rtio n tickb o x help s to maintain yo ur imag e's p ro p o rtio ns b y calculating the relevant d imensio n's valueb ased o n the value that yo u enter fo r wid th o r heig ht, therefo re p reventing d isto rtio n o f yo ur imag e's d imensio ns as it is resized .
If yo u enter a value fo r wid th, the imag e ed ito r calculates the relevant heig ht, and vice versa. Leaving the Keep p ro p rtio n tickb o xunchecked allo ws yo u to enter b o th heig ht and wid th d imensio ns and exclud e any imag e recalculating b y the imag e ed ito r.
Pressing the Resize b utto n will resize yo ur imag e to the d imensio ns yo u have sp ecified .
Selecting an entry fro m the Cho o se Preset d ro p d o wn menu will resize yo ur imag e b ased o n the d imensio ns assig ned to the Presetwithin the Utlities mo d ule's Imag e Sizes interface. Pressing the Resize b utto n will resize yo ur imag e to the d imensio ns yo u havesp ecified .
Ad d itio nal o p tio ns allo w yo u to o p timize yo ur imag e fo r d isp lay o n the web , transfo rm the imag e b y ro tating o r fl ip p ing it, and toad just the b rig htness and co ntrast o f the imag e.
EffectsThe Effects to o ls allo w yo u to assig n p red efined imag e styles to a selected imag e:
Asset manag er
40 1

Greyscale - ap p lies a g reyscale fi lter to yo ur imag e.
Watermark - ap p lies a cap tio n co ntaining yo ur web site's d o main name to the fo o ter o f yo ur imag e.
Ro und ed - ap p lies ro und ed co rners to yo ur imag e.
Dro p Shad o w - ap p lies a d ro p p ed shad o w to yo ur imag e.
Reflectio n - ap p lies a reflectio n fro m the b o tto m o f yo ur imag e.
Blur - b lurs the fo cus o f yo ur imag e.
Sharp en - sharp ens the fo cus o f yo ur imag e.
Image and Multimedia categoriesWhen ad d ing imag es and med ia to the Imag e and Multimed ia Lib raries, users must asso ciate them with a l ib rary categ o ry used too rg anize them into co llectio ns. This makes navig ating the lib raries a s imp ler and mo re user friend ly p ro cess when trying to lo catean item to use.
These categ o ries may b e custo mized using the Imag e Categ o ries interface fro m within the Asset Manag er. A d efault categ o rystructure is includ ed and b ased o n co ntent typ e.
Asset manag er
40 2

Default Image Categories.
To ad d a new Sub -Categ o ry c lick o n the New Sub -Categ o ry b utto n and enter the title o f yo ur categ o ry in the sp ace p ro vid ed b efo reclicking Save. Sub -Categ o ries may b e ad d ed at any level b y d ril l ing d o wn thro ug h the Imag e Navig atio n categ o ries.
Adding a new Image Navigation sub-category
To ed it an existing categ o ry yo u must first select it fro m the Imag e Navig atio n lis t b efo re c licking o n the Ed it b utto n.
Asset manag er
40 3

Editing an existing category
When ed iting an existing categ o ry it is p o ssib le to chang e the categ o ry ID and Name. Yo u can also mo ve the p o sitio n o f thecateg o ry using the asso ciated Categ o ry Mo vement b utto ns.
Once yo u have mad e yo ur chang es click the Save b utto n.
To d elete an existing categ o ry yo u must first select it fro m the Imag e Navig atio n lis t b efo re c licking o n the Delete b utto n.
Deleting an existing category
Asset manag er
40 4

Readable URLsThe CMS allo ws Read ab le URLs to b e d ep lo yed d ynamically fro m yo ur Jad u p latfo rm, enab ling co ntent to b e referenced via ad ynamic, yet mo re human and semantic web friend ly URL.
The CMS has a s imp le uti l i ty that enab les switching b etween either d ynamic ID o r human read ab le URLs at the p ush o f a b utto n.When the CMS is set to g enerate human read ab le URLs (as in the screensho t b elo w), uniq ue URLs will ap p ear in the fo llo wingfo rmat:
www.mysite.net/info /0 0 5/info rmatio n/10 /co ntact_us
When the CMS is set to g enerate d ynamic ID URLs (so metimes useful fo r integ rating with kno wled g e o r CRM systems), URLs willap p ear in the fo llo wing fo rmat:
www.mysite.net/s ite/scrip ts/d o cuments_info .p hp ?d o cumentID=30 3&categ o ryID=10 0 0 0 5
Activating Readable URLs
Read ab le URLs
40 5

The On/Off SwitchJad u g ives yo u the facil ity to take yo ur entire web site o ffl ine at the p ush o f a b utto n, and to reactivate it just as easily.
It is ho p ed that yo u will never need to take ad vantag e o f this functio nality b ut it’s there in case o f emerg encies. An examp le o f whenyo u mig ht use this co uld b e if yo u have p ub lished co ntent which may leave yo u o p en to l itig atio n and yo u need to remo ve it.
To take yo ur web site o nline o r o ffl ine yo u must select the Site On/Site Off o p tio n fro m within the Setting s mo d ule.
The site is currently LIVE
Selecting TAKE OFFLINE will take yo ur s ite o ffl ine, to b e rep laced with a g eneric messag e stating that the s ite has b een taken d o wnfo r ro utine maintenance.
This d o es no t just affect yo ur ho mep ag e b ut the entire s ite, so if so meo ne tries to lo ad a b o o kmarked p ag e fro m yo ur s ite it wil lalso d isp lay as o ffl ine.
On/Off Switch
40 6

The site is currently OFFLINE
To take yo ur s ite o nline select the MAKE LIVE o p tio n. This will immed iately make yo ur s ite availab le ag ain.
On/Off Switch
40 7

MyJadu APIThe MyJad u API is a RESTful interface to the co ntent in Jad u. The API allo ws third p arty d evelo p ers to req uest s ite co ntent to b ereturned to them as XML. This allo ws them to b uild their o wn ap p licatio ns b ased o n the co ntent o f a Jad u site.
Access RestrictionsBy d efault, the API is no t accessib le. In o rd er to use the API a reg istered user o f the s ite must ap p ly fo r an API key. The fo llo wingo p tio ns, availab le in the access restrictio ns tab , d etermine the availab il ity o f the API:
Disab led : The API canno t b e accessed b y anyo ne.Pub lic: Users reg istered o n the web site can req uest an API key. Users who req uest an API key will b e auto matically g rantedo ne.Private: Users reg istered o n the web site can req uest an API key. The req uest must b e ap p ro ved b y an ad ministrato r o f the Jad uCo ntro l Center who has access to the API mo d ule.
Dep end ing o n the mo d ules imp lemented b y yo ur o rg anizatio n, the MyJad u API has the p o tential to access the fo llo wing co ntent:
Ad min TasksCateg o riesDirecto riesDo cumentsDo wnlo ad sEventsNewsRup aStatus
The fo llo wing are o nly availab le o n the main s ite:
Co uncillo rsCo uncillo r Ward sFo rmsMeeting Minutes: Co mmitteesMeeting Minutes: Meeting AttachmentsMeeting Minutes: Meeting Attachments Typ esMeeting Minutes: Meeting sReceived Fo rmsServices
Enab ling the API fo r these areas o f co ntent means that any co ntent availab le o n the web site can also b e accessed as XML.
To chang e the access restrictio ns o f the MyJad u API, select the ap p ro p riate o p tio ns o n the Access restrictio ns tab acco rd ing tothe info rmatio n ab o ve and click the Save Chang es b utto n.
MyJad u API
40 8

API access restrictions
Users' applications for API keysIf the MyJad u API is enab led fo r p ub lic o r p rivate access (as d escrib ed ab o ve), reg istered web site users can ap p ly fo r an API key.They can d o this b y fo llo wing a link o n their p erso nal web site acco unt p ag e.
MyJad u API
40 9

Applying for an API Key
If the MyJad u API is p rivately enab led then the req uest will b e marked as p end ing and must b e ap p ro ved b y a Co ntro l Centerad ministrato r. To view all p end ing req uests, c lick the API Keys tab and then click the Pend ing link. Yo u will b e sho wn a lis t o f allp end ing API keys.
MyJad u API
410

API request list
The API key can b e activated using the select b o x next to the email ad d ress o f the ind ivid ual who mad e the req uest. When the APIkey is activated , the user will b e no tified via email.
The fo llo wing statuses can b e ap p lied :
Active: the API key can b e used to retrieve XML d ata fro m the web site.Pend ing : a user has req uested an API key b ut the req uest has yet to b e g ranted .Disab led : the API key canno t b e used to retrieve XML d ata fro m the web site.
The status o f an API key and the d etails o f the API key use can b e mo d ified b y c licking o n the email ad d ress o f the s ite user.
Creating an API key for a userIt is p o ssib le to create an API key fo r a user rather than have them d o this via the p ub lic facing web site. To d o this first c lick the APIKeys tab and click " Create a New API Key" . Yo u must then enter the email ad d ress o f a user reg istered o n the web site. An o p tio nald escrip tio n o f what the user will b e using the API key fo r can b e entered . Once the d etails have b een entered , c lick the SaveChang es b utto n.
MyJad u API
411

API Key details
When an API key has b een created the user will b e emailed to no tify them o f their new API key.
Regenerating an API KeyIt may b eco me necessary to reg enerate an API can. This may b e req uired if it is b elieved that an unautho rised p erso n has g ainedaccess to a user's API key. A new key can b e g enerated and co mmunicated to a user fo r them to co ntinue using the API while theunautho rised p erso n will no lo ng er b e ab le to use the key they have.
To reg enerate an API key c lick the name o f the p erso n in the API Keys lis t and then click the " Re-Generated API Key" b utto n.
MyJad u API
412

Generating an API Key
Once the key has b een reg enerated it wil l b e emailed to the user.
MyJad u API
413

LicensesThe licenses p ag e is where yo u can enter the license keys fo r yo ur CMS and Galaxies. The CMS license key d etermines ho w manyad ministrato rs are allo wed to b e created in the CMS. The CMS co mes p re-installed with o ne ad ministrato r. A license key will needto b e entered to enab le further ad ministrato rs to b e ad d ed .
The Galaxies license key d etermines ho w many Galaxies are allo wed to b e mad e live using the CMS. Any numb er o f Galaxies canb e created using the CMS, ho wever o nly the numb er allo wed b y the license key can b e mad e live.
To enter a l icense key that has b een p ro vid ed to yo u b y Jad u, enter the key in the resp ective text b o x and click the Save LicenseKeys b utto n. Once a license key has b een entered the numb er o f ad ministrato rs o r Galaxies the license key is valid fo r will b ed isp layed und er the license key.
Adding a license key
Please no te that a l icense key is tied to the d o main o f the web site and will no t wo rk o n a web site o f a d ifferent d o main.
Licenses
414