document automation: never type again - … automation: never type again . ... 2. how it works - big...
TRANSCRIPT
Barron K. Henley, Esq. [email protected] AFFINITY CONSULTING GROUP 1550 Old Henderson Rd., Suite S150 Columbus, OH 43220 Phone: 614.340.3444 Fax: 614.340.3443 2013 Affinity Consulting Group
Document Automation: Never Type Again
Table of Contents Page 1
Document Automation: Never Type Again Table of Contents
I. Purpose of This Seminar .................................................................................... 1
II. Drafting Methodologies ..................................................................................... 1
A. Find an Existing Document and Modify It ("Find and Fix") ................................. 1 1. High Margin for Error ........................................................................... 1 2. Slow ................................................................................................... 1 3. Errors of Omission ............................................................................... 1 4. Errors of Inclusion ............................................................................... 1
B. Plain Forms, Model Documents and Templates ("Plain Forms") ......................... 1
C. Forms Plus Word Processor Automation ("Forms Plus") ..................................... 2
D. Forms Plus Document Assembly Software ("Document Assembly") .................... 2 1. What Is Document Assembly? .............................................................. 2 2. How It Works - Big Picture ................................................................... 3 3. Document Assembly Options ................................................................ 3
III. Create Gold Standard Templates At A Minimum ............................................... 4
A. Word Processor Based .................................................................................... 4
B. One Document Per Instrument ........................................................................ 4
C. Create "Real" Templates ................................................................................. 4
IV. The Case For Word Processor Automation ("Forms Plus") ............................... 5
A. Benefits of Forms Plus .................................................................................... 5 1. An Excellent Starting Point for Examining Your Work Flow ..................... 5 2. Learning How To Use What You Already Own Is a Great Investment ...... 5 3. Simplicity of Creation ........................................................................... 5 4. Quick and Easy Training ...................................................................... 5 5. Absolute Flexibility ............................................................................... 5
B. Drawbacks ..................................................................................................... 5
V. Microsoft Word Templates - a Primer ............................................................... 5
A. Template Definition ........................................................................................ 5
B. Why You Need to Use Templates .................................................................... 6
C. Two Basic Types of Templates in Word ............................................................ 6 1. Global Templates ................................................................................. 6 2. Document Templates ........................................................................... 6
D. Normal Template (Default) ............................................................................. 6
E. Creating Templates ........................................................................................ 8

Table of Contents Page 2
F. Modify a Template .......................................................................................... 9
G. Sharing Templates ........................................................................................10
VI. Word Processor Functionality You Must Incorporate Into Your Templates: .. 11
A. Multi-Level Paragraph Numbering ...................................................................11 1. How Multilevel Paragraph Numbering Works ........................................11 2. Why You Should Use Multilevel Numbering In Every Circumstance ........11 3. Set Up a Multilevel Paragraph Numbering Scheme ................................11
B. Automatic Spacing Between Paragraphs .........................................................15
C. Make All Paragraphs Double Spaced ...............................................................15
D. Restart Numbering at 1 .................................................................................15
E. Make Changes To Your Numbering Scheme ....................................................15
F. Turn Numbering Off ......................................................................................15
G. Paragraph Cross References ...........................................................................16 1. Insert a Cross Reference Using the Standard Method............................16 2. Insert a Cross Reference Using Bookmarks ..........................................16 3. Update Cross References ....................................................................17
VII. Microsoft Word Fillable Form Templates ......................................................... 17
A. What Are Fillable Form Templates? .................................................................17
B. Create a Form ...............................................................................................18 1. Create a template ...............................................................................18 3. Insert fields ........................................................................................18 4. Set field properties .............................................................................19 5. Protect the form .................................................................................19
C. Form Field Descriptions and Uses ...................................................................20 1. Text Form Fields.................................................................................20 2. Check Box Form Field .........................................................................21
D. Advanced Techniques ....................................................................................22 1. Repeat the Result of One Field in Other Places in the Document ...........22 2. Making Fields Contingent Upon Another Answer ...................................24 3. Automatically Unlock the Form ............................................................26
E. Fill a Form ....................................................................................................27
F. Using Fill-In Fields .........................................................................................27
VIII. The Case for Document Assembly Software ("Document Assembly") ............ 28
A. Faster and More Sophisticated Template Development ....................................28
B. Data Sharing .................................................................................................28
C. Form Consolidation ........................................................................................29
D. Database Integration and Third Party Program Integration ..............................29

Table of Contents Page 3
E. What About PDFs? .........................................................................................29
F. True Document Assembly Not Always Necessary .............................................29
G. Document Automation on the Web .................................................................29
H. Get a Free Trial of HotDocs ............................................................................30
IX. Comparing Methods ......................................................................................... 30
A. Raw Speed - advantage Document Assembly ..................................................30
B. Ability to Automate Complex Documents - advantage Document Assembly .......30
C. Cost - advantage Forms Plus ..........................................................................31
D. Error Elimination - advantage Document Assembly ..........................................31
E. Ease of Learning Automation Tools - advantage Forms Plus .............................31
F. Time Required To Complete an Automation Project - advantage Document Assembly ......................................................................................................31
G. Database Integration - advantage Document Assembly ...................................31
Page 1
Document Automation: Never Type Again
I. PURPOSE OF THIS SEMINAR: As an organization involved in CLE, you probably
generate a lot of repetitive documents. Contracts/speaker agreements, releases, thank you letters, reminder letters… Most of the time, documents such as these are generated by finding an existing one and making changes to it. As it happens, there is a much better approach for this.
II. DRAFTING METHODOLOGIES: There are four primary methods for drafting documents. They are broadly classified as follows:
A. Find an Existing Document and Modify It ("Find and Fix"): When creating new documents, most people simply start with the last similar document they created and modify it (cut-and-paste, search-and-replace). Although this is the most common approach, it has several significant disadvantages:
1. High Margin for Error: The margin for error arises from the fact that Find and Fix is unstructured, relies on memory, assumes the word processor will "catch" all of the items in need of replacement and requires many steps. Memories fail, word processors don't catch everything and more steps create more mistakes and slower drafting.
2. Slow: First the starting point document must be located, then it has to be carefully read so you find all of the items that need to change.
3. Errors of Omission: It's easy to leave something out you should have added to the starting point document.
4. Errors of Inclusion: It's easy to leave something in that you should have taken out.
As a result of the foregoing, Find and Fix is characterized by disorganization, mistakes, and inefficiency; and should be avoided whenever possible.
B. Plain Forms, Model Documents and Templates ("Plain Forms"): Some have taken the time to create model documents or templates which contain as many language options as possible. In the alternative, some have broken all of their documents down into component parts and assemble their documents by cobbling together unique clauses, paragraphs or phrases they've previously organized, categorized and labeled. The language from either approach may contain blanks and/or written instructions to the user as to what should be entered into any particular blank and under what circumstances optional language should be included or excluded. This is significantly better than Find and Fix, but is still slow and contains a margin for error unacceptable to many.

Page 2
C. Forms Plus Word Processor Automation ("Forms Plus"): Some take the Plain Forms approach, then improve it by adding in automation features available in their word processor (typically WordPerfect or Word). This can mean utilizing merge functions, "prompt" or “fill-in” fields, macros to expedite the insertion of optional language, and/or better use of Word's AutoText or Quick Parts features or WordPerfect's QuickWords feature. It's fairly easy to create templates and utilize the tools that Word or WordPerfect provides you for automating those templates. Automating the fill-in of names and the like is fairly easy. However, unless you're a programmer, gathering lists (beneficiaries, trustees, personal representatives, etc.), making language conditional and calculating things (such as he/she, him/her, verb conjugation, list punctuation) is extremely difficult, particularly in MS Word. This approach also assumes that you have a mastery of your word processor and know, for example, how to utilize automatic paragraph numbering, auto-calculating cross references, automatic tables of contents and other higher-end features. If these things aren't built into your templates, then you end up spending a lot of time wrestling with formatting issues and paragraph numbering which can significantly off-set any efficiencies you may have otherwise gained by utilizing word processor automation features. Having said all of that, you should be utilizing this approach at a minimum. It is superior to Find and Fix and Plain Forms in almost every respect.
D. Forms Plus Document Assembly Software ("Document Assembly"): Finally, some will take the Plain Forms approach and raise it to another level by utilizing third-party document assembly software in conjunction with their word processor. In effect, these individuals are creating their own commercial drafting systems. In fact, many of the Commercial Systems available are exactly that: a combination of Word and/or WordPerfect and a home-grown or commercially available document assembly program.
1. What Is Document Assembly? Most document assembly programs integrate with your word processor and enable you to create sophisticated templates. Those templates typically generate an interview (series of questions) presented to the user. Upon answering the questions, a customized document is instantly generated. In addition to simply filling in blanks, document assembly programs support conditional logic, infinite lists, and the ability to calculate text, numbers and dates.
The on-screen interview is quite powerful because the template designer can control everything about the sequence and content of the interview. With practice, you can reproduce your entire decision tree in the template and build in safe-guards that walk even novice users through the assembly process. An example of how an interview looks is shown below:

Page 3
2. How It Works - Big Picture: Using HotDocs as an example, the program allows users to replace changeable text with variables (i.e., «Speaker Name», «Speaker Street Address»), make the inclusion of text (words, sentences, paragraphs, etc.) conditional, gather (infinite) lists, and automatically calculate dates, text and numbers. By “lists”, I mean that the template can gather and process multiple records.
With each new variable, you create a corresponding question (prompt) which is presented to the user during the assembly process. Generating a new document is a simple matter of answering the questions presented by the template. After the questions are answered, the completed document appears on the screen (in Word or WordPerfect), ready edit, save, print, etc.
After a document is assembled, HotDocs allows users to save the answers entered for one document so that they can be used to assemble other documents which use the same information. In this manner, users simultaneously decrease the margin for error while eliminating time wasted on redundant data entry. The document produced by HotDocs is a plain word processor document and can be edited and stored like any other document.
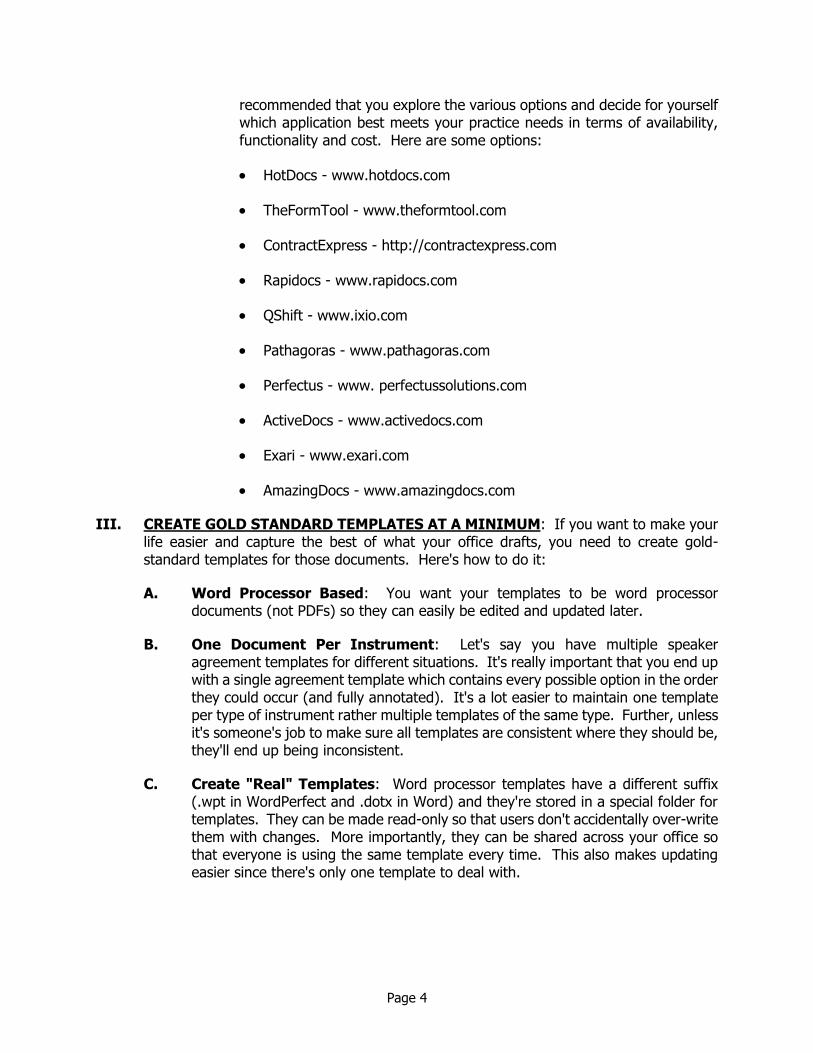
3. Document Assembly Options: There are several available document automation applications and while each has its own unique way of handling the task, they all are very capable and able to achieve the objectives we discuss below. Each of them work with Word or WordPerfect or both. Some provide the ability to automate PDF forms. Because HotDocs continues to dominate the market and both of us are most familiar with it we refer to and show examples from HotDocs throughout this article but we could just as easily be referring to any of these applications. It is highly
Page 4
recommended that you explore the various options and decide for yourself which application best meets your practice needs in terms of availability, functionality and cost. Here are some options:
HotDocs - www.hotdocs.com
TheFormTool - www.theformtool.com
ContractExpress - http://contractexpress.com
Rapidocs - www.rapidocs.com
QShift - www.ixio.com
Pathagoras - www.pathagoras.com
Perfectus - www. perfectussolutions.com
ActiveDocs - www.activedocs.com
Exari - www.exari.com
AmazingDocs - www.amazingdocs.com
III. CREATE GOLD STANDARD TEMPLATES AT A MINIMUM: If you want to make your life easier and capture the best of what your office drafts, you need to create gold-standard templates for those documents. Here's how to do it:
A. Word Processor Based: You want your templates to be word processor documents (not PDFs) so they can easily be edited and updated later.
B. One Document Per Instrument: Let's say you have multiple speaker agreement templates for different situations. It's really important that you end up with a single agreement template which contains every possible option in the order they could occur (and fully annotated). It's a lot easier to maintain one template per type of instrument rather multiple templates of the same type. Further, unless it's someone's job to make sure all templates are consistent where they should be, they'll end up being inconsistent.
C. Create "Real" Templates: Word processor templates have a different suffix (.wpt in WordPerfect and .dotx in Word) and they're stored in a special folder for templates. They can be made read-only so that users don't accidentally over-write them with changes. More importantly, they can be shared across your office so that everyone is using the same template every time. This also makes updating easier since there's only one template to deal with.
Page 5
IV. THE CASE FOR WORD PROCESSOR AUTOMATION ("FORMS PLUS"):
A. Benefits of Forms Plus:
1. An Excellent Starting Point for Examining Your Work Flow: This approach is an excellent testing ground for any further automation in that it starts your analysis process.
2. Learning How To Use What You Already Own Is a Great Investment: You already own a word processor so leveraging as many of its features as possible makes a lot of sense.
3. Simplicity of Creation: While WordPerfect and Microsoft Word vary in their arsenal of automation options, from “click here” and “ask” fields in Word to keyboard merges in WordPerfect, the concepts are relatively simple to master and cost not much more than time and investigation. Very small libraries of terms, conditions and optional clauses can be maintained with the aforementioned AutoText/QuickWords and other tools.
4. Quick and Easy Training: Training on the use of Word Processor forms automation is also an easily assigned task, and when combined with detailed formatting/styling options can yield professional and consistent results.
5. Absolute Flexibility: Don’t like the look of a form? Want to add new clause options? No programmer necessary here. This means that with some basic knowledge you have absolute control over the work product environment.
B. Drawbacks:
Updates or changes are up to you.
Though training may be a simple matter, it’s in the hands of your office (or you).
Changes in core word processor technology are your problem. If a newer version of your favorite program alters, adds, or eliminates a feature, it’s up to you to re-think your template/forms library.
Decision based (if/then) logic can be well beyond the native capabilities of the Word Processor without programming knowledge.
V. MICROSOFT WORD TEMPLATES - A PRIMER
A. Template Definition: A template is a special kind of file that provides a model for the underlying structure (or pattern) of a particular finished document (such as a Deed or Lease or Revocable Trust). Templates may also contain document settings such as AutoText entries, Quick Parts, fonts, key assignments, macros,

Page 6
menus, page layouts, special formatting and styles. When you create a new document based upon a template, you get a copy of the template, but not the template itself. In that manner, templates are protected and cannot be accidentally over-written with changes a user makes to a new document based upon one. In Word 2007/10/13, a template can be a .dotx file, or it can be a .dotm file (a .dotm file type allows you to enable macros in the file).
B. Why You Need to Use Templates: Maybe you think you have never used templates before, but in reality, every single document you've ever created in Word was based on a template. More importantly, templates are the basic component of any forms system and, if you aren't using a forms system in your practice, you're missing out on one of the fundamental benefits of a word processor. A forms system is important because:
1. It saves an enormous amount of time;
2. It ensures consistency in your documents;
3. It increases accuracy; and
4. It helps you convey your knowledge to others in your firm and makes it easier for new employees to learn your firm's drafting style.
C. Two Basic Types of Templates in Word: The two basic types of templates are global templates and document templates.
1. Global Templates: Global templates contain settings that are available in every Word document. The Normal.dotm template is considered a global template. Remember that templates can store styles, AutoText entries, AutoCorrect entries, macros, toolbars, custom menu settings, and shortcut keys. If you have additional of those items (except styles) you would like to make available at any time in Word, then you can store them in global templates.
2. Document Templates: Document templates contain settings that are available only to documents based on that particular template. For example, if you create a fax cover sheet using a fax cover sheet template, you'll have access to the settings from both the fax cover sheet template as well as the settings in any global template. Word comes with many sample document templates and you can, of course, create your own.
D. Normal Template (Default): Unless you specify a different template, Word bases every new document on the Normal template. Calling the template Normal doesn't mean that it's just some ordinary template. The Normal template is actually a file called normal.dotm and it can be customized and modified just like any other. Since normal.dotm is the default global template, much of your Word customization is stored in it (such as AutoText entries, fonts, key assignments, macros, menus, page layouts, special formatting, and styles). If the file normal.dotm is deleted, Word simply creates a new one the next time you run it,
Page 7
but you'll lose all of your macros and other items which were stored in it. Therefore, it is a good idea to make a backup copy of normal.dotm just in case something happens. To determine where Word is storing your normal.dotm file, click the Office ButtonWord OptionsAdvancedFile Locations button under the "General" heading.
If you click on User Templates, and then click Modify, you'll see the folder where normal.dotm is stored.
Page 8
E. Creating Templates:
1. Create or open a document you would like to use as a template.
2. Click Office Button/File menu Save As.
3. Change to the Trusted Templates folder (button on the left side of the Save As dialog)
4. Change the Save As Type drop down at the bottom of the dialog to .dotm or .dotx as appropriate.
5. Enter a file name.
6. Click the Save button.
7. Close the template before trying to use it.
8. Using Your Template
In order to create a new document based upon your template, you must follow these steps:
1. Click Office Button New….
2. Click My Templates
Page 9
You'll now see the following dialog. Choose your template and click OK.
You'll now have a new, unnamed document on your screen which is based upon the template you chose.
F. Modify a Template: To edit a template, go to File, then Open… and change the Files of type designation (at the bottom of the Open dialog) to All Files or Document Templates. Browse to the folder that contains the template want to edit. Click once on the name of your template and click Open. Make whatever changes you would like to the template, save it and you're done.

Page 10
G. Sharing Templates: You can designate a "public" folder on your server where public templates are stored which are accessible by everyone. Follow these steps:
1. First, create the folder into which you'll save future public templates on a drive that everyone has access to (on your server). Note that only those who add or edit templates need full access to that folder. Everyone who simply uses those templates must only have read and list rights to the shared template folder. We recommend a folder name like x:\Word Templates (where "x" is a network drive.)
2. Now you need to tell Word where to look for these public templates. To do this, open a blank document in Word, click the Office buttonWord OptionsAdvancedFile Locations button under the "General" heading. You'll see the following dialog:
3. Note that the Workgroup Templates location is blank. Simply click on that line, then click the Modify button below it. Choose the folder you created on the server and click OK.
4. Note, you'll need to repeat step #3, above, on everyone's computer who will need access to these templates.
5. Add a template to the public folder, then click FileNew…On my computer… and make sure it shows up in the list of available templates.
6. You're done!
Page 11
VI. WORD PROCESSOR FUNCTIONALITY YOU MUST INCORPORATE INTO YOUR TEMPLATES:
A. Multi-Level Paragraph Numbering:
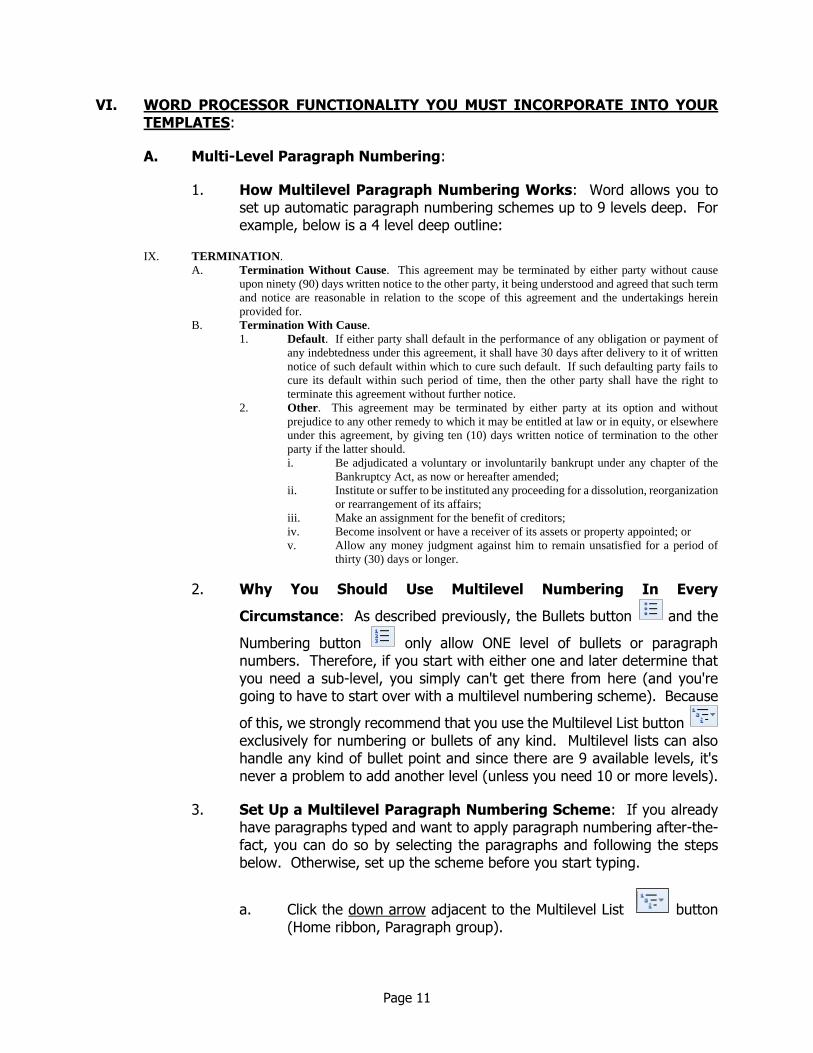
1. How Multilevel Paragraph Numbering Works: Word allows you to set up automatic paragraph numbering schemes up to 9 levels deep. For example, below is a 4 level deep outline:
IX. TERMINATION.
A. Termination Without Cause. This agreement may be terminated by either party without cause
upon ninety (90) days written notice to the other party, it being understood and agreed that such term
and notice are reasonable in relation to the scope of this agreement and the undertakings herein
provided for.
B. Termination With Cause.
1. Default. If either party shall default in the performance of any obligation or payment of
any indebtedness under this agreement, it shall have 30 days after delivery to it of written
notice of such default within which to cure such default. If such defaulting party fails to
cure its default within such period of time, then the other party shall have the right to
terminate this agreement without further notice.
2. Other. This agreement may be terminated by either party at its option and without
prejudice to any other remedy to which it may be entitled at law or in equity, or elsewhere
under this agreement, by giving ten (10) days written notice of termination to the other
party if the latter should.
i. Be adjudicated a voluntary or involuntarily bankrupt under any chapter of the
Bankruptcy Act, as now or hereafter amended;
ii. Institute or suffer to be instituted any proceeding for a dissolution, reorganization
or rearrangement of its affairs;
iii. Make an assignment for the benefit of creditors;
iv. Become insolvent or have a receiver of its assets or property appointed; or
v. Allow any money judgment against him to remain unsatisfied for a period of
thirty (30) days or longer.
2. Why You Should Use Multilevel Numbering In Every
Circumstance: As described previously, the Bullets button and the
Numbering button only allow ONE level of bullets or paragraph numbers. Therefore, if you start with either one and later determine that you need a sub-level, you simply can't get there from here (and you're going to have to start over with a multilevel numbering scheme). Because
of this, we strongly recommend that you use the Multilevel List button exclusively for numbering or bullets of any kind. Multilevel lists can also handle any kind of bullet point and since there are 9 available levels, it's never a problem to add another level (unless you need 10 or more levels).
3. Set Up a Multilevel Paragraph Numbering Scheme: If you already have paragraphs typed and want to apply paragraph numbering after-the-fact, you can do so by selecting the paragraphs and following the steps below. Otherwise, set up the scheme before you start typing.
a. Click the down arrow adjacent to the Multilevel List button (Home ribbon, Paragraph group).

Page 12
b. Choose Define New Multilevel List (not Define New List Style) at the bottom of the drop down menu.
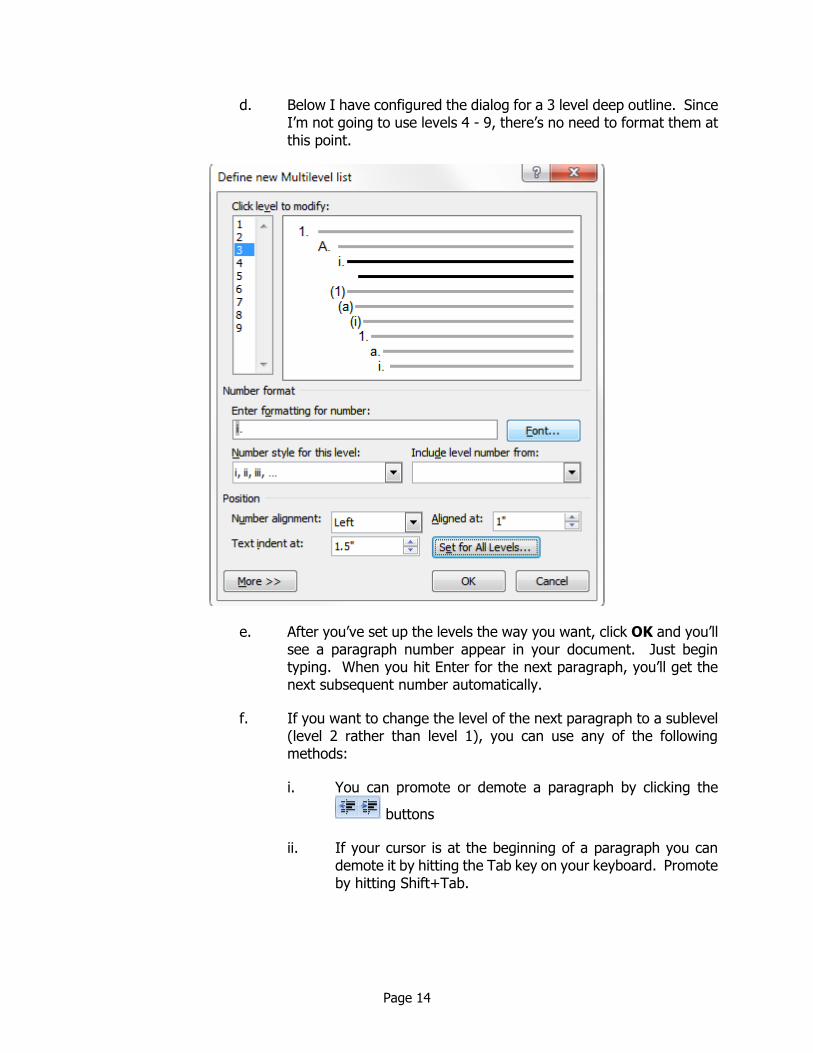
c. You will now see the dialog shown above. Here are a couple of things to keep in mind:
i. You can make adjustments to any of the 9 levels by simply clicking on the level you want to modify on the top, left side of the dialog.
ii. You NEVER type a number in the Enter formatting for number box. Instead, you use the code for the paragraph number which will be inserted when you choose something from the drop down below Number style for this level.
iii. Font button should only be clicked if you want the formatting for the paragraph number to be different from the paragraph that follows it. Therefore, you should not click the Font button in most cases.
iv. Number alignment must always be set to Left, even if you’re centering an article number.
Page 13
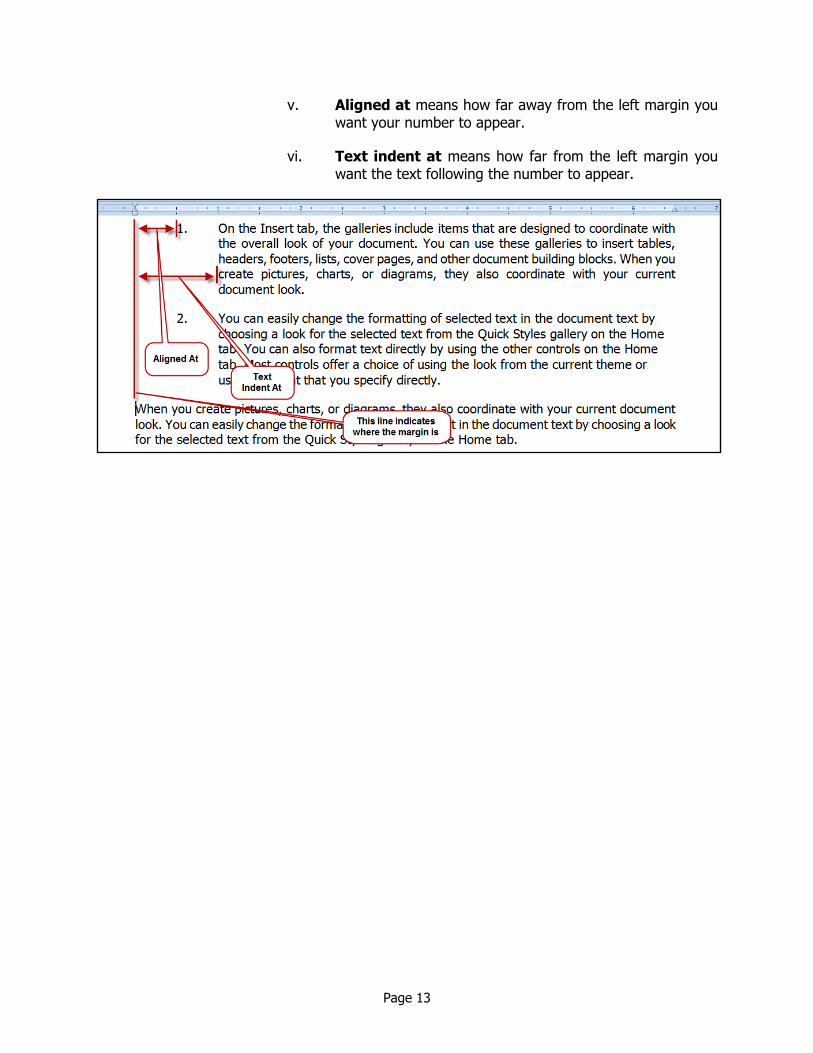
v. Aligned at means how far away from the left margin you want your number to appear.
vi. Text indent at means how far from the left margin you want the text following the number to appear.
Page 14
d. Below I have configured the dialog for a 3 level deep outline. Since I’m not going to use levels 4 - 9, there’s no need to format them at this point.
e. After you’ve set up the levels the way you want, click OK and you’ll see a paragraph number appear in your document. Just begin typing. When you hit Enter for the next paragraph, you’ll get the next subsequent number automatically.
f. If you want to change the level of the next paragraph to a sublevel (level 2 rather than level 1), you can use any of the following methods:
i. You can promote or demote a paragraph by clicking the
buttons
ii. If your cursor is at the beginning of a paragraph you can demote it by hitting the Tab key on your keyboard. Promote by hitting Shift+Tab.
Page 15
iii. If you right-click the paragraph, you can promote it by choosing Increase Indent or demote it by choosing Decrease Indent.
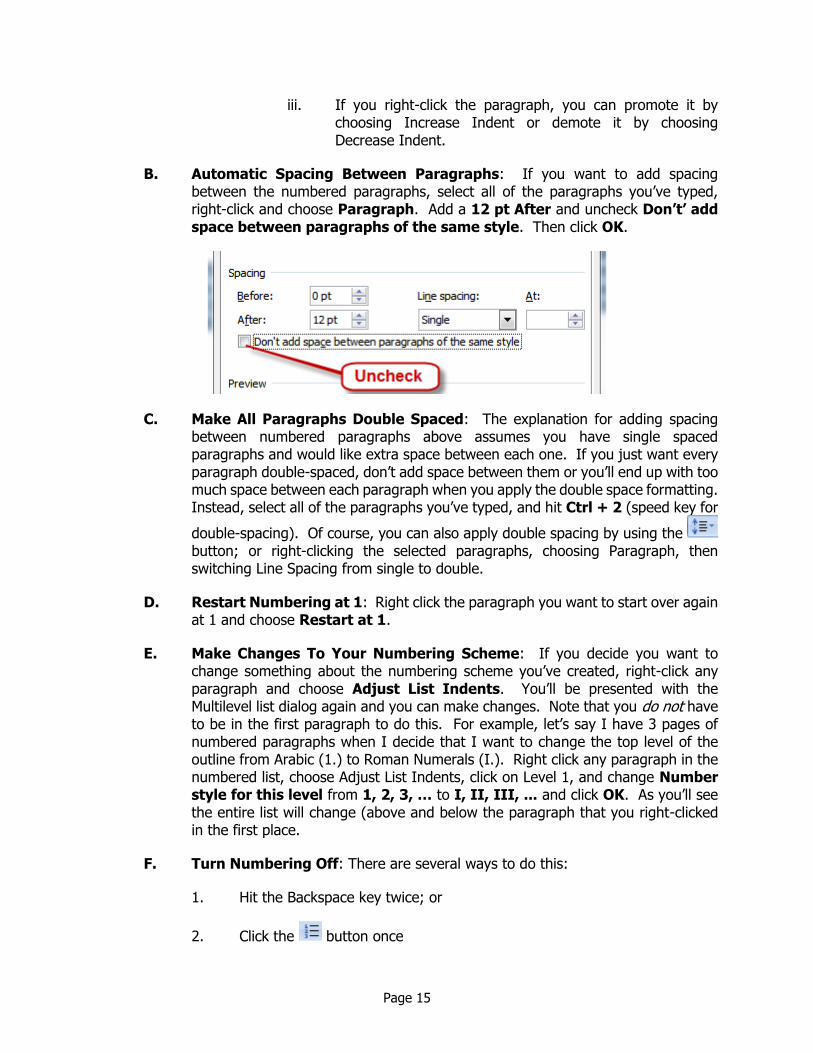
B. Automatic Spacing Between Paragraphs: If you want to add spacing between the numbered paragraphs, select all of the paragraphs you’ve typed, right-click and choose Paragraph. Add a 12 pt After and uncheck Don’t’ add space between paragraphs of the same style. Then click OK.
C. Make All Paragraphs Double Spaced: The explanation for adding spacing between numbered paragraphs above assumes you have single spaced paragraphs and would like extra space between each one. If you just want every paragraph double-spaced, don’t add space between them or you’ll end up with too much space between each paragraph when you apply the double space formatting. Instead, select all of the paragraphs you’ve typed, and hit Ctrl + 2 (speed key for
double-spacing). Of course, you can also apply double spacing by using the button; or right-clicking the selected paragraphs, choosing Paragraph, then switching Line Spacing from single to double.
D. Restart Numbering at 1: Right click the paragraph you want to start over again at 1 and choose Restart at 1.
E. Make Changes To Your Numbering Scheme: If you decide you want to change something about the numbering scheme you’ve created, right-click any paragraph and choose Adjust List Indents. You’ll be presented with the Multilevel list dialog again and you can make changes. Note that you do not have to be in the first paragraph to do this. For example, let’s say I have 3 pages of numbered paragraphs when I decide that I want to change the top level of the outline from Arabic (1.) to Roman Numerals (I.). Right click any paragraph in the numbered list, choose Adjust List Indents, click on Level 1, and change Number style for this level from 1, 2, 3, … to I, II, III, ... and click OK. As you’ll see the entire list will change (above and below the paragraph that you right-clicked in the first place.
F. Turn Numbering Off: There are several ways to do this:
1. Hit the Backspace key twice; or
2. Click the button once
Page 16
G. Paragraph Cross References: Now that you have mastered automatic paragraph numbering, you are ready to insert cross references. Cross references are used in legal documents quite frequently. Word provides a simple and convenient way to use cross references, automatically updating them if a paragraph is moved. For instance, in a contract, you may have a reference that looks something like "see paragraph II.B.3" at the end of a paragraph. Anyone can type "see paragraph II.B.3" without creating a cross reference, but what happens if paragraph II.B.3 is moved – and it now becomes paragraph II.B.4? Word can solve this problem with 100% accuracy.
To use Cross References, there are several steps. First, you apply automatic paragraph numbering as outlined above. Second, select numbered item as the Reference type. Third, find and insert the Cross Reference.
1. Insert a Cross Reference Using the Standard Method:
a. Go to the location where you would like to insert a cross reference.
b. Place the cursor exactly where the cross reference will be inserted.
c. Select Cross reference from the Links group on the Insert tab.
d. Under Reference type, select Numbered item. (You can also cross reference numbered lists, headings, bookmarks, footnotes, endnotes, equations, figures, or tables).
e. Under Insert reference to select Paragraph number.
f. Under For which numbered item, highlight the correct paragraph that you are cross-referencing.
g. Click Insert to insert the cross reference.
h. If you have a multiple section cross reference, such as 4(g) be sure to use Paragraph Number (full context) under "Insert reference to."
2. Insert a Cross Reference Using Bookmarks: Former WordPerfect users are accustomed to inserting a "target" code, a "reference" code and then clicking a button to "generate cross reference." The same methodology can be applied to Word's cross references by using bookmarks. In order to accomplish this, insert a bookmark somewhere in the paragraph you want to reference (Insert ribbon Bookmark button). Then, follow these steps:
a. Go to the spot in the document where you would like to insert the cross reference.
b. Place the cursor exactly where the cross reference will be inserted.
c. Select Cross reference from the Links group on the Insert tab.

Page 17
d. Under Reference type, select Bookmark.
e. Under Insert reference to, make sure you select Paragraph Number.
f. Click Insert to insert the cross reference.
3. Update Cross References: Ctrl + A to select the whole documentHit F9 to update.
VII. MICROSOFT WORD FILLABLE FORM TEMPLATES
A. What Are Fillable Form Templates? A fillable form is simply a template which utilizes Word form fields. In Word 2003, you created these forms by using the tools on the Forms Toolbar which looked like this:
Users would be able to create a new document based upon a template using form fields and simply hit the Tab key to move from field to field. It was easy and slick. Unfortunately, Microsoft decided to change all of this in Word 2007/10/13. You can still get to the old form fields from within Word 2007/10/13, but they are well hidden (I'll explain below). They've clearly intended to replace those form fields with a new thing Content Controls. Content Controls are nice and offer a few new things that the old form fields did not. However, there are many aspects of them we do not like and as a result, we recommend you use the old types of fields that Word 2003 and prior used (they’re still available in Word 2007/10/13).
Page 18
B. Create a Form: In order to create a Word form, complete the following steps:
1. Create a template. It is probably easiest to pull up an existing document you created for a client which is a good representation of the variety you use most often. To create a template from an existing document, open the document and click Save As…, in the Open dialog, change the Save as type box to "Word Macro-Enabled Template (*.dotm)."
2. Enable the Developer Tab. This ribbon is not visible by default in Word 2007 (but is in Word 2010/13) and it is the only place you'll find the form fields you need to insert into your form. To turn it on permanently, click the Office ButtonWord OptionsPopularcheck the box adjacent to Show Developer tab in the ribbon. You only need to do this once and the Developer ribbon will be permanently visible in Word.
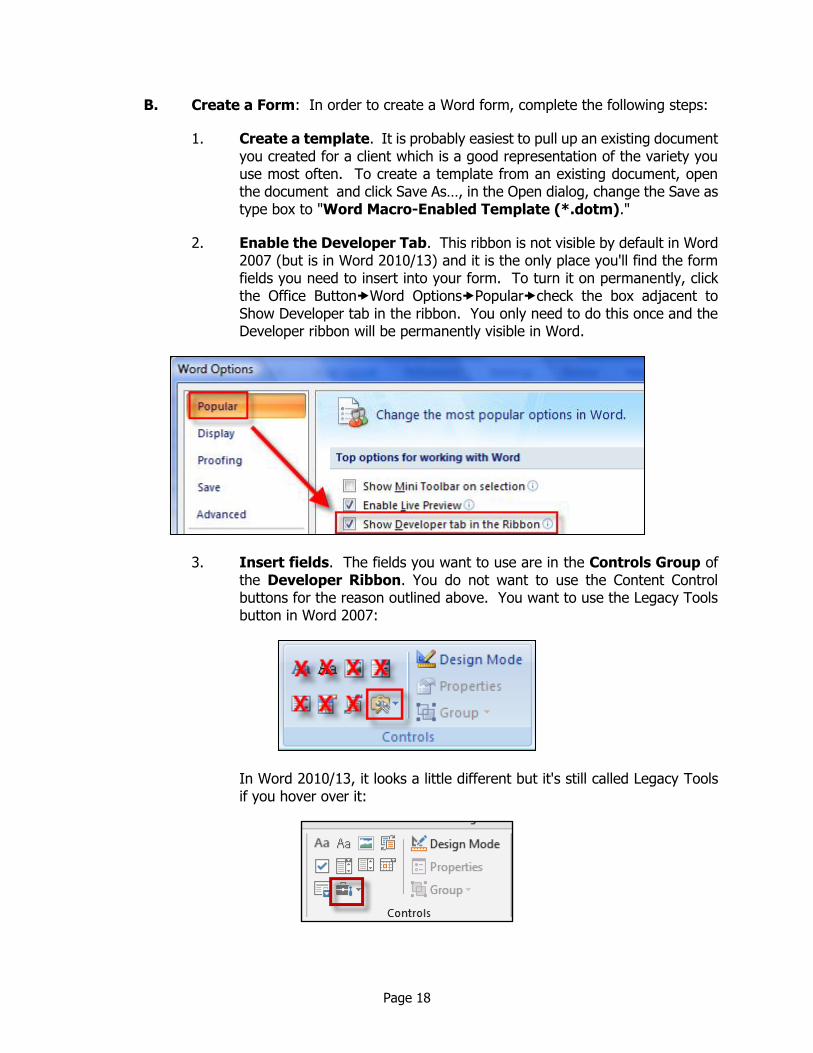
3. Insert fields. The fields you want to use are in the Controls Group of the Developer Ribbon. You do not want to use the Content Control buttons for the reason outlined above. You want to use the Legacy Tools button in Word 2007:
In Word 2010/13, it looks a little different but it's still called Legacy Tools if you hover over it:
Page 19
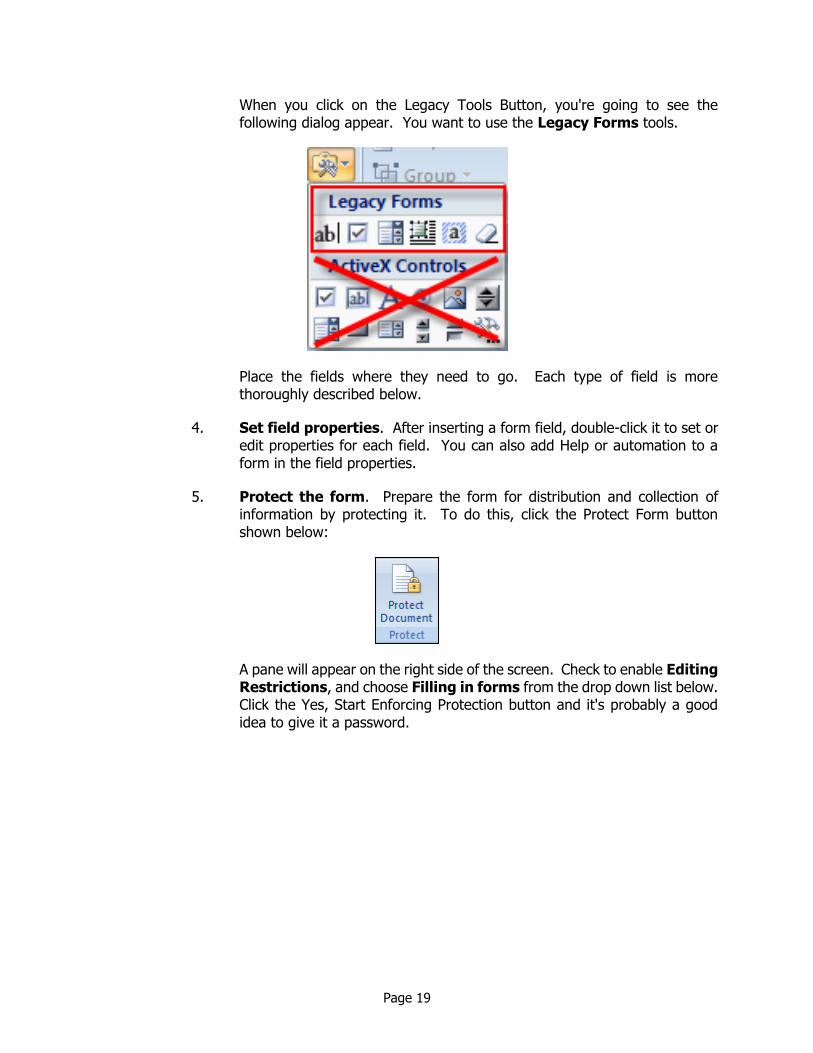
When you click on the Legacy Tools Button, you're going to see the following dialog appear. You want to use the Legacy Forms tools.
Place the fields where they need to go. Each type of field is more thoroughly described below.
4. Set field properties. After inserting a form field, double-click it to set or edit properties for each field. You can also add Help or automation to a form in the field properties.
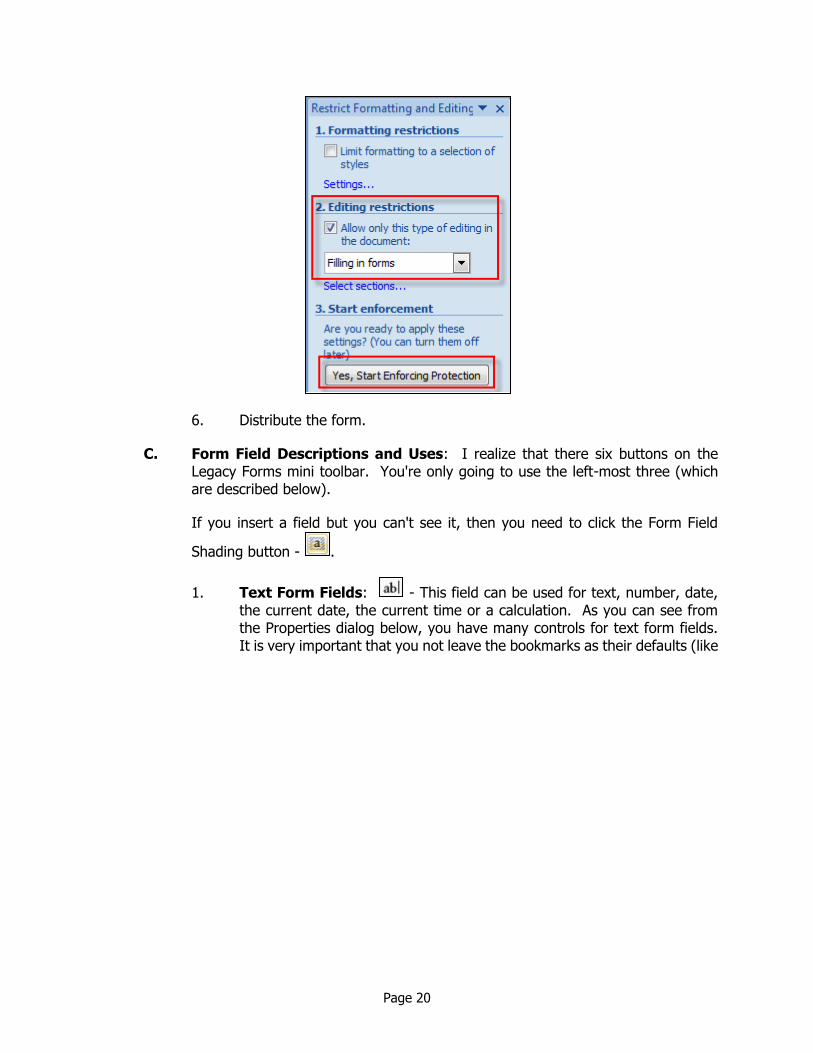
5. Protect the form. Prepare the form for distribution and collection of information by protecting it. To do this, click the Protect Form button shown below:
A pane will appear on the right side of the screen. Check to enable Editing Restrictions, and choose Filling in forms from the drop down list below. Click the Yes, Start Enforcing Protection button and it's probably a good idea to give it a password.
Page 20
6. Distribute the form.
C. Form Field Descriptions and Uses: I realize that there six buttons on the Legacy Forms mini toolbar. You're only going to use the left-most three (which are described below).
If you insert a field but you can't see it, then you need to click the Form Field
Shading button - .
1. Text Form Fields: - This field can be used for text, number, date, the current date, the current time or a calculation. As you can see from the Properties dialog below, you have many controls for text form fields. It is very important that you not leave the bookmarks as their defaults (like

Page 21
Text1). You can't have spaces in the bookmark names, but you can use underscores.
2. Check Box Form Field: - This field is used to create a box which can be checked or unchecked. See properties below:
Page 22
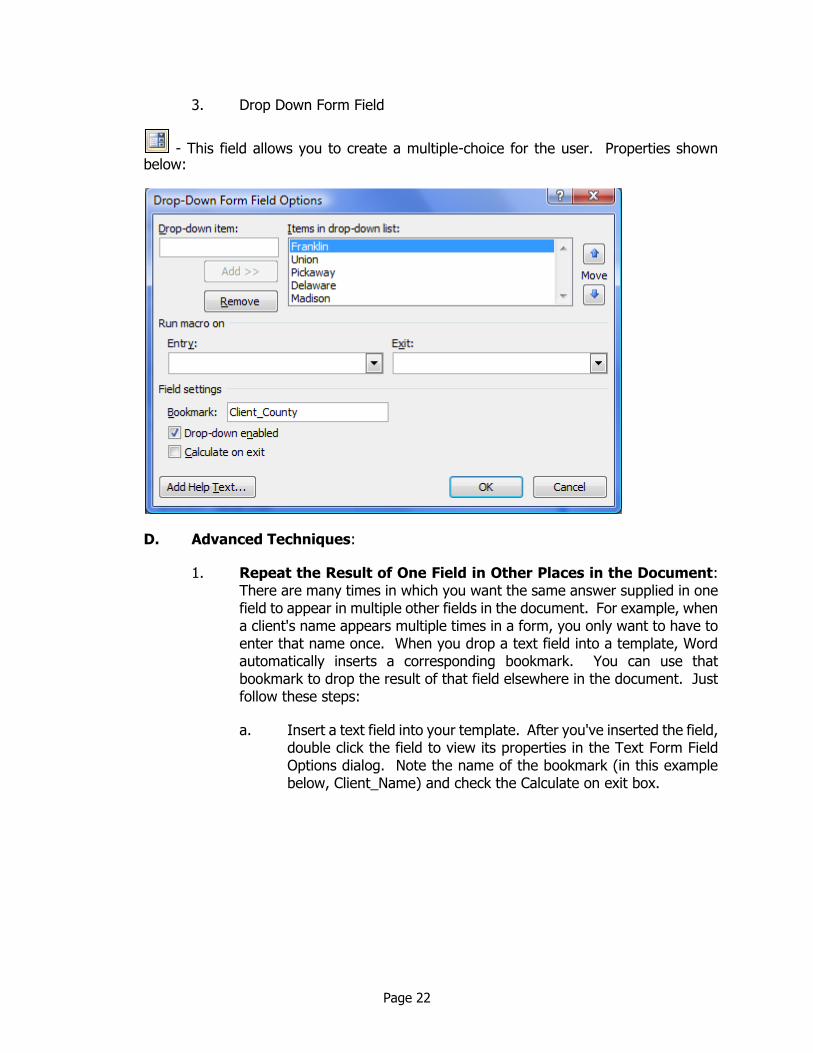
3. Drop Down Form Field
- This field allows you to create a multiple-choice for the user. Properties shown below:
D. Advanced Techniques:
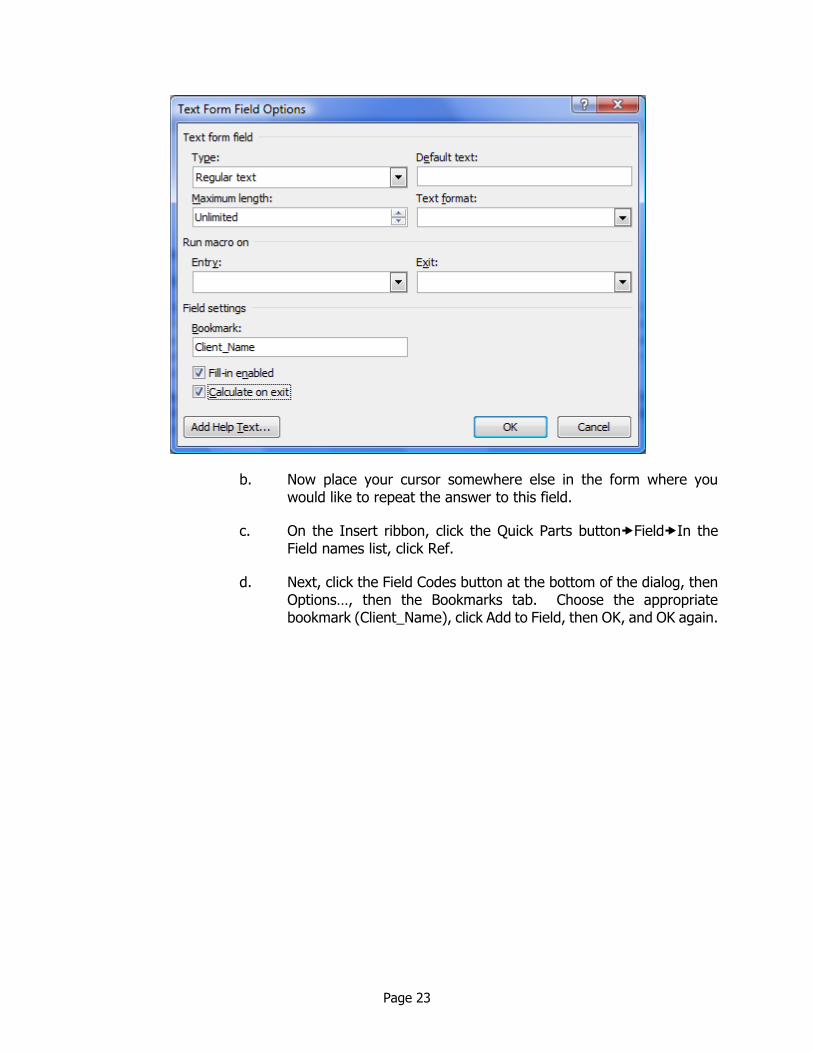
1. Repeat the Result of One Field in Other Places in the Document: There are many times in which you want the same answer supplied in one field to appear in multiple other fields in the document. For example, when a client's name appears multiple times in a form, you only want to have to enter that name once. When you drop a text field into a template, Word automatically inserts a corresponding bookmark. You can use that bookmark to drop the result of that field elsewhere in the document. Just follow these steps:
a. Insert a text field into your template. After you've inserted the field, double click the field to view its properties in the Text Form Field Options dialog. Note the name of the bookmark (in this example below, Client_Name) and check the Calculate on exit box.
Page 23
b. Now place your cursor somewhere else in the form where you would like to repeat the answer to this field.
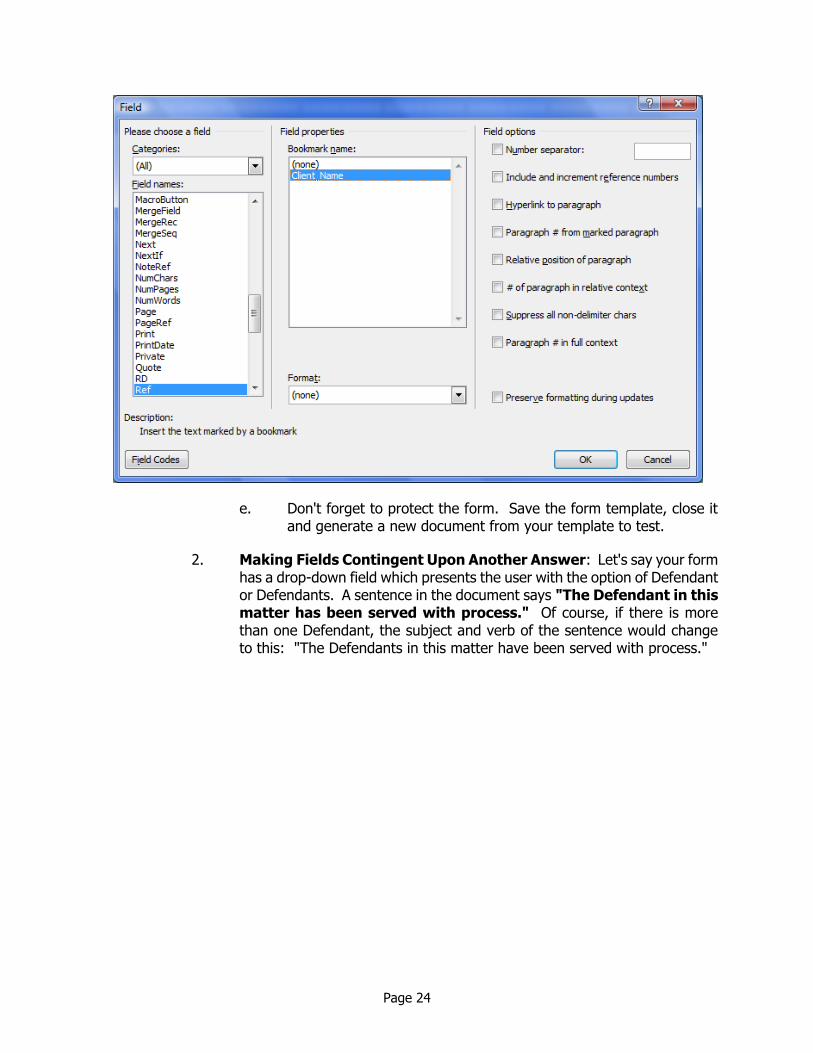
c. On the Insert ribbon, click the Quick Parts buttonFieldIn the Field names list, click Ref.
d. Next, click the Field Codes button at the bottom of the dialog, then Options…, then the Bookmarks tab. Choose the appropriate bookmark (Client_Name), click Add to Field, then OK, and OK again.
Page 24
e. Don't forget to protect the form. Save the form template, close it and generate a new document from your template to test.
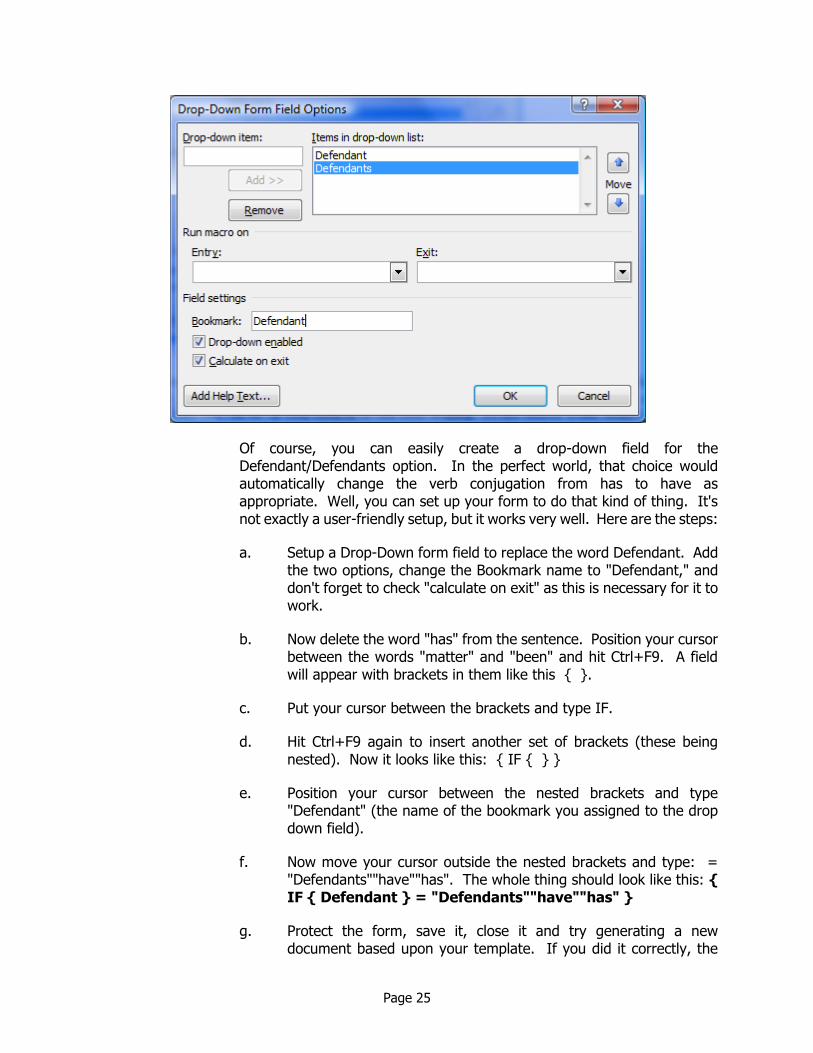
2. Making Fields Contingent Upon Another Answer: Let's say your form has a drop-down field which presents the user with the option of Defendant or Defendants. A sentence in the document says "The Defendant in this matter has been served with process." Of course, if there is more than one Defendant, the subject and verb of the sentence would change to this: "The Defendants in this matter have been served with process."
Page 25
Of course, you can easily create a drop-down field for the Defendant/Defendants option. In the perfect world, that choice would automatically change the verb conjugation from has to have as appropriate. Well, you can set up your form to do that kind of thing. It's not exactly a user-friendly setup, but it works very well. Here are the steps:
a. Setup a Drop-Down form field to replace the word Defendant. Add the two options, change the Bookmark name to "Defendant," and don't forget to check "calculate on exit" as this is necessary for it to work.
b. Now delete the word "has" from the sentence. Position your cursor between the words "matter" and "been" and hit Ctrl+F9. A field will appear with brackets in them like this { }.
c. Put your cursor between the brackets and type IF.
d. Hit Ctrl+F9 again to insert another set of brackets (these being nested). Now it looks like this: { IF { } }
e. Position your cursor between the nested brackets and type "Defendant" (the name of the bookmark you assigned to the drop down field).
f. Now move your cursor outside the nested brackets and type: = "Defendants""have""has". The whole thing should look like this: { IF { Defendant } = "Defendants""have""has" }
g. Protect the form, save it, close it and try generating a new document based upon your template. If you did it correctly, the
Page 26
have/has will change automatically depending upon what you choose for Defendant/Defendants. Don't forget that you have to hit a TAB key in order for it to take effect.
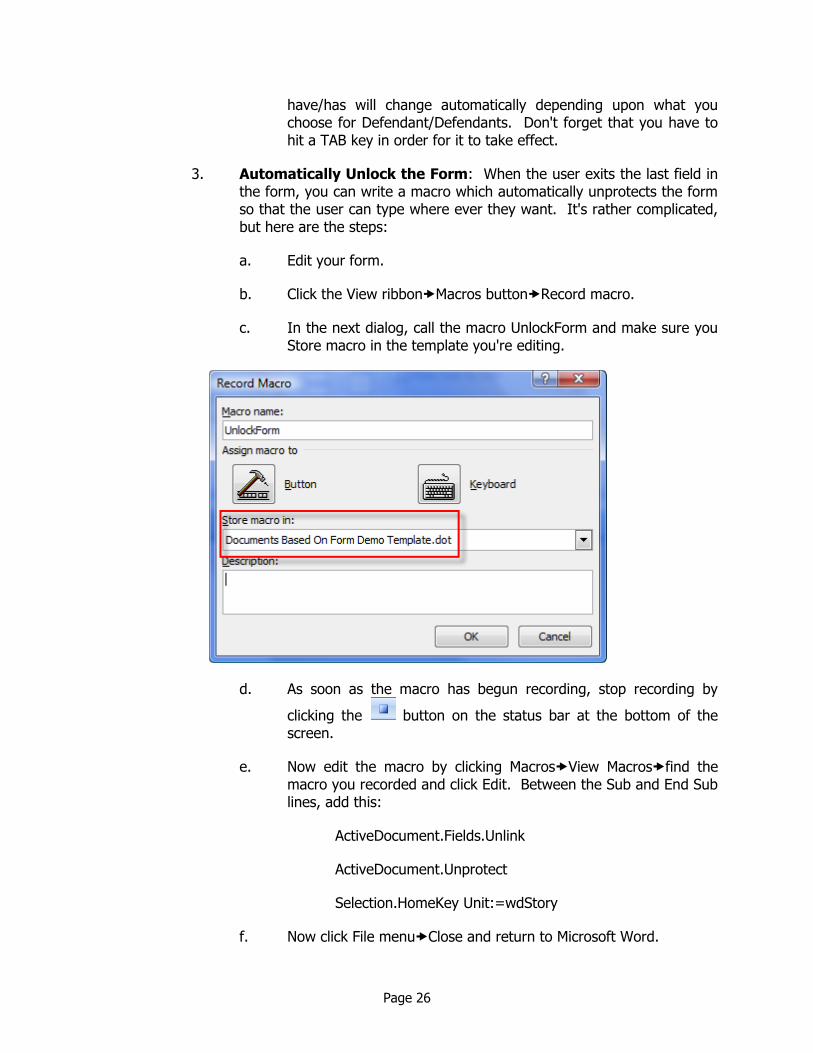
3. Automatically Unlock the Form: When the user exits the last field in the form, you can write a macro which automatically unprotects the form so that the user can type where ever they want. It's rather complicated, but here are the steps:
a. Edit your form.
b. Click the View ribbonMacros buttonRecord macro.
c. In the next dialog, call the macro UnlockForm and make sure you Store macro in the template you're editing.
d. As soon as the macro has begun recording, stop recording by
clicking the button on the status bar at the bottom of the screen.
e. Now edit the macro by clicking MacrosView Macrosfind the macro you recorded and click Edit. Between the Sub and End Sub lines, add this:
ActiveDocument.Fields.Unlink
ActiveDocument.Unprotect
Selection.HomeKey Unit:=wdStory
f. Now click File menuClose and return to Microsoft Word.
Page 27
g. Now locate the last field the user enters information into in your form and double click the field to open the properties.
h. Under "Run Macro On" click the drop down under Exit and choose the macro you created.
i. Protect the form.
j. Save the form.
E. Fill a Form: In order to fill a form based on a form template, click the Office ButtonNewclick My Templateschoose the template/form. In a protected form, you can advance from field to field by hitting the Tab key.
F. Using Fill-In Fields: This is not as sophisticated as the foregoing, but Fill-In fields are a very easy way of entering information into blanks in a form. Just follow these steps:
1. Create a template. It is probably easiest to pull up an existing document you created for a client which is a good representation of the variety you use most often. To create a template from an existing document, open the document and click Save As…, in the Open dialog, change the Save as type box to "Word Macro-Enabled Template (*.dotm)."
2. Show Fields. If you don’t do this, you will not be able to see the fields you’re entering. Just hit Alt+F9 to toggle the field codes on. After you’re done inserting all of your fields, hit Alt+F9again to turn the fields off.
3. Place your cursor where you would like the user to enter informationclick the Insert ribbonQuickPartsFieldFill-In. Type in a prompt you want the user to see.

Page 28
4. Repeat the foregoing step until you have fields inserted everywhere you want them.
5. Save the template again and close it.
6. Fill in the form as described in the previous section. You’ll see that the prompts pop up and ask you for each input.
VIII. THE CASE FOR DOCUMENT ASSEMBLY SOFTWARE ("DOCUMENT ASSEMBLY"):
A. Faster and More Sophisticated Template Development: Automation options native to Word and WordPerfect are very capable. However, to build sophisticated systems using only the tools within the word processor (Word, in particular) can be exceedingly difficult and slow. For example, I worked with a firm that had a Visual Basic programmer on staff who was working to automate several departments within the law firm using Microsoft Word's native functionality. Once they saw how efficient HotDocs could perform this task at a higher level, they immediately abandoned their Visual Basic coding. According to the gentleman who was doing the programming, he could create templates 3 times as fast using HotDocs (compared to Visual Basic) and had more advanced tools to work with.
B. Data Sharing: You can generate as many documents per seminar or speaker as you want and never answer the same question twice.
Page 29
C. Form Consolidation: Combining every possible derivation of a single document into a single template is easy with document assembly software in the mix.
D. Database Integration and Third Party Program Integration: Another great benefit of document assembly is that most applications can integrate with existing ODBC-compliant databases. For example, HotDocs integrates with Outlook, Access, SQL and many other common database programs.
E. What About PDFs? If you have PDF forms to complete as part of what you do, make sure the program you've chosen can fill in the fields in those documents as well. In the perfect world, you could fill out PDF forms as easily as you generate Word or WordPerfect documents. HotDocs, for one, is capable of this.
F. True Document Assembly Not Always Necessary: In spite of the foregoing, sometimes true document assembly is overkill. For example, if you're only generating documents with simple fill in fields and you don't really need to calculate anything or gather lists or do anything really "fancy," then you can probably get by with the automation tools already present in Word or WordPerfect. Word makes this task a bit more difficult than WordPerfect, but it's a fast, easy alternative for simple, straight-forward drafting.
G. Document Automation on the Web: Many of the document automation programs today provide the ability to deliver automated documents through a web browser. The interview is presented to the user in a web form and the documents are generated on a web server and made available for downloading. This example shows the same interview in the example above but presented through Internet Explorer.

Page 30
There are very few differences in the look and functionality of the interview. Using web technologies greatly enhances the flexibility of deploying automated document templates and customizing how those templates are used in legal practice.
H. Get a Free Trial of HotDocs: Before you spend money on it, you can try HotDocs for 30 days. Just go here: http://tinyurl.com/q5lzrx3
IX. COMPARING METHODS: The following is a brief summary of the relative pros and cons of using Forms Plus Word Processor Automation (“Forms Plus”) compared to using Forms Plus Document Assembly Software (“Document Assembly”).
A. Raw Speed - advantage Document Assembly: Document assembly software allows documents to be generated much faster than plain word processor automation.
B. Ability to Automate Complex Documents - advantage Document Assembly: Word processor automation can certainly fill in blanks, handle some basic logic and automatically format an answer entered (such as automatically converting a date entered like this: 8/14/09 into this format: August 14, 2009). However, document assembly software allows one to set up lists (infinite), calculate dates, text and numbers, easily make whole paragraphs or sections
Page 31
conditional. Almost anything you can think of can be done with document assembly software. As such, you can automate extremely complicated documents like leases, asset purchase agreements, estate planning documents or contracts.
C. Cost - advantage Forms Plus: Since Forms Plus does not require that you buy anything else and this type of automation can easily be done in-house, it is definitely cheaper than document assembly.
D. Error Elimination - advantage Document Assembly: With Forms Plus, you typically present users with a blank and they can type whatever they want into the field. With document assembly, you build a complete interview and have total control over what a user can enter and how prompts are phrased. You can also eliminate irrelevant questions from the interview, require that others are answered, and provide user help text with every question. As such, a good document assembly system prevents errors even if the individual using it has little idea about what they’re doing or the relevant area of law.
E. Ease of Learning Automation Tools - advantage Forms Plus: Because the tools built into Microsoft Word are fairly basic, it does not take long to learn how to use them effectively. Document assembly programs, on the other hand, can take months or years to master. Of course, the work product from a skilled document assembly developer is far more sophisticated, but it definitely takes a lot longer to get to reach that skill level.
F. Time Required To Complete an Automation Project - advantage Document Assembly: Automation options native to Word and WordPerfect are very capable. However, to build sophisticated systems using only the tools within the word processor (Word, in particular) can be difficult and slow. For example, I worked with a law firm that had a Visual Basic programmer on staff who was working to automate several departments using Microsoft Word's native functionality. Once they saw how efficient HotDocs could perform this task at a higher level, they immediately abandoned their Visual Basic coding. According to the gentleman who was doing the programming, he could create templates 3 times as fast using HotDocs (compared to Visual Basic) and had more advanced tools to work with.
G. Database Integration - advantage Document Assembly: Database integration means that you can pull client or case information directly out of a database and into your documents. This could be something as simple as pulling a name and address out of Outlook, or as complex as pulling party and all key contract terms out of a matter management application. The idea is that if you’ve already entered that information into a program, you shouldn’t have to enter it again into the related documents.
Word processors allow you to use a technique typically referred to as “mail merge” in which you can merge information from a data source into a merge document. This approach is really great if you want to print address labels or simple letters for 500 individuals. However, it doesn’t work so well when you want to generate a single set of documents for one transaction. On the other hand, document
Page 32
assembly programs typically allow users to tap databases or case management applications easily. For example, HotDocs comes with a database connector which allows one to link any HotDocs template to Outlook or any ODBC compliant database such as Access, SQL, Paradox, etc. Furthermore, almost every major matter management program has a HotDocs link so that case information can be drawn directly into templates during the assembly process.