dmp 44 lc setup guide - extron...
TRANSCRIPT

Product Category
1
DMP 44 LC • Setup Guide
The Extron DMP 44 LC Digital Matrix Processor is a compact 4x4 audio matrix processor featuring a digital signal processing (DSP) platform for audio signal routing, processing, and control. The DMP 44 LC features four line level inputs and outputs, all balanced or unbalanced. It offers several audio DSP tools for mixing, routing, and room optimization with quick and intuitive configuration using the DSP Configurator™ Software.
NOTE: For full installation, configuration, and operation details, see the DMP 44 LC User Guide available at www.extron.com.
Rear Panel Features and Connections
a 12 VDC power connector e RS-232 connector
b Power/Reset LED f Digital input connector
c Line input connectors (1 – 4) g Reset button
d Line output connectors (1 – 4)
Installing the DMP 44 LC1. Disconnect power from all equipment.
2. (Optional) Mount the unit to a rack or furniture.
3. Connect the audio input. Connect up to four balanced or unbalanced mono line level input devices to line input connectors c above (see the wiring diagram on the right).
4. Connect the audio output. For balanced or unbalanced audio output, connect up to four output devices to line output connectors d above (see the wiring diagram on the right).
5. Connect a control device. Connect a host device, such as a computer, to one of the following DMP 44 LC ports to configure and control the DMP via Simple Instruction Set (SIS™) commands.
z RS-232 port (rear panel) — Connect a host device to the Tx, Rx, and _ (ground) pins of this 6-pole captive screw connector (e). The default baud rate for this port is 38400 baud, 1 stop bit, no parity, 8 data bits, and no flow control (see the wiring diagram on the right).
z Config port (front panel) — Connect a USB cable (USB-A to Mini-B) between a USB port on your computer and this port (a on the front panel illustration shown on the right).
6. Digital input connector. Up to three configurable input ports (see f on the rear panel diagram) allow connection to various digital devices including motion detectors, alarms, buttons, photo (light) sensors, and temperature sensors. This connector shares a ground pin with the RS-232 connector (see the wiring diagram above). Both the RS-232 and digital input connectors may be used simultaneously by using a 6-pin captive screw connector with two wires sharing the same ground connector (see the diagram on the right).
7. Reset button. The recessed reset button is used to access various modes of resets. The green power LEDs on both the front and rear panels indicate the reset mode that was accessed. The reset modes are detailed in the user guide.
BalancedUnbalanced
TipRing
Sleeve
Tip
Sleeve
Receive (Rx)Transmit (Tx)
Ground ( )
Bidirectional
RS-232Device
Ground ( )Receive (Rx)Transmit (Tx)
RxTx
Do not tinthe wires!
DMP 44 LC
RESET
Tx Rx 1 2 3
RS-232 DIGI IN3 4
1 2
3 4
1INPUTS
2OUTPUTS
POWER12V 0.3A MAX
7
1 2 3 4 5 6
DMP 44 LCDIGITAL MATRIX PROCESSOR
CONFIG
1
Audio Output Wiring
CAUTIONFor unbalanced audio, connect the sleeve to the ground contact. DO NOT connect the sleeve to the negative (−) contacts.
Unbalanced Output
Tip
SleeveNO Ground Here
Balanced Output
Tip
SleeveRing
Audio Input Wiring
Balanced Input
Tip
SleeveRing
TipSleeve
Unbalanced Input
RS-232 DIGI IN
Tx Rx 1 2 3
Do not tin the wires!
123
_
RS
-232
21
TxR
x
DIG
I IN 3
68-1938-50 Rev. A 10 112 © 2011 Extron Electronics All rights reserved. www.extron.com
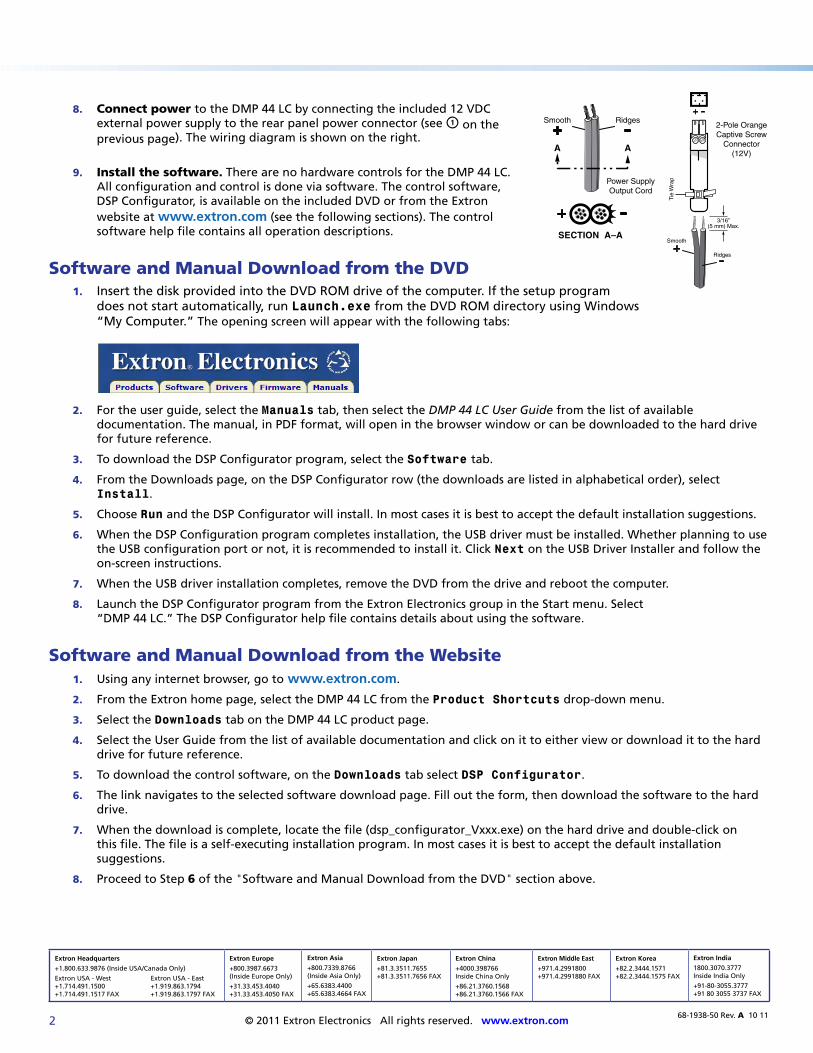
8. Connect power to the DMP 44 LC by connecting the included 12 VDC external power supply to the rear panel power connector (see a on the previous page). The wiring diagram is shown on the right.
9. Install the software. There are no hardware controls for the DMP 44 LC. All configuration and control is done via software. The control software, DSP Configurator, is available on the included DVD or from the Extron website at www.extron.com (see the following sections). The control software help file contains all operation descriptions.
Software and Manual Download from the DVD1. Insert the disk provided into the DVD ROM drive of the computer. If the setup program
does not start automatically, run Launch.exe from the DVD ROM directory using Windows “My Computer.” The opening screen will appear with the following tabs:
2. For the user guide, select the Manuals tab, then select the DMP 44 LC User Guide from the list of available documentation. The manual, in PDF format, will open in the browser window or can be downloaded to the hard drive for future reference.
3. To download the DSP Configurator program, select the Software tab.
4. From the Downloads page, on the DSP Configurator row (the downloads are listed in alphabetical order), select Install.
5. Choose Run and the DSP Configurator will install. In most cases it is best to accept the default installation suggestions.
6. When the DSP Configuration program completes installation, the USB driver must be installed. Whether planning to use the USB configuration port or not, it is recommended to install it. Click Next on the USB Driver Installer and follow the on-screen instructions.
7. When the USB driver installation completes, remove the DVD from the drive and reboot the computer.
8. Launch the DSP Configurator program from the Extron Electronics group in the Start menu. Select “DMP 44 LC.” The DSP Configurator help file contains details about using the software.
Software and Manual Download from the Website1. Using any internet browser, go to www.extron.com.
2. From the Extron home page, select the DMP 44 LC from the Product Shortcuts drop-down menu.
3. Select the Downloads tab on the DMP 44 LC product page.
4. Select the User Guide from the list of available documentation and click on it to either view or download it to the hard drive for future reference.
5. To download the control software, on the Downloads tab select DSP Configurator.
6. The link navigates to the selected software download page. Fill out the form, then download the software to the hard drive.
7. When the download is complete, locate the file (dsp_configurator_Vxxx.exe) on the hard drive and double-click on this file. The file is a self-executing installation program. In most cases it is best to accept the default installation suggestions.
8. Proceed to Step 6 of the "Software and Manual Download from the DVD" section above.
Extron Headquarters
+1.800.633.9876 (Inside USA/Canada Only)
Extron USA - West Extron USA - East +1.714.491.1500 +1.919.863.1794 +1.714.491.1517 FAX +1.919.863.1797 FAX
Extron Europe
+800.3987.6673 (Inside Europe Only)
+31.33.453.4040 +31.33.453.4050 FAX
Extron Asia
+800.7339.8766 (Inside Asia Only)
+65.6383.4400+65.6383.4664 FAX
Extron Japan
+81.3.3511.7655+81.3.3511.7656 FAX
Extron China
+4000.398766 Inside China Only
+86.21.3760.1568 +86.21.3760.1566 FAX
Extron Middle East
+971.4.2991800+971.4.2991880 FAX
Extron Korea
+82.2.3444.1571+82.2.3444.1575 FAX
Extron India
1800.3070.3777 Inside India Only
+91-80-3055.3777 +91 80 3055 3737 FAX
SECTION A–A
Power SupplyOutput Cord
Ridges
A
Smooth
A
Ridges
Smooth
2-Pole OrangeCaptive Screw
Connector(12V)
Tie
Wra
p
3/16”(5 mm) Max.