diy retaining wall guide - ahfencingtimber.com.au
TRANSCRIPT
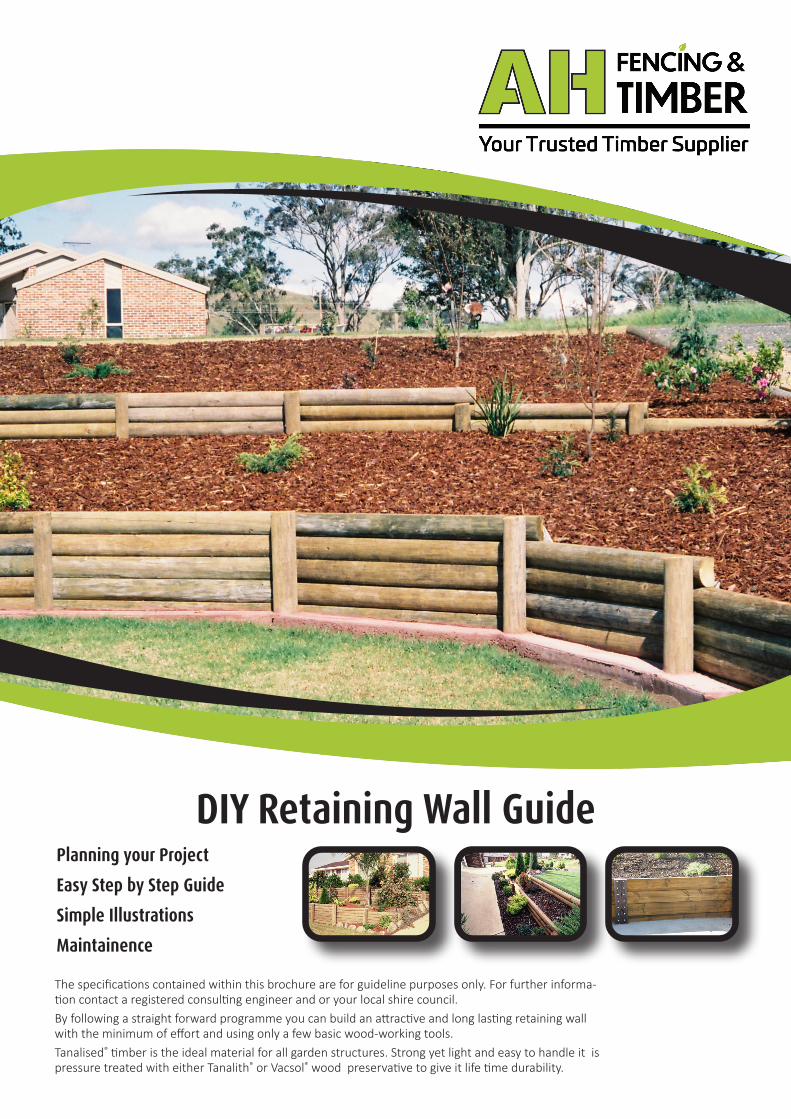
Planning your ProjectEasy Step by Step GuideSimple IllustrationsMaintainence
The specifications contained within this brochure are for guideline purposes only. For further informa-tion contact a registered consulting engineer and or your local shire council.By following a straight forward programme you can build an attractive and long lasting retaining wall with the minimum of effort and using only a few basic wood-working tools.Tanalised® timber is the ideal material for all garden structures. Strong yet light and easy to handle it is pressure treated with either Tanalith® or Vacsol® wood preservative to give it life time durability.
DIY Retaining Wall Guide

Planning your Project
General Hints: When you have planned your retaining wall it is advisable to consult with a registered engineer your local council to ensure the structure conforms to local government regulations. Many local authorities require that you seek building approval for retaining walls over 1 metre in height and or if the retaining wall is constructed within 1.5m of an existing building or another retaining wall.
It is strongly recommended that a competent licensed builder be engaged to construct large walls, or those to be built in difficult soil conditions, eg: clay or silty soils.
It is important to provide adequate drainage behind the retaining wall with adequate fall to a legal point of discharge.
It is also important to make sure that the retaining wall does not interfere with existing drainage, plumbing or electricity services.
Before you Start: • This leaflet describes construction methods for structural retaining walls and may require council approval.• Ensure any required council approvals and permits have been obtained prior to starting your retaining wall.• Ensure that the style of retaining wall chosen will provide the desired appearance when fully constructed.• These styles can be constructed using Tanalised® treated pine rounds, slabs or sawn timber offering a different effect.• For decorative, non-structural walls such as garden beds or planter boxes please consult the DIY Garden Wall brochure.• Mark out the location of the retaining wall accurately. • Check to make sure that you can achieve good post embedment. This is equal to the height of the wall. The stability of the structure depends largely upon firm embedment of posts. • Providing drainage behind retaining walls is critical to the long term stability and durability of the wall.
Notes:
This guide has been developed for a clay site having the fol-lowing conservative soil parameters:• Friction Angle 25 degrees• Unit Weight 18kN per cubic metre• Cohesion 5kPaAs all sites are not the same you should engage a geotechnical engineer to confirm the above parameters and where they are different you should engage a registered civil/structural engineer to design your footings for the appropriate wind and soil conditions.Drainage reduces the water pressure behind the wall allowing economical design and construction. The method to reduce hydrostatic loads (water pressure) from the retaining wall in most cases is to provide free draining granular fill to back fill the void between the wall and the retained soil. A geotextile filter fabric can also be provided between the soil and the fill to
minimise the silting up of this granular fill.
Timber Selection Guide:
Hazard Class Typical Uses
Outside, above ground
Decking, fencing, cladding, fascia, window joinery, exterior structural timber (above ground), engineered
wood products
Outside, in ground
Fencing, pergolas, landscaping timbers, posts, greenhouses, non structural
retaining walls less than 1m high
Outside, in ground or fresh water
Structural retaining walls, building poles, house stumps, cooling tower infill, pilings in fresh water or critical
applications
Marine waters
Boat hulls, marine piles, jetty cross-bracing, landing steps,
sea walls
Hazard Class Selection Guide AS1604.
Tools checklist: Tape measure, Square, Pencil Hammer and Chisel Spirit level, plumb bob String line, String level Crowbar and Shovel Circular saw or
Hand saw Power drill with bits 12mm masonry bit Spanner for 12mm bolts/nuts Endseal preservative Galvanised fasteners
H4
H3
H5
H6

Easy Step by Step Guide
Closed Face Cantilever Walls:
• First establish post spacing and embedment depth, this is usually equal to the retained height. Mark out and dig the holes for the uprights.• Set posts as shown using either concrete making sure they have an inward lean, or batter, to compensate for any deflec-tion of timber under load or movement of the foundation under load. Your Tanalised® treated pine stockists design tables include information on correct angles. A batter of 5○ from verti-cal will cover most cases. • The posts should be stood and temporarily braced before setting. Check the height, alignment and batter by using string lines or other suitable methods. Remember, any inaccuracies at this stage will be difficult to compensate for at a later stage and could spoil the end result.• Before setting posts make sure there is enough clearance behind to fit the horizontal timbers allowing for the wall to be built correctly. If there is any possibility of seepage, run a perforated polythene pipe along the back of the wall as shown in sketch 1.
• Allow sufficient fall along the length of the wall for the water to drain to a legal point of discharge. Provide a granular drain-age layer behind the wall (crushed rock or something similar), particularly around the pipe. It may also be appropriate to provide geotextile fabric to wrap the granular backfill to inhibit silting and blockage of the drainage system.• Where the ground slopes towards the wall and the water catchment behind the wall extends more than 6 metres, a sur-face drain should be provided with adequate fall to a legal point of discharge. • When fixing the waling, variations in the thickness along the lengths of the logs, due to natural taper can be compensated
for by turning them end to end alternating thick and thin ends. • Joins in horizontal timbers should only be made where they meet a vertical post. The ends should be scarfed to ensure an even bearing face, see sketch 2.
• Waling should be fixed with 10mm galvanized bridge spikes. Drill slightly undersize holes eg. 8mm into waling and drive spike into upright, see sketch 3.
• Structural graded, treated timber sleepers are also acceptable for use as waling.
Important: Below is a guide only, consult a registered civil/ structural engineer for detailed design information for your specific requirements.
Setting Posts: First establish post spacing and embedment depth. Then mark out and dig the holes for the uprights.
Hole Diameters:Up to 250mm posts -dig 450mm diameter holes.
Dig post holes to a depth of900mm.
Set posts as shown using concrete. The posts should be stood and temporarily braced before setting. Check the height, alignment using string lines and a level.
CONCRETE EMBEDMENTUse minimum 25mPa concrete for concrete footings
Carry concrete above groundwater level and angle to shed water runoff.
Dig Post holes at least 200mmgreater in width than the post.
Dig 100mm over deep and layer with 100mm of coarse hard fill for drainage.
Easy Step by Step Guide
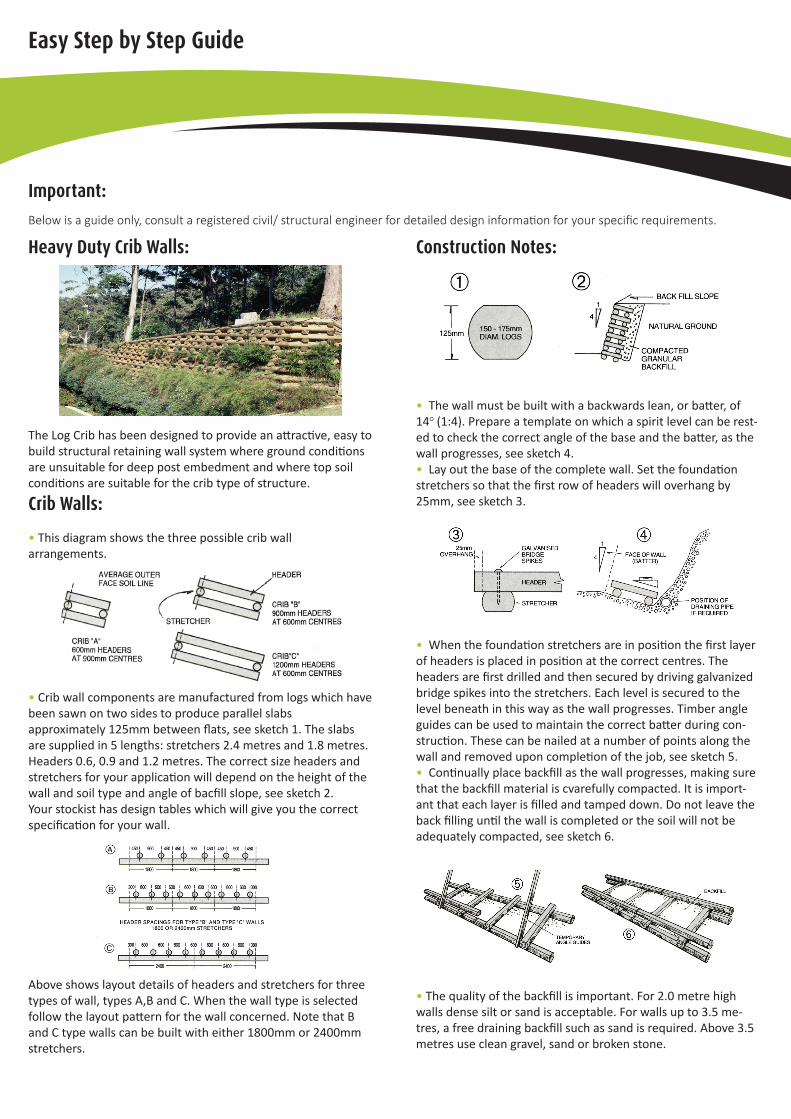
Heavy Duty Crib Walls:
The Log Crib has been designed to provide an attractive, easy to build structural retaining wall system where ground conditions are unsuitable for deep post embedment and where top soil conditions are suitable for the crib type of structure.
Crib Walls:
• This diagram shows the three possible crib wall arrangements.
• Crib wall components are manufactured from logs which have been sawn on two sides to produce parallel slabs approximately 125mm between flats, see sketch 1. The slabs are supplied in 5 lengths: stretchers 2.4 metres and 1.8 metres. Headers 0.6, 0.9 and 1.2 metres. The correct size headers and stretchers for your application will depend on the height of the wall and soil type and angle of bacfill slope, see sketch 2. Your stockist has design tables which will give you the correct specification for your wall.
Above shows layout details of headers and stretchers for three types of wall, types A,B and C. When the wall type is selected follow the layout pattern for the wall concerned. Note that B and C type walls can be built with either 1800mm or 2400mm stretchers.
Construction Notes:
• The wall must be built with a backwards lean, or batter, of 14○ (1:4). Prepare a template on which a spirit level can be rest-ed to check the correct angle of the base and the batter, as the wall progresses, see sketch 4.• Lay out the base of the complete wall. Set the foundation stretchers so that the first row of headers will overhang by 25mm, see sketch 3.
• When the foundation stretchers are in position the first layer of headers is placed in position at the correct centres. The headers are first drilled and then secured by driving galvanized bridge spikes into the stretchers. Each level is secured to the level beneath in this way as the wall progresses. Timber angle guides can be used to maintain the correct batter during con-struction. These can be nailed at a number of points along the wall and removed upon completion of the job, see sketch 5.• Continually place backfill as the wall progresses, making sure that the backfill material is cvarefully compacted. It is import-ant that each layer is filled and tamped down. Do not leave the back filling until the wall is completed or the soil will not be adequately compacted, see sketch 6.
• The quality of the backfill is important. For 2.0 metre high walls dense silt or sand is acceptable. For walls up to 3.5 me-tres, a free draining backfill such as sand is required. Above 3.5 metres use clean gravel, sand or broken stone.
Important: Below is a guide only, consult a registered civil/ structural engineer for detailed design information for your specific requirements.

Easy Step by Step Guide
Palisade Walls:
• This type of wall is a variation of the Closed Face Cantilever Wall and the construction methods are basically the same except that a continuous trench is dug rather than individual post holes. Any naturally occurring taper can be compensated for by alternating thick and thin ends. To provide stability and hold alignment of posts in high walls during setting, use wire and staples along the top of the posts. This can be removed on completion of the job.
• Walls of greater height than 1.2 metres should have an inward lean, or batter, of approximately 4○ – 5○ to compensate for any possible deflection of timber under load or movement of foundations under load.
• Tops of posts can be trimmed at different heights.
Open Face Cantilever Walls:
• This type of wall is built in exactly the same way as the closed wall system described previously except for the waling and backfill.
• The waling (horizontal timbers) are round logs which are carried past the upright posts and set to overlap each other leaving gaps between the courses. The gaps are then blocked with rocks which for the front layer of the backfill as shown in sketch 1.
• Open face construction provides a simple solution to retaining on a slope.
Maintaining your Wall:
• Walls should be cleaned on a regular basis, either by simply brushing the wall using a long bristled broom ensuring the gaps between the boards are also cleaned, or by using a pressure washer for a thorough clean.
• Your retaining wall will benefit from an annual treatment of quality decking oil such as Tanacare® Timbercoat, to protect it.
Important: Below is a guide only, consult a registered civil/ structural engineer for detailed design information for your specific requirements.

for more DIY projects visit us online or in store at
www.ahfencingtimber.com.auVICTORIAAH FENCING & TIMBER24 Vesper Drive, Narre Warren VIC [email protected]+61 3 9705 6288
Tanalised, Tanalith, Tanacoat, Enseal and Vacsol are registered trademarks of LSI or its subsidiaries. ©Archwoodprotection 2021 #AHFDIYRetWall001_0921
Safety Instructions
Safety Instructions:
Always refer to product safety data sheets for full health and safety instructions
Disclaimer:
These specifications are for guideline purposes only. As conditions vary from one site to another it is strongly recommended that you consult with a registered consulting engineer and your local shire council. These plans have been checked and approved (at the time of printing)by Civil & Structural consulting engineers Roy B Hoskins & Associates of QLD 4060, to be technically accurate and generally designed in accordance with the appropriate Australian Standards. As the Australian standards, local, state and national laws are subject to change, please check with your local authorities prior to starting construction.
Wash work clothing regularly and separately.
Always wear dust mask and goggles when handling treated timber.
Always wear gloves when handling treated timber.
Treated timber should not come in contact with drinking water.
Always Dispose of treated waste in an approved landfill.
Do not use treated timber for cooking fuel.
Do not burn treated timber.
Always wash your hands before eating, smoking or going to the toilet.
Don’t use treated sawdust or shavings for animal litter.