digital technical support … technical support olympus imaging america inc. (888) 553-4448 how to...
TRANSCRIPT

D I G I T A L T E C H N I C A L S U P P O R T
O L Y M P U S I M A G I N G A M E R I C A I N C .
( 8 8 8 ) 5 5 3 - 4 4 4 8
h t t p : / / s u p p o r t . o l y m p u s a m e r i c a . c o m
How to Download Images Using Olympus Auto-Connect USB Cameras and Olympus Master
Introduction Auto-Connect USB is a feature that allows Olympus digital cameras to emulate a Hard disk drive when connected to a computer. This feature makes it simple to copy the images to your computer using standard drag-and-drop procedures. To use Auto-Connect USB, your computer must have a built-in USB 2.0 port and run any of the following operating systems: Windows XP, Windows 2000 Professional, Windows Me, Windows 98 SE (driver required), or Macintosh OS X 10.2 and higher. These instructions will show you, step-by-step, how to connect an Olympus digital camera with Auto-Connect USB to a computer, how to download images from the camera to the computer, and how to safely disconnect the camera from the computer.
How to connect an Olympus Auto-Connect USB camera to a computer 1. If your computer runs Windows 98 SE, the first step is to install the driver. (See below.)
If your computer runs Windows XP (Professional, Home or Media Center editions), Windows 2000 Professional, Windows Me, or Macintosh OS X), skip to Step 2.
2. Connect the camera to the USB port of the computer using the USB cable packaged with your digital camera. The flat end of the cable is imprinted with a distinctive icon. Plug this end into the USB port, which may also bear the icon to help you identify it. Plug the other end into the camera. Refer to your camera’s documentation for the specific location of the USB jack.
3. On some models, you must tell the camera whether you wish to communicate with a computer or a printer. If, after connecting the USB cable, the LCD monitor of your camera offers these options, select the computer (e.g. by choosing PC and then pressing OK) to initiate the connection. When the camera is connected to a Windows computer, the following icon will be displayed in the system tray.
When the camera is connected to a Macintosh computer, a new icon will appear on the desktop. The icon will be labeled No Name.
Once you see the icon, you are connected and ready to transfer images to your computer. 4. When you are finished working with the digital camera, disconnect the camera using the
safe-disconnect procedure described below.
Olympus Imaging America Inc. Page 1 of 7
D I G I T A L T E C H N I C A L S U P P O R T
O L Y M P U S I M A G I N G A M E R I C A I N C .
( 8 8 8 ) 5 5 3 - 4 4 4 8
h t t p : / / s u p p o r t . o l y m p u s a m e r i c a . c o m
How to transfer images using Olympus Master software The Olympus Master software that is included with Olympus digital cameras allows you to view, edit, and print your pictures. You can also use Olympus Master to download pictures from your Olympus Auto-Connect USB camera by following this procedure:
1. Install the Olympus Master software. Refer to the instructions packaged with your digital camera.
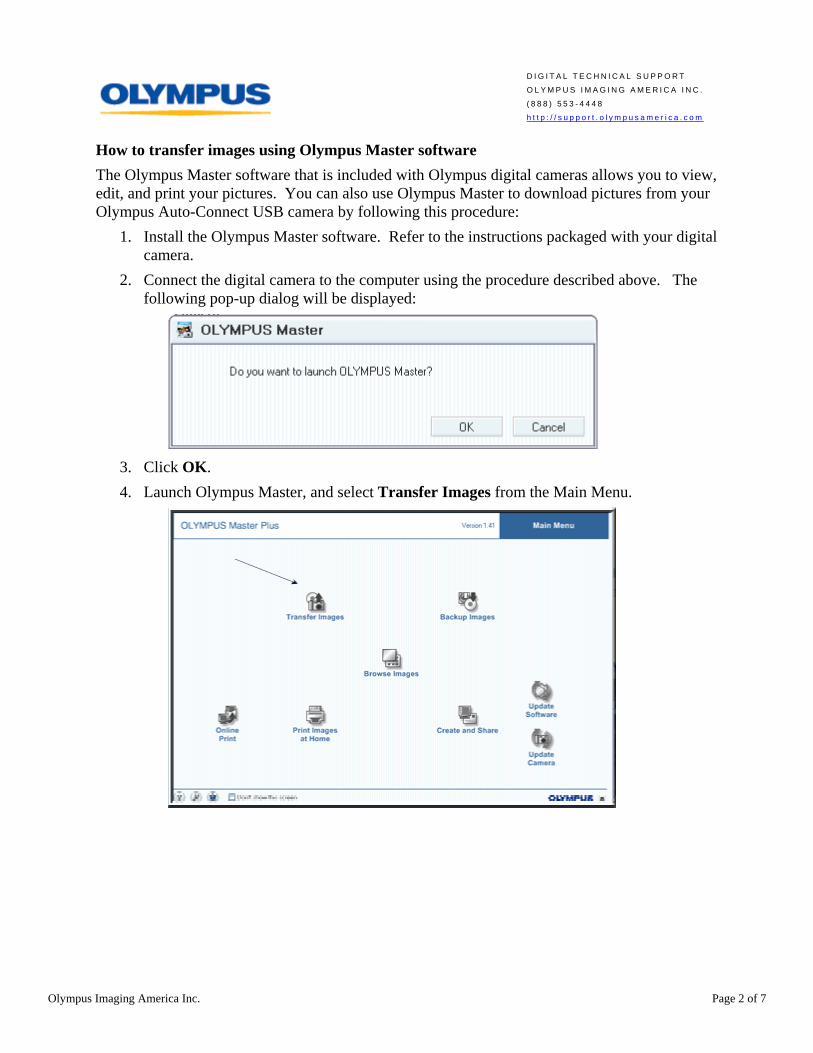
2. Connect the digital camera to the computer using the procedure described above. The following pop-up dialog will be displayed:
3. Click OK. 4. Launch Olympus Master, and select Transfer Images from the Main Menu.
Olympus Imaging America Inc. Page 2 of 7
D I G I T A L T E C H N I C A L S U P P O R T
O L Y M P U S I M A G I N G A M E R I C A I N C .
( 8 8 8 ) 5 5 3 - 4 4 4 8
h t t p : / / s u p p o r t . o l y m p u s a m e r i c a . c o m
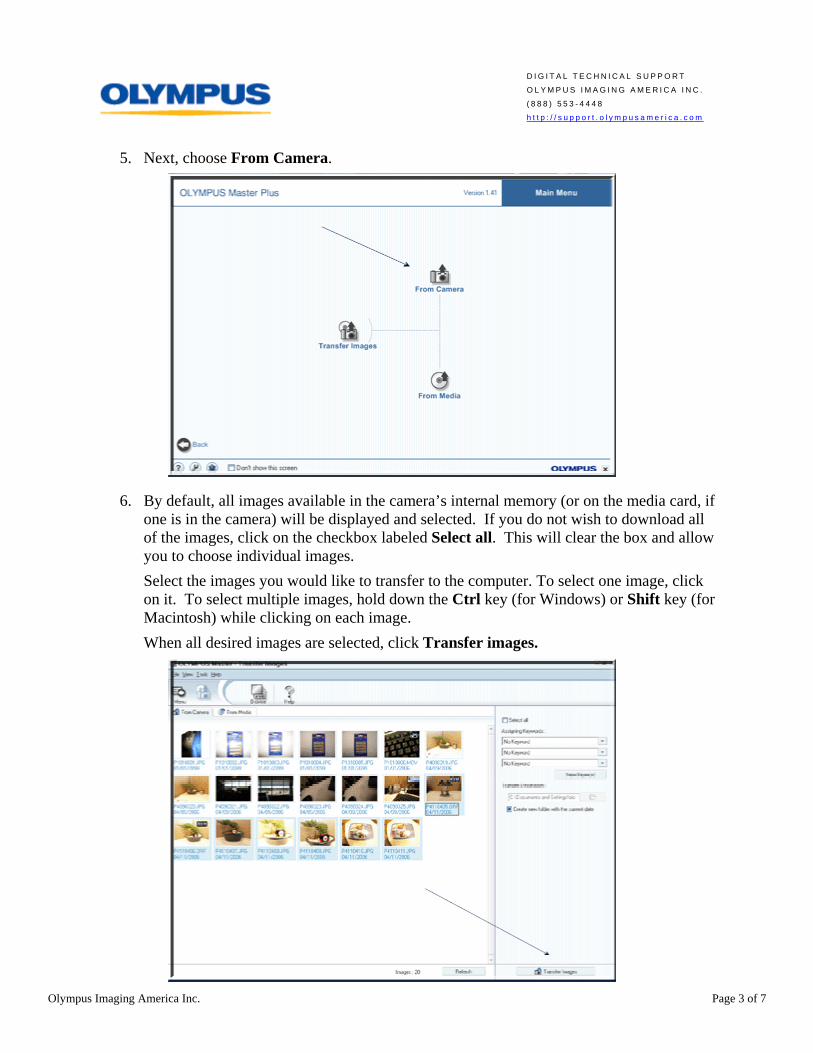
5. Next, choose From Camera.
6. By default, all images available in the camera’s internal memory (or on the media card, if one is in the camera) will be displayed and selected. If you do not wish to download all of the images, click on the checkbox labeled Select all. This will clear the box and allow you to choose individual images. Select the images you would like to transfer to the computer. To select one image, click on it. To select multiple images, hold down the Ctrl key (for Windows) or Shift key (for Macintosh) while clicking on each image. When all desired images are selected, click Transfer images.
Olympus Imaging America Inc. Page 3 of 7

D I G I T A L T E C H N I C A L S U P P O R T
O L Y M P U S I M A G I N G A M E R I C A I N C .
( 8 8 8 ) 5 5 3 - 4 4 4 8
h t t p : / / s u p p o r t . o l y m p u s a m e r i c a . c o m
7. A progress bar will be displayed while the images download to the computer. Once the download has completed, click Browse images now to view the pictures in Olympus Master.
After the pictures have been completely downloaded to your computer, you can use Olympus Master’s calendar view to locate the images you downloaded.
8. When you are finished transferring files to your computer, disconnect the camera from your computer using the safe-disconnect procedure below.
Olympus Imaging America Inc. Page 4 of 7

D I G I T A L T E C H N I C A L S U P P O R T
O L Y M P U S I M A G I N G A M E R I C A I N C .
( 8 8 8 ) 5 5 3 - 4 4 4 8
h t t p : / / s u p p o r t . o l y m p u s a m e r i c a . c o m
How to safely disconnect an Olympus Auto-Connect USB camera from a computer Follow these instructions carefully. Improperly disconnecting a camera from a computer may damage the camera, the computer, the memory card (if one is in the camera), and/or any image or movie files stored in your camera’s internal memory or on a memory card in the camera.
For Windows XP/2000/Me/98 SE: 1. Verify that media card access indicator is not blinking. Some camera models have
either a lamp on the right of the viewfinder or a card access lamp. The location varies depending on the model. Refer to examples shown below.
2. Single-click the Safely Remove Hardware icon on the task bar.
3. A pop-up message appears, identifying the name of the drive that represents the camera. (The text varies with operating system.)
4. A message appears, indicating that the USB cable can now be safely removed from the system.
5. Unplug the USB cable from the computer.
For Macintosh OS X: 1. Verify that media card access indicator is not blinking. Some camera models have
either a lamp on the right of the viewfinder or a card access lamp. The location varies depending on the model. Refer to examples above.
2. Drag the No Name icon on the desktop to the Trash icon, and drop it in the trash. “Dragging” means to position the cursor over a selection (the Trash icon, in this case), then press and hold down the mouse button while moving the cursor. The selected icon will follow the cursor. When the cursor passes over the Trash icon, it will become highlighted. Release the mouse button. This will cause the selected files to be copied into the new location. The act of releasing the mouse button and transferring a selection to a new location is called “dropping” the selection.
3. Remove the USB cable from the camera. You may also remove the USB cable from your computer, but this is not usually necessary.
Olympus Imaging America Inc. Page 5 of 7
D I G I T A L T E C H N I C A L S U P P O R T
O L Y M P U S I M A G I N G A M E R I C A I N C .
( 8 8 8 ) 5 5 3 - 4 4 4 8
h t t p : / / s u p p o r t . o l y m p u s a m e r i c a . c o m
Appendix
How to transfer images when not using Olympus Master software 1. Turn the camera off, and connect the digital camera to the USB port of the computer
using the USB cable packaged with the camera. On some models, you must tell the camera whether you wish to communicate with a computer or printer. If, after connecting the cable, the LCD monitor of your camera shows these options, select the computer (e.g. by choosing “PC”) and press the OK button to initiate the connection.
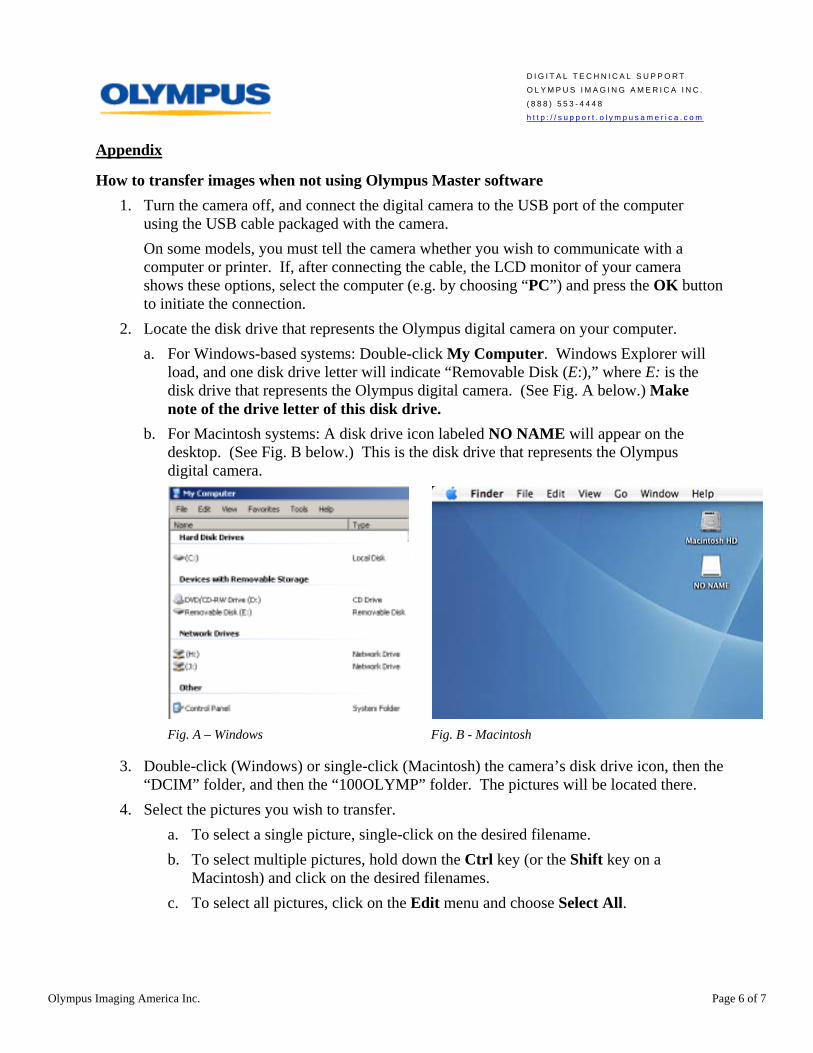
2. Locate the disk drive that represents the Olympus digital camera on your computer. a. For Windows-based systems: Double-click My Computer. Windows Explorer will
load, and one disk drive letter will indicate “Removable Disk (E:),” where E: is the disk drive that represents the Olympus digital camera. (See Fig. A below.) Make note of the drive letter of this disk drive.
b. For Macintosh systems: A disk drive icon labeled NO NAME will appear on the desktop. (See Fig. B below.) This is the disk drive that represents the Olympus digital camera.
Fig. A – Windows Fig. B - Macintosh
3. Double-click (Windows) or single-click (Macintosh) the camera’s disk drive icon, then the “DCIM” folder, and then the “100OLYMP” folder. The pictures will be located there.
4. Select the pictures you wish to transfer. a. To select a single picture, single-click on the desired filename. b. To select multiple pictures, hold down the Ctrl key (or the Shift key on a
Macintosh) and click on the desired filenames. c. To select all pictures, click on the Edit menu and choose Select All.
Olympus Imaging America Inc. Page 6 of 7
D I G I T A L T E C H N I C A L S U P P O R T
O L Y M P U S I M A G I N G A M E R I C A I N C .
( 8 8 8 ) 5 5 3 - 4 4 4 8
h t t p : / / s u p p o r t . o l y m p u s a m e r i c a . c o m
5. Drag and drop the pictures to a folder on the computer’s hard disk or other storage device. “Dragging” means to position the cursor over a selection (in this case, the filenames), then press and hold down the mouse button while moving the cursor. The selected files will follow the cursor. When your cursor passes over a location that can receive the files, the location’s name or icon will become highlighted. Release the mouse button when the desired location is highlighted. This will cause the selected files to be copied into the new location. The act of releasing the mouse button and transferring the files to the new location is called “dropping” the files. Files may be dropped into any existing folder. Please refer to your operating system or computer user’s guide for instructions on creating folders.
6. After the files have been successfully transferred to your computer, disconnect the camera from your computer using the procedure listed above.
How to install the USB driver (Windows 98 SE only) Before you can connect an Olympus Auto-Connect USB digital camera to a computer running Windows 98 SE, a USB driver needs to be installed on the computer. (Olympus Master is not supported in Windows 98.)
If you have an Olympus Master CD-ROM: 1. Insert the Olympus Master compact disc into your CD-ROM drive. If the selection
menu is not automatically displayed, click on the Start menu and choose Run. In the resulting pop-up field, type d:\Launcher.exe where d: is your CD-ROM drive.
2. When the menu is displayed, choose Please read first to read the Olympus Master software installation guide.
3. Next, choose a language from the drop menu in the top right of the window. 4. Next, choose Olympus Master and follow the prompts to install the software. The
driver is automatically installed along with the Olympus Master software. 5. Choose OK to reboot the computer. When it restarts, the driver will be enabled.
If you do not have an Olympus Master CD-ROM: 1. Download the driver from Olympus by clicking here. 2. Double-click the file AutoConnDriv_Win98SE.exe to extract its contents. 3. A dialog will open. In the Extract to field, enter the location of a folder on your hard
drive. You may do this directly by typing a valid path, such as C:\Windows\temp, or you may click on the Browse button and use the resulting dialog to navigate to a folder of your choice. (When you click OK, the dialog will close and the folder you selected will be displayed in the Extract to field.)
4. Click Extract. 5. Launch Windows Explorer, and navigate to the folder you entered in Step 3. 6. Double-click on the file install.exe. 7. Follow the on-screen instructions. When prompted, reboot your computer. When the
computer restarts, the driver will be enabled.
Olympus Imaging America Inc. Page 7 of 7