digital satellite meter - satking · digital satellite meter i the professional equipment........
TRANSCRIPT
THE PROFESSIONAL EQUIPMENT
USER’S MANUAL
DIGITALSATELLITE
METER


iDigital Satellite Meter
THE PROFESSIONAL EQUIPMENT .................................. USER'S MANUAL
DIGITAL SATELLITE METERUSER'S MANUAL
Please read this manual carefully before using your meter for the fi rst time.The technical specifi cations and operating methods included in this manual are subject to changes without notice. In case of any inquires after a period of usage, please contact the manufacturer.Please charge the battery before using your meter for the fi rst time.(Recommend 5 hours)
ii Digital Satellite Meter
THE PROFESSIONAL EQUIPMENT .................................. USER'S MANUAL
CONTENTS
Chapter I Introduction ................................................ 1
Chapter II Function ....................................................... 1
A. Front Panel .................................................................................. 1
B. Detailed Operation Guide ..................................................... 3
1. Satellite Finding .........................................................................32. System Setting ............................................................................63. Spectrum Analyzer ...................................................................84. Real time Spectrum Analyzer Operation Guide ............95. Angle Calculation ...................................................................14
Chapter III Specifi cations .........................................15
1Digital Satellite Meter
THE PROFESSIONAL EQUIPMENT .................................. USER'S MANUAL
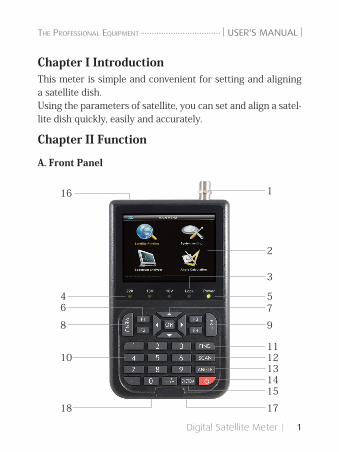
Chapter I IntroductionThis meter is simple and convenient for setting and aligning a satellite dish.Using the parameters of satellite, you can set and align a satel-lite dish quickly, easily and accurately.
Chapter II Function
A. Front Panel
1
4
16
8
10
18
6
2
5
9
1112131415
17
7
3
2 Digital Satellite Meter
THE PROFESSIONAL EQUIPMENT .................................. USER'S MANUAL
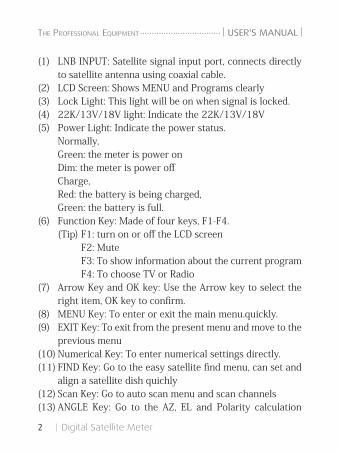
(1) LNB INPUT: Satellite signal input port, connects directly to satellite antenna using coaxial cable.
(2) LCD Screen: Shows MENU and Programs clearly(3) Lock Light: This light will be on when signal is locked.(4) 22K/13V/18V light: Indicate the 22K/13V/18V(5) Power Light: Indicate the power status. Normally, Green: the meter is power on Dim: the meter is power off Charge, Red: the battery is being charged, Green: the battery is full.(6) Function Key: Made of four keys, F1-F4. (Tip) F1: turn on or off the LCD screen
F2: MuteF3: To show information about the current programF4: To choose TV or Radio
(7) Arrow Key and OK key: Use the Arrow key to select the right item, OK key to confi rm.
(8) MENU Key: To enter or exit the main menu.quickly.(9) EXIT Key: To exit from the present menu and move to the
previous menu(10) Numerical Key: To enter numerical settings directly.(11) FIND Key: Go to the easy satellite fi nd menu, can set and
align a satellite dish quichly(12) Scan Key: Go to auto scan menu and scan channels(13) ANGLE Key: Go to the AZ, EL and Polarity calculation
3Digital Satellite Meter
THE PROFESSIONAL EQUIPMENT .................................. USER'S MANUAL
menu(14) : Press to swith between Operation and power off modes(15) SYSTEM Key: To set all system parameters.(16) Battery ON/OFF button: To switch the battery on or Off (17) USB Port: Connect to PC to upgrade.(18) Charge port: To connect with the charger cord.
B. Detailed Operation Guide
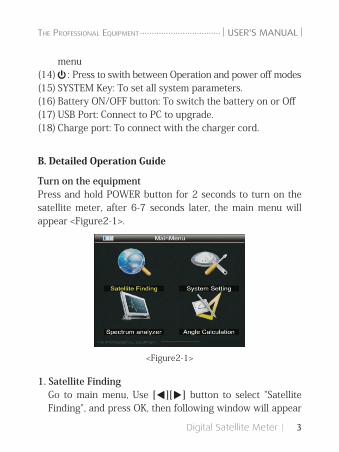
Turn on the equipmentPress and hold POWER button for 2 seconds to turn on the satellite meter, after 6-7 seconds later, the main menu will appear <Figure2-1>.
<Figure2-1>
1. Satellite FindingGo to main menu, Use [A ][B ] button to select "Satellite Finding", and press OK, then following window will appear
4 Digital Satellite Meter
THE PROFESSIONAL EQUIPMENT .................................. USER'S MANUAL
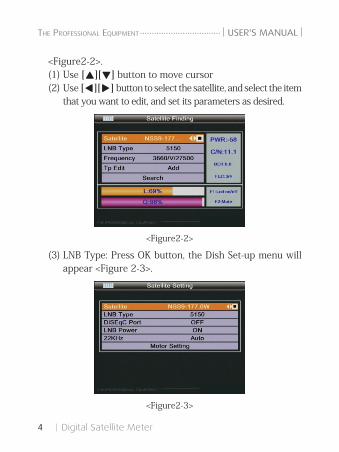
<Figure2-2>.(1) Use [Y ][Z ] button to move cursor(2) Use [A ][B ] button to select the satellite, and select the item that you want to edit, and set its parameters as desired.
<Figure2-2>
(3) LNB Type: Press OK button, the Dish Set-up menu will appear <Figure 2-3>.
<Figure2-3>
5Digital Satellite Meter
THE PROFESSIONAL EQUIPMENT .................................. USER'S MANUAL
a. Use [Y ][Z ] to move cursorb. Use [A ][B ] button to select the item you want.
LNB Type: Use [A ][B ] button to choose LNB Type between UNIVERSAL/5150/9750/10750/ 11300/10700/Customised
L.O LOW: Use digital button to input the LOW L.O.F once the LNB Type is Customized
L.O. HIGH L: Use digital button to input the High L.O.F once the LNB Type is Customized
22K: choose among AUTO/OFF/ONLNB POWER: choose among AUTO/13V/18V/OFFSWITCH TYPE: choose NONE/DiSEqC1.0/ DiSEqC1.1SWITCH INPUT: choose from 1/2/3/4 inputMotor: Choose among Fixed/DiSEQC 1.2/USALS/
(4) Frequency: Use [A ][B ] button to select the TP frequen-cy you want. FREQUENCY set its parameters, can input numerically SYMBOL RATE set its parameters, can input numerically
(5) POL: POLARITY Select between Vertical and horizontal.(6) When signal fi nding: you can see the bar meter of the LEVEL and QUALITY, and the numerical of C/N ,FEC, a.BER (after BER) at the same time the LOCK light will come on and the speaker will notify.
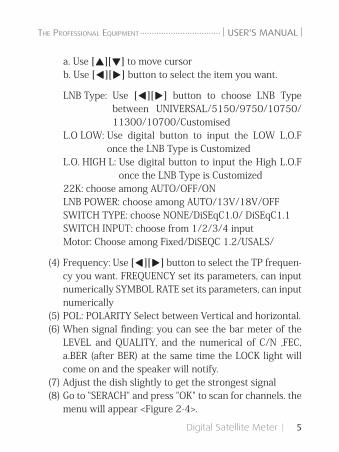
(7) Adjust the dish slightly to get the strongest signal(8) Go to "SERACH" and press "OK" to scan for channels. the menu will appear <Figure 2-4>.
6 Digital Satellite Meter
THE PROFESSIONAL EQUIPMENT .................................. USER'S MANUAL
<Figure2-4>
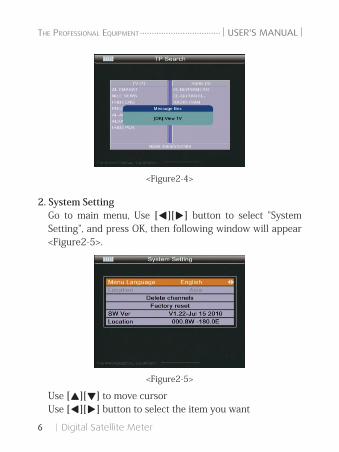
2. System SettingGo to main menu, Use [A ][B ] button to select "System Setting", and press OK, then following window will appear <Figure2-5>.
<Figure2-5>
Use [Y ][Z ] to move cursorUse [A ][B ] button to select the item you want
7Digital Satellite Meter
THE PROFESSIONAL EQUIPMENT .................................. USER'S MANUAL
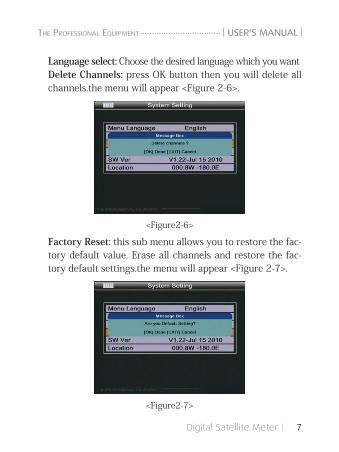
Language select: Choose the desired language which you wantDelete Channels: press OK button then you will delete all channels.the menu will appear <Figure 2-6>.
<Figure2-6>
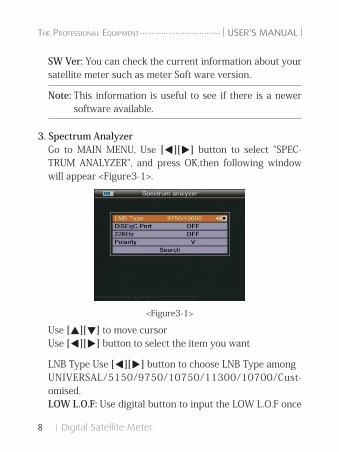
Factory Reset: this sub menu allows you to restore the fac-tory default value. Erase all channels and restore the fac-tory default settings.the menu will appear <Figure 2-7>.
<Figure2-7>
8 Digital Satellite Meter
THE PROFESSIONAL EQUIPMENT .................................. USER'S MANUAL
SW Ver: You can check the current information about your satellite meter such as meter Soft ware version.
Note: This information is useful to see if there is a newer software available.
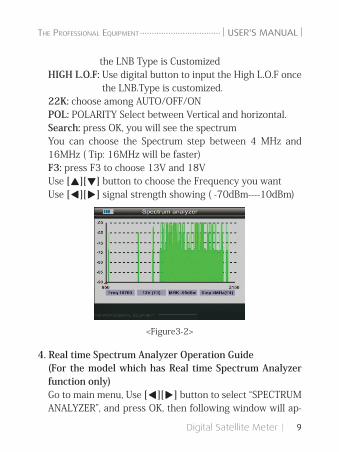
3. Spectrum AnalyzerGo to MAIN MENU, Use [A ][B ] button to select "SPEC-TRUM ANALYZER", and press OK,then following window will appear <Figure3-1>.
<Figure3-1>
Use [Y ][Z ] to move cursorUse [A ][B ] button to select the item you want
LNB Type Use [A ][B ] button to choose LNB Type amongUNIVERSAL/5150/9750/10750/11300/10700/Cust-omised.LOW L.O.F: Use digital button to input the LOW L.O.F once
9Digital Satellite Meter
THE PROFESSIONAL EQUIPMENT .................................. USER'S MANUAL
the LNB Type is CustomizedHIGH L.O.F: Use digital button to input the High L.O.F once
the LNB.Type is customized.22K: choose among AUTO/OFF/ONPOL: POLARITY Select between Vertical and horizontal.Search: press OK, you will see the spectrumYou can choose the Spectrum step between 4 MHz and 16MHz ( Tip: 16MHz will be faster)F3: press F3 to choose 13V and 18VUse [Y ][Z ] button to choose the Frequency you wantUse [A ][B ] signal strength showing ( -70dBm----10dBm)
<Figure3-2>
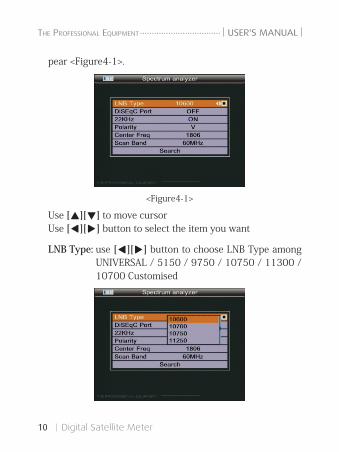
4. Real time Spectrum Analyzer Operation Guide(For the model which has Real time Spectrum Analyzer function only) Go to main menu, Use [A ][B ] button to select “SPECTRUM ANALYZER”, and press OK, then following window will ap-
10 Digital Satellite Meter
THE PROFESSIONAL EQUIPMENT .................................. USER'S MANUAL
pear <Figure4-1>.
<Figure4-1>
Use [Y ][Z ] to move cursor Use [A ][B ] button to select the item you want
LNB Type: use [A ][B ] button to choose LNB Type among UNIVERSAL / 5150 / 9750 / 10750 / 11300 / 10700 Customised
11Digital Satellite Meter
THE PROFESSIONAL EQUIPMENT .................................. USER'S MANUAL
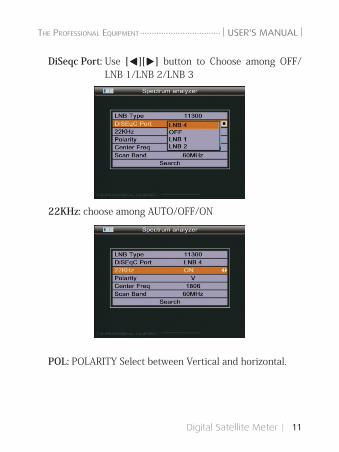
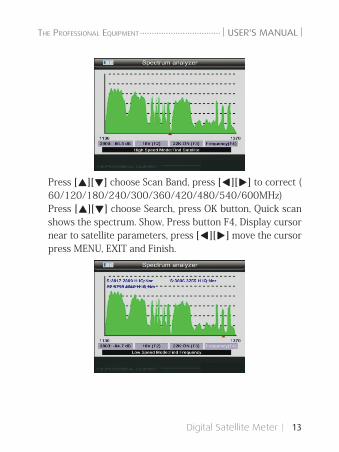
DiSeqc Port: Use [A ][B ] button to Choose among OFF/LNB 1/LNB 2/LNB 3
22KHz: choose among AUTO/OFF/ON
POL: POLARITY Select between Vertical and horizontal.

12 Digital Satellite Meter
THE PROFESSIONAL EQUIPMENT .................................. USER'S MANUAL
Center Freq: Use digital button to input the center Frequen-cy according the required parameters (From 950~2150MHz)
For example: LNB frequency: 5150, enter center frequency: 1250So, Center frequency spectrum image corresponding to the next of satellite frequency: 5150-1250=3900MHzOn the picture X Coordinate, 1370-1130=240MHz, that is Scan Band value show
13Digital Satellite Meter
THE PROFESSIONAL EQUIPMENT .................................. USER'S MANUAL
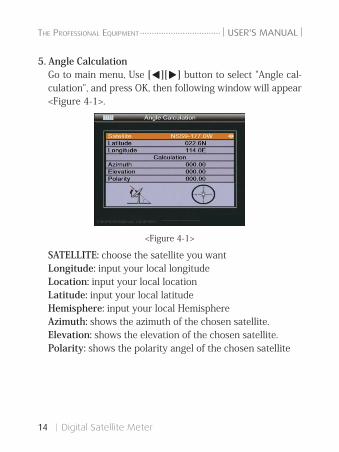
Press [Y ][Z ] choose Scan Band, press [A ][B ] to correct (60/120/180/240/300/360/420/480/540/600MHz)Press [Y ][Z ] choose Search, press OK button, Quick scan shows the spectrum. Show, Press button F4, Display cursor near to satellite parameters, press [A ][B ] move the cursor press MENU, EXIT and Finish.
14 Digital Satellite Meter
THE PROFESSIONAL EQUIPMENT .................................. USER'S MANUAL
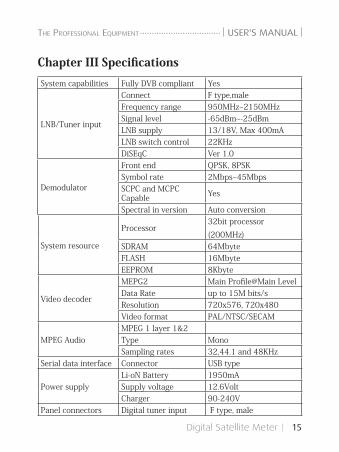
5. Angle CalculationGo to main menu, Use [A ][B ] button to select "Angle cal-culation", and press OK, then following window will appear <Figure 4-1>.
<Figure 4-1>
SATELLITE: choose the satellite you wantLongitude: input your local longitudeLocation: input your local locationLatitude: input your local latitudeHemisphere: input your local HemisphereAzimuth: shows the azimuth of the chosen satellite.Elevation: shows the elevation of the chosen satellite.Polarity: shows the polarity angel of the chosen satellite
15Digital Satellite Meter
THE PROFESSIONAL EQUIPMENT .................................. USER'S MANUAL
Chapter III Specifi cationsSystem capabilities Fully DVB compliant Yes
LNB/Tuner input
Connect F type,maleFrequency range 950MHz~2150MHzSignal level -65dBm~-25dBmLNB supply 13/18V, Max 400mALNB switch control 22KHzDiSEqC Ver 1.0
Demodulator
Front end QPSK, 8PSKSymbol rate 2Mbps~45MbpsSCPC and MCPCCapable Yes
Spectral in version Auto conversion
System resource
Processor32bit processor (200MHz)
SDRAM 64MbyteFLASH 16MbyteEEPROM 8Kbyte
Video decoder
MEPG2 Main Profi le@Main LevelData Rate up to 15M bits/sResolution 720x576, 720x480Video format PAL/NTSC/SECAM
MPEG AudioMPEG 1 layer 1&2Type MonoSampling rates 32,44.1 and 48KHz
Serial data interface Connector USB type
Power supplyLi-oN Battery 1950mASupply voltage 12.6VoltCharger 90-240V
Panel connectors Digital tuner input F type, male
16 Digital Satellite Meter
THE PROFESSIONAL EQUIPMENT .................................. USER'S MANUAL
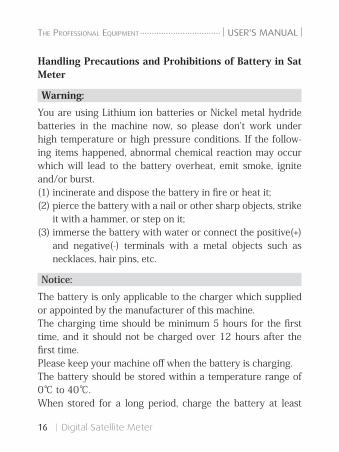
Handling Precautions and Prohibitions of Battery in Sat Meter
Warning:
You are using Lithium ion batteries or Nickel metal hydride batteries in the machine now, so please don't work under high temperature or high pressure conditions. If the follow-ing items happened, abnormal chemical reaction may occur which will lead to the battery overheat, emit smoke, ignite and/or burst.(1) incinerate and dispose the battery in fi re or heat it;(2) pierce the battery with a nail or other sharp objects, strike it with a hammer, or step on it;
(3) immerse the battery with water or connect the positive(+) and negative(-) terminals with a metal objects such as necklaces, hair pins, etc.
Notice:
The battery is only applicable to the charger which supplied or appointed by the manufacturer of this machine.The charging time should be minimum 5 hours for the fi rst time, and it should not be charged over 12 hours after the fi rst time.Please keep your machine off when the battery is charging.The battery should be stored within a temperature range of 0℃ to 40℃.When stored for a long period, charge the battery at least
17Digital Satellite Meter
THE PROFESSIONAL EQUIPMENT .................................. USER'S MANUAL
once per half month so as to prevent over discharge.The battery is expendable.
Handling:
Improper setting of new battery may lead to the battery burst.Please use the battery only supplied by the manufacturer if you want to change a new battery.Please do not put the battery in fi re or dispose it together with garbage.Please contact the waste administrative institute in your place to get the nearest battery collection station.
18 Digital Satellite Meter
THE PROFESSIONAL EQUIPMENT .................................. USER'S MANUAL
MEMO:

THE PROFESSIONAL EQUIPMENT
DIGITAL SATELLITE METER