dfg/tfg 316/320/425/430/435 08.07- - jungheinrich.it · operating instructions 51077668 dfg/tfg...
TRANSCRIPT

Operating Instructions
51077668
DFG/TFG 316/320/425/430/435
G
08.07-
09.08

01
08.G
B
Foreword
The present ORIGINAL OPERATING INSTRUCTIONS are designed to providesufficient instruction for the safe operation of the industrial truck. The information isprovided clearly and concisely. The chapters are arranged by letter. Each chapterstarts with page 1. The page identification consists of a chapter letter and a pagenumber.For example: Page B 2 is the second page in chapter B.
The operating instructions detail different truck models. When operating and servicingthe truck, make sure that the instructions apply to your truck model.
Safety instructions and important explanations are indicated by the followinggraphics:
F Used before safety instructions which must be observed to avoid danger topersonnel.
M Used before notices which must be observed to avoid material damage.
Z Used before notices and explanations.
t Used to indicate standard equipment.
o Used to indicate optional equipment.
Our trucks are subject to ongoing development. Jungheinrich reserves the right toalter the design, equipment and technical features of the truck. No guarantee ofparticular features of the truck should therefore be inferred from the present operatinginstructions.
Copyright
Copyright of these operating instructions remains with JUNGHEINRICH AG.
Jungheinrich Aktiengesellschaft
Am Stadtrand 3522047 Hamburg - GERMANY
Telephone: +49 (0) 40/6948-0
www.jungheinrich.com

01
08.G
B

I 1
07
08.G
B
Table of contents
A Correct Use and Application
B Truck Description
1 Application ........................................................................................... B 1
2 Assemblies and functional description ................................................ B 2
2.1 Truck ................................................................................................... B 3
3 Standard version specifications .......................................................... B 5
3.1 Performance data DFG 316-320 ......................................................... B 5
3.2 Engine Data ........................................................................................ B 12
3.3 Tyres ................................................................................................ B 14
3.4 Mast Versions ..................................................................................... B 15
3.5 EN standards ...................................................................................... B 18
3.6 Operating Conditions .......................................................................... B 18
4 Identification points, warning labels and data plates ........................... B 19
4.1 Truck data plate .................................................................................. B 20
4.2 Truck load diagram ............................................................................. B 20
4.3 Attachment load diagram .................................................................... B 21
C Transport and Commissioning
1 Lifting by crane .................................................................................... C 1
2 Securing the truck during transport. .................................................... C 2
3 Using the truck for the first time .......................................................... C 3
4 Towing the truck .................................................................................. C 3
D Fuelling the Truck
1 Safety regulations for handling fuel ..................................................... D 1
2 Filling with diesel ................................................................................. D 2
3 Replace the LPG bottle ....................................................................... D 3
E Operation
1 Safety regulations for the operation of industrial trucks ...................... E 1
2 Controls and displays .......................................................................... E 3
3 Starting up the truck ............................................................................ E 8
3.1 Daily checks and operations to be performed before starting work .... E 8
3.2 Trucks with reduced headroom X (o) ................................................. E 8
3.3 Adjusting the driver’s seat ................................................................... E 10
3.4 Safety restraint belt ............................................................................. E 11
3.5 Adjust steering column ........................................................................ E 13
3.6 Starting the truck ................................................................................. E 14
3.7 Starting procedure for the TFG ........................................................... E 15
3.8 Starting procedure for the DFG ........................................................... E 16

07
08.G
B
I 2
3.9 Operational Fault Displays .................................................................. E 18
3.10 Stopping the engine1. ......................................................................... E 19
4 Industrial Truck Operation ................................................................... E 20
4.1 Safety regulations for truck operation ................................................. E 20
4.2 Travel .................................................................................................. E 22
4.3 Steering ............................................................................................... E 24
4.4 Braking ................................................................................................ E 24
4.5 Mast and Attachment Operation ......................................................... E 25
4.6 Collecting, transporting and depositing loads ..................................... E 29
4.7 Parking the truck securely ................................................................... E 33
4.8 Towing trailers ..................................................................................... E 35
5 Troubleshooting .................................................................................. E 36
F Industrial Truck Maintenance
1 Operational safety and environmental protection ................................ F 1
2 Maintenance safety regulations .......................................................... F 1
3 Servicing and inspection ..................................................................... F 3
4 DFG/TFG maintenance checklist ........................................................ F 4
5 DFG maintenance checklist ................................................................ F 6
6 TFG maintenance checklist ................................................................. F 7
7 Coolant specification ........................................................................... F 8
8 DFG fuel specifications ....................................................................... F 9
9 Lubrication Schedule ........................................................................... F 10
9.1 Consumables ...................................................................................... F 11
10 Maintenance and repairs ..................................................................... F 13
10.1 Preparing the truck for maintenance and repairs ................................ F 13
10.2 Engine panel ....................................................................................... F 14
10.3 Starting aid .......................................................................................... F 14
10.4 Servicing the engine DFG ................................................................... F 15
10.5 Engine servicing TFG .......................................................................... F 19
10.6 Checking the hydraulic oil level ........................................................... F 22
10.7 Gas system drain tap .......................................................................... F 23
10.8 Checking the coolant level .................................................................. F 24
10.9 Checking the coolant concentration .................................................... F 25
10.10 Filling the cooling circuit ...................................................................... F 25
10.11 Cleaning/replacing the air filter cartridge ............................................. F 26
10.12 DFG/TFG transmission: ...................................................................... F 27
10.13 Brake ................................................................................................... F 28
10.14 Checking the wheel attachments. ....................................................... F 29
10.15 Hydraulic system ................................................................................. F 29
10.16 Clean/replace hydraulic reservoir discharge system ........................... F 29
10.17 Electrical Equipment ........................................................................... F 30
11 Exhaust system ................................................................................... F 34
12 Restoring the truck to service after cleaning or repairs ....................... F 34
13 Decommissioning the industrial truck .................................................. F 34
13.1 Prior to decommissioning: ................................................................... F 34

I 3
07
08.G
B13.2 During decommissioning: .................................................................... F 35
13.3 Returning the truck to operation after decommissioning ..................... F 35
14 Safety checks to be performed at regular intervals and following any unusual incidents .......................................................................... F 36
15 Final de-commissioning, disposal ....................................................... F 36
16 HUSS FS - MK Series Diesel Particle Filter Operating Instructions .... F 37
16.1 Important General Instructions ............................................................ F 37
16.2 Important safety instructions ............................................................... F 37
16.3 Functional description ......................................................................... F 38
16.4 HUSS Control Operation ..................................................................... F 39
16.5 HUSS Control Operating Instructions ................................................. F 40
16.6 Regeneration ....................................................................................... F 41
16.7 Maintenance ........................................................................................ F 44

07
08.G
B
I 4

A 1
08
.07.G
B
A Correct Use and Application
Z The “Guidelines for the Correct Use and Application of Industrial Trucks” (VDMA) aresupplied with the truck. The guidelines form part of these operating instructions andmust be observed. National regulations apply in full.
It must be used, operated and serviced in accordance with the present instructions.All other types of use lie beyond the scope of application and can result in damage topersonnel, the truck or property. In particular, avoid overloading the truck with loadswhich are too heavy or placed on one side. The data plate attached to the truck or theload chart are binding for the maximum load capacity. The industrial truck must notbe used in fire or explosion endangered areas, or areas threatened by corrosion orexcessive dust.
Proprietor responsibilities: For the purposes of the present operator manual the“proprietor” is defined as any natural or legal person who either uses the industrialtruck himself, or on whose behalf it is used. In special cases (e.g. leasing or renting)the proprietor is considered the person who, in accordance with existing contractualagreements between the owner and user of the industrial truck, is charged withoperational duties.The proprietor must ensure that the truck is used only for the purpose it is intendedfor and that danger to life and limb of the user and third parties are excluded.Furthermore, accident prevention regulations, safety regulations and operating,servicing and repair guidelines must be followed. The user must comply with legalrequirements, technical standards and health and safety regulations when operatingan IC engine powered lift truck in closed rooms. The owner must ensure that all truckusers have read and understood these operating instructions.
M Failure to comply with the operating instructions shall invalidate the warranty.The same applies if improper work is carried out on the truck by the customer or thirdparties without the permission of the manufacturer’s customer service department.
Attaching accessories: The mounting or installation of additional equipment whichaffects or enhances the performance of the industrial truck requires the writtenpermission of the manufacturer. In some cases, local authority approval shall berequired.Approval of the local authorities however does not constitute the manufacturer’sapproval.
Trailing and towed loads: The truck may only be used for trailing or towed loads forwhich the truck has been approved.

08
.07.G
B
A 2

B 1
07
08.G
B
B Truck Description
1 Application
The DFG/TFG series are IC engine, 4-wheel rider trucks. The DFG series are dieselengine trucks, while the TFG series are equipped with a petrol engine for LPGoperation.
The DFG/TFG 316-435 is equipped with a hydrodynamic drive system. The left pedalis a combination of crawl speed and brake pedal, and activates the rapid lift functionduring slow travel. The middle pedal is a standard brake as well as emergency brakepedal.
The capacity depends on the model. The model reference indicates the maximumload rating. For example, a DFG/TFG 316 can carry loads of up to 1600 kg and aDFG/TFG 435 loads of up to 3500 kg.
Truck models and maximum capacity:
*) The load diagrams attached to the truck are binding in terms of capacity
Model max. capacity *) Load centre of gravity
DFG/TFG 316 1600 kg 500 mm
DFG/TFG 320 2000 kg 500 mm
DFG/TFG 425 2500 kg 500 mm
DFG/TFG 430 3000 kg 500 mm
DFG/TFG 435 3500 kg 500 mm

07
08.G
B
B 2
2 Assemblies and functional description
Item Description Item Description
1 t Driver’s seat 8 t Fork
2 t Steering column 9 t Fork carriage
3 t Dashboard 10 t Drive axle
4 t Overhead guard 11 t Engine panel
5 t Mast 12 t Steering axle
6 t Load chain 13 t Trailer coupling
7 t Lift cylinder 14 t Counterweight
7
1
2
3
4
9
10
11
1314 12
8
6
5

B 3
07
08.G
B2.1 Truck
Chassis/superstructure: A rigid chassis which protects the units and controls,provides the truck with maximum static safety.
A wide opening panel (11) facilitates service and maintenance work. The hydraulic oilreservoir is integrated on the right-hand side and the fuel tank for the DFG series onthe opposite side in the chassis. The LPG bottle for the TFG series is secured to abracket on the counterbalance weight (14). The exhaust system prevents exhaustgases from entering the driver’s position.
Driver’s position: A non-slip step and a handle on the posts of the overhead guardprovide easy entry and exit. The driver is protected by the overhead guard (4). On thedriver’s seat (1) the seat cushioning and the seat position are adjustable, while thesteering wheel tilt can be set on the steering column (2). Easy operation throughergonomically arranged controls and a practically vibration-proof cab mean that thedriver is only subjected to minimum stress. The controls and warning indicators onthe dashboard (3) provide system monitoring during operation. This results in a veryhigh level of safety.
F Before the truck is started, the overhead guard must be inspected for cracks, and ifdamaged, must be repaired or replaced.
Engine: Silent, water-cooled engines featuring high performance and lowconsumption. In the DFG series diesel engines are used with very clean fuelcombustion under all operating conditions and soot levels below the visibility level.For the TFG series, petrol engines are used with very low residual exhaust levels.
Drive system: A power shift gear with radiator and torque converter is directlyflanged to the engine. This transfers the force to the drive axle (10).
The travel direction switch on the left hydraulic control lever regulates forward/reversetravel and the neutral position.
Steering: The hydrostatic steering consists of a steer cylinder integrated in thesteering axle (12). The steering axle is fully floating in the chassis to ensure excellentgrip even on non-level surfaces.
Brakes: The brake pedal actuates two drum brakes which are applied to the drivewheels. The drum brakes are also actuated by the slow travel / brake pedal, althoughthis is only intended as a crawl speed aid. The pedal should not be used for normalbraking purposes. Worn drum brakes are automatically adjusted. The parking brakeoperates through mechanical actuation of the parking brake lever on the drum brakevia Bowden cables.
Wheels: All wheels are located within the geometry of the truck. A choice of air orsuperelastic tyres is available.

07
08.G
B
B 4
Hydraulic system: The gear pump of the hydraulic system is powered by the enginethrough a power take off. The pump speed and hence the supply flow are controlledby the accelerator pedal through the engine speed.
Hydraulic functions are controlled by the control lever through a multiple control valve.
Electrical system: The 12 volt system consists of a starter battery and a threephasegenerator with integrated controller. A repeat start block prevents incorrect operationduring start-up and a safety switch ensures the engine can only start when the traveldirection switch is in neutral. For diesel motors, a rapid pre-heat system is installed,LPG motors have a non-contact electronic ignition system for rapid and trouble-freeengine starting. The ignition / starter switch is used to switch off the engine.
Mast (5): The aim is to optimize visibility. The maximum strength steel section arenarrow, allowing for good fork visibility in particular with the three-stage mast.The same standard has been achieved for the fork carriage.The mast and the fork carriage run on permanently-lubricated and hencemaintenance-free angled casters.
Attachments: The trucks can be optionally fitted with mechanical and hydraulicattachments.

B 5
07
08.G
B3 Standard version specifications
Z Technical specification details in accordance with VDI 2198. Technical modificationsand additions reserved.
3.1 Performance data DFG 316-320
TFG 316-320 Performance Data
Model DFG 316 DFG 320
Q Capacity 1600 2000 kg
C Load centre of gravity distance 500 500 mm
Travel Speedw/w.o. load
18/19 18/19 km/h
Lift Speedw/w.o. load
0.6/0.62 0.6/0.62 m/s
Lower Speedw/w.o. load
0.55/0.49 0.55/0.49 m/s
Gradeabilityw/w.o. load
23 20 %
Model TFG 316 TFG 320
Q Capacity 1600 2000 kg
C Load centre of gravity distance 500 500 mm
Travel Speedw/w.o. load
18/19 18/19 km/h
Lift Speedw/w.o. load
0.6/0.63 0.6/0.63 m/s
Lower Speedw/w.o. load
0.55/0.49 0.55/0.49 m/s
Gradeabilityw/w.o. load
25 22 %

07
08.G
B
B 6
Performance data DFG/TFG 425-435
Model DFG 425 DFG 430 DFG 435
Q Capacity 2500 3000 3500 kg
C Load centre of gravity distance 500 500 500 mm
Travel Speedw/w.o. load
17/19 18/19 18/19 km/h
Lift Speedw/w.o. load
0.59/0.60 0.53/0.59 0.49/0.53 m/s
Lower Speedw/w.o. load
0.55/0.45 0.55/0.45 0.55/0.42 m/s
Gradeabilityw/w.o. load
27 23 18 %
Model TFG 425 TFG 430 TFG 435
Q Capacity 2500 3000 3500 kg
C Load centre of gravity distance 500 500 500 mm
Travel Speedw/w.o. load
17/19 18/19 18/19 km/h
Lift Speedw/w.o. load
0.5/0.6 0.46/0.55 0.41/0.51 m/s
Lower Speedw/w.o. load
0.55/0.45 0.55/0.45 0.55/0.42 m/s
Gradeabilityw/w.o. load
27 23 19 %

B 7
07
08.G
B

07
08.G
B
B 8
Dimensions DFG
Model DFG 316 DFG 320
a/2 Safety distance 100 100 mm
h1 Mast height retracted 2185 2185 mm
h2 Free lift 150 150 mm
h3 Lift 3300 3300 mm
h4 Mast height extended 3920 3920 mm
h6 Overhead guard height 2145 2145 mm
h7 Seat height (SIP) 1049 1049 mm
L1 Length including forks 3386 3416 mm
L2 Headlength 2236 2266 mm
b1 Overall width 1080 1080 mm
e Fork width 100 100 mm
m1 Ground clearance with load below mast 120 120 mm
m2 Ground clearance centre wheel base 130 130 mm
AstWorking aisle width for pallets 800 x 1200 longit.
3618 3640 mm
AstWorking aisle width for pallets 1200 x 800 transverse
3818 3840 mm
Wa Turning radius 2020 2042 mm
x Load distance 398 398 mm
y Wheel base 1495 1495 mm
Truck weight 2870 3280 kg

B 9
07
08.G
BDimensions
Model DFG 425 DFG 430 DFG 435
a/2 Safety distance 100 100 100 mm
h1 Mast height retracted 2080 2080 2180 mm
h2 Free lift 150 150 150 mm
h3 Lift 2900 2900 3100 mm
h4 Mast height extended 3685 3685 3885 mm
h6 Overhead guard height 2220 2250 2250 mm
h7 Seat Height 1068 1068 1068 mm
L1 Length including forks 3690 3810 3945 mm
L2 Headlength 2540 2660 2795 mm
b1 Overall width 1174 1300 1300 mm
e Fork width 120 125 125 mm
m1 Ground clearance with load below mast 125 125 125 mm
m2 Ground clearance centre wheel base 130 140 140 mm
AstWorking aisle width for pallets 800 x 1200 longit.
4215 4331 4511 mm
AstWorking aisle width for pallets 1200 x 800 transverse
3900 4015 4195 mm
Wa Turning radius 2290 2370 2550 mm
x Load distance 473 515 515 mm
y Wheel base 1685 1685 1785 mm
Truck weight 4290 4730 5098 kg

07
08.G
B
B 10
TFG dimensions
Model TFG 316 TFG 320
a/2 Safety distance 100 100 mm
h1 Mast height retracted 2185 2185 mm
h2 Free lift 150 150 mm
h3 Lift 3300 3300 mm
h4 Mast height extended 3920 3920 mm
h6 Overhead guard height 2145 2145 mm
h7 Seat height (SIP) 1049 1049 mm
L1 Length including forks 3386 3416 mm
L2 Headlength 2236 2266 mm
b1 Overall width 1080 1080 mm
e Fork width 100 100 mm
m1 Ground clearance with load below mast 120 120 mm
m2 Ground clearance centre wheel base 130 130 mm
AstWorking aisle width for pallets 800 x 1200 longit.
3618 3640 mm
AstWorking aisle width for pallets 1200 x 800 transverse
3818 3840 mm
Wa Turning radius 2020 2042 mm
x Load distance 398 398 mm
y Wheel base 1495 1495 mm
Truck weight 2840 3250 kg

B 11
07
08.G
B
Model TFG 425 TFG 430 TFG 435
a/2 Safety distance 100 100 100 mm
h1 Mast height retracted 2080 2080 2180 mm
h2 Free lift 150 150 150 mm
h3 Lift 2900 2900 3100 mm
h4 Mast height extended 3685 3685 3885 mm
h6 Overhead guard height 2220 2250 2250 mm
h7 Seat height 1068 1068 1068 mm
L1 Length including forks 3690 3810 3945 mm
L2 Headlength 2540 2660 2795 mm
b1 Overall width 1174 1300 1300 mm
e Fork width 120 125 125 mm
m1 Ground clearance with load below mast 125 125 125 mm
m2 Ground clearance centre wheel base 130 140 140 mm
AstWorking aisle width for pallets 800 x 1200 longit.
4215 4331 4511 mm
AstWorking aisle width for pallets 1200 x 800 transverse
3900 4015 4195 mm
Wa Turning radius 2290 2370 2550 mm
x Load distance 473 515 515 mm
y Wheel base 1685 1685 1785 mm
Truck weight 4190 4630 4998 kg

07
08.G
B
B 12
3.2 Engine Data
Engine - DFG316 - 320
DFG 425-435 Engine
Model S4Q2 four cylinder
Ignition sequence 1 3 4 2
Capacity 2505 cc
Control speed2350 rpm (without load)680 rpm (idle)
Valve play Inlet and outlet 0.25 mm cold
Oil volume 8.0 l
Tank volume 48 l
Coolant volume 5.5 l + system = 14.0 l
Model S4S four cylinder
Ignition sequence 1 3 4 2
Capacity 3331 cc
Control speed2350 rpm (without load)680 rpm (idle)
Valve play Inlet and outlet 0.25 mm cold
Oil volume 10.0 l
Tank volume 58 l
Coolant volume 5.5 l + system = 15.0 l

B 13
07
08.G
BEngine - TFG 316-320
TFG 425-435 Engine
Model 2.1 L L4 four cylinder, four stroke, LPG
Ignition sequence 1 3 4 2
Capacity 2065 cc
Control speed2700 ±50 rpm (without load)850 ±50 rpm (idle)
Valve play Inlet and outlet 0.38 mm warm
Spark plug type NGH FR2A-D
Spark plug electrode distance 0.8-0.9 mm
Oil volume 3.8 litres
Coolant volume 3.5 litre + system = 13 litres
Model 2.5 L L4 four cylinder, four stroke, LPG
Ignition sequence 1 3 4 2
Capacity 2488 cc
Control speed2700 ±50 rpm (without load)850 ±50 rpm (idle)
Valve play Inlet and outlet 0.38 mm warm
Spark plug type NGH FR2A-D
Spark plug electrode distance 0.8-0.9 mm
Oil volume 3.8 litres
Coolant volume 3.5 litre - system = 13 litres

07
08.G
B
B 14
3.3 Tyres
Z Permissible tyre types: Only use tyres approved by the lift truck manufacturer, if indoubt contact your local JH service branch.
Full rubber SE tyres(= Solid)
DFG/TFG 316 DFG/TFG 320
Drive axle 6.50-10 6.50-10
Steering axle 18x7-8 18x7-8
Pneumatic tyres (diagonal tyres)
DFG/TFG 316 DFG / TFG 320
Drive axle 6-50-10 14PR 6-50-10 14PR
Steering axle 18x7-8 14PR 18x7-8 14PR
Tyre pressure DFG / TFG 316 DFG / TFG 320
Drive axle 10 bar 10 bar
Steering axle 9.0 bar 9.0 bar
Full rubber SE tyres(= Solid)
DFG / TFG 425 DFG / TFG 430 DFG / TFG 435
Drive axle 7.00x12 28x9-15 250x15
Steering axle 6.50x10 6.50x10 6.50x10
Pneumatic tyres (diagonal tyres)
DFG / TFG 425 DFG / TFG 430 DFG / TFG 435
Drive axle 7.00x12 16PR 28x9-15 14PR 250x15 16PR
Steering axle 6.50x10 14PR 6.50x10 14PR 6.50x10 14PR
Tyre pressure DFG / TFG 425 DFG / TFG 430 DFG / TFG 435
Drive axle 10.0 bar 9,0 bar 8,25 bar
Steering axle 10.0 bar 10.0 bar 10.0 bar

B 15
07
08.G
B3.4 Mast Versions
(all dimensions in mm)
DFG/TFG 316/320
Mast table
VDI 3596Description
Lifth3
Free lifth2
Retracted height h1Extended height
h4
ZT
2900 150 1985 3520
3100 150 2085 3720
3300 150 2185 3920
3600 150 2335 4220
3800 150 2435 4420
4000 150 2535 4620
4500 150 2835 5120
5000 150 3085 5620
5500 150 3435 6120
5800 150 3635 6420
ZZ
2900 1290 1940 3550
3100 1390 2040 3750
3300 1490 2140 3950
3600 1640 2290 4250
3800 1740 2390 4450
4000 1840 2490 4650
4500 2140 2790 5150
DZ
4200 1290 1940 4850
4350 1340 1990 5000
4500 1390 2040 5150
4800 1490 2140 5450
5000 1565 2215 5650
5500 1740 2390 6150
6000 1940 2590 6650
6500 2190 2840 7150

07
08.G
B
B 16
DFG/TFG 425/430
Mast table
VDI 3596Description
Lifth3
Free lifth2
Retracted height h1 Extended heighth4
ZT 2900 150 2080 3510
3100 150 2180 3710
3300 150 2280 3910
3500 150 2380 4110
3700 150 2480 4310
4000 150 2630 4610
4300 150 2830 4910
4500 150 2930 5110
4700 150 3030 5310
5000 150 3180 5610
5500 150 3480 6110
5800 150 3630 6410
6000 150 3730 6610
ZZ 2900 1480 2080 3500
3100 1580 2180 3700
3300 1680 2280 3900
3500 1780 2380 4100
3700 1880 2480 4300
4000 2030 2630 4600
4300 2230 2830 4900
4500 2330 2930 5100
DZ 4400 1480 2080 5000
4700 1580 2180 5300
5000 1680 2280 5600
5500 1880 2480 6100
6000 2080 2680 6600
6500 2280 2880 7100
7000 2480 3080 7600

B 17
07
08.G
BDFG/TFG 435
Mast table
VDI 3596Description
Lifth3
Free lifth2
Retracted height h1 Extended heighth4
ZT 3100 150 2180 3870
3500 150 2380 4270
4000 150 2630 4770
4500 150 2930 5270
5000 150 3180 5770
DZ
4700 1417 2180 5463
5000 1517 2280 5763
5500 1717 2480 6263
6000 1917 2680 6763
6500 2117 2880 7263

07
08.G
B
B 18
3.5 EN standards
Noise emission level: 79 dB(A) +/- 3dB (depending on tolerances and equipment)
in accordance with EN 12053 as harmonised withISO 4871.
Z The noise emission level is calculated in accordance with standard procedures andtakes into account the noise level when travelling, lifting and when idle. The soundpressure level is measured at the ear.
MSG 65
Vibration : DFG/TFG 316-320 0.50 m/s2
DFG/TFG 425-435 0.73 m/s2
In accordance with EN 13059.
Z The vibration acceleration acting on the body in the operating position is, inaccordance with standard procedures, the linearly integrated, weighted accelerationin the vertical direction. It is calculated when travelling over bumps at constant speed.
Electromagnetic compatibility (EMC)
The manufacturer confirms that equipment complies withtolerance levels for electromagnetic emissions andresistance as well as static electricity discharge testing inaccordance with EN 12895 including the normativeprocedures contained therein.
Z No changes to electric or electronic components or their arrangement may be madewithout the written agreement of the manufacturer.
3.6 Operating Conditions
Ambient temperature- operating at -20 °C to 40 °C
Z Special equipment and authorisation are required if the truck is to be constantly usedin conditions of extreme temperature or air humidity fluctuations.

B 19
07
08.G
B4 Identification points, warning labels and data plates
Item Description
15 Attention: Read operating instructions.
16 Load fork, Capacity / Load Centre of Gravity / Lift Height diagram
17 “Travel with raised load prohibited” / “Mast forward tilt with raised load prohibited” warning
18 "Attach safety restraint belt" notice
19 Strap points for crane lifting
20 “Procedure when truck in danger of tipover” notice
21 "Do not stand under load handler” / “Do not stand under load handler” / “Risk of trapping when mast extended” combined notice
22 “Maximum body size” notice o
23 Test sticker (o)
24 Jack contact points
25 Serial number, on chassis below the engine cover
26 “Do not carry passengers” warning
27 Data plate, truck, below engine panel (316-320=left; 425-435=right)
24
19
D (mm)
(mm) Q (kg)
24
2115
1718
16
27
19
26
20
23
121110
98
76
54 3 2
1
2000
22
25

07
08.G
B
B 20
4.1 Truck data plate
Z For queries regarding the truck or ordering spare parts always quote the truck serialnumber (29).
4.2 Truck load diagram
The load diagram (16) gives the capacity (Q) of the truck in kg with a vertical mast.The diagram will differ, depending on the height of the mast used. The maximumcapacity is shown as a table with a given load centre of gravity D (in mm) and therequired lift height H (in mm). The truck load diagram shows the truck's capacity withnew forks (as supplied). From a fork length of 1300 mm this means a decrease inload. Trucks supplied without fork tines are given a standard data plate.
Example of how to calculate the maximum capacity:
For a load centre of gravity D of 600 mm and a maximum lift height H of 3600 mm themaximum capacity Q is 1105 kg.
Item Description Item Description
28 Model 33 Manufacturer’s logo
29 Serial no. 34 Net. weight
30 Rated capacity (kg) 35 Load centre of gravity (mm)
31 Output (kW) 36 Year of manufacture
32 Manufacturer 37 Option
28
29
30
31
32
36
35
33
34
37
4250
3600
29001250 1250 850
500 600 700
1105 1105 850
850 850 600
For example:
16
B 21
07
08.G
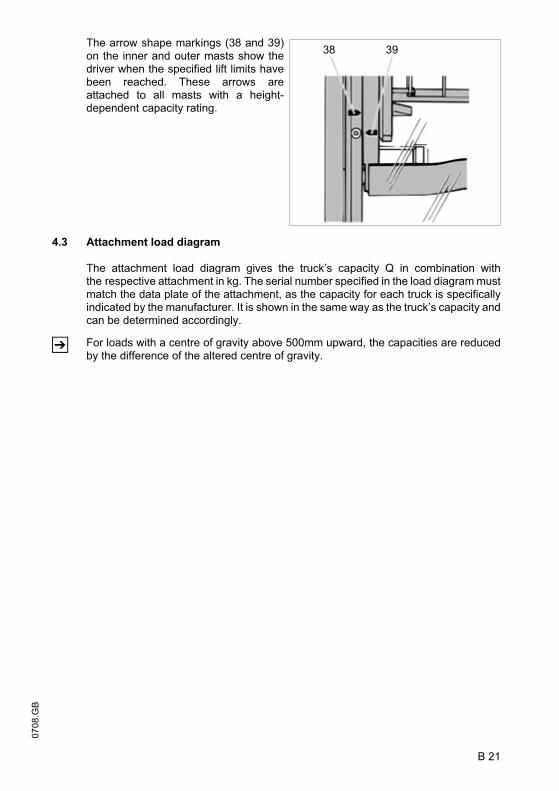
BThe arrow shape markings (38 and 39)on the inner and outer masts show thedriver when the specified lift limits havebeen reached. These arrows areattached to all masts with a height-dependent capacity rating.
4.3 Attachment load diagram
The attachment load diagram gives the truck’s capacity Q in combination withthe respective attachment in kg. The serial number specified in the load diagram mustmatch the data plate of the attachment, as the capacity for each truck is specificallyindicated by the manufacturer. It is shown in the same way as the truck’s capacity andcan be determined accordingly.
Z For loads with a centre of gravity above 500mm upward, the capacities are reducedby the difference of the altered centre of gravity.
38 39

07
08.G
B
B 22

C 1
08
.07.G
B
C Transport and Commissioning
1 Lifting by crane
M Only use lifting gear with sufficientcapacity (for transport weight see truckdata plate).
– Parking the truck securely(see Chapter E).
– Attach the crane slings to the crossmember of the mast (1) and the trailercoupling (2).
M Only suspend crane belts/chains tothe top eye of the counterbalance weightand the eyes of the upper cross member(mast).The mast must be tilted back fully.The crane belt or the chain on the mastmust be at least 2m long.
M Lifting slings should be fastened to the harness in such a way that they do not comeinto contact with any attachments or the overhead guard when it is being raised.
2
1

08
.07.G
B
C 2
2 Securing the truck during transport.
The truck must be securely fastenedwhen being transported on a lorry or atrailer. The lorry / trailer must havefastening rings and a wooden floor.Loading shall be carried out by staffespecially trained for that purpose inaccordance with recommendationscontained in Guidelines VDI 2700 andVDI 2703.
In each case correct measurementsmust be determined and appropriatesafety measures applied.
To secure the truck with the mastassembled, use the eyes on the uppercross member of the mast and the trailerpins. See top picture (fastening withmast assembled) and centre picture(fastening without a mast).
If the truck is to be transported without amast, it must be tied down at the frontover the overhead guard. See centrepicture.
The lower picture shows theapproximate centre of gravity.

C 3
08
.07.G
B3 Using the truck for the first time
F Commissioning and driver instruction must be performed by trained personnel.If several trucks have been delivered, make sure that always the serial numbers ofthe load handlers, masts and basic trucks match each other.
To prepare the truck after delivery or after transport, proceed as follows:
– Make sure the truck’s equipment is complete and in a satisfactory condition.
– Check engine oil level.
– Check power shift transmission oil level.
– Check brake fluid level
– Check battery terminals and acid level.
– Start up the truck in accordance with instructions (see Chapter E).
4 Towing the truck
As the gear unit of the forklift engine is powered, it is not lubricated and will overheatif a truck has to be towed with the engine switched off. To avoid this, the truck canonly be towed at a max. speed of 4 km per hour for a maximum length of 5 km.
Hitch point
A rigid tow bar must be used for movinga forklift truck.
The tow point of the truck is marked (57) .
– Attach the tow bar / rope to the trailer coupling of the recovery vehicle and the truckto be recovered.
– Release the parking brake.
F One person must be seated in the towed truck to steer it. Tow the truck at crawlspeed.
Z As the steering auxiliary unit is not applied, extra effort is required to steer the truck.
56
57

08
.07.G
B
C 4

D 1
08
.07.G
B
D Fuelling the Truck
1 Safety regulations for handling fuel
Before filling up or replacing the LPG bottle, first park the truck securely(see Chapter E).
Fire protection: When handling fuels and LPG, smoking, naked flames and otherignition sources are strictly prohibited in the immediate vicinity. Labels indicating thehazard zone must be positioned where they are clearly visible. It is prohibited to storeflammable materials in this area. Operational fire equipment must be provided withineasy reach of the filling area.
F Only use carbon dioxide dry extinguishers or carbon dioxide gas extinguishers for fireprotection.
Storage and transport: The diesel fuel and LPG storage and transport devices mustcomply with statutory requirements. If there is no filling point available, the fuel mustbe stored and transported in clean, approved containers. The contents must beclearly indicated on the container. Unsealed LPG bottles must be broughtimmediately into the open air, stored in well ventilated areas and the supplier must benotified. Spilled diesel must be set using a suitable agent and disposed of inaccordance with environmental regulations.
Personnel for filling fuel and replacing LPG bottles: Personnel handling LPGmust be have sufficient knowledge of the nature of liquid gases to ensure safeoperation.
Filling up the LPG tank: LPG tanks remain connected to the truck and are filled upat LPG stations. Always follow the instructions of the tank system and LPG tankmanufacturer as well as statutory and local regulations when filling up.
Hose / Pipe break safety device
M Attention: A hose / pipe break safety device must be present when using fluid gas ,to prevent the gas from escaping suddenly if a line fails.
– Use only gas bottles with a hose / pipe break safety device
– The bottle connection to the truck must have a hose / pipe break safety device(available from the factory)
The owner must comply with all legal requirements, technical standards and healthand safety regulations applicable to liquid gas.
F Liquid gas produces frost damage to naked skin.

08
.07.G
B
D 2
2 Filling with diesel
F The truck must only be filled at locationsspecifically designed for this purpose.
– Park the truck securely before fillingup (see Chapter E).
– Open the cap (1).
– Fill up with clean diesel.
Z Do not overfill the tank.
Capacities:
DFG 316 - 320= 48 l
DFG 425 - 435= 58l
M Only use DIN EN 590 diesel with acetane rating above 50.
The fuel gauge (2) indicates the fuellevel. If it points to the red zone, fill thetank. This is also displayed by the spareindicator (1).
M Never allow the fuel tank to run dry!Air in the fuel system will result inmalfunctions.
– Tighten the cap back on after fillingwith fuel.
1
2
1
DFG

D 3
08
.07.G
B3 Replace the LPG bottle
F The LPG bottle must only be replaced at designated areas by trained and authorisedpersonnel.
– Park the truck securely before fillingup (see Chapter E).
– Close the shut-off valve (3) securely.
– Start the engine and allow the LPGsystem to run empty in neutral.
– Unscrew the union nut (4) with anappropriate key while holding againstthe handle (6).
– Remove the hose (5) and immediatelyscrew the valve cap onto the emptyLPG bottle.
– Remove the stop bolt (7) and rotatethe LPG bottle and bracket around thehandle (9).
– Fold back the lever of the toggle-typefastener (8) and unhook thetensioning pivot from the bracket.
– Remove the tensioning belt.
– Carefully remove the LPG bottle fromthe bracket and place it downsecurely.
F Only use 18–kg (29 l) LPG replacementbottles.
– Insert the new LPG bottle in thebracket and turn it so that the neck ofthe shut off valve is facing up.
– Fit the tensioning belt around the LPGbottle.
– Hook in the tensioning pivot andtension the belt with the lever (8).
– Rotate the LPG bottle and the bracketaround the handle (9).
– Press in the stop bolt (7).
– Refit the hose (5) in accordance with regulations.
– Carefully open the shut off valve and check the connection is sealed using a foam-based agent.
3
4
6
5
9

08
.07.G
B
D 4
o “Rotarex” gas limit display operating instructions
Functional description
The gas limit display is a threshold device forthe fluid phase, known as an MLD (MinimumLiquid Detector). The MLD indicates whenthere is just a small amount of gas left inthe container. The remaining travel time willthen depend on the application and ambientconditions. Normally it is 8 - 12 minutes. Thisis then displayed via the spare indicator (2) onthe dashboard.
Z Note: if the container level is low, the spareindicator can briefly light up or flicker due tofluctuations in the liquid gas level producedduring travel. Only when the indicator is permanently lit does this indicate that the tankis almost empty.
M Safety Notices
- All maintenance, assembly and disassembly of the MLD fitting must be carried outsolely by qualified personnel trained in gas systems. Such personnel must havedetailed knowledge of ECE R67-01 and/or Directive 97/23/EC and all standards andregulations referred to therein.
- The user is responsible for the cleanliness of the container used. It must be free ofgrease, metal particles, plastic particles or anything else that could hinder theoperation of the valve.
- The MLD must not be subjected to impacts or other mechanical effects. It isprohibited to continue using bent or otherwise damaged fittings.
- It is prohibited to approach the Propane/Butane installation with fire or a nakedflame
- The markings on the fitting must not be removed or altered.
- All users must strictly observe national and regional regulations on assembling andusing Propane/Butane gas valves.
- The user is responsible for all accidents and material or non-material, direct andindirect damage caused by improper handling and servicing or non-authorised use.

D 5
08
.07.G
BReusable LPG bottles with central filling device
F Refillable liquid gas bottles contain adispensing valve (10), a filling stopvalve (11), a relief valve (12) and a leveldisplay (13). To fill the tank close thedispensing valve, unscrew the cover ofthe filling stop valve and insert thenozzle of the LPG pump into the fillingport. The filling stop valve automaticallystops the gas from being filled when thebottle reaches the maximum level.At filling, screw the lid back on. Observeany guidelines or regulations on fillingLPG bottles that are attached to theLPG pump.
Z Safety notices :
- Do not carry out any work on the tank.Repairs must only be carried out by trained personnel
- The user must always check the fittings for damage and wear before using the tank
- The tank and the fittings must be checked regularly for physical damage, corrosionand other damage in accordance with the regulations of the country of use.
Lift trucks with two LPG bottles
F A twin LPG bottle container may only be used if the truck is equipped with anoperational reverse camera system and outer mirrors on both sides.
Z A supply valve is also attached to the unit in addition to the shutoff valves on both gasbottles. This valve can be used to select from which of the two bottles the gas is to betaken. The two bottles cannot be used together.
M Close both shutoff valves on the gas bottles to interrupt the supply of gas.
1110 12
13

08
.07.G
B
D 6

E 1
03
.08.G
B
E Operation
1 Safety regulations for the operation of industrial trucks
Permission to operate: The industrial truck may only be used by suitably trainedpersonnel, who have demonstrated to the proprietor or his representative that theycan drive and handle loads and have been authorised to operate the truck by theproprietor or his representative.
Driver’s rights, obligations and responsibilities: The driver must be informed ofhis duties and responsibilities and be instructed in the operation of the truck and shallbe familiar with the operator manual. He shall be afforded all due rights. Safety shoes must be worn for pedestrian operated trucks.
Prohibition of unauthorized use: The driver is responsible for the truck during thetime it is in use. The driver must prevent unauthorised persons from driving oroperating the truck. Do not carry passengers or lift other people.
Damage and faults: The supervisor must be immediately informed of any damageor faults to the industrial truck or attachment. Trucks which are unsafe for operation(e.g. wheel or brake problems) must not be used until they have been rectified.
Repairs: The driver must not carry out any repairs or alterations to the industrial truckwithout the necessary training and authorisation to do so. The driver must neverdisable or adjust safety mechanisms or switches.
Dangerous area: A hazardous area is defined as the area in which a person is at riskdue to truck movement, lifting operations, the load handler (e.g. forks or attachments)or the load itself. This also includes areas which can be reached by falling loads orlowering operating equipment.
F Unauthorised persons must be kept away from the hazardous area. Where there isdanger to personnel, a warning must be sounded with sufficient notice.If unauthorised personnel are still within the hazardous area the truck shall bebrought to a halt immediately.
Safety devices and warning signs: Safety devices, warning signs and warninginstructions shall be strictly observed.
M Trucks with reduced headroom are equipped with a warning sign within the driver'sline of sight. The max. recommended body size indicated on this sign must beobserved.

03
.08.G
B
E 2
1
2
3 5
4 2 49
7 8
6
1 3 5 7
6
15 14 13 12 11 10 14 12 11 10
1716
18
19
20
21
22
26 25 24 23
29
28
27

E 3
03
.08.G
B2 Controls and displays
Item Control /Display Function
1 Air filter indicator tWhen lit, indicates that the air filter is contaminated.
2 Engine oil pressure indicator tWhen lit, indicates insufficient engine lubricant oil pressure.
3 Charging current indicator tWhen lit, indicates that the battery is not charged.
4Transmission oil temperature indicator
t
When lit, indicates that the transmission oil temperature is too high.
5 Parking brake indicator tWhen lit, indicates that the parking brake is applied.
6 Fuel supply indicator (DFG) tWhen lit, indicates the fuel supply is too low.
7 Brake fluid indicator tWhen lit, indicates the brake fluid level is too low.
8 Soot filter indicator tLights up to indicate that the soot filter is clogged.
9 Diesel filter indicator tLights up to indicate that the diesel filter is clogged.
10 Coolant temperature indicator t Indicates the coolant temperature.
11 Time / Service hour display tIndicates the time or number of service hours operated.
12 Indicator control light t Shows the indicator status (right/left).
13 Preheat control light (DFG) tIndicates the cold start mechanism is operating.
14 Neutral position t
Lights up to indicate that the travel direction switch is in neutral (see Neutral Interlock in this chapter)
15 Fuel display (DFG) tIndicates how much fuel is left in the tank.

03
.08.G
B
E 4
1
2
3 5
4 2 49
7 8
6
1 3 5 7
6
15 14 13 12 11 10 14 12 11 10
1716
18
19
20
21
22
26 25 24 23
29
28
27

E 5
03
.08.G
B
Item Control /Display Function
16 Parking brake lever t
Applies / releases parking brake.
To engage, turn switch to position 1.
To release, turn switch to position 0.
Pull up lever to engage.
Push lever forward to release.
17 Steering wheel t Steers truck in desired direction.
18Steering column adjusting lever
t Adjusts the steering column tilt.
19 Ignition / starter switch t
Switches power supply on and off.Starts and stops the engine. Removing the ignition key prevents the truck from being switched on by unauthorised personnel.
20 Options switch t Options
21 Brake pedal Standard emergency braking
22 Accelerator pedal tControls engine speed / travel and lift speed.
23 Auxiliary hydraulics (ZH2) o Used for hydraulic attachments.
24 Auxiliary hydraulics (ZH1) o Used for hydraulic attachments.
25 Mast tilt control lever t
Tilts the mast forward and backward. To tilt the mast forward: push the lever forward.To tilt the mast backward: pull the lever back.
26 Lift/lower control lever t
Raises and lowers the fork carriage
To raise the fork carriage: pull the lever back.To lower the fork carriage: push the lever forward.
27 Horn button t Triggers an audible warning.
28 Travel direction switch t Select the travel direction.
29 Slow travel / brake pedal t1st range: controls slow travel.2nd range: applies service brake.

03
.08.G
B
E 6
t Travel direction switch
Z When the travel direction switch (28) isin the central position, the transmissionis in idle.
– To select the forward gear, pushthe switch forward.
– To select the reverse gear, pushthe switch back.
Z The engine will not start if a traveldirection is pre-selected.
o Aisle selector (option) attachedto steering column
The standard aisle selector at-tached to the right of the driver'sseat can optionally be replaced byan aisle selector attached to thesteering column (30).
Z When the aisle selector (30) is in thecentre position, the transmission isin idle.
– To select forward gear, push thelever forward.
– To select reverse gear, push thelever back.
Z The engine will not start if a travel direction is pre-selected.
Neutral Interlock
If the truck is abandoned without taking it out of gear, the truck is automatically set toneutral. This is shown by the neutral indicator in the dashboard. When travel isresumed (by sitting on the truck), the travel direction switch must be set to neutral (N).Travel can now resume.
28
30

E 7
03
.08.G
BHeating and Fan
– Turn the thermostat controlbutton (31) anti-clockwise to increasethe temperature in the driver’s cab.
– Press the switch (30) to activatethe fan.
Horn
– To activate the horn press the warningbutton (27) in the hydraulic lever.
30
31
27

03
.08.G
B
E 8
3 Starting up the truck
F Before the truck can be started, operated or a load lifted, the driver must ensure thatthere is nobody within the hazardous area.
3.1 Daily checks and operations to be performed before starting work
Truck
– The entire truck (in particular wheels and load handler) must be inspected fordamage.
– Make sure the load chains are evenly tensioned.
– Check the operation of the seat belt buckle and the belt returning to the retractor.For further information see section 3.3.
3.2 Trucks with reduced headroom X (o)
M Failure to observe the recommendedbody size can cause stress andendanger the driver and may lead tolasting ill health due to an unhealthyposture and excessive strain on thedriver.The owner must ensure that truckoperators do not exceed the max. bodysize indicated.In addition the owner must check thatthe driver’s used can sit in an uprightposition without having to strain.

E 9
03
.08.G
B
Z Covers may need to be opened for the inspection.
Checking the fuel supply - DFG
– Set the ignition / starter key (19) tothe “I” position.
– Read off the fuel supply from the fuelgauge (15).
– If necessary, add diesel (seeChapter D).
o Testing the windscreen fluid level
– The windscreen wiper fluidcontainer (32) is located at the rearright spar (33) of the cabin.
– Make sure there is sufficientwindscreen fluid in the container.Top up if required.
– Use a windscreen fluid with anti-freeze solution.
Wheels and Tyres
– Check wheels and tyres for wear (seeChapter F). Measure the tyre pressure (pneumatic tyres only) (see Chapter B).
15
19
32
33

03
.08.G
B
E 10
3.3 Adjusting the driver’s seat
Standard seat MSG 65
To achieve optimal seat damping the driver’s seat must be adjusted according tothe driver’s weight.
Adjusting the seat to the driver's weight:
– Sit on the driver’s seat. When the correct weight adjustment has been made,the arrow of the driver weight display (37) will be above the calibration line.If the arrow is facing too far to the left or right, the seat must be adjusted tothe driver's weight.
– To do this, move the weight adjustment lever (36) approx. 90° forward.
– To set the seat to a lesser weight, push the weight adjustment lever (36) down.
– To set the seat to a greater weight, push the weight adjustment lever up.
– After adjusting, return the lever to its original position.
Adjusting the backrest incline:
– Sit on the driver’s seat.
– Lift up the backrest tilt adjuster (34) and adjust the incline of the backrest.
– Release the backrest tilt adjuster (34) to lock the backrest in position.
Adjusting the seat position:
– Pull up the longitudinal adjuster (35) and push the driver’s seat forwards orbackwards to the desired position.
– Engage the longitudinal adjuster (35) in position again.
F The longitudinal adjuster must be securely located in the desired position.The driver’s seat setting must not be changed during travel.
34
35
36
37

E 11
03
.08.G
B3.4 Safety restraint belt
The driver must check the operation and condition of the seat belt every day beforeusing the industrial truck. Faulty operation can only be detected in good time throughregular inspection.
F Put on the safety restraint belt each time before starting the industrial truck. The belt protects against serious injury.
Protect the belt from contamination (e.g. cover it when the truck is idle) and clean itregularly. Frozen belt locks or pulleys must be thawed out and dried to prevent themfrom freezing up again.
Z The dry temperature of the warm air should not exceed +60 °C.
F Do not alter the belt setting. This will increase the risk of malfunctioning.
– Always replace the safety restraint belt after an accident.
– Only original spare parts must be used for retrofits or repairs.
F Damaged or non-operational belts must only be replaced by contractual dealers orbranches.
– Pull out the belt completely and check for fraying
– Test the belt buckle and make sure the belt returns correctly into the retractor.
Check the cover for damage
Testing the automatic blocking system:
– Park the truck on a horizontal surface
– Pull out the belt with a jerk.
M The automatic system should lock the belt in the retractor.
– Open the engine bonnet approx. 30 degrees
M The automatic system should lock the belt in the retractor.
Starting the industrial truck on steep slopes
The automatic blocking system locks the belt in the retractor when the truck ispositioned on a steep slope. This prevents the belt from being pulled out of theretractor.
Z Carefully drive the truck off the slope and then put on the belt.

03
.08.G
B
E 12
How to act in unusual situations
F If the truck is about to tip over, neverundo the restraint belt and try to jumpout.This will only increase the risk of injury.
Correct procedure:
– Lean your upper body over thesteering wheel.
– Grip the steering wheel with bothhands and brace feet.
– Lean your body against the oppositedirection of fall

E 13
03
.08.G
B3.5 Adjust steering column
– Release the steering column adjustinglever (18) in the direction of thearrow (L).
– Tilt the steering column (38) forwardor backward as required.
– Push the steering column adjustinglever in the direction of the arrow (F).
F
L
38
18

03
.08.G
B
E 14
3.6 Starting the truck
Before starting the truck
If the engine has not been run for several weeks or if the oil filter has been changed,start the engine (see section 3.7 or 3.8) and leave it to run in idle for a few minutesbefore starting.
Start the engine
F The truck should only be operated from the driver’s seat.
– Apply the parking brake.
Z Set the travel direction switch (28) to neutral N.
Z The engine will only start when the travel direction switch is in neutral.
Z Starting procedure for the TFG (see section 3.7)Starting procedure for the DFG (see section 3.8)
Key operated ignition
Operation:
O - All main circuits are cut outand the key can be removed.
I - Controls and instruments areswitched on. Enginepreheating (diesel only).
II - Starting the engine(automatically returns to the Iposition).
28

E 15
03
.08.G
B3.7 Starting procedure for the TFG
F Note the safety regulations forhandling liquid gas (see Chapter D,section 1).
– Slowly open the shutoff valve onthe LPG bottle.
– Put the key in the ignition / starterswitch (19).
– Set the ignition / starter key tothe “I” position.
– Press the horn button (27) andtest the horn.
The charging current (3), engine oilpressure (2), neutral setting (14)and parking brake (5) indicatorslight up.
– Gently apply the acceleratorpedal (22).
– Set the ignition / starter key nowto the II position.
M Only apply the starter for amaximum of15 seconds withoutinterruption. Before starting again,wait 30-60 seconds and reset theignition / starter switch to 0.
– Release the key as soon as theengine starts. It automaticallyreturns to the I position.
F When working with LPG trucks it isessential to always observe thefollowing safety regulations.
If a truck will not start:
– Close the gas bottle shutoff valve.
– Turn off the ignition / starter O.
– Call for a trained, authorised customer service engineer.
M All indicators lights except for neutral setting (14) and parking brake (5) should go outas soon as the engine starts. If not, stop the engine immediately and rectify the fault.
14
3 52
27
2219

03
.08.G
B
E 16
3.8 Starting procedure for the DFG
– Put the key in the ignition / starterswitch (19).
– Set the ignition / starter key to the“I” position.
– Press the horn button (27) andtest the horn.
– After setting the ignition /starter (19) to the I position,the charging current (3), engineoil pressure (2), neutralsetting (14) and parking brake (5)indicators and the preheat (13)control light will light up.
– Apply the accelerator pedal (22)fully and wait until the preheatcontrol light goes out.
Z The preheat time depends on theengine temperature, but normallylasts approx. 4 seconds.
– Set the ignition / starter key nowto the II position.
M Only apply the starter for amaximum of15 seconds withoutinterruption. Before starting again,wait 30-60 seconds and reset theignition / starter switch to 0.
– Release the key as soon as theengine starts. It automaticallyreturns to the I position.
M All indicators lights except forneutral setting (14) and parking brake (5) should go out as soon as the engine starts.If not, stop the engine immediately and rectify the fault.
14
3 52
22
27

E 17
03
.08.G
B
F After starting the engine, carryout a test run and check thefollowing functions:
– Test the parking brake (16)and the slow travel /brakepedal (29+21).
– Test the engine speed withthe accelerator pedal (22)over a range of speedswhile checking the freedomof movement of the pedal.
– Test the operation of theraise/lower (26), tilt (25) andif applicable the attachmenthydraulic control functions.
– Turn the steeringwheel (17) as far as it willgo in both directions andtest the steering.
M Do not run up the engine inidle. The engine soon reachesoperating temperature at amoderate charge and whenthe speed alternates.Only fully charge the enginewhen the engine coolanttemperature display (10)shows operating temperature.
The truck is ready foroperation once all thefunctional controls have beensatisfactorily performed andoperating temperature isreached.
22
26
25
17
10
03
.08.G
B
E 18
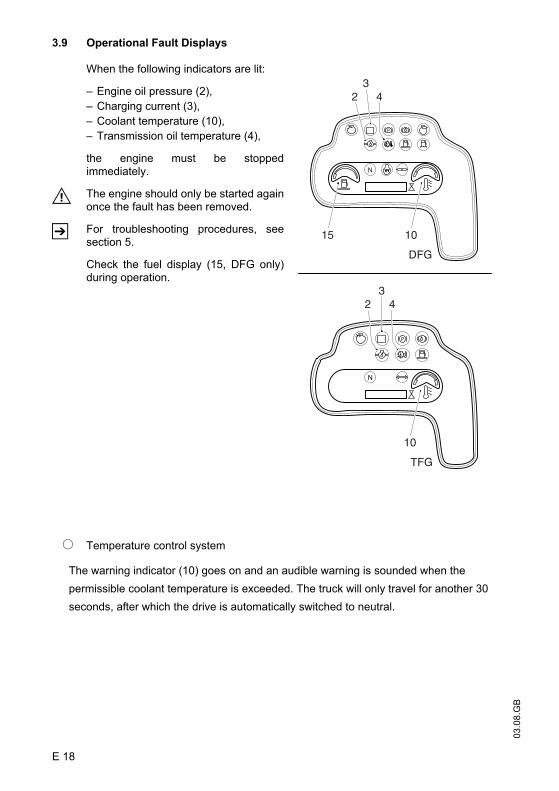
3.9 Operational Fault Displays
When the following indicators are lit:
– Engine oil pressure (2),
– Charging current (3),
– Coolant temperature (10),
– Transmission oil temperature (4),
the engine must be stoppedimmediately.
M The engine should only be started againonce the fault has been removed.
Z For troubleshooting procedures, seesection 5.
Check the fuel display (15, DFG only)during operation.
o Temperature control system
The warning indicator (10) goes on and an audible warning is sounded when the
permissible coolant temperature is exceeded. The truck will only travel for another 30
seconds, after which the drive is automatically switched to neutral.
1015
23
4
10
32 4

E 19
03
.08.G
BAs soon as the permissible coolant temperature is exceeded, proceed as follows:
- Remove the truck from the hazardous area if necessary
- Lower the fork carriage and load securely- Switch the drive to neutral and apply the parking brake- Run the engine at a slightly higher speed (to improve the cooling effect of the fan)
until the temperature drops back to the normal level.
Z If the temperature does not drop, park the truck securely, switch the engine off andhave the truck examined
M Attention: In each case the cause of the overheating must be established andrectified by a trained and authorised customer service engineer.
Z Note: In acutely hazardous situations, after the 30 second residual travel period,the truck can be operated again for a further 30 seconds by switching off the ignitionand starting the engine again.
3.10 Stopping the engine1.
M Do not stop the engine fromfull charge. Instead, let it runfor a short while to allow thetemperature to compensate.
– Stop the truck.
– Set the travel directionswitch (28) to neutral.
– Apply the parkingbrake (16).
– Turn the ignition / starterswitch (19) to the 0position.
16
19
28

03
.08.G
B
E 20
4 Industrial Truck Operation
4.1 Safety regulations for truck operation
Travel routes and work areas: Only use lanes and routes specifically designated fortruck traffic. Unauthorised third parties must stay away from work areas. Loads mustonly be stored in places specially designated for this purpose.
Driving conduct: The driver must adapt the travel speed to local conditions.The truck must be driven at slow speed when negotiating bends or narrowpassageways, when passing through swing doors and at blind spots. The driver mustalways observe an adequate braking distance between the industrial truck andthe vehicle in front and must be in control of the truck at all times. Abrupt stopping(except in emergencies), rapid U turns and overtaking at dangerous or blind spots arenot permitted. It is forbidden to lean out of or reach beyond the working and operatingarea.
Travel visibility: The driver must look in the direction of travel and must always havea clear view of the route ahead. Loads which affect visibility must be positioned atthe rear of the truck, or else the truck must reverse. If this is not possible, a secondperson must walk in front of the truck as a lookout.
Negotiating slopes and inclines: Negotiating slopes or inclines is only permitted ifsuch roads are clean and have a non-slip surface and providing such journeys aresafely undertaken in accordance with the technical specifications for the truck inquestion. The truck must always be driven with the load unit facing uphill.The industrial truck must not be turned, operated at an angle or parked on inclines orslopes. Inclines must only be negotiated at slow speed, with the driver ready to brakeat any moment.
Negotiating lifts and docks: Lifts and docks must only be used if they have sufficientcapacity, are suitable for driving on and authorised for truck traffic by the owner.The driver must satisfy himself of the above before entering these areas. The truckmust enter lifts with the load in front and must take up a position which does not allowit to come into contact with the walls of the lift shaft.Persons riding in the lift with the industrial truck must only enter the lift after the truckhas come to a rest and must leave the lift before the truck.
Nature of loads to be carried: The operator must make sure that the load is in asatisfactory condition. Do not carry loads unless they are positioned safely andcarefully. Use suitable precautions, e.g. a load guard, to prevent parts of the load fromtipping or falling down.

E 21
03
.08.G
BTowing trailers: see chapter 4.8, page E35.
F Exhaust emissions: The truck must only be operated in well ventilated areas. If thetruck is operated in enclosed areas, this can lead to a build-up of harmful exhaustemissions, resulting in dizziness, tiredness and even death.
M The user must comply with legal requirements, technical standards and health andsafety regulations when operating an IC engine powered lift truck in closed rooms.
Emergency Disconnect with truck electronic system deactivation: All electricalfunctions are switched off.
Set the key switch to the O position. For trucks with a cabin or a canvas top the doorsmust be open. Press the pushbutton in the leg area. The engine panel opens, removeblue quick release lock from the battery pool.
F For gas operated trucks the shutoff valve on the gas tank or gas bottle must betightened to prevent the gas from entering the engine area.

03
.08.G
B
E 22
4.2 Travel
F Adapt the travel speed to the conditions of the travel lane, the work area and the load
– Set the travel direction switch (28) to neutral.
– Raise the fork carriage approx. 200 mm so that the fork tines are clear ofthe ground.
– Tilt the mast fully backward:
– Release the parking brake.
Forward travel
– Set the travel direction switch (28) forward.
– Slowly apply the accelerator pedal (22) until you reach the required travel speed.
Changing direction
M Only change direction when the truck has stopped.
– Set the travel direction switch (28) via neutral to the required direction.
– Slowly apply the accelerator pedal (22) until you reach the required travel speed.
Reversing
F Make sure you have sufficient space toreverse into.
– Set the travel direction switch (28) tothe rear.
Accelerating
– Slowly apply the acceleratorpedal (22) until the truck starts tomove.
– Continue to depress the accelerator.The engine and travelspeedsincrease.
Slowing down the truck
F The braking pattern of the truck dependsto a large extent on the condition of theground. The driver must take this intoconsideration when handling the truck.Carefully brake the truck to preventthe load from slipping.
21
2922
28

E 23
03
.08.G
BBraking
- Take your foot off the accelerator pedal (22).
- Depress the brake pedal (21).
Slow travel with the slow travel / brake pedal
Sensitive application of the slow travel / brake pedal (29) allows for excellent shuntingin confined areas and rapid lifting at a slow travel speed.
The slow travel / brake pedal can also actuate the drum brakes but this is onlyintended as a crawl speed aid. The pedal should not be used for normal brakingpurposes
M This operating mode can only be used for max. 5 seconds when the engine isrunning at high speed.
o Speed reduction
Speed reduction restricts the maximum speed to a predefined level. For example,it could be set to the maximum speed permissible on the company premises. At first,the full engine speed and performance are available when the truck is in idle andaccelerating. When a certain speed threshold is exceeded the engine speed isbrought back to the required level.
The maximum speed is factory set and can be adjusted by trained and authorisedcustomer service personnel.
o Reversing Block
The reversing block reduces the stress and hence wear on the powertrain andthe tyres. Two functions are essentially fulfilled:
The travel direction can only be changed (reversing) if the lift truck is travelling at lessthan 3 km/h. If the driver attempts to change direction without braking at a fasterspeed, the system automatically activates idle speed. The required travel level canonly be applied when the speed is reduced accordingly.
The drive cannot be set from neutral to travel if the engine is more than 300 rpmabove idle speed. Travel is only activated when the speed falls below this limit.
03
.08.G
B
E 24
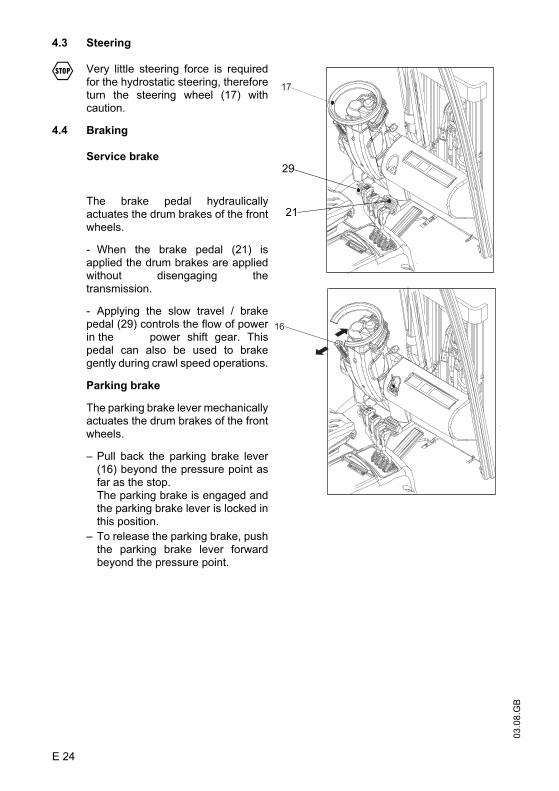
4.3 Steering
F Very little steering force is requiredfor the hydrostatic steering, thereforeturn the steering wheel (17) withcaution.
4.4 Braking
Service brake
The brake pedal hydraulicallyactuates the drum brakes of the frontwheels.
- When the brake pedal (21) isapplied the drum brakes are appliedwithout disengaging thetransmission.
- Applying the slow travel / brakepedal (29) controls the flow of powerin the power shift gear. Thispedal can also be used to brakegently during crawl speed operations.
Parking brake
The parking brake lever mechanicallyactuates the drum brakes of the frontwheels.
– Pull back the parking brake lever(16) beyond the pressure point asfar as the stop. The parking brake is engaged andthe parking brake lever is locked inthis position.
– To release the parking brake, pushthe parking brake lever forwardbeyond the pressure point.
29
21

E 25
03
.08.G
B4.5 Mast and Attachment Operation
F The control levers must only be operated from the driver’s seat.
The lifting device is operated from the control levers on the right-hand side ofthe driver's seat.
Lifting/lowering the fork carriage
F Never reach through the mast!
– Pull the control lever (26) back to raisethe fork carriage.
– Push the control lever (26) forward tolower the fork carriage.
Tilting the mast forward / backward
F When tilting the mast back, do notposition any part of your body betweenthe mast and the front wall.
– Pull the control lever (25) back to tiltthe mast back.
– Push the control lever (25) forward totilt the mast forward.
o Operating Attachments
Auxiliary hydraulics ZH1
The auxiliary hydraulics ZH 1 (controllever 24) can be used to controlhydraulic attachments (e.g. sideshift).They are applied by pressing the leverforward or pulling it back.
Auxiliary hydraulics ZH2
The auxiliary hydraulics ZH2 (e.g. for fork positioners) are operated like ZH1 byapplying the control lever (23).Refer also to the manufacturer’s operating instructionswhen operating an attachment.
26
25
24
23

03
.08.G
B
E 26
Auxiliary hydraulics ZH3
Use button (1) to toggle control lever (23) from ZH2 to ZH3.
To activate ZH3, press button (1) when thecontrol lever is in the neutral position andapply the lever. When the button isdepressed, ZH3 is permanently activated. Ifthe button is released after moving thecontrol lever out of its neutral position, ZH3will only remain activated until the controllever is restored to the neutral position. Totoggle back from ZH2 to ZH3 press thebutton again.

E 27
03
.08.G
BOperating the integrated sideshift (ISS)
The integrated sideshift allows the fork carriage to be moved to the side.Sideshift left(as seen by driver):
– Push the control lever (24) forward.
Sideshift right (as seen by driver):
– Pull the control lever (24) back.
Integrated fork positioner
The integrated fork positioner allows the distance between the forks to be set.Pushing the lever (23) forward opens the forks, pulling the lever back closes them.If the forks are no longer even, the fork positioner can be re-synchronised. To do this,open the forks as far as the stop and close them again.
Other Attachments
Always follow the manufacturer’s operating instructions when using otherattachments.
The control levers of the attachments are indicated by symbols to show the functionof the attachment.
M Attention: Only use attachments that have CE approval. The reduced residualcapacity must be re-calculated and indicated by a separate capacity plate.
F Note reduced capacity for extending (see Chapter B).

03
.08.G
B
E 28
Controlling the speed of thelifting device
Moving the control lever andchanging the engine speed governsthe operating speed of the hydrauliccylinders.
When the control levers arereleased (23, 24) they automaticallyrevert to neutral and the liftingdevice remains in the position it hasreached.
M Always apply the control leversensitively, never with a suddenjerk. Release the control lever assoon as you reach the stop.
– Set the travel direction switch(28) to neutral.
– Increase the engine speed withthe accelerator pedal (22) and
– Keep moving the control leverback to increase the speed of thelifting device.
Z The engine speed does not affectthe lowering speed of the forkcarriage.
24
23
28
22

E 29
03
.08.G
B4.6 Collecting, transporting and depositing loads
F The control levers must only be operated from the driver’s seat.
M Before collecting a load, the driver must ensure that it is correctly palletised and thatthe capacity of the truck is not exceeded.Note the load chart
Adjusting the forks
F Adjust the fork tines in such a way thatboth are equally distanced from theouter edge of the fork carriage and theload centre of gravity is in the middle ofthe fork tines.
– Raise the locking lever (39).
– Push the forks (40) into the correctposition on the fork carriage (41).
– Turn the locking lever down and movethe forks until the locking pin engagesin a slot.
40
41
39

03
.08.G
B
E 30
Lifting loads
F Do not lift other people with the liftingdevice.
– Carefully approach the load to belifted.
– Set the travel direction switch (28) toneutral.
– Raise the forks to the correct height forthe load.
– Set the mast vertical.
– Set the travel direction switch toforward travel.
F At least two thirds of their length mustextend into the load.
– Drive the truck with forks spread as farapart as possible underneath the load.
– Set the travel direction switch (28) to neutral.
– Raise the fork carriage until the load rests freely on the forks.
– Set the travel direction switch to reverse.
– Make sure you have enough space to reverse into.
– Reverse carefully and slowly until the load is outside the storage area.
F Do not allow anyone to standunderneath a raised load.
28

E 31
03
.08.G
B– Lower the load as far as is absolutely
necessary for transport (groundclearance approx. 150...200 mm).
– Tilt the mast fully backward:
F The higher the load is transported, theless the operating safety of the truck.
Transporting loads
If the load is stacked up so high that itaffects forward visibility, you mustreverse.
– Gently accelerate with the acceleratorpedal (22) and slowly brake with theslow travel / brake pedal (29). Beready to brake at all times.
– Adapt your travel speed to theconditions of the route and the loadyou are transporting.
– Watch out for other traffic at crossingsand passageways.
– Always travel with a lookout atblindspots.
F On slopes and inclines always carry theload facing uphill, never approach at anangle or turn.
22
29

03
.08.G
B
E 32
Depositing a load
– Drive the truck carefully up to the rack.
– Set the travel direction switch (28) toneutral.
– Raise the forks to the correct height forthe rack space.
– Set the travel direction switch (28) toforward. Carefully enter the load intothe rack space.
– Slowly lower the load until the forksare free.
– Set the mast vertical.
M Avoid placing the load down suddenly toavoid damaging the load and the loadhandler.
Handling individually suspended loads
Travel at max. crawl speed when transporting suspended loads. For operationsinvolving suspended loads, the safety of the truck must be individually assessed by aspecialist.” The capacity is reduced by at least 1/3.
28

E 33
03
.08.G
B4.7 Parking the truck securely
F When you leave the truck it must besecurely parked even if you only intendto leave it for a short time.Never park and abandon a truck with araised load.
– Drive the truck onto a level surface.
F LPG powered trucks must not beoperated on ground floors with abasement.Liquid gas is colourless, heavier than airand does not easily dissipate. It tends tosink to the lowest possible level and cancollect in pits, drains, basements andother recesses.This means that LPG gas can gather in areas far away from the truck and constitutesa hazard for people who are unaware of the potential risks from explosions andfrostbite.
– Fully lower the forks and tilt the mast forward.
– Set the travel direction switch (28) to neutral.
– Apply the parking brake lever (16).
28
16

03
.08.G
B
E 34
Stopping the engine DFG
– Set the ignition / starter switch (19)to “0”.
– Remove the key from the ignition /starter switch (19).
Stopping the engine TFG
– Close the shut-off valve (42) of theLPG bottle securely.
– Wait until the engine comes to a stop.
– Turn the ignition / starter switch (19)to “0”.
– Remove the key from the ignition /starter switch (19).
M If the ignition key is set to “0” whilethe engine is running, the engine willcontinue to run for a short time. Thisensures that the remaining gas in thelines between the engine and theautomatic shutoff valve of the gassystem is used up.
o Steel cab
For trucks fitted with a steel cabin, bothdoors can be closed.
– To unlock the cabin door turn the keyanti-clockwise.
– To lock the cabin door turn the keyclockwise.
– To open the cabin door, unlock thedoor and remove the handle (43).
19
42
43

E 35
03
.08.G
B4.8 Towing trailers
The truck is designed only for occasional towing of trailers within commercialpremises.
The max. tow load is the capacity indicated on the capacity plate (see decals diagramon page B21).
The tow load consists of the weight of the trailer and the capacity load.
If a load is transported on the forks, the tow load must be reduced by the sameamount.
F Important instructions for safe towing:
– The truck must only be used for occasional towing operations. It must not becontinually operated with trailers.
– No supporting loads permitted!
– The maximum speed is 5 km/h (walking pace)
– Towing must only be performed on level, secure travel routes.
– If using other trailer couplings, observe the regulations of the couplingmanufacturer.
– The owner must test trailer operation with the permissible tow load by means of atrial run under the applicable operating conditions on site.

03
.08.G
B
E 36
5 Troubleshooting
This chapter is designed to help the user identify and rectify basic faults or the resultsof incorrect operation. When locating a fault, proceed in the order shown in the table.
Fault Probable Cause Action
Starter does not turn
– Travel direction switchnot in neutral
– Battery charge too low
– Battery terminal cableloose or terminalsoxidized.
– Starter cable loose orbroken
– Starter magnetic switchjammed
– Turn travel direction switch to neutral(see Neutral Interlock in this chapter)
– Check battery charge, charge battery ifnecessary
– Clean and grease terminals, tightenbattery terminal cable
– Check starter cable, tighten or replaceas required
– Check if the magnetic switch audiblyengages
Engine does not start
– Air filter contaminated
– Bowden cable faulty orhanging
Additional for LPG
– LPG bottle shutoff valveclosed
– LPG bottle empty
– Ignition distributor capdamp
– Spark plugs damp, oilyor loose
– Spark plugs faulty
Additional for diesel
– Fuel tank empty,injection system hassuctioned in air
– Water in fuel system
– Fuel filter contaminated
– Paraffin separation fromthe diesel (flakesforming)
– Clean / replace air filter
– Check Bowden cable
– Shutoff valve open
– Replace the LPG bottle
– Ignition distributor cap dry, ifnecessary apply contact spray
– Dry, clean and tighten spark plugs
– Replacing spark plugs
– Fill up with diesel and bleed theinjection system
– Discharge the fuel systemAdd fuelDischarge fuel system
– Check the flow of fuel, if necessaryreplace the fuel filter
– Park the truck in a warm room and waituntil the separation has returned to itsoriginal state.If necessary replace the fuel filterFill up with winter diesel

E 37
03
.08.G
B
Fault Probable Cause Action
Engine oil indicator lit duringoperation
– Engine oil level too low – Check engine oil level, top up ifnecessary
Enginetemperaturedisplay in red zone
– Engine oil level too low
– Radiator contaminated
– Coolant level too low
– Fan V belt slipping
– Check engine oil level, top up ifnecessary
– Clean radiator
– Check engine radiator system forleaks, add coolant if necessary
– Check V belt tension, tighten orreplace as required
Transmissionoil indicator lit duringoperation
– Transmission oil leveltoo low
– Radiator contaminated
– Check transmission oil level, top up ifnecessary
– Clean radiator
Engine running but truck does not travel
– Travel direction switchin neutral
– Parking brake applied
– Set travel direction switch to requireddirection
– Release parking brake
Truck does not reach max. speed
– Transmission oil leveltoo low
– Check transmission oil level, top up ifnecessary
Lift speed too low
– Hydraulic reservoir oillevel too low
– Hydraulic reservoirdischarge systemcontaminated orblocked
– Check hydraulic oil, if necessary topup
– Clean / replace hydraulic reservoirdischarge system
Load cannot be raised to max. height.
– Hydraulic reservoir oillevel too low
– Check hydraulic oil, if necessary topup
Steering is sluggish
– Air pressure in steeringaxle tyres too low
– Check tyre air pressure, increase tocorrect pressure if necessary
Excessivesteering play
– Air in steering system – Check hydraulic oil level and top up ifnecessary, then turn the steeringwheel several times from one end tothe other.

03
.08.G
B
E 38
Z If the truck cannot be restored to operation despite carrying out the remedies above,please contact the manufacturer's service department. Additional troubleshooting must only be performed by the manufacturer’s specialistservice engineers. The manufacturer has a customer service department speciallytrained for these tasks. In order for Customer Services to react quickly and specifically to the fault, thefollowing information is essential:-Truck serial number-Fault description-Current location of truck

F 1
09
08.G
B
F Industrial Truck Maintenance
1 Operational safety and environmental protection
The servicing and inspection duties contained in this chapter must be performed inaccordance with the intervals indicated in the servicing checklists.
F Any modifications to the industrial truck assemblies, in particular the safetymechanisms, is prohibited. The operational speeds of the truck must not be changedunder any circumstances.
M Only original spare parts have been certified by our quality assurance department. Toensure safe and reliable operation of the truck, use only the manufacturer's spareparts. Used parts, oils and fuels must be disposed of in accordance with the relevantenvironmental protection regulations. For oil changes, contact the manufacturer’sspecialist department.
Upon completion of inspection and servicing, the tasks contained in the“Recommissioning” section must be performed (see Chapter F).
M In the event of irregularities in the truck’s traction and operating qualities, inform themanufacturer’s service department immediately.
2 Maintenance safety regulations
Maintenance personnel: Industrial trucks must only be serviced and maintained bythe manufacturer’s trained personnel. The manufacturer’s service department hasfield technicians specially trained for these tasks. We therefore recommend amaintenance contract with the manufacturer’s local service centre.
Lifting and jacking up: When an industrial truck is to be lifted, the lifting gear mustonly be secured to the points specially provided for this purpose. When jacking up thetruck, take appropriate measures to prevent the truck from slipping or tipping over(e.g. wedges, wooden blocks). You may only work underneath a raised load handlerif it is supported by a sufficiently strong chain.
Z For jack points see Chapter B.
Cleaning operations: Do not use flammable liquids to clean the industrial truck. Priorto cleaning, implement all necessary safety measures to prevent sparking (e.g.through short circuits). For battery-operated trucks, the battery connector must beremoved. Use only low vacuum air, low compressed air and non-conducting,antistatic brushes for the cleaning of electric or electronic assemblies.
M If the truck is to be cleaned with a water jet or a high-pressure cleaner, all electricaland electronic components must be carefully covered beforehand as moisture cancause malfunctions.Cleaning by means of a steam jet is not permitted.
After cleaning the truck, carry out the activities detailed in the “Recommissioning”section.

09
08.G
B
F 2
Work on the electric system: Only suitably trained personnel may operate on thetruck’s electrical system. Before working on the electrical system, take allprecautionary measures to avoid electric shocks.
Welding: To avoid damaging electric or electronic components, remove these fromthe truck before performing welding operations.
Settings: When repairing or replacing hydraulic, electric or electronic components orassemblies, always note the truck-specific settings.
Tyres: The quality of tyres affects the stability and performance of the truck. Whenreplacing tyres fitted at the factory, only use the manufacturer’s original spare parts.Otherwise the data sheet specifications of the truck cannot be guaranteed. Whenchanging wheels and tyres, ensure that the truck does not slew (e.g. when replacingwheels always left and right simultaneously).
Lift chains: Lift chains wear rapidly if not lubricated. The intervals stated in theservice checklist apply to normal duty use. More demanding conditions (dust,temperature) require more regular lubrication. The prescribed chain spray must beused in accordance with the instructions. Applying grease externally will not providesufficient lubrication.
Hydraulic hoses: The hoses must be replaced every six years. When replacinghydraulic components, also replace the hoses in the hydraulic system.
Starter battery disposal: Batteries may only be disposed of in accordance withnational environmental protection regulations or disposal laws. Do not dispose ofused batteries with general waste. The manufacturer’s specifications for the disposalmust be heeded. End users, both private and commercial, are legally obliged to returnused truck starter batteries to the battery manufacturer through the trade, i.e.wherever batteries are sold, or through authorized disposal agents. If in doubt,contact the Jungheinrich service department.

F 3
09
08.G
B3 Servicing and inspection
Thorough and expert servicing is one of the most important preconditions for safeoperation of the industrial truck. Failure to perform regular servicing can lead to truckfailure and poses a potential hazard to personnel and equipment.
M The application conditions of an industrial truck have a considerable impact on thewear of the service components. We recommend that a Jungheinrich customer adviser carries out an applicationanalysis on site to work out specific service intervals to prevent damage due to wear.The service intervals listed are based on single shift operation under normaloperating conditions. They must be reduced accordingly if the truck is to be used inconditions of extreme dust, temperature fluctuations or multiple shifts.
The following maintenance checklist specifies the tasks and intervals after which theyshould be carried out. The servicing intervals are defined as follows:
W = Every 50 service hours, at least weeklyB = Every 500 service hours, or at least every six months.B = Every 1000 service hours, or at least annually.C = Every 2000 service hours, or at least annually.
Z W service intervals must be performed by the owner.
During the run-in period – after approx. 100 service hours – the owner must check thewheel nuts/bolts and re-tighten if necessary.

09
08.G
B
F 4
4 DFG/TFG maintenance checklist
Maintenance intervals
Standard = t W A B C
Brake 1.1 Check effectiveness of operating and parking brakes,adjust where necessary and measure braking distance.
t
1.2 Check brake lining wear and check brake drum diameter t
1.3 Check brake fluid level in container and top up ifnecessary
t
1.4 Change brake fluid annually, bleed the system ifrequired
t
1.5 Check connections and lines for leaks t
1.6 Check brake mechanism, adjust and lubricate ifnecessary
t
Electrics 2.1 Test operation of instruments, displays and controlswitches
t
2.2 Test warning and safety devices t
2.3 Check fuse ratings t
2.4 Make sure wire connections are secure and check fordamage
t
2.5 Test lighting t
2.6 Test micro switch setting t
2.7 Test relay t
Energysupply
3.1 Battery visual inspection t
3.2 Check battery connections are secure, grease terminalsif necessary.
t
3.3 Check acid density, acid level and battery voltage t
Truck Design 4.1 Check mast attachment t
4.2 Check chassis for damage. t
4.3 Check the counterweight is secure. t
4.4 Check the overhead guard / cabin for damage. t
4.5 Check driver’s seat and restraint system t
4.6 Check labels t
4.7 Check trailer coupling / tow mechanism t
4.8 Check the screw connections, in particular theconnections between the counterweight and the chassisand between the front axle and the chassis
t

F 5
09
08.G
B
Maintenance intervals
Standard = t W A B C
Hydraulicoperation
5.1 Check mast bearings t
5.2 Check setting of slide pieces and stops, and adjust ifnecessary
t
5.3 Visually inspect the mast rollers and check contactsurface wear level
t
5.4 Check lateral clearance of mast connections and of forkcarriage
t
5.5 Check load chain setting and tighten if necessary t
5.6 Check forks and fork carriage for wear and damage t
5.7 Check mast tilt angle t
5.8 Check position of tilt cylinder, check piston head jam nutis secure and tighten if necessary
t
5.9 Test hydraulic system operation t
5.10 Check that hose and pipe lines and their connectionsare secure, check for leaks and damage, and tightenconnections if necessary.
t
5.11 Check cylinders and piston rods for damage and leaks,and make sure they are secure
t
5.12 Check hydraulic oil level and top up if necessary t
5.13 Replace hydraulic oil (this may have to be performed viaa specialist environmental service truck)
t
5.14 Replace the hydraulic oil filter t
5.15 Replace hydraulic reservoir discharge paper filter t
5.16 Check attachments and auxiliary equipment are secure,test operation and check for damage
t
Sign off/Dem-onstration
6.1 Lubricate truck in accordance with LubricationSchedule.
t
6.2 Test run t
6.3 Demonstration after servicing t
Steeringsystem
7.1 Check function of steering t
7.2 Check mechanical parts of steering column t
7.3 Check steering axle and steering knuckle for wear anddamage
t

09
08.G
B
F 6
5 DFG maintenance checklist
Z For optional DPF: check condensate separator, empty if necessary (W: weekly check)
Z For optional DPF: air blast the filter (A: 500 h)
Z For optional DPF: check diesel motor emissions in accordance with TRGS 554(B: 1000 h or annually)
Maintenance intervals
Standard = t W A B C
Travel 7.1 Check engine for noise and leaks t
7.2 Check engine oil level, top up if necessary t t
7.3 Change engine oil t
7.4 Replace engine oil filter t
7.5 Check valve play, adjust if necessary t
7.6 Test glow plugs, electric t
7.7 Check V belt for tension and damage t
7.8 Check maximum speed (without load), adjust ifnecessary
t
7.9 Check coolant level, top up if necessary t t
7.10 Add anti-freeze to coolant t
7.11 Test anti-freeze, top up if necessary t
7.12 Test water pump and fan t
7.13 Check radiator and clean if necessary t t
7.14 Test starter and generator t
7.15 Check exhaust system for leaks and damage t
7.16 Clean the air filter cartridge t
7.17 Replace air filter cartridge t
7.18 Replace fuel filter t
7.19 Check the fuel/water separator, and discharge ifnecessary
t
7.20 Check fuel tank and lines for leaks and damage t
7.21 Check the transmission for noise and leakage t
7.22 Check travel mechanism, adjust and lubricate ifnecessary
t
7.23 Check transmission oil level, top up if necessary t
7.24 Replace transmission oil t
7.25 Clean transmission oil suction filter and discharge t
7.26 Replace transmission oil filter t
7.27 Check drive axle for noise and leakage t
7.28 Check drive axle oil level and top up if necessary t
7.29 Replace drive axle oil t
7.30 Check wheels for wear and damage t
7.31 Check wheel bearings and attachments t
7.32 Check tyre air pressure, adjust if necessary t t

F 7
09
08.G
B6 TFG maintenance checklist
Maintenance intervals
Standard = t W A B C
Travel 8.1 Check engine for noise and leaks t
8.2 Replace spark plugs t
8.3 Check ignition system and ignition point t
8.4 Check valve play, adjust if necessary t
8.5 Check engine oil level, top up if necessary t t
8.6 Change engine oil t
8.7 Replace engine oil filter t
8.8 Check V belt for tension and damage t
8.9 Check maximum speed (without load), adjust ifnecessary
t
8.10 Check coolant level, top up if necessary t t
8.11 Add anti-freeze to coolant t
8.12 Test anti-freeze, top up if necessary t
8.13 Test water pump and fan t
8.14 Check radiator and clean if necessary t t
8.15 Test starter and generator t
8.16 Check exhaust system for leaks and damage t
8.17 Check exhaust levels, adjust if necessary t
8.18 Clean the air filter cartridge t
8.19 Replace air filter cartridge t
8.20 Test LPG system, check for leaks and damage (to beperformed by authorised specialist personnel)
t
8.21 Clean LPG filter (to be performed by authorisedspecialist personnel)
t
8.22 Check transmission for noise and leakage t
8.23 Check travel mechanism, adjust and lubricate ifnecessary
t
8.24 Check transmission oil level, top up if necessary t
8.25 Replace transmission oil t
8.26 Clean transmission oil suction filter and discharge t
8.27 Replace transmission oil filter t
8.28 Check drive axle for noise and leakage t
8.29 Check drive axle oil level and top up if necessary t
8.30 Replace drive axle oil t
8.31 Check wheels for wear and damage t
8.32 Check wheel suspension and attachments t
8.33 Check tyre air pressure, adjust if necessary t t

09
08.G
B
F 8
7 Coolant specification
The quality of the coolant has a considerable effect on the efficiency and useful life ofthe cooling system. The following instructions are designed to provide the bestservicing in terms of frost and corrosion protection.
– Always use clean, soft water.
– To avoid frost and corrosion damage use an ethylene-glycol based anti-freezemixture. Use a standard anti-freeze with a pH value of 7.0 – 8.5.
– Make sure the mixture ratio is correct when using an anti-freeze. The frostprotection level must satisfy the above standard.
The manufacturer cannot be held liable for frost or corrosion damage caused byincorrect procedures.
F The anti-freeze contains ethylene-glycol and other poisonous substances. Ingressioninto the human body can result if large quantities come into contact with the skin forlong or repeated periods.
U.S.A. ASTM D4985 or SAE J1941 Ethylene—glycol based engine coolant
Lowest temperature required for protection
% volume of anti-freeze Anti-freeze volume ratio Water
-37 °C 50 1:1

F 9
09
08.G
BWhen handling anti-freeze always observe the following safety measures:
– NEVER swallow anti-freeze. If anti-freeze is accidentally swallowed, seekIMMEDIATE medical attention.
– Avoid prolonged skin contact with anti-freeze.
– Wipe off spray from the skin immediately.
– If anti-freeze is sprayed into the eyes, rinse them immediately.
– Clothing sprayed with anti-freeze must be removed and washed before being wornagain.
– Wear protective clothing if you are regularly handling anti-freeze (plastic or rubbergloves, boots and non-permeable overalls or aprons).
F Anti-corrosion solutions contain additives which are poisonous if swallowed andwhich can be absorbed in poisonous quantities through persistent, repeated contactwith the skin. Observe the same safety precautions as for anti-freeze.
8 DFG fuel specifications
Use only DIN EN 590 diesel with a Cetane rating above 50.

09
08.G
B
F 10
9 Lubrication Schedule
g Contact surfaces b Transmission oil filler neck
s Grease nipple a Transmission oil drain plug
Hydraulic oil filler neck tMineral oil filler neck for brake system
c Hydraulic oil drain plug K Oil dipstick
E(cardan shaft)
(steering axle)

F 11
09
08.G
B9.1 Consumables
Handling consumables: Consumables must always be handled correctly. Followthe manufacturer’s instructions.
F Improper handling is hazardous to health, life and the environment. Consumablesmust only be stored in appropriate containers. They may be flammable and musttherefore not come into contact with hot components or naked flames.
Only use clean containers when filling up with consumables. Do not mix consumablesof different grades. The only exception to this is when mixing is expressly stipulatedin the Operating Instructions.
Spilled liquids must be removed immediately with suitable bonding agents and thebonding agent / consumable mixture must be disposed of in accordance withregulations.
DFG/TFG 316-320.
DFG / TFG 425-435
Order no. Quantity Description Used for
A 52017728 55 l HVLP46 Hydraulic system
D 00002832 0.25 lBrake fluidSAE J 1703
Braking system
E 50055726 K-P-2K grease
G 29201280 Chain spray Chains
N 05099205 5.4 l ATF Dexron II D Transmission
52030273 4 lTitan Supergear 80W-90
Axle
510940568l (DFG)
4l (TFG)
TITAN UNIC PLUS SAE 10W-40
Engine oil;
Order no. Quantity Description Used for
A 52017728 55 l HVLP46 Hydraulic system
D 00002832 0.25 lBrake fluidSAE J 1703
Braking system
E 50055726 K-P-2K grease
G 29201280 Chain spray Chains
N 05099205 5.5 l ATF Dexron II D Transmission
52030273 5 lTitan Supergaer80W-90
Axle
510940568l (DFG)
4l (TFG)
TITAN UNIC PLUS SAE 10W-40
Engine oil;

09
08.G
B
F 12
Z Bio oils
Bio-degradeable hydraulic oils may only be used after consultation with the relevantJH service department.
Grease data
Code Saponification Dew point °C
Workedpenetration at
25 °C
NLG1 class Applicationtemperature °C
E Lithium 185 265-295 2 -35/+120

F 13
09
08.G
B10 Maintenance and repairs
10.1 Preparing the truck for maintenance and repairs
All necessary safety measures must be taken to avoid accidents when carrying outmaintenance and repairs. The following preparations must be made:
– Park the truck securely(see Chapter E).
– Pull the key out of the ignition/starterswitch (1) to prevent the truck frombeing switched on accidentally.
– When working under a raised load forkor a raised truck, secure them toprevent them from lowering, tipping orsliding away.
F Note the following when raising theindustrial truck:
M Only use lifting gear with sufficient capacity (for transport weight see truck data plate).
– Park the truck securely (see Chapter E).
– Attach crane slings to the mast at the appropriate points.
– Attach the crane slings to the counterweight of the trailer coupling.
M Lifting slings should be fastened to the harness in such a way that they do not comeinto contact with any attachments or the overhead guard when it is being raised.

09
08.G
B
F 14
10.2 Engine panel
Z Before opening the motor panel thesteering column and the steering columnadjustment lever (18) must be pushedforward fully.Push the driver’s seat forward. The stop bolt on the left hand seat guiderail should engage facing up.
– Press the pushbutton in the legcompartment and raise the enginecover (54) slightly.
– Fully raise the engine cover (54).A gas pressure damper keeps theengine cover in the raised position.
M If a forklift truck is equipped with a steel cabin, both cabin doors and the rear windowmust be opened before raising the engine cover.
When you close the engine cover, pull the stop bolt down and push the driver’s seatback again.
M Make sure the engine cover has engaged correctly before operating the truck again.
10.3 Starting aid
M Only use an ISO 6722 batteryjump lead with fully insulatedterminal pliers and a leaddiameter of at least 25 mm2.
Procedure:
– First connect the red lead tothe positive terminal
– Connect the black lead to thefeeder battery and the earthpoint on the engine block
– To start the lift truck with theengine panel open, press theswitch on the battery retainerand then start the engine withthe ignition key
– When the engine has startedfirst remove the negativelead-then remove the positivelead
Z Note: If the starter motor does not switch on the engine after connecting the batteryterminals, check that the battery terminal clips are positioned correctly.
1854

F 15
09
08.G
B10.4 Servicing the engine DFG
Checking the engine oil - DFG
– Remove the dipstick (8).
– Wipe the dipstick with a lint-free clothand put in back fully into its port.
– Remove the dipstick again and checkwhether the oil level is between theMIN and MAX markings.
– If the oil level is below the centre point,remove the fuel cap and add thecorrect grade of oil to the engine untilthe oil level has reached the MAXmark on the dipstick.
32
31
2
8
4 3

09
08.G
B
F 16
Replacing the engine oil and engine oil filter
M Only change the engine oil when the engine is at operating temperature and the truckis horizontal. Always replace the engine oil and engine oil filter together.
Draining the engine oil
– Unscrew the (2) lid.
– Thoroughly clean the oil drain plug (4)and around the drain hole.
– Unscrew the oil drain plug and drainthe oil into a suitable container.
F Risk of scalding through hot oil.
– Screw in the oil drain plug with a newseal.
F Dispose of used oil in accordance withenvironmental regulations.
Replacing the engine oil filter
– Undo the hose clamp (10) from thehose (9)-
– Pull off the hose.
– Undo the air filter attachment (11) andplace the air filter to one side.
– Undo the oil filter (3) with a filterwrench and manually unscrew it.
F Collect any emerging oil and dispose ofthe oil and oil filter in accordance withenvironmental regulations.
– Thoroughly clean the raised faces ofthe oil filter flange.
– Apply a thin layer of fresh engine oil tothe seal of the new oil filter.
– Hand-tighten the oil filter.
– Fit the air filter, insert the hoses andtighten with hose clamps.
2
4 3

F 17
09
08.G
BAdding engine oil
– Add fresh engine oil through the fillerport (2) in accordance with theconsumables table.
Capacity: 8,0 l
Check the engine oil level with the
dipstick (1) and adjust as necessary.
Screw the lid backon.
– Fully insert the dipstick (1).
M After changing the oil and the oil filter,note the engine oil pressure indicator (9)when you run the engine again andcheck the oil drain plug and oil filter aresealed.
Checking the V belt tension
– Insert the V belt between the fan V beltpulley and the generator V belt pulleyusing a force of 45 N.
It should be possible to insert the V beltafter approx. 10 mm.
Adjusting the V belt tension
– Undo the screws (10) and pull the ACgenerator until you reach theprescribed V belt tension. Re-tightenthe screws.
– Check the V belt tension again andrepeat the adjustment if necessary.
9
10

09
08.G
B
F 18
Replacing the fuel filter
Drain the fuel from the filter into asuitable container.
Undo the fuel filter (13) with a filterwrench and manually unscrew it.
F Dispose of the fuel filter and fuel inaccordance with environmentalregulations.
– Thoroughly clean the raised faces ofthe filter flange.
– Apply a thin layer of diesel to the sealof the new fuel filter.
– Manually screw in the fuel filter untilthe seal contacts the filter flange.
– Tighten the fuel filter another third of aturn.
– Bleed the fuel system
Bleeding the fuel system
F Collect any emerging fuel and dispose of it in accordance with environmentalregulations.
– Open the discharge screw (12).
– Apply the manual pump lever (11) on the fuel pump until fuel escapes from thedischarge screw without bubbles.
– Tighten the bleed screw (12).
– Apply the starter motor via the key switch for approx. 10 secs.
– Wait for 10 seconds.
– Repeat the process until the engine starts up.
M While running the engine check the fuel filter, the discharge valve and the union nutsof the injection nozzles for leaks.
Z If the engine does not start up or stops after a short time, repeat the bleedingprocedure.
11
13
12

F 19
09
08.G
B10.5 Engine servicing TFG
Checking the engine oil - TFG
– Remove the oil dipstick (32).
– Wipe the dipstick with a lint-free clothand put in back fully into its port.
– Remove the dipstick again and checkwhether the oil level is between theMIN and MAX markings.
– If the oil level is below the centre point,remove the fuel cap (31) and add thecorrect grade of oil to the engine untilthe oil level has reached the MAXmark on the dipstick.
Replacing the engine oil and engine oil filter
Only change the engine oil when theengine is at operating temperature andthe truck is horizontal. Always replacethe engine oil and engine oil filtertogether.
Draining the engine oil
– Unscrew the (18) lid.
– Thoroughly clean the oil drain plug(21) and around the drain hole.
– Unscrew the oil drain plug and drainthe oil into a suitable container.
F Risk of scalding through hot oil.
– Screw in the oil drain plug with a newseal.
F Dispose of used oil in accordance with environmental regulations.
32
31
19
20
21
18

09
08.G
B
F 20
Replacing the engine oil filter
– Undo the oil filter (20) with a filterwrench and manually unscrew it.
F Collect any emerging oil and dispose ofthe oil and oil filter in accordance withenvironmental regulations.
– Thoroughly clean the raised faces ofthe oil filter flange.
– Apply a thin layer of fresh engine oil tothe seal of the new oil filter.
– Hand-tighten the oil filter.
Adding engine oil
– Add fresh engine oil through the filler port in accordance with the consumablestable (see Section 9.1).
Capacity: 4,0 l
– Check the engine oil level with thedipstick (19) and adjust as necessary..
– Screw the lid back on.
– Insert the dipstick back fully.
M After changing the oil and the oil filter,note the engine oil pressure indicator(18) when running the engine again andcheck the oil drain plug and oil filter aresealed.
18

F 21
09
08.G
BReplacing spark plugs
– Remove spark plug connector (19) .
– Thoroughly clean around the sparkplugs on the cylinder head.
– Unscrew the spark plugs.
– Check the electrode distance of thenew spark plugs with a feeler gauge,and adjust as required.
Rated value: 1.0 mm
M Only use original spark plugs.
– Manually screw in the spark plugs and then torque them to 20 Nm.
Checking the V belt tension
– Insert the V belt between the fan V belt pulley and the generator V belt pulley usinga force of 45 N.
It should be possible to insert the V belt after approx. 11 mm.
Adjusting the V belt tension
– Undo the screws (20) and pull the ACgenerator until you reach theprescribed V belt tension.
– Re-tighten the screws.
Check the V belt tension again andrepeat the adjustment if necessary.
19
20

09
08.G
B
F 22
10.6 Checking the hydraulic oil level
If the oil is cold
– Fully raise and lower the mast in oneoperation.
– Stop the engine.
– Remove the dipstick (35) and clean itwith a clean cloth. Check the hydraulicoil level. It should lie between the MINand MAX markings on the dipstick. Ifnecessary, top up to the MIN markingon the dipstick.
If the oil is hot
– Fully raise and lower the mast in oneoperation.
– Stop the engine.
– Remove the dipstick (35) and clean itwith a clean cloth. Check the hydraulicoil level. It should lie just above theMAX marking on the dipstick. Ifnecessary, top up to just above theMAX marking on the dipstick.
If the engine cuts out or does not run smoothly when the mast is raise, the mast mustbe gently lowered before continuing with this procedure.
35

F 23
09
08.G
B10.7 Gas system drain tap
Z The gas system drain tap must always be closed during operation (it should only beopened by service personnel for maintenance purposes).
F If the drain is opened gas may escape!
Drain open
Drain closed

09
08.G
B
F 24
10.8 Checking the coolant level
– Open the cover lock and turn it to the right
– Remove the panel
– Check the coolant level on thereservoir.
The coolant should lie between theMIN and MAXmarkings (36).
M If the coolant is below the MINmarking, this indicates possibleleakage in the radiator system. Thetruck must only be used once thecause has been removed.
F If the engine is hot, the radiatorsystem is pressurised. Only openthe expansion vessel (37) lid whenthe engine has cooled down.
When topping up, add a premixed water and antifreeze solution in equal quantitiesinto the existing solution.
It should be possible to empty the system by opening the drain taps in the radiatorand on the side of the cylinder block. The drain plugs may be made of brass. Whendraining, remove the expansion vessel lid and lay it on the driver's seat as an indicatorthat the engine does not contain any coolant.
For details on recommended concentrations and safety measures, refer to Chapter F.
36
37

F 25
09
08.G
B10.9 Checking the coolant concentration
F Do not open the radiator lid when theengine is hot.
To prevent the build up of lime as wellas front and corrosion damage, and toraise the boiling point temperature, thecooling circuit must be filled each yearwith a mixture of water and anti-freezewith anti-corrosion additives.
– If there is insufficient anti-freeze, drain the coolant and add anti-freeze to thereservoir (21) until you obtain the correct proportion in the mixture. Use anti-freezein accordance with the coolant specifications (see section 7).
M The water/anti-freeze mixture proportion and the degree of frost protection to beachieved can be taken from the anti-freeze specifications.
Cooling circuit capacity:
DFG/TFG: 14.0 l
10.10 Filling the cooling circuit
F Leave the engine to cool down in order to fill it with coolant. Slowly open the lid;dangerously hot coolant can escape if the coolant circuit is still pressurized. Do notadd too much coolant to the circuit. The lid contains a safety valve which opens to lethot coolant dissipate if the fluid level is too high.
M If coolant is added in the course of servicing, it must meet the specifications of theoriginal fluid (see Section 7). If you add coolant too quickly or if the truck is nothorizontal, air will enter the cooling circuit. Running the engine with air in the coolantcircuit will result in excessive operating temperatures and can damage the engine.
M The truck must be horizontal. Slowly open the reservoir lid. Using a funnel, slowly fillthe coolant circuit to the level indicated in the manufacturer's manual. The funnel willcreate the pressure required to force air out of the coolant circuit. Wait until all the airbubbles have escaped and then refit the lid. Start the engine. Switch off the enginewhen it reaches operating temperature and then let it cool down. Slowly open thereservoir lid and if necessary add coolant in accordance with the manual instructionsuntil you obtain the correct level. Refit the lid.
21

09
08.G
B
F 26
10.11 Cleaning/replacing the air filter cartridge
M Carry out all maintenance work with theengine switched off. Do not start theengine if the air filter cartridge isremoved.
– Undo the quick release lock (29) andlift it up.
– Raise the air filter housing.
– Undo the 2 mounting clamps (30) andremove the dust collector pot.
– Carefully remove the internal andexternal air filter cartridges from thefilter housing.
– Apply dry compressed air from theinside of the external cartridge to theoutside until no more dust emerges.
– Carefully wipe the internal cartridgewith a lint-free cloth.
M Do not apply compressed air to the filter housing, instead wipe with a clean cloth.
– Replace any damaged or heavily contaminated air filter cartridges.
– Thoroughly clean the dust collector pot, to do this remove the rubber element.
– Insert the air filter cartridges back in the filter housing and secure them.
M Take care not to damage the air filter cartridges when assembling.
– Insert the dust collector pot and secure it with the 2 mounting clamps (30).
– Fit the air filter housing in the assembly position.
– Close the quick release lock (29).
29
30

F 27
09
08.G
B10.12 DFG/TFG transmission:
M It is important to check the oil level correctly. The oil is a lubricant which also acts asa coolant and operates the clutches. A low oil level will result in loss of transmissionand pressure. It also causes overheating and resultant transmission failure.
Checking the transmission oil level
Z Only use clean, fresh oil from cleancontainers to fill or top up thetransmission. Damage will arise fromcontamination or water entering thetransmission.
You access the transmission oil dipstickon the right-hand side of thetransmission (looking in the direction oftravel).
– Start the engine and with the parkingbrake applied, first engage forward gear followed by reverse and wait until thetransmission has reached operating temperature.
– When the engine is running in idle, remove the dipstick (24).
– Wipe the dipstick with a lint-free cloth and put in back fully into its port.
– Remove the dipstick again and check whether the oil level is between the MIN andMAX markings.
– If the level is below the centre point, add the right grade of transmission oil throughthe filler port (23) into the transmission unit, until it reaches the MAX marking on thedipstick.
– Refit the dipstick in the port.
2423
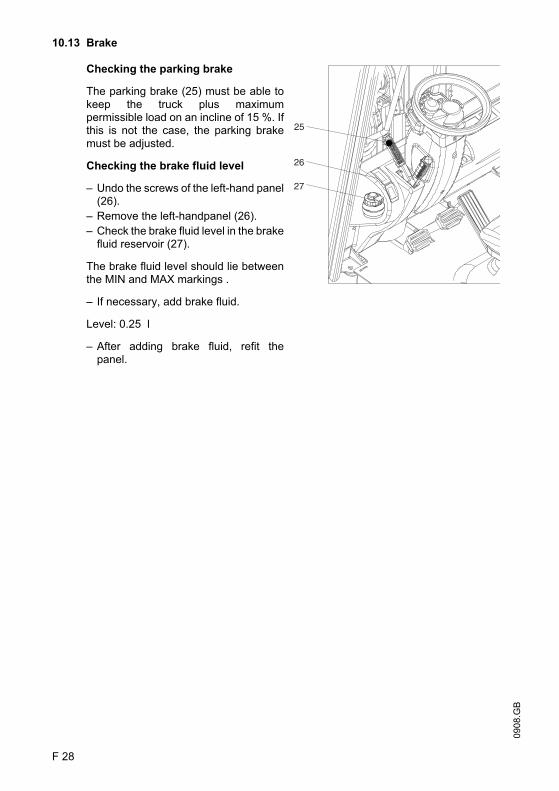
09
08.G
B
F 28
10.13 Brake
Checking the parking brake
The parking brake (25) must be able tokeep the truck plus maximumpermissible load on an incline of 15 %. Ifthis is not the case, the parking brakemust be adjusted.
Checking the brake fluid level
– Undo the screws of the left-hand panel(26).
– Remove the left-handpanel (26).
– Check the brake fluid level in the brakefluid reservoir (27).
The brake fluid level should lie betweenthe MIN and MAX markings .
– If necessary, add brake fluid.
Level: 0.25 l
– After adding brake fluid, refit thepanel.
25
26
27

F 29
09
08.G
B10.14 Checking the wheel attachments.
– Parking the truck securely(see Chapter E).
– Tighten the wheel nuts (36) crosswise with atorque wrench.
Torque
10.15 Hydraulic system
Replacing the hydraulic oil filter
– Unscrew the lid (31).
– Remove the hydraulic oil filterintegrated in the lid.
– Insert a new hydraulic oil filter andscrew the lid back on.
F Collect any spilled hydraulic oil. Disposeof the hydraulic oil and hydraulic oil filterin accordance with environmentalregulations.
10.16 Clean/replace hydraulic reservoir discharge system
– Unscrew the hydraulic reservoir lid (31).
– Lift up the cap (30).
– Remove the filter insert form under the cap.
– Clean the filter insert.
M If the contamination cannot be removed by cleaning, replace the filter insert.
Typ VFG 316-320 VFG 425-435
Drive wheels 200 NM 380 NM
Rear wheels 200 NM 200 NM
36
3130

09
08.G
B
F 30
10.17 Electrical Equipment
Checking the battery condition, the acid level and acid density
F Battery acid is highly corrosive. Therefore it is essential to avoid contact with batteryacid. If clothing, skin or eyes have nevertheless come into contact with battery acid,immediately rinse the affected parts with water. If the eyes have been affected,immediately seek medical attention. Neutralise spilled battery acid immediately.
– Check the battery housing for cracks and any spilled acid.
– Remove any oxydation remains from the battery terminals.
– Lubricate the battery terminals with an acid-free grease.
– Check the acid level.
The acid should lie between the top and bottom markings.
– Clean the area around the inspection plugs.
– Unscrew the inspectionplugs.
– If necessary, add distilled water to the top mark.
– Check the acid density.
If the battery is charged sufficiently, the acid density should be 1.24 to 1.28 kg/l.
– If necessary, re-charge the battery.
– Screw the inspection plugs back on.
Z It is not necessary to check the acid level or the acid density in batteries with lowmaintenance requirements.

F 31
09
08.G
BChecking electrical fuses
– Prepare the truck for maintenance and repair work (see “Preparing the Truck forMaintenance and Repairs” in this chapter)
– for rear mounted fuses, open the rear panel lock and turn it to the right
– Remove the panel
– Check the fuse rating and condition in accordance with the table; replace ifnecessary.
– Fit the panels.
t Standard fuse box (DFG)
t Standard fuse box (TFG)
Item Ref. To protect: Rating
39 2F14 Pre-heat relay, diesel valve 5 A
40 4F1 Air filter control, travel direction valves, seat switch, horn 10 A
41 7F5 Diesel filter control, brake fluid control, handbrake control 5 A
42 4F8 Display unit 5 A
43 F19 12 volt system 10 A
44 9F7 Ignition on options relay 10 A
Item Ref. To protect: Rating
39 2F14 Gas valve, ignition distributor 5 A
40 4F1 Air filter control, travel direction valves, seat switch, horn 10 A
41 7F5 Brake fluid control, handbrake control 5 A
42 4F8 Display unit 5 A
43 F19 12 volt system 10 A
44 9F7 Ignition on options relay 10 A
5152
5354
55
5657
5859
60

09
08.G
B
F 32
DFG main current
TFG main current
o Fuse box for optional equipment (DFG/TFG)
F To avoid damaging the electrical system, only use fuses with the correct ratings.
Item Ref.To protect:
Rating
55 9F11 Preheat fuse 70 A
56 9F8 Engine running option relay 50 A
57 9F7 Ignition on options relay 50 A
58 9F16 Key switch 20 A
59 9F17 Pre-fuse for F19 20 A
60 9F19
50A generator 50 A
80A generator
120A generator
70 A
120A
Item Ref.To protect:
Rating
51 9F8 Engine running option relay 50 A
52 9F7 Ignition on options relay 50 A
53 9F16 Key switch 20 A
54 9F17 Pre-fuse for F19 20 A
60 9F1950A generator 50 A
80A generator 70 A
Item Ref.To protect:
Rating
45 4F4 Beacon 7.5 A
46 9F1 Windscreen wiper 7.5 A
47 5F6 Cab 15 A
48 5F1 Searchlights 25 A
49 5F3 Reverse lights 15 A
50 5F5.2 Road traffic parking light 15 A

F 33
09
08.G
Bo Road traffic system fuse box
o DFG options fuse box
o TFG options fuse box
Item Ref. To protect: Rating
62 4F5 Warning indicator system control fuse 10 A
63 4F6 Brake light control fuse 10 A
64 5F4 Tail light control fuse 5 A
65 5F4.1 Tail light control fuse 5 A
66 5F5 Lighting control fuse 7.5 A
67 5F5.1 Left lights control fuse 7.5 A
Item Ref. To protect: Rating
68 F14 Heating fuse 15 A
69 9F2 Seat heating control fuse 10 A
70 9F12 Catalyser fuse 7.5 A
71 9F13 Catalyser control fuse 5 A
Item Ref. To protect: Rating
68 F14 Heating fuse 15 A
69 9F2 Seat heating control fuse 10 A
70 9F21 Speed signal generator fuse 5 A
71 6F7 Soot filter electronics control fuse 5 A

09
08.G
B
F 34
11 Exhaust system
The exhaust system must be checked for emissions at regular intervals. Black or blueexhaust smoke is an indicator of high emission levels. Seek assistance fromspecialist personnel.
The soot filter must be serviced in accordance with manufacturer’s instructions(starting F37).
12 Restoring the truck to service after cleaning or repairs
The truck may only be restored to service after cleaning or repair work, once thefollowing operations have been performed.
– Test horn.
– Test main switch operation.
– Test brakes.
– Lubricate the truck in accordance with the lubrication chart.
13 Decommissioning the industrial truck
If the industrial truck is to be decommissioned for more than two months, e.g. foroperational reasons, it must be parked in a frost-free and dry location and allnecessary measures must be taken before, during and after decommissioning asdescribed.
M On decommissioning the truck must be jacked up so that all the wheels are clear ofthe ground. This is the only way of ensuring that the wheels and wheel bearings arenot damaged.
If the truck is to be out of service for more than 6 months, further measures must betaken in consultation with the manufacturer’s service department.
13.1 Prior to decommissioning:
– Thoroughly clean the truck.
– Check the brakes.
– Check the hydraulic oil level and replenish as necessary (see Chapter F).
– Apply a thin layer of oil or grease to any non-painted mechanical components.
– Lubricate the truck in accordance with the lubrication schedule (see Chapter F).
– Charge the battery.
– Disconnect the battery, clean it and apply grease to the battery poles.
Z In addition, follow the battery manufacturer’s instructions.
– Spay all exposed electrical contacts with a suitable contact spray.

F 35
09
08.G
B13.2 During decommissioning:
Every 2 months:
– Charge the battery.
13.3 Returning the truck to operation after decommissioning
Z It is advisable to have the truck restored to service after decommissioning by anengineer of the manufacturer.
– Thoroughly clean the truck.
– Lubricate the truck in accordance with the lubrication schedule (see Chapter F).
– Clean the battery, grease the terminals and connect the battery.
– Charge the battery.
– Check transmission oil for condensed water and replace if necessary.
– Check hydraulic oil for condensed water and replace if necessary.
– Start up the truck (see Chapter E).
F Perform several brake tests immediately after re-commissioning the truck.

09
08.G
B
F 36
14 Safety checks to be performed at regular intervals and following any unusualincidents
Z Carry out a safety check in accordance with national regulations. Junheinrichrecommends checks in accordance with FEM Guideline 4.004. Jungheinrich has aspecial safety department with trained personnel to carry out such checks.
The truck must be inspected at least annually (refer to national regulations) or afterany unusual event by a qualified inspector. The inspector shall assess the conditionof the truck from purely a safety viewpoint, without regard to operational or economiccircumstances. The inspector shall be sufficiently instructed and experienced to beable to assess the condition of the truck and the effectiveness of the safetymechanisms based on the technical regulations and principles governing theinspection of forklift trucks.
A thorough test of the truck must be undertaken with regard to its technical conditionfrom a safety aspect. The truck must also be examined for damage caused bypossible improper use. A test report shall be provided. The test results must be keptfor at least the next 2 inspections.
The owner is responsible for ensuring that faults are immediately rectified.
Z A test plate is attached to the truck as proof that it has passed the safety inspection.This plate indicates the due date for the next inspection.
15 Final de-commissioning, disposal
Z Final, proper decommissioning or disposal of the truck must be performed inaccordance with the regulations of the country of application. In particular, regulationsgoverning the disposal of batteries, fuels and electronic and electrical systems mustbe observed.

F 37
09
08.G
Bo Optional
16 HUSS FS - MK Series Diesel Particle Filter Operating Instructions
16.1 Important General Instructions
Read the operating instructions carefully before using the soot particle filter.
The general accident prevention and other health and safety regulations must beobserved.
The use of additive-based fuels can have a negative effect on the exhaust and thusthe useful life of the diesel particle filter. Therefore use only DIN EN 590 diesel with aCetane rating above 50.
Z The HUSS diesel particle filter complies with TRGS 554, TA Air and VERT(Switzerland).
Application range of TRGS 554 (Technical Regulations for Hazardous Materials), TAAir and VERT:
– These Technical Regulations apply to work environments where diesel engineemissions may be contained in the air in the workplace.
– In Switzerland, VERT specifies in particular the requirements for tunnel buildingprojects and major construction sites.
16.2 Important safety instructions
M Attention:
The safe and proper use of the diesel particle filter requires careful operation andmaintenance.
M Operation and regeneration:
The diesel particle filter may only be operated and regenerated by persons who havebeen trained in filter regeneration and are aware of the potential hazards. Only trainedand authorized personnel may work on the diesel particle filter. Remove the dieselparticle filter from service immediately if it is clearly damaged or not working properly.Avoid any build up of flammable materials near the filter.
M Risk of burning
During regeneration the entire diesel particle filter system heats up and hot exhaustemerges from the exhaust pipe.
M Starting the truck in a hazardous situation (with starter interlock active):
Depress and hold down both the “M” and “F” buttons on the HUSS control and at thesame time start the truck.

09
08.G
B
F 38
16.3 Functional description
As the engine runs the diesel engine exhaust flows through the filter element whichretains virtually all the harmful soot particles.
The longer the diesel engine runs, the more the diesel particle filter fills up and thegreater the backpressure on the exhaust.
The level of the diesel particle filter is shown on the HUSS Control display, enablingregeneration to be made at the right time.
When a defined maximum backpressure or maximum charge time is reached, theHUSS Control activates the “Filter Full” alarm.
To burn off the soot particles in the filter element, the HUSS Control system startsregeneration when the engine is switched off.
A starter interlock and engine forced cutout are incorporated in the control system toprotect the engine and diesel particle filter.

F 39
09
08.G
B16.4 HUSS Control Operation
The diesel particle filter is operated by the HUSS Control unit. The control unit ismounted within the operator’s field of vision.
Display screen
The top line shows the functional stages; in the bottom line a bar indicates thecondition of the filter (backpressure / regeneration time)
Keys
Control (control key )Mode (mode key )Function (function key)
Important!
The HUSS control system only workswith the igitionis switched on.

09
08.G
B
F 40
16.5 HUSS Control Operating Instructions
Normal operation Display Function LED
Switch on the ignition. The buzzer sounds for min. 1 second and both LEDs light up at the same time.
Self test Green and red LEDs lit
If a message is stored it will be displayed, in conjunction with the flashing red LED.
e.g. alarm / filter full
HHHHHHHHHHH
Red LED flashing
Stored message: Before the last cutout the exhaust backpressure exceeded the upper limit for at least 20 seconds or regeneration was interrupted. The buzzer sounds continuously
Note to this message: The lift truck cannot be started, regeneration must be performed.
M Attention:
in a hazardous situation the lift
truck can be started by continually
pressing on the “M” and “F”
buttons.
If no message is stored the engine can be started.
Engine ready

F 41
09
08.G
BMessages in normal mode that indicate the status of the dieselparticle filter:
16.6 Regeneration
Z Regenerate daily even if the filter is not full
M Risk of fire and explosion
Pay attention when handling fuel Avoid naked flames when handling fuel. Do notsmoke. This applies even in areas where the fuel can only be smelled.
M Risk of fire and poisoning
High temperatures and exhaust with poisonous content result every time combustiontakes place.
The entire exhaust system becomes very hot during and immediately after operation.
with this message>>>Normal mode possible
Filter conditionHHHHHHHH
Green LED
Flashes
with this message>>>Regeneration required
RegenerateHHHHHHHH
Red LED flashing
10 regenerations had to be made within the maximum charge time, call the JH service department
Call service department / White ash
Diesel particle filter maintenance required, the JH service department must be called.
Maintenance

09
08.G
B
F 42
Regeneration Display ---------------Function LED
Park the truck on a level surface
Switch off the engine.
Ignition ON: HUSS Control is energised.
Press the “M” button and hold it down for 5 seconds. Regeneration starts after 5
seconds.
Start regeneration in 5 seconds >>>>>>>>Green LED
Other displays after the 5 seconds
The fan is set to pre-cooling.
Pre-cooling glow plug
The glow plug is switched on. Regeneration
Start glow plug
The fuel-air mixture is ignited. Regeneration start ignition
The diesel particle filter is regenerated. The display shows the remaining
regeneration time. Regeneration on
Regeneration is complete. This display appears for 3 minutes.
Regeneration completed

F 43
09
08.G
B
Regeneration Display ---------------Function LED
Regeneration can be interrupted by switching off the ignition with the ignition key or by pressing the “F” button on the
control system. The display counts down from 5 seconds until the regeneration process is switched off. The buzzer
sounds continuously.
“Filter full” alarm >> red LED flashes
M Important
If you press the “M” and “F”buttons simultaneously the enginecan also be started in hazardoussituations even when “Alarm/Filter
full”.
M Faults
All the hardware and softwarefunctions are tested duringregeneration.
Any faults will cause theregeneration to be cancelled.Faults are displayed on the HUSScontrol. The battery voltage is alsochecked. If the minimum level isnot reached, regeneration iscancelled. If one of the faultsindicated here is displayed, callthe JH service department torectify the fault
Glow plug fault
Fuel pump fault
Solenoid fault
Fan fault
Temperature gauge fault
Regeneration fault
Regeneration interrupted
Low voltage

09
08.G
B
F 44
16.7 Maintenance
The HUSS control displays the scheduled maintenance times.
Call the JH service department to carry out maintenance.
The Huss control system is factory-set for the truck. Only trained JH serviceengineers are authorised to make changes to these settings.