devkit-s12vr quick start guide (qsg) - mouser … · devkit-s12vr quick start guide (qsg) ... pin...
TRANSCRIPT

EXTERNAL USE
ULTRA-RELIABLE MCUS FOR
INDUSTRIAL AND AUTOMOTIVE
DEVKIT-S12VR
QUICK START GUIDE (QSG)

1 EXTERNAL USE
Get to know the DEVKIT-S12VR
NXP Microcontroller
S12VR
ADC
Potentiometer
On-Board
OSBDM
User –
Push button [2]
RGB LED
I/Os Headers
Freedom+ and Arduino
Power Supply
LIN Interface
Relay
The DEVKIT-S12VR is an ultra-low-cost development platform for S12 Microcontrollers.
Features include easy access to all MCU I/O´s, a standard-based form factor compatible with the Arduino™ pin layout, providing a broad range of expansion board options, and an USB serial port interface for connection to the IDE, the board has option to be powered via USB or an external power supply. DEVKIT-S12VR
Features
I/Os Headers
Freedom+ and
Arduino

2 EXTERNAL USE
Power Supply and Communications
DESCRIPTION NAME PINLIN J10-01VLIN J10-02GND J10-03GND J10-04
DESCRIPTION NAME PINVBAT J16-01GND J16- 02/03

3 EXTERNAL USE
Input/Output Connectors
J1
J2
Arduino Compatibility
The internal rows of the I/O headers on
the DEVKIT-S12VR are arranged to
fulfill Arduino™ shields compatibility .
PIN PORT FUNCTION J2J2-01 PS0 RXD1
J2-02 PS1 TXD1
J2-03 PP0 PWM0
J2-04 PP1 PWM1
J2-05 PP2 PWM2
J2-06 PP3 PWM3
J2-07 PP4 PWM4
J2-08 PP5 PWM5

4 EXTERNAL USE
Input/Output Connectors
J18
J17
Arduino Compatibility
The internal rows of the I/O headers on
the DEVKIT-S12VR are arranged to
fulfill Arduino™ shields compatibility .
PIN PORT FUNCTION J18 PIN PORT FUNCTION
J3-02 PE0 GPIO J3-01 PL1 HVI1
J3-04 PE1 GPIO J3-03 PL0 HVI0
J3-06 PT2 GPIO J3-05 PAD5 ADC5
J3-08 PT3 GPIO J3-07 PAD4 ADC4
J3-10 HS0 HS0 J3-09 PAD3 ADC3
J3-12 HS1 HS1 J3-11 PAD2 ADC2
J3-14 LS0 LS0 J3-13 PAD1 ADC1
J3-16 LS1 LS1 J3-15 PAD0 ADC0
PIN PORT FUNCTION J17J17-01 VBAT
J17-02 VDDX
J17-03 RESET_B
J17-04 P3V3
J17-05 P5V0
J17-06 GND
J17-07 GND
J17-08 VBAT

5 EXTERNAL USE
Default jumpers
REF POSITION DESCRIPTION
J11 OPEN Enable LIN Master modeJ15 1-2 Power the board from LIN VBATJ13 1-2 Supply the board with different
voltage supplyJ9 1-2 Connect or disconnect
potentiometer from ADCJ12 1 - 2 Shield is being powered from
VDDX (MCU)2 – 3
[DEFAULT]Shield is being powered from USB port
J13
J12
CAUTION:
When powered from the USB bus, do not exceed the
500mA maximum allowable current drain. Damage to
the target board or host PC may result.J15J11
J9

6 EXTERNAL USE
Programming interface and User Peripherals
REFERENCEMCUPORT
DESCRIPTION
Potentiometer R13 AN0 Rotary Potentiometer
PushButton
SW1 RESET
SW2 PL0
SW3 PL1
LED D6 PWR VDDX power Indicator
D1 RESET RESET LED indicator
D8RGB
PP2 User LED
PP3 User LED
PP4 User LED
HSDRV Indicators J19 HS0 Activate HS0 LED indicator
J20 HS1 Activate HS1 LED indicator
Programming and Debug Interface
J7 On-board JTAG connection via open sourceOSBDM circuit using the MC9S08JM60microcontroller
J6 Support for USB Multilink
Interface BDM
RGB LED [D8]
RESET [SW1]
Potentiometer [R13]
MICRO USB [J7]
BDM [J6]
User – Push Button
[SW3]
User – Push Button
[SW2]
HSDRV0 [J19]
HSDRV1 [J20]
LED [D6]
LED [D1]

7 EXTERNAL USE
Step-by-Step Installation Instructions
1
Install Software and Tools
Install CodeWarrior Development
Studio for S12 V5.1 or later. CodeWarrior Dev Tools for HCS12(X)
MCUs
2
Connect the USB Cable
Connect one end of the USB cable to the PC and the other end to
the mini-B connector on the DEVKIT-S12VR board. Allow the PC to
automatically configure the USB drivers if needed.
3
Using the Example Project
The pre-loaded example project utilizes the RGB LED. Once the
board is plugged in you can see how the RGB LEDs change the
color.
4
Learn More About the S12VR
Read the release notes and documentation on the nxp.com/S12VR.
• The Processor Expert graphical initialization software included in
your CodeWarrior installation will help reduce your time to
market
• CodeWarrior for S12 with examples
In this quick start guide, you
will learn how to set up the
DEVKIT-S12VR board and
run the default exercise.

8 EXTERNAL USE
CAUTIONARY NOTES
Electrostatic Discharge (ESD) prevention measures should be used when handling this product. ESD damage is not a warranty repair item.
NXP does not assume any liability arising out of the application or use of any product or circuit described herein; neither does it convey any license under patent rights or the rights of others.
EMC Information on the DEVKIT-S12VR board:
• This product as shipped from the factory with associated power supplies and cables, has been verified to meet with requirements of CE and the FCC as a CLASS A product.
• This product is designed and intended for use as a development platform for hardware or software in an educational or professional laboratory.
• Attaching additional wiring to this product or modifying the products operation from the factory default as shipped may effect its performance.

9 EXTERNAL USE
Documentation and References
Application Notes
• AN4643, S12VR Hardware Design Guidelines
• AN4975: Using MSCAN on the MagniV Family
• AN5122, Using NXP’s LIN Driver with the MagniV Family
• MC9S12VR Family Demonstration Lab Training
Reference Manuals
• MC9S12VRRM, MC9S12VR-Family Reference Manual
For more information please visit : www.nxp.com/S12VR
10 EXTERNAL USE
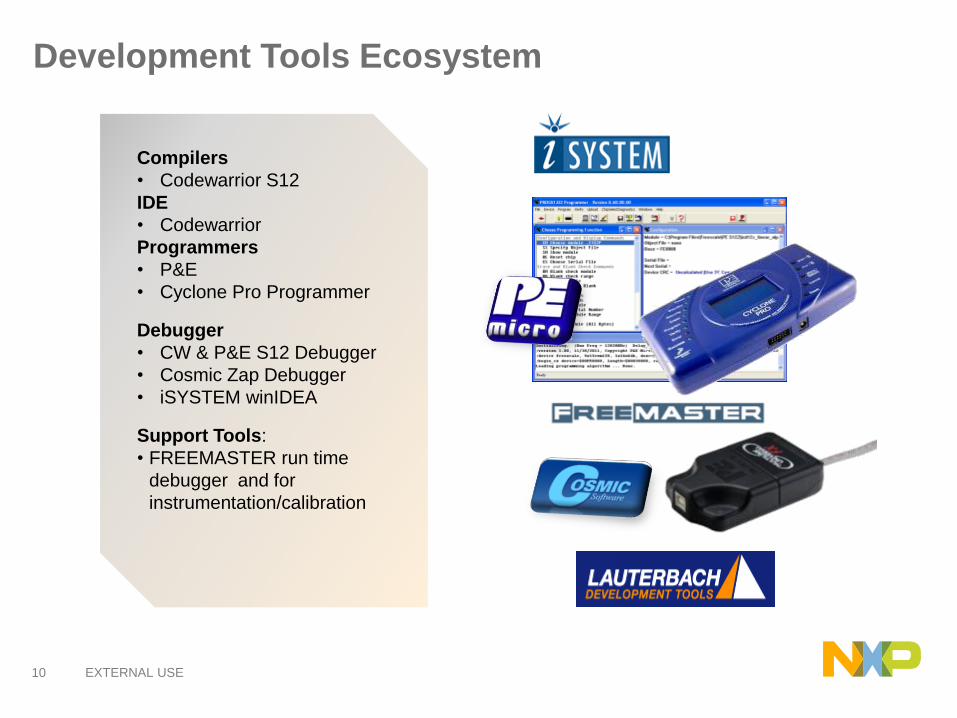
Development Tools Ecosystem
Compilers
• Codewarrior S12
IDE
• Codewarrior
Programmers
• P&E
• Cyclone Pro Programmer
Debugger
• CW & P&E S12 Debugger
• Cosmic Zap Debugger
• iSYSTEM winIDEA
Support Tools:
• FREEMASTER run time
debugger and for
instrumentation/calibration
