destiny 6100 owners
TRANSCRIPT

Revised 1/19/96Part # 800-6006A
Owners ManualDESTINYDESTINY
116
NOTE: When in 2 way mode, the following key functions apply:
Digit: 1 = turns on microphone #12 = turns on microphone #23 = turns on microphone #34 = turns off microphone #15 = turns off microphone #26 = turns off microphone #37 = changes to "high microphone sensitivity"8 = changes to "normal microphone sensitivity"9 = all microphones on0 = Exit to keypad mode/or will hang up
(programming option)
* = Listen# = Talk
NOTE: Some central stations may designate other key functions whenin 2 way mode. If this is the case, the homeowner "listen in" willfollow the new key assignments.
New Digit: 1= ____ 4= ____ 7= ____ 0= ____2= ____ 5= ____ 8= ____ *= ____3= ____ 6= ____ 9= ____ #= ____
CHANGING THE CLOCK TIME
To set or change the system time, press the 2 & 8 keyssimultaneously from a hardwired keypad. The system will respond byspeaking "enter four-digit time." Simply enter the time in a 12-hourformat. After the time is entered, the system will say "enter (1) AM, (2)PM." After selecting AM or PM, the system will confirm the enteredtime. If an invalid entry is made, the system will speak "error" andwait for a valid entry.
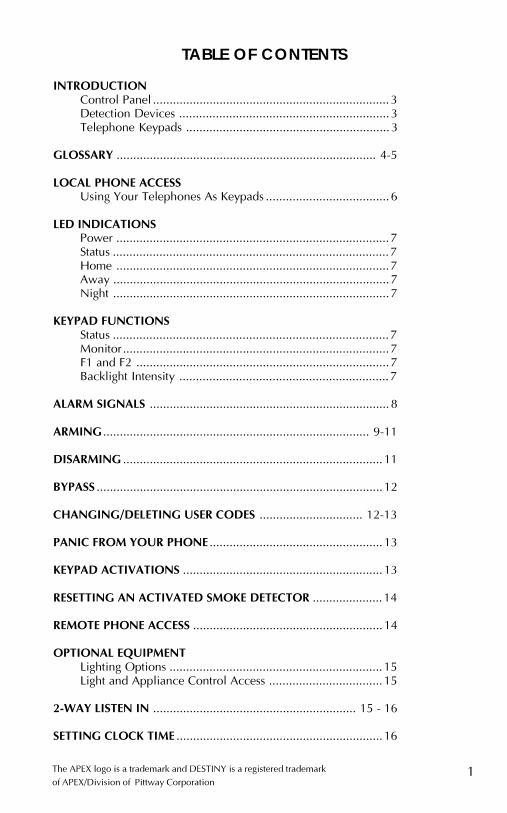
NOTE: TABLE OF CONTENTS
INTRODUCTIONControl Panel ....................................................................... 3Detection Devices ............................................................... 3Telephone Keypads ............................................................. 3
GLOSSARY .............................................................................. 4-5
LOCAL PHONE ACCESSUsing Your Telephones As Keypads ..................................... 6
LED INDICATIONSPower .................................................................................. 7Status ................................................................................... 7Home .................................................................................. 7Away ................................................................................... 7Night ................................................................................... 7
KEYPAD FUNCTIONSStatus ................................................................................... 7Monitor ................................................................................ 7F1 and F2 ............................................................................ 7Backlight Intensity ............................................................... 7
ALARM SIGNALS ........................................................................ 8
ARMING ................................................................................ 9-11
DISARMING .............................................................................. 11
BYPASS ......................................................................................12
CHANGING/DELETING USER CODES ............................... 12-13
PANIC FROM YOUR PHONE .................................................... 13
KEYPAD ACTIVATIONS ............................................................ 13
RESETTING AN ACTIVATED SMOKE DETECTOR ..................... 14
REMOTE PHONE ACCESS ......................................................... 14
OPTIONAL EQUIPMENTLighting Options ................................................................ 15Light and Appliance Control Access .................................. 15
2-WAY LISTEN IN ............................................................. 15 - 16
SETTING CLOCK TIME ..............................................................16
The APEX logo is a trademark and DESTINY is a registered trademarkof APEX/Division of Pittway Corporation
2 15
OPTIONALEQUIPMENT
LIGHTINGOPTIONS:
KEYPAD AND PHONE DIGIT QUICKREFERENCE
User code +1 .. speaks timeUser code +2 .. toggles monitor modeUser code +3 .. toggles extended monitor A on/offUser code +4 .. toggles extended monitor B on/offUser code +5 .. silences day zone speech after activationUser code +6 .. resets hardwire smoke detectorUser code +7 .. auxiliary user code entry/delete modeUser code +8 .. speaks long term memoryUser code +9 .. manual bypass modeUser code +0 .. immediate communicator test (no siren)
NOTE: Only "full function" codes can perform the aboveoperations.
The DESTINY control panel provides many "conve-nience related" features and options that greatly en-hance the system's interaction with your daily functions.Depending on your system's specific configuration, youmay or may not have the following options integratedinto your control panel.Enhanced features and options:� automatic arming/disarming based on time of day� 2-way voice with central station for alarm verification� homeowner listen-in from local or remote phones� homeowner global paging from local and remote phones� automatic control of lights and appliances based on
time of day� manual control of lights and appliances from
keypads, local and remote phones� complete energy management functions
� spoken temperature upon request from keypads, local and remote phones� Automatic and manual thermostat setback/forward operation� thermostat control by time of day
Specialized "convenience" features and options:� electric garage door operation from keypads and phones� front door visitor-to-homeowner communications
without opening door� motion activated lighting� vehicle activated driveway annunciation
The following 2-digit functions are only available fromthe RK-36 series keypads and not from phones:
� 1 & 3 and/or 3 & status initiate fire alarm� 4 & 6 and/or 6 & monitor initiate medical alarm
(inside speaker only)� 7 & 9 and/or 9 & F1 initiate panic alarm� 1 & 7 programmable (default enters remote control)� 2 & 8 changes time of day in the system clock� 3 & 9 programmable (default toggles monitor function)
KEYPAD ANDPHONE DIGITQUICKREFERENCE
NOTE:
OPTIONAL EQUIPMENT
LIGHTING OPTIONS:
The DESTINY allows you to turn on different lights and/orappliances when using the optional lighting accessories.Different lights can come on for an alarm condition orother system activity such as prealarm (entry delay). Yoursystem can also be programmed to turn lights on or off atcertain times of the day, as well as providing you with theability to control your lights from any keypad, localphone, and/or remote phone to include cellular andcordless types.
LIGHTS AND APPLIANCECONTROL ACCESS:
From your phones, either locally or remotely, access thesystem as you normally would (see local and remotephone access) and enter 8,8,8,8. From the keypad, the F1or F2 keys may be used instead of 8,8,8,8. After entering8,8,8,8 or F1, the system will speak "enter remote unit,"or if programmed, it will speak a menu of the activechannels in the system. At this point, enter a two-digitchannel number from 01 to 33. Your installer will let youknow what channels control which lights or appliances.Channel 33 is an "all lights on/off" channel that canactivate a group or bank of lights at the same time. Afterentering the desired channel, the system will echo yourchoice by speaking the programmed word descriptionsfor that channel. To activate the channel, the A or * keyturns the unit on, and the H or # key turns the unit off. ifthe dimming option is enabled, then the successivedepressions of the A or * key turns the unit off. If thedimming option is enabled, then the successive depres-sions of the A or * key will step through the six levels. Toexit remote control, enter 0,0 or any F key. If no digit isentered within 20 seconds the system will automaticallyexit.
NOTE: When twenty seconds pass without pressing anykeys, the system will automatically exit lights andappliance control and return to normal operation.
2 WAY AND LISTEN IN:
1. Access the system (see Local Access or Remote Access)
2. Press 9,9,9,9 to enter "Listen" mode.
3. Press # to talk, * to listen.
4. Hang up when done or press 0 to return to keypad mode.
LIGHTS ANDAPPLIANCE
CONTROLACCESS:
2 WAY ANDLISTEN IN
NOTE:

3
DESTINY
You have made a wise decision to protect your family andproperty with the DESTINY Security System. The DESTINYhas been designed to provide you with a maximum levelof security while being as simple as possible to under-stand and operate.
Your DESTINY Security System consists of:
1. Control panel
2. Detection devices
3. Your telephones
4. Keypad(s)
CONTROL PANELThe control panel is the heart of the security system andincludes a communicator which transmits information tothe central station. The control panel is housed in a metalcabinet which should only be opened by a qualifiedsecurity system technician.
DETECTION DEVICESThe detection devices continually monitor the status ofthe premises. Switches will alert the control panel of anopen door or window. A transmitter will do the same aswell as indicate when it has a weak battery. The glassbreak detector is exactly what the name implies: it picksup the frequency of breaking glass and instantly alertsthe control panel. A motion detector is used as a secondline of defense to detect intruders within a protectedarea. The smoke detector is always on.
TELEPHONE KEYPADSYour phones and keypads are used to send commands toyour security system. Because your phones and keypadsare your access to operating the security system, the mainemphasis of this user�s manual is to help you understandtheir operation.
Before reading this manual, it is recommended that youbecome familiar with the terms and definitions in theGlossary.
14
RESETTING AN ACTIVATED SMOKEDETECTOR
Whenever any of your wired (non-battery powered)smoke detectors activate the system, they will latch �ON�until you reset them. To do so, enter your primary codefollowed by 6. The system will say �SMOKE POWER�.
REMOTE PHONE ACCESS
You can gain access to the system from any touch-tonephone when you are away from home. If you use ananswering machine, your installer will program anoverride digit which you will use to bypass the answeringmachine and get directly into the system.
Following is a step-by-step description of phone access:
1. Dial your home number from any touch-tone phone.
2. The system will answer after a programmed numberof rings and you will hear an acknowledgment tonethat your system is ready and waiting. If you have ananswering machine, wait for it to answer, then pressthe programmed override digit within 10 secondsand you will then hear the acknowledgment toneindicating that your system is ready and waiting.
3. You must now enter your disarm code and the systemwill �speak� your system status. If you do not enter anacceptable code within 5 seconds of the tone youheard in Step 2, the system will automatically hang up.
4. Now that you have entered your code and havereceived the system status, your telephone can beused as a keypad. To hear the status of your systemagain, press the first digit of your disarm code andwait three seconds. The system status will berepeated through your telephone receiver.
To disarm the system over the phone, simply enter yourdisarm code on the telephone keypad. To arm thesystem, use the * key to arm to AWAY or use the # key toarm to HOME. Once you have finished, simply hang upthe phone and the system will hang up at the other end. Ifyou do not press any digits for a period of 15 seconds,the system will automatically hang up.
NOTE: Your installer can increase or decrease this time.
RESETTING ANACTIVATEDSMOKEDETECTOR
REMOTEPHONEACCESS
1 2 3 STATUS
POWER
STATUS
HOME
AWAY
MONITOR4 5 6
7 8 9 F1
0A H F2
SWITCHES
MOTIONDETECTOR
SMOKE DETECTOR
GLASS BREAKDETECTOR
TRANSMITTER
INTRODUCTION
NOTE:

4
GLOSSARY
ALERT - The "alert" status indicates the system has beentripped. The system will remember the "alert" status untilcleared. To clear the "alert" status, simply re-arm the panel.
ANNUNCIATION - Beep or speech emitted over the phoneor through system speakers to announce activity or reportsystem status.
ARM - To turn the security system ON to detect intrusion.There are three modes, or levels, of arming: AWAY, HOMEor NIGHT.
AWAY - Arming mode for use when you are �AWAY� fromthe premises. All interior and perimeter devices are armed;intrusion and/or movement within the premises will activatethe alarm.
BYPASS - To temporarily remove a zone from the systemthat would normally be active when the system is armed. Ifa zone is bypassed, it is not part of the system, and will notinitiate an alarm.
CENTRAL STATION - If your security system is monitored,this is the agency that receives the incoming burglary oremergency message from the security system and reports itto the proper authorities.
COMMUNICATOR - The device in the control panel thatreports all burglary and emergency alarms to the centralstation via telephone lines.
CONTROL PANEL - The heart of the security system. Only aqualified security system technician should open thecontainer which houses the control panel.
DISARM - To turn the security system OFF or silence alarmactivations, including fire alarms, that may occur while thesystem is armed.
DISARM CODE - The three or four digit number you enterto disarm the security system. The system will accept 32different disarm codes, including disappearing and duresscodes. Your disarm code allows you to control the system.
ENTRANCE DELAY - Time permitted to enter the armedpremises and disarm the security system before the alarm isactivated. A 20 second delay is set at the factory, but yourinstaller can program a longer or shorter time, as desired.
GLOSSARY
ANNUNCIATION
ARM
BYPASS
13
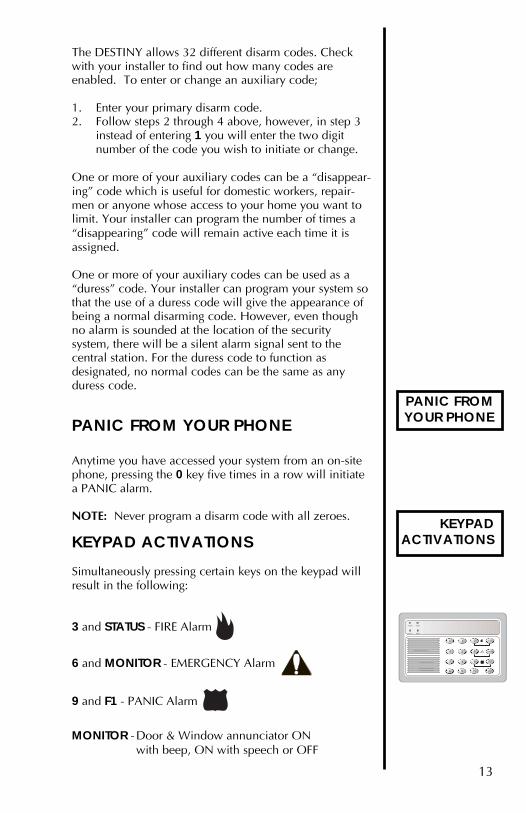
The DESTINY allows 32 different disarm codes. Checkwith your installer to find out how many codes areenabled. To enter or change an auxiliary code;
1. Enter your primary disarm code.2. Follow steps 2 through 4 above, however, in step 3
instead of entering 1 you will enter the two digitnumber of the code you wish to initiate or change.
One or more of your auxiliary codes can be a �disappear-ing� code which is useful for domestic workers, repair-men or anyone whose access to your home you want tolimit. Your installer can program the number of times a�disappearing� code will remain active each time it isassigned.
One or more of your auxiliary codes can be used as a�duress� code. Your installer can program your system sothat the use of a duress code will give the appearance ofbeing a normal disarming code. However, even thoughno alarm is sounded at the location of the securitysystem, there will be a silent alarm signal sent to thecentral station. For the duress code to function asdesignated, no normal codes can be the same as anyduress code.
PANIC FROM YOUR PHONE
Anytime you have accessed your system from an on-sitephone, pressing the 0 key five times in a row will initiatea PANIC alarm.
NOTE: Never program a disarm code with all zeroes.
KEYPAD ACTIVATIONS
Simultaneously pressing certain keys on the keypad willresult in the following:
3 and STATUS - FIRE Alarm
6 and MONITOR - EMERGENCY Alarm
9 and F1 - PANIC Alarm
MONITOR -Door & Window annunciator ONwith beep, ON with speech or OFF
1 2 3 STATUS
POWER
STATUS
HOME
AWAY
MONITOR4 5 6
7 8 9 F1
0A H F2
CONTROL PANEL
DISARM CODE
ENTRANCE DELAY
DISARM
COMMUNICATOR
PANIC FROMYOUR PHONE
KEYPADACTIVATIONS
AWAY
CENTRAL STATION
ALERT

5
GLOSSARY,cont.
12
BYPASS
To enter BYPASS mode, your system must be disarmed.Make sure the system is disarmed and follow the stepsbelow:
1. Enter your code and immediately press the 9 key togain entry into BYPASS mode. You will hear�BYPASSED MODE, ENTER ZONE NUMBER.�
2. Enter the two digit number of the zone (use a leadingzero if necessary) you wish to bypass. You will hear�(description of selected zone) BYPASSED (ON orOFF).� Only zones that exist in the system can bebypassed. If an invalid zone number is entered,refusal will be signaled by three beeps.
3. Press the * or A key. The yellow status led willlight to indicate that the zone is bypassed. The RK-36 Keypad LCD will display the zone descriptor andbeep. A second push of the * or A key within 10seconds will remove the zone from bypass and theyellow STATUS LED will clear as well as the zonedescriptor on the LCD display.
4. Pressing 00 while in BYPASS mode will clear allbypassed zones.
5. Press the # or H key to exit BYPASS mode. Youwill hear �EXIT�.
NOTE: If ten seconds pass without pressing any keys, thesystem will automatically exit BYPASS mode.
CHANGING/DELETING USER CODES
Assuming your primary code is 1,2,3,4:
1. Enter 1, 2, 3, 4, 7.
2. The system will speak �ENTER USER NUMBER�.
3. Enter 2 digit user number, (01-32). The system willspeak "ENTER CODE X X" (X X = 01-32)You do not need to clear a code to change a code.
4. Enter the new 4 digit code or hit the A key to deletethe user code from step 3. If a new 4 digit code isentered the system will speak �EXIT� after the 4thdigit. If a code is deleted the system will speak�CODE OUT�.
BYPASS
NOTE:
EXIT DELAY - Time permitted to leave the premises afterarming the system. A 30 second delay is set at the factory,but your installer can program a longer or shorter time, asdesired.
EXTENDED MONITOR - Allows a zone to speak continu-ously or for a programmable time period when tripped.Example would be "pool door open, pool door open, ..."
FORCE ARM - To override the security system's initialrefusal to arm because of an open zone. When the system isforce armed it will disregard any open zones until they havebeen closed.
HOME - Arming mode for use when you are at �HOME�.Only perimeter devices are armed allowing you to moveabout freely within the premises. The system will beprogrammed to eliminate all entrance delays when armed tohome. This might be preferable for individuals living alone.
INTERIOR ZONES - Zones consisting of motion detectors orany other detection devices located within the premises.
LCD - Liquid Crystal Display. Will display all system statusin English.
LED - Light emitting diode. These are used as indicators ofsystem conditions on keypads.
NIGHT - Arming mode for use when everyone is in for the�NIGHT�. All perimeter devices become instant and someinterior zones can be active.
PERIMETER ZONES - Zones consisting of door and windowcontacts and glass break detectors which will detect anintruder before he gains entry into the premises.
PREALARM SPEECH - When the system is armed, andsomeone enters the premises through a "delay" door, thesystem speaks "entry detected" followed by the worddescription programmed for that door. Example: "entrydetected, front door...entry detected, front door." Thisspeech will be heard for the duration of the entrance delay.If the disarm code is not entered within the programmedtime, theBURGLAR ALARM will sound. If an alarm tookplace while you were gone, then the system would speak"system showing alert," followed by the prealarm speech.
PREALARM TONE - Steady, low volume sound emittedthrough the speakers when the entry delay door is opened.This tone will continue until the disarm code is entered todisarm the system. If the disarm code is not entered withinthe programmed time, the BURGLAR ALARM will sound. Apulsing prealarm tone indicates there was an activationwhile you were gone.
ZONE - Any area or point of protection in the securitysystem such as doors, windows, and all other areas coveredby detection devices.
EXIT DELAY
FORCE ARM
HOME
INTERIOR ZONES
LCD
LED
NIGHT
PERIMETER ZONES
PREALARM SPEECH
PREALARM TONE
ZONE

6
LOCAL PHONE ACCESS
USING YOUR TELEPHONES AS KEYPADS
The system can be programmed to allow the use of yourhome telephones as keypads. You will notice that thekeypad shown below duplicates the keys on your phone.The * key on the phone is replaced by the A key on thekeypad and the # key on the phone is replaced by the Hkey on the keypad. Your installer will let you knowwhich key or keys will access the system. The localphone access code must be entered within (5) seconds ofpicking up the phone. If the correct code is enteredwithin (5) seconds, you will hear the systemacknowledgement tone or system status. At this point youcan control the system from the phone just like from thehardwired keypad.
NOTE: If your regular phone line is out for any reasonyou will not hear a dial tone when you pick up a phone,however, you will hear a series of tones indicating theline is gone. If this is the case, there is no need to accessthe system because the phone will already be a systemkeypad when it is picked up. Press any key and the toneswill stop. If your system communicates to a central stationand there is an activation, you can pick up a phone andsimply enter your disarm code. The system will recognizethe phone as a keypad as soon as you pick it up.
NOTE: When you access the system from your homephone, your normal incoming phone line is discon-nected. In the case of an incoming call you will hearone-second tones similar to call waiting. To answer thecall simply hang up to terminate telephone keypad access.
USING YOURTELEPHONESAS KEYPADS
11
5. Preventing accidental arming:
If you want to prevent anyone from accidentallyarming the system, your installer can program thealarm system to require your disarm code to alsoserve as an arming code. When programmed to thisoption, you must enter your code before you pressthe * or A key (AWAY mode) or # or H key (HOMEmode) to arm the system.
DISARMING
How to TURN OFF the alarm system
Enter your disarm code.
When the system is disarmed, you will hear �CONTROLIS DISARMED� over the phone or through thespeaker and the red HOME LED and/or green AWAYLED will go out.
When you open the entry door while the system isarmed to AWAY, you may hear �PRE-ALARM�spoken instead of hearing the tone. This is theprealarm tone and it will continue until you enteryour disarm code. You have 20 seconds to disarm thesystem before the BURGLAR alarm will activate. Yourinstaller can program a longer or shorter entry delaytime, at your request.
If the prealarm tone is not a continuous, steady tone,but is instead a series of broken tones, this is anindication that the security system was activatedwhile you were gone, and the yellow STATUS LEDwill be flashing.
In the unlikely event of a �FALSE� or �ACCIDENTAL�ALARM, enter your code to disarm the system andstop the audible alarms. Check with your installerand/or central station to determine the properprocedure for dealing with false or accidental alarms.Depending on the structure of your central station,you may need to notify the central station or theymay call you. In either event, be prepared to reciteyour central station account number or abort code toverify your identity.
ARMING,cont.
PREVENTINGACCIDENTAL
ARMING:
DISARMING
1 2 3 STATUS
POWER
STATUS
HOME
AWAY
MONITOR4 5 6
7 8 9 F1
0A H F2
RK-36 KEYPAD
MONITOR MODE FROM A PHONESee RK-36 Keypad description for explanation of"Monitor Mode."
To change monitor mode from a phone; access thesystem (refer to Local Access or Remote Access), thenenter the user code plus the 2 digit. This toggles to themonitor mode.
NOTE:
NOTE:
MONITOR MODEFROM A PHONE
7
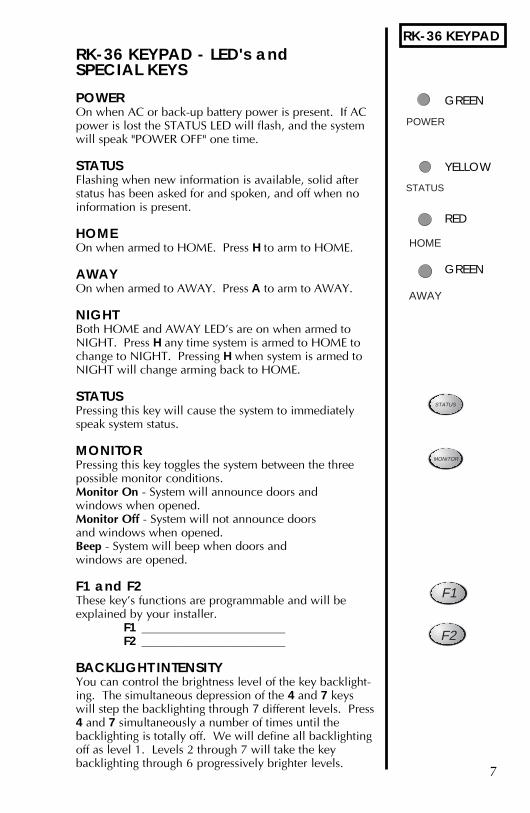
RK-36 KEYPADRK-36 KEYPAD - LED's andSPECIAL KEYS
POWEROn when AC or back-up battery power is present. If ACpower is lost the STATUS LED will flash, and the systemwill speak "POWER OFF" one time.
STATUSFlashing when new information is available, solid afterstatus has been asked for and spoken, and off when noinformation is present.
HOMEOn when armed to HOME. Press H to arm to HOME.
AWAYOn when armed to AWAY. Press A to arm to AWAY.
NIGHTBoth HOME and AWAY LED's are on when armed toNIGHT. Press H any time system is armed to HOME tochange to NIGHT. Pressing H when system is armed toNIGHT will change arming back to HOME.
STATUSPressing this key will cause the system to immediatelyspeak system status.
MONITORPressing this key toggles the system between the threepossible monitor conditions.Monitor On - System will announce doors andwindows when opened.Monitor Off - System will not announce doorsand windows when opened.Beep - System will beep when doors andwindows are opened.
F1 and F2These key's functions are programmable and will beexplained by your installer.
F1 ________________________F2 ________________________
BACKLIGHT INTENSITYYou can control the brightness level of the key backlight-ing. The simultaneous depression of the 4 and 7 keyswill step the backlighting through 7 different levels. Press4 and 7 simultaneously a number of times until thebacklighting is totally off. We will define all backlightingoff as level 1. Levels 2 through 7 will take the keybacklighting through 6 progressively brighter levels.
10
LED will not light and you will hear the system say�ZONES OPEN� over the phone or through the speakerwhich indicates that the system did NOT arm.See "Force Arming" to continue.
3. Arming the system to NIGHT: (Optional)
Arm the system to HOME mode. (See item 2)
Push the # or H key again.
The green AWAY LED will light with the red HOMELED and the system will say �ARMED TO NIGHT�over the phone or through the speaker. When armedto the NIGHT mode, the perimeter entry delay zonesbecome instant and your installer may program someinterior zones to be active. If you wish to return tothe HOME mode, simply push the # or H key anytime the system is in the NIGHT mode.
4. Force Arming the system:
If you attempt to arm the system to either HOME orAWAY but you hear �ZONES OPEN� over the phoneor through the speaker and notice that neither theHOME LED nor the AWAY LED has come on, thesystem is NOT armed. However, the system can beFORCE ARMED.
Push the # or H or * or A key a second time within10 seconds. If arming to HOME, the red HOME LEDwill now light and �FORCE ARMED TO HOME� willbe heard indicating that the system is now ARMED toHOME. If arming to AWAY, the green AWAY LEDwill now light and �FORCE ARMED TO AWAY� willbe heard. When FORCE ARMED either to HOME orAWAY, the yellow STATUS LED will be lit. You canfind out which zones are open by requesting systemstatus.
PLEASE NOTE: When you FORCE ARM your system,security is compromised because the open zone willbe ignored by the system. Check with your installerto determine how the open zone will again be part ofthe system.
Zones which operate 24 hours a day such as FIREand PANIC are always armed and take priority overall other types of protection in the system.
ARMING
PLEASE NOTE:
ARMING THESYSTEM TONIGHT:(OPTIONAL)
PUSH THE # OR HKEY AGAIN.
FORCE ARMINGTHE SYSTEM:
F1
F2
STATUS
MONITOR
POWER
STATUS
HOME
AWAY
GREEN
YELLOW
RED
GREEN

8
ALARMSIGNALS ALARM SIGNALS
Understanding the alarm signals:
FIRE Alarm: a continuous, steady, loud tone emittedthrough the speakers. Your installer may also program thesystem to speak in between tones saying �FIRE, (descriptionof zone that activated), REMAIN CALM, LEAVE IMMEDI-ATELY�.
EMERGENCY Alarm: a low pulsing tone is emitted throughthe speakers. Your installer may also program the systemto speak in between tones saying �ALERT, (description ofzone that activated)�.
PANIC Alarm: a loud pulsing tone is emitted through thespeakers. Your installer may also program the system tospeak in between tones saying �ALERT, ALERT, (descrip-tion of zone that activated)�.
BURGLAR Alarm: a loud yelping tone is emitted throughthe speakers. Your installer may also program the systemto speak in between tones saying �INTRUSIONDETECTED, INTRUSION DETECTED (description of thezone that activated)�.
PREALARM tone: a steady, low volume tone emittedthrough the speakers during the entrance delay. This toneis activated by opening the delay door and will continueuntil the security system is disarmed. If the system is notdisarmed within the programmed delay time, the BUR-GLAR alarm will sound. A broken or pulsing prealarm tonesignals that an alarm activation has occurred while youwere gone.
If the option is programmed to �speak during prealarm,�the system will speak �entry detected,� followed by thezone descriptor, instead of a solid prealarm tone.
DOOR & WINDOW ANNUNCIATOR: The system willspeak up to four words describing a zone followed by theword �OPEN�. If you would prefer not to hear anythingwhen you open a window or door, simply access thesystem from one of your phones and press your codefollowed by 2 or press the MONITOR key at an optionalkeypad and you will hear �MONITOR OFF�. Now eachtime you open a protected door or window there will bestatus available over the phone and/or visual indication atthe keypad, but no sound. If you prefer to hear a beepwhen you open, enter your code followed by 2 or press theMONITOR key again. You will now hear one beep. Enteryour code followed by 2 or press the MONITOR key andyou will hear �MONITOR ON� and the system will returnto speech. No monitor will be heard for a door or windowthat is bypassed.
Loss of AC power signal: Anytime that you lose AC power,your security system automatically switches to the backupbattery and speaks �POWER OFF� one time through thespeaker.
9
ARMING
When referring to operation from a phone, the followinginstructions will assume that access to the system hasalready taken place. Remember, your installer hasprogrammed a one to four digit code which you will enterwhen you pick up the phone to get access to the system.
How to TURN ON the alarm system to provide protection:
1. Arming the system to AWAY:
Push the * or A key.
If no zones are open, the green AWAY LED will lightand the system will say �ARMED TO AWAY� overthe phone or through the speaker.
The security system is now on, or armed. When armedin the AWAY mode, all interior zones, includingmotion detectors, become active, as well as allperimeter zones. If any zone is open while attemptingto arm the system, the AWAY LED will not light andthe system will say �ZONES OPEN� over the phone orthrough the speaker, indicating that the system didNOT arm because a window or door is OPEN.See �Force Arm� to continue to arm.
After you have ARMED the system, you must leavethrough the designated entry/exit door within thespecified exit delay time. Your installer can programthe exit delay time you desire.
NOTE: If a zone is opened before the exit delayexpires, or the system is force armed, then that zonewill not be part of the system until that zone isclosed.
2. Arming the system to HOME:
Push the # or H key.
If no zones are open, the red HOME LED will lightand you will hear the system say �ARMED TOHOME� over the phone or through the speaker.
The security system is now on, or armed. Whenarmed to the HOME mode, only the exterior, orperimeter, zones are armed. This will allow you tomove about freely within your home. If any zone isopen while attempting to arm the system, the HOME
ARMING
ARMING THESYSTEM TO
AWAY:PUSH THE * OR A
KEY.
NOTE:
ARMING THESYSTEM TO
HOME:PUSH THE # OR H
KEY.

7
RK-36 KEYPADRK-36 KEYPAD - LED's andSPECIAL KEYS
POWEROn when AC or back-up battery power is present. If ACpower is lost the STATUS LED will flash, and the systemwill speak "POWER OFF" one time.
STATUSFlashing when new information is available, solid afterstatus has been asked for and spoken, and off when noinformation is present.
HOMEOn when armed to HOME. Press H to arm to HOME.
AWAYOn when armed to AWAY. Press A to arm to AWAY.
NIGHTBoth HOME and AWAY LED's are on when armed toNIGHT. Press H any time system is armed to HOME tochange to NIGHT. Pressing H when system is armed toNIGHT will change arming back to HOME.
STATUSPressing this key will cause the system to immediatelyspeak system status.
MONITORPressing this key toggles the system between the threepossible monitor conditions.Monitor On - System will announce doors andwindows when opened.Monitor Off - System will not announce doorsand windows when opened.Beep - System will beep when doors andwindows are opened.
F1 and F2These key's functions are programmable and will beexplained by your installer.
F1 ________________________F2 ________________________
BACKLIGHT INTENSITYYou can control the brightness level of the key backlight-ing. The simultaneous depression of the 4 and 7 keyswill step the backlighting through 7 different levels. Press4 and 7 simultaneously a number of times until thebacklighting is totally off. We will define all backlightingoff as level 1. Levels 2 through 7 will take the keybacklighting through 6 progressively brighter levels.
10
LED will not light and you will hear the system say�ZONES OPEN� over the phone or through the speakerwhich indicates that the system did NOT arm.See "Force Arming" to continue.
3. Arming the system to NIGHT: (Optional)
Arm the system to HOME mode. (See item 2)
Push the # or H key again.
The green AWAY LED will light with the red HOMELED and the system will say �ARMED TO NIGHT�over the phone or through the speaker. When armedto the NIGHT mode, the perimeter entry delay zonesbecome instant and your installer may program someinterior zones to be active. If you wish to return tothe HOME mode, simply push the # or H key anytime the system is in the NIGHT mode.
4. Force Arming the system:
If you attempt to arm the system to either HOME orAWAY but you hear �ZONES OPEN� over the phoneor through the speaker and notice that neither theHOME LED nor the AWAY LED has come on, thesystem is NOT armed. However, the system can beFORCE ARMED.
Push the # or H or * or A key a second time within10 seconds. If arming to HOME, the red HOME LEDwill now light and �FORCE ARMED TO HOME� willbe heard indicating that the system is now ARMED toHOME. If arming to AWAY, the green AWAY LEDwill now light and �FORCE ARMED TO AWAY� willbe heard. When FORCE ARMED either to HOME orAWAY, the yellow STATUS LED will be lit. You canfind out which zones are open by requesting systemstatus.
PLEASE NOTE: When you FORCE ARM your system,security is compromised because the open zone willbe ignored by the system. Check with your installerto determine how the open zone will again be part ofthe system.
Zones which operate 24 hours a day such as FIREand PANIC are always armed and take priority overall other types of protection in the system.
ARMING
PLEASE NOTE:
ARMING THESYSTEM TONIGHT:(OPTIONAL)
PUSH THE # OR HKEY AGAIN.
FORCE ARMINGTHE SYSTEM:
F1
F2
STATUS
MONITOR
POWER
STATUS
HOME
AWAY
GREEN
YELLOW
RED
GREEN

6
LOCAL PHONE ACCESS
USING YOUR TELEPHONES AS KEYPADS
The system can be programmed to allow the use of yourhome telephones as keypads. You will notice that thekeypad shown below duplicates the keys on your phone.The * key on the phone is replaced by the A key on thekeypad and the # key on the phone is replaced by the Hkey on the keypad. Your installer will let you knowwhich key or keys will access the system. The localphone access code must be entered within (5) seconds ofpicking up the phone. If the correct code is enteredwithin (5) seconds, you will hear the systemacknowledgement tone or system status. At this point youcan control the system from the phone just like from thehardwired keypad.
NOTE: If your regular phone line is out for any reasonyou will not hear a dial tone when you pick up a phone,however, you will hear a series of tones indicating theline is gone. If this is the case, there is no need to accessthe system because the phone will already be a systemkeypad when it is picked up. Press any key and the toneswill stop. If your system communicates to a central stationand there is an activation, you can pick up a phone andsimply enter your disarm code. The system will recognizethe phone as a keypad as soon as you pick it up.
NOTE: When you access the system from your homephone, your normal incoming phone line is discon-nected. In the case of an incoming call you will hearone-second tones similar to call waiting. To answer thecall simply hang up to terminate telephone keypad access.
USING YOURTELEPHONESAS KEYPADS
11
5. Preventing accidental arming:
If you want to prevent anyone from accidentallyarming the system, your installer can program thealarm system to require your disarm code to alsoserve as an arming code. When programmed to thisoption, you must enter your code before you pressthe * or A key (AWAY mode) or # or H key (HOMEmode) to arm the system.
DISARMING
How to TURN OFF the alarm system
Enter your disarm code.
When the system is disarmed, you will hear �CONTROLIS DISARMED� over the phone or through thespeaker and the red HOME LED and/or green AWAYLED will go out.
When you open the entry door while the system isarmed to AWAY, you may hear �PRE-ALARM�spoken instead of hearing the tone. This is theprealarm tone and it will continue until you enteryour disarm code. You have 20 seconds to disarm thesystem before the BURGLAR alarm will activate. Yourinstaller can program a longer or shorter entry delaytime, at your request.
If the prealarm tone is not a continuous, steady tone,but is instead a series of broken tones, this is anindication that the security system was activatedwhile you were gone, and the yellow STATUS LEDwill be flashing.
In the unlikely event of a �FALSE� or �ACCIDENTAL�ALARM, enter your code to disarm the system andstop the audible alarms. Check with your installerand/or central station to determine the properprocedure for dealing with false or accidental alarms.Depending on the structure of your central station,you may need to notify the central station or theymay call you. In either event, be prepared to reciteyour central station account number or abort code toverify your identity.
ARMING,cont.
PREVENTINGACCIDENTAL
ARMING:
DISARMING
1 2 3 STATUS
POWER
STATUS
HOME
AWAY
MONITOR4 5 6
7 8 9 F1
0A H F2
RK-36 KEYPAD
MONITOR MODE FROM A PHONESee RK-36 Keypad description for explanation of"Monitor Mode."
To change monitor mode from a phone; access thesystem (refer to Local Access or Remote Access), thenenter the user code plus the 2 digit. This toggles to themonitor mode.
NOTE:
NOTE:
MONITOR MODEFROM A PHONE

5
GLOSSARY,cont.
12
BYPASS
To enter BYPASS mode, your system must be disarmed.Make sure the system is disarmed and follow the stepsbelow:
1. Enter your code and immediately press the 9 key togain entry into BYPASS mode. You will hear�BYPASSED MODE, ENTER ZONE NUMBER.�
2. Enter the two digit number of the zone (use a leadingzero if necessary) you wish to bypass. You will hear�(description of selected zone) BYPASSED (ON orOFF).� Only zones that exist in the system can bebypassed. If an invalid zone number is entered,refusal will be signaled by three beeps.
3. Press the * or A key. The yellow status led willlight to indicate that the zone is bypassed. The RK-36 Keypad LCD will display the zone descriptor andbeep. A second push of the * or A key within 10seconds will remove the zone from bypass and theyellow STATUS LED will clear as well as the zonedescriptor on the LCD display.
4. Pressing 00 while in BYPASS mode will clear allbypassed zones.
5. Press the # or H key to exit BYPASS mode. Youwill hear �EXIT�.
NOTE: If ten seconds pass without pressing any keys, thesystem will automatically exit BYPASS mode.
CHANGING/DELETING USER CODES
Assuming your primary code is 1,2,3,4:
1. Enter 1, 2, 3, 4, 7.
2. The system will speak �ENTER USER NUMBER�.
3. Enter 2 digit user number, (01-32). The system willspeak "ENTER CODE X X" (X X = 01-32)You do not need to clear a code to change a code.
4. Enter the new 4 digit code or hit the A key to deletethe user code from step 3. If a new 4 digit code isentered the system will speak �EXIT� after the 4thdigit. If a code is deleted the system will speak�CODE OUT�.
BYPASS
NOTE:
EXIT DELAY - Time permitted to leave the premises afterarming the system. A 30 second delay is set at the factory,but your installer can program a longer or shorter time, asdesired.
EXTENDED MONITOR - Allows a zone to speak continu-ously or for a programmable time period when tripped.Example would be "pool door open, pool door open, ..."
FORCE ARM - To override the security system's initialrefusal to arm because of an open zone. When the system isforce armed it will disregard any open zones until they havebeen closed.
HOME - Arming mode for use when you are at �HOME�.Only perimeter devices are armed allowing you to moveabout freely within the premises. The system will beprogrammed to eliminate all entrance delays when armed tohome. This might be preferable for individuals living alone.
INTERIOR ZONES - Zones consisting of motion detectors orany other detection devices located within the premises.
LCD - Liquid Crystal Display. Will display all system statusin English.
LED - Light emitting diode. These are used as indicators ofsystem conditions on keypads.
NIGHT - Arming mode for use when everyone is in for the�NIGHT�. All perimeter devices become instant and someinterior zones can be active.
PERIMETER ZONES - Zones consisting of door and windowcontacts and glass break detectors which will detect anintruder before he gains entry into the premises.
PREALARM SPEECH - When the system is armed, andsomeone enters the premises through a "delay" door, thesystem speaks "entry detected" followed by the worddescription programmed for that door. Example: "entrydetected, front door...entry detected, front door." Thisspeech will be heard for the duration of the entrance delay.If the disarm code is not entered within the programmedtime, theBURGLAR ALARM will sound. If an alarm tookplace while you were gone, then the system would speak"system showing alert," followed by the prealarm speech.
PREALARM TONE - Steady, low volume sound emittedthrough the speakers when the entry delay door is opened.This tone will continue until the disarm code is entered todisarm the system. If the disarm code is not entered withinthe programmed time, the BURGLAR ALARM will sound. Apulsing prealarm tone indicates there was an activationwhile you were gone.
ZONE - Any area or point of protection in the securitysystem such as doors, windows, and all other areas coveredby detection devices.
EXIT DELAY
FORCE ARM
HOME
INTERIOR ZONES
LCD
LED
NIGHT
PERIMETER ZONES
PREALARM SPEECH
PREALARM TONE
ZONE
4
GLOSSARY
ALERT - The "alert" status indicates the system has beentripped. The system will remember the "alert" status untilcleared. To clear the "alert" status, simply re-arm the panel.
ANNUNCIATION - Beep or speech emitted over the phoneor through system speakers to announce activity or reportsystem status.
ARM - To turn the security system ON to detect intrusion.There are three modes, or levels, of arming: AWAY, HOMEor NIGHT.
AWAY - Arming mode for use when you are �AWAY� fromthe premises. All interior and perimeter devices are armed;intrusion and/or movement within the premises will activatethe alarm.
BYPASS - To temporarily remove a zone from the systemthat would normally be active when the system is armed. Ifa zone is bypassed, it is not part of the system, and will notinitiate an alarm.
CENTRAL STATION - If your security system is monitored,this is the agency that receives the incoming burglary oremergency message from the security system and reports itto the proper authorities.
COMMUNICATOR - The device in the control panel thatreports all burglary and emergency alarms to the centralstation via telephone lines.
CONTROL PANEL - The heart of the security system. Only aqualified security system technician should open thecontainer which houses the control panel.
DISARM - To turn the security system OFF or silence alarmactivations, including fire alarms, that may occur while thesystem is armed.
DISARM CODE - The three or four digit number you enterto disarm the security system. The system will accept 32different disarm codes, including disappearing and duresscodes. Your disarm code allows you to control the system.
ENTRANCE DELAY - Time permitted to enter the armedpremises and disarm the security system before the alarm isactivated. A 20 second delay is set at the factory, but yourinstaller can program a longer or shorter time, as desired.
GLOSSARY
ANNUNCIATION
ARM
BYPASS
13
The DESTINY allows 32 different disarm codes. Checkwith your installer to find out how many codes areenabled. To enter or change an auxiliary code;
1. Enter your primary disarm code.2. Follow steps 2 through 4 above, however, in step 3
instead of entering 1 you will enter the two digitnumber of the code you wish to initiate or change.
One or more of your auxiliary codes can be a �disappear-ing� code which is useful for domestic workers, repair-men or anyone whose access to your home you want tolimit. Your installer can program the number of times a�disappearing� code will remain active each time it isassigned.
One or more of your auxiliary codes can be used as a�duress� code. Your installer can program your system sothat the use of a duress code will give the appearance ofbeing a normal disarming code. However, even thoughno alarm is sounded at the location of the securitysystem, there will be a silent alarm signal sent to thecentral station. For the duress code to function asdesignated, no normal codes can be the same as anyduress code.
PANIC FROM YOUR PHONE
Anytime you have accessed your system from an on-sitephone, pressing the 0 key five times in a row will initiatea PANIC alarm.
NOTE: Never program a disarm code with all zeroes.
KEYPAD ACTIVATIONS
Simultaneously pressing certain keys on the keypad willresult in the following:
3 and STATUS - FIRE Alarm
6 and MONITOR - EMERGENCY Alarm
9 and F1 - PANIC Alarm
MONITOR -Door & Window annunciator ONwith beep, ON with speech or OFF
1 2 3 STATUS
POWER
STATUS
HOME
AWAY
MONITOR4 5 6
7 8 9 F1
0A H F2
CONTROL PANEL
DISARM CODE
ENTRANCE DELAY
DISARM
COMMUNICATOR
PANIC FROMYOUR PHONE
KEYPADACTIVATIONS
AWAY
CENTRAL STATION
ALERT

3
DESTINY
You have made a wise decision to protect your family andproperty with the DESTINY Security System. The DESTINYhas been designed to provide you with a maximum levelof security while being as simple as possible to under-stand and operate.
Your DESTINY Security System consists of:
1. Control panel
2. Detection devices
3. Your telephones
4. Keypad(s)
CONTROL PANELThe control panel is the heart of the security system andincludes a communicator which transmits information tothe central station. The control panel is housed in a metalcabinet which should only be opened by a qualifiedsecurity system technician.
DETECTION DEVICESThe detection devices continually monitor the status ofthe premises. Switches will alert the control panel of anopen door or window. A transmitter will do the same aswell as indicate when it has a weak battery. The glassbreak detector is exactly what the name implies: it picksup the frequency of breaking glass and instantly alertsthe control panel. A motion detector is used as a secondline of defense to detect intruders within a protectedarea. The smoke detector is always on.
TELEPHONE KEYPADSYour phones and keypads are used to send commands toyour security system. Because your phones and keypadsare your access to operating the security system, the mainemphasis of this user�s manual is to help you understandtheir operation.
Before reading this manual, it is recommended that youbecome familiar with the terms and definitions in theGlossary.
14
RESETTING AN ACTIVATED SMOKEDETECTOR
Whenever any of your wired (non-battery powered)smoke detectors activate the system, they will latch �ON�until you reset them. To do so, enter your primary codefollowed by 6. The system will say �SMOKE POWER�.
REMOTE PHONE ACCESS
You can gain access to the system from any touch-tonephone when you are away from home. If you use ananswering machine, your installer will program anoverride digit which you will use to bypass the answeringmachine and get directly into the system.
Following is a step-by-step description of phone access:
1. Dial your home number from any touch-tone phone.
2. The system will answer after a programmed numberof rings and you will hear an acknowledgment tonethat your system is ready and waiting. If you have ananswering machine, wait for it to answer, then pressthe programmed override digit within 10 secondsand you will then hear the acknowledgment toneindicating that your system is ready and waiting.
3. You must now enter your disarm code and the systemwill �speak� your system status. If you do not enter anacceptable code within 5 seconds of the tone youheard in Step 2, the system will automatically hang up.
4. Now that you have entered your code and havereceived the system status, your telephone can beused as a keypad. To hear the status of your systemagain, press the first digit of your disarm code andwait three seconds. The system status will berepeated through your telephone receiver.
To disarm the system over the phone, simply enter yourdisarm code on the telephone keypad. To arm thesystem, use the * key to arm to AWAY or use the # key toarm to HOME. Once you have finished, simply hang upthe phone and the system will hang up at the other end. Ifyou do not press any digits for a period of 15 seconds,the system will automatically hang up.
NOTE: Your installer can increase or decrease this time.
RESETTING ANACTIVATEDSMOKEDETECTOR
REMOTEPHONEACCESS
1 2 3 STATUS
POWER
STATUS
HOME
AWAY
MONITOR4 5 6
7 8 9 F1
0A H F2
SWITCHES
MOTIONDETECTOR
SMOKE DETECTOR
GLASS BREAKDETECTOR
TRANSMITTER
INTRODUCTION
NOTE:

2 15
OPTIONALEQUIPMENT
LIGHTINGOPTIONS:
KEYPAD AND PHONE DIGIT QUICKREFERENCE
User code +1 .. speaks timeUser code +2 .. toggles monitor modeUser code +3 .. toggles extended monitor A on/offUser code +4 .. toggles extended monitor B on/offUser code +5 .. silences day zone speech after activationUser code +6 .. resets hardwire smoke detectorUser code +7 .. auxiliary user code entry/delete modeUser code +8 .. speaks long term memoryUser code +9 .. manual bypass modeUser code +0 .. immediate communicator test (no siren)
NOTE: Only "full function" codes can perform the aboveoperations.
The DESTINY control panel provides many "conve-nience related" features and options that greatly en-hance the system's interaction with your daily functions.Depending on your system's specific configuration, youmay or may not have the following options integratedinto your control panel.Enhanced features and options:� automatic arming/disarming based on time of day� 2-way voice with central station for alarm verification� homeowner listen-in from local or remote phones� homeowner global paging from local and remote phones� automatic control of lights and appliances based on
time of day� manual control of lights and appliances from
keypads, local and remote phones� complete energy management functions
� spoken temperature upon request from keypads, local and remote phones� Automatic and manual thermostat setback/forward operation� thermostat control by time of day
Specialized "convenience" features and options:� electric garage door operation from keypads and phones� front door visitor-to-homeowner communications
without opening door� motion activated lighting� vehicle activated driveway annunciation
The following 2-digit functions are only available fromthe RK-36 series keypads and not from phones:
� 1 & 3 and/or 3 & status initiate fire alarm� 4 & 6 and/or 6 & monitor initiate medical alarm
(inside speaker only)� 7 & 9 and/or 9 & F1 initiate panic alarm� 1 & 7 programmable (default enters remote control)� 2 & 8 changes time of day in the system clock� 3 & 9 programmable (default toggles monitor function)
KEYPAD ANDPHONE DIGITQUICKREFERENCE
NOTE:
OPTIONAL EQUIPMENT
LIGHTING OPTIONS:
The DESTINY allows you to turn on different lights and/orappliances when using the optional lighting accessories.Different lights can come on for an alarm condition orother system activity such as prealarm (entry delay). Yoursystem can also be programmed to turn lights on or off atcertain times of the day, as well as providing you with theability to control your lights from any keypad, localphone, and/or remote phone to include cellular andcordless types.
LIGHTS AND APPLIANCECONTROL ACCESS:
From your phones, either locally or remotely, access thesystem as you normally would (see local and remotephone access) and enter 8,8,8,8. From the keypad, the F1or F2 keys may be used instead of 8,8,8,8. After entering8,8,8,8 or F1, the system will speak "enter remote unit,"or if programmed, it will speak a menu of the activechannels in the system. At this point, enter a two-digitchannel number from 01 to 33. Your installer will let youknow what channels control which lights or appliances.Channel 33 is an "all lights on/off" channel that canactivate a group or bank of lights at the same time. Afterentering the desired channel, the system will echo yourchoice by speaking the programmed word descriptionsfor that channel. To activate the channel, the A or * keyturns the unit on, and the H or # key turns the unit off. ifthe dimming option is enabled, then the successivedepressions of the A or * key turns the unit off. If thedimming option is enabled, then the successive depres-sions of the A or * key will step through the six levels. Toexit remote control, enter 0,0 or any F key. If no digit isentered within 20 seconds the system will automaticallyexit.
NOTE: When twenty seconds pass without pressing anykeys, the system will automatically exit lights andappliance control and return to normal operation.
2 WAY AND LISTEN IN:
1. Access the system (see Local Access or Remote Access)
2. Press 9,9,9,9 to enter "Listen" mode.
3. Press # to talk, * to listen.
4. Hang up when done or press 0 to return to keypad mode.
LIGHTS ANDAPPLIANCE
CONTROLACCESS:
2 WAY ANDLISTEN IN
NOTE:

116
NOTE: When in 2 way mode, the following key functions apply:
Digit: 1 = turns on microphone #12 = turns on microphone #23 = turns on microphone #34 = turns off microphone #15 = turns off microphone #26 = turns off microphone #37 = changes to "high microphone sensitivity"8 = changes to "normal microphone sensitivity"9 = all microphones on0 = Exit to keypad mode/or will hang up
(programming option)
* = Listen# = Talk
NOTE: Some central stations may designate other key functions whenin 2 way mode. If this is the case, the homeowner "listen in" willfollow the new key assignments.
New Digit: 1= ____ 4= ____ 7= ____ 0= ____2= ____ 5= ____ 8= ____ *= ____3= ____ 6= ____ 9= ____ #= ____
CHANGING THE CLOCK TIME
To set or change the system time, press the 2 & 8 keyssimultaneously from a hardwired keypad. The system will respond byspeaking "enter four-digit time." Simply enter the time in a 12-hourformat. After the time is entered, the system will say "enter (1) AM, (2)PM." After selecting AM or PM, the system will confirm the enteredtime. If an invalid entry is made, the system will speak "error" andwait for a valid entry.
NOTE: TABLE OF CONTENTS
INTRODUCTIONControl Panel ....................................................................... 3Detection Devices ............................................................... 3Telephone Keypads ............................................................. 3
GLOSSARY .............................................................................. 4-5
LOCAL PHONE ACCESSUsing Your Telephones As Keypads ..................................... 6
LED INDICATIONSPower .................................................................................. 7Status ................................................................................... 7Home .................................................................................. 7Away ................................................................................... 7Night ................................................................................... 7
KEYPAD FUNCTIONSStatus ................................................................................... 7Monitor ................................................................................ 7F1 and F2 ............................................................................ 7Backlight Intensity ............................................................... 7
ALARM SIGNALS ........................................................................ 8
ARMING ................................................................................ 9-11
DISARMING .............................................................................. 11
BYPASS ......................................................................................12
CHANGING/DELETING USER CODES ............................... 12-13
PANIC FROM YOUR PHONE .................................................... 13
KEYPAD ACTIVATIONS ............................................................ 13
RESETTING AN ACTIVATED SMOKE DETECTOR ..................... 14
REMOTE PHONE ACCESS ......................................................... 14
OPTIONAL EQUIPMENTLighting Options ................................................................ 15Light and Appliance Control Access .................................. 15
2-WAY LISTEN IN ............................................................. 15 - 16
SETTING CLOCK TIME ..............................................................16
The APEX logo is a trademark and DESTINY is a registered trademarkof APEX/Division of Pittway Corporation