designer series - suzuki pianos · 1 fp-s spinet digital piano designer series suzuki pianos...
TRANSCRIPT
1
FP-SSPINET DIGITAL PIANO Designer Series
SUZUKI PIANOS
OWNER’S MANUAL
SUZUKI

2

3
WELCOME!
We would like to express our appreciation and congratulate you for purchasing this Suzuki digital piano. Thispiano has been designed to provide you with years of musical enjoyment. State of the art electronics are combinedwith an elegant cabinet that will add beauty and sophistication to any home environment. Listed below are just afew of the features that your new piano is equipped with:
• graded hammer action piano for an authentic acoustic piano feel• 128 instrument sounds stereo sampled for ultra authentic acoustic realism• 64 note polyphony - which ensures acoustic piano performance• a dynamic 4 speaker concert hall sound delivery system with EQ controls• 100 professional quality orchestrated rhythm accompaniments with variations• built-in play along songs for learning and enjoyment• easy 5 track music recorder for writing songs or to record your lesson progress• karaoke display and video output to external TV for musical enjoyment for the entire family• floppy Disk Drive to save Performances or Lessons plus play thousands of MIDI songs• SD (Secure Digital) Memory Card, this cutting edge technology is also used in Digital Camera’s, you can use to save Performances or Lessons plus play thousands of MIDI songs• complete MIDI controls allows for computer hook up and enables you to update your pianos features so that it never becomes obsolete• USB interface for plug ‘n play computer connections
You will find many more features and functions listed within this owners manual. In order to fully appreciate allthe impressive features of this digital piano, please take a few minutes to read the following pages of instruction.We will cover general precautions, assembly, the function of each control button, and warranty information.
Thank you and congratulations again, for choosing this Digital Piano from the Suzuki Corporation’s pianoproduct line of portable pianos, home digital pianos, home composer ensembles pianos, elegant digital grandensembles, and the acoustic upright and grand piano line.
SUZUKI
4
GENERAL PRECAUTIONS
CAUTIONRISK OF ELECTRIC SHOCK
DO NOT OPEN
INSTRUCTIONS PERTAINING TO A RISK OF FIRE, ELECTRIC SHOCK OR INJURY:
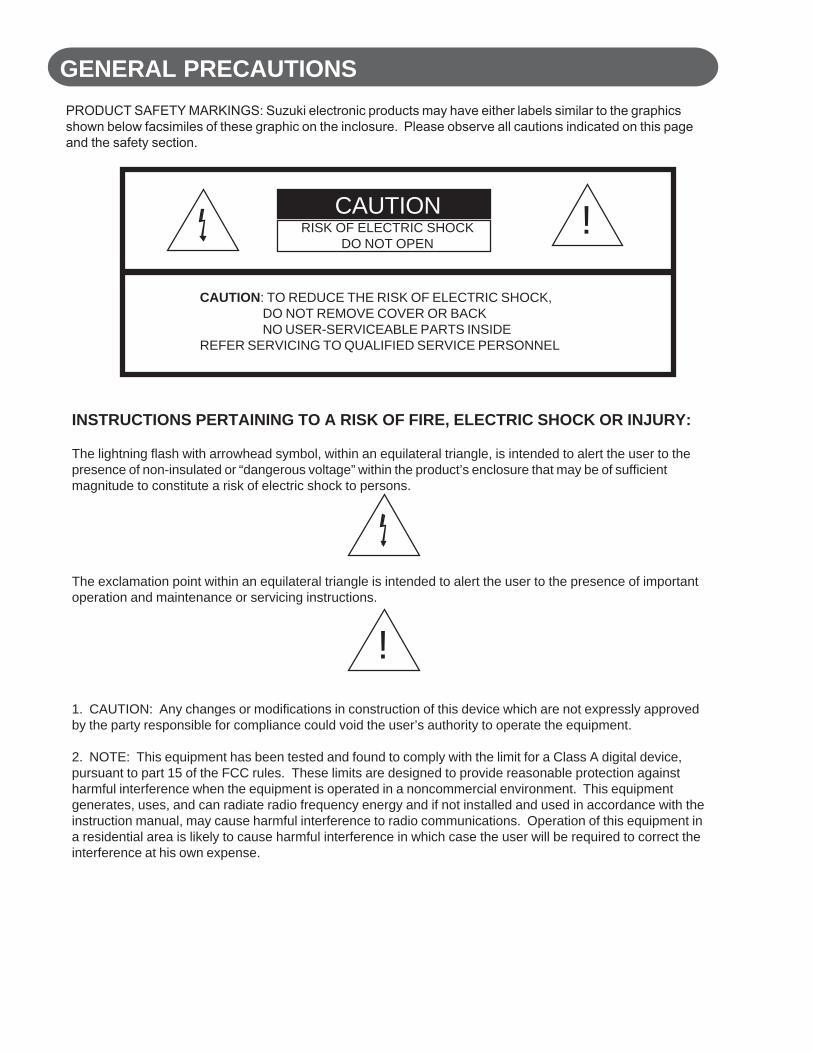
The lightning flash with arrowhead symbol, within an equilateral triangle, is intended to alert the user to thepresence of non-insulated or “dangerous voltage” within the product’s enclosure that may be of sufficientmagnitude to constitute a risk of electric shock to persons.
The exclamation point within an equilateral triangle is intended to alert the user to the presence of importantoperation and maintenance or servicing instructions.
1. CAUTION: Any changes or modifications in construction of this device which are not expressly approvedby the party responsible for compliance could void the user’s authority to operate the equipment.
2. NOTE: This equipment has been tested and found to comply with the limit for a Class A digital device,pursuant to part 15 of the FCC rules. These limits are designed to provide reasonable protection againstharmful interference when the equipment is operated in a noncommercial environment. This equipmentgenerates, uses, and can radiate radio frequency energy and if not installed and used in accordance with theinstruction manual, may cause harmful interference to radio communications. Operation of this equipment ina residential area is likely to cause harmful interference in which case the user will be required to correct theinterference at his own expense.
!
!
PRODUCT SAFETY MARKINGS: Suzuki electronic products may have either labels similar to the graphicsshown below facsimiles of these graphic on the inclosure. Please observe all cautions indicated on this pageand the safety section.
CAUTION: TO REDUCE THE RISK OF ELECTRIC SHOCK,DO NOT REMOVE COVER OR BACKNO USER-SERVICEABLE PARTS INSIDE
REFER SERVICING TO QUALIFIED SERVICE PERSONNEL
5
This Suzuki digital piano will supply you with years of musical enjoyment if you follow the simple rules listed below.
IMPORTANT SAFETY INSTRUCTIONS
WARNINGWhen using electrical products, basic safetyprecautions should always be followed, includ-ing the following.
SAFETYPower Source - The product should always be
connected to a power supply of the typedescribed in the operating instructions or asmarked on the product.
Periods of Nonuse - The power-supply cord ofthe product should be unplugged from the outletwhen left unused for a long period of time.
Disposal NoticeShould this product become damaged beyondrepair, or for some reason its useful life isconsidered to be at an end, please observe alllocal, state, and federal regulations that relateto the disposal of product that contain lead,batteries or plastics.
SERVICE AND MODIFICATIONThis product should be serviced by qualifiedservice personnel when,• the power supply cord or the plug has beendamaged,• liquid has been spattered into the unit or ithas been exposed to rain,• the instrument does not appear to operatenormally or exhibits a marked change inperformance, or• the instrument has been dropped or thecabinet has been damaged.Do not attempt to open the piano or make anychange in the circuits or parts of the unit.
CONNECTIONBefore connecting the instrument to otherelectronic components, turn off the power for allcomponents. Before turning the power on or offfor all components, set all volume levels tominimum. Also, be sure to set the volumes ofall components at their minimum levels andgradually raise the volume controls whileplaying the instrument to set the desiredlistening level.
CAUTIONAlways follow the basic precautions listedbelow, to avoid the possibility of physicaldamage to the instrument or other property,precautions include, but are not limited to,the following:• When removing the electric plug from theinstrument or an outlet, always hold theplug itself and not the cord. Pulling on thecord can damage it.• Do not put burning items, such ascandles, on the unit. A burning item may fallover and cause a fire.• If the power cord or plug becomes frayedor damaged, or if there is a sudden loss ofsound during use of the instrument, or if anyunusual smells or smoke should appear,immediately turn off the power switch,disconnect the electric plug from the outletand have the instrument inspected by aSuzuki service personal.
POWERTurn the power switch off when theinstrument is not in use.To avoid damage to the instrument and otherdevices to which it is connected, turn thepower switches of all related devices offprior to connection or disconnection of MIDIcables.Turn the power off if the main cable isdamaged or the instrument is spattered withliquid.Do not switch the unit on and off in quicksuccession, this places an undue load onthe electronic components.Unplug the AC power cord during anelectrical storm.Avoid plugging the AC power cord into thesame AC outlet as appliances with highpower consumption, such as electricheaters or refrigerators.Do not defeat the purpose of the polarized orgrounding-type plug. A polarized plug hastwo blades with one wider than the other. Agrounding type plug has two blades andthird grounding prong. The wide blade orthird prong are for your safety. If the providedplug does not fit into your outlet, consult anelectrician for replacement of the obsoleteoutlet.
GENERAL PRECAUTIONS
6
HANDLING CAUTION• Take care that the key cover does not pinch
your fingers, and do not insert a finger or handin any gaps on the key cover or instrument.
• Never insert or drop paper, metallic, or otherobjects into the gaps on the key cover, panelor keyboard. If this happens, turn off the powerimmediately and unplug the power cord fromthe AC outlet. Then have the instrumentinspected by qualified Suzuki service person-nel.
• Do not place vinyl, plastic or rubber objects onthe instrument, since this might discolor thepanel or keyboard.
• Bumping the surface of the instrument withmetal, porcelain, or other hard objects cancause the finish to crack or peel. Use caution.
• Do not rest your weight on, or place heavyobjects on the instrument, and do not useexcessive force on the buttons, switches orconnectors.
• Do not operate the instrument for a long periodof time at a high or uncomfortable volumelevel, since this can cause permanent hearingloss. If you experience any hearing loss orringing in the ears, consult a physician.
HANDLING AND TRANSPORTNever apply excessive force to the controls,connectors or other parts of the instrument.Always unplug cables by gripping the plugfirmly, not by pulling on the cable.Disconnect all cables before moving theinstrument.Physical shocks caused by dropping, bump-ing, or placing heavy objects on the instru-ment can result in scratches and/or moreserious damage.Carefully check the amplifier volume controlbefore starting to play. Excessive volume cancause permanent hearing loss.
LOCATIONDo not expose the instrument to the followingconditions to avoid deformation, discoloration, or moreserious damage:
•direct sunlight (near a window),•high temperatures (near a heat source, outside, or
near a window),•excessive humidity,•excessive dust, or•strong vibration.
Leave enough space around the piano for it to beproperly ventilated.This instrument contains digital circuitry and maycause interference if placed too close to radio ortelevision receivers. If interference occurs, move theinstrument further away from the affected equipment.Avoid placing vinyl objects on top of the instrument,vinyl can stick to and discolor the surface.
USING THE BENCHDo not place the bench in an unstable position whereit might accidentally fall over.Do not play carelessly with, or stand on the bench.Using it as a tool or stepladder might result inaccident or injury.Only one person should sit on the bench at a time, inorder to prevent the possibility of accident or injury.Do not attempt to adjust the bench height while sittingon the bench, since this can cause excessive force tobe imposed on the adjustment mechanism, possiblyresulting in damage to the mechanism or even injury.If the bench screws become loose due to extensivelong-term use, tighten them.
CLEANINGClean the cabinet and panel with a soft nonabrasivedry cloth. This cloth should be for High Gloss LacquerFinish Furniture. A polish specifically for High GlossLacquer Finish Furniture may be used on the cabinet.Do not use paint thinner or petrochemical basedpolishes.To maintain the luster of the keys and buttons wipewith a clean, slightly damp cloth, and then polish witha soft dry cloth.
GENERAL PRECAUTIONS
7
TABLE OF CONTENTS
ASSEMBLY ................................................................. 8CONNECTOR PANEL ............................................... 14
Video Output ........................................................... 14Headphone Input ..................................................... 14Audio In & Out ........................................................ 14MIDI Jacks .............................................................. 14USB ........................................................................ 14Microphone Input .................................................... 14
PANEL CONTROLS ................................................... 15Memory Card Slot ................................................... 25Disk Drive ............................................................... 26
PEDALS .................................................................... 27DISPLAY SCREEN .................................................... 28DEMO ........................................................................ 29PIANO VOICES ......................................................... 30
Assigning a Mode ................................................... 30Voice Selection ....................................................... 31Quick Select ........................................................... 32
RHYTHM SECTION ................................................... 35Rhythm Style Select ............................................... 35Quick Select ........................................................... 35Starting and Stopping the Rhythm Style .................. 38Fill-In ....................................................................... 38Ending .................................................................... 38Fade ....................................................................... 39Adjusting the Tempo ............................................... 39
AUTO ACCOMP. (AUTO BASE CHORD) ................... 40One Finger .............................................................. 41Fingered .................................................................. 42Piano ...................................................................... 43Manual Bass Chord ................................................ 43Selecting Chord Type .............................................. 44Starting and Stopping the Auto Accomp. ................. 45Fill-In ....................................................................... 46Fill to Variation ........................................................ 46Fade ....................................................................... 46
SETUP ....................................................................... 47Performance
Velocity ............................................................ 48Split Point ......................................................... 48Transpose ........................................................ 49Screen Hold ..................................................... 49Tune ................................................................. 50Fixed Level ....................................................... 50Fade Time ........................................................ 51Octave Shift ...................................................... 51
SETUP (Continued)Harmony ................................................................. 51Key Mode
Manual Bass .................................................... 53Lower Hold ....................................................... 53
Sustain ................................................................... 54Reverb .................................................................... 55Effects .................................................................... 56Chord (Auto Accompaniment Fingering) .................. 57Pedal Menu ............................................................ 58Percussion (Drum Kit Assign) ................................. 59Metronome.............................................................. 60
REGISTRATION MEMORY ........................................ 61RECORD .................................................................... 62
Recording ............................................................... 64Playback ................................................................ 65Mark ....................................................................... 66
SONG ........................................................................ 67Song Select ............................................................ 67Using the Lesson Feature ....................................... 68
MEMORY CARD ........................................................ 70Load Song .............................................................. 71Save Song .............................................................. 72Play Card ................................................................ 73Play Card Menu ...................................................... 74Play Card Utility ...................................................... 75
DISK ........................................................................ 77Load Song .............................................................. 78Save Song .............................................................. 79Play Disk ................................................................ 80Utility ...................................................................... 81
Format .............................................................. 82Copy ................................................................ 82Delete ............................................................... 83Rename ............................................................ 83
PLAYING AND SINGING KARAOKE ......................... 84MIDI & VIDEO OUTPUT .......................................... 85MIDI ........................................................................ 86MIDI IMPLEMENTATION CHART .............................. 88VOICE LIST ............................................................... 89STYLE LIST .............................................................. 90DRUM KIT LIST 1 ..................................................... 91DRUM KIT LIST 2 ..................................................... 92SPECIFICATIONS ..................................................... 93QUESTIONS / PROBLEMS ....................................... 94WARRANTY ............................................................... 96

8
ASSEMBLY
PLEASE DO NOT ATTEMPT TO ASSEMBLE OR MOVE YOUR PIANOBEFORE READING THESE INSTRUCTIONS!
IF YOU HAVE ANY QUESTION OR PROBLEMS,DO NOT CALL OR RETURN PRODUCT TO THE STORE
Visit www.suzukipianos.com/fp-s
OR CALL THIS TOLL FREE HELP LINE
1-800-854-1594
PLEASE DO NOT PUSH OR ROLL YOUR PIANO!LIFT THE PIANO AND CARRY IT TO YOUR DESIRED LOCATION.
9
ASSEMBLY
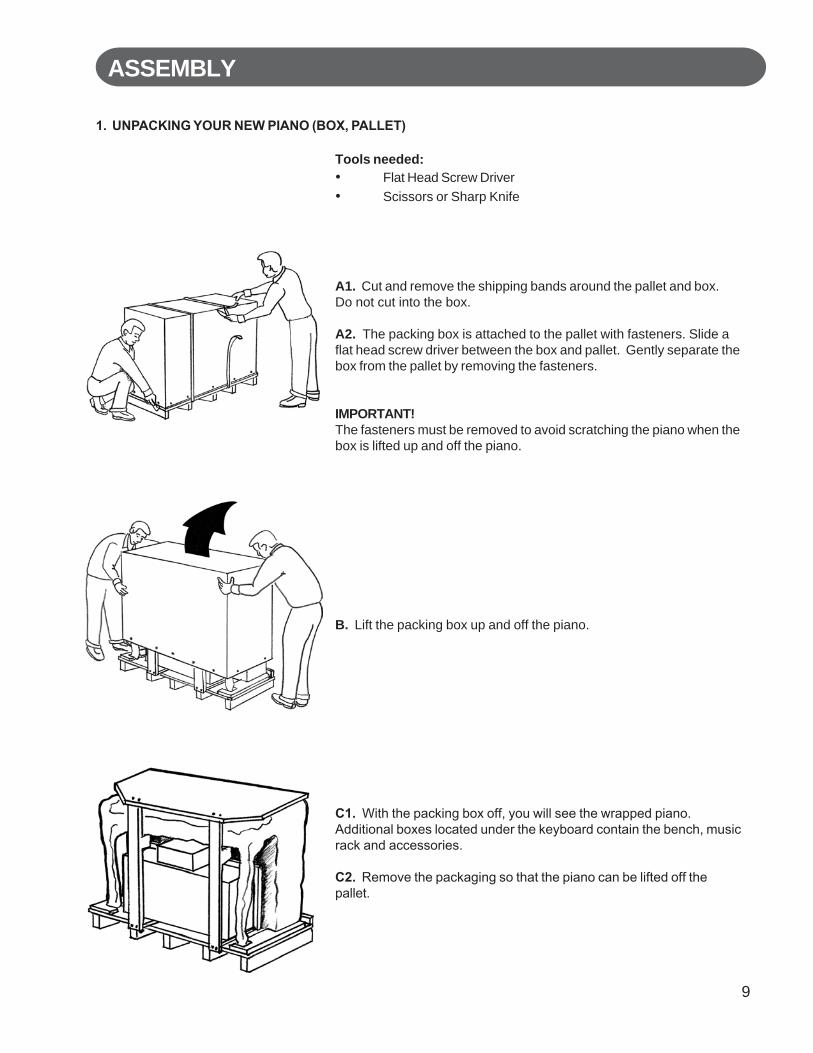
B. Lift the packing box up and off the piano.
Tools needed:• Flat Head Screw Driver• Scissors or Sharp Knife
C1. With the packing box off, you will see the wrapped piano.Additional boxes located under the keyboard contain the bench, musicrack and accessories.
C2. Remove the packaging so that the piano can be lifted off thepallet.
1. UNPACKING YOUR NEW PIANO (BOX, PALLET)
A1. Cut and remove the shipping bands around the pallet and box.Do not cut into the box.
A2. The packing box is attached to the pallet with fasteners. Slide aflat head screw driver between the box and pallet. Gently separate thebox from the pallet by removing the fasteners.
IMPORTANT!The fasteners must be removed to avoid scratching the piano when thebox is lifted up and off the piano.
10
ASSEMBLY
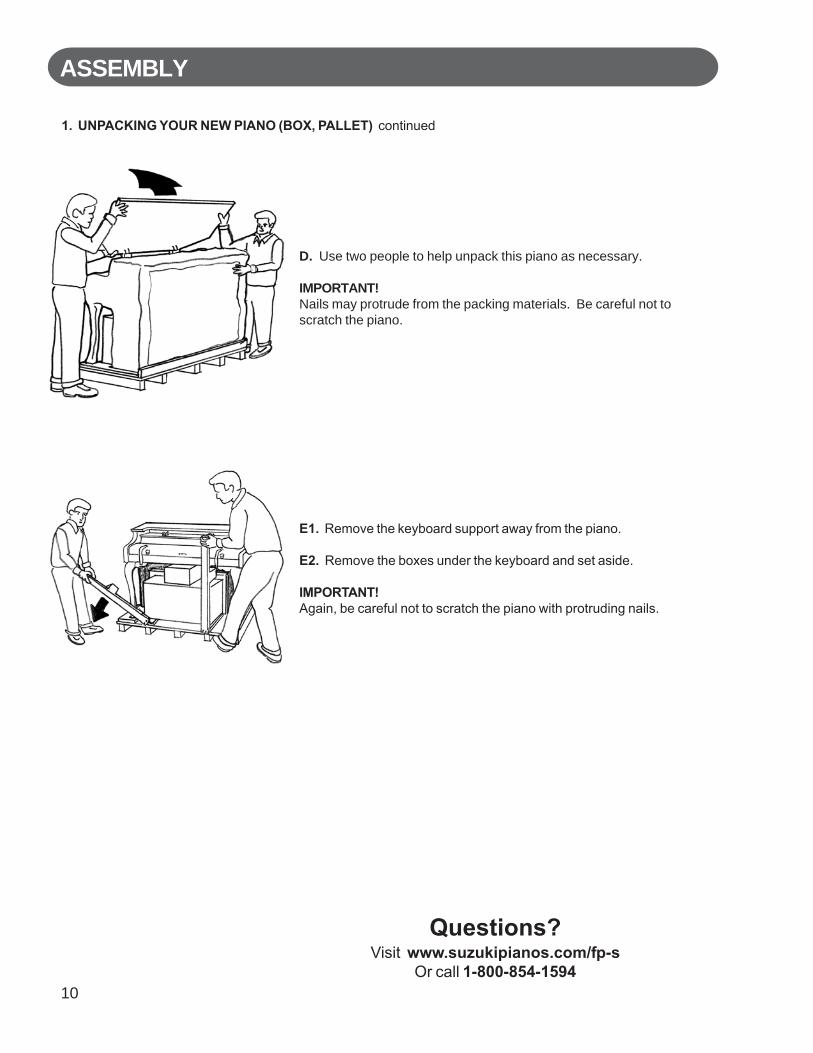
D. Use two people to help unpack this piano as necessary.
IMPORTANT!Nails may protrude from the packing materials. Be careful not toscratch the piano.
E1. Remove the keyboard support away from the piano.
E2. Remove the boxes under the keyboard and set aside.
IMPORTANT!Again, be careful not to scratch the piano with protruding nails.
1. UNPACKING YOUR NEW PIANO (BOX, PALLET) continued
Questions?Visit www.suzukipianos.com/fp-s
Or call 1-800-854-1594
11
ASSEMBLY
2. PACKING MATERIAL AND PLACEMENT
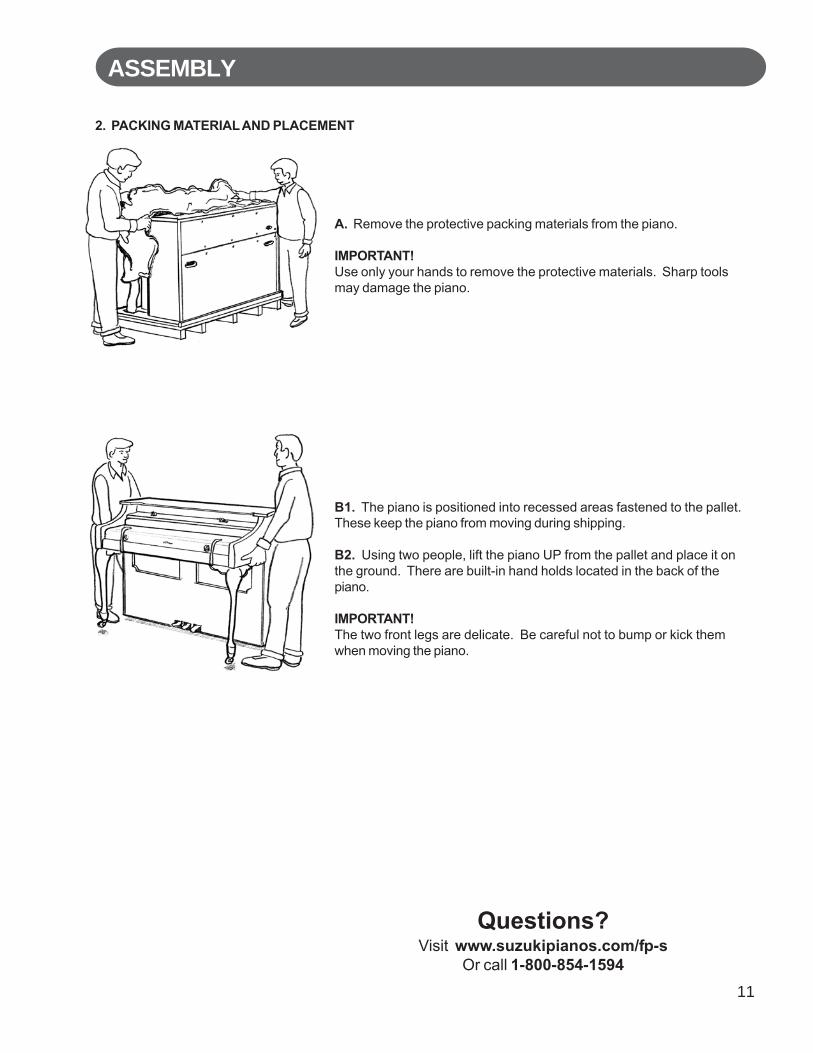
A. Remove the protective packing materials from the piano.
IMPORTANT!Use only your hands to remove the protective materials. Sharp toolsmay damage the piano.
B1. The piano is positioned into recessed areas fastened to the pallet.These keep the piano from moving during shipping.
B2. Using two people, lift the piano UP from the pallet and place it onthe ground. There are built-in hand holds located in the back of thepiano.
IMPORTANT!The two front legs are delicate. Be careful not to bump or kick themwhen moving the piano.
Questions?Visit www.suzukipianos.com/fp-s
Or call 1-800-854-1594
12
ASSEMBLY
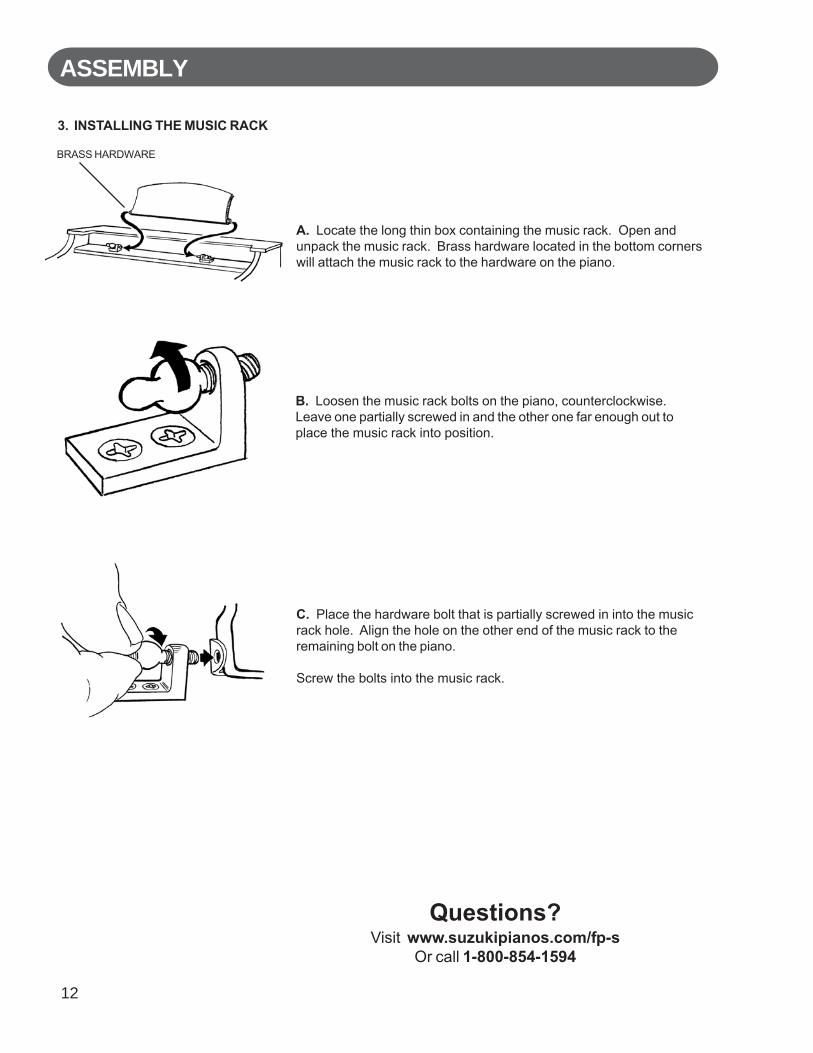
A. Locate the long thin box containing the music rack. Open andunpack the music rack. Brass hardware located in the bottom cornerswill attach the music rack to the hardware on the piano.
3. INSTALLING THE MUSIC RACK
B. Loosen the music rack bolts on the piano, counterclockwise.Leave one partially screwed in and the other one far enough out toplace the music rack into position.
C. Place the hardware bolt that is partially screwed in into the musicrack hole. Align the hole on the other end of the music rack to theremaining bolt on the piano.
Screw the bolts into the music rack.
BRASS HARDWARE
Questions?Visit www.suzukipianos.com/fp-s
Or call 1-800-854-1594
13
ASSEMBLY
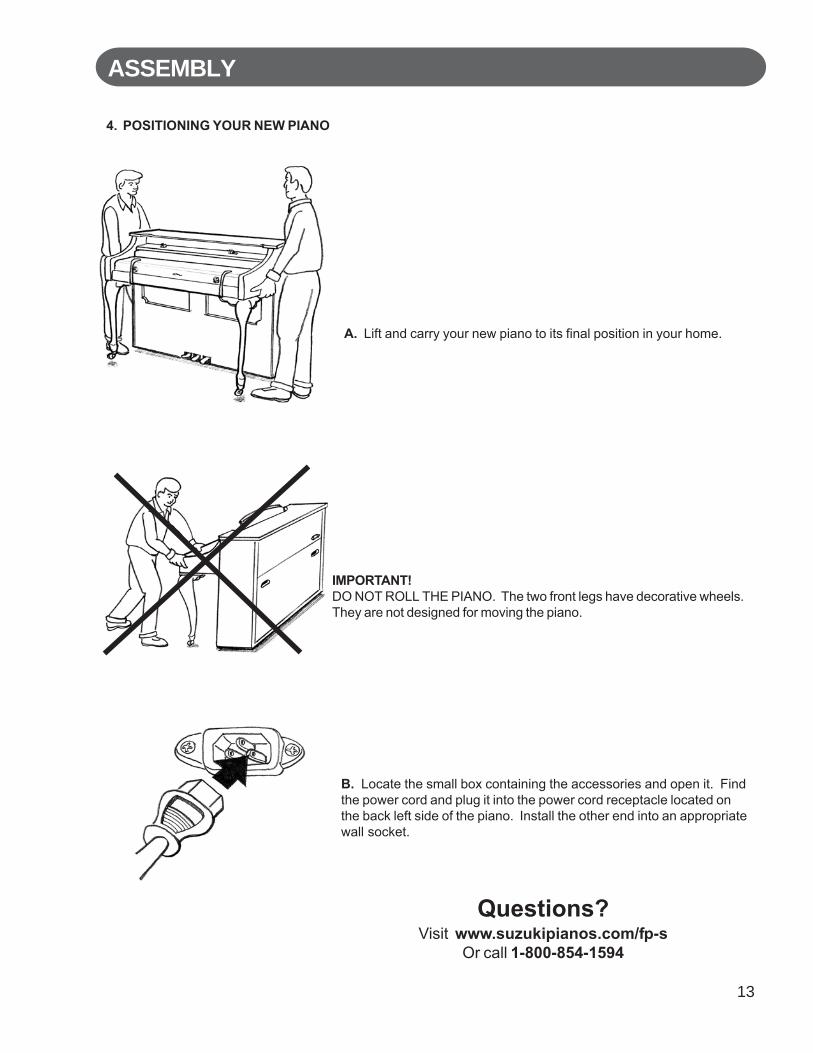
A. Lift and carry your new piano to its final position in your home.
4. POSITIONING YOUR NEW PIANO
Questions?Visit www.suzukipianos.com/fp-s
Or call 1-800-854-1594
B. Locate the small box containing the accessories and open it. Findthe power cord and plug it into the power cord receptacle located onthe back left side of the piano. Install the other end into an appropriatewall socket.
IMPORTANT!DO NOT ROLL THE PIANO. The two front legs have decorative wheels.They are not designed for moving the piano.
14
CONNECTOR PANEL
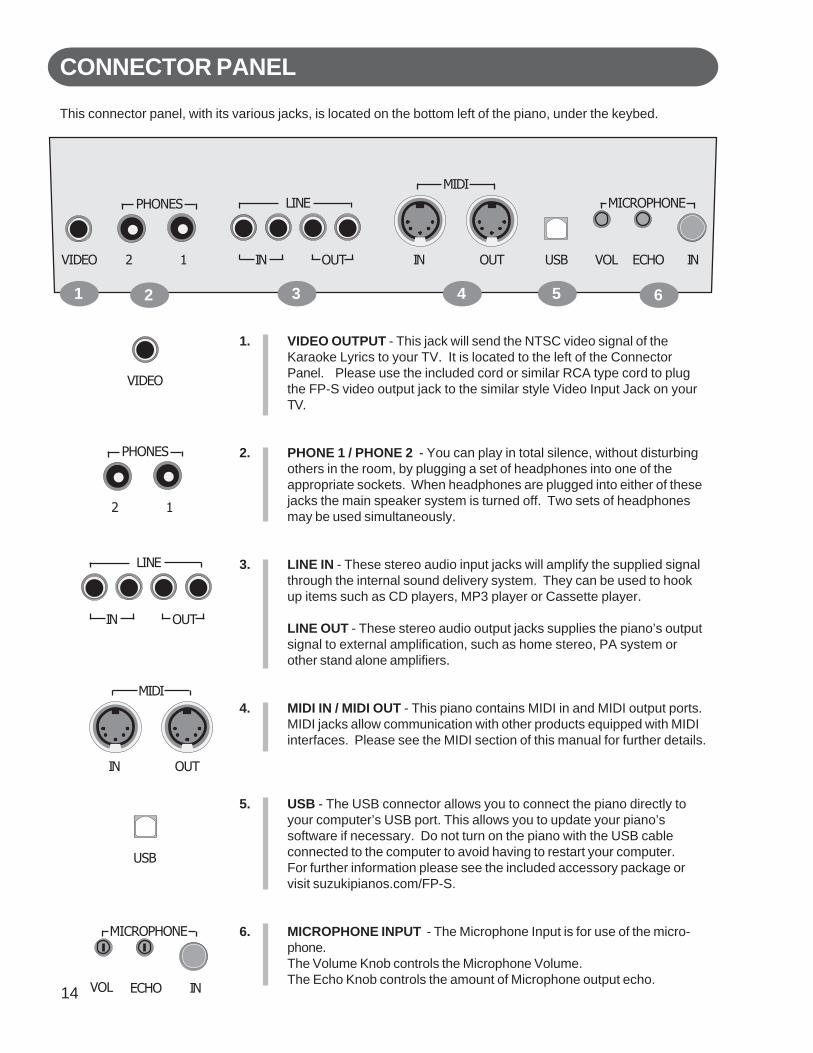
1. VIDEO OUTPUT - This jack will send the NTSC video signal of theKaraoke Lyrics to your TV. It is located to the left of the ConnectorPanel. Please use the included cord or similar RCA type cord to plugthe FP-S video output jack to the similar style Video Input Jack on yourTV.
2. PHONE 1 / PHONE 2 - You can play in total silence, without disturbingothers in the room, by plugging a set of headphones into one of theappropriate sockets. When headphones are plugged into either of thesejacks the main speaker system is turned off. Two sets of headphonesmay be used simultaneously.
3. LINE IN - These stereo audio input jacks will amplify the supplied signalthrough the internal sound delivery system. They can be used to hookup items such as CD players, MP3 player or Cassette player.
LINE OUT - These stereo audio output jacks supplies the piano’s outputsignal to external amplification, such as home stereo, PA system orother stand alone amplifiers.
4. MIDI IN / MIDI OUT - This piano contains MIDI in and MIDI output ports.MIDI jacks allow communication with other products equipped with MIDIinterfaces. Please see the MIDI section of this manual for further details.
5. USB - The USB connector allows you to connect the piano directly toyour computer’s USB port. This allows you to update your piano’ssoftware if necessary. Do not turn on the piano with the USB cableconnected to the computer to avoid having to restart your computer.For further information please see the included accessory package orvisit suzukipianos.com/FP-S.
6. MICROPHONE INPUT - The Microphone Input is for use of the micro-phone.The Volume Knob controls the Microphone Volume.The Echo Knob controls the amount of Microphone output echo.
This connector panel, with its various jacks, is located on the bottom left of the piano, under the keybed.
VIDEO USB
1 2 3 4 5 6
PHONES
2 1
LINE
IN OUT
PHONES
2 1
LINE
IN OUT IN OUT
MIDIMICROPHONE
ECHO INVOL
IN OUT
MIDI
MICROPHONE
ECHO INVOL
USB
VIDEO
15
PANEL CONTROLS
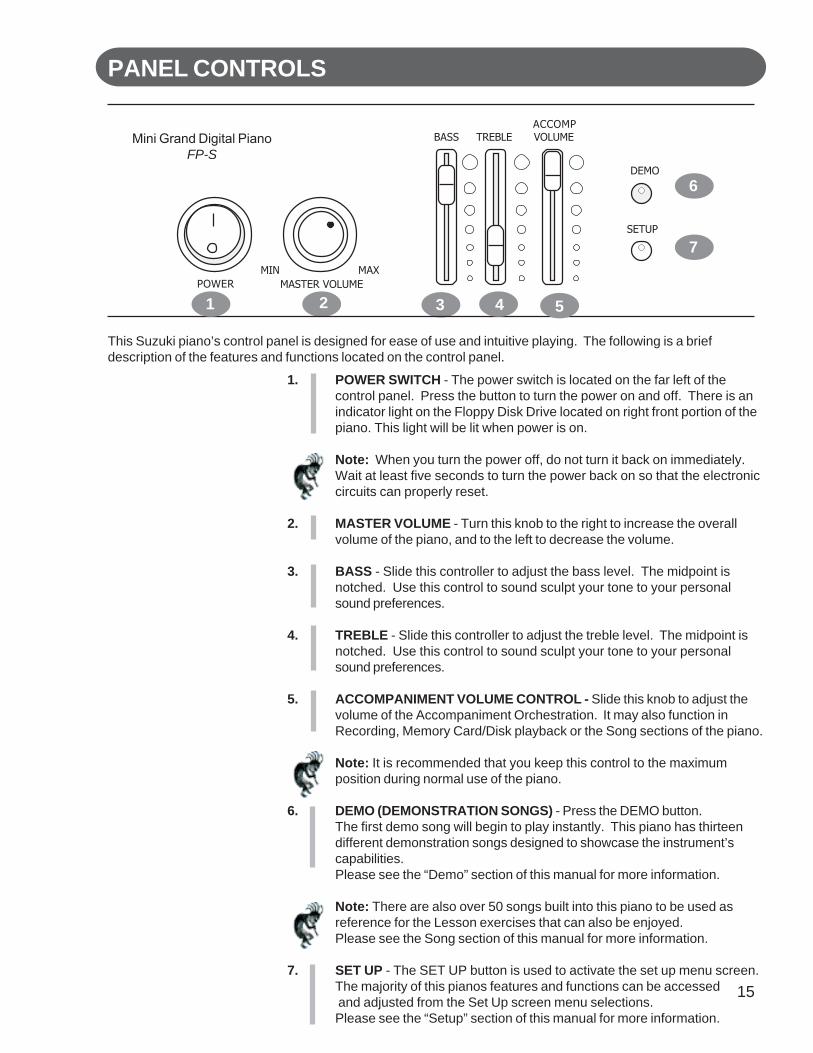
This Suzuki piano’s control panel is designed for ease of use and intuitive playing. The following is a briefdescription of the features and functions located on the control panel.
1. POWER SWITCH - The power switch is located on the far left of thecontrol panel. Press the button to turn the power on and off. There is anindicator light on the Floppy Disk Drive located on right front portion of thepiano. This light will be lit when power is on.
Note: When you turn the power off, do not turn it back on immediately.Wait at least five seconds to turn the power back on so that the electroniccircuits can properly reset.
2. MASTER VOLUME - Turn this knob to the right to increase the overallvolume of the piano, and to the left to decrease the volume.
3. BASS - Slide this controller to adjust the bass level. The midpoint isnotched. Use this control to sound sculpt your tone to your personalsound preferences.
4. TREBLE - Slide this controller to adjust the treble level. The midpoint isnotched. Use this control to sound sculpt your tone to your personalsound preferences.
5. ACCOMPANIMENT VOLUME CONTROL - Slide this knob to adjust thevolume of the Accompaniment Orchestration. It may also function inRecording, Memory Card/Disk playback or the Song sections of the piano.
Note: It is recommended that you keep this control to the maximumposition during normal use of the piano.
6. DEMO (DEMONSTRATION SONGS) - Press the DEMO button.The first demo song will begin to play instantly. This piano has thirteendifferent demonstration songs designed to showcase the instrument’scapabilities.Please see the “Demo” section of this manual for more information.
Note: There are also over 50 songs built into this piano to be used asreference for the Lesson exercises that can also be enjoyed.Please see the Song section of this manual for more information.
7. SET UP - The SET UP button is used to activate the set up menu screen.The majority of this pianos features and functions can be accessed and adjusted from the Set Up screen menu selections.Please see the “Setup” section of this manual for more information.
2 3 4
Mini Grand Digital PianoFP-S
6
7
POWER MASTER VOLUMEMIN MAX
4
DEMO
SETUP
1 5
BASS TREBLE VOLUMEACCOMP

16
11
PANEL CONTROLS
8
9
8. METRONOME - The METRONOME button toggles the metronomefeature on and off and accesses the Metronome menu. The tempo canbe increased or decreased using the TEMPO + and - buttons.Please see the Setup section of this manual for more information.
9. MIDI - MIDI is an acronym for Musical Instrument Digital Interface. TheMIDI features in this piano are capable of communicating with and/orcontrolling other MIDI Musical Instruments or MIDI devices such ascomputers etc... Please see the MIDI section of this manual for moreinformation.
10. TEMPO - Press one of the TEMPO buttons, the current tempo value willappear on the display.You can use the TEMPO +, TEMPO – buttons, or the +/– VALUEbuttons to increase or decrease the tempo of OrchestratedAccompaniment Patterns and other Recorded features.The Tempo value range is from 40 to 250 bpm (beats per minute).
Note: Press the – TEMPO or + TEMPO buttons or the +/– VALUEbuttons simultaneously to recall the default tempo setting for theselected rhythm style.
LED Rhythm light bar display - There is a four-dot beat indicator to theleft of the tempo buttons. It indicates the Tempo and beat for theaccompaniment that is playing. The lights flash simultaneously on thefirst beat of each measure, then the indicators flash individually insequence on the remaining beats.
11. ONE TOUCH - This button works in association with your selectedRhythm Style. The ONE TOUCH button will automatically select thepredetermined optimum instrument voice settings for the selected rhythmstyle.
Note: The voice, voice volume, fingered accompaniment chord, mode,harmony and effects will automatically be engaged or altered when theOne Touch button is engaged.
.
RHYTHM CONTROL
FADEFILL TO VARFILL-ININTRO/ENDING
– TEMPO +
SYNC
ACCOMP
START/STOP
ONE TOUCH
LED Light Bar Display
METRONOME
MIDI
DEMO
SETUP
10
17
PANEL CONTROLS
13
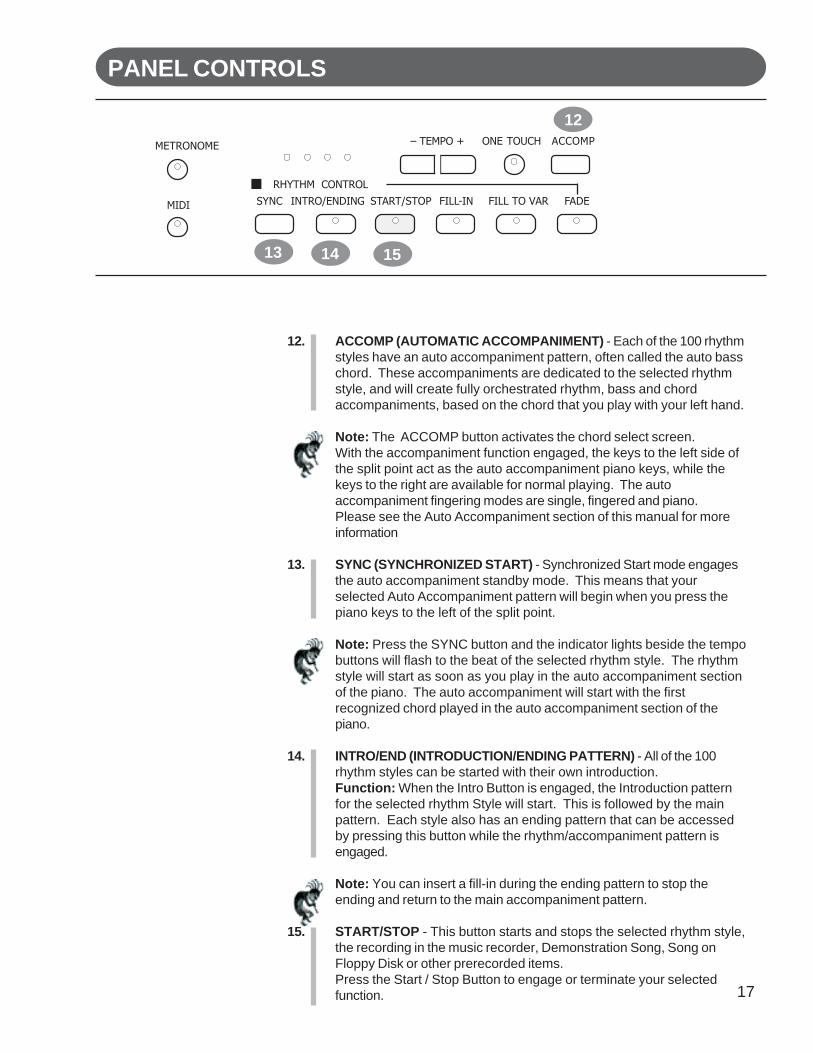
12. ACCOMP (AUTOMATIC ACCOMPANIMENT) - Each of the 100 rhythmstyles have an auto accompaniment pattern, often called the auto basschord. These accompaniments are dedicated to the selected rhythmstyle, and will create fully orchestrated rhythm, bass and chordaccompaniments, based on the chord that you play with your left hand.
Note: The ACCOMP button activates the chord select screen.With the accompaniment function engaged, the keys to the left side ofthe split point act as the auto accompaniment piano keys, while thekeys to the right are available for normal playing. The autoaccompaniment fingering modes are single, fingered and piano.Please see the Auto Accompaniment section of this manual for moreinformation
13. SYNC (SYNCHRONIZED START) - Synchronized Start mode engagesthe auto accompaniment standby mode. This means that yourselected Auto Accompaniment pattern will begin when you press thepiano keys to the left of the split point.
Note: Press the SYNC button and the indicator lights beside the tempobuttons will flash to the beat of the selected rhythm style. The rhythmstyle will start as soon as you play in the auto accompaniment sectionof the piano. The auto accompaniment will start with the firstrecognized chord played in the auto accompaniment section of thepiano.
14. INTRO/END (INTRODUCTION/ENDING PATTERN) - All of the 100rhythm styles can be started with their own introduction.Function: When the Intro Button is engaged, the Introduction patternfor the selected rhythm Style will start. This is followed by the mainpattern. Each style also has an ending pattern that can be accessedby pressing this button while the rhythm/accompaniment pattern isengaged.
Note: You can insert a fill-in during the ending pattern to stop theending and return to the main accompaniment pattern.
15. START/STOP - This button starts and stops the selected rhythm style,the recording in the music recorder, Demonstration Song, Song onFloppy Disk or other prerecorded items.Press the Start / Stop Button to engage or terminate your selectedfunction.
RHYTHM CONTROL
FADEFILL TO VARFILL-ININTRO/ENDING
– TEMPO +
SYNC
ACCOMP
START/STOP
ONE TOUCH
12
14 15
METRONOME
MIDI
18
PANEL CONTROLS
16
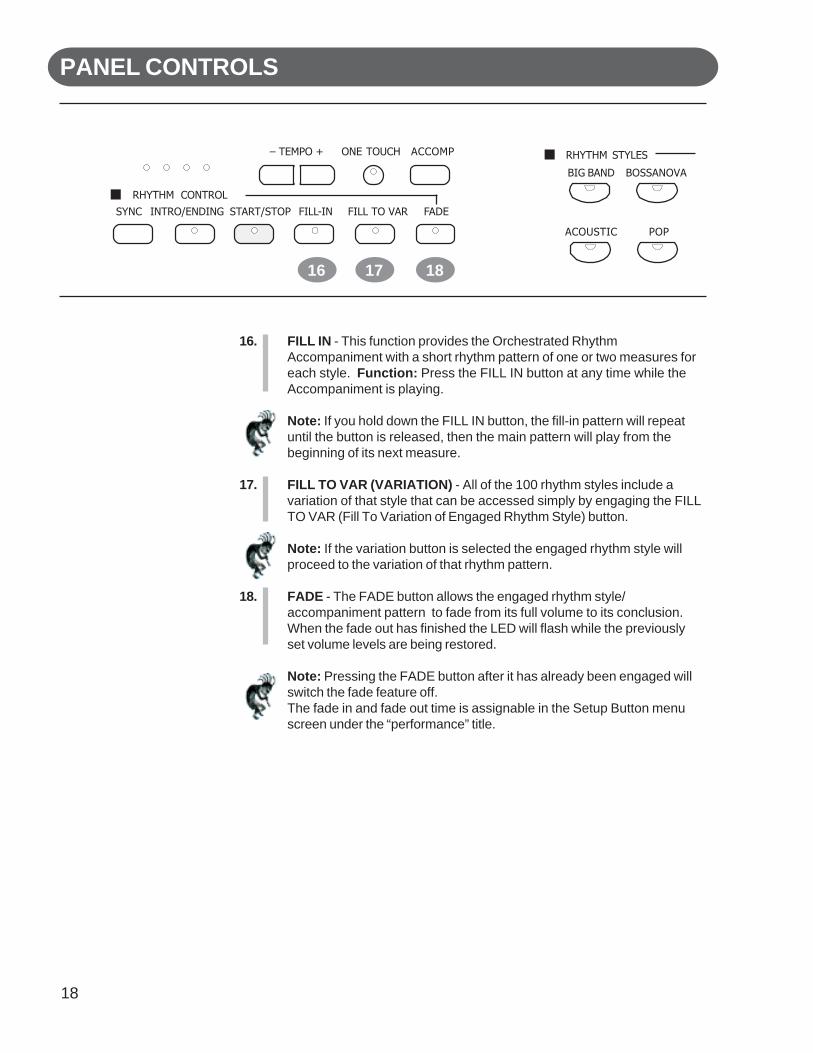
16. FILL IN - This function provides the Orchestrated RhythmAccompaniment with a short rhythm pattern of one or two measures foreach style. Function: Press the FILL IN button at any time while theAccompaniment is playing.
Note: If you hold down the FILL IN button, the fill-in pattern will repeatuntil the button is released, then the main pattern will play from thebeginning of its next measure.
17. FILL TO VAR (VARIATION) - All of the 100 rhythm styles include avariation of that style that can be accessed simply by engaging the FILLTO VAR (Fill To Variation of Engaged Rhythm Style) button.
Note: If the variation button is selected the engaged rhythm style willproceed to the variation of that rhythm pattern.
18. FADE - The FADE button allows the engaged rhythm style/accompaniment pattern to fade from its full volume to its conclusion.When the fade out has finished the LED will flash while the previouslyset volume levels are being restored.
Note: Pressing the FADE button after it has already been engaged willswitch the fade feature off.The fade in and fade out time is assignable in the Setup Button menuscreen under the “performance” title.
RHYTHM STYLES
POPACOUSTIC
BIG BAND BOSSANOVA
RHYTHM CONTROL
FADEFILL TO VARFILL-ININTRO/ENDING
– TEMPO +
SYNC
ACCOMP
START/STOP
ONE TOUCH
17 18
19
PANEL CONTROLS
19
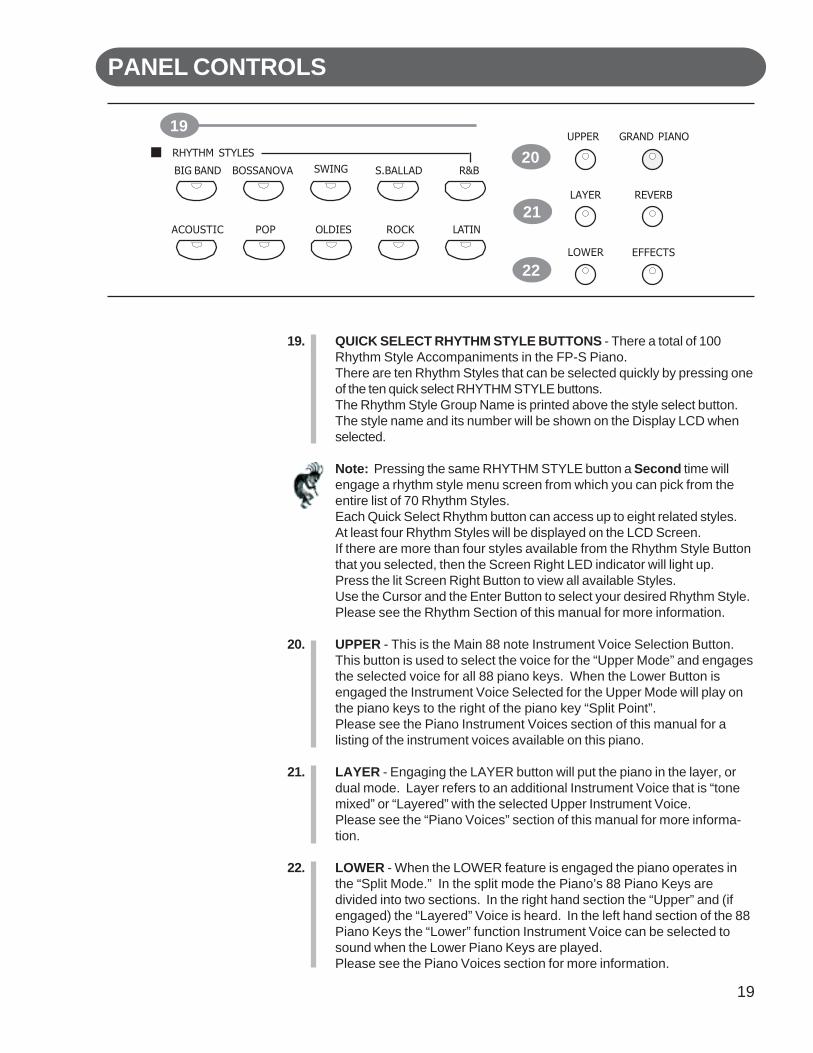
19. QUICK SELECT RHYTHM STYLE BUTTONS - There a total of 100Rhythm Style Accompaniments in the FP-S Piano.There are ten Rhythm Styles that can be selected quickly by pressing oneof the ten quick select RHYTHM STYLE buttons.The Rhythm Style Group Name is printed above the style select button.The style name and its number will be shown on the Display LCD whenselected.
Note: Pressing the same RHYTHM STYLE button a Second time willengage a rhythm style menu screen from which you can pick from theentire list of 70 Rhythm Styles.Each Quick Select Rhythm button can access up to eight related styles.At least four Rhythm Styles will be displayed on the LCD Screen.If there are more than four styles available from the Rhythm Style Buttonthat you selected, then the Screen Right LED indicator will light up.Press the lit Screen Right Button to view all available Styles.Use the Cursor and the Enter Button to select your desired Rhythm Style.Please see the Rhythm Section of this manual for more information.
20. UPPER - This is the Main 88 note Instrument Voice Selection Button.This button is used to select the voice for the “Upper Mode” and engagesthe selected voice for all 88 piano keys. When the Lower Button isengaged the Instrument Voice Selected for the Upper Mode will play onthe piano keys to the right of the piano key “Split Point”.Please see the Piano Instrument Voices section of this manual for alisting of the instrument voices available on this piano.
21. LAYER - Engaging the LAYER button will put the piano in the layer, ordual mode. Layer refers to an additional Instrument Voice that is “tonemixed” or “Layered” with the selected Upper Instrument Voice.Please see the “Piano Voices” section of this manual for more informa-tion.
22. LOWER - When the LOWER feature is engaged the piano operates inthe “Split Mode.” In the split mode the Piano’s 88 Piano Keys aredivided into two sections. In the right hand section the “Upper” and (ifengaged) the “Layered” Voice is heard. In the left hand section of the 88Piano Keys the “Lower” function Instrument Voice can be selected tosound when the Lower Piano Keys are played.Please see the Piano Voices section for more information.
RHYTHM STYLES
LATINROCKOLDIESPOP
SWING
ACOUSTIC
S.BALLAD R&BBIG BAND BOSSANOVA
UPPER
LAYER
LOWER
21
20
22
REVERB
EFFECTS
GRAND PIANO
20
PANEL CONTROLS
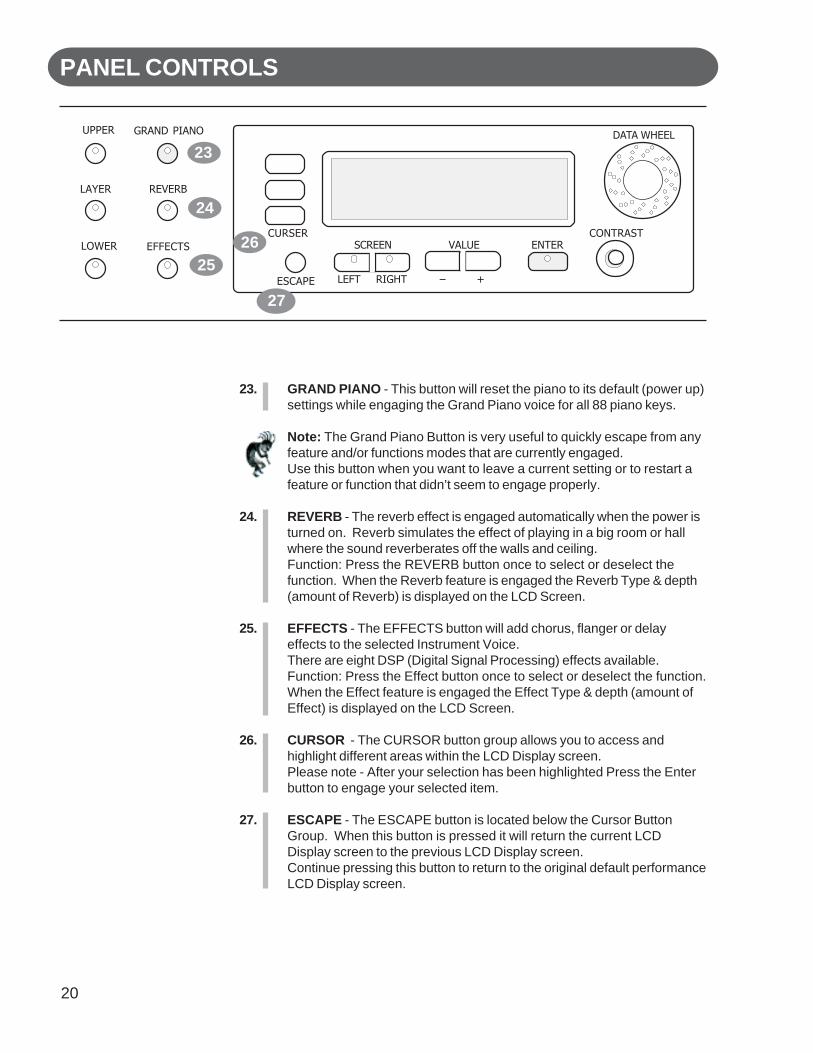
23. GRAND PIANO - This button will reset the piano to its default (power up)settings while engaging the Grand Piano voice for all 88 piano keys.
Note: The Grand Piano Button is very useful to quickly escape from anyfeature and/or functions modes that are currently engaged.Use this button when you want to leave a current setting or to restart afeature or function that didn’t seem to engage properly.
24. REVERB - The reverb effect is engaged automatically when the power isturned on. Reverb simulates the effect of playing in a big room or hallwhere the sound reverberates off the walls and ceiling.Function: Press the REVERB button once to select or deselect thefunction. When the Reverb feature is engaged the Reverb Type & depth(amount of Reverb) is displayed on the LCD Screen.
25. EFFECTS - The EFFECTS button will add chorus, flanger or delayeffects to the selected Instrument Voice.There are eight DSP (Digital Signal Processing) effects available.Function: Press the Effect button once to select or deselect the function.When the Effect feature is engaged the Effect Type & depth (amount ofEffect) is displayed on the LCD Screen.
26. CURSOR - The CURSOR button group allows you to access andhighlight different areas within the LCD Display screen.Please note - After your selection has been highlighted Press the Enterbutton to engage your selected item.
27. ESCAPE - The ESCAPE button is located below the Cursor ButtonGroup. When this button is pressed it will return the current LCDDisplay screen to the previous LCD Display screen.Continue pressing this button to return to the original default performanceLCD Display screen.
UPPER
LAYER
LOWER
24
23
25
REVERB
EFFECTS
GRAND PIANO
VALUE
– +
CONTRAST
LEFT RIGHT
SCREEN
DATA WHEEL
ESCAPE
ENTERCURSER
27
26

21
PANEL CONTROLS
28. SCREEN LEFT, SCREEN RIGHT - The SCREEN buttons are availablefor use when there is more information than can be viewed on the LCDDisplay Screen. If your selected feature or function has additional LCDDisplay Screen information the Screen Left and/or Screen Right LEDbuttons will lit up. If an indicator light is on then there is additionalscreen information available for the selected function.Use the SCREEN LEFT or SCREEN RIGHT buttons to access theadditional menu pages that you want to view.
29. VALUE - Use the VALUE + and - buttons to adjust levels on thecurrently selected feature.These buttons auto repeat when they are held down, therefore they willcontinue to cycle upward or downward until the button is released.
Note: The default factory setting of the selected parameter can berecalled by pressing down both the VALUE + and - buttons at thesame time.
30. ENTER - Use the Enter button to select the highlighted function orfeature on the LCD Display Screen of the piano. This will engage yourselected highlighted item.
31. CONTRAST KNOB - Use the contrast knob to adjust the brightnessand contrast of the display screen.
32. VALUE WHEEL - Use the value wheel to change the function param-eters or levels of the selected item or it’s highlighted feature. It hasthe same function as the Value + or - buttons.To increase the value turn the wheel clockwise, to decrease the valueturn the wheel counterclockwise.
VALUE
– +
CONTRAST
LEFT RIGHT
SCREEN
DATA WHEEL
ESCAPE
ENTERCURSER
REVERB
EFFECTS
GRAND PIANO
28 29 30 31
32
22
PANEL CONTROLS
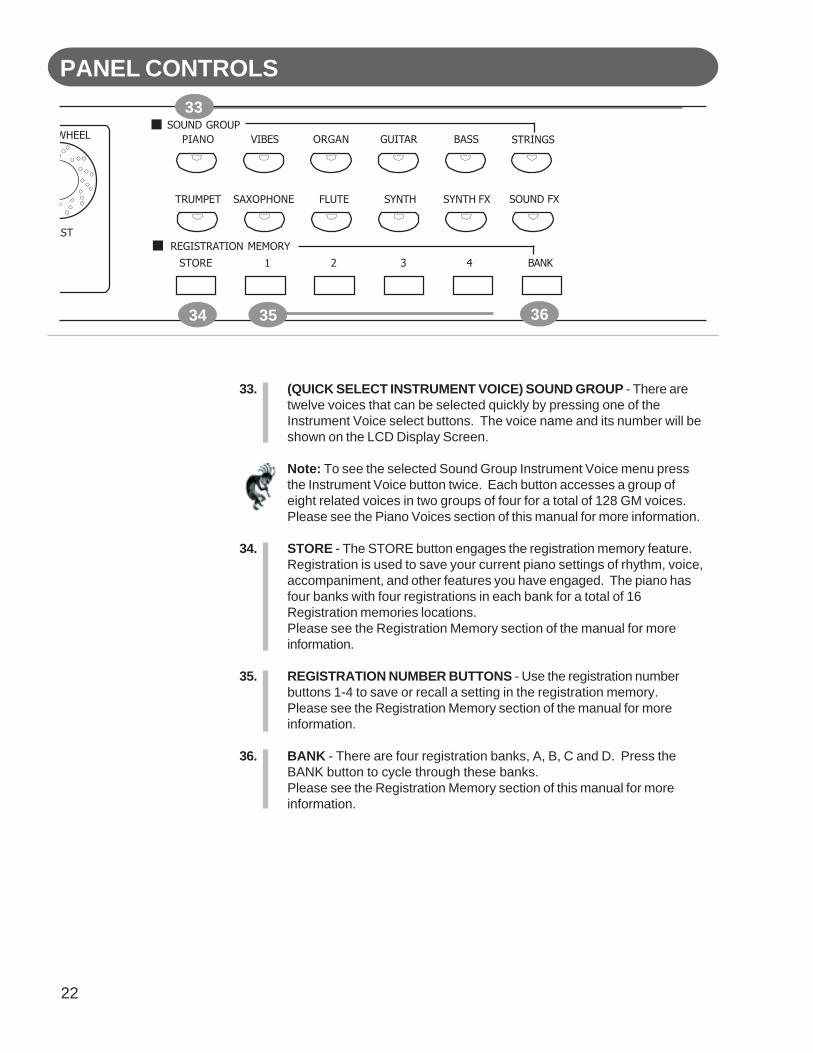
33. (QUICK SELECT INSTRUMENT VOICE) SOUND GROUP - There aretwelve voices that can be selected quickly by pressing one of theInstrument Voice select buttons. The voice name and its number will beshown on the LCD Display Screen.
Note: To see the selected Sound Group Instrument Voice menu pressthe Instrument Voice button twice. Each button accesses a group ofeight related voices in two groups of four for a total of 128 GM voices.Please see the Piano Voices section of this manual for more information.
34. STORE - The STORE button engages the registration memory feature.Registration is used to save your current piano settings of rhythm, voice,accompaniment, and other features you have engaged. The piano hasfour banks with four registrations in each bank for a total of 16Registration memories locations.Please see the Registration Memory section of the manual for moreinformation.
35. REGISTRATION NUMBER BUTTONS - Use the registration numberbuttons 1-4 to save or recall a setting in the registration memory.Please see the Registration Memory section of the manual for moreinformation.
36. BANK - There are four registration banks, A, B, C and D. Press theBANK button to cycle through these banks.Please see the Registration Memory section of this manual for moreinformation.
33
363534
AST
DATA WHEEL
REGISTRATION MEMORY
BANK4321STORE
SOUND GROUP
SYNTH FXSYNTHFLUTESAXOPHONE
ORGAN
TRUMPET
GUITAR BASSPIANO VIBES
SOUND FX
STRINGS
23
PANEL CONTROLS
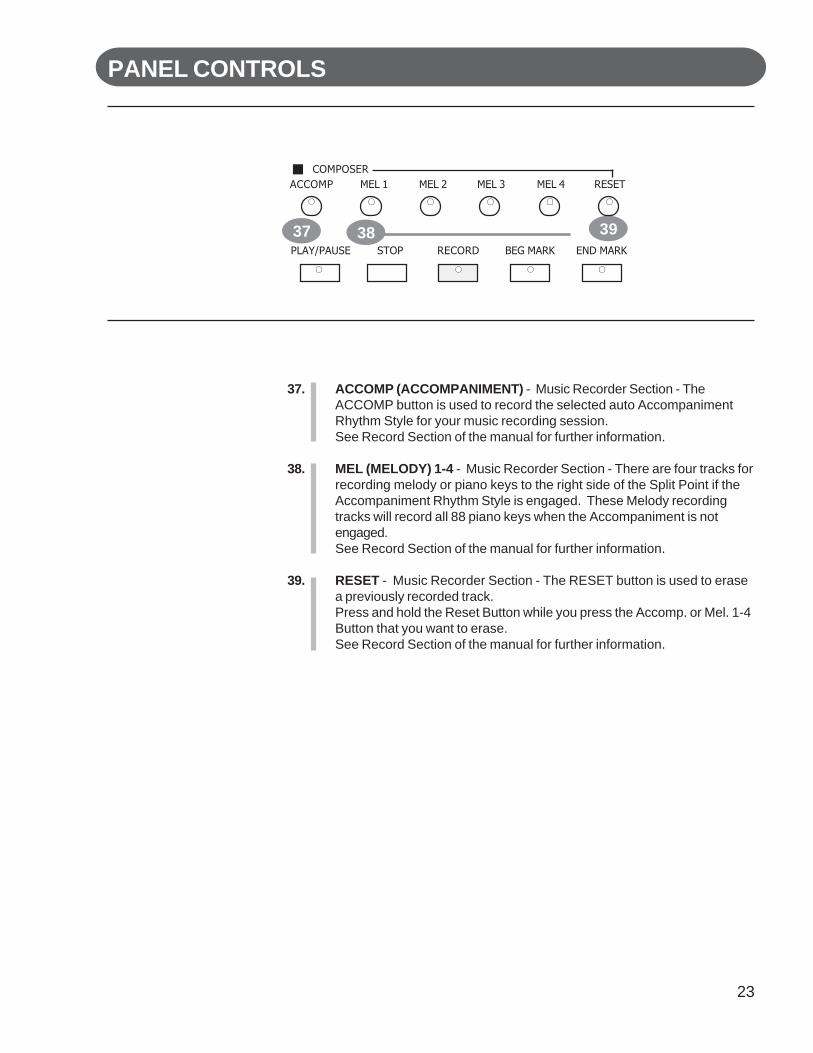
37. ACCOMP (ACCOMPANIMENT) - Music Recorder Section - TheACCOMP button is used to record the selected auto AccompanimentRhythm Style for your music recording session.See Record Section of the manual for further information.
38. MEL (MELODY) 1-4 - Music Recorder Section - There are four tracks forrecording melody or piano keys to the right side of the Split Point if theAccompaniment Rhythm Style is engaged. These Melody recordingtracks will record all 88 piano keys when the Accompaniment is notengaged.See Record Section of the manual for further information.
39. RESET - Music Recorder Section - The RESET button is used to erasea previously recorded track.Press and hold the Reset Button while you press the Accomp. or Mel. 1-4Button that you want to erase.See Record Section of the manual for further information.
37 38 39
ACCOMP MEL 1COMPOSER
MEL 2 MEL 3 MEL 4 RESET
END MARKBEG MARKRECORDSTOPPLAY/PAUSE
24
PANEL CONTROLS
40 41 42 43 44
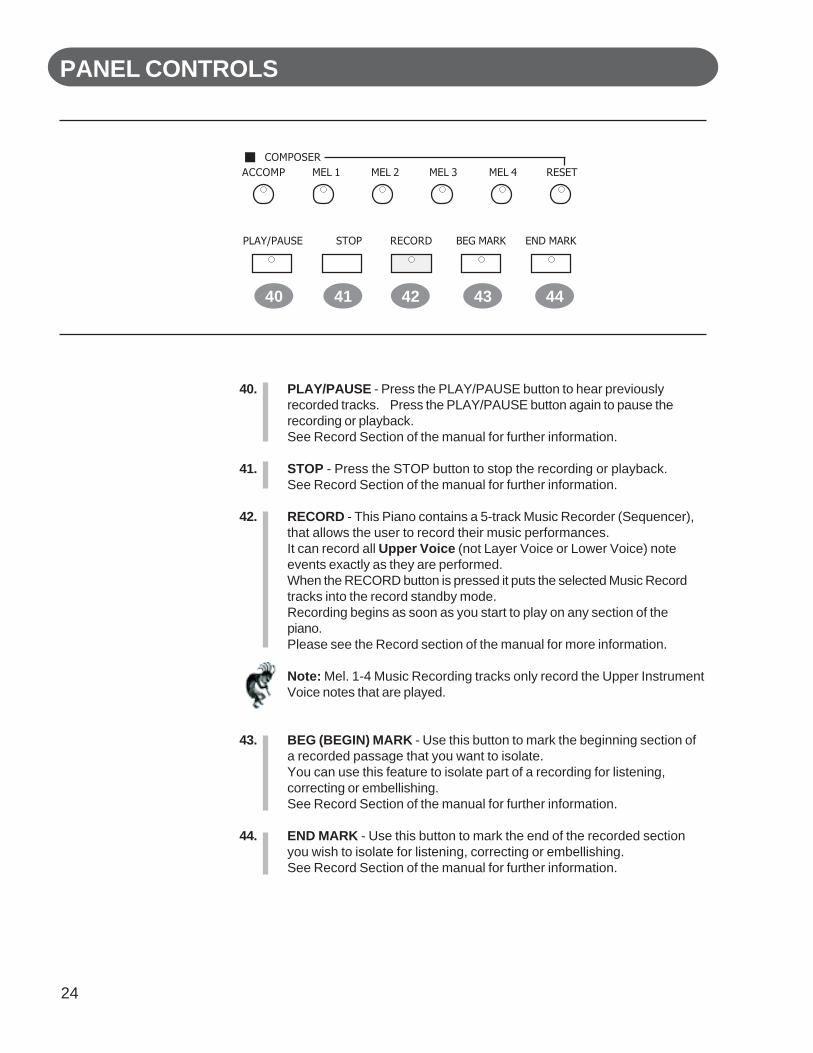
40. PLAY/PAUSE - Press the PLAY/PAUSE button to hear previouslyrecorded tracks. Press the PLAY/PAUSE button again to pause therecording or playback.See Record Section of the manual for further information.
41. STOP - Press the STOP button to stop the recording or playback.See Record Section of the manual for further information.
42. RECORD - This Piano contains a 5-track Music Recorder (Sequencer),that allows the user to record their music performances.It can record all Upper Voice (not Layer Voice or Lower Voice) noteevents exactly as they are performed.When the RECORD button is pressed it puts the selected Music Recordtracks into the record standby mode.Recording begins as soon as you start to play on any section of thepiano.Please see the Record section of the manual for more information.
Note: Mel. 1-4 Music Recording tracks only record the Upper InstrumentVoice notes that are played.
43. BEG (BEGIN) MARK - Use this button to mark the beginning section ofa recorded passage that you want to isolate.You can use this feature to isolate part of a recording for listening,correcting or embellishing.See Record Section of the manual for further information.
44. END MARK - Use this button to mark the end of the recorded sectionyou wish to isolate for listening, correcting or embellishing.See Record Section of the manual for further information.
ACCOMP MEL 1COMPOSER
MEL 2 MEL 3 MEL 4 RESET
END MARKBEG MARKRECORDSTOPPLAY/PAUSE
25
PANEL CONTROLS
45
46
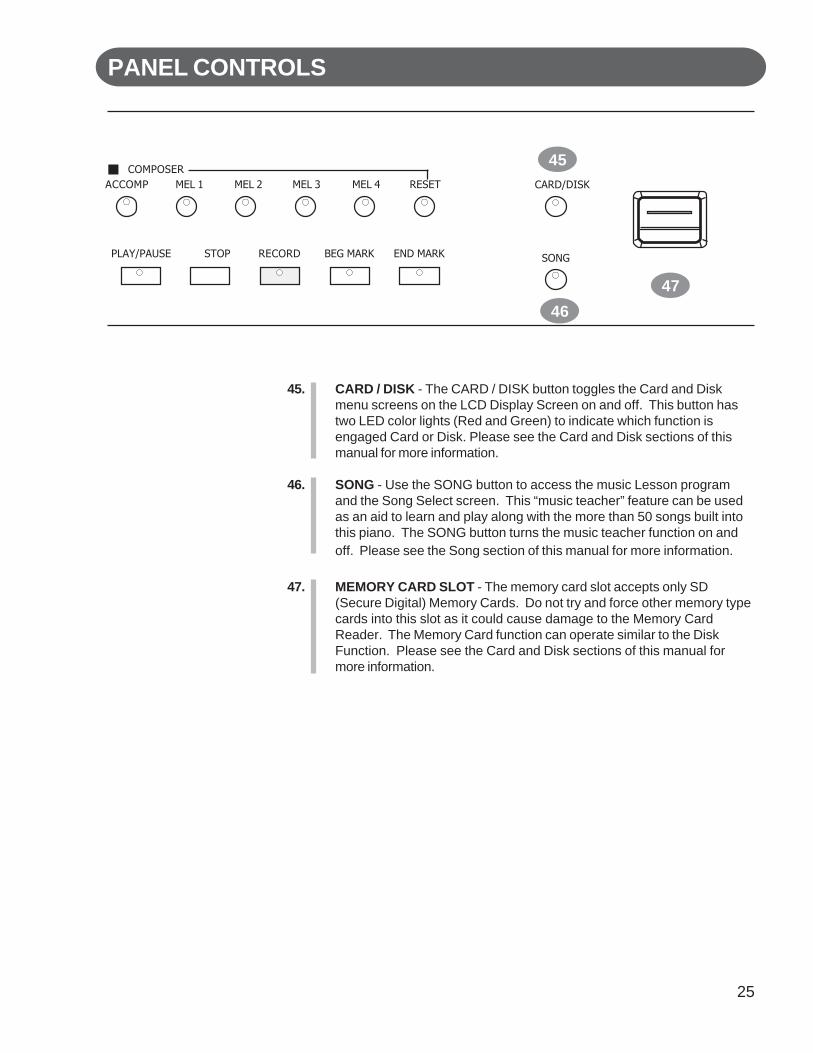
45. CARD / DISK - The CARD / DISK button toggles the Card and Diskmenu screens on the LCD Display Screen on and off. This button hastwo LED color lights (Red and Green) to indicate which function isengaged Card or Disk. Please see the Card and Disk sections of thismanual for more information.
46. SONG - Use the SONG button to access the music Lesson programand the Song Select screen. This “music teacher” feature can be usedas an aid to learn and play along with the more than 50 songs built intothis piano. The SONG button turns the music teacher function on andoff. Please see the Song section of this manual for more information.
47. MEMORY CARD SLOT - The memory card slot accepts only SD(Secure Digital) Memory Cards. Do not try and force other memory typecards into this slot as it could cause damage to the Memory CardReader. The Memory Card function can operate similar to the DiskFunction. Please see the Card and Disk sections of this manual formore information.
ACCOMP MEL 1COMPOSER
MEL 2 MEL 3 MEL 4 RESET
SONG
CARD/DISK
47
END MARKBEG MARKRECORDSTOPPLAY/PAUSE

26
PANEL CONTROLS
METRONOME
SONGMIDI
CARD/DISK
48
48. DISK DRIVE - The Disk Drive feature allows you to Load Songs, SaveSongs, Delete Song Files and Rename your song files on a 3.5 disk.Please see the Disk section of this manual for more information.
27
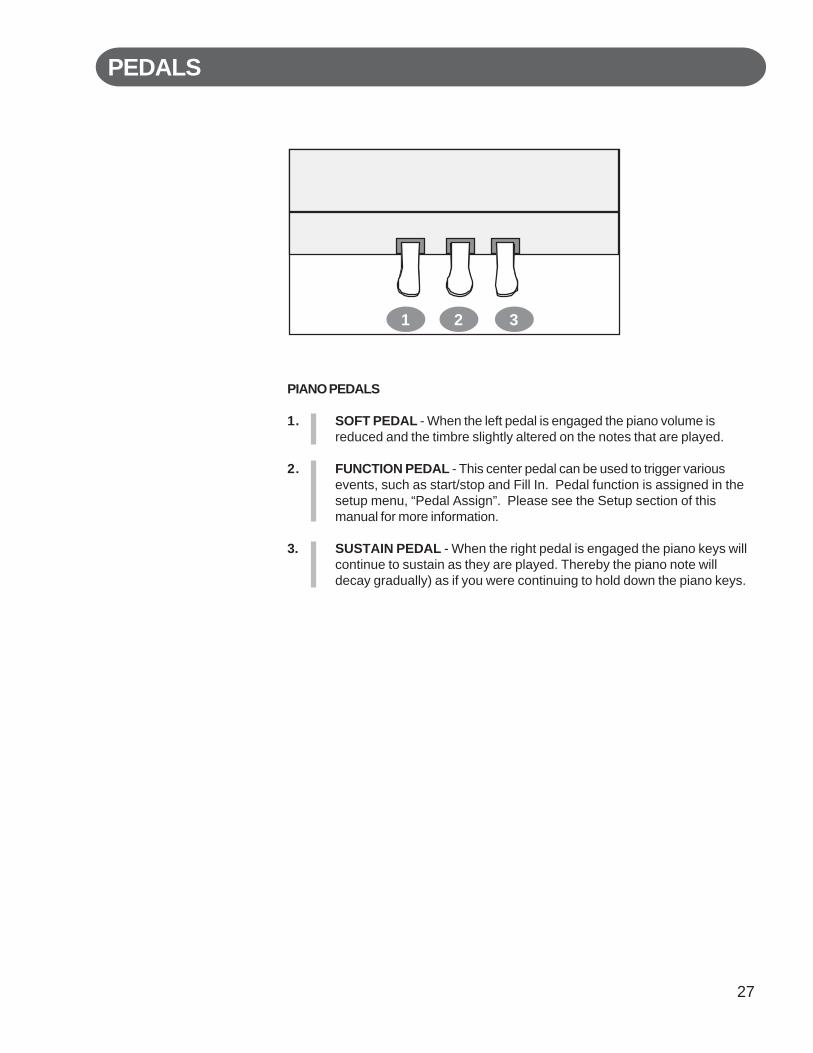
PIANO PEDALS
1. SOFT PEDAL - When the left pedal is engaged the piano volume isreduced and the timbre slightly altered on the notes that are played.
2. FUNCTION PEDAL - This center pedal can be used to trigger variousevents, such as start/stop and Fill In. Pedal function is assigned in thesetup menu, “Pedal Assign”. Please see the Setup section of thismanual for more information.
3. SUSTAIN PEDAL - When the right pedal is engaged the piano keys willcontinue to sustain as they are played. Thereby the piano note willdecay gradually) as if you were continuing to hold down the piano keys.
PEDALS
1 32

28
DISPLAY SCREEN
How to select and engage a Menu Item on the LCD Display Screen:
1. Use the CURSOR keys to select Function or Feature that you wish toengage. When this item is selected it will be highlighted.
2. Use the Escape Button to go back to the previous Display Screen.The ESCAPE button in the middle of the cursor controls will return thecurrent LCD Display screen to the previous LCD Display screen.Continue pressing the Escape button to return to the initial MenuScreen.
3. The Left and Right SCREEN buttons will move the Screen Display toadditional Menu Screens within the selected Menu.The Left and Right Screen Button LED indicators will be lit if there isadditional Screen Menu information available.
4. Use the (+ and -) VALUE buttons to adjust the parameter of the selectedScreen Menu item.
5. Use the ENTER button to engage a highlighted selection.You must press the Enter Button to engage your selected Feature orFunction.
6. The VALUE or DATA wheel can be used as an alternative to the VALUEbuttons.
3 4 5
VALUE
– +
CONTRAST
LEFT RIGHT
SCREEN
DATA WHEEL
ESCAPE
ENTERCURSER
1
2
6
The Main Performance Menu Screen is shown and explained below.
The soundchannel mode.
Auto Accompaniment: Whenauto accompaniment isengaged, this area shows thechord that is playing.(NC = no chord)
Registration: The currentbank (A) and registrationnumber (1).
The currentselected tempo.
The currently selected InstrumentVoice Number and Name, since thisarea is highlighted it is selected andavailable for changes.
The currentlyselected Stylenumber andname.
UPPER
NC1 : Big Band
A1 / = 100
1 : Grand Piano
MAIN PERFORMANCE SCREEN

29
DEMONSTRATION SONGS
SELECT AND PLAY A DEMO SONG1. Press the DEMO button, the indicator will turn on. The first demo song will
playback instantly. The piano will now play all thirteen demonstrationsongs unless the Start/Stop or Demo Button is pressed.
2. Press the DEMO button again to play a specific Demo Song.
3. Use the SCREEN RIGHT or SCREEN LEFT buttons to access all thirteenDemo Songs within the Demo Song Select menu.
4. Use the CURSOR buttons to move the highlighted area to the song youwish to hear.
5. Press the ENTER button to confirm your selection. Your selected songwill playback instantly. When the song has finished the next Demo Songwill begin to play. To Stop press the START/STOP or Demo Button.
6. Press the DEMO button again to exit the Demonstration Song Mode,the LED Indicator Light will turn off.
PLAYING THE DEMONSTRATION SONGS - This piano has thirteen different demonstration songs that aredesigned to showcase the different Instrument Voices that are available on this Mini Grand Piano.The LCD Screen Display will show the demonstration song name.All the demonstration songs will play back repeatedly until the Start/Stop or Demo Button is pressed.In addition there are over 50 Play Along Songs in the Lesson Portion of this piano that can also be listened to fortheir musical enjoyment. Please see the Lesson section of this manual for more information.
123456789012345678901234567890121234567890123456789012345678901212345612345678901234567890123456789012123456789012345678901234567890121234561234567890123456789012345678901212345678901234567890123456789012123456123456789012345678901234567890121234567890123456789012345678901212345612345678901234567890123456789012123456789012345678901234567890121234561234567890123456789012345678901212345678901234567890123456789012123456123456789012345678901234567890121234567890123456789012345678901212345612345678901234567890123456789012123456789012345678901234567890121234561234567890123456789012345678901212345678901234567890123456789012123456123456789012345678901234567890121234567890123456789012345678901212345612345678901234567890123456789012123456789012345678901234567890121234561234567890123456789012345678901212345678901234567890123456789012123456
DEMO
Bossa Nueva
123456789012345678901234567890121234567890123456789012345678901212345612345678901234567890123456789012123456789012345678901234567890121234561234567890123456789012345678901212345678901234567890123456789012123456123456789012345678901234567890121234567890123456789012345678901212345612345678901234567890123456789012123456789012345678901234567890121234561234567890123456789012345678901212345678901234567890123456789012123456123456789012345678901234567890121234567890123456789012345678901212345612345678901234567890123456789012123456789012345678901234567890121234561234567890123456789012345678901212345678901234567890123456789012123456123456789012345678901234567890121234567890123456789012345678901212345612345678901234567890123456789012123456789012345678901234567890121234561234567890123456789012345678901212345678901234567890123456789012123456
Demo Song SelectBossa Nueva
Vibra Jazz
Mozart Piano
String Riot
123456789012345678901234567890121234567890123456789012345678901212345612345678901234567890123456789012123456789012345678901234567890121234561234567890123456789012345678901212345678901234567890123456789012123456123456789012345678901234567890121234567890123456789012345678901212345612345678901234567890123456789012123456789012345678901234567890121234561234567890123456789012345678901212345678901234567890123456789012123456123456789012345678901234567890121234567890123456789012345678901212345612345678901234567890123456789012123456789012345678901234567890121234561234567890123456789012345678901212345678901234567890123456789012123456123456789012345678901234567890121234567890123456789012345678901212345612345678901234567890123456789012123456789012345678901234567890121234561234567890123456789012345678901212345678901234567890123456789012123456
Demo Song SelectSamba Time
Spanish Vibe
Bach F minor
Symphonic
123456789012345678901234567890121234567890123456789012345678901212345612345678901234567890123456789012123456789012345678901234567890121234561234567890123456789012345678901212345678901234567890123456789012123456123456789012345678901234567890121234567890123456789012345678901212345612345678901234567890123456789012123456789012345678901234567890121234561234567890123456789012345678901212345678901234567890123456789012123456123456789012345678901234567890121234567890123456789012345678901212345612345678901234567890123456789012123456789012345678901234567890121234561234567890123456789012345678901212345678901234567890123456789012123456123456789012345678901234567890121234567890123456789012345678901212345612345678901234567890123456789012123456789012345678901234567890121234561234567890123456789012345678901212345678901234567890123456789012123456
DEMO
Bach F minor
DEMO
DEMO
CURSER
LEFT RIGHT
SCREEN
ENTER
DEMO
30
PIANO VOICES - SOUND CHANNEL MODES
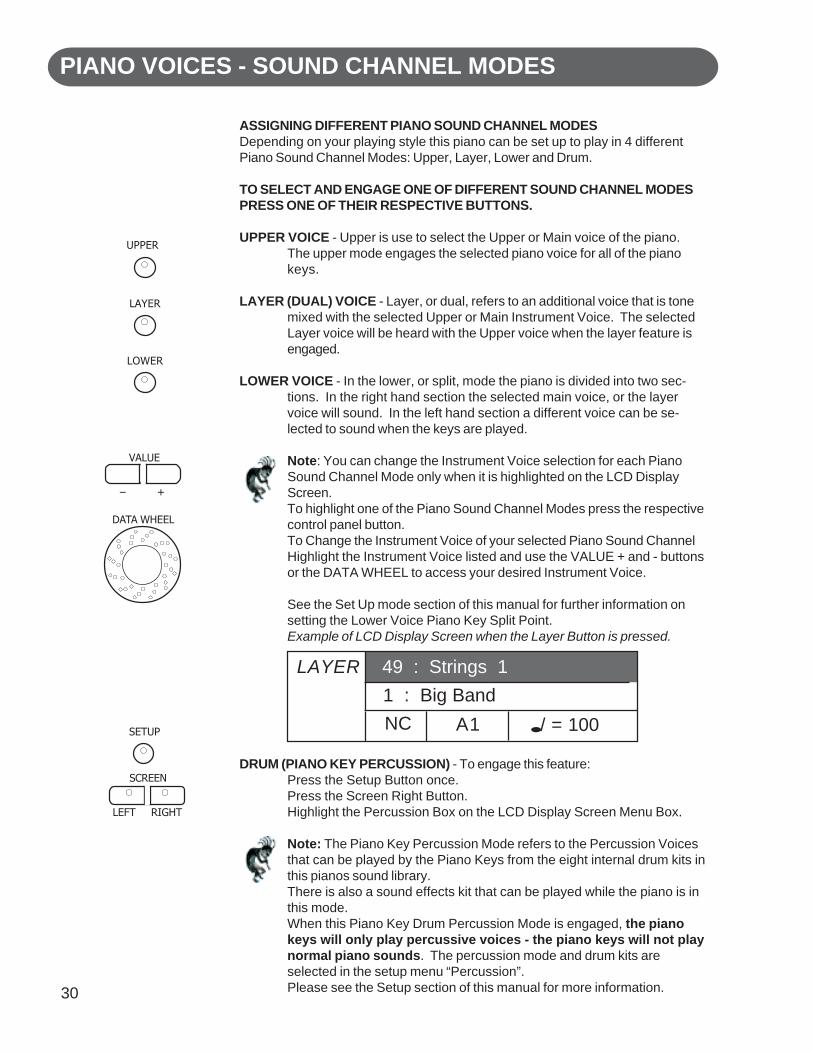
ASSIGNING DIFFERENT PIANO SOUND CHANNEL MODESDepending on your playing style this piano can be set up to play in 4 differentPiano Sound Channel Modes: Upper, Layer, Lower and Drum.
TO SELECT AND ENGAGE ONE OF DIFFERENT SOUND CHANNEL MODESPRESS ONE OF THEIR RESPECTIVE BUTTONS.
UPPER VOICE - Upper is use to select the Upper or Main voice of the piano.The upper mode engages the selected piano voice for all of the pianokeys.
LAYER (DUAL) VOICE - Layer, or dual, refers to an additional voice that is tonemixed with the selected Upper or Main Instrument Voice. The selectedLayer voice will be heard with the Upper voice when the layer feature isengaged.
LOWER VOICE - In the lower, or split, mode the piano is divided into two sec-tions. In the right hand section the selected main voice, or the layervoice will sound. In the left hand section a different voice can be se-lected to sound when the keys are played.
Note: You can change the Instrument Voice selection for each PianoSound Channel Mode only when it is highlighted on the LCD DisplayScreen.To highlight one of the Piano Sound Channel Modes press the respectivecontrol panel button.To Change the Instrument Voice of your selected Piano Sound ChannelHighlight the Instrument Voice listed and use the VALUE + and - buttonsor the DATA WHEEL to access your desired Instrument Voice.
See the Set Up mode section of this manual for further information onsetting the Lower Voice Piano Key Split Point.Example of LCD Display Screen when the Layer Button is pressed.
DRUM (PIANO KEY PERCUSSION) - To engage this feature:Press the Setup Button once.Press the Screen Right Button.Highlight the Percussion Box on the LCD Display Screen Menu Box.
Note: The Piano Key Percussion Mode refers to the Percussion Voicesthat can be played by the Piano Keys from the eight internal drum kits inthis pianos sound library.There is also a sound effects kit that can be played while the piano is inthis mode.When this Piano Key Drum Percussion Mode is engaged, the pianokeys will only play percussive voices - the piano keys will not playnormal piano sounds. The percussion mode and drum kits areselected in the setup menu “Percussion”.Please see the Setup section of this manual for more information.
LAYER
NC1 : Big Band
A1 / = 100
49 : Strings 1
UPPER
LAYER
LOWER
SETUP
VALUE
– +
LEFT RIGHT
SCREEN
DATA WHEEL
31
PIANO VOICES - VOICE SELECTION
UPPER
NC1 : Big Band
A1 / = 100
20 : Church Organ
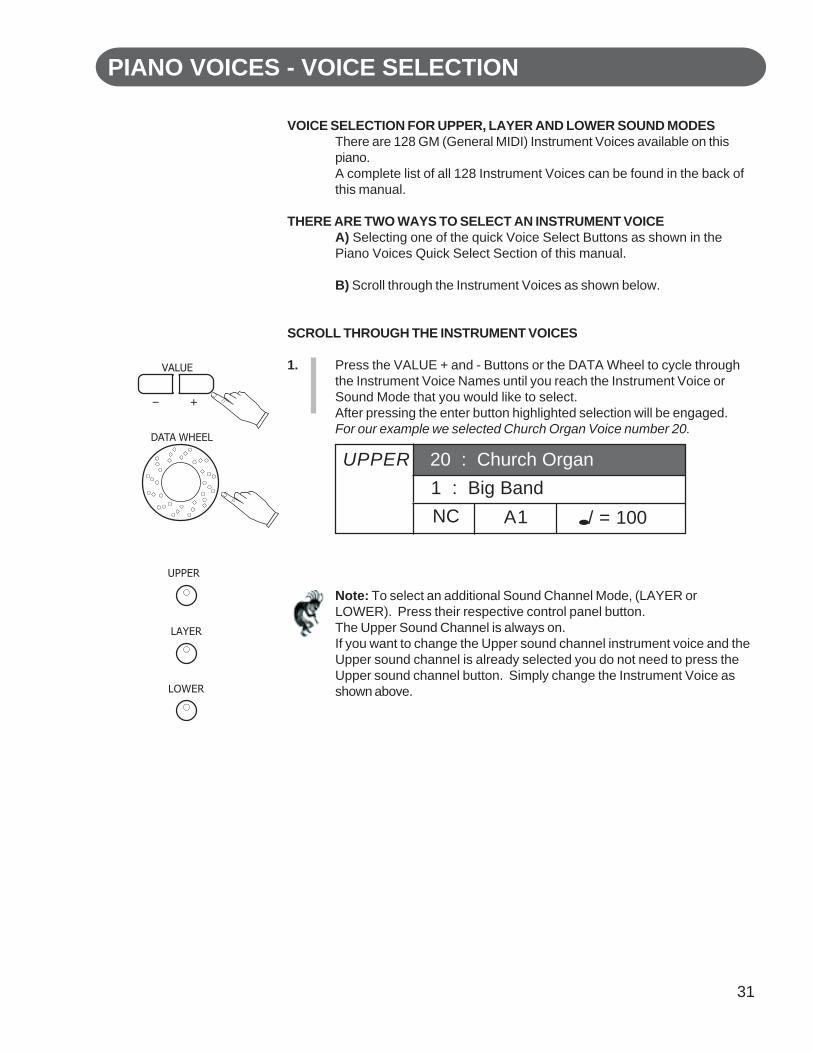
VOICE SELECTION FOR UPPER, LAYER AND LOWER SOUND MODESThere are 128 GM (General MIDI) Instrument Voices available on thispiano.A complete list of all 128 Instrument Voices can be found in the back ofthis manual.
THERE ARE TWO WAYS TO SELECT AN INSTRUMENT VOICEA) Selecting one of the quick Voice Select Buttons as shown in thePiano Voices Quick Select Section of this manual.
B) Scroll through the Instrument Voices as shown below.
SCROLL THROUGH THE INSTRUMENT VOICES
1. Press the VALUE + and - Buttons or the DATA Wheel to cycle throughthe Instrument Voice Names until you reach the Instrument Voice orSound Mode that you would like to select.After pressing the enter button highlighted selection will be engaged.For our example we selected Church Organ Voice number 20.
Note: To select an additional Sound Channel Mode, (LAYER orLOWER). Press their respective control panel button.The Upper Sound Channel is always on.If you want to change the Upper sound channel instrument voice and theUpper sound channel is already selected you do not need to press theUpper sound channel button. Simply change the Instrument Voice asshown above.
VALUE
– +
DATA WHEEL
UPPER
LAYER
LOWER
32
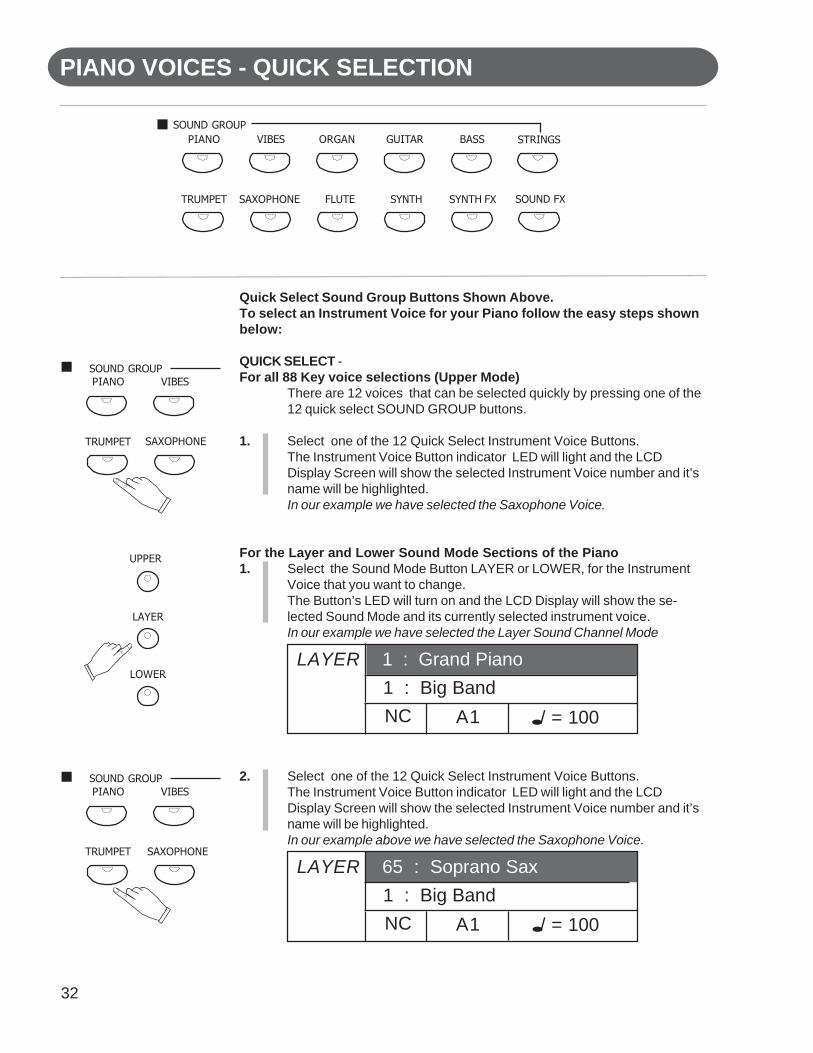
Quick Select Sound Group Buttons Shown Above.To select an Instrument Voice for your Piano follow the easy steps shownbelow:
QUICK SELECT -For all 88 Key voice selections (Upper Mode)
There are 12 voices that can be selected quickly by pressing one of the12 quick select SOUND GROUP buttons.
1. Select one of the 12 Quick Select Instrument Voice Buttons.The Instrument Voice Button indicator LED will light and the LCDDisplay Screen will show the selected Instrument Voice number and it’sname will be highlighted.In our example we have selected the Saxophone Voice.
For the Layer and Lower Sound Mode Sections of the Piano1. Select the Sound Mode Button LAYER or LOWER, for the Instrument
Voice that you want to change.The Button’s LED will turn on and the LCD Display will show the se-lected Sound Mode and its currently selected instrument voice.In our example we have selected the Layer Sound Channel Mode
2. Select one of the 12 Quick Select Instrument Voice Buttons.The Instrument Voice Button indicator LED will light and the LCDDisplay Screen will show the selected Instrument Voice number and it’sname will be highlighted.In our example above we have selected the Saxophone Voice.
PIANO VOICES - QUICK SELECTION
LAYER
NC1 : Big Band
A1 / = 100
1 : Grand Piano
LAYER
NC1 : Big Band
A1 / = 100
65 : Soprano Sax
SOUND GROUP
SAXOPHONETRUMPET
PIANO VIBES
UPPER
LAYER
LOWER
SOUND GROUP
SAXOPHONETRUMPET
PIANO VIBES
SOUND GROUP
SYNTH FXSYNTHFLUTESAXOPHONE
ORGAN
TRUMPET
GUITAR BASSPIANO VIBES
SOUND FX
STRINGS
33
PIANO VOICES - SELECTING ALL VOICES
1234567890123456789012345678901212345678901234567890123456789012123456123456789012345678901234567890121234567890123456789012345678901212345612345678901234567890123456789012123456789012345678901234567890121234561234567890123456789012345678901212345678901234567890123456789012123456123456789012345678901234567890121234567890123456789012345678901212345612345678901234567890123456789012123456789012345678901234567890121234561234567890123456789012345678901212345678901234567890123456789012123456123456789012345678901234567890121234567890123456789012345678901212345612345678901234567890123456789012123456789012345678901234567890121234561234567890123456789012345678901212345678901234567890123456789012123456123456789012345678901234567890121234567890123456789012345678901212345612345678901234567890123456789012123456789012345678901234567890121234561234567890123456789012345678901212345678901234567890123456789012123456
Reed Group A
Soprano Sax
Tenor Sax
Alto Sax
Baritone Sax
123456789012345678901234567890121234567890123456789012345678901212345612345678901234567890123456789012123456789012345678901234567890121234561234567890123456789012345678901212345678901234567890123456789012123456123456789012345678901234567890121234567890123456789012345678901212345612345678901234567890123456789012123456789012345678901234567890121234561234567890123456789012345678901212345678901234567890123456789012123456123456789012345678901234567890121234567890123456789012345678901212345612345678901234567890123456789012123456789012345678901234567890121234561234567890123456789012345678901212345678901234567890123456789012123456123456789012345678901234567890121234567890123456789012345678901212345612345678901234567890123456789012123456789012345678901234567890121234561234567890123456789012345678901212345678901234567890123456789012123456
Reed Group B
Oboe
Bassoon
English Horn
Clarinet
UPPER
NC1 : Big Band
A1 / = 100
70 : English Horn
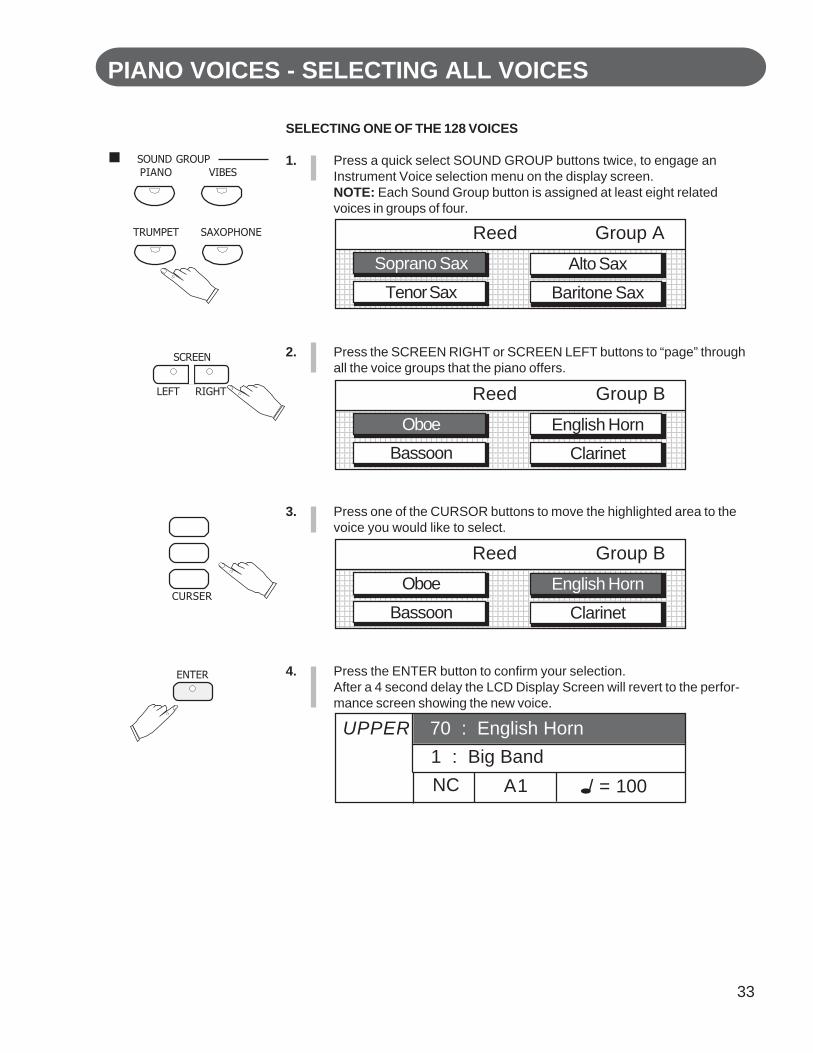
SELECTING ONE OF THE 128 VOICES
1. Press a quick select SOUND GROUP buttons twice, to engage anInstrument Voice selection menu on the display screen.NOTE: Each Sound Group button is assigned at least eight relatedvoices in groups of four.
2. Press the SCREEN RIGHT or SCREEN LEFT buttons to “page” throughall the voice groups that the piano offers.
3. Press one of the CURSOR buttons to move the highlighted area to thevoice you would like to select.
4. Press the ENTER button to confirm your selection.After a 4 second delay the LCD Display Screen will revert to the perfor-mance screen showing the new voice.
SOUND GROUP
SAXOPHONETRUMPET
PIANO VIBES
LEFT RIGHT
SCREEN
CURSER
ENTER
34
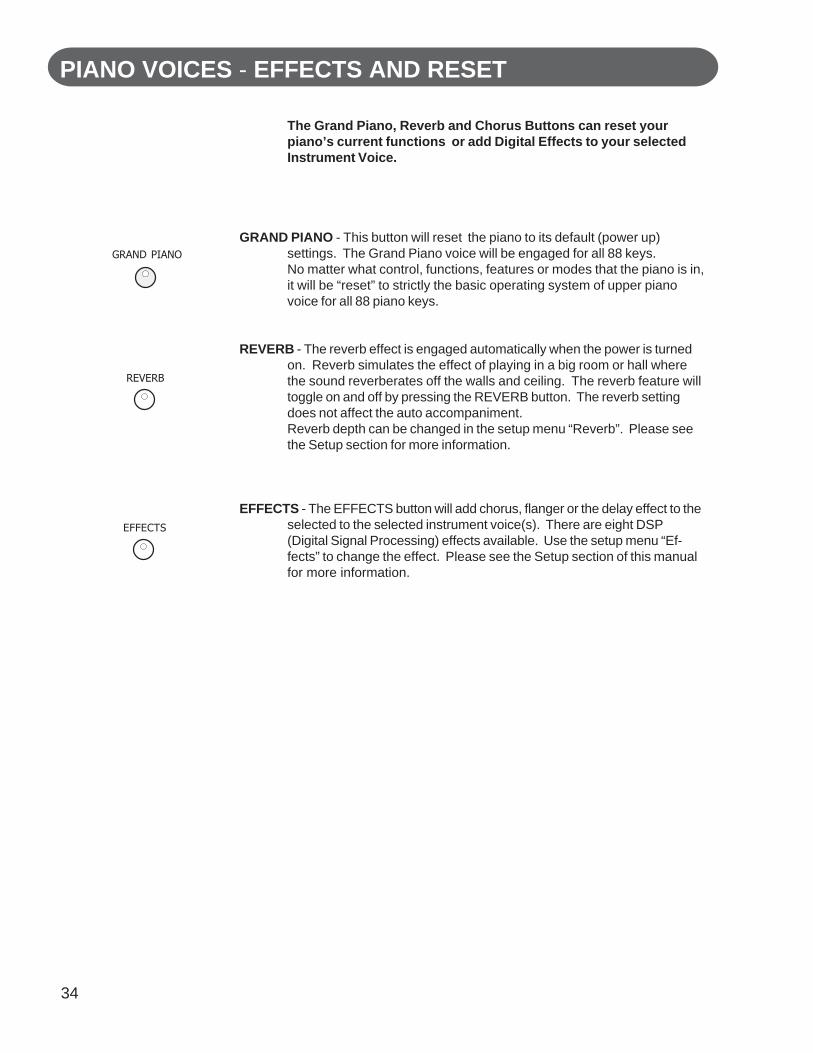
The Grand Piano, Reverb and Chorus Buttons can reset yourpiano’s current functions or add Digital Effects to your selectedInstrument Voice.
GRAND PIANO - This button will reset the piano to its default (power up)settings. The Grand Piano voice will be engaged for all 88 keys.No matter what control, functions, features or modes that the piano is in,it will be “reset” to strictly the basic operating system of upper pianovoice for all 88 piano keys.
REVERB - The reverb effect is engaged automatically when the power is turnedon. Reverb simulates the effect of playing in a big room or hall wherethe sound reverberates off the walls and ceiling. The reverb feature willtoggle on and off by pressing the REVERB button. The reverb settingdoes not affect the auto accompaniment.Reverb depth can be changed in the setup menu “Reverb”. Please seethe Setup section for more information.
EFFECTS - The EFFECTS button will add chorus, flanger or the delay effect to theselected to the selected instrument voice(s). There are eight DSP(Digital Signal Processing) effects available. Use the setup menu “Ef-fects” to change the effect. Please see the Setup section of this manualfor more information.
PIANO VOICES - EFFECTS AND RESET
GRAND PIANO
REVERB
EFFECTS
35
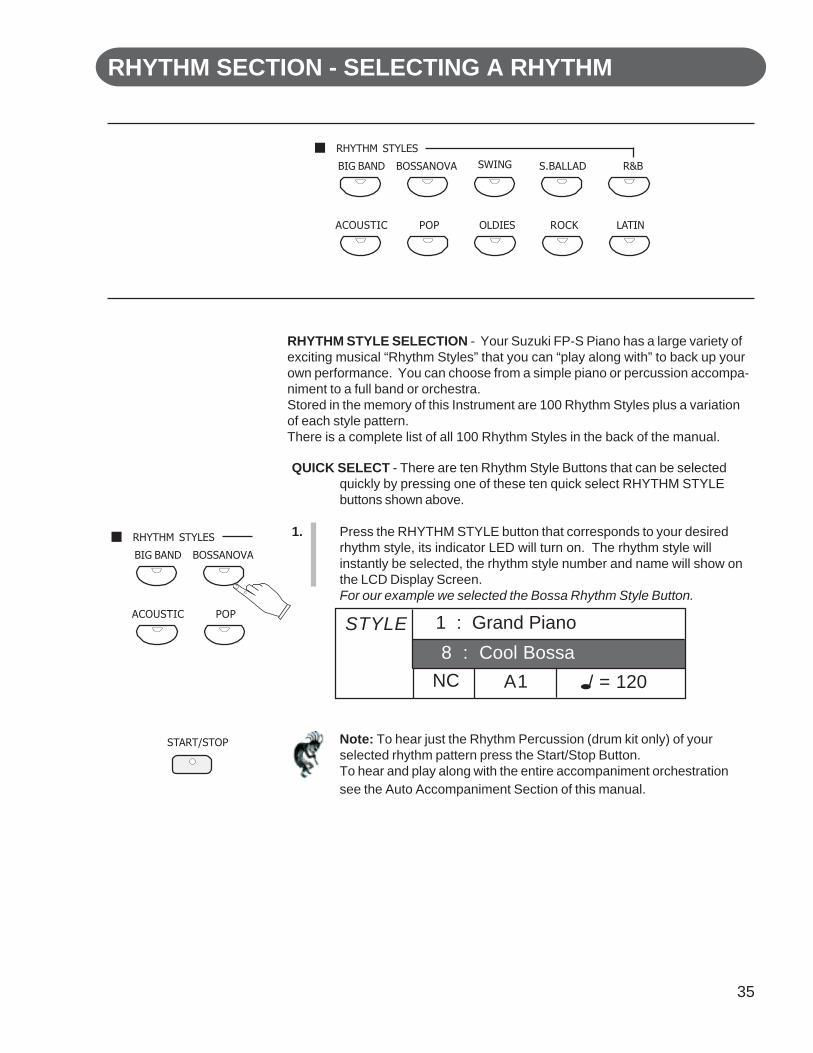
QUICK SELECT - There are ten Rhythm Style Buttons that can be selectedquickly by pressing one of these ten quick select RHYTHM STYLEbuttons shown above.
1. Press the RHYTHM STYLE button that corresponds to your desiredrhythm style, its indicator LED will turn on. The rhythm style willinstantly be selected, the rhythm style number and name will show onthe LCD Display Screen.For our example we selected the Bossa Rhythm Style Button.
Note: To hear just the Rhythm Percussion (drum kit only) of yourselected rhythm pattern press the Start/Stop Button.To hear and play along with the entire accompaniment orchestrationsee the Auto Accompaniment Section of this manual.
RHYTHM SECTION - SELECTING A RHYTHM
RHYTHM STYLE SELECTION - Your Suzuki FP-S Piano has a large variety ofexciting musical “Rhythm Styles” that you can “play along with” to back up yourown performance. You can choose from a simple piano or percussion accompa-niment to a full band or orchestra.Stored in the memory of this Instrument are 100 Rhythm Styles plus a variationof each style pattern.There is a complete list of all 100 Rhythm Styles in the back of the manual.
STYLE
NC
1 : Grand Piano
A1 / = 120
8 : Cool Bossa
RHYTHM STYLES
LATINROCKOLDIESPOP
SWING
ACOUSTIC
S.BALLAD R&BBIG BAND BOSSANOVA
RHYTHM STYLES
POPACOUSTIC
BIG BAND BOSSANOVA
START/STOP
36
RHYTHM SECTION - SELECTING A RHYTHM
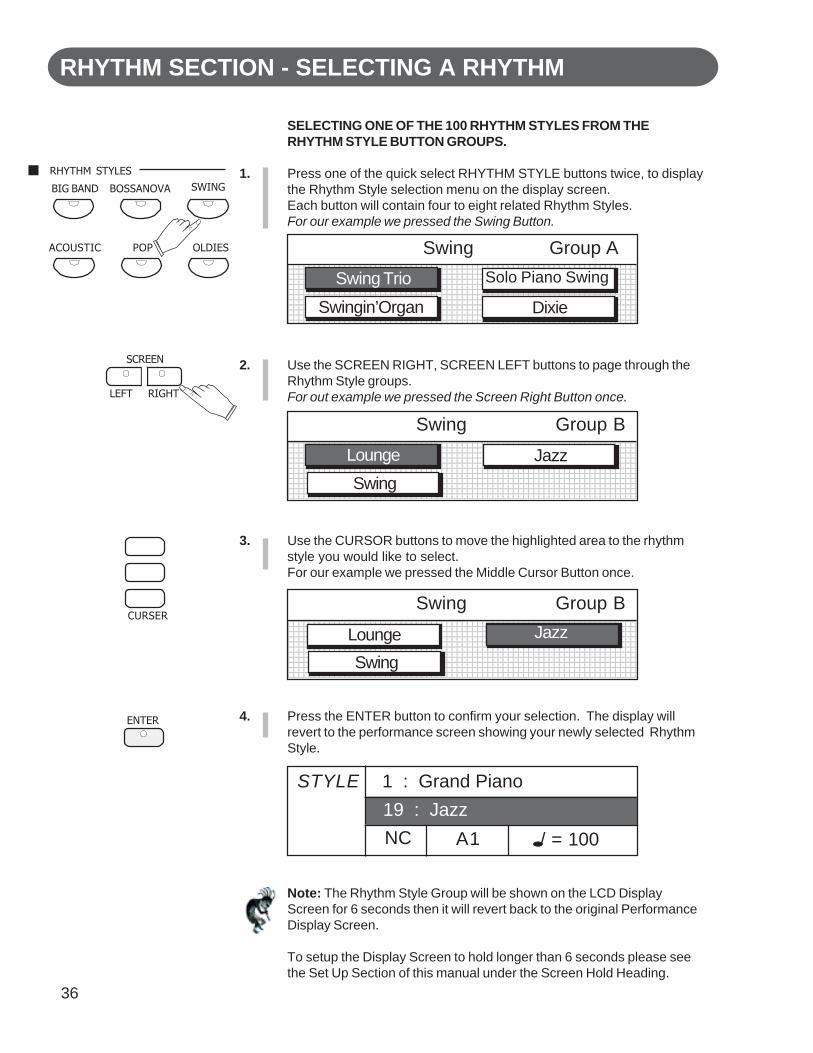
SELECTING ONE OF THE 100 RHYTHM STYLES FROM THERHYTHM STYLE BUTTON GROUPS.
1. Press one of the quick select RHYTHM STYLE buttons twice, to displaythe Rhythm Style selection menu on the display screen.Each button will contain four to eight related Rhythm Styles.For our example we pressed the Swing Button.
2. Use the SCREEN RIGHT, SCREEN LEFT buttons to page through theRhythm Style groups.For out example we pressed the Screen Right Button once.
3. Use the CURSOR buttons to move the highlighted area to the rhythmstyle you would like to select.For our example we pressed the Middle Cursor Button once.
4. Press the ENTER button to confirm your selection. The display willrevert to the performance screen showing your newly selected RhythmStyle.
123456789012345678901234567890121234567890123456789012345678901212345123456789012345678901234567890121234567890123456789012345678901212345123456789012345678901234567890121234567890123456789012345678901212345123456789012345678901234567890121234567890123456789012345678901212345123456789012345678901234567890121234567890123456789012345678901212345123456789012345678901234567890121234567890123456789012345678901212345123456789012345678901234567890121234567890123456789012345678901212345123456789012345678901234567890121234567890123456789012345678901212345123456789012345678901234567890121234567890123456789012345678901212345123456789012345678901234567890121234567890123456789012345678901212345123456789012345678901234567890121234567890123456789012345678901212345123456789012345678901234567890121234567890123456789012345678901212345
Swing Group A
Swing Trio
Swingin’Organ
Solo Piano Swing
Dixie
STYLE
NC19 : Jazz
A1 / = 100
1 : Grand Piano
123456789012345678901234567890121234567890123456789012345678901212345123456789012345678901234567890121234567890123456789012345678901212345123456789012345678901234567890121234567890123456789012345678901212345123456789012345678901234567890121234567890123456789012345678901212345123456789012345678901234567890121234567890123456789012345678901212345123456789012345678901234567890121234567890123456789012345678901212345123456789012345678901234567890121234567890123456789012345678901212345123456789012345678901234567890121234567890123456789012345678901212345123456789012345678901234567890121234567890123456789012345678901212345123456789012345678901234567890121234567890123456789012345678901212345123456789012345678901234567890121234567890123456789012345678901212345123456789012345678901234567890121234567890123456789012345678901212345
Swing Group B
JazzLounge
123456789012345678901234567890121234567890123456789012345678901212345123456789012345678901234567890121234567890123456789012345678901212345123456789012345678901234567890121234567890123456789012345678901212345123456789012345678901234567890121234567890123456789012345678901212345123456789012345678901234567890121234567890123456789012345678901212345123456789012345678901234567890121234567890123456789012345678901212345123456789012345678901234567890121234567890123456789012345678901212345123456789012345678901234567890121234567890123456789012345678901212345123456789012345678901234567890121234567890123456789012345678901212345123456789012345678901234567890121234567890123456789012345678901212345123456789012345678901234567890121234567890123456789012345678901212345123456789012345678901234567890121234567890123456789012345678901212345
Swing Group B
Lounge Jazz
Swing
Swing
Note: The Rhythm Style Group will be shown on the LCD DisplayScreen for 6 seconds then it will revert back to the original PerformanceDisplay Screen.
To setup the Display Screen to hold longer than 6 seconds please seethe Set Up Section of this manual under the Screen Hold Heading.
RHYTHM STYLES
OLDIESPOP
SWING
ACOUSTIC
BIG BAND BOSSANOVA
LEFT RIGHT
SCREEN
CURSER
ENTER

37
RHYTHM SECTION - SELECTING A RHYTHM
SELECTING A RHYTHM STYLE USING LCD DISPLAY PANEL CONTROLSSelecting a Rhythm Style using only the Cursor and Value Buttons
1. Highlight the Rhythm Style name area using the CURSOR buttons.
2. Press the VALUE + and - buttons or turn the Data Wheel to cyclethrough the Rhythm Style numbers and names until you reach yourdesired rhythm style.For our example we pressed the Value + Button until we arrived at theSwing Trio Rhythm Style.
Note: If you hold down the + or - Value Button the Rhythm Styles willcycle up or down respectively until you release the Button.
STYLE
NC1 : Big Band
A1 / = 100
1 : Grand Piano
STYLE
NC14 : Swing Trio
A1 / = 100
1 : Grand Piano
CURSER
VALUE
– +
38
RHYTHM SECTION - PLAYING THE RHYTHM
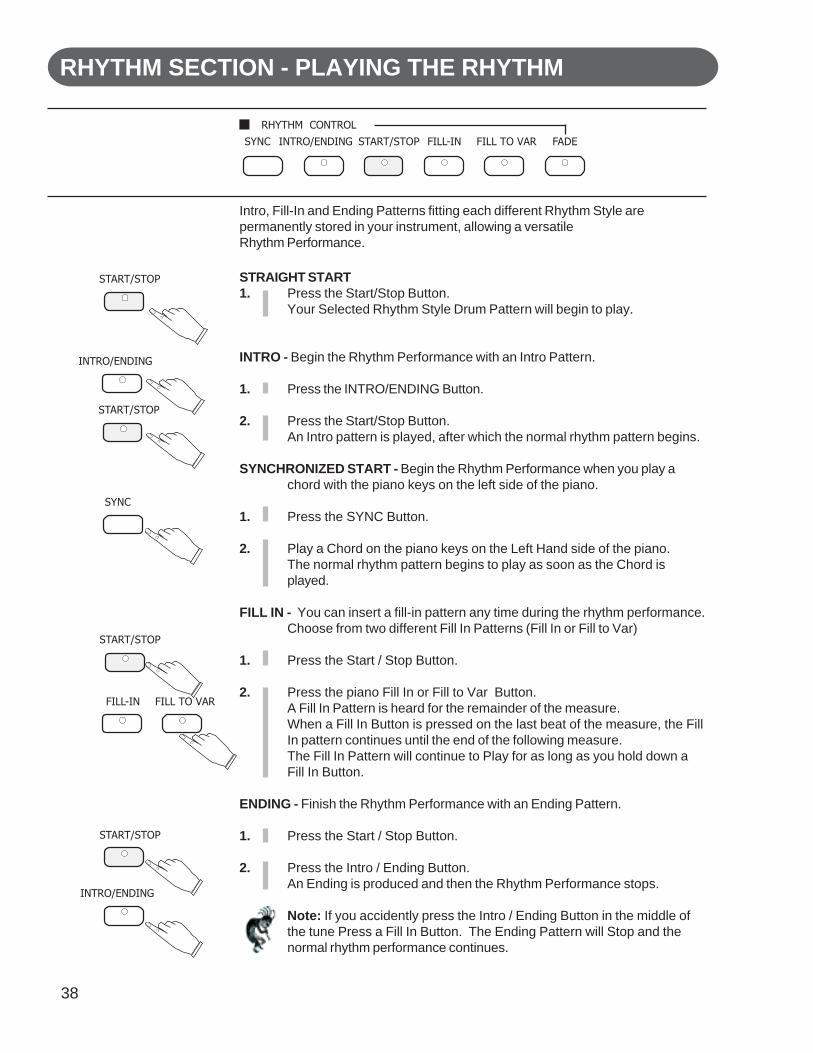
STRAIGHT START1. Press the Start/Stop Button.
Your Selected Rhythm Style Drum Pattern will begin to play.
INTRO - Begin the Rhythm Performance with an Intro Pattern.
1. Press the INTRO/ENDING Button.
2. Press the Start/Stop Button.An Intro pattern is played, after which the normal rhythm pattern begins.
SYNCHRONIZED START - Begin the Rhythm Performance when you play achord with the piano keys on the left side of the piano.
1. Press the SYNC Button.
2. Play a Chord on the piano keys on the Left Hand side of the piano.The normal rhythm pattern begins to play as soon as the Chord isplayed.
FILL IN - You can insert a fill-in pattern any time during the rhythm performance.Choose from two different Fill In Patterns (Fill In or Fill to Var)
1. Press the Start / Stop Button.
2. Press the piano Fill In or Fill to Var Button.A Fill In Pattern is heard for the remainder of the measure.When a Fill In Button is pressed on the last beat of the measure, the FillIn pattern continues until the end of the following measure.The Fill In Pattern will continue to Play for as long as you hold down aFill In Button.
ENDING - Finish the Rhythm Performance with an Ending Pattern.
1. Press the Start / Stop Button.
2. Press the Intro / Ending Button.An Ending is produced and then the Rhythm Performance stops.
Note: If you accidently press the Intro / Ending Button in the middle ofthe tune Press a Fill In Button. The Ending Pattern will Stop and thenormal rhythm performance continues.
Intro, Fill-In and Ending Patterns fitting each different Rhythm Style arepermanently stored in your instrument, allowing a versatileRhythm Performance.
START/STOP
INTRO/ENDING
START/STOP
SYNC
START/STOP
FILL-IN FILL TO VAR
INTRO/ENDING
START/STOP
RHYTHM CONTROL
FADEFILL TO VARFILL-ININTRO/ENDINGSYNC START/STOP
39
RHYTHM SECTION - PLAYING THE RHYTHM
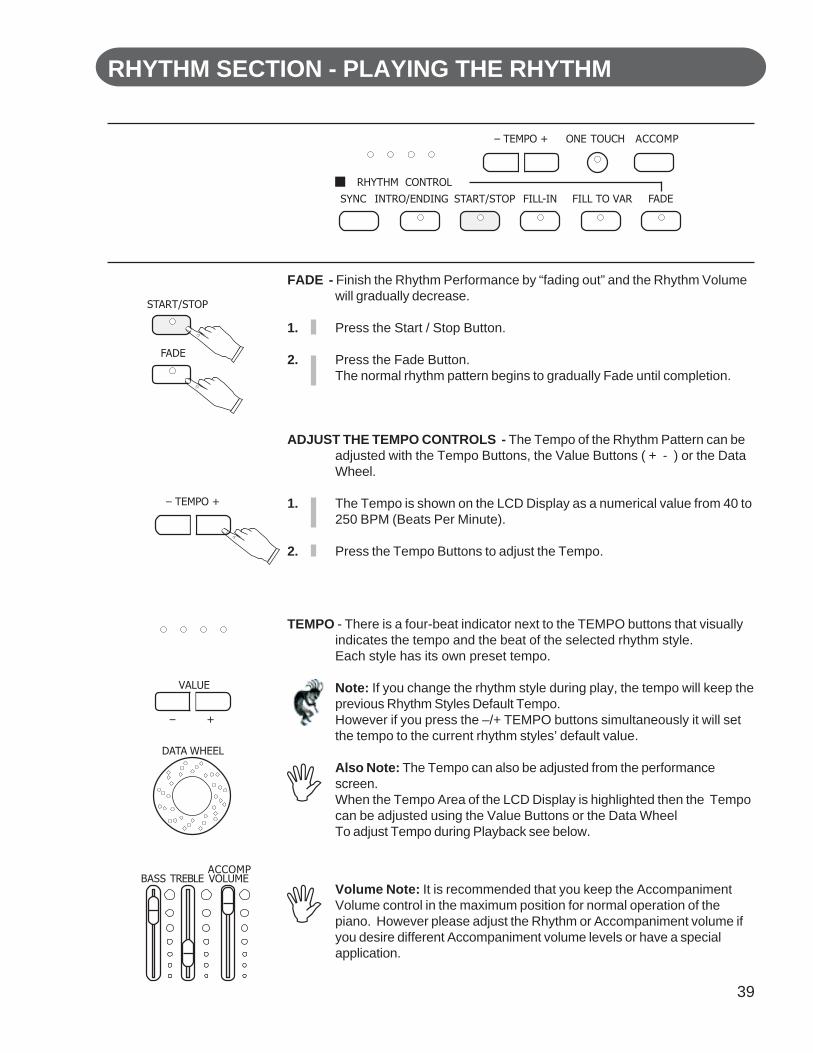
FADE - Finish the Rhythm Performance by “fading out” and the Rhythm Volumewill gradually decrease.
1. Press the Start / Stop Button.
2. Press the Fade Button.The normal rhythm pattern begins to gradually Fade until completion.
ADJUST THE TEMPO CONTROLS - The Tempo of the Rhythm Pattern can beadjusted with the Tempo Buttons, the Value Buttons ( + - ) or the DataWheel.
1. The Tempo is shown on the LCD Display as a numerical value from 40 to250 BPM (Beats Per Minute).
2. Press the Tempo Buttons to adjust the Tempo.
TEMPO - There is a four-beat indicator next to the TEMPO buttons that visuallyindicates the tempo and the beat of the selected rhythm style.Each style has its own preset tempo.
Note: If you change the rhythm style during play, the tempo will keep theprevious Rhythm Styles Default Tempo.However if you press the –/+ TEMPO buttons simultaneously it will setthe tempo to the current rhythm styles’ default value.
Also Note: The Tempo can also be adjusted from the performancescreen.When the Tempo Area of the LCD Display is highlighted then the Tempocan be adjusted using the Value Buttons or the Data WheelTo adjust Tempo during Playback see below.
– TEMPO +
START/STOP
FADE
VALUE
– +
DATA WHEEL
RHYTHM CONTROL
FADEFILL TO VARFILL-ININTRO/ENDING
– TEMPO +
SYNC
ACCOMPONE TOUCH
START/STOP
BASS TREBLE VOLUMEACCOMP
Volume Note: It is recommended that you keep the AccompanimentVolume control in the maximum position for normal operation of thepiano. However please adjust the Rhythm or Accompaniment volume ifyou desire different Accompaniment volume levels or have a specialapplication.
40
AUTO ACCOMPANIMENT
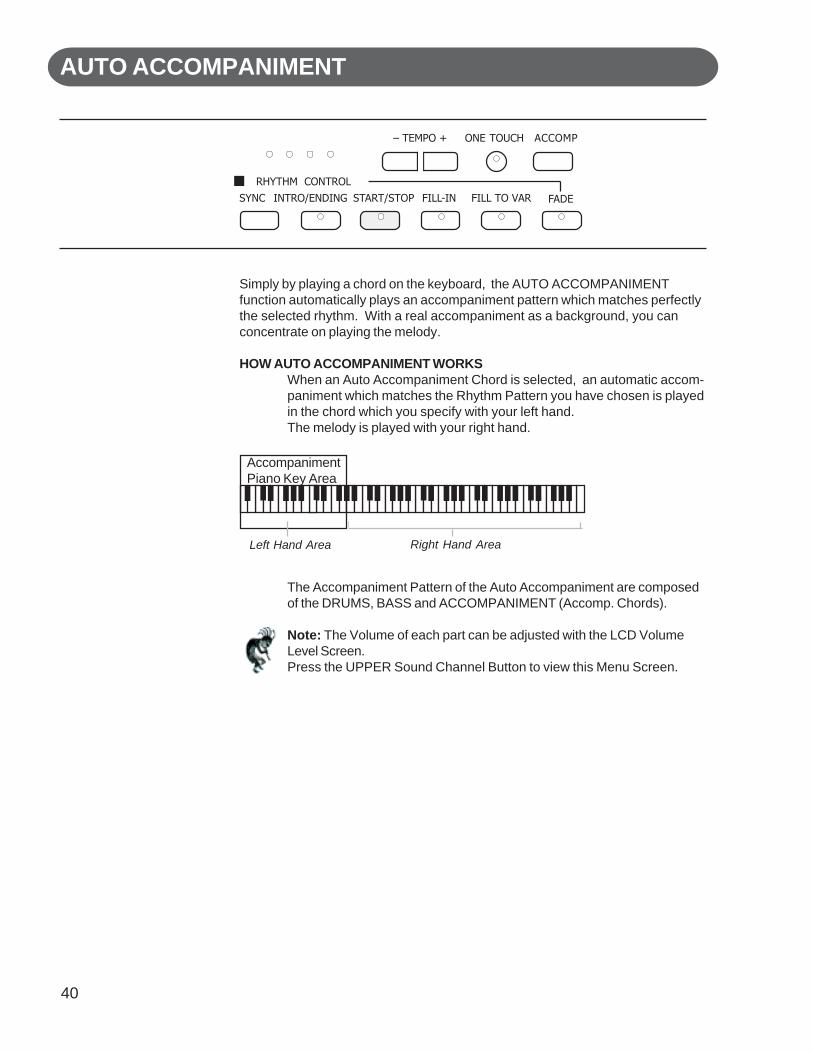
Simply by playing a chord on the keyboard, the AUTO ACCOMPANIMENTfunction automatically plays an accompaniment pattern which matches perfectlythe selected rhythm. With a real accompaniment as a background, you canconcentrate on playing the melody.
HOW AUTO ACCOMPANIMENT WORKSWhen an Auto Accompaniment Chord is selected, an automatic accom-paniment which matches the Rhythm Pattern you have chosen is playedin the chord which you specify with your left hand.The melody is played with your right hand.
The Accompaniment Pattern of the Auto Accompaniment are composedof the DRUMS, BASS and ACCOMPANIMENT (Accomp. Chords).
Note: The Volume of each part can be adjusted with the LCD VolumeLevel Screen.Press the UPPER Sound Channel Button to view this Menu Screen.
AccompanimentPiano Key Area
Left Hand Area Right Hand Area
RHYTHM CONTROL
– TEMPO + ACCOMPONE TOUCH
START/STOPINTRO/ENDINGSYNC FILL-IN FILL TO VAR FADE

41
AUTO ACCOMPANIMENT - TYPES
HOW TO PLAY CHORDSThere are 3 different ways to specify chords on the Keyboard.
Basic Mode (One Finger)For beginner players, a left hand chord can be specified with just onefinger. You can either press one key on the left keyboard section tospecify the root note (one-finger), or play all the notes of the chord.
Note: When the rhythm is on, even if the keys are released, theaccompaniment continues to play in the specified chord until you specifyanother chord.
ONE FINGERPress a key in the left keyboard section to specify the root note. Themajor chord corresponding to this root note is automatically played in anaccompaniment pattern.
AccompanimentPiano Key Area
Left Hand Area Right Hand Area
Major Chord: Press any key in the auto accompaniment section ofthe piano. The key you press determines the root note of the majorchord.
Minor Chord: Press the root key and the third piano key to its right(minor 3rd key) in the auto accompaniment section of the pianosimultaneously.
Seventh Chord: Press the root key and the piano key to its immedi-ate left (7th key) in the auto accompaniment section of the pianosimultaneously.
Minor-Seventh Chord: Press the root key and both the secondpiano key to its left (7th key) and the third piano key to its right (minor3rd key) in the auto accompaniment section of the piano simulta-neously.
42
AUTO ACCOMPANIMENT - TYPES
FINGERING GUIDE
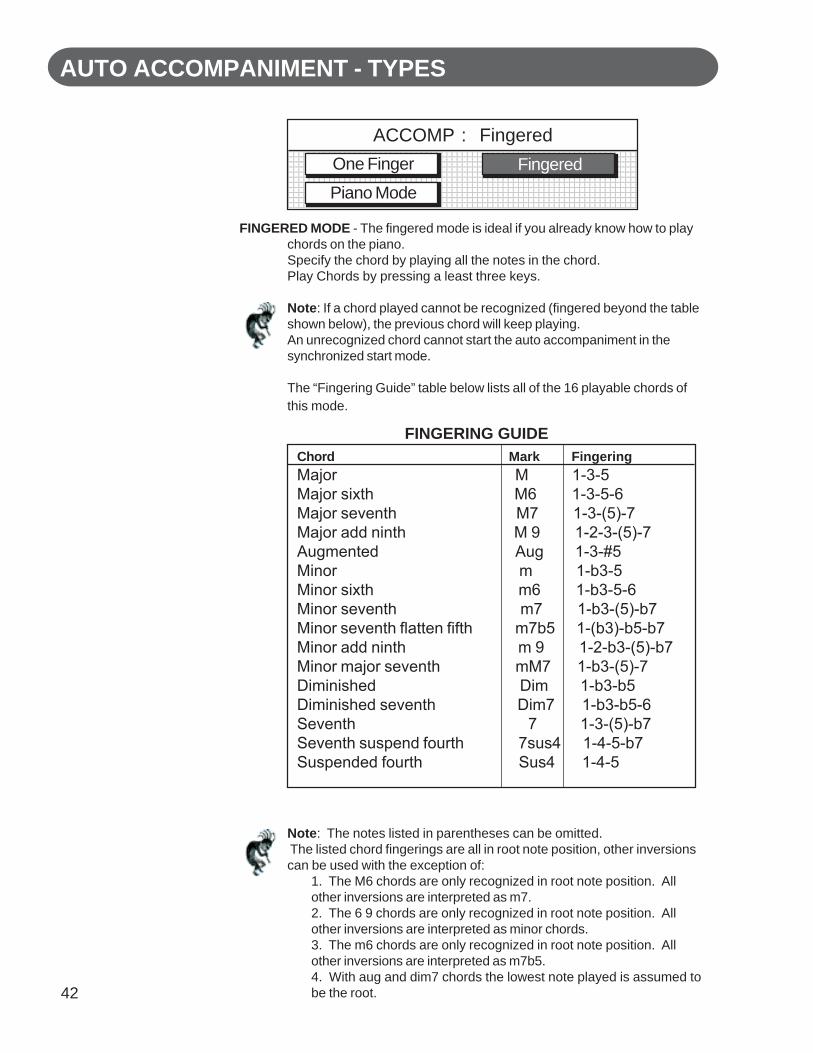
Note: The notes listed in parentheses can be omitted. The listed chord fingerings are all in root note position, other inversionscan be used with the exception of:
1. The M6 chords are only recognized in root note position. Allother inversions are interpreted as m7.2. The 6 9 chords are only recognized in root note position. Allother inversions are interpreted as minor chords.3. The m6 chords are only recognized in root note position. Allother inversions are interpreted as m7b5.4. With aug and dim7 chords the lowest note played is assumed tobe the root.
FINGERED MODE - The fingered mode is ideal if you already know how to playchords on the piano.Specify the chord by playing all the notes in the chord.Play Chords by pressing a least three keys.
Note: If a chord played cannot be recognized (fingered beyond the tableshown below), the previous chord will keep playing.An unrecognized chord cannot start the auto accompaniment in thesynchronized start mode.
The “Fingering Guide” table below lists all of the 16 playable chords ofthis mode.
123456789012345678901234567890121234567890123456789012345678901212345123456789012345678901234567890121234567890123456789012345678901212345123456789012345678901234567890121234567890123456789012345678901212345123456789012345678901234567890121234567890123456789012345678901212345123456789012345678901234567890121234567890123456789012345678901212345123456789012345678901234567890121234567890123456789012345678901212345123456789012345678901234567890121234567890123456789012345678901212345123456789012345678901234567890121234567890123456789012345678901212345123456789012345678901234567890121234567890123456789012345678901212345123456789012345678901234567890121234567890123456789012345678901212345123456789012345678901234567890121234567890123456789012345678901212345123456789012345678901234567890121234567890123456789012345678901212345
ACCOMP : FingeredOne Finger
Piano Mode
Fingered
Chord Mark FingeringMajor M 1-3-5Major sixth M6 1-3-5-6Major seventh M7 1-3-(5)-7Major add ninth M 9 1-2-3-(5)-7Augmented Aug 1-3-#5Minor m 1-b3-5Minor sixth m6 1-b3-5-6Minor seventh m7 1-b3-(5)-b7Minor seventh flatten fifth m7b5 1-(b3)-b5-b7Minor add ninth m 9 1-2-b3-(5)-b7Minor major seventh mM7 1-b3-(5)-7Diminished Dim 1-b3-b5Diminished seventh Dim7 1-b3-b5-6Seventh 7 1-3-(5)-b7Seventh suspend fourth 7sus4 1-4-5-b7Suspended fourth Sus4 1-4-5

43
PIANO CHORD MODEIn the Piano Mode the entire keyboard can be used to specify chords forthe automatic accompaniment.
Note: In this Mode the keyboard does not Split.Chords can be specified anywhere on the keyboard.Chords are specified the same way as for the Fingered Mode and thetypes of Chords are also the same.
MANUAL BASSIt is possible to play Single Note Bass Lines in the AccompanimentPiano Key Area of the Piano when the Manual Bass Function is en-gaged.Please see the Key Mode area of the SET UP section of this manual.
AUTO ACCOMPANIMENT - TYPES
123456789012345678901234567890121234567890123456789012345678901212345612345678901234567890123456789012123456789012345678901234567890121234561234567890123456789012345678901212345678901234567890123456789012123456123456789012345678901234567890121234567890123456789012345678901212345612345678901234567890123456789012123456789012345678901234567890121234561234567890123456789012345678901212345678901234567890123456789012123456123456789012345678901234567890121234567890123456789012345678901212345612345678901234567890123456789012123456789012345678901234567890121234561234567890123456789012345678901212345678901234567890123456789012123456123456789012345678901234567890121234567890123456789012345678901212345612345678901234567890123456789012123456789012345678901234567890121234561234567890123456789012345678901212345678901234567890123456789012123456
ACCOMP : PianoOne Finger
Piano Mode
Fingered
SPLIT POINTThe piano is split into two sections at the split point.The default split point is the G2 key for auto accompaniment.A different split point can be assigned in the setup menu “Performance”.Please see the Setup Section of this manual for more information.
44
AUTO ACCOMPANIMENT - HOW TO USE
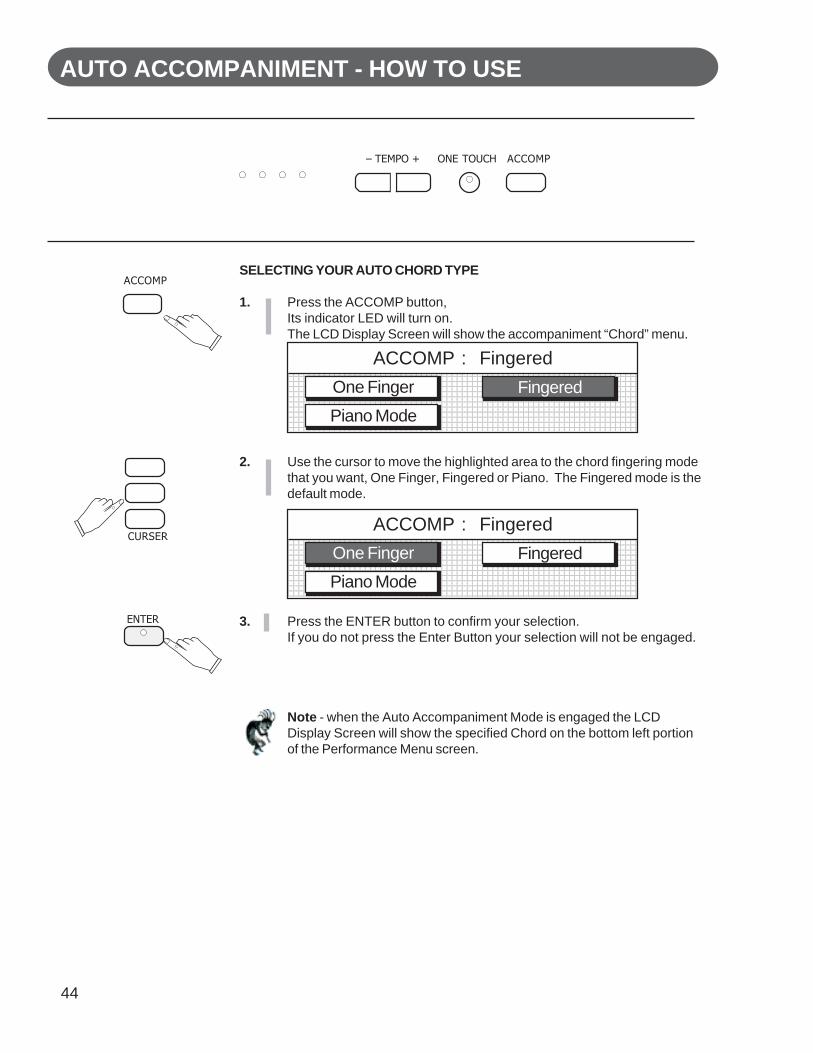
SELECTING YOUR AUTO CHORD TYPE
1. Press the ACCOMP button,Its indicator LED will turn on.The LCD Display Screen will show the accompaniment “Chord” menu.
2. Use the cursor to move the highlighted area to the chord fingering modethat you want, One Finger, Fingered or Piano. The Fingered mode is thedefault mode.
3. Press the ENTER button to confirm your selection.If you do not press the Enter Button your selection will not be engaged.
Note - when the Auto Accompaniment Mode is engaged the LCDDisplay Screen will show the specified Chord on the bottom left portionof the Performance Menu screen.
123456789012345678901234567890121234567890123456789012345678901212345123456789012345678901234567890121234567890123456789012345678901212345123456789012345678901234567890121234567890123456789012345678901212345123456789012345678901234567890121234567890123456789012345678901212345123456789012345678901234567890121234567890123456789012345678901212345123456789012345678901234567890121234567890123456789012345678901212345123456789012345678901234567890121234567890123456789012345678901212345123456789012345678901234567890121234567890123456789012345678901212345123456789012345678901234567890121234567890123456789012345678901212345123456789012345678901234567890121234567890123456789012345678901212345123456789012345678901234567890121234567890123456789012345678901212345123456789012345678901234567890121234567890123456789012345678901212345123456789012345678901234567890121234567890123456789012345678901212345
ACCOMP : FingeredOne Finger
Piano Mode
Fingered
123456789012345678901234567890121234567890123456789012345678901212345123456789012345678901234567890121234567890123456789012345678901212345123456789012345678901234567890121234567890123456789012345678901212345123456789012345678901234567890121234567890123456789012345678901212345123456789012345678901234567890121234567890123456789012345678901212345123456789012345678901234567890121234567890123456789012345678901212345123456789012345678901234567890121234567890123456789012345678901212345123456789012345678901234567890121234567890123456789012345678901212345123456789012345678901234567890121234567890123456789012345678901212345123456789012345678901234567890121234567890123456789012345678901212345123456789012345678901234567890121234567890123456789012345678901212345123456789012345678901234567890121234567890123456789012345678901212345
ACCOMP : FingeredOne Finger
Piano Mode
Fingered
– TEMPO + ONE TOUCH ACCOMP
ACCOMP
CURSER
ENTER
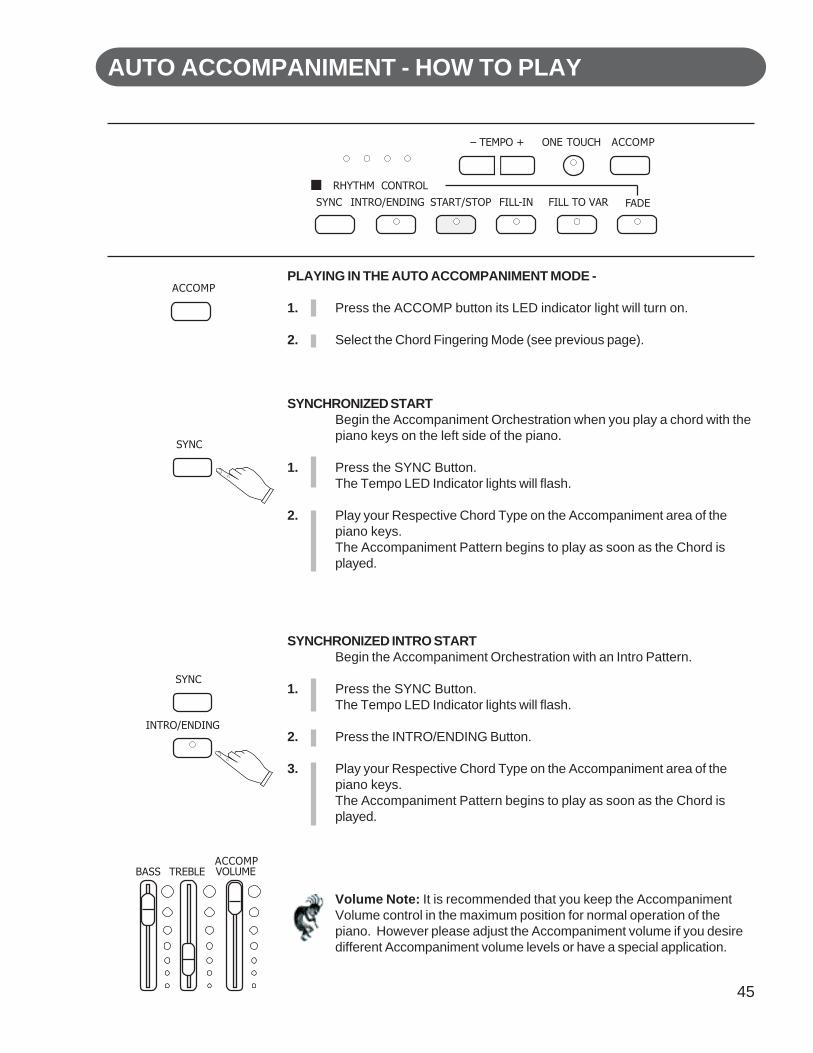
45
AUTO ACCOMPANIMENT - HOW TO PLAY
PLAYING IN THE AUTO ACCOMPANIMENT MODE -
1. Press the ACCOMP button its LED indicator light will turn on.
2. Select the Chord Fingering Mode (see previous page).
SYNCHRONIZED STARTBegin the Accompaniment Orchestration when you play a chord with thepiano keys on the left side of the piano.
1. Press the SYNC Button.The Tempo LED Indicator lights will flash.
2. Play your Respective Chord Type on the Accompaniment area of thepiano keys.The Accompaniment Pattern begins to play as soon as the Chord isplayed.
SYNCHRONIZED INTRO STARTBegin the Accompaniment Orchestration with an Intro Pattern.
1. Press the SYNC Button.The Tempo LED Indicator lights will flash.
2. Press the INTRO/ENDING Button.
3. Play your Respective Chord Type on the Accompaniment area of thepiano keys.The Accompaniment Pattern begins to play as soon as the Chord isplayed.
ACCOMP
SYNC
SYNC
INTRO/ENDING
RHYTHM CONTROL
– TEMPO + ONE TOUCH
START/STOP FILL-IN FILL TO VAR FADE
ACCOMP
SYNC INTRO/ENDING
BASS TREBLE VOLUMEACCOMP
Volume Note: It is recommended that you keep the AccompanimentVolume control in the maximum position for normal operation of thepiano. However please adjust the Accompaniment volume if you desiredifferent Accompaniment volume levels or have a special application.
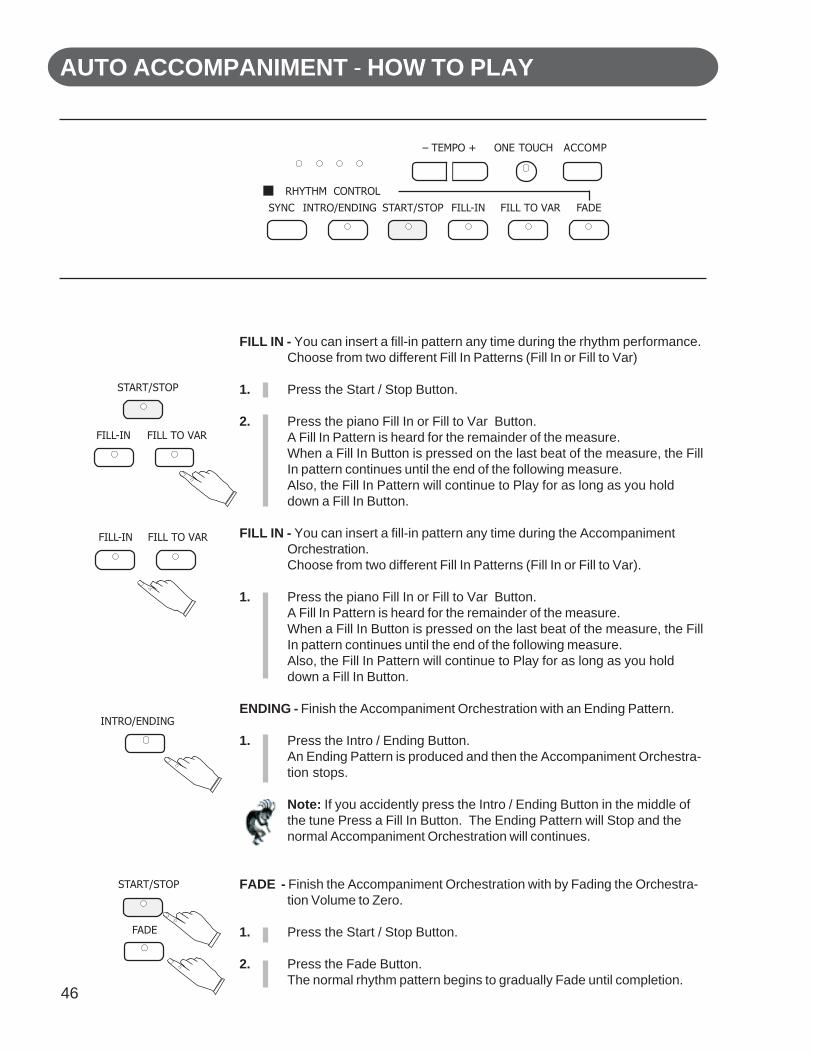
46
AUTO ACCOMPANIMENT - HOW TO PLAY
FILL IN - You can insert a fill-in pattern any time during the rhythm performance.Choose from two different Fill In Patterns (Fill In or Fill to Var)
1. Press the Start / Stop Button.
2. Press the piano Fill In or Fill to Var Button.A Fill In Pattern is heard for the remainder of the measure.When a Fill In Button is pressed on the last beat of the measure, the FillIn pattern continues until the end of the following measure.Also, the Fill In Pattern will continue to Play for as long as you holddown a Fill In Button.
FILL IN - You can insert a fill-in pattern any time during the AccompanimentOrchestration.Choose from two different Fill In Patterns (Fill In or Fill to Var).
1. Press the piano Fill In or Fill to Var Button.A Fill In Pattern is heard for the remainder of the measure.When a Fill In Button is pressed on the last beat of the measure, the FillIn pattern continues until the end of the following measure.Also, the Fill In Pattern will continue to Play for as long as you holddown a Fill In Button.
ENDING - Finish the Accompaniment Orchestration with an Ending Pattern.
1. Press the Intro / Ending Button.An Ending Pattern is produced and then the Accompaniment Orchestra-tion stops.
Note: If you accidently press the Intro / Ending Button in the middle ofthe tune Press a Fill In Button. The Ending Pattern will Stop and thenormal Accompaniment Orchestration will continues.
FADE - Finish the Accompaniment Orchestration with by Fading the Orchestra-tion Volume to Zero.
1. Press the Start / Stop Button.
2. Press the Fade Button.The normal rhythm pattern begins to gradually Fade until completion.
FILL-IN FILL TO VAR
FILL-IN FILL TO VAR
INTRO/ENDING
FADE
START/STOP
RHYTHM CONTROL
FADEFILL TO VARFILL-ININTRO/ENDING
– TEMPO +
SYNC
ACCOMPONE TOUCH
START/STOP
START/STOP
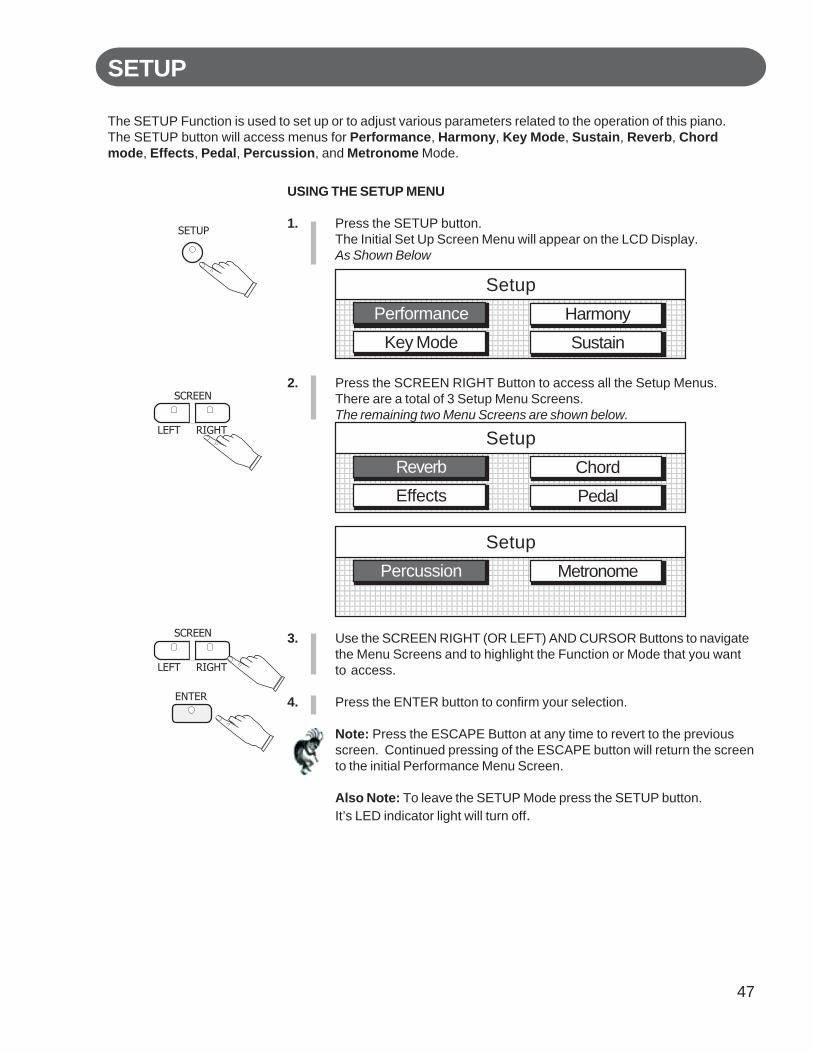
47
SETUP
USING THE SETUP MENU
1. Press the SETUP button.The Initial Set Up Screen Menu will appear on the LCD Display.As Shown Below
2. Press the SCREEN RIGHT Button to access all the Setup Menus.There are a total of 3 Setup Menu Screens.The remaining two Menu Screens are shown below.
3. Use the SCREEN RIGHT (OR LEFT) AND CURSOR Buttons to navigatethe Menu Screens and to highlight the Function or Mode that you wantto access.
4. Press the ENTER button to confirm your selection.
Note: Press the ESCAPE Button at any time to revert to the previousscreen. Continued pressing of the ESCAPE button will return the screento the initial Performance Menu Screen.
Also Note: To leave the SETUP Mode press the SETUP button.It’s LED indicator light will turn off.
The SETUP Function is used to set up or to adjust various parameters related to the operation of this piano.The SETUP button will access menus for Performance, Harmony, Key Mode, Sustain, Reverb, Chordmode, Effects, Pedal, Percussion, and Metronome Mode.
123456789012345678901234567890121234567890123456789012345678901212345612345678901234567890123456789012123456789012345678901234567890121234561234567890123456789012345678901212345678901234567890123456789012123456123456789012345678901234567890121234567890123456789012345678901212345612345678901234567890123456789012123456789012345678901234567890121234561234567890123456789012345678901212345678901234567890123456789012123456123456789012345678901234567890121234567890123456789012345678901212345612345678901234567890123456789012123456789012345678901234567890121234561234567890123456789012345678901212345678901234567890123456789012123456123456789012345678901234567890121234567890123456789012345678901212345612345678901234567890123456789012123456789012345678901234567890121234561234567890123456789012345678901212345678901234567890123456789012123456
SetupPerformance
Key Mode
Harmony
Sustain
123456789012345678901234567890121234567890123456789012345678901212345612345678901234567890123456789012123456789012345678901234567890121234561234567890123456789012345678901212345678901234567890123456789012123456123456789012345678901234567890121234567890123456789012345678901212345612345678901234567890123456789012123456789012345678901234567890121234561234567890123456789012345678901212345678901234567890123456789012123456123456789012345678901234567890121234567890123456789012345678901212345612345678901234567890123456789012123456789012345678901234567890121234561234567890123456789012345678901212345678901234567890123456789012123456123456789012345678901234567890121234567890123456789012345678901212345612345678901234567890123456789012123456789012345678901234567890121234561234567890123456789012345678901212345678901234567890123456789012123456
SetupReverb
Effects
Chord
Pedal
1234567890123456789012345678901212345678901234567890123456789012123456123456789012345678901234567890121234567890123456789012345678901212345612345678901234567890123456789012123456789012345678901234567890121234561234567890123456789012345678901212345678901234567890123456789012123456123456789012345678901234567890121234567890123456789012345678901212345612345678901234567890123456789012123456789012345678901234567890121234561234567890123456789012345678901212345678901234567890123456789012123456123456789012345678901234567890121234567890123456789012345678901212345612345678901234567890123456789012123456789012345678901234567890121234561234567890123456789012345678901212345678901234567890123456789012123456123456789012345678901234567890121234567890123456789012345678901212345612345678901234567890123456789012123456789012345678901234567890121234561234567890123456789012345678901212345678901234567890123456789012123456
SetupPercussion Metronome
SETUP
LEFT RIGHT
SCREEN
LEFT RIGHT
SCREEN
ENTER
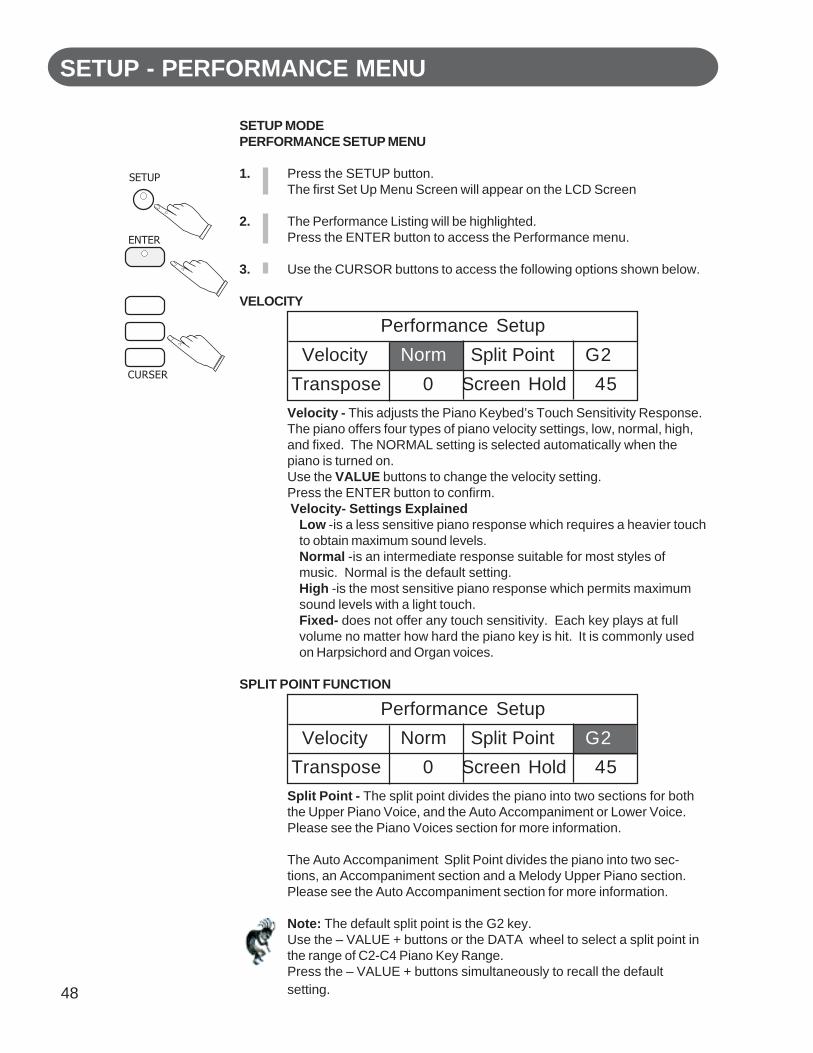
48
SETUP MODEPERFORMANCE SETUP MENU
1. Press the SETUP button.The first Set Up Menu Screen will appear on the LCD Screen
2. The Performance Listing will be highlighted.Press the ENTER button to access the Performance menu.
3. Use the CURSOR buttons to access the following options shown below.
VELOCITY
Velocity - This adjusts the Piano Keybed’s Touch Sensitivity Response.The piano offers four types of piano velocity settings, low, normal, high,and fixed. The NORMAL setting is selected automatically when thepiano is turned on.Use the VALUE buttons to change the velocity setting.Press the ENTER button to confirm. Velocity- Settings Explained
Low -is a less sensitive piano response which requires a heavier touchto obtain maximum sound levels.Normal -is an intermediate response suitable for most styles ofmusic. Normal is the default setting.High -is the most sensitive piano response which permits maximumsound levels with a light touch.Fixed- does not offer any touch sensitivity. Each key plays at fullvolume no matter how hard the piano key is hit. It is commonly usedon Harpsichord and Organ voices.
SPLIT POINT FUNCTION
Split Point - The split point divides the piano into two sections for boththe Upper Piano Voice, and the Auto Accompaniment or Lower Voice.Please see the Piano Voices section for more information.
The Auto Accompaniment Split Point divides the piano into two sec-tions, an Accompaniment section and a Melody Upper Piano section.Please see the Auto Accompaniment section for more information.
Note: The default split point is the G2 key.Use the – VALUE + buttons or the DATA wheel to select a split point inthe range of C2-C4 Piano Key Range.Press the – VALUE + buttons simultaneously to recall the defaultsetting.
Performance Setup
Velocity
Transpose
Norm
0
Split Point G2
Screen Hold 45
Performance Setup
Velocity
Transpose
Norm
0
Split Point G2
Screen Hold 45
SETUP - PERFORMANCE MENU
CURSER
ENTER
SETUP

49
SETUP - PERFORMANCE MENU
Performance Setup
Velocity
Transpose
Norm
0
Split Point G2
Screen Hold 45
Performance Setup
Velocity
Transpose
Norm
0
Split Point G2
Screen Hold 4S
PERFORMANCE- SETUP MENU
1. Press the SETUP button.The first Set Up Menu Screen will appear on the LCD Screen
2. The Performance Listing will be highlighted.Press the ENTER button to access the Performance menu.
3. Use the CURSOR buttons to access the following options shown below.
TRANSPOSE -The Transpose feature can shift the pitch of the piano up or down insemitone intervals.Use the VALUE + or VALUE – buttons to set the transpose value rangefrom –5, five consecutive piano keys lower, to six consecutive piano keyshigher.The Transpose setting of zero is pitch neutral or not engaged.Transpose does not affect notes that are sounding and it does not affectthe piano percussion.
LCD SCREEN DISPLAY HOLD -The Screen Hold sets the time for which the selected Menu Screen willstay on the LCD Display before automatically reverting to the priorscreen.Use the – VALUE + buttons or the VALUE wheel to select a screen holdin the range of 1 second to 44 seconds.Press the – VALUE + buttons simultaneously to recall the default settingof 4 seconds.
CURSER
ENTER
SETUP
VALUE
– +

50
PERFORMANCE- SETUP MENU
1. Press the SETUP button.The first Set Up Menu Screen will appear on the LCD Screen
2. The Performance Listing will be highlighted.Press the ENTER button to access the Performance menu.
3. Use the SCREEN RIGHT BUTTON and the CURSOR buttons to accessthe following options shown below.
Performance Setup
Tune
Fade Time
0
105
Fixed Level 100
Octave Shift 0
Performance Setup
Tune
Fade Time
0
105
Fixed Level 100
Octave Shift 0
TUNEThe pitch of this piano is very accurate and stable, it is automatically setto standard A440 pitch when the piano is turned on.The Tuning feature of this piano makes it possible to adjust the pitch ofthis instrument in fine intervals.If necessary, you can adjust the pitch of this piano to match the pitch ofanother instrument or singer.Use the – VALUE + buttons or the VALUE wheel to select a tuning valuein the range of –50 to +50 semitone steps, or cents.Press the – VALUE + buttons simultaneously to recall the default settingof 0.
FIXED LEVELWhen the Touch Response of the Piano Keys is Fixed or without TouchSensitivity, the Fixed Level controls the overall sound output from thepiano keys.Fixed Touch Response is used when you would like the piano keyboardto play like an Organ.Use the – VALUE + buttons or the VALUE wheel to select a fixed levelvolume value in the range of 10-127.Press the – VALUE + buttons simultaneously to recall the default settingof 100.
SETUP - PERFORMANCE MENU
SETUP
LEFT RIGHT
SCREEN
CURSER
ENTER

51
SETUP - PERFORMANCE MENU
PERFORMANCE- SETUP MENU
1. Press the SETUP button.The first Set Up Menu Screen will appear on the LCD Screen.
2. The Performance Listing will be highlighted.Press the ENTER button to access the Performance menu.
3. Use the SCREEN RIGHT BUTTON and the CURSOR buttons toaccess the following options shown below.
Performance Setup
Tune
Fade Time
0
10S
Fixed Level 100
Octave Shift 0
Performance Setup
Tune
Fade Time
0
10S
Fixed Level 100
Octave Shift 0
FADE TIMEFade time adjusts the length of time that an accompaniment fadeintroduction or fade out ending takes.Use the VALUE + and - buttons or the VALUE wheel to select a fadetune value in the range of 2 - 25 seconds.Press the VALUE + and - buttons simultaneously to recall the defaultsetting of 10 seconds.
OCTAVE SHIFTThe Octave Shift will transpose the entire piano one octave down (12semitone steps).This Octave Shift only transposes one Octave down.Use the VALUE + and - buttons to select an octave shift of -1, and thekeys will play as if they were an octave lower on the piano.The Octave Shift Setting of 0 is the normal default piano settings.
SETUP
LEFT RIGHT
SCREEN
CURSER
ENTER

52
SETUP - HARMONY MENU
Harmony
Trio
OFF
Duet
OFF
Oct
OFF
HARMONY SETUP MENU
1. Press the SETUP button.
2. Use the CURSOR button to highlight the Harmony menu.
3. Press the ENTER button to access the Harmony menu.
4. Use the CURSOR button to select a harmony type, then use the VALUEbuttons to turn that harmony type on or off.Only one harmony type can be selected at a time.
HARMONYHarmony is used to enhance a single note melody line that you wouldplay while the auto accompaniment is engaged.When the Harmony feature is engaged, the single note on the right-handsection of the piano will sound with additional auto harmony notes.The note played in the right-hand section of the piano determines theroot key of the harmony.If more than one note is played only the highest note will add harmony.NOTE: The Harmony Feature is only available when the autoaccompaniment is engaged.
HARMONY TYPESTrio - adds two harmonizing notes sounding below the single notethat you play.Duet adds a harmonizing note sounding below the single note thatyou play.Octave add a note one octave below the note you play in the righthand section of the piano.
SETUP
ENTER
CURSER
CURSER
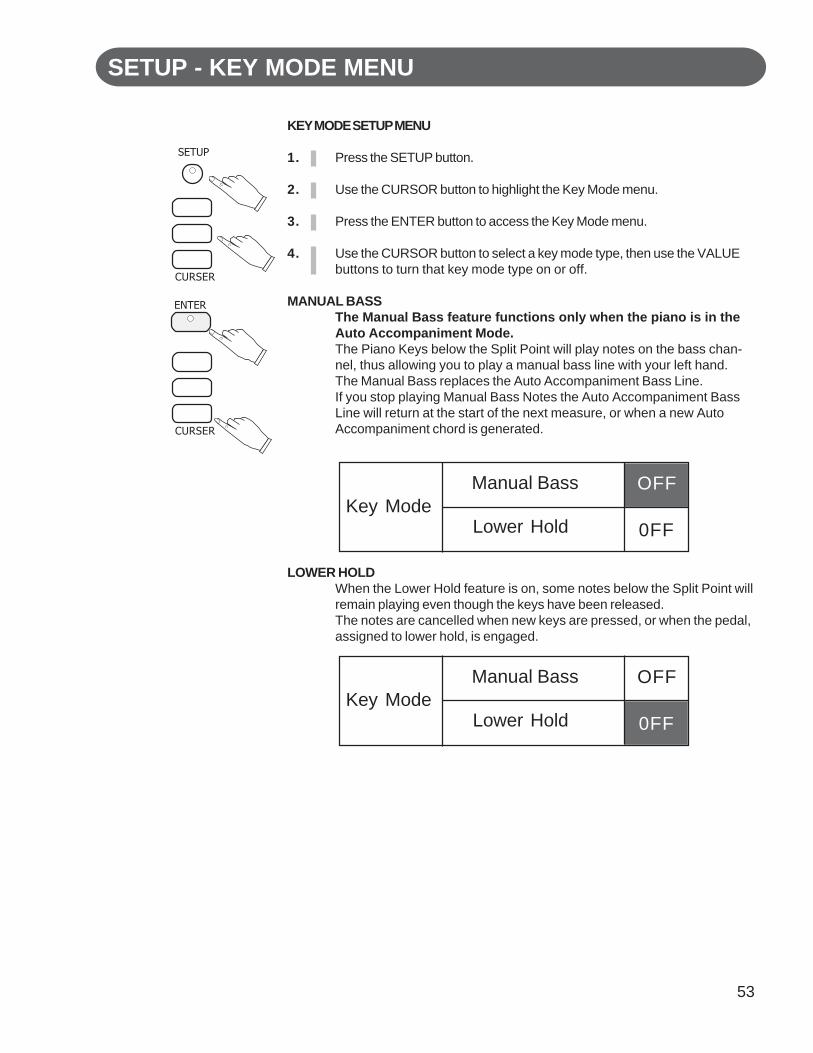
53
SETUP - KEY MODE MENU
Key ModeOFFManual Bass
Lower Hold 0FF
Key ModeOFFManual Bass
Lower Hold 0FF
KEY MODE SETUP MENU
1. Press the SETUP button.
2. Use the CURSOR button to highlight the Key Mode menu.
3. Press the ENTER button to access the Key Mode menu.
4. Use the CURSOR button to select a key mode type, then use the VALUEbuttons to turn that key mode type on or off.
MANUAL BASSThe Manual Bass feature functions only when the piano is in theAuto Accompaniment Mode.The Piano Keys below the Split Point will play notes on the bass chan-nel, thus allowing you to play a manual bass line with your left hand.The Manual Bass replaces the Auto Accompaniment Bass Line.If you stop playing Manual Bass Notes the Auto Accompaniment BassLine will return at the start of the next measure, or when a new AutoAccompaniment chord is generated.
LOWER HOLDWhen the Lower Hold feature is on, some notes below the Split Point willremain playing even though the keys have been released.The notes are cancelled when new keys are pressed, or when the pedal,assigned to lower hold, is engaged.
SETUP
ENTER
CURSER
CURSER

54
SETUP - SUSTAIN MENU
Sustain
UPPER
ON
LAYER
ON
LOWER
ON
Sustain
UPPER
ON
LAYER
ON
LOWER
ON
Sustain
UPPER
ON
LAYER
ON
LOWER
ON
SUSTAIN - SETUP MENU
1. Press the SETUP button.
2. Use the CURSOR button to highlight the Sustain menu.
3. Press the ENTER button to access the Sustain menu.
4. Use the CURSOR button to select a sustain type, then use the VALUEbuttons to adjust your selected sustain type on or off.Sustain defaults to all options on.
SUSTAINThe Sustain Pedal can affect the Sound Channels Upper, Layer and/or Lower of this piano.This menu allows you to configure which Sound Channels will beaffected by the sustain pedal.
Upper - When Sustain Upper is on, the right pedal when engaged,will Sustain the Upper Sound Channel Voice Notes.
Layer - When Sustain Layer is on, the right pedal when engaged,will Sustain the Layer Sound Channel Voice Notes.
Lower - When Sustain Lower is on, the right pedal when engaged,will Sustain the Lower Sound Channel Voice Notes.
SETUP
ENTER
CURSER
CURSER
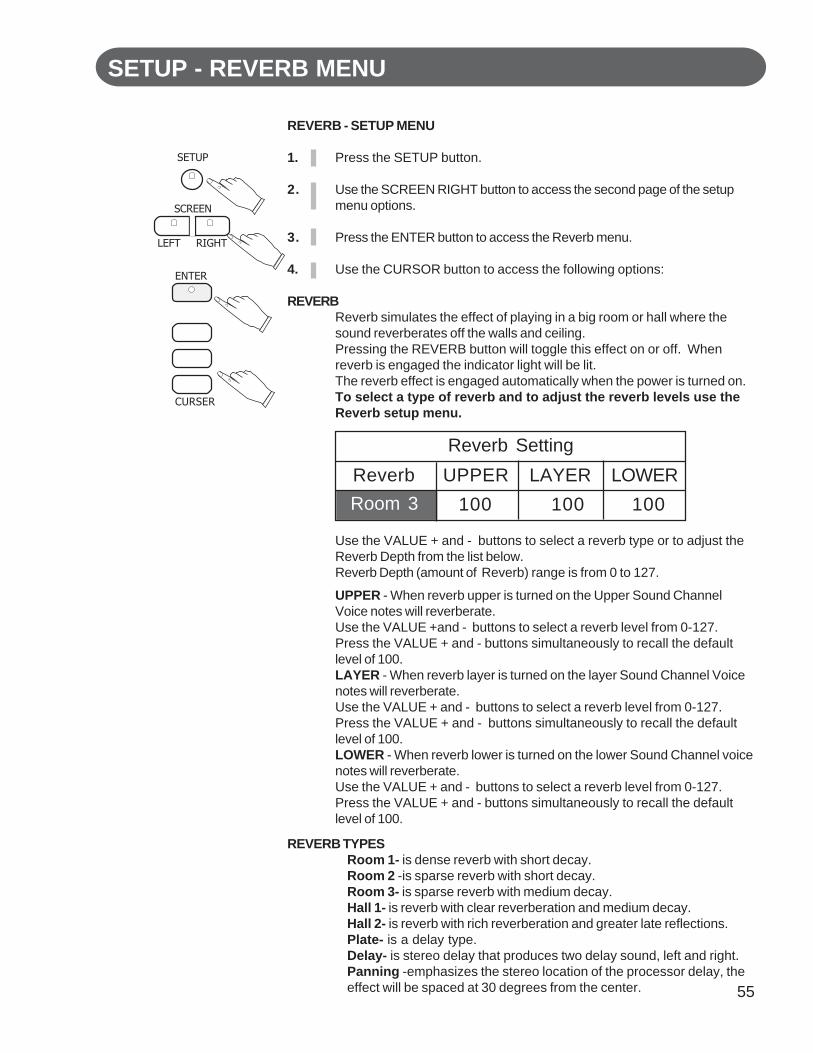
55
SETUP - REVERB MENU
Reverb Setting
Reverb UPPERRoom 3 100
LAYER LOWER
100 100
REVERB - SETUP MENU
1. Press the SETUP button.
2. Use the SCREEN RIGHT button to access the second page of the setupmenu options.
3. Press the ENTER button to access the Reverb menu.
4. Use the CURSOR button to access the following options:
REVERBReverb simulates the effect of playing in a big room or hall where thesound reverberates off the walls and ceiling.Pressing the REVERB button will toggle this effect on or off. Whenreverb is engaged the indicator light will be lit.The reverb effect is engaged automatically when the power is turned on.To select a type of reverb and to adjust the reverb levels use theReverb setup menu.
Use the VALUE + and - buttons to select a reverb type or to adjust theReverb Depth from the list below.Reverb Depth (amount of Reverb) range is from 0 to 127.
REVERB TYPESRoom 1- is dense reverb with short decay.Room 2 -is sparse reverb with short decay.Room 3- is sparse reverb with medium decay.Hall 1- is reverb with clear reverberation and medium decay.Hall 2- is reverb with rich reverberation and greater late reflections.Plate- is a delay type.Delay- is stereo delay that produces two delay sound, left and right.Panning -emphasizes the stereo location of the processor delay, theeffect will be spaced at 30 degrees from the center.
UPPER - When reverb upper is turned on the Upper Sound ChannelVoice notes will reverberate.Use the VALUE +and - buttons to select a reverb level from 0-127.Press the VALUE + and - buttons simultaneously to recall the defaultlevel of 100.LAYER - When reverb layer is turned on the layer Sound Channel Voicenotes will reverberate.Use the VALUE + and - buttons to select a reverb level from 0-127.Press the VALUE + and - buttons simultaneously to recall the defaultlevel of 100.LOWER - When reverb lower is turned on the lower Sound Channel voicenotes will reverberate.Use the VALUE + and - buttons to select a reverb level from 0-127.Press the VALUE + and - buttons simultaneously to recall the defaultlevel of 100.
SETUP
ENTER
LEFT RIGHT
SCREEN
CURSER
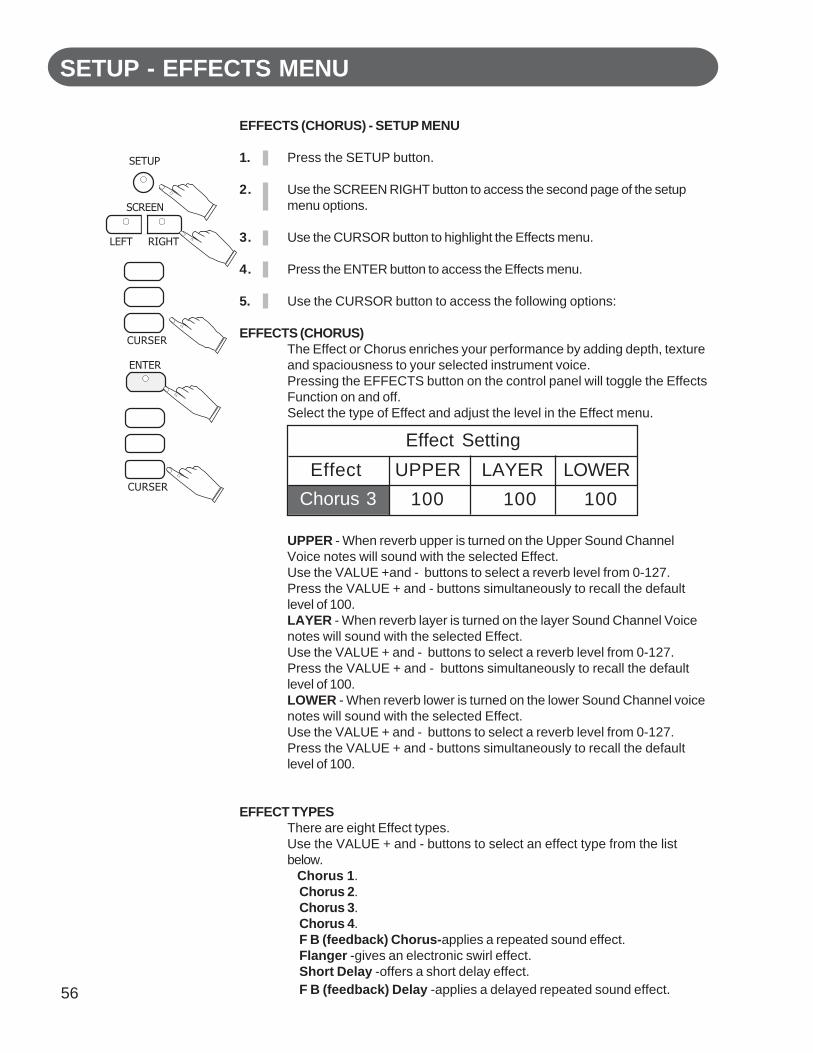
56
SETUP - EFFECTS MENU
Effect Setting
Effect UPPER
Chorus 3 100
LAYER LOWER
100 100
EFFECTS (CHORUS) - SETUP MENU
1. Press the SETUP button.
2. Use the SCREEN RIGHT button to access the second page of the setupmenu options.
3. Use the CURSOR button to highlight the Effects menu.
4. Press the ENTER button to access the Effects menu.
5. Use the CURSOR button to access the following options:
EFFECTS (CHORUS)The Effect or Chorus enriches your performance by adding depth, textureand spaciousness to your selected instrument voice.Pressing the EFFECTS button on the control panel will toggle the EffectsFunction on and off.Select the type of Effect and adjust the level in the Effect menu.
UPPER - When reverb upper is turned on the Upper Sound ChannelVoice notes will sound with the selected Effect.Use the VALUE +and - buttons to select a reverb level from 0-127.Press the VALUE + and - buttons simultaneously to recall the defaultlevel of 100.LAYER - When reverb layer is turned on the layer Sound Channel Voicenotes will sound with the selected Effect.Use the VALUE + and - buttons to select a reverb level from 0-127.Press the VALUE + and - buttons simultaneously to recall the defaultlevel of 100.LOWER - When reverb lower is turned on the lower Sound Channel voicenotes will sound with the selected Effect.Use the VALUE + and - buttons to select a reverb level from 0-127.Press the VALUE + and - buttons simultaneously to recall the defaultlevel of 100.
EFFECT TYPESThere are eight Effect types.Use the VALUE + and - buttons to select an effect type from the listbelow. Chorus 1.
Chorus 2.Chorus 3.Chorus 4.F B (feedback) Chorus-applies a repeated sound effect.Flanger -gives an electronic swirl effect.Short Delay -offers a short delay effect.F B (feedback) Delay -applies a delayed repeated sound effect.
SETUP
CURSER
LEFT RIGHT
SCREEN
CURSER
ENTER
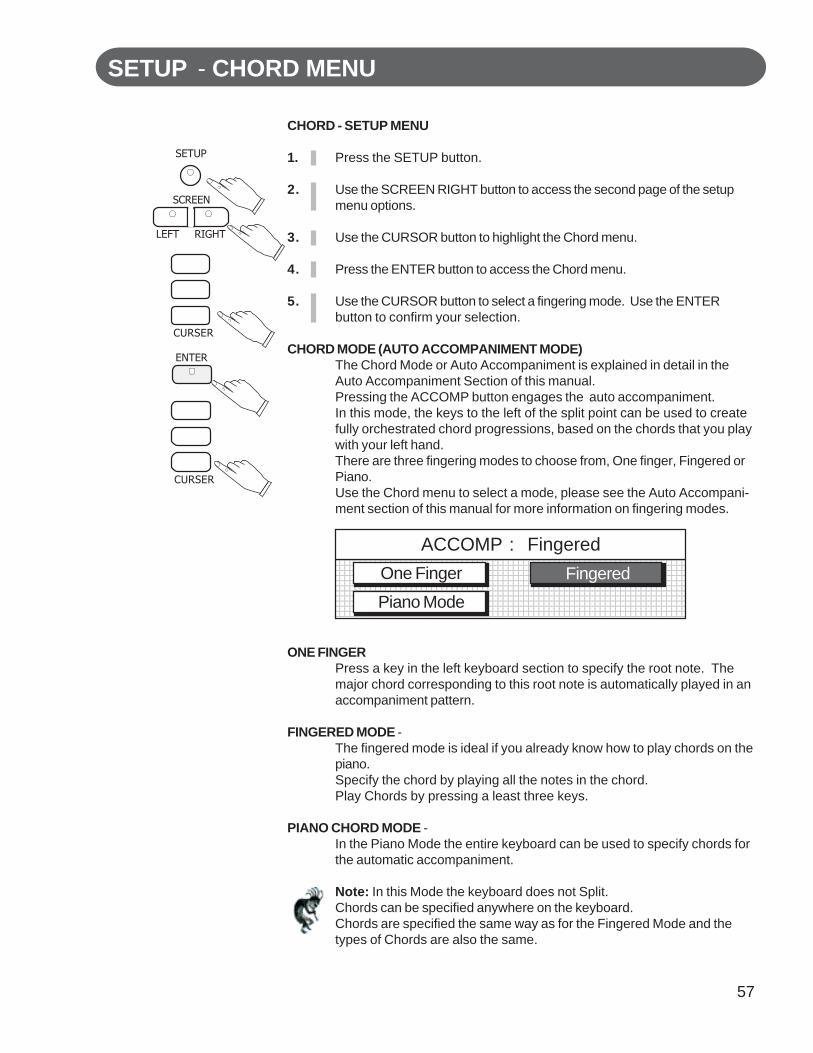
57
SETUP - CHORD MENU
123456789012345678901234567890121234567890123456789012345678901212345612345678901234567890123456789012123456789012345678901234567890121234561234567890123456789012345678901212345678901234567890123456789012123456123456789012345678901234567890121234567890123456789012345678901212345612345678901234567890123456789012123456789012345678901234567890121234561234567890123456789012345678901212345678901234567890123456789012123456123456789012345678901234567890121234567890123456789012345678901212345612345678901234567890123456789012123456789012345678901234567890121234561234567890123456789012345678901212345678901234567890123456789012123456123456789012345678901234567890121234567890123456789012345678901212345612345678901234567890123456789012123456789012345678901234567890121234561234567890123456789012345678901212345678901234567890123456789012123456
ACCOMP : FingeredOne Finger
Piano Mode
Fingered
CHORD - SETUP MENU
1. Press the SETUP button.
2. Use the SCREEN RIGHT button to access the second page of the setupmenu options.
3. Use the CURSOR button to highlight the Chord menu.
4. Press the ENTER button to access the Chord menu.
5. Use the CURSOR button to select a fingering mode. Use the ENTERbutton to confirm your selection.
CHORD MODE (AUTO ACCOMPANIMENT MODE)The Chord Mode or Auto Accompaniment is explained in detail in theAuto Accompaniment Section of this manual.Pressing the ACCOMP button engages the auto accompaniment.In this mode, the keys to the left of the split point can be used to createfully orchestrated chord progressions, based on the chords that you playwith your left hand.There are three fingering modes to choose from, One finger, Fingered orPiano.Use the Chord menu to select a mode, please see the Auto Accompani-ment section of this manual for more information on fingering modes.
ONE FINGERPress a key in the left keyboard section to specify the root note. Themajor chord corresponding to this root note is automatically played in anaccompaniment pattern.
FINGERED MODE -The fingered mode is ideal if you already know how to play chords on thepiano.Specify the chord by playing all the notes in the chord.Play Chords by pressing a least three keys.
PIANO CHORD MODE -In the Piano Mode the entire keyboard can be used to specify chords forthe automatic accompaniment.
Note: In this Mode the keyboard does not Split.Chords can be specified anywhere on the keyboard.Chords are specified the same way as for the Fingered Mode and thetypes of Chords are also the same.
SETUP
CURSER
LEFT RIGHT
SCREEN
CURSER
ENTER

58
SETUP - PEDAL MENU
123456789012345678901234567890121234567890123456789012345678901212345123456789012345678901234567890121234567890123456789012345678901212345123456789012345678901234567890121234567890123456789012345678901212345123456789012345678901234567890121234567890123456789012345678901212345123456789012345678901234567890121234567890123456789012345678901212345123456789012345678901234567890121234567890123456789012345678901212345123456789012345678901234567890121234567890123456789012345678901212345123456789012345678901234567890121234567890123456789012345678901212345123456789012345678901234567890121234567890123456789012345678901212345123456789012345678901234567890121234567890123456789012345678901212345123456789012345678901234567890121234567890123456789012345678901212345123456789012345678901234567890121234567890123456789012345678901212345
Pedal AssignStart/Stop
Intro/Ending
Fill
Lower Hold
PEDAL ASSIGN - SETUP MENU1. Press the SETUP button.
2. Use the SCREEN RIGHT button to access the second page of the setupmenu options.
3. Use the CURSOR button to highlight the Pedal menu.
4. Press the ENTER button to access the Pedal menu.
5. Use the CURSOR button to select the following options, the pedal can onlybe assigned to one.
PEDAL ASSIGNThe center pedal is the only assignable function pedal.The sustain pedal (the pedal on the right), can only control the SoundChannel Voice notes.The soft pedal (on the left), is also not assignable like the Sustain Pedal.
Start/StopWhen selected the center pedal function now responds like the START/STOP button on the control panel.Step on the center pedal to start or stop a selected Rhythm or Accompa-niment feature.The Center Pedal default mode is Start/Stop.
FillWhen selected the center pedal function now responds like the Fill InButtons on the control panel.When engaged the pedal triggers the Fill In of the currently selected Fill-In to the main pattern or the Fill In to Variation.
Intro/EndingWhen engaged the center pedal function now responds like the Into/Ending button on the control panel.Therefore the pedal triggers an introduction or ending pattern.
Lower HoldWhen selected pressing the pedal will prevent notes below the split pointfrom being switched off until the pedal is released.If lower hold from the key mode setup is engaged, the pedal can be usedto cancel notes that are played.
SETUP
CURSER
LEFT RIGHT
SCREEN
CURSER
ENTER
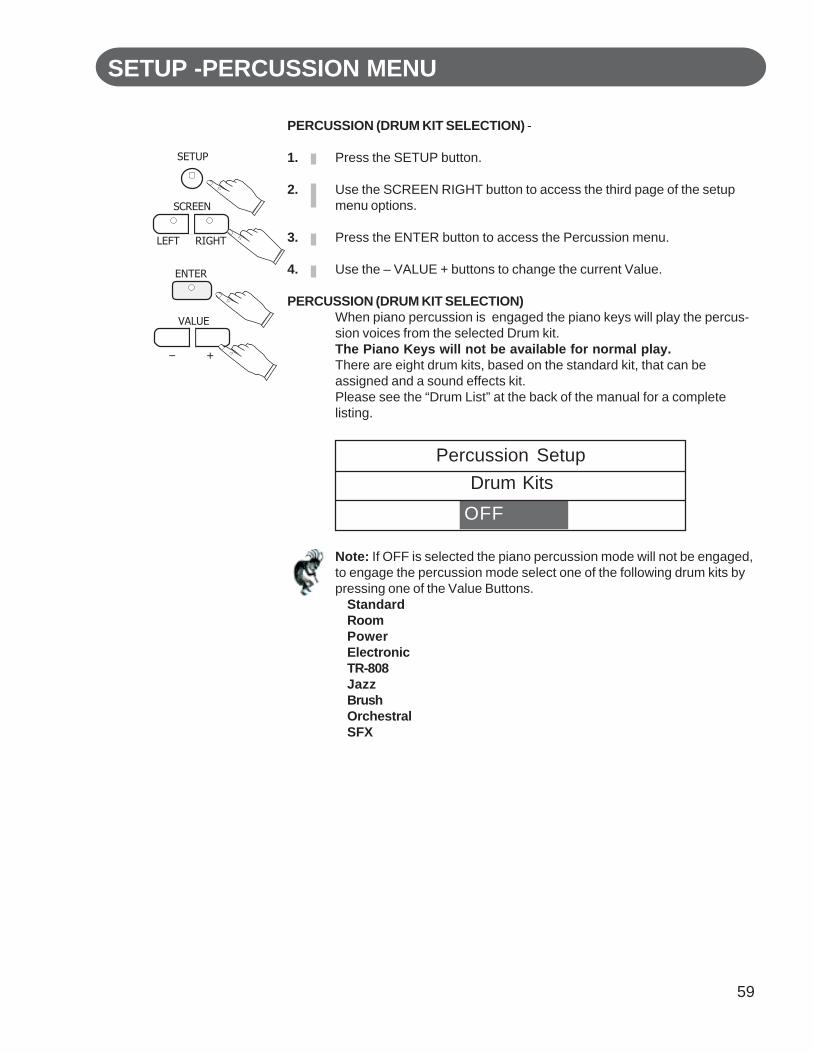
59
SETUP -PERCUSSION MENU
Percussion SetupDrum Kits
OFF
PERCUSSION (DRUM KIT SELECTION) -
1. Press the SETUP button.
2. Use the SCREEN RIGHT button to access the third page of the setupmenu options.
3. Press the ENTER button to access the Percussion menu.
4. Use the – VALUE + buttons to change the current Value.
PERCUSSION (DRUM KIT SELECTION)When piano percussion is engaged the piano keys will play the percus-sion voices from the selected Drum kit.The Piano Keys will not be available for normal play.There are eight drum kits, based on the standard kit, that can beassigned and a sound effects kit.Please see the “Drum List” at the back of the manual for a completelisting.
Note: If OFF is selected the piano percussion mode will not be engaged,to engage the percussion mode select one of the following drum kits bypressing one of the Value Buttons.
StandardRoomPowerElectronicTR-808JazzBrushOrchestralSFX
SETUP
LEFT RIGHT
SCREEN
ENTER
VALUE
– +
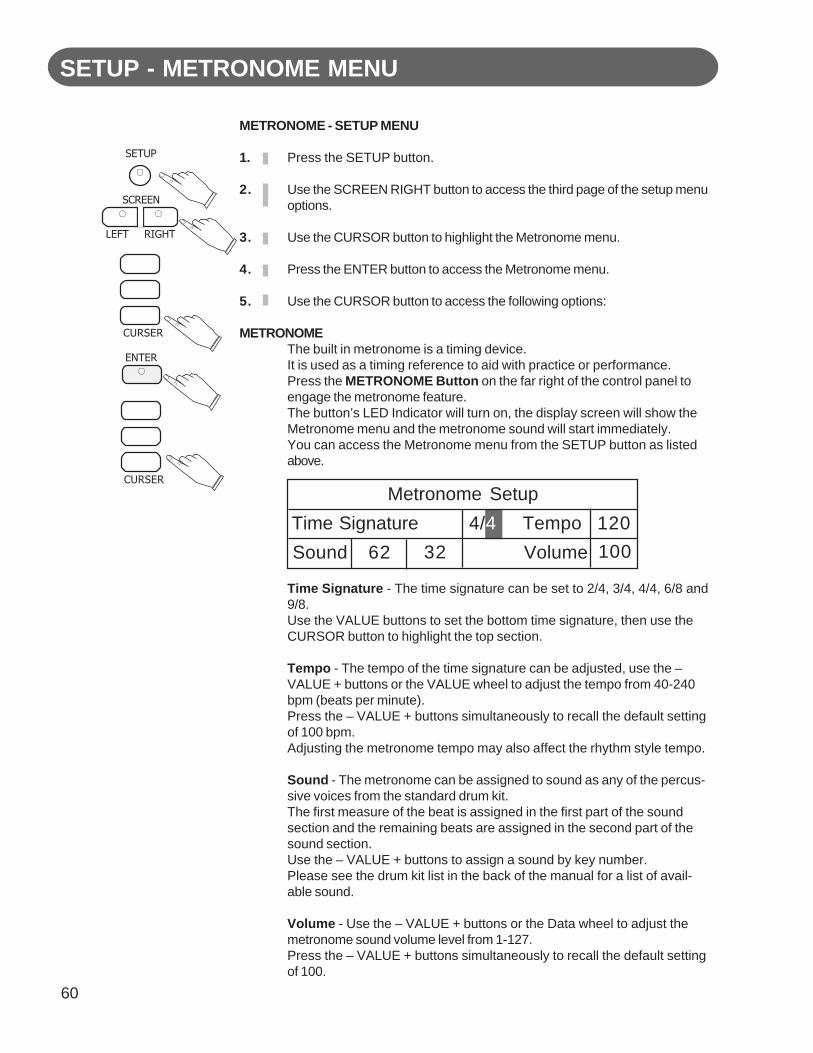
60
SETUP - METRONOME MENU
Metronome Setup
Time Signature
Sound
Tempo100120
Volume
4/4
62 32
METRONOME - SETUP MENU
1. Press the SETUP button.
2. Use the SCREEN RIGHT button to access the third page of the setup menuoptions.
3. Use the CURSOR button to highlight the Metronome menu.
4. Press the ENTER button to access the Metronome menu.
5. Use the CURSOR button to access the following options:
METRONOMEThe built in metronome is a timing device.It is used as a timing reference to aid with practice or performance.Press the METRONOME Button on the far right of the control panel toengage the metronome feature.The button’s LED Indicator will turn on, the display screen will show theMetronome menu and the metronome sound will start immediately.You can access the Metronome menu from the SETUP button as listedabove.
Time Signature - The time signature can be set to 2/4, 3/4, 4/4, 6/8 and9/8.Use the VALUE buttons to set the bottom time signature, then use theCURSOR button to highlight the top section.
Tempo - The tempo of the time signature can be adjusted, use the –VALUE + buttons or the VALUE wheel to adjust the tempo from 40-240bpm (beats per minute).Press the – VALUE + buttons simultaneously to recall the default settingof 100 bpm.Adjusting the metronome tempo may also affect the rhythm style tempo.
Sound - The metronome can be assigned to sound as any of the percus-sive voices from the standard drum kit.The first measure of the beat is assigned in the first part of the soundsection and the remaining beats are assigned in the second part of thesound section.Use the – VALUE + buttons to assign a sound by key number.Please see the drum kit list in the back of the manual for a list of avail-able sound.
Volume - Use the – VALUE + buttons or the Data wheel to adjust themetronome sound volume level from 1-127.Press the – VALUE + buttons simultaneously to recall the default settingof 100.
SETUP
CURSER
LEFT RIGHT
SCREEN
CURSER
ENTER
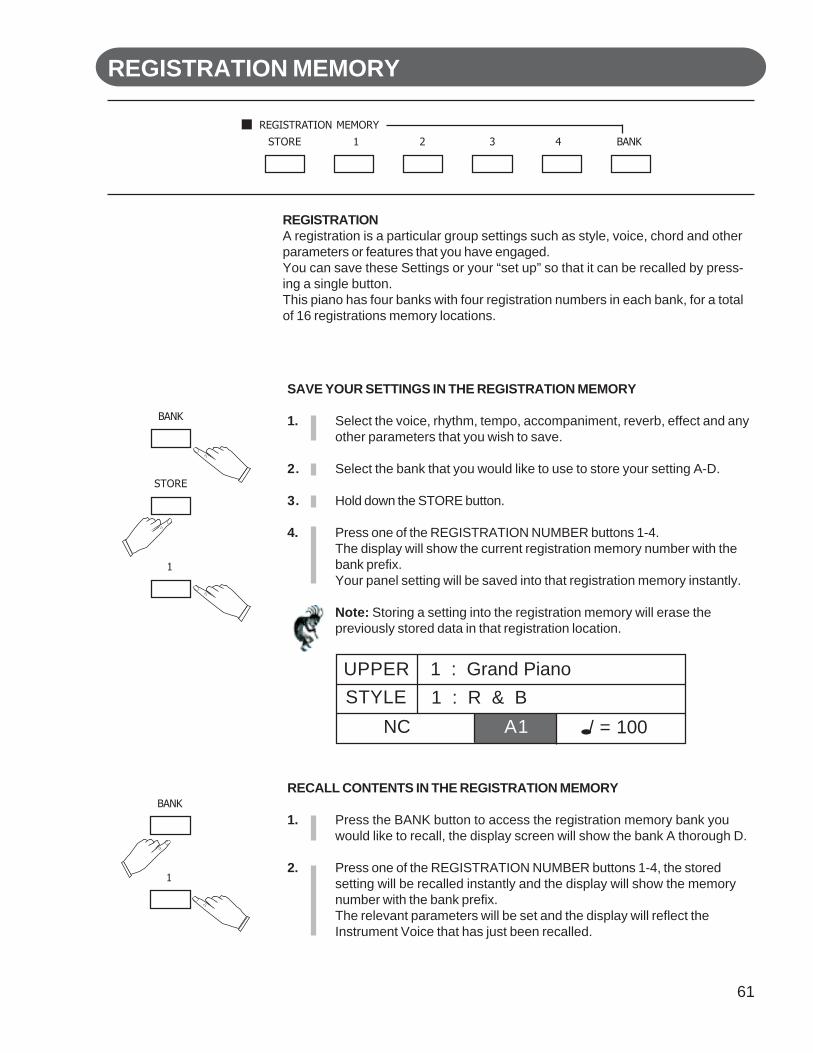
61
REGISTRATION MEMORY
REGISTRATIONA registration is a particular group settings such as style, voice, chord and otherparameters or features that you have engaged.You can save these Settings or your “set up” so that it can be recalled by press-ing a single button.This piano has four banks with four registration numbers in each bank, for a totalof 16 registrations memory locations.
SAVE YOUR SETTINGS IN THE REGISTRATION MEMORY
1. Select the voice, rhythm, tempo, accompaniment, reverb, effect and anyother parameters that you wish to save.
2. Select the bank that you would like to use to store your setting A-D.
3. Hold down the STORE button.
4. Press one of the REGISTRATION NUMBER buttons 1-4.The display will show the current registration memory number with thebank prefix.Your panel setting will be saved into that registration memory instantly.
Note: Storing a setting into the registration memory will erase thepreviously stored data in that registration location.
RECALL CONTENTS IN THE REGISTRATION MEMORY
1. Press the BANK button to access the registration memory bank youwould like to recall, the display screen will show the bank A thorough D.
2. Press one of the REGISTRATION NUMBER buttons 1-4, the storedsetting will be recalled instantly and the display will show the memorynumber with the bank prefix.The relevant parameters will be set and the display will reflect theInstrument Voice that has just been recalled.
UPPERSTYLE
NC
1 : R & B
A1 / = 100
1 : Grand Piano
BANK
STORE
1
1
BANK
REGISTRATION MEMORY
BANK4321STORE

62
RECORD FUNCTIONS
This piano’s 5 track music recorder (sequencer), is designed to be very simple touse.It will record all note events and the accompaniment patterns exactly as they areperformed.All the recorded tracks can playback separately or together as a complete song.You may also save your recorded information to disk, to play back at a later dateor to create your own sound library.Please see the Disk section of this manual for more information.
RECORD FEATURES
Record Melody OnlyAny of the Melody tracks (2 thorough 5) will record one Sound Channel(Upper, Layer and Lower) note events, as they are performed.These are assigned by pressing one of the four MELODY (Mel) Buttons.If one of the MELODY buttons is selected, the recording will begin assoon as you play on the piano.
Note: Only one melody track and only one Sound Channel Voice (Upper,Layer or Lower) can be recorded at a time.
Also Note: If recording one Melody track ONLY with the Accompani-ment mode engaged, the auto accompaniment section of the piano willnot be recorded, even though you can hear it being played.
OUTLINE OF A MUSIC RECORDER (OR SEQUENCER)A music recorder records your performance in a similar way to a tape recorder.This instrument’s music recorder allows you to record and save up to 5 differentways.You may want to record your entire performance at one time (especially if youare using Auto Accompaniment to provide the Orchestration), or build up acomplex arrangement with several different parts playing together, like an en-sembles score.This Instruments Music Recorder has 5 different tracks. This means that youcan record 5 different parts. However you don’t have to use all 5 tracks.For some uses you may only need to use one or two tracks. This instrument’sMusic Recorder allows you to change a tracks musical passage unlike a taperecorder.
ACCOMP MEL 1COMPOSER
MEL 2 MEL 3 MEL 4 RESET
END MARKBEG MARKRECORDSTOPPLAY/PAUSE
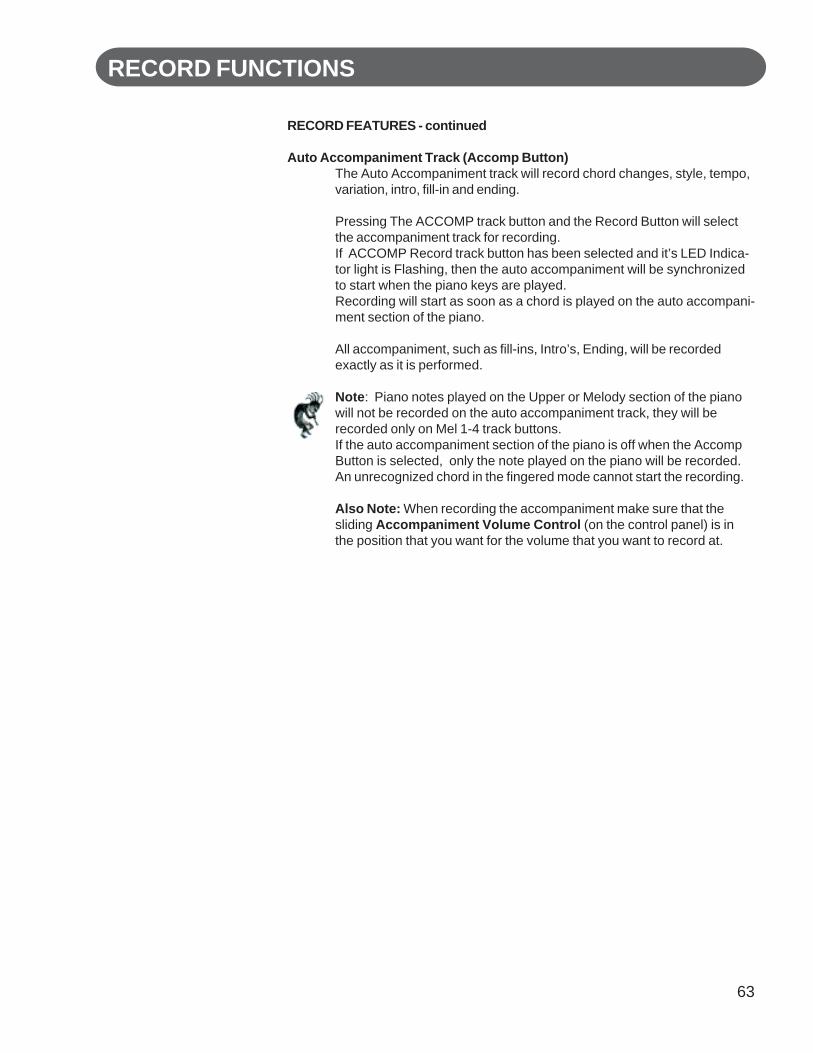
63
RECORD FUNCTIONS
RECORD FEATURES - continued
Auto Accompaniment Track (Accomp Button)The Auto Accompaniment track will record chord changes, style, tempo,variation, intro, fill-in and ending.
Pressing The ACCOMP track button and the Record Button will selectthe accompaniment track for recording.If ACCOMP Record track button has been selected and it’s LED Indica-tor light is Flashing, then the auto accompaniment will be synchronizedto start when the piano keys are played.Recording will start as soon as a chord is played on the auto accompani-ment section of the piano.
All accompaniment, such as fill-ins, Intro’s, Ending, will be recordedexactly as it is performed.
Note: Piano notes played on the Upper or Melody section of the pianowill not be recorded on the auto accompaniment track, they will berecorded only on Mel 1-4 track buttons.If the auto accompaniment section of the piano is off when the AccompButton is selected, only the note played on the piano will be recorded.An unrecognized chord in the fingered mode cannot start the recording.
Also Note: When recording the accompaniment make sure that thesliding Accompaniment Volume Control (on the control panel) is inthe position that you want for the volume that you want to record at.
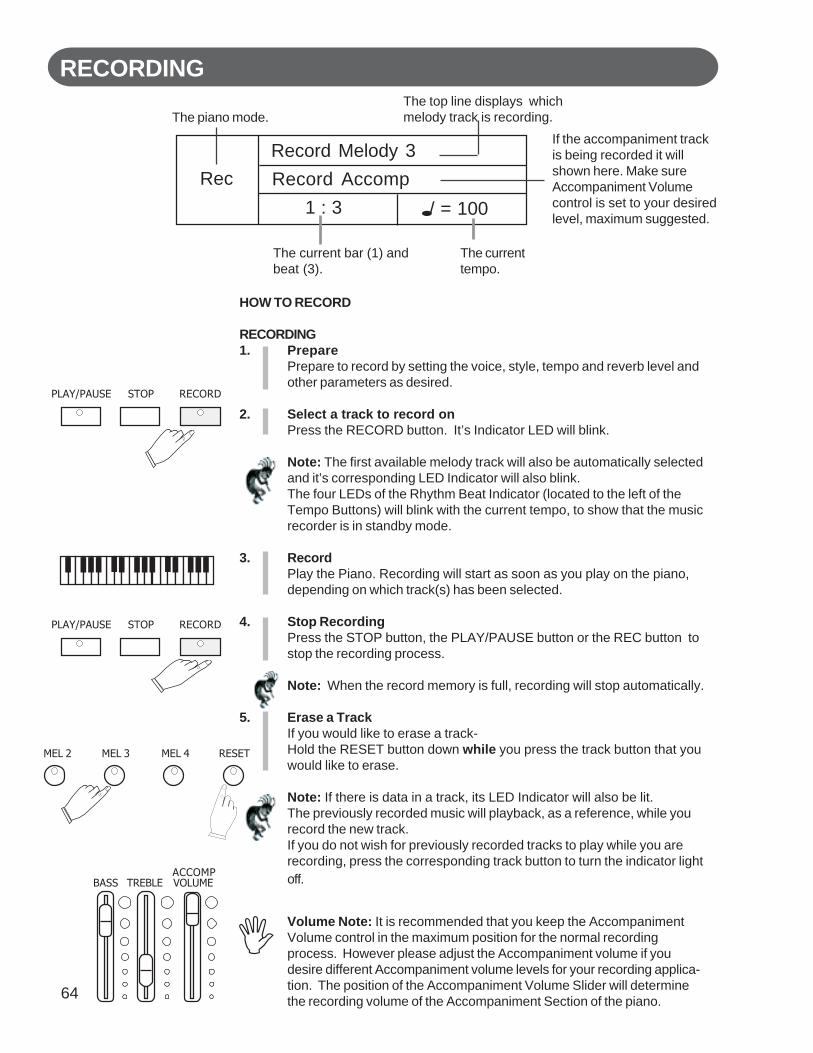
64
RECORDING
HOW TO RECORD
RECORDING1. Prepare
Prepare to record by setting the voice, style, tempo and reverb level andother parameters as desired.
2. Select a track to record onPress the RECORD button. It’s Indicator LED will blink.
Note: The first available melody track will also be automatically selectedand it’s corresponding LED Indicator will also blink.The four LEDs of the Rhythm Beat Indicator (located to the left of theTempo Buttons) will blink with the current tempo, to show that the musicrecorder is in standby mode.
3. RecordPlay the Piano. Recording will start as soon as you play on the piano,depending on which track(s) has been selected.
4. Stop RecordingPress the STOP button, the PLAY/PAUSE button or the REC button tostop the recording process.
Note: When the record memory is full, recording will stop automatically.
5. Erase a TrackIf you would like to erase a track-Hold the RESET button down while you press the track button that youwould like to erase.
Note: If there is data in a track, its LED Indicator will also be lit.The previously recorded music will playback, as a reference, while yourecord the new track.If you do not wish for previously recorded tracks to play while you arerecording, press the corresponding track button to turn the indicator lightoff.
Rec Record Accomp1 : 3 / = 100
Record Melody 3
The piano mode.The top line displays whichmelody track is recording.
The current bar (1) andbeat (3).
The currenttempo.
If the accompaniment trackis being recorded it willshown here. Make sureAccompaniment Volumecontrol is set to your desiredlevel, maximum suggested.
PLAY/PAUSE STOP RECORD
PLAY/PAUSE STOP RECORD
RESETMEL 4MEL 3MEL 2
BASS TREBLE VOLUMEACCOMP
Volume Note: It is recommended that you keep the AccompanimentVolume control in the maximum position for the normal recordingprocess. However please adjust the Accompaniment volume if youdesire different Accompaniment volume levels for your recording applica-tion. The position of the Accompaniment Volume Slider will determinethe recording volume of the Accompaniment Section of the piano.
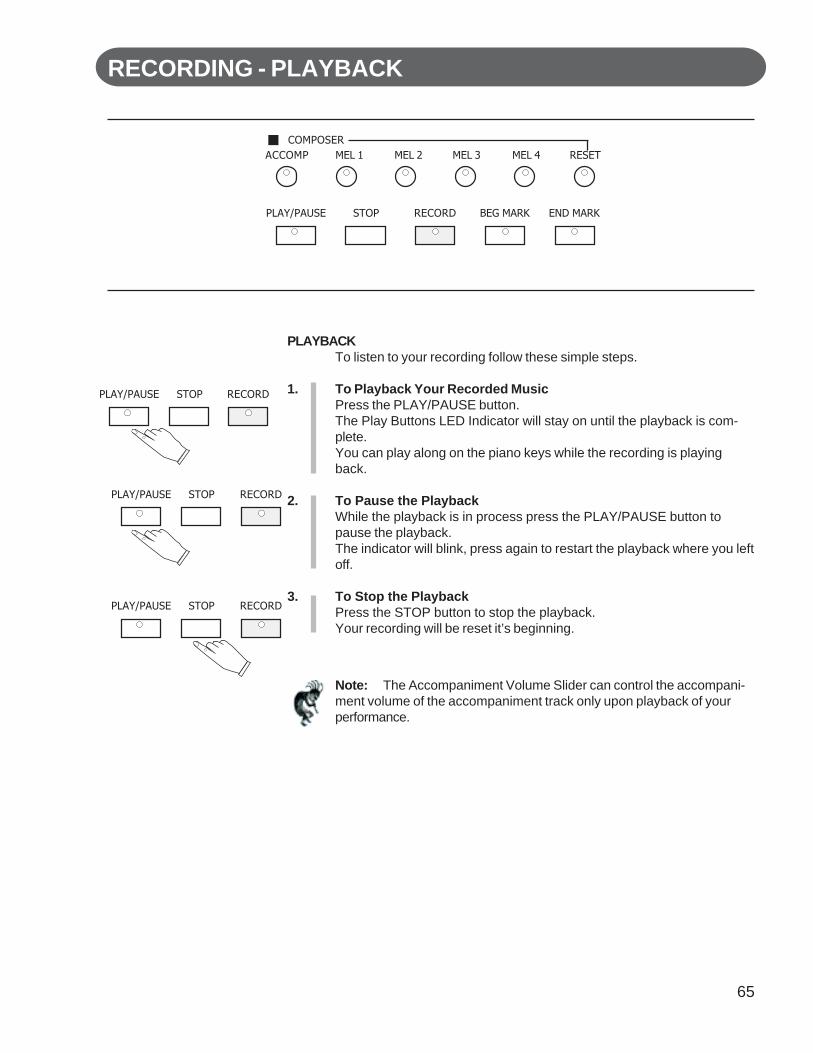
65
RECORDING - PLAYBACK
PLAYBACKTo listen to your recording follow these simple steps.
1. To Playback Your Recorded MusicPress the PLAY/PAUSE button.The Play Buttons LED Indicator will stay on until the playback is com-plete.You can play along on the piano keys while the recording is playingback.
2. To Pause the PlaybackWhile the playback is in process press the PLAY/PAUSE button topause the playback.The indicator will blink, press again to restart the playback where you leftoff.
3. To Stop the PlaybackPress the STOP button to stop the playback.Your recording will be reset it’s beginning.
PLAY/PAUSE STOP RECORD
PLAY/PAUSE STOP RECORD
PLAY/PAUSE STOP RECORD
Note: The Accompaniment Volume Slider can control the accompani-ment volume of the accompaniment track only upon playback of yourperformance.
ACCOMP MEL 1COMPOSER
MEL 2 MEL 3 MEL 4 RESET
END MARKBEG MARKRECORDSTOPPLAY/PAUSE

66
RECORDING - MARK
MARKThe mark feature allows you to isolate a section of a track of yourrecording.If you would like study or to redo a segment of your track recording, itcan be easily accomplished with the BEG MARK, END MARK buttons.
The area that you mark by using the BEG MARK and END MARKbuttons will function the same way as your previous recordings andplaybacks except it is only that portion of the song instead of the entiresong.
HOW TO USE BEG. MARK AND END MARK BUTTONS1. With your musical performance recorded into the music recorder, press
the PLAY/PAUSE button.
2. While listening to the playback press the BEG MARK Button at theplace that you would like to begin to “isolate” your song.The Beg. Mark Button LED Indication will turn on.
3. As your song continues to playback press the End Mark Button at theend of the portion of your song that you want to “isolate.”The End Mark Button LED Indication will turn on.The playback of your song will automatically stop.
4. Press the PLAY/PAUSE button to listen to the section of the song thatyou marked.
5. Press the RECORD button to add a musical passage to your “markedor isolated area” of your song.
Note: You may also wish to select the track that you already recordedon.The recorded passage will playback from the beginning of the markedsection until the end mark.You can Record only the marked section and only on your selectedtrack.
6. Press the BEG MARK and END MARK buttons to disengage themarked section.The Mark Buttons’ LED Indicators will turn on.Your song will now playback in its entirety.
PLAY/PAUSE
BEG MARK
END MARK
PLAY/PAUSE
RECORD
BEG MARK END MARK
ACCOMP MEL 1COMPOSER
MEL 2 MEL 3 MEL 4 RESET
END MARKBEG MARKRECORDSTOPPLAY/PAUSE

67
SONG - PLAY ALONG SONGThis piano includes a range of songs covering a variety of genres that are enjoy-able to listen to, or to play along with. You can begin practicing with just onehand, and you can even practice at your own tempo. This instrument will evenevaluate and grade your performance for you!
SONGThe SONG button will access a play along music lesson guide that can be usedas a fun way to learn new music.There are approximately 50 songs built into the piano as reference for yourLesson entertainment.
123456789012345678901234567890121234567890123456789012345678901212345612345678901234567890123456789012123456789012345678901234567890121234561234567890123456789012345678901212345678901234567890123456789012123456123456789012345678901234567890121234567890123456789012345678901212345612345678901234567890123456789012123456789012345678901234567890121234561234567890123456789012345678901212345678901234567890123456789012123456123456789012345678901234567890121234567890123456789012345678901212345612345678901234567890123456789012123456789012345678901234567890121234561234567890123456789012345678901212345678901234567890123456789012123456123456789012345678901234567890121234567890123456789012345678901212345612345678901234567890123456789012123456789012345678901234567890121234561234567890123456789012345678901212345678901234567890123456789012123456
Song SelectAllegro
Annie
Anchors Awgh
Asia
HOW TO SELECT AND LISTEN TO YOUR SONG1. Press the SONG button to display the Song Select Menu Screen.
See the first Song Select menu screen shown below
2. Press the SCREEN RIGHT button to access subsequent pages in theSong Select menu screens until the abbreviated song name you wouldlike to use is displayed.For our example we pressed the screen right button twice.
3. Press the CURSOR Buttons to highlight the song you would like toselect.
4. Press the Enter Button to select your desired Song.The Play Along Song Lesson Menu Screen will appear as shown below.
5. Press the Start/Stop Button or Play/Pause Button to listen to yourselected song.
123456789012345678901234567890121234567890123456789012345678901212345612345678901234567890123456789012123456789012345678901234567890121234561234567890123456789012345678901212345678901234567890123456789012123456123456789012345678901234567890121234567890123456789012345678901212345612345678901234567890123456789012123456789012345678901234567890121234561234567890123456789012345678901212345678901234567890123456789012123456123456789012345678901234567890121234567890123456789012345678901212345612345678901234567890123456789012123456789012345678901234567890121234561234567890123456789012345678901212345678901234567890123456789012123456123456789012345678901234567890121234567890123456789012345678901212345612345678901234567890123456789012123456789012345678901234567890121234561234567890123456789012345678901212345678901234567890123456789012123456
Song SelectBallgame
Bumble Bee
Battle Hymn
Chopin
Play RHnd=Y LHnd=Y Acmp=YR=Y L=Y / = 110
Measure
Test
Bumble Bee
METRONOME
SONGMIDI
DISK
LEFT RIGHT
SCREEN
CURSER
ENTER
PLAY/PAUSE
START/STOP
BASS TREBLE VOLUMEACCOMP
Volume Note: It is recommended that you keep the AccompanimentVolume control in the maximum position for normal operation of thepiano. However some of these built-in songs can use the Accompani-ment Volume control to adjust the volume level during playback of the lefthand and/or accompaniment sections.If there is no song data on the volume channels then the AccompanimentVolume control will have no effect.

68
SONG - LESSON
USING THE LESSON FEATURE - From Song Selected Menu Screen ShownAbove. Listed below is an example of how to access the variousfeatures of this Function.Example: To test Left Hand Play (listen to right hand only and playleft hand part)
1. Press the CURSOR Buttons to Highlight the L=Y Function.This function denotes which hand you would like to be tested on.R = Right HandL = Left HandY = YesN = No
2. Press the Value Button to select L=N (No).For our example we want L = N.This indicates that we want to be tested on the Left Hand.
3. Press the CURSOR Buttons to Highlight LHnd=Y.This denotes which parts of the sound you will hear during your test.RHnd=Right Hand Portion of the Song.LHnd=Left Hand Portion of the Song.Acmp=Rhythm Accompaniment Portion of the Song if applicable.
4. Press the Value Button to select LHnd=NThis denotes that we will not hear the Left Hand Portion of the Song, sowe can be tested playing along with the song.
5. Press the CURSOR Buttons to select the TEST mode.
6. Press the ENTER Button to begin the Test.The Metronome will count in and the Right Hand portion of the Song“Bumblebee” will begin to play. You should play the left hand portion ofthe song.
Note: Song Function must be in TEST mode to be Graded. And theAccompaniment Volume Control Slider can control the left handchannel volume level.
Play RHnd=Y LHnd=Y Acmp=YR=Y L=Y / = 110
The name of the selected song. This area will count the song’s measureduring play or test.
TEST MODE: Select which “Hands” you wouldlike to be tested on. The right hand for melody,left hand for accompaniment or both hands.
The selected songstempo.
PLAY MODE: On thisline select the parts ofthe song you would liketo hear during Songplayback. The right handis melody, the left hand isBass or Accompanimentand the Acmp is therhythm accompaniment(where applicable).
Measure
Test
Bumble BeeUse “Play” to listen to theselected parts ofthe song.
Use “Test” to be gradedon your performance ofthe selected parts ofthe song.
PLAY ALONG SONG - LESSONS The Menu Screen Shown above lists many ofthe features of the Song Function.
ENTER
VALUE
– +
CURSER
CURSER
VALUE
– +

69
SONG - LESSON
LESSON FEATURES
TEST - Pressing the ENTER button engages the TEST mode when highlighted.You may test yourself on the right hand melody, the left hand accompa-niment or both hands by highlighting the appropriate area and using theVALUE buttons to toggle those parts on, Y (Yes) or off, N (No).
TEST MODESRight hand test - Select R=Y L=N.
Then highlight the TEST mode area and press the ENTER button.After the metronome sound the Left hand portion of the song and theauto accompaniment will playback (if applicable).You should play the right hand melody while listening to the Left Handpart.
Left hand test - Select R=N L=Y.Then highlight the TEST mode area and press the ENTER button.After the metronome sound the Left hand portion of the song and theauto accompaniment will playback (if applicable).You should play the left hand part while listening to the Right Handmelody.
Right and Left hand exercise - Select R=Y L=Y.Then highlight the TEST mode area and press the ENTER button.After the metronome sound you should play the piano parts of bothhands.You will hear the rhythm accompaniment where applicable.
TEST RESULTSYou will hear a vocal grading when you finish your song in Test Mode.This vocal Grade will evaluate your performance.The vocal grades are “Try Again”, “Good”, “Very good” and “Excellent”.
STOP THE SONG MODEPress the SONG button to exit from the Song / Lesson course.
BASS TREBLE VOLUMEACCOMP
Volume Note: It is recommended that you keep the AccompanimentVolume control in the maximum position for normal operation of thepiano. However some of these built-in songs can use the Accompani-ment Volume control to adjust the volume level during playback of the lefthand and/or accompaniment sections.If there is no song data on the volume channels then the AccompanimentVolume control will have no effect.
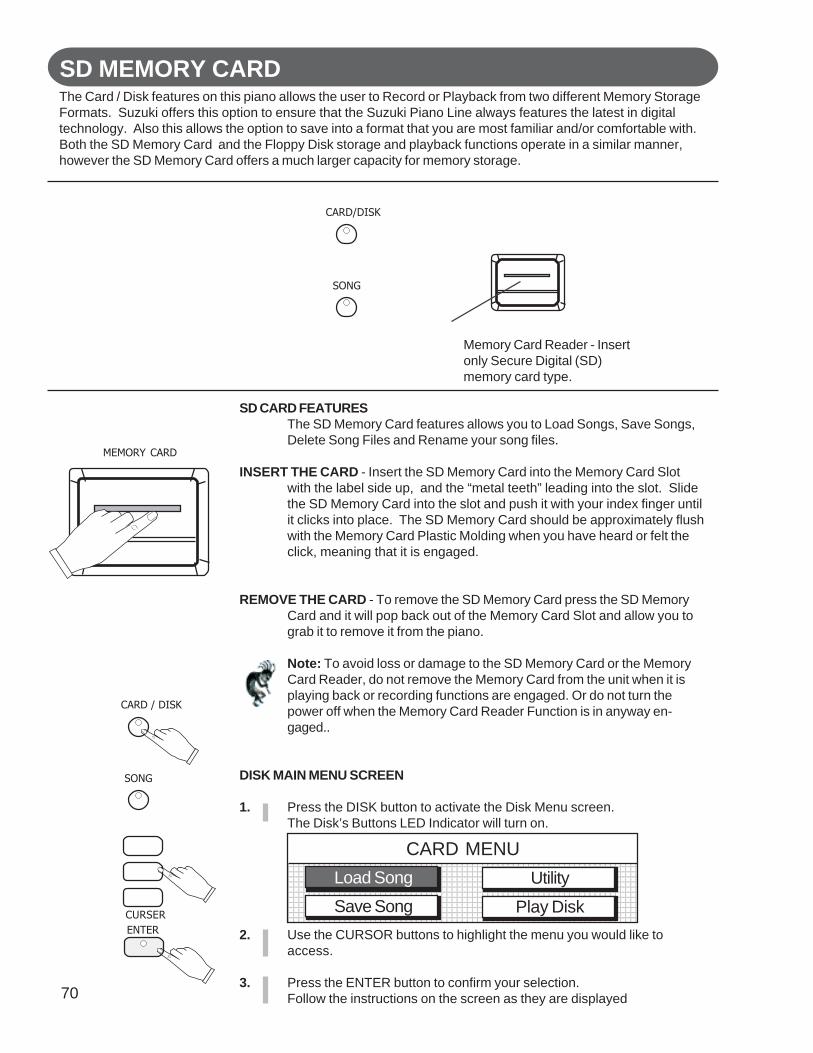
70
SD MEMORY CARD
SD CARD FEATURESThe SD Memory Card features allows you to Load Songs, Save Songs,Delete Song Files and Rename your song files.
INSERT THE CARD - Insert the SD Memory Card into the Memory Card Slotwith the label side up, and the “metal teeth” leading into the slot. Slidethe SD Memory Card into the slot and push it with your index finger untilit clicks into place. The SD Memory Card should be approximately flushwith the Memory Card Plastic Molding when you have heard or felt theclick, meaning that it is engaged.
REMOVE THE CARD - To remove the SD Memory Card press the SD MemoryCard and it will pop back out of the Memory Card Slot and allow you tograb it to remove it from the piano.
Note: To avoid loss or damage to the SD Memory Card or the MemoryCard Reader, do not remove the Memory Card from the unit when it isplaying back or recording functions are engaged. Or do not turn thepower off when the Memory Card Reader Function is in anyway en-gaged..
DISK MAIN MENU SCREEN
1. Press the DISK button to activate the Disk Menu screen.The Disk’s Buttons LED Indicator will turn on.
2. Use the CURSOR buttons to highlight the menu you would like toaccess.
3. Press the ENTER button to confirm your selection.Follow the instructions on the screen as they are displayed
123456789012345678901234567890121234567890123456789012345678901212345123456789012345678901234567890121234567890123456789012345678901212345123456789012345678901234567890121234567890123456789012345678901212345123456789012345678901234567890121234567890123456789012345678901212345123456789012345678901234567890121234567890123456789012345678901212345123456789012345678901234567890121234567890123456789012345678901212345123456789012345678901234567890121234567890123456789012345678901212345123456789012345678901234567890121234567890123456789012345678901212345123456789012345678901234567890121234567890123456789012345678901212345123456789012345678901234567890121234567890123456789012345678901212345123456789012345678901234567890121234567890123456789012345678901212345123456789012345678901234567890121234567890123456789012345678901212345123456789012345678901234567890121234567890123456789012345678901212345
CARD MENULoad Song
Save Song
Utility
Play DiskENTERCURSER
Memory Card Reader - Insertonly Secure Digital (SD)memory card type.
SONG
CARD/DISK
The Card / Disk features on this piano allows the user to Record or Playback from two different Memory StorageFormats. Suzuki offers this option to ensure that the Suzuki Piano Line always features the latest in digitaltechnology. Also this allows the option to save into a format that you are most familiar and/or comfortable with.Both the SD Memory Card and the Floppy Disk storage and playback functions operate in a similar manner,however the SD Memory Card offers a much larger capacity for memory storage.
MEMORY CARD
SONG
CARD / DISK
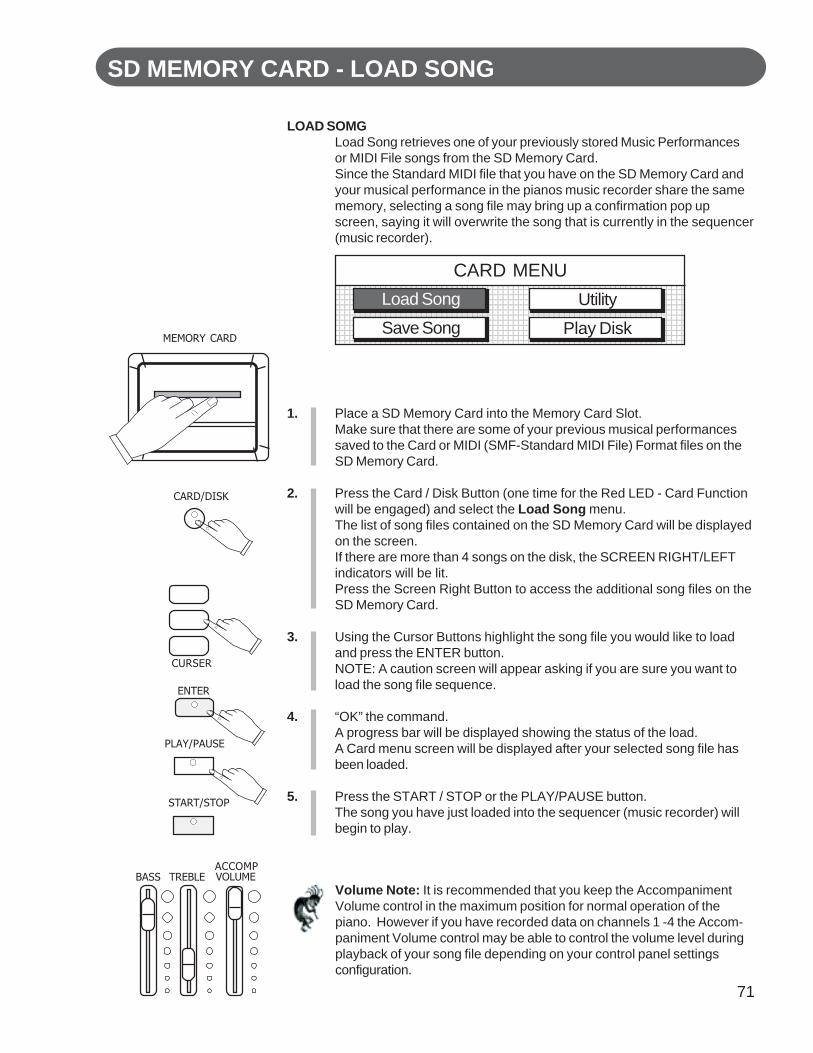
71
SD MEMORY CARD - LOAD SONG
LOAD SOMGLoad Song retrieves one of your previously stored Music Performancesor MIDI File songs from the SD Memory Card.Since the Standard MIDI file that you have on the SD Memory Card andyour musical performance in the pianos music recorder share the samememory, selecting a song file may bring up a confirmation pop upscreen, saying it will overwrite the song that is currently in the sequencer(music recorder).
1. Place a SD Memory Card into the Memory Card Slot.Make sure that there are some of your previous musical performancessaved to the Card or MIDI (SMF-Standard MIDI File) Format files on theSD Memory Card.
2. Press the Card / Disk Button (one time for the Red LED - Card Functionwill be engaged) and select the Load Song menu.The list of song files contained on the SD Memory Card will be displayedon the screen.If there are more than 4 songs on the disk, the SCREEN RIGHT/LEFTindicators will be lit.Press the Screen Right Button to access the additional song files on theSD Memory Card.
3. Using the Cursor Buttons highlight the song file you would like to loadand press the ENTER button.NOTE: A caution screen will appear asking if you are sure you want toload the song file sequence.
4. “OK” the command.A progress bar will be displayed showing the status of the load.A Card menu screen will be displayed after your selected song file hasbeen loaded.
5. Press the START / STOP or the PLAY/PAUSE button.The song you have just loaded into the sequencer (music recorder) willbegin to play.
1234567890123456789012345678901212345678901234567890123456789012123456123456789012345678901234567890121234567890123456789012345678901212345612345678901234567890123456789012123456789012345678901234567890121234561234567890123456789012345678901212345678901234567890123456789012123456123456789012345678901234567890121234567890123456789012345678901212345612345678901234567890123456789012123456789012345678901234567890121234561234567890123456789012345678901212345678901234567890123456789012123456123456789012345678901234567890121234567890123456789012345678901212345612345678901234567890123456789012123456789012345678901234567890121234561234567890123456789012345678901212345678901234567890123456789012123456123456789012345678901234567890121234567890123456789012345678901212345612345678901234567890123456789012123456789012345678901234567890121234561234567890123456789012345678901212345678901234567890123456789012123456
CARD MENULoad Song
Save Song
Utility
Play Disk
ENTER
CURSER
PLAY/PAUSE
START/STOP
BASS TREBLE VOLUMEACCOMP
Volume Note: It is recommended that you keep the AccompanimentVolume control in the maximum position for normal operation of thepiano. However if you have recorded data on channels 1 -4 the Accom-paniment Volume control may be able to control the volume level duringplayback of your song file depending on your control panel settingsconfiguration.
MEMORY CARD
CARD/DISK
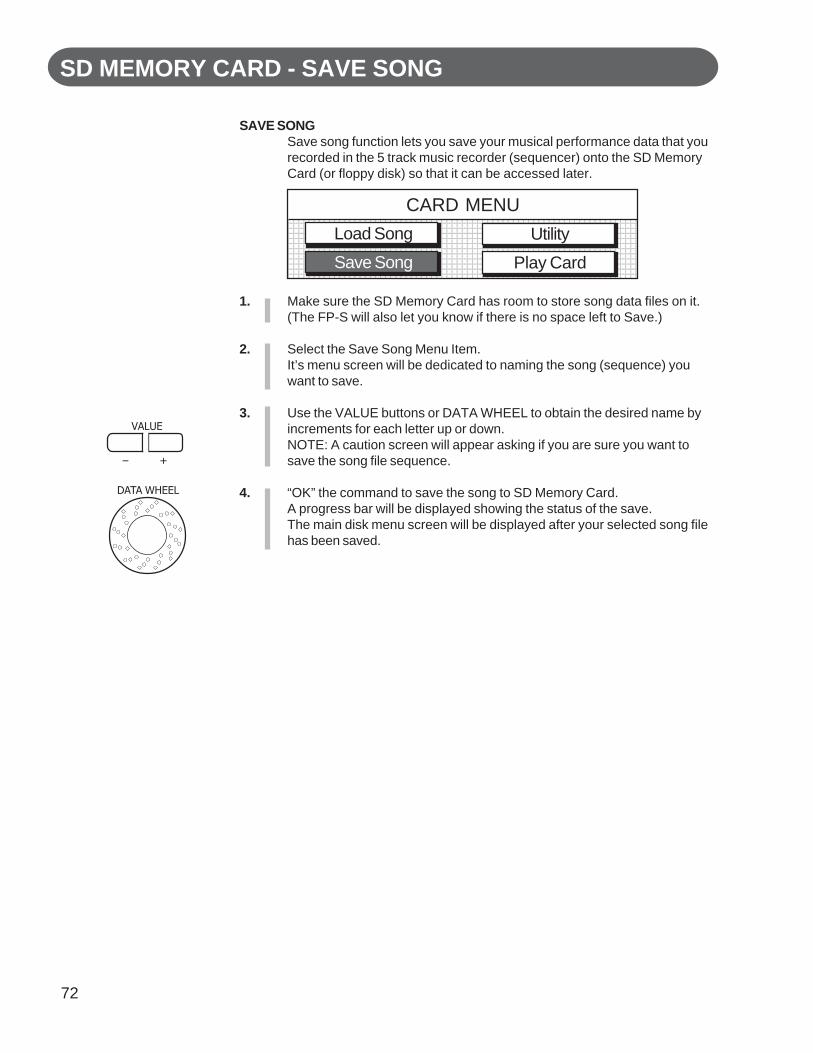
72
SD MEMORY CARD - SAVE SONG
SAVE SONGSave song function lets you save your musical performance data that yourecorded in the 5 track music recorder (sequencer) onto the SD MemoryCard (or floppy disk) so that it can be accessed later.
1. Make sure the SD Memory Card has room to store song data files on it.(The FP-S will also let you know if there is no space left to Save.)
2. Select the Save Song Menu Item.It’s menu screen will be dedicated to naming the song (sequence) youwant to save.
3. Use the VALUE buttons or DATA WHEEL to obtain the desired name byincrements for each letter up or down.NOTE: A caution screen will appear asking if you are sure you want tosave the song file sequence.
4. “OK” the command to save the song to SD Memory Card.A progress bar will be displayed showing the status of the save.The main disk menu screen will be displayed after your selected song filehas been saved.
DATA WHEEL
VALUE
– +
123456789012345678901234567890121234567890123456789012345678901212345123456789012345678901234567890121234567890123456789012345678901212345123456789012345678901234567890121234567890123456789012345678901212345123456789012345678901234567890121234567890123456789012345678901212345123456789012345678901234567890121234567890123456789012345678901212345123456789012345678901234567890121234567890123456789012345678901212345123456789012345678901234567890121234567890123456789012345678901212345123456789012345678901234567890121234567890123456789012345678901212345123456789012345678901234567890121234567890123456789012345678901212345123456789012345678901234567890121234567890123456789012345678901212345123456789012345678901234567890121234567890123456789012345678901212345123456789012345678901234567890121234567890123456789012345678901212345123456789012345678901234567890121234567890123456789012345678901212345
CARD MENULoad Song
Save Song
Utility
Play Card
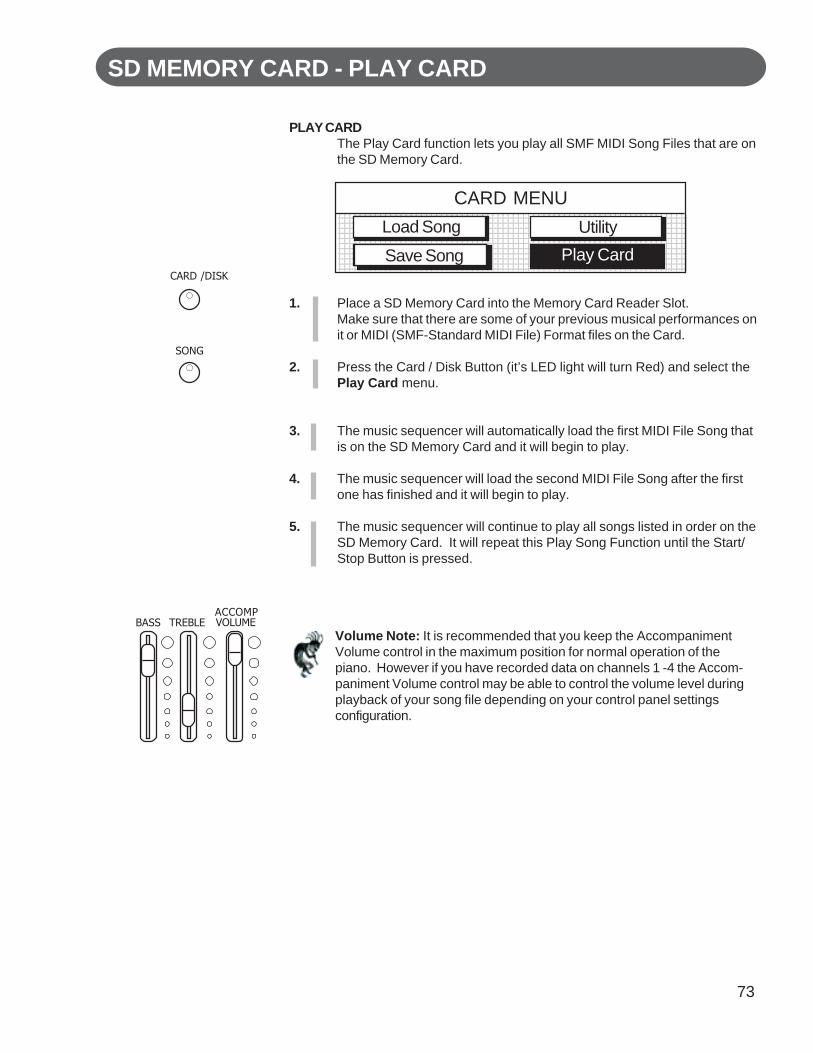
73
SD MEMORY CARD - PLAY CARD
123456789012345678901234567890121234567890123456789012345678901212345123456789012345678901234567890121234567890123456789012345678901212345123456789012345678901234567890121234567890123456789012345678901212345123456789012345678901234567890121234567890123456789012345678901212345123456789012345678901234567890121234567890123456789012345678901212345123456789012345678901234567890121234567890123456789012345678901212345123456789012345678901234567890121234567890123456789012345678901212345123456789012345678901234567890121234567890123456789012345678901212345123456789012345678901234567890121234567890123456789012345678901212345123456789012345678901234567890121234567890123456789012345678901212345123456789012345678901234567890121234567890123456789012345678901212345123456789012345678901234567890121234567890123456789012345678901212345
CARD MENULoad Song
Play Card
Utility
Save Song
PLAY CARDThe Play Card function lets you play all SMF MIDI Song Files that are onthe SD Memory Card.
1. Place a SD Memory Card into the Memory Card Reader Slot.Make sure that there are some of your previous musical performances onit or MIDI (SMF-Standard MIDI File) Format files on the Card.
2. Press the Card / Disk Button (it’s LED light will turn Red) and select thePlay Card menu.
3. The music sequencer will automatically load the first MIDI File Song thatis on the SD Memory Card and it will begin to play.
4. The music sequencer will load the second MIDI File Song after the firstone has finished and it will begin to play.
5. The music sequencer will continue to play all songs listed in order on theSD Memory Card. It will repeat this Play Song Function until the Start/Stop Button is pressed.
::BASS TREBLE VOLUMEACCOMP
Volume Note: It is recommended that you keep the AccompanimentVolume control in the maximum position for normal operation of thepiano. However if you have recorded data on channels 1 -4 the Accom-paniment Volume control may be able to control the volume level duringplayback of your song file depending on your control panel settingsconfiguration.
SONG
CARD /DISK

74
SD MEMORY CARD - PLAY CARD MENUSVarious Menu Screens - Load Song function has various menu screens that
allow you to view Song Lyrics and to play along with the SD MemoryCard.
FILE DATA - The File Data Screen displays the song’s MIDI file name and whatMusical Instrument Voice for the piano has been selected.This Instrument Voice is called the Solo Instrument because you cansolo by playing the piano keys while the MIDI song plays.
LYRICS - The Lyrics Screen displays the Lyrics of the Song that is being played,if your MIDI File Song has Lyrics attached.
Note: The Video Out Jack will supply this Lyric Screen to your TV whenconnected. See the Connector Panel section of this manual for moreinformation.
MUTE CHANNEL - The Mute Channel Screen allows you to select certainindividual tracks of your MIDI File Song to Mute. Therefore depending onyour Standard MIDI File Formatted Song you would be able to Mute theBass or Melody Line of the Song if you so desired. Mutable Channelsare Channels 1 - 4. Therefore it depends on the MIDI File that you areplaying along with as to what recorded channels are listed on Channels1 - 4.
SOLO CHANNEL - The Solo Channel Screen allows you to select certainindividual tracks of your MIDI File Song to Solo on (play along with).Therefore depending on your Standard MIDI File Formatted Song youwould be able to Solo on one of four Channels. Channels 1 - 4 areavailable for playing along with the MIDI Song.
Note: If you select a Solo Channel, the Accompaniment Volume SliderControl will adjust its volume control, when there is data on thosechannels. If there is no data the volume control will have no effect.
123456789012345678901234567890121234567890123456789012345678901212345612345678901234567890123456789012123456789012345678901234567890121234561234567890123456789012345678901212345678901234567890123456789012123456123456789012345678901234567890121234567890123456789012345678901212345612345678901234567890123456789012123456789012345678901234567890121234561234567890123456789012345678901212345678901234567890123456789012123456123456789012345678901234567890121234567890123456789012345678901212345612345678901234567890123456789012123456789012345678901234567890121234561234567890123456789012345678901212345678901234567890123456789012123456123456789012345678901234567890121234567890123456789012345678901212345612345678901234567890123456789012123456789012345678901234567890121234561234567890123456789012345678901212345678901234567890123456789012123456
CARD MENUFile Data
Lyrics
Mute Channel
Solo Channel
123456789012345678901234567890121234567890123456789012345678901212345123456789012345678901234567890121234567890123456789012345678901212345123456789012345678901234567890121234567890123456789012345678901212345123456789012345678901234567890121234567890123456789012345678901212345123456789012345678901234567890121234567890123456789012345678901212345123456789012345678901234567890121234567890123456789012345678901212345123456789012345678901234567890121234567890123456789012345678901212345123456789012345678901234567890121234567890123456789012345678901212345123456789012345678901234567890121234567890123456789012345678901212345123456789012345678901234567890121234567890123456789012345678901212345123456789012345678901234567890121234567890123456789012345678901212345123456789012345678901234567890121234567890123456789012345678901212345
CARD MENUPlayback Options
PLAYBACK OPTIONS - The Playback Options Menu Screen will also allow youto access the Mute or Solo Channel Playback Commands, before youhave engaged the Song File that you wish to Playback.
1. The Playback Options Screen can be reached by:Press the Card / Disk Button (its LED light turns Red)
2. Press the Screen Right Button one time
3. Press the Enter Button to engage the Playback Options Menu Screen
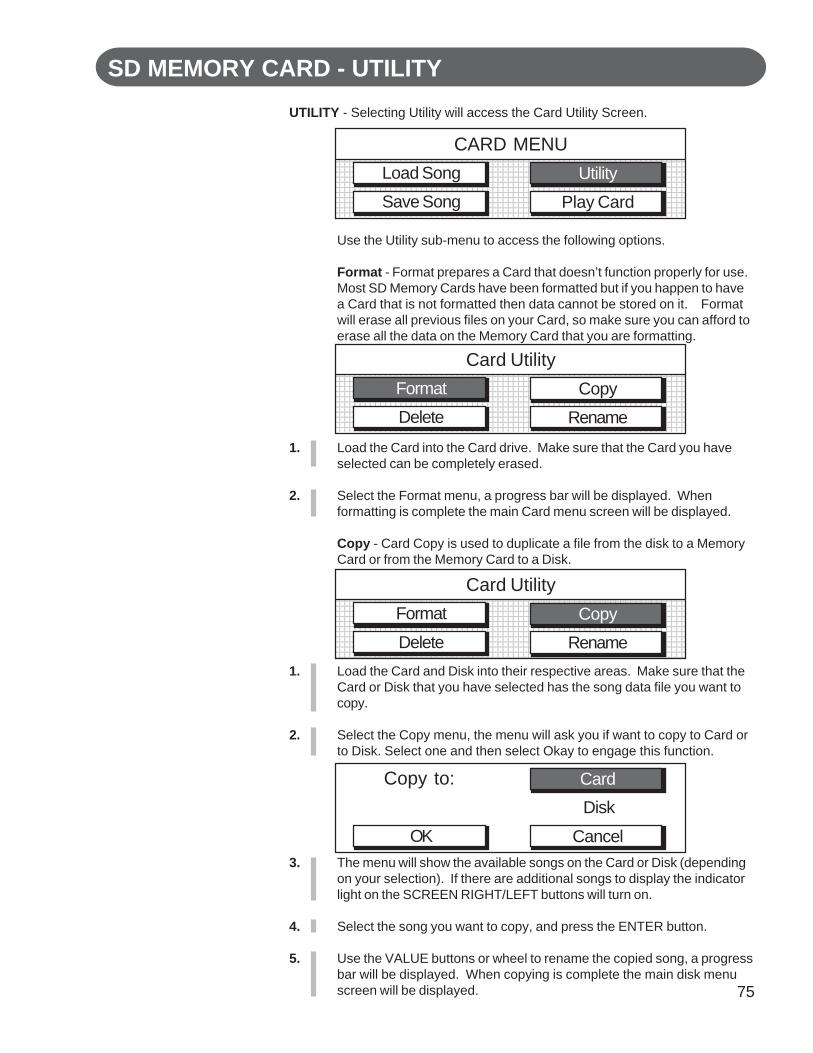
75
SD MEMORY CARD - UTILITY
UTILITY - Selecting Utility will access the Card Utility Screen.
Use the Utility sub-menu to access the following options.
Format - Format prepares a Card that doesn’t function properly for use.Most SD Memory Cards have been formatted but if you happen to havea Card that is not formatted then data cannot be stored on it. Formatwill erase all previous files on your Card, so make sure you can afford toerase all the data on the Memory Card that you are formatting.
1. Load the Card into the Card drive. Make sure that the Card you haveselected can be completely erased.
2. Select the Format menu, a progress bar will be displayed. Whenformatting is complete the main Card menu screen will be displayed.
Copy - Card Copy is used to duplicate a file from the disk to a MemoryCard or from the Memory Card to a Disk.
1. Load the Card and Disk into their respective areas. Make sure that theCard or Disk that you have selected has the song data file you want tocopy.
2. Select the Copy menu, the menu will ask you if want to copy to Card orto Disk. Select one and then select Okay to engage this function.
3. The menu will show the available songs on the Card or Disk (dependingon your selection). If there are additional songs to display the indicatorlight on the SCREEN RIGHT/LEFT buttons will turn on.
4. Select the song you want to copy, and press the ENTER button.
5. Use the VALUE buttons or wheel to rename the copied song, a progressbar will be displayed. When copying is complete the main disk menuscreen will be displayed.
123456789012345678901234567890121234567890123456789012345678901212345612345678901234567890123456789012123456789012345678901234567890121234561234567890123456789012345678901212345678901234567890123456789012123456123456789012345678901234567890121234567890123456789012345678901212345612345678901234567890123456789012123456789012345678901234567890121234561234567890123456789012345678901212345678901234567890123456789012123456123456789012345678901234567890121234567890123456789012345678901212345612345678901234567890123456789012123456789012345678901234567890121234561234567890123456789012345678901212345678901234567890123456789012123456123456789012345678901234567890121234567890123456789012345678901212345612345678901234567890123456789012123456789012345678901234567890121234561234567890123456789012345678901212345678901234567890123456789012123456
CARD MENULoad Song
Save Song
Utility
Play Card
123456789012345678901234567890121234567890123456789012345678901212345612345678901234567890123456789012123456789012345678901234567890121234561234567890123456789012345678901212345678901234567890123456789012123456123456789012345678901234567890121234567890123456789012345678901212345612345678901234567890123456789012123456789012345678901234567890121234561234567890123456789012345678901212345678901234567890123456789012123456123456789012345678901234567890121234567890123456789012345678901212345612345678901234567890123456789012123456789012345678901234567890121234561234567890123456789012345678901212345678901234567890123456789012123456123456789012345678901234567890121234567890123456789012345678901212345612345678901234567890123456789012123456789012345678901234567890121234561234567890123456789012345678901212345678901234567890123456789012123456
Card UtilityFormat
Delete
Copy
Rename
Copy to:Disk
OK
Card
Cancel
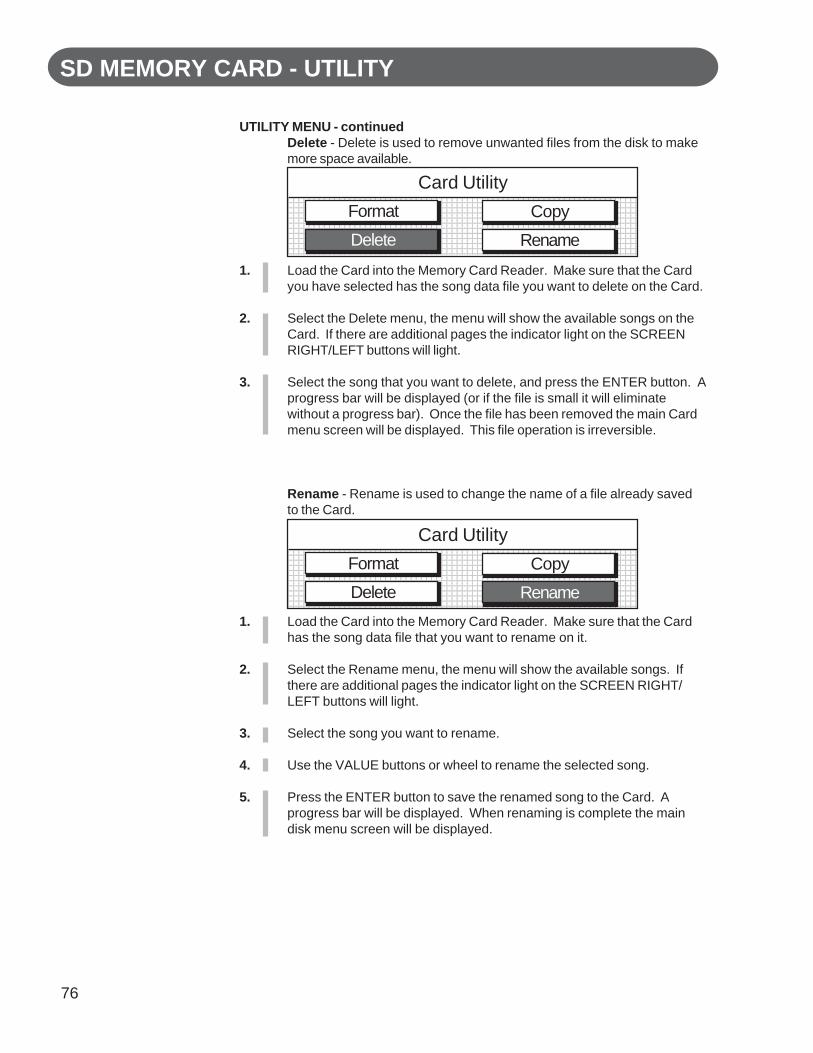
76
SD MEMORY CARD - UTILITY
UTILITY MENU - continuedDelete - Delete is used to remove unwanted files from the disk to makemore space available.
1. Load the Card into the Memory Card Reader. Make sure that the Cardyou have selected has the song data file you want to delete on the Card.
2. Select the Delete menu, the menu will show the available songs on theCard. If there are additional pages the indicator light on the SCREENRIGHT/LEFT buttons will light.
3. Select the song that you want to delete, and press the ENTER button. Aprogress bar will be displayed (or if the file is small it will eliminatewithout a progress bar). Once the file has been removed the main Cardmenu screen will be displayed. This file operation is irreversible.
Rename - Rename is used to change the name of a file already savedto the Card.
1. Load the Card into the Memory Card Reader. Make sure that the Cardhas the song data file that you want to rename on it.
2. Select the Rename menu, the menu will show the available songs. Ifthere are additional pages the indicator light on the SCREEN RIGHT/LEFT buttons will light.
3. Select the song you want to rename.
4. Use the VALUE buttons or wheel to rename the selected song.
5. Press the ENTER button to save the renamed song to the Card. Aprogress bar will be displayed. When renaming is complete the maindisk menu screen will be displayed.
123456789012345678901234567890121234567890123456789012345678901212345123456789012345678901234567890121234567890123456789012345678901212345123456789012345678901234567890121234567890123456789012345678901212345123456789012345678901234567890121234567890123456789012345678901212345123456789012345678901234567890121234567890123456789012345678901212345123456789012345678901234567890121234567890123456789012345678901212345123456789012345678901234567890121234567890123456789012345678901212345123456789012345678901234567890121234567890123456789012345678901212345123456789012345678901234567890121234567890123456789012345678901212345123456789012345678901234567890121234567890123456789012345678901212345123456789012345678901234567890121234567890123456789012345678901212345123456789012345678901234567890121234567890123456789012345678901212345
Card UtilityFormat
Delete
Copy
Rename
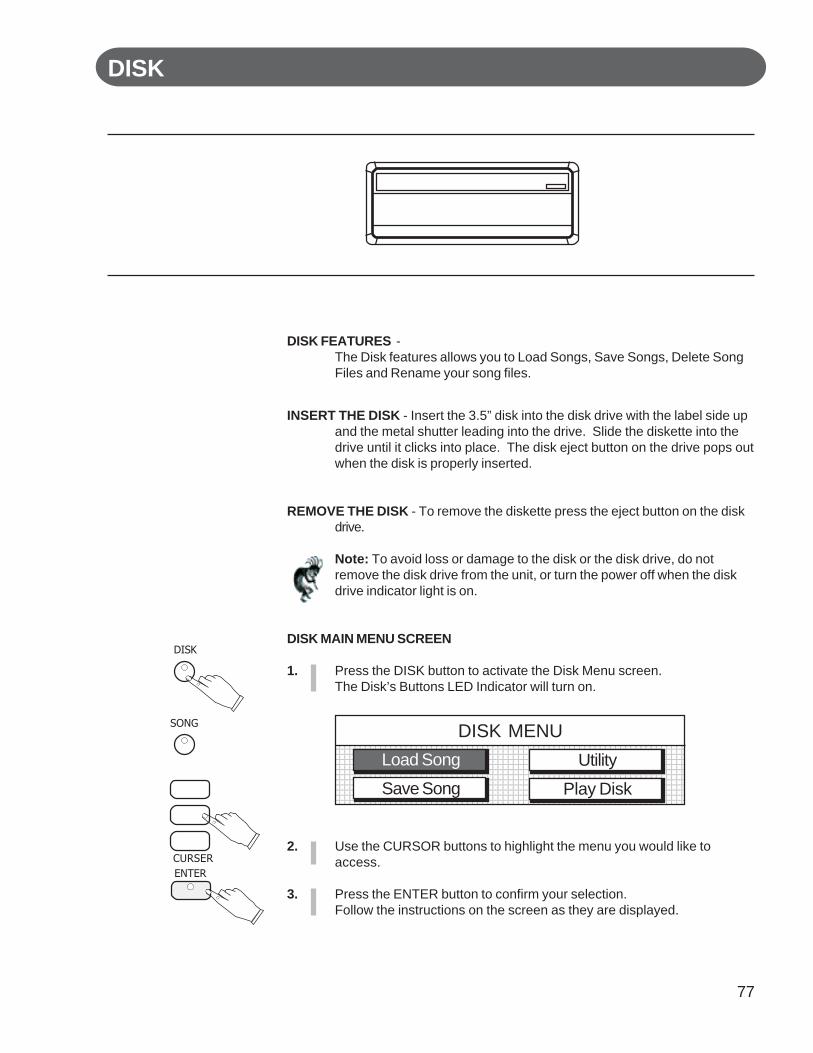
77
DISK
DISK FEATURES -The Disk features allows you to Load Songs, Save Songs, Delete SongFiles and Rename your song files.
INSERT THE DISK - Insert the 3.5” disk into the disk drive with the label side upand the metal shutter leading into the drive. Slide the diskette into thedrive until it clicks into place. The disk eject button on the drive pops outwhen the disk is properly inserted.
REMOVE THE DISK - To remove the diskette press the eject button on the diskdrive.
Note: To avoid loss or damage to the disk or the disk drive, do notremove the disk drive from the unit, or turn the power off when the diskdrive indicator light is on.
DISK MAIN MENU SCREEN
1. Press the DISK button to activate the Disk Menu screen.The Disk’s Buttons LED Indicator will turn on.
2. Use the CURSOR buttons to highlight the menu you would like toaccess.
3. Press the ENTER button to confirm your selection.Follow the instructions on the screen as they are displayed.
1234567890123456789012345678901212345678901234567890123456789012123456123456789012345678901234567890121234567890123456789012345678901212345612345678901234567890123456789012123456789012345678901234567890121234561234567890123456789012345678901212345678901234567890123456789012123456123456789012345678901234567890121234567890123456789012345678901212345612345678901234567890123456789012123456789012345678901234567890121234561234567890123456789012345678901212345678901234567890123456789012123456123456789012345678901234567890121234567890123456789012345678901212345612345678901234567890123456789012123456789012345678901234567890121234561234567890123456789012345678901212345678901234567890123456789012123456123456789012345678901234567890121234567890123456789012345678901212345612345678901234567890123456789012123456789012345678901234567890121234561234567890123456789012345678901212345678901234567890123456789012123456
DISK MENULoad Song
Save Song
Utility
Play Disk
ENTERCURSER
SONG
DISK
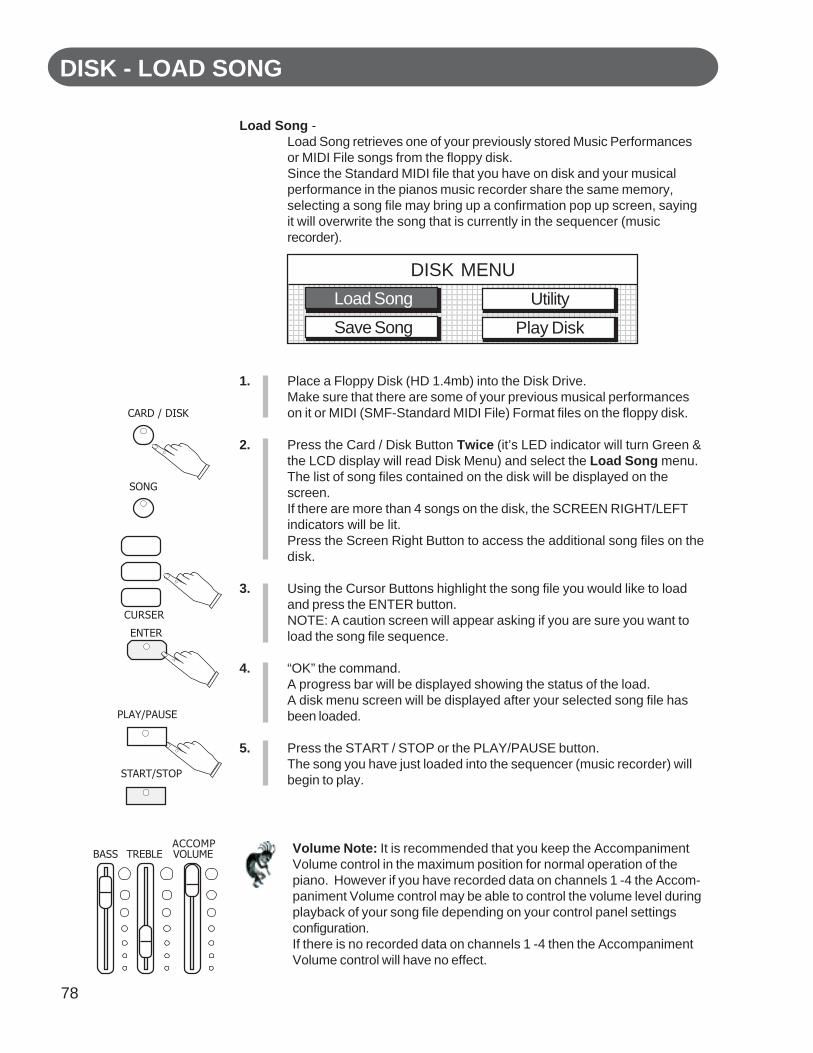
78
DISK - LOAD SONG
Load Song -Load Song retrieves one of your previously stored Music Performancesor MIDI File songs from the floppy disk.Since the Standard MIDI file that you have on disk and your musicalperformance in the pianos music recorder share the same memory,selecting a song file may bring up a confirmation pop up screen, sayingit will overwrite the song that is currently in the sequencer (musicrecorder).
1. Place a Floppy Disk (HD 1.4mb) into the Disk Drive.Make sure that there are some of your previous musical performanceson it or MIDI (SMF-Standard MIDI File) Format files on the floppy disk.
2. Press the Card / Disk Button Twice (it’s LED indicator will turn Green &the LCD display will read Disk Menu) and select the Load Song menu.The list of song files contained on the disk will be displayed on thescreen.If there are more than 4 songs on the disk, the SCREEN RIGHT/LEFTindicators will be lit.Press the Screen Right Button to access the additional song files on thedisk.
3. Using the Cursor Buttons highlight the song file you would like to loadand press the ENTER button.NOTE: A caution screen will appear asking if you are sure you want toload the song file sequence.
4. “OK” the command.A progress bar will be displayed showing the status of the load.A disk menu screen will be displayed after your selected song file hasbeen loaded.
5. Press the START / STOP or the PLAY/PAUSE button.The song you have just loaded into the sequencer (music recorder) willbegin to play.
123456789012345678901234567890121234567890123456789012345678901212345123456789012345678901234567890121234567890123456789012345678901212345123456789012345678901234567890121234567890123456789012345678901212345123456789012345678901234567890121234567890123456789012345678901212345123456789012345678901234567890121234567890123456789012345678901212345123456789012345678901234567890121234567890123456789012345678901212345123456789012345678901234567890121234567890123456789012345678901212345123456789012345678901234567890121234567890123456789012345678901212345123456789012345678901234567890121234567890123456789012345678901212345123456789012345678901234567890121234567890123456789012345678901212345123456789012345678901234567890121234567890123456789012345678901212345123456789012345678901234567890121234567890123456789012345678901212345
DISK MENULoad Song
Save Song
Utility
Play Disk
ENTER
CURSER
PLAY/PAUSE
START/STOP
BASS TREBLE VOLUMEACCOMP Volume Note: It is recommended that you keep the Accompaniment
Volume control in the maximum position for normal operation of thepiano. However if you have recorded data on channels 1 -4 the Accom-paniment Volume control may be able to control the volume level duringplayback of your song file depending on your control panel settingsconfiguration.If there is no recorded data on channels 1 -4 then the AccompanimentVolume control will have no effect.
SONG
CARD / DISK
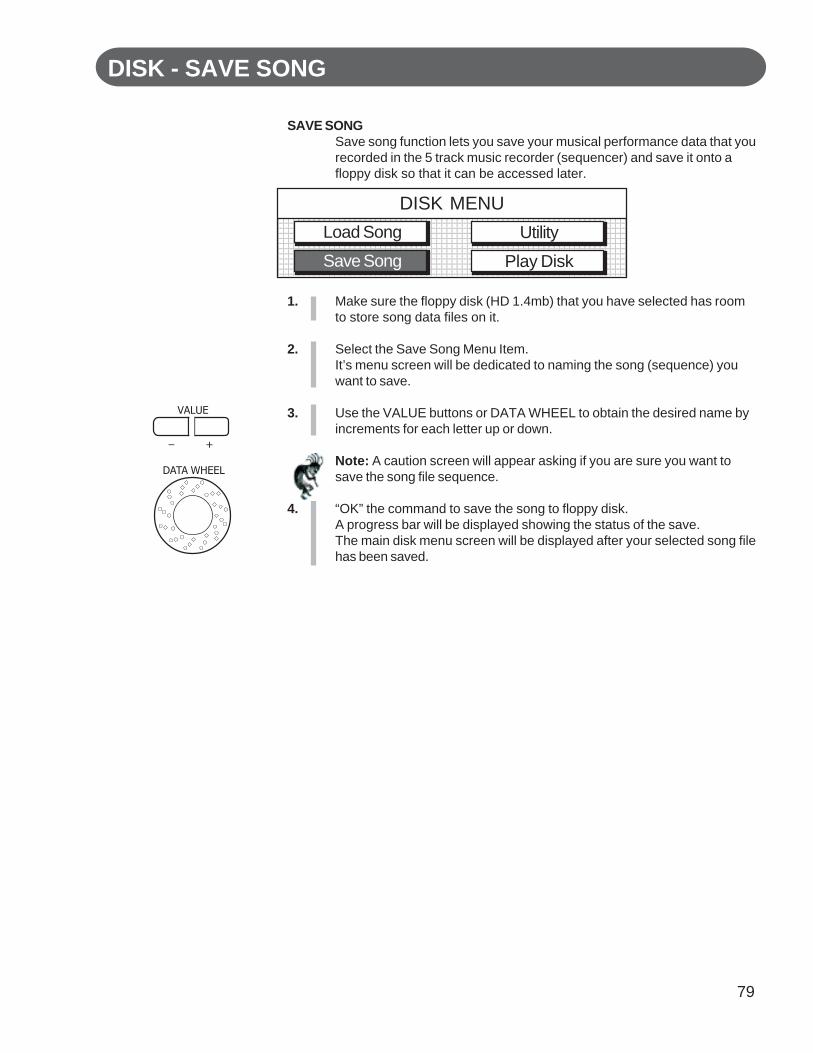
79
DISK - SAVE SONG
123456789012345678901234567890121234567890123456789012345678901212345123456789012345678901234567890121234567890123456789012345678901212345123456789012345678901234567890121234567890123456789012345678901212345123456789012345678901234567890121234567890123456789012345678901212345123456789012345678901234567890121234567890123456789012345678901212345123456789012345678901234567890121234567890123456789012345678901212345123456789012345678901234567890121234567890123456789012345678901212345123456789012345678901234567890121234567890123456789012345678901212345123456789012345678901234567890121234567890123456789012345678901212345123456789012345678901234567890121234567890123456789012345678901212345123456789012345678901234567890121234567890123456789012345678901212345123456789012345678901234567890121234567890123456789012345678901212345
DISK MENULoad Song
Save Song
Utility
Play Disk
SAVE SONGSave song function lets you save your musical performance data that yourecorded in the 5 track music recorder (sequencer) and save it onto afloppy disk so that it can be accessed later.
1. Make sure the floppy disk (HD 1.4mb) that you have selected has roomto store song data files on it.
2. Select the Save Song Menu Item.It’s menu screen will be dedicated to naming the song (sequence) youwant to save.
3. Use the VALUE buttons or DATA WHEEL to obtain the desired name byincrements for each letter up or down.
Note: A caution screen will appear asking if you are sure you want tosave the song file sequence.
4. “OK” the command to save the song to floppy disk.A progress bar will be displayed showing the status of the save.The main disk menu screen will be displayed after your selected song filehas been saved.
DATA WHEEL
VALUE
– +

80
DISK - PLAY DISK
1234567890123456789012345678901212345678901234567890123456789012123456123456789012345678901234567890121234567890123456789012345678901212345612345678901234567890123456789012123456789012345678901234567890121234561234567890123456789012345678901212345678901234567890123456789012123456123456789012345678901234567890121234567890123456789012345678901212345612345678901234567890123456789012123456789012345678901234567890121234561234567890123456789012345678901212345678901234567890123456789012123456123456789012345678901234567890121234567890123456789012345678901212345612345678901234567890123456789012123456789012345678901234567890121234561234567890123456789012345678901212345678901234567890123456789012123456123456789012345678901234567890121234567890123456789012345678901212345612345678901234567890123456789012123456789012345678901234567890121234561234567890123456789012345678901212345678901234567890123456789012123456
DISK MENULoad Song
Play Disk
Utility
Save Song
PLAY DISKThe Play Disk function lets you play all SMF MIDI Song Files that are onthe floppy disk.
1. Place a Floppy Disk (HD 1.4mb) into the Disk Drive.Make sure that there are some of your previous musical performances onit or MIDI (SMF-Standard MIDI File) Format files on the floppy disk.
2. Press the Disk Button Twice (it’s LED indicator will turn Green) andselect the Play Disk menu.
3. The music sequencer will automatically load the first MIDI File Song thatis on the floppy disk and it will begin to play.
4. The music sequencer will load the second MIDI File Song after the firstone has finished and it will begin to play.
5. The music sequencer will continue to play all songs listed in order on thefloppy disk. It will repeat this Play Song Function until the Start/StopButton is pressed.
BASS TREBLE VOLUMEACCOMP Volume Note: It is recommended that you keep the Accompaniment
Volume control in the maximum position for normal operation of thepiano. However if you have recorded data on channels 1 -4 the Accom-paniment Volume control may be able to control the volume level duringplayback of your song file depending on your control panel settingsconfiguration.If there is no recorded data on channels 1 -4 then the AccompanimentVolume control will have no effect.
SONG
CARD / DISK
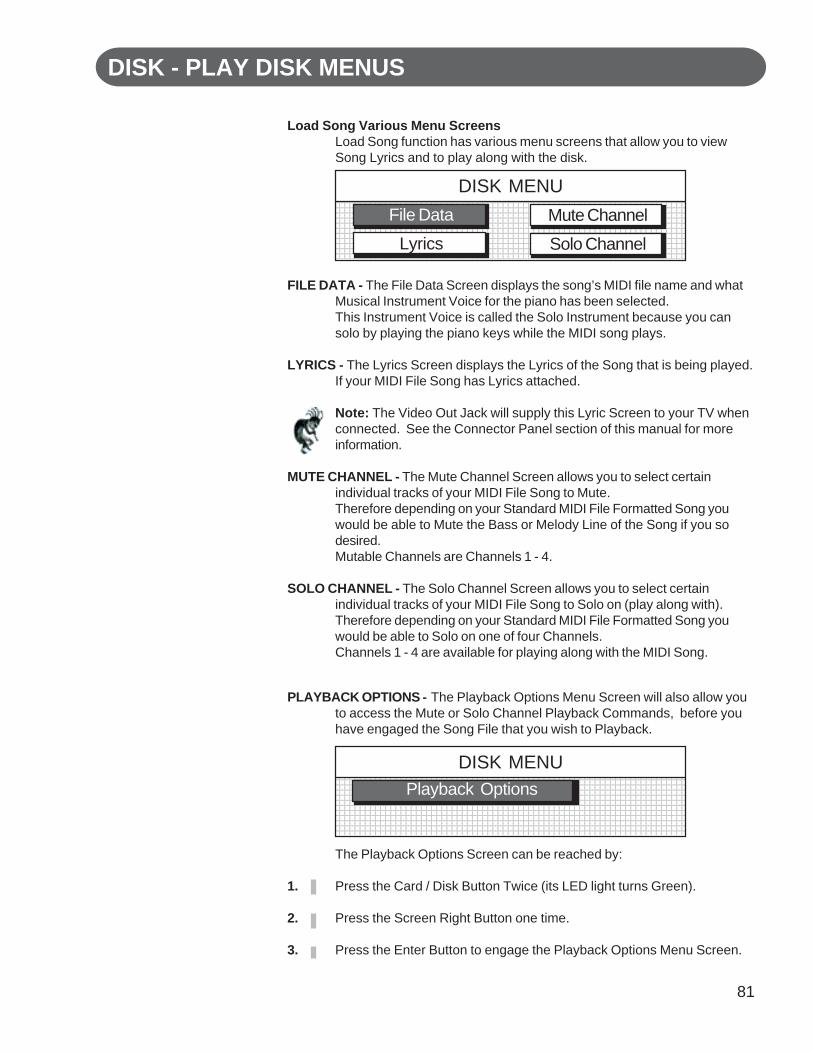
81
DISK - PLAY DISK MENUS
Load Song Various Menu ScreensLoad Song function has various menu screens that allow you to viewSong Lyrics and to play along with the disk.
FILE DATA - The File Data Screen displays the song’s MIDI file name and whatMusical Instrument Voice for the piano has been selected.This Instrument Voice is called the Solo Instrument because you cansolo by playing the piano keys while the MIDI song plays.
LYRICS - The Lyrics Screen displays the Lyrics of the Song that is being played.If your MIDI File Song has Lyrics attached.
Note: The Video Out Jack will supply this Lyric Screen to your TV whenconnected. See the Connector Panel section of this manual for moreinformation.
MUTE CHANNEL - The Mute Channel Screen allows you to select certainindividual tracks of your MIDI File Song to Mute.Therefore depending on your Standard MIDI File Formatted Song youwould be able to Mute the Bass or Melody Line of the Song if you sodesired.Mutable Channels are Channels 1 - 4.
SOLO CHANNEL - The Solo Channel Screen allows you to select certainindividual tracks of your MIDI File Song to Solo on (play along with).Therefore depending on your Standard MIDI File Formatted Song youwould be able to Solo on one of four Channels.Channels 1 - 4 are available for playing along with the MIDI Song.
123456789012345678901234567890121234567890123456789012345678901212345612345678901234567890123456789012123456789012345678901234567890121234561234567890123456789012345678901212345678901234567890123456789012123456123456789012345678901234567890121234567890123456789012345678901212345612345678901234567890123456789012123456789012345678901234567890121234561234567890123456789012345678901212345678901234567890123456789012123456123456789012345678901234567890121234567890123456789012345678901212345612345678901234567890123456789012123456789012345678901234567890121234561234567890123456789012345678901212345678901234567890123456789012123456123456789012345678901234567890121234567890123456789012345678901212345612345678901234567890123456789012123456789012345678901234567890121234561234567890123456789012345678901212345678901234567890123456789012123456
DISK MENUFile Data
Lyrics
Mute Channel
Solo Channel
123456789012345678901234567890121234567890123456789012345678901212345612345678901234567890123456789012123456789012345678901234567890121234561234567890123456789012345678901212345678901234567890123456789012123456123456789012345678901234567890121234567890123456789012345678901212345612345678901234567890123456789012123456789012345678901234567890121234561234567890123456789012345678901212345678901234567890123456789012123456123456789012345678901234567890121234567890123456789012345678901212345612345678901234567890123456789012123456789012345678901234567890121234561234567890123456789012345678901212345678901234567890123456789012123456123456789012345678901234567890121234567890123456789012345678901212345612345678901234567890123456789012123456789012345678901234567890121234561234567890123456789012345678901212345678901234567890123456789012123456
DISK MENUPlayback Options
PLAYBACK OPTIONS - The Playback Options Menu Screen will also allow youto access the Mute or Solo Channel Playback Commands, before youhave engaged the Song File that you wish to Playback.
The Playback Options Screen can be reached by:
1. Press the Card / Disk Button Twice (its LED light turns Green).
2. Press the Screen Right Button one time.
3. Press the Enter Button to engage the Playback Options Menu Screen.
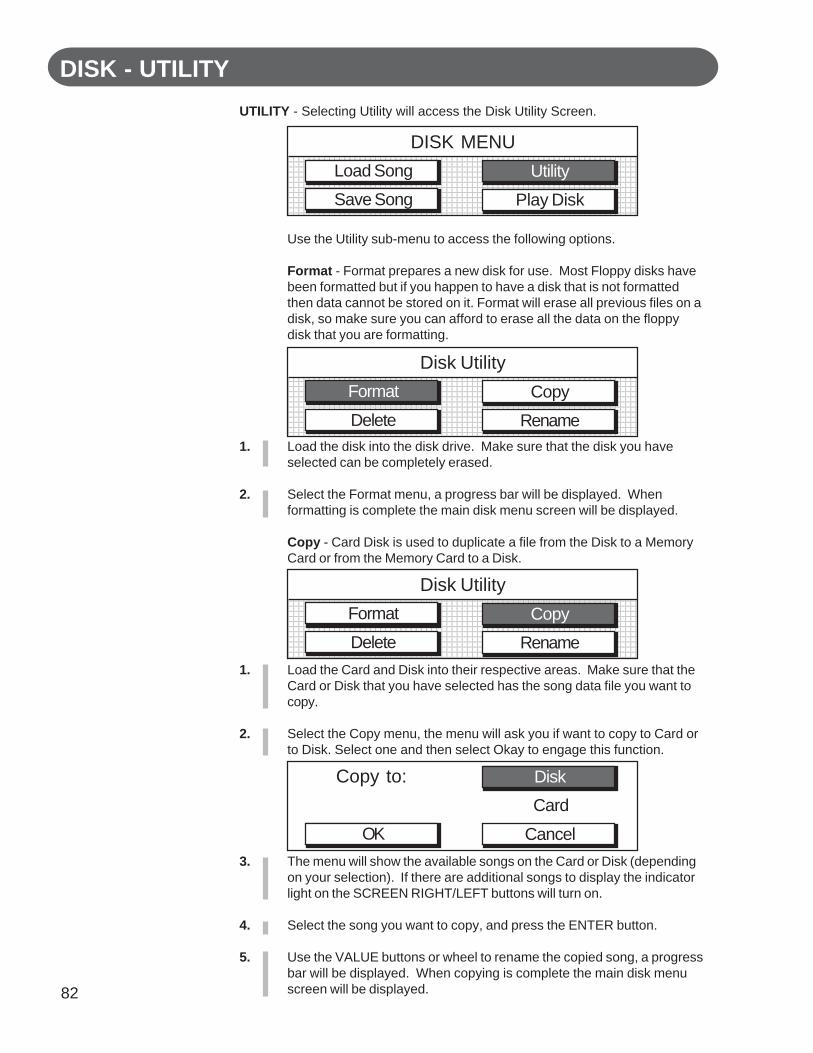
82
DISK - UTILITYUTILITY - Selecting Utility will access the Disk Utility Screen.
Use the Utility sub-menu to access the following options.
Format - Format prepares a new disk for use. Most Floppy disks havebeen formatted but if you happen to have a disk that is not formattedthen data cannot be stored on it. Format will erase all previous files on adisk, so make sure you can afford to erase all the data on the floppydisk that you are formatting.
1. Load the disk into the disk drive. Make sure that the disk you haveselected can be completely erased.
2. Select the Format menu, a progress bar will be displayed. Whenformatting is complete the main disk menu screen will be displayed.
Copy - Card Disk is used to duplicate a file from the Disk to a MemoryCard or from the Memory Card to a Disk.
1. Load the Card and Disk into their respective areas. Make sure that theCard or Disk that you have selected has the song data file you want tocopy.
2. Select the Copy menu, the menu will ask you if want to copy to Card orto Disk. Select one and then select Okay to engage this function.
3. The menu will show the available songs on the Card or Disk (dependingon your selection). If there are additional songs to display the indicatorlight on the SCREEN RIGHT/LEFT buttons will turn on.
4. Select the song you want to copy, and press the ENTER button.
5. Use the VALUE buttons or wheel to rename the copied song, a progressbar will be displayed. When copying is complete the main disk menuscreen will be displayed.
123456789012345678901234567890121234567890123456789012345678901212345123456789012345678901234567890121234567890123456789012345678901212345123456789012345678901234567890121234567890123456789012345678901212345123456789012345678901234567890121234567890123456789012345678901212345123456789012345678901234567890121234567890123456789012345678901212345123456789012345678901234567890121234567890123456789012345678901212345123456789012345678901234567890121234567890123456789012345678901212345123456789012345678901234567890121234567890123456789012345678901212345123456789012345678901234567890121234567890123456789012345678901212345123456789012345678901234567890121234567890123456789012345678901212345123456789012345678901234567890121234567890123456789012345678901212345123456789012345678901234567890121234567890123456789012345678901212345
DISK MENULoad Song
Save Song
Utility
Play Disk
123456789012345678901234567890121234567890123456789012345678901212345123456789012345678901234567890121234567890123456789012345678901212345123456789012345678901234567890121234567890123456789012345678901212345123456789012345678901234567890121234567890123456789012345678901212345123456789012345678901234567890121234567890123456789012345678901212345123456789012345678901234567890121234567890123456789012345678901212345123456789012345678901234567890121234567890123456789012345678901212345123456789012345678901234567890121234567890123456789012345678901212345123456789012345678901234567890121234567890123456789012345678901212345123456789012345678901234567890121234567890123456789012345678901212345123456789012345678901234567890121234567890123456789012345678901212345123456789012345678901234567890121234567890123456789012345678901212345123456789012345678901234567890121234567890123456789012345678901212345
Disk UtilityFormat
Delete
Copy
Rename
123456789012345678901234567890121234567890123456789012345678901212345123456789012345678901234567890121234567890123456789012345678901212345123456789012345678901234567890121234567890123456789012345678901212345123456789012345678901234567890121234567890123456789012345678901212345123456789012345678901234567890121234567890123456789012345678901212345123456789012345678901234567890121234567890123456789012345678901212345123456789012345678901234567890121234567890123456789012345678901212345123456789012345678901234567890121234567890123456789012345678901212345123456789012345678901234567890121234567890123456789012345678901212345123456789012345678901234567890121234567890123456789012345678901212345123456789012345678901234567890121234567890123456789012345678901212345123456789012345678901234567890121234567890123456789012345678901212345
Disk UtilityFormat
Delete
Copy
Rename
Copy to:Card
OK
Disk
Cancel

83
DISK - UTILITY
UTILITY MENU - continuedDelete - Delete is used to remove unwanted files from the disk to makemore space available.
1. Load the disk into the disk drive. Make sure that the disk you haveselected has the song data file you want to delete on the disk.
2. Select the Delete menu, the menu will show the available songs on thedisk. If there are additional pages the indicator light on the SCREENRIGHT/LEFT buttons will light.
3. Select the song that you want to delete, and press the ENTER button. Aprogress bar will be displayed. Once the file has been removed the maindisk menu screen will be displayed. This file operation is irreversible.
Rename - Rename is used to change the name of a file already savedto the disk.
1. Load the disk into the disk drive. Make sure that the disk has song datafiles on it.
2. Select the Rename menu, the menu will show the available songs. Ifthere are additional pages the indicator light on the SCREEN RIGHT/LEFT buttons will light.
3. Select the song you want to rename.
4. Use the VALUE buttons or wheel to rename the selected song.
5. Press the ENTER button to save the renamed song to floppy disk. Aprogress bar will be displayed. When renaming is complete the maindisk menu screen will be displayed.
123456789012345678901234567890121234567890123456789012345678901212345612345678901234567890123456789012123456789012345678901234567890121234561234567890123456789012345678901212345678901234567890123456789012123456123456789012345678901234567890121234567890123456789012345678901212345612345678901234567890123456789012123456789012345678901234567890121234561234567890123456789012345678901212345678901234567890123456789012123456123456789012345678901234567890121234567890123456789012345678901212345612345678901234567890123456789012123456789012345678901234567890121234561234567890123456789012345678901212345678901234567890123456789012123456123456789012345678901234567890121234567890123456789012345678901212345612345678901234567890123456789012123456789012345678901234567890121234561234567890123456789012345678901212345678901234567890123456789012123456
Disk UtilityFormat
Delete
Copy
Rename
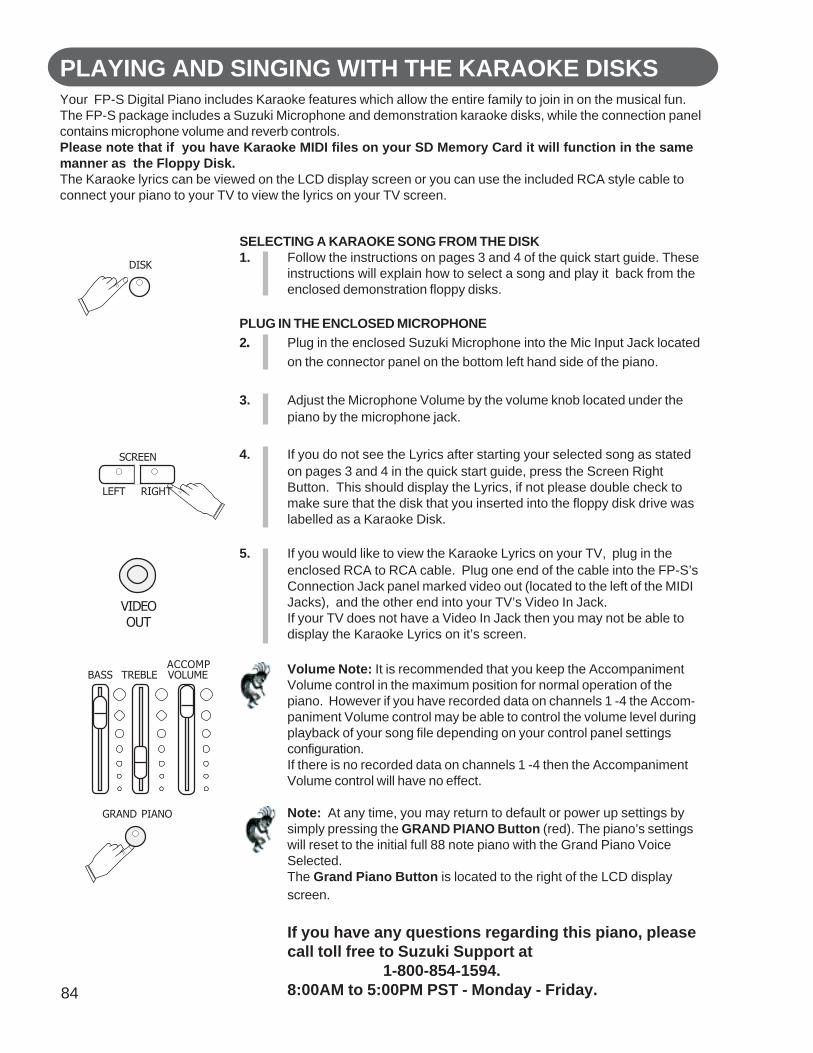
84
SELECTING A KARAOKE SONG FROM THE DISK1. Follow the instructions on pages 3 and 4 of the quick start guide. These
instructions will explain how to select a song and play it back from theenclosed demonstration floppy disks.
PLUG IN THE ENCLOSED MICROPHONE2. Plug in the enclosed Suzuki Microphone into the Mic Input Jack located
on the connector panel on the bottom left hand side of the piano.
3. Adjust the Microphone Volume by the volume knob located under thepiano by the microphone jack.
4. If you do not see the Lyrics after starting your selected song as statedon pages 3 and 4 in the quick start guide, press the Screen RightButton. This should display the Lyrics, if not please double check tomake sure that the disk that you inserted into the floppy disk drive waslabelled as a Karaoke Disk.
5. If you would like to view the Karaoke Lyrics on your TV, plug in theenclosed RCA to RCA cable. Plug one end of the cable into the FP-S’sConnection Jack panel marked video out (located to the left of the MIDIJacks), and the other end into your TV’s Video In Jack.If your TV does not have a Video In Jack then you may not be able todisplay the Karaoke Lyrics on it’s screen.
Note: At any time, you may return to default or power up settings bysimply pressing the GRAND PIANO Button (red). The piano’s settingswill reset to the initial full 88 note piano with the Grand Piano VoiceSelected.The Grand Piano Button is located to the right of the LCD displayscreen.
If you have any questions regarding this piano, pleasecall toll free to Suzuki Support at
1-800-854-1594.8:00AM to 5:00PM PST - Monday - Friday.
Your FP-S Digital Piano includes Karaoke features which allow the entire family to join in on the musical fun.The FP-S package includes a Suzuki Microphone and demonstration karaoke disks, while the connection panelcontains microphone volume and reverb controls.Please note that if you have Karaoke MIDI files on your SD Memory Card it will function in the samemanner as the Floppy Disk.The Karaoke lyrics can be viewed on the LCD display screen or you can use the included RCA style cable toconnect your piano to your TV to view the lyrics on your TV screen.
VIDEOOUT
GRAND PIANO
DISK
LEFT RIGHT
SCREEN
PLAYING AND SINGING WITH THE KARAOKE DISKS
BASS TREBLE VOLUMEACCOMP Volume Note: It is recommended that you keep the Accompaniment
Volume control in the maximum position for normal operation of thepiano. However if you have recorded data on channels 1 -4 the Accom-paniment Volume control may be able to control the volume level duringplayback of your song file depending on your control panel settingsconfiguration.If there is no recorded data on channels 1 -4 then the AccompanimentVolume control will have no effect.
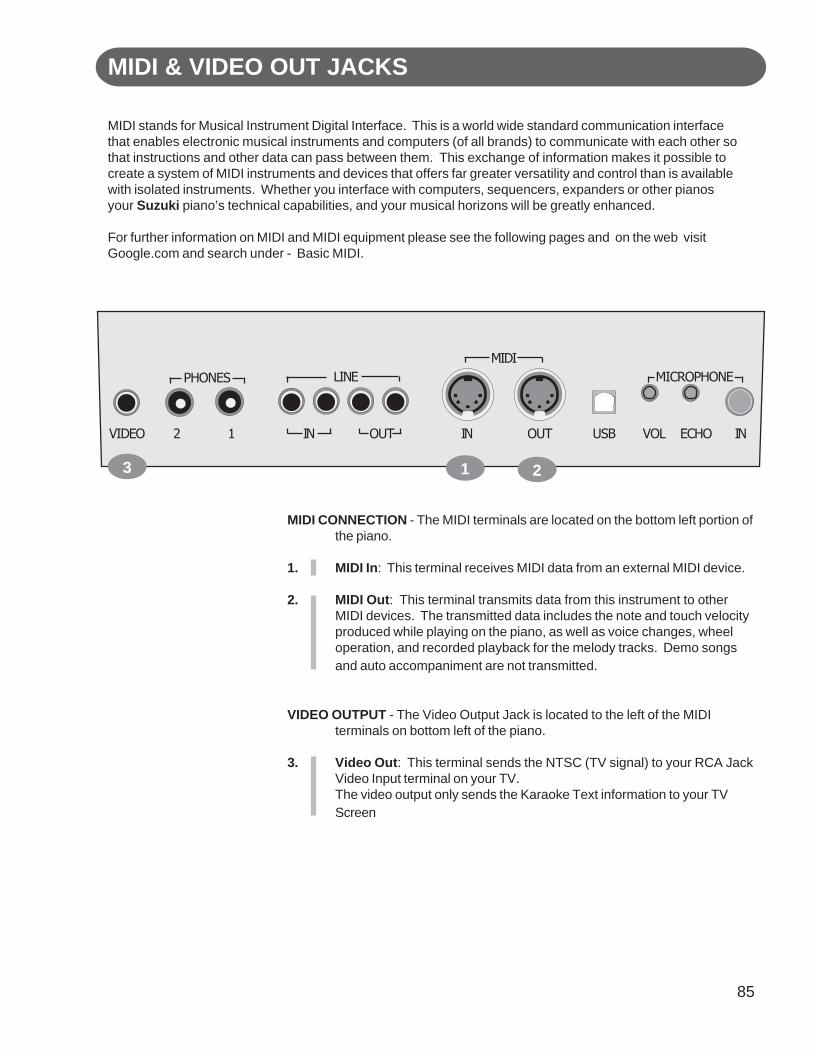
85
MIDI & VIDEO OUT JACKS
MIDI stands for Musical Instrument Digital Interface. This is a world wide standard communication interfacethat enables electronic musical instruments and computers (of all brands) to communicate with each other sothat instructions and other data can pass between them. This exchange of information makes it possible tocreate a system of MIDI instruments and devices that offers far greater versatility and control than is availablewith isolated instruments. Whether you interface with computers, sequencers, expanders or other pianosyour Suzuki piano’s technical capabilities, and your musical horizons will be greatly enhanced.
For further information on MIDI and MIDI equipment please see the following pages and on the web visitGoogle.com and search under - Basic MIDI.
MIDI CONNECTION - The MIDI terminals are located on the bottom left portion ofthe piano.
1. MIDI In: This terminal receives MIDI data from an external MIDI device.
2. MIDI Out: This terminal transmits data from this instrument to otherMIDI devices. The transmitted data includes the note and touch velocityproduced while playing on the piano, as well as voice changes, wheeloperation, and recorded playback for the melody tracks. Demo songsand auto accompaniment are not transmitted.
VIDEO OUTPUT - The Video Output Jack is located to the left of the MIDIterminals on bottom left of the piano.
3. Video Out: This terminal sends the NTSC (TV signal) to your RCA JackVideo Input terminal on your TV.The video output only sends the Karaoke Text information to your TVScreen
VIDEO USB
PHONES
2 1
LINE
IN OUT IN OUT
MIDIMICROPHONE
ECHO INVOL
1 23
86
MIDI
MIDI CHANNELS - The MIDI system in this unit has 16 channels numbered from1-16. Each of the channels is responsible for a voice. When theinstrument receives from an external device, the active channel isdetermined by the control message. The transmission channels on thispiano are fixed as follows:
Channel 1: Master voiceChannel 2: Layer voiceChannel 3: Split voiceChannel 4: Bass in manual bass chord modeChannel 7: Chord in manual bass chord modeChannel 10: Percussion sound
Please see the MIDI Implementation Chart for more detail.
BASIC MIDI SETUPS
Output to an external sound generator - MIDI pianos transmit noteand velocity (touch sensitivity) information via the MIDI Out connector.Connect the MIDI Out terminal of the piano and the MIDI IN terminal ofan external device, piano, synthesizer, or sound module, and theexternal device should respond to your playing.
By connecting this Suzuki piano to another piano in this way you canessentially play two instruments at the same time or play on your pianoto the sound of another MIDI devise to produce thick, layered multi-instrument sounds.
Output from an external MIDI device - Connect the MIDI In terminal ofthe piano and the MIDI Out terminal of an external device. Data gener-ated on another device are passed through your pianos sound deliverysystem.
Connect with an computer - Although the Suzuki piano offers a builtin sequencer, the music recorder is a real-time five track sequencer, thesame type of musical information transfer that is described above can beused for more sophisticated MIDI sequence recording using an externalsequencer or computer. These devices could be used to record MIDIdata received from this piano. You can transmit your performance to acomputer to utilized advanced recording, composing and editing availablefrom software on the computer. MIDI music stored on the computer canbe played back through your instrument.

87
MIDI
MIDI LOCAL CONTROL MODE - Local control refers to the fact that normally,this Suzuki piano controls the internal tone generator. This is thenormal play mode. Local control can be turned off, so that the pianodoes not play the internal voices, however, the MIDI information is stilltransmitted via the MIDI Out connector when notes are played on thepiano. At the same time, the internal tone generator can respond toMIDI data received via the MIDI In connector.
MIDI INPUT CHANNEL SELECTION - You may select an individual MIDI channelto receive MIDI data on. The power up default setting is the OMNI modewhich receives MIDI data on all channels.
MIDI SPLIT INPUT LOWER CHANNEL MODE - This MIDI input channel modeis used to select which MIDI input channel you want to receive for thelower split piano MIDI data. The previous MIDI input mode will receive theupper split piano data.
MIDI OUTPUT CHANNEL SELECTION - You may select an individual MIDIchannel to transmit MIDI data on. The power up default setting totransmit MIDI data is channel 1.
MIDI SLIT OUTPUT LOWER CHANNEL MODE - This MIDI output channel modeis used to select which MIDI output channel that you want to transmit onfor the lower split piano data. This MIDI data can be sent separately ona discrete MIDI channel. The previous MIDI input mode will transmit theupper split piano data. The default setting for this mode transmits onchannel two.
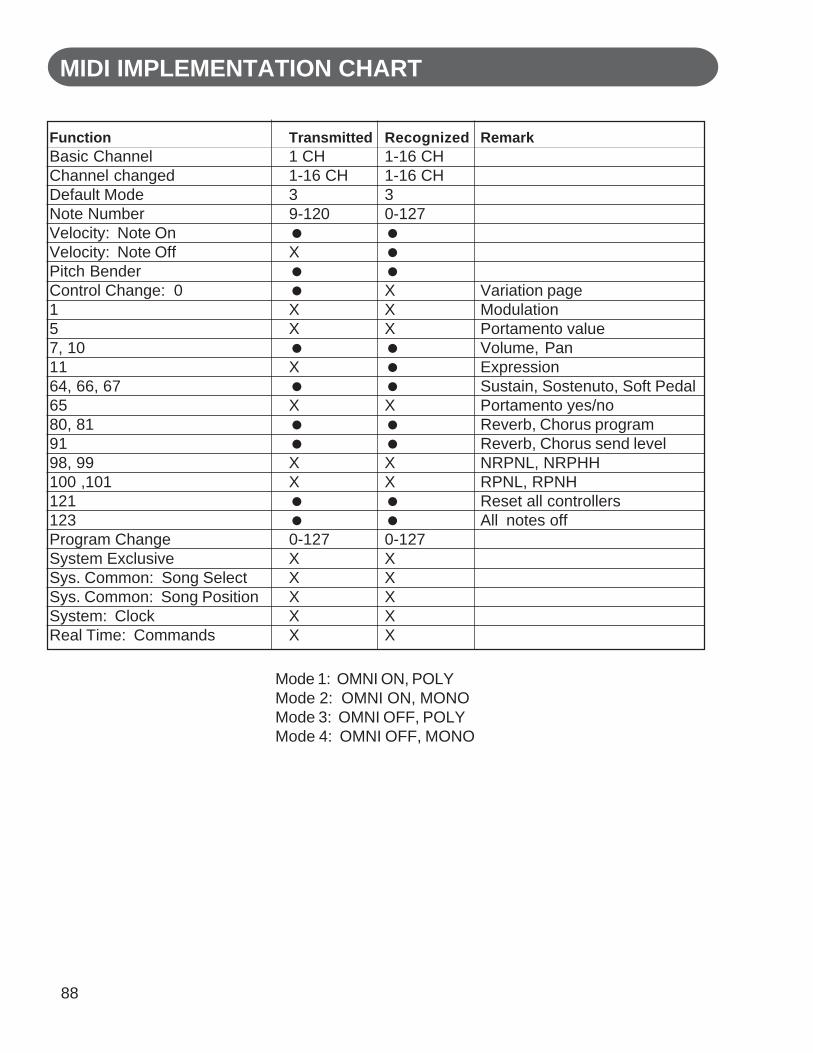
88
MIDI IMPLEMENTATION CHART
Function Transmitted Recognized RemarkBasic Channel 1 CH 1-16 CHChannel changed 1-16 CH 1-16 CHDefault Mode 3 3Note Number 9-120 0-127Velocity: Note OnVelocity: Note Off XPitch BenderControl Change: 0 X Variation page1 X X Modulation5 X X Portamento value7, 10 Volume, Pan11 X Expression64, 66, 67 Sustain, Sostenuto, Soft Pedal65 X X Portamento yes/no80, 81 Reverb, Chorus program91 Reverb, Chorus send level98, 99 X X NRPNL, NRPHH100 ,101 X X RPNL, RPNH121 Reset all controllers123 All notes offProgram Change 0-127 0-127System Exclusive X XSys. Common: Song Select X XSys. Common: Song Position X XSystem: Clock X XReal Time: Commands X X
Mode 1: OMNI ON, POLYMode 2: OMNI ON, MONOMode 3: OMNI OFF, POLYMode 4: OMNI OFF, MONO
MIDI IMPLEMENTATION CHART
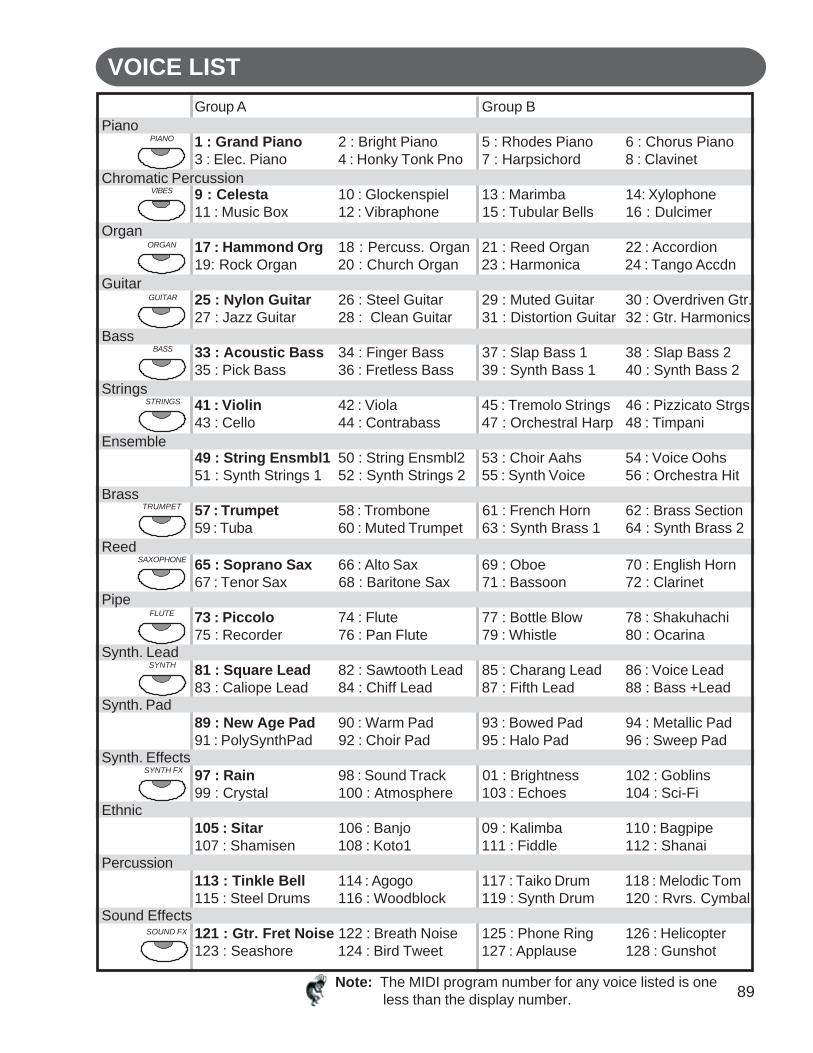
89
VOICE LIST
Note: The MIDI program number for any voice listed is oneless than the display number.
Group A Group B
1 : Grand Piano 2 : Bright Piano 5 : Rhodes Piano 6 : Chorus Piano3 : Elec. Piano 4 : Honky Tonk Pno 7 : Harpsichord 8 : Clavinet
9 : Celesta 10 : Glockenspiel 13 : Marimba 14: Xylophone11 : Music Box 12 : Vibraphone 15 : Tubular Bells 16 : Dulcimer
17 : Hammond Org 18 : Percuss. Organ 21 : Reed Organ 22 : Accordion19: Rock Organ 20 : Church Organ 23 : Harmonica 24 : Tango Accdn
25 : Nylon Guitar 26 : Steel Guitar 29 : Muted Guitar 30 : Overdriven Gtr.27 : Jazz Guitar 28 : Clean Guitar 31 : Distortion Guitar 32 : Gtr. Harmonics
33 : Acoustic Bass 34 : Finger Bass 37 : Slap Bass 1 38 : Slap Bass 235 : Pick Bass 36 : Fretless Bass 39 : Synth Bass 1 40 : Synth Bass 2
41 : Violin 42 : Viola 45 : Tremolo Strings 46 : Pizzicato Strgs.43 : Cello 44 : Contrabass 47 : Orchestral Harp 48 : Timpani
49 : String Ensmbl1 50 : String Ensmbl2 53 : Choir Aahs 54 : Voice Oohs51 : Synth Strings 1 52 : Synth Strings 2 55 : Synth Voice 56 : Orchestra Hit
57 : Trumpet 58 : Trombone 61 : French Horn 62 : Brass Section59 : Tuba 60 : Muted Trumpet 63 : Synth Brass 1 64 : Synth Brass 2
65 : Soprano Sax 66 : Alto Sax 69 : Oboe 70 : English Horn67 : Tenor Sax 68 : Baritone Sax 71 : Bassoon 72 : Clarinet
73 : Piccolo 74 : Flute 77 : Bottle Blow 78 : Shakuhachi75 : Recorder 76 : Pan Flute 79 : Whistle 80 : Ocarina
81 : Square Lead 82 : Sawtooth Lead 85 : Charang Lead 86 : Voice Lead83 : Caliope Lead 84 : Chiff Lead 87 : Fifth Lead 88 : Bass +Lead
89 : New Age Pad 90 : Warm Pad 93 : Bowed Pad 94 : Metallic Pad91 : PolySynthPad 92 : Choir Pad 95 : Halo Pad 96 : Sweep Pad
97 : Rain 98 : Sound Track 01 : Brightness 102 : Goblins99 : Crystal 100 : Atmosphere 103 : Echoes 104 : Sci-Fi
105 : Sitar 106 : Banjo 09 : Kalimba 110 : Bagpipe107 : Shamisen 108 : Koto1 111 : Fiddle 112 : Shanai
113 : Tinkle Bell 114 : Agogo 117 : Taiko Drum 118 : Melodic Tom115 : Steel Drums 116 : Woodblock 119 : Synth Drum 120 : Rvrs. Cymbal
121 : Gtr. Fret Noise 122 : Breath Noise 125 : Phone Ring 126 : Helicopter123 : Seashore 124 : Bird Tweet 127 : Applause 128 : Gunshot
PIANO
VIBES
ORGAN
GUITAR
BASS
STRINGS
SYNTH FX
SYNTH
FLUTE
SAXOPHONE
TRUMPET
SOUND FX
Piano
Chromatic Percussion
Organ
Guitar
Bass
Strings
Ensemble
Brass
Reed
Pipe
Synth. Lead
Synth. Pad
Synth. Effects
Ethnic
Percussion
Sound Effects
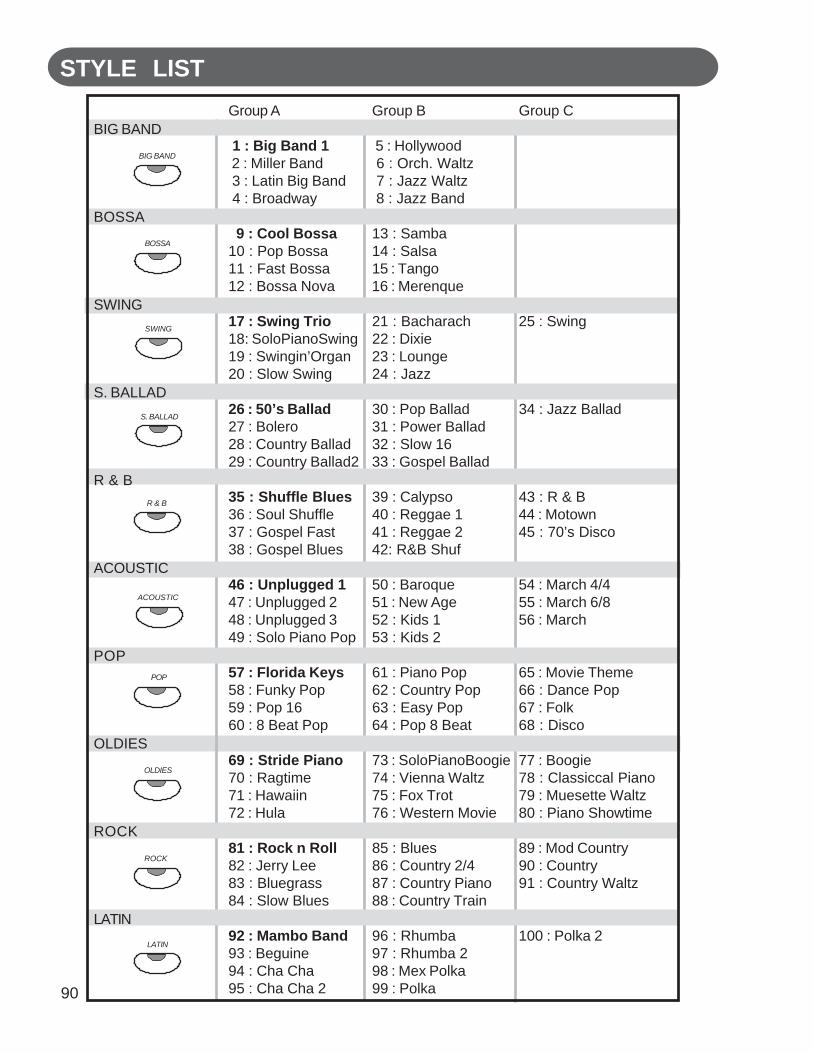
90
STYLE LISTGroup A Group B Group C
1 : Big Band 1 5 : Hollywood 2 : Miller Band 6 : Orch. Waltz 3 : Latin Big Band 7 : Jazz Waltz 4 : Broadway 8 : Jazz Band
9 : Cool Bossa 13 : Samba10 : Pop Bossa 14 : Salsa11 : Fast Bossa 15 : Tango12 : Bossa Nova 16 : Merenque
17 : Swing Trio 21 : Bacharach 25 : Swing18: SoloPianoSwing 22 : Dixie19 : Swingin’Organ 23 : Lounge20 : Slow Swing 24 : Jazz
26 : 50’s Ballad 30 : Pop Ballad 34 : Jazz Ballad27 : Bolero 31 : Power Ballad28 : Country Ballad 32 : Slow 1629 : Country Ballad2 33 : Gospel Ballad
35 : Shuffle Blues 39 : Calypso 43 : R & B36 : Soul Shuffle 40 : Reggae 1 44 : Motown37 : Gospel Fast 41 : Reggae 2 45 : 70’s Disco38 : Gospel Blues 42: R&B Shuf
46 : Unplugged 1 50 : Baroque 54 : March 4/447 : Unplugged 2 51 : New Age 55 : March 6/848 : Unplugged 3 52 : Kids 1 56 : March49 : Solo Piano Pop 53 : Kids 2
57 : Florida Keys 61 : Piano Pop 65 : Movie Theme58 : Funky Pop 62 : Country Pop 66 : Dance Pop59 : Pop 16 63 : Easy Pop 67 : Folk60 : 8 Beat Pop 64 : Pop 8 Beat 68 : Disco
69 : Stride Piano 73 : SoloPianoBoogie 77 : Boogie70 : Ragtime 74 : Vienna Waltz 78 : Classiccal Piano71 : Hawaiin 75 : Fox Trot 79 : Muesette Waltz72 : Hula 76 : Western Movie 80 : Piano Showtime
81 : Rock n Roll 85 : Blues 89 : Mod Country82 : Jerry Lee 86 : Country 2/4 90 : Country83 : Bluegrass 87 : Country Piano 91 : Country Waltz84 : Slow Blues 88 : Country Train
92 : Mambo Band 96 : Rhumba 100 : Polka 293 : Beguine 97 : Rhumba 294 : Cha Cha 98 : Mex Polka95 : Cha Cha 2 99 : Polka
BIG BAND
BOSSA
SWING
S. BALLAD
R & B
ACOUSTIC
POP
OLDIES
ROCK
LATIN
BIG BAND
BOSSA
LATIN
ROCK
OLDIES
POP
ACOUSTIC
R & B
S. BALLAD
SWING
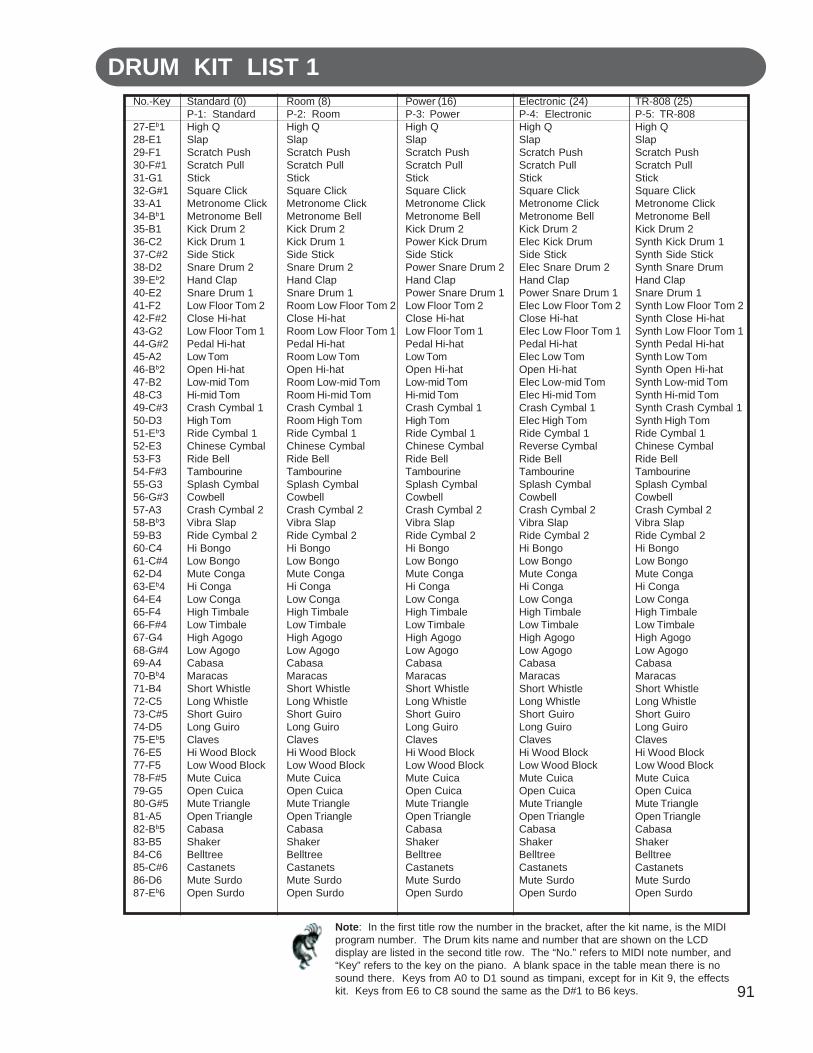
91
DRUM KIT LIST 1
Note: In the first title row the number in the bracket, after the kit name, is the MIDIprogram number. The Drum kits name and number that are shown on the LCDdisplay are listed in the second title row. The “No.” refers to MIDI note number, and“Key” refers to the key on the piano. A blank space in the table mean there is nosound there. Keys from A0 to D1 sound as timpani, except for in Kit 9, the effectskit. Keys from E6 to C8 sound the same as the D#1 to B6 keys.
No.-Key
27-Eb128-E129-F130-F#131-G132-G#133-A134-Bb135-B136-C237-C#238-D239-Eb240-E241-F242-F#243-G244-G#245-A246-Bb247-B248-C349-C#350-D351-Eb352-E353-F354-F#355-G356-G#357-A358-Bb359-B360-C461-C#462-D463-Eb464-E465-F466-F#467-G468-G#469-A470-Bb471-B472-C573-C#574-D575-Eb576-E577-F578-F#579-G580-G#581-A582-Bb583-B584-C685-C#686-D687-Eb6
Standard (0)P-1: StandardHigh QSlapScratch PushScratch PullStickSquare ClickMetronome ClickMetronome BellKick Drum 2Kick Drum 1Side StickSnare Drum 2Hand ClapSnare Drum 1Low Floor Tom 2Close Hi-hatLow Floor Tom 1Pedal Hi-hatLow TomOpen Hi-hatLow-mid TomHi-mid TomCrash Cymbal 1High TomRide Cymbal 1Chinese CymbalRide BellTambourineSplash CymbalCowbellCrash Cymbal 2Vibra SlapRide Cymbal 2Hi BongoLow BongoMute CongaHi CongaLow CongaHigh TimbaleLow TimbaleHigh AgogoLow AgogoCabasaMaracasShort WhistleLong WhistleShort GuiroLong GuiroClavesHi Wood BlockLow Wood BlockMute CuicaOpen CuicaMute TriangleOpen TriangleCabasaShakerBelltreeCastanetsMute SurdoOpen Surdo
Room (8)P-2: RoomHigh QSlapScratch PushScratch PullStickSquare ClickMetronome ClickMetronome BellKick Drum 2Kick Drum 1Side StickSnare Drum 2Hand ClapSnare Drum 1Room Low Floor Tom 2Close Hi-hatRoom Low Floor Tom 1Pedal Hi-hatRoom Low TomOpen Hi-hatRoom Low-mid TomRoom Hi-mid TomCrash Cymbal 1Room High TomRide Cymbal 1Chinese CymbalRide BellTambourineSplash CymbalCowbellCrash Cymbal 2Vibra SlapRide Cymbal 2Hi BongoLow BongoMute CongaHi CongaLow CongaHigh TimbaleLow TimbaleHigh AgogoLow AgogoCabasaMaracasShort WhistleLong WhistleShort GuiroLong GuiroClavesHi Wood BlockLow Wood BlockMute CuicaOpen CuicaMute TriangleOpen TriangleCabasaShakerBelltreeCastanetsMute SurdoOpen Surdo
Power (16)P-3: PowerHigh QSlapScratch PushScratch PullStickSquare ClickMetronome ClickMetronome BellKick Drum 2Power Kick DrumSide StickPower Snare Drum 2Hand ClapPower Snare Drum 1Low Floor Tom 2Close Hi-hatLow Floor Tom 1Pedal Hi-hatLow TomOpen Hi-hatLow-mid TomHi-mid TomCrash Cymbal 1High TomRide Cymbal 1Chinese CymbalRide BellTambourineSplash CymbalCowbellCrash Cymbal 2Vibra SlapRide Cymbal 2Hi BongoLow BongoMute CongaHi CongaLow CongaHigh TimbaleLow TimbaleHigh AgogoLow AgogoCabasaMaracasShort WhistleLong WhistleShort GuiroLong GuiroClavesHi Wood BlockLow Wood BlockMute CuicaOpen CuicaMute TriangleOpen TriangleCabasaShakerBelltreeCastanetsMute SurdoOpen Surdo
Electronic (24)P-4: ElectronicHigh QSlapScratch PushScratch PullStickSquare ClickMetronome ClickMetronome BellKick Drum 2Elec Kick DrumSide StickElec Snare Drum 2Hand ClapPower Snare Drum 1Elec Low Floor Tom 2Close Hi-hatElec Low Floor Tom 1Pedal Hi-hatElec Low TomOpen Hi-hatElec Low-mid TomElec Hi-mid TomCrash Cymbal 1Elec High TomRide Cymbal 1Reverse CymbalRide BellTambourineSplash CymbalCowbellCrash Cymbal 2Vibra SlapRide Cymbal 2Hi BongoLow BongoMute CongaHi CongaLow CongaHigh TimbaleLow TimbaleHigh AgogoLow AgogoCabasaMaracasShort WhistleLong WhistleShort GuiroLong GuiroClavesHi Wood BlockLow Wood BlockMute CuicaOpen CuicaMute TriangleOpen TriangleCabasaShakerBelltreeCastanetsMute SurdoOpen Surdo
TR-808 (25)P-5: TR-808High QSlapScratch PushScratch PullStickSquare ClickMetronome ClickMetronome BellKick Drum 2Synth Kick Drum 1Synth Side StickSynth Snare DrumHand ClapSnare Drum 1Synth Low Floor Tom 2Synth Close Hi-hatSynth Low Floor Tom 1Synth Pedal Hi-hatSynth Low TomSynth Open Hi-hatSynth Low-mid TomSynth Hi-mid TomSynth Crash Cymbal 1Synth High TomRide Cymbal 1Chinese CymbalRide BellTambourineSplash CymbalCowbellCrash Cymbal 2Vibra SlapRide Cymbal 2Hi BongoLow BongoMute CongaHi CongaLow CongaHigh TimbaleLow TimbaleHigh AgogoLow AgogoCabasaMaracasShort WhistleLong WhistleShort GuiroLong GuiroClavesHi Wood BlockLow Wood BlockMute CuicaOpen CuicaMute TriangleOpen TriangleCabasaShakerBelltreeCastanetsMute SurdoOpen Surdo

92
DRUM KIT LIST 2
Note: In the first title row the number in the bracket, after the kit name, is the MIDIprogram number. The Drum kits name and number that are shown on the LCD displayare listed in the second title row. The “No.” refers to MIDI note number, and “Key”refers to the key on the piano. A blank space in the table mean there is no sound there.Keys from A0 to D1 sound as timpani, except for in Kit 9, the effects kit. Keys from E6to C8 sound the same as the D#1 to B6 keys.
No.-Key
27-Eb128-E129-F130-F#131-G132-G#133-A134-Bb135-B136-C237-C#238-D239-Eb240-E241-F242-F#243-G244-G#245-A246-Bb247-B248-C349-C#350-D351-Eb352-E353-F354-F#355-G356-G#357-A358-Bb359-B360-C461-C#462-D463-Eb464-E465-F466-F#467-G468-G#469-A470-Bb471-B472-C573-C#574-D575-Eb576-E577-F578-F#579-G580-G#581-A582-Bb583-B584-C685-C#686-D687-Eb6
Jazz (32)P-6: JazzHigh QSlapScratch PushScratch PullStickSquare ClickMetronome ClickMetronome BellJazz Bass Drum70 Bass Drum 1Side StickSnare Drum 2Hand ClapSnare Drum 1Low Floor Tom 2Close Hi-hatLow Floor Tom 1Pedal Hi-hatLow TomOpen Hi-hatLow-mid TomHi-mid TomCrash Cymbal 1High TomRide Cymbal 1Chinese CymbalRide BellTambourineSplash CymbalCowbellCrash Cymbal 2Vibra SlapRide Cymbal 2Hi BongoLow BongoMute CongaHi CongaLow CongaHigh TimbaleLow TimbaleHigh AgogoLow AgogoCabasaMaracasShort WhistleLong WhistleShort GuiroLong GuiroClavesHi Wood BlockLow Wood BlockMute CuicaOpen CuicaMute TriangleOpen TriangleCabasaShakerBelltreeCastanetsMute SurdoOpen Surdo
Brush (40)P-7: BrushHigh QSlapScratch PushScratch PullStickSquare ClickMetronome ClickMetronome BellJazz Bass Drum70 Bass DrumSide StickBrush TapBrush SlapBrush SwirlLow Floor Tom 2Close Hi-hatLow Floor Tom 1Pedal Hi-hatLow TomOpen Hi-hatLow-mid TomHi-mid TomCrash Cymbal 1High TomRide Cymbal 1Chinese CymbalRide BellTambourineSplash CymbalCowbellCrash Cymbal 2Vibra SlapRide Cymbal 2Hi BongoLow BongoMute CongaHi CongaLow CongaHigh TimbaleLow TimbaleHigh AgogoLow AgogoCabasaMaracasShort WhistleLong WhistleShort GuiroLong GuiroClavesHi Wood BlockLow Wood BlockMute CuicaOpen CuicaMute TriangleOpen TriangleCabasaShakerBelltreeCastanetsMute SurdoOpen Surdo
Orchestra (48)P-8: OrchestraHigh QSlapScratch PushScratch PullStickSquare ClickMetronome ClickMetronome BellOrche Bass Drum 2Orche Bass Drum 1Side StickOrche Snare Drum 2Hand ClapOrche Snare Drum 1Timpani FTimpani F#Timpani GTimpani G#Timpani ATimpani A#Timpani BTimpani CTimpani C#Timpani DTimpani D#Timpani ETimpani FTambourineSplash CymbalCowbellOrche Crash CymbalVibra SlapOrche CymbalHi BongoLow BongoMute CongaHi CongaLow CongaHigh TimbaleLow TimbaleHigh AgogoLow AgogoCabasaMaracasShort WhistleLong WhistleShort GuiroLong GuiroClavesHi Wood BlockLow Wood BlockMute CuicaOpen CuicaMute TriangleOpen TriangleCabasaShakerBelltreeCastanetsMute SurdoOpen Surdo
Effects (56)P-10: SFX
High-QSlapScratch PushScratch PullStickSquare ClickMetronome ClickMetronome BellGtr. Cut Noise1 (down)Gtr. Cut Noise2 (up)Bass SlapBass PickKey ClickLaughingScreamingPunchHeart BeatFootstep 1Footstep 2ApplauseDoor CreakingDoor ClosingScratchWind ChimeCar Engine StartingCar CrashCar PassPolice SirenTrainJet PlaneHelicopterStarshipGun ShotLaser GunExplosionHorse GallopBirdsRainThunderWindSea ShoreStreamBubble
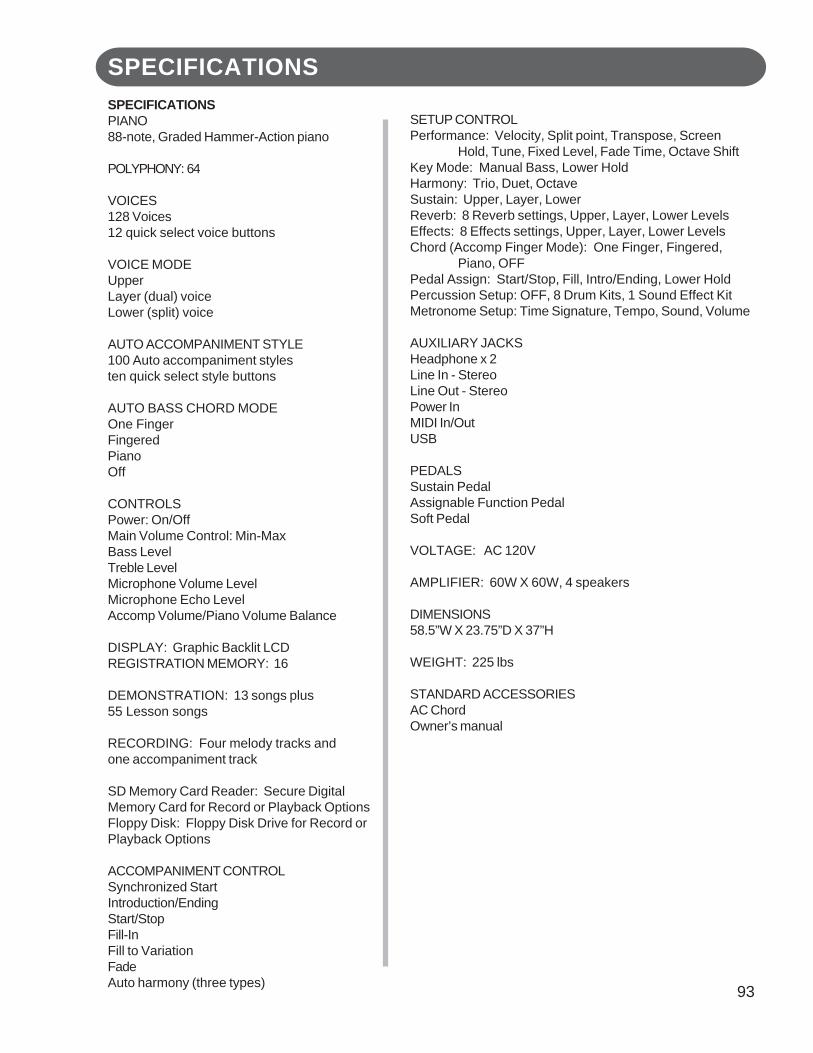
93
SPECIFICATIONSSPECIFICATIONSPIANO88-note, Graded Hammer-Action piano
POLYPHONY: 64
VOICES128 Voices12 quick select voice buttons
VOICE MODEUpperLayer (dual) voiceLower (split) voice
AUTO ACCOMPANIMENT STYLE100 Auto accompaniment stylesten quick select style buttons
AUTO BASS CHORD MODEOne FingerFingeredPianoOff
CONTROLSPower: On/OffMain Volume Control: Min-MaxBass LevelTreble LevelMicrophone Volume LevelMicrophone Echo LevelAccomp Volume/Piano Volume Balance
DISPLAY: Graphic Backlit LCDREGISTRATION MEMORY: 16
DEMONSTRATION: 13 songs plus55 Lesson songs
RECORDING: Four melody tracks andone accompaniment track
SD Memory Card Reader: Secure DigitalMemory Card for Record or Playback OptionsFloppy Disk: Floppy Disk Drive for Record orPlayback Options
ACCOMPANIMENT CONTROLSynchronized StartIntroduction/EndingStart/StopFill-InFill to VariationFadeAuto harmony (three types)
SETUP CONTROLPerformance: Velocity, Split point, Transpose, Screen
Hold, Tune, Fixed Level, Fade Time, Octave ShiftKey Mode: Manual Bass, Lower HoldHarmony: Trio, Duet, OctaveSustain: Upper, Layer, LowerReverb: 8 Reverb settings, Upper, Layer, Lower LevelsEffects: 8 Effects settings, Upper, Layer, Lower LevelsChord (Accomp Finger Mode): One Finger, Fingered,
Piano, OFFPedal Assign: Start/Stop, Fill, Intro/Ending, Lower HoldPercussion Setup: OFF, 8 Drum Kits, 1 Sound Effect KitMetronome Setup: Time Signature, Tempo, Sound, Volume
AUXILIARY JACKSHeadphone x 2Line In - StereoLine Out - StereoPower InMIDI In/OutUSB
PEDALSSustain PedalAssignable Function PedalSoft Pedal
VOLTAGE: AC 120V
AMPLIFIER: 60W X 60W, 4 speakers
DIMENSIONS58.5”W X 23.75”D X 37”H
WEIGHT: 225 lbs
STANDARD ACCESSORIESAC ChordOwner’s manual
94
QUESTIONS AND/OR PROBLEMS
Where is the serial number on my piano? The serial number of the piano should be directly underneath the piano on the right hand sidenear the floppy disk drive.
Where can I buy recorded disks to play in my piano?Visit www.suzukimusic.com/FP-S. You may purchase from other outlets but please remember to order only Standard MIDI File( SMF ) floppy disks.
Problem: Power is not coming on.1. Check to make sure that the Piano is plugged into the AC Outlet Properly.2. Have qualified technician check fuses under top lid.3. Call Suzuki customer service department (858-566-9710) for assistance.
Problem: Keyboard’s Control Panel Buttons don’t operate or operate strangely.1. Please see the next pages for how to do a Hard Reset on your Piano.2. Call Suzuki customer service department (858-566-9710) for assistance .
Problem: All pedals do not work.1. Check that the pedal rods are properly aligned beneath the piano.2. Call Suzuki customer service department (858-566-9710) for assistance.
Problem: ”Blue screen” no control panel lights.1. Please see the next problem for how to do a Hard Reset on your Piano.2. Have a qualified technician check fuses under top lid.3. Call Suzuki customer service department (858-566-9710) for assistance.
Problem: How do you perform a “hard reset” .Just like with your home computer, every now and then you may have to perform a Hard Reset onyour Piano to clear its memory of any software conflicts.With unit turned off depress and hold down the 2 tempo buttons. Turn power on while holding the2 buttons for 10 seconds..Piano will now be at its factory default settings. All user memory has also been reset and therefore erased.
Problem: Disk Drive is not working.1. Try one of the Suzuki Demonstration Floppy Disks.2. Call Suzuki customer service department for assistance.
Problem: Piano does power up, but no sound is heard.1. Make sure that the Balance Slider Knob is in the center position.2. Check the headphone connection to see if headphones are plugged in.3. Test the piano with Headphones for sound.4. Call Suzuki customer service department for assistance.
Problem: Disk drive seams too slow on play back.1. Try using a different floppy disk.2. Call Suzuki customer service department for assistance.
Problem: There are no lyrics being displayed on the screen.1. Try a known working floppy disk that has lyric files not just song files.2. Press Lyric LCD Screen Menu Button to display the lyrics.3. Call Suzuki customer service department for assistance.
QUESTIONS

95
NOTES
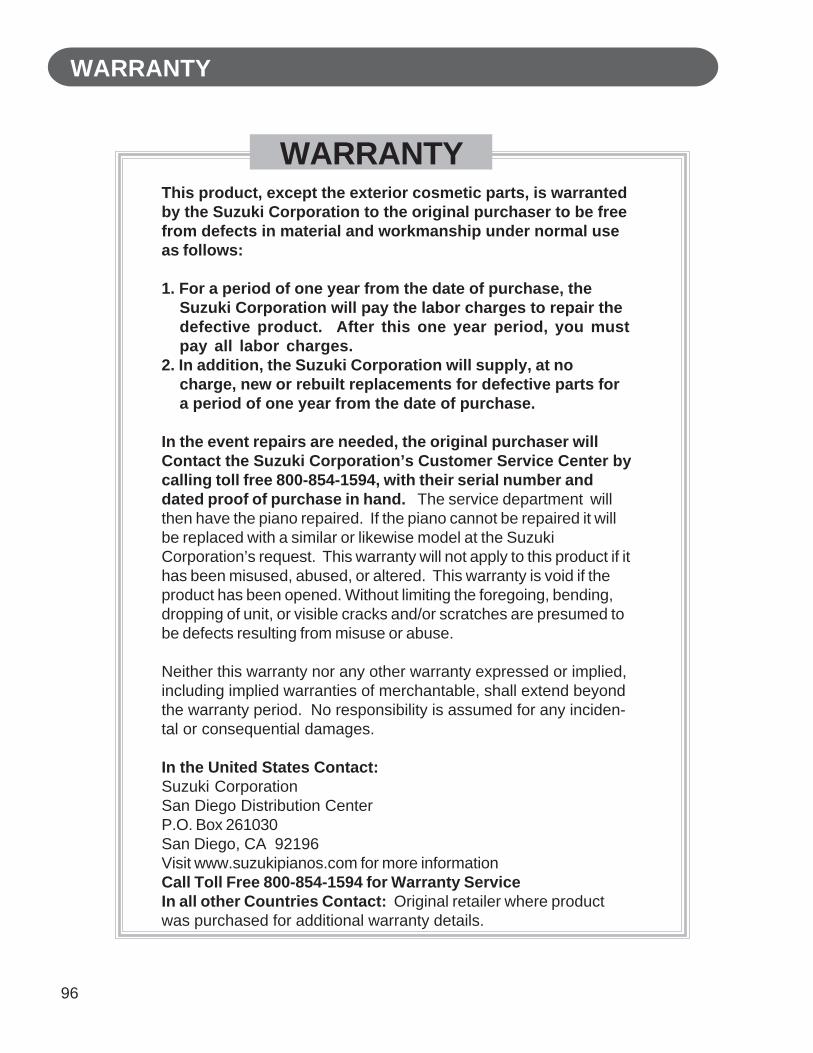
96
WARRANTY
This product, except the exterior cosmetic parts, is warrantedby the Suzuki Corporation to the original purchaser to be freefrom defects in material and workmanship under normal useas follows:
1. For a period of one year from the date of purchase, theSuzuki Corporation will pay the labor charges to repair thedefective product. After this one year period, you mustpay all labor charges.
2. In addition, the Suzuki Corporation will supply, at nocharge, new or rebuilt replacements for defective parts fora period of one year from the date of purchase.
In the event repairs are needed, the original purchaser willContact the Suzuki Corporation’s Customer Service Center bycalling toll free 800-854-1594, with their serial number anddated proof of purchase in hand. The service department willthen have the piano repaired. If the piano cannot be repaired it willbe replaced with a similar or likewise model at the SuzukiCorporation’s request. This warranty will not apply to this product if ithas been misused, abused, or altered. This warranty is void if theproduct has been opened. Without limiting the foregoing, bending,dropping of unit, or visible cracks and/or scratches are presumed tobe defects resulting from misuse or abuse.
Neither this warranty nor any other warranty expressed or implied,including implied warranties of merchantable, shall extend beyondthe warranty period. No responsibility is assumed for any inciden-tal or consequential damages.
In the United States Contact:Suzuki CorporationSan Diego Distribution CenterP.O. Box 261030San Diego, CA 92196Visit www.suzukipianos.com for more informationCall Toll Free 800-854-1594 for Warranty ServiceIn all other Countries Contact: Original retailer where productwas purchased for additional warranty details.
WARRANTY

97

98
SUZUKISpinet Digital Piano
SUZUKI
OWNER’S MANUAL
FP-S
P.O. BOX 261030SAN DIEGO, CALIFORNIA 92196
(858) 566-9710Visit us on the web at www.suzukipianos.com/FP-S
Copyright Suzuki Musical Instrument Corporation