design by river rose for ibw - nationalbeadingweek
TRANSCRIPT

Teeny Tiny Vessel Design By River Rose for IBW
We start with something small,
something doable, while
Our secret ambitions
Are something else!
Teeny Tiny Vessel by River Rose Page of 1 15
Teeny Tiny Vessel by River Ivy Rose
Well, let me begin by taking you back to the year 2001... I had been beading for about nine years, had become familiar with several different bead working stitches... brick stitch, looming, right angle weave, peyote stitch, branching, embroidering beads onto flat beadwork, sculptural peyote stitch a little... I had designed and made wearable pouches and pendants using brick and peyote... I had beaded on boxes and vases using peyote and right angle weave... I had already completed my head dress... when I took a class to learn herringbone stitch.
It was a one day class at the Bead and Button Show in Portland, OR. I think I was more interested in taking a class with NanC Meinhardt than learning a new technique There was no project for this class, we just learned the basic techniques. But as I was learning how to increase, I experienced an explosion of imagination, seeing all manner of possibilities. You see, in all my work with both brick stitch and peyote stitch, I always started at the widest point of a piece and then decreased to shape it because I didn’t like the look of increases. With herringbone stitch, I loved increasing as much as decreasing which I knew, even then, would allow so much freedom in shaping 3D pieces.
I embarked on a journey that was the equivalent of an all consuming love affair, as if beading hadn’t already been all consuming. My lariat and the original drawstring purse (not the one pictured here) are two of my earliest projects. Now you can see that my visions in that class were indeed immense! Ahhh... but in those months following the class, I was alone with the beads and my guides for long hours, and knowledge seemed to flow in just for the asking and the beads were sooo cooperative. Now, after more than 17 years of working with herringbone stitch, I still love its versatility and it is still the technique that I work with the most.
The real challenge of herringbone stitch came when I was asked to teach the draw string purse and lariat. Admittedly, this was not the place to start... but I was naive and I was excited to share what I had learned, both in the class and on my own through hours of beading. So, a group of students and I embarked on a four part class over a period of a year. Writing the instructions for those two pieces was the most difficult undertaking of my beading career. I had no idea that others might not readily “see” what I had seen when I first learned.
Very little had yet been written in the way of herringbone stitch instruction so there were no universally accepted terms or phrases to fall back on. I was on my own, with the help of willing students, to come up with terms and directives to teach others what had come to me intuitively, without words.
Teeny Tiny Vessel by River Rose Page of 2 15

During that year of on going workshop, I actually took apart the original purse in order to dissect all that information that had come to me intuitively. This is also how I was able to see how to work secondary ways of increasing and decreasing. Yet where were the words that were going to help students see what I saw in my head??? I wrote and rewrote instruction. And still, early instructions were full of inconsistencies. Over the years, I did develop the use of certain terms and phrases as the means of conveying my visions and knowledge to students. These are not new words or phrases, but my use of them is specific to my working with and teaching herringbone stitch. These terms will be defined as we move through this intro project but they are more clearly defined in the glossary for continual reference.
In the spring of 2014, I began designing small and tiny vessels expressly for introducing my work in a one day class at the BABE bead show in California with the hope that students would get far enough along with the piece to get introduced to all the techniques used while I was there to answer questions. The Small and Tiny Vessels were a hit...
In 2016, I met four lovely women at the Bead Society of Northern California Bead Together who came to study herringbone stitch and vessel making with me. They have gone through a lot of my herringbone stitch projects. It is so gratifying to work with students on going... I get to see them finish pieces and I am moved and inspired by their enthusiasm to take on the next project. This on going work has also pushed me to new levels with my instructions, because these students questioned and offered feedback and suggestions. As I made changes to the instructions, they let me know how it helped their work with each project. They have been a great help and inspiration to me to make my instructions more able to stand on their own. Now, from the beginning to the end of each project, the language is consistent.
From my perspective, there are two main reasons to bead... one is to partake in the dance of creative flow with beads for myself, and two is the students. In addition to the women I’ve met through the bead society, several students have returned who beaded with me years ago before I moved up to Washington. All the students that have worked more than one herringbone stitch project with me, and especially the ones that have worked several of my more elaborate projects, agree with me that there is a starting place and in the last few years, I have come to see it is with this Small Vessel. From this piece, students can move with confidence into and through the world of herringbone stitch and especially vessel making.
Of course most people are attracted to and want to work the big elaborate projects... but there is a progression to learning... especially with vessel making because it is more than just following the directions, even when they are good directions. Vessel making is a combination of beading and sculpting. You do have to mold and shape a vessel as you bead and the tension must be firm in order to get and hold the desired shape. Then you also need to learn how to relax your tension in order that your beadwork will drape when you are working projects that are not vessels.
Teeny Tiny Vessel by River Rose Page of 3 15

Starting Herringbone Stitch Basic Herringbone Stitch is worked by stitching two beads at a time into the previous row. But before there is a previous row, what do you do? In other words, how do you begin a technique that is worked into the previous row? I learned using a ladder as a foundation to begin each piece. The ladder is temporary and removable and becomes a tool in its own right, as it is reusable.
I use bugles and two different colors to make a ladder, using the second color every 10th or 8th or 6th (depending on the number of beads in your sets) bead as a marker. Two or three mm bugles are much easier to hold than single cylinder beads. 3mm are my preference. Defining sets by using marker beads makes counting pairs a lot easier, especially as you move into bigger pieces. And starting with the correct number of pairs is crucial for each piece. The length of a ladder needs to be at least twice the number of beads as pairs for any given piece.
~ pull a length of thread (use a 4 lb fire line for ladders in a different color thread than your vessel will use), at least 2 feet for a 30 bead ladder with 2mm bugles. You will want a longer thread for a longer ladder. It is always better to err on the side of too long a piece of thread than too short because you do not want to have to add thread when making a ladder as there is already enough thread in the beads.
~ pick up two beads of the main color and pull them down to about an inch from the end of the thread. Travel through these two beads a second time, pulling the thread all the way through, causing these two beads to line up side by side.
~ pick up a third bead; travel down the previous bead and back up the new bead.
~ pick up a fourth bead; travel up the previous bead and down the newest bead.
~ continue your ladder by repeating the above directions for the addition of the 3rd and 4th beads until you have the number of beads needed. The first 9 beads are the main color, then 1 bead of a second color... continue for another 2 sets. For this project you need a 30 bead ladder to accommodate 15 pairs.
Teeny Tiny Vessel by River Rose Page of 4 15

Discussion: As must always be stressed, the use of the terms left or right and up or down is relative to how YOU *hold your work* I am right handed so these directions are written only from my perspective. I work the ladder from left to right... but then I work herringbone stitch from right to left. Hopefully, the illustrations will allow you to make any necessary adjustments to see it from your own perspective.
When you have 30 beads stitched together, your working thread is coming up out of the last bead, and your tail thread is coming down out of the first bead.
~ Sew back through the ladder by traveling down through the 2nd bead from the end and then up through the 3rd bead, down the 4th, up the 5th, down the 6th.... back to the beginning of the ladder.
~ Tie the two thread ends together into a knot; clip the excess leaving about an inch of tails. This is now an independent tool. It is a removable foundation. It can be used again and again, until a thread breaks or a bead breaks, and that happens.
After you have completed five rows of herringbone stitch, you will remove the ladder because it constricts the herringbone mesh. Initially, I would cut up the ladder to remove it. But during one class, a student pulled her ladder off after clipping only one thread. It was a delightful discovery as making a ladder for each project can be tedious, especially when you move into the bigger pieces. The ladder becomes one of your tools to be used again and again.
Teeny Tiny Vessel by River Rose Page of 5 15

Glossary of Terms and Directives For Herringbone Stitch
As used in instructions by River Rose
Accent bead - in my use of herringbone stitch, this is referring to the bead used to begin an increase and to finish a decrease. An accent bead typically is a drop or an 11.
Art - the act or practice or process of communing with one’s inner self and ultimately the source of all creation. It is to be in the moment with full self expressing from within. Art is not necessarily an end result or a product.
Basic Herringbone Stitch - a technique of bead work that is worked in horizontal rows, stitching two beads at a time into the previous row. Tubular herringbone stitch - herringbone stitch that is brought into a circle, then worked around and around in the same direction with a step up at the end of each row. Flat herringbone stitch - herringbone stitch that is worked in horizontal rows back and forth from side to side.
Bead pairs - the two beads used together in each basic herringbone stitch. Almost always referred to as a pair or pairs... because of course we know we are talking beads! See the directive work a pair.
Color coding - capital letters are used to denote each color used in any project. In all my directions A is the main color; B is the second color used; C is third color used and so on. This is to honor each student’s choice of color as well as encourage students to make their own choices with color.
Column - the vertical stacks of bead pairs that tip toward each other. Once you have worked a second row, you have columns.
Creativity - entry into the mysterious. Technique, expertise, and knowledge are tools but the key is to abandon oneself to the energy that fuels the birth of all things. When we are creative, we are open to what wants to be expressed through us.
Decrease #1 - the process employed to end a column.
Decrease #2 - the process employed to turn 2 columns into one.
Experimentation - doing something without knowing how it will turn out. It is the key to originality, to personal signature in our creative work.
Ideas - fairy sprites sent by the creative force to find open and willing vessels. (Lol!) The more we experiment with creative ideas, the more often they will come. This is the process of developing a relationship with the creative forces. Oh yeah! I’ve been told that my writing is too woo woo.... But here’s the thing... creative work takes a deep and soulful commitment, and there’s nothing wrong with tempering it with humor.
Insert - used both as a noun and a verb. Inserting a bead or beads follows the directive to partially work a pair or single bead. It means that while your working thread is between columns, you will pick up a bead or beads and travel up the right bead of the next over pair. In the case of inserting behind an ended column as in a decrease, you travel up the right bead of the pair next to the ended column.
Increase #1 - the process employed to insert a new column between existing columns. Increase #2 - the process employed to turn one column into two.
Ladder - a row of beads, in my work #1 bugles, sewn together side by side. It is used as a temporary foundation to work herringbone stitch from. I focus a lot on the ladder because it becomes one of your more significant tools if you get enmeshed with herringbone stitch work.
Teeny Tiny Vessel by River Rose Page of 6 15
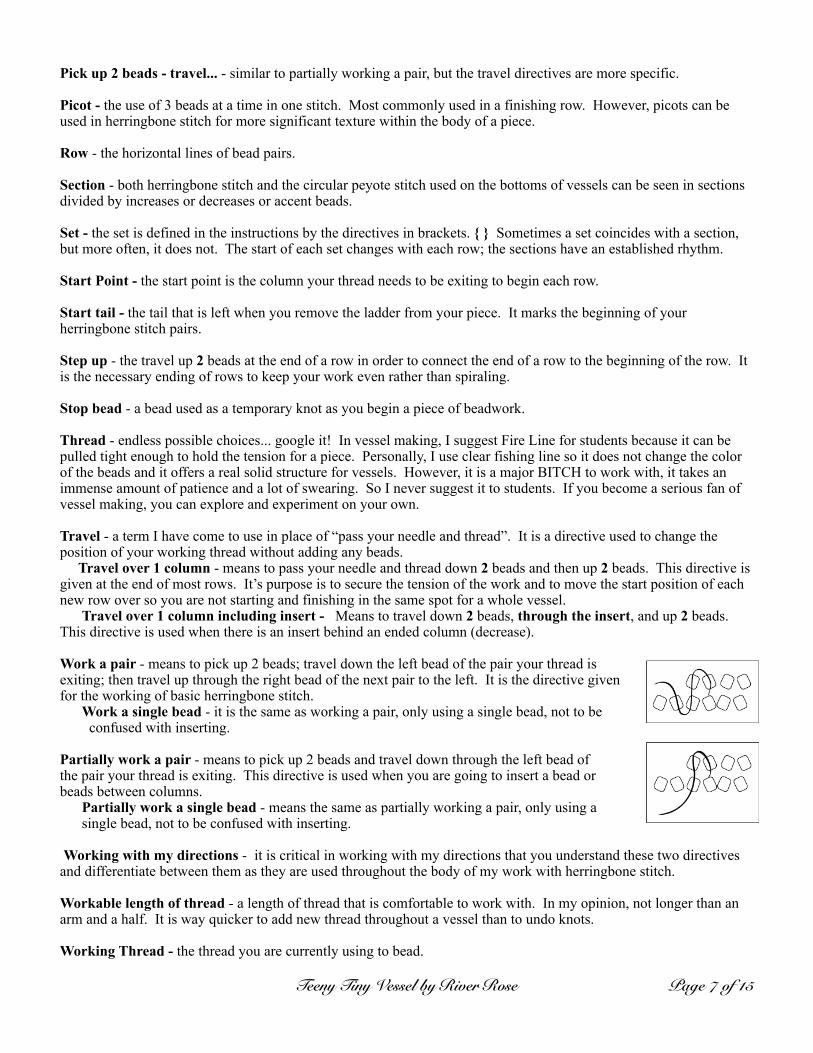
Pick up 2 beads - travel... - similar to partially working a pair, but the travel directives are more specific.
Picot - the use of 3 beads at a time in one stitch. Most commonly used in a finishing row. However, picots can be used in herringbone stitch for more significant texture within the body of a piece.
Row - the horizontal lines of bead pairs.
Section - both herringbone stitch and the circular peyote stitch used on the bottoms of vessels can be seen in sections divided by increases or decreases or accent beads.
Set - the set is defined in the instructions by the directives in brackets. { } Sometimes a set coincides with a section, but more often, it does not. The start of each set changes with each row; the sections have an established rhythm.
Start Point - the start point is the column your thread needs to be exiting to begin each row.
Start tail - the tail that is left when you remove the ladder from your piece. It marks the beginning of your herringbone stitch pairs.
Step up - the travel up 2 beads at the end of a row in order to connect the end of a row to the beginning of the row. It is the necessary ending of rows to keep your work even rather than spiraling.
Stop bead - a bead used as a temporary knot as you begin a piece of beadwork.
Thread - endless possible choices... google it! In vessel making, I suggest Fire Line for students because it can be pulled tight enough to hold the tension for a piece. Personally, I use clear fishing line so it does not change the color of the beads and it offers a real solid structure for vessels. However, it is a major BITCH to work with, it takes an immense amount of patience and a lot of swearing. So I never suggest it to students. If you become a serious fan of vessel making, you can explore and experiment on your own.
Travel - a term I have come to use in place of “pass your needle and thread”. It is a directive used to change the position of your working thread without adding any beads. Travel over 1 column - means to pass your needle and thread down 2 beads and then up 2 beads. This directive is given at the end of most rows. It’s purpose is to secure the tension of the work and to move the start position of each new row over so you are not starting and finishing in the same spot for a whole vessel. Travel over 1 column including insert - Means to travel down 2 beads, through the insert, and up 2 beads. This directive is used when there is an insert behind an ended column (decrease).
Work a pair - means to pick up 2 beads; travel down the left bead of the pair your thread is exiting; then travel up through the right bead of the next pair to the left. It is the directive given for the working of basic herringbone stitch. Work a single bead - it is the same as working a pair, only using a single bead, not to be confused with inserting.
Partially work a pair - means to pick up 2 beads and travel down through the left bead of the pair your thread is exiting. This directive is used when you are going to insert a bead or beads between columns. Partially work a single bead - means the same as partially working a pair, only using a single bead, not to be confused with inserting.
Working with my directions - it is critical in working with my directions that you understand these two directives and differentiate between them as they are used throughout the body of my work with herringbone stitch.
Workable length of thread - a length of thread that is comfortable to work with. In my opinion, not longer than an arm and a half. It is way quicker to add new thread throughout a vessel than to undo knots.
Working Thread - the thread you are currently using to bead.
Teeny Tiny Vessel by River Rose Page of 7 15

Teeny Tiny Vessel Welcome to this intro to vessel making offered especially for International Beading Week! This vessel was originally designed for a four hour class. This vessel is worked by starting at the bottom, working to the top and out the star like flare, then working the bottom.
Materials needed: for this teeny tiny vessel, you will need 5 grams of cylinder beads, 1.5 grams size 11 for the accent beads. Fire Line 6 lb. When possible, choose a different color thread for your vessel than you used for the ladder.
~ follow the illustrated instruction to make your ladder. For this project, you need a ladder of at least 24 beads to accommodate 12 bead pairs. A longer ladder may be used. ~
~ to begin, cut a workable length of thread; thread a needle; attach a stop bead in this way. Travel through a stray bead and pull it to about an inch from the end opposite the needle; travel through this bead again and pull thread all the way through. (travel is my term for pass your needle and thread). ~
~ travel through the end bead of the ladder opposite the finish tails, pull thread all the way through to the stop bead. ~
Row 1 ~ work 12 bead pairs onto your ladder in this way: ~ pick up 2 beads; travel down ladder bead to the left (2nd bead from the end); then travel up next ladder bead to left (3rd bead from end). Continue until you have 11 pairs. ~ now pick up 1 more pair and travel down the last ladder bead at the tails end, or the 24th bead if you are using a longer ladder. (A total of 12 pairs worked onto your ladder, the 12th pair being unfinished.)
I have colored the start pair in the first few illustrations for visual aid ONLY. Teeny Tiny Vessel by River Rose Page of 8 15

~ flip ladder and 1st row over so that stop bead end is in your left hand; holding stop bead aside, travel up through the 1st bead of the ladder and the 1st bead of the 1st pair; pull thread all the way through. This will pull the ladder and 1st row into a circle. The circle is secured only by 1 thread. Do not secure it further before moving on to the next direction!!! This single thread that brings your piece into a circle, is the thread you will later cut to release the ladder.
~ travel down the left bead of the 1st pair and the 2nd ladder bead and then up the 3rd ladder bead and the right bead of the 2nd bead pair. This is the last time you travel into the ladder. You have a total of 12 pairs. Please double check this.
Row 2 ~ Start point for row 2 is the 2nd pair over from the start of row 1. You can recognize the start from your ladder marker bead (the one with the stop bead attached) and because the beads of row 1 are not yet attached. ~ pick up 2 beads; travel down the left bead of the pair your thread is exiting; pull your needle through far enough to allow you to travel up the right bead of the pair to the left; now pull your thread all the way through and snug. ~
The tops of the bead pairs you are working will tip toward each other and touch. The bottoms of the right and left beads of the previous row should touch. This is how you will know if your tension is good. ~ Work another 10 pairs in the same way. ~ ~ as you work the 12th pair, and the end of row 2 meets the beginning of row 2, notice that you need to travel up 2 beads in order to keep your rows even. This is your step up, preparing you to begin row 3. In this illustration, you see the last pair worked and the step up.
~ after you step up, before you begin row 3, you will travel over one column. As explained in the glossary...
Travel over 1 column - means to pass your needle and thread down 2 beads and then up 2 beads. This directive is given at the end of most rows. It’s purpose is to secure the tension of the work and to move the start position of each new row over so you are not starting and finishing in the same spot for a whole vessel.
Teeny Tiny Vessel by River Rose Page of 9 15
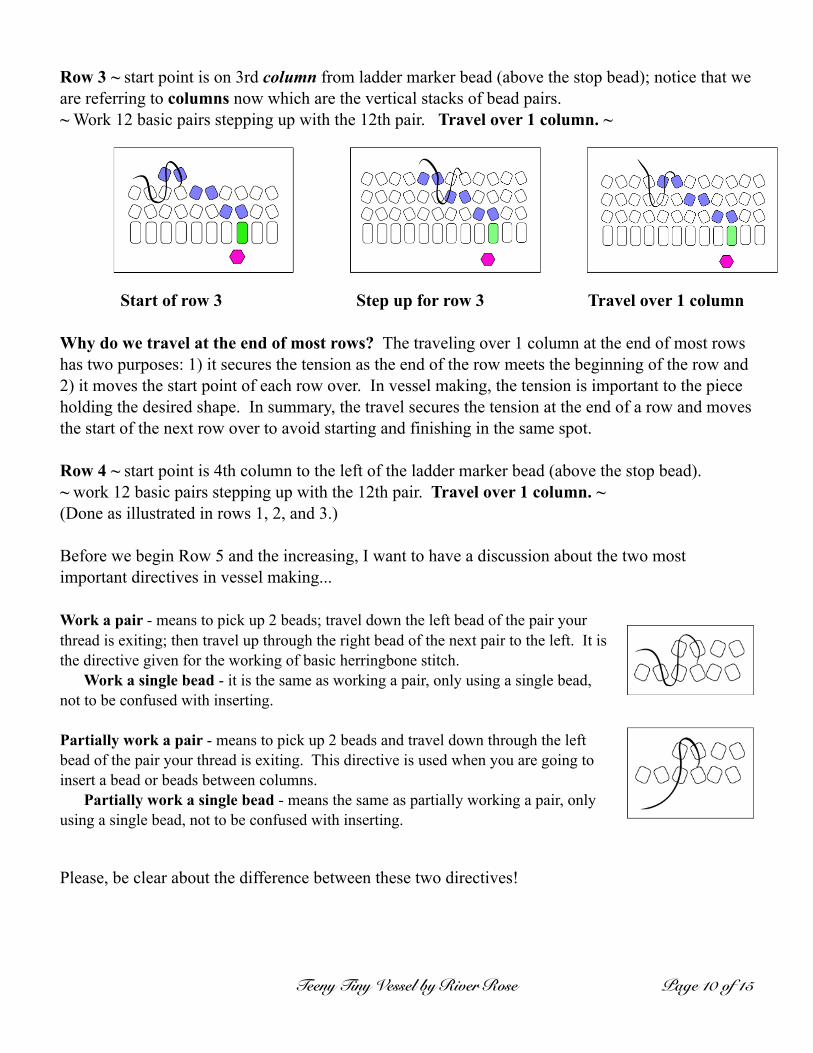
Row 3 ~ start point is on 3rd column from ladder marker bead (above the stop bead); notice that we are referring to columns now which are the vertical stacks of bead pairs. ~ Work 12 basic pairs stepping up with the 12th pair. Travel over 1 column. ~
Start of row 3 Step up for row 3 Travel over 1 column Why do we travel at the end of most rows? The traveling over 1 column at the end of most rows has two purposes: 1) it secures the tension as the end of the row meets the beginning of the row and 2) it moves the start point of each row over. In vessel making, the tension is important to the piece holding the desired shape. In summary, the travel secures the tension at the end of a row and moves the start of the next row over to avoid starting and finishing in the same spot.
Row 4 ~ start point is 4th column to the left of the ladder marker bead (above the stop bead). ~ work 12 basic pairs stepping up with the 12th pair. Travel over 1 column. ~ (Done as illustrated in rows 1, 2, and 3.)
Before we begin Row 5 and the increasing, I want to have a discussion about the two most important directives in vessel making...
Work a pair - means to pick up 2 beads; travel down the left bead of the pair your thread is exiting; then travel up through the right bead of the next pair to the left. It is the directive given for the working of basic herringbone stitch. Work a single bead - it is the same as working a pair, only using a single bead, not to be confused with inserting.
Partially work a pair - means to pick up 2 beads and travel down through the left bead of the pair your thread is exiting. This directive is used when you are going to insert a bead or beads between columns. Partially work a single bead - means the same as partially working a pair, only using a single bead, not to be confused with inserting.
Please, be clear about the difference between these two directives!
Teeny Tiny Vessel by River Rose Page of 10 15

Row 5 ~ start of the first set of increases. Each accent bead you insert between columns, is like planting a seed that will become a new column. Start point is 5th column to the left of the ladder marker bead with the stop bead attached. (First 2 illustrations are at the beginning of row 5.) {work 1 pair; partially work 1 pair; insert 1 accent bead.}
Repeat set 5 more times. It is helpful to count out the beads for 5 more sets so that as you finish, you will know you are at the end of the row. As you insert the last accent bead, travel up 2 beads for the step up. Each time you step up, you are stepping up to the pair you started the row with. Travel over 1 column. (Illustrations are of end of row 5.) Working last B bead and step up. Travel over 1 column.
Because herringbone stitch is worked into the previous row, notice that the accent bead insert falls down into row 4. Also the 2 cylinder bead insert of row 6 falls into row 5.
Row 5 is a pivotal point in your vessel so stop and check to see that there are 2 columns between each of 6 accent beads. If yes, then you can remove the ladder.
~ Between the stop bead tail and the ladder tails, there is one thread that you will cut at the bottom of the ladder. Refer to the 1st illustration of page 9. Be careful. Then pull the ladder and unthread with an awl until the ladder comes free. ~ The tail thread that is left is referred to as the start tail and is a marker when you come back to close the bottom. This entire vessel will only ever have 6 accent beads and/or sets in a single row. We increase the number of columns in the sets and then decrease the number of columns in the sets... but there are always 6 sets.
If you count out the six sets of beads for each row as you read the instruction for each row, you will be less likely to miss your step up, as when your bead sets are gone, you will be at the step up.
Teeny Tiny Vessel by River Rose Page of 11 15

Let’s take a moment to look at the punctuation used with the directives. The ~ (wave) is used at the beginning and end of the whole row’s directives. The { } (brackets) are used to highlight the set that will be repeated in each row. The ; (semi-colon) is used between directives within the set as new beads are picked up. The - (hyphen) is used when there are further travel directives without picking up beads. (See row 7 for first use.)
Row 6 ~ start point is on column just to the right of B bead insert. ~ {partially work 1 pair; insert 2 cylinder beads (above accent bead); work 1 pair.} (Illustration is beginning of row 6 first set.) Repeat set 5 more times.
Step up with last pair worked. Travel down 3 beads - through the B insert - up 3 beads. ~ (Illustration is of end of row 6.)
Row 7 ~ start point is on the column just left of 2 bead insert. ~ {work 1 pair; pick up 2 beads - travel down 2 beads and through the 1st bead of the 2 bead insert; pick up 2 beads - travel through the 2nd bead of 2 bead insert and up 2 beads (check tension, situate beads, they will be sticking out).} Repeat set 5 more times. Step up is with last pick up 2 beads - so the step up is up 3 beads. Beginning of row End of row
Row 8 ~ start point is on the column just right of new column. ~ work 18 pairs, stepping up with the 18th pair. Travel over 1 column. ~
Row 9 ~ start of second set of increases. Start point is on new column. {work 1 pair; partially work 1 pair; insert 1 B; work 1 pair.} Repeat set 5 more times. Step up with the last pair worked. (You are stepping up to a new column, which is a bit shorter, so be careful.) Travel over 1 column. ~
Teeny Tiny Vessel by River Rose Page of 12 15

Row 10 ~ start point is on the column just right of B insert. ~ {partially work 1 pair; insert 2 beads; work 2 pairs.} Repeat set 5 more times. Step up with last pair worked. No Travel. ~
Row 11 ~ start point is on the column just right of 2 bead insert. ~ {pick up 2 beads - travel down 2 beads and through the 1st bead of the 2 bead insert; pick up 2 beads - travel through the 2nd bead of the 2 bead insert and up 2 beads; work 2 pairs.} Repeat set 5 more times. Step up with last pair worked. No Travel. ~
Row 12 ~ start point is on the column just right of the new column. ~ work 24 pairs, stepping up with the 24th pair. Step up. Travel over 1 column. ~
Row 13 ~ start of first set of decreases. Start point is on the new column. ~ {work 2 pairs; work 1 B bead (on first new column); work 1 pair.} Repeat set 5 more times. Step up is up to the new column, which is shorter a bit, so be careful. Travel over 1 column. ~
Row 14 ~ start point is on the column just right of the ended column/decrease. ~ {partially work 1 pair; insert 1 bead behind the ended column; work 2 pairs.} Repeat set 5 more times. Step up with last pair worked. Travel over 1 column including the insert. ~ Beginning of row. End of row.
Row 15 ~ start point is on the column just left of decrease. ~ work 18 pairs, stepping up with the 18th pair. Travel over 1 column. ~
Row 16 ~ start point is on the 2nd column to the left (or right) of decrease. ~ work 18 pairs, stepping up with the 18th pair. Travel over 1 column. ~
Row 17 ~ start of second set of decreases. Start point is on the column just right of the decrease. ~ {work 2 pairs; work 1 B accent bead on 2nd new column.} Repeat set 5 more times. Step up with last B accent bead worked. Travel over 1 column. ~
Teeny Tiny Vessel by River Rose Page of 13 15
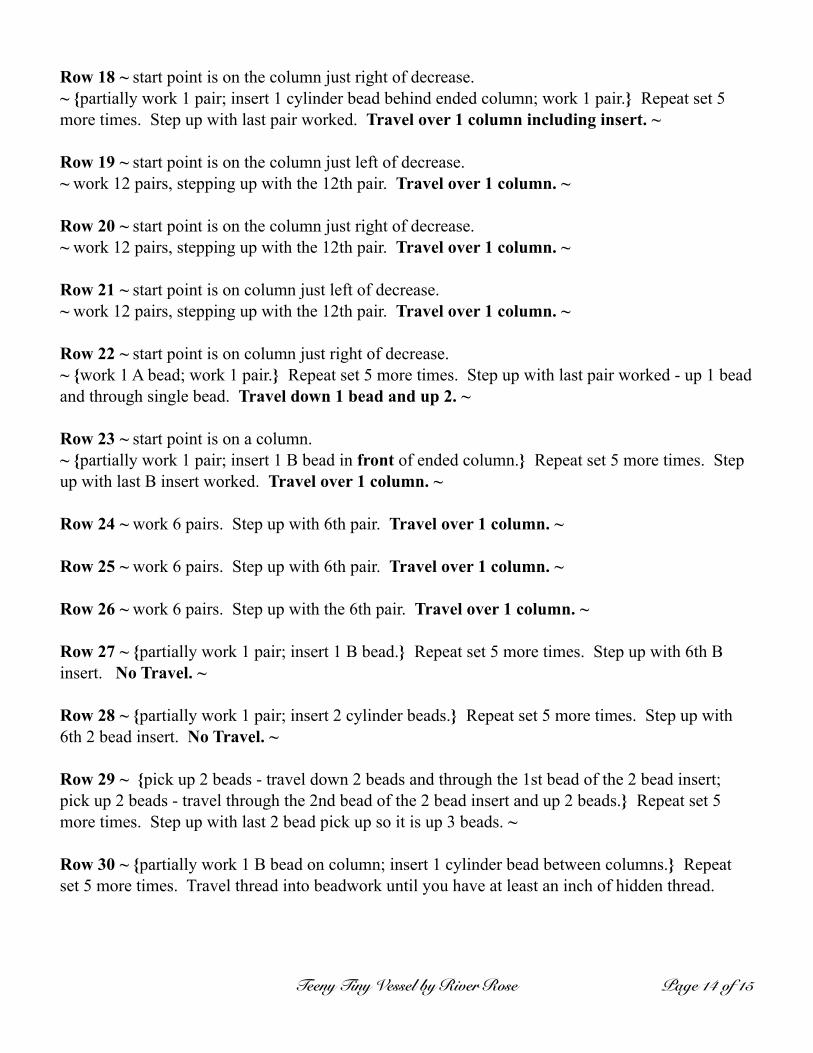
Row 18 ~ start point is on the column just right of decrease. ~ {partially work 1 pair; insert 1 cylinder bead behind ended column; work 1 pair.} Repeat set 5 more times. Step up with last pair worked. Travel over 1 column including insert. ~
Row 19 ~ start point is on the column just left of decrease. ~ work 12 pairs, stepping up with the 12th pair. Travel over 1 column. ~
Row 20 ~ start point is on the column just right of decrease. ~ work 12 pairs, stepping up with the 12th pair. Travel over 1 column. ~
Row 21 ~ start point is on column just left of decrease. ~ work 12 pairs, stepping up with the 12th pair. Travel over 1 column. ~
Row 22 ~ start point is on column just right of decrease. ~ {work 1 A bead; work 1 pair.} Repeat set 5 more times. Step up with last pair worked - up 1 bead and through single bead. Travel down 1 bead and up 2. ~
Row 23 ~ start point is on a column. ~ {partially work 1 pair; insert 1 B bead in front of ended column.} Repeat set 5 more times. Step up with last B insert worked. Travel over 1 column. ~
Row 24 ~ work 6 pairs. Step up with 6th pair. Travel over 1 column. ~
Row 25 ~ work 6 pairs. Step up with 6th pair. Travel over 1 column. ~
Row 26 ~ work 6 pairs. Step up with the 6th pair. Travel over 1 column. ~
Row 27 ~ {partially work 1 pair; insert 1 B bead.} Repeat set 5 more times. Step up with 6th B insert. No Travel. ~
Row 28 ~ {partially work 1 pair; insert 2 cylinder beads.} Repeat set 5 more times. Step up with 6th 2 bead insert. No Travel. ~
Row 29 ~ {pick up 2 beads - travel down 2 beads and through the 1st bead of the 2 bead insert; pick up 2 beads - travel through the 2nd bead of the 2 bead insert and up 2 beads.} Repeat set 5 more times. Step up with last 2 bead pick up so it is up 3 beads. ~
Row 30 ~ {partially work 1 B bead on column; insert 1 cylinder bead between columns.} Repeat set 5 more times. Travel thread into beadwork until you have at least an inch of hidden thread.
Teeny Tiny Vessel by River Rose Page of 14 15

Working the Bottom of the Vessel The first thing you want to do is be sure you are happy with the shape of your vessel. If there is any shaping that you want to do, now is the last time you will be able to reach inside the vessel. If your finger does not fit, perhaps the curved handle of pliers.
When you are happy with the shape of the vessel, bring a new working thread into the bottom edge about 3 columns before that start tail that is hanging off the edge. Travel up 4 beads, down 3 beads, up 3 beads, down 2, then up 2 and down 2 until you are a few columns past the start tail. Clip the start tail.
Row 1 ~ work 1 cylinder bead on each column, 12 total. ~
Row 2 ~ work 1 bead between each of these 12 beads. Step up through the first bead of this row. You are now working circular peyote stitch. ~
Row 3 ~ work 1 bead between each of these 12 beads. Step up through 1st bead of this row. ~
Row 4 ~ {work 1 bead; work 1 skip} (a skip is worked by traveling through the “down” bead of the space and the next over “up” bead.) Repeat set 5 more times. The last skip is also the step up, so you will travel up 3 beads. There are now 6 up beads. ~ Row 5 ~ work 1 B bead in each skip space. 6 beads worked. Step up through 1st B worked. ~
Row 6 ~ work 1 A bead; work 1 skip. Step up through 1st A of this row.
Row 7 ~ work 1 B bead in each skip space. Total of 3. Travel through the last 6 beads worked, then through the last 3 beads worked, pulling the bottom closed. Now travel your thread out into the bottom to tuck a tail and secure the thread. Clip excess.
When you work this pattern, if you have any questions or comments, please contact me at:
[email protected]. Thank you for any questions or comments!
Teeny Tiny Vessel by River Rose Page of 15 15