deploying f5 with microsoft remote desktop session host ... · pdf filedeploying f5 with...
TRANSCRIPT

F5 Deployment Guide
Deploying F5 with Microsoft Remote Desktop Session Host ServersWelcome to the F5 deployment guide for Microsoft® Remote Desktop Services included in Windows® Server 2012 and Windows Server 2008 R2. This document provides guidance on configuring the BIG-IP Local Traffic Manager (LTM) for directing traffic and maintaining persistence to Microsoft Remote Desktop Services Session Hosts. It also shows how to use the BIG-IP Advanced Firewall Manager (AFM) to provide a sophisticated layer of security for your Remote Desktop Session Host deployment.
Remote Desktop Services enables users to remotely access full Windows desktops, or individual Windows-based applications, on Remote Desktop Session Host computers. In an environment using BIG-IP LTM system, a farm of Remote Desktop Session Host servers has incoming connections distributed in a balanced manner across the members of the farm.
While this deployment guide and the associated iApp template are specific to Remote Desktop Session Host, F5 has created guidance on a wide variety of Remote Desktop Services. See https://f5.com/solutions/deployment-guides/tag/microsoft.
To provide feedback on this deployment guide or other F5 solution documents, contact us at [email protected].
Visit the Microsoft page of F5’s online developer community, DevCentral, for Microsoft forums, solutions, blogs and more: http://devcentral.f5.com/Microsoft/.
Products and versions
Product Version
BIG-IP LTM, AFM 11.4 - 13.1
Microsoft Windows Server Remote Desktop Services 2012 R2, 2012, 2008 R2
iApp version f5.microsoft_rds_session_host.v1.0.4
Deployment Guide version
Last updated
2.0 (see Document Revision History on page 29)
12-14-2017
Important: Make sure you are using the most recent version of this deployment guide, available at http://f5.com/pdf/deployment-guides/microsoft-rds-session-host-dg.pdf For previous versions of this and other guides, see the Deployment guide Archive tab on f5.com: https://f5.com/solutions/deployment-guides/archive-608

F5 Deployment Guide Microsoft Remote Desktop Session Host2
ContentsPrerequisites and configuration notes 3
Configuration example 3
Using this guide 4
Configuring the BIG-IP system for Remote Desktop Session Host 5
Downloading and importing the new iApp 5
Upgrading an Application Service from previous version of the iApp template 5
Starting the iApp 6
Next steps 14
Manual configuration table 15
Supporting RemoteFX for Remote Desktop Session Host (optional) 16
Troubleshooting 21
Appendix A: Adding Remote Desktop Web Access to BIG-IP LTM (optional) 22
Appendix B: Publishing Remote Desktop Resources using BIG-IP APM (optional) 25
Prerequisites and configuration notes 25
Configuring the BIG-IP APM 25
Creating the profiles 27
Configuring the virtual server 27
Appendix C: Configuring DNS and NTP settings on the BIG-IP system 28
Document Revision History 29

F5 Deployment Guide Microsoft Remote Desktop Session Host3
Prerequisites and configuration notes
BIG-IP system and general prerequisites
h The BIG-IP LTM system must be running version 11.4 or later. For more detailed information on the BIG-IP system, see http://www.f5.com/products/bigip/.
h The BIG-IP LTM offers the ability to mix IPv4 and IPv6 addressing; for instance, you might want to use IPv6 addressing on your internal networks even though connections from clients on the Internet use IPv4.
h Although our examples and diagrams show external users connecting to the BIG-IP system in a routed configuration, the steps described in this document are equally valid for a one-armed configuration, and both topologies may be used simultaneously.
h The third-party Web site information in this guide is provided to help you find the technical information you need. The URLs are subject to change without notice.
h This guide contains two optional sections: Appendix A: Adding Remote Desktop Web Access to BIG-IP LTM (optional) on page 22, and Appendix B: Publishing Remote Desktop Resources using BIG-IP APM (optional) on page 25.
Remote Desktop Services and Windows Server prerequisites
h You must be using Windows Server 2008 R2 or 2012 or 2012 R2 Remote Desktop Services. If you are using a previous version see the Deployment Guide index at: http://www.f5.com/solutions/resources/deployment-guides.html.
h For more information on Microsoft Windows Server, including Windows Remote Desktop Services, see one of the following links:
» Windows Server 2012: technet.microsoft.com/library/hh831447 » Windows Server 2008 R2: technet.microsoft.com/en-us/library/dd647502%28WS.10%29.aspx
h Install the Remote Desktop Session Host role on at least one server; for load balancing connections, you need at least two servers. See the Microsoft document Installing Remote Desktop Session Host Step-by-Step guide available at: http://technet.microsoft.com/en-us/library/dd883275(WS.10).aspx (for Windows Server 2008 R2).
h Install the Remote Desktop Connection Broker role on at least one server according to the Microsoft document: http://technet.microsoft.com/en-us/library/dd883258%28WS.10%29.aspx (for Windows Server 2008 R2). Make sure the servers are part of a RD Connection Broker farm.
h The following are requirements for the RD Connection Broker farm:
» RD Connection Broker role is installed
» Members should not participate in Connection Broker load balancing (Windows 2008 R2).
» Members should use token redirection.
» The farm may be configured in standard or high availability mode (Windows 2012 or 2012 R2 only).
Optional Modules This iApp allows you to use four modules on the BIG-IP system. To take advantage of these modules, they must be licensed and provisioned before starting the iApp template. For information on licensing modules, contact your sales representative.
• BIG-IP AFM BIG-IP Advanced Firewall Manager (AFM) is a high-performance, stateful, full-proxy network firewall designed to guard data centers against incoming threats that enter the network on the most widely deployed protocols—including HTTP/S, SMTP, DNS, and FTP. By aligning firewall policies with the applications they protect, BIG-IP AFM streamlines application deployment, security, and monitoring. For more information on BIG-IP AFM, see https://f5.com/products/modules/advanced-firewall-manager.
Configuration example The iApp template and this deployment guide describe how to configure the BIG-IP system for Remote Desktop Services, Session Host. In this scenario, we configure a BIG-IP LTM for use with Remote Desktop Access. Users connect through the BIG-IP LTM to an RD Session Host server farm using the Remote Desktop Protocol (RDP), with an RD Connection Broker server managing persistence. The BIG-IP LTM provides advanced load balancing to farm members, while honoring RD Connection Broker routing tokens.

F5 Deployment Guide Microsoft Remote Desktop Session Host4
Using this guideThis deployment guide is intended to help users deploy the BIG-IP system. This document contains guidance configuring the BIG-IP system using the iApp template, as well as manually configuring the BIG-IP system.
Using this guide to configure the iApp templateWe recommend using the iApp template to configure the BIG-IP system for your Microsoft RDS implementation. The majority of this guide describes the iApp template and the different options the template provides for configuring the system for Microsoft RDS Remote Access.
The iApp template configuration portion of this guide walks you through the entire iApp, giving detailed information not found in the iApp or inline help. The questions in the UI for the iApp template itself are all displayed in a table and at the same level. In this guide, we have grouped related questions and answers in a series of lists. Questions are part of an ordered list and are underlined and in italics or bold italics. Options or answers are part of a bulleted list, and in bold. Questions with dependencies on other questions are shown nested under the top level question, as shown in the following example:
1. Top-level question found in the iApp template• Select an object you already created from the list (such as a profile or pool; not present on all questions. Shown in bold italic)• Choice #1 (in a drop-down list)• Choice #2 (in the list)
a. Second level question dependent on selecting choice #2• Sub choice #1• Sub choice #2
a. Third level question dependent on sub choice #2• Sub-sub choice • Sub-sub #2
a. Fourth level question (and so on)
Advanced options/questions in the template are marked with the Advanced icon: Advanced . These questions only appear if you select the Advanced configuration mode.
Using this guide to manually configure the BIG-IP systemUsers already familiar with the BIG-IP system can use the manual configuration tables to configure the BIG-IP system for the Remote Desktop implementation. These configuration tables only show the configuration objects and any non-default settings recommended by F5, and do not contain procedures on specifically how to configure those options in the Configuration utility. See Manual configuration table on page 15.

F5 Deployment Guide Microsoft Remote Desktop Session Host5
Configuring the BIG-IP system for Remote Desktop Session HostUse the following guidance to download the iApp template and configure the BIG-IP system for Microsoft Remote Desktop Session Host. If you are configuring the BIG-IP system manually, see the Manual configuration table on page 15.
Downloading and importing the new iAppThe first task is to download and import the iApp template.
To download and import the iApp
1. Open a web browser and go to downloads.f5.com.
2. Click Find a Download.
3. In the BIG-IP F5 Product Family section, click iApp Templates.
4. On the Product Version and Container page, click iApp-Templates.
5. Accept the EULA, and then download the iapps zip file to a location accessible from your BIG-IP system.
6. Extract (unzip) the f5.microsoft_rds_session_host.v<latest version>.tmpl file. This fully supported version is in the root directory.
7. Log on to the BIG-IP system web-based Configuration utility.
8. On the Main tab, expand iApp, and then click Templates.
9. Click the Import button on the right side of the screen.
10. Click a check in the Overwrite Existing Templates box.
11. Click the Browse button, and then browse to the location you saved the iApp file.
12. Click the Upload button. The iApp is now available for use.
Upgrading an Application Service from previous version of the iApp templateIf you configured your BIG-IP system using a previous version of the f5.microsoft_rds_session_host iApp template, we strongly recommend you upgrade the iApp template to the most recent version.
When you upgrade to the current template version, the iApp retains all of your settings for use in the new template. In some new versions, you may notice additional questions, or existing questions asked in different ways, but your initial settings are always saved.
To upgrade an Application Service to the current version of the template
1. From the Main tab of the BIG-IP Configuration utility, expand iApp and then click Application Services.
2. Click the name of your existing f5.microsoft_rds_remote_access application service from the list.
3. On the Menu bar, click Reconfigure.
4. At the top of the page, in the Template row, click the Change button to the right of the list.
5. From the Template list, select f5.microsoft_rds_session_host.<latest version>.
6. Review the questions in the new template, making any necessary modifications. Use the iApp walkthrough section of this guide for information on specific questions.
7. Click Finished.

F5 Deployment Guide Microsoft Remote Desktop Session Host6
Starting the iAppTo begin the Remote Desktop Session Host iApp Template, use the following procedure.
1. Log on to the BIG-IP system.
2. On the Main tab, expand iApp, and then click Application Services.
3. Click Create. The Template Selection page opens.
4. In the Name box, type a name. In our example, we use rds-session_host_.
5. From the Template list, select f5.microsoft_rds_session_host.v<latest version>. The iApp template opens.
Advanced optionsIf you select Advanced from the Template Selection list at the top of the page, you see Device and Traffic Group options for the application. This feature, new to v11, is a part of the Device Management configuration. This functionality extends the existing High Availability infrastructure and allows for clustering, granular control of configuration synchronization and granular control of failover. To use the Device and Traffic Group features, you must have already configured Device and Traffic Groups before running the iApp. For more information on Device Management, see the product documentation.
1. Device GroupTo select a specific Device Group, clear the Device Group check box and then select the appropriate Device Group from the list.
2. Traffic GroupTo select a specific Traffic Group, clear the Traffic Group check box and then select the appropriate Traffic Group from the list.
Template OptionsThis section contains general questions about the way you configure the iApp template.
1. Do you want to see inline help?Choose whether you want to see informational and help messages inline throughout the template, or if you would rather hide this inline help. If you are unsure, we recommend having the iApp display the inline help. Important and critical notes are always shown, no matter which selection you make.
• Yes, show inline help textSelect this option to see all available inline help text.
• No, do not show inline help textIf you are familiar with this iApp template, or with the BIG-IP system in general, select this option to hide the inline help text.
2. Which configuration mode do you want to use?Select whether you want to use F5 recommended settings, or have more granular, advanced options presented.
• Basic - Use F5’s recommended settingsIn basic configuration mode, options like load balancing method and parent profiles are all set automatically. The F5 recommended settings come as a result of extensive testing with web applications, so if you are unsure, choose Basic.
• Advanced - Configure advanced optionsIn advanced configuration mode, you have more control over individual settings and objects, such as server-side optimizations and advanced options like Slow Ramp Time and Priority Group Activation. You can also choose to attach iRules you have previously created to the Application Service. The Advanced option provides more flexibility for experienced users.
As mentioned, advanced options in the template are marked with the Advanced icon: Advanced . If you are using Basic/F5 recommended settings, you can skip the questions with the Advanced icon.
3. Which version of Windows Server are you deploying?Select the version of Microsoft Windows Server you are using in this implementation. The BIG-IP system uses this information to create the appropriate health monitor strings to verify server health.
• Windows Server 2008 R2Select this option if you are using Windows Server 2008 R2. No further information is needed.

F5 Deployment Guide Microsoft Remote Desktop Session Host7
• Windows Server 2012Select this option if you are using Windows Server 2012.
a. Will clients be connecting via UDP?Select whether your clients will attempt to connect to the Windows Server 2012 or 2012 R2 servers using UDP. The BIG-IP system uses this information to create an additional virtual server for UDP traffic.
• Windows Server 2012 R2Select this option if you are using Windows Server 2012.
a. Will clients be connecting via UDP?Select whether your clients will attempt to connect to the Windows Server 2012 or 2012 R2 servers using UDP. The BIG-IP system uses this information to create an additional virtual server for UDP traffic.
NetworkThis section contains questions about your networking configuration.
1. What type of network connects clients to the BIG-IP system? Advanced
Choose the type of network that connects your clients to the BIG-IP system. If you choose WAN or LAN, the BIG-IP system uses this information to determine the appropriate TCP optimizations. If you choose WAN through another BIG-IP system, the system uses a secure an optimized tunnel (called an iSession tunnel) for traffic between BIG-IP systems on opposite sides of the WAN. Only choose this option if you have another BIG-IP system across the WAN that will be a part of this implementation.
• Local area network (LAN)Select this option if most clients are connecting to the BIG-IP system on a LAN. This field is used to determine the appropriate TCP profile which is optimized for LAN clients. In this case, the iApp creates a TCP profile using the tcp-lan-optimized parent with no additional modifications.
• Wide area network (WAN)Select this option if most clients are connecting to the BIG-IP system over a WAN. This field is used to determine the appropriate TCP profile which is optimized for WAN clients. In this case, the iApp creates a TCP profile using the tcp-wan-optimized parent with no additional modifications.
2. Which VLANs transport client traffic? Advanced
The BIG-IP system allows you to restrict client traffic to specific VLANs that are present on the system. This can provide an additional layer of security, as you can allow traffic only from the VLANs you choose. The VLAN objects must already be configured on this BIG-IP system before you can select them.
By default, all VLANs configured on the system are enabled and appear in the Selected list. Use the Move buttons (<<) and (>>) to adjust list membership. Only VLANs in the Selected list are allowed.
3. Where will the virtual servers be in relation to the Remote Desktop Session Host servers?Select whether your BIG-IP virtual servers are on the same subnet as your Remote Desktop Session Host servers, or on different subnets. This setting is used to determine the SNAT (secure NAT) and routing configuration.
• BIG-IP virtual server IP and Remote Desktop Session Host servers are on the same subnetIf the BIG-IP virtual servers and Remote Desktop Session Host servers are on the same subnet, SNAT is configured on the BIG-IP virtual server and you must specify the number of concurrent connections.
a. How many connections to you expect to each Remote Desktop Session Host server?Select whether you expect more or fewer than 64,000 concurrent connections to each server. This answer is used to determine what type of SNAT that system uses. A SNAT is an object that maps the source client IP address in a request to a translation address defined on the BIG-IP device. The system configures SNAT Auto Map (fewer than 64,000) or a SNAT pool (more than 64,000).
• Fewer than 64,000 concurrent connectionsSelect this option if you expect fewer than 64,000 concurrent connections per Remote Desktop Session Host server. With this option, the system applies SNAT Auto Map, doesn’t require any additional IP addresses, as an existing self IP address is used for translation. Continue with the next section.
• More than 64,000 concurrent connectionsSelect this option if you have a very large deployment and expect more than 64,000 connections at one time. The iApp creates a SNAT Pool, for which you need one IP address for each 64,000 connections you expect.

F5 Deployment Guide Microsoft Remote Desktop Session Host8
a. Create a new SNAT pool or use an existing one?If you have already created a SNAT pool on the BIG-IP system, you can select it from the list. Otherwise, the system creates a new SNAT pool with the addresses you specify.
• Create a new SNAT poolSelect this option (the default) to enable the system to create a new SNAT pool. You must specify the appropriate number of IP addresses in the next question.
a. What are the IP addresses you want to use for the SNAT pool?Specify one otherwise unused IP address for every 64,000 concurrent connections you expect, or fraction thereof. Click Add for additional rows. Do not use any self IP addresses on the BIG-IP system.
• Select a SNAT poolSelect the SNAT pool you created for this deployment from the list.
i Important If you choose more than 64,000 connections, but do not specify enough SNAT pool address(es), after the maximum connection limit of 64,000 concurrent connections per server is reached, new requests fail.
• BIG-IP virtual servers and Remote Desktop Session Host servers are on different subnetsIf the BIG-IP virtual servers and servers are on different subnets, the following question appears.
a. How have you configured routing on your Remote Desktop Session Host servers?If you chose different subnets, this question appears asking whether the Remote Desktop Session Host servers use this BIG-IP system’s self IP address as their default gateway. Select the appropriate answer.
• Servers have a route to clients through the BIG-IP systemChoose this option if the servers use the BIG-IP system as their default gateway. In this case, no configuration is needed to support your environment to ensure correct server response handling. Continue with the next section.
• Servers do not have a route to clients through the BIG-IP systemIf the Remote Desktop Session Host servers do not use the BIG-IP system as their default gateway, SNAT is configured on the BIG-IP virtual server and you must select the expected number of concurrent connections in the next question.
a. How many connections to you expect to each Remote Desktop Session Host server?Select whether you expect more or fewer than 64,000 concurrent connections to each server. This answer is used to determine what type of SNAT that system uses. A SNAT is an object that maps the source client IP address in a request to a translation address defined on the BIG-IP device. The system configures SNAT Auto Map (fewer than 64,000) or a SNAT pool (more than 64,000).
• Fewer than 64,000 concurrent connectionsSelect this option if you expect fewer than 64,000 concurrent connections per Remote Desktop Session Host server. With this option, the system applies SNAT Auto Map, doesn’t require any additional IP addresses, as an existing self IP address is used for translation. Continue with the SSL Encryption section.
• More than 64,000 concurrent connectionsSelect this option if you have a very large deployment and expect more than 64,000 connections at one time. The iApp creates a SNAT Pool, for which you need one IP address for each 64,000 connections you expect.
a. Create a new SNAT pool or use an existing one?If you have already created a SNAT pool on the BIG-IP system, you can select it from the list. Otherwise, the system creates a new SNAT pool with the addresses you specify.
• Create a new SNAT poolSelect this option (the default) to enable the system to create a new SNAT pool. You must specify the appropriate number of IP addresses in the next question.
a. Which IP addresses do you want to use for the SNAT pool?Specify one otherwise unused IP address for every 64,000 concurrent connections you expect, or fraction thereof. Click Add for additional rows. Do not use any self IP addresses on the BIG-IP system.
• Select a SNAT poolSelect the SNAT pool you created for this deployment from the list.
i Important If you choose more than 64,000 connections, but do not specify enough SNAT pool address(es), after the maximum connection limit of 64,000 concurrent connections per server is reached, new requests fail.
F5 Deployment Guide Microsoft Remote Desktop Session Host9
Advanced Firewall Manager (BIG-IP AFM)This section gathers information about BIG-IP Advanced Firewall Manager if you want to use it to protect this implementation. For more information on configuring BIG-IP AFM, see http://support.f5.com/kb/en-us/products/big-ip-afm.html, and then select your version. This section only appears if you have BIG-IP AFM licensed and provisioned on your system.
1. Do you want to use BIG-IP AFM to protect your application?Choose whether you want to use BIG-IP AFM, F5's network firewall, to secure this Remote Desktop Session Host deployment. If you choose to use BIG-IP AFM, you can restrict access to the Remote Desktop Session Host virtual server to a specific network or IP address. See the BIG-IP AFM documentation for specific details on configuring AFM.
• No, do not use AFM to secure your applicationSelect this option if you do not want to enable BIG-IP AFM at this time. You can always re-enter the template at a later date to enable BIG-IP AFM. Continue with the next section.
• Select an existing AFM policy from the listIf you already created a BIG-IP AFM policy for this implementation, select it from the list. Continue with c.
• Yes, use F5's recommended AFM configurationSelect this option if you want to enable BIG-IP AFM using F5's recommended configuration.
a. Do you want to restrict access to your application by network or IP address?Choose if you want to restrict access to the Remote Desktop Session Host implementation via the BIG-IP virtual server.
• No, do not restrict source addresses (allow all sources)By default, the iApp configures the Advanced Firewall module to accept traffic destined for the Remote Desktop Session Host virtual server from all sources. If you do not have a need to restrict access to the virtual server, leave this option selected and then continue with b.
• Restrict source addressesSelect this option if you want to restrict access to the Remote Desktop Session Host virtual server by IP address or network address.
a. What IP or network addresses should be allowed to access your application?Specify the IP address or network access that should be allowed access to the Remote Desktop Session Host virtual server. You can specify a single IP address, a list of IP addresses separated by spaces (not commas or other punctuation), a range of IP addresses separated by a dash (for example 192.0.2.10-192.0.2.100), or a single network address, such as 192.0.2.200/24.
b. How do you want to control access to your application from sources with a low reputation score?The BIG-IP AFM uses an IP intelligence database to categorize IP addresses coming into the system. Choose what you want the system to do for sources that are attempting to access the Remote Desktop Session Host virtual server with a low reputation score. For more information, see the BIG-IP AFM documentation.
Important: You must have an active IP Intelligence license for this feature to function. See https://f5.com/products/modules/ip-intelligence-services for information.
• Allow all sources regardless of reputationSelect this option to allow all sources, without taking into consideration the reputation score.
• Reject access from sources with a low reputationSelect this option to reject access to the Remote Desktop Session Host virtual server from any source with a low reputation score.
• Allow but log access from sources with a low reputationSelect this option to allow access to the Remote Desktop Session Host virtual server from sources with a low reputation score, but add an entry for it in the logs.
c. Would you like to stage a policy for testing purposes?Choose whether you want to stage a firewall policy for testing purposes. A staged policy allows you to evaluate the effect a policy has on traffic by analyzing the system logs, without actually modifying traffic based on the firewall rules. You must already have a policy on the system in order to select it.
• Do not apply a staging policySelect this option if you do not want to apply a logging profile at this time. You can always re-enter the template at a later date to add a logging profile. Continue with the next question.

F5 Deployment Guide Microsoft Remote Desktop Session Host10
• Select an existing policy from the listIf you have already created a firewall policy for this implementation, select it from the list. Only policies that already exist on the system appear in the list. To create a new policy, on the Main tab, click Security > Network Firewall > Policies. Specific instructions for creating a firewall policy is outside the scope of this iApp and deployment guide.
d. Which logging profile would you like to use?Choose whether you or not you want to use a logging profile for this AFM implementation. You can configure the BIG-IP system to log detailed information about BIG-IP system Network Firewall events and store those logs on the BIG-IP system or a remote logging server (supports syslog and Splunk). If you want to use a logging profile, we recommend creating one outside this template. The list only contains profiles with Network Firewall enabled.
• Do not apply a logging profileSelect this option if you do not want to apply a logging profile at this time. You can always re-enter the template at a later date to add a logging profile. Continue with the next question.
• Select an existing logging profile from the listIf you have already created a logging profile for this implementation, select it from the list. You must create a profile before it is available in the list. To create a logging profile, on the Main tab, click Security > Event Logs > Logging Profiles. Specific instructions for creating a logging profile is outside the scope of this iApp and deployment guide. See the online help or the About Local Logging with the Network Firewall chapter of the BIG-IP Network Firewall: Policies and Implementations guide for more information.
High AvailabilityThis section gathers information about your Remote Desktop Session Host deployment that is used in the BIG-IP virtual server.
1. What IP address do you want to use for the virtual server(s)?Type the IP address you want to use for the BIG-IP virtual server. This is the address clients use (or a DNS entry resolves to this address) to access the Remote Desktop Session Host deployment via the BIG-IP system. If you are using Windows Server 2012 or 2012 R2, and specified clients will use UDP, the system creates an additional virtual server using this address for UDP traffic.
2. What is the associated service port?Type the port number to use for the BIG-IP virtual server. For Remote Desktop Session Host deployments, this is typically 3389.
3. Do you want to create a new pool or use an existing one?A load balancing pool is a logical set of servers, grouped together to receive and process traffic. When clients attempt to access the application via the BIG-IP virtual server, the BIG-IP system distributes requests to any of the servers that are members of that pool.
• Select an existing poolIf you have already created a pool for your Remote Desktop Session Host servers, you can select it from the list. If you do select an existing pool, all of the rest of the questions in this section disappear.
• Create a new poolLeave this default option to create a new load balancing pool and configure specific options.
a. Which load balancing method do you want to use? Advanced
Specify the load balancing method you want to use for this Remote Desktop Session Host server pool. We recommend the default, Least Connections (member).
b. Should the BIG-IP system queue TCP requests?Select whether you want the BIG-IP system to queue TCP requests. TCP request queuing provides the ability to queue connection requests that exceed the capacity of connections for a pool, as determined by the connection limit. Consequently, instead of dropping connection requests that exceed the capacity of a pool, TCP request queuing enables those connection requests to reside within a queue according to defined conditions until capacity becomes available. For more information on TCP Request Queuing, see the Preventing TCP Connection Requests From Being Dropped chapter in the BIG-IP Local Traffic Manager: Implementations guide, available on support.f5.com.
i Important TCP Request Queuing is an advanced feature and should be used only if you understand how it will affect your deployment, including application behavior and BIG-IP performance. If you enable TCP Request Queuing, you must have a Connection Limit set on at least one of the nodes when configuring the Address/Port for the nodes.

F5 Deployment Guide Microsoft Remote Desktop Session Host11
• No, do not enable TCP request queuing (recommended)Select this option if you do not want the BIG-IP system to queue TCP requests.
• Yes, enable TCP request queuingSelect this option if you want to enable TCP request queuing on the BIG-IP system.
a. What is the maximum number of TCP requests for the queue?Type the maximum number of requests you want to queue. We do not recommend using 0, which means unlimited and is only constrained by available memory.
b. How many milliseconds should requests remain in the queue?Type a number of milliseconds for the TCP request timeout value.
c. Use a Slow Ramp time for newly added servers? Advanced
With Slow Ramp, the BIG-IP system gradually adds connections to a newly-enabled or newly-added Remote Desktop Session Host server over a time period you specify, rather than sending a full proportion of the traffic immediately. Slow Ramp is essential when using the Least Connections load balancing method (our recommended method for Remote Desktop Session Host servers), as the BIG-IP system would otherwise send all new connections to a new server immediately, potentially overwhelming that server.
Select whether you want to use a Slow Ramp time.
• Use Slow RampSelect this option for the system to implement Slow Ramp time for this pool.
a. How many seconds should Slow Ramp time last?Specify a duration in seconds, for Slow Ramp. The time period you select for Slow Ramp is highly dependent on the speed of your server hardware and the behavior of your web services. The default setting of 300 seconds (5 minutes) is very conservative in most cases.
• Do not use Slow RampSelect this option if you do not want to use Slow Ramp. If you select this option, we recommend you do not use the Least Connections load balancing method.
d. Do you want to give priority to specific groups of servers? Advanced
Select whether you want to use Priority Group Activation. Priority Group Activation allows you to segment your servers into priority groups. With Priority Group Activation, the BIG-IP system load balances traffic according to the priority number you assign to the pool members. A higher number indicates higher priority. Traffic is only sent to the servers with the highest priority, unless the number of available servers in that priority group falls below the value you specify as the minimum. The BIG-IP then sends traffic to the group of servers with the next highest priority, and so on.
• Do not use Priority Group Activation (recommended)Select this option if you do not want to enable Priority Group Activation.
• Use Priority Group ActivationSelect this option if you want to enable Priority Group Activation. You must add a priority to each server in the Priority box described in #c.
a. What is the minimum number of active members for each priority group?Specify the minimum number of servers that must be active to continue sending traffic to the priority group. If the number of active servers falls below this minimum, traffic will be sent to the group of servers with the next highest priority group number.
e. Which servers are a part of this pool?Specify the IP address(es) of your Remote Desktop Session Host servers. If you have existing nodes on this BIG-IP system, you can select them from the list, otherwise type the addresses. You can optionally add a Connection Limit. If you enabled Priority Group Activation, you must also specify a Priority for each device. Click Add to include additional servers.
Application HealthIn this section, you answer questions about how you want to implement application health monitoring on the BIG-IP system.
1. Create a new health monitor or use an existing one?Application health monitors are used to verify the content that is returned by a request. The system uses these monitors to ensure traffic is only sent to available Remote Desktop Session Host servers.

F5 Deployment Guide Microsoft Remote Desktop Session Host12
Unless you have requirements for configuring other options not in the following list of questions, we recommend allowing the iApp to create a new monitor. Creating a custom health monitor is not a part of this template; see Local Traffic >> Monitors. To select any new monitors you create, you need to restart or reconfigure this template.
• Select the monitor you created from the listIf you manually created the health monitor, select it from the list. Only monitors with a Type of tcp appear in the list. Continue with the next section.
• Create a new health monitorIf you want the iApp to create a new monitor, continue with the following.
a. How many seconds should pass between health checks?Specify how long the system should wait between each health check. This is used as the Interval setting for the monitor. We recommend the default of 30 seconds.
Client OptimizationIn this section, you answer a question on how you want to optimize client-side connections. This determines the type of TCP profile the iApp assigns to the virtual server. This entire section only appears if you selected the Advanced configuration mode.
1. How do you want to optimize client-side connections? Advanced
The client-side TCP profile optimizes the communication between the BIG-IP system and the server by controlling the behavior of the traffic which results in higher transfer rates, improved connection reliability and increased bandwidth efficiency.
Unless you have requirements for configuring specific TCP optimization settings, we recommend allowing the iApp to create a new profile. Creating a custom profile is not a part of this template; see Local Traffic >> Profiles : Protocol : TCP to create a TCP profile. To select any new profiles you create, you need to restart or reconfigure this template.
• New profile based on tcp-wan-optimized (recommended)Select this option to have the system create the recommended TCP profile optimized for WAN connections.
• Select the TCP profile you created from the listIf you created a custom TCP profile for the client-side connections, select it from the list.
Server OptimizationIn this section, you answer a question on how you want to optimize server-side connections. This determines the type of TCP profile the iApp assigns to the virtual server. This entire section only appears if you selected the Advanced configuration mode.
1. How do you want to optimize server-side connections? Advanced
The client-side TCP profile optimizes the communication between the BIG-IP system and the server by controlling the behavior of the traffic which results in higher transfer rates, improved connection reliability and increased bandwidth efficiency.
Unless you have requirements for configuring specific TCP optimization settings, we recommend allowing the iApp to create a new profile. Creating a custom profile is not a part of this template; see Local Traffic >> Profiles : Protocol : TCP to create a TCP profile. To select any new profiles you create, you need to restart or reconfigure this template.
• New profile based on tcp-lan-optimized (recommended)Select this option to have the system create the recommended TCP profile optimized for LAN connections.
• Select the TCP profile you created from the listIf you created a custom TCP profile for server-side connections, select it from the list.
iRulesIn this section, you can add custom iRules to the Remote Desktop Session Host deployment. This section is available only if you selected Advanced mode.
iRules are a scripting language that allows an administrator to instruct the system to intercept, inspect, transform, direct and track inbound or outbound application traffic. An iRule contains the set of instructions the system uses to process data flowing through it, either in the header or payload of a packet.
1. Do you want to add any custom iRules to the TCP virtual server? Advanced
Select if have preexisting iRules you want to add to your Remote Desktop Session Host implementation.

F5 Deployment Guide Microsoft Remote Desktop Session Host13
! Warning Improper use or misconfiguration of an iRule can result in unwanted application behavior and poor performance of your BIG-IP system. We recommended you verify the impact of an iRule prior to deployment in a production environment.
If you do not want to add any iRules to the configuration, continue with the following section.
If you have iRules you want to attach to the virtual server the iApp creates for your Remote Desktop Session Host servers, from the Options box, click the name of the applicable iRule(s) and then click the Add (<<) button to move them to the Selected box.
2. Do you want to add any custom iRules to the UDP virtual server? Advanced
Select if have preexisting iRules you want to add to your Remote Desktop Session Host implementation.
FinishedReview the answers to your questions. When you are satisfied, click the Finished button. The BIG-IP system creates the relevant objects for the Remote Desktop Session Host application.

F5 Deployment Guide Microsoft Remote Desktop Session Host14
Next stepsAfter completing the iApp Template, the BIG-IP Application Services page opens for the Microsoft Remote Desktop Session Host Application Service you just created. To see the list of all the configuration objects created to support the application, on the Menu bar, click Components. The complete list of all related objects opens. You can click individual objects to see the settings.
Once the objects have been created, you are ready to use the new deployment.
Modifying DNS settings to use the BIG-IP virtual server addressBefore sending traffic to the BIG-IP system, your DNS administrator may need to modify any DNS entries for the RDS implementation to point to the BIG-IP system’s virtual server address.
Modifying the iApp configurationThe iApp Application Service you just created can be quickly and easily modified if you find it necessary to make changes to the configuration. The Strict Updates feature of the iApp prevents users from manually modifying the iApp configuration (Strict Updates can be turned off, but use extreme caution). iApp allows you to re-enter the template, make changes, and then update the template. The modifications are automatically made to any of the associated objects.
To modify the configuration
1. On the Main tab, expand iApp and then click Application Services.
2. Click the name of your Remote Desktop Application Service from the list.
3. On the Menu bar, click Reconfigure.
4. Make the necessary modifications to the template.
5. Click the Finished button.
Viewing statisticsYou can easily view a number of different statistics on the BIG-IP system related to the configuration objects created by the iApp template.
Object-level statisticsIf you want to view object-level statistics, use the following procedure.
To view object-level statics
1. On the Main tab, expand Overview, and then click Statistics.
2. From the Statistics Type menu, you can select Virtual Servers to see statistics related to the virtual servers.
3. You can also choose Pools or Nodes to get a closer look at the traffic.
4. To see Networking statistics in a graphical format, click Dashboard.
For more information on viewing statistics on the BIG-IP system, see the online help or product documentation.

F5 Deployment Guide Microsoft Remote Desktop Session Host15
Manual configuration tableThis table contains a list of BIG-IP LTM configuration objects along with any non-default settings you should configure as a part of this deployment scenario. Unless otherwise specified, settings not mentioned in the table can be configured as applicable for your configuration. For specific instructions on configuring individual objects, see the online help or product manuals.
Health Monitors (Main tab > Local Traffic > Monitors)
Name Type a unique name
Type TCP
Interval 30 (recommended)
Timeout 91 (recommended)
Send String2 (use the string for your version of Windows Server
Window Server 2012 R2
\x03\x00\x00\x13\x0E\xE0\x00\x00\x00\x00\x00\x01\x00\x08\x00\x0b\x00\x00\x00
Window Server 2012, 2008 R2
\x03\x00\x00\x13\x0E\xE0\x00\x00\x00\x00\x00\x01\x00\x08\x00\x03\x00\x00\x00
Receive String2 (use the string for your version of Windows Server)
Window Server 2012 R2
\x03\x00\x00\x13\x0E\xD0\x00\x00\x12\x34\x00\x02\x0f\x08\x00\x08\x00\x00\x00
Window Server 2012
\x03\x00\x00\x13\x0E\xD0\x00\x00\x12\x34\x00\x02\x07\x08\x00\x02\x00\x00\x00
Window Server 2008 R2
\x03\x00\x00\x13\x0E\xD0\x00\x00\x12\x34\x00\x02\x09\x08\x00\x02\x00\x00\x00
Pools (Main tab > Local Traffic > Pools)
Name Type a unique name
Health Monitor Select the monitor you created above
Slow Ramp Time2 300
Load Balancing Method Choose a load balancing method. We recommend Least Connections (Member)
Address Type the IP Address of the RD Session Host nodes. This can be an IPv4 or IPv6 address.
Service Port 3389 Click Add, and repeat Address and Port for all nodes
Profiles (Main tab > Local Traffic > Profiles)
TCP (Profiles-->Protocol)
Name Type a unique name
Parent Profile Use tcp-wan-optimized or tcp-lan-optimized depending on where your clients are located.
Nagle's Algorithm If you selected tcp-wan-optimized: Clear the Nagle's Algorithm box to disable Nagle's Algorithm.
Idle Timeout 1200
Keep Alive Interval 75
Persistence (Profiles-->Persistence)
Name Type a unique name
Persistence Type Microsoft® Remote Desktop
Has Session Directory If you are using Remote Desktop Connection Broker, check the Has Session Directory box.
Virtual Servers (Main tab > Local Traffic > Virtual Servers)
Name Type a unique name.
Address Type the IP Address for the virtual server
Service Port 3389
Protocol Profile (client)1 Select the TCP profile you created above
Protocol Profile (server)1 Select the TCP profile you created above
Secure Address Translation3 Auto Map (optional; see footnote 3)
Default Pool Select the pool you created above
Default Persistence Profile Select the Persistence profile you created
1 If you are using BIG-IP version 11.5.x, see Troubleshooting on page 212 You must select Advanced from the Configuration list for these options to appear3 If want to use SNAT, and you have a large deployment expecting more than 64,000 simultaneous connections, you must configure a SNAT Pool with an IP address for
each 64,000 simultaneous connections you expect. See the BIG-IP documentation on configuring SNAT Pools

F5 Deployment Guide Microsoft Remote Desktop Session Host16
Supporting RemoteFX for Remote Desktop Session Host (optional)If you are using Microsoft RemoteFX for Remote Desktop Services, use the following table to configure additional BIG-IP LTM objects for the Remote Desktop Session Host servers.
Health Monitors (Main tab > Local Traffic > Monitors)
UDP Monitor
Name Type a unique name
Type UDP
Interval 30 (recommended)
Timeout 91 (recommended)
Gateway ICMP Monitor
Name Type a unique name
Type Gateway ICMP
Interval 30 (recommended)
Timeout 91 (recommended)
Pools (Main tab > Local Traffic > Pools)
Name Type a unique name
Health Monitor Select both monitors you created above (ensure Availability Requirement is set to All (the default)
Slow Ramp Time1 300
Load Balancing Method Choose a load balancing method. We recommend Least Connections (Member)
Address Type the IP Address of a Remote Desktop Session Host
Service Port 3389 Click Add, and repeat Address and Port for all Remote Desktop Session Host devices
Profiles (Main tab > Local Traffic > Profiles)
Persistence (Profiles-->Persistence)
Name Type a unique name
Persistence Type Source Address Affinity
Match Across Services Enabled
Virtual Servers (Main tab > Local Traffic > Virtual Servers)
Name Type a unique name.
Address Type the same IP Address you used for the Session Host virtual server in the table on the previous page.
Service Port 3389
SNAT Pool 2 Auto Map (optional; see footnote 2)
Default Pool Select the Remote Desktop Session Host pool you created above
Default Persistence Profile Select the Persistence profile you created.
1 You must select Advanced from the Configuration list for these options to appear2 If want to use SNAT, and you have a large deployment expecting more than 64,000 simultaneous connections, you must configure a SNAT Pool with an IP address for
each 64,000 simultaneous connections you expect. See the BIG-IP documentation on configuring SNAT Pools.
Modifying the Session Host virtual server to use the Persistence profile you createdThe final task is to modify the Session Host virtual server you configured (using the guidance on the previous page) to use the persistence profile you just created for RemoteFX as a fallback method.
To modify the virtual server
1. Expand Local Traffic and then click Virtual Servers.
2. Click the name of the TCP Session Host virtual server you created using the guidance from the table on page 5.
3. On the Menu bar, click Resources.
4. From the Fallback Persistence Profile list, select the name of the Source Address Affinity persistence profile you just created.
5. Click Update.

F5 Deployment Guide Microsoft Remote Desktop Session Host17
Manually configuring the BIG-IP Advanced Firewall Module to secure your Session Host deploymentThis section describes how to manually configure BIG-IP AFM, F5's Network Firewall module, to secure your Remote Desktop Session Host deployment. BIG-IP AFM is particularly useful if you want to only allow access from specific clients or networks. Because this configuration can be complex, we recommend using the iApp template in version 11.6 and later to configure BIG-IP AFM.
Network Firewall settingsWhen configuring the BIG-IP Advanced Firewall Manager, you may want to configure your BIG-IP system to drop all traffic that you have not specifically allowed with firewall rules. This in known as firewall mode. By default, your BIG-IP system is set to default-accept, or ADC mode. Instructions for configuring your BIG-IP system, and the implications to consider, can be found on AskF5. For example, for BIG-IP v11.5: http://support.f5.com/kb/en-us/products/big-ip-afm/manuals/product/network-firewall-policies-implementations-11-5-0/1.html
If you have licensed IP Intelligence on the BIG-IP system, you can prohibit connections from sources with low reputation scores.
The following instructions cover a basic firewall configuration that is effective for the most common scenario of wanting to allow connections from a single trusted network. If you have complex requirements, such as the need to schedule different policies for different times of the day, or you want to create complicated rule or address lists, consult the BIG-IP AFM documentation. The basic steps for Policy and Rule creation apply to all scenarios.
To configure the BIG-IP AFM to allow connections from a single trusted network
1. Create a Network Firewall Policy:
a. From the Configuration utility, click Security > Network Firewall > Policies, and then click Create.
b. In the Name field, type a unique name for the policy, such as Session Host-Policy.
c. Click Finished.
2. Create a rule to allow authorized hosts or networks to connect:
a. Click Security > Network Firewall > Policies.
b. Click the name of the policy you just created.
c. In the Rule section (below the General Properties section), click the Add button.
d. Leave the Type list set to Rule.
e. From the Order list, select First. The Order list only appears in version 11.5 and later. In 11.4.x, you must reorder the rules from the Policy General Properties page.
f. In the Name field, type a unique name, for instance Session Host-traffic-Allowed.
g. Ensure the State list is set to Enabled.
h. From the Protocol list, select TCP. Leave the box to the right of TCP set to 6.
i. In the Source section, from the Address/Region list, select Specify. You are now able to list the trusted source addresses for your connection. In the following example, we will configure a single subnet as trusted.
• Select Address.
• In the box, type the network address you want to allow, including netmask if more than a single host. Specify a network using CIDR notation, such as 10.0.0.0/24.
• Do not configure a source port.
• Optional: If you want to limit inbound connections to a specific VLAN or Tunnel, from the VLAN / Tunnel list, select Specify, and then move the VLANs or tunnels that are allowed access to the Selected box.
• Click Add.
• Repeat these steps for additional hosts or networks. Use Address List or Address Range when appropriate.
j. In the Destination section, leave the Address/Region and Port set to Any. Because you will be applying your policy to a virtual server that listens only on a single desired address and port, do not specify that information here.
k. If necessary, from the Action list, select Accept.

F5 Deployment Guide Microsoft Remote Desktop Session Host18
l. Optional: If you have configured a logging profile and want to log connections, from the Logging list, select Enabled. Typically, allowed connections do not need to be logged.
m. Click Finished.
3. Creating a firewall rule to block all other traffic The next task is to create a firewall rule to block all other traffic that you have not allowed. Although this is not a required step if your BIG-IP system is set to default deny (Firewall mode), it is required in default-accept (ADC mode), and is a good practice to always configure such a rule.
a. Click Security > Network Firewall > Policies.
b. Click the name of the policy you created in step 1.
c. In the Rule section (below the General Properties section), click the Add button.
d. Leave the Type list set to Rule.
e. Leave the Order list, select Last.
f. In the Name field, type a unique name, for example Session Host-traffic-Prohibited.
g. Ensure the State list is set to Enabled.
h. From the Protocol list, select TCP. Leave the box to the right of TCP set to 6.
i. In the Source section, leave all the lists set to Any
j. From the Action list, select either Drop (to silently discard incoming connections) or Reject (to send a Destination Unreachable message to the sender).
k. If you configured a logging profile as described in Optional: Configuring the BIG-IP system to log network firewall events on page 19, from the Logging list, select Enabled.
l. Click Finished. You return to the Policy Properties page.
m. On the Policy Properties page, in the Rules section, ensure the rule with the Action of Accept comes before the Drop or Reject rule you just created. If it does not, use the Reorder button and drag the rules into the correct order.
4. Apply Your Firewall Policy to your Virtual Server
a. Click Security > Network Firewall > Active Rules.
b. In the Rule section (below the General Properties section), click the Add button.
c. From the Context list, select Virtual Server, and then select the virtual server you created for your Remote Desktop Session Host traffic.
d. From the Type list, select Policy, and then select the firewall policy you created.
e. From the Policy Type list, select Enforced.
f. Click Finished.
Optional: Assigning an IP Intelligence Policy to your Remote Desktop Session Host virtual serverIf you want to restrict access to your Session Host virtual server based on the reputation of the remote sender, you can enable and assign an IP Intelligence policy. This requires an IP intelligence license; contact your F5 Sales representative for more information.
It is outside the scope of this document to provide instructions on configuring an IP Intelligence Policy. Full documentation on enabling and configuring the IP Intelligence feature can be found on AskF5. For example, the manual for BIG-IP AFM v11.5 is: https://support.f5.com/kb/en-us/products/big-ip-afm/manuals/product/network-firewall-policies-implementations-11-5-0/5.html
After enabling and configuring an IP Intelligence policy, use the following steps to assign the policy to the Session Host virtual server:
To assign the IP intelligence policy to the Session Host virtual server
1. On the Main tab, click Local Traffic > Virtual Servers. The Virtual Server List screen opens.
2. Click the name of your Session Host virtual server.

F5 Deployment Guide Microsoft Remote Desktop Session Host19
3. From the Security menu, choose Policies.
4. Next to IP Intelligence, select Enabled, then select the IP intelligence policy to apply to traffic on the virtual server.
5. Click Update. The list screen and the updated item are displayed. The IP Intelligence policy is applied to traffic on the virtual server.
Optional: Configuring the BIG-IP system to log network firewall eventsIf you are using BIG-IP AFM, you have the option of logging network firewall events to one or more remote syslog servers (recommended) or to log events locally. You can either use an iApp template to create the logging profile, or create the logging profile manually.
For specific information on logging on the BIG-IP system, see the appropriate guide for your version. For example, for 11.5.0:
• Remote High-Speed Logging: https://support.f5.com/kb/en-us/products/big-ip_ltm/manuals/product/tmos-implementations-11-5-0/22.html
• Local logging: https://support.f5.com/kb/en-us/products/big-ip_ltm/manuals/product/tmos-concepts-11-5-0/11.html
Creating the logging profile using the iApp templateUse this section to create the logging profile using the logging profile iApp template. If you have not already downloaded the iApp template, see https://devcentral.f5.com/wiki/iApp.F5-Remote-Logging-iApp.ashx.
To configure the logging profile iApp
1. Log on to the BIG-IP system.
2. On the Main tab, click iApp > Application Services.
3. Click Create. The Template Selection page opens.
4. In the Name box, type a name. In our example, we use logging-iapp_.
5. From the Template list, select f5.remote_logging.v<latest-version>. The template opens
6. Use the following table for guidance on configuring the iApp template. Questions not mentioned in the table can be configured as applicable for your implementation.
Question Your selection
Do you want to create a new pool of remote logging servers, or use an existing one?
Unless you have already created a pool on the BIG-IP system for your remote logging servers, select Create a new pool.
Which servers should be included in this pool? Specify the IP addresses of your logging servers. Click Add to include more servers.
What port do the pool members use? Specify the port used by your logging servers, typically 514.
Do the pool members expect UDP or TCP connections? TCP
Do you want to create a new monitor for this pool, or use an existing one?
Unless you have already created a health monitor for your pool of logging servers, select Use a simple ICMP (ping) monitor.
Do your log pool members require a specific log format? If your logging servers require a specific format, select the appropriate format from the list.
7. Click Finished.
8. On the Main tab, click Local Traffic > Virtual Servers. The Virtual Server List screen opens.
9. Click the name of your Session Host virtual server.
10. From the Security menu, choose Policies.
11. Next to Log Profile, select Enabled, then select the Logging profile you created.
12. Click Update. The list screen and the updated item are displayed.
Note: The iApp template creates a log publisher and attaches it to the logging profile. If the publisher does not appear in the BIG-IP Configuration utility (GUI), you can verify the configuration by running the following command from the Traffic Management shell (tmsh): list security log profile <your profile name>.
F5 Deployment Guide Microsoft Remote Desktop Session Host20
Creating logging profile manuallyIf you do not want to use the iApp template to create a logging profile, use this section for guidance on configuring the logging profile manually. You must have access to the tmsh command line to use this method.
To manually configure a logging profile
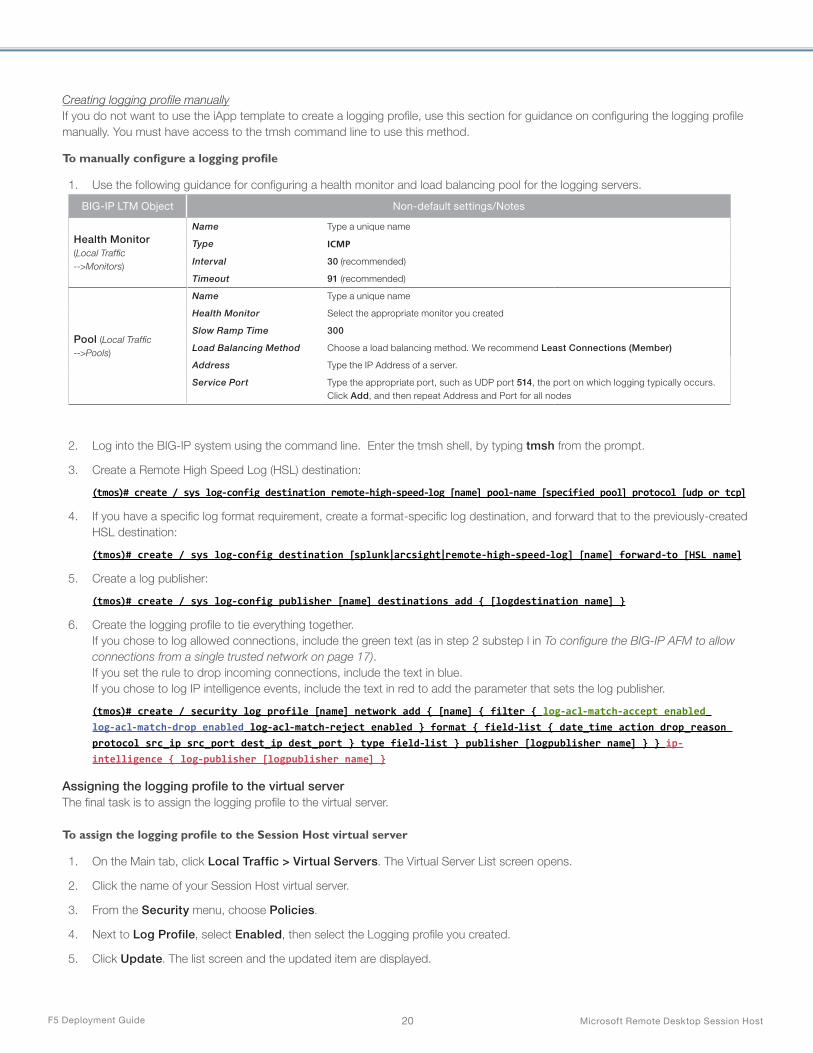
1. Use the following guidance for configuring a health monitor and load balancing pool for the logging servers.
BIG-IP LTM Object Non-default settings/Notes
Health Monitor (Local Traffic -->Monitors)
Name Type a unique name
Type ICMP
Interval 30 (recommended)
Timeout 91 (recommended)
Pool (Local Traffic -->Pools)
Name Type a unique name
Health Monitor Select the appropriate monitor you created
Slow Ramp Time 300
Load Balancing Method Choose a load balancing method. We recommend Least Connections (Member)
Address Type the IP Address of a server.
Service Port Type the appropriate port, such as UDP port 514, the port on which logging typically occurs. Click Add, and then repeat Address and Port for all nodes
2. Log into the BIG-IP system using the command line. Enter the tmsh shell, by typing tmsh from the prompt.
3. Create a Remote High Speed Log (HSL) destination:
(tmos)# create / sys log-config destination remote-high-speed-log [name] pool-name [specified pool] protocol [udp or tcp]
4. If you have a specific log format requirement, create a format-specific log destination, and forward that to the previously-created HSL destination:
(tmos)# create / sys log-config destination [splunk|arcsight|remote-high-speed-log] [name] forward-to [HSL name]
5. Create a log publisher:
(tmos)# create / sys log-config publisher [name] destinations add { [logdestination name] }
6. Create the logging profile to tie everything together. If you chose to log allowed connections, include the green text (as in step 2 substep l in To configure the BIG-IP AFM to allow connections from a single trusted network on page 17). If you set the rule to drop incoming connections, include the text in blue. If you chose to log IP intelligence events, include the text in red to add the parameter that sets the log publisher.
(tmos)# create / security log profile [name] network add { [name] { filter { log-acl-match-accept enabled log-acl-match-drop enabled log-acl-match-reject enabled } format { field-list { date_time action drop_reason protocol src_ip src_port dest_ip dest_port } type field-list } publisher [logpublisher name] } } ip-intelligence { log-publisher [logpublisher name] }
Assigning the logging profile to the virtual serverThe final task is to assign the logging profile to the virtual server.
To assign the logging profile to the Session Host virtual server
1. On the Main tab, click Local Traffic > Virtual Servers. The Virtual Server List screen opens.
2. Click the name of your Session Host virtual server.
3. From the Security menu, choose Policies.
4. Next to Log Profile, select Enabled, then select the Logging profile you created.
5. Click Update. The list screen and the updated item are displayed.

F5 Deployment Guide Microsoft Remote Desktop Session Host21
TroubleshootingUse this section for common troubleshooting tips.
Q: After rebooting the BIG-IP system (or running the command load sys config) running version 11.5.x, why are all pool members are being marked down by the BIG-IP device, even though they are available?
A: This is a known issue in BIG-IP version 11.5.x. After a reboot or loading the system configuration from the command line, the backslashes in the TCP health monitors for the Session Host and Connection Broker scenarios no longer appear. This causes the system to improperly mark the pool members as unavailable. This is not an issue in earlier (or later) versions of the BIG-IP system.
To work around this issue, you must manually reconfigure the Send and Receive Strings for the TCP health monitors using the strings in the configuration table. Alternatively you could upgrade to BIG-IP version 11.6 or later.
Q: Why are the monitors marking Windows 2008 R2 RDSH pool members down after installing Windows Update KB3003743?
A: This issue has been resolved in v1.0.0 of the iApp template. If you are experiencing this issue (found in v1.0.0rc1), be sure you are using the latest iApp template available from downloads.f5.com.
If you have recently installed Windows update KB3003743 on a Windows 2008 R2 server, the TCP monitor configured by the iApp template (and in the manual configuration table in the previous version of this guide) may result in pool members being marked down incorrectly. This issue only affects Windows 2008 R2.
To work around this issue, you must update the Receive String in the health monitor.
Old Receive String: \x03\x00\x00\x13\x0E\xD0\x00\x00\x12\x34\x00\x02\x01\x08\x00\x02\x00\x00\x00
New Receive String: \x03\x00\x00\x13\x0E\xD0\x00\x00\x12\x34\x00\x02\x09\x08\x00\x02\x00\x00\x00
Use the following guidance to update the strings, depending on whether you configured the BIG-IP system using the iApp template or manually.
If you configured the system manually If you manually configured the BIG-IP system, simply modify the TCP monitor Receive String to use the new string. Click Local Traffic > Monitors> <name of the TCP monitor>. Use the new Receive String as shown above, and then click Update.
If you configured the system using the iApp template If you used the iApp template, you must manually create a TCP monitor using the correct receive string, and apply it to your deployment by reconfiguring the iApp. This new monitor configuration will be included in a future release of the iApp template.
1. Click Local Traffic > Monitors> Create.
2. In the Name field, type a unique name.
3. From the Type list, select TCP.
4. In the Interval field, type 30.
5. In the Timeout field, type 91.
6. In the Send String field, type: \x03\x00\x00\x13\x0E\xE0\x00\x00\x00\x00\x00\x01\x00\x08\x00\x03\x00\x00\x00
7. In the Receive String field, type: \x03\x00\x00\x13\x0E\xD0\x00\x00\x12\x34\x00\x02\x09\x08\x00\x02\x00\x00\x00
8. Click Finished.
9. Click iApps > Application Services > <name of your iApp service>.
10. On the menu bar, click Reconfigure.
11. In the Application Health section, from the “Create a new health monitor or use an existing one?” question, select the monitor you just created, and then click the Finished button.

F5 Deployment Guide Microsoft Remote Desktop Session Host22
Appendix A: Adding Remote Desktop Web Access to BIG-IP LTM (optional)In this section, we configure the BIG-IP LTM for the RD Web Access server component. The Web Access role allows authorized users to connect to a web site that presents preconfigured icons for access to either individual applications (RemoteApp) or Remote Desktops on RD Session Host farms. The applications may be made available either directly via RDP, or through a Gateway server. Note that the Web Access Servers should use a separate LTM virtual server than used for the Gateway servers, whether or not the Gateway roles are installed on the same devices.
Prerequisites and configuration notes
i Important
You must complete the prerequisites in this list before you attempt to configure a RemoteApp source that corresponds to a farm of Session Host server that is load balanced by BIG-IP LTM. Otherwise, you will be unsuccessful.
h Install the Remote Desktop Web Access role on at least one server; for load-balancing connections, you will need at least two servers. See this Microsoft document: technet.microsoft.com/en-us/library/dd883258%28WS.10%29.aspx (Installing Remote Desktop Web Access with Remote Desktop Connection Host Step-by-Step Guide).
h Install the Remote Desktop Session Host role, as described previously.
h Install the Remote Desktop Connection Broker role on at least one server, as described previously.
h The DNS name that will be used by the BIG-IP LTM virtual must be resolvable by Web Access servers; choose One or more RemoteApp sources during configuration (the virtual server must already exist) and use the DNS Name (see Figure 6).
h For Remote Desktop Web Access, you must either configure the BIG-IP system for SSL Bridging or no encryption as shown in the configuration table.
Figure 1: Remote Desktop Services default connection page (2008 R2)

F5 Deployment Guide Microsoft Remote Desktop Session Host23
Configuration tableThe following table contains a list of BIG-IP LTM configuration objects along with any non-default settings you should configure as a part of this deployment scenario. Unless otherwise specified, settings not mentioned in the table can be configured as applicable for your configuration. For specific instructions on configuring individual objects, see the online help or product manuals.
Health Monitors (Main tab > Local Traffic > Monitors)
Name Type a unique name
Type HTTP (use HTTPS if configuring SSL Bridging)
Interval 30 (recommended)
Timeout 91 (recommended)
Send String GET /RDWeb/Pages/en-US/login.aspx HTTP/1.1\r\nHost: rdwa.example.com\r\nConnection: Close\r\n\r\n (replace red text with your host name)
Receive String 200 OK
User Name Type a valid user name in your Active Directory domain
Password Type the associated password
Pools (Main tab > Local Traffic > Pools)
Name Type a unique name
Health Monitor Select the monitor you created above
Slow Ramp Time1 300
Load Balancing Method Choose a load balancing method. We recommend Least Connections (Member)
Address Type the IP Address of the RD Web Access nodes. This can be an IPv4 or IPv6 address.
Service Port 80 (use 443 if configuring SSL Bridging) Click Add, and repeat Address and Port for all nodes
Profiles (Main tab > Local Traffic > Profiles)
TCP (Profiles-->Protocol)
Name Type a unique name
Parent Profile Use tcp-wan-optimized or tcp-lan-optimized depending on client location.
Persistence (Profiles-->Persistence)
Name Type a unique name
Persistence Type Cookie
HTTP (Profiles-->Services)
Name Type a unique name
Parent Profile http
Redirect Rewrite2 All2
Client SSL (Profiles-->SSL)
Name Type a unique name
Parent Profile clientssl
Certificate and Key Select the certificate and key you imported
Server SSL2 (Profiles-->SSL)
Name Type a unique name
Parent Profile serverssl
Virtual Servers (Main tab > Local Traffic > Virtual Servers)
Remote Desktop Web Access main virtual server
Name Type a unique name.
Address Type the IP Address for the virtual server
Service Port 443
Protocol Profile (client)1 Select the TCP profile you created above
Protocol Profile (server)1 Select the TCP profile you created above
HTTP Profile Select the HTTP profile you created above
SSL Profile (Client) Select the Client SSL profile you created above
SSL Profile (Server) If configuring SSL Bridging Only: Select the Server SSL profile you created above
SNAT Pool 3 Auto Map (optional; see footnote 3)
Default Pool Select the pool you created above
Persistence Profile Select the Persistence profile you created
1 You must select Advanced from the Configuration list for these options to appear2 Only necessary if offloading SSL3 If want to use SNAT, and you have a large deployment expecting more than 64,000 simultaneous connections, you must configure a SNAT Pool with an IP address for
each 64,000 simultaneous connections you expect. See the BIG-IP documentation on configuring SNAT Pools.

F5 Deployment Guide Microsoft Remote Desktop Session Host24
Port 135 virtual server
Name Type a unique name.
Address Type the IP Address for the virtual server
Service Port 135
Source Address Translation3 Auto Map (optional; see footnote 3)
Default Pool Select the pool you created above
Persistence Profile source_addr
3 If want to use SNAT, and you have a large deployment expecting more than 64,000 simultaneous connections, you must configure a SNAT Pool with an IP address for each 64,000 simultaneous connections you expect. See the BIG-IP documentation on configuring SNAT Pools.
This completes the configuration for this scenario.

F5 Deployment Guide Microsoft Remote Desktop Session Host25
Appendix B: Publishing Remote Desktop Resources using BIG-IP APM (optional)F5’s Access Policy Manager allows you to securely publish Remote Desktop connections and programs, which users can access using links on an APM Webtop. This can eliminate the need to locate a Remote Desktop Web Access server in the DMZ or perimeter network. This section shows how to publish both a Remote Desktop connection and an individual program using APM.
Prerequisites and configuration notesThe following are prerequisites and notes specific to this scenario.
h You must have BIG-IP APM or Edge Gateway licensed and provisioned on your BIG-IP system. For more information, contact your F5 sales representative.
h The BIG-IP system running APM must have a route to the Remote Desktop servers. For information on creating Routes on the BIG-IP system, see the BIG-IP documentation.
h You must have DNS and NTP configured on the BIG-IP system. See Appendix C: Configuring DNS and NTP settings on the BIG-IP system on page 28.
h You must have imported a valid SSL certificate and key for use in the Client SSL profile.
h If you are publishing programs to an APM Webtop, you must have either:
» Configured each program as a RemoteApp program in Remote Desktop Services,
» Modified the following Windows Group Policy setting: Computer Configuration>Administrative Templates>Windows Components>Remote Desktop Services>Remote Desktop Session Host>Connections>Allow remote start of unlisted programs>Enabled
Configuring the BIG-IP APMUse the following table to create the BIG-IP Edge Gateway or APM configuration. Create the objects in the order they appear in the table. For specific instructions on configuring individual objects, see the product documentation.
Remote Desktop (Access Policy--> Application Access--> Remote Desktops)
Name Type a unique name.
Type RDP
Destination Type the host name of the RDP server. Alternatively, click the IP Address button and then type the IP address
Port 3389
Auto Logon Check the box to enable Auto Logon
Caption If necessary, type the appropriate caption. By default, the Caption is the value for Name you typed above.
Optional: Use the following settings to restrict access to a specific application instead of a full RDP logon
Application to Start Type the name of the application (i.e. calc.exe or notepad.exe)
Working Directory Type the directory where the application resides (i.e. C:\Windows\System32 for Calculator or Notepad)
AAA Server (Access Policy-->AAA Servers)
Name Type a unique name.
Type Active Directory
Domain Controller Type the IP address or FQDN name of an Active Directory Domain Controller
Domain Name Type the Active Directory domain name
Admin Name1 Type the AD user name with administrative permissions (optional)
Admin Password1 Type the associated password (optional). Verify the Password
Connectivity Profile (Access Policy-->Secure Connectivity)
Name Type a unique name. All other fields are optional.
1 Optional. Admin Name and Password are required if anonymous binding to Active Directory is not allowed.
Webtop (Access Policy-->Webtops)
Name Type a unique name.
Type Full

F5 Deployment Guide Microsoft Remote Desktop Session Host26
Access Profile (Access Policy-->Access Profiles)
Name Type a unique name.
Language Select the appropriate language and move it to the Accepted Languages box.
Edit the Access Policy
Edit Edit the Access Profile using the Visual Policy Editor using the following procedure.
Configuring the Access PolicyAfter creating the objects in the table above, use the following procedure to edit the Access Policy on the BIG-IP APM using the Visual Policy Editor (VPE).
To configure the Access Policy
1. On the Main tab, expand Access Policy, and click Access Profiles.
2. Locate the Access Profile you created using the table above, and then, in the Access Policy column, click Edit. The VPE opens in a new window.
3. Click the + symbol between Start and Deny. A box opens with options for different actions.
4. Click the Logon Page option button, and then the Add Item button at the bottom.
5. In row #3, perform the following:
a. From the Type list, select text from the list.
b. In the Post Variable Name box, type domain.
c. In the Session Variable Name box, type domain.
d. In the Customization section, in the Logon Page Input Field #3 box, type Domain.
e. Configure any other settings as applicable, and then click Save. In our example, we leave the defaults.
6. Click the + symbol between Logon Page and Deny. A box opens with options for different actions.
7. Click the AD Auth option button, and then click Add Item.
a. From the Server list, select the AAA Server you created using the table on the previous page.
b. Click Save.
8. On the Successful path, click the + symbol between AD Auth and Deny. A box opens with options for different actions.
9. Click the Advanced Resource Assign option button (v11.4 and later) or Full Resource Assign (v11.3), and then click Add Item.
a. Click the Add New entry button.
b. In the Expression box that appears, click Add/Delete.
c. Click the Remote Desktop tab, and then check the box for the Remote Desktop object you created.
d. Click the Webtop tab, and then click the button for the Webtop object you created.
e. Click Update.
f. Click Save.
10. Click the Deny box on the path leading from Advanced (or Full) Resource Assign.
11. Click the Allow option button, and then click Save.
12. Click the yellow Apply Access Policy link in the upper left part of the window. You must apply an Access Policy before it takes effect.

F5 Deployment Guide Microsoft Remote Desktop Session Host27
Creating the profilesFor this configuration, you must create a Client SSL profile and a HTTP profile. Use the following table:
BIG-IP Object Non-default settings/Notes
HTTP ( Local Traffic-->Profiles-->Services)
Name Type a unique name
Parent Profile http
Client SSL ( Local Traffic-->Profiles-->SSL)
Name Type a unique name
Parent Profile clientssl
Certificate Select the SSL certificate you imported
Key Select the associated key
Configuring the virtual serverThe next task is to create a virtual server on the BIG-IP system. Use the following table to configure the virtual server.
BIG-IP Object Non-default settings/Notes
Virtual Server (Main tab-->Local Traffic -->Virtual Servers)
Name Type a unique name.
Address Type the IP Address for the virtual server
Service Port 443
HTTP Profile Select the HTTP profile you created above
SSL Profile (Client) Select the Client SSL profile you created
Access Profile Select the Access profile you created above
Connectivity Profile Select the Connectivity profile you created above
This completes the configuration.

F5 Deployment Guide Microsoft Remote Desktop Session Host28
Appendix C: Configuring DNS and NTP settings on the BIG-IP systemThis section contains information on configuring the BIG-IP system for objects or settings that are required, but not part of the template.
Configuring DNS and NTP settings If you are configuring the iApp to use BIG-IP APM, you must configure DNS and NTP settings on the BIG-IP system before beginning the iApp.
Configuring the DNS settingsIn this section, you configure the DNS settings on the BIG-IP system to point to a DNS server that can resolve your Active Directory server or servers. In many cases, this IP address will be that of your Active Directory servers themselves.
Note: DNS lookups go out over one of the interfaces configured on the BIG-IP system, not the management interface. The management interface has its own, separate DNS settings.
i Important The BIG-IP system must have a self IP address in the same local subnet and VLAN as the DNS server, or a route to the DNS server if located on a different subnet. The route configuration is found on the Main tab by expanding Network and then clicking Routes. For specific instructions on configuring a route on the BIG-IP system, see the online help or the product documentation.
To configure DNS settings
1. On the Main tab, expand System, and then click Configuration.
2. On the Menu bar, from the Device menu, click DNS.
3. In the DNS Lookup Server List row, complete the following:
a. In the Address box, type the IP address of a DNS server that can resolve the Active Directory server.
b. Click the Add button.
4. Click Update.
Configuring the NTP settingsThe next task is to configure the NTP settings on the BIG-IP system for authentication to work properly.
To configure NTP settings
1. On the Main tab, expand System, and then click Configuration.
2. On the Menu bar, from the Device menu, click NTP.
3. In the Address box, type the fully-qualified domain name (or the IP address) of the time server that you want to add to the Address List.
4. Click the Add button.
5. Click Update.
To verify the NTP setting configuration, you can use the ntpq utility. From the command line, run ntpq -np.

29
F5 Networks, Inc.Corporate [email protected]
F5 Networks, Inc. 401 Elliott Avenue West, Seattle, WA 98119 888-882-4447 www.f5.com
F5 Networks Ltd.Europe/Middle-East/[email protected]
F5 NetworksJapan [email protected]
©2017 F5 Networks, Inc. All rights reserved. F5, F5 Networks, the F5 logo, and IT agility. Your way., are trademarks of F5 Networks, Inc. in the U.S. and in certain other countries. Other F5 trademarks are identified at f5.com. Any other products, services, or company names referenced herein may be trademarks of their respective owners with no endorsement or affiliation, express or implied, claimed by F5. 0412
Document Revision History
Version Description Date
1.0 New deployment guide for the f5.microsoft_rds_session_host.v1.0.0 iApp. 04-09-2015
1.1 Added two new sections: Appendix A: Adding Remote Desktop Web Access to BIG-IP LTM (optional) on page 22,
and Appendix B: Publishing Remote Desktop Resources using BIG-IP APM (optional) on page 25.06-10-2015
1.2 Added support for BIG-IP version 12.0 09-02-2015
1.3
Updated the deployment guide for the fully supported f5.microsoft_rds_session_host.v1.0.1. This maintenance release contained only one change:
- For versions 11.6 and later: The iApp adds the ability for a user with the BIG-IP "Manager" role to deploy the template for BIG-IP LTM features only.
01-26-2016
1.4 Updated the persistence information in the manual configuration table in Supporting RemoteFX for Remote Desktop
Session Host (optional) on page 16.04-19-2016
1.5 Added support for BIG-IP version 12.1 05-18-2016
1.6 Updated the deployment guide for the fully supported f5.microsoft_rds_session_host.v1.0.2. This maintenance release contained only one fix. The previous template called the incorrect version of a CLI script.
06-16-2016
1.7 Updated the deployment guide for f5.microsoft_rds_session_host.v1.0.3rc1. This maintenance release contained only one fix to the TCP profile settings in the iApp. The profile produced by the iApp template now matches the TCP profile settings in this guide. There were no changes to this deployment guide.
08-30-2016
1.8 Updated the deployment guide for the fully supported f5.microsoft_rds_session_host.v1.0.3. This maintenance release contains no changes from RC1 described in the previous revision.
10-18-2016
1.9
Updated this guide for iApp template version f5.microsoft_rds_session_host.v1.0.4rc1 which includes the following changes:
- Added support for BIG-IP v13.1.
- Updated the iApp with new BIG-IP AFM IP Intelligence threat categories to support BIG-IP v13.1.
- Added support for route domain 0 from non-Common partitions.
11-09-2017
2.0Updated the guide for iApp version f5.microsoft_rds_session_host.v1.0.4, now available on downloads.f5.com. This is the fully supported version of the changes to the template made in v1.0.4rc1. There were no additional modifications.
12-14-2017