davco waterproofing guide - parexdavco: australia · 1. waterproofing wet areas 1.1 shower recesses...
TRANSCRIPT
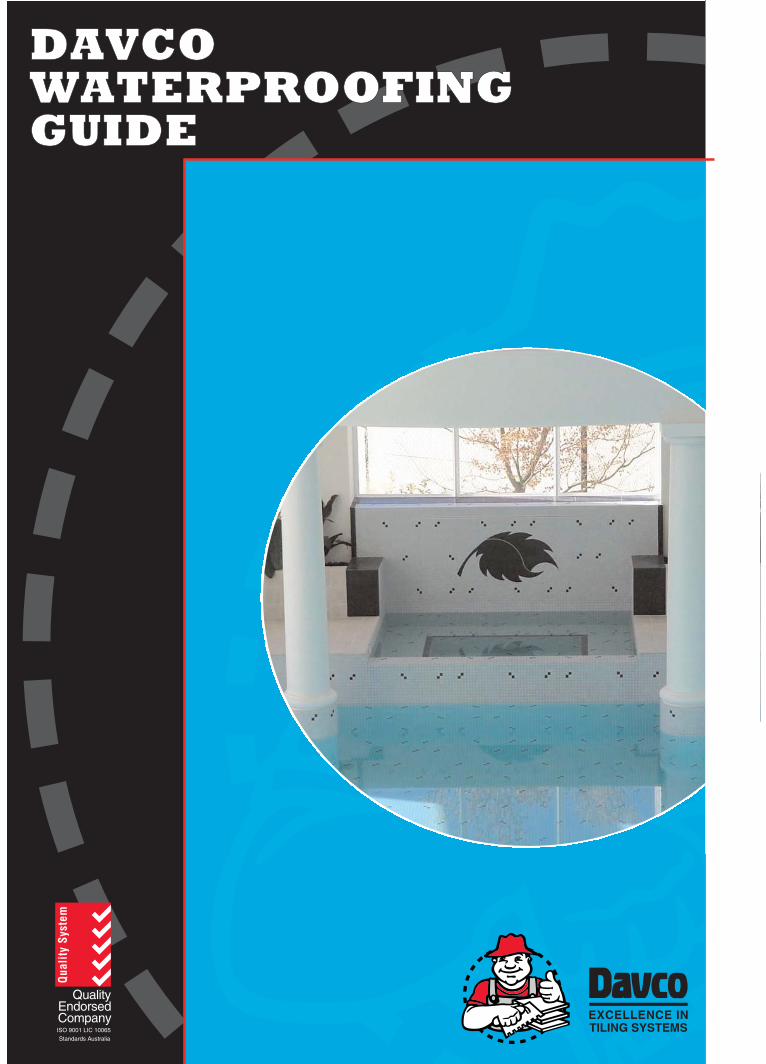
DAVCOWATERPROOFINGGUIDE
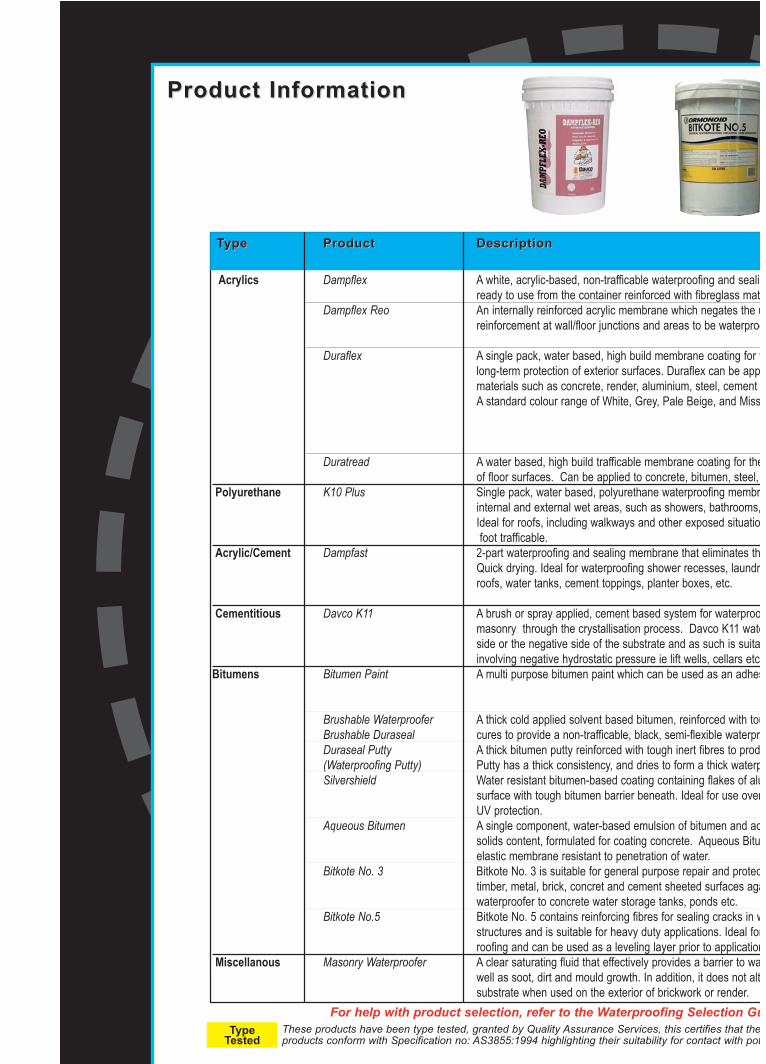
TTypeype ProductProduct DescriptionDescription
Acrylics Dampflex A white, acrylic-based, non-trafficable waterproofing and sealinready to use from the container reinforced with fibreglass mat
Dampflex Reo An internally reinforced acrylic membrane which negates the ureinforcement at wall/floor junctions and areas to be waterproo
Duraflex A single pack, water based, high build membrane coating for tlong-term protection of exterior surfaces. Duraflex can be appmaterials such as concrete, render, aluminium, steel, cement A standard colour range of White, Grey, Pale Beige, and Miss
Duratread A water based, high build trafficable membrane coating for theof floor surfaces. Can be applied to concrete, bitumen, steel,
Polyurethane K10 Plus Single pack, water based, polyurethane waterproofing membrinternal and external wet areas, such as showers, bathrooms,Ideal for roofs, including walkways and other exposed situatiofoot trafficable.
Acrylic/Cement Dampfast 2-part waterproofing and sealing membrane that eliminates thQuick drying. Ideal for waterproofing shower recesses, laundrroofs, water tanks, cement toppings, planter boxes, etc.
Cementitious Davco K11 A brush or spray applied, cement based system for waterproomasonry through the crystallisation process. Davco K11 wateside or the negative side of the substrate and as such is suitainvolving negative hydrostatic pressure ie lift wells, cellars etc
Bitumens Bitumen Paint A multi purpose bitumen paint which can be used as an adhes
Brushable Waterproofer A thick cold applied solvent based bitumen, reinforced with touBrushable Duraseal cures to provide a non-trafficable, black, semi-flexible waterprDuraseal Putty A thick bitumen putty reinforced with tough inert fibres to prod(Waterproofing Putty) Putty has a thick consistency, and dries to form a thick waterpSilvershield Water resistant bitumen-based coating containing flakes of alu
surface with tough bitumen barrier beneath. Ideal for use overUV protection.
Aqueous Bitumen A single component, water-based emulsion of bitumen and acsolids content, formulated for coating concrete. Aqueous Bituelastic membrane resistant to penetration of water.
Bitkote No. 3 Bitkote No. 3 is suitable for general purpose repair and protectimber, metal, brick, concret and cement sheeted surfaces agawaterproofer to concrete water storage tanks, ponds etc.
Bitkote No.5 Bitkote No. 5 contains reinforcing fibres for sealing cracks in wstructures and is suitable for heavy duty applications. Ideal forroofing and can be used as a leveling layer prior to application
Miscellanous Masonry Waterproofer A clear saturating fluid that effectively provides a barrier to wawell as soot, dirt and mould growth. In addition, it does not altsubstrate when used on the exterior of brickwork or render.
Product InformationProduct Information
TypeTested
These products have been type tested, granted by Quality Assurance Services, this certifies that theproducts conform with Specification no: AS3855:1994 highlighting their suitability for contact with pot
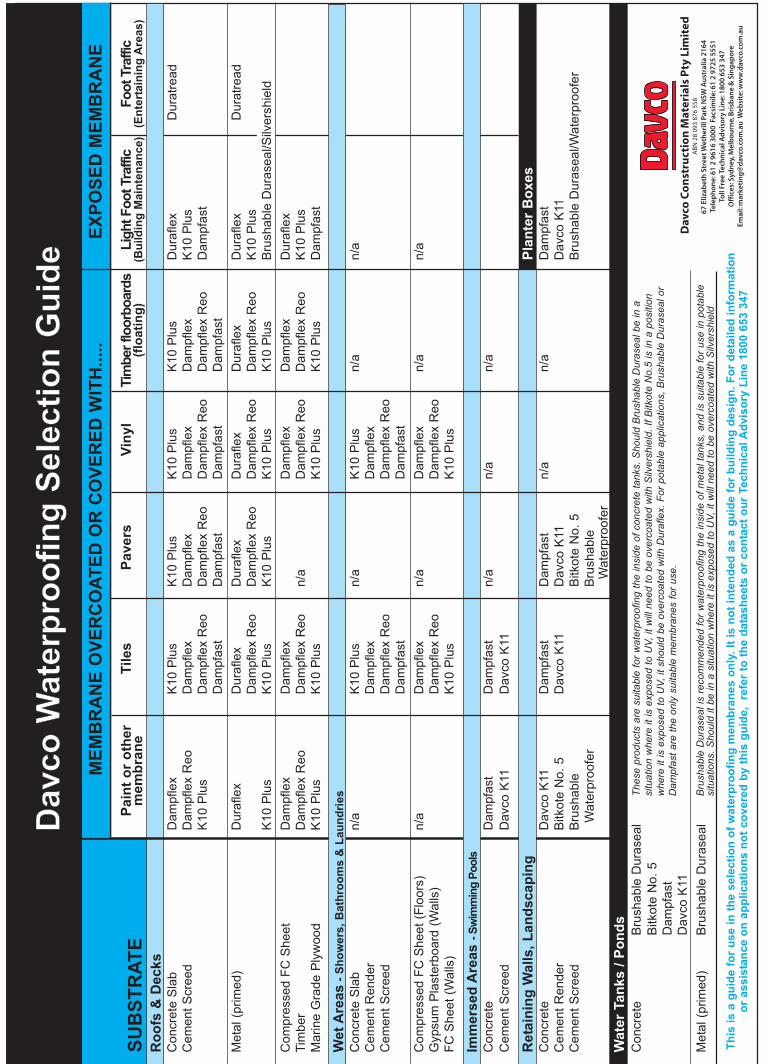
For help with product selection, refer to the Waterproofing Selection Gu
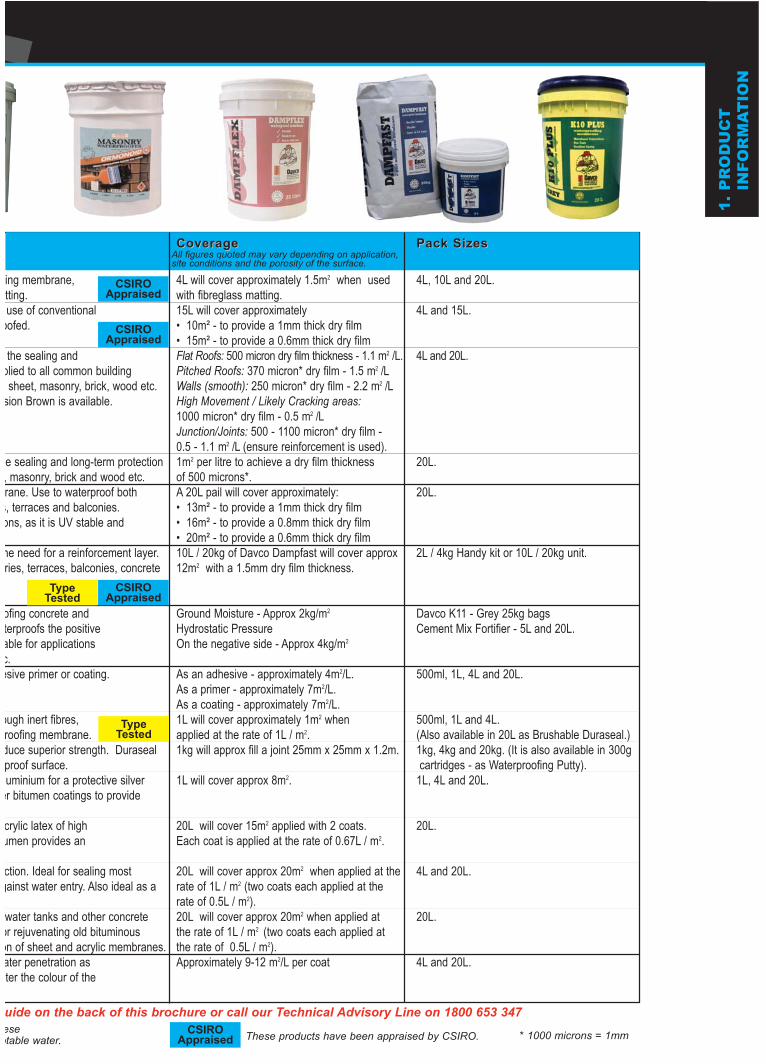
CoverageCoverage Pack SizesPack Sizes
ing membrane, 4L will cover approximately 1.5m2 when used 4L, 10L and 20L.tting. with fibreglass matting.use of conventional 15L will cover approximately 4L and 15L.
oofed. • 10m² - to provide a 1mm thick dry film • 15m² - to provide a 0.6mm thick dry film
the sealing and Flat Roofs: 500 micron dry film thickness - 1.1 m2 /L. 4L and 20L.plied to all common building Pitched Roofs: 370 micron* dry film - 1.5 m2 /L sheet, masonry, brick, wood etc. Walls (smooth): 250 micron* dry film - 2.2 m2 /Lsion Brown is available. High Movement / Likely Cracking areas:
1000 micron* dry film - 0.5 m2 /LJunction/Joints: 500 - 1100 micron* dry film - 0.5 - 1.1 m2 /L (ensure reinforcement is used).
e sealing and long-term protection 1m2 per litre to achieve a dry film thickness 20L., masonry, brick and wood etc. of 500 microns*.rane. Use to waterproof both A 20L pail will cover approximately: 20L.
s, terraces and balconies. • 13m² - to provide a 1mm thick dry filmons, as it is UV stable and • 16m² - to provide a 0.8mm thick dry film
• 20m² - to provide a 0.6mm thick dry filmhe need for a reinforcement layer. 10L / 20kg of Davco Dampfast will cover approx 2L / 4kg Handy kit or 10L / 20kg unit.ries, terraces, balconies, concrete 12m2 with a 1.5mm dry film thickness.
ofing concrete and Ground Moisture - Approx 2kg/m2 Davco K11 - Grey 25kg bags terproofs the positive Hydrostatic Pressure Cement Mix Fortifier - 5L and 20L.able for applications On the negative side - Approx 4kg/m2
c.esive primer or coating. As an adhesive - approximately 4m2/L. 500ml, 1L, 4L and 20L.
As a primer - approximately 7m2/L.As a coating - approximately 7m2/L. f
ough inert fibres, 1L will cover approximately 1m2 when 500ml, 1L and 4L. roofing membrane. applied at the rate of 1L / m2. (Also available in 20L as Brushable Duraseal.)duce superior strength. Duraseal 1kg will approx fill a joint 25mm x 25mm x 1.2m. 1kg, 4kg and 20kg. (It is also available in 300gproof surface. cartridges - as Waterproofing Putty).uminium for a protective silver 1L will cover approx 8m2. 1L, 4L and 20L.
er bitumen coatings to provide
crylic latex of high 20L will cover 15m2 applied with 2 coats. 20L. umen provides an Each coat is applied at the rate of 0.67L / m2.
ction. Ideal for sealing most 20L will cover approx 20m2 when applied at the 4L and 20L. gainst water entry. Also ideal as a rate of 1L / m2 (two coats each applied at the
rate of 0.5L / m2).water tanks and other concrete 20L will cover approx 20m2 when applied at 20L.
or rejuvenating old bituminous the rate of 1L / m2 (two coats each applied aton of sheet and acrylic membranes. the rate of 0.5L / m2).ater penetration as Approximately 9-12 m2/L per coat 4L and 20L.ter the colour of the
1.P
RO
DU
CT
INFO
RM
AT
ION
CSIROAppraised
CSIROAppraised
CSIROAppraised
CSIROAppraised
TypeTested
TypeTested
eseotable water. These products have been appraised by CSIRO.
All figures quoted may vary depending on application,site conditions and the porosity of the surface.
* 1000 microns = 1mm
uide on the back of this brochure or call our Technical Advisory Line on 1800 653 347
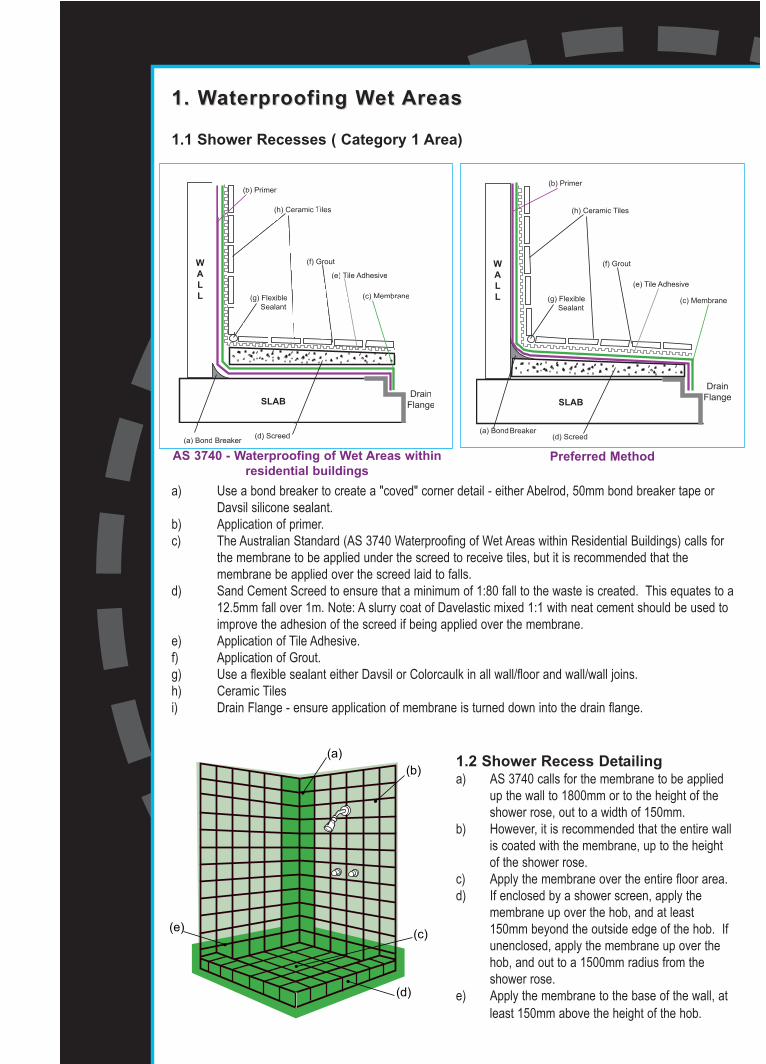
1. 1. WWaterproofing Waterproofing Wet et AreasAreas
1.1 Shower Recesses ( Category 1 Area)
a) Use a bond breaker to create a "coved" corner detail - either Abelrod, 50mm bond breaker tape orDavsil silicone sealant.
b) Application of primer.c) The Australian Standard (AS 3740 Waterproofing of Wet Areas within Residential Buildings) calls for
the membrane to be applied under the screed to receive tiles, but it is recommended that themembrane be applied over the screed laid to falls.
d) Sand Cement Screed to ensure that a minimum of 1:80 fall to the waste is created. This equates to a12.5mm fall over 1m. Note: A slurry coat of Davelastic mixed 1:1 with neat cement should be used toimprove the adhesion of the screed if being applied over the membrane.
e) Application of Tile Adhesive. f) Application of Grout.g) Use a flexible sealant either Davsil or Colorcaulk in all wall/floor and wall/wall joins.h) Ceramic Tilesi) Drain Flange - ensure application of membrane is turned down into the drain flange.
1.2 Shower Recess Detailinga) AS 3740 calls for the membrane to be applied
up the wall to 1800mm or to the height of theshower rose, out to a width of 150mm.
b) However, it is recommended that the entire wallis coated with the membrane, up to the heightof the shower rose.
c) Apply the membrane over the entire floor area.d) If enclosed by a shower screen, apply the
membrane up over the hob, and at least150mm beyond the outside edge of the hob. Ifunenclosed, apply the membrane up over thehob, and out to a 1500mm radius from theshower rose.
e) Apply the membrane to the base of the wall, atleast 150mm above the height of the hob.
AS 3740 - Waterproofing of Wet Areas withinresidential buildings
Preferred Method
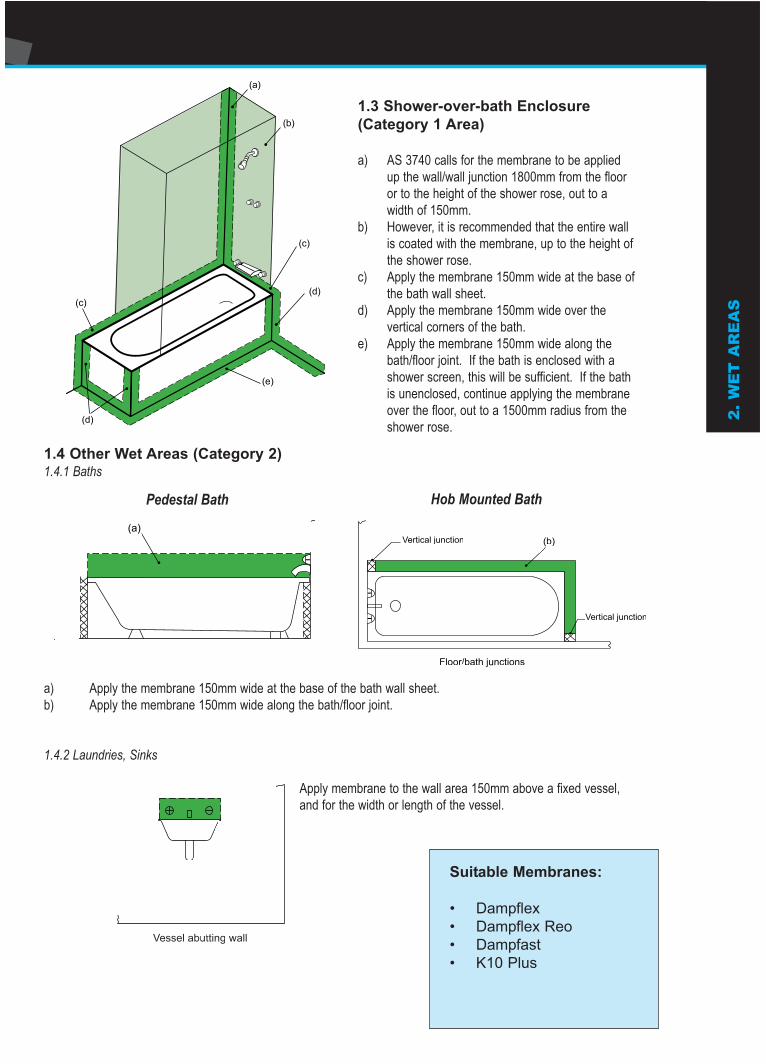
1.4 Other Wet Areas (Category 2)1.4.1 Baths
a) Apply the membrane 150mm wide at the base of the bath wall sheet.b) Apply the membrane 150mm wide along the bath/floor joint.
1.4.2 Laundries, Sinks
Apply membrane to the wall area 150mm above a fixed vessel, and for the width or length of the vessel.
1.3 Shower-over-bath Enclosure(Category 1 Area)
a) AS 3740 calls for the membrane to be appliedup the wall/wall junction 1800mm from the flooror to the height of the shower rose, out to awidth of 150mm.
b) However, it is recommended that the entire wallis coated with the membrane, up to the height ofthe shower rose.
c) Apply the membrane 150mm wide at the base ofthe bath wall sheet.
d) Apply the membrane 150mm wide over thevertical corners of the bath.
e) Apply the membrane 150mm wide along thebath/floor joint. If the bath is enclosed with ashower screen, this will be sufficient. If the bathis unenclosed, continue applying the membraneover the floor, out to a 1500mm radius from theshower rose.
2.W
ET
AR
EA
S
Suitable Membranes:
• Dampflex• Dampflex Reo• Dampfast• K10 Plus
Pedestal Bath Hob Mounted Bath
2. 2. WWaterproofing, Roofs Decks and Balconiesaterproofing, Roofs Decks and Balconies
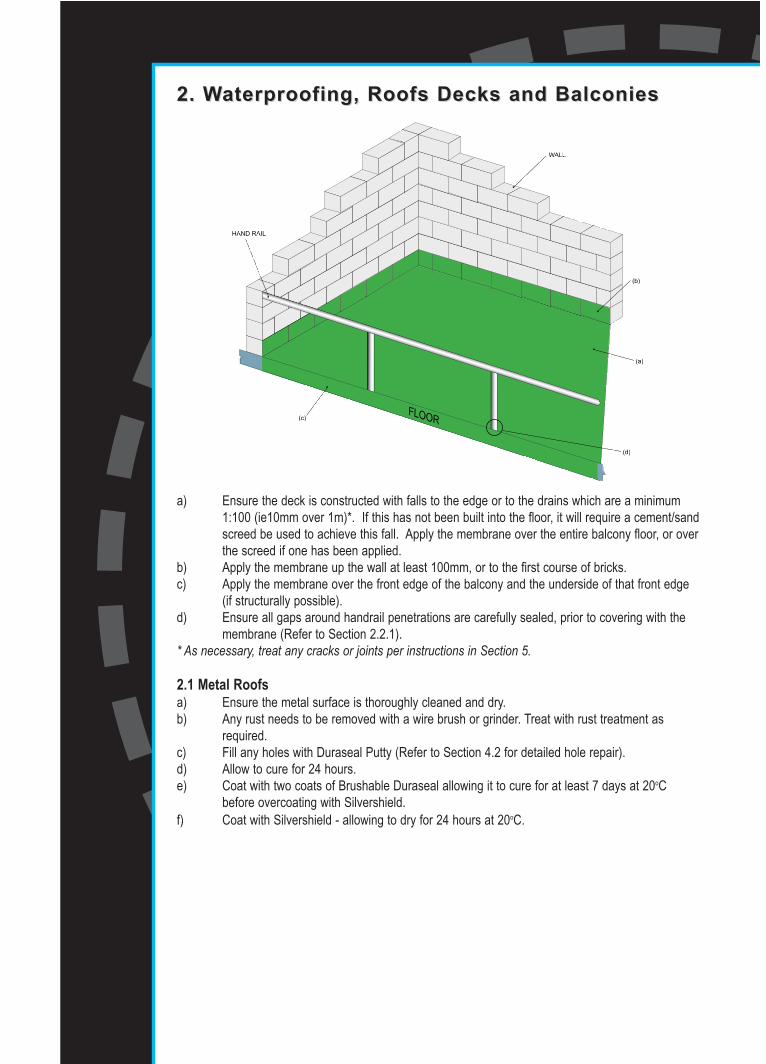
a) Ensure the deck is constructed with falls to the edge or to the drains which are a minimum1:100 (ie10mm over 1m)*. If this has not been built into the floor, it will require a cement/sandscreed be used to achieve this fall. Apply the membrane over the entire balcony floor, or overthe screed if one has been applied.
b) Apply the membrane up the wall at least 100mm, or to the first course of bricks.c) Apply the membrane over the front edge of the balcony and the underside of that front edge
(if structurally possible).d) Ensure all gaps around handrail penetrations are carefully sealed, prior to covering with the
membrane (Refer to Section 2.2.1).* As necessary, treat any cracks or joints per instructions in Section 5.
2.1 Metal Roofsa) Ensure the metal surface is thoroughly cleaned and dry.b) Any rust needs to be removed with a wire brush or grinder. Treat with rust treatment as
required.c) Fill any holes with Duraseal Putty (Refer to Section 4.2 for detailed hole repair). d) Allow to cure for 24 hours.e) Coat with two coats of Brushable Duraseal allowing it to cure for at least 7 days at 20oC
before overcoating with Silvershield.f) Coat with Silvershield - allowing to dry for 24 hours at 20oC.
2.2 Rail/Pipe Penetration Details
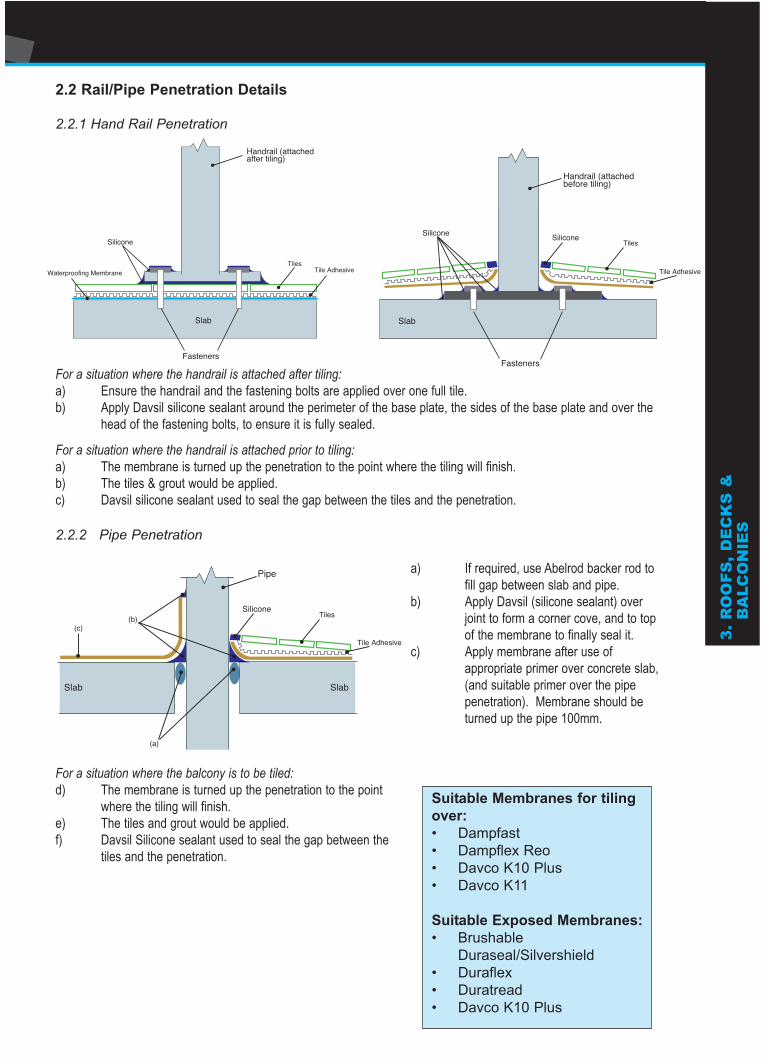
2.2.1 Hand Rail Penetration
For a situation where the handrail is attached after tiling:a) Ensure the handrail and the fastening bolts are applied over one full tile.b) Apply Davsil silicone sealant around the perimeter of the base plate, the sides of the base plate and over the
head of the fastening bolts, to ensure it is fully sealed.
For a situation where the handrail is attached prior to tiling:a) The membrane is turned up the penetration to the point where the tiling will finish.b) The tiles & grout would be applied.c) Davsil silicone sealant used to seal the gap between the tiles and the penetration.
2.2.2 Pipe Penetration
a) If required, use Abelrod backer rod tofill gap between slab and pipe.
b) Apply Davsil (silicone sealant) overjoint to form a corner cove, and to topof the membrane to finally seal it.
c) Apply membrane after use ofappropriate primer over concrete slab,(and suitable primer over the pipepenetration). Membrane should beturned up the pipe 100mm.
For a situation where the balcony is to be tiled:d) The membrane is turned up the penetration to the point
where the tiling will finish.e) The tiles and grout would be applied.f) Davsil Silicone sealant used to seal the gap between the
tiles and the penetration.
3.R
OO
FS,
DE
CK
S &
BA
LCO
NIE
S
Suitable Membranes for tilingover:• Dampfast• Dampflex Reo• Davco K10 Plus• Davco K11
Suitable Exposed Membranes:• Brushable
Duraseal/Silvershield• Duraflex• Duratread• Davco K10 Plus
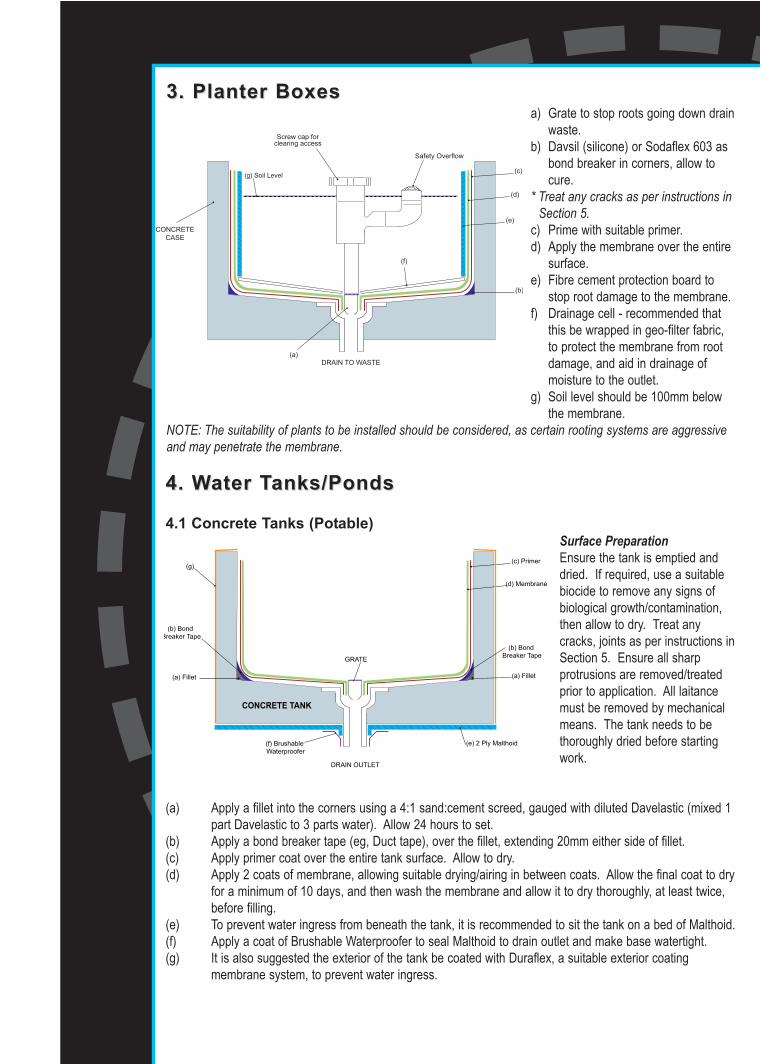
3. 3. Planter BoxesPlanter Boxesa) Grate to stop roots going down drain
waste.b) Davsil (silicone) or Sodaflex 603 as
bond breaker in corners, allow tocure.
* Treat any cracks as per instructions inSection 5.
c) Prime with suitable primer.d) Apply the membrane over the entire
surface.e) Fibre cement protection board to
stop root damage to the membrane.f) Drainage cell - recommended that
this be wrapped in geo-filter fabric,to protect the membrane from rootdamage, and aid in drainage ofmoisture to the outlet.
g) Soil level should be 100mm belowthe membrane.
NOTE: The suitability of plants to be installed should be considered, as certain rooting systems are aggressiveand may penetrate the membrane.
4. 4. WWater Tater Tanks/Pondsanks/Ponds
4.1 Concrete Tanks (Potable)Surface PreparationEnsure the tank is emptied anddried. If required, use a suitablebiocide to remove any signs ofbiological growth/contamination,then allow to dry. Treat anycracks, joints as per instructions inSection 5. Ensure all sharpprotrusions are removed/treatedprior to application. All laitancemust be removed by mechanicalmeans. The tank needs to bethoroughly dried before startingwork.
(a) Apply a fillet into the corners using a 4:1 sand:cement screed, gauged with diluted Davelastic (mixed 1part Davelastic to 3 parts water). Allow 24 hours to set.
(b) Apply a bond breaker tape (eg, Duct tape), over the fillet, extending 20mm either side of fillet.(c) Apply primer coat over the entire tank surface. Allow to dry.(d) Apply 2 coats of membrane, allowing suitable drying/airing in between coats. Allow the final coat to dry
for a minimum of 10 days, and then wash the membrane and allow it to dry thoroughly, at least twice,before filling.
(e) To prevent water ingress from beneath the tank, it is recommended to sit the tank on a bed of Malthoid.(f) Apply a coat of Brushable Waterproofer to seal Malthoid to drain outlet and make base watertight.(g) It is also suggested the exterior of the tank be coated with Duraflex, a suitable exterior coating
membrane system, to prevent water ingress.
CONCRETE TANK
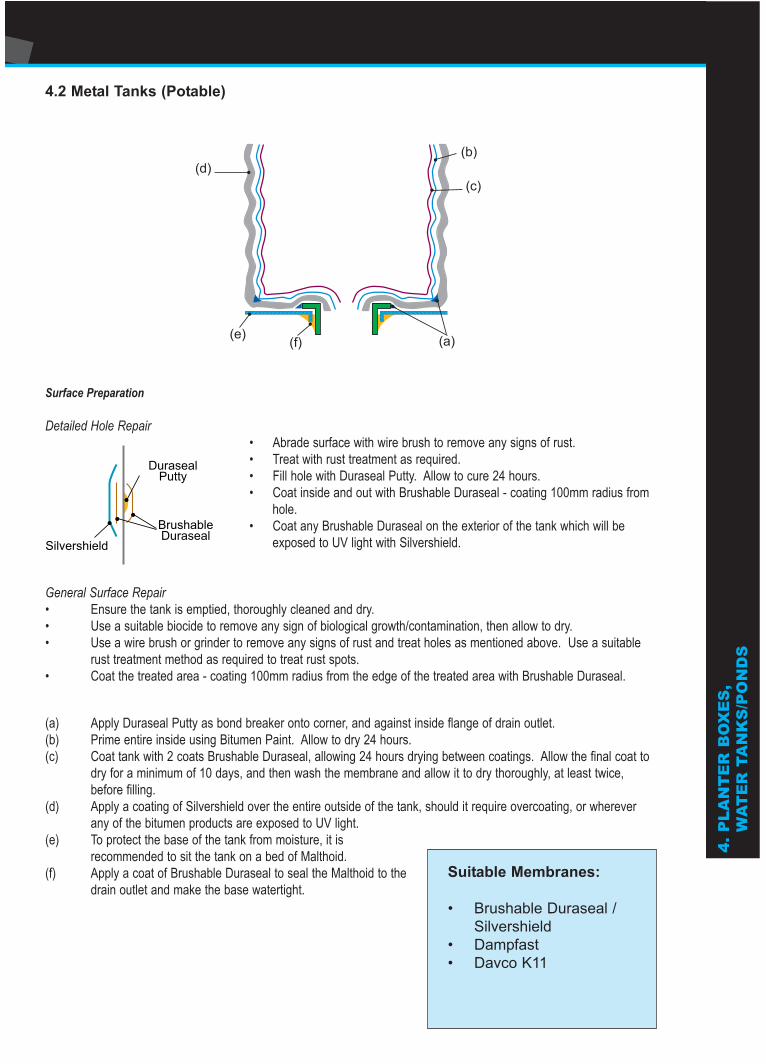
4.2 Metal Tanks (Potable)
Surface Preparation
Detailed Hole Repair• Abrade surface with wire brush to remove any signs of rust.• Treat with rust treatment as required.• Fill hole with Duraseal Putty. Allow to cure 24 hours.• Coat inside and out with Brushable Duraseal - coating 100mm radius from
hole.• Coat any Brushable Duraseal on the exterior of the tank which will be
exposed to UV light with Silvershield.
General Surface Repair• Ensure the tank is emptied, thoroughly cleaned and dry.• Use a suitable biocide to remove any sign of biological growth/contamination, then allow to dry.• Use a wire brush or grinder to remove any signs of rust and treat holes as mentioned above. Use a suitable
rust treatment method as required to treat rust spots.• Coat the treated area - coating 100mm radius from the edge of the treated area with Brushable Duraseal.
(a) Apply Duraseal Putty as bond breaker onto corner, and against inside flange of drain outlet.(b) Prime entire inside using Bitumen Paint. Allow to dry 24 hours.(c) Coat tank with 2 coats Brushable Duraseal, allowing 24 hours drying between coatings. Allow the final coat to
dry for a minimum of 10 days, and then wash the membrane and allow it to dry thoroughly, at least twice,before filling.
(d) Apply a coating of Silvershield over the entire outside of the tank, should it require overcoating, or whereverany of the bitumen products are exposed to UV light.
(e) To protect the base of the tank from moisture, it isrecommended to sit the tank on a bed of Malthoid.
(f) Apply a coat of Brushable Duraseal to seal the Malthoid to thedrain outlet and make the base watertight.
(b)(d)
(a)(e) (f)
(c)
4.P
LAN
TE
R B
OX
ES
,W
AT
ER
TA
NK
S/P
ON
DS
Suitable Membranes:
• Brushable Duraseal /Silvershield
• Dampfast• Davco K11
5. T5. Treatment of Expreatment of Expansion Jointansion Joints and Crackss and Cracks
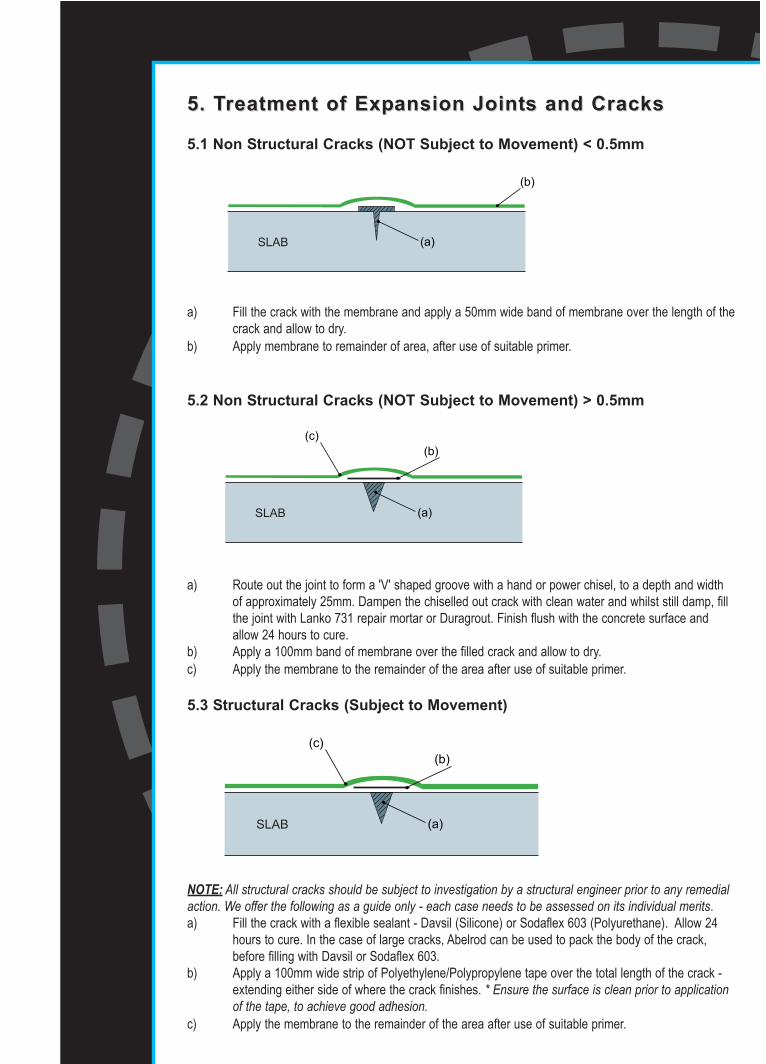
5.1 Non Structural Cracks (NOT Subject to Movement) < 0.5mm
a) Fill the crack with the membrane and apply a 50mm wide band of membrane over the length of thecrack and allow to dry.
b) Apply membrane to remainder of area, after use of suitable primer.
5.2 Non Structural Cracks (NOT Subject to Movement) > 0.5mm
a) Route out the joint to form a 'V' shaped groove with a hand or power chisel, to a depth and widthof approximately 25mm. Dampen the chiselled out crack with clean water and whilst still damp, fillthe joint with Lanko 731 repair mortar or Duragrout. Finish flush with the concrete surface andallow 24 hours to cure.
b) Apply a 100mm band of membrane over the filled crack and allow to dry.c) Apply the membrane to the remainder of the area after use of suitable primer.
5.3 Structural Cracks (Subject to Movement)
NOTE: All structural cracks should be subject to investigation by a structural engineer prior to any remedialaction. We offer the following as a guide only - each case needs to be assessed on its individual merits.a) Fill the crack with a flexible sealant - Davsil (Silicone) or Sodaflex 603 (Polyurethane). Allow 24
hours to cure. In the case of large cracks, Abelrod can be used to pack the body of the crack,before filling with Davsil or Sodaflex 603.
b) Apply a 100mm wide strip of Polyethylene/Polypropylene tape over the total length of the crack -extending either side of where the crack finishes. * Ensure the surface is clean prior to applicationof the tape, to achieve good adhesion.
c) Apply the membrane to the remainder of the area after use of suitable primer.
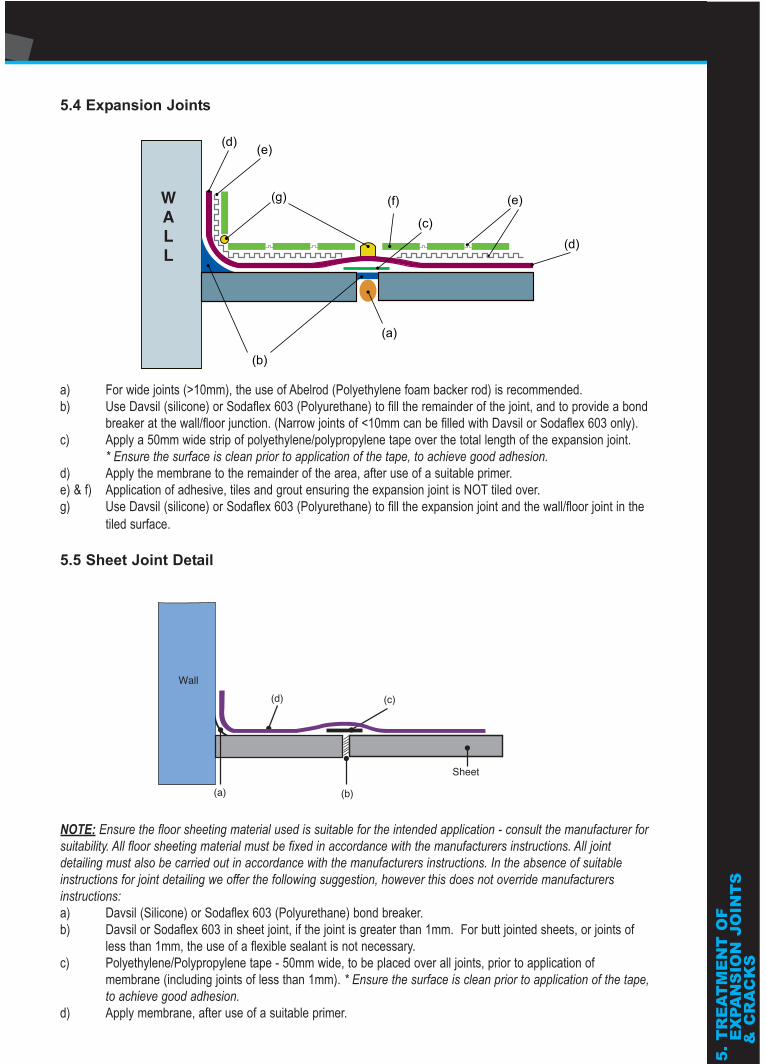
5.4 Expansion Joints
a) For wide joints (>10mm), the use of Abelrod (Polyethylene foam backer rod) is recommended.b) Use Davsil (silicone) or Sodaflex 603 (Polyurethane) to fill the remainder of the joint, and to provide a bond
breaker at the wall/floor junction. (Narrow joints of <10mm can be filled with Davsil or Sodaflex 603 only).c) Apply a 50mm wide strip of polyethylene/polypropylene tape over the total length of the expansion joint.
* Ensure the surface is clean prior to application of the tape, to achieve good adhesion.d) Apply the membrane to the remainder of the area, after use of a suitable primer.e) & f) Application of adhesive, tiles and grout ensuring the expansion joint is NOT tiled over.g) Use Davsil (silicone) or Sodaflex 603 (Polyurethane) to fill the expansion joint and the wall/floor joint in the
tiled surface.
5.5 Sheet Joint Detail
NOTE: Ensure the floor sheeting material used is suitable for the intended application - consult the manufacturer forsuitability. All floor sheeting material must be fixed in accordance with the manufacturers instructions. All jointdetailing must also be carried out in accordance with the manufacturers instructions. In the absence of suitableinstructions for joint detailing we offer the following suggestion, however this does not override manufacturersinstructions:a) Davsil (Silicone) or Sodaflex 603 (Polyurethane) bond breaker.b) Davsil or Sodaflex 603 in sheet joint, if the joint is greater than 1mm. For butt jointed sheets, or joints of
less than 1mm, the use of a flexible sealant is not necessary.c) Polyethylene/Polypropylene tape - 50mm wide, to be placed over all joints, prior to application of
membrane (including joints of less than 1mm). * Ensure the surface is clean prior to application of the tape,to achieve good adhesion.
d) Apply membrane, after use of a suitable primer.
5.T
RE
AT
ME
NT
OF
EX
PAN
SIO
N J
OIN
TS
&
CR
AC
KS
SUB
STR
ATE
Pain
t or o
ther
Tile
sPa
vers
Viny
lTi
mbe
r flo
orbo
ards
Ligh
t Foo
t Tra
ffic
Foot
Tra
ffic
mem
bran
e(fl
oatin
g)(B
uild
ing
Mai
nten
ance
)(E
nter
tain
ing
Are
as)
Roo
fs &
Dec
ksC
oncr
ete
Slab
Dam
pfle
xK1
0 Pl
usK1
0 Pl
usK1
0 Pl
usK1
0 Pl
usD
uraf
lex
Dur
atre
adC
emen
t Scr
eed
Dam
pfle
x R
eoD
ampf
lex
Dam
pfle
xD
ampf
lex
Dam
pfle
xK1
0 Pl
usK1
0 Pl
usD
ampf
lex
Reo
Dam
pfle
x R
eoD
ampf
lex
Reo
Dam
pfle
x R
eoD
ampf
ast
Dam
pfas
tD
ampf
ast
Dam
pfas
tD
ampf
ast
Met
al (p
rimed
)D
uraf
lex
Dur
afle
xD
uraf
lex
Dur
afle
xD
uraf
lex
Dur
afle
xD
urat
read
Dam
pfle
x R
eoD
ampf
lex
Reo
Dam
pfle
x R
eoD
ampf
lex
Reo
K10
Plus
K10
Plus
K10
Plus
K10
Plus
K10
Plus
K10
Plus
Brus
habl
e D
uras
eal/S
ilver
shie
ldC
ompr
esse
d FC
She
etD
ampf
lex
Dam
pfle
xD
ampf
lex
Dam
pfle
xD
uraf
lex
Tim
ber
Dam
pfle
x R
eoD
ampf
lex
Reo
n/a
Dam
pfle
x R
eoD
ampf
lex
Reo
K10
Plus
Mar
ine
Gra
de P
lyw
ood
K10
Plus
K10
Plus
K10
Plus
K10
Plus
Dam
pfas
t
Wet
Are
as- S
how
ers,
Bat
hroo
ms
& L
aund
ries
Con
cret
e Sl
abn/
aK1
0 Pl
usn/
aK1
0 Pl
usn/
an/
aC
emen
t Ren
der
Dam
pfle
xD
ampf
lex
Cem
ent S
cree
d D
ampf
lex
Reo
Dam
pfle
x R
eoD
ampf
ast
Dam
pfas
tC
ompr
esse
d FC
She
et (F
loor
s)n/
aD
ampf
lex
n/a
Dam
pfle
xn/
an/
aG
ypsu
m P
last
erbo
ard
(Wal
ls)
Dam
pfle
x R
eoD
ampf
lex
Reo
FC S
heet
(Wal
ls)
K10
Plus
K10
Plus
Imm
erse
d A
reas
-Sw
imm
ing
Pool
sC
oncr
ete
Dam
pfas
tD
ampf
ast
n/a
n/a
n/a
Cem
ent S
cree
d D
avco
K11
Dav
co K
11
Ret
aini
ng W
alls
, Lan
dsca
ping
Pl
ante
r Box
esC
oncr
ete
Dav
co K
11D
ampf
ast
Dam
pfas
tn/
an/
aD
ampf
ast
Cem
ent R
ende
rBi
tkot
e N
o. 5
Dav
co K
11D
avco
K11
Dav
co K
11C
emen
t Scr
eed
Brus
habl
eBi
tkot
e N
o. 5
Brus
habl
e D
uras
eal/W
ater
proo
fer
Wat
erpr
oofe
rBr
usha
ble
Wat
erpr
oofe
rW
ater
Tan
ks /
Pond
sC
oncr
ete
Brus
habl
e D
uras
eal
Bitk
ote
No.
5D
ampf
ast
Dav
co K
11M
etal
(prim
ed)
Brus
habl
e D
uras
ealDDDD
aaaa vvvvcccc oooo
WWWWaaaa tttt
eeee rrrrpppp rrrr
oooo ooooffff iiii nnnn
gggg SSSS
eeee lllleeee cccc
tttt iiii oooonnnn
GGGGuuuu iiii
dddd eeeeEX
POSE
D M
EMB
RA
NE
MEM
BR
AN
E O
VER
CO
ATED
OR
CO
VER
ED W
ITH
.....
This
is a
gui
de fo
r use
in th
e se
lect
ion
of w
ater
proo
fing
mem
bran
es o
nly.
It is
not
inte
nded
as
a gu
ide
for b
uild
ing
desi
gn. F
or d
etai
led
info
rmat
ion
or a
ssis
tanc
e on
app
licat
ions
not
cov
ered
by
this
gui
de,
refe
r to
the
data
shee
ts o
r con
tact
our
Tec
hnic
al A
dvis
ory
Line
180
0 65
3 34
7
Thes
e pr
oduc
ts a
re s
uita
ble
for w
ater
proo
fing
the
insi
de o
f con
cret
e ta
nks.
Sho
uld
Brus
habl
e D
uras
eal b
e in
asi
tuat
ion
whe
re it
is e
xpos
ed to
UV,
it w
ill ne
ed to
be
over
coat
ed w
ith S
ilver
shie
ld. I
f Bitk
ote
No.
5 is
in a
pos
ition
whe
re it
is e
xpos
ed to
UV,
it s
houl
d be
ove
rcoa
ted
with
Dur
afle
x. F
or p
otab
le a
pplic
atio
ns, B
rush
able
Dur
asea
l or
Dam
pfas
t are
the
only
sui
tabl
e m
embr
anes
for u
se.
Brus
habl
e D
uras
eal i
s re
com
men
ded
for w
ater
proo
fing
the
insi
de o
f met
al ta
nks,
and
is s
uita
ble
for u
se in
pot
able
situ
atio
ns. S
houl
d it
be in
a s
ituat
ion
whe
re it
is e
xpos
ed to
UV,
it w
ill ne
ed to
be
over
coat
ed w
ith S
ilver
shie
ld