datacap document capture · documents is called ibm datacap. documents will be processed through a...
TRANSCRIPT
College Document Capture Manual
CUNY College Capture
Datacap Document Capture
User / Training Manual
College Document Capture Manual
I Last Update 05/26/2015
TABLE OF CONTENTS
Datacap Document Capture .......................................................................................................... 1 Unit Introduction ..................................................................................................................................1 Unit Objectives .....................................................................................................................................1
Datacap Daily Document Capture Flow ......................................................................................... 2
Datacap Archive Document Capture Flow ..................................................................................... 2
Chapter 1: Document Capture Workflow ...................................................................................... 3 Chapter Objectives ................................................................................................................................3 Overview of the Capture Workflow .......................................................................................................3 Topic 1: Attended Tasks.........................................................................................................................3 Topic 2: Automated Tasks ......................................................................................................................4
Chapter 2: Datacap Navigator Client ............................................................................................. 5 Chapter Objectives ................................................................................................................................5 Topic 1: Navigator Client Overview ........................................................................................................5 SIMULATION ACTIVITIES ........................................................................................................................8 Topic 2: Batch Scanning .........................................................................................................................9 SIMULATION ACTIVITIES ...................................................................................................................... 11 Topic 3: Page Identification (nClassify) ................................................................................................. 14 SIMULATION ACTIVITIES ...................................................................................................................... 15 Topic 4: Data Verification .................................................................................................................... 17 SIMULATION ACTIVITIES ...................................................................................................................... 19 Topic 5: Exception Handling ................................................................................................................. 20 SIMULATION ACTIVITIES ...................................................................................................................... 21
Chapter 3: Datacap System Administration ................................................................................. 23 Chapter Objectives .............................................................................................................................. 23 Topic 1: Datacap Navigator Monitor .................................................................................................... 23 SIMULATION ACTIVITIES ...................................................................................................................... 25 Topic 2: Datacap Dashboard ................................................................................................................ 27 Datacap Dashboard Views ................................................................................................................... 27
Content Management Terms and Descriptions ............................................................................ 30
Admissions Document Retrieval Manual
1
Datacap Document Capture
Unit Introduction
College documents will enter the system through a capture process that includes both scanning paper documents and importing electronic documents. The product that is used to capture documents is called IBM Datacap. Documents will be processed through a pre-defined Datacap workflow which includes tasks to be performed by human operators as well as through automation. The goal of the document capture workflow is to send each document along with its identifiable indexing information to the document repository.
This unit will describe the aspects of the Datacap document capture including:
• The Document capture workflow
• The Datacap Navigator client
• The automated document processing tasks
• Datacap system administration topics
Unit Objectives
Upon completion of this unit, you will be able to:
• Understand the purpose of each task in the document capture workflow. • Understand the Datacap Desktop purpose and functionality.
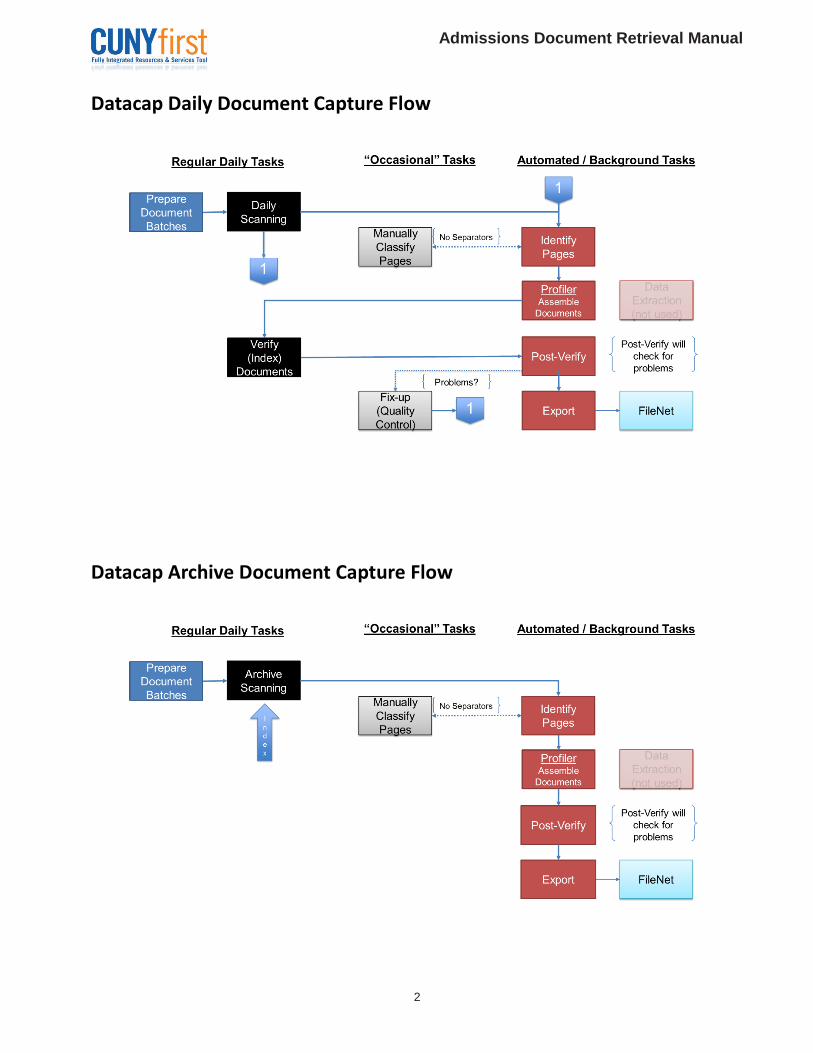
There are two main capture task flow types. The first type is for daily document capture. The second is for archive document capture. The daily document capture flow is for batches containing documents that may be associated with multiple students. It includes a separate verification (indexing) task that is used by an operator to provide student information individually to each document. It also provides the capability to route documents to a separate nFixUp task where an operator can correct problems batch problems such as rescanning pages or splitting single documents into multiple documents. The archive document capture flow is more streamlined. It is for batches containing multiple documents associated with a single user. All index information is provided during the scan task. Once the batch is scanned and submitted and separator pages have been used in the batch, there is no further human interaction with the batch before it moves to the export task where documents are uploaded to FileNet. The diagrams below provide an overview of the document capture task flow. As indicated in the diagrams, some are regular tasks performed by a human operator. Some are occasional tasks performed by a human operator. Others are automated/background tasks that are performed without operator involvement.
Admissions Document Retrieval Manual
2
Datacap Daily Document Capture Flow
Datacap Archive Document Capture Flow
Admissions Document Retrieval Manual
3
Chapter 1: Document Capture Workflow
Document capture processing requires multiple tasks, some automated, and some operator assisted. These tasks are combined into a capture task flow. Chapter Objectives
Upon completion of this chapter, you will be able to:
• Understand the difference between attended and automated document capture tasks • Understand the purpose of each attended tasks • Understand the purpose of each automated/background task
Overview of the Capture Workflow
Document workflow consists of several basic tasks which include: • Batch Preparation • Scanning or import • Identification of the scanned or imported pages and documents • Extraction of information from the documents • Verification of the extracted information • Export the documents and extracted data
Topic 1: Attended Tasks
The capture workflow attended tasks consist of tasks that require operator interaction. These are: scan/import (nScan and nArchive), manual page identification (nClassify), verification (nVerify), and fixup (nFixup).
Daily Scanning (nScan): After a batch of documents has been properly prepared and assembled for scanning, they are placed into the scanner. From the Datacap Navigator client, the scanner operator will select the scan function. If document separators have been placed in the batch during batch preparation, subsequent manual page classification task will be bypassed. Archive Scanning (nArchive): After a batch of documents has been properly prepared and assembled for scanning, they are placed into the scanner. From the Datacap Navigator client, the scanner operator will select the scan function. After the pages have been scanned, the operator will also provide the required index data. If document separators have been placed in the batch during batch preparation, subsequent manual page classification task will be bypassed.
Manually Classify Pages (nClassify): If a batch contains any unidentified pages, it will be necessary for an operator to manually identify the first page of each document in the batch. Unidentified pages have a page type of “Other”.
Admissions Document Retrieval Manual
4
The operator performs manual page identification from the nClassify task. If page identification is not done, or is done incorrectly, the batch will continually be re-routed to the nClassify task until all pages have been correctly identified.
Verify (nVerify): After pages in the batch have been identified, the batch will go through an automated task that will combine individual pages into documents. After this process has completed, an operator will be required to provide index data for each document and verify the accuracy of the data that has been pre-populated. The verification process is described in more detail later in this document.
Fix-up (nFixup): The verification operator will have the ability to flag any pages in the batch that need to be reviewed, rescanned or deleted from the batch. After the operator flags a page for one of these conditions, the associated document is split from the main batch and routed to a nFixup task. The remaining documents in the batch continue to the export task in the capture flow.
Topic 2: Automated Tasks
Automated tasks are tasks that run in the background and do not involve operator interaction.
Identify Pages: All pages scanned or imported into a batch need to be identified before any further steps can occur. Including document separator sheets in the batch enables the automated processes to perform this task without further operator input. If document separator sheets are not included in the batch, this task must be aided by routing the batch to the Manual Page Classification task (nClassify).
Profiler (Assemble Documents): After individual pages in a batch have been identified, a background task will run that will assemble the individual pages into complete documents.
Post-Verify: This task runs after the operator completes the verification step. It is responsible for routing documents to the nFixUp task that have been flagged for exception processing by the verification operator.
Export: The final background process is the export task. This task will take the data from each document as well as the document itself and export it to the CUNY FileNet repository.
Admissions Document Retrieval Manual
5
Chapter 2: Datacap Navigator Client
In the first chapter, we introduced the Datacap capture workflow. We discussed the types of tasks of the workflow and what entity is responsible for executing each of those tasks. In this chapter we will discuss the Datacap Navigator Client. The Navigator Client is a web interface that will enable the user to perform the attended tasks such as scanning, page identification, verification, and exception handling. Chapter Objectives
Upon completion of this chapter, you will:
• Understand the functionality of the Datacap Navigator client • Use the Datacap Navigator nScan task to scan paper documents. • Use the Datacap Navigator nArchive task to scan paper documents. • Use the Datacap Navigator nClassify task to manually identify pages. • Use the Datacap Navigator nVerify task to provide index information for transcript
and enrollment documents • Use the Datacap Navigator nFixup task to correct problems within the batch.
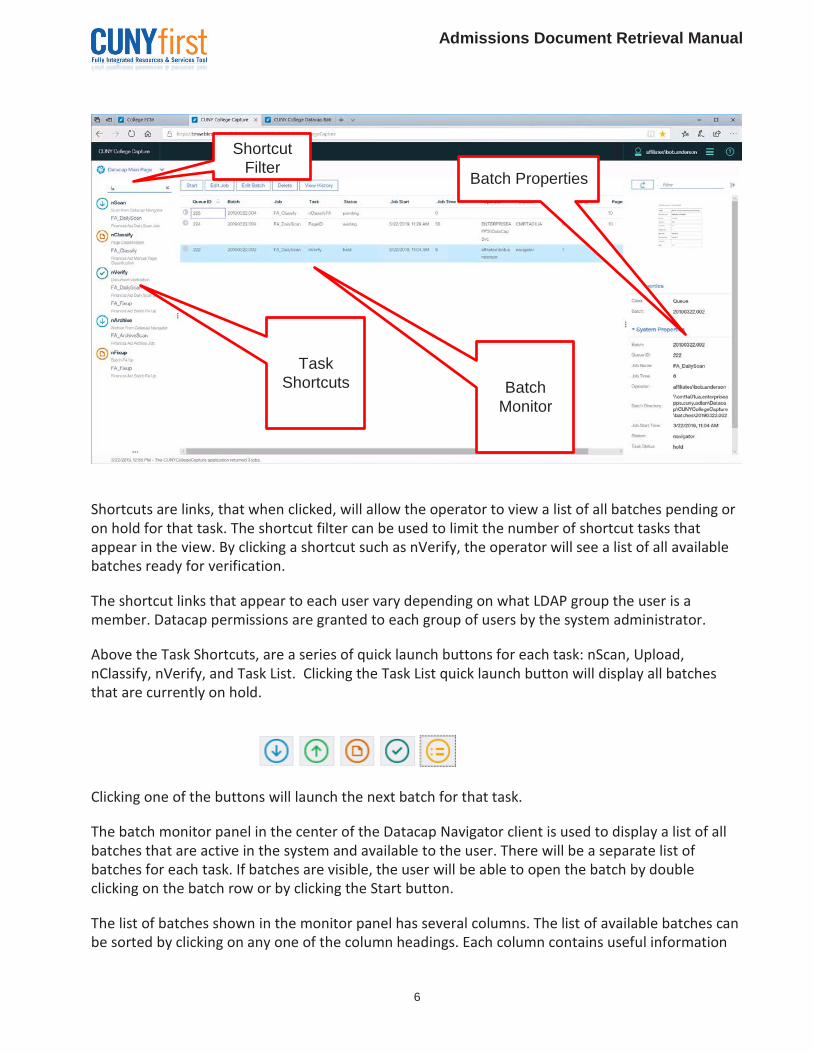
Topic 1: Navigator Client Overview
Below, is a view of the Datacap Navigator client. Open a web browser to the URL provided for your college. For example:
https://<hostname>:9443/navigator/?desktop=<College Identifier>CollegeCapture
A similar view will appear once a user logs in with his or her assigned credentials.
After logging in, users in each college department will be able to access batches for their own department. Departments include: Financial Aid, Registrar, and Health Services.
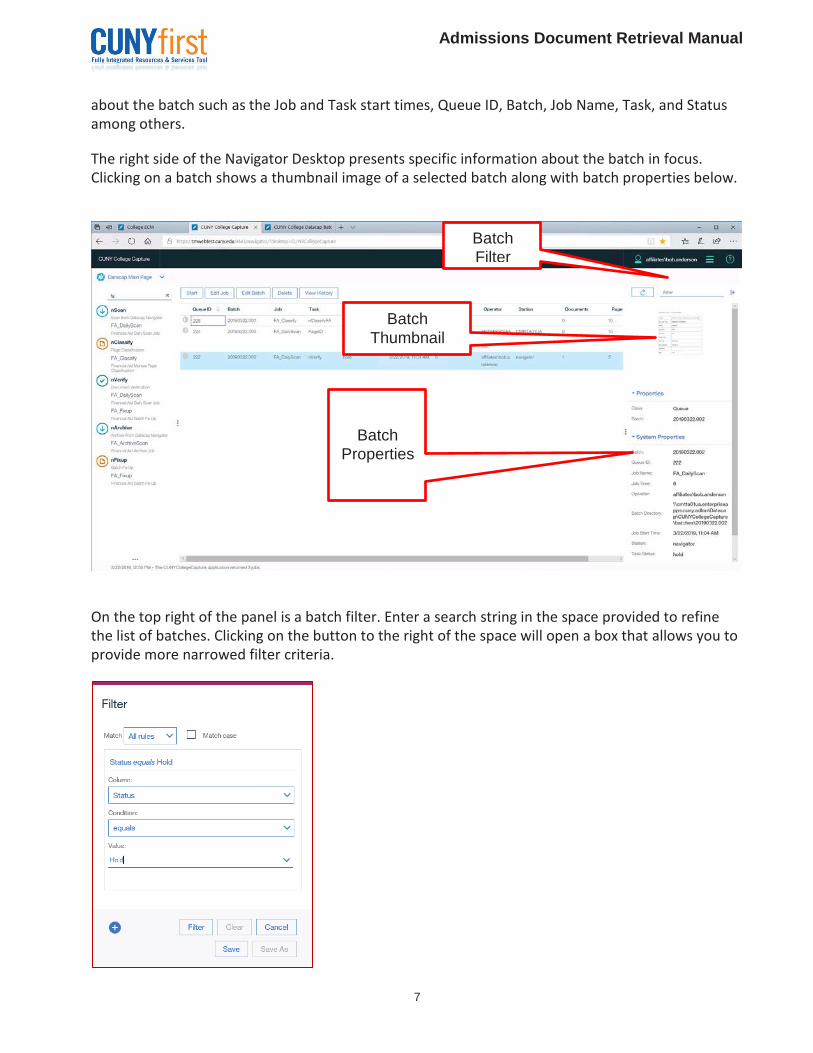
The Datacap Navigator client is divided into three main sections: Task Shortcuts on the left, Batch Monitor in the center, and batch properties on the right.
Admissions Document Retrieval Manual
6
Shortcuts are links, that when clicked, will allow the operator to view a list of all batches pending or on hold for that task. The shortcut filter can be used to limit the number of shortcut tasks that appear in the view. By clicking a shortcut such as nVerify, the operator will see a list of all available batches ready for verification.
The shortcut links that appear to each user vary depending on what LDAP group the user is a member. Datacap permissions are granted to each group of users by the system administrator.
Above the Task Shortcuts, are a series of quick launch buttons for each task: nScan, Upload, nClassify, nVerify, and Task List. Clicking the Task List quick launch button will display all batches that are currently on hold.
Clicking one of the buttons will launch the next batch for that task.
The batch monitor panel in the center of the Datacap Navigator client is used to display a list of all batches that are active in the system and available to the user. There will be a separate list of batches for each task. If batches are visible, the user will be able to open the batch by double clicking on the batch row or by clicking the Start button.
The list of batches shown in the monitor panel has several columns. The list of available batches can be sorted by clicking on any one of the column headings. Each column contains useful information
Task Shortcuts Batch
Monitor
Batch Properties
Shortcut Filter
Admissions Document Retrieval Manual
7
about the batch such as the Job and Task start times, Queue ID, Batch, Job Name, Task, and Status among others.
The right side of the Navigator Desktop presents specific information about the batch in focus. Clicking on a batch shows a thumbnail image of a selected batch along with batch properties below.
On the top right of the panel is a batch filter. Enter a search string in the space provided to refine the list of batches. Clicking on the button to the right of the space will open a box that allows you to provide more narrowed filter criteria.
Batch Properties
Batch Thumbnail
Batch Filter
Admissions Document Retrieval Manual
8
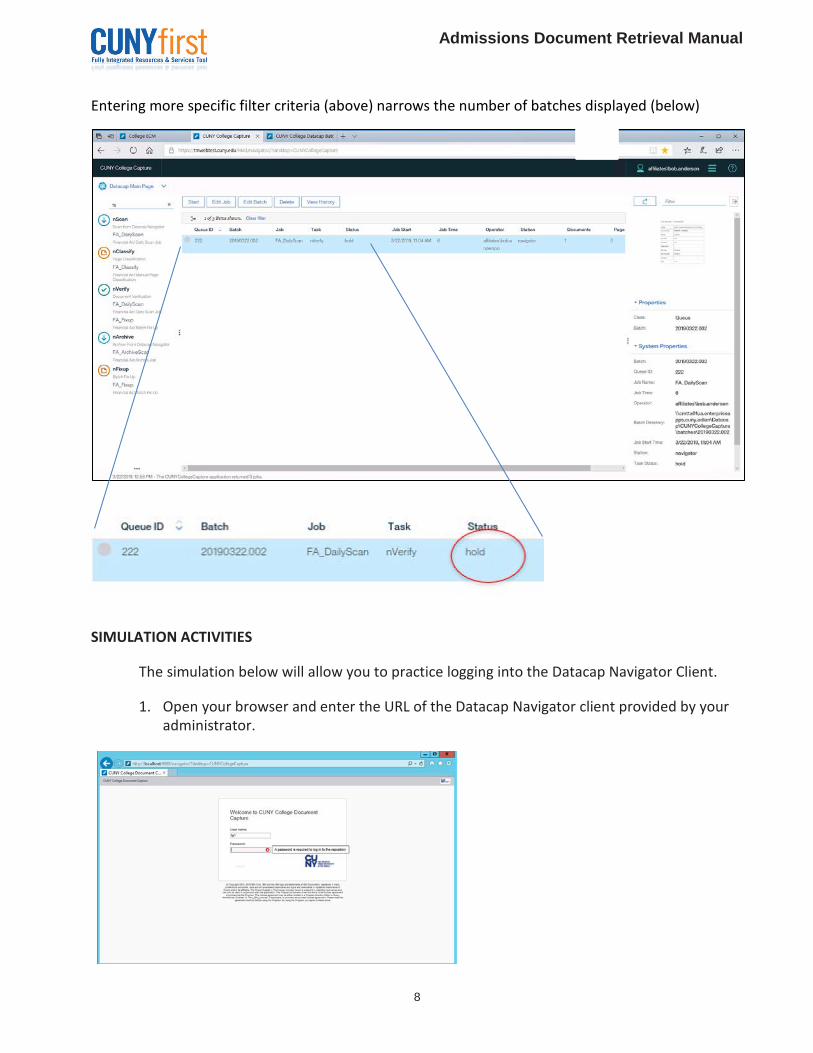
Entering more specific filter criteria (above) narrows the number of batches displayed (below)
SIMULATION ACTIVITIES
The simulation below will allow you to practice logging into the Datacap Navigator Client.
1. Open your browser and enter the URL of the Datacap Navigator client provided by your administrator.
Admissions Document Retrieval Manual
9
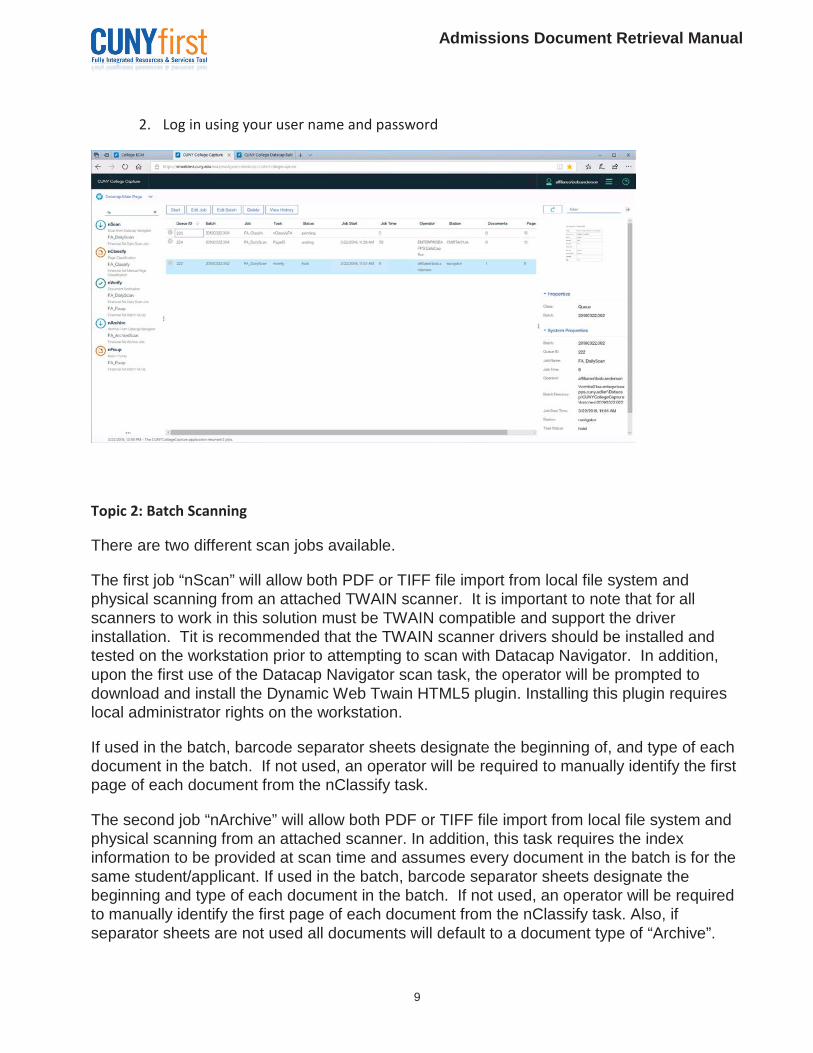
2. Log in using your user name and password
Topic 2: Batch Scanning
There are two different scan jobs available.
The first job “nScan” will allow both PDF or TIFF file import from local file system and physical scanning from an attached TWAIN scanner. It is important to note that for all scanners to work in this solution must be TWAIN compatible and support the driver installation. Tit is recommended that the TWAIN scanner drivers should be installed and tested on the workstation prior to attempting to scan with Datacap Navigator. In addition, upon the first use of the Datacap Navigator scan task, the operator will be prompted to download and install the Dynamic Web Twain HTML5 plugin. Installing this plugin requires local administrator rights on the workstation.
If used in the batch, barcode separator sheets designate the beginning of, and type of each document in the batch. If not used, an operator will be required to manually identify the first page of each document from the nClassify task.
The second job “nArchive” will allow both PDF or TIFF file import from local file system and physical scanning from an attached scanner. In addition, this task requires the index information to be provided at scan time and assumes every document in the batch is for the same student/applicant. If used in the batch, barcode separator sheets designate the beginning and type of each document in the batch. If not used, an operator will be required to manually identify the first page of each document from the nClassify task. Also, if separator sheets are not used all documents will default to a document type of “Archive”.
Admissions Document Retrieval Manual
10
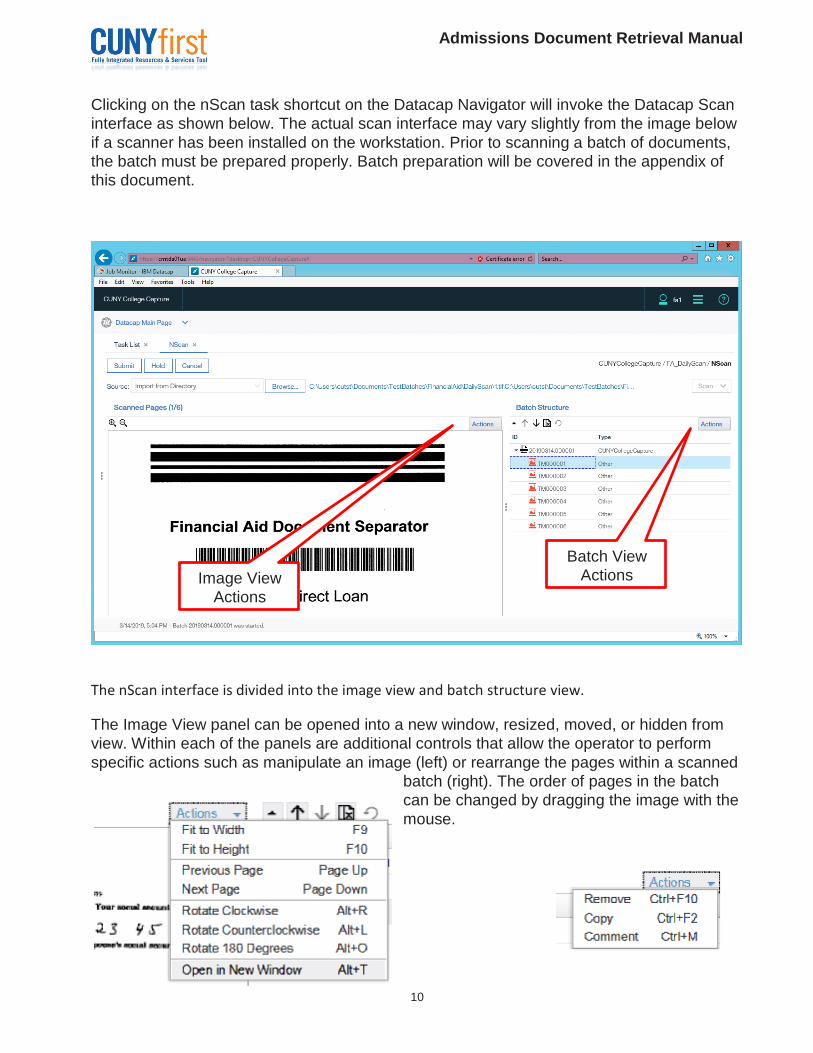
Clicking on the nScan task shortcut on the Datacap Navigator will invoke the Datacap Scan interface as shown below. The actual scan interface may vary slightly from the image below if a scanner has been installed on the workstation. Prior to scanning a batch of documents, the batch must be prepared properly. Batch preparation will be covered in the appendix of this document.
The nScan interface is divided into the image view and batch structure view.
The Image View panel can be opened into a new window, resized, moved, or hidden from view. Within each of the panels are additional controls that allow the operator to perform specific actions such as manipulate an image (left) or rearrange the pages within a scanned
batch (right). The order of pages in the batch can be changed by dragging the image with the mouse.
Image View Actions
Batch View Actions
Admissions Document Retrieval Manual
11
After the batch has been scanned, the operator can check the batch pages to ensure that all pages scanned cleanly and are in the proper sequence. If a page needs to be rescanned, or is deemed to be out of sequence, the operator can make the necessary adjustments prior to submitting the batch. If need be, the batch can be placed on hold by clicking the Hold button
SIMULATION ACTIVITIES
The simulation below will allow you to practice daily scanning hardcopy pages with Datacap Navigator.
1. Load the pages that you want to scan into your scanner's feeder.
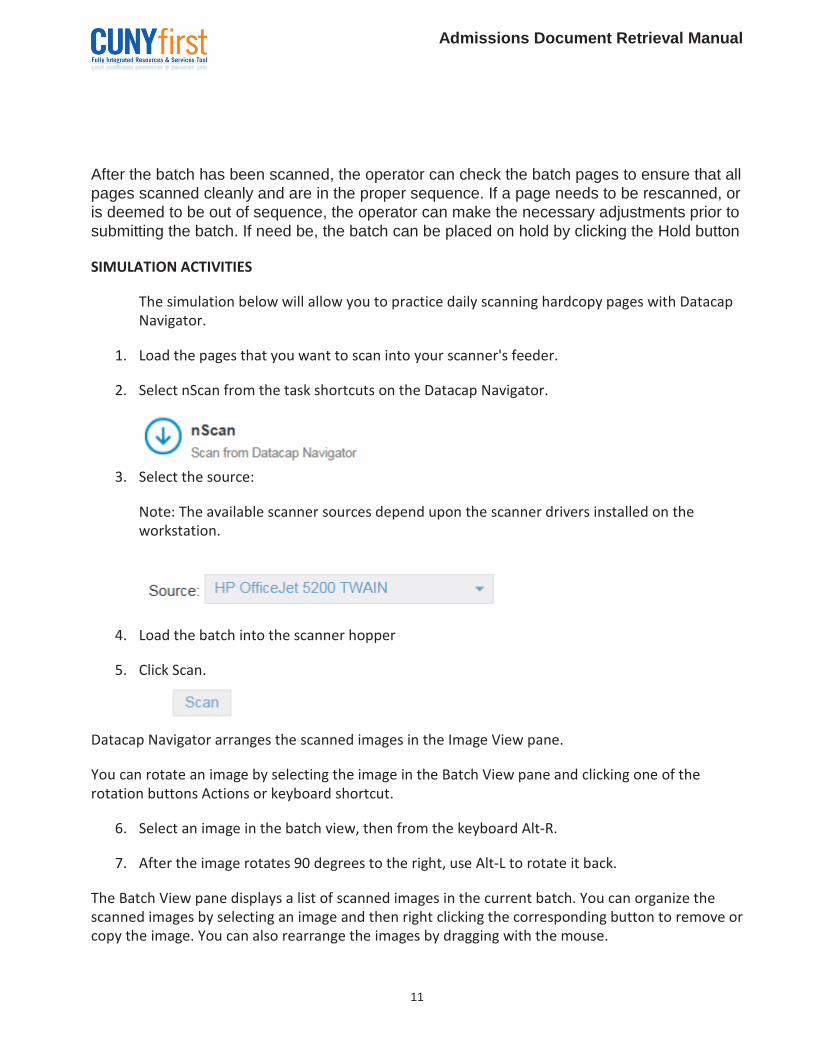
2. Select nScan from the task shortcuts on the Datacap Navigator.
3. Select the source:
Note: The available scanner sources depend upon the scanner drivers installed on the workstation.
4. Load the batch into the scanner hopper
5. Click Scan.
Datacap Navigator arranges the scanned images in the Image View pane.
You can rotate an image by selecting the image in the Batch View pane and clicking one of the rotation buttons Actions or keyboard shortcut.
6. Select an image in the batch view, then from the keyboard Alt-R.
7. After the image rotates 90 degrees to the right, use Alt-L to rotate it back.
The Batch View pane displays a list of scanned images in the current batch. You can organize the scanned images by selecting an image and then right clicking the corresponding button to remove or copy the image. You can also rearrange the images by dragging with the mouse.
Admissions Document Retrieval Manual
12
8. Click and hold the mouse button on one of the pages in the batch and drag it so that it is now in a different location in the batch, then drag it back.
9. Place more pages into your scanner’s feeder and click Scan to add images to the batch. Click the Scan button and choose Append from the choice list. The newly scanned pages will be added to the batch.
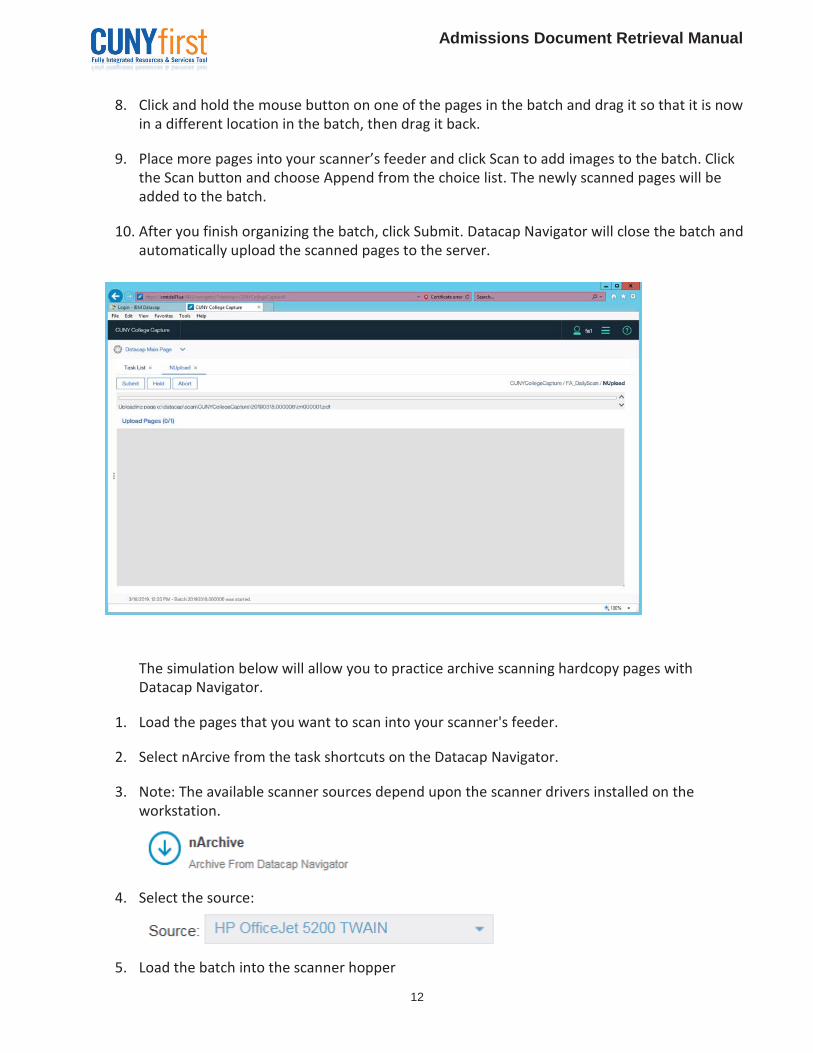
10. After you finish organizing the batch, click Submit. Datacap Navigator will close the batch and automatically upload the scanned pages to the server.
The simulation below will allow you to practice archive scanning hardcopy pages with Datacap Navigator.
1. Load the pages that you want to scan into your scanner's feeder.
2. Select nArcive from the task shortcuts on the Datacap Navigator.
3. Note: The available scanner sources depend upon the scanner drivers installed on the workstation.
4. Select the source:
5. Load the batch into the scanner hopper
Admissions Document Retrieval Manual
13
6. Click Scan.
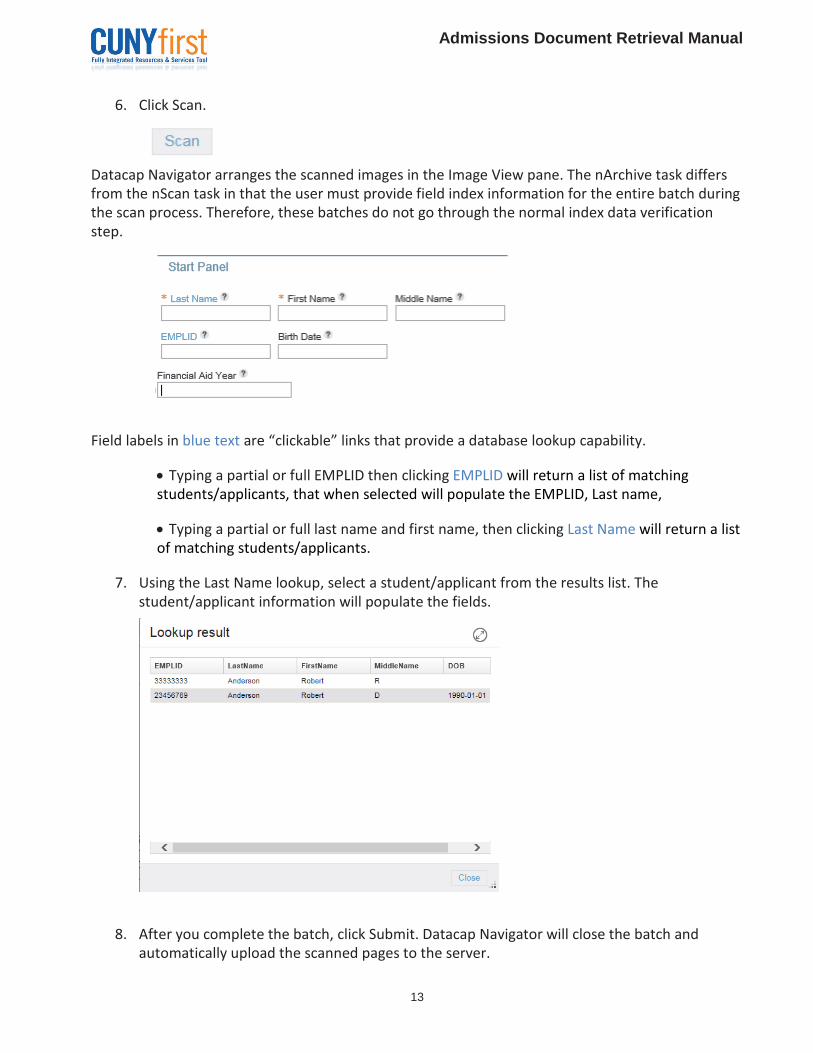
Datacap Navigator arranges the scanned images in the Image View pane. The nArchive task differs from the nScan task in that the user must provide field index information for the entire batch during the scan process. Therefore, these batches do not go through the normal index data verification step.
Field labels in blue text are “clickable” links that provide a database lookup capability.
• Typing a partial or full EMPLID then clicking EMPLID will return a list of matching students/applicants, that when selected will populate the EMPLID, Last name,
• Typing a partial or full last name and first name, then clicking Last Name will return a list of matching students/applicants.
7. Using the Last Name lookup, select a student/applicant from the results list. The student/applicant information will populate the fields.
8. After you complete the batch, click Submit. Datacap Navigator will close the batch and automatically upload the scanned pages to the server.
Admissions Document Retrieval Manual
14
Topic 3: Page Identification (nClassify)
All batches entering the system will undergo the automated background page identification task. Batches with pages that have not been identified must go through the operator assisted page identification (nClassify) task. The operator will verify and correct the results of the automated page identification or identify pages that were not previously identified.
Batch structure is critical to the integrity of the capture process. Therefore, when assembling a batch to be scanned, pages must be placed in the correct order. Ideally, each document (not page) in the batch will be separated by a barcoded separator page. If a document has multiple pages, the pages must be grouped together with the first page immediately following the separator page.
If the automated page identification can not determine how documents should be separated, the operator will perform that function.
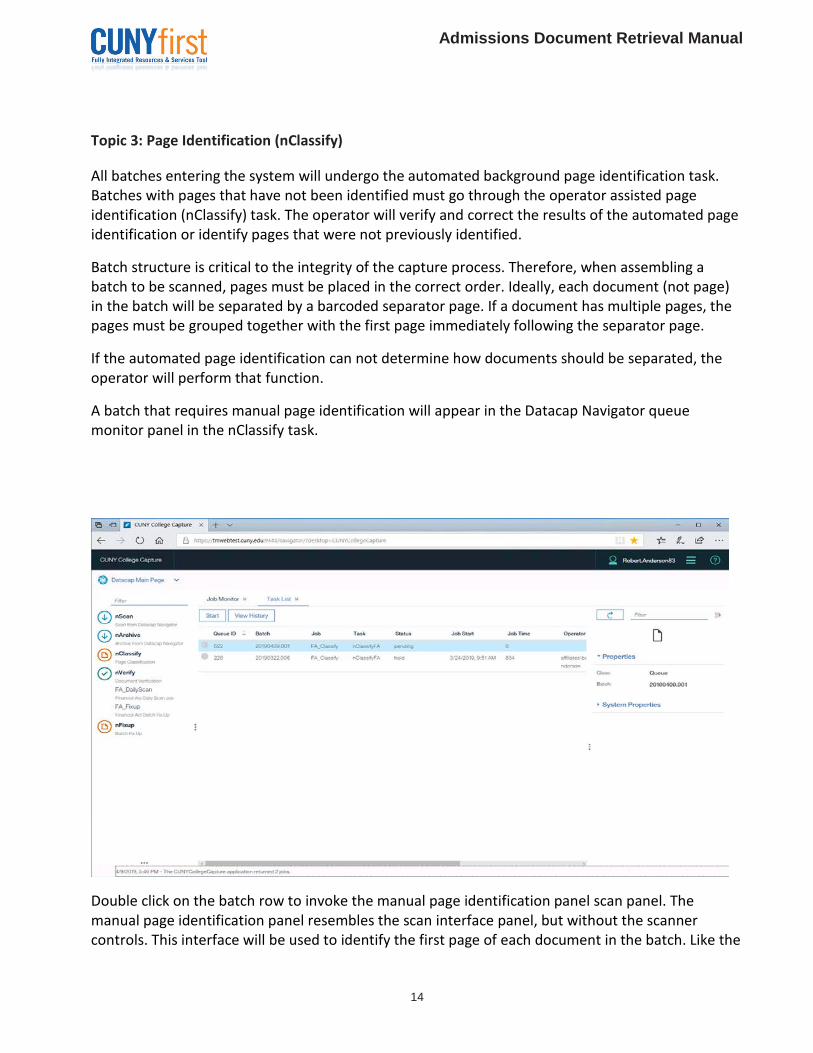
A batch that requires manual page identification will appear in the Datacap Navigator queue monitor panel in the nClassify task.
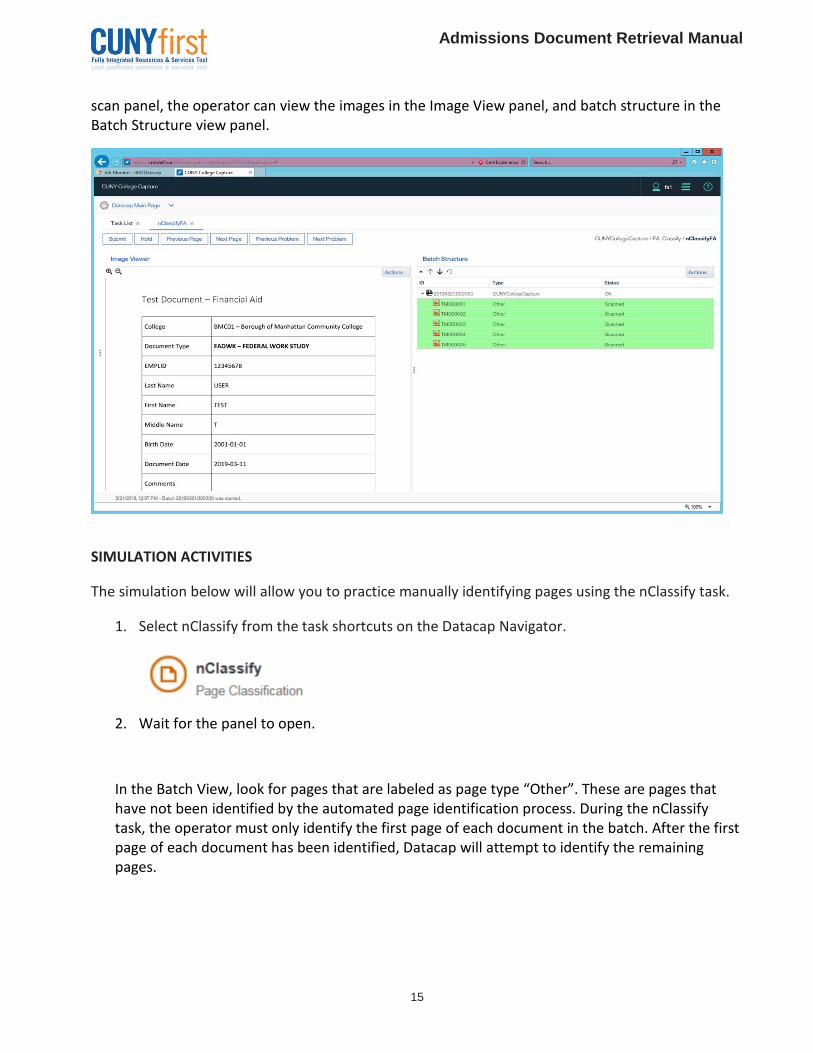
Double click on the batch row to invoke the manual page identification panel scan panel. The manual page identification panel resembles the scan interface panel, but without the scanner controls. This interface will be used to identify the first page of each document in the batch. Like the
Admissions Document Retrieval Manual
15
scan panel, the operator can view the images in the Image View panel, and batch structure in the Batch Structure view panel.
SIMULATION ACTIVITIES
The simulation below will allow you to practice manually identifying pages using the nClassify task.
1. Select nClassify from the task shortcuts on the Datacap Navigator.
2. Wait for the panel to open.
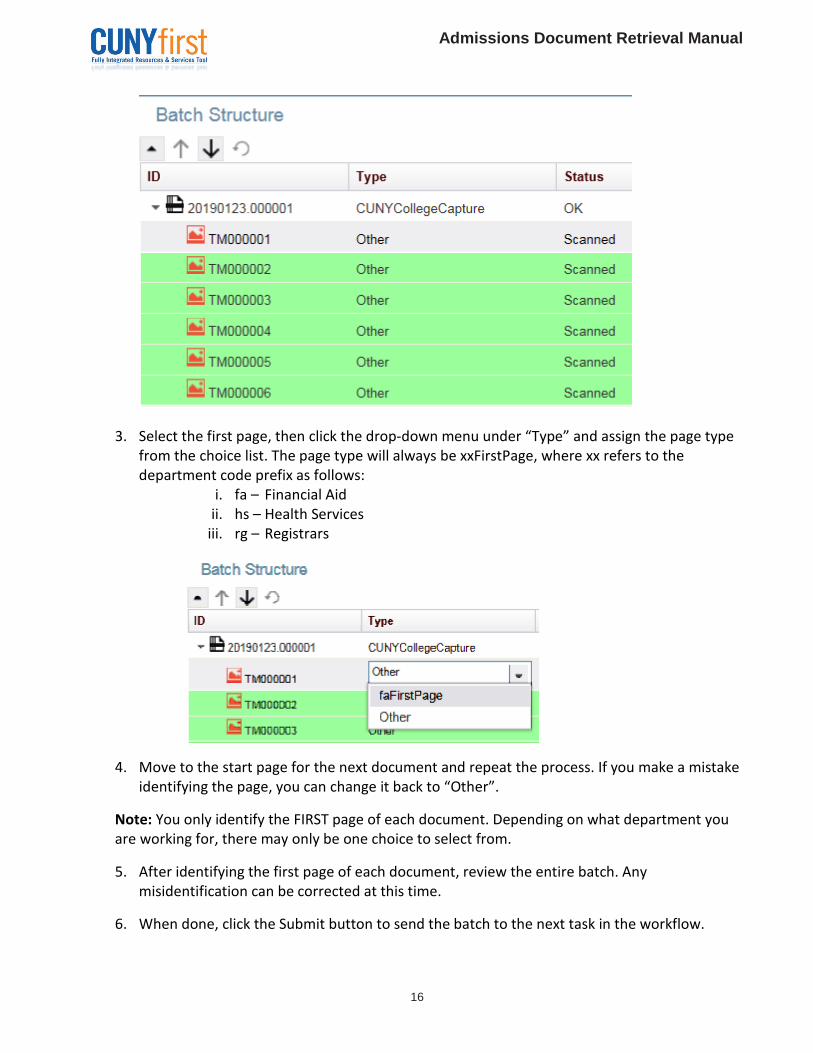
In the Batch View, look for pages that are labeled as page type “Other”. These are pages that have not been identified by the automated page identification process. During the nClassify task, the operator must only identify the first page of each document in the batch. After the first page of each document has been identified, Datacap will attempt to identify the remaining pages.
Admissions Document Retrieval Manual
16
3. Select the first page, then click the drop-down menu under “Type” and assign the page type from the choice list. The page type will always be xxFirstPage, where xx refers to the department code prefix as follows:
i. fa – Financial Aid ii. hs – Health Services
iii. rg – Registrars
4. Move to the start page for the next document and repeat the process. If you make a mistake identifying the page, you can change it back to “Other”.
Note: You only identify the FIRST page of each document. Depending on what department you are working for, there may only be one choice to select from.
5. After identifying the first page of each document, review the entire batch. Any misidentification can be corrected at this time.
6. When done, click the Submit button to send the batch to the next task in the workflow.

Admissions Document Retrieval Manual
17
Topic 4: Data Verification
Verification occurs after documents have been constructed.
The operator will need to provide missing or additional index information for each document in the batch. There are a few mechanisms in place to make this process more accurate and less cumbersome for the verification operator.
The verification interface consists of a tool bar and three main sections that can be manipulated according to operator preferences. The Image Viewer and Batch Structure sections can be resized, moved, or hidden from view. The Image View can be undocked from the main window which enables the image to be viewed on a second monitor. Within each of the sections are actions that allow the operator to perform specific functions such as resize and rotate the image.
The Field
Details view is where index data will be provided by the operator. For some fields, the information that is required to be captured is done so automatically. For others, the information required must be provided by the verification operator. The Datacap application provides various means to provide the information during verification by using database lookups, ClickNKey, and manual data entry. Each of these methods will be described below.
Admissions Document Retrieval Manual
18
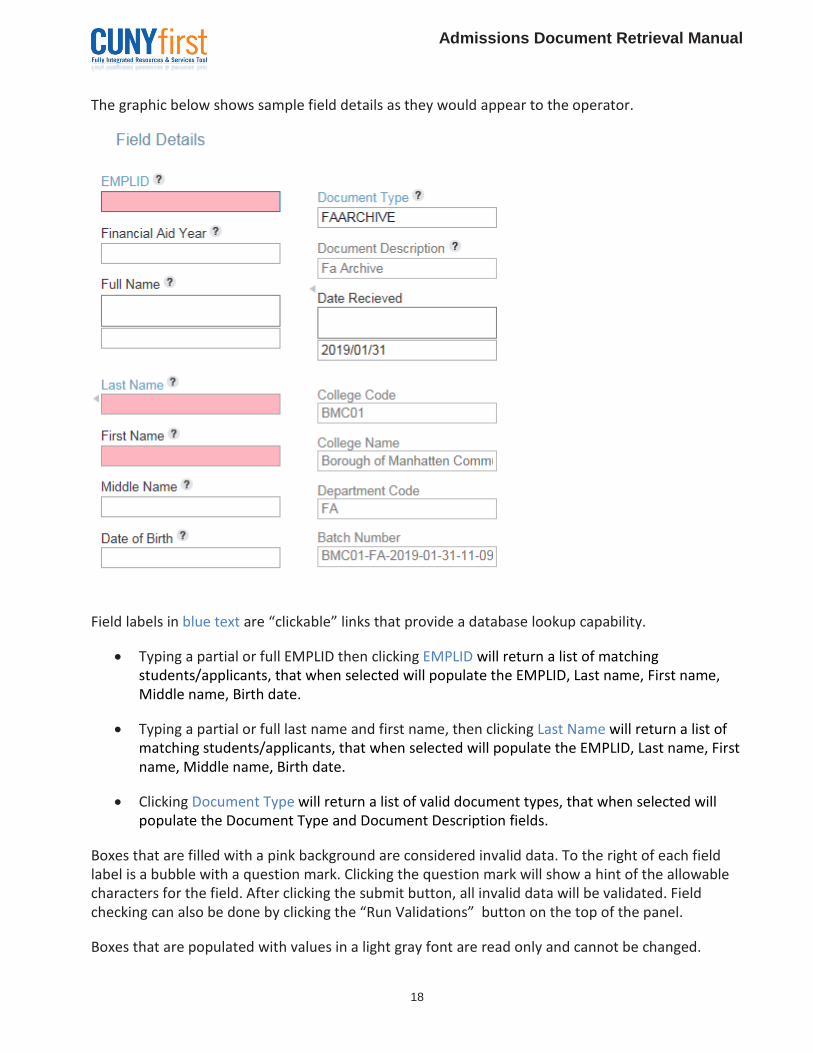
The graphic below shows sample field details as they would appear to the operator.
Field labels in blue text are “clickable” links that provide a database lookup capability.
• Typing a partial or full EMPLID then clicking EMPLID will return a list of matching students/applicants, that when selected will populate the EMPLID, Last name, First name, Middle name, Birth date.
• Typing a partial or full last name and first name, then clicking Last Name will return a list of matching students/applicants, that when selected will populate the EMPLID, Last name, First name, Middle name, Birth date.
• Clicking Document Type will return a list of valid document types, that when selected will populate the Document Type and Document Description fields.
Boxes that are filled with a pink background are considered invalid data. To the right of each field label is a bubble with a question mark. Clicking the question mark will show a hint of the allowable characters for the field. After clicking the submit button, all invalid data will be validated. Field checking can also be done by clicking the “Run Validations” button on the top of the panel.
Boxes that are populated with values in a light gray font are read only and cannot be changed.
Admissions Document Retrieval Manual
19
If a value is in the Full Name field, that value will be used to automatically populate the first, middle, and last name fields.
ClickNKey is a capability that assists in the manual entry of data into a verification form by allowing the operator to select words directly from the page in the image viewer. The steps to use ClickNkey to populate a field are as follows:
• On the Field details panel, click focus to the field to be populated.
• In the Image Viewer, first click on the control, then using the mouse, draw a box around the image text that you want to grab. The resultant text will be copied into the field.
Marking Exceptions Occasionally, a misidentified document, document of poor quality, or pages that should not be grouped together may slip through to the Verify process. If this occurs, the verification operator can choose to flag a page for review, rescan, or deletion. Flagging a page in a document will route that document to the nFixUp task where corrective actions can be taken.
Right click on a page in the Batch View, then click either Mark for Review, Mark for Rescan, or Mark for Delete. You can optionally provide an explanation by clicking on Comment and entering an more information. After the batch is submitted, it will then be routed to the exception handling nFixUp task for action by an operator.
SIMULATION ACTIVITIES
The simulation below will allow you to practice verifying pages using the Verify task.
1. Select Verify from the task shortcuts on the Datacap Navigator.
2. Select a batch from the Queue Monitor by double clicking on the batch entry row or by clicking the Start button.
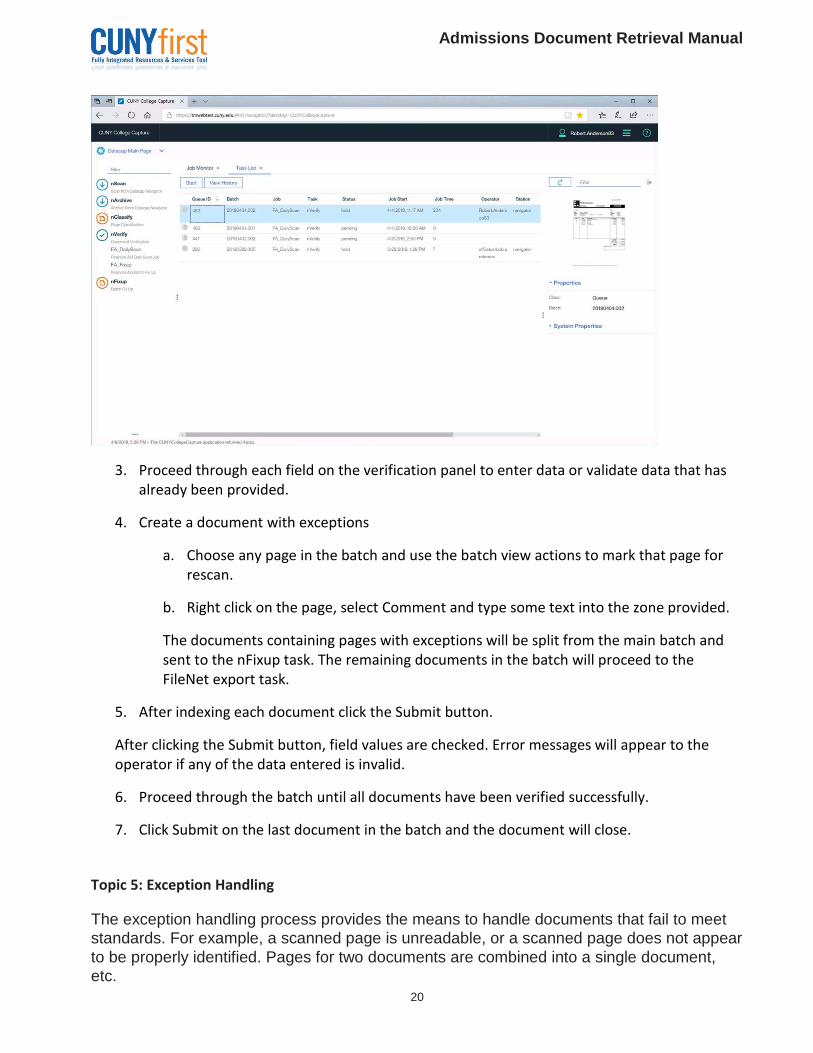
Admissions Document Retrieval Manual
20
3. Proceed through each field on the verification panel to enter data or validate data that has already been provided.
4. Create a document with exceptions
a. Choose any page in the batch and use the batch view actions to mark that page for rescan.
b. Right click on the page, select Comment and type some text into the zone provided.
The documents containing pages with exceptions will be split from the main batch and sent to the nFixup task. The remaining documents in the batch will proceed to the FileNet export task.
5. After indexing each document click the Submit button.
After clicking the Submit button, field values are checked. Error messages will appear to the operator if any of the data entered is invalid.
6. Proceed through the batch until all documents have been verified successfully.
7. Click Submit on the last document in the batch and the document will close.
Topic 5: Exception Handling
The exception handling process provides the means to handle documents that fail to meet standards. For example, a scanned page is unreadable, or a scanned page does not appear to be properly identified. Pages for two documents are combined into a single document, etc.
Admissions Document Retrieval Manual
21
If, after visual inspection, the verification operator flags a document page for review, rescan, or deletion, the batch will be routed to the nFixup task.
To resolve the problem that caused the batch to be routed to the nFixup task, the operator will click the Fixup shortcut from the Datacap Navigator Task Shortcuts so that corrective action can be taken.
SIMULATION ACTIVITIES
The simulation below will allow you to practice correcting batch problems using the Fixup task.
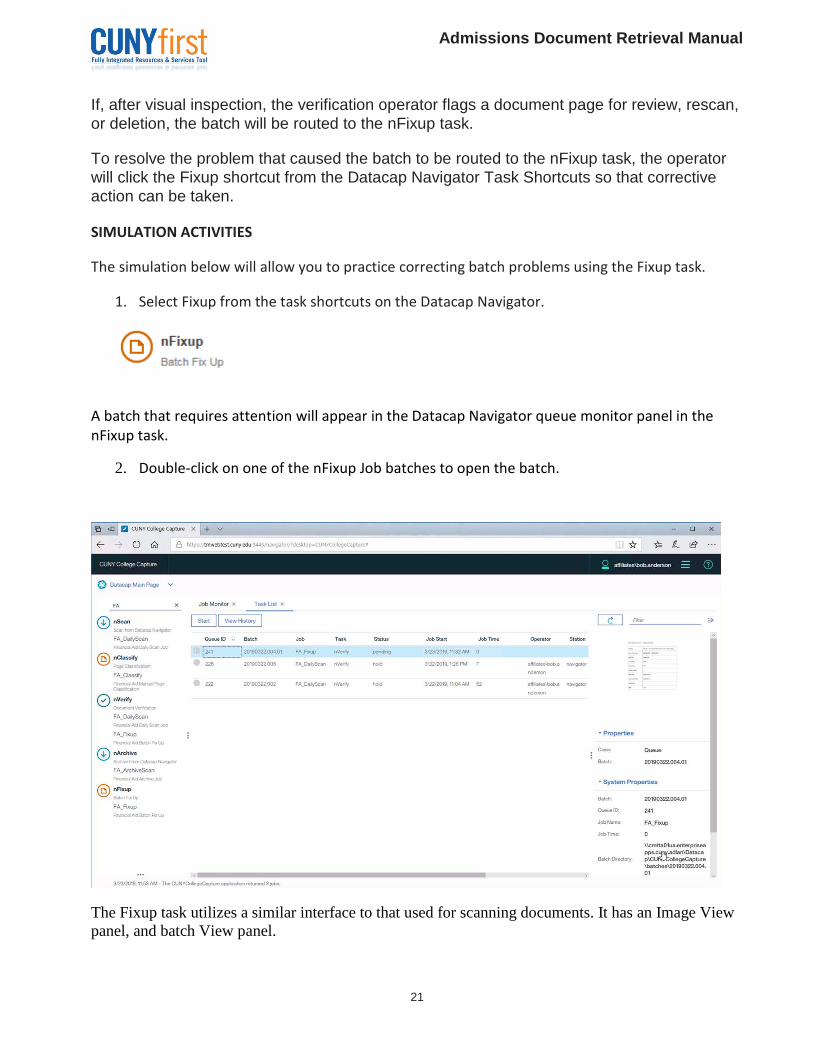
1. Select Fixup from the task shortcuts on the Datacap Navigator.
A batch that requires attention will appear in the Datacap Navigator queue monitor panel in the nFixup task.
2. Double-click on one of the nFixup Job batches to open the batch.
The Fixup task utilizes a similar interface to that used for scanning documents. It has an Image View panel, and batch View panel.
Admissions Document Retrieval Manual
22
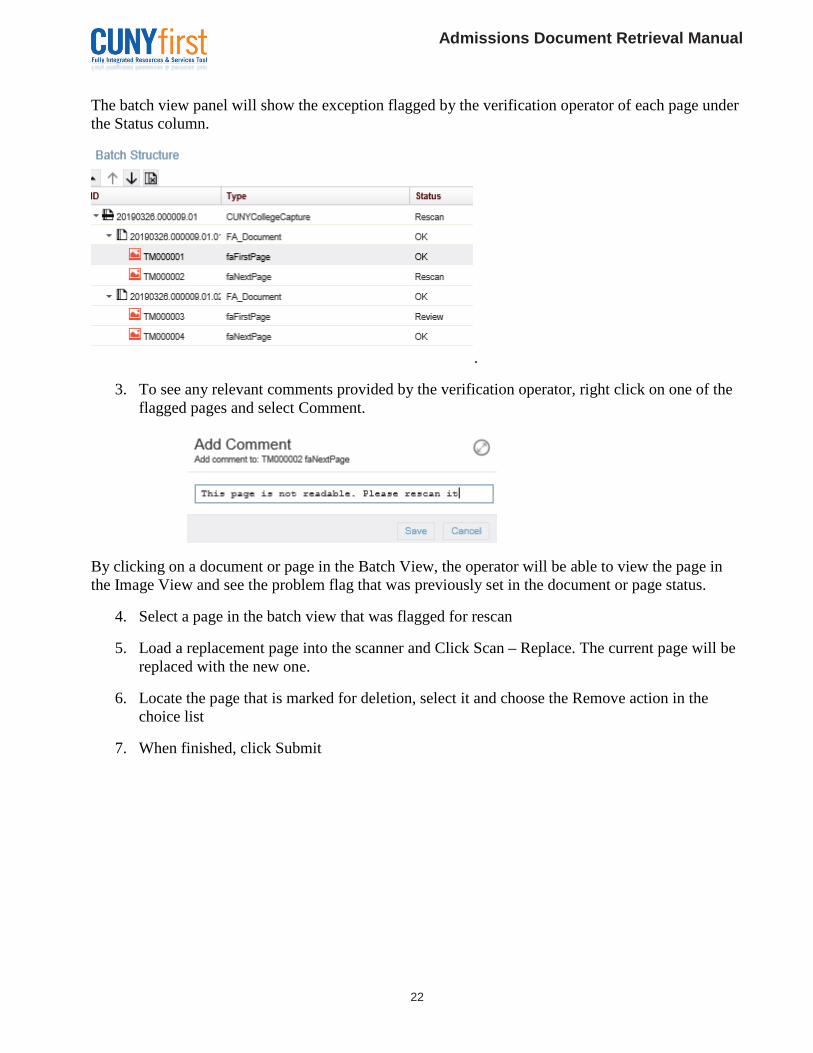
The batch view panel will show the exception flagged by the verification operator of each page under the Status column.
.
3. To see any relevant comments provided by the verification operator, right click on one of the flagged pages and select Comment.
By clicking on a document or page in the Batch View, the operator will be able to view the page in the Image View and see the problem flag that was previously set in the document or page status.
4. Select a page in the batch view that was flagged for rescan
5. Load a replacement page into the scanner and Click Scan – Replace. The current page will be replaced with the new one.
6. Locate the page that is marked for deletion, select it and choose the Remove action in the choice list
7. When finished, click Submit
Admissions Document Retrieval Manual
23
Chapter 3: Datacap System Administration
Chapter Objectives
Upon completion of this chapter, you will be able to:
• Understand how to monitor batches moving through the capture workflow tasks • Understand what actions to take in the event batches do not complete successfully • Become familiar with the Datacap Dashboard.
Topic 1: Datacap Navigator Monitor
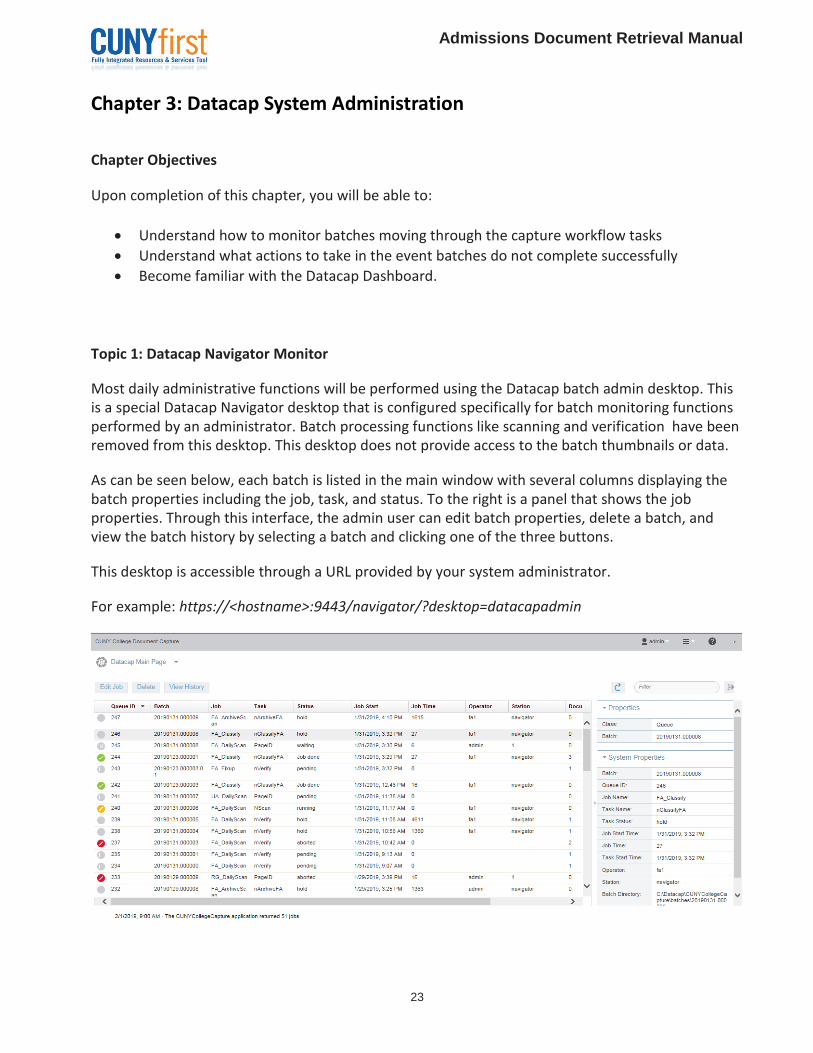
Most daily administrative functions will be performed using the Datacap batch admin desktop. This is a special Datacap Navigator desktop that is configured specifically for batch monitoring functions performed by an administrator. Batch processing functions like scanning and verification have been removed from this desktop. This desktop does not provide access to the batch thumbnails or data.
As can be seen below, each batch is listed in the main window with several columns displaying the batch properties including the job, task, and status. To the right is a panel that shows the job properties. Through this interface, the admin user can edit batch properties, delete a batch, and view the batch history by selecting a batch and clicking one of the three buttons.
This desktop is accessible through a URL provided by your system administrator.
For example: https://<hostname>:9443/navigator/?desktop=datacapadmin
Admissions Document Retrieval Manual
24
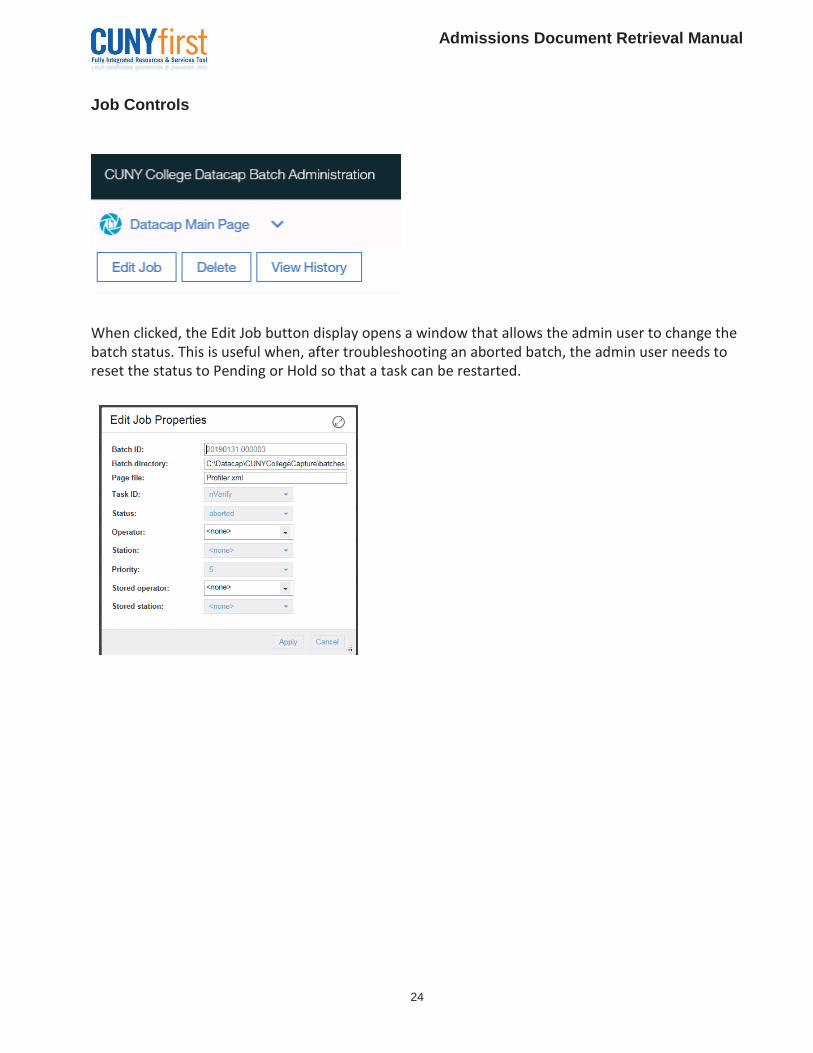
Job Controls
When clicked, the Edit Job button display opens a window that allows the admin user to change the batch status. This is useful when, after troubleshooting an aborted batch, the admin user needs to reset the status to Pending or Hold so that a task can be restarted.
Admissions Document Retrieval Manual
25
SIMULATION ACTIVITIES
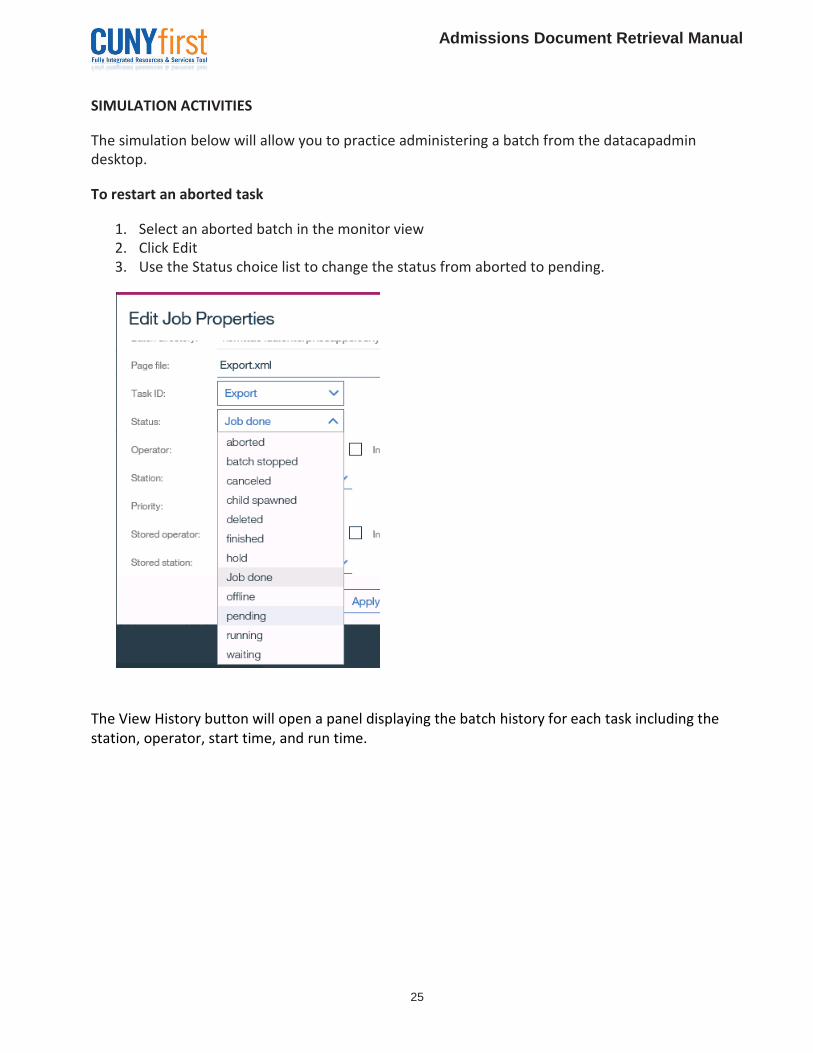
The simulation below will allow you to practice administering a batch from the datacapadmin desktop.
To restart an aborted task
1. Select an aborted batch in the monitor view 2. Click Edit 3. Use the Status choice list to change the status from aborted to pending.
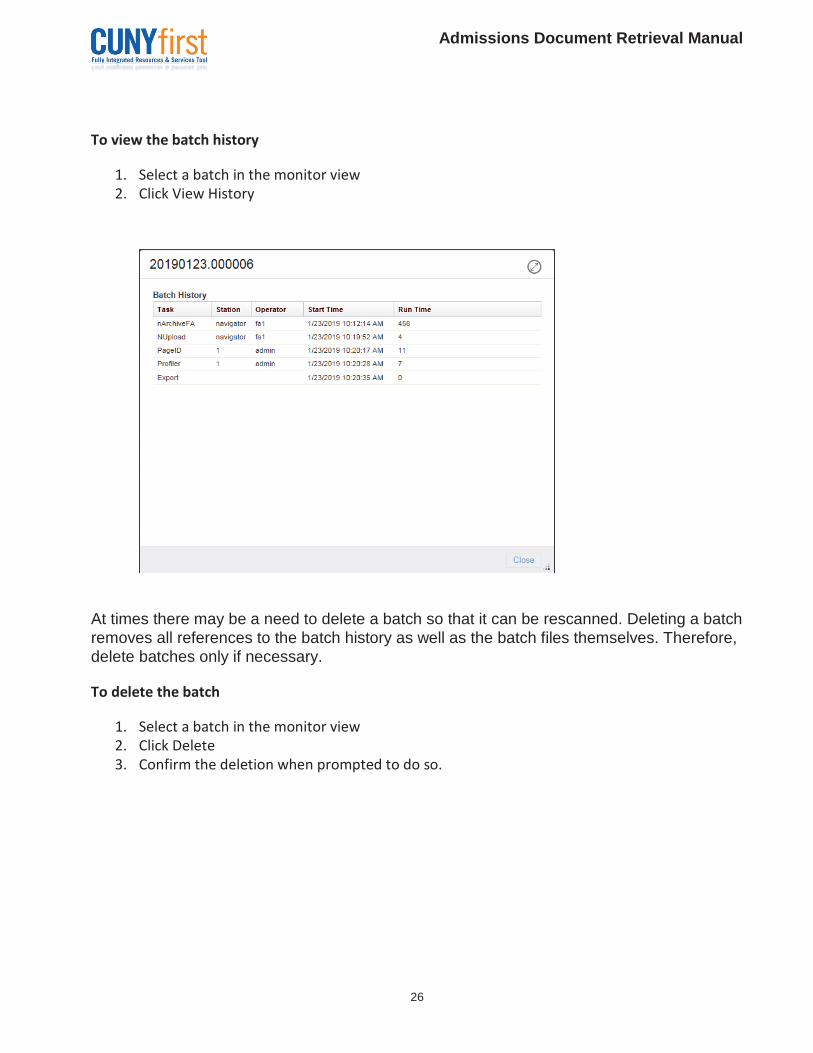
The View History button will open a panel displaying the batch history for each task including the station, operator, start time, and run time.
Admissions Document Retrieval Manual
26
To view the batch history
1. Select a batch in the monitor view 2. Click View History
At times there may be a need to delete a batch so that it can be rescanned. Deleting a batch removes all references to the batch history as well as the batch files themselves. Therefore, delete batches only if necessary.
To delete the batch
1. Select a batch in the monitor view 2. Click Delete 3. Confirm the deletion when prompted to do so.
Admissions Document Retrieval Manual
27
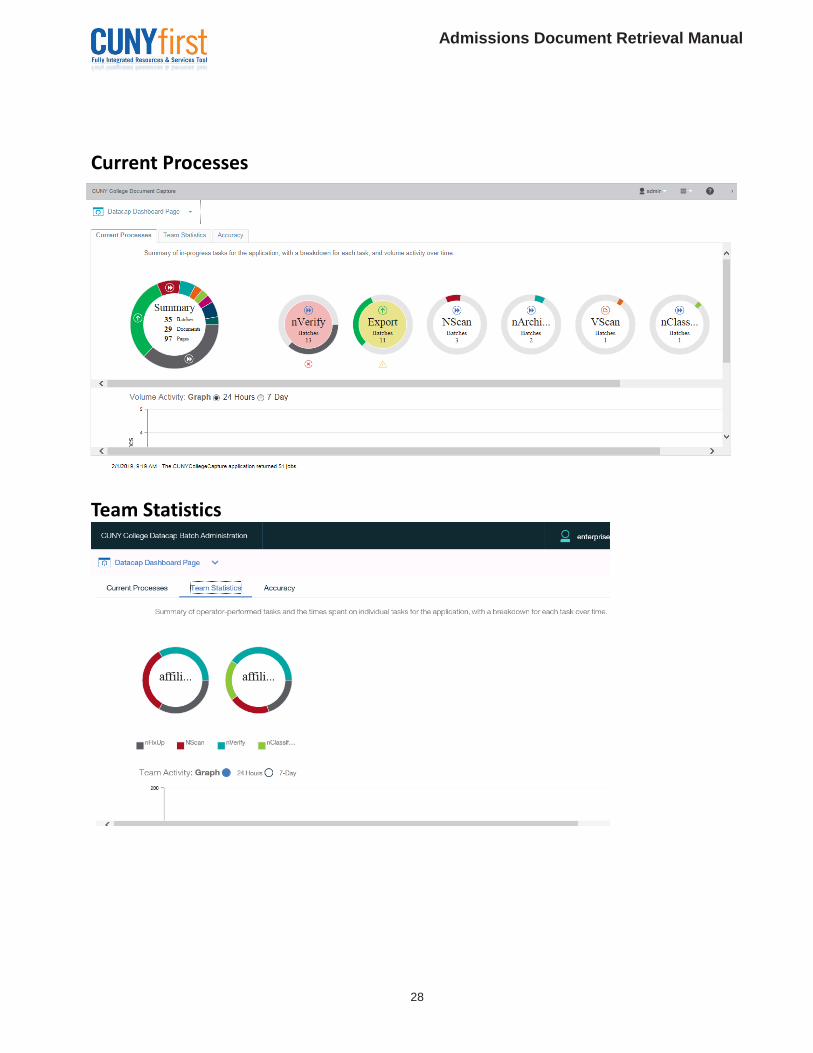
Topic 2: Datacap Dashboard
Monitor the Datacap system by using the dashboard in Datacap Navigator. The dashboard shows summary information for the following categories in three tabs:
• Current Processes - Summary of in-progress tasks for the application, with a breakdown for each task, and volume activity over time.
• Team Statistics - Summary of operator-performed tasks and the times spent on individual tasks for the application, with a breakdown for each task over time.
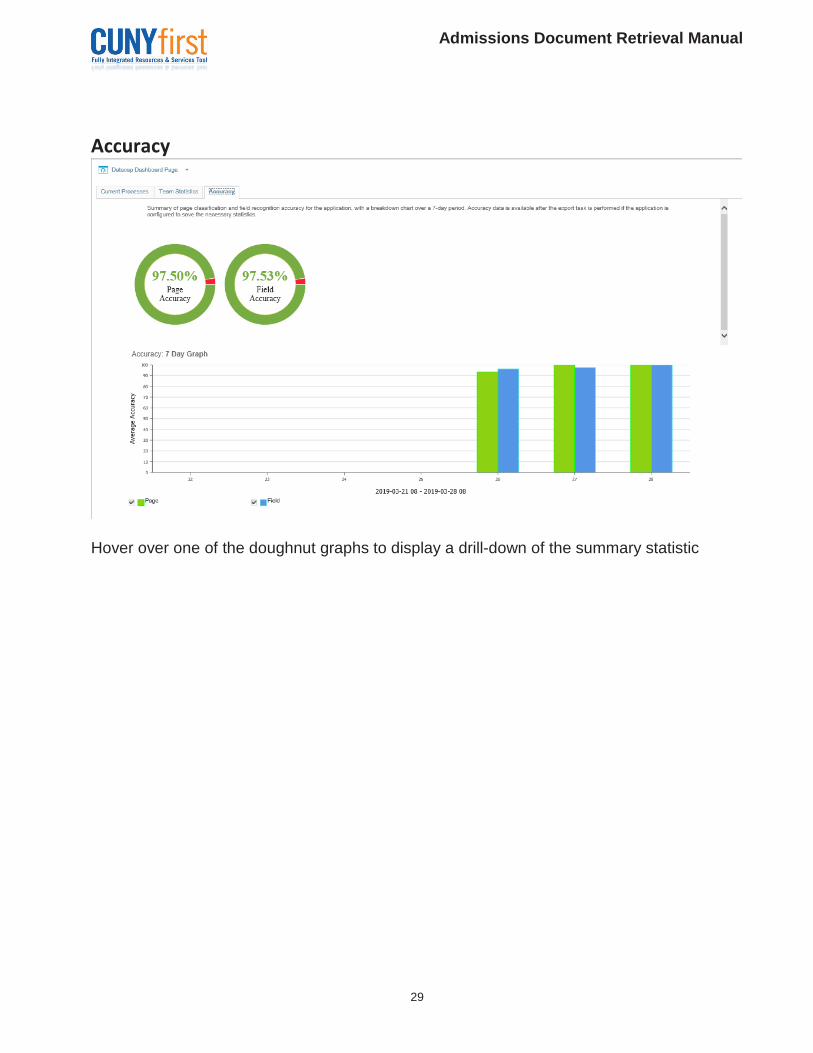
• Accuracy - Summary of page classification and field recognition accuracy for the application, with a breakdown chart over a 7-day period. Accuracy data is available after the export task is performed if the application is configured to save the necessary statistics.
Note: Available Accuracy statistics may be limited since the current College capture application does not make use of OCR-based indexing or fingerprint page classification
The summary information is shown in two main ways:
• Donuts- The relative amounts of various items are shown visually in circles that are called donuts. For example, for in-progress tasks, the proportion of batches that are in the Verify task is shown.
• Graphs- Item metrics over time are shown.
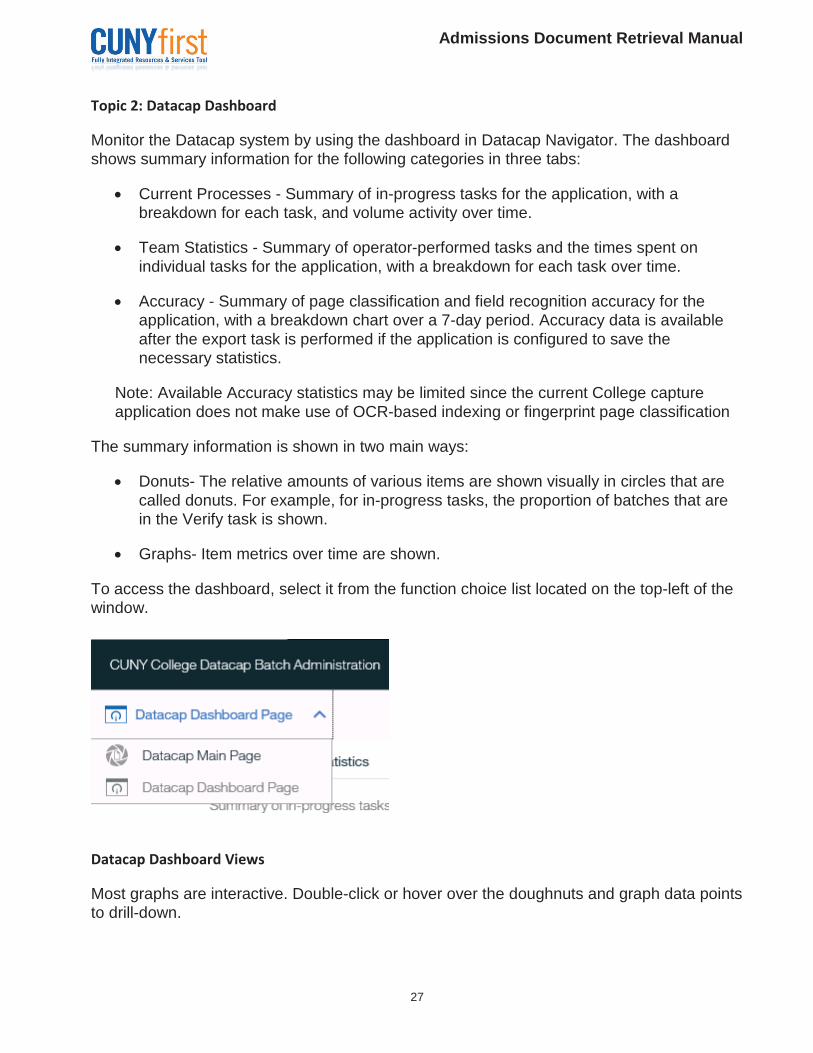
To access the dashboard, select it from the function choice list located on the top-left of the window.
Datacap Dashboard Views
Most graphs are interactive. Double-click or hover over the doughnuts and graph data points to drill-down.
Admissions Document Retrieval Manual
28
Current Processes
Team Statistics
Admissions Document Retrieval Manual
29
Accuracy
Hover over one of the doughnut graphs to display a drill-down of the summary statistic
Admissions Document Retrieval Manual
30
Content Management Terms and Descriptions
Term Description
Annotation Annotations are small images or text that overlay a document. These are useful for highlighting areas, making comments, or providing stamps for approvals or other functions.
Application Document
An application document is any document associated with a specific application, including the application itself. These documents will carry the application number to allow filtering of documents for viewing.
Authentication Authentication is the mechanism for allowing a user to access documents in the document management system. Authentication requires that a user have a UserID and password in the security system that is a member of a group that has access to the document management system.
Authorization Authorization is
Button A button is an on-screen component in a web page for performing a function. The function is initiated by clicking the button.
Content Content is any unstructured or structured information. For purpose of this document, content refers to any object stored in the content (document) management system.
Document A document is an unstructured set of content, such as a letter or spreadsheet or image. Documents can consist of one or more pages. For the purposes of this application, documents will exist in either tiff or pdf format.
Document List A document list is a group of one or more rows with attributes defining a document. The list is initiated by a search and presented in a results window.
ECM Enterprise Content Management. This is an industry term to describe the system in which unstructured content, such as electronic documents are stored.
Group A group is a security group defined in the company security system to which users can be added. Groups are defined in the document management system to allow users to do specific functions. For example, if you are a member of a security group that allows you to view certain document classes, you will be able to retrieve those document classes.
Link A link is a component on a web page, such as a button, that redirects you to a new component page. For example, the document search button links you to the search and document list web page.
Log on The process of authenticating yourself to a system. This generally required a UserID and password.
Search A search is a function to find documents or content with specific attributes characteristics. It is initiated by retrieving attribute values from a CUNYfirst component and calling a search module with those attributes to filter the document list. Generally, all searches will have at least an EMPLID value defined.
Test A document that provided information on test results for an applicant or student.
Thumbnail A small image of a document used primarily for page navigation. Thumbnails provide the ability to view multiple pages simultaneously to quickly select which page to view.
Admissions Document Retrieval Manual
31
Term Description
Transcript A transcript document provides previous educational information at an institution. It is institution specific.
Print Provide a paper copy of a document stored electronically.
Viewer A component in the document management system to visually see and manage a document on-screen.
Web Page An interface to the CUNYfirst or document management system that opens in a standard browser such as Internet Explorer.