data structures b.tech eee ii year i … dept. of eee lecture notes on data structures b.tech eee ii...
TRANSCRIPT

CREC, Dept. of EEE
LECTURE NOTES
ON
DATA STRUCTURES
B.TECH EEE II YEAR I SEMESTER(JNTUA-R15)
Mrs. N.HEMALATHAASST.PROFESSOR
DEPARTMENT OF COMPUTER SCIENCE & ENGINEERING
CHADALAWADA RAMANAMMA ENGINEERING COLLEGECHADALAWADA NAGAR, RENIGUNTA ROAD, TIRUPATI (A.P) - 517506

N.HEMALATHA, Dept. of CSE.
JAWAHARLAL NEHRU TECHNOLOGICAL UNIVERSITY ANANTAPUR
B. Tech II - I sem (E.E.E) T Tu C3 1 3
(15A05201) DATA STRUCTURES(Common to all branches of Engineering)
Objectives:
∑ Understand different Data Structures
∑ Understand Searching and Sorting techniques
Unit-1: Introduction and overview: Asymptotic Notations, One Dimensional array- Multi Dimensional array-pointer arrays.
Linked lists: Definition- Single linked list- Circular linked list- Double linked list- Circular Double linked list-Application of linked lists.
Unit-2:Stacks: Introduction-Definition-Representation of Stack-Operations on Stacks- Applications of Stacks.
Queues: Introduction, Definition- Representations of Queues- Various Queue Structures- Applications of Queues. Tables: Hash tables.
Unit-3:Trees: Basic Terminologies- Definition and Concepts- Representations of Binary Tree- Operation on a Binary Tree- Types of Binary Trees-Binary Search Tree, Heap Trees, Height Balanced Trees, B. Trees, Red Black Trees. Graphs: Introduction- Graph terminologies- Representation of graphs- Operations on Graphs- Application of Graph Structures: Shortest path problem- topological sorting.
Unit-4:Sorting : Sorting Techniques- Sorting by Insertion: Straight Insertion sort- List insertion sort- Binary insertion sort- Sorting by selection: Straight selection sort- Heap Sort- Sorting by Exchange- Bubble Sort- Shell Sort-Quick Sort-External Sorts: Merging Order Files-Merging Unorder Files- Sorting Process.
Unit-5:Searching: List Searches- Sequential Search- Variations on Sequential Searches- Binary Search-Analyzing Search Algorithm- Hashed List Searches- Basic Concepts- Hashing Methods- Collision Resolutions-Open Addressing- Linked List Collision Resolution- Bucket Hashing.
Text Books:
1. “Classic Data Structures”, Second Edition by Debasis Samanta, PHI.
2. “Data Structures A Pseudo code Approach with C”, Second Edition by
Richard F. Gilberg, Behrouz A. Forouzan, Cengage Learning.
Reference Books:
1. Fundamentals of Data Structures in C – Horowitz, Sahni, Anderson- Freed, Universities Press, Second Edition.
2. Schaum’ Outlines – Data Structures – Seymour Lipschutz – McGrawHill-Revised First Edition.
3. Data structures and Algorithms using C++, Ananda Rao Akepogu and Radhika Raju Palagiri, Pearson Education.

DEPARTMENT OF COMPUTER SCIENCE & ENGINEERING
SUB: DATA STRUCTURES

Objectives:
• Understand different Data Structures
• Understand Searching and Sorting techniques
Unit-1 Introduction and overview: Asymptotic Notations, One Dimensional array , Multi
Dimensional array- pointer arrays. Linked lists: Definition- Single linked list- Circular
linked list- Double linked list- Circular Double linked list
The term DATA STRUCTURE is used to describe the way data is stored, and the term
algorithm is used to describe the way data is processed. Data structures and algorithms are
interrelated. Choosing a data structure affects the kind of algorithm you might use, and
choosing an algorithm affects the data structures we use.
An Algorithm is a finite sequence of instructions, each of which has a clear meaning
and can be performed with a finite amount of effort in a finite length of time. No matter what
the input values may be, an algorithm terminates after executing a finite number of
instructions.
Introduction to Data Structures:
Data structure is a representation of logical relationship existing between individual elements of
data. In other words, a data structure defines a way of organizing all data items that considers
not only the elements stored but also their relationship to each other. The term data structure is
used to describe the way data is stored.
To develop a program of an algorithm we should select an appropriate data structure for that
algorithm. Therefore, data structure is represented as:
Algorithm + Data structure = Program
A data structure is said to be linear if its elements form a sequence or a linear list. The linear
data structures like an array, stacks, queues and linked lists organize data in linear order. A data
structure is said to be non linear if its elements form a hierarchical classification where, data
items appear at various levels.

Trees and Graphs are widely used non-linear data structures. Tree and graph structures
represents hierarchial relationship between individual data elements. Graphs are nothing but
trees with certain restrictions removed.
Data structures are divided into two types:
• Primitive data structures.
• Non-primitive data structures.
Da t a Struc ture s
Pri mit iv e Da t a Struc ture s No n- Pri mit iv e Da t a Struc ture s
Int e ger Flo at Char P o int ers Array s List s File s
Line ar List s No n- Line ar List s
Stac ks Que ue s Gra phs T re e s
Figure 1. 1. Cla s s if ic at io n of Da t a Struc ture s
Primitive Data Structures are the basic data structures that directly operate upon the machine
instructions. They have different representations on different computers. Integers, floating point
numbers, character constants, string constants and pointers come under this category.
Non-primitive data structures are more complicated data structures and are derived from
primitive data structures. They emphasize on grouping same or different data items with
relationship between each data item. Arrays, lists and files come under this category. Figure 1.1
shows the classification of data structures.
Data structures: Organization of data
The collection of data you work with in a program have some kind of structure or organization.
No matte how complex your data structures are they can be broken down into two fundamental
types:
• Contiguous
• Non-Contiguous.
In contiguous structures, terms of data are kept together in memory (either RAM or in a
file). An array is an example of a contiguous structure. Since each element in the array is

located next to one or two other elements. In contrast, items in a non-contiguous structure and
scattered in memory, but we linked to each other in some way. A linked list is an example of a
non-contiguous data structure. Here, the nodes of the list are linked together using pointers
stored in each node. Figure 1.2 below illustrates the difference between contiguous and non-
contiguous structures.
1 2 3
1 2
3
(a) Contiguous (b) non-contiguous
Figure 1.2 Contiguous and Non-contiguous structures compared
Contiguous structures:
Contiguous structures can be broken drawn further into two kinds: those that contain
data items of all the same size, and those where the size may differ. Figure 1.2 shows example
of each kind. The first kind is called the array. Figure 1.3(a) shows an example of an array of
numbers. In an array, each element is of the same type, and thus has the same size.
The second kind of contiguous structure is called structure, figure 1.3(b) shows a simple
structure consisting of a person‟s name and age. In a struct, elements may be of different data
types and thus may have different sizes.
For example, a person‟s age can be represented with a simple integer that occupies two
bytes of memory. But his or her name, represented as a string of characters, may require many
bytes and may even be of varying length.Couples with the atomic types (that is, the single data-
item built-in types such as integer, float and pointers), arrays and structs provide all the
“mortar” you need to built more exotic form of data structure, including the non-contiguous
forms.
int arr[3] = {1, 2, 3}; struct cust_data
{
int age;
1 2 3 char name[20];
};
cust_data bill= {21, “bill the student”};
(a) Array
21 (b) struct
“bill the student”
Figure 1.3 Examples of contiguous structures.

Non-contiguous structures:
Non-contiguous structures are implemented as a collection of data-items, called nodes,
where each node can point to one or more other nodes in the collection. The simplest kind of
non-contiguous structure is linked list.
A linked list represents a linear, one-dimension type of non-contiguous structure, where
there is only the notation of backwards and forwards. A tree such as shown in figure 1.4(b) is
an example of a two-dimensional non-contiguous structure. Here, there is the notion of up and
down and left and right.
In a tree each node has only one link that leads into the node and links can only go
down the tree. The most general type of non-contiguous structure, called a graph has no such
restrictions. Figure 1.4(c) is an example of a graph.
A B C A
(a) Linked List
B C
A
D
E G
B C
(b) Tree F (c) graph
D E F G
Figure 1.4. Examples of non-contiguous structures

Abstract Data Type (ADT):
The design of a data structure involves more than just its organization. You also
need to plan for the way the data will be accessed and processed – that is, how the data will
be interpreted actually, non-contiguous structures – including lists, tree and graphs – can be
implemented either contiguously or non- contiguously like wise, the structures that are
normally treated as contiguously - arrays and structures – can also be implemented non-
contiguously.
The notion of a data structure in the abstract needs to be treated differently from
what ever is used to implement the structure. The abstract notion of a data structure is
defined in terms of the operations we plan to perform on the data.
Considering both the organization of data and the expected operations on the data,
leads to the notion of an abstract data type. An abstract data type in a theoretical construct
that consists of data as well as the operations to be performed on the data while hiding
implementation.
For example, a stack is a typical abstract data type. Items stored in a stack can only be added
and removed in certain order – the last item added is the first item removed. We call these
operations, pushing and popping. In this definition, we haven‟t specified have items are
stored on the stack, or how the items are pushed and popped. We have only specified the
valid operations that can be performed.To be made useful, an abstract data type (such as
stack) has to be implemented and this is where data structure comes into ply. For instance,
we might choose the simple data structure of an array to represent the stack, and then define
the appropriate indexing operations to perform pushing and popping.
1.1 Asymptotic Notations
What are they?

Asymptotic Notations are languages that allow us to analyze an algorithm‟s running time by
identifying its behavior as the input size for the algorithm increases. This is also known as
an algorithm‟s growth rate. Does the algorithm suddenly become incredibly slow when the
input size grows? Does it mostly maintain its quick run time as the input size increases?
Asymptotic Notation gives us the ability to answer these questions.
Types of Asymptotic Notation
In the first section of this doc we described how an Asymptotic Notation identifies
the behavior of an algorithm as the input size changes. Let us imagine an algorithm as a
function f, n as the input size, and f(n) being the running time. So for a given algorithm f,
with input size n you get some resultant run time f(n). This results in a graph where the Y
axis is the runtime, X axis is the input size, and plot points are the resultants of the amount
of time for a given input size.You can label a function, or algorithm, with an Asymptotic
Notation in many different ways. Some examples are, you can describe an algorithm by its
best case, worse case, or equivalent case. The most common is to analyze an algorithm by
its worst case. You typically don‟t evaluate by best case because those conditions aren‟t
what you‟re planning for. A very good example of this is sorting algorithms; specifically,
adding elements to a tree structure. Best case for most algorithms could be as low as a single
operation. However, in most cases, the element you‟re adding will need to be sorted
appropriately through the tree, which could mean examining an entire branch. This is the
worst case, and this is what we plan for.
Types of functions, limits, and simplification
Logarithmic Function - log n
Linear Function - an + b
Quadratic Function - an^2 + bn + c
Polynomial Function - an^z + . . . + an^2 + a*n^1 + a*n^0, where z is some
constant
Exponential Function - a^n, where a is some constant
These are some basic function growth classifications used in various notations. The list
starts at the slowest growing function (logarithmic, fastest execution time) and goes on to
the fastest growing (exponential, slowest execution time). Notice that as „n‟, or the input,
increases in each of those functions, the result clearly increases much quicker in quadratic,
polynomial, and exponential, compared to logarithmic and linear.
One extremely important note is that for the notations about to be discussed you should do
your best to use simplest terms. This means to disregard constants, and lower order terms,
because as the input size (or n in our f(n) example) increases to infinity (mathematical

limits), the lower order terms and constants are of little to no importance. That being said, if
you have constants that are 2^9001, or some other ridiculous, unimaginable amount, realize
that simplifying will skew your notation accuracy.
Since we want simplest form, lets modify our table a bit…
Logarithmic - log n
Linear - n
Quadratic - n^2
Polynomial - n^z, where z is some constant
Exponential - a^n, where a is some constant
Big-O
Big-O, commonly written as O, is an Asymptotic Notation for the worst case, or ceiling of
growth for a given function. It provides us with an asymptotic upper bound for the growth
rate of runtime of an algorithm. Say f(n) is your algorithm runtime, and g(n) is an arbitrary
time complexity you are trying to relate to your algorithm. f(n) is O(g(n)), if for some real
constant c (c > 0), f(n) <= c g(n) for every input size n (n > 0).
Example 1
f(n) = 3log n + 100
g(n) = log n
Is f(n) O(g(n))? Is 3 log n + 100 O(log n)? Let‟s look to the definition of Big-O.
3log n + 100 <= c * log n
Is there some constant c that satisfies this for all n?
3log n + 100 <= 150 * log n, n > 2 (undefined at n = 1)
Yes! The definition of Big-O has been met therefore f(n) is O(g(n)).
Example 2
f(n) = 3*n^2
g(n) = n
Is f(n) O(g(n))? Is 3 * n^2 O(n)? Let‟s look at the definition of Big-O.
3 * n^2 <= c * n
Is there some constant c that satisfies this for all n? No, there isn‟t. f(n) is NOT O(g(n)).
Big-Omega
Big-Omega, commonly written as Ω, is an Asymptotic Notation for the best case, or a floor
growth rate for a given function. It provides us with an asymptotic lower bound for the
growth rate of runtime of an algorithm.
f(n) is Ω(g(n)), if for some real constant c (c > 0), f(n) is >= c g(n) for every input size n (n
> 0).
Note
The asymptotic growth rates provided by big-O and big-omega notation may or may not be
asymptotically tight. Thus we use small-o and small-omega notation to denote bounds that
are not asymptotically tight.
Small-o
Small-o, commonly written as o, is an Asymptotic Notation to denote the upper bound (that
is not asymptotically tight) on the growth rate of runtime of an algorithm.
f(n) is o(g(n)), if for any real constant c (c > 0), f(n) is < c g(n) for every input size n (n > 0).
The definitions of O-notation and o-notation are similar. The main difference is that in f(n)
= O(g(n)), the bound f(n) <= g(n) holds for some constant c > 0, but in f(n) = o(g(n)), the
bound f(n) < c g(n) holds for all constants c > 0.
Small-omega
Small-omega, commonly written as ω, is an Asymptotic Notation to denote the lower bound
(that is not asymptotically tight) on the growth rate of runtime of an algorithm.
f(n) is ω(g(n)), if for any real constant c (c > 0), f(n) is > c g(n) for every input size n (n >
0).
The definitions of Ω-notation and ω-notation are similar. The main difference is that in f(n)
= Ω(g(n)), the bound f(n) >= g(n) holds for some constant c > 0, but in f(n) = ω(g(n)), the
bound f(n) > c g(n) holds for all constants c > 0.
Theta
Theta, commonly written as Θ, is an Asymptotic Notation to denote the asymptotically tight
bound on the growth rate of runtime of an algorithm.
f(n) is Θ(g(n)), if for some real constants c1, c2 (c1 > 0, c2 > 0), c1 g(n) is < f(n) is < c2
g(n) for every input size n (n > 0).
∴ f(n) is Θ(g(n)) implies f(n) is O(g(n)) as well as f(n) is Ω(g(n)).
Feel free to head over to additional resources for examples on this. Big-O is the primary
notation use for general algorithm time complexity.
Ending Notes
It‟s hard to keep this kind of topic short, and you should definitely go through the books and
online resources listed. They go into much greater depth with definitions and examples.
More where x=„Algorithms & Data Structures‟ is on its way; we‟ll have a doc up on
analyzing actual code examples soon.
1.2 Arrays
Arrays a kind of data structure that can store a fixed-size sequential collection of
elements of the same type. An array is used to store a collection of data, but it is often more
useful to think of an array as a collection of variables of the same type.
Instead of declaring individual variables, such as number0, number1, ..., and number99,
you declare one array variable such as numbers and use numbers[0], numbers[1], and ...,
numbers[99] to represent individual variables. A specific element in an array is accessed by
an index.
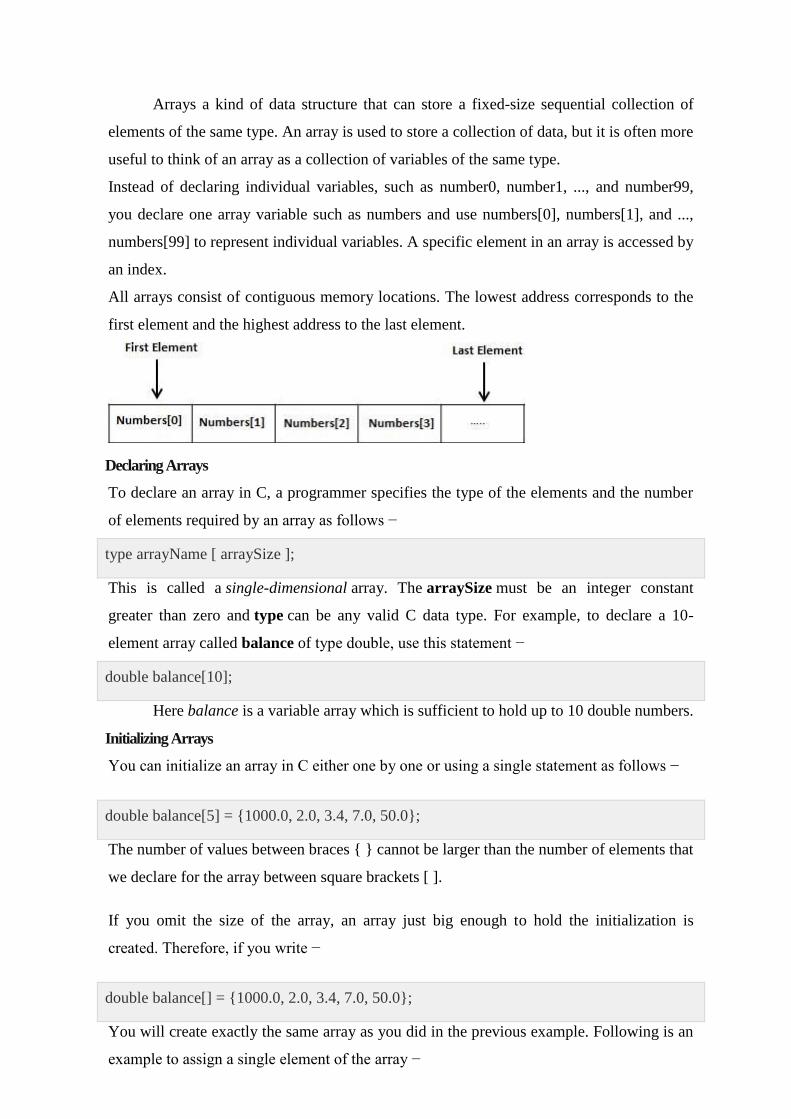
All arrays consist of contiguous memory locations. The lowest address corresponds to the
first element and the highest address to the last element.
Declaring Arrays
To declare an array in C, a programmer specifies the type of the elements and the number
of elements required by an array as follows −
type arrayName [ arraySize ];
This is called a single-dimensional array. The arraySize must be an integer constant
greater than zero and type can be any valid C data type. For example, to declare a 10-
element array called balance of type double, use this statement −
double balance[10];
Here balance is a variable array which is sufficient to hold up to 10 double numbers.
Initializing Arrays
You can initialize an array in C either one by one or using a single statement as follows −
double balance[5] = {1000.0, 2.0, 3.4, 7.0, 50.0};
The number of values between braces { } cannot be larger than the number of elements that
we declare for the array between square brackets [ ].
If you omit the size of the array, an array just big enough to hold the initialization is
created. Therefore, if you write −
double balance[] = {1000.0, 2.0, 3.4, 7.0, 50.0};
You will create exactly the same array as you did in the previous example. Following is an
example to assign a single element of the array −

balance[4] = 50.0;
The above statement assigns the 5th
element in the array with a value of 50.0. All arrays
have 0 as the index of their first element which is also called the base index and the last
index of an array will be total size of the array minus 1. Shown below is the pictorial
representation of the array we discussed above
Types of Arrays
1. .Single Dimensional Array :
1. Single or One Dimensional array is used to represent and store data in a linear form.
2. Array having only one subscript variable is called One-Dimensional array
3. It is also called as Single Dimensional Array or Linear Array
Syntax :
<data-type> <array_name> [size];
Example of Single Dimensional Array :
int iarr[3] = {2, 3, 4};
char carr[20] = "c4learn" ;
float farr[3] = {12.5,13.5,14.5} ;
2. Multi Dimensional Array :
1. Array having more than one subscript variable is called Multi-Dimensional array.
2. Multi Dimensional Array is also called as Matrix.
Syntax :
<data-type> <array_name> [row_subscript][column-subscript];
Example : Two Dimensional Array
int a[3][3] = { 1,2,3
5,6,7
8,9,0 }

3. Pointer Arrays
When an array is declared, compiler allocates sufficient amount of memory to
contain all the elements of the array. Base address which gives location of the first element
is also allocated by the compiler.
Suppose we declare an array arr,
int arr[5]={ 1, 2, 3, 4, 5 };
Assuming that the base address of arr is 1000 and each integer requires two byte, the five
element will be stored as follows
Here variable arr will give the base address, which is a constant pointer pointing to the
element, arr[0]. Therefore arr is containing the address of arr[0] i.e 1000.
arr is equal to &arr[0] // by default
We can declare a pointer of type int to point to the array arr.
int *p;
p = arr;
or p = &arr[0]; //both the statements are equivalent.
Now we can access every element of array arr using p++ to move from one element to
another.
NOTE : You cannot decrement a pointer once incremented. p-- won't work.
Pointer to Array
As studied above, we can use a pointer to point to an Array, and then we can use that pointer
to access the array. Lets have an example,
int i;
int a[5] = {1, 2, 3, 4, 5};
int *p = a; // same as int*p = &a[0]
for (i=0; i<5; i++)
{

printf("%d", *p);
p++;
}
In the aboce program, the pointer *p will print all the values stored in the array one by one.
We can also use the Base address (a in above case) to act as pointer and print all the values.
Pointer to Multidimensional Array
A multidimensional array is of form, a[i][j] . Lets see how we can make a pointer point to
such an array. As we know now, name of the array gives its base address. In a[i][j] , a will
give the base address of this array, even a+0+0 will also give the base address, that is the
address of a[0][0] element.
Here is the generalized form for using pointer with multidimensional arrays.
*(*(ptr + i) + j) is same as a[i][j]

Linked Lists
Definition: A linked list is a non-sequential collection of data items. It is a
dynamic data structure. For every data item in a linked list, there is an associated pointer
that would give the memory location of the next data item in the linked list.
The data items in the linked list are not in consecutive memory locations. They may be
anywhere, but the accessing of these data items is easier as each data item contains the
address of the next data item.
Advantages of linked lists:
Linked lists have many advantages. Some of the very important advantages are:
1. Linked lists are dynamic data structures. i.e., they can grow or shrink during the
execution of a program.
2. Linked lists have efficient memory utilization. Here, memory is not pre-
allocated. Memory is allocated whenever it is required and it is de-allocated
(removed) when it is no longer needed.
3. Insertion and Deletions are easier and efficient. Linked lists provide flexibility in
inserting a data item at a specified position and deletion of the data item from the
given position.
4. Many complex applications can be easily carried out with linked lists.
Disadvantages of linked lists:
1. It consumes more space because every node requires a additional pointer to store
address of the next node.
2. Searching a particular element in list is difficult and also time consuming.
3.2. Types of Linked Lists:
Basically we can put linked lists into the following four items:
1. Single Linked List.
2. Double Linked List.
3. Circular Linked List.
4. Circular Double Linked List.
A single linked list is one in which all nodes are linked together in some sequential

manner. Hence, it is also called as linear linked list.
A double linked list is one in which all nodes are linked together by multiple links
which helps in accessing both the successor node (next node) and predecessor node
(previous node) from any arbitrary node within the list. Therefore each node in a double
linked list has two link fields (pointers) to point to the left node (previous) and the right
node (next). This helps to traverse in forward direction and backward direction.
A circular linked list is one, which has no beginning and no end. A single linked list
can be made a circular linked list by simply storing address of the very first node in the link
field of the last node.
A circular double linked list is one, which has both the successor pointer and
predecessor pointer in the circular manner.
Single Linked List: A linked list allocates space for each element separately in its own block of memory called a
"node". The list gets an overall structure by using pointers to connect all its nodes together
like the links in a chain. Each node contains two fields; a "data" field to store whatever
element, and a "next" field which is a pointer used to link to the next node. Each node is
allocated in the heap using malloc(), so the node memory continues to exist until it is
explicitly de-allocated using free(). The front of the list is a pointer to the “start” node.
A single linked list is shown in figure .
STACK HEAP
100
start
10
200
20 300
The start 100 200
pointer holds Each node stores
Stores the next
the address
the data. node address.
of the first node of the list.
30 400
40 X
300 400

The beginning of the linked list is stored in a "start" pointer which points to the first node.
The first node contains a pointer to the second node. The second node contains a pointer to
the third node,. and so on. The last node in the list has its next field set to NULL to mark the
end of the list. Code can access any node in the list by starting at the start and following the
next pointers.
The start pointer is an ordinary local pointer variable, so it is drawn separately on the left
top to show that it is in the stack. The list nodes are drawn on the right to show that they are
allocated in the heap.
The basic operations in a single linked list are:
• Creation.
• Insertion.
• Deletion.
• Traversing.
Creating a node for Single Linked List:
Creating a singly linked list starts with creating a node. Sufficient memory has to be
allocated for creating a node. The information is stored in the memory, allocated by using
the malloc() function. The function getnode(), is used for creating a node, after allocating
memory for the structure of type node, the information for the item (i.e., data) has to be read
from the user, set next field to NULL and finally returns the address of the node. The below
figure illustrates the creation of a node for single linked list.
node* getnode()
{
node* newnode;
newnode = (node *) malloc(sizeof(node)); printf("\n Enter data: ");
scanf("%d", &newnode -> data); newnode -> next = NULL;
return newnode;
}
Creating a Singly Linked List with ‘n’ number of nodes:
The following steps are to be followed to create „n‟ number of nodes:
• Get the new node using getnode().
newnode = getnode();
• If the list is empty, assign new node as start.
start = newnode;
• If the list is not empty, follow the steps given below:

• The next field of the new node is made to point the first node (i.e. start node) in
the list by assigning the address of the first node.
The start pointer is made to point the new node by assigning the address of
the new node. Repeat the above steps „n‟ times
Insertion of a Node:
One of the most primitive operations that can be done in a singly linked list is the
insertion of a node. Memory is to be allocated for the new node (in a similar way that is done
while creating a list) before reading the data. The new node will contain empty data field and
empty next field. The data field of the new node is then stored with the information read
from the user. The next field of the new node is assigned to NULL. The new node can then
be inserted at three different places namely:
• Inserting a node at the beginning.
• Inserting a node at the end.
• Inserting a node at intermediate position.
Inserting a node at the beginning:
The following steps are to be followed to insert a new node at the beginning of the list:
• Get the new node using getnode().
newnode = getnode();
• If the list is empty then start = newnode.
• If the list is not empty, follow the steps given below:
newnode -> next = start;
start = newnode;
The function insert_at_beg(), is used for inserting a node at the beginning
void insert_at_beg()
{
node *newnode; newnode = getnode();
if(start == NULL)
{
start = newnode;
}
else
{
newnode -> next = start; start = newnode;
}
}

Inserting a node at the end:
The following steps are followed to insert a new node at the end of the list:
• Get the new node using getnode()
newnode = getnode();
• If the list is empty then start = newnode.
• If the list is not empty follow the steps given below: temp= start;
while(temp -> next != NULL) temp = temp ->
next;
temp -> next = newnode;
The function insert_at_end(), is used for inserting a node at the end.
void insert_at_end()
{
node *newnode,
*temp; newnode =
getnode(); if(start ==
NULL)
{
start = newnode;
}
else
{
temp = start;
while(temp -> next !=
NULL) temp = temp
-> next;
temp -> next = newnode;
}
}
Inserting a node at intermediate position:
The following steps are followed, to insert a new node in an intermediate position in the
list:
• Get the new node using getnode(). newnode = getnode();
• Ensure that the specified position is in between first node and last node. If not,
specified position is invalid. This is done by countnode() function.
• Store the starting address (which is in start pointer) in temp and prev pointers.

Then traverse the temp pointer upto the specified position followed by prev
pointer.
• After reaching the specified position, follow the steps given below:
prev -> next = newnode;
newnode -> next = temp;
The function insert_at_mid(), is used for inserting a node in the intermediate position.
void insert_at_mid()
{
node *newnode, *temp, *prev; int pos, nodectr, ctr = 1;
newnode = getnode();
printf("\n Enter the position: ");
scanf("%d", &pos);
nodectr = countnode(start);
if(pos > 1 && pos < nodectr)
{
temp = prev = start;
while(ctr < pos)
{
prev = temp;
temp = temp -> next;
ctr++;
}
prev -> next = newnode;
newnode -> next = temp;
}
else
{
printf("position %d is not a middle position", pos);
}
}

Deletion of a node:
Another primitive operation that can be done in a singly linked list is the deletion
of a node. Memory is to be released for the node to be deleted. A node can be deleted
from the list from three different places namely.
• Deleting a node at the beginning.
• Deleting a node at the end.
• Deleting a node at intermediate position.
Deleting a node at the beginning:
The following steps are followed, to delete a node at the beginning of the list:
• If list is empty then display „Empty List‟ message.
• If the list is not empty, follow the steps given
below: temp = start;
start = start ->
next;
free(temp);
The function delete_at_beg(), is used for deleting the first node in the list.
void delete_at_beg()
{
node *temp; if(start ==
NULL)
{
printf("\n No nodes are exist..");
return ;
}
else
{
temp = start;
start = temp -
> next;
free(temp);
printf("\n Node deleted ");
}
}

Deleting a node at the end:
The following steps are followed to delete a node at the end of the list:
• If list is empty then display „Empty List‟ message.
• If the list is not empty, follow the steps given below:
temp = prev = start;
while(temp -> next != NULL)
{
prev = temp;
temp = temp -> next;
}
prev -> next = NULL;
free(temp);
The function delete_at_last(), is used for deleting the last node in the list.
void delete_at_last()
{
node *temp, prev;
if(start == NULL)
{
printf("\n Empty List.."); return ;
}
else
{
temp = start;
prev = start;
while(temp -> next != NULL)
{
prev = temp;
temp = temp -> next;
}
prev -> next = NULL;
free(temp);
printf("\n Node deleted ");
}
}

Deleting a node at Intermediate position:
The following steps are followed, to delete a node from an intermediate position in the list
(List must contain more than two node).
• If list is empty then display „Empty List‟ message
• If the list is not empty, follow the steps given below.
if(pos > 1 && pos < nodectr)
{
temp = prev = start; ctr = 1;
while(ctr < pos)
{
prev = temp;
temp = temp -> next;
ctr++;
}
prev -> next = temp -> next;
free(temp);
printf("\n node deleted..");
}
Double Linked List:
A double linked list is a two-way list in which all nodes will have two links. This helps
in accessing both successor node and predecessor node from the given node position. It
provides bi-directional traversing. Each node contains three fields:
• Left link.
• Data.
• Right link.
The left link points to the predecessor node and the right link points to the successor
node. The data field stores the required data.
Many applications require searching forward and backward thru nodes of a list.
For example searching for a name in a telephone directory would need forward and
backward scanning thru a region of the whole list.
The basic operations in a double linked list are:
• Creation.
• Insertion.
• Deletion.
• Traversing.

Creating a node for Double Linked List:
Creating a double linked list starts with creating a node. Sufficient memory has to be
allocated for creating a node. The information is stored in the memory, allocated by using
the malloc() function. The function getnode(), is used for creating a node, after allocating
memory for the structure of type node, the information for the item (i.e., data) has to be read
from the user and set left field to NULL and right field also set to NULL.
node* getnode()
{
node* newnode;
newnode = (node *) malloc(sizeof(node));
printf("\n Enter data: ");
scanf("%d", &newnode -> data);
newnode -> left = NULL;
newnode -> right = NULL;
return newnode;
}
Creating a Double Linked List with ‘n’ number of nodes:
The following steps are to be followed to create „n‟ number of nodes:
• Get the new node using getnode().
newnode =getnode();
• If the list is empty then start = newnode.
• If the list is not empty, follow the steps given below:
• The left field of the new node is made to point the previous node.
• The previous nodes right field must be assigned with address of the new
node.
• Repeat the above steps „n‟ times.
The function createlist(), is used to create „n‟ number of nodes:
vo id createlist(int n) {
int i; no de * new no de; no de *tem p; for(i = 0; i < n; i+ +) {
new no de = getno de(); if(start = = NULL) {
start = new no de; } else {
tem p = start; w hile(tem p - > right)
tem p = tem p - > right; tem p - > right = new no de; new no de - > left = tem p;
} }
}

Inserting a node at the beginning:
The following steps are to be followed to insert a new node at the beginning of the list:
• Get the new node using getnode().
newnode=getnode();
• If the list is empty then start = newnode.
• If the list is not empty, follow the steps given below:
newnode -> right = start;
start -> left = newnode;
start = newnode;
Inserting a node at the end:
The following steps are followed to insert a new node at the end of the list:
• Get the new node using getnode()
newnode=getnode();
• If the list is empty then start = newnode.
• If the list is not empty follow the steps given below:
temp = start;
while(temp -> right != NULL)
temp = temp -> right;
temp -> right = newnode;
newnode -> left = temp;
Inserting a node at an intermediate position:
The following steps are followed, to insert a new node in an intermediate position in the list:
• Get the new node using getnode().
newnode=getnode();
• Ensure that the specified position is in between first node and last node. If not,
specified position is invalid. This is done by countnode() function.
• Store the starting address (which is in start pointer) in temp and prev pointers.
Then traverse the temp pointer upto the specified position followed by prev
pointer.
• After reaching the specified position, follow the steps given below:
newnode -> left = temp; newnode -> right = temp -> right;
temp -> right -> left = newnode; temp -> right = newnode;

Deleting a node at the beginning:
The following steps are followed, to delete a node at the beginning of the list:
• If list is empty then display „Empty List‟ message.
• If the list is not empty, follow the steps given below:
temp = start;
start = start -> right; start -> left =
NULL; free(temp);
Deleting a node at the end:
The following steps are followed to delete a node at the end of the list:
• If list is empty then display „Empty List‟ message
• If the list is not empty, follow the steps given below:
temp = start;
while(temp -> right != NULL)
{
temp = temp -> right;
}
temp -> left -> right = NULL;
free(temp);
Deleting a node at Intermediate position:
The following steps are followed, to delete a node from an intermediate position in the list
(List must contain more than two nodes).
• If list is empty then display „Empty List‟ message.
• If the list is not empty, follow the steps given below:
• Get the position of the node to delete.
• Ensure that the specified position is in between first node and last node.
If not, specified position is invalid.
• Then perform the following steps:
if(pos > 1 && pos < nodectr)
{
temp = start; i
= 1;
while(i < pos)
{
temp = temp -> right;
i++;

}
temp -> right -> left = temp -> left;
temp -> left -> right = temp -> right;
free(temp);
printf("\n node deleted..");
}
Circular Single Linked List:
It is just a single linked list in which the link field of the last node points back to the
address of the first node. A circular linked list has no beginning and no end. It is necessary
to establish a special pointer called start pointer always pointing to the first node of the list.
Circular linked lists are frequently used instead of ordinary linked list because many
operations are much easier to implement. In circular linked list no null pointers are used,
hence all pointers contain valid address.
The basic operations in a circular single linked list are:
• Creation.
• Insertion.
• Deletion.
• Traversing.
Creating a circular single Linked List with ‘n’ number of nodes:
The following steps are to be followed to create „n‟ number of nodes:
• Get the new node using getnode().
newnode = getnode();
• If the list is empty, assign new node as start.
start = newnode;
• If the list is not empty, follow the steps given below:
temp = start;
while(temp -> next != NULL)
temp = temp -> next;
temp -> next = newnode;
• Repeat the above steps „n‟ times.
• newnode -> next = start;
Inserting a node at the beginning:
The following steps are to be followed to insert a new node at the beginning of the circular
list:
• Get the new node using getnode().
newnode = getnode();

• If the list is empty, assign new node as start.
start = newnode; newnode -> next = start;
• If the list is not empty, follow the steps given below:
last = start;
while(last -> next != start)
last = last -> next;
newnode -> next = start;
start = newnode;
last -> next = start;
Inserting a node at the end:
The following steps are followed to insert a new node at the end of the list:
• Get the new node using getnode().
newnode = getnode();
• If the list is empty, assign new node as start.
start = newnode; newnode -> next = start;
• If the list is not empty follow the steps given below:
temp = start;
while(temp -> next != start)
temp = temp -> next;
temp -> next = newnode;
newnode -> next = start;
Deleting a node at the beginning:
The following steps are followed, to delete a node at the beginning of the list:
• If the list is empty, display a message „Empty List‟.
• If the list is not empty, follow the steps given below:
last = temp = start;
while(last -> next != start)
last = last -> next;
start = start -> next;
last -> next = start;
• After deleting the node, if the list is empty then start = NULL.
Deleting a node at the end: The following steps are followed to delete a node at the end of the list:

• If the list is empty, display a message „Empty List‟.
• If the list is not empty, follow the steps given below:
temp = start;
prev = start;
while(temp -> next != start) {
prev = temp; temp = temp -> next;
} prev -> next = start;
After deleting the node, if the list is empty then start = NULL.
Circular Double Linked List:
A circular double linked list has both successor pointer and predecessor pointer in
circular manner. The objective behind considering circular double linked list is to simplify
the insertion and deletion operations performed on double linked list. In circular double
linked list the right link of the right most node points back to the start node and left link of
the first node points to the last node.
The basic operations in a circular double linked list are:
• Creation.
• Insertion.
• Deletion.
• Traversing.
Creating a Circular Double Linked List with ‘n’ number of nodes:
The following steps are to be followed to create „n‟ number of nodes:
• Get the new node using getnode().
newnode = getnode();
• If the list is empty, then do the following
start = newnode;
newnode -> left = start;
newnode ->right = start;
• If the list is not empty, follow the steps given below:
newnode -> left = start -> left;
newnode -> right = start;
start -> left->right = newnode;
start -> left = newnode;
Inserting a node at the beginning:
The following steps are to be followed to insert a new node at the beginning of the list:
• Get the new node using getnode().

newnode=getnode();
• If the list is empty, then
start = newnode;
newnode -> left = start;
newnode -> right = start;
• If the list is not empty, follow the steps given below:
newnode -> left = start -> left;
newnode -> right = start;
start -> left -> right = newnode;
start -> left = newnode;
start = newnode;
Inserting a node at the end:
The following steps are followed to insert a new node at the end of the list:
• Get the new node using getnode()
newnode=getnode();
• If the list is empty, then
start = newnode;
newnode -> left = start;
newnode -> right = start;
• If the list is not empty follow the steps given below:
newnode -> left = start -> left;
newnode -> right = start;
start -> left -> right = newnode;
start -> left = newnode;
The function cdll_insert_end(), is used for inserting a node at the end. Figure 3.8.3 shows
inserting a node into the circular linked list at the end.
Inserting a node at an intermediate position: The following steps are followed, to insert a new node in an intermediate position in the list:
• Get the new node using getnode().
newnode=getnode();
• Ensure that the specified position is in between first node and last node. If not,
specified position is invalid. This is done by countnode() function.
• Store the starting address (which is in start pointer) in temp. Then traverse the
temp pointer upto the specified position.
• After reaching the specified position, follow the steps given below:

newnode -> left = temp;
newnode -> right = temp -> right;
temp -> right -> left = newnode;
temp -> right = newnode;
nodectr++;
Deleting a node at the beginning:
The following steps are followed, to delete a node at the beginning of the list:
• If list is empty then display „Empty List‟ message.
• If the list is not empty, follow the steps given below:
temp = start;
start = start -> right;
temp -> left -> right = start;
start -> left = temp -> left;
Deleting a node at the end:
The following steps are followed to delete a node at the end of the list:
• If list is empty then display „Empty List‟ message
• If the list is not empty, follow the steps given below:
temp = start;
while(temp -> right != start)
{
temp = temp -> right;
}
temp -> left -> right = temp -> right;
temp -> right -> left = temp -> left;
Deleting a node at Intermediate position: The following steps are followed, to delete a node from an intermediate position in the list
(List must contain more than two node).
• If list is empty then display „Empty List‟ message.
• If the list is not empty, follow the steps given below:
• Get the position of the node to delete.
• Ensure that the specified position is in between first node and last node.
If not, specified position is invalid.
• Then perform the following steps:
if(pos > 1 && pos < nodectr)

{
temp = start; i = 1;
while(i < pos)
{
temp = temp -> right ;
i++;
}
temp -> right -> left = temp -> left;
temp -> left -> right = temp -> right;
free(temp);
printf("\n node deleted..");
nodectr--;
}

Unit-2
Stacks: Introduction-Definition-Representation of Stack-Operations on Stacks-
Applications of Stacks.
Queues: Introduction, Definition- Representations of Queues- Various Queue
Structures- Applications of Queues. Tables: Hash tables.
STACK
A stack is a list of elements in which an element may be inserted or deleted only at
one end, called the top of the stack. Stacks are sometimes known as LIFO (last in, first out)
lists.
As the items can be added or removed only from the top i.e. the last item to be added to a
stack is the first item to be removed.
The two basic operations associated with stacks are:
• Push: is the term used to insert an element into a stack.
• Pop: is the term used to delete an element from a stack.
“Push” is the term used to insert an element into a stack. “Pop” is the term used to delete an
element from the stack.
All insertions and deletions take place at the same end, so the last element added to the stack
will be the first element removed from the stack. When a stack is created, the stack base
remains fixed while the stack top changes as elements are added and removed. The most
accessible element is the top and the least accessible element is the bottom of the stack.
Representation of Stack:
Let us consider a stack with 6 elements capacity. This is called as the size of the
stack. The number of elements to be added should not exceed the maximum size of the
stack. If we attempt to add new element beyond the maximum size, we will encounter a
stack overflow condition. Similarly, you cannot remove elements beyond the base of the
stack. If such is the case, we will reach a stack underflow condition. When an element is
added to a stack, the operation is performed by push().
4 4 4 4
3
3
3
3
TOP
2
2
2 33 2
TOP
1
1
22 1
22 1
TOP
0
11 0
11 0
11 0
TOP
Empty Insert Insert Insert
Stack 11 22 33

4 4 4 4
3
3
3
3
TOP
33 2
2
2
2
TOP
22 1
22 1
1
1
TOP
11
11
11
0 0 0 TOP 0
Initial POP POP POP
Stack Empty
Linked List Implementation of Stack:
We can represent a stack as a linked list. In a stack push and pop operations are
performed at one end called top. We can perform similar operations at one end of list using
top pointer. The linked stack looks as shown in figure
top
400 data next
40 X
400
30 400
300
20 300
start 200
100 10 200
100
Algebraic Expressions:
An algebraic expression is a legal combination of operators and operands. Operand
is the quantity on which a mathematical operation is performed. Operand may be a variable
like x, y, z or a constant like 5, 4, 6 etc. Operator is a symbol which signifies a mathematical
or logical operation between the operands. Examples of familiar operators include +, -, *, /,
^ etc.
An algebraic expression can be represented using three different notations. They are infix,
postfix and prefix notations:
Infix: It is the form of an arithmetic expression in which we fix (place) the arithmetic
operator in between the two operands.
Example: (A + B) * (C - D)
Prefix: It is the form of an arithmetic notation in which we fix (place) the arithmetic
operator before (pre) its two operands.

The prefix notation is called as polish notation
Example: * + A B – C D
Postfix: It is the form of an arithmetic expression in which we fix (place) the arithmetic
operator after (post) its two operands. The postfix notation is called as suffix
notation and is also referred to reverse polish notation.
Example: A B + C D - *
The three important features of postfix expression are:
1. The operands maintain the same order as in the equivalent infix expression.
2. The parentheses are not needed to designate the expression un-ambiguously.
3. While evaluating the postfix expression the priority of the operators is no longer
relevant.
We consider five binary operations: +, -, *, / and $ or ↑ (exponentiation). For these binary
operations, the following in the order of precedence (highest to lowest):
Converting expressions using Stack:
Let us convert the expressions from one type to another. These can be done as follows:
1. Infix to postfix
2. Infix to prefix
3. Postfix to infix
4. Postfix to prefix
5. Prefix to infix
6. Prefix to postfix
Conversion from infix to postfix:
Procedure to convert from infix expression to postfix expression is as follows:
1. Scan the infix expression from left to right.
2. a) If the scanned symbol is left parenthesis, push it onto the stack.
b) If the scanned symbol is an operand, then place directly in the postfix
expression (output).
OPERATOR PRECEDENCE VALUE
Exponentiation ($ or ↑ or ^) Highest 3
*, / Next highest 2
+, - Lowest 1

c) If the symbol scanned is a right parenthesis, then go on popping all the
items from the stack and place them in the postfix expression till we get
the matching left parenthesis.
d) If the scanned symbol is an operator, then go on removing all the
operators from the stack and place them in the postfix expression, if and
only if the precedence of the operator which is on the top of the stack is
greater than (or greater than or equal) to the precedence of the scanned
operator and push the scanned operator onto the stack otherwise, push the
scanned operator onto the stack.
Example 1: Convert ((A – (B + C)) * D) ↑ (E + F) infix expression to postfix form:
SYMBOL POSTFIX STRING STACK REMARKS
( (
( ( (
A A ( (
- A ( ( -
( A ( ( - (
B A B ( ( - (
+ A B ( ( - ( +
C A B C ( ( - ( +
) A B C + ( ( -
) A B C + - (
* A B C + - ( *
D A B C + - D ( *
) A B C + - D *
↑ A B C + - D * ↑
( A B C + - D * ↑ (
E A B C + - D * E ↑ (
+ A B C + - D * E ↑ ( +
F A B C + - D * E F ↑ ( +
) A B C + - D * E F + ↑
End of The input is now empty. Pop the output symbols string A B C + - D * E F + ↑ from the stack until it is empty.
Conversion from infix to prefix:

The precedence rules for converting an expression from infix to prefix are identical.
The only change from postfix conversion is that traverse the expression from right to left
and the operator is placed before the operands rather than after them. The prefix form of a
complex expression is not the mirror image of the postfix form.
Example 1:
Convert the infix expression A + B - C into prefix expression.
SYMBOL PREFIX STACK
REMARKS
STRING
C C
- C -
B B C -
+ B C - +
A A B C - +
End of - + A B C The input is now empty. Pop the output symbols from the
string stack until it is empty.
Conversion from postfix to infix:
Procedure to convert postfix expression to infix expression is as follows:
1. Scan the postfix expression from left to right.
2. If the scanned symbol is an operand, then push it onto the stack.
3. If the scanned symbol is an operator, pop two symbols from the stack and
create it as a string by placing the operator in between the operands and push
it onto the stack.
4. Repeat steps 2 and 3 till the end of the expression.
Conversion from postfix to prefix:
Procedure to convert postfix expression to prefix expression is as follows:
1. Scan the postfix expression from left to right.
2. If the scanned symbol is an operand, then push it onto the stack.
3. If the scanned symbol is an operator, pop two symbols from the stack and
create it as a string by placing the operator in front of the operands and push
it onto the stack.
4. Repeat steps 2 and 3 till the end of the expression.
Conversion from prefix to infix:
Procedure to convert prefix expression to infix expression is as follows:

1. Scan the prefix expression from right to left (reverse order).
2. If the scanned symbol is an operand, then push it onto the stack.
3. If the scanned symbol is an operator, pop two symbols from the stack and
create it as a string by placing the operator in between the operands and push
it onto the stack.
4. Repeat steps 2 and 3 till the end of the expression.
Conversion from prefix to postfix:
Procedure to convert prefix expression to postfix expression is as follows:
1. Scan the prefix expression from right to left (reverse order).
2. If the scanned symbol is an operand, then push it onto the stack.
3. If the scanned symbol is an operator, pop two symbols from the stack and
create it as a string by placing the operator after the operands and push it
onto the stack.
4. Repeat steps 2 and 3 till the end of the expression.
Applications of stacks:
1. Stack is used by compilers to check for balancing of parentheses, brackets and
braces.
2. Stack is used to evaluate a postfix expression.
3. Stack is used to convert an infix expression into postfix/prefix form.
4. In recursion, all intermediate arguments and return values are stored on the
processor‟s stack.
5. During a function call the return address and arguments are pushed onto a stack
and on return they are popped off.
Queues:
A queue is another special kind of list, where items are inserted at one end called the
rear and deleted at the other end called the front. Another name for a queue is a “FIFO” or
“First-in-first-out” list.
The operations for a queue are analogues to those for a stack, the difference is that the
insertions go at the end of the list, rather than the beginning. We shall use the following
operations on queues:
• enqueue: which inserts an element at the end of the queue.
• dequeue: which deletes an element at the start of the queue.
Representation of Queue:
Let us consider a queue, which can hold maximum of five elements. Initially the queue is
empty.

0 1 2 3 4
Que u e E mpt y
F RO NT = REA R = 0
F R
Now, insert 11 to the queue. Then queue status will be:
0 1 2 3 4
REA R = REA R + 1 = 1
11
F RO NT = 0
Now, insert 22 to the queue
0 1 2 3 4
REA R = REA R + 1 = 1
11
F RO NT = 0
Now, insert 33 to the queue
0 1 2 3 4
REA R = REA R + 1 = 1
11 22 33
F RO NT = 0
Linked List Implementation of Queue:
We can represent a queue as a linked list. In a queue data is deleted from the front
end and inserted at the rear end. We can perform similar operations on the two ends of a list.
We use two pointers front and rear for our linked queue implementation.
The linked queue looks as shown in figure
Applications of Queue:
1. It is used to schedule the jobs to be processed by the CPU.
2. When multiple users send print jobs to a printer, each printing job is kept in the
printing queue. Then the printer prints those jobs according to first in first out
(FIFO) basis.
3. Breadth first search uses a queue data structure to find an element from a graph.
Circular Queue:
A more efficient queue representation is obtained by regarding the array Q[MAX] as
circular. Any number of items could be placed on the queue. This implementation of a
queue is called a circular queue because it uses its storage array as if it were a circle instead
of a linear list.
There are two problems associated with linear queue. They are:
• Time consuming: linear time to be spent in shifting the elements to the

beginning of the queue.
• Signaling queue full: even if the queue is having vacant position.
For example, let us consider a linear queue status as follows:
0 1 2 3 4
REA R = 5
33 44 55
F RO NT = 2
F R
Next insert another element, say 66 to the queue. We cannot insert 66 to the queue as the
rear crossed the maximum size of the queue (i.e., 5). There will be queue full signal. The
queue status is as follows:
0 1 2 3 4
REA R = 5
33 44 55
F RO NT = 2
F R
This difficulty can be overcome if we treat queue position with index zero as a position that
comes after position with index four then we treat the queue as a circular queue.
In circular queue if we reach the end for inserting elements to it, it is possible to insert new
elements if the slots at the beginning of the circular queue are empty.
Representation of Circular Queue:
Let us consider a circular queue, which can hold maximum (MAX) of six elements. Initially
the queue is empty.
F R
5 0
1 Que u e E mpt y
4 M A X = 6
F RO NT = REA R = 0
CO U NT = 0
3
2
Circ ular Que ue
Now, insert 11 to the circular queue. Then circular queue status will be:
F
5 0
R
11
F RO NT = 0

1
4 REA R = ( REA R + 1) % 6 = 1
CO U NT = 1
3
2
Circ ular Que ue
Insert new elements 22, 33, 44 and 55 into the circular queue. The circular queue
status is: F
R
5 0
11
4 55
22 1 FRONT = 0
REAR = (REAR + 1) % 6 = 5
COUNT = 5
44
33
3 2
Circular Queue
Now, delete an element. The element deleted is the element at the front of the circular
queue. So, 11 is deleted. The circular queue status is as follows:
R 0
5 F
4 55 22 1
44
33
3
2
Circ ular Que ue
F RO NT = (F R O NT + 1) % 6 = 1 REA R = 5 CO U NT = CO U NT - 1 = 4
Again, delete an element. The element to be deleted is always pointed to by the FRONT pointer. So, 22 is deleted. The circular queue status is as follows:
R
5 0
4 55
1 F RO NT = (F R O NT + 1) % 6 = 2
REA R = 5
CO U NT = CO U NT - 1 = 3
44
33
3
2
F
Circ ular Que ue

Again, insert another element 66 to the circular queue. The status of the circular queue
is: R
5
0
66
4 55
1
F RO NT = 2
REA R = ( REA R + 1) % 6 = 0
CO U NT = CO U NT + 1 = 4
44
33
3 2 F
Circ ular Que ue
Deque:
In the preceding section we saw that a queue in which we insert items at one end and
from which we remove items at the other end. In this section we examine an extension of
the queue, which provides a means to insert and remove items at both ends of the queue.
This data structure is a deque. The word deque is an acronym derived from double-ended
queue. Figure 4.5 shows the representation of a deque.
Deletion
36 16 56 62 19
Insertion
Insertion
Deletion
front
rear
Figure 4.5. Representation of a deque.
A deque provides four operations. Figure 4.6 shows the basic operations on a deque.
• enqueue_front: insert an element at front.
• dequeue_front: delete an element at front.
• enqueue_rear: insert element at rear.
• dequeue_rear: delete element at rear.
There are two variations of deque. They are:
• Input restricted deque (IRD)
• Output restricted deque (ORD)
An Input restricted deque is a deque, which allows insertions at one end but allows
deletions at both ends of the list.

Priority Queue:
A priority queue is a collection of elements such that each element has been assigned a
priority and such that the order in which elements are deleted and processed comes from
the following rules:
1. An element of higher priority is processed before any element of lower priority.
2. two elements with same priority are processed according to the order in which
they were added to the queue.
A prototype of a priority queue is time sharing system: programs of high priority are
processed first, and programs with the same priority form a standard queue. An efficient
implementation for the Priority Queue is to use heap, which in turn can be used for sorting
purpose called heap sort.
An output restricted deque is a deque, which allows deletions at one end but allows
insertions at both ends of the list.

