crustbuster owner / operator manual
TRANSCRIPT
1
CRUSTBUSTER OWNER / OPERATOR MANUAL
MODEL # CB-1 CRUSTBUSTER
Manufactured by: LEWIS BROTHERS MANUFACTURING, INC. Post Office Box 146
Baxley, GA 31513 Tel: (912) 367-4651 Fax: (912) 367-3958
4-20-20

2
INTRODUCTION
All Lewis Brothers equipment is manufactured under stringent production and quality assurance procedures prior to preparation for shipment. A final quality check is performed on all equipment before shipping. The best equipment is only as good as its operation and management. Sound operation and good preventive maintenance practices are essential to efficient performance of your Lewis Crustbuster. Questions on parts and service for the equipment covered in this manual should be referred to the local dealer from whom the equipment was purchased, or the nearest Lewis Brothers Dealer. We sincerely thank you for purchasing Lewis Brothers equipment.
3
TABLE OF CONTENTS INTRODUCTION 2 SAFETY 4
Owner’s And Operator’s Responsibility 5 General Precautions 6
WARRANTY 7
Limited Warranty 8 SPECIFICATIONS 9
Model CB-1 Specifications 10
SETUP AND OPERATION 11
Attachment to Tractor 12 Operating Instructions 14
MAINTENANCE 15 Chain Adjustment 16 DECALS 17-19 PARTS 20-26

4
SAFETY
5
OWNER'S AND OPERATOR'S RESPONSIBILITY This manual is intended for use with your Lewis Crustbuster. Extra effort has been made to provide for safe operation of this equipment. This manual as well as the safety decals placed on the equipment is part of that effort. Your new Crustbuster should perform the various functions for which it was designed if it is maintained, adjusted to your specific conditions, and operated correctly. It is the responsibility of the owner and every operator of this equipment to read and understand this manual before initial startup, before each season, before performing service or maintenance tasks and prior to storing the equipment. Each employee who will work on or around this equipment should be instructed in how to do so safely. It is important to understand the operational methods and safety issues mentioned in this manual. Lewis Brothers cannot anticipate all conceivable ways service and operational functions might be performed and of the possible hazardous consequences of such. Anyone using or servicing this equipment must first satisfy themselves that their chosen methods do not jeopardize the safety of themselves, others, or the equipment. Read the warranty on page 8. The purchaser is required to fill out and return the registration card supplied with this owner's manual within ten (10) days of purchase to Lewis Brothers Manufacturing to be eligible for warranty coverage. Genuine Lewis replacement parts will insure the durability and long life of your Crustbuster. Lewis repair parts and optional equipment should be ordered through your Lewis Brothers' Dealer. Operators should thoroughly inspect the Crustbuster before and after each use. All bearings should be properly lubricated as specified, and any worn or damaged parts repaired or replaced. Failure to repair or replace worn parts could result in damage or excess wear to other parts. Be sure that all shields are in place. Do Not attempt to work on Crustbuster when supported by tractor lift.
6
GENERAL PRECAUTIONS • MAKE SURE everyone is clear of the equipment before starting
the tractor's engine and while equipment is under operation. • DO NOT permit anyone to ride on this equipment. • KEEP hands, feet, hair and clothing away from all moving parts.
Do not wear loose clothing while operating equipment, as this may present an entanglement hazard.
• DRIVE the pulling tractor at speeds compatible with conditions and
good safety practices. This is especially important when operating over rough ground, on slopes, crossing ditches or while turning.
• NEVER LEAVE this equipment in the raised position when parked
and unattended. • STOP the tractor's engine and relieve any hydraulic pressure
before disconnecting any part of the hydraulic system. • MAKE SURE hitch components are attached securely before
operating or transporting. • USE flashing warning lights when on highways, except where
prohibited by law. • STOP tractor engine before leaving operator's position to adjust,
lubricate, clean or unclog machine. • KEEP all shields in place. • MAXIMUM towing speed is 25 MPH. • OBSERVE all safety decals located on machine. Should any
safety decal become damaged unreadable, or lost, REPLACE IT IMMEDIATELY. New decals may be obtained from your Lewis Brothers' dealer.
• WEAR dust respirator at all times while using this machine (3M
part # 8710 is recommended).

7
WARRANTY
8
LEWIS BROTHERS MANUFACTURING, INC.
LIMITED WARRANTY
Lewis Brothers Manufacturing, Inc. (hereinafter referred to as “LBM”) warrants each item of new equipment manufactured by LBM to be free from defects in material and workmanship under normal use and service. The obligation of LBM under this LIMITED WARRANTY is limited to repair or replacement, as LBM may elect, of any parts that prove, in LBM’s judgment, to be defective in material and workmanship within the first twelve (12) months after the date of invoice to the original purchaser. THIS LIMITED WARRANTY DOES NOT APPLY TO BELTS, HYDRAULIC HOSES, TIRES, AND OTHER SERVICE ITEMS, WHICH SHALL HAVE A NINETY (90) DAY WARRANTY. THIS LIMITED WARRANTY WILL APPLY FOR (3) MONTHS ONLY WHEN THE UNIT IS USED IN A COMMERCIAL APPLICATION. All warranty part repairs and replacements must be made by a certified LBM dealer. Any outside work or alterations made without written approval of LBM will render this LIMITED WARRANTY void. LBM’s obligation specifically excludes any liability for consequential damages, such as loss of profit, delays, expenses, damage to goods or property used in connection with or processed in or by the product sold, or damage to the product sold from whatever cause, whether or not such loss is due to negligence by LBM. This LIMITED WARRANTY shall not apply to any item that has been operated in a manner not recommended by LBM. No person is authorized to give any other warranties or to assume any other liability on behalf of LBM unless made in writing by Lewis Brothers Manufacturing, Inc. THIS LIMITED WARRANTY IS IN LIEU OF AND REPLACES ALL OTHER WARRANTIES, EXPRESSED OR IMPLIED. WARRANTIES OF MERCHANTABILITY AND FITNESS FOR A PARTICULAR PURPOSE ARE EXCLUDED, AS ARE ALL OTHER REPRESENTATIONS TO THE USER-PURCHASER AND ALL OTHER OBLIGATIONS OR LIABILITIES, INCLUDING LIABILITY FOR INCIDENTAL AND CONSEQUENTIAL DAMAGES, ON THE PART OF LBM.
LEWIS BROTHERS MANUFACTURING, INC. P.O. BOX 146 - BAXLEY, GA. 31513
FEBRUARY 1, 2007

9
SPECIFICATIONS
10
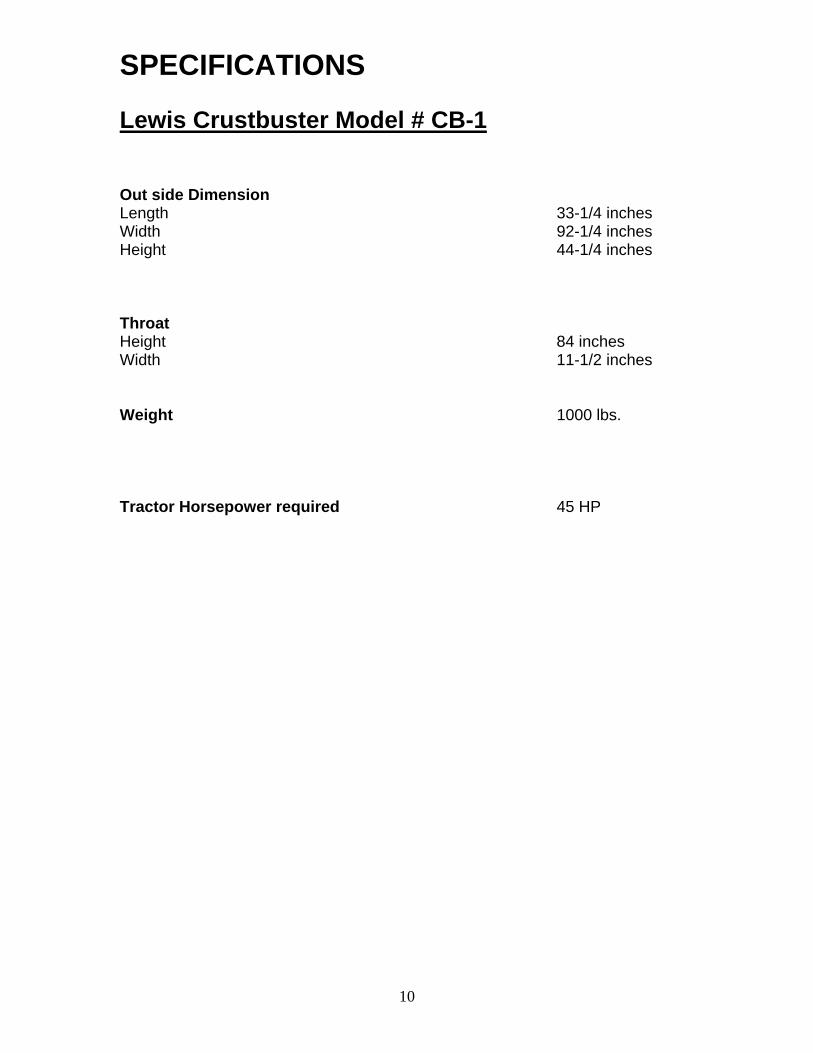
SPECIFICATIONS Lewis Crustbuster Model # CB-1 Out side Dimension Length 33-1/4 inches Width 92-1/4 inches Height 44-1/4 inches Throat Height 84 inches Width 11-1/2 inches Weight 1000 lbs. Tractor Horsepower required 45 HP

11
SETUP AND
OPERATION
12
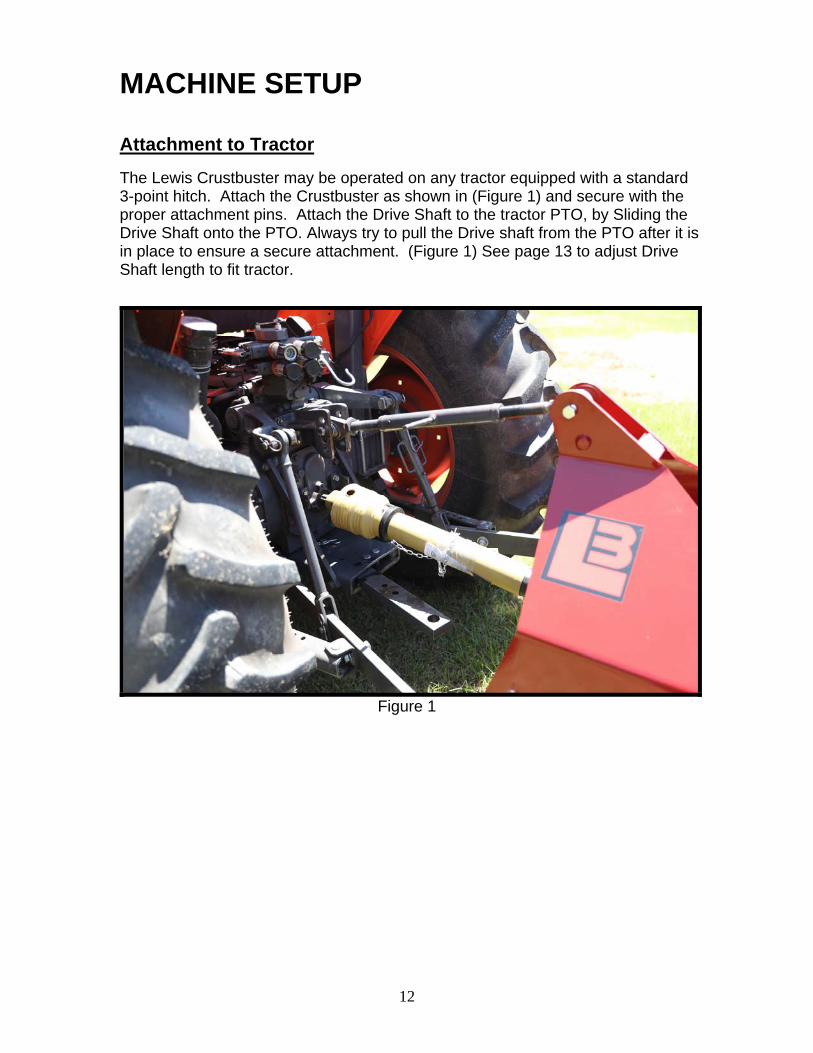
MACHINE SETUP Attachment to Tractor The Lewis Crustbuster may be operated on any tractor equipped with a standard 3-point hitch. Attach the Crustbuster as shown in (Figure 1) and secure with the proper attachment pins. Attach the Drive Shaft to the tractor PTO, by Sliding the Drive Shaft onto the PTO. Always try to pull the Drive shaft from the PTO after it is in place to ensure a secure attachment. (Figure 1) See page 13 to adjust Drive Shaft length to fit tractor.
Figure 1
13
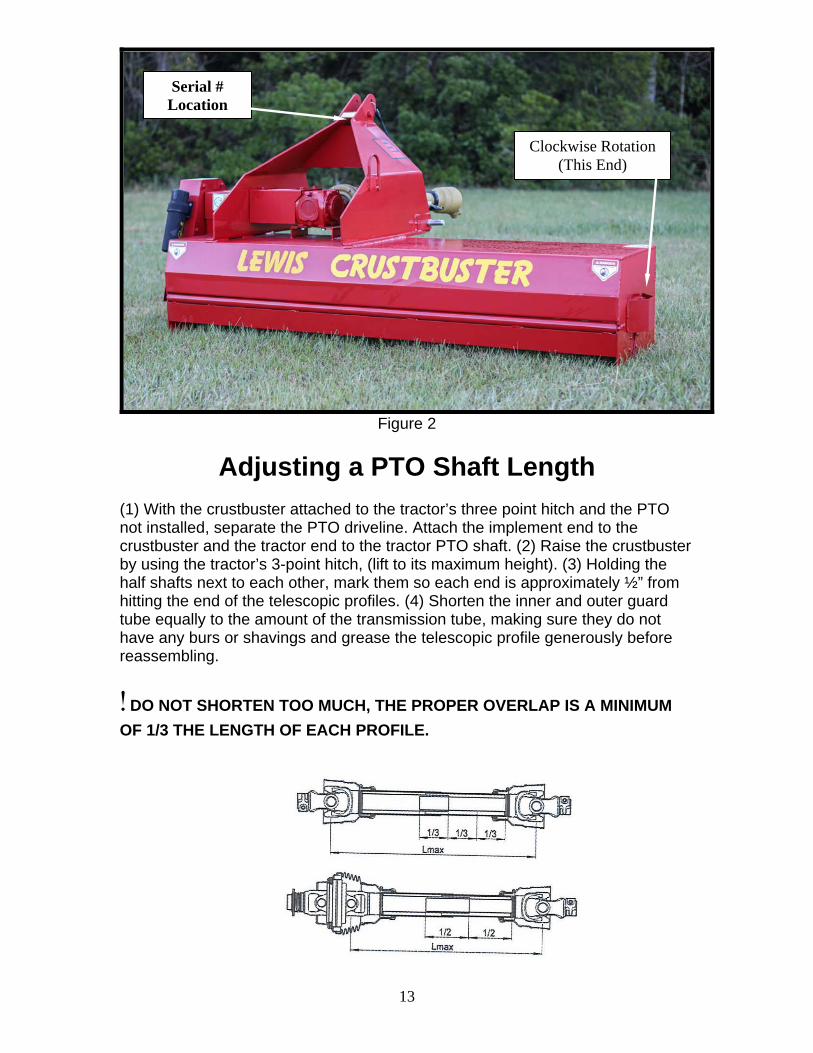
Figure 2
Adjusting a PTO Shaft Length (1) With the crustbuster attached to the tractor’s three point hitch and the PTO not installed, separate the PTO driveline. Attach the implement end to the crustbuster and the tractor end to the tractor PTO shaft. (2) Raise the crustbuster by using the tractor’s 3-point hitch, (lift to its maximum height). (3) Holding the half shafts next to each other, mark them so each end is approximately ½” from hitting the end of the telescopic profiles. (4) Shorten the inner and outer guard tube equally to the amount of the transmission tube, making sure they do not have any burs or shavings and grease the telescopic profile generously before reassembling.
!DO NOT SHORTEN TOO MUCH, THE PROPER OVERLAP IS A MINIMUM OF 1/3 THE LENGTH OF EACH PROFILE.
Clockwise Rotation (This End)
Serial # Location
14
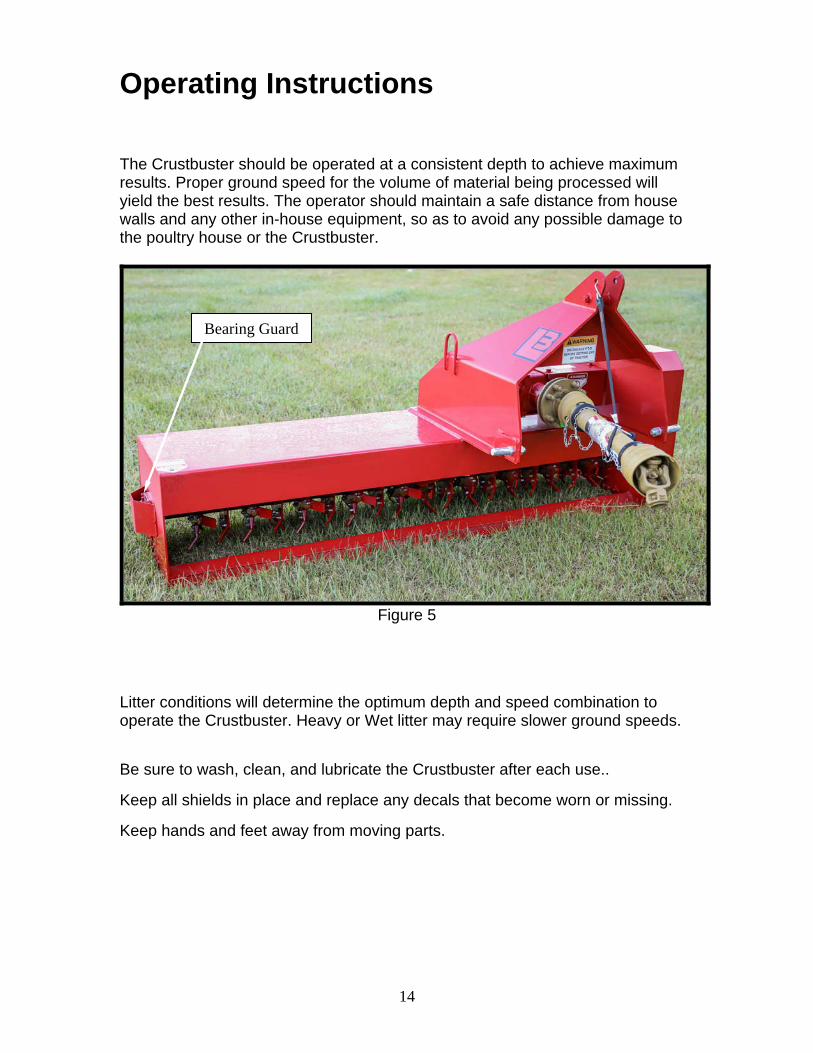
Operating Instructions The Crustbuster should be operated at a consistent depth to achieve maximum results. Proper ground speed for the volume of material being processed will yield the best results. The operator should maintain a safe distance from house walls and any other in-house equipment, so as to avoid any possible damage to the poultry house or the Crustbuster.
Figure 5
Litter conditions will determine the optimum depth and speed combination to operate the Crustbuster. Heavy or Wet litter may require slower ground speeds. Be sure to wash, clean, and lubricate the Crustbuster after each use.. Keep all shields in place and replace any decals that become worn or missing. Keep hands and feet away from moving parts.
Bearing Guard

15
MAINTENANCE
16
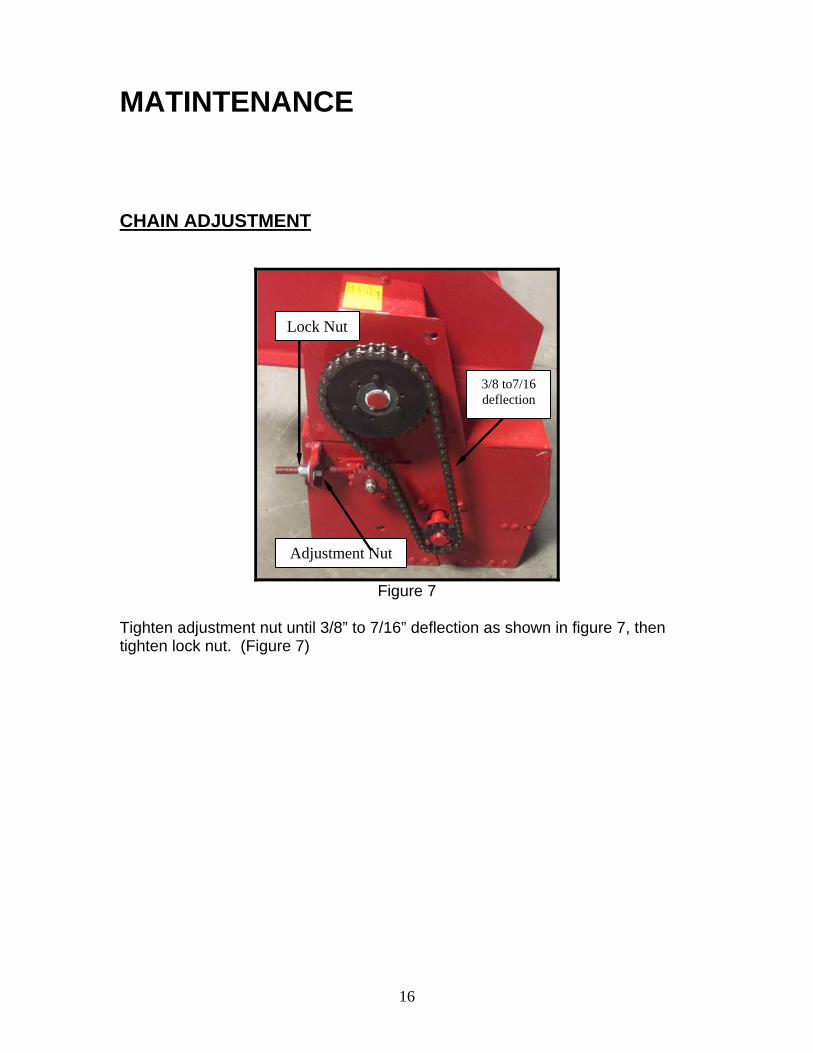
MATINTENANCE CHAIN ADJUSTMENT
Figure 7
Tighten adjustment nut until 3/8” to 7/16” deflection as shown in figure 7, then tighten lock nut. (Figure 7)
Lock Nut
3/8 to7/16 deflection
Adjustment Nut

17
DECALS
18
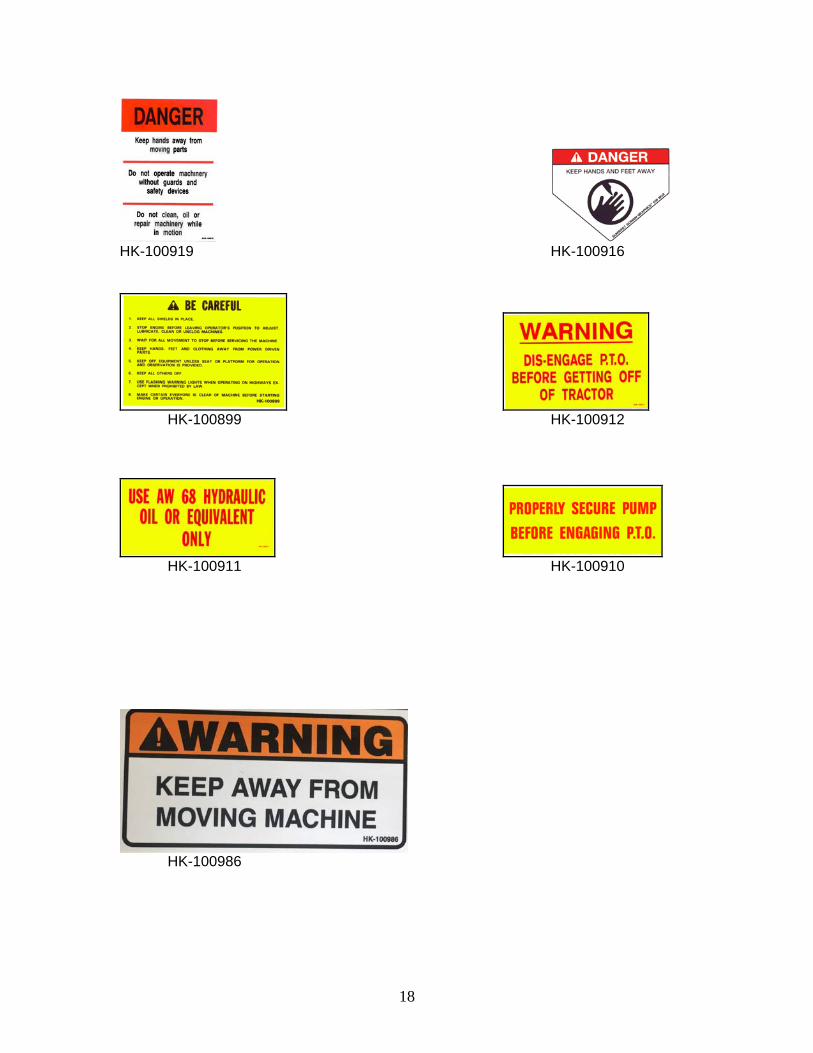
HK-100919 HK-100916
HK-100899 HK-100912
HK-100911 HK-100910
HK-100986
19
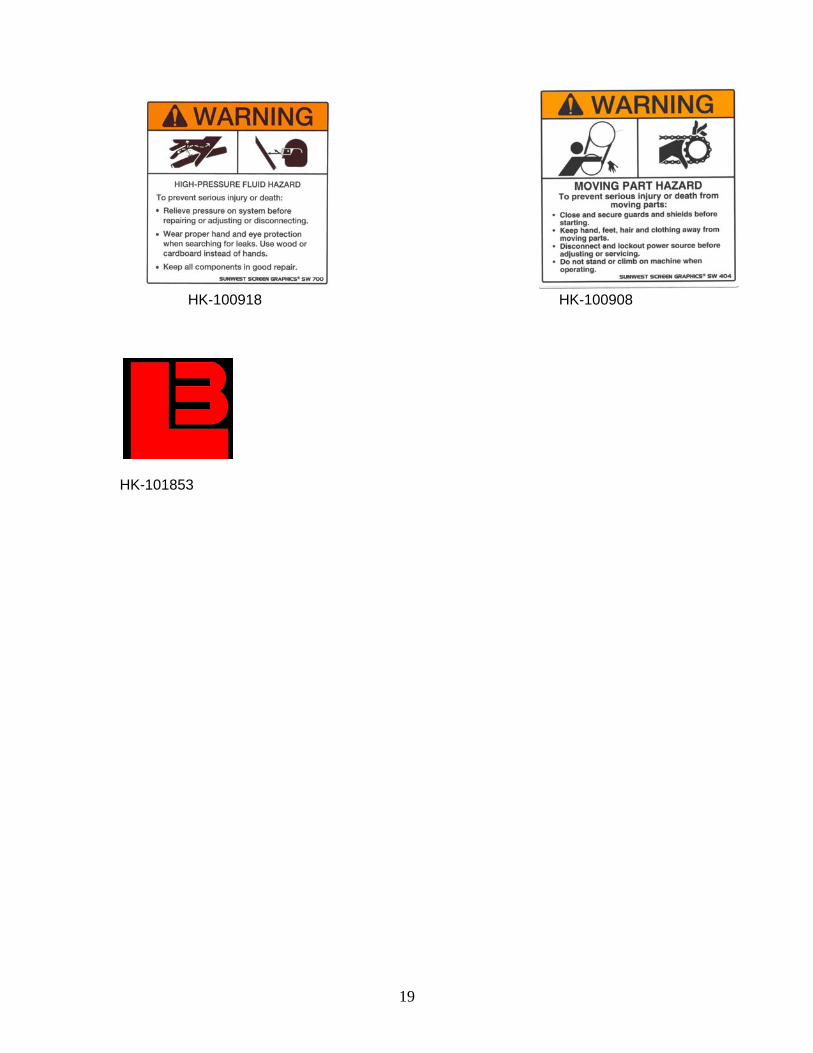
HK-100918 HK-100908 HK-101853

20
PARTS
21
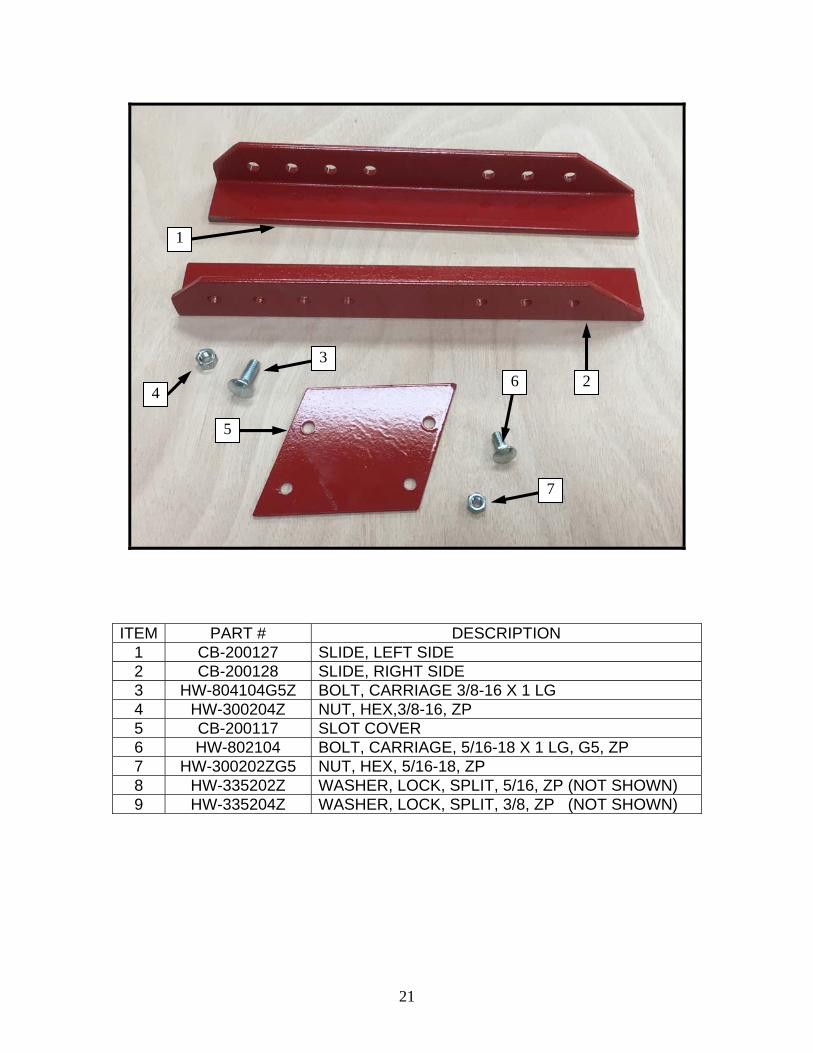
ITEM PART # DESCRIPTION 1 CB-200127 SLIDE, LEFT SIDE 2 CB-200128 SLIDE, RIGHT SIDE 3 HW-804104G5Z BOLT, CARRIAGE 3/8-16 X 1 LG 4 HW-300204Z NUT, HEX,3/8-16, ZP 5 CB-200117 SLOT COVER 6 HW-802104 BOLT, CARRIAGE, 5/16-18 X 1 LG, G5, ZP 7 HW-300202ZG5 NUT, HEX, 5/16-18, ZP 8 HW-335202Z WASHER, LOCK, SPLIT, 5/16, ZP (NOT SHOWN) 9 HW-335204Z WASHER, LOCK, SPLIT, 3/8, ZP (NOT SHOWN)
1
2 4
3
5
6
7
22
7
1
6
2 3
8
4
5
9
17
1615
14
13
18
11
12
10
12
19
23
ITEM # PART # DESCRIPTION
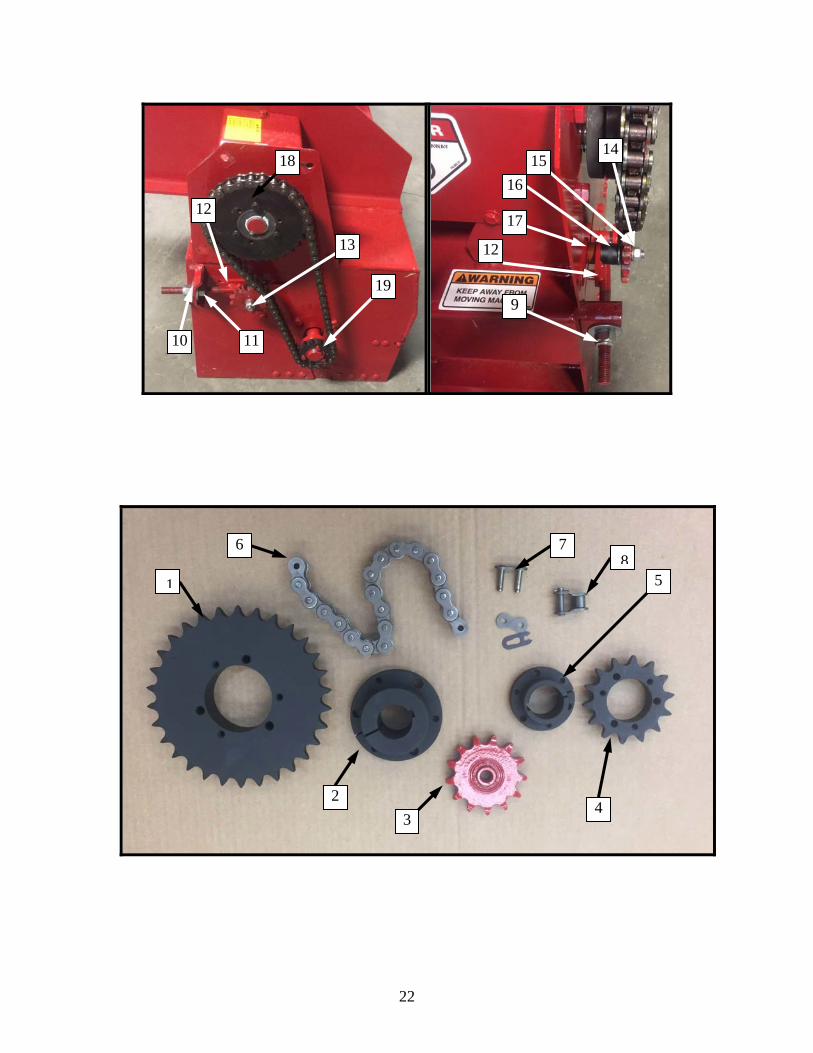
1 HK-100448 SPROCKET (30T) (GEAR BOX DRIVE) 2 HK-100447 TAPER BUSHING (GEAR BOX DRIVE 3 CB-400019 IDLET SPROCKET 4 CB-400016 SHROCKET (15T) (CYLINDER) 5 CB-400015 TAPER BUSHING SH 1-3/8 (CYLINDER) 6 WR-600092 #60 HD ROLLER CHAIN (48-3/4 IN LG OR 65
PITCHES) 7 WR-600094 #60 HD CONNECTING LINK 8 WR-600093 #60 HD OFFSET LINK 9 HW-301212NEZ NUT,NYLON INSERT LOCK, HEX, 5/8-11, ZP 10 HW-325212Z 5/8, FLAT, WASHER,ZP 11 HW-300212ZG5 NUT, HEX, 5/8-11, INC PLATED, G5 12 CB-400045 CHAIN ADJUSTMENT ROD 13 HW-808124G5 BOLT, CARRIAGE, 1/2-13 X 3-1/2’ LG, G5 14 HW-301208SC NUT, STOVER LOCK, HEX, 1/2-13, 15 HW-335208Z 1/2, WASHER, LOCK, ZP 16 CB-400049 SPACER 17 CB-400048 SPACER (3/8 LG) 18 HW-202108G8C BOLT, HEX HEAD, 5/16-18X 1-1/2” LG, G8 19 HW 200108G8BXF BOLT, HEX HEAD, 1/4-20 X 1-1/2” LG, G8, BLACK
OXIDE FULL THREAD
24
1
7 3
7
4
2
9
9
10
14
13
14
25
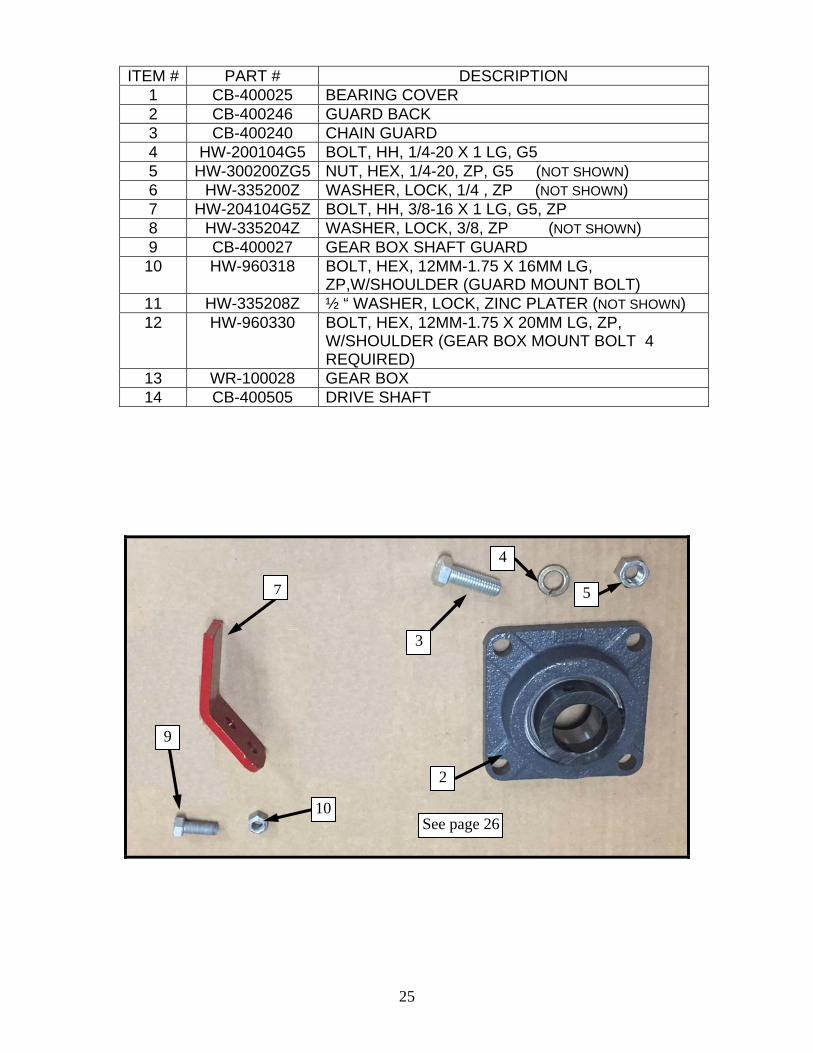
ITEM # PART # DESCRIPTION
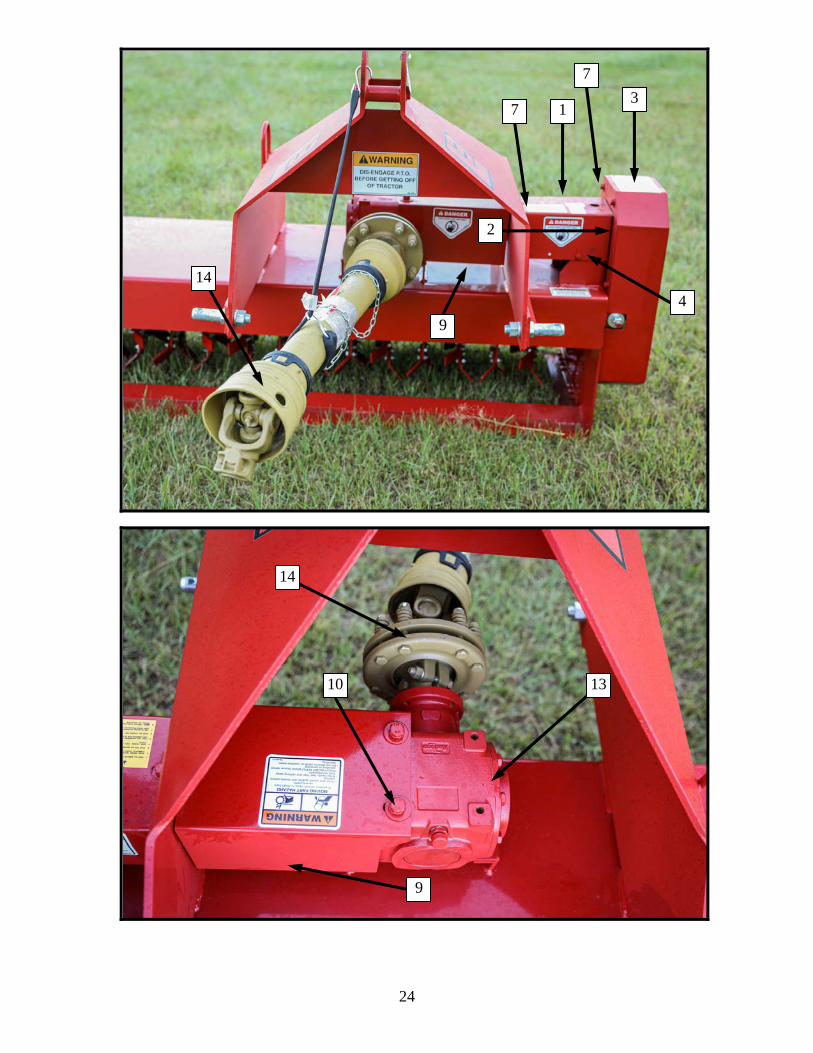
1 CB-400025 BEARING COVER 2 CB-400246 GUARD BACK 3 CB-400240 CHAIN GUARD 4 HW-200104G5 BOLT, HH, 1/4-20 X 1 LG, G5 5 HW-300200ZG5 NUT, HEX, 1/4-20, ZP, G5 (NOT SHOWN) 6 HW-335200Z WASHER, LOCK, 1/4 , ZP (NOT SHOWN) 7 HW-204104G5Z BOLT, HH, 3/8-16 X 1 LG, G5, ZP 8 HW-335204Z WASHER, LOCK, 3/8, ZP (NOT SHOWN) 9 CB-400027 GEAR BOX SHAFT GUARD 10 HW-960318 BOLT, HEX, 12MM-1.75 X 16MM LG,
ZP,W/SHOULDER (GUARD MOUNT BOLT) 11 HW-335208Z ½ “ WASHER, LOCK, ZINC PLATER (NOT SHOWN) 12 HW-960330 BOLT, HEX, 12MM-1.75 X 20MM LG, ZP,
W/SHOULDER (GEAR BOX MOUNT BOLT 4 REQUIRED)
13 WR-100028 GEAR BOX 14 CB-400505 DRIVE SHAFT
3
7
4
5
2
10
9
See page 26
26
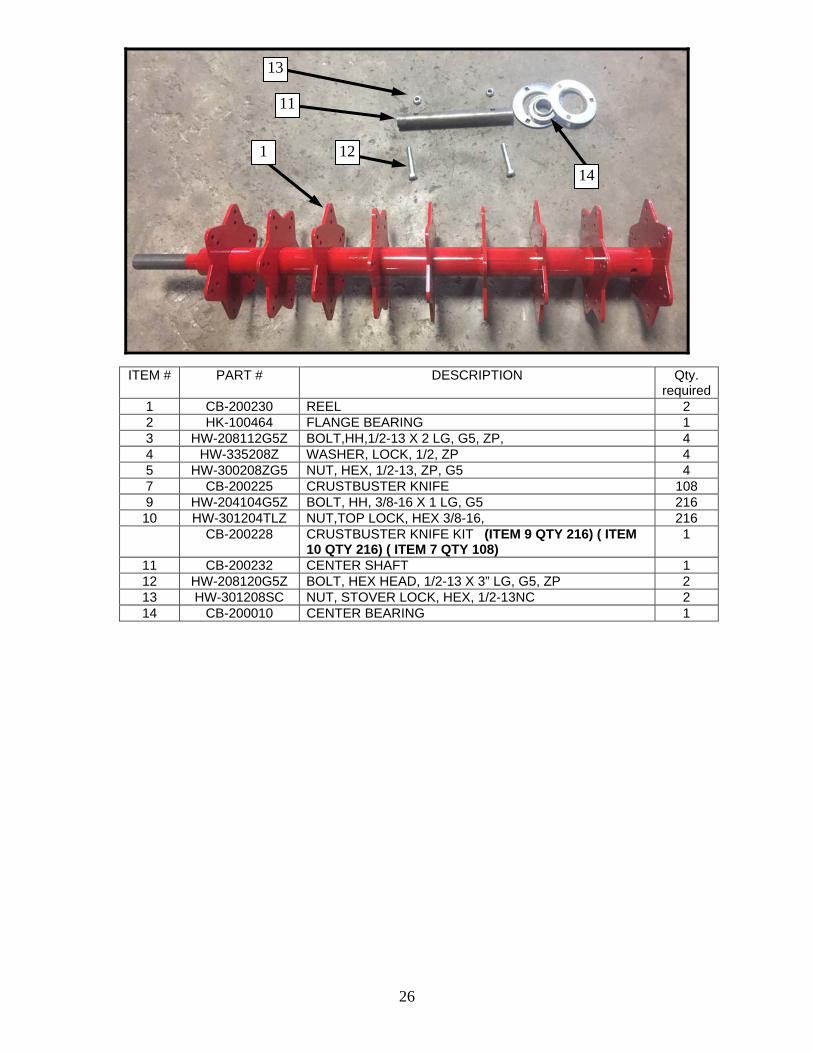
ITEM # PART # DESCRIPTION Qty. required
1 CB-200230 REEL 2 2 HK-100464 FLANGE BEARING 1 3 HW-208112G5Z BOLT,HH,1/2-13 X 2 LG, G5, ZP, 4 4 HW-335208Z WASHER, LOCK, 1/2, ZP 4 5 HW-300208ZG5 NUT, HEX, 1/2-13, ZP, G5 4 7 CB-200225 CRUSTBUSTER KNIFE 108 9 HW-204104G5Z BOLT, HH, 3/8-16 X 1 LG, G5 216 10 HW-301204TLZ NUT,TOP LOCK, HEX 3/8-16, 216
CB-200228 CRUSTBUSTER KNIFE KIT (ITEM 9 QTY 216) ( ITEM 10 QTY 216) ( ITEM 7 QTY 108)
1
11 CB-200232 CENTER SHAFT 1 12 HW-208120G5Z BOLT, HEX HEAD, 1/2-13 X 3” LG, G5, ZP 2 13 HW-301208SC NUT, STOVER LOCK, HEX, 1/2-13NC 2 14 CB-200010 CENTER BEARING 1
11
1
13
1214