cribbage board directions for mastercam x
TRANSCRIPT

Creating Geometry
Creating a Line by Editing End PointsCreateCreate LineCreate Line Endpoint…
Create a line by clicking the left mouse button at any two separate locations on the screen
Edit the end points that create the line by clicking on Edit End Point 1
The location of point 1 should be (0,0,0)
Edit point 2 by clicking on Edit End Point 2
The location of point 2 should be (11,0,0)
Click Fit
Enter
Enter
Click Apply
1Cribbage Board
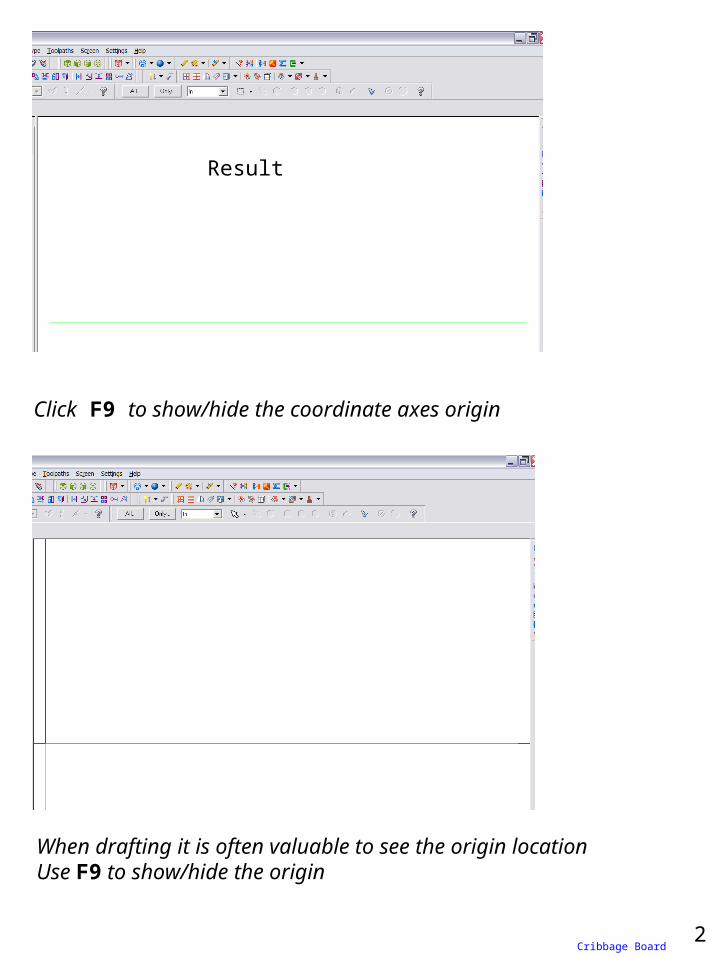
Result
Click F9 to show/hide the coordinate axes origin
When drafting it is often valuable to see the origin locationUse F9 to show/hide the origin
2Cribbage Board
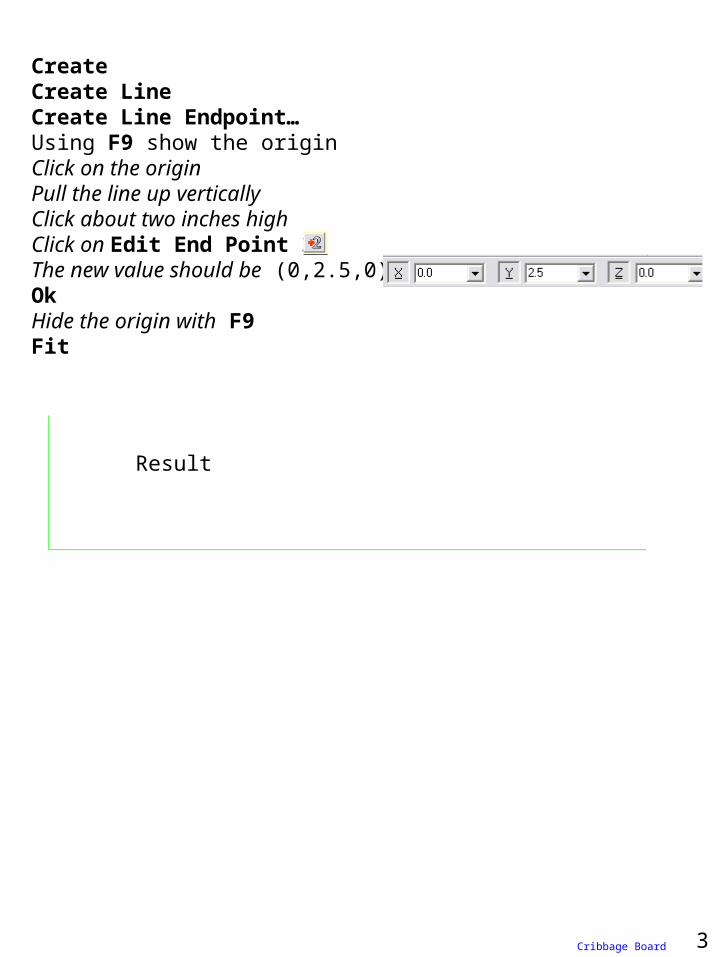
CreateCreate LineCreate Line Endpoint…Using F9 show the originClick on the originPull the line up verticallyClick about two inches highClick on Edit End Point 2 The new value should be (0,2.5,0)OkHide the origin with F9Fit
Result
3Cribbage Board
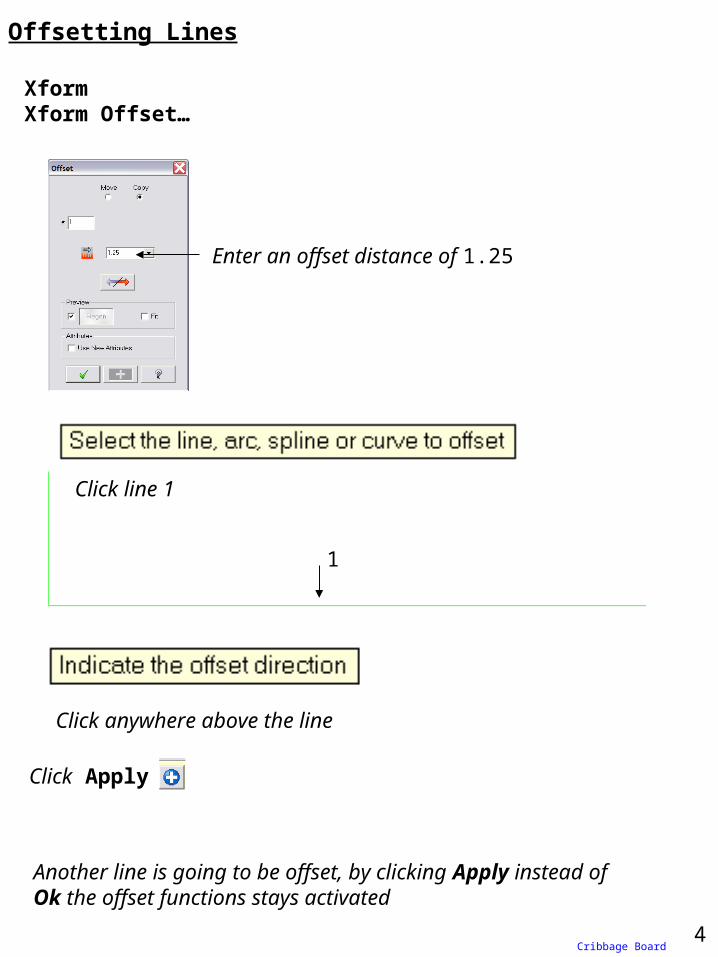
Offsetting Lines
XformXform Offset…
Enter an offset distance of 1.25
Click line 1
Click anywhere above the line
Click Apply
Another line is going to be offset, by clicking Apply instead of Ok the offset functions stays activated
4
1
Cribbage Board
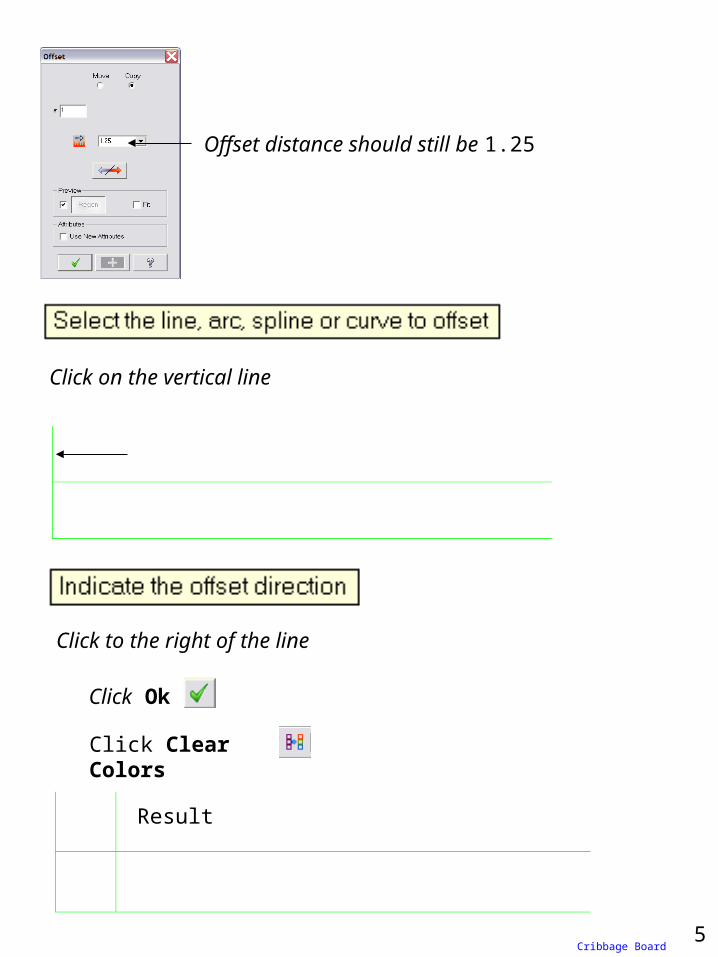
Click on the vertical line
Click to the right of the line
Click Ok
Result
5
Offset distance should still be 1.25
Click Clear Colors
Cribbage Board
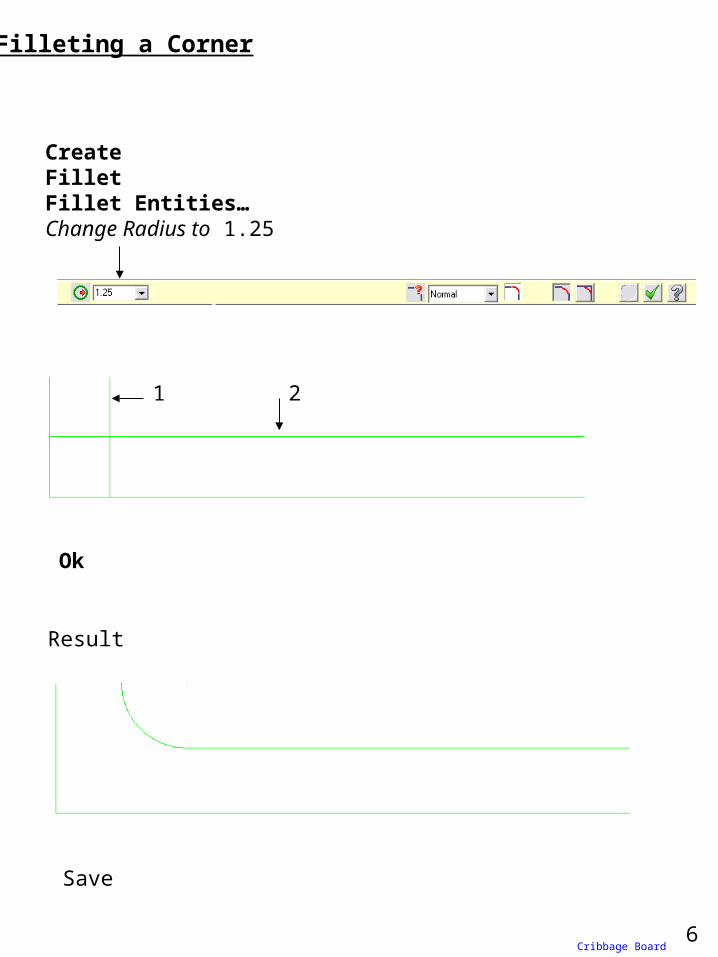
Filleting a Corner
CreateFilletFillet Entities…Change Radius to 1.25
1 2
Result
Save
6Cribbage Board
Ok

Offsetting a Contour
XformXform Offset Contour…
Make changes
Click on contour 1
1
Ok
7Cribbage Board
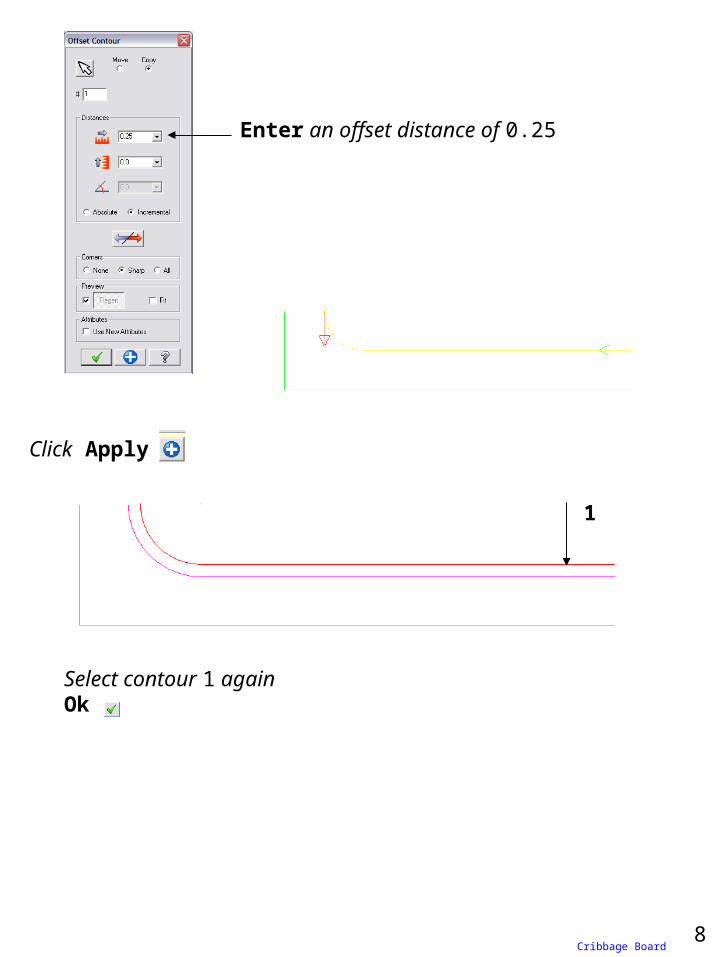
Enter an offset distance of 0.25
Click Apply
8
Select contour 1 againOk
1
Cribbage Board
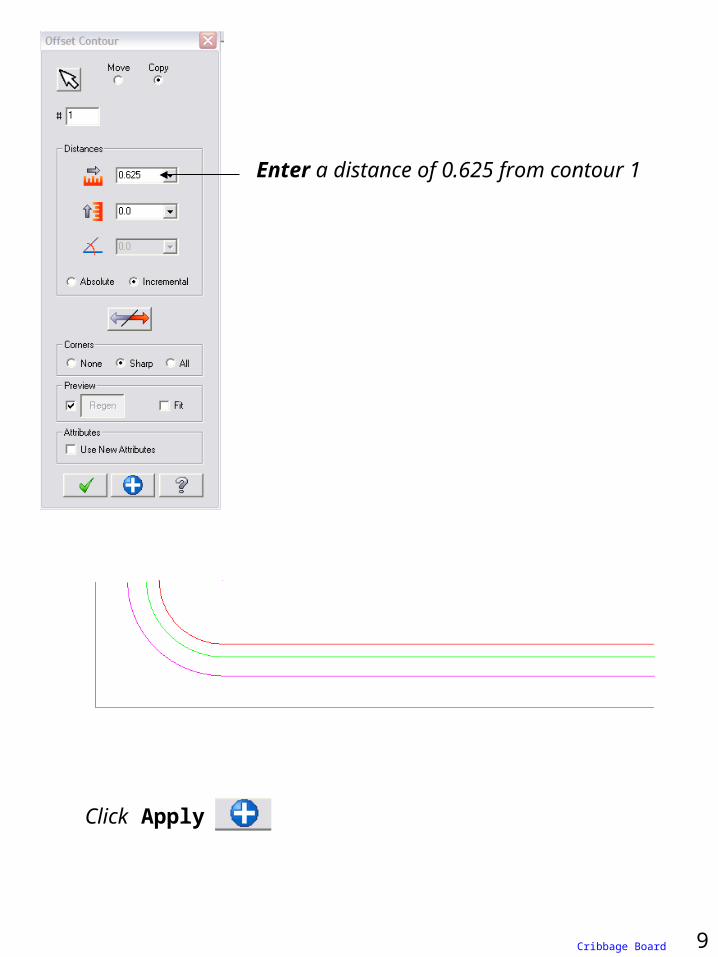
Enter a distance of 0.625 from contour 1
Click Apply
9Cribbage Board
1
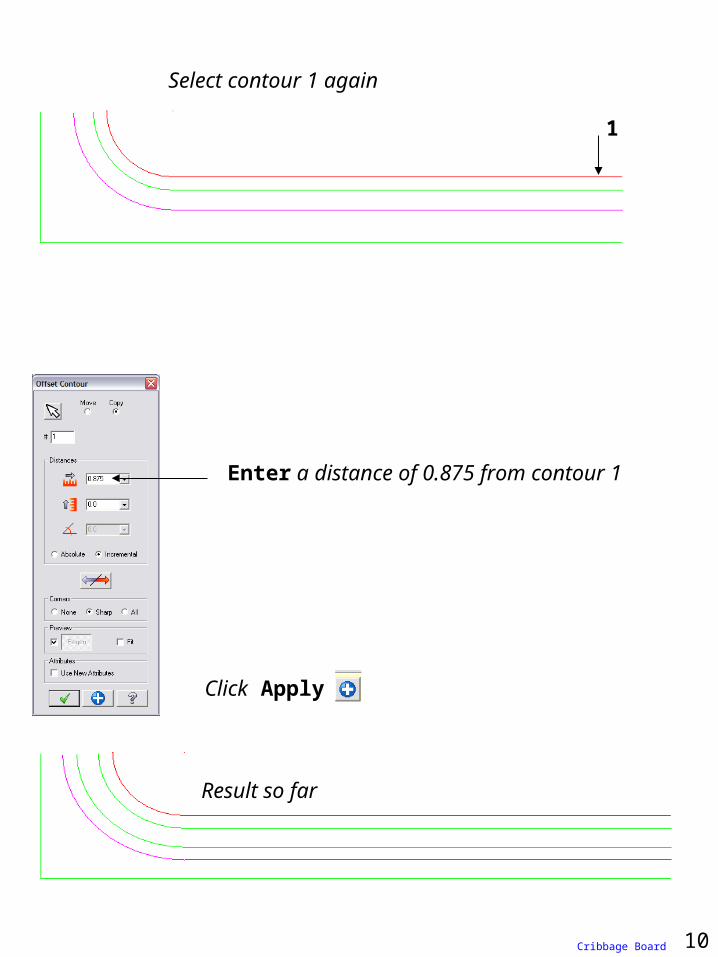
Select contour 1 again
Enter a distance of 0.875 from contour 1
Click Apply
Result so far
10Cribbage Board

Select contour 1 again
1
Ok
Enter a distance of 1.0 from contour 1
Click Apply
Ok
Result
Click Clear Colors
11
Save
Cribbage Board
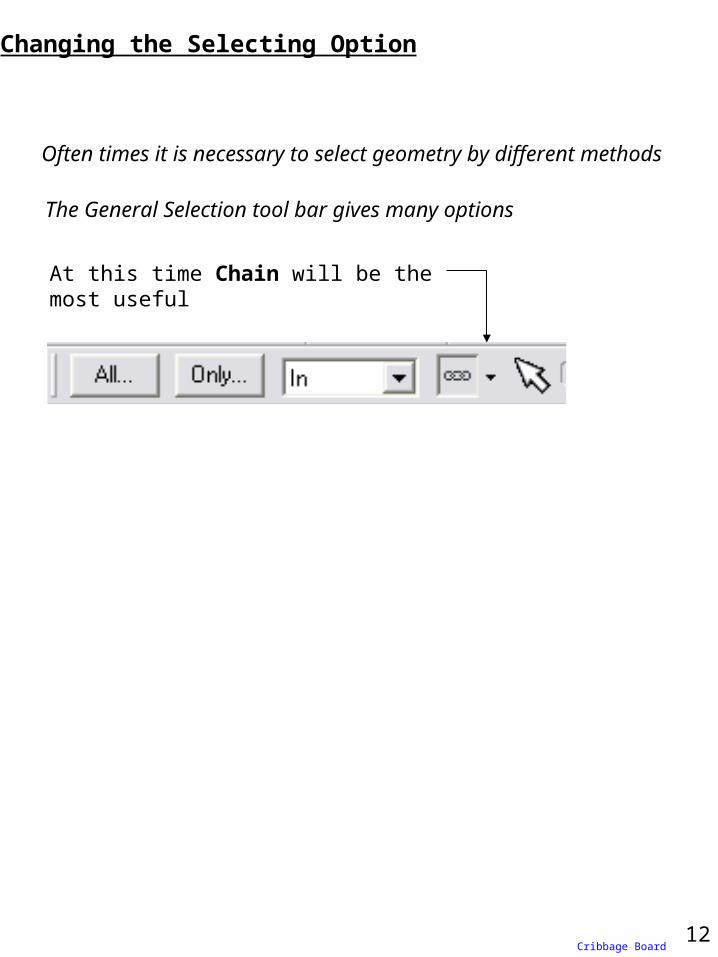
Changing the Selecting Option
Often times it is necessary to select geometry by different methods
The General Selection tool bar gives many options
At this time Chain will be the most useful
12Cribbage Board
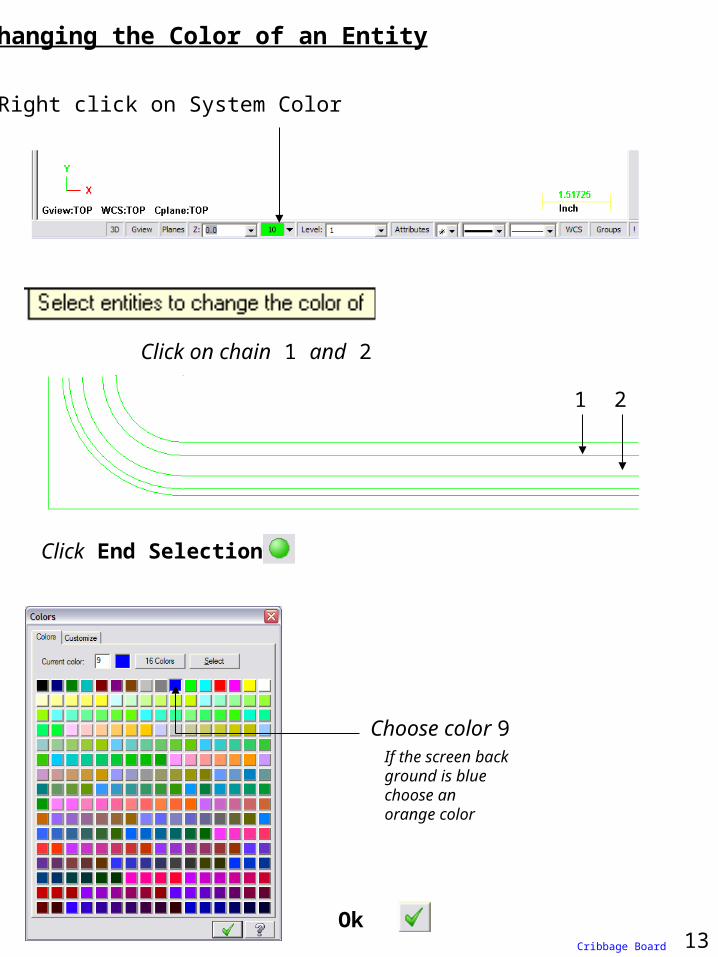
Changing the Color of an Entity
Right click on System Color
1 2
Click End Selection
Choose color 9
Ok
Click on chain 1 and 2
13Cribbage Board
If the screen back ground is blue choose an orange color
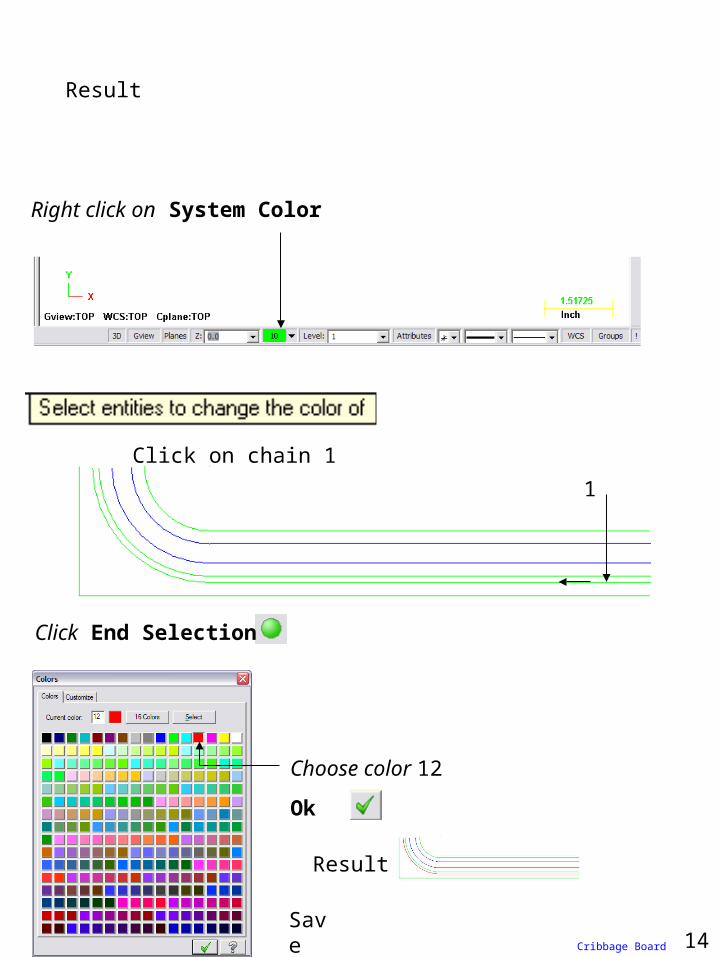
Result
Right click on System Color
1
Click End Selection
Choose color 12
Ok
Click on chain 1
Save
Result
14Cribbage Board
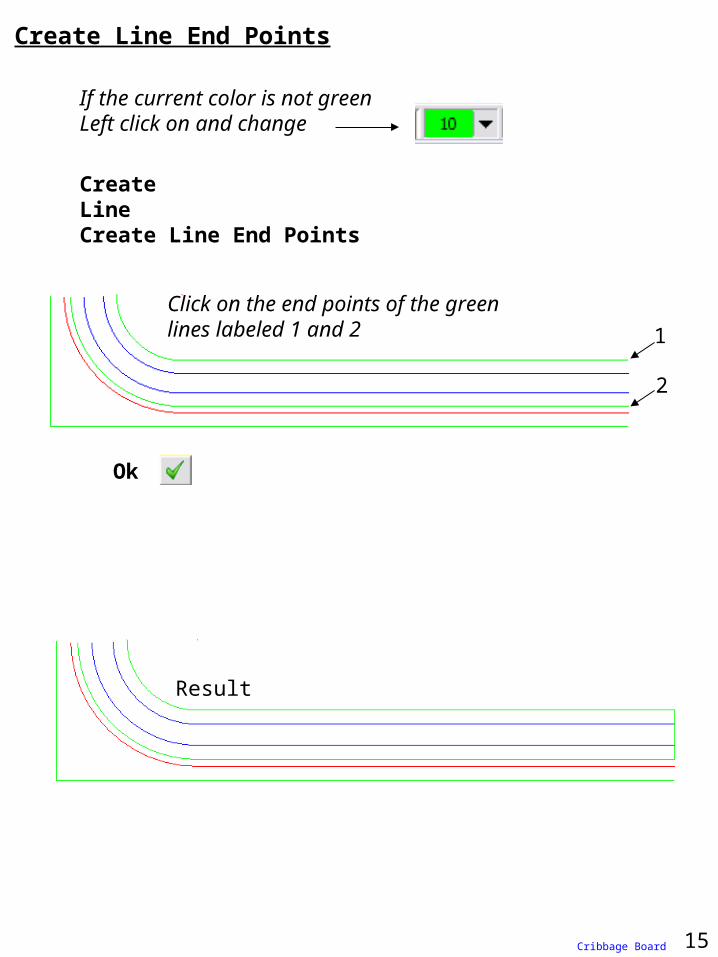
If the current color is not greenLeft click on and change
Create Line End Points
CreateLineCreate Line End Points
Click on the end points of the green lines labeled 1 and 2
Ok
1
2
Result
15Cribbage Board

Offsetting Lines
XformXform Offset…
Enter an offset distance of 0.375
Click line 1
Click to the left of line 1
Click Apply
16
1
Ok
Save
ResultCribbage Board
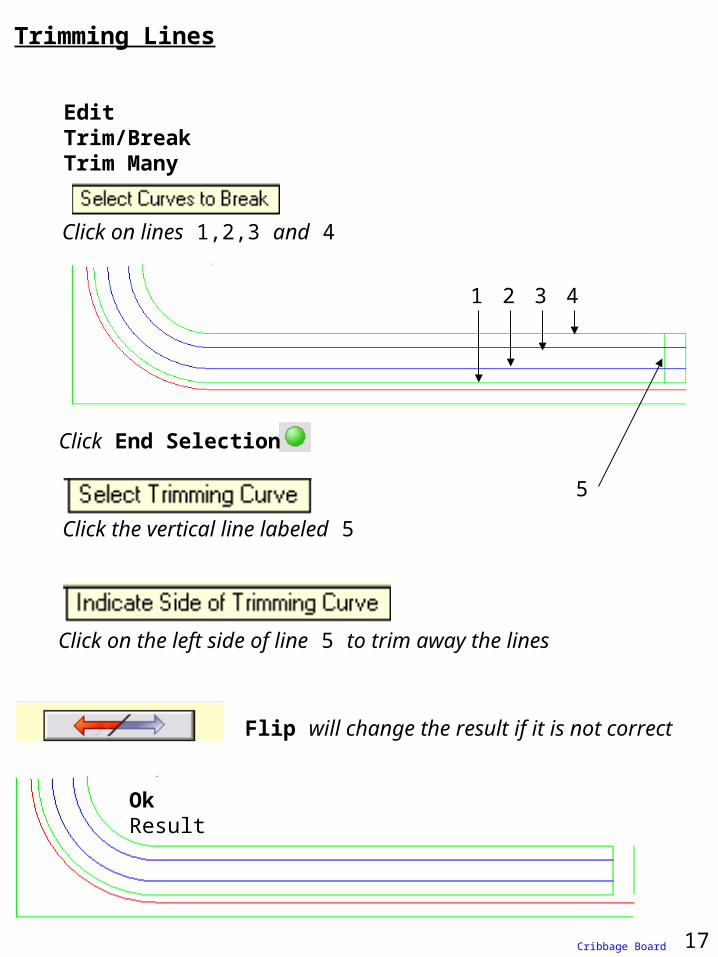
Trimming Lines
EditTrim/BreakTrim Many
Click on lines 1,2,3 and 4
1 2 3 4
Click End Selection
Click the vertical line labeled 5
5
Click on the left side of line 5 to trim away the lines
Flip will change the result if it is not correct
OkResult
17Cribbage Board
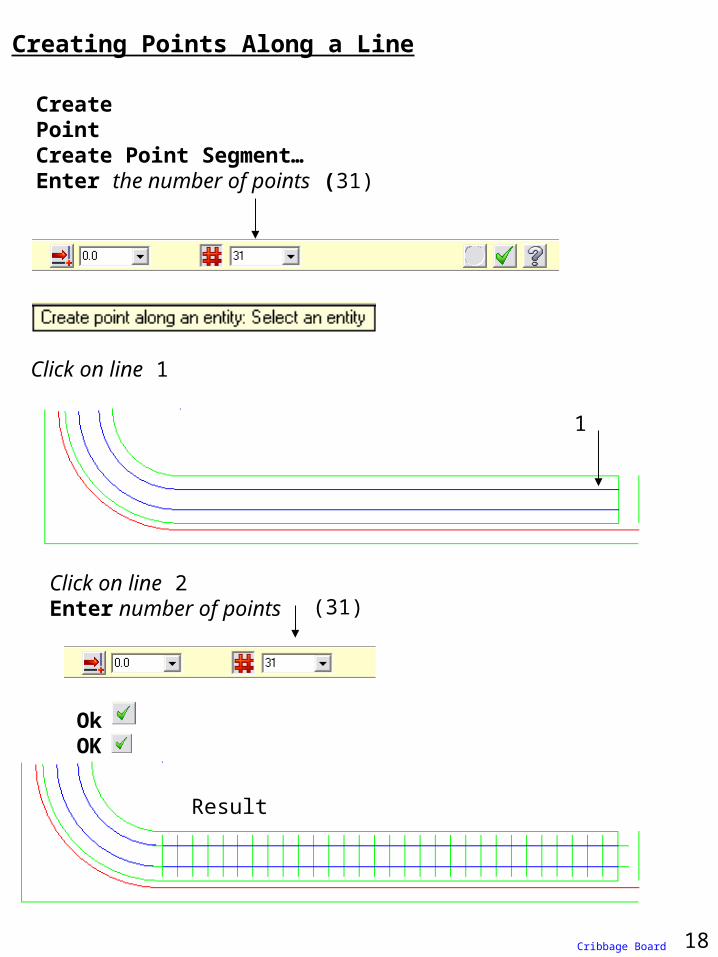
Creating Points Along a Line
CreatePointCreate Point Segment…Enter the number of points (31)
Click on line 1
1
Click on line 2Enter number of points (31)
Result
18
OkOK
Cribbage Board

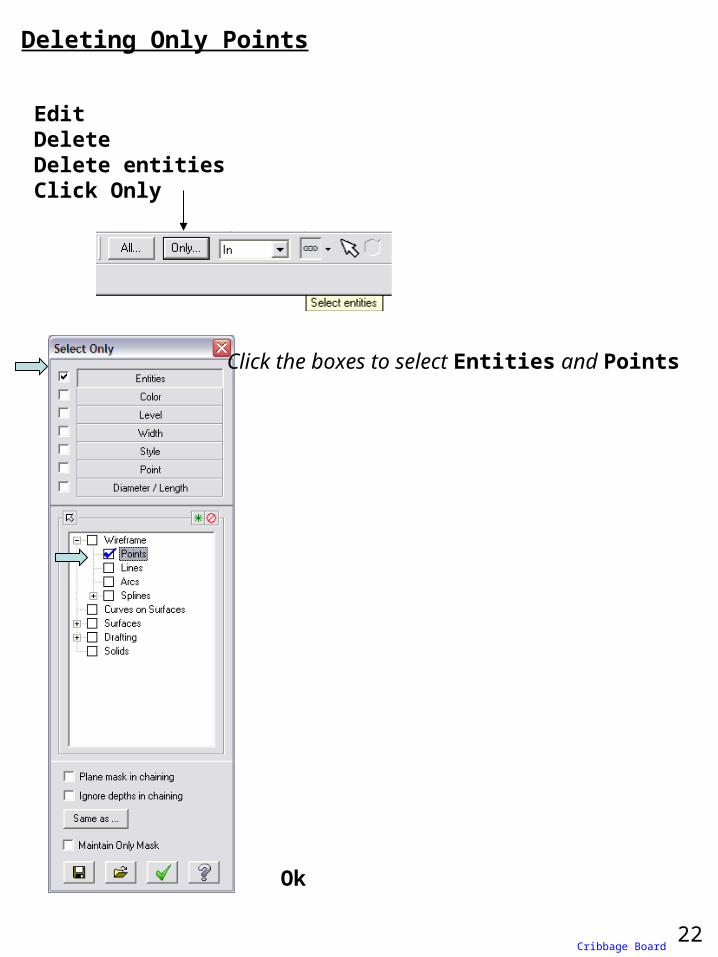
Deleting Only Points
EditDeleteDelete entitiesClick Only
Click the boxes to select Entities and Points
Ok
19Cribbage Board
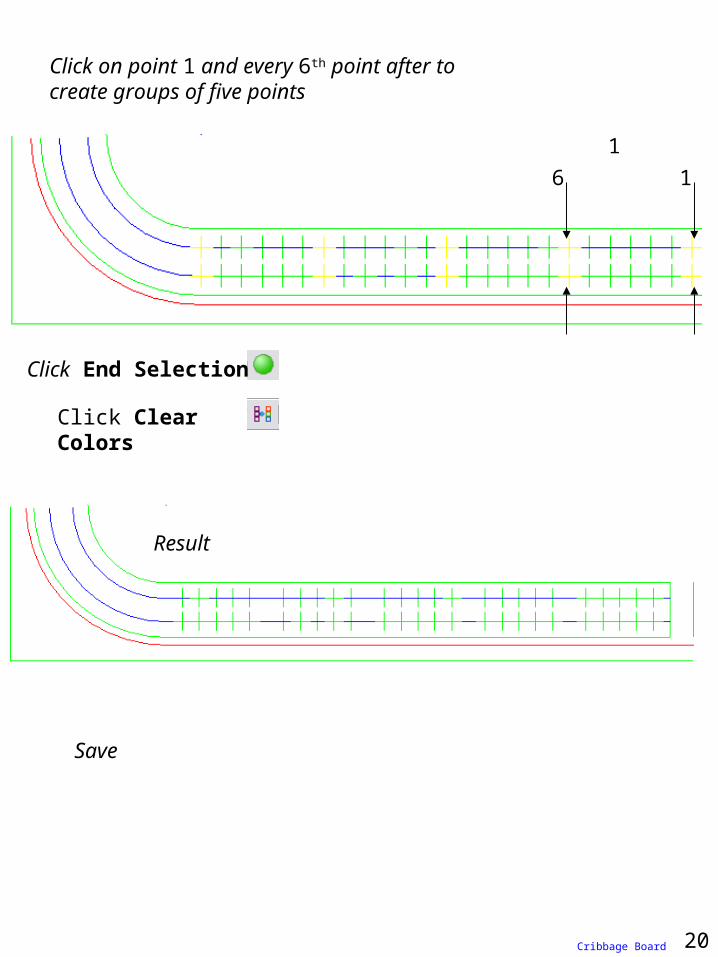
Click on point 1 and every 6th point after to create groups of five points
Click End Selection
Click Clear Colors
Result
Save
20Cribbage Board
1
16
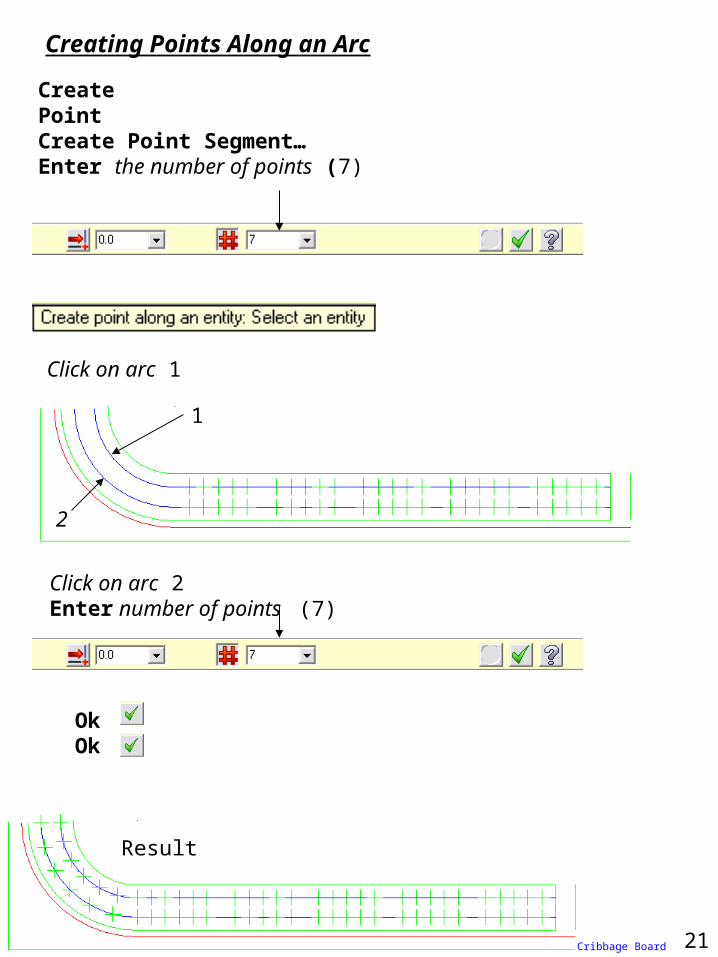
Creating Points Along an Arc
CreatePointCreate Point Segment…Enter the number of points (7)
Click on arc 1
1
Click on arc 2Enter number of points
OkOk
(7)
Result
21
1
2
Cribbage Board
Deleting Only Points
EditDeleteDelete entitiesClick Only
Click the boxes to select Entities and Points
Ok
22Cribbage Board
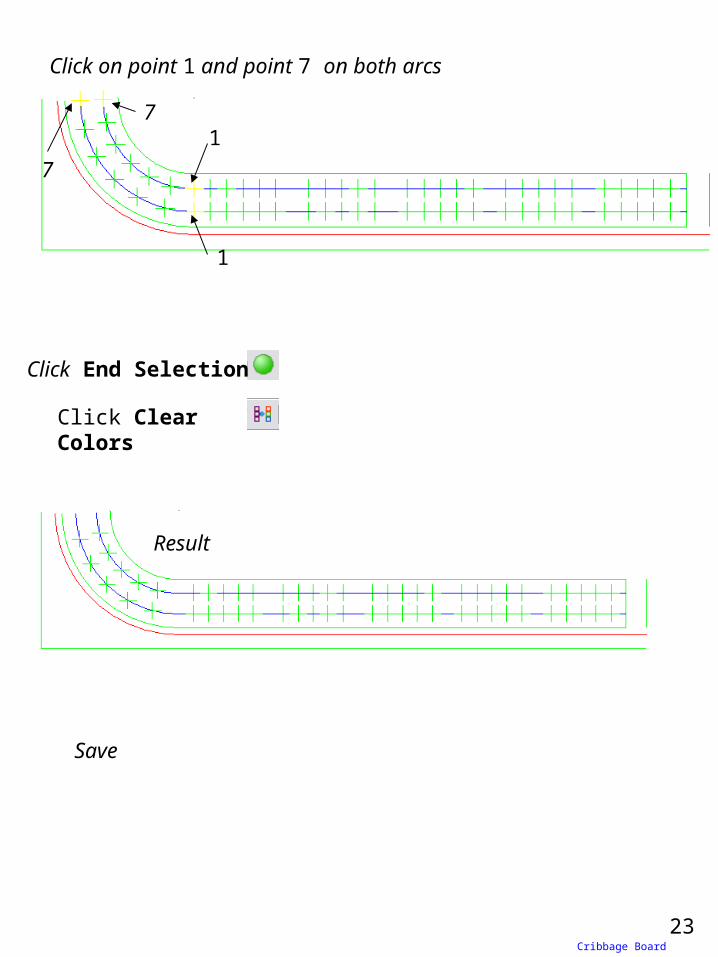
Click on point 1 and point 7 on both arcs
Click End Selection
Click Clear Colors
Result
Save
1
1
7
7
23Cribbage Board
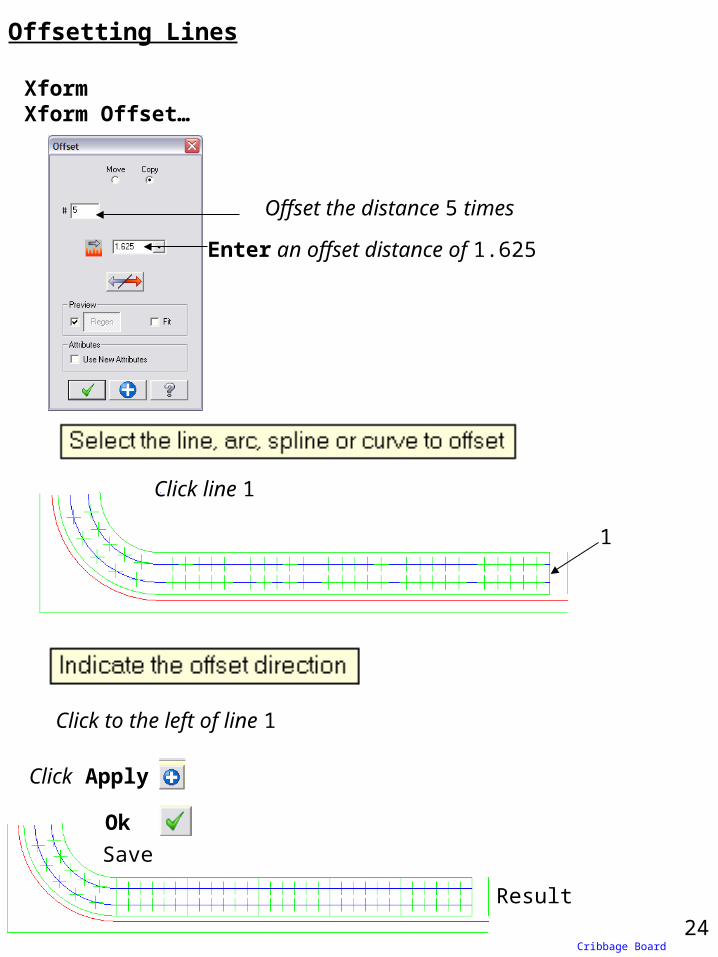
Offsetting Lines
XformXform Offset…
Enter an offset distance of 1.625
Click line 1
Click to the left of line 1
Click Apply
24
1
Ok
Save
Result
Offset the distance 5 times
Cribbage Board
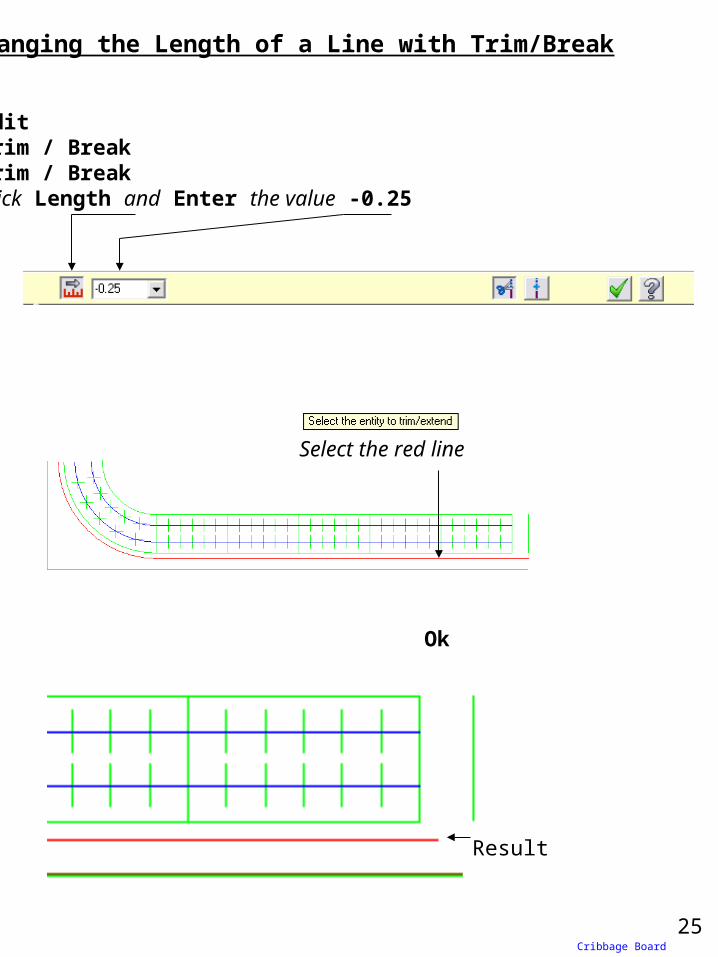
Changing the Length of a Line with Trim/Break
Edit Trim / BreakTrim / BreakClick Length and Enter the value -0.25
Select the red line
Result
25Cribbage Board
Ok
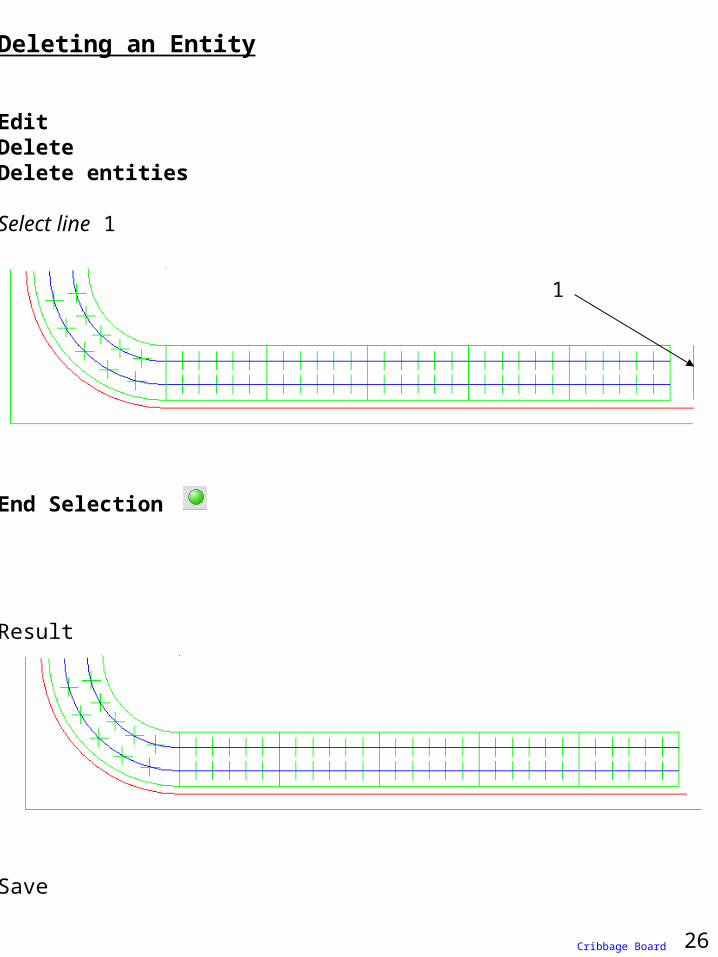
Deleting an Entity
Edit DeleteDelete entities
Select line 1
End Selection
Result
Save
1
26Cribbage Board

Mirror Geometry
Change the selection option to Window
Window the part by clicking position 1 and 2
1
2
XformXform Mirror
End Selection
27Cribbage Board
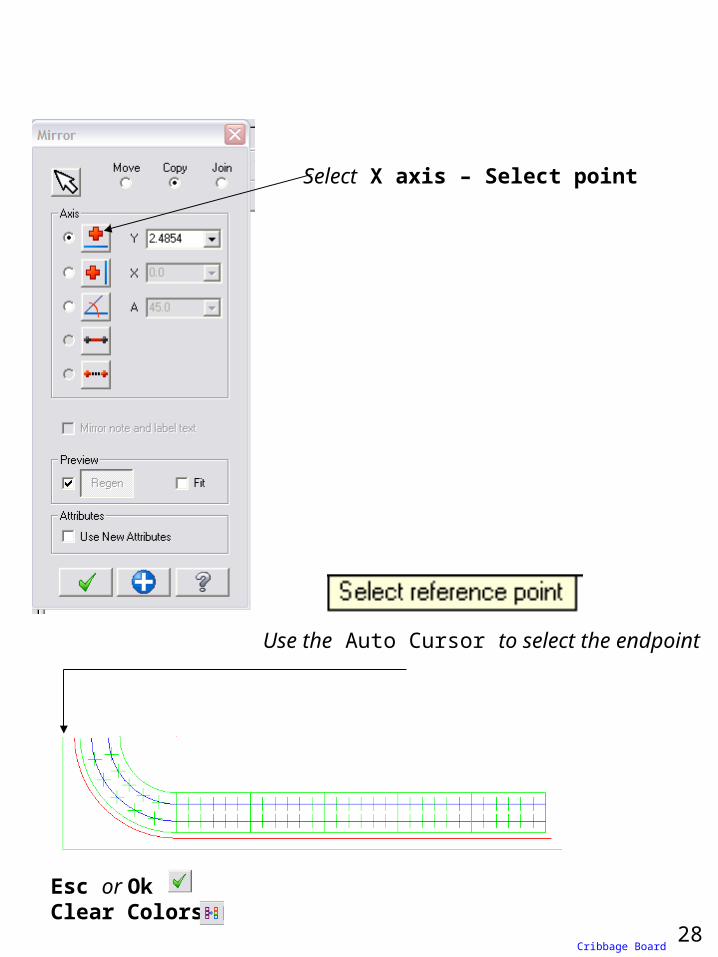
Select X axis – Select point
Use the Auto Cursor to select the endpoint
Esc or OkClear Colors
28Cribbage Board
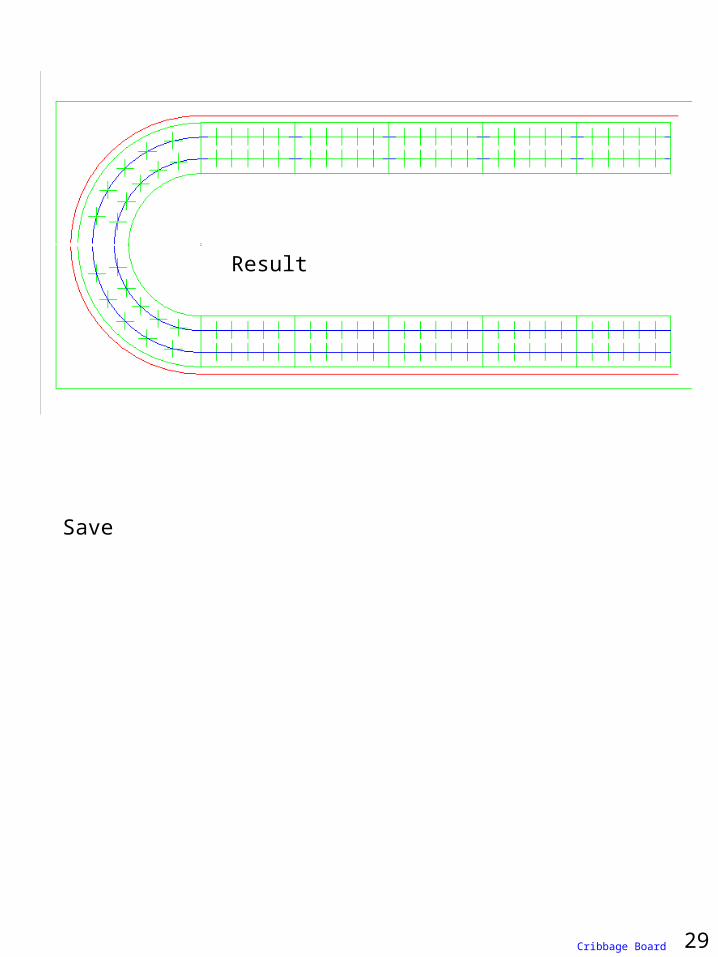
Result
Save
29Cribbage Board
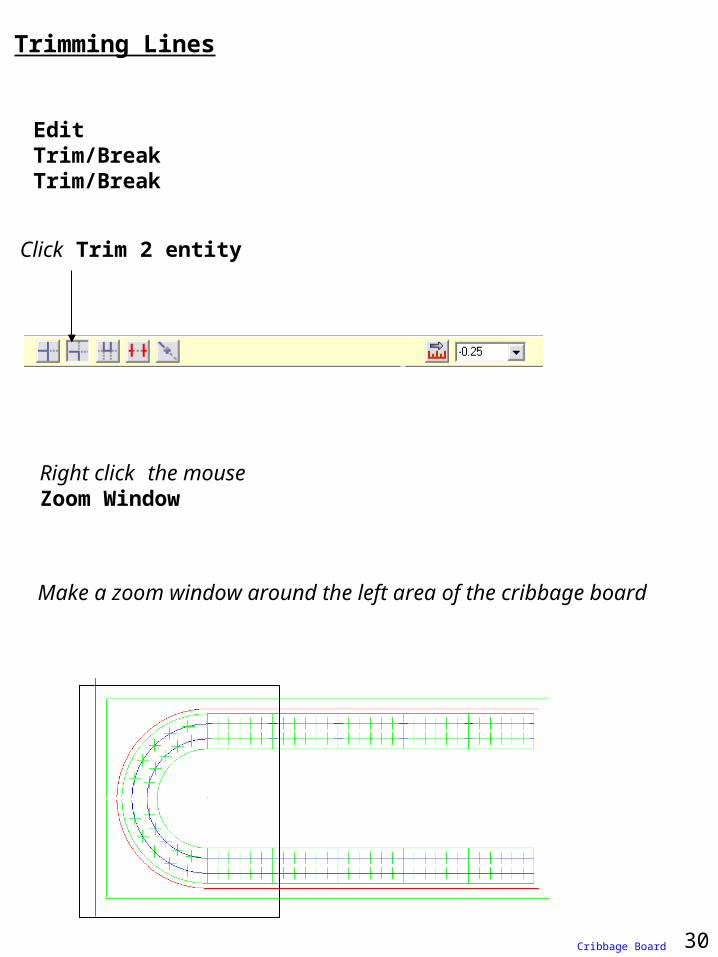
Trimming Lines
EditTrim/BreakTrim/Break
Click Trim 2 entity
Right click the mouseZoom Window
Make a zoom window around the left area of the cribbage board
30Cribbage Board
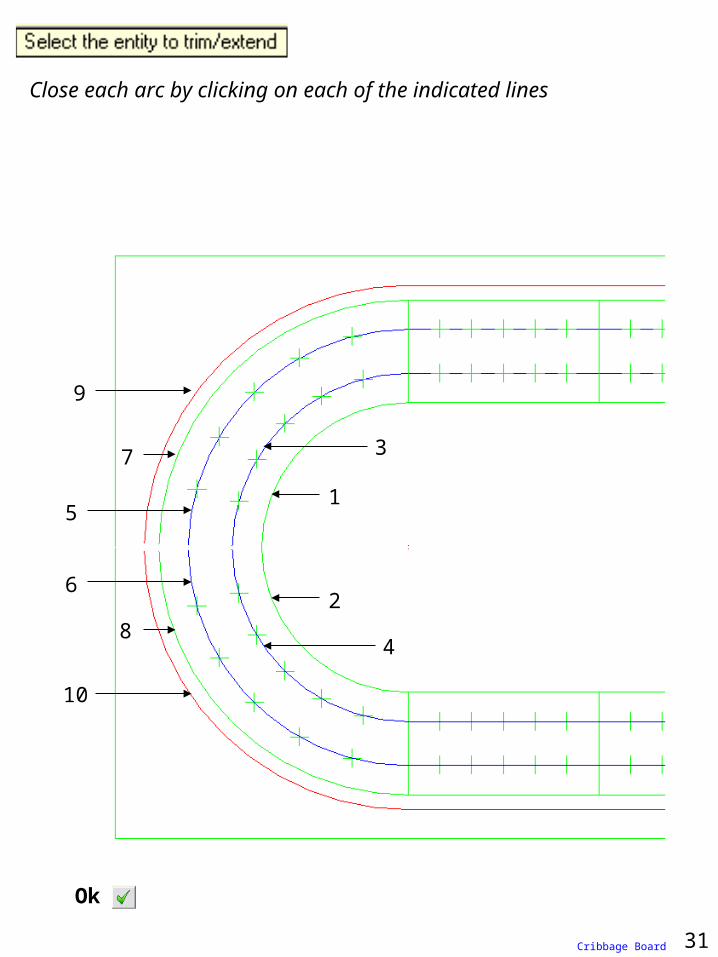
Close each arc by clicking on each of the indicated lines
1
2
3
4
5
6
7
8
9
10
Ok
31Cribbage Board

Result
Click Fit
Result
32Cribbage Board
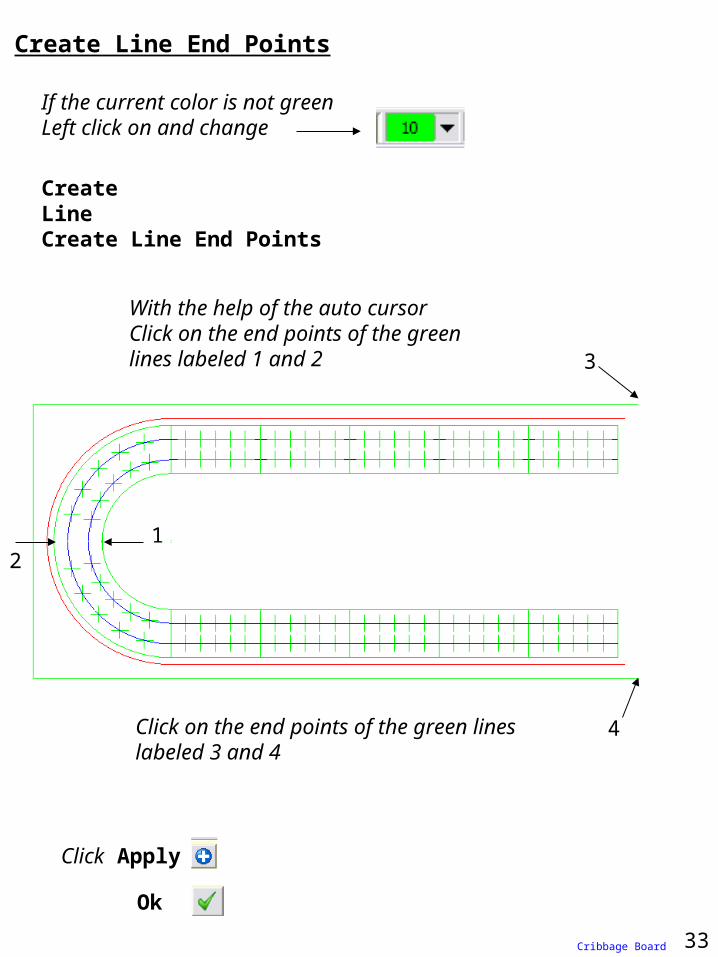
If the current color is not greenLeft click on and change
Create Line End Points
CreateLineCreate Line End Points
With the help of the auto cursorClick on the end points of the green lines labeled 1 and 2
12
Click on the end points of the green lines labeled 3 and 4
3
4
33
Click Apply
Ok
Cribbage Board
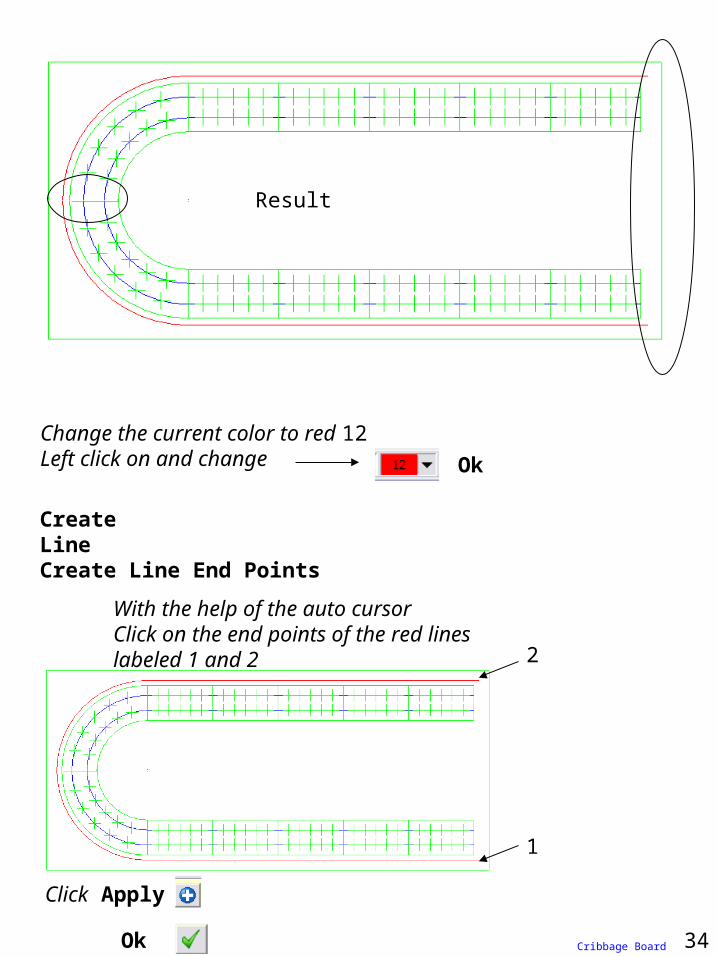
Result
Change the current color to red 12Left click on and change
CreateLineCreate Line End Points
With the help of the auto cursorClick on the end points of the red lines labeled 1 and 2
1
2
34
Click Apply
Ok Cribbage Board
Ok
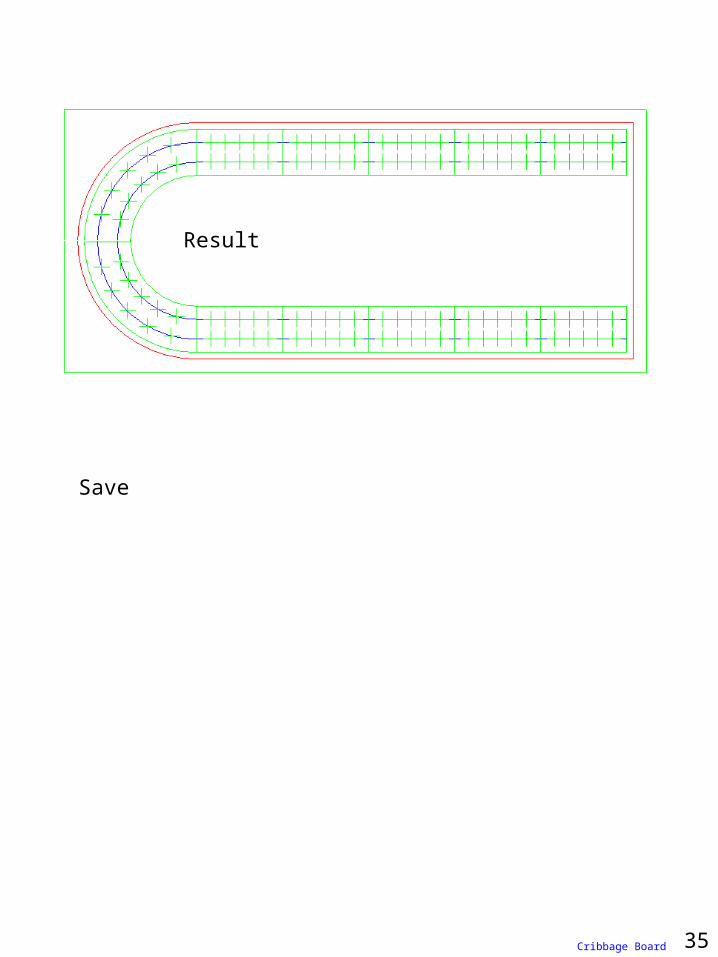
Result
Save
35Cribbage Board
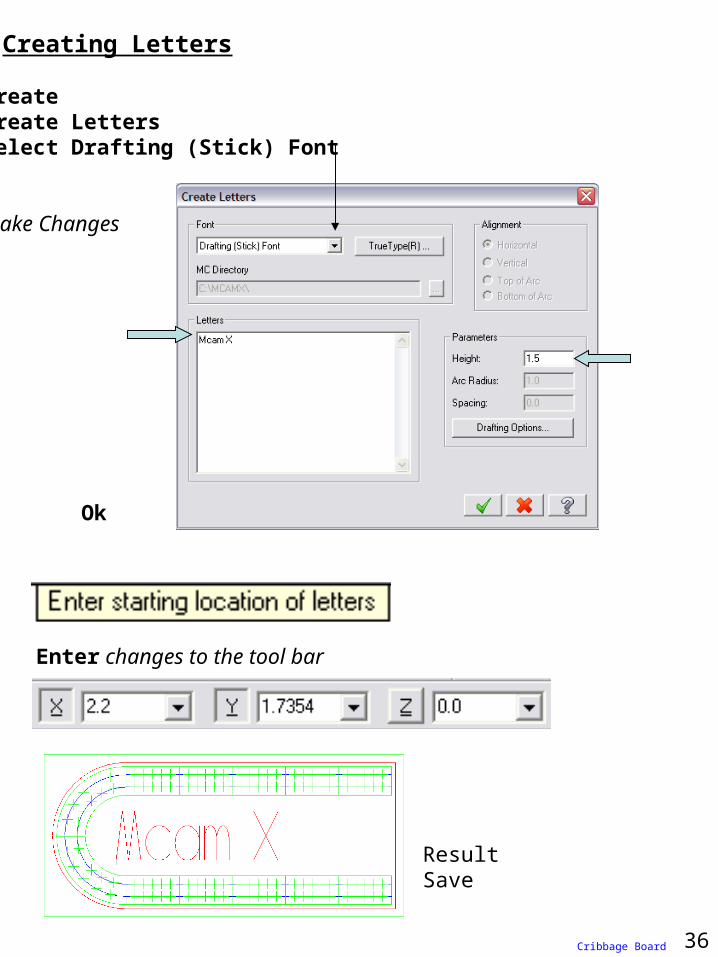
Creating Letters
CreateCreate LettersSelect Drafting (Stick) Font
Make Changes
Ok
Enter changes to the tool bar
ResultSave
36Cribbage Board

Creating a Rectangle
CreateCreate Rectangle
Change the current color to dark green 2Left click on and change
Enter the values into the Ribbon Bar
Enter changes to the tool bar
Click Apply
Ok
37
ResultSave
Cribbage Board
Ok

Creating Tool Paths
Select Machine Type
Machine TypeMillClick on your machine or a generic 3 axis VMC
Notice the information stored in the Operations Manager
38Cribbage Board

Click to show Stock setup
Click
Make changes
Ok
To move arrow location, click desired location
39Cribbage Board
Stock Setup

Drill Tool Path
ToolpathsDrill Toolpaths…
Click Window Points
Use the mouse to draw a window around the entire project
OK
40Cribbage Board
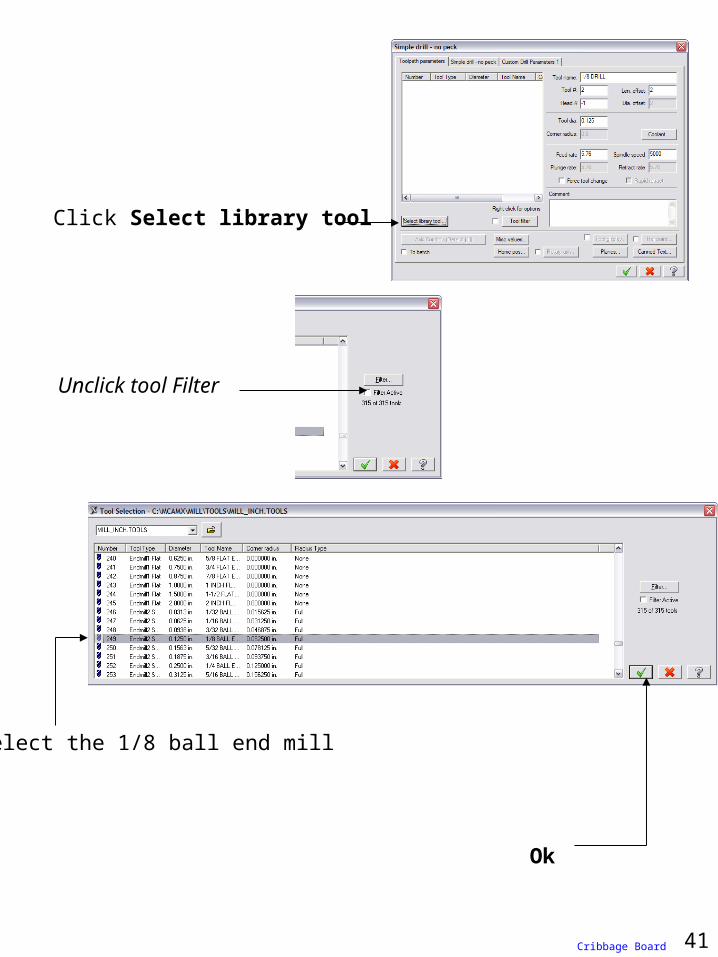
Click Select library tool
Unclick tool Filter
Select the 1/8 ball end mill
Ok
41Cribbage Board

Make changes
No
Select the Simple drill – no peck tab
Don’t click Ok
Make changes
Click Ok
42Cribbage Board
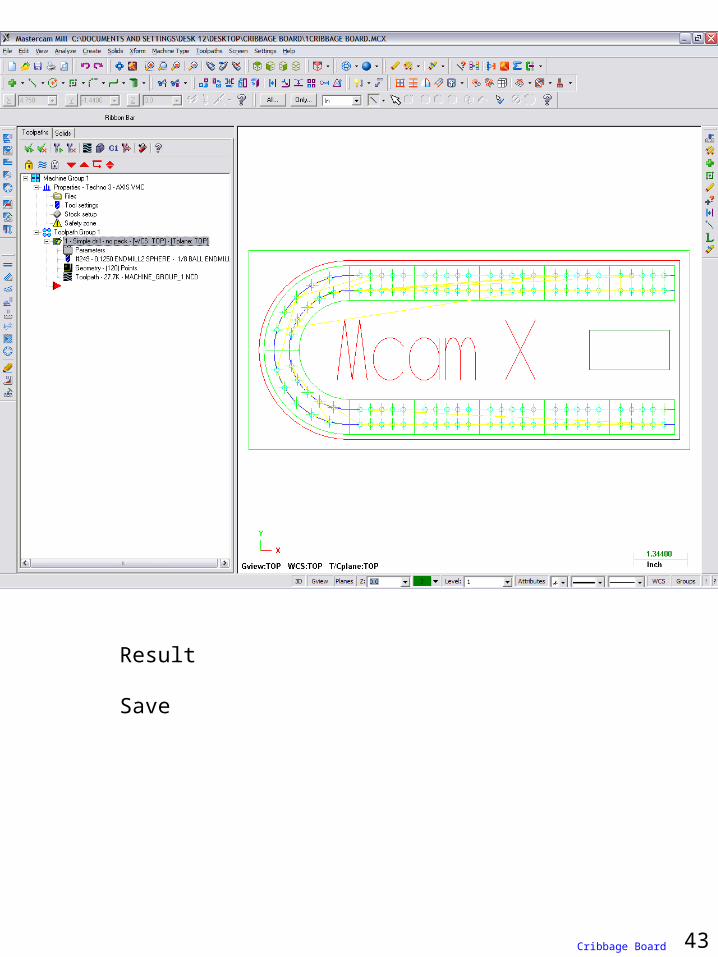
Result
Save
43Cribbage Board

Contour Tool Path
ToolpathsContour Toolpath…
The goal is to select all the letters along with the green lines around and between the holes.
To select these entities use Chain and Single
Chain
Single
If a chain loops around and ends at the start point click End Chain
If this warning comes upClick OKClick End ChainAnd Try using the Single chaining method
44Cribbage Board
Unselect may be helpful
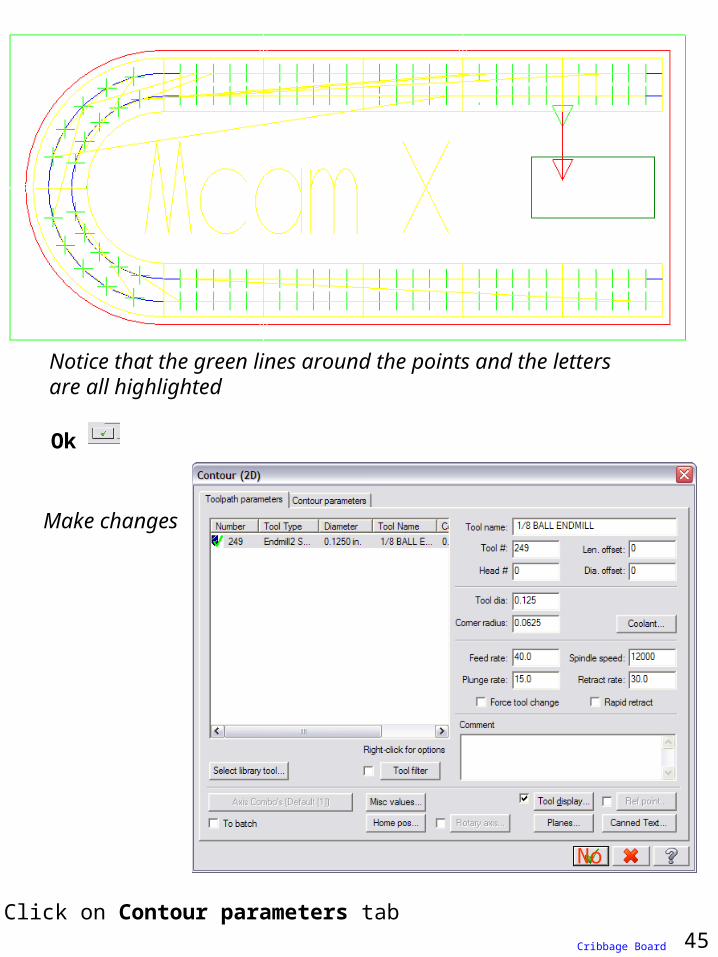
Notice that the green lines around the points and the letters are all highlighted
Ok
Make changes
No
Click on Contour parameters tab45Cribbage Board
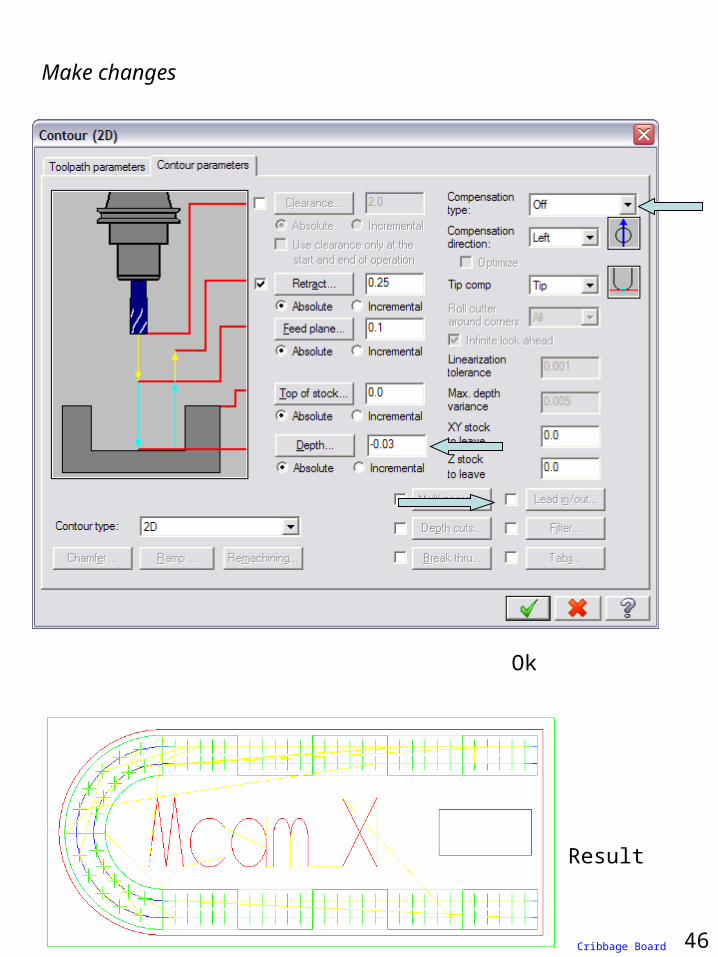
Make changes
Ok
Result
46Cribbage Board

Pocket Tool Paths
ToolpathsPocket toolpathsUsing the Chain method select the rectangle
Chain
Ok
Make changes
Don’t click OkNO 47Cribbage Board

Make changes
Turn on Depth CutsClick Depth cuts
Make changes
Ok
No
Select Roughing/Finishing parameters48Cribbage Board
Select Pocketing parameters
Make changes
Ok
Result
49Save
Cribbage Board
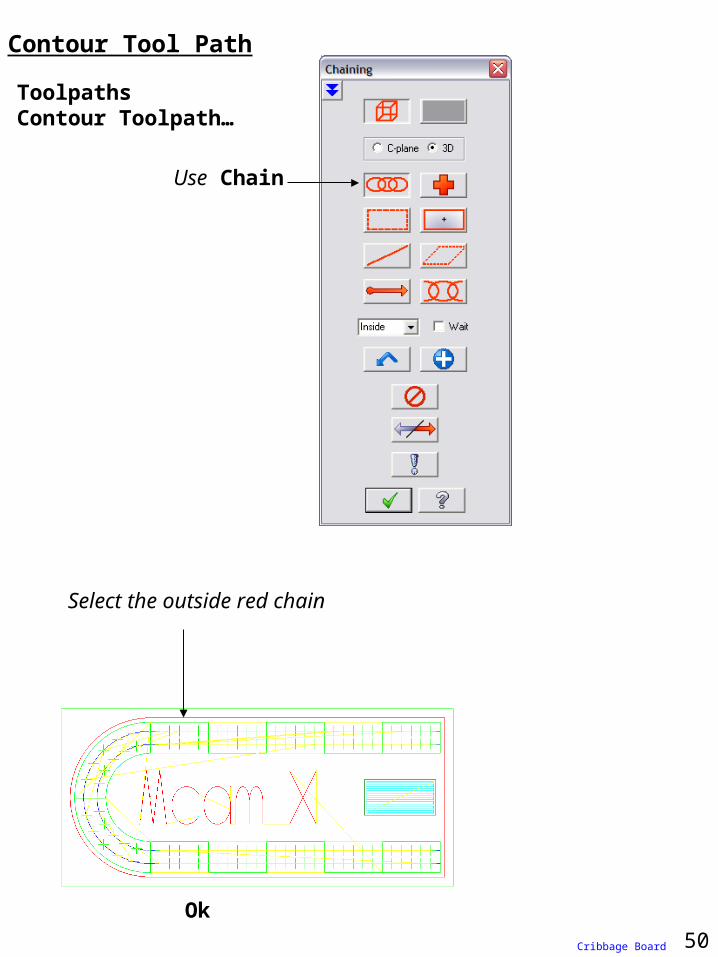
Contour Tool Path
ToolpathsContour Toolpath…
Use Chain
Select the outside red chain
Ok
50Cribbage Board

Make changes
Don’t click Ok
Click on Contour parameters
No
No
Click Depth cuts
51
Make changes
Cribbage Board
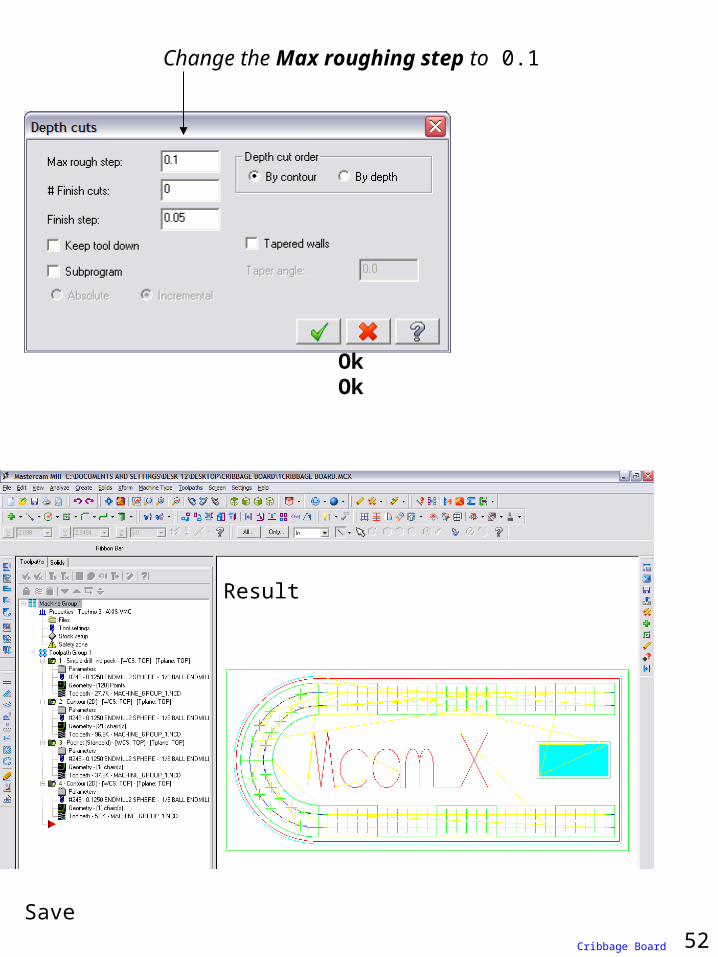
Change the Max roughing step to 0.1
OkOk
Result
52Save
Cribbage Board

Verify Selected operation
Drag the mouse over the Toolpath page and notice how the buttons light up
Click Configure to verify stock size
Isometric ViewFit
Verifying Selected Operation
53Cribbage Board
Click Select all operations
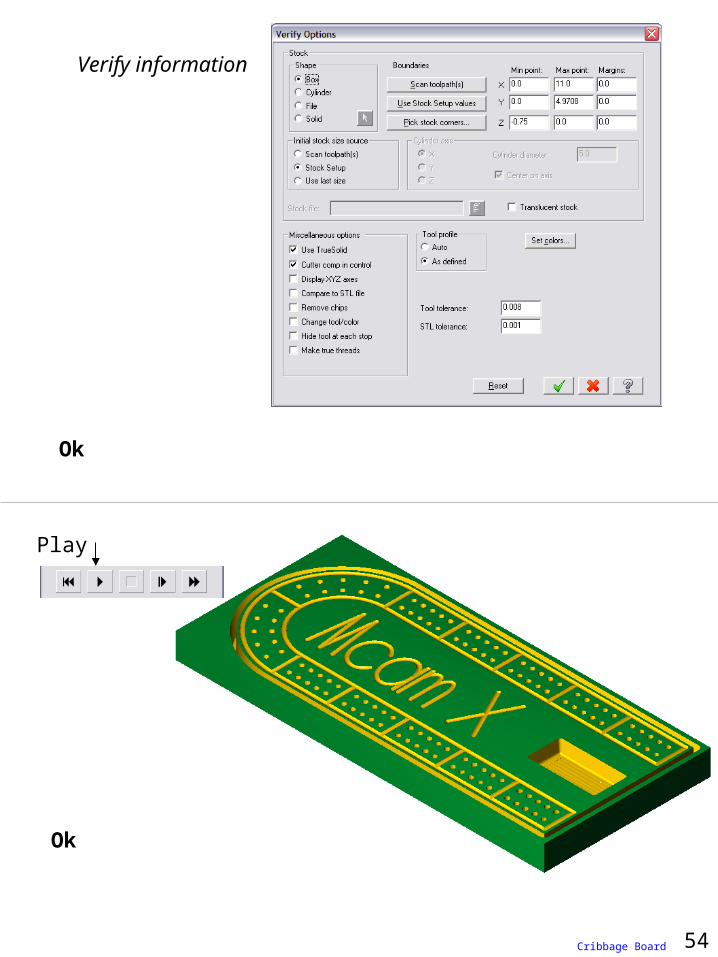
Verify information
Ok
Play
Ok
54Cribbage Board

Posting the G and M Code
Make Changes
Click to post code
Ok
Save to the desired destinationMake the chips fly
55Cribbage Board

Creating Geometry
Creating a Line by Editing End Points 1Offsetting Lines 4,16Filleting a Corner 6Offsetting a Contour 7Changing the Selecting Option 12Changing the Color of an Entity 13Create Line End Points 15,33Trimming Lines 17,30Creating Points Along a Line or Arc 18,21Deleting Only Points 19,22Offsetting Lines 24Changing the Length of a Line with Trim/Break 25Deleting an Entity 26Mirror Geometry 27Creating Letters 36Creating a Rectangle 37
Creating Tool Paths
Select Machine Type 38Stock Setup 39Drill Tool Path 40Contour Tool Path 44,50Pocket Tool Paths 47Verifying Selected Operation 53Posting the G and M Code 55
Cutting Tools Sources
MSC Industrial Supply Co.1-800-645-7270www.mscdirect.com
J&L Industrial Supplywww.jlindustrialsupply.com
Encowww.use-enco.com1-800-USE-ENCO
Micro 100 Tool Corporation1-800-635-3080
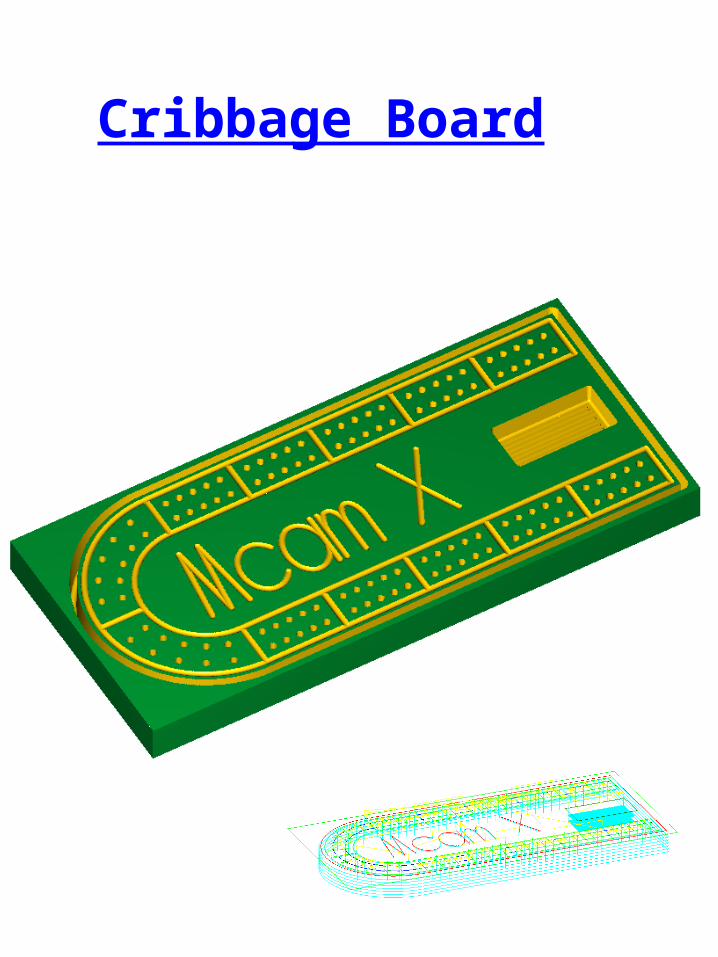
Cribbage Board