creating decorative fused glass...
TRANSCRIPT
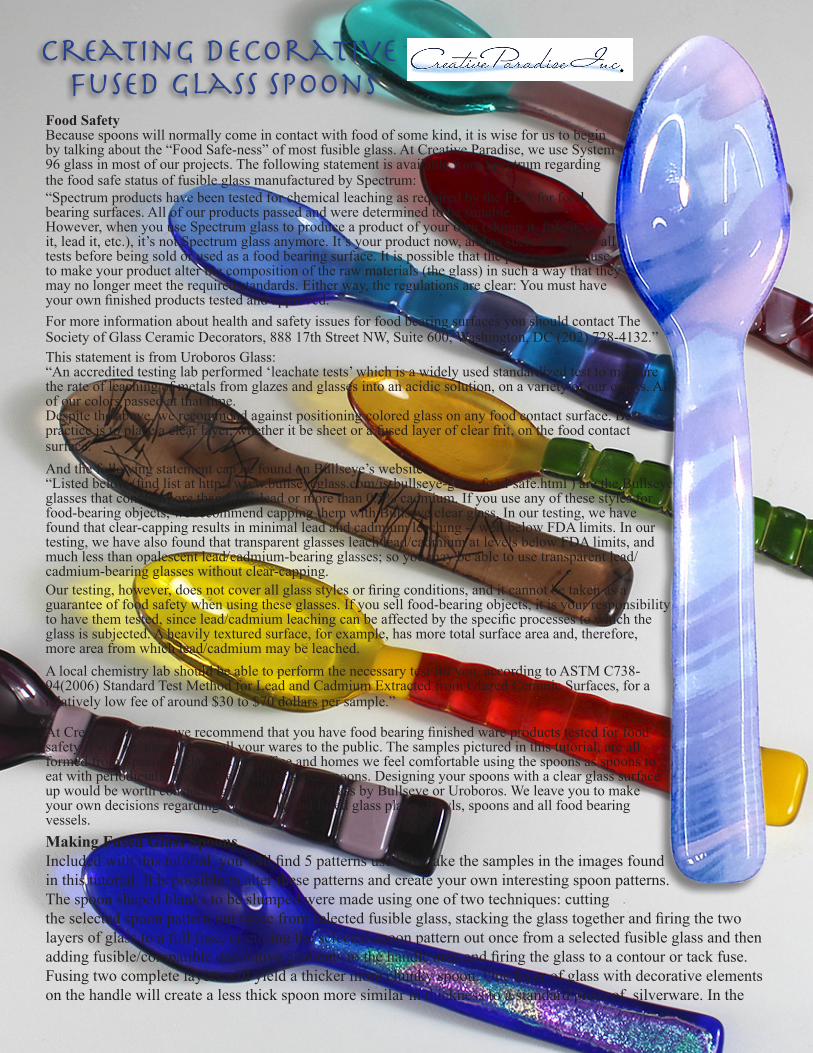
Creating Decorative Fused Glass Spoons
Food Safety Because spoons will normally come in contact with food of some kind, it is wise for us to begin by talking about the “Food Safe-ness” of most fusible glass. At Creative Paradise, we use System 96 glass in most of our projects. The following statement is available from Spectrum regarding the food safe status of fusible glass manufactured by Spectrum: “Spectrum products have been tested for chemical leaching as required by the FDA for food bearing surfaces. All of our products passed and were determined to be suitable.However, when you use Spectrum glass to produce a product of your own (slump it, fuse it, foil it, lead it, etc.), it’s not Spectrum glass anymore. It’s your product now, and as such, must pass all tests before being sold or used as a food bearing surface. It is possible that the processes you use to make your product alter the composition of the raw materials (the glass) in such a way that they may no longer meet the required standards. Either way, the regulations are clear: You must have your own finished products tested and approved.For more information about health and safety issues for food bearing surfaces you should contact The Society of Glass Ceramic Decorators, 888 17th Street NW, Suite 600, Washington, DC (202) 728-4132.”This statement is from Uroboros Glass:“An accredited testing lab performed ‘leachate tests’ which is a widely used standardized test to measure the rate of leaching of metals from glazes and glasses into an acidic solution, on a variety of our colors. All of our colors passed at that time.Despite the above, we recommend against positioning colored glass on any food contact surface. Best practice is to place a clear layer, whether it be sheet or a fused layer of clear frit, on the food contact surface.”And the following statement can be found on Bullseye’s website:“Listed below (find list at http://www.bullseyeglass.com/is-bullseye-glass-food-safe.html ) are the Bullseye glasses that contain more than 1.0% lead or more than 0.5% cadmium. If you use any of these styles for food-bearing objects, we recommend capping them with Bullseye clear glass. In our testing, we have found that clear-capping results in minimal lead and cadmium leaching -- well below FDA limits. In our testing, we have also found that transparent glasses leach lead/cadmium at levels below FDA limits, and much less than opalescent lead/cadmium-bearing glasses; so you may be able to use transparent lead/cadmium-bearing glasses without clear-capping.Our testing, however, does not cover all glass styles or firing conditions, and it cannot be taken as a guarantee of food safety when using these glasses. If you sell food-bearing objects, it is your responsibility to have them tested, since lead/cadmium leaching can be affected by the specific processes to which the glass is subjected. A heavily textured surface, for example, has more total surface area and, therefore, more area from which lead/cadmium may be leached.A local chemistry lab should be able to perform the necessary test for you, according to ASTM C738-94(2006) Standard Test Method for Lead and Cadmium Extracted from Glazed Ceramic Surfaces, for a relatively low fee of around $30 to $70 dollars per sample.”
At Creative Paradise, we recommend that you have food bearing finished ware products tested for food safety if you are planning to sell your wares to the public. The samples pictured in this tutorial, are all formed from Spectrum glass. In our office and homes we feel comfortable using the spoons as spoons to eat with periodicially and to use as dip or sauce spoons. Designing your spoons with a clear glass surface up would be worth considering if you are using glass by Bullseye or Uroboros. We leave you to make your own decisions regarding food safety and fused glass plates, bowls, spoons and all food bearing vessels.Making Fused Glass SpoonsIncluded with this tutorial, you will find 5 patterns used to make the samples in the images found in this tutorial. It is possible to alter these patterns and create your own interesting spoon patterns. The spoon shaped blanks to be slumped were made using one of two techniques: cutting the selected spoon pattern out twice from selected fusible glass, stacking the glass together and firing the two layers of glass to a full fuse, or cutting the selected spoon pattern out once from a selected fusible glass and then adding fusible/compatible decorative elements to the handle area and firing the glass to a contour or tack fuse. Fusing two complete layers will yield a thicker more chunky spoon. One layer of glass with decorative elements on the handle will create a less thick spoon more similar in thickness to a standard piece of silverware. In the
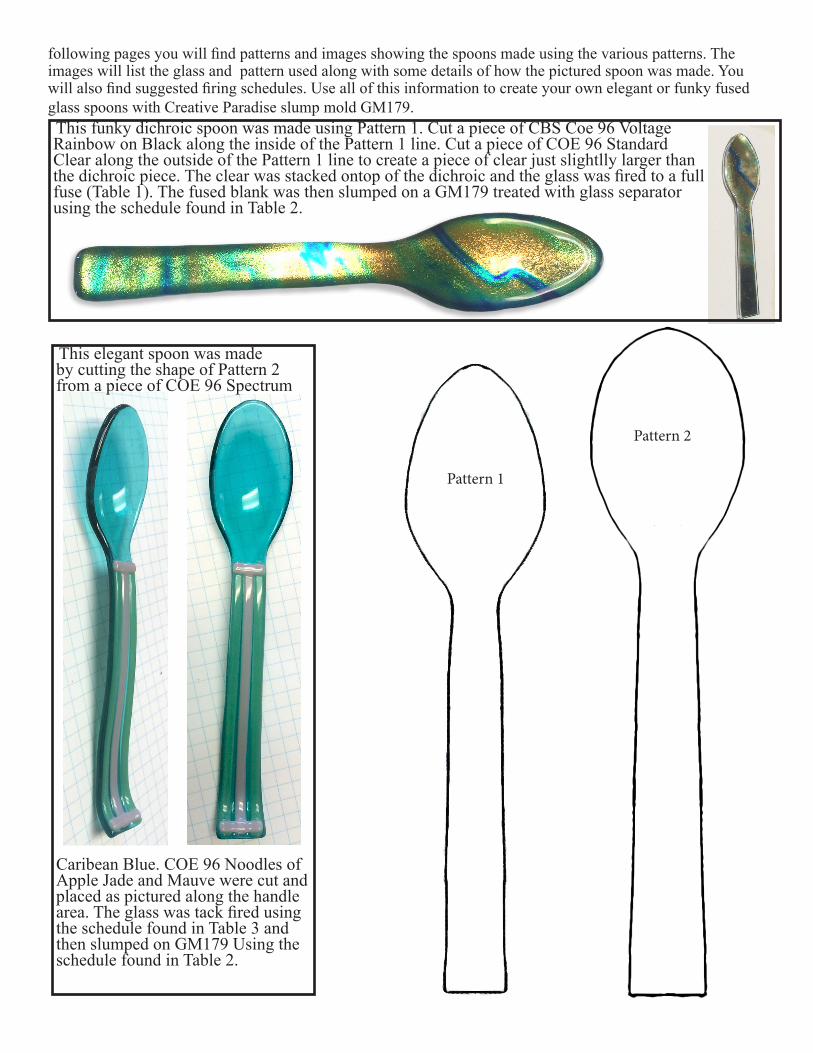
following pages you will find patterns and images showing the spoons made using the various patterns. The images will list the glass and pattern used along with some details of how the pictured spoon was made. You will also find suggested firing schedules. Use all of this information to create your own elegant or funky fused glass spoons with Creative Paradise slump mold GM179.
Pattern 1
Pattern 2
This funky dichroic spoon was made using Pattern 1. Cut a piece of CBS Coe 96 Voltage Rainbow on Black along the inside of the Pattern 1 line. Cut a piece of COE 96 Standard Clear along the outside of the Pattern 1 line to create a piece of clear just slightlly larger than the dichroic piece. The clear was stacked ontop of the dichroic and the glass was fired to a full fuse (Table 1). The fused blank was then slumped on a GM179 treated with glass separator using the schedule found in Table 2.
This elegant spoon was made by cutting the shape of Pattern 2 from a piece of COE 96 Spectrum
Caribean Blue. COE 96 Noodles of Apple Jade and Mauve were cut and placed as pictured along the handle area. The glass was tack fired using the schedule found in Table 3 and then slumped on GM179 Using the schedule found in Table 2.
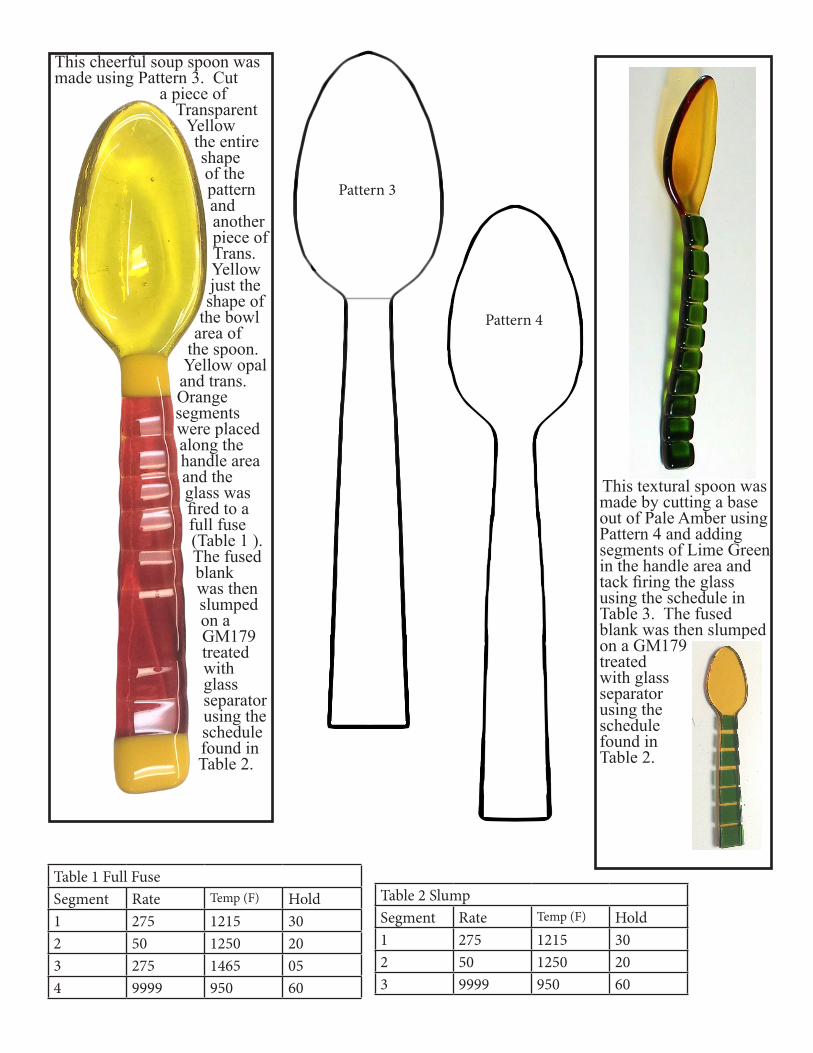
This cheerful soup spoon was made using Pattern 3. Cut
a piece of Transparent
Yellow the entire shape of the pattern and another piece of Trans. Yellow just the shape of
the bowl area of
the spoon. Yellow opal and trans. Orange segments were placed along the handle area and the glass was fired to a full fuse (Table 1 ). The fused blank was then slumped on a GM179 treated with glass separator using the schedule found in Table 2.
Pattern 3
This textural spoon was made by cutting a base out of Pale Amber using Pattern 4 and adding segments of Lime Green in the handle area and tack firing the glass using the schedule in Table 3. The fused blank was then slumped on a GM179 treated with glass separator using the schedule found in Table 2.
Pattern 4
Table 1 Full FuseSegment Rate Temp (F) Hold1 275 1215 302 50 1250 203 275 1465 054 9999 950 60
Table 2 SlumpSegment Rate Temp (F) Hold1 275 1215 302 50 1250 203 9999 950 60
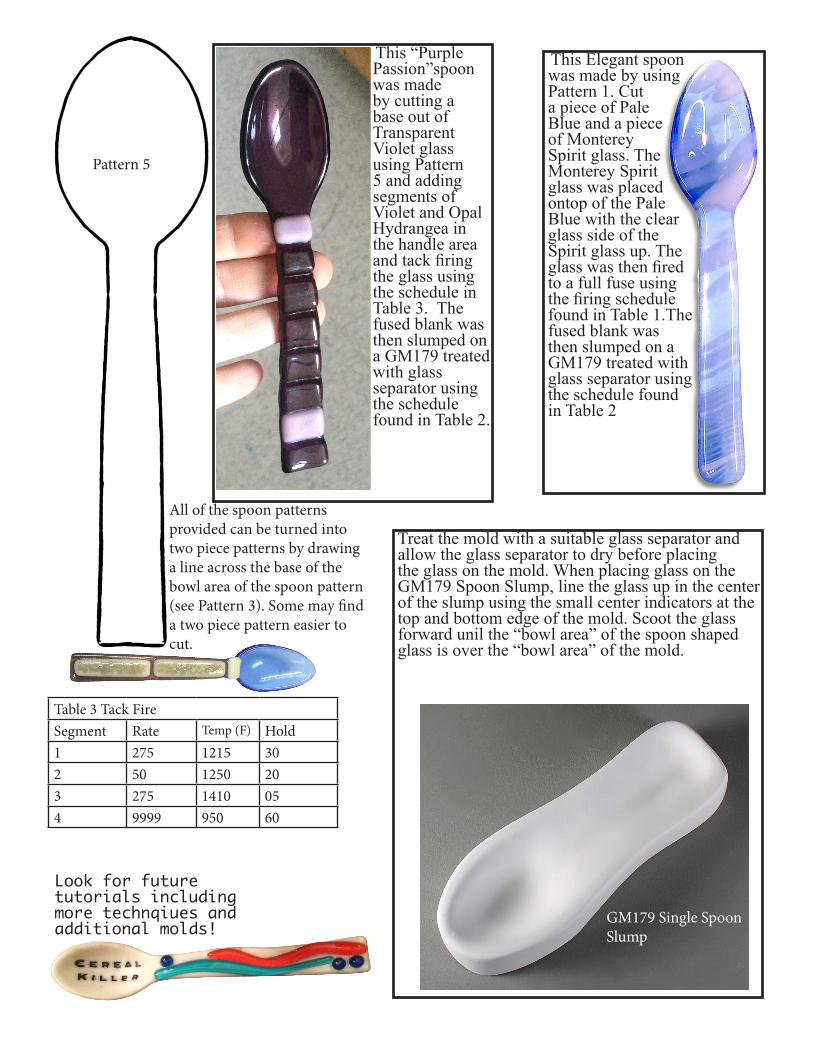
Pattern 5
This “Purple Passion”spoon was made by cutting a base out of Transparent Violet glass using Pattern 5 and adding segments of Violet and Opal Hydrangea in the handle area and tack firing the glass using the schedule in Table 3. The fused blank was then slumped on a GM179 treated with glass separator using the schedule found in Table 2.
This Elegant spoon was made by using Pattern 1. Cut a piece of Pale Blue and a piece of Monterey Spirit glass. The Monterey Spirit glass was placed ontop of the Pale Blue with the clear glass side of the Spirit glass up. The glass was then fired to a full fuse using the firing schedule found in Table 1.The fused blank was then slumped on a GM179 treated with glass separator using the schedule found in Table 2
Treat the mold with a suitable glass separator and allow the glass separator to dry before placing the glass on the mold. When placing glass on the GM179 Spoon Slump, line the glass up in the center of the slump using the small center indicators at the top and bottom edge of the mold. Scoot the glass forward unil the “bowl area” of the spoon shaped glass is over the “bowl area” of the mold.
Table 3 Tack FireSegment Rate Temp (F) Hold1 275 1215 302 50 1250 203 275 1410 054 9999 950 60
Look for future tutorials including more technqiues and additional molds!
All of the spoon patterns provided can be turned into two piece patterns by drawing a line across the base of the bowl area of the spoon pattern (see Pattern 3). Some may find a two piece pattern easier to cut.
GM179 Single SpoonSlump
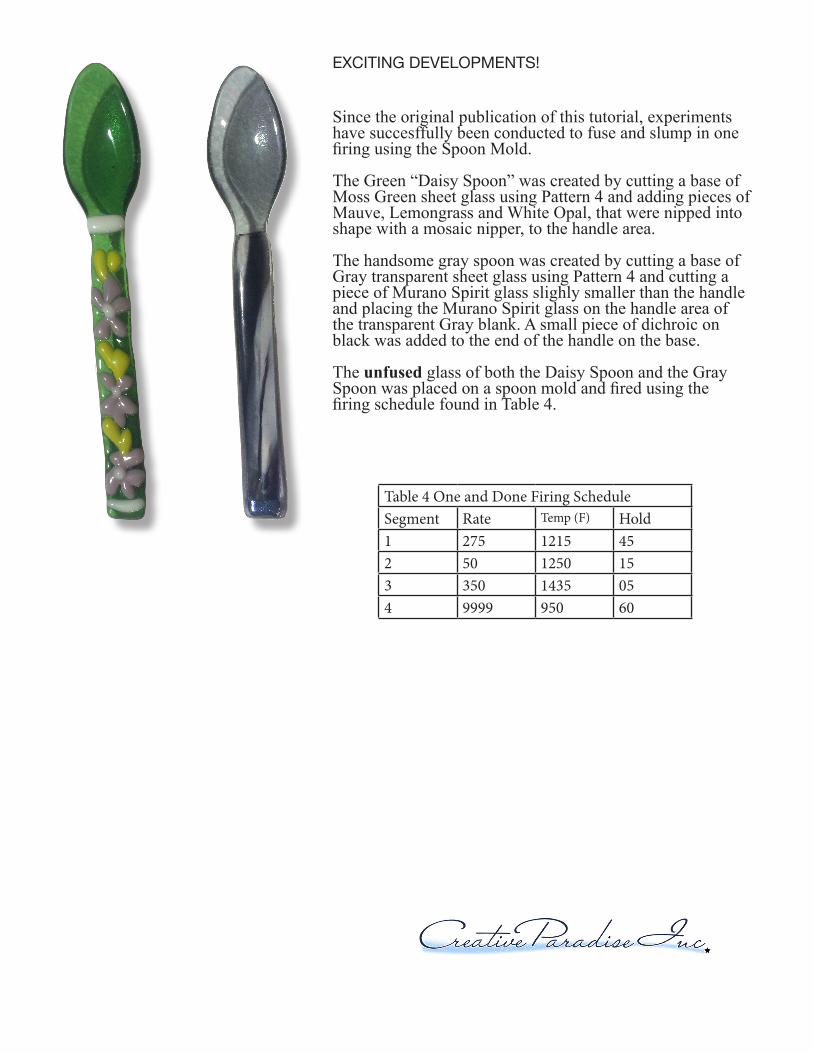
EXCITING DEVELOPMENTS!
Since the original publication of this tutorial, experiments have succesffully been conducted to fuse and slump in one firing using the Spoon Mold.
The Green “Daisy Spoon” was created by cutting a base of Moss Green sheet glass using Pattern 4 and adding pieces of Mauve, Lemongrass and White Opal, that were nipped into shape with a mosaic nipper, to the handle area.
The handsome gray spoon was created by cutting a base of Gray transparent sheet glass using Pattern 4 and cutting a piece of Murano Spirit glass slighly smaller than the handle and placing the Murano Spirit glass on the handle area of the transparent Gray blank. A small piece of dichroic on black was added to the end of the handle on the base.
The unfused glass of both the Daisy Spoon and the Gray Spoon was placed on a spoon mold and fired using the firing schedule found in Table 4.
Table 4 One and Done Firing ScheduleSegment Rate Temp (F) Hold1 275 1215 452 50 1250 153 350 1435 054 9999 950 60