coveo platform 6.5 - liferay connector guide · coveo platform 6.5 - liferay connector guide...
TRANSCRIPT
Coveo Platform 6.5Liferay Connector Guide
Coveo Platform 6.5 | Liferay Connector Guide
NoticeThe content in this document represents the current view of Coveo as of the date of publication. BecauseCoveo continually responds to changingmarket conditions, information in this document is subject to changewithout notice. For the latest documentation, visit our website at www.coveo.com.
Copyright © 2012, Coveo Solutions Inc.
All rights reserved.
Coveo is a trademark of Coveo Solutions Inc. This document is protected by copyright and other intellectualproperty law and is subject to the confidentiality and other restrictions specified in the Coveo LicenseAgreement.
Document part number: PM-110816-ENRevision: APublication date: 2012-08-10
4www.coveo.com ii
Coveo Platform 6.5 | Liferay Connector Guide
Table of Contents1. Liferay Connector Features 1
1.1 Connector features 1
2. Liferay Connector Deployment Overview 2
3. Liferay Connector Requirements 4
4. Deploying the Coveo Liferay Portlet Plugin 5
5. Setting up a Liferay Crawling Account 8
6. Configuring a Liferay Connector User Identity 10
7. Configuring a Liferay Security Provider 11
8. Configuring and Indexing a Liferay Source 14
9. Adding the Liferay Type Facet to a Search Interface 20
10. About the Liferay Connector Mapping File 22
11. Customizing the Liferay Connector Mapping File 23
12. Modifying Hidden Liferay Source Parameters 24
12.1 Showing Advanced Hidden Source Parameters 26
4www.coveo.com iii

Coveo Platform 6.5 | Liferay Connector Guide
1. Liferay Connector FeaturesThe Coveo connector for Liferay portals allows crawling and bringing Liferay content into the unified index,making it easily searchable by end-users.
1.1 Connector featuresThe features of the Liferay connector are:
Content indexing
The connector can retrieve and index the following default Liferay portal entity types:
l Communitiesl Organizationsl Usersl User groupsl Blogsl Calendar eventsl Document librariesl Message boardsl Web contentl Wikisl Comments and files attached to indexed entity types.
The connector can be customized to index other default Liferay entities (see "Customizing the LiferayConnector Mapping File" on page 23).
Fully supported security model
The connector fully supports the Liferay security model using a security provider to get permissions foreach indexed Liferay item. This means that, in Coveo search interfaces, a user searching Liferay contentonly sees the content to which he has access in the Liferay portal.
Live indexing
The Coveo Liferay portlet plugin registers events to quickly and efficiently index new, modified, anddeleted Liferay items.
Coveo Platform version Connector feature history6.5 build 4351 l Indexing of user group content
l Live indexing extended to user and user group content
6.5 build 4332 Connector introduction
What's Next?l Review the deployment process (see "Liferay Connector Deployment Overview" on page 2).
4www.coveo.com 1
Coveo Platform 6.5 | Liferay Connector Guide
2. Liferay Connector Deployment OverviewThe following procedure outlines the steps needed to deploy the Liferay connector. The steps indicate theorder in which youmust perform configuration tasks on both the Liferay and Coveo servers.
1. Validate that your environment meets the requirements (see "Liferay Connector Requirements" on page4).
2. In Liferay:
a. Deploy the Coveo Liferay portlet plugin.
The Coveo connector communicates with this plugin to crawl and index the Liferay content (see"Deploying the Coveo Liferay Portlet Plugin" on page 5).
b. Select or create the crawling account.
The Coveo connector needs a Liferay account with which it can fully crawl the Liferay content (see"Setting up a Liferay Crawling Account" on page 8).
3. In the Coveo Administration Tool:
a. Configure a user identity.
The Coveo connector needs to know the Liferay account that you previously selected or created (see"Configuring a Liferay Connector User Identity" on page 10).
b. Configure a security provider.
The Coveo connector needs a security provider to be able to get the permissions for each indexedLiferay item, and therefore fully support the Liferay security model (see "Configuring a LiferaySecurity Provider" on page 11).
c. Configure and index the Liferay source
The Coveo connector needs to know details about the Liferay portal to be able to index its content(see "Configuring and Indexing a Liferay Source" on page 14).
d. Optionally, customize themapping file to fine-tune indexed content
Consider customizing the connector mapping file to fine-tune the indexed content or to index otherentities in your Liferay portal (see "About the Liferay Connector Mapping File" on page 22 and"Customizing the Liferay Connector Mapping File" on page 23).
e. Optionally, modify hidden source parameters
Once your Liferay source is up and running, if you encounter issues, consider modifying some hiddensource parameters to try resolving the issues (see "Modifying Hidden Liferay Source Parameters" onpage 24).
4. In the Interface Editor, add the built-in Liferay facets
4www.coveo.com 2

Coveo Platform 6.5 | Liferay Connector Guide
CES comes with a built-in Liferay Type facet that you can add to your search interface so that users canmore easily refine search results based on file types (see "Adding the Liferay Type Facet to a SearchInterface" on page 20).
4www.coveo.com 3
Coveo Platform 6.5 | Liferay Connector Guide
3. Liferay Connector RequirementsYour environment must meet the following requirements to be able to use the Coveo connector for Liferayportals:
l Coveo Platform 6.5
The connector was introduced with the Coveo Platform 6.5 build 4332 and is therefore not available inprevious CES versions.
l Coveo license for the Liferay connector
Your Coveo licensemust include support for the Liferay connector to be able to use this connector.
l Liferay version 6
The connector was developed and tested with Liferay version 6.0.5.
What's Next?
Review the deployment process (see "Liferay Connector Deployment Overview" on page 2).
4www.coveo.com 4
Coveo Platform 6.5 | Liferay Connector Guide
4. Deploying the Coveo Liferay Portlet PluginThe Coveo connector retrieves content from the Liferay portal by connecting to the Coveo Liferay portletplugin. Youmust deploy the plugin on the Liferay server.
To deploy the Coveo Liferay portlet plugin
1. Using an administrative account, connect to the Coveo server.
2. From a browser, use an administrative account to connect to your Liferay portal.
3. On themenu bar of the Liferay portal, selectManage > Control Panel.
4. In the Liferay Control Panel:
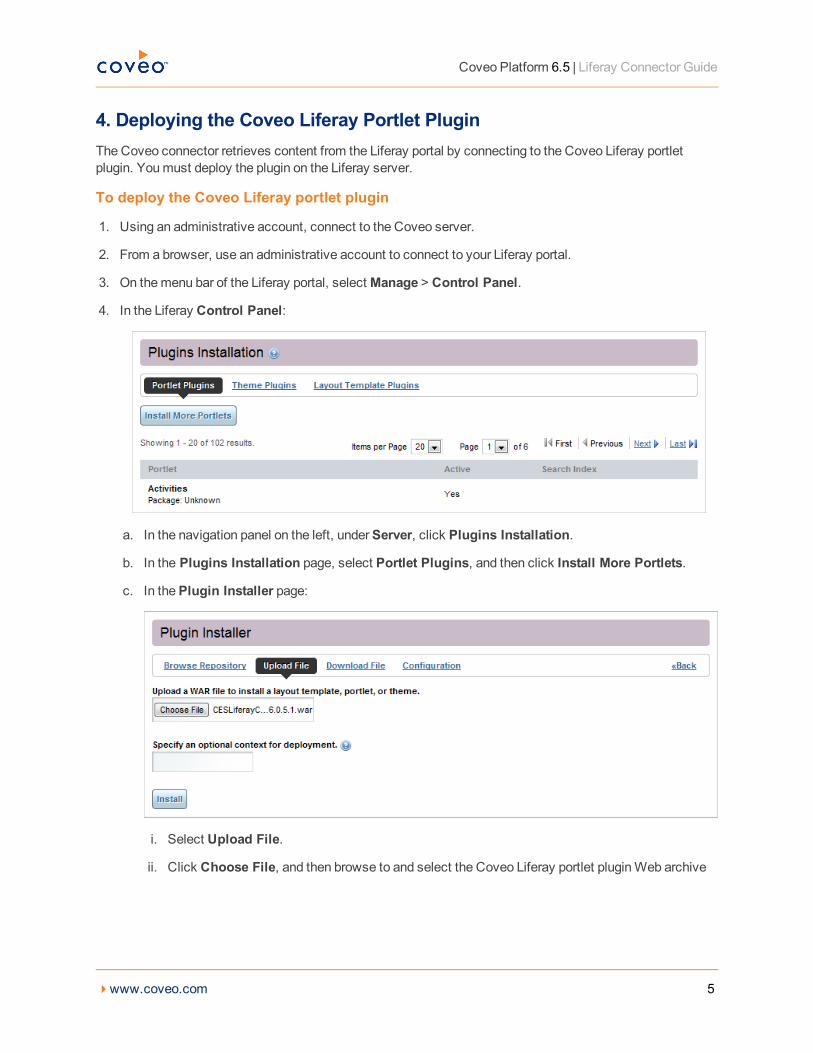
a. In the navigation panel on the left, underServer, click Plugins Installation.
b. In the Plugins Installation page, select Portlet Plugins, and then click Install More Portlets.
c. In thePlugin Installer page:
i. Select Upload File.
ii. Click Choose File, and then browse to and select the Coveo Liferay portlet pluginWeb archive
4www.coveo.com 5
Coveo Platform 6.5 | Liferay Connector Guide
(WAR) file: [CES_Installation_Path]\bin\CESLiferayConnector-portlet-6.0.5.1.war
Example:With the default installation path: C:\Program Files\Coveo EnterpriseSearch 6\bin\CESLiferayConnector-portlet-6.0.5.1.war
iii. Click Install.
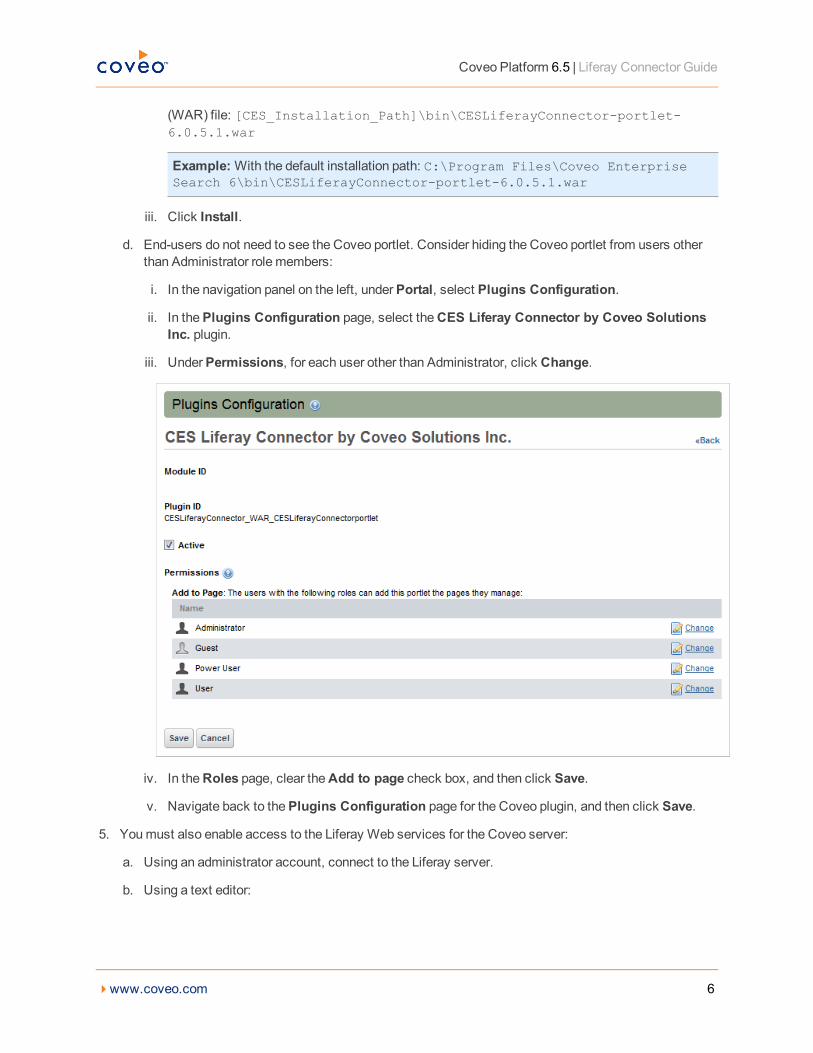
d. End-users do not need to see the Coveo portlet. Consider hiding the Coveo portlet from users otherthan Administrator role members:
i. In the navigation panel on the left, underPortal, select Plugins Configuration.
ii. In thePlugins Configuration page, select theCES Liferay Connector by Coveo SolutionsInc. plugin.
iii. UnderPermissions, for each user other than Administrator, click Change.
iv. In theRoles page, clear theAdd to page check box, and then click Save.
v. Navigate back to thePlugins Configuration page for the Coveo plugin, and then click Save.
5. Youmust also enable access to the Liferay Web services for the Coveo server:
a. Using an administrator account, connect to the Liferay server.
b. Using a text editor:
4www.coveo.com 6
Coveo Platform 6.5 | Liferay Connector Guide
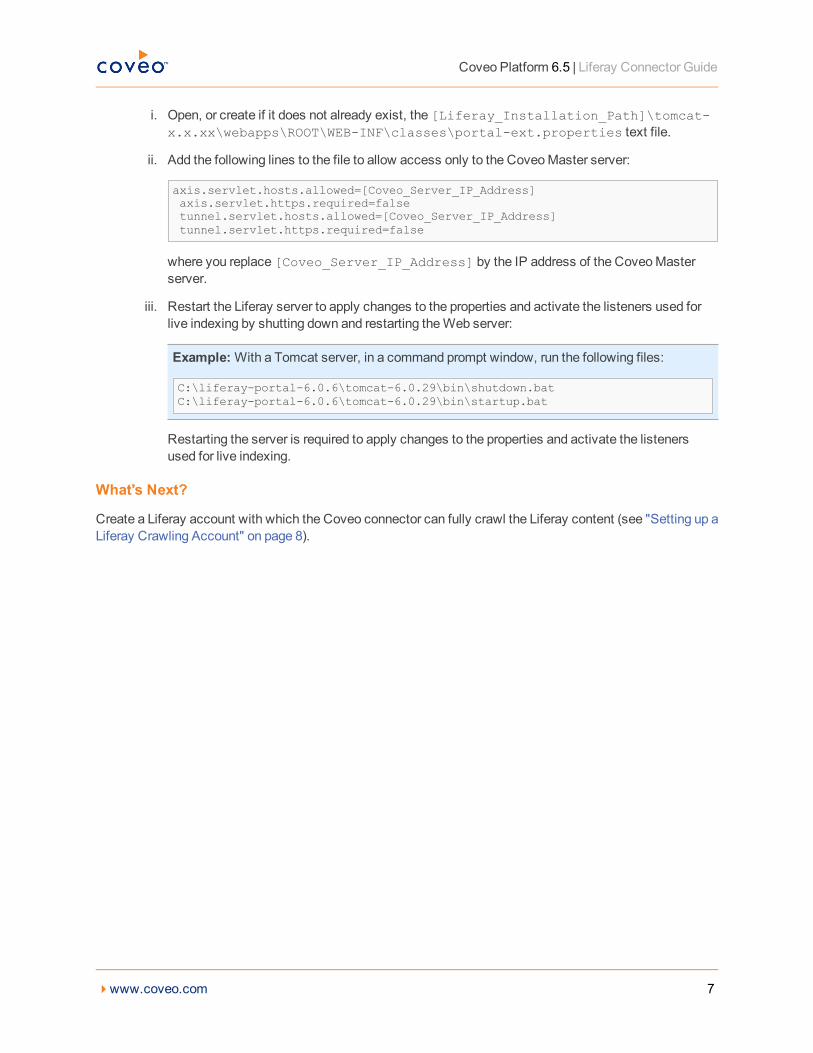
i. Open, or create if it does not already exist, the [Liferay_Installation_Path]\tomcat-x.x.xx\webapps\ROOT\WEB-INF\classes\portal-ext.properties text file.
ii. Add the following lines to the file to allow access only to the CoveoMaster server:
axis.servlet.hosts.allowed=[Coveo_Server_IP_Address]axis.servlet.https.required=falsetunnel.servlet.hosts.allowed=[Coveo_Server_IP_Address]tunnel.servlet.https.required=false
where you replace [Coveo_Server_IP_Address] by the IP address of the CoveoMasterserver.
iii. Restart the Liferay server to apply changes to the properties and activate the listeners used forlive indexing by shutting down and restarting theWeb server:
Example:With a Tomcat server, in a command prompt window, run the following files:
C:\liferay-portal-6.0.6\tomcat-6.0.29\bin\shutdown.batC:\liferay-portal-6.0.6\tomcat-6.0.29\bin\startup.bat
Restarting the server is required to apply changes to the properties and activate the listenersused for live indexing.
What's Next?
Create a Liferay account with which the Coveo connector can fully crawl the Liferay content (see "Setting up aLiferay Crawling Account" on page 8).
4www.coveo.com 7
Coveo Platform 6.5 | Liferay Connector Guide
5. Setting up a Liferay Crawling AccountThe Coveo connector needs to connect to the Liferay portal using an account that has read access to all theLiferay content that you wish to index. The Coveo connector only reads and does not modify the Liferaycontent.
The best practice is to create a Liferay fixed password account used exclusively by the Coveo connector andassigned to the built-in Administrator role that has complete access to all Liferay content.
Setting up a dedicated Liferay full read account
1. Using a Liferay account that has an Administrator role, sign in to your Liferay portal.
2. On themenu bar, selectManage > Control Panel.
3. In the Liferay Control Panel, in the navigation panel on the left underPortal, click Users.
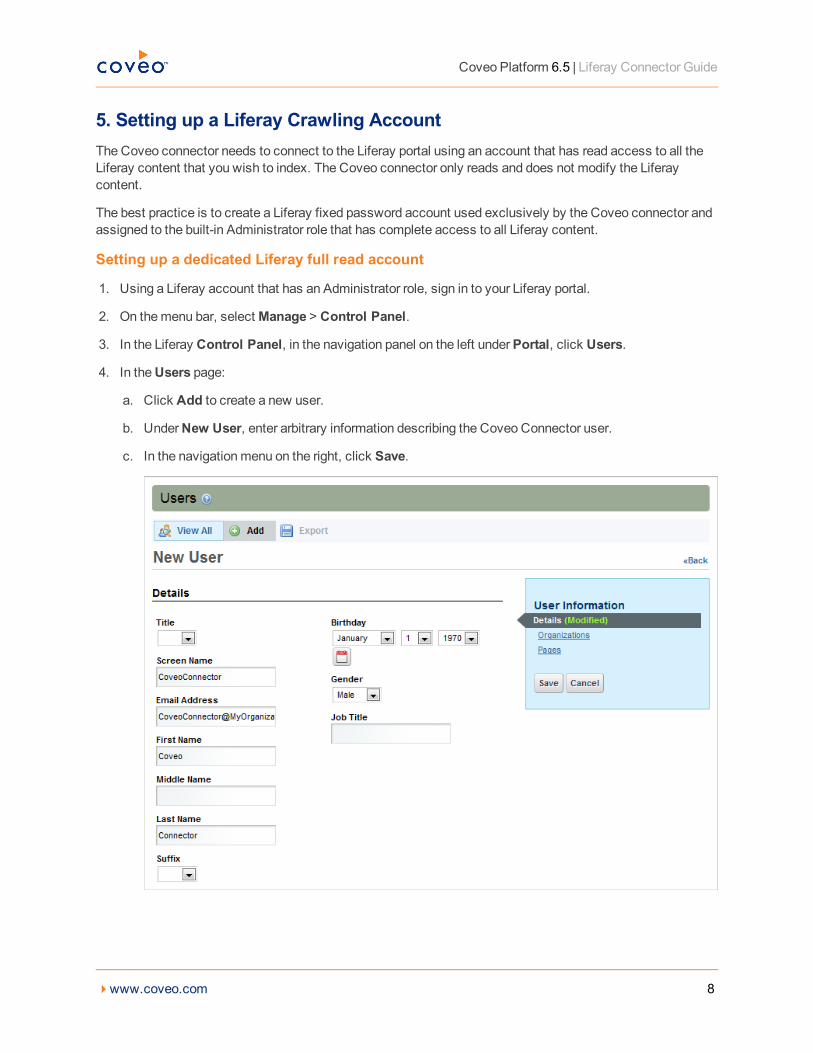
4. In theUsers page:
a. Click Add to create a new user.
b. UnderNew User, enter arbitrary information describing the Coveo Connector user.
c. In the navigationmenu on the right, click Save.
4www.coveo.com 8
Coveo Platform 6.5 | Liferay Connector Guide
d. In the navigationmenu on the right, underUser Information, click Roles.
e. UnderRegular Roles, click Select.
f. In the window that appears, underRoles, click theAdministrator, to assign the Administrator role tothe account.
g. If thePower User role has been assigned automatically, click Remove on the corresponding line, toensure that only the Administrator role is assigned to this user.
h. In the navigationmenu on the right, click Save.
i. In the navigationmenu on the right, underUser Information, click Password.
j. Enter a strong password in both theNew Password andEnter Again fields.
k. Leave thePassword Reset Required checkbox cleared to prevent forcing the user to change thepassword when logging in the first time.
Note: If the password changes in Liferay, you will also need to change it in the CES user identity(see "Configuring a Liferay Connector User Identity" on page 10).
l. In the navigationmenu on the right, click Save.
What's Next?
On the Coveo server, configure a user identity for your Liferay portal (see "Configuring a Liferay ConnectorUser Identity" on page 10).
4www.coveo.com 9
Coveo Platform 6.5 | Liferay Connector Guide
6. Configuring a Liferay Connector User IdentityOnce you created a Liferay account dedicated for the Coveo connector (see "Setting up a Liferay CrawlingAccount" on page 8), youmust create a CES user identity to use this account. You will later assign this useridentity to the security provider and the source used by the connector to crawl the Liferay content.
To configure a Liferay connector user identity
1. On the Coveo server, access the Administration Tool.
2. Select Configuration > Security.
3. In theSecurity page, in the navigation panel on the left, click User Identities.
4. In theUser Identities page, click Add.
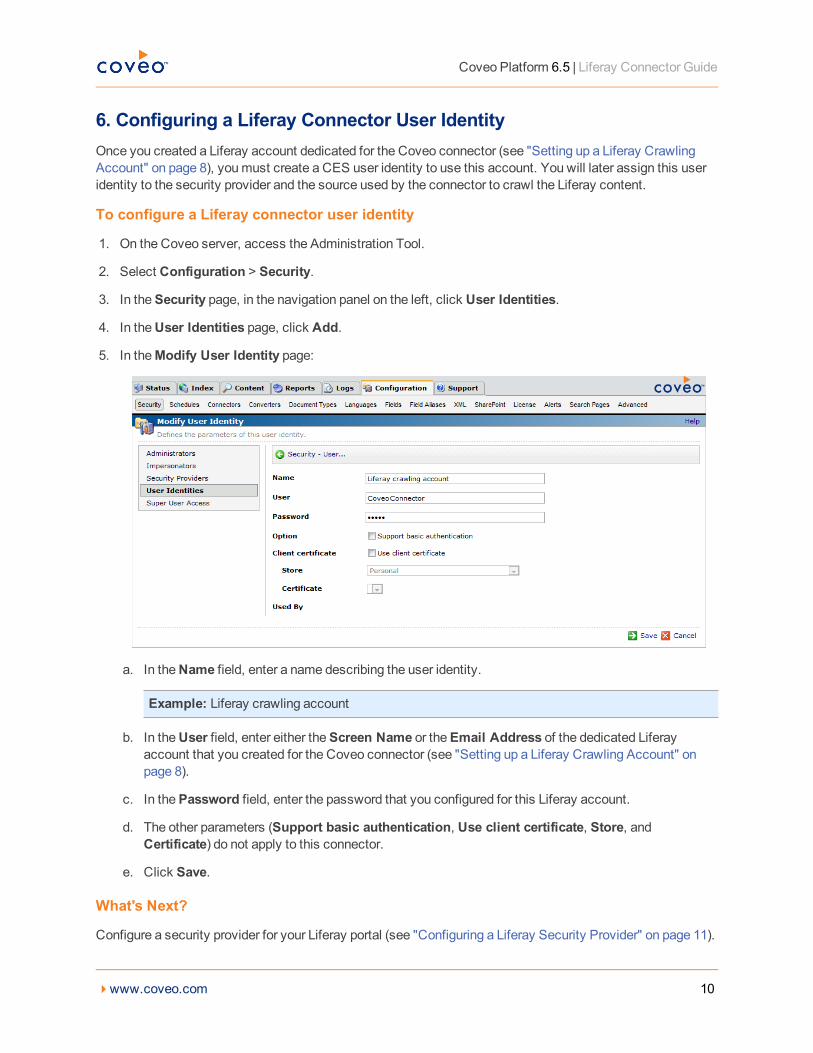
5. In theModify User Identity page:
a. In theName field, enter a name describing the user identity.
Example: Liferay crawling account
b. In theUser field, enter either theScreen Name or theEmail Address of the dedicated Liferayaccount that you created for the Coveo connector (see "Setting up a Liferay Crawling Account" onpage 8).
c. In thePassword field, enter the password that you configured for this Liferay account.
d. The other parameters (Support basic authentication, Use client certificate, Store, andCertificate) do not apply to this connector.
e. Click Save.
What's Next?
Configure a security provider for your Liferay portal (see "Configuring a Liferay Security Provider" on page 11).
4www.coveo.com 10
Coveo Platform 6.5 | Liferay Connector Guide
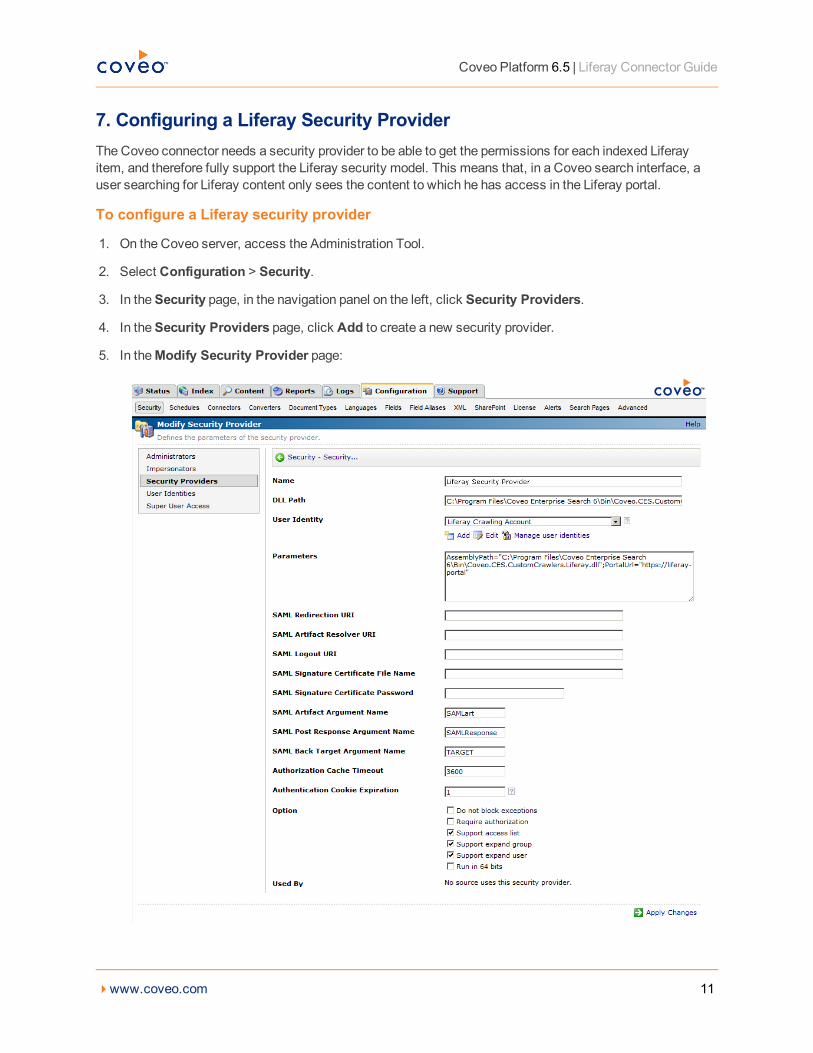
7. Configuring a Liferay Security ProviderThe Coveo connector needs a security provider to be able to get the permissions for each indexed Liferayitem, and therefore fully support the Liferay security model. This means that, in a Coveo search interface, auser searching for Liferay content only sees the content to which he has access in the Liferay portal.
To configure a Liferay security provider
1. On the Coveo server, access the Administration Tool.
2. Select Configuration > Security.
3. In theSecurity page, in the navigation panel on the left, click Security Providers.
4. In theSecurity Providers page, click Add to create a new security provider.
5. In theModify Security Provider page:
4www.coveo.com 11
Coveo Platform 6.5 | Liferay Connector Guide
a. Configure the following required parameters:
Name
Choose a significant name to identify the security provider.
Example: Liferay Security Provider
DLL Path
The path to the custom crawler security provider DLL. Enter the following path:
[CES_Installation_Path]\Bin\Coveo.CES.CustomCrawlersSecurityProvider.dll
Example:With the default installation path: C:\Program Files\Coveo EnterpriseSearch 6\Bin\Coveo.CES.CustomCrawlersSecurityProvider.dll).
User Identity
Select the Liferay user identity that you created previously (see "Configuring a Liferay ConnectorUser Identity" on page 10).
b. In theParameters text box, specify custom configuration parameters, entering all parameters as asingle string in the following format:
ParameterName1="ParameterValue1";ParameterName2="ParameterValue2"; etc
Example:AssemblyPath="C:\Program Files\Coveo Enterprise Search6\Bin\Coveo.CES.CustomCrawlers.Liferay.dll";PortalUrl="http://MyliferayPortal:8080/"
i. Include the following required parameters:
AssemblyPath
Path to the Liferay custom crawler executable: [CES_Installation_Path]\Bin\Coveo.CES.CustomCrawlers.Liferay.dll
Example:With the default installation path: C:\Program Files\Coveo EnterpriseSearch 6\Bin\Coveo.CES.CustomCrawlers.Liferay.dll).
PortalUrl
The address of the Liferay portal. This should be the same address as the one specified whenyou configure the source for the connector (see "Configuring and Indexing a Liferay Source"on page 14). Enter the URL in the following format: http://[LiferayPortal]:[port]
Example: PortalUrl="http://MyLiferayPortal:8080"
c. Leave all the Security AssertionMarkup Language (SAML) parameters as is.
4www.coveo.com 12
Coveo Platform 6.5 | Liferay Connector Guide
6. In theOption section:
a. Youmust select the following check boxes for the Liferay connector to work:
Support access list
To use early-binding security, select to instruct the connector to add an Access Control List (ACL)to each document when crawling the repository.
Support expand group
Select to instruct the connector to expand the repository group into a list of repository users.
Support expand users
Select to instruct the connector to convert the list of repository users into a list of Microsoft ActiveDirectory users.
b. Youmust clear the following check box for the Liferay connector to work:
Require authorization
Select only when you use late-binding security, to instruct CES to retrieve document-levelpermissions at query time from the repository.
c. Clear theDo not block exceptions check box unless instructed to select it by a Coveo Supportagent. When selected, this option instructs the security provider to transmit errors to CES. In rarecases, this option can provide additional information that may help to diagnose security providerproblems.
d. On a 64-bit Coveo server, select theRun in 64 bits check box to instruct CES to run the securityprovider in 64-bit mode and therefore take advantage of the 64-bit performance. Clear this option onlyfor rare connectors (not the Liferay connector) for which the security provider must run in 32-bit mode.On a 32-bit server, this option is disabled.
7. Click Save.
What's Next?
Configure and index a Liferay source (see "Configuring and Indexing a Liferay Source" on page 14).
4www.coveo.com 13
Coveo Platform 6.5 | Liferay Connector Guide
8. Configuring and Indexing a Liferay SourceA source defines a set of configuration parameters for a specific Liferay portal.
Note: In an environment with more than one Liferay portal, you need to define one source for each Liferayportal that you wish to index.
To configure and index a Liferay source
1. On the Coveo server, access the Administration Tool.
2. Select Index > Sources and Collections.
3. In theCollections section:
a. Select an existing collection in which you wish to add the new source.
OR
b. Click Add to create a new collection.
4. In theSources section, click Add.
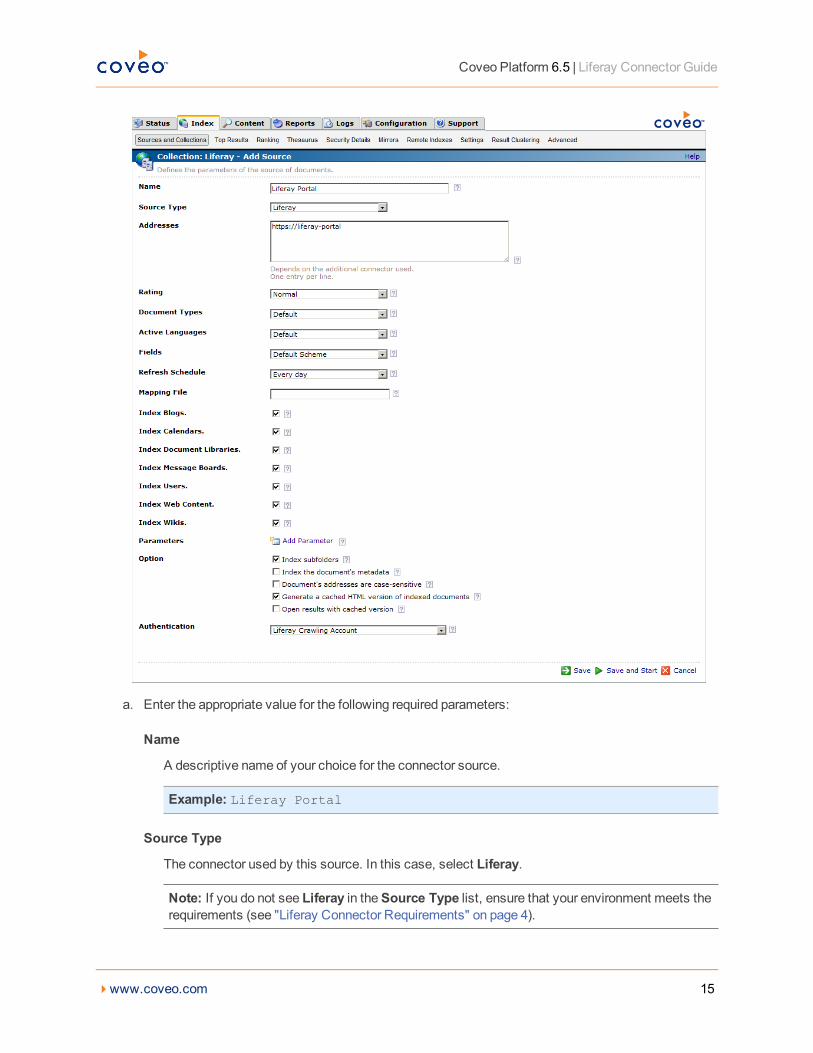
5. In theAdd Source page:
4www.coveo.com 14
Coveo Platform 6.5 | Liferay Connector Guide
a. Enter the appropriate value for the following required parameters:
Name
A descriptive name of your choice for the connector source.
Example: Liferay Portal
Source Type
The connector used by this source. In this case, select Liferay.
Note: If you do not see Liferay in theSource Type list, ensure that your environment meets therequirements (see "Liferay Connector Requirements" on page 4).
4www.coveo.com 15
Coveo Platform 6.5 | Liferay Connector Guide
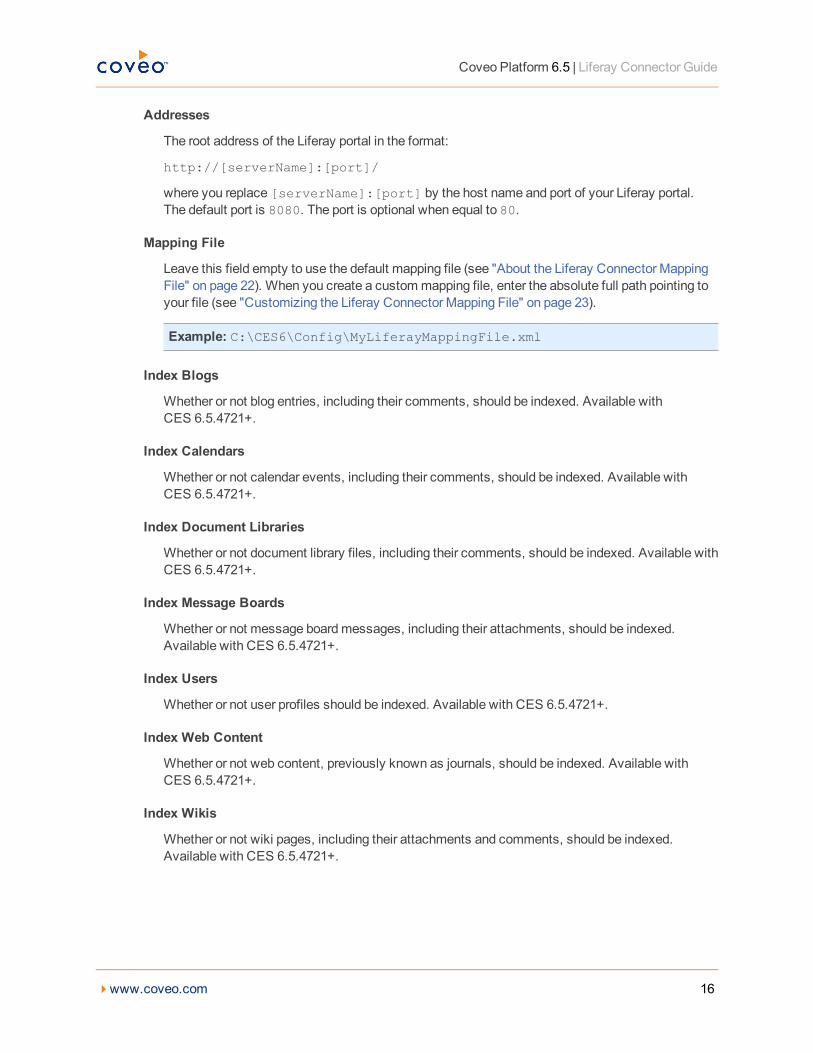
Addresses
The root address of the Liferay portal in the format:
http://[serverName]:[port]/
where you replace [serverName]:[port] by the host name and port of your Liferay portal.The default port is 8080. The port is optional when equal to 80.
Mapping File
Leave this field empty to use the default mapping file (see "About the Liferay Connector MappingFile" on page 22). When you create a custommapping file, enter the absolute full path pointing toyour file (see "Customizing the Liferay Connector Mapping File" on page 23).
Example: C:\CES6\Config\MyLiferayMappingFile.xml
Index Blogs
Whether or not blog entries, including their comments, should be indexed. Available withCES 6.5.4721+.
Index Calendars
Whether or not calendar events, including their comments, should be indexed. Available withCES 6.5.4721+.
Index Document Libraries
Whether or not document library files, including their comments, should be indexed. Available withCES 6.5.4721+.
Index Message Boards
Whether or not message boardmessages, including their attachments, should be indexed.Available with CES 6.5.4721+.
Index Users
Whether or not user profiles should be indexed. Available with CES 6.5.4721+.
Index Web Content
Whether or not web content, previously known as journals, should be indexed. Available withCES 6.5.4721+.
Index Wikis
Whether or not wiki pages, including their attachments and comments, should be indexed.Available with CES 6.5.4721+.
4www.coveo.com 16
Coveo Platform 6.5 | Liferay Connector Guide
Authentication
Select the user identity that you created previously for the Liferay portal (see "Configuring aLiferay Connector User Identity" on page 10).
b. The following parameters generally do not need to be changed:
Rating
Change this value only when you want to globally change the rating associated with all items inthis source relative to the rating of other sources.
Example:When a source replaces a legacy system, youmay want to set this parameter toHigh, so that in the search interface, results from this source appear earlier in the list comparedto those from legacy system sources.
Document Types
If you defined a custom document type set for this source, select it.
Active Languages
If you defined custom active language sets, ensure to select themost appropriate for this source.
Refresh Schedule
Time interval at which the index is automatically refreshed to keep the index content up-to-date.By default, theEvery day option instructs CES to refresh the source everyday at 12 AM.
Note: Live indexing does not catch changes to security and file attachment elements. Only arefresh does.
Fields
If you defined custom field sets, ensure to select themost appropriate for this source.
Parameter
Click Add Parameterwhen you want to show advanced source parameters (see "ModifyingHidden Liferay Source Parameters" on page 24).
c. TheOption check boxes generally do not need to be changed:
Index Subfolders
Keep this check box selected (recommended). By doing so, all subfolders from the specifiedportal address are indexed.
Index the document's metadata
When selected, CES indexes all the document metadata, evenmetadata that are not associatedwith a field. The orphanmetadata are added to the body of the document so that they can besearched using free text queries. This option is cleared by default.
4www.coveo.com 17
Coveo Platform 6.5 | Liferay Connector Guide
Document's addresses are case-sensitive
Leave the check box cleared. This parameter needs to be checked only in rare cases for systemsin which distinct documents may have the same name but different casing.
Generate a cached HTML version of indexed documents
When you select this check box (recommended), at indexing time, CES creates HTML versionsof indexed documents. In the search interfaces, users can thenmore rapidly review the content byclicking the Quick View link rather than opening the original document with the original application.Consider clearing this check box only when you do not want to useQuick View links or to saveresources when building the source.
Open results with cached version
Leave this check box cleared (recommended) so that in the search interfaces, themain searchresult link opens the original document with the original application. Consider selecting this checkbox only when you do not want users to be able to open the original document but only see theHTML version of the document as aQuick View. In this case, youmust also select Generate acached HTML version of indexed documents.
d. Click Save to save the source configuration.
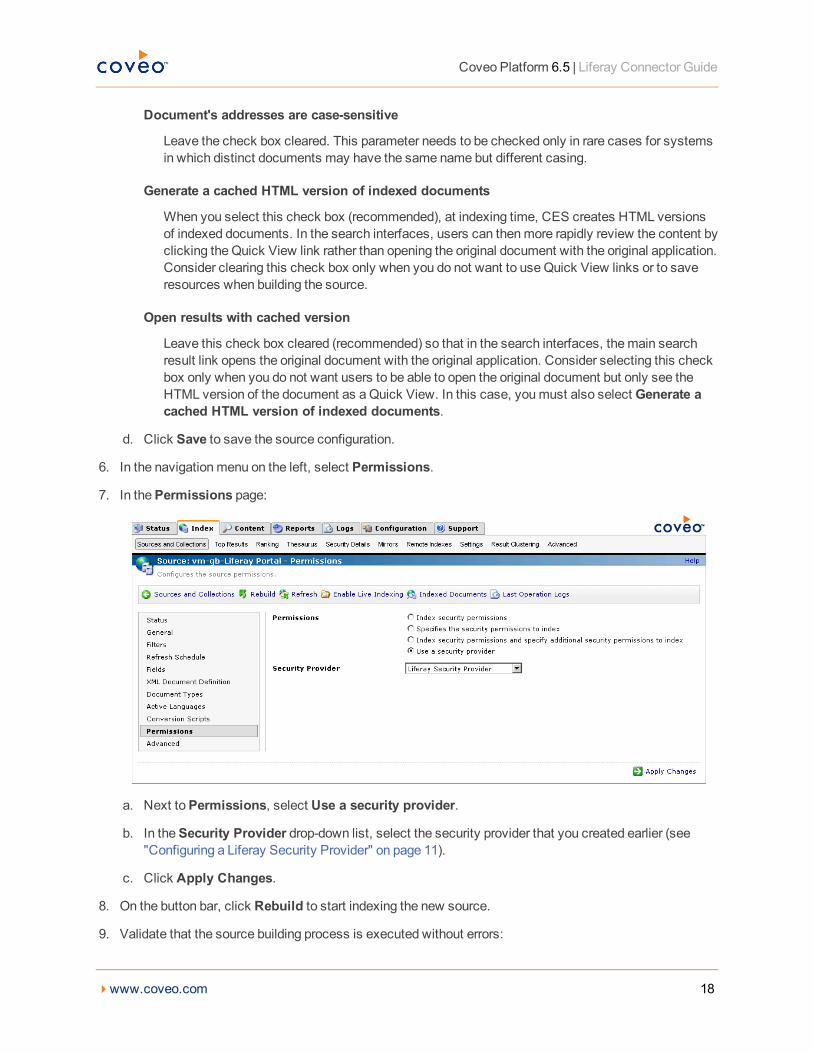
6. In the navigationmenu on the left, select Permissions.
7. In thePermissions page:
a. Next toPermissions, select Use a security provider.
b. In theSecurity Provider drop-down list, select the security provider that you created earlier (see"Configuring a Liferay Security Provider" on page 11).
c. Click Apply Changes.
8. On the button bar, click Rebuild to start indexing the new source.
9. Validate that the source building process is executed without errors:
4www.coveo.com 18
Coveo Platform 6.5 | Liferay Connector Guide
l In the navigation panel on the left, click Status, and then validate that the indexing proceeds withouterrors.
OR
l Open the CES Console tomonitor the source building activities.
What's Next?
Add the built-in the Liferay facet to your search interface (see "Adding the Liferay Type Facet to a SearchInterface" on page 20).
4www.coveo.com 19
Coveo Platform 6.5 | Liferay Connector Guide
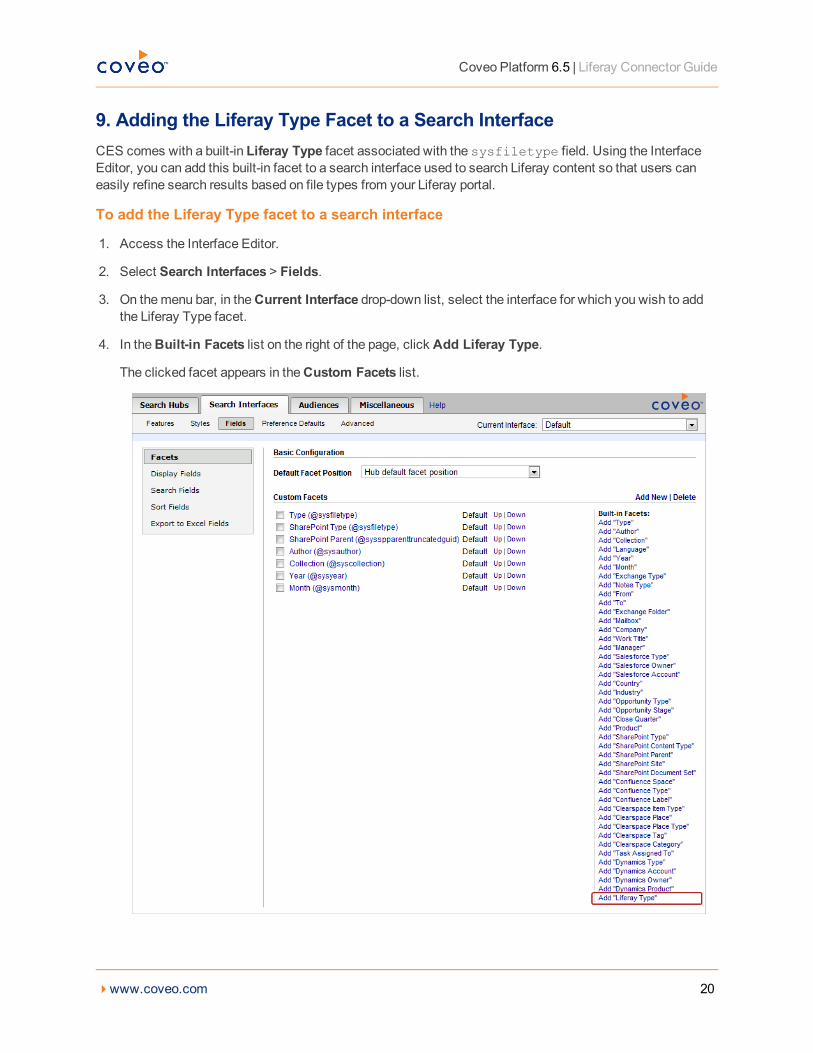
9. Adding the Liferay Type Facet to a Search InterfaceCES comes with a built-in Liferay Type facet associated with the sysfiletype field. Using the InterfaceEditor, you can add this built-in facet to a search interface used to search Liferay content so that users caneasily refine search results based on file types from your Liferay portal.
To add the Liferay Type facet to a search interface
1. Access the Interface Editor.
2. Select Search Interfaces > Fields.
3. On themenu bar, in theCurrent Interface drop-down list, select the interface for which you wish to addthe Liferay Type facet.
4. In theBuilt-in Facets list on the right of the page, click Add Liferay Type.
The clicked facet appears in theCustom Facets list.
4www.coveo.com 20

Coveo Platform 6.5 | Liferay Connector Guide
5. Optionally click Up orDown next to the facet to change its position in relation with the other facets.
6. Open themodified search interface, search for Liferay content, and then verify that the added Liferay facetappears.
4www.coveo.com 21
Coveo Platform 6.5 | Liferay Connector Guide
10. About the Liferay Connector Mapping FileThe Liferay connector mapping file determines exactly which Liferay entities are indexed, what metadata isretrieved, and where this information is added in the Coveo unified index. The default mapping file ([CES_Installation_Path]\bin\Coveo.CES.CustomCrawlers.Liferay.DefaultMappingFile.xml) is automatically usedwhen nomapping file is specified in the source.
The default mapping file specifies to index the following Liferay default entity types:
l Attachmentl BlogEntryl CalendarEventl Commentl DocumentLibraryFilel MessageBoardMessagel Userl WebContentLocalizedl WikiPage
Themapping file is an XML file that contains various sections and subsections. The root element is<LiferayMapping>. It contains various <Mapping> nodes, each defining one entity type to be indexedwith the correspondingmetadata.
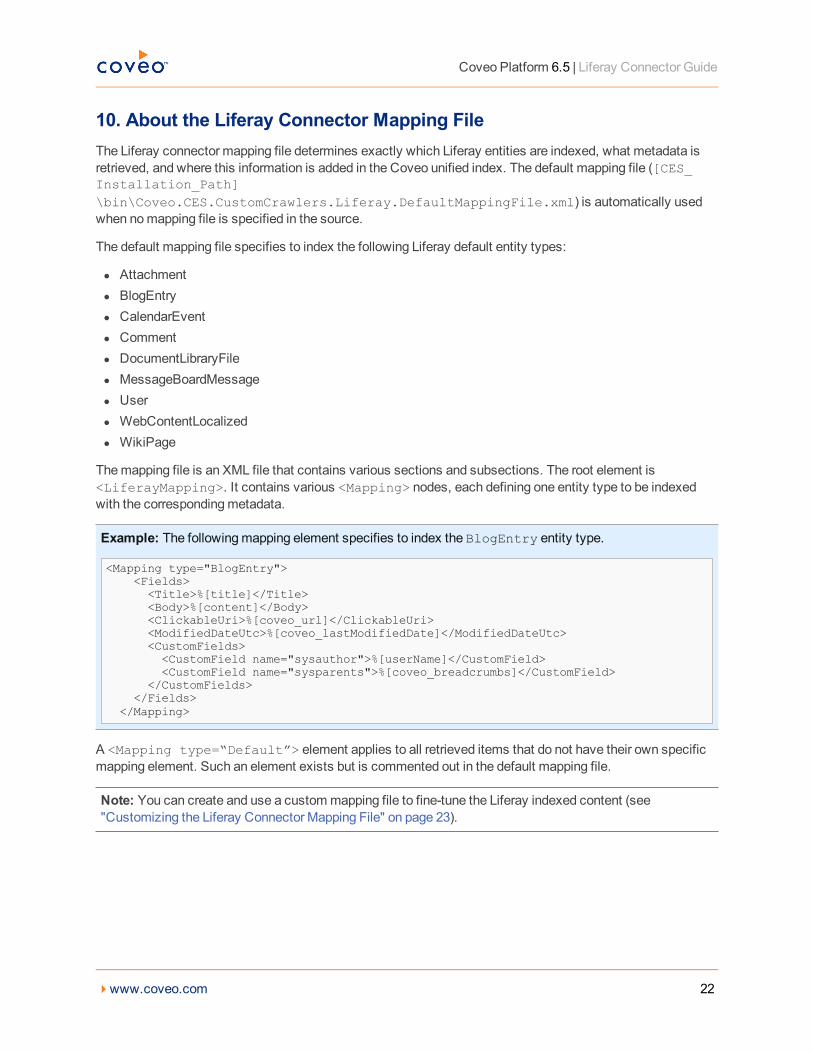
Example: The followingmapping element specifies to index the BlogEntry entity type.
<Mapping type="BlogEntry"><Fields><Title>%[title]</Title><Body>%[content]</Body><ClickableUri>%[coveo_url]</ClickableUri><ModifiedDateUtc>%[coveo_lastModifiedDate]</ModifiedDateUtc><CustomFields><CustomField name="sysauthor">%[userName]</CustomField><CustomField name="sysparents">%[coveo_breadcrumbs]</CustomField>
</CustomFields></Fields>
</Mapping>
A <Mapping type=“Default”> element applies to all retrieved items that do not have their own specificmapping element. Such an element exists but is commented out in the default mapping file.
Note: You can create and use a custommapping file to fine-tune the Liferay indexed content (see"Customizing the Liferay Connector Mapping File" on page 23).
4www.coveo.com 22
Coveo Platform 6.5 | Liferay Connector Guide
11. Customizing the Liferay Connector Mapping FileThe Coveo connector for Liferay portals comes with a default mapping file that makes the connector ready toindex the default Liferay entities (see "About the Liferay Connector Mapping File" on page 22).
You can customize themapping file to fine-tune the indexed content or to include other Liferay entities.
To customize the mapping file
1. Using an administrative account, connect to the CoveoMaster server.
2. Using a text editor:
a. Open the default mapping file: [CES_Installation_Path]\bin\Coveo.CES.CustomCrawlers.Liferay.DefaultMappingFile.xml
Example:With the default installation path: C:\Program Files\Coveo EnterpriseSearch 6\Bin\Coveo.CES.CustomCrawlers.Liferay.DefaultMappingFile.xml
b. Save the file using a name of your choice in the [Index_Path]\Config\ folder.
Example:With the default index path: C:\CES6\Config\MyLiferayMappingFile.xml
c. Respecting themapping file format (see "About the Liferay Connector Mapping File" on page 22),customize the file. Use the CustomFields section to directly reference columns present on aLiferay entity.
d. Save your changes.
What's Next?
Specify your customizedmapping file in your Liferay source (see "Configuring and Indexing a Liferay Source"on page 14).
4www.coveo.com 23
Coveo Platform 6.5 | Liferay Connector Guide
12. Modifying Hidden Liferay Source ParametersTheAdd Source andSource: ... General pages of the Administration Tool present the parameters withwhich you can configure the connector for most Liferay setups. More advanced andmore rarely usedparameters are hidden. You can choose tomake one or more of these parameters appear in theAdd SourceandSource: ... General pages of the Administration Tool so that you can change their default value.Consider changing values of hidden parameters when you encounter issues.
The following list describes the advanced hidden parameters available with Liferay sources. The parametertype (integer, string,…) appears between parentheses following the parameter name.
WebServiceBatchSize (integer)
Number of items to fetch per request made to the Liferay portal. The default value is 300. Theminimumvalue is 1. A small value forces the connector to make small but frequent queries to Liferay. A larger valueleads to larger and less frequent queries.
CacheLifeSpan (integer)
The connector keeps a local cache of all the Liferay users. This way the connector does not have toretrieve all users from Liferay on every full or live indexing run. This parameter controls the amount of time(in minutes) this user cache remains valid. When this delay expires, all users are fetched again, instead ofbeing taken out of the cache. The default value is480minutes (8 hours).
BlogPortletId (string)CalendarPortletId (string)DocumentLibraryPortletId (string)MessageBoardPortletId (string)WikiPortletId (string)
These parameters tell the connector what is the ID of the portlet to use when creating clickable URIs forthe different types of items. Youmust set these parameters only if your Liferay portal does not use thedefault values.
Example: BlogPortletId determines which portlet is used to present blogs. The default ID value is33 for this portlet.
Note: You can find this information in the Liferay Control Panel. UnderPortal, click PluginsConfiguration. In the list of plugins that appears, click the desired plugin to see its information, includingthePlugin ID (the information youmust put in these parameters).
Languages (string)
The comma-separated list of languages to consider when retrievingWebContent. One item is returned perlanguage. The parameter is empty by default and considers only the default portal language. Enter a * tospecify all languages.
Example: en_US,fr_FR,de_DE,it_IT,ja_JP,es_ES
4www.coveo.com 24
Coveo Platform 6.5 | Liferay Connector Guide
Note: You can find possible languages in the Liferay Control Panel. UnderPortal, click Portal Settings.In themenu on the right, click Display Settings. Look in theAvailable Languages field for possiblevalues.
SiteMinderFormLoginAction (string)
This parameter, like the SiteMinderFormLoginPage parameter, is only required when Liferay residesinside a SiteMinder secure realm. These parameters enable the connector to authenticate with SiteMinderin order to gain access to the Liferay server so it can retrieve the content to index. This parameter containsthe POST action that will be sent to the SiteMinder authentication form (login.fcc).
Example:USER=use-rname&PASSWORD=password&SMAUTHREASON=0&TARGET=https%3a%2f%2fliferayportal
Note: The POST action contains four parameters: USER, PASSWORD, SMAUTHREASON, and TARGET.USER and PASSWORD are the credentials to authenticate to SiteMinder. SMAUTHREASON is always equalto zero. The TARGET parameter is the secure resource you want to access, in this case the Liferay portalURL (https://liferayportal), andmust be properly escaped.
SiteMinderFormLoginPage (string)
This parameter is the URL of the SiteMinder authentication form (login.fcc).
Example: https://www.acme.com/siteminderagent/forms/login.fcc
Note: Ask your SiteMinder administrator for the URL of the authentication form.
NumberOfRefreshThreads (integer)
This determines the number of threads that simultaneously crawl the Liferay portal. The default value is 2.
WebId (string)
This parameter determines which company to index. A company is associated with aWebId.
Note: You can find this ID in the Liferay Control Panel. UnderServer, click Portal Instances, and thenWeb Id. There is amaximum of 1 ID per source. The default value is an empty string, whichcorresponds to the first WebId encountered.
Use the following procedure only when you want to modify one or more of the above hidden sourceparameters.
To modify hidden Liferay source parameters1. Refer to "Showing Advanced Hidden Source Parameters" on page 26 to add one or more Liferay hidden
source parameters.2. For a new Liferay source, access theAdd Source page of the Administration Tool to modify the value of
the newly added advanced parameter:
4www.coveo.com 25
Coveo Platform 6.5 | Liferay Connector Guide
a. Select Index > Sources and Collections.b. UnderCollections, select the collection in which you wish to add the source.c. UnderSources, click Add.d. In theAdd Source page, edit the newly added advanced parameter value.
3. For an existing Liferay source, access theSource: ... General page of the Administration Tool to modifythe value of the newly added advanced parameter:a. Select Index > Sources and Collections.b. UnderCollections, select the collection containing the source you wish tomodify.c. UnderSources, click the existing Liferay source in which you wish tomodify the newly added
advanced parameter.d. In theSource: ... General page, edit the newly added advanced parameter value.
4. Rebuild your Liferay source to apply the changes to the parameters.
12.1 Showing Advanced Hidden Source ParametersWhen you create or configure a source, the Coveo Administration Tool presents source parameters withwhich you can configure the connector for most setups. For many connectors, more advanced andmorerarely used source parameters also exist but are hidden by default. CES then uses the default valueassociated with each of these hidden parameters.
You can however choose tomake one or more of these parameters appear in theAdd Source andSource: ...General pages of the Administration Tool so that you can change their default value.
Note: Refer to the documentation of each connector to get information on available hidden parameters.
To show advanced hidden source parameters
1. On the Coveo server, access the Administration Tool.
2. Access theModify Additional Connector page:a. Select Configuration > Connectors.b. In the panel on the left, select Additional Connector.c. In the list on the right, select the connector for which you wish to show advanced hidden parameters.
3. In theModify Additional Connector page, for each hidden parameter that you wish tomodify, performthe following steps:
a. Click Add Parameter.
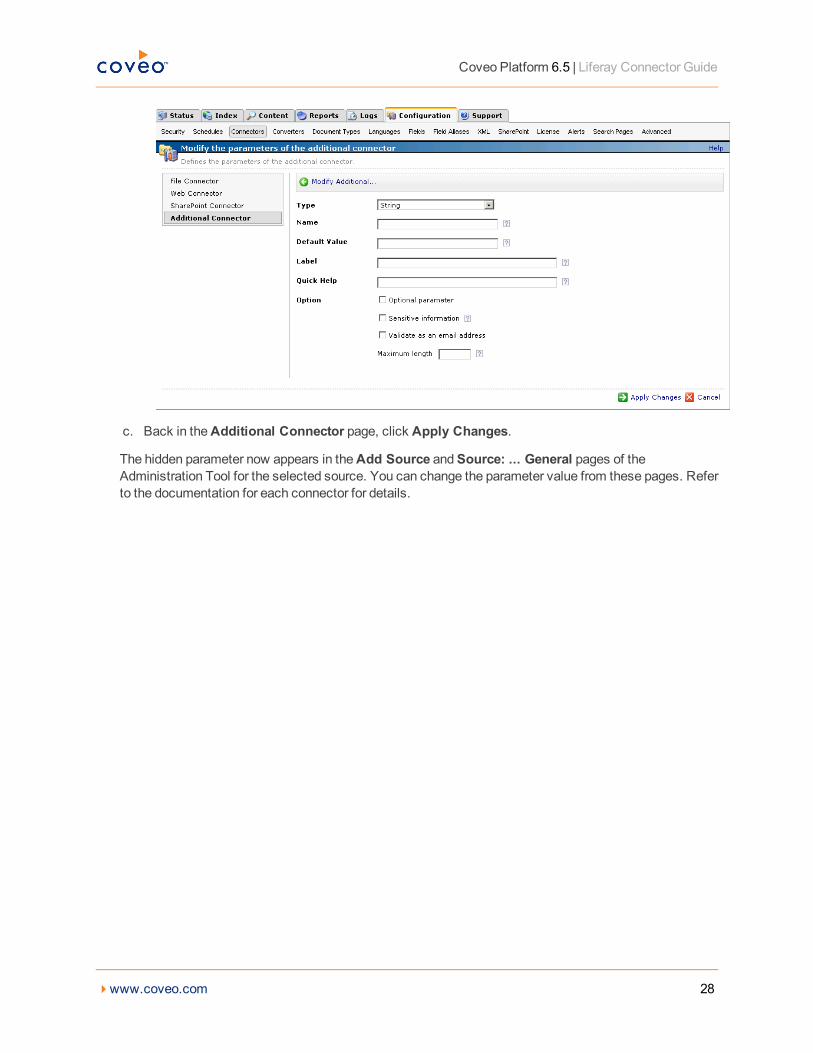
b. In theModify the parameters of the additional connector page:
i. In the Type list, select the parameter type as specified in the parameter description.
ii. In theName box, type the parameter name exactly as it appears in the parameter description.Parameter names are case sensitive.
iii. In theDefault Value box, enter the default value specified in the parameter description.
4www.coveo.com 26
Coveo Platform 6.5 | Liferay Connector Guide
Important: Do not set the value that you wish to use for a specific source. The value that youenter here will be used for all sources defined using this connector so it must be set to therecommended default value. You will be able to change the value for each source later, in theAdd Source andSource: ... General pages of the Administration Tool.
iv. In the Label box, enter the label that you wish to see for this parameter.
To easily link the label to the hidden parameter, you can simply use the parameter name, and ifapplicable, insert spaces between concatenated words.
Example: For theBatchSize hidden parameter, enter Batch Size for the label.
v. Optionally, inQuick Help, enter the help text that you wish to see for this parameter whenclicking the questionmark button beside the parameter value.
Tip: Copy and paste the key elements from the parameter description.
vi. For thePredefined values parameter type only, in theValue box, enter the parameter valuesthat you wish to see available in the drop-down parameter that will appear in the AdministrationTool interface. Enter one value per line. The entered values must exactly match the values listedin the hidden parameter description.
vii. Select theOptional parameter check box when you wish to identify this parameter as anoptional parameter.
When cleared, CES does not allow to save changes when the parameter is empty. Thisparameter does not appear forBoolean andPredefined values parameter types.
viii. Select theSensitive information check box for password or other sensitive parameter so that inthe Administration Tool pages where the parameter appears, the parameter value appears hidden(ex.: ). This parameter appears only for theString type.
ix. Select theValidate as an email address check box when you want CES to validate that thetext string that a user enters in this parameter respects the format of a valid email address. Thisparameter appears only for theString type.
x. In theMaximum length box, enter themaximum number of characters for the string. Thisparameter appears only for theString type.
xi. Click Save.
4www.coveo.com 27
Coveo Platform 6.5 | Liferay Connector Guide
c. Back in theAdditional Connector page, click Apply Changes.
The hidden parameter now appears in theAdd Source andSource: ... General pages of theAdministration Tool for the selected source. You can change the parameter value from these pages. Referto the documentation for each connector for details.
4www.coveo.com 28