counterpoint installation guide - · pdf filecounterpoint installation guide 5 introduction...
TRANSCRIPT

Copyright 1984 - 2010 by Radiant Systems, Inc.
PROPRIETARY RIGHTS NOTICE: All rights reserved. No part of this material may be reproduced in any form without written permission from Radiant Systems, Inc. Radiant Systems has taken reasonable measures to ensure the accuracy of this information, but makes no warranties and shall not be liable for damages resulting from any errors or omissions.
Installation Guide

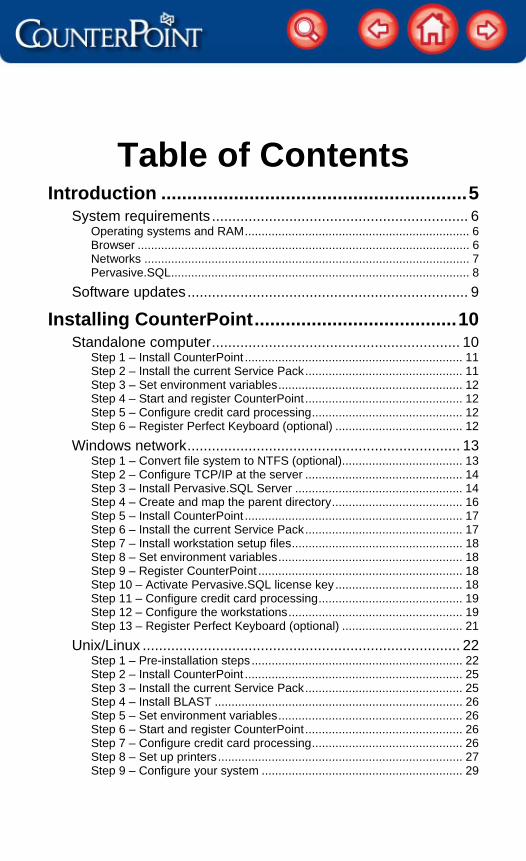
Table of Contents Introduction ........................................................... 5
System requirements ............................................................... 6 Operating systems and RAM ................................................................... 6 Browser ................................................................................................... 6 Networks ................................................................................................. 7 Pervasive.SQL ......................................................................................... 8
Software updates ..................................................................... 9
Installing CounterPoint ....................................... 10
Standalone computer ............................................................. 10 Step 1 – Install CounterPoint ................................................................. 11 Step 2 – Install the current Service Pack ............................................... 11 Step 3 – Set environment variables ....................................................... 12 Step 4 – Start and register CounterPoint ............................................... 12 Step 5 – Configure credit card processing ............................................. 12 Step 6 – Register Perfect Keyboard (optional) ...................................... 12
Windows network ................................................................... 13 Step 1 – Convert file system to NTFS (optional).................................... 13 Step 2 – Configure TCP/IP at the server ............................................... 14 Step 3 – Install Pervasive.SQL Server .................................................. 14 Step 4 – Create and map the parent directory ....................................... 16 Step 5 – Install CounterPoint ................................................................. 17 Step 6 – Install the current Service Pack ............................................... 17 Step 7 – Install workstation setup files ................................................... 18 Step 8 – Set environment variables ....................................................... 18 Step 9 – Register CounterPoint ............................................................. 18 Step 10 – Activate Pervasive.SQL license key ...................................... 18 Step 11 – Configure credit card processing ........................................... 19 Step 12 – Configure the workstations .................................................... 19 Step 13 – Register Perfect Keyboard (optional) .................................... 21
Unix/Linux .............................................................................. 22 Step 1 – Pre-installation steps ............................................................... 22 Step 2 – Install CounterPoint ................................................................. 25 Step 3 – Install the current Service Pack ............................................... 25 Step 4 – Install BLAST .......................................................................... 26 Step 5 – Set environment variables ....................................................... 26 Step 6 – Start and register CounterPoint ............................................... 26 Step 7 – Configure credit card processing ............................................. 26 Step 8 – Set up printers ......................................................................... 27 Step 9 – Configure your system ............................................................ 29
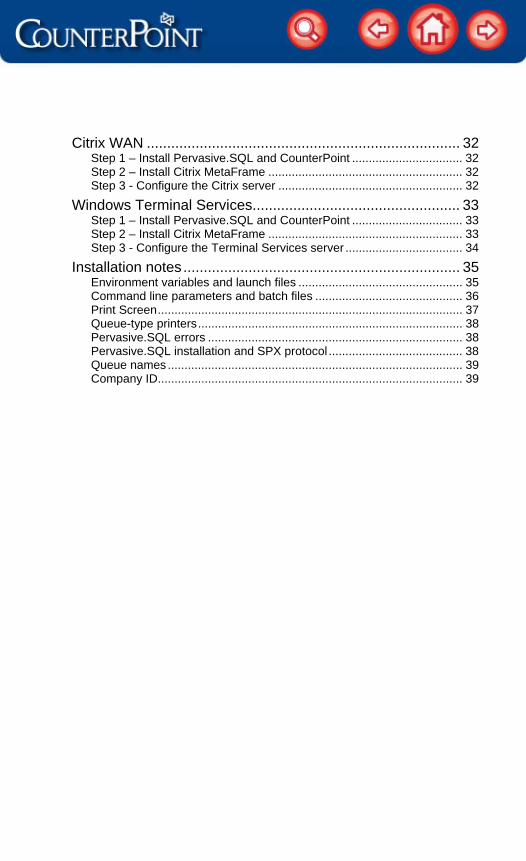
Citrix WAN ............................................................................. 32 Step 1 – Install Pervasive.SQL and CounterPoint ................................. 32 Step 2 – Install Citrix MetaFrame .......................................................... 32 Step 3 - Configure the Citrix server ....................................................... 32
Windows Terminal Services................................................... 33 Step 1 – Install Pervasive.SQL and CounterPoint ................................. 33 Step 2 – Install Citrix MetaFrame .......................................................... 33 Step 3 - Configure the Terminal Services server ................................... 34
Installation notes .................................................................... 35 Environment variables and launch files ................................................. 35 Command line parameters and batch files ............................................ 36 Print Screen ........................................................................................... 37 Queue-type printers ............................................................................... 38 Pervasive.SQL errors ............................................................................ 38 Pervasive.SQL installation and SPX protocol ........................................ 38 Queue names ........................................................................................ 39 Company ID........................................................................................... 39
CounterPoint Installation Guide 5
Introduction CounterPoint is a 32-bit integrated business software application that provides point-of-sale, inventory management, customer tracking, purchasing, labeling, apparel, receivables, payables, general ledger, check reconciliation, order processing, ecommerce, and wireless functionality for retail and wholesale businesses.
When you purchase CounterPoint, you receive:
A CD that includes CounterPoint software and the CounterPoint Electronic Documentation (click Read Me from the CounterPoint launch menu for a detailed description of the CD contents)
The CounterPoint Installation Guide (this book)
The CounterPoint Installation Guide includes detailed instructions for installing and configuring CounterPoint in the following operating environments:
Standalone computer
Windows network
Unix/Linux
Citrix WAN
Windows Terminal Services
Each set of steps in Installing CounterPoint, starting on page 10, details the process of installing CounterPoint in a particular environment.
For configuration tips and solutions to common problems, refer to Installation notes on page 35.
NOTE: This book is intended for new CounterPoint installations. If you are updating from a previous version, refer to the CounterPoint Update Guide in the CounterPoint Electronic Documentation.
CounterPoint Installation Guide 6
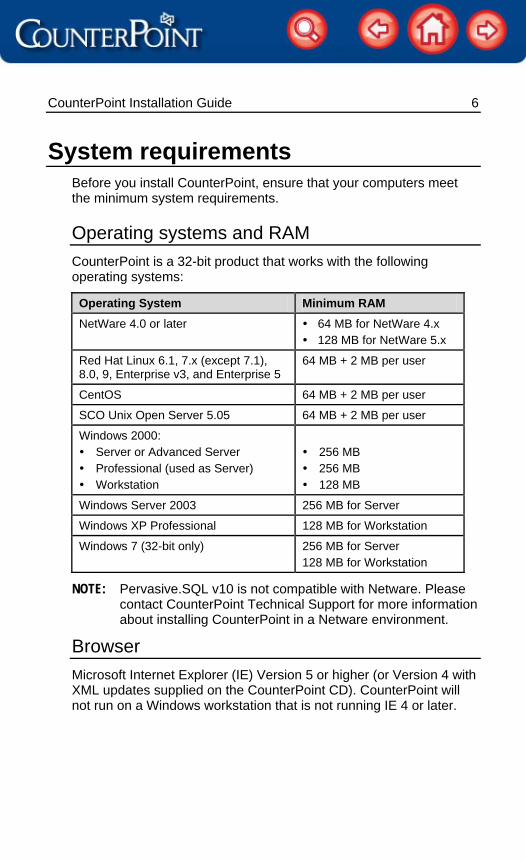
System requirements Before you install CounterPoint, ensure that your computers meet the minimum system requirements.
Operating systems and RAM CounterPoint is a 32-bit product that works with the following operating systems:
Operating System Minimum RAM NetWare 4.0 or later 64 MB for NetWare 4.x
128 MB for NetWare 5.x
Red Hat Linux 6.1, 7.x (except 7.1), 8.0, 9, Enterprise v3, and Enterprise 5
64 MB + 2 MB per user
CentOS 64 MB + 2 MB per user
SCO Unix Open Server 5.05 64 MB + 2 MB per user
Windows 2000: Server or Advanced Server Professional (used as Server) Workstation
256 MB 256 MB 128 MB
Windows Server 2003 256 MB for Server
Windows XP Professional 128 MB for Workstation
Windows 7 (32-bit only) 256 MB for Server 128 MB for Workstation
NOTE: Pervasive.SQL v10 is not compatible with Netware. Please contact CounterPoint Technical Support for more information about installing CounterPoint in a Netware environment.
Browser Microsoft Internet Explorer (IE) Version 5 or higher (or Version 4 with XML updates supplied on the CounterPoint CD). CounterPoint will not run on a Windows workstation that is not running IE 4 or later.
CounterPoint Installation Guide 7
Networks CounterPoint can operate over Local Area Networks (LANs) and Wide Area Networks (WANs).
Local Area Network Protocol
TCP/IP network protocol is required for both clients and servers for Windows networks.
Wide Area Networks
CounterPoint supports WAN configurations (in which programs are installed separately from data files) as long as the WAN includes at least one server that is running Microsoft Windows as the network operating system.
In a WAN configuration, only data file access requests are passed to the remote server. In a non-Citrix WAN configuration, programs are loaded locally—either from a local hard drive or a local server—to reduce network traffic over the remote link and to increase throughput.
The WAN / Workgroup Option provides capabilities that are valuable in WAN environments.
Citrix is a server application that can perform all processing for remote workstations. For example, several workstations can connect to a Citrix server (using either a dial-up or Internet connection) to run CounterPoint. All of the actual CounterPoint processing takes place on the Citrix server itself, which acts as a CounterPoint workstation on the network.
Citrix MetaFrame is required for the Citrix server, which must be a workstation on Windows network. CounterPoint does not support running Citrix simultaneously as a network server and a workstation.
Windows Terminal Server (WTS) is a thin-client solution that offers many of the advantages of Citrix MetaFrame, but at a lower cost. For more information about WTS, refer to Windows Terminal Services on page 33.
CounterPoint Installation Guide 8
Pervasive.SQL Pervasive.SQL is required to use CounterPoint with Windows. CounterPoint includes Pervasive.SQL v10, which you can install along with CounterPoint.
The Pervasive.SQL v10 Workstation Engine for Windows is provided for single-user and offline systems. The Pervasive.SQL v10 Server Engine and Client are provided for multi-user systems.
NOTE: The Pervasive.SQL Client is included on the CounterPoint CD. The Pervasive.SQL Server Engine for Windows is available for download from our Web site at http://www.counterpointpos.com/support/software_cpv7.htm.
You must be a registered CSS subscriber to access the Support area of the CounterPoint Web site.
For a standalone system, you can install the Pervasive.SQL v10 Workstation Engine on a computer that is running Windows 2000, Windows Server 2003, Windows 7, or Windows XP.
For a network system, you can install Pervasive.SQL v10 Server on a server that is running Windows 2000, Windows Server 2003, or Windows 7. The server on a Windows network can also function as a CounterPoint workstation.
You can install Pervasive.SQL v10 Client on a network computer that is running Windows 2000, Windows Server 2003, Windows 7, or Windows XP.
NOTE: Pervasive.SQL v10 is not compatible with Netware. Please contact CounterPoint Technical Support for more information about installing CounterPoint in a Netware environment.
CounterPoint Installation Guide 9
Software updates When you purchase CounterPoint, you are shipped the version of the software that was available as of the last CD fabrication. The CD does not necessarily include the latest corrections and updates to the software. The installation steps outlined in this book include downloading and installing the current CounterPoint Service Pack.
CounterPoint Service Packs contain the latest software updates and enhancements. You can obtain the current CounterPoint Service Pack from the Support area of the CounterPoint Web site at www.counterpointpos.com/support/software_cpv7.htm. Instructions for installing the Service Pack are available on the Web site.
NOTE: You must be a registered CSS subscriber to access the Support area of the CounterPoint Web site and download Service Packs.
The CounterPoint Service Pack is updated as often as updates become available. You should periodically download the appropriate Service Pack for your operating system to ensure that you are running the latest software.
Each Service Pack includes the Service Pack Log and the Reported Problem Log. The Service Pack Log describes enhancements and corrections in the Service Pack, while the Reported Problem Log documents reported problems in the current software. We encourage you to install all Service Packs, regardless of whether the Service Pack Log includes anything that seems to be of interest to you.
You can receive automatic email notifications of new Service Packs by subscribing to our Service Pack list. To subscribe to the list, visit www.counterpointpos.com/support/software_email.htm.
Service Packs may contain revised or supplemental documentation, which will be listed in the Release Notes: CounterPoint Service Pack document in the CounterPoint Electronic Documentation.
You can use System > Utilities > Environment to display your current version of CounterPoint and any Service Packs that have been installed.
CounterPoint Installation Guide 10
Installing CounterPoint This section includes detailed instructions for installing and configuring CounterPoint in the following environments:
Standalone computer
Windows network
Unix/Linux
Citrix WAN
Windows Terminal Services
Each set of instructions in this section includes the steps that you must follow to install CounterPoint in a particular environment. For configuration tips and solutions to common problems, refer to Installation notes on page 35.
Standalone computer The following steps outline the process of installing and configuring CounterPoint on a standalone computer:
Step 1 Install CounterPoint Step 2 Install the current Service Pack Step 3 Set environment variables Step 4 Start and register CounterPoint Step 5 Configure credit card processing Step 6 Register Perfect Keyboard (optional)
CounterPoint Installation Guide 11
Step 1 – Install CounterPoint 1. Insert the CounterPoint CD into your CD-ROM drive to display
the CounterPoint launch menu.
2. From the launch menu, click Install, and then click CounterPoint V7.
3. Follow the on-screen instructions to install CounterPoint.
If the CounterPoint 7.5 Setup program does not detect Perfect Keyboard, Adobe Reader, or BLAST Data Pump, you may install them during this process. Do not restart your computer if you are prompted to do so after each installation.
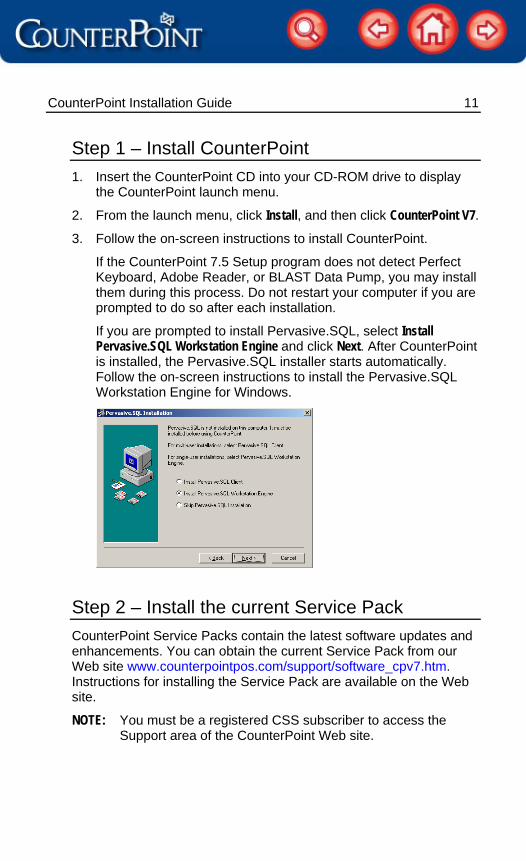
If you are prompted to install Pervasive.SQL, select Install Pervasive.SQL Workstation Engine and click Next. After CounterPoint is installed, the Pervasive.SQL installer starts automatically. Follow the on-screen instructions to install the Pervasive.SQL Workstation Engine for Windows.
Step 2 – Install the current Service Pack CounterPoint Service Packs contain the latest software updates and enhancements. You can obtain the current Service Pack from our Web site www.counterpointpos.com/support/software_cpv7.htm. Instructions for installing the Service Pack are available on the Web site.
NOTE: You must be a registered CSS subscriber to access the Support area of the CounterPoint Web site.
CounterPoint Installation Guide 12
Step 3 – Set environment variables 1. Set any optional environment variables for CounterPoint, as
described in Environment Variable Setup in the CounterPoint Electronic Documentation.
2. If you are using credit card processing, set the WINEDC environment variable to match the processor you are using, as described in Credit Cards in the CounterPoint Electronic Documentation.
Step 4 – Start and register CounterPoint 1. Select Start > Programs > CounterPoint 7.5 > CounterPoint or double-
click the CounterPoint shortcut on your desktop to start CounterPoint.
2. Log in using any User ID, and then select System > Registration.
3. Follow the instructions in Registering CounterPoint in the CounterPoint Electronic Documentation to register CounterPoint and the Options you have purchased.
Step 5 – Configure credit card processing If you are using CounterPoint’s credit card processing features, you must complete the appropriate steps to configure CounterPoint to use your credit card processor. Refer to Credit Cards in the CounterPoint Electronic Documentation for more information.
Step 6 – Register Perfect Keyboard (optional) If you installed Perfect Keyboard during the installation of CounterPoint, follow these steps to register it:
1. Click the Perfect Keyboard Pro icon in the Windows taskbar to start Perfect Keyboard, and then select Register from the Help menu.
2. Browse to the \PERFKYBD directory on the CounterPoint CD and open the pkreg.txt file in Notepad or another text editor.
3. Copy the User Name and Registration Number from the pkreg.txt file to the Perfect Keyboard Pro Register dialog, and then click OK.
You have finished installing CounterPoint on your standalone computer!
CounterPoint Installation Guide 13
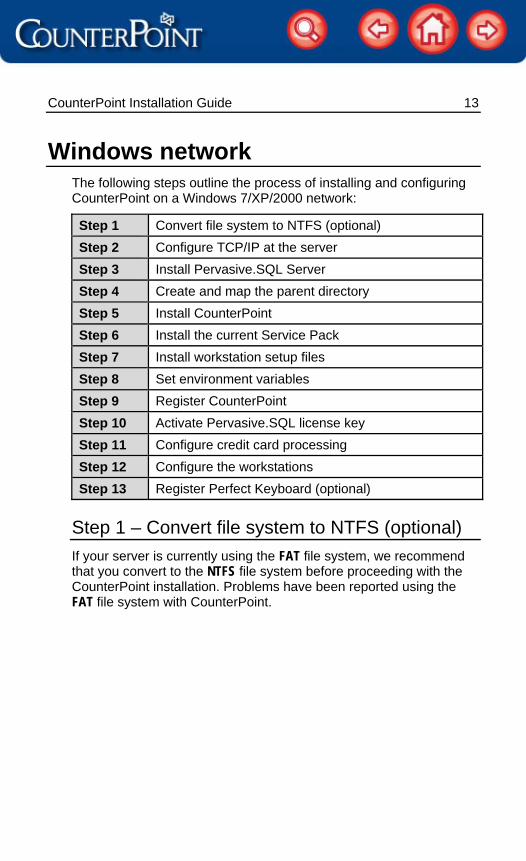
Windows network The following steps outline the process of installing and configuring CounterPoint on a Windows 7/XP/2000 network:
Step 1 Convert file system to NTFS (optional) Step 2 Configure TCP/IP at the server Step 3 Install Pervasive.SQL Server Step 4 Create and map the parent directory Step 5 Install CounterPoint Step 6 Install the current Service Pack Step 7 Install workstation setup files Step 8 Set environment variables Step 9 Register CounterPoint Step 10 Activate Pervasive.SQL license key Step 11 Configure credit card processing Step 12 Configure the workstations Step 13 Register Perfect Keyboard (optional)
Step 1 – Convert file system to NTFS (optional) If your server is currently using the FAT file system, we recommend that you convert to the NTFS file system before proceeding with the CounterPoint installation. Problems have been reported using the FAT file system with CounterPoint.
CounterPoint Installation Guide 14
Step 2 – Configure TCP/IP at the server If necessary, follow the appropriate steps for your operating system to configure the TCP/IP network protocol at the server:
NOTE: Your server must be configured with a static IP address.
To install the TCP/IP network protocol, do the following:
1. Double-click Network Connections (Windows XP) or Network and Dial-up Connections (Windows 2000) from the Windows Control Panel.
2. Right-click Local Area Connection and select Properties.
3. From the General tab, click Install. 4. Select Protocol and click Add.
5. Select Internet Protocol (TCP/IP) and click OK.
6. Close the Local Area Connection Properties dialog, and then restart your server.
Step 3 – Install Pervasive.SQL Server Follow these steps to install Pervasive.SQL v10 Server on your database server:
NOTE: You must be logged into the database server as an administrator.
1. If another version of Pervasive.SQL is installed on your server, use the Windows Task Manager to stop all Pervasive tasks that are running on the server.
2. From a workstation connected to the database server, download the PSQLNT.ZIP file to the database server from the Other Downloads section of the CounterPoint Web site at http://www.counterpointpos.com/support/software_cpv7.htm.
NOTE: You must be a registered CSS subscriber to access the Support area of the CounterPoint Web site and download the Pervasive.SQL v10 Server for Windows.
CounterPoint Installation Guide 15
3. Extract the PSQLNT.ZIP file to a temporary directory on the Windows server.
4. From the temporary directory to which you extracted PSQLNT.ZIP, run SETUP.EXE to start the Pervasive.SQL v10 Server for Windows installer.
5. Click Next from the Welcome dialog, select I accept the terms of the license agreement from the License Agreement dialog, and then click Next to proceed.
6. Select Complete from the Setup Type dialog, and then click Next. 7. Click Install to begin installing Pervasive.SQL v10 Server.
8. If you are prompted to install the Java Runtime Environment, click Yes to proceed.
9. Follow the on-screen instructions to run the transactional and relational tests from the Pervasive System Analyzer dialog. Click Finish when the tests are complete.
10. Click Finish when the installation is complete.
11. To configure Pervasive.SQL v10 for use with CounterPoint, do the following:
Select Start > Programs > Pervasive > PSQL 10 > Control Center and Documentation to start the Pervasive.SQL Control Center.
On the Pervasive.SQL tab, expand the Pervasive.SQL folder, and then expand the Engines folder.
Right-click your database server and select Properties.
Select Access from the list of configuration options and clear the Allow Cache Engine Connections check box.
Select the Communication protocols configuration option, clear the TCP/IP Multihomed check box, and then enter your server’s IP address in the Listen IP Address field.
In the Supported Protocols list, make sure that the TCP/IP check box is selected.
Select the Data integrity configuration option and select the Transaction Durability check box.
Select the Memory usage configuration option and select the System Cache check box.
CounterPoint Installation Guide 16
Select the Performance tuning configuration option and change the Number of Input/Output Threads value to 4 and the Max MicroKernal Memory Usage value to 0.
Click OK to save your settings and click Yes when you are prompted to restart the Pervasive.SQL services.
Close the Pervasive.SQL Control Center.
Step 4 – Create and map the parent directory 1. At the server, create a parent directory for the CounterPoint top-
level directory (e.g., C:\SYNSHARE75).
2. Enable sharing for this directory. Refer to your Windows documentation for instructions on how to enable sharing.
3. At the server, or on the workstation from which you will install CounterPoint, map a drive letter to the CounterPoint parent directory you created in the previous step (e.g., map drive F: to <server>\SYNSHARE75).
CounterPoint Installation Guide 17
Step 5 – Install CounterPoint 1. From the server or from a workstation at which you mapped a
drive to the parent CounterPoint directory, insert the CounterPoint CD to display the launch menu.
2. From the launch menu, click Install, and then click CounterPoint Version V7.
3. Follow the on-screen instructions to install CounterPoint.
Make sure that you specify to install CounterPoint on the drive you mapped to the CounterPoint parent directory (e.g., F:\SYN75, which is actually \\SYNSHARE\SYN75 on the server). Always install CounterPoint in its own directory, apart from other applications.
If the CounterPoint 7.5 Setup program does not detect Perfect Keyboard, Adobe Reader, or BLAST Data Pump, you may install them during this process. Do not restart your computer if you are prompted to do so after each installation.
If you are installing from a workstation and you are prompted to install Pervasive.SQL, select Pervasive.SQL Client and click Next. After CounterPoint is installed, the Pervasive.SQL installer starts automatically. Follow the on-screen instructions to install the Pervasive.SQL v10 Client.
NOTE: The Pervasive.SQL v10 Client must be installed to allow the workstation to communicate with the server.
Step 6 – Install the current Service Pack CounterPoint Service Packs contain the latest software updates and enhancements. You can obtain the current Service Pack from our Web site at www.counterpointpos.com/support/software_cpv7.htm. Instructions for installing the Service Pack are included on the Web site.
NOTE: You must be a registered CSS subscriber to access the Support area of the CounterPoint Web site.
CounterPoint Installation Guide 18
Step 7 – Install workstation setup files 1. Restart your computer, and then insert the CounterPoint CD into
your CD-ROM drive to display the launch menu.
2. From the launch menu, click Install, and then click Workstation Setup Files to copy the required set of workstation files to your network, so that you can prepare each workstation to run CounterPoint.
Step 8 – Set environment variables Set any optional environment variables for CounterPoint, as described in Environment Variable Setup in the CounterPoint Electronic Documentation.
Step 9 – Register CounterPoint 1. From your server, select Start > Programs > CounterPoint 7.5 >
CounterPoint or double-click the CounterPoint shortcut on the server’s desktop to start CounterPoint.
2. Log in using any User ID, and then select System > Registration.
3. Follow the instructions in Registering CounterPoint in the CounterPoint Electronic Documentation to register your CounterPoint system and the Options you have purchased.
Step 10 – Activate Pervasive.SQL license key 1. Select Start > Programs > Pervasive > Pervasive.SQL > Other Utilities >
License Administrator to start the Pervasive Software License Administrator.
2. Enter the permanent Pervasive.SQL license key that you received from Radiant Systems in the License Key fields.
3. Click Apply License Key to add the new license key to the Applied Licenses list.
NOTE: If you have multiple Pervasive.SQL keys, repeat steps 2 and 3 for each one.
4. Close the Pervasive Software License Administrator.
CounterPoint Installation Guide 19
Step 11 – Configure credit card processing If you are using CounterPoint’s credit card processing features, you must complete the appropriate steps to configure CounterPoint to use your credit card processor. Refer to Credit Cards in the CounterPoint Electronic Documentation for more information.
Step 12 – Configure the workstations Follow these steps to configure each workstation on your Windows 7/XP/2000 network that will run CounterPoint:
1. To configure TCP/IP at each workstation, do the following:
Double-click Network Connections (Windows 7/XP) or Network and Dial-up Connections (Windows 2000) from the Windows Control Panel.
Right-click Local Area Connection and select Properties.
From the General tab, click Install. Select Protocol and click Add.
Select Internet Protocol (TCP/IP) and click OK.
Close the Local Area Connection Properties dialog, and then restart the workstation.
2. Map a drive letter to the CounterPoint parent directory on the server (i.e., the directory that you shared at the server). The parent directory contains the top-level CounterPoint directory.
3. To install CounterPoint on each workstation, do the following:
From each workstation, browse to the top-level CounterPoint directory on the network, using the drive letter you mapped in the previous step, and then double-click CPWRKSET.EXE to start the CounterPoint 7.5 Workstation Setup program.
CounterPoint Installation Guide 20
Follow the on-screen instructions to install the necessary CounterPoint workstations files.
If the CounterPoint 7.5 Workstation Setup program does not detect Perfect Keyboard, Adobe Reader, or BLAST Data Pump, you may install them during this process. Do not restart your computer if you are prompted to do so after each installation.
If you are prompted to install Pervasive.SQL, select Version 10 Client and click Next. After CounterPoint is installed, the Pervasive.SQL installer starts automatically. Follow the on-screen instructions to install the Pervasive.SQL v10 Client.
NOTE: The Pervasive.SQL v10 Client must be installed to allow the workstation to communicate with the server.
4. To configure the Pervasive.SQL v10 Client for use with CounterPoint, do the following:
Select Start > Programs > Pervasive > PSQL 10 > Control Center & Documentation to start the Pervasive.SQL Control Center.
On the Pervasive.SQL tab, expand the Pervasive.SQL folder, expand the Local Client folder, and then double-click Microkernal Router.
Select the Communication protocols configuration option and make sure that only the TCP/IP check box is selected in the Supported Protocols list (i.e., clear all other check boxes).
Select the Performance tuning configuration option and make sure the Use Cache Engine check box is not selected.
Click OK to save your changes, and then close the Pervasive.SQL Control Center.
5. Set any workstation-specific CounterPoint environment variables, as described in Environment Variable Setup in the CounterPoint Electronic Documentation.
6. Restart the workstation, and then select Start > Programs > CounterPoint 7.5 > CounterPoint or double-click the CounterPoint shortcut on the workstation’s desktop to start CounterPoint.
CounterPoint Installation Guide 21
Step 13 – Register Perfect Keyboard (optional) If you installed Perfect Keyboard during the installation of CounterPoint, follow these steps to register it at each workstation:
1. Click the Perfect Keyboard Pro icon in the Windows taskbar to start Perfect Keyboard, and then select Register from the Help menu.
2. Browse to the \PERFKYBD directory on the CounterPoint CD and open the pkreg.txt file in Notepad or another text editor.
3. Copy the User Name and Registration Number from the pkreg.txt file to the Perfect Keyboard Pro Register dialog, and then click OK.
You have finished installing CounterPoint on your Windows network!
CounterPoint Installation Guide 22
Unix/Linux The following steps outline the process of installing and configuring CounterPoint on a Unix/Linux system:
Step 1 Pre-installation steps Step 2 Install CounterPoint Step 3 Install the current Service Pack Step 4 Install BLAST Step 5 Configure credit card processing Step 6 Set environment variables Step 7 Set up the printers Step 8 Configure your system Step 9 Register CounterPoint
Step 1 – Pre-installation steps Follow the appropriate steps for your operating system before you begin installing CounterPoint:
Open Server systems Set the disk swap space to 1.5.
All Red Hat systems It is not necessary to enable binary compatibility for Linux.
When running from the console, you must set the TERM variable to linux.
NOTE: If the CounterPoint screens do not display correctly, try changing the TERM variable to linux7 or linux8.
Red Hat Linux 7.x Linux must be installed using the workstation option.
CounterPoint will not run on a Red Hat 7.x server installation. CounterPoint is not supported on Red Hat Linux 7.1.
CounterPoint Installation Guide 23
Red Hat Linux 7.3 • Ensure that compat-libstdc is installed by running rpm – qa | grep
compat-libstdc. If no output is returned, compat-libstdc is not installed. You can install it from your Red Hat media, or download it from Red Hat’s Web site or from rpmfind.net.
Red Hat Linux 8.0 Ensure that compat-libstdc is installed by running rpm – qa | grep
compat-libstdc. If no output is returned, compat-libstdc is not installed. You can install it from your Red Hat media, or download it from Red Hat’s Web site or from rpmfind.net.
Install ncompress from the Red Hat CD or the Web if you receive the following error when running cpblinst: Uncompressing BLAST files ../cpblinst: ./compress: /usr/lib/libc.so.1: bad ELF interpreter: No such file or directory COMPRESSION ERROR!!!
Red Hat Linux 9 Ensure that compat-libstdc is installed by running rpm – qa | grep
compat-libstdc. If no output is returned, compat-libstdc is not installed. You can install it from your Red Hat media, or download it from Red Hat’s Web site or from rpmfind.net.
Set the following environment variable in the .bash_profile (located in the home\user directory) for all users that run CounterPoint:
LD_ASSUME_KERNEL=2.4.19
Install ncompress from the Red Hat CD or the Web if you receive the following error when running cpblinst: Uncompressing BLAST files ../cpblinst: ./compress: /usr/lib/libc.so.1: bad ELF interpreter: No such file or directory COMPRESSION ERROR!!!
CounterPoint Installation Guide 24
Red Hat Enterprise Linux Ensure that compat-libstdc is installed by running rpm – qa | grep
compat-libstdc. If no output is returned, compat-libstdc is not installed. You can install it from your Red Hat media or download it from Red Hat’s Web site or from rpmfind.net.
Set the following environment variable in the .bash_profile (located in the home\user directory) for all users that run CounterPoint:
LD_ASSUME_KERNEL=2.4.19 To use BLAST Data Pump, you must run the following
command:
ln -s /usr/lib/libncurses.so.5 /usr/lib/libncurses.so.4
Install ncompress from the Red Hat CD or the Web if you receive the following error when running cpblinst: Uncompressing BLAST files ../cpblinst: ./compress: /usr/lib/libc.so.1: bad ELF interpreter: No such file or directory COMPRESSION ERROR!!!
CentOS • Ensure that compat-libstdc is installed by running rpm – qa | grep
compat-libstdc. If no output is returned, compat-libstdc is not installed. You can install it from your CentOS media or download it from rpmfind.net.
• To install compat-libstdc from CentOS install disks run the following two commands with the CentOS CD mounted:
rpm -ivh /mnt/CentOS/compat-libstdc++-33-3.2.3-61.i386.rpm rpm -ivh /mnt/CentOS/compat-libstdc++-296-2.96-i38.i386.rpm
• Create a symlink from libstdc++-libc6.2-2.so.3 to libstdc++-libc6.1-12.so.2 in your /usr/lib directory:
ln -s /usr/lib/libstdc++-libc6.2-2.so.3 /usr/lib/libstdc++-libc6.1-12.so.2
Linux networks If you run an all Linux network, Linux workstations must telnet
into the server. Since the workstations are Linux consoles, you must set the TERM environment variable to linux.

CounterPoint Installation Guide 25
Step 2 – Install CounterPoint 1. Mount the CD and change directories to the mount point.
Typically, these commands are:
Operating system Command Open Server mount /dev/cd0 /mnt
cd /mnt Linux mount /dev/cdrom /mnt
cd /mnt
2. Run the install script by typing one of the following commands, and then follow the on-screen prompts to choose the installation directory.
Operating system Command Open Server & Linux sh INSTALL.SH
3. When installation is complete, change to a different directory to unmount the CD. Typically, the command is:
umount /mnt
Step 3 – Install the current Service Pack CounterPoint Service Packs contain the latest software updates and enhancements. You can obtain the current Service Pack from our Web site at www.counterpointpos.com/support/software_cpv7.htm. Instructions for installing the Service Pack are included on the Web site.
NOTE: You must be a registered CSS subscriber to access the Support area of the CounterPoint Web site.
CounterPoint Installation Guide 26
Step 4 – Install BLAST To install BLAST Professional for Unix, log in as root, and then follow these steps:
1. Change directories to the top-level CounterPoint directory.
2. Type: sh cpblinst 3. Follow the on-screen instructions. BLAST automatically installs
into the BL directory, located below the top-level CounterPoint directory
Before running BLAST, you must first run System > Registration in CounterPoint.
Step 5 – Set environment variables 1. Set any optional environment variables for CounterPoint, as
described in Environment Variable Setup in the CounterPoint Electronic Documentation.
2. If you are using credit card processing, set the WINEDC environment variable to match the processor you are using, as described under Setting WINEDC and creating SYNEDC.CFG in Credit Cards in the CounterPoint Electronic Documentation.
Step 6 – Start and register CounterPoint 1. To start CounterPoint, go to the top-level CounterPoint directory,
type syn at the command prompt, and then press Enter. 2. Log in to CounterPoint using any User ID, and then select System
> Registration.
3. Follow the instructions in Registering CounterPoint in the CounterPoint Electronic Documentation to register your system and the Options you have purchased.
Step 7 – Configure credit card processing If you are using CounterPoint’s credit card processing features, you must complete the appropriate steps to configure CounterPoint to use your credit card processor. Refer to Credit Cards in the CounterPoint Electronic Documentation for more information.
CounterPoint Installation Guide 27
Step 8 – Set up printers Spooled printers You can send reports to a spooled printer by defining printer variables in a file called synsuppl in the CounterPoint top-level directory. For example, if you define a spooled printer in Setup > System > Printer groups with a device name of oki393, you would add a line similar to the following in synsuppl:
Unix: dd_oki393=">/usr/bin/lpr -s -doki393";export dd_oki393
Linux: dd_oki393=">/usr/bin/lpr -s -Poki393";export dd_oki393
Any dd_ printer variables defined in synsuppl are automatically set when you start CounterPoint.
Refer to Environment Variables Setup in the CounterPoint Electronic Documentation for more information about printer variables.
Local printers You can define a Unix local printer type by selecting L (i.e., Local) as the Printer type in Setup > Point of Sale > Device codes. For a Unix local printer, enable/disable codes are sent only at the beginning and end of the print operations, without regard to the setting of the +5 switch. This feature provides compatibility with point-of-sale devices such as paper cutters.
Unix local printers do not allow F1 to pause printing.
TinyTERM allows you to emulate terminals on a Unix system. If you are using PCs, you may choose the SCO Console emulation for a full screen, 25-line color emulation of the console on a Unix system.
Although the actual SCO console does not support local printing, TinyTERM emulation allows you to print to a local device using aux on/off sequences.
CounterPoint Installation Guide 28
Local printers in printer groups To set up a local printer in printer groups using TinyTERM SCO Console emulation and CounterPoint, perform the following steps:
1. In CounterPoint, select Setup > System > Printer groups. Define the printer as a local (L) type printer. Enter the local printer codes for the TinyTERM emulation you are using. The local printer codes for the SCO console emulation are as follows:
Enable codes 1B5B3569 Disable codes 1B5B3469
You can determine the local printer codes for the emulation you are using by selecting TinyTERM help and choosing Emulation reference under Advanced topics.
2. In Setup > System > Printer groups, for the Device ID, enter the TinyTERM device you used to login to the Unix system. An example would be /dev/ttyp1 or /dev/ttyp2. You can find out how you are logged in to the Unix system by typing who at the Unix prompt. Precede the device name with /dev.
3. From the TinyTERM menu, select Configure > Printer. In the Printer Setup dialog box, enter the device name for the local printer (e.g., LPT1, COM1, etc.), and then choose DEVICE as the device.
Local printers in Point of Sale To set up a local printer to use from Point of Sale, perform the following steps:
1. Select Setup > Point of Sale > Device codes and select Printer from Device type. Enter the local printer codes for the TinyTERM emulation you are using. The local printer codes for the SCO console emulation are as follows:
Enable codes 1B5B3569 Disable codes 1B5B3469 You can determine the local printer codes for the emulation you are using by selecting TinyTERM help and choosing Emulation reference under Advanced topics.
CounterPoint Installation Guide 29
2. Select Setup > Point of Sale > Registers. On the second screen, enter the device code you defined in the previous step as the Device code for the printer. For the Device ID, enter the TinyTERM device you used to log in to the Unix system. An example would be /dev/ttyp1 or /dev/ttyp2.
You can determine how you are logged in to the Unix system by typing who at the Unix prompt. Precede the device name with /dev.
3. From the TinyTERM menu, select Configure > Printer. In the Printer Setup dialog box, enter the device name for the local printer (e.g., LPT1, COM1, etc.), and then choose DEVICE as the device.
Step 9 – Configure your system Instructions for configuring CounterPoint are organized by operating system in the following sections:
Open Server system configuration
Linux system configuration
Open Server system configuration
PATH Variable All users running CounterPoint must have the current directory (.) set up as the first directory on the search path in their .profile file. If necessary, use vi or another text editor to change the PATH entry in the .profile file so that it looks similar to the following:
PATH=.:/path2:/path3
# of Processes Each time you start CounterPoint, additional Unix processes are initiated. Using the ps -u user-id Unix command, you can see how many processes are currently running for a specific user login. For example, to see all processes running for the user xyz, type:
ps -u xyz If you have a number of users who are logging in with the same user ID, it is possible to exceed the Unix number of processes per user parameter from the system configuration files.
Evidence of having exceeded this parameter could be:
One or more users appear to be hung (terminal will not respond).
CounterPoint Installation Guide 30
Users cannot use Shift+F2 to temporarily exit to the operating system.
Users cannot return to CounterPoint by typing exit. Sometimes, pressing Ctrl+D can unlock the hung terminal.
Sometimes, the system supervisor may need to handle this situation from the console. This situation is not common, but it can occur.
Two solutions are available:
Increase the number of processes available for each user ID by modifying the system configuration.
Create more login IDs, so that only a few users are using the same login.
# Files/inodes/locks The most common system parameters that need adjustment are the settings for the number of open inodes, number of open files, and number of file locks.
Some Unix systems have other related system parameters. If so, the appropriate Unix documentation will mention these parameters.
Generally, the number of open files must not be greater than the number of open inodes, and the number of available file locks must be less than the number of open files.
When Unix is initially installed, the values for these parameters are set to what the Unix operating system's installation routine considers to be realistic for most users.
For those using large databases and other file-intensive applications, the documentation on these systems generally recommends adjusting these parameters up to a more appropriate level.
Because Unix dynamically allocates its resources, the required minimum settings for these parameters may vary depending on the software being used at any given time. Therefore, only realistic guidelines can be given in this guide.
The general rule for running CounterPoint is that each user should have 100 open files available (NOFILES setting). This setting can vary depending on the CounterPoint application that is running (e.g., Point of Sale uses more files than Inventory).
CounterPoint Installation Guide 31
Recommended settings:
Total open inodes (NINODE): 100 + 100 per login
Total open files (NFILE) : 100 + 100 per login
Total number of locks (FLCKREC): 100 + 100 per login (file or record locks)
Some versions of Unix may handle these variables differently. Refer to the appropriate documentation for your system for more information on your requirements.
Memory Note that when you add memory to your machine, you may need to adjust the amount of available swap space. Refer to your operating system documentation if you plan to add memory.
LINUX system configuration
PATH variable All users running CounterPoint must have the current directory (.) set up as the first directory on the search path in their .profile file. If necessary, use vi or another text editor to change the PATH entry in the .profile file so that it looks similar to the following:
PATH=.:/path2:/path3
Running CounterPoint from the Linux Console To run CounterPoint from the Linux Console, ensure that the TERM environment variable is set to linux.
You have finished installing CounterPoint on your Unix/Linux system!

CounterPoint Installation Guide 32
Citrix WAN CounterPoint is compatible with Citrix MetaFrame running on a workstation in a Windows XP/2000 network. In a Citrix WAN environment, you must first install Pervasive.SQL Server and CounterPoint on your network server (or any suitable computer on your network, other than your Citrix server), and then configure your Citrix server as a CounterPoint workstation.
The following steps outline the process of installing CounterPoint on a Citrix WAN:
Step 1 Install Pervasive.SQL and CounterPoint Step 2 Install Citrix MetaFrame Step 3 Configure the Citrix server
Step 1 – Install Pervasive.SQL and CounterPoint Complete Step 1 – Convert file system to NTFS (optional) on page 13 through Step 11 – Configure credit card processing on page 19 to install Pervasive.SQL Server and CounterPoint on your network server (or another suitable computer, other than your Citrix server).
Step 2 – Install Citrix MetaFrame On the workstation that you have designated as the Citrix server, install Citrix MetaFrame, using the instructions provided by Citrix.
Do not install Citrix on the Windows XP/2000 server (or on the computer onto which you installed Pervasive.SQL Server and CounterPoint).
Step 3 - Configure the Citrix server Complete Step 12 – Configure the workstations, starting on page 19, to configure your Citrix server as a CounterPoint workstation.
NOTE: You may wish to log in to your Citrix server as an administrator before running CPWRKSET.EXE to create a CounterPoint program group that is available to all users.
If you are logged in as a specific user instead of as an administrator, the workstation installer will create a program group that is only available to the logged-in user.
CounterPoint Installation Guide 33
Windows Terminal Services CounterPoint is compatible with Windows Terminal Services (WTS) under Windows 2000 Terminal Services, and Windows Server 2003 Terminal Services. Workstation clients running Windows 2000 Pro and Windows XP Pro do not require additional Microsoft licensing.
In a WTS environment, you must first install Pervasive.SQL Server and CounterPoint on your network server (or any suitable computer on your network, other than your WTS server), and then configure your WTS server as a CounterPoint workstation.
The following steps outline the process of installing CounterPoint on a Windows Terminal Services WAN:
Step 1 Install Pervasive.SQL and CounterPoint Step 2 Install Terminal Services Step 3 Configure the Terminal Services server
Step 1 – Install Pervasive.SQL and CounterPoint Complete Step 1 – Convert file system to NTFS (optional) on page 13 through Step 11 – Configure credit card processing on page 19 to install Pervasive.SQL Server and CounterPoint on your network server (or another suitable computer, other than your WTS server).
Step 2 – Install Citrix MetaFrame On the workstation that you have designated as the Terminal Services server, install Terminal Services, using the instructions provided by Microsoft.
Do not install Terminal Services on the Windows XP/2000 server (or on the computer onto which you installed Pervasive.SQL Server and CounterPoint).

CounterPoint Installation Guide 34
Step 3 - Configure the Terminal Services server Complete Step 12 – Configure the workstations, starting on page 19, to configure your WTS server as a CounterPoint workstation.
NOTE: You may wish to log in to your WTS server as an administrator before running CPWRKSET.EXE to create a CounterPoint program group that is available to all users.
If you are logged in as a specific user instead of as an administrator, the workstation installer will create a program group that is only available to the logged-in user.
CounterPoint Installation Guide 35
Installation notes This section provides tips, solutions to common errors, and other information that might be helpful during the installation of CounterPoint.
Environment variables and launch files Launch files are used to set environment variables and runtime switches used in CounterPoint. (V7.0 used SYNSUPPL and SYNENVxx batch files for this purpose.) The default launch file is named SYNRUN.SYN and is located in the top-level CounterPoint directory. SYNRUN.SYN contains the following entry:
COBDIR=. Typically, in SYNRUN.SYN, you would place environment variables and runtime switches that are common to all users. For example, if all users access the company named DEMO1, you would modify SYNRUN.SYN so that it contained the following:
COBDIR=. COMPANY=DEMO1
You can create multiple launch files to start CounterPoint with values that are specific to individual workstations, users, or tasks. Launch files should be created in the top-level CounterPoint directory and can have any name followed by the extension .SYN. For example, if you wanted to use a separate launch file for users who process credit cards, you could create a file named CCUSER.SYN in the top-level CounterPoint directory containing the following entries:
COBDIR=. COMPANY=DEMO1 WINEDC=WINCES
Then, on the user's system, modify the icon that starts CounterPoint and replace SYNRUN.SYN with CCUSER.SYN on the command line. For example:
MFENVG.EXE CCUSER.SYN .\SYNRUNW.EXE
CounterPoint Installation Guide 36
Launch files can be combined on the command line. If you combine launch files, semi-colons must separate them. For example, to set up an icon that starts the standard runtime and combines the common settings and the credit card settings, enter a command line similar to the following:
MFENVG.EXE SYNRUN.SYN;CCUSER.SYN .\SYNRUNW.EXE Although it is theoretically possible to set workstation-specific environment variables in AUTOEXEC.BAT, this approach is strongly discouraged, because those values are hidden when looking at an icon's properties, and are overridden by the settings of the launch files. All CounterPoint environment variables should be set using launch files.
Refer to Environment Variable Setup in the CounterPoint Electronic Documentation for a list of environment variables and runtime switches and where to set them.
Command line parameters and batch files You can start CounterPoint from an icon (i.e., a desktop shortcut), or from a command line or a batch file.
The Micro Focus executable, or MFENVG, must precede the command so that the .SYN launch file(s) is processed and the environment variables are set. SYNRUNW.EXE is specified next and must be prefixed by a path, usually the current directory path of ".\". Then, any additional parameters such as company ID, -PLAY, -RECORD, etc. are added. For example, the following command line starts CounterPoint for the company DEMO1:
MFENVG.EXE SYNRUN.SYN .\SYNRUNW.EXE DEMO1 If you include the command to start the runtime in a batch file, subsequent commands in the batch file are processed immediately, prior to exiting CounterPoint. For example, if your batch file included commands to back up the data, start CounterPoint and run Point of Sale > End of Day > Post, and then perform another backup, the final backup command would be executed as soon as CounterPoint was launched (i.e., before Point of Sale > End of Day > Post has completed). To ensure that CounterPoint has completed all operations prior to executing the next command in the batch file, add START /W (the W is for wait) to the beginning of the command that starts CounterPoint.
CounterPoint Installation Guide 37
An example of using START /W in a batch file using the standard runtime would be:
START /W MFENVG.EXE SYNRUN.SYN .\SYNRUNW.EXE DEMO1 NOTE: Windows 95/98 do not support the START /W command.
Command line parameters can be included in a batch file. For simplified batch operations, a file named SYN.BAT is provided. When using SYN.BAT, you may specify a company on the command line, but a launch file of the same name must exist.
For example, to use SYN.BAT to start CounterPoint for company DEMO1, the command would be SYN DEMO1. If DEMO1.SYN does not exist, an error message will appear.
Prior to using this command, you must first create the DEMO1.SYN launch file. DEMO1.SYN should contain the COMPANY environment variable specification. If nothing is specified on the command line, the default launch file SYNRUN.SYN is used. If the COMPANY environment variable is not set, DATAFILS is used as a default.
SYNSUPPL.BAT is no longer supported. All environment variables used by CounterPoint should be set in .SYN launch files (see above).
All environment variables should be set using launch files. Refer to Environment Variable Setup in the CounterPoint Electronic Documentation for more information about setting environment variables. We DO NOT recommend setting workstation-specific environment variables in AUTOEXEC.BAT because those values are hidden when you examine an icon's properties and overridden by the launch files’ settings.
Print Screen Ctrl-P is used in CounterPoint to print the contents of the current screen to a CounterPoint printer. This keystroke combination is the same one used in Unix.
CounterPoint Installation Guide 38
Queue-type printers The default QSTART and QSTART batch files use Windows networking commands by default (instead of NetWare commands). The NetWare commands are still included, but they are commented out. The Windows commands should also work on NetWare networks, so no change should be required.
Queue-type printers still redirect LPT1 to send output to the queue and terminate the connection when finished. For complete information on using network queue printers, refer to Network Queue Printers in the CounterPoint Electronic Documentation.
Pervasive.SQL errors
Older Btrieve/Pervasive.SQL versions You may encounter Pervasive.SQL errors if older versions of Btrieve or Pervasive.SQL are installed on your system. Follow these steps to complete remove older Pervasive software from your system using the Pervasive System Analyzer Wizard:
1. Select Start > Programs > Pervasive System Analyzer to start the Pervasive System Analyzer Wizard, and then click Next.
2. Select Delete components or archives, and then click Next. 3. Select Local Machine, and then click Next. 4. Select the Delete Pervasive.SQL components and registry settings
check box, and then select the Delete Pervasive archives check box.
5. Click Next, and then click Yes to remove all Pervasive software, including older components and archives, from your system. When this process is complete, you must reinstall Pervasive.SQL on your server and/or workstations.
Pervasive.SQL installation and SPX protocol When installing Pervasive.SQL on an SPX server, the relational access check fails.
Change the default TCP/IP communication protocol to SPX to allow the Pervasive.SQL installer to run correctly.
For a NetWare server, change the MgrUse Transport parameter to SPX in the System/ODBC.ini file on the server, then restart the SRDE.
CounterPoint Installation Guide 39
Queue names If a network print queue name is too long to enter as the device name when setting up printers in CounterPoint, or if you need to enter a file server name, you can use an alias to access this print queue. Refer to Network Print Queues in the CounterPoint Electronic Documentation for more information.
Company ID You can start CounterPoint in a particular company in one of two ways:
Set the COMPANY environment variable prior to starting CounterPoint (see Environment Variables Setup in the CounterPoint Electronic Documentation).
Add the company ID to the end of the command to start CounterPoint (Modify the Target for the shortcut using Start > Settings > Taskbar & Start menu (Advanced tab).
If you want to create new shortcuts that launch particular companies, you can copy an existing CounterPoint shortcut and modify the command line to include the appropriate company ID. You can also change companies once you are in CounterPoint by selecting System > Switch company.