coolaroo is the leader in outdoor fabric technology. · pdf filecoolaroo is the leader in...
TRANSCRIPT
E V E R Y D A Y
WARNING
When installing and using this product, safety precautions should always be followed to reduce the risk of personal injury and damage to equipment. Please read all instructions before installation and use.
– At least two or more people are recommended forsafe installation.
– Keep all children and pets awayfrom installation area.
– Avoid installation during severe weather conditions.
– Check all fixing points for tightnessbefore and regularly during usage.
– Do not place the product near an open flame;or too close to any heat source.
– Once installed, ensure children or pets cannot climb onto the Shade Sail.
To register your product go to coolaroo.com. The product code can be found printed above the barcodeon the product packaging, alternatively you can find it on the relevant coolaroo.com product page.
DISCLAIMER The installation instructions in this booklet are to be used as a guide only. Many factors can vary depending on your region (anchor points, soil types, wind conditions, etc.) Gale Pacific accepts no responsibility for installations.
C O M M E R C I A L G R A D E & E V E R Y D A Y
A S S E M B L Y G U I D E
c o o l a r o o . c o m
Installing your new Coolaroo Shade Sail is simple,
following our step-by-step instructions.
Gale Pacific Limited 145 Woodlands Drive, Braeside, Victoria, 3195 Australia
Gale Pacific (NZ) Limited Suite A 45C Mt Wellington Highway, Mt Wellington, Auckland 1060 New Zealand
For help with product assembly or for any other questions you may have, contact our Customer Service Department.
Australia Toll Free: 1800 331 521New Zealand Toll Free: 0800 555 171United States Ph: +1 407 772 7900Middle East Ph: +971 4 881 7114China Ph: +86 574 5626 8888
Coolaroo is the leader in outdoor fabric technology.
Our extensive range of attractive shade solutions
is carefully manufactured to protect your home,
garden and family from the harsh sun.
Our range of Shade Sail accessories*
®Coolaroo is a registered trademark of Gale Pacific Limited.
*Accessories not included.
Made in China.
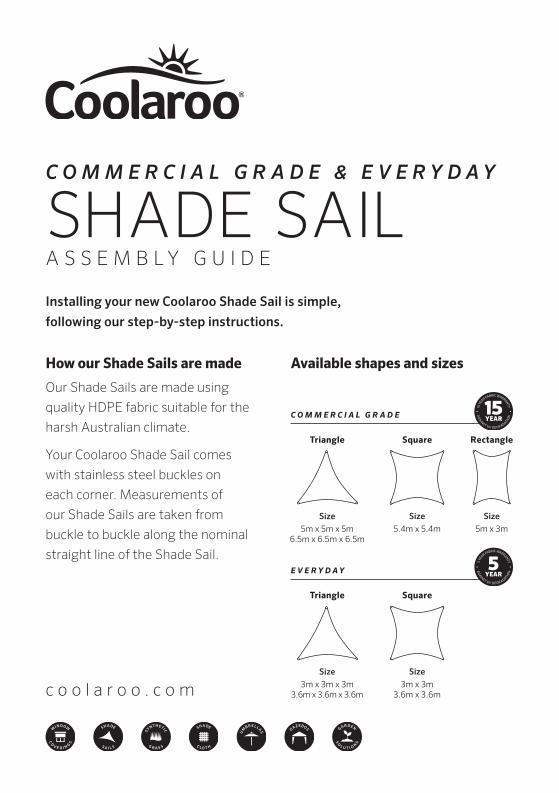
Available shapes and sizes
Triangle
Triangle
RectangleSquare
Square
Size5m x 5m x 5m
6.5m x 6.5m x 6.5m
Size3m x 3m x 3m
3.6m x 3.6m x 3.6m
Size5m x 3m
Size5.4m x 5.4m
Size3m x 3m
3.6m x 3.6m
Scan this QR code with your smart phone to
find out more. QR code reader app required.
HANDY HINTS
– Once your Shade Sail has been installed for a couple of weeks and it has experienced the full force of Mother Nature, it is a good idea to check to see if further tensioning is required. The fabric is very tight when it is first installed and after a few weeks of rain, wind, and sun, it is normal for the material to settle inand loosen a little bit requiring additional tensioning.
– It is important to keep your Shade Sail taut as this will increase the lifespan significantly and will keep itlooking great!
– It is highly recommended to take your Shade Saildown in instances of severe weather.
– Periodically check all your fixing points and tensioning accessories to ensure they are in goodcondition and are not wearing down.
– If you live in a leafy environment or in an area prone to debris falling, it’s recommended to remove this from the Shade Sail regularly to reduce instances of fabric staining.
CARE & MAINTENANCE
Your Coolaroo Shade Sail may be cleaned at any time using a solution of mild detergent and water. Apply the solution with a sponge or a very soft brush then rinse thoroughly with water from your garden hose. Do not put the fabric in your washing machine, clothesdrier, or scrub it with a stiff brush, scouring pad, or an abrasive cleaner.
How our Shade Sails are made
Our Shade Sails are made using
quality HDPE fabric suitable for the
harsh Australian climate.
Your Coolaroo Shade Sail comes
with stainless steel buckles on
each corner. Measurements of
our Shade Sails are taken from
buckle to buckle along the nominal
straight line of the Shade Sail.
Shade Sail layout design ideas
C O M M E R C I A L G R A D E
A N C H O R S – U S E I N C O N J U N C T I O N W I T H L I N K S
Pad Eye For securing the Shade Sail corner to a flat surface (wall, timber, fascia). Use in
conjunction with a link or Turnbuckle to connect the Shade Sail.
Eye Bolt For securing the Shade Sail corner to timber or steel poles or solid surface
where rear access is available. Use in conjunction with a link or Turnbuckle to
connect the Shade Sail.
L I N K S
D Shackle Use to link the Shade Sail corner to Pad Eye or Eye Bolt.
S Hook Use to link Shade Sail corners to Pad Eye or Eye Bolt.
Snap Hook Use to link Shade Sail corners to Pad Eye or Eye Bolt. Quick and easy to
connect / disconnect.
T E N S I O N I N G
Turnbuckle Use to link the Shade Sail corner ring to a fixing point and provide tension to the
Shade Sail. At least 2 tension devices are recommended per sail.
Strap Tensioner
Use to assist tensioning the structure. The gauge heat-treated ratchet is extra-
strong thanks to the double-stitched nylon strap and vinyl-coated hooks.
SHADE SAIL

Shade Sail connectionConnect fixing accessories to mounting points as required. Ensure all connections face towards the middle of the sail and are tightly secured.
Check again to ensure all mounting points are solid.
Lay your sail out to commence installation. The Coolaroo tag should be facing down.
It is important to note that your sail will require at least two of the accessories to be tensioning devices (ie. turnbuckles). If required, stainless steel chain can be used to extend your Shade Sail corner to a fixing point.
Connect the Shade Sail to the fixing accessories, leaving one of the tensioning fixing points to last for connection. If necessary, to gain increased leverage use a Coolaroo Strap Tensioner.
B E F O R E Y O U S T A R T !
Building approvalIt is important to check prior to installation for any relevant building regulations with your local authorities (council).
Selecting the locationBefore installing your Shade Sail, consider what your needs are.
Factors which should be taken into account are:
– Strength of existing structuresintended to be anchor points
– Ability to insert fixing posts
– Location of barbecues, electrical / telephonecables, water / sprinkler pipes, etc.
– Water run-off
– Sun direction
There could also be other factors, specific to your situation, which require consideration.
Shade Sail installationsIf you require assistance in regards to your specific installation, please consult a qualified builder or engineer.
Note: It is important when deciding on the positioning of the sail lower point, that the slope of the fabric will allow good water run-off. Water which is allowed to pond on the sail will lead to premature sail failure and may lead to structural failure at fixing points. It is recommended to have the Shade Sail on a 10 ̊ + slope.
To achieve the hyperbolic style, two corners are required to be at high points and two corners at low points. (Image a.)
To achieve the resort style, two corners are required to be at high points and one corner at a low point. (Image b.)
Determining suitable fixing pointsAfter deciding on the location of your Coolaroo Shade Sail it is important to identify structurally suitable fixing points for the sail corners. This stage is critical. Your sail will be under significant tension and as such fixing points need to be strong. It is recommended that the fixing height be at least 2.4m from the ground on 2 of the sides. Allow 10% of the sail length between each fixing point and the corner D Rings for tensioning. Consider using stainless steel chain to reach certain fixing points.
If using existing fixtures, such as side fascia or the roof of your house, be sure to check the structure carefully to ensure it can bear the load. If unsure about the most suitable fixing points, obtain independent advice from a qualified builder or engineer.
After identifying the most suitable fixing points, lay the sail out on the ground in the proposed position to confirm the positioning is workable.
There is an extensive range of Coolaroo fixing accessories available to help you secure your sail (refer to Shade Sail accessories table).
LowLow
HighHigh
Low
HighHigh
Fixing points
Utilising existing supportsIf you intend to fix your sail to a fascia, the use of a fascia support is strongly recommended. The fascia support will reinforce the overhangs of rafters or trusses and provide a stronger connection between the two. Fascia supports are available from your local hardware store.
Fascia support
Ra�er/truss
Ra�er/truss
Fascia support
PostsNote: It is not recommended to use a tree for a sail fixing.
Post lengths should be calculated taking into account the proposed height of your sail plus the depth of your footings.
It is recommended to use galvanised or painted posts to prevent rust. Steel posts are available from your local hardware store or steel supplier, and can be cut to predetermined lengths and colour-matched to your sail and environment.
It is recommended to use a round steel post with a minimum diameter of 90mm, or a 90x90mm square steel post. Post wall thickness should be a minimum of 3.5mm. (Image c.)
Alternatively, the use of treated softwood (H5 level treatment) or Hardwood of durability Class 1 is also suitable. The timber post should be a minimum 125mm in diameter. Your local timber supplier can assist you in your selection. (Image d.)
It is advisable to lean posts at an angle of 5 (̊50mm per 1m of pole height), sloping away from the centre of the sail for additional support. (Image e.)
5°
90mm90mm
Galvanised steel posts 3.5mm
125mm125mm
Treated timber posts
Footings for your Shade SailAll posts should be embedded in concrete footings with a minimum 20 MPa.
Measure out centres of the footing positions and mark locations. (Image f.)
3m size Shade Sails
400mm
400mm
800mm
5m size or larger Shade Sails
400mm
400mm
1200mm
Firm groundIf installing your post in firm ground, lay a 100mm (4”) depth of 20mm (3/4”) diameter gravel at the base of the post to allow for the lean. Position the post at a 5 ̊ angle (50mm per 1m of pole height), sloping away from the centre of the sails position and add the required amount of concrete. Temporarily brace the posts until concrete is fully cured. (Image i.)Firm ground
Concretefooting
100mm
20mm diametergravel
5°
Soft groundIf installing your shade post into soft ground, first pour a 100mm (4”) depth of concrete into the hole and allow to set completely. Add a gravel bed, 100mm (4”) in depth. Position the post at a 5 ̊ angle (50mm per 1m of pole height), slopingaway from the centre of the sails position and add the required amount of concrete. (Image j.)
Temporarily brace the posts until concrete is fully cured.
20mm diametergravel
Concrete pad
So� ground
Concretefooting
100mm
100mm
5°
Tensioning your Shade SailOnce all corners of the sail have been connected, adjust the tension with fixing accessories.
Stop tensioning when the sail is rigid with little or no creases, the Coolaroo Strap Tensioner can be used to assist in tensioning the sail. A sail which has been mounted and tensioned correctly will have little to no creases.
Caution: Do not over tension, tension only by hand, and only tight enough to remove creases. Over tensioning can cause damage to your Shade Sail.
Your sail should be firm and tight to reduce windflap.
After 30 days, check the tension and re-tighten if required.
Tensioned correctly
Tension required
c.
d.
e.
Dig holes to the required size for your posts height, using the centre of the footing as the approximate locations of the point of the sail.
– For a 3m size sail dig footing holes 400mmsquare and 800mm deep (Image g.)
– For a 5m or larger sail dig footing holes 400mmsquare and 1200mm deep (Image h.)
Conditions vary for different environments; if unsure of the concrete type best suited to your area contact your local concrete supplier. Mix the concrete to the manufacturer’s instructions, these should be clearly labelled on the packet.
f.
g.
h.b.
a.
i.
j.

E V E R Y D A Y
WARNING
When installing and using this product, safety precautions should always be followed to reduce the risk of personal injury and damage to equipment. Please read all instructions before installation and use.
– At least two or more people are recommended forsafe installation.
– Keep all children and pets awayfrom installation area.
– Avoid installation during severe weather conditions.
– Check all fixing points for tightnessbefore and regularly during usage.
– Do not place the product near an open flame;or too close to any heat source.
– Once installed, ensure children or pets cannot climb onto the Shade Sail.
To register your product go to coolaroo.com. The product code can be found printed above the barcodeon the product packaging, alternatively you can find it on the relevant coolaroo.com product page.
DISCLAIMER The installation instructions in this booklet are to be used as a guide only. Many factors can vary depending on your region (anchor points, soil types, wind conditions, etc.) Gale Pacific accepts no responsibility for installations.
C O M M E R C I A L G R A D E & E V E R Y D A Y
A S S E M B L Y G U I D E
c o o l a r o o . c o m
Installing your new Coolaroo Shade Sail is simple,
following our step-by-step instructions.
Gale Pacific Limited 145 Woodlands Drive, Braeside, Victoria, 3195 Australia
Gale Pacific (NZ) Limited Suite A 45C Mt Wellington Highway, Mt Wellington, Auckland 1060 New Zealand
For help with product assembly or for any other questions you may have, contact our Customer Service Department.
Australia Toll Free: 1800 331 521New Zealand Toll Free: 0800 555 171United States Ph: +1 407 772 7900Middle East Ph: +971 4 881 7114China Ph: +86 574 5626 8888
Coolaroo is the leader in outdoor fabric technology.
Our extensive range of attractive shade solutions
is carefully manufactured to protect your home,
garden and family from the harsh sun.
Our range of Shade Sail accessories*
®Coolaroo is a registered trademark of Gale Pacific Limited.
*Accessories not included.
Made in China.
Available shapes and sizes
Triangle
Triangle
RectangleSquare
Square
Size5m x 5m x 5m
6.5m x 6.5m x 6.5m
Size3m x 3m x 3m
3.6m x 3.6m x 3.6m
Size5m x 3m
Size5.4m x 5.4m
Size3m x 3m
3.6m x 3.6m
Scan this QR code with your smart phone to
find out more. QR code reader app required.
HANDY HINTS
– Once your Shade Sail has been installed for a couple of weeks and it has experienced the full force of Mother Nature, it is a good idea to check to see if further tensioning is required. The fabric is very tight when it is first installed and after a few weeks of rain, wind, and sun, it is normal for the material to settle inand loosen a little bit requiring additional tensioning.
– It is important to keep your Shade Sail taut as this will increase the lifespan significantly and will keep itlooking great!
– It is highly recommended to take your Shade Saildown in instances of severe weather.
– Periodically check all your fixing points and tensioning accessories to ensure they are in goodcondition and are not wearing down.
– If you live in a leafy environment or in an area prone to debris falling, it’s recommended to remove this from the Shade Sail regularly to reduce instances of fabric staining.
CARE & MAINTENANCE
Your Coolaroo Shade Sail may be cleaned at any time using a solution of mild detergent and water. Apply the solution with a sponge or a very soft brush then rinse thoroughly with water from your garden hose. Do not put the fabric in your washing machine, clothesdrier, or scrub it with a stiff brush, scouring pad, or an abrasive cleaner.
How our Shade Sails are made
Our Shade Sails are made using
quality HDPE fabric suitable for the
harsh Australian climate.
Your Coolaroo Shade Sail comes
with stainless steel buckles on
each corner. Measurements of
our Shade Sails are taken from
buckle to buckle along the nominal
straight line of the Shade Sail.
Shade Sail layout design ideas
C O M M E R C I A L G R A D E
A N C H O R S – U S E I N C O N J U N C T I O N W I T H L I N K S
Pad Eye For securing the Shade Sail corner to a flat surface (wall, timber, fascia). Use in
conjunction with a link or Turnbuckle to connect the Shade Sail.
Eye Bolt For securing the Shade Sail corner to timber or steel poles or solid surface
where rear access is available. Use in conjunction with a link or Turnbuckle to
connect the Shade Sail.
L I N K S
D Shackle Use to link the Shade Sail corner to Pad Eye or Eye Bolt.
S Hook Use to link Shade Sail corners to Pad Eye or Eye Bolt.
Snap Hook Use to link Shade Sail corners to Pad Eye or Eye Bolt. Quick and easy to
connect / disconnect.
T E N S I O N I N G
Turnbuckle Use to link the Shade Sail corner ring to a fixing point and provide tension to the
Shade Sail. At least 2 tension devices are recommended per sail.
Strap Tensioner
Use to assist tensioning the structure. The gauge heat-treated ratchet is extra-
strong thanks to the double-stitched nylon strap and vinyl-coated hooks.
SHADE SAIL