contisys quick guide - united kingdom · quick reference guide 6 english quick reference...
TRANSCRIPT
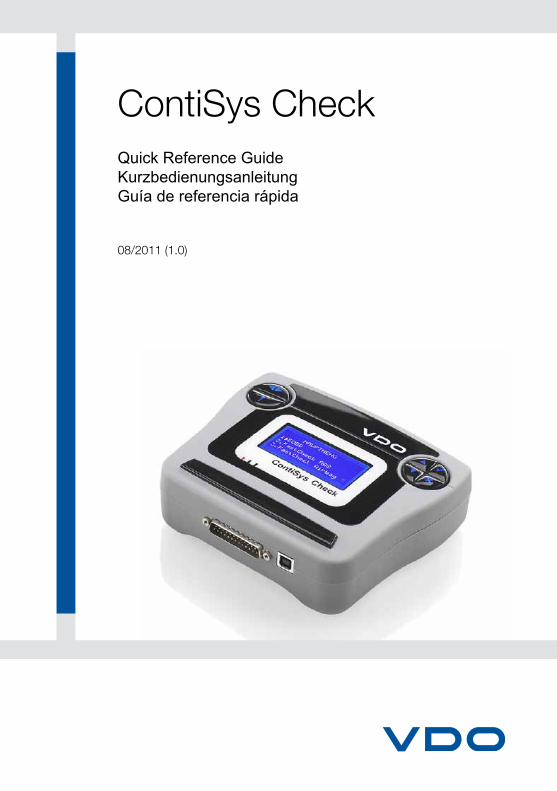
ContiSys CheckQuick Reference GuideKurzbedienungsanleitungGuía de referencia rápida
08/2011 (1.0)
ContiSys Quick Guide.book Page 3 Tuesday, September 13, 2011 1:30 PM
English............................................... 6
German............................................ 14
Español ........................................... 22
3

4
ContiSys Quick Guide.book Page 4 Tuesday, September 13, 2011 1:30 PM

5
Contents
Quick Reference GuideIntroduction ............................................................... 6Overview.................................................................... 6Keypads .................................................................... 8ContiSys Check Service Tool ..................................... 9Cable identification................................................... 10
ContiSys Quick Guide.book Page 5 Tuesday, September 13, 2011 1:30 PM

Quick Reference Guide
6
ContiSys Quick Guide.book Page 6 Tuesday, September 13, 2011 1:30 PM
EnglishQuick Reference Guide
IntroductionCongratulations on choosing the ContiSys Check Service Tool.
This Quick Reference Guide will outline the components of ContiSys Check and how to connect and use the service tool. Before using this service tool refer to the Operating Instructions on the enclosed CD ROM.
Documentation
1. Insert the ContiSys Check CD into the CD/DVD drive
2. The CD should auto-run and display the menu. If it does not, navigate to the CD , use “Windows Explorer” and double-click on “Start” to bring up the Menu
3. Now you can select from the list: Quick Start Guide; Operating Instructions; Applications List.
4. Please click on the item you wish to open.
Registration of service tool
To start the registration process of your new service tool, log on to www.contisys-service.com and follow the On-Screen instructions.
Further support can be obtained by calling +44 (0) 870 949 3606.
For product support via email please send details of your query to: [email protected]
Overview
ContiSys Check - Kit
The kit includes:
1. Service tool
2. EOBD cable
3. USB software update cable
4. CD ROM containing the Operating Instructions and Application list
5. Carry case
3
2
41
OM1658s
5
Quick Reference Guide
ContiSys Quick Guide.book Page 7 Tuesday, September 13, 2011 1:30 PM
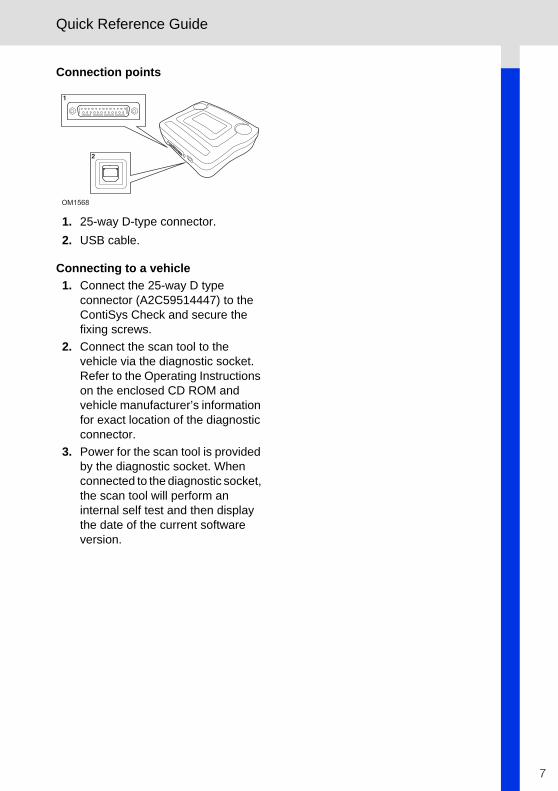
Connection points
1. 25-way D-type connector.
2. USB cable.
Connecting to a vehicle
1. Connect the 25-way D type connector (A2C59514447) to the ContiSys Check and secure the fixing screws.
2. Connect the scan tool to the vehicle via the diagnostic socket. Refer to the Operating Instructions on the enclosed CD ROM and vehicle manufacturer’s information for exact location of the diagnostic connector.
3. Power for the scan tool is provided by the diagnostic socket. When connected to the diagnostic socket, the scan tool will perform an internal self test and then display the date of the current software version.
1
2
OM1568
7
Quick Reference Guide
8
ContiSys Quick Guide.book Page 8 Tuesday, September 13, 2011 1:30 PM
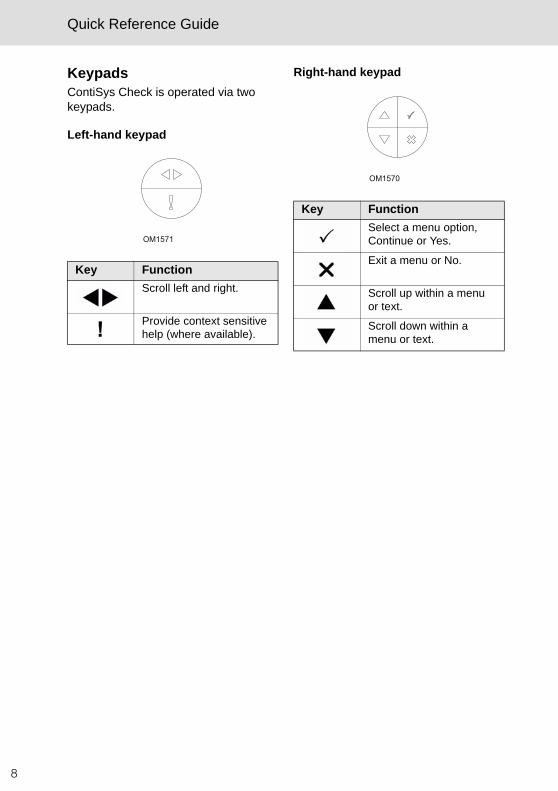
KeypadsContiSys Check is operated via two keypads.
Left-hand keypad
Right-hand keypad
Key Function
Scroll left and right.
Provide context sensitive help (where available).
OM1571
Key Function
Select a menu option, Continue or Yes.
Exit a menu or No.
Scroll up within a menu or text.
Scroll down within a menu or text.
OM1570
Quick Reference Guide
ContiSys Quick Guide.book Page 9 Tuesday, September 13, 2011 1:30 PM
ContiSys Check Service Tool
Introduction
The functions listed in the main menu are dependent on the software version loaded on the tool. For further details on available functions, please visit www.vdo.com/contisys
Connection
Connection to the specific system is via either the vehicle's EOBD (J1962) diagnostic socket or by a system specific connector. Refer to the 'Vehicle Application List' on the enclosed CD ROM to determine the correct cable.
Connect the appropriate cable between the service tool and the vehicle's diagnostic connector. Once connected, the current software version number is displayed before displaying the main menu.
Use the and keys to select the required menu function. Press to confirm the selection and then follow the on-screen instructions.
If there is a connection problem, the 'Please Wait' screen will be replaced with help screens.
Refer to the 'Operating Instructions' and ‘Vehicle Applications List’ on the enclosed CD ROM for more detail.
Note: The latest version of the vehicle application list can be downloaded from the Download section of www.vdo.com.
9
Quick Reference Guide
10
ContiSys Quick Guide.book Page 10 Tuesday, September 13, 2011 1:30 PM
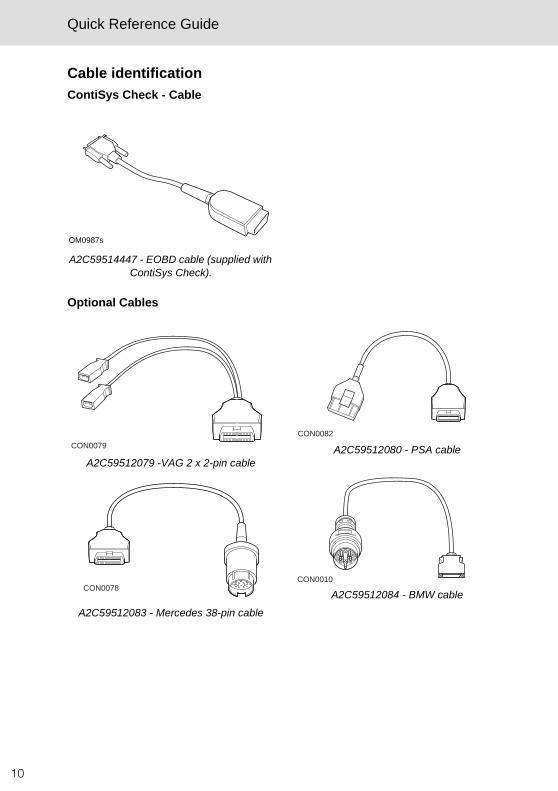
Cable identification
ContiSys Check - Cable
A2C59514447 - EOBD cable (supplied with ContiSys Check).
Optional Cables
A2C59512079 -VAG 2 x 2-pin cable
A2C59512083 - Mercedes 38-pin cable
A2C59512080 - PSA cable
A2C59512084 - BMW cable
OM0987s
CON0079
CON0078
CON0082
CON0010
Quick Reference Guide
ContiSys Quick Guide.book Page 11 Tuesday, September 13, 2011 1:30 PM
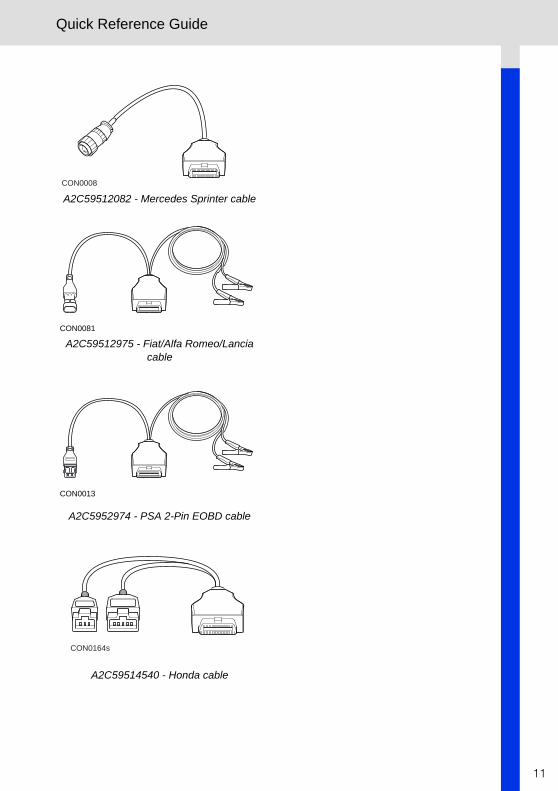
A2C59512082 - Mercedes Sprinter cable
A2C59512975 - Fiat/Alfa Romeo/Lancia cable
A2C5952974 - PSA 2-Pin EOBD cable
A2C59514540 - Honda cable
CON0008
CON0081
CON0013
CON0164s
11
Quick Reference Guide
12
ContiSys Quick Guide.book Page 12 Tuesday, September 13, 2011 1:30 PM
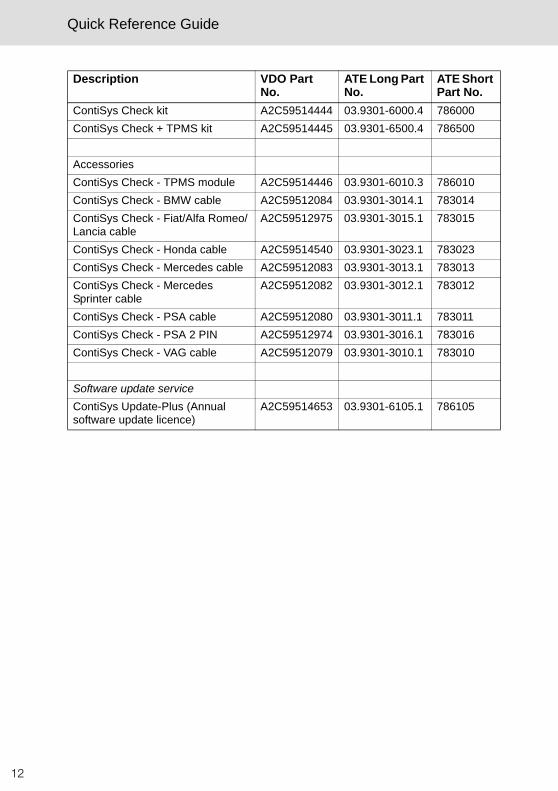
Description VDO Part No.
ATE Long Part No.
ATE Short Part No.
ContiSys Check kit A2C59514444 03.9301-6000.4 786000
ContiSys Check + TPMS kit A2C59514445 03.9301-6500.4 786500
Accessories
ContiSys Check - TPMS module A2C59514446 03.9301-6010.3 786010
ContiSys Check - BMW cable A2C59512084 03.9301-3014.1 783014
ContiSys Check - Fiat/Alfa Romeo/Lancia cable
A2C59512975 03.9301-3015.1 783015
ContiSys Check - Honda cable A2C59514540 03.9301-3023.1 783023
ContiSys Check - Mercedes cable A2C59512083 03.9301-3013.1 783013
ContiSys Check - Mercedes Sprinter cable
A2C59512082 03.9301-3012.1 783012
ContiSys Check - PSA cable A2C59512080 03.9301-3011.1 783011
ContiSys Check - PSA 2 PIN A2C59512974 03.9301-3016.1 783016
ContiSys Check - VAG cable A2C59512079 03.9301-3010.1 783010
Software update service
ContiSys Update-Plus (Annual software update licence)
A2C59514653 03.9301-6105.1 786105
13
Inhalt
KurzbedienungsanleitungEinführung ................................................................ 14Übersicht.................................................................. 14Tastenfeld................................................................. 16ContiSys Check Service-Tool ................................... 17Anschlusskabel......................................................... 18
ContiSys Quick Guide.book Page 13 Tuesday, September 13, 2011 1:30 PM
Kurzbedienungsanleitung
14
ContiSys Quick Guide.book Page 14 Tuesday, September 13, 2011 1:30 PM
German
Kurzbedienungsanleitung
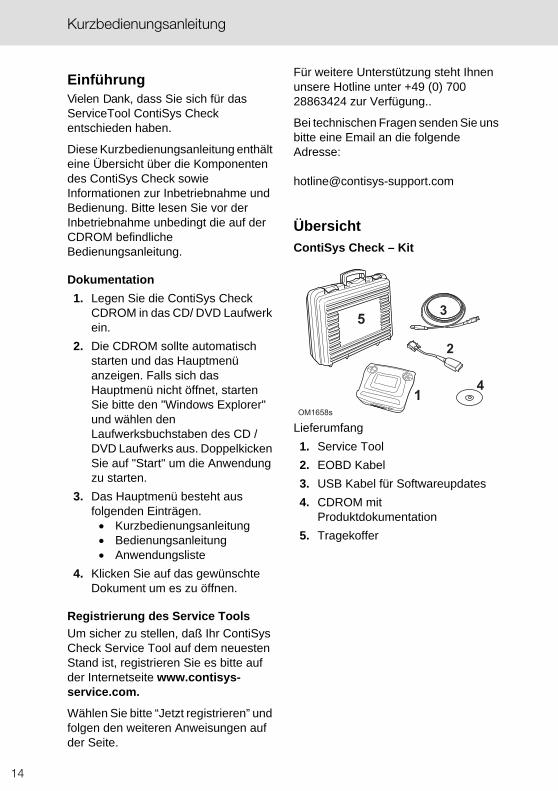
EinführungVielen Dank, dass Sie sich für das ServiceTool ContiSys Check entschieden haben.
Diese Kurzbedienungsanleitung enthält eine Übersicht über die Komponenten des ContiSys Check sowie Informationen zur Inbetriebnahme und Bedienung. Bitte lesen Sie vor der Inbetriebnahme unbedingt die auf der CDROM befindliche Bedienungsanleitung.
Dokumentation
1. Legen Sie die ContiSys Check CDROM in das CD/ DVD Laufwerk ein.
2. Die CDROM sollte automatisch starten und das Hauptmenü anzeigen. Falls sich das Hauptmenü nicht öffnet, starten Sie bitte den "Windows Explorer" und wählen den Laufwerksbuchstaben des CD / DVD Laufwerks aus. Doppelkicken Sie auf "Start" um die Anwendung zu starten.
3. Das Hauptmenü besteht aus folgenden Einträgen. Kurzbedienungsanleitung Bedienungsanleitung Anwendungsliste
4. Klicken Sie auf das gewünschte Dokument um es zu öffnen.
Registrierung des Service Tools
Um sicher zu stellen, daß Ihr ContiSys Check Service Tool auf dem neuesten Stand ist, registrieren Sie es bitte auf der Internetseite www.contisys-service.com.
Wählen Sie bitte “Jetzt registrieren” und folgen den weiteren Anweisungen auf der Seite.
Für weitere Unterstützung steht Ihnen unsere Hotline unter +49 (0) 700 28863424 zur Verfügung..
Bei technischen Fragen senden Sie uns bitte eine Email an die folgende Adresse:
Übersicht
ContiSys Check – Kit
Lieferumfang
1. Service Tool
2. EOBD Kabel
3. USB Kabel für Softwareupdates
4. CDROM mit Produktdokumentation
5. Tragekoffer
3
2
41
OM1658s
5
Kurzbedienungsanleitung
ContiSys Quick Guide.book Page 15 Tuesday, September 13, 2011 1:30 PM
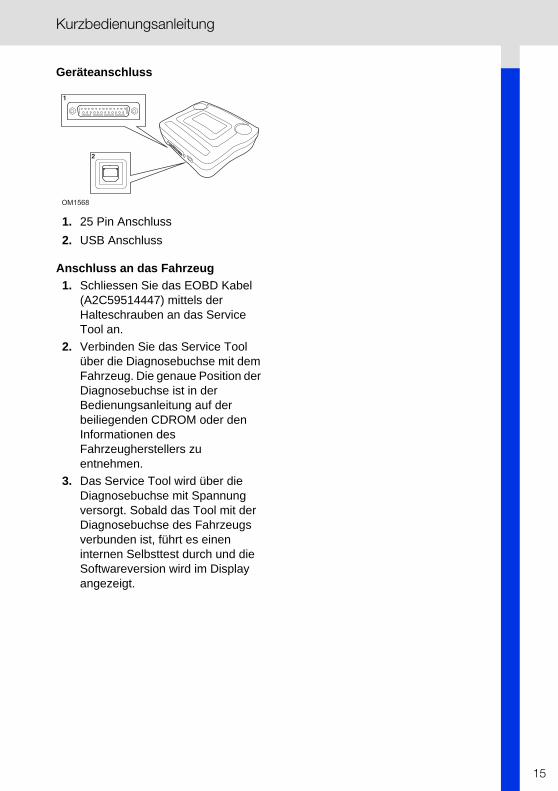
Geräteanschluss
1. 25 Pin Anschluss
2. USB Anschluss
Anschluss an das Fahrzeug
1. Schliessen Sie das EOBD Kabel (A2C59514447) mittels der Halteschrauben an das Service Tool an.
2. Verbinden Sie das Service Tool über die Diagnosebuchse mit dem Fahrzeug. Die genaue Position der Diagnosebuchse ist in der Bedienungsanleitung auf der beiliegenden CDROM oder den Informationen des Fahrzeugherstellers zu entnehmen.
3. Das Service Tool wird über die Diagnosebuchse mit Spannung versorgt. Sobald das Tool mit der Diagnosebuchse des Fahrzeugs verbunden ist, führt es einen internen Selbsttest durch und die Softwareversion wird im Display angezeigt.
1
2
OM1568
15
Kurzbedienungsanleitung
16
ContiSys Quick Guide.book Page 16 Tuesday, September 13, 2011 1:30 PM
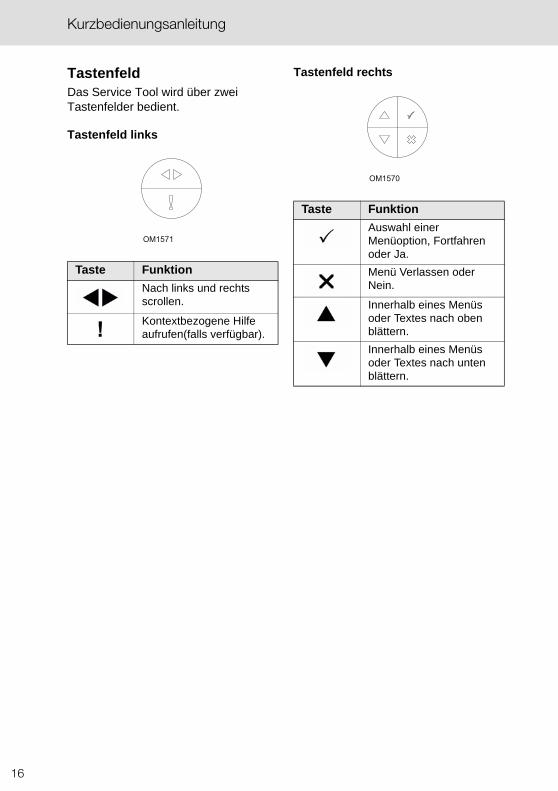
TastenfeldDas Service Tool wird über zwei Tastenfelder bedient.
Tastenfeld links
Tastenfeld rechts
Taste Funktion
Nach links und rechts scrollen.
Kontextbezogene Hilfe aufrufen(falls verfügbar).
OM1571
Taste Funktion
Auswahl einer Menüoption, Fortfahren oder Ja.
Menü Verlassen oder Nein.
Innerhalb eines Menüs oder Textes nach oben blättern.
Innerhalb eines Menüs oder Textes nach unten blättern.
OM1570
Kurzbedienungsanleitung
ContiSys Quick Guide.book Page 17 Tuesday, September 13, 2011 1:30 PM
ContiSys Check Service Tool
Einführung
Allgemeine Informationen finden Sie auf der im Lieferumfang enthaltenen CDROM. Zudem auf unseren Internet-, und Extranetseiten.
Anschließen
Der Anschluss an das entsprechende System erfolgt über die EOBD (J1962) Diagnosebuchse des Fahrzeugs oder über eine systemspezifische Buchse. Siehe hierzu die „Fahrzeug-Anwendungsliste“ auf der beiliegenden CDROM zur Bestimmung des richtigen Kabels.
Schließen Sie das entsprechende Kabel am Service Tool und der Diagnosebuchse im Fahrzeug an. Im Anschluss daran wird die aktuelle Softwareversion angezeigt, bevor das Hauptmenü eingeblendet wird.
Verwenden Sie die Tasten und zur Auswahl der gewünschten Menüfunktion. Drücken Sie zur Bestätigung der Auswahl und befolgen Sie dann die Anweisungen auf dem Bildschirm.
Besteht ein Problem mit der Verbindung, wird der Bildschirm „Bitte warten“ durch Hilfebildschirme ersetzt.
Weitere Informationen finden Sie in der „Bedienungsanleitung“ und „Fahrzeug-Anwendungsliste“ auf der beiliegenden CDROM.
Hinweis: Die jeweils neueste Version der Bedienungsanleitung und der Fahrzeug-Anwendungsliste steht auf unserer Webseite www.vdo.de/contisys unter "Downloads" zur Verfügung.
17
Kurzbedienungsanleitung
18
ContiSys Quick Guide.book Page 18 Tuesday, September 13, 2011 1:30 PM
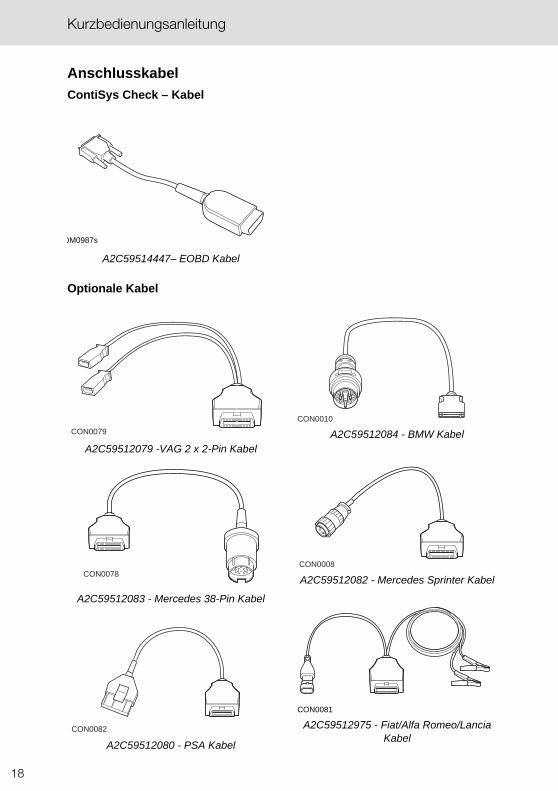
Anschlusskabel
ContiSys Check – Kabel
A2C59514447– EOBD Kabel
Optionale Kabel
A2C59512079 -VAG 2 x 2-Pin Kabel
A2C59512083 - Mercedes 38-Pin Kabel
A2C59512080 - PSA Kabel
A2C59512084 - BMW Kabel
A2C59512082 - Mercedes Sprinter Kabel
A2C59512975 - Fiat/Alfa Romeo/Lancia Kabel
OM0987s
CON0079
CON0078
CON0082
CON0010
CON0008
CON0081
Kurzbedienungsanleitung
ContiSys Quick Guide.book Page 19 Tuesday, September 13, 2011 1:30 PM
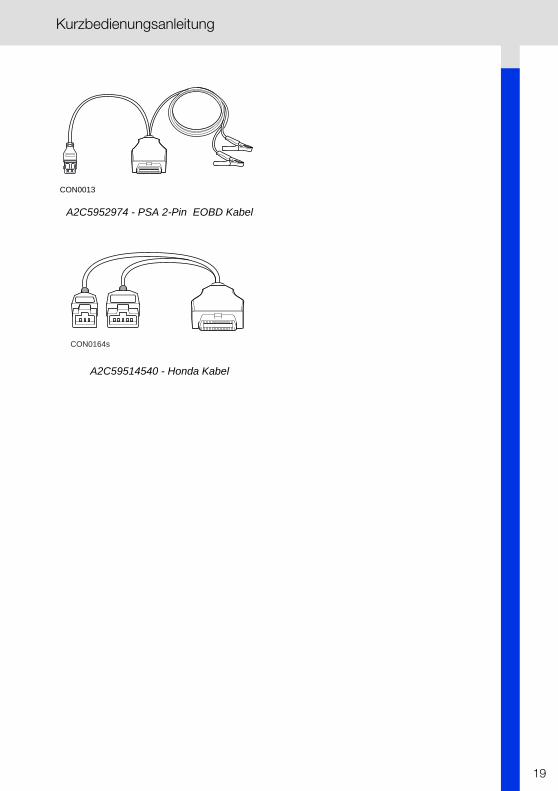
A2C5952974 - PSA 2-Pin EOBD Kabel
A2C59514540 - Honda Kabel
CON0013
CON0164s
19
Kurzbedienungsanleitung
20
ContiSys Quick Guide.book Page 20 Tuesday, September 13, 2011 1:30 PM
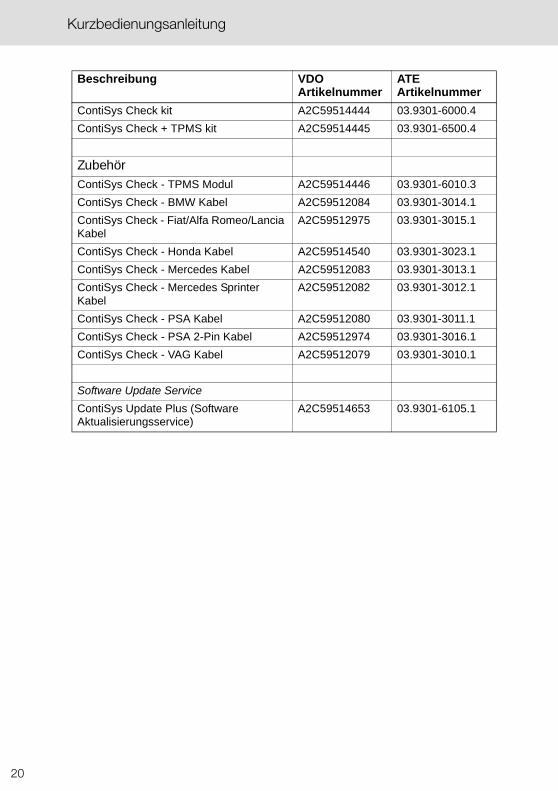
Beschreibung VDO Artikelnummer
ATE Artikelnummer
ContiSys Check kit A2C59514444 03.9301-6000.4
ContiSys Check + TPMS kit A2C59514445 03.9301-6500.4
ZubehörContiSys Check - TPMS Modul A2C59514446 03.9301-6010.3
ContiSys Check - BMW Kabel A2C59512084 03.9301-3014.1
ContiSys Check - Fiat/Alfa Romeo/Lancia Kabel
A2C59512975 03.9301-3015.1
ContiSys Check - Honda Kabel A2C59514540 03.9301-3023.1
ContiSys Check - Mercedes Kabel A2C59512083 03.9301-3013.1
ContiSys Check - Mercedes Sprinter Kabel
A2C59512082 03.9301-3012.1
ContiSys Check - PSA Kabel A2C59512080 03.9301-3011.1
ContiSys Check - PSA 2-Pin Kabel A2C59512974 03.9301-3016.1
ContiSys Check - VAG Kabel A2C59512079 03.9301-3010.1
Software Update Service
ContiSys Update Plus (Software Aktualisierungsservice)
A2C59514653 03.9301-6105.1
21
Indice
Guía de referencia rápidaIntroducción............................................................. 22Descripción general ................................................. 22Teclado.................................................................... 24Herramienta de servicio ContiSys CHECK................ 25Identificación de cables............................................ 26
ContiSys Quick Guide.book Page 21 Tuesday, September 13, 2011 1:30 PM
Guía de referencia rápida
22
ContiSys Quick Guide.book Page 22 Tuesday, September 13, 2011 1:30 PM
EspañolGuía de referencia rápida
IntroducciónEnhorabuena por elegir la herramienta de servicio ContiSys Check.
En esta Guía de Consulta Rápida se describen los componentes de ContiSys Check y la manera de conectar y utilizar la herramienta de servicio. Antes de utilizar la herramienta de servicio consulte el Manual de instrucciones del CD ROM adjunto.
Documentacion
1. Introduzca el CD del ContiSys Check en el lector de CD/DVD.
2. El programa deberá iniciarse automáticamente. En caso de que no arranque, mediante el explorador de Windows entre directamente en el contenido del CD y haga doble clic en “Start” para que aparezca el Menú.
3. Desde la lista del Menú podrá elegir entre los siguientes documentos: Guía de referencia rápida; Manual del Usuario; Lista de aplicaciones.
4. Haga doble clic sobre el elegido para abrirlo.
Registro de la herramienta de servicio
Para asegurar de que su equipo ContiSys Check esté actualizado hasta la fecha, regístrelo cuanto antes
www.contisys-service.com
y siga las instrucciones en la pantalla
También puede solicitar asistencia en el teléfono +44 (0) 870 949 3606.
Si desea recibir soporte del producto por correo electrónico, envíe su consulta a: [email protected]
Guía de referencia rápida
ContiSys Quick Guide.book Page 23 Tuesday, September 13, 2011 1:30 PM
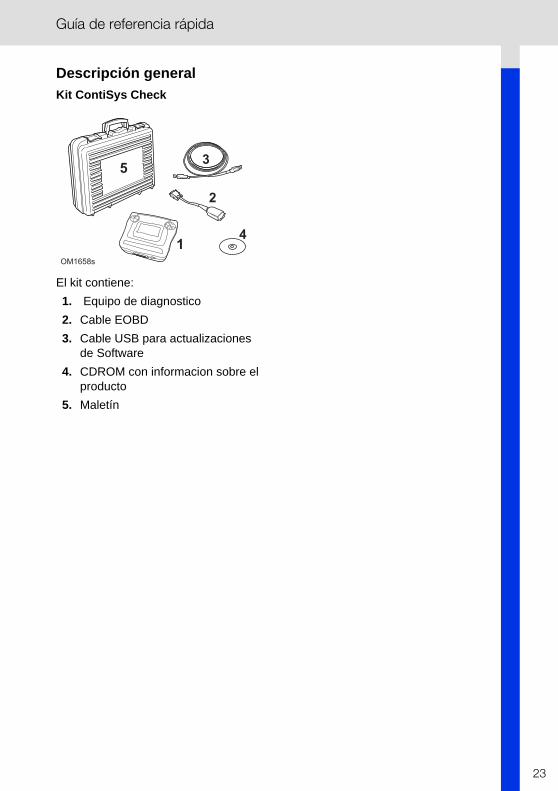
Descripción general
Kit ContiSys Check
El kit contiene:
1. Equipo de diagnostico
2. Cable EOBD
3. Cable USB para actualizaciones de Software
4. CDROM con informacion sobre el producto
5. Maletín
3
2
41
OM1658s
5
23
Guía de referencia rápida
24
ContiSys Quick Guide.book Page 24 Tuesday, September 13, 2011 1:30 PM
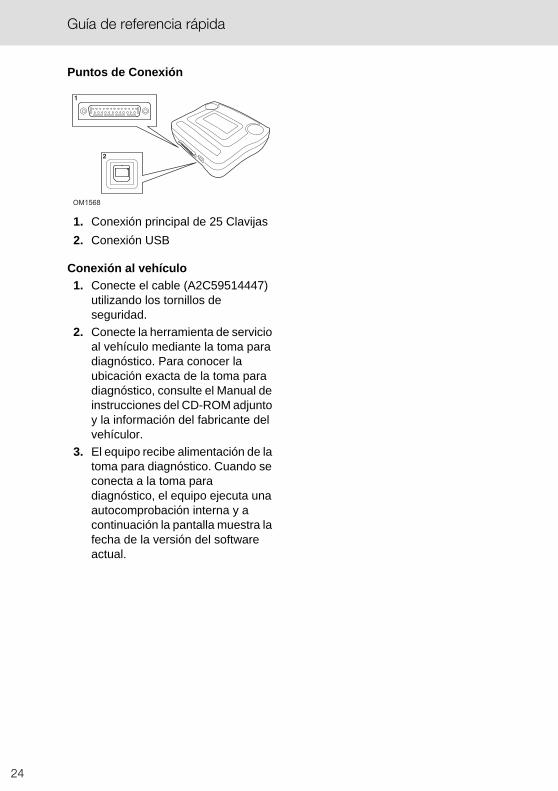
Puntos de Conexión
1. Conexión principal de 25 Clavijas
2. Conexión USB
Conexión al vehículo
1. Conecte el cable (A2C59514447) utilizando los tornillos de seguridad.
2. Conecte la herramienta de servicio al vehículo mediante la toma para diagnóstico. Para conocer la ubicación exacta de la toma para diagnóstico, consulte el Manual de instrucciones del CD-ROM adjunto y la información del fabricante del vehículor.
3. El equipo recibe alimentación de la toma para diagnóstico. Cuando se conecta a la toma para diagnóstico, el equipo ejecuta una autocomprobación interna y a continuación la pantalla muestra la fecha de la versión del software actual.
1
2
OM1568
Guía de referencia rápida
ContiSys Quick Guide.book Page 25 Tuesday, September 13, 2011 1:30 PM
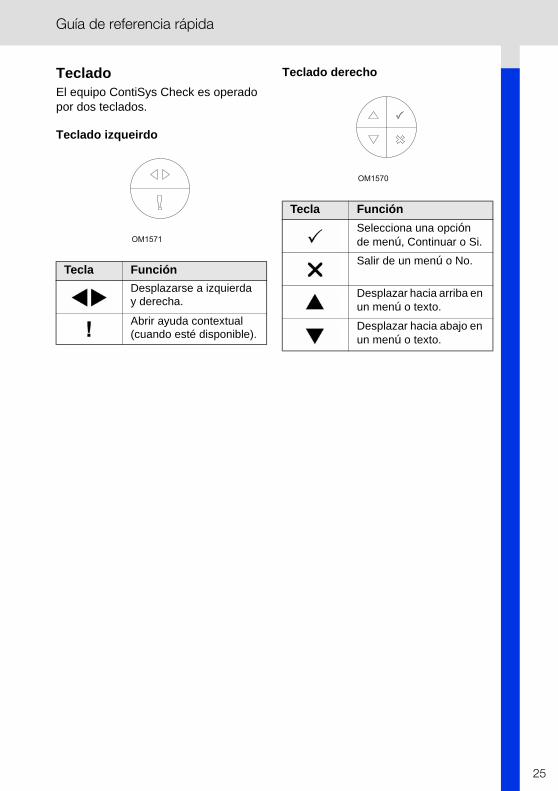
TecladoEl equipo ContiSys Check es operado por dos teclados.
Teclado izqueirdo
Teclado derecho
Tecla Función
Desplazarse a izquierda y derecha.
Abrir ayuda contextual (cuando esté disponible).
OM1571
Tecla Función
Selecciona una opción de menú, Continuar o Si.
Salir de un menú o No.
Desplazar hacia arriba en un menú o texto.
Desplazar hacia abajo en un menú o texto.
OM1570
25
Guía de referencia rápida
26
ContiSys Quick Guide.book Page 26 Tuesday, September 13, 2011 1:30 PM
Herramienta de servicio ContiSys CHECK
Introducción
Las funciones que se enumeran en el menú principal dependen de la versión de software instalada en la herramienta. Más información sobre las funciones disponibles en
www.vdo.com/contisys
Conexión
La conexión con el sistema específico se realiza mediante la toma para diagnóstico EOBD (J1962) del vehículo o con un conector específico del sistema. Consulte 'Vehicle Application List' en el CD ROM adjunto para saber cuál es el cable correcto.
Conecte el cable correcto entre la herramienta de servicio y el conector para diagnóstico del vehículo. Una vez establecida la conexión, se muestra el número de versión de software actual antes de que aparezca el menú principal.
Utilice las teclas and para seleccionar la función de menú que corresponda. Pulse para confirmar la elección y siga las instrucciones en pantalla.
Si surge algún problema de conexión, las pantallas de Ayuda sustituyen a la que indica 'Please Wait' (Espere).
Consulte las instrucciones de funcionamiento ('Operating Instructions') y la lista de aplicaciones de vehículos ('Vehicle Applications List') del CD ROM adjunto para obtener más información.
Nota: La última versión de la lista de aplicaciones de vehículos se puede descargar de
www.vdo.com
Guía de referencia rápida
ContiSys Quick Guide.book Page 27 Tuesday, September 13, 2011 1:30 PM
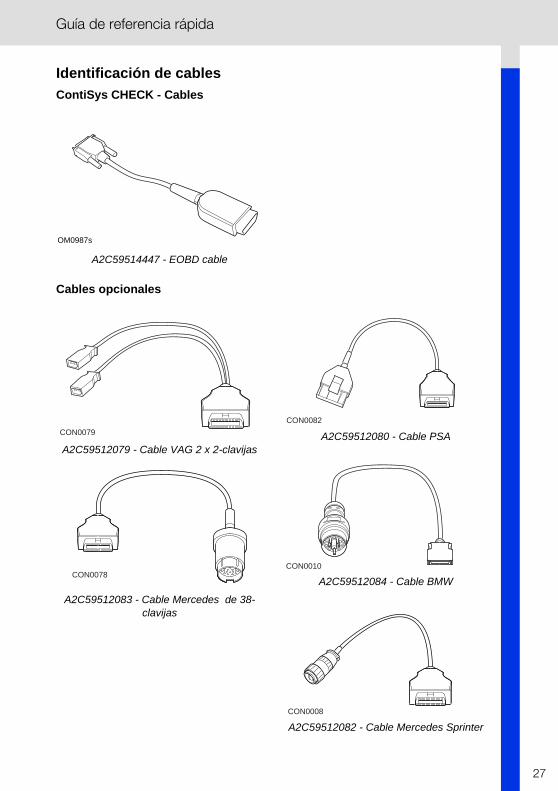
Identificación de cables
ContiSys CHECK - Cables
A2C59514447 - EOBD cable
Cables opcionales
A2C59512079 - Cable VAG 2 x 2-clavijas
A2C59512083 - Cable Mercedes de 38-clavijas
A2C59512080 - Cable PSA
A2C59512084 - Cable BMW
A2C59512082 - Cable Mercedes Sprinter
OM0987s
CON0079
CON0078
CON0082
CON0010
CON0008
27
Guía de referencia rápida
28
ContiSys Quick Guide.book Page 28 Tuesday, September 13, 2011 1:30 PM
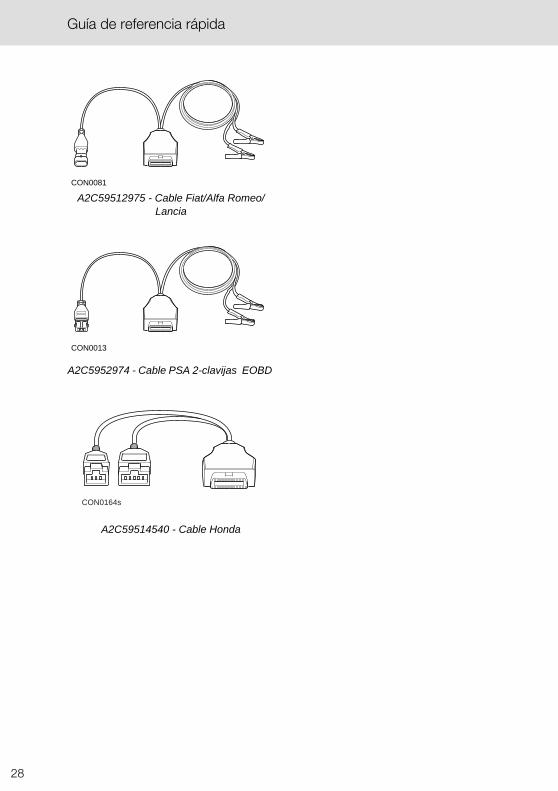
A2C59512975 - Cable Fiat/Alfa Romeo/Lancia
A2C5952974 - Cable PSA 2-clavijas EOBD
A2C59514540 - Cable Honda
CON0081
CON0013
CON0164s
Guía de referencia rápida
ContiSys Quick Guide.book Page 29 Tuesday, September 13, 2011 1:30 PM
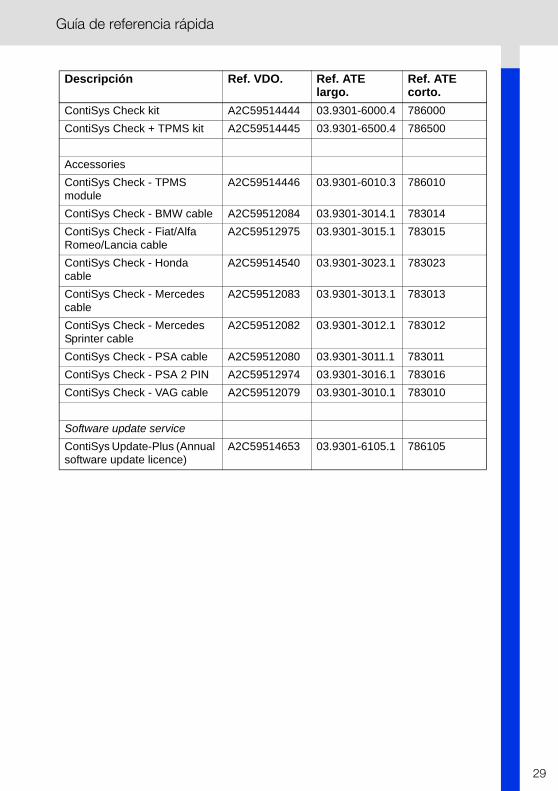
Descripción Ref. VDO. Ref. ATE largo.
Ref. ATE corto.
ContiSys Check kit A2C59514444 03.9301-6000.4 786000
ContiSys Check + TPMS kit A2C59514445 03.9301-6500.4 786500
Accessories
ContiSys Check - TPMS module
A2C59514446 03.9301-6010.3 786010
ContiSys Check - BMW cable A2C59512084 03.9301-3014.1 783014
ContiSys Check - Fiat/Alfa Romeo/Lancia cable
A2C59512975 03.9301-3015.1 783015
ContiSys Check - Honda cable
A2C59514540 03.9301-3023.1 783023
ContiSys Check - Mercedes cable
A2C59512083 03.9301-3013.1 783013
ContiSys Check - Mercedes Sprinter cable
A2C59512082 03.9301-3012.1 783012
ContiSys Check - PSA cable A2C59512080 03.9301-3011.1 783011
ContiSys Check - PSA 2 PIN A2C59512974 03.9301-3016.1 783016
ContiSys Check - VAG cable A2C59512079 03.9301-3010.1 783010
Software update service
ContiSys Update-Plus (Annual software update licence)
A2C59514653 03.9301-6105.1 786105
29
