contents - cdn.ymaws.com · landscape speci⁄cation guidelines 2 part 1: exterior landscape...
TRANSCRIPT
Landscape Specification Guidelines i Part 1: Exterior Landscape Installation
1.0 General Conditions ......................................11.1 Scope of Work .................................................................. 11.2 Standards ......................................................................... 11.3 Submittals ......................................................................... 11.4 Approvals .......................................................................... 11.5 Substitutions: Pre-bid ....................................................... 11.6 Substitutions: Post-bid ...................................................... 11.7 Utilities and Underground Features ................................... 11.8 Concealed Contingencies ................................................. 11.9 Drainage ........................................................................... 21.10 Workmanship .................................................................... 21.11 Water Supply..................................................................... 21.12 Planting Seasons .............................................................. 21.13 Inspection and Acceptance .............................................. 21.14 Warranty ........................................................................... 3
2.0 Plant Materials .............................................32.1 Scope of Work .................................................................. 32.2 Standards ......................................................................... 32.3 Inspection ......................................................................... 4
3.0 Products ........................................................43.1 Fertilizer............................................................................. 43.2 Mulch ................................................................................ 43.3 Stakes ............................................................................... 43.4 Guying Material ................................................................. 43.5 Turnbuckles ...................................................................... 53.6 Hose ................................................................................. 53.7 Clamps.............................................................................. 53.8 Cable ................................................................................ 53.9 Twine ................................................................................. 53.10 Prefabricated Tree Support Systems ................................ 53.11 Tree Wrap.......................................................................... 5
4.0 Planting Procedures for Trees ...................54.1 Preparing Tree Pit .............................................................. 54.2 Placing Tree in Pit .............................................................. 54.3 Backfilling Tree Pit ............................................................. 54.4 Pruning Details for Trees ................................................... 6
5.0 Bracing Procedures .....................................65.1 Tree Staking ...................................................................... 65.2 Typical Upright Staking Detail ........................................... 65.3 Tree Guying ....................................................................... 65.4 Typical Tree Guying Detail ................................................. 75.5 Guying With Prefabricated Cable Systems ........................ 75.6 Typical Tree Guying With Prefabricated Cable Systems .... 75.7 Tree Support Schedule ..................................................... 8
6.0 Planting Procedures for Shrubs .................86.1 Planting Shrubs ................................................................. 86.2 Planting Bare Root Material ............................................... 86.3 Planting Procedures for All Container-Grown Trees and
Shrubs .............................................................................. 8
7.0 Planting Procedures for Ground Cover, Perennials, and Annuals .............................9
7.1 Preparing Ground Cover, Perennial, and Annual Beds ...... 97.2 Planting Ground Cover, Perennials, and Annuals .............. 9
8.0 Planting Procedures for Bulbs ...................98.1 Preparing the Planting Bed ............................................... 98.2 Planting Bulbs ................................................................... 98.3 Planting Chart ................................................................. 10
9.0 Mechanical Tree Planting ......................... 109.1 General Conditions ......................................................... 109.2 Selecting Size of Mechanical Digger ............................... 109.3 Equipment ....................................................................... 109.4 Procedure ....................................................................... 109.5 Mechanical Tree Planting Detail on Level Grade ............. 119.6 Details on Transplanting Trees From Sloped Areas
to Level Areas Using a Mechanical Tree Spade .............. 119.7 Mechanical Tree Planting Detail for Sloped Areas ........... 12
10.0 Planting Above Structure and in Raised Planters ....................................................... 12
10.1 Scope of Work ................................................................ 1210.2 Related Work .................................................................. 1210.3 Testing ............................................................................ 1210.4 Products ......................................................................... 1210.5 Procedure ....................................................................... 12
11.0 Green Roofs ................................................ 13
Part 1: Exterior Landscape Installation
Contents

Landscape Specification Guidelines ii Part 1: Exterior Landscape Installation
Landscape Specification Guidelines 1 Part 1: Exterior Landscape Installation
1.0 General Conditions1.1 Scope of Work
A. The landscape contractor shall provide all materials, labor, and equipment to complete all landscape work as shown on the plans and specifications.
B. It is recommended that the landscape contractor have Landscape Industry Certified Technicians–Exterior on staff and performing the work whenever possible.
C. Total number of plants shall be drawn on the landscape plan. The landscape contractor shall state the total number of each plant with the contract price. The plant list submitted with the bid will automatically become part of the contract documents.
NOTE: If the contractor bids according to the Plant List, he/she should thoroughly check the plant list quantities with the symbols drawn on the plan to be sure there are no discrepancies. It is the landscape architect’s responsibility to be sure the plant count is correct on both the plan and the plant list, if used. Each plant grouping shall be labeled with the total number of plants per grouping by the landscape architect. If quantities are specified on a plant list, that list shall be accurate. If there is a discrepancy between the drawing and the list on the plans, the contract between the owner and the contractor shall take precedence.
D. The owner shall furnish a certified land survey of the site.
1.2 Standards
A. All plant material will conform to the current issue of the American Standard for Nursery Stock, published by AmericanHort (formerly ANLA).
B. Plant material must be selected from nurseries that have been inspected and certified by state plant inspectors.
C. Collected material may be used only when approved by owner’s representative.
D. Nomenclature will be in accordance with Hortus III, by L.H. Bailey.
1.3 Submittals
When requested by the owner or owner’s representative, samples of all materials other than plants shall be submitted to the owner’s designated representative for approval.
1.4 Approvals
All approvals shall be in writing.
1.5 Substitutions: Pre-bid
It is the landscape contractor’s responsibility to make every reasonable effort to find the material specified by the architect. The landscape contractor is responsible for qualifying his/her proposal to document any plant suitability or availability problems. The landscape contractor may offer substitutions to the landscape architect for his/her consideration. The landscape contractor will notify the landscape architect if there are known diseases or insect-resistant species that can be substituted for a selected pest-prone plant. The contractor shall submit a base bid as per plan, plus price clarifications for all recommended substitutions.
1.6 Substitutions: Post-bid
The intent is to eliminate post-bid substitutions. However, in the event that the contract material has become unavailable, an appropriate substitution must be approved by the owner’s representative.
1.7 Utilities and Underground Features
A. The landscape contractor shall notify utility companies and/or the general contractor in advance of construction to locate utilities (Miss Utility: www.missutility.net for MD, DC, and DE or http://va811.com for VA).
B. Street lighting and other private utilities, including cable TV, communication lines, etc., shall be located by the owner or general contractor.
C. If there is a conflict with the utilities and the planting, the landscape architect shall be responsible for relocating plants prior to the planting process. Any costs due to relocating after planting shall be borne by the owner.
D. Underground features, including, but not limited to, existing irrigation, septic systems, drain systems, invisible pet fencing, landscape lighting, underground natural gas, and security systems shall be located by the owner or general contractor.
1.8 Concealed Contingencies
The correction of undisclosed subsurface conditions, including, but not limited to, rock, roots, stumps, water, clay pan, soils contaminated with toxic substances, or other obstacles encountered in excavation work, that are not apparent at the time of estimating will result in additional costs to the owner. Upon discovery of undisclosed conditions, the landscape contractor shall notify the owner, with written approval regarding any additional costs, before corrective measures are taken.
Landscape Specification Guidelines 2 Part 1: Exterior Landscape Installation
1.9 Drainage
If plants are to be installed in areas that show obvious poor drainage, and the plants are inappropriate for that condition, the landscape contractor shall notify the landscape architect and owner. If deemed necessary, the plants shall be relocated, the contract shall be adjusted to allow for drainage correction at a negotiated cost, or the plant selection shall be modified by the landscape architect to accommodate the poor drainage situation.
1.10 Workmanship
A. During delivery and installation, the landscape contractor shall perform in a professional manner, coordinating his/her activities so as not to interfere unduly with the work of other trades, and leaving his/her work area(s) clean of litter and debris at the close of each workday.
B. During planting, all areas shall be kept neat and clean, and precautions shall be taken to avoid damage to existing plants, large trees, turf, and structures. Where existing trees are to be preserved, additional precautions should be taken to avoid unnecessary accumulation of excavated materials, soil compaction, or root damage. See Landscape Specification Guidelines Part 8: Tree Preservation.
C. Upon completion, all debris and waste material resulting from planting operations shall be removed from the project and the area cleaned up.
D. Any damaged areas caused by the landscape contractor shall be restored to their original condition.
1.11 Water Supply
The owner shall supply water on site at no cost. If the landscape contractor has to supply water to the site, it shall be at an additional cost.
1.12 Planting Seasons
A professional horticulturist, nursery professional, or arborist shall be consulted to determine the proper time, based on plant species, climate, and weather conditions, (e.g. frozen ground, oversaturation) to move and install particular plant material to minimize stress to the plant. It is safe to plant year-round if certain criteria are followed. Plant material moved out of the normal planting season may require special treatment and will result in additional expense to the owner. The following guidelines should aid the landscape contractor and landscape architect in determining what and when to plant:
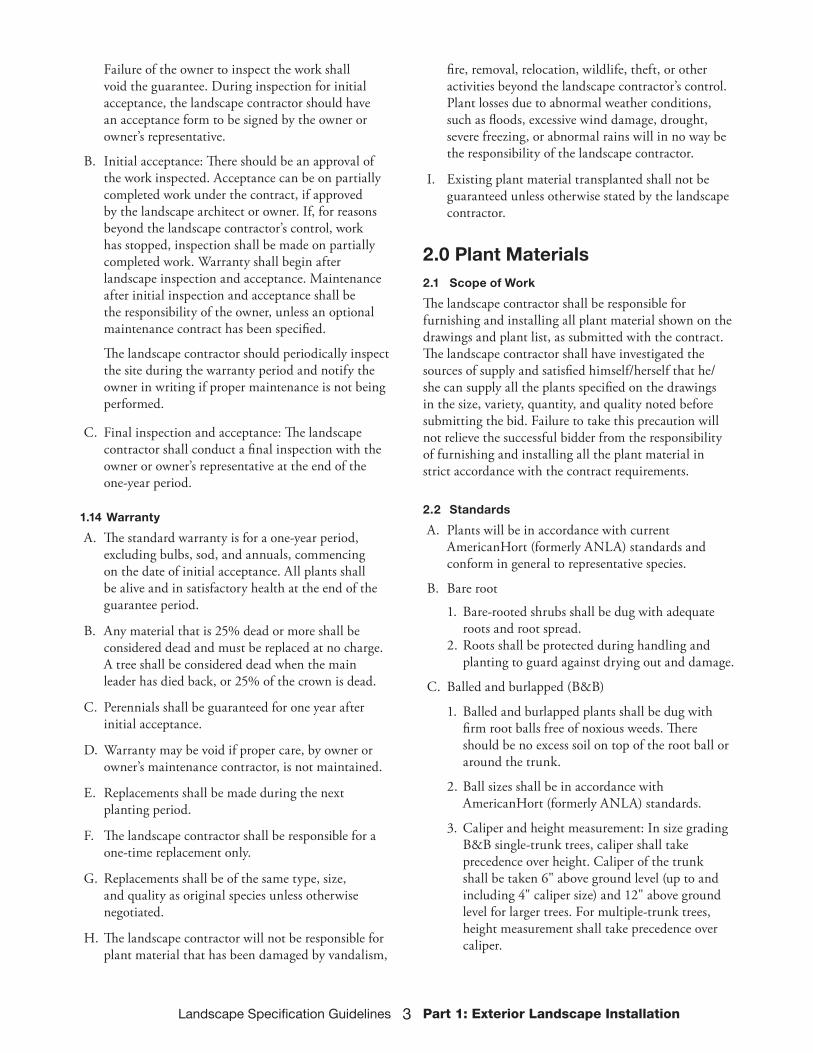
A. Stress Chart for B&B Deciduous Material
B. All woody plant material dug in full foliage between the months of May and September shall be handled in one of the following ways to harden-off:
1. Properly harden-off in the field 7–10 days prior to digging by a gradual process of trenching and soaking, leaving the bottom surface of the ball attached to soil until shipping.
2. Condition under irrigation in partial shade or sun for at least four days prior to shipping.
C. Container-grown and B&B deciduous material can be planted year-round, provided it receives adequate irrigation for the first growing season.
D. Herbaceous perennials and summer flowering bulbs can be installed as soon as the ground is workable in spring until November 15. Plants installed after November 15 require protective, supplemental mulch applied after December 15 and removed March 1.
E. Cold-sensitive annuals can be installed after danger of frost has passed.
F. Spring-flowering bulbs can be installed between September 15 and December 31.
G. Field-grown, balled and burlapped Red, White, Willow, and Scarlet Oaks; Dogwood; Sweet Gum; Leyland Cypress; and White Pine, and all broadleaf evergreens should be planted between March 1 and October 30 based on normal climatic conditions.
1.13 Inspection and Acceptance
A. Inspection: There should be a verification of performance for work by contract documents, to be conducted by the architect or owner’s representative on site and in the presence of the landscape contractor, for the purpose of acceptance. Inspection shall be made within two (2) weeks of written notification from the landscape contractor.
Lowest Risk
Highest Risk
1. Deciduous plants dug and planted while dormant in spring or fall except for those listed in G. below.
2. Deciduous plants dug during dormancy and planted after producing leaves, provided they have been properly stored.
3. Deciduous plants dug after leaves have fully expanded and hardened off.
4. Deciduous plants dug in the spring during newly expanding leaf production.
Landscape Specification Guidelines 3 Part 1: Exterior Landscape Installation
Failure of the owner to inspect the work shall void the guarantee. During inspection for initial acceptance, the landscape contractor should have an acceptance form to be signed by the owner or owner’s representative.
B. Initial acceptance: There should be an approval of the work inspected. Acceptance can be on partially completed work under the contract, if approved by the landscape architect or owner. If, for reasons beyond the landscape contractor’s control, work has stopped, inspection shall be made on partially completed work. Warranty shall begin after landscape inspection and acceptance. Maintenance after initial inspection and acceptance shall be the responsibility of the owner, unless an optional maintenance contract has been specified.
The landscape contractor should periodically inspect the site during the warranty period and notify the owner in writing if proper maintenance is not being performed.
C. Final inspection and acceptance: The landscape contractor shall conduct a final inspection with the owner or owner’s representative at the end of the one-year period.
1.14 Warranty
A. The standard warranty is for a one-year period, excluding bulbs, sod, and annuals, commencing on the date of initial acceptance. All plants shall be alive and in satisfactory health at the end of the guarantee period.
B. Any material that is 25% dead or more shall be considered dead and must be replaced at no charge. A tree shall be considered dead when the main leader has died back, or 25% of the crown is dead.
C. Perennials shall be guaranteed for one year after initial acceptance.
D. Warranty may be void if proper care, by owner or owner’s maintenance contractor, is not maintained.
E. Replacements shall be made during the next planting period.
F. The landscape contractor shall be responsible for a one-time replacement only.
G. Replacements shall be of the same type, size, and quality as original species unless otherwise negotiated.
H. The landscape contractor will not be responsible for plant material that has been damaged by vandalism,
fire, removal, relocation, wildlife, theft, or other activities beyond the landscape contractor’s control. Plant losses due to abnormal weather conditions, such as floods, excessive wind damage, drought, severe freezing, or abnormal rains will in no way be the responsibility of the landscape contractor.
I. Existing plant material transplanted shall not be guaranteed unless otherwise stated by the landscape contractor.
2.0 Plant Materials2.1 Scope of Work
The landscape contractor shall be responsible for furnishing and installing all plant material shown on the drawings and plant list, as submitted with the contract. The landscape contractor shall have investigated the sources of supply and satisfied himself/herself that he/she can supply all the plants specified on the drawings in the size, variety, quantity, and quality noted before submitting the bid. Failure to take this precaution will not relieve the successful bidder from the responsibility of furnishing and installing all the plant material in strict accordance with the contract requirements.
2.2 Standards
A. Plants will be in accordance with current AmericanHort (formerly ANLA) standards and conform in general to representative species.
B. Bare root
1. Bare-rooted shrubs shall be dug with adequate roots and root spread.
2. Roots shall be protected during handling and planting to guard against drying out and damage.
C. Balled and burlapped (B&B)
1. Balled and burlapped plants shall be dug with firm root balls free of noxious weeds. There should be no excess soil on top of the root ball or around the trunk.
2. Ball sizes shall be in accordance with AmericanHort (formerly ANLA) standards.
3. Caliper and height measurement: In size grading B&B single-trunk trees, caliper shall take precedence over height. Caliper of the trunk shall be taken 6" above ground level (up to and including 4" caliper size) and 12" above ground level for larger trees. For multiple-trunk trees, height measurement shall take precedence over caliper.
Landscape Specification Guidelines 4 Part 1: Exterior Landscape Installation
D. Container-grown stock
1. The size of container-grown shrubs is measured by height and width of plant. Herbaceous perennials shall be measured by pot size, not top growth. The root system of container-grown plants shall be well developed and well distributed throughout the container.
2. All container-grown trees and shrubs that have circling and matted roots shall be treated in the following manner prior to planting: using a knife or sharp blade, make 4–5 cuts, 1" deep, the length of the root ball, to cut all circling roots. See section 6.3 (Planting Procedures For All Container-Grown Trees and Shrubs) in this guideline.
3. All container-grown plants should be grouped and watered adequately until they are planted in the landscape. To properly acclimate to new conditions after being planted in soil, soil must remain moist. Water twice weekly or at four-day intervals until the equivalent of one inch of rainfall or supplemental irrigation is received.
E. Root control bags—trees and shrubs: Plants grown in root control bags may be slightly larger than root ball sizes identified by AmericanHort (formerly ANLA) standards. Before transplanting these into the landscape, the geotextile bag must be completely removed from around the root ball and the tree properly staked. See section 5.2 (Typical Upright Staking Detail) in this guideline. Adequate irrigation is essential to root control bagged trees and shrubs.
F. Trees shall be nursery-grown unless otherwise specified. Pruning shall be done before planting or during the planting operation. See section 4.4 (Pruning Details for Trees) in this guideline.
G. All plant material in transit shall be covered to keep material from drying out. The covering shall comply with state and local laws pertaining to the transport of materials.
2.3 Inspection
A. Plants may be subject to inspection and approval by the owner or owner’s representative at the place of growth or holding yard for conformity to specification requirements as to quality, size, and variety. It is the landscape contractor’s responsibility to know his/her sources. The landscape contractor shall select plants ahead of inspection visits to prevent rejection of materials delivered to the site. Cost of inspection visits shall be borne by each individual party.
B. Plants damaged in handling or transportation can be rejected by the owner or owner’s representative.
C. Plants with soil excessively covering the root flare, if not removed, can be rejected by the owner or owner’s representative.
D. Any plant material inspected at the place of growth, accepted, and tagged by the owner’s representative that has not been damaged during transportation cannot be rejected at the site as long as the tag remains attached to the plant.
E. State nursery inspection certificates shall be furnished to the landscape architect upon request.
3.0 Products3.1 Fertilizer
A. Perform a soil test to determine nutrient requirements. Apply fertilizer based on soil test results and recommendations.
B. Slow-release fertilizer should be the preferred type. The technical data sheet or label on the fertilizer should show that a minimum of 50% of the nitrogen source is water insoluble (WIN) and the salt index is less than 50. (Note: Salt index is relative to sodium nitrate, with a salt index of 100.)
3.2 Mulch
A. Organic material including shredded hardwood bark and ground wood waste shall be composted and mature. (Reference: Landscape Specification Guidelines Part 7: Soils, Section 2.1, Organic Amendments)
B. Organic material shall be uniform in size and free of foreign matter.
C. Pine bark, pine needles, cypress bark, redwood bark, and cocoa shell do not need to be composted.
3.3 Stakes
Stakes shall be 2" x 2" hardwood or approved equal. See section 5.7, Tree Support Schedule in this guideline for proper stake length.
3.4 Guying Material
A. Wire: 12 or 14 gauge galvanized steel or acceptable equal, depending on size of tree.
B. See section 5.7 (Tree Support Schedule) in this guideline.
C. Non-wire tie: Flat, woven, smooth, elastic tie material (e.g., ArborTie®).
Landscape Specification Guidelines 5 Part 1: Exterior Landscape Installation
3.5 Turnbuckles
Turnbuckles shall be galvanized steel or zinc-coated. See section 5.7 (Tree Support Schedule) in this guideline.
3.6 Hose
Hose shall be corded rubber, uniform in color and either 1/2" or 3/4" depending on the size of the tree. Other methods, such as straps or plastic chain locks, may be used where acceptable. See section 5.7 (Tree Support Schedule) in this guideline.
3.7 Clamps
Clamps shall be galvanized, zinc- or vinyl-coated, and large enough to hold the wire or cable used.
3.8 Cable
Cable shall be galvanized steel. Level of strength and diameter depend on size of tree. See section 5.7 (Tree Support Schedule) in this guideline.
3.9 Twine
Twine shall be 2–3-ply jute or an approved equal and biodegradable.
3.10 Prefabricated Tree Support Systems
Steel anchors. See section 5.7 (Tree Support Schedule) in this guideline.
3.11 Tree Wrap
It is recommended that smooth bark trees be wrapped during dormant installation and removed when canopy is in leaf.
4.0 Planting Procedures for Trees4.1 Preparing Tree Pit
A. Walls of tree pit shall be dug so that they are vertical or sloping outward in heavy soils, and scarified.
B. The tree pit must be wide enough to adequately compact soil on every side of the tree’s root ball.
C. The tree pit shall be deep enough to allow 1/8 of the ball to be above the existing grade. Plants shall rest on undisturbed existing soil or well-compacted backfill.
D. Pits for bare-rooted trees shall only be broad enough to accommodate the roots fully extended and only deep enough so that the uppermost roots will be just below the original grade.
E. If poor drainage is suspected, a percolation test may be required. A 12-inch wide by 18-inch deep hole
must be filled with water, and eight hours later, the hole should be empty. Sub drainage may be needed if the hole does not drain properly in eight hours.
4.2 Placing Tree in Pit
A. Identify the root flare and remove excess soil if necessary.
B. Place the tree in the pit carrying the ball and then lower it into the pit. Never lift the tree by the trunk or branches.
C. Set the tree straight and in the center of the pit with the most desirable side facing toward the prominent view.
D. For bare-rooted trees, set the tree in the pit so that all roots, when fully extended, will not touch the walls of the planting pit and the uppermost root is just below the original grade.
E. Remove containers from all container-grown trees. Slash the edges of the root balls from top to bottom, at least 1" deep, as described in section 6.3 (Planting Procedures for All Container-Grown Trees and Shrubs) in this guideline. The slashing of roots may not be required for plants grown in a CelluGRO™ system, in root containment bags, or in air-root-pruned containment systems.
4.3 Backfilling Tree Pit
A. Each site is unique. Soil tests should be used to identify special conditions. Backfill mixture for trees and shrubs shall be 3/4 existing soil mixed with 1/4 organic material, plus granular fertilizer. If compost is used, omit the granular fertilizer.
B. If any other additives are found to be needed at the time of planting, it shall be with the approval of the landscape contractor, landscape architect, and owner or owner’s representative at an additional negotiated cost.
C. Backfill tree pit with a soil mixture stated in the specifications, except where existing soil is suitable according to soil test results.
D. At the time of installation, you must cut and remove rope or wire back to the edge of the ball. Remove as much burlap, woven products, and twine as possible. All plastic or synthetic film or twine must be removed from the root ball. Cut all twine away from trunk. It is recommended that all materials be removed or pulled back 12" below the top of the root ball.
E. The tree must remain straight during backfilling procedure.
Landscape Specification Guidelines 6 Part 1: Exterior Landscape Installation
F. Thoroughly mix soil amendments, if needed, either prior to filling pit or as pit is being filled.
G. Backfill sides of tree pit halfway with soil mixture and tamp as pit is being filled. Do not over compact top 2/3 of planting mixture.
H. Finish backfilling sides of tree pit and tamp firmly.
I. Never cover top of root ball with soil.
J. Form a saucer above existing grade, around the outer rim of the tree pit, especially on slopes and in heavy soils.
K. Mulch top of root ball and saucer to a minimum depth of 2", not to exceed 3". Do not place mulch against the trunk.
L. Water thoroughly on the interior of the tree saucer until it is filled, even if it is raining. A second watering may be necessary to ensure saturation of the root ball and elimination of air pockets. An alternative watering method is to backfill half the pit, flood the pit, and completely backfill afterwards. Slow-release watering devices or automatic drip irrigation systems will improve survival.
M. Remove all tags, labels, strings, and wire from the tree, unless otherwise directed.
4.4 Pruning Details for Trees
A. Pruning should be restricted to corrective pruning only, including, but not limited to, dead/dying and/or crossing branches.
B. Do not cut main leader.
C. Make all cuts back to a lateral branch or bud. Cuts should be perpendicular above branch collar. See Landscape Specification Guidelines Part 2: Exterior Landscape Maintenance.
D. Final pruning shall be done after tree is in place.
5.0 Bracing Procedures5.1 Tree Staking
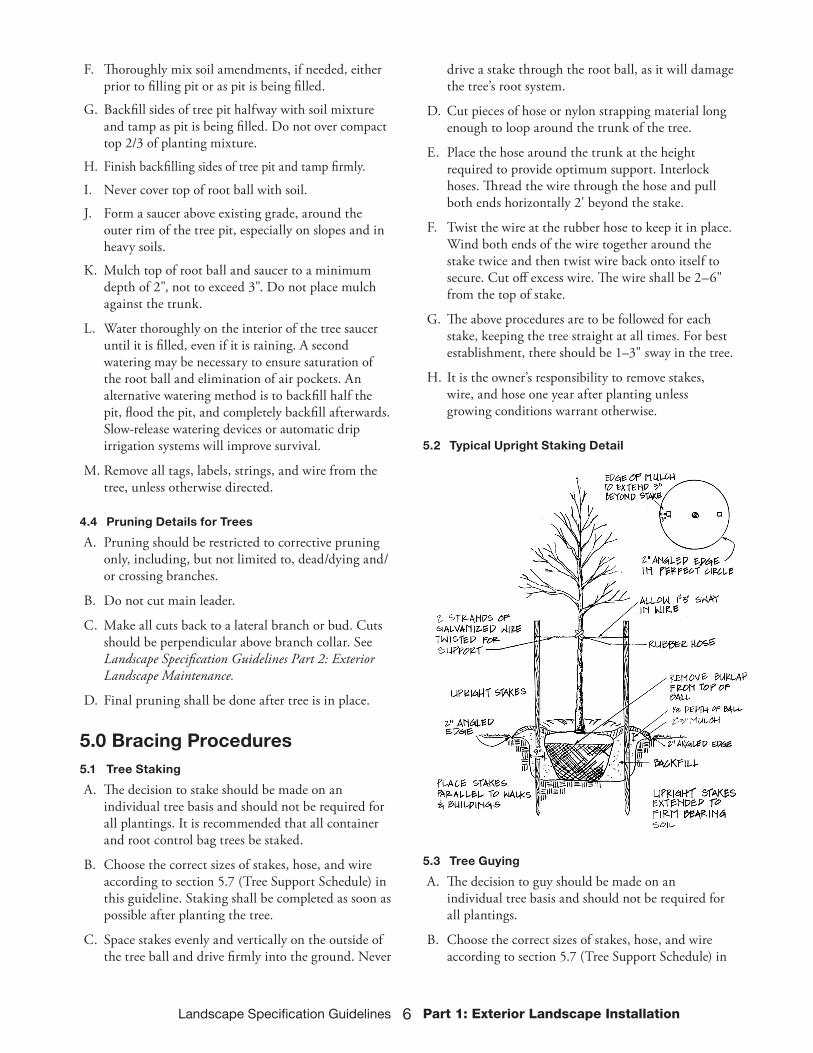
A. The decision to stake should be made on an individual tree basis and should not be required for all plantings. It is recommended that all container and root control bag trees be staked.
B. Choose the correct sizes of stakes, hose, and wire according to section 5.7 (Tree Support Schedule) in this guideline. Staking shall be completed as soon as possible after planting the tree.
C. Space stakes evenly and vertically on the outside of the tree ball and drive firmly into the ground. Never
drive a stake through the root ball, as it will damage the tree’s root system.
D. Cut pieces of hose or nylon strapping material long enough to loop around the trunk of the tree.
E. Place the hose around the trunk at the height required to provide optimum support. Interlock hoses. Thread the wire through the hose and pull both ends horizontally 2' beyond the stake.
F. Twist the wire at the rubber hose to keep it in place. Wind both ends of the wire together around the stake twice and then twist wire back onto itself to secure. Cut off excess wire. The wire shall be 2–6" from the top of stake.
G. The above procedures are to be followed for each stake, keeping the tree straight at all times. For best establishment, there should be 1–3" sway in the tree.
H. It is the owner’s responsibility to remove stakes, wire, and hose one year after planting unless growing conditions warrant otherwise.
5.2 Typical Upright Staking Detail
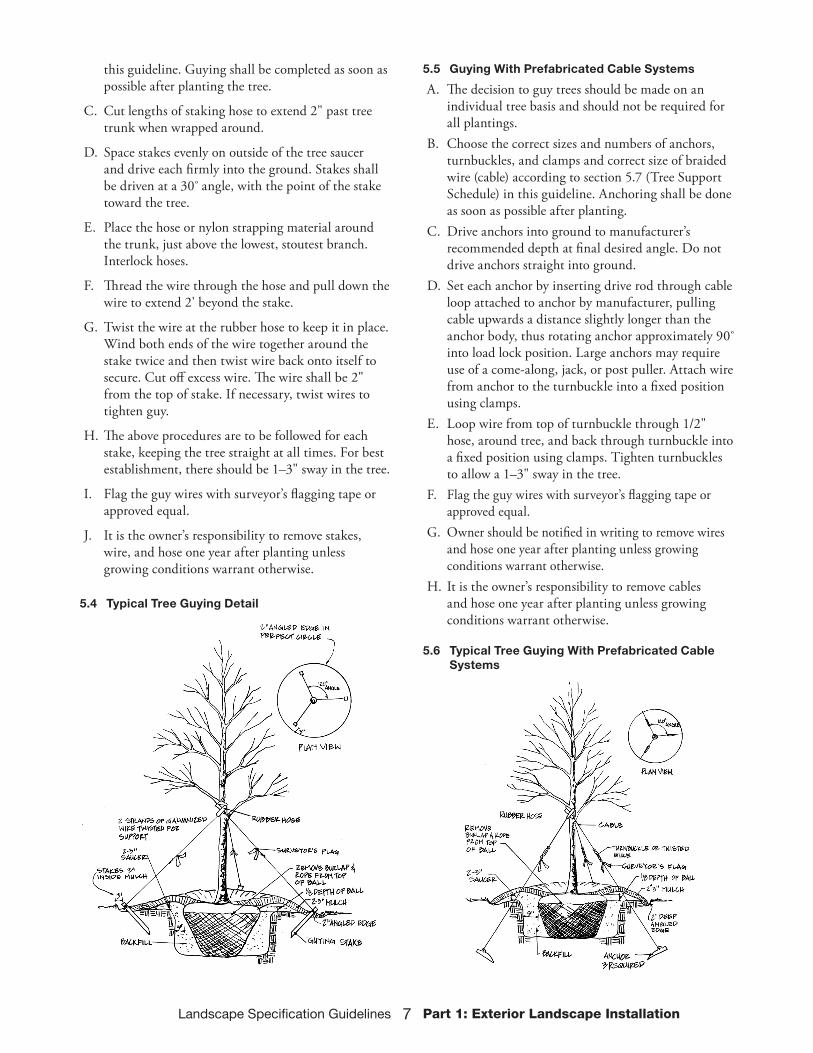
5.3 Tree Guying
A. The decision to guy should be made on an individual tree basis and should not be required for all plantings.
B. Choose the correct sizes of stakes, hose, and wire according to section 5.7 (Tree Support Schedule) in
Landscape Specification Guidelines 7 Part 1: Exterior Landscape Installation
this guideline. Guying shall be completed as soon as possible after planting the tree.
C. Cut lengths of staking hose to extend 2" past tree trunk when wrapped around.
D. Space stakes evenly on outside of the tree saucer and drive each firmly into the ground. Stakes shall be driven at a 30º angle, with the point of the stake toward the tree.
E. Place the hose or nylon strapping material around the trunk, just above the lowest, stoutest branch. Interlock hoses.
F. Thread the wire through the hose and pull down the wire to extend 2' beyond the stake.
G. Twist the wire at the rubber hose to keep it in place. Wind both ends of the wire together around the stake twice and then twist wire back onto itself to secure. Cut off excess wire. The wire shall be 2" from the top of stake. If necessary, twist wires to tighten guy.
H. The above procedures are to be followed for each stake, keeping the tree straight at all times. For best establishment, there should be 1–3" sway in the tree.
I. Flag the guy wires with surveyor’s flagging tape or approved equal.
J. It is the owner’s responsibility to remove stakes, wire, and hose one year after planting unless growing conditions warrant otherwise.
5.4 Typical Tree Guying Detail
5.5 Guying With Prefabricated Cable Systems
A. The decision to guy trees should be made on an individual tree basis and should not be required for all plantings.
B. Choose the correct sizes and numbers of anchors, turnbuckles, and clamps and correct size of braided wire (cable) according to section 5.7 (Tree Support Schedule) in this guideline. Anchoring shall be done as soon as possible after planting.
C. Drive anchors into ground to manufacturer’s recommended depth at final desired angle. Do not drive anchors straight into ground.
D. Set each anchor by inserting drive rod through cable loop attached to anchor by manufacturer, pulling cable upwards a distance slightly longer than the anchor body, thus rotating anchor approximately 90º
into load lock position. Large anchors may require use of a come-along, jack, or post puller. Attach wire from anchor to the turnbuckle into a fixed position using clamps.
E. Loop wire from top of turnbuckle through 1/2" hose, around tree, and back through turnbuckle into a fixed position using clamps. Tighten turnbuckles to allow a 1–3" sway in the tree.
F. Flag the guy wires with surveyor’s flagging tape or approved equal.
G. Owner should be notified in writing to remove wires and hose one year after planting unless growing conditions warrant otherwise.
H. It is the owner’s responsibility to remove cables and hose one year after planting unless growing conditions warrant otherwise.
5.6 Typical Tree Guying With Prefabricated Cable Systems
Landscape Specification Guidelines 8 Part 1: Exterior Landscape Installation
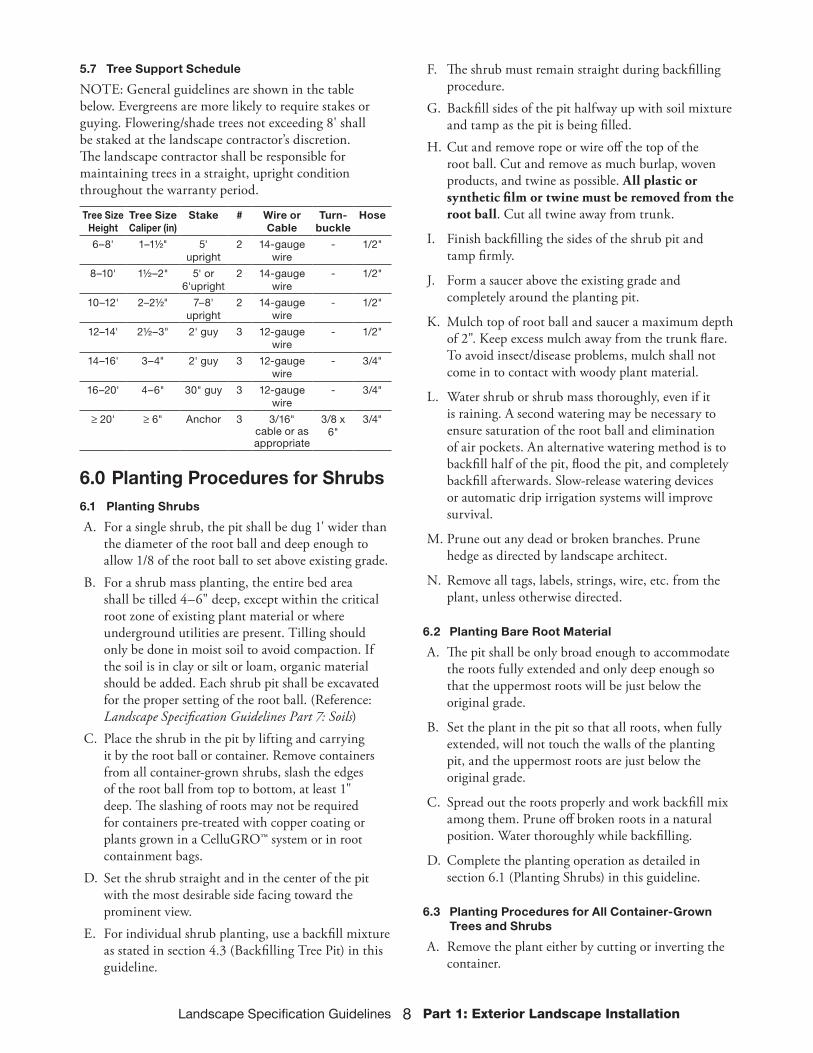
5.7 Tree Support Schedule
NOTE: General guidelines are shown in the table below. Evergreens are more likely to require stakes or guying. Flowering/shade trees not exceeding 8' shall be staked at the landscape contractor’s discretion. The landscape contractor shall be responsible for maintaining trees in a straight, upright condition throughout the warranty period.
Tree Size Height
Tree SizeCaliper (in)
Stake # Wire or Cable
Turn-buckle
Hose
6–8' 1–1½" 5' upright
2 14-gauge wire
- 1/2"
8–10' 1½–2" 5' or 6'upright
2 14-gauge wire
- 1/2"
10–12' 2–2½" 7–8'upright
2 14-gauge wire
- 1/2"
12–14' 2½–3" 2' guy 3 12-gauge wire
- 1/2"
14–16' 3–4" 2' guy 3 12-gauge wire
- 3/4"
16–20' 4–6" 30" guy 3 12-gauge wire
- 3/4"
≥ 20' ≥ 6" Anchor 3 3/16" cable or as appropriate
3/8 x 6"
3/4"
6.0 Planting Procedures for Shrubs6.1 Planting Shrubs
A. For a single shrub, the pit shall be dug 1' wider than the diameter of the root ball and deep enough to allow 1/8 of the root ball to set above existing grade.
B. For a shrub mass planting, the entire bed area shall be tilled 4–6" deep, except within the critical root zone of existing plant material or where underground utilities are present. Tilling should only be done in moist soil to avoid compaction. If the soil is in clay or silt or loam, organic material should be added. Each shrub pit shall be excavated for the proper setting of the root ball. (Reference: Landscape Specification Guidelines Part 7: Soils)
C. Place the shrub in the pit by lifting and carrying it by the root ball or container. Remove containers from all container-grown shrubs, slash the edges of the root ball from top to bottom, at least 1" deep. The slashing of roots may not be required for containers pre-treated with copper coating or plants grown in a CelluGRO™ system or in root containment bags.
D. Set the shrub straight and in the center of the pit with the most desirable side facing toward the prominent view.
E. For individual shrub planting, use a backfill mixture as stated in section 4.3 (Backfilling Tree Pit) in this guideline.
F. The shrub must remain straight during backfilling procedure.
G. Backfill sides of the pit halfway up with soil mixture and tamp as the pit is being filled.
H. Cut and remove rope or wire off the top of the root ball. Cut and remove as much burlap, woven products, and twine as possible. All plastic or synthetic film or twine must be removed from the root ball. Cut all twine away from trunk.
I. Finish backfilling the sides of the shrub pit and tamp firmly.
J. Form a saucer above the existing grade and completely around the planting pit.
K. Mulch top of root ball and saucer a maximum depth of 2". Keep excess mulch away from the trunk flare. To avoid insect/disease problems, mulch shall not come in to contact with woody plant material.
L. Water shrub or shrub mass thoroughly, even if it is raining. A second watering may be necessary to ensure saturation of the root ball and elimination of air pockets. An alternative watering method is to backfill half of the pit, flood the pit, and completely backfill afterwards. Slow-release watering devices or automatic drip irrigation systems will improve survival.
M. Prune out any dead or broken branches. Prune hedge as directed by landscape architect.
N. Remove all tags, labels, strings, wire, etc. from the plant, unless otherwise directed.
6.2 Planting Bare Root Material
A. The pit shall be only broad enough to accommodate the roots fully extended and only deep enough so that the uppermost roots will be just below the original grade.
B. Set the plant in the pit so that all roots, when fully extended, will not touch the walls of the planting pit, and the uppermost roots are just below the original grade.
C. Spread out the roots properly and work backfill mix among them. Prune off broken roots in a natural position. Water thoroughly while backfilling.
D. Complete the planting operation as detailed in section 6.1 (Planting Shrubs) in this guideline.
6.3 Planting Procedures for All Container-Grown Trees and Shrubs
A. Remove the plant either by cutting or inverting the container.
Landscape Specification Guidelines 9 Part 1: Exterior Landscape Installation
B. For untreated plastic container-grown plants with circling roots, use a sharp knife to make four or five 1" cuts the length of the root ball.
C. Plant shrub or tree a minimum of 1/8 of the height of the root ball above existing grade.
D. Apply no more than a 2" thick layer of approved mulch.
E. Plants grown in root containment bags must have the bags removed during the planting operation. No additional slashing of the root ball is necessary.
7.0 Planting Procedures for Ground Cover, Perennials, and Annuals
7.1 Preparing Ground Cover, Perennial, and Annual Beds
A. The planting bed shall be loosened by tilling when the soil is moist prior to planting. Soil shall be loosened to a depth of 4–6"except within the critical root zone of existing plant material or where underground utilities are present.
B. Organic matter shall be spread over the bed to a depth of 2" after the soil has been loosened. The organic matter shall then be worked into the bed by tilling. (Reference: Landscape Specification Guidelines Part 7: Soils)
C. Fertilizer shall be top-dressed over annual bed area (except when compost is applied) based on soil test results. In the establishment stage, liquid fertilizer may be applied to annuals, as directed by owner or landscape architect.
D. The entire bed shall be mulched to a minimum depth of 1" (2" maximum) with approved mulch, such as pine fines, pine needles, or unscreened compost.
7.2 Planting Ground Cover, Perennials, and Annuals
A. Before planting, biodegradable pots shall be split, and non biodegradable pots shall be removed. Root systems of all potted plants shall be split or crumbled.
B. The plants, either potted or bare root, shall be installed so that the roots are surrounded by soil below the mulch. Potted plants shall be set so that the top of the pot is even with the existing grade. The roots of bare root plants shall be covered to the crown.
C. Spacing of plants shall be installed as noted on the landscape plan or contract.
D. The entire planting bed shall be thoroughly watered.
E. Treat the planted bed with a pre-emergent, soil-applied herbicide, per label instructions, unless otherwise directed by the owner or landscape architect. Apply the pre-emergent herbicide only when all foliage is dry to prevent foliar burn.
8.0 Planting Procedures for Bulbs8.1 Preparing the Planting Bed
A. The planting bed shall be loosened prior to planting by tilling when the soil is moist, except within the critical root zone of existing plant material or where underground utilities are present. Depth of loosening depends on bulb species. See section 8.3 (Bulb Planting Chart) in this guideline.
B. Organic matter shall be spread over the bed to a depth of 2" after the soil has been loosened. The organic matter shall then be worked into the bed by tilling.
C. Fertilizer shall be incorporated into the soil, except when compost is used, to the planting depth of perennials and bulbs. The fertilizer rate will be based on the results of the soil test. Annual bulbs do not require fertilizer.
D. The entire bed shall be mulched to a minimum depth of 1" (2" maximum) with approved mulch.
8.2 Planting Bulbs
A. Bulbs shall be installed by one of the following methods:1. The bulb-planting hole shall be dug through the
mulch with a hand trowel, bulb planter, or power auger.
2. Excavate to the recommended planting depth. Set out the bulbs and then cover the bulbs with soil.
3. Bulbs used as a single season display may be planted at a lesser depth.
B. Bulbs shall be planted so that the basal plate faces down in the planting hole.
C. Spacing of bulbs shall be installed as noted on the landscape plan or contract.
D. Treat the planted bed with a pre-emergent approved for bulbs, as per label instructions.
Landscape Specification Guidelines 10 Part 1: Exterior Landscape Installation
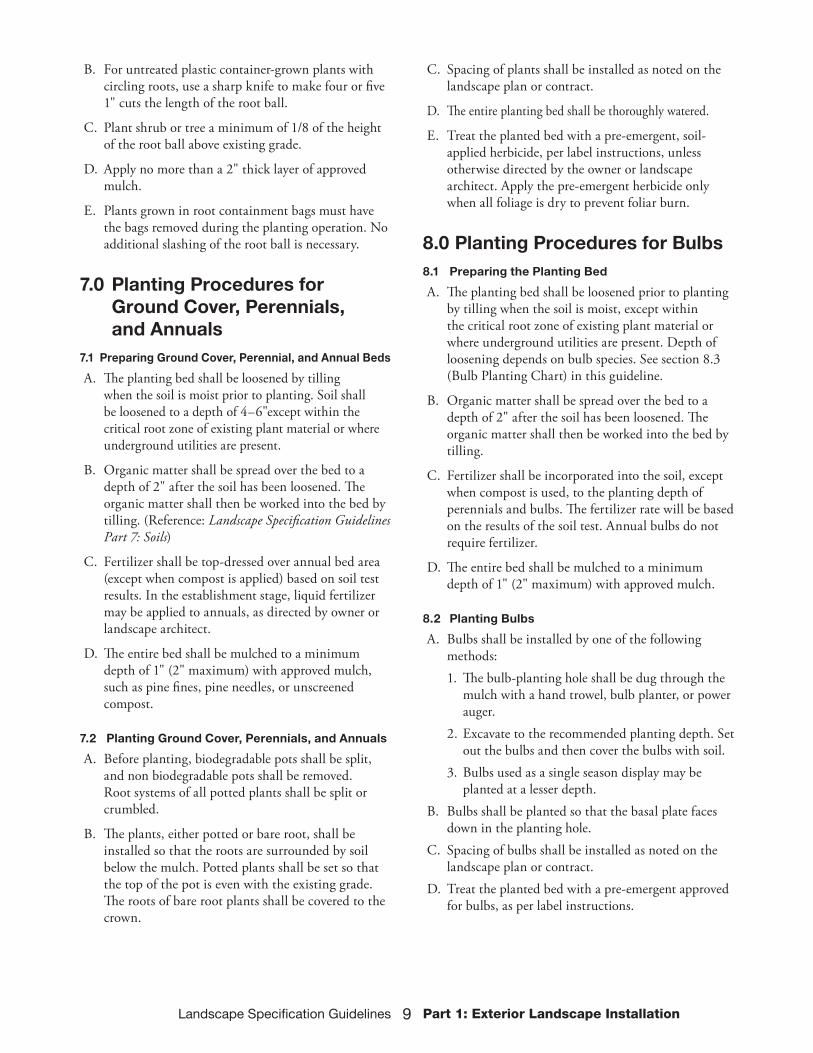
8.3 Planting ChartBulbs, Perennials, Tubers, Corns, Rhizomes
Reprinted by permission from Landscape Designer & Estimator’s Guide. (Revised Edition) written by National Landscape Association
9.0 Mechanical Tree Planting9.1 General Conditions
A. Mechanical tree planters may be used for transplanting trees and other large plants whenever practical.
9.2 Selecting Size of Mechanical Digger
A. Determine the size of the plant to be moved.B. Use caliper inch as per AmericanHort (formerly
ANLA) standards to measure all trees.C. The size of mechanical digger used will be based on
trunk diameter, species, time of year, and condition of tree and site factors.
D. Use the mechanical digger that will give a root equivalent to 9" or 10" of soil per inch of trunk diameter. Example: A 4" caliper tree should be dug with 36" or 40" tree spade to ensure proper root area during transplanting. For trees, this rule of thumb is generally used up to 10" caliper. Larger trees are generally dug with a backhoe, burlapped, and moved with a crane.
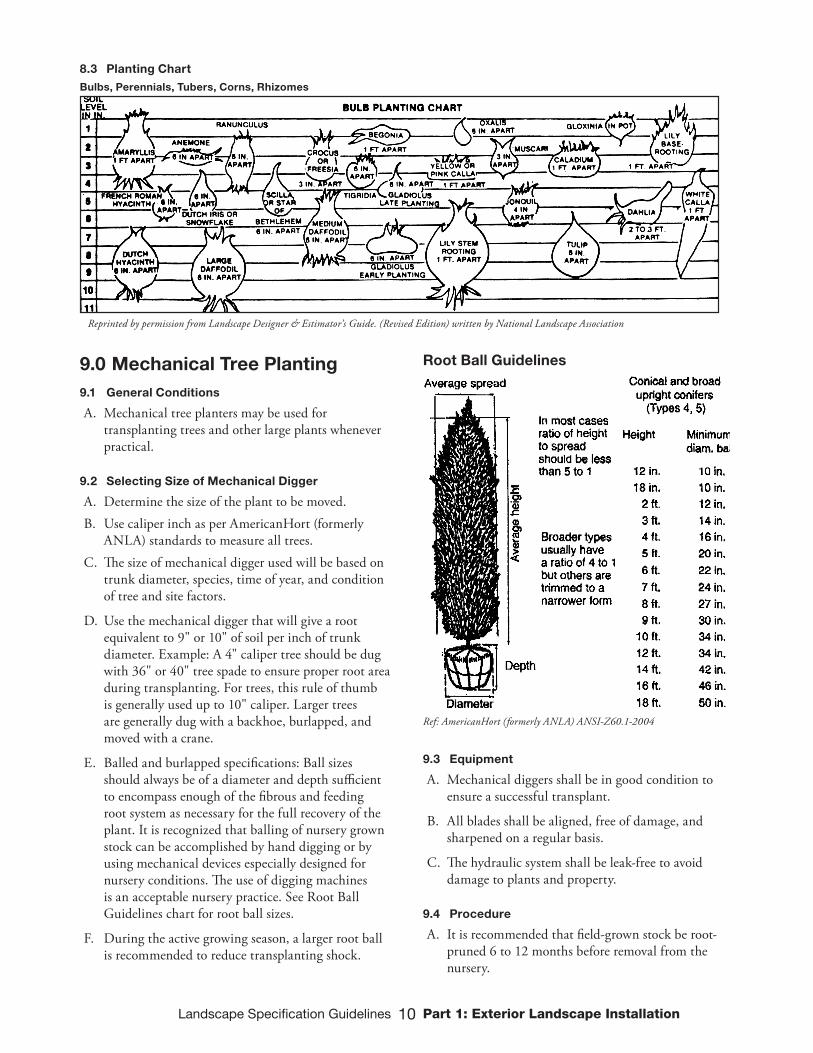
E. Balled and burlapped specifications: Ball sizes should always be of a diameter and depth sufficient to encompass enough of the fibrous and feeding root system as necessary for the full recovery of the plant. It is recognized that balling of nursery grown stock can be accomplished by hand digging or by using mechanical devices especially designed for nursery conditions. The use of digging machines is an acceptable nursery practice. See Root Ball Guidelines chart for root ball sizes.
F. During the active growing season, a larger root ball is recommended to reduce transplanting shock.
Root Ball Guidelines
Ref: AmericanHort (formerly ANLA) ANSI-Z60.1-2004
9.3 Equipment
A. Mechanical diggers shall be in good condition to ensure a successful transplant.
B. All blades shall be aligned, free of damage, and sharpened on a regular basis.
C. The hydraulic system shall be leak-free to avoid damage to plants and property.
9.4 Procedure
A. It is recommended that field-grown stock be root-pruned 6 to 12 months before removal from the nursery.
Landscape Specification Guidelines 11 Part 1: Exterior Landscape Installation
B. Before digging the tree, skim off any weeds and excess topsoil from the ball. Avoid damaging any roots or trunk. Match the size of the root ball to the hole excavated for transplanting.
C. Digging
1. Prepare tree for digging:
a. Tie branches up or down to allow good access to the tree by the mechanical spade.
b. Prune only those branches interfering with the digging process.
c. Prepare and protect site as directed by the owner or landscape architect.
2. For digging trees on existing slopes, refer to section 9.7 (Mechanical Tree Planting Detail for Sloped Areas) in this guideline.
3. Drop spades one at a time, alternating from one side to the other, to ensure even penetration and clean root cutting. Water injection is helpful at this point, if available. Presoaking the area 24 to 48 hours prior to digging is recommended.
4. After lifting the tree from the hole, using sharpened hand tools, cut any roots protruding from the spades.
5. If the tree is moved off site, it must be tarped to prevent water loss from leaves and stems.
6. Remove any loose debris and, if possible, tarp bottom of root ball before transporting.
D. Setting
1. Scarify sides of the hole to remove glazing. Plant tree into hole dug by tree spade at the same elevation as the tree’s original grade. Up to 1/8 of the root ball can be higher than the tree’s original grade but never deeper. Level and adjust tree to straighten it as blades are being removed.
2. Should voids exist between the hole and the root ball, fill with good grade of topsoil or clean existing soil.
3. Use a long, slender tool (e.g., shovel handle, digging bar) to pack excess soil tightly around the edge of the root ball and create a saucer around the tree as if hand planting.
4. Shave certain areas of the root ball, if necessary, in slope situations. Use extreme caution to minimize root disruption. Refer to section 9.7 (Mechanical Tree Planting Detail for Sloped Areas) in this guideline.
5. Staking and mulching procedures shall follow those for B&B trees. See section 5.7 (Tree Support
Schedule) and section 9.5 (Mechanical Tree Planting Detail on Level Grade) in this guideline.
6. Remove all string, tags, and seals, and prune any broken branches, unless otherwise directed.
7. Thoroughly water tree.
8. It is the owner’s responsibility to remove stakes, wire, and hose one year after planting, unless growing conditions warrant otherwise.
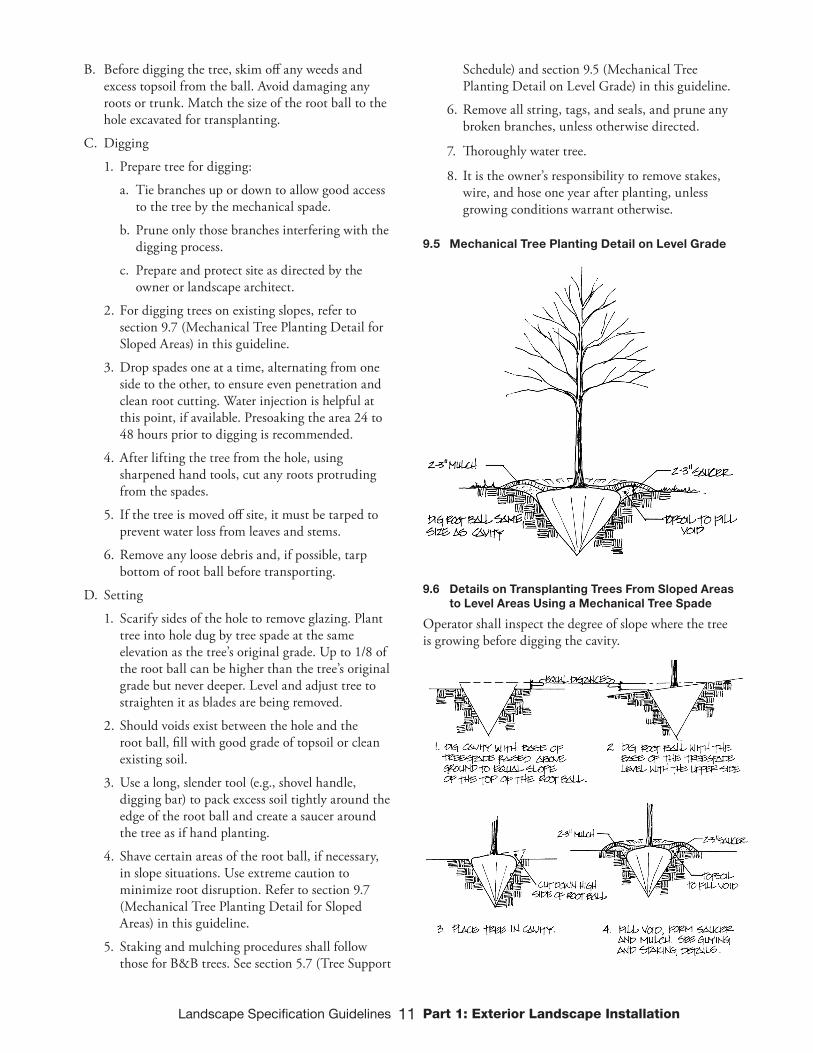
9.5 Mechanical Tree Planting Detail on Level Grade
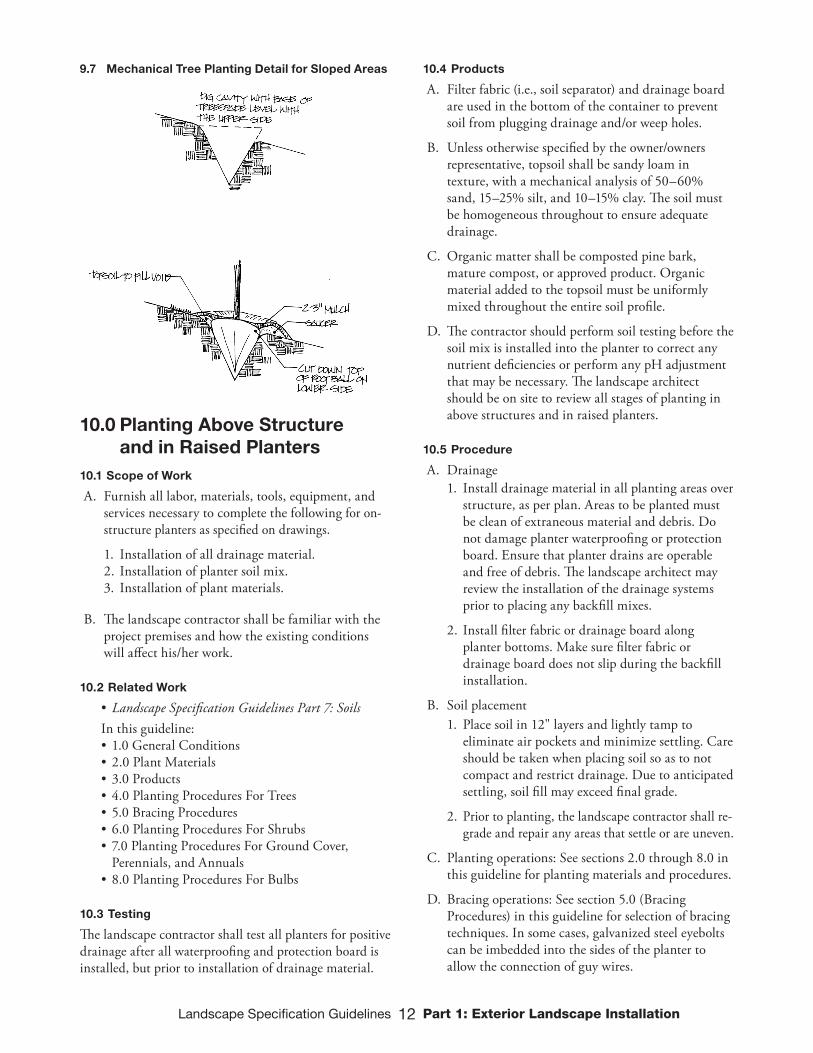
9.6 Details on Transplanting Trees From Sloped Areas to Level Areas Using a Mechanical Tree Spade
Operator shall inspect the degree of slope where the tree is growing before digging the cavity.
Landscape Specification Guidelines 12 Part 1: Exterior Landscape Installation
9.7 Mechanical Tree Planting Detail for Sloped Areas
10.0 Planting Above Structure and in Raised Planters
10.1 Scope of Work
A. Furnish all labor, materials, tools, equipment, and services necessary to complete the following for on-structure planters as specified on drawings.
1. Installation of all drainage material.2. Installation of planter soil mix.3. Installation of plant materials.
B. The landscape contractor shall be familiar with the project premises and how the existing conditions will affect his/her work.
10.2 Related Work
• Landscape Specification Guidelines Part 7: SoilsIn this guideline: • 1.0 General Conditions• 2.0 Plant Materials• 3.0 Products• 4.0 Planting Procedures For Trees• 5.0 Bracing Procedures• 6.0 Planting Procedures For Shrubs• 7.0 Planting Procedures For Ground Cover,
Perennials, and Annuals• 8.0 Planting Procedures For Bulbs
10.3 Testing
The landscape contractor shall test all planters for positive drainage after all waterproofing and protection board is installed, but prior to installation of drainage material.
10.4 Products
A. Filter fabric (i.e., soil separator) and drainage board are used in the bottom of the container to prevent soil from plugging drainage and/or weep holes.
B. Unless otherwise specified by the owner/owners representative, topsoil shall be sandy loam in texture, with a mechanical analysis of 50–60% sand, 15–25% silt, and 10–15% clay. The soil must be homogeneous throughout to ensure adequate drainage.
C. Organic matter shall be composted pine bark, mature compost, or approved product. Organic material added to the topsoil must be uniformly mixed throughout the entire soil profile.
D. The contractor should perform soil testing before the soil mix is installed into the planter to correct any nutrient deficiencies or perform any pH adjustment that may be necessary. The landscape architect should be on site to review all stages of planting in above structures and in raised planters.
10.5 Procedure
A. Drainage1. Install drainage material in all planting areas over
structure, as per plan. Areas to be planted must be clean of extraneous material and debris. Do not damage planter waterproofing or protection board. Ensure that planter drains are operable and free of debris. The landscape architect may review the installation of the drainage systems prior to placing any backfill mixes.
2. Install filter fabric or drainage board along planter bottoms. Make sure filter fabric or drainage board does not slip during the backfill installation.
B. Soil placement1. Place soil in 12" layers and lightly tamp to
eliminate air pockets and minimize settling. Care should be taken when placing soil so as to not compact and restrict drainage. Due to anticipated settling, soil fill may exceed final grade.
2. Prior to planting, the landscape contractor shall re-grade and repair any areas that settle or are uneven.
C. Planting operations: See sections 2.0 through 8.0 in this guideline for planting materials and procedures.
D. Bracing operations: See section 5.0 (Bracing Procedures) in this guideline for selection of bracing techniques. In some cases, galvanized steel eyebolts can be imbedded into the sides of the planter to allow the connection of guy wires.
Landscape Specification Guidelines 13 Part 1: Exterior Landscape Installation
11.0 Green RoofsThis section refers to Maryland Department of the Environment – 2000 Maryland Stormwater Design Manual, Volume II, Stormwater Design Appendices, Appendix B.4 Construction Specifications for Environmental Site Design Practices, Section B.4.A Green Roof Specifications: http://www.mde.maryland.gov/programs/water/stormwatermanagementprogram/soilerosionandsedimentcontrol/documents/md swm volume 2.pdf
B.4.A Green Roof Specifications
1. Material SpecificationsBecause there is significant variation in green roof assemblies and methods, providing comprehensive specifications is not feasible. Material specifications for green roofs will vary based on each roofing system, and specific information should be obtained from the appropriate manufacturer or retailer. The following information and specifications, which include acceptable materials for generic applications, are not exclusive or limiting.
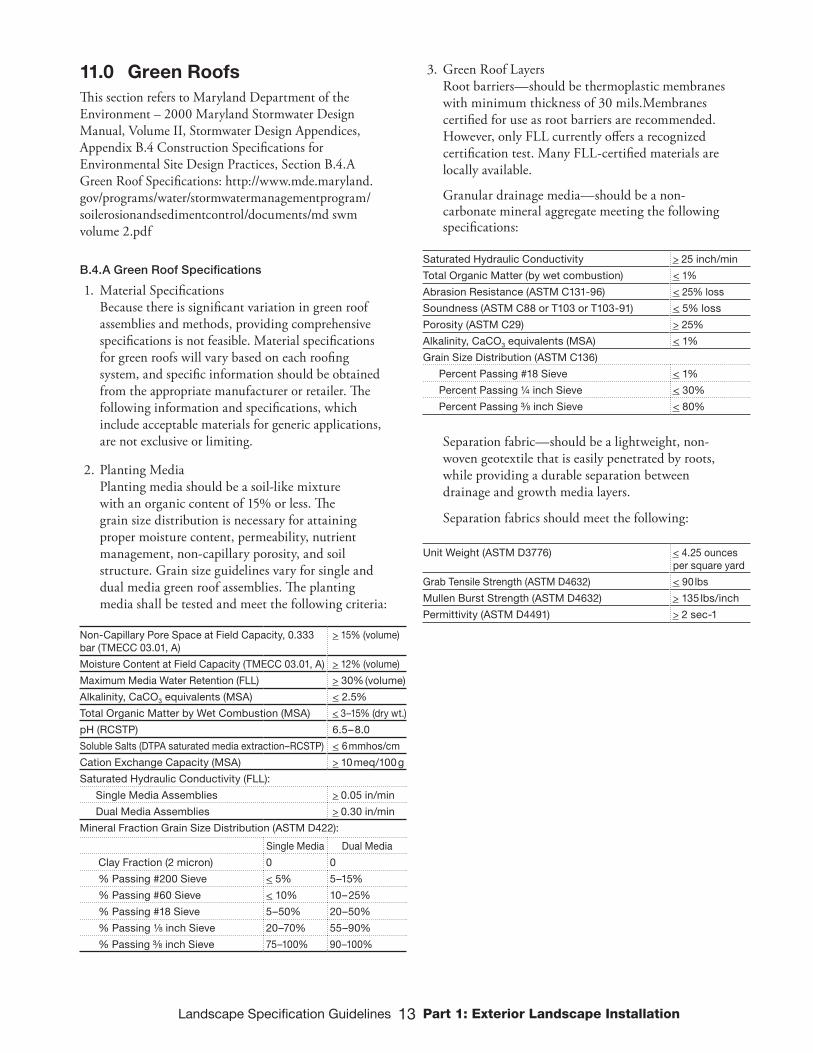
2. Planting MediaPlanting media should be a soil-like mixture with an organic content of 15% or less. The grain size distribution is necessary for attaining proper moisture content, permeability, nutrient management, non-capillary porosity, and soil structure. Grain size guidelines vary for single and dual media green roof assemblies. The planting media shall be tested and meet the following criteria:
Non-Capillary Pore Space at Field Capacity, 0.333 bar (TMECC 03.01, A)
> 15% (volume)
Moisture Content at Field Capacity (TMECC 03.01, A) > 12% (volume)
Maximum Media Water Retention (FLL) > 30% (volume)
Alkalinity, CaCO3 equivalents (MSA) < 2.5%
Total Organic Matter by Wet Combustion (MSA) < 3–15% (dry wt.)
pH (RCSTP) 6.5– 8.0
Soluble Salts (DTPA saturated media extraction–RCSTP) < 6 mmhos/cm
Cation Exchange Capacity (MSA) > 10 meq/100 g
Saturated Hydraulic Conductivity (FLL):
Single Media Assemblies > 0.05 in/min
Dual Media Assemblies > 0.30 in/min
Mineral Fraction Grain Size Distribution (ASTM D422):
Single Media Dual Media
Clay Fraction (2 micron) 0 0
% Passing #200 Sieve < 5% 5–15%
% Passing #60 Sieve < 10% 10– 25%
% Passing #18 Sieve 5–50% 20–50%
% Passing ¹⁄8 inch Sieve 20–70% 55–90%
% Passing ³⁄8 inch Sieve 75–100% 90–100%
3. Green Roof LayersRoot barriers—should be thermoplastic membranes with minimum thickness of 30 mils.Membranes certified for use as root barriers are recommended. However, only FLL currently offers a recognized certification test. Many FLL-certified materials are locally available.
Granular drainage media—should be a non-carbonate mineral aggregate meeting the following specifications:
Saturated Hydraulic Conductivity > 25 inch/min
Total Organic Matter (by wet combustion) < 1%
Abrasion Resistance (ASTM C131-96) < 25% loss
Soundness (ASTM C88 or T103 or T103-91) < 5% loss
Porosity (ASTM C29) > 25%
Alkalinity, CaCO3 equivalents (MSA) < 1%
Grain Size Distribution (ASTM C136)
Percent Passing #18 Sieve < 1%
Percent Passing ¼ inch Sieve < 30%
Percent Passing ³⁄8 inch Sieve < 80%
Separation fabric—should be a lightweight, non-woven geotextile that is easily penetrated by roots, while providing a durable separation between drainage and growth media layers.
Separation fabrics should meet the following:
Unit Weight (ASTM D3776) < 4.25 ounces per square yard
Grab Tensile Strength (ASTM D4632) < 90 lbs
Mullen Burst Strength (ASTM D4632) > 135 lbs/inch
Permittivity (ASTM D4491) > 2 sec-1

Landscape Specification Guidelines 14 Part 1: Exterior Landscape Installation