construction estimatingconstructioncomputersoftware.com/files/estimating-quickstart.pdf · 2.2 data...
TRANSCRIPT

Construction
Estimating
Quick Start Guide
Feb 2018

Version 2.01c97 on Windows 7
was used for the screen shots in these notes.
We enhance & update the software on a regular basis
and minor deviations of the screen and menus
might be encountered in the current software versions you are using.

. iii
Chapter 1. Downloading from the Internet ........................................................................................ 1
1.1 Introduction ................................................................................................................................................... 1
Chapter 2. Starting Up ............................................................................................................................ 2
2.1 Starting Candy .............................................................................................................................................. 2
2.2 Data Selector ................................................................................................................................................. 2
2.3 Company Selector........................................................................................................................................ 2
2.4 Create a New Company ............................................................................................................................. 3
2.5 Job Selector ................................................................................................................................................... 4
2.6 System Registration..................................................................................................................................... 6
Chapter 3. Importing the Bill of Quantities ........................................................................................ 7
3.1 Setting up a new estimate ......................................................................................................................... 8
3.2 The Bill Importer document ...................................................................................................................... 9
3.3 Importing a BoQ from an Excel spread sheet ................................................................................... 10
3.4 The Document Manager ......................................................................................................................... 16
3.5 Changing comments to section headings ......................................................................................... 17
Chapter 4. Defining Trades & Resource types.................................................................................. 18
4.1 Introduction - Trades ............................................................................................................................... 18
4.2 Introduction – Resource Types ............................................................................................................. 18
4.3 Trade Definitions ....................................................................................................................................... 19
4.4 Resource type definitions ....................................................................................................................... 19
Chapter 5. Pricing the Bill Items ......................................................................................................... 20
5.1 Plug Rate Pricing ....................................................................................................................................... 21
5.2 Split rate pricing ........................................................................................................................................ 22
Chapter 6. Pricing using Worksheets ................................................................................................. 25
6.1 Price Codes ................................................................................................................................................. 25
6.2 Trade code allocation .............................................................................................................................. 26
6.3 Pricing using Worksheets ....................................................................................................................... 28
6.4 Changing the Store Worksheet mode ................................................................................................ 30
Chapter 7. Worksheet Tools and Shortcuts ...................................................................................... 44
7.1 Applied Factor ............................................................................................................................................ 44
7.2 Local Variables ........................................................................................................................................... 45
7.3 Comments ................................................................................................................................................... 46
Chapter 8. Subcontractor Adjudicator ............................................................................................... 47
8.1 Introduction ................................................................................................................................................ 47
Chapter 9. Trade Totals Display & Resource Analysis ..................................................................... 48
9.1 Trade Totals Display ................................................................................................................................. 48
9.2 Resource Analysis ..................................................................................................................................... 49
Chapter 10. Mark Up ............................................................................................................................. 51
10.1 Mark up All Trades.................................................................................................................................... 51
10.2 Trade Mark up............................................................................................................................................ 52
10.3 Individual Mark up .................................................................................................................................... 52
10.4 Trade Totals Display ................................................................................................................................. 53
10.5 Report Manager ........................................................................................................................................ 54

. iv
Chapter 11. Post Tender Control ........................................................................................................ 55
11.1 Selling Rate ................................................................................................................................................. 55
Chapter 12. Value Engineering or Re-modelling ............................................................................. 57
12.1 Resource List .............................................................................................................................................. 57
12.2 Bill of Quantities – Net vs. Gross vs. Selling ...................................................................................... 58
Chapter 13. Other Candy modules ..................................................................................................... 59
13.1 Planning ....................................................................................................................................................... 59
13.2 Link & Forecast .......................................................................................................................................... 60
13.3 Cash flow ..................................................................................................................................................... 60
13.4 Valuations.................................................................................................................................................... 61
13.5 Subcontract Manager .............................................................................................................................. 63
Cost & Allowable .................................................................................................................................................... 64
Chapter 14. Candy User Interface ....................................................................................................... 66
14.1 Candy menu bar ........................................................................................................................................ 66
14.2 Document navigation .............................................................................................................................. 67
14.3 Menus on the documents ...................................................................................................................... 68
14.4 Customising the System ......................................................................................................................... 71
14.5 Keystrokes, Icons and Mouse Functions ............................................................................................ 72
Candy Construction Estimating and Valuations Downloading and Installing
. 1
Chapter 1. Downloading from the Internet
1.1 Introduction This quick start guide’s intent is to get you up and running in Candy’s Estimating module. A more
comprehensive explanation on the functionality of Candy Estimating can be found in the course
notes, available for licenced users from their local distributors. (Refer page 7)
The latest version of the Candy may be downloaded from the Internet. The files may be used for a
new Candy installation or to update the existing system.
The files can be copied onto a removable disk and installed onto any computer.
Create a folder on your hard disk named c:\ccsdownloads.
From the windows desktop click Start, Programs and Windows Explorer. On pull down menu select
File, New, Folder, type ccsdownloads and press enter.
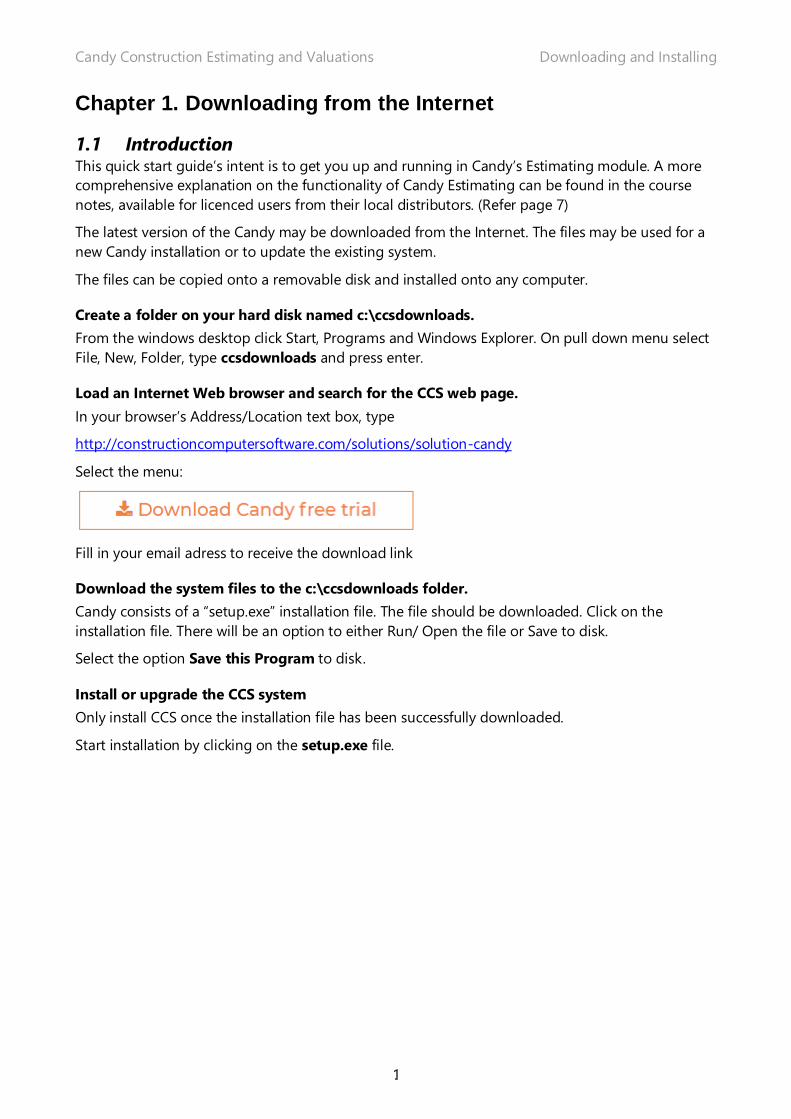
Load an Internet Web browser and search for the CCS web page.
In your browser’s Address/Location text box, type
http://constructioncomputersoftware.com/solutions/solution-candy
Select the menu:
Fill in your email adress to receive the download link
Download the system files to the c:\ccsdownloads folder.
Candy consists of a “setup.exe” installation file. The file should be downloaded. Click on the
installation file. There will be an option to either Run/ Open the file or Save to disk.
Select the option Save this Program to disk .
Install or upgrade the CCS system
Only install CCS once the installation file has been successfully downloaded.
Start installation by clicking on the setup.exe file.

Candy Construction Estimating and Valuations Starting up
2.
Chapter 2. Starting Up
2.1 Starting Candy
Start Candy from the windows desktop by double clicking in the Candy shortcut.
Complete the user Login with your User Name, Initials and Company name.
2.2 Data Selector A data folder is created with the first installation of Candy on the computer and displayed the first
time you open Candy. Highlight the path name and click on Select to open the Company selector.
2.3 Company Selector This is the top-level menu in the data folder. You may create up to 24 companies in the selected
data folder.
For example, if you are doing a tender in a joint venture with another firm, you can create a brand-
new company on the computer for that bid.
Candy Construction Estimating and Valuations Starting up
3.
To select a company, position the cursor on the required company and use Enter or Double click
with the mouse.
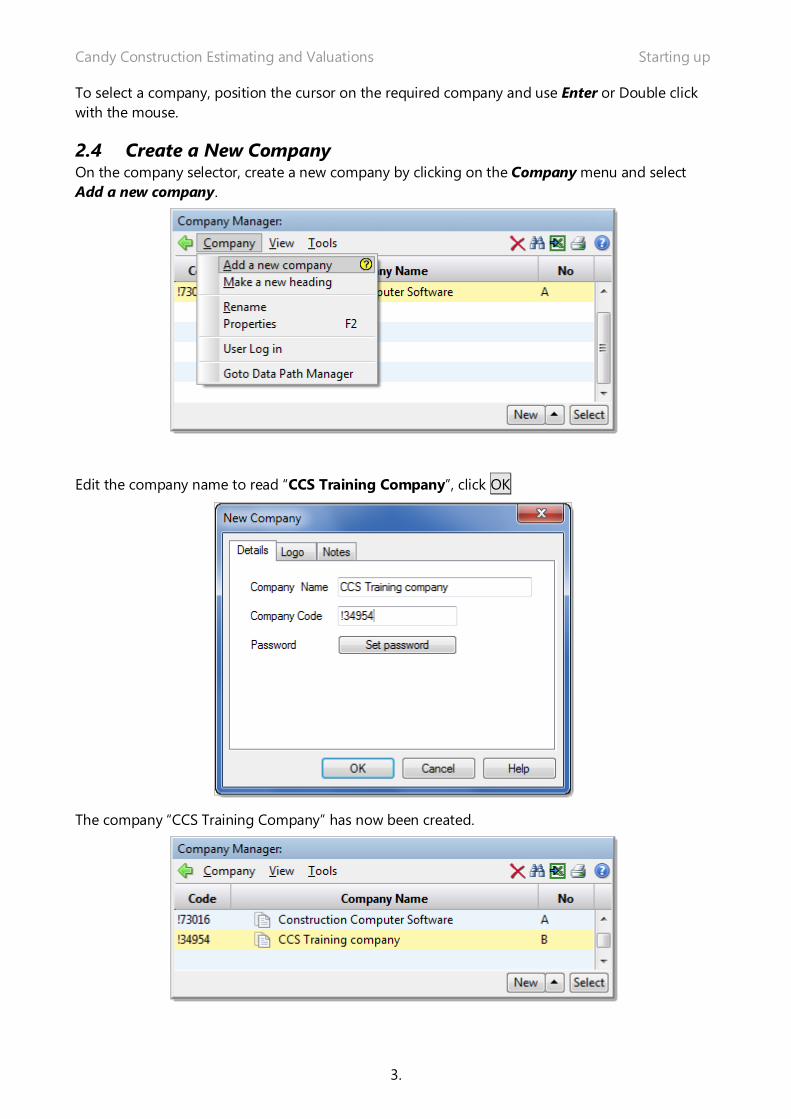
2.4 Create a New Company On the company selector, create a new company by clicking on the Company menu and select
Add a new company.
Edit the company name to read “CCS Training Company”, click OK
The company “CCS Training Company” has now been created.

Candy Construction Estimating and Valuations Starting up
4.
2.5 Job Selector Double click on the “CCS Training Company” to access the Jobs in the company.
The job selector will generate a new header and new job automatically.
You may create up to 99 jobs within a company and they may be created, copied, renamed,
deleted and backed up either using the Job menu or using the Right-click menu.
To return to the Company manager after you have opened the Job manager, you can right click on
the button to open the Company Manager.
Create a new Job
Click on the Job menu, select New job or click on New button.
Edit the job name to read “Waste Water Treatment Works”

Candy Construction Estimating and Valuations Starting up
5.
Click OK
Open the job by double clicking on the job or by clicking Select.

Candy Construction Estimating and Valuations Starting up
6.
2.6 System Registration In order to use Candy, the system must be registered with CCS and a monthly licence fee paid.
CCS will allow prospective clients a free trail licence to assess the software.
The free trail download will give you an evaluation licence for 30 calendar days.
The only restrictions of the evaluation software are:
• You can only recover a backup, not make a backup
• You cannot export anything to Excel
• All the reports will have a watermark on it.
The data accumulated during the trial period can be used when you rent the full system.
Once the trail licence has expired the software will indicate a non-registered system.
If your system has not been registered, the system registration dialogue will be displayed with a
broken key.
The registration process is completed telephonically with your local distributor (refer next page);
using a set of unlocking codes.
If the system has been registered the job selector will be displayed.
To register the system, please contact your local CCS office.
The contact details are avialble at http://constructioncomputersoftware.com/contact-us

Candy Construction Estimating and Valuations Importing
7.
Chapter 3. Importing the Bill of Quantities A bill of quantities can be created by:
• Manual entry of bill items.
• Copying items from a previous Bill of Quantities.
• Importing an entire Bill from an external file, e.g. Excel™, WinQS™ or QS Plus™ etc., provided by
the client or Professional QS
Let’s first import these Bill pages below from Microsoft Excel.

Candy Construction Estimating and Valuations Importing
8.
3.1 Setting up a new estimate
Do this:
Click the Bill Prep menu.
If there is no Bill of Quantities present in this job, the first time you try to
access it, the setup dialog will appear.
The setup dialog is used to select a master reference job and to enter the
tender details. Working with Masters will be covered in detail in later chapters.
For pricing the “Waste Water Treatment Works”, we currently have no Master and all items will
be imported, entered and priced from first principles.
When we have finished pricing this job, it can be used as a Master for any other job
Do this:
Since we have no previous jobs and no Master, make sure that the master checkbox is not ticked.
Contract reference information and other general details may be entered into the Estimate Details
dialog. You can change these tender details from the Main > Estimate details menu.

Candy Construction Estimating and Valuations Importing
9.
3.2 The Bill Importer document A special Bill document exists in Candy for importing Bills. The Bill Importer document contains all
the tools required to import and format the Bill.
Do this:
Click Bill Prep > Bill Importing.
There are no bill items at present. We will copy a Bill from an Excel spread sheet and paste it into
this document.
Candy Construction Estimating and Valuations Importing
10.
3.3 Importing a BoQ from an Excel spread sheet
Copying all the Bill data in the Excel spread sheet to the clipboard
Do this:
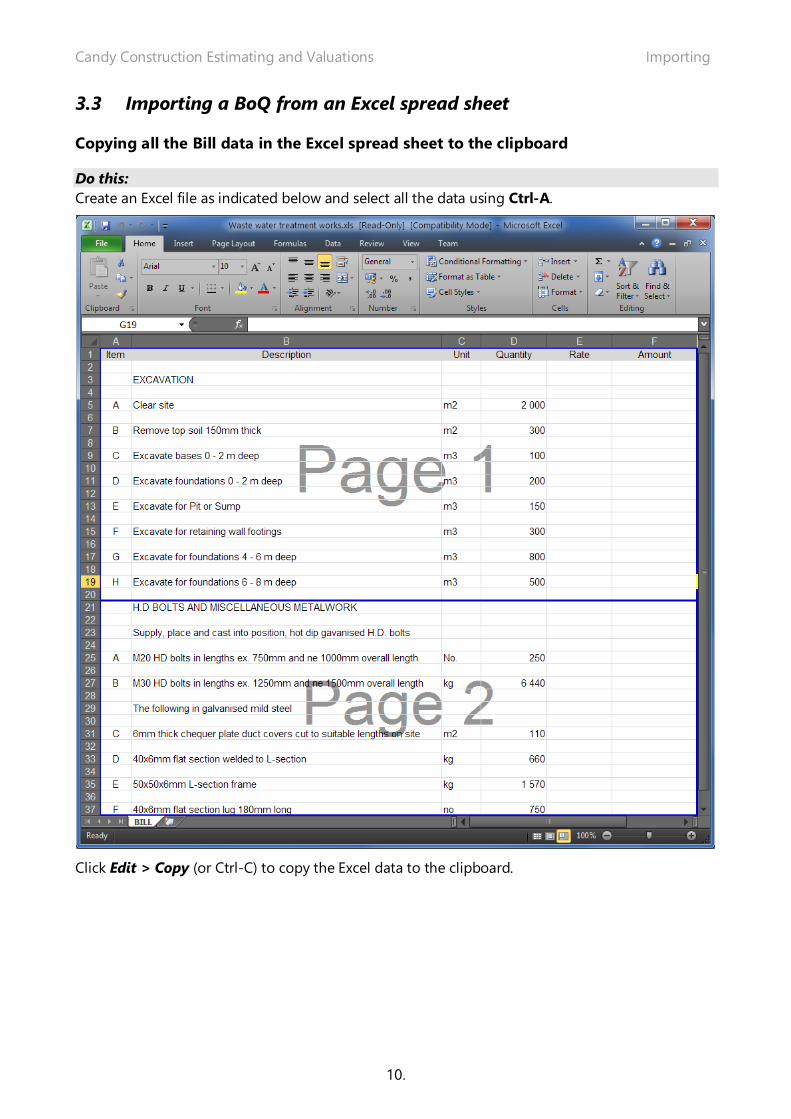
Create an Excel file as indicated below and select all the data using Ctrl-A.
Click Edit > Copy (or Ctrl-C) to copy the Excel data to the clipboard.

Candy Construction Estimating and Valuations Importing
11.
Pasting the bill from the
clipboard
Return to Candy. On the Bill Importer
document, and choose
Tools > Import Bill > Paste bill
from clipboard (or Ctrl-V).
The Column Selection dialog appears. We need to identify the Item number, Description, Unit and
Quantity.
Click the item in the list on the left which identifies the column under the big grey arrow. The arrow
will then move to the next column. Click Continue when you have finished.
The bill import indicates that 19 items were imported – 18 bill items and one column heading row.
The bill quantity hash total displays the sum of all the
quantities imported (ignoring the unit types)
This is used as a quick check to see if all the bill items
are imported.
Compare this to the sum of all the quantities in Excel.
If the same; all quantities have been imported.

Candy Construction Estimating and Valuations Importing
12.
The Bill Importer document now shows the imported items.
Note the entire bill is imported on page 1.
Remove unwanted lines
All the information including the column headings created in Excel are imported. To remove the
Excel column headings, select the row with the unwanted heading, right-click to open the menu
and select Delete or use CTRL + DEL on the record.

Candy Construction Estimating and Valuations Importing
13.
Repaginating the bill
The original Bill contained two pages; our imported bill consists of one long bill page. We need to
set page break marks in the New Page No column for all the items which must start on a new Bill
page. Then we will repaginate the Bill to see the page breaks.
We want all the metalwork items to be on page 2.
Do this:
To set a page break on H.D. Bolts and miscellaneous metalwork right-click in the New page no.
column for this item, and choose Set page break marks
Click Yes to the confirmation dialog.
The “+” represents the page break mark.
Now we can repaginate the
bill.
Since we want to do
something to all items in the
Paginate column, right-click on
the New Page No. column
heading and select Paginate
the bill.

Candy Construction Estimating and Valuations Importing
14.
There are additional options that can be set for pagination which are not handled in this course.
For this course we will keep the default settings.
Click OK to confirm the repagination...
…and confirm pagination complete.

Candy Construction Estimating and Valuations Importing
15.
And this is the end result:
We have now completed importing the Bill. You can close this document.
Now we’ll use the ordinary Bill documents to setup the summary heading levels and price the Bill
items.

Candy Construction Estimating and Valuations Importing
16.
3.4 The Document Manager The Bill of Quantities can be viewed, edited and priced using various layouts in the Document
Manager.
Do this:
Open the Bill Document Manager by clicking on Documents > Estimating Document Manager.
The Document Manager contains a standard set of data and column layouts which may be copied,
customised or renamed.
The layouts in the Document Manager are universal to all your jobs in Candy. Any change which
you make to a document will be reflected in all jobs.

Candy Construction Estimating and Valuations Importing
17.
3.5 Changing comments to section headings
All non-Bill items imported from external file will have been marked as comments. We can convert
many of these to meaningful headings to improve the readability of the Bill.
Do this:
Open document 1.2 Pricing bill and change the first comment of each page to a Level 1 heading
by typing the number 1 in the Level column “L” (the first column). As the level changes, the line
colour will change to the colour for that level – as defined in the System settings.
Notice that both pages of our bill are shown. The Candy bill can be displayed in a multi-page
mode (like this), or a single page mode, where only one page at a time is visible.
Do this:
To make things simpler in the next exercises, from the Bill document menu, click View > Multi-
page bill to remove the tick and get the one-page-at-a-time mode. Now close the Bill document.
Section headings
In a Candy Bill you can create a hierarchy of headings, allowing you to navigate the Bill easier by
opening and closing sections in it and also to generate summary pages in reports.

Candy Construction Estimating and Valuations Trades & Resource types
18.
Chapter 4. Defining Trades & Resource types
4.1 Introduction - Trades Bill items are priced using Price Codes. Price codes are the fundamental pricing mechanism in
Candy. Price code represents an item of work and is priced to reflect its unit rate.
Every Price code must have a Trade code and this must be the first character of the code. The code
is up to 8 characters in length and the first character identifies the Trade to which it belongs.
For example:
• E203 Excavate column bases - the "E" in the code indicates that this Price code is in the
Excavation trade.
Where Trade codes are used:
• Trade totals display - Summary of the job by Trade into resource types.
• Trade mark-up - Different mark-up can be applied to each trade.
• Trade spread sheet - An analysis of the job pricing arranged by Price code showing the
rates split into resource types.
• Subcontract adjudicator - Trades can be used to populate subcontract adjudication
documents.
The order of the trades in the Trade definitions document dictates the order in trade related report.
The vertical order of the trades on the Trade definitions document can be changed with the
Ctrl+Left-arrow and Ctrl+Right-arrow keys to 'bubble' trade definitions up and down.
The Price code List is sorted alphabetically by Trade.
4.2 Introduction – Resource Types Simple resources are used to price worksheets for Price codes and Complex resource.
(Complex resource discussed in detail later)
Each Simple resource must belong to one of the nine Resource Types, such as Labour, Material,
Equipment, etc.
Simple resources are usually created on the Resource List - they can also be created from a
worksheet. Once a resource exists it can be used on both Price code and Complex resource
worksheets.

Candy Construction Estimating and Valuations Trades & Resource types
19.
4.3 Trade Definitions
Do this:
The Trade codes can be defined in the definitions menu. Access the definitions menu by selecting
Main > Definitions & Settings or click on the blue hammer
in the Estimating Toolbar.
Select 1.1 Trades. Define the remainder of the trades by entering an Alphabetic letter as a trade
code and a description. A maximum of 52 Trades may be defined.
4.4 Resource type definitions
Do this:
Click Main > Definitions and Settings (or ) and choose 1.2 Resource Types.
Type in the following resource types: (Up to 9 resource types can be defined).

Candy Construction Estimating and Valuations Pricing the Bill
20.
Chapter 5. Pricing the Bill Items The Bill items can be priced using plug rates, split rates, or worksheets. This chapter will cover
pricing in Plug and Split rates. The pricing type and other item information are shown in the
Attributes column. Let’s add this column to the Bill document.
Do this:
Open the Estimating Document
Manager again (Documents >
Bill documents), choose 1.2
Pricing Bill and then click the
Customise button to change
the column layout.
The column pick list
This type of dialog below is called
a pick list. You can add columns
from the left-hand Available list
to the right-hand Selected list.
Notice that the Available
columns are grouped into
headings.
Double clicking on a heading
opens or closes it.
Open section 2 Bill Items.
Choose column
2.9 Attributes and use the
to move the column to the
Selected list.
The column order can be changed with the and
arrows. Move the Attributes column to
below the Units column and click OK to store the new column layout.

Candy Construction Estimating and Valuations Pricing the Bill
21.
5.1 Plug Rate Pricing Plug rate pricing is done by simply plugging in a rate in the Net Rate column for each item.
In the Document manager, open 1.2 Pricing Bill. Note the U in the new Attributes column shows
that all the bill items are Unpriced.
Price item “A Clear Site” by entering 10.00 in
the Nett Rate column.
Every bill item will require a Trade Code when
pricing.
Now you can allocate the Earthworks trade to the Clear site bill
item by selecting Earthworks and confirm.

Candy Construction Estimating and Valuations Pricing the Bill
22.
Note that PT is displayed in the Attributes column indicating that the Item now has a Plug rate and
a Trade mark-up. (Mark-up currently = 0 % – Mark-up will be done later)
Double click on the Attributes column to display the explanation of the attributes.
5.2 Split rate pricing Split Rate pricing must be done in a Split Bill of Quantities document which shows the Net split rate
columns. Open the document manager again and select New Document > 1.5 Split Rate Pricing
to add this document to the document manager.

Candy Construction Estimating and Valuations Pricing the Bill
23.
Now go to the document manager again and open 1.5 Split Bill of Quantities.
Note that the document displays the Net Split Rate columns.
Price Item B by entering 2.00 in Labour Split Rate column.

Candy Construction Estimating and Valuations Pricing the Bill
24.
If Candy asks for the Trade allocation, choose Earthworks and confirm.
…and enter 8.00 in Plant Split Rate column.
Go back to the document manager and open 1.2 Pricing Bill.
Note the ST in the Attributes column indicating that the Item has a Split rate and a Trade mark-up.

Candy Construction Estimating and Valuations Pricing using Worksheets
25.
Chapter 6. Pricing using Worksheets Pricing using plug rate and split rate is not recommended because it only generates financial
information for the job. Pricing using Worksheets is the ideal method because we price from first
principles using resources. Candy can then be used to its full potential to generate both financial
and engineering information.
6.1 Price Codes
Do this:
Open Bill document 1.2 Pricing Bill.
This layout contains columns relating to the Price Code.
The Price Code for the first priced items was automatically created by Candy.
Example:
The Bill item Clear site on page 1 has a Price Code E00004 with a rate of 10.00. By allocating the
same Price Code to any other bill items will price them using the Price Code rate, effectively
speeding up the pricing process.
An explanation of Price Codes
The Price Code’s function is to deal the unit price of a bill item. To rate a bill item, a Price Code
is entered against it and the bill item adopts the rate from the Price Code (however it was
generated, by plug rate, split rates or worksheet).
The Price Code can be up to 8 alpha-numeric characters in length. The first character of the
Price Code must start with a Trade Code letter and the rest of the code is entirely up to you.
Note that the Price Code has its own Description. The description of the bill item is totally
independent of the Price Code description. This means that two items in the bill, with different
descriptions, can be priced using the same Price Code. Conversely, two items in the Bill with the
same description can be priced using different Price Code and therefore have different rates.

Candy Construction Estimating and Valuations Pricing using Worksheets
26.
6.2 Trade code allocation Pricing using Worksheets is made a lot easier if we first allocate Trade codes to the relevant bill
items.
Do this:
In item C’s Trade code field , right-click and select Allocate Trade Codes.
Select Earthworks and confirm.
Now let’s allocate Trade code E to the all of the excavation bill
items on Page 1.
In the Trade code column header
,click the first item and
shift-click the last item of page 1.
This selects all the records of page 1.
Now right-click in the Trade code column header
and
choose Allocate Trade codes from the menu.
Select Earthworks and confirm.

Candy Construction Estimating and Valuations Pricing using Worksheets
27.
The Earthworks Trade code has been allocated to page 1’s items.
Using the same method, allocate trade code M to the metal works bill items on Page 2.

Candy Construction Estimating and Valuations Pricing using Worksheets
28.
6.3 Pricing using Worksheets Having allocated Trade codes we can price items easier using worksheets. We will price item 1/C.
The worksheet allows for resource-based pricing.
The worksheet may contain up to 200 calculations.
Do this:
Place the bar cursor on Page 1 / item C and click the Worksheet button at the bottom of the
document.
Explanation of Simple Resources
For resource-based pricing, we need to create some resources. We have already defined some
Resource Types, which categorise simple resources. For example, Labour resources fall into the L
resource type, material resources, such as stone, fall under the M type. Sand is a simple
resource, whereas concrete is not, because it is made up of sand, stone, and cement.

Candy Construction Estimating and Valuations Pricing using Worksheets
29.
Create a resource within a Worksheet
Do this:
Create a resource by right-clicking on a blank line in the worksheet. Choose Edit/New resource
from the menu.
Enter the details for the new resource in the Resource Input dialog as shown below.
Click OK
Candy Construction Estimating and Valuations Pricing using Worksheets
30.
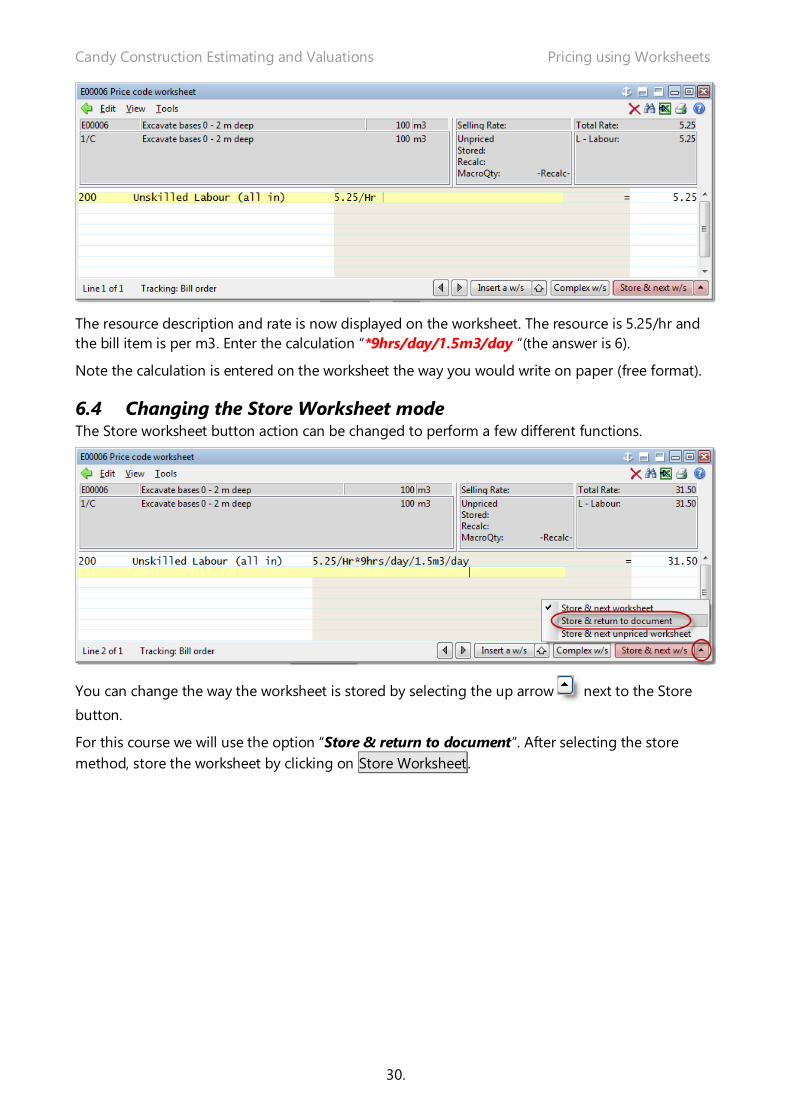
The resource description and rate is now displayed on the worksheet. The resource is 5.25/hr and
the bill item is per m3. Enter the calculation “*9hrs/day/1.5m3/day “(the answer is 6).
Note the calculation is entered on the worksheet the way you would write on paper (free format).
6.4 Changing the Store Worksheet mode The Store worksheet button action can be changed to perform a few different functions.
You can change the way the worksheet is stored by selecting the up arrow next to the Store
button.
For this course we will use the option “Store & return to document”. After selecting the store
method, store the worksheet by clicking on Store Worksheet.

Candy Construction Estimating and Valuations Pricing using Worksheets
31.
Note that WT is displayed in the Attributes column indicating that the Item has a Worksheet and a
Trade mark-up.
Candy Construction Estimating and Valuations Pricing using Worksheets
32.
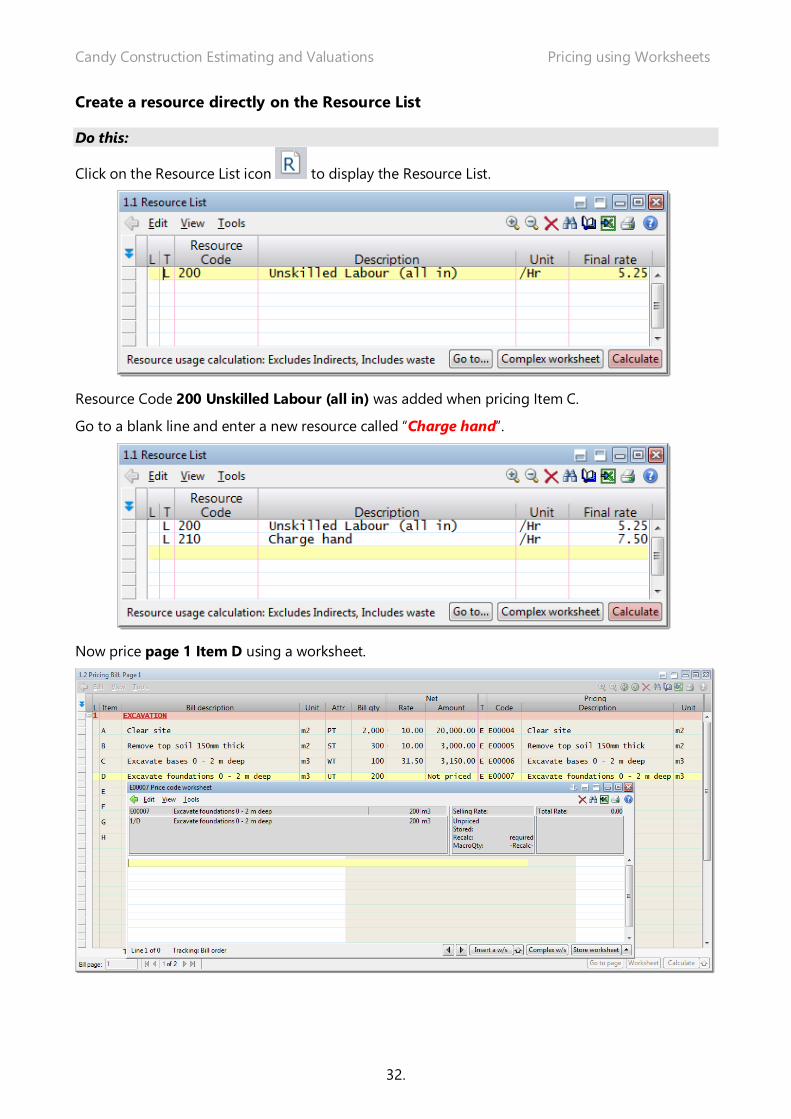
Create a resource directly on the Resource List
Do this:
Click on the Resource List icon to display the Resource List.
Resource Code 200 Unskilled Labour (all in) was added when pricing Item C.
Go to a blank line and enter a new resource called “Charge hand”.
Now price page 1 Item D using a worksheet.

Candy Construction Estimating and Valuations Pricing using Worksheets
33.
Insert an existing resource in the Resource list using the right-click menu
Do this:
Open the Resource List by right-clicking on a
blank line in the worksheet.
Choose Resource list on the menu.
Select resource 200 Unskilled Labour (all in) and
confirm.
Add resource 210 Charge hand using the same
method.
The worksheet now contains the resources, but no calculation for the rate.
Now enter the following calculations against each resource in the worksheet.
The worksheet contains two calculations. To display the total of both calculations, place an equal
sign “=” on a new line against the left margin and press enter.
Notice the total for these calculations at the end of the line. Note the total rate is also displayed on
the top right-hand corner.
Click Store worksheet.

Candy Construction Estimating and Valuations Pricing using Worksheets
34.
…and item 1/D is now priced using a worksheet.

Candy Construction Estimating and Valuations Pricing using Worksheets
35.
Complex Resources
Explanation of Complex Resources
It would be tedious to have to bring the Unskilled Labour and Charge Hand and to combine them
every time you priced an Excavation item in the Bill of Quantities. Similarly, pricing concrete, it
would be tedious to have to combine the sand, stone and cement in the correct portions for each
bill item.
Candy allows you to combine these Simple Resources and create a Complex Resource. When you
have an excavation item to price, you bring the excavation team complex resource into the
worksheet; similarly, when you have a concrete item to price you bring the concrete complex
resource into the worksheet for the bill item.
Higher level complex resources can be made from other complex and simple resources. Level 9 is a
very basic complex resource which can be made of only Simple resources, a Level 8 resource can be
made of level 9 and Simple resources, a Level 7 resource can be made of Level 8, Level 9 and Simple
resources, and so on in a hierarchy of Complex Resources.
This diagram shows the principle of the hierarchy of Complex Resources:
A Complex Resource is created by assigning a level number between 1 and 9 in the Resource List
type column.

Candy Construction Estimating and Valuations Pricing using Worksheets
36.
Do this:
Enter the new complex resource 220 Hand Exc. team (1C + 2L) in the resource list .
Complex resources must be priced using a worksheet. With your cursor on the 220 Hand Exc.
team (1C + 2L), click on Complex worksheet.
Changing the complex resource code’s background colours
To highlight the complex resources in the resource list, you can change the background colour
of the code. Select Main > Definitions & Settings > 6.2 Item and attribute colours.

Candy Construction Estimating and Valuations Pricing using Worksheets
37.
Insert a resource into a worksheet by typing in the resource code.
Do this:
Type in the resource code 200 against the left margin of the worksheet and press Enter. Do the
same to insert resource code 210. Enter the following calculations to calculate the daily cost of the
Hand Exc. Team.
You can also change the way the complex worksheet is stored by selecting the up arrow next to the
Store button. For this course we will use the option “Store & back to document”
Remember to store the worksheet by clicking Store complex.
Now the Resource List shows two Simple Labour resources and one Level 9 Complex Resource.
Candy Construction Estimating and Valuations Pricing using Worksheets
38.
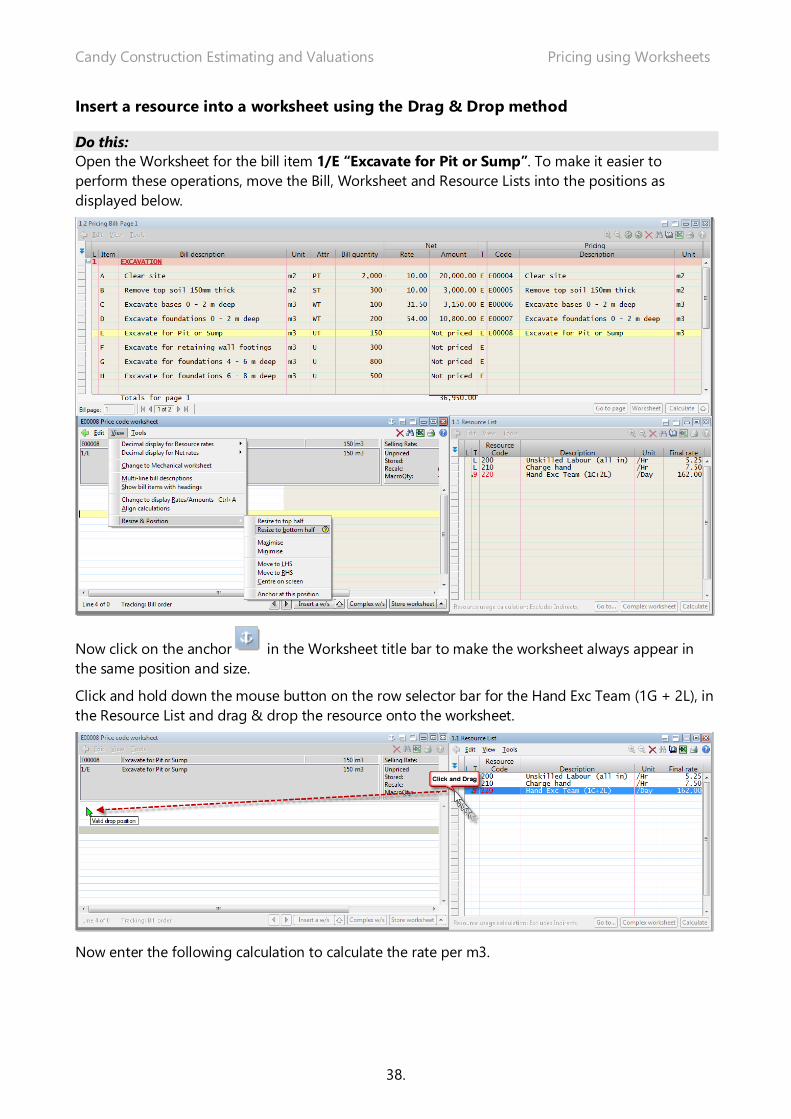
Insert a resource into a worksheet using the Drag & Drop method
Do this:
Open the Worksheet for the bill item 1/E “Excavate for Pit or Sump”. To make it easier to
perform these operations, move the Bill, Worksheet and Resource Lists into the positions as
displayed below.
Now click on the anchor in the Worksheet title bar to make the worksheet always appear in
the same position and size.
Click and hold down the mouse button on the row selector bar for the Hand Exc Team (1G + 2L), in
the Resource List and drag & drop the resource onto the worksheet.
Now enter the following calculation to calculate the rate per m3.
Candy Construction Estimating and Valuations Pricing using Worksheets
39.
Click Store worksheet

Candy Construction Estimating and Valuations Pricing using Worksheets
40.
Copying Worksheets using the drag & drop method
The next item 1/F has the same rate as item 1/E but a different price code is required. The
worksheet can be copied from Item 1/E into Item 1/F using the drag and drop method.
Do this:
Open the Worksheet for the bill item 1/F Excavate for retaining wall footings.
From the bill document click on the record selector bar for bill item 1/E Excavate for pit or sump
and drag it into the worksheet for Excavate for retaining wall footings.
The worksheet calculations for Bill Item 1/E is copied into item 1/F worksheet. There is no need to
input the complex resource or the production as this information was copied from the previous Bill
item 1/E.
Click Store worksheet

Candy Construction Estimating and Valuations Pricing using Worksheets
41.
Pricing Items 1/H and 1/G
On page 1 the last 2 items are deep excavations and therefore will require an Excavator. Create a
new complex resource for an Excavator including the diesel and use it to price the bill items.
Do this:
Open the resource list and create Simple Resources for the Excavator and Diesel. Remember
the Simple Resources must be categorised into the correct Resource Type, i.e. Excavator into Plant
(P) and Diesel into Material (M).
Now create the Complex Resource for Excavator (Wet). Remember that the Complex Resource
must have a Level number between 1 and 9 in the Resource Type column.
Price the Complex Resource “CAT 215 Excavator (Wet)” using the following resources and
calculations:
Use any one of these methods above to insert resources into the worksheets:

Candy Construction Estimating and Valuations Pricing using Worksheets
42.
Click Store Complex
Price Item 1/G using a worksheet
Now Item 1/G can be priced from first principles using the complex resource Excavator (wet) and 3
Unskilled Labourers.
Do this:
Open the worksheet for item 1/G to price it using the following resources and calculations.
Click Store worksheet

Candy Construction Estimating and Valuations Pricing using Worksheets
43.
Copy worksheets using the Insert a w/s button
Item 1/H is similar to Item 1/G, the
only difference is the excavation depth.
To save time we can copy the
worksheet information from Item 1/G
into Item 1/H.
Open the worksheet for Item 1/H. Click
Insert a w/s.
Use the “spinner” up and down arrows
to scroll through the available Price
Codes.
When Price Code E00010 “Excavate for foundations 4 – 6 m deep” appears, click OK to copy the
worksheet information.
Adjust the production to 400m3/day to compensate for the deeper excavation and then store the
worksheet.
All the items on page 1 should now be priced and the page total should be “69,172.94”. Press
Calculate to calculate & display the Excavation heading amount.
Candy Construction Estimating and Valuations Worksheet tools & shortcuts
44.
Chapter 7. Worksheet Tools and Shortcuts Various tools and shortcuts in the worksheets have been developed to speed up the pricing
process.
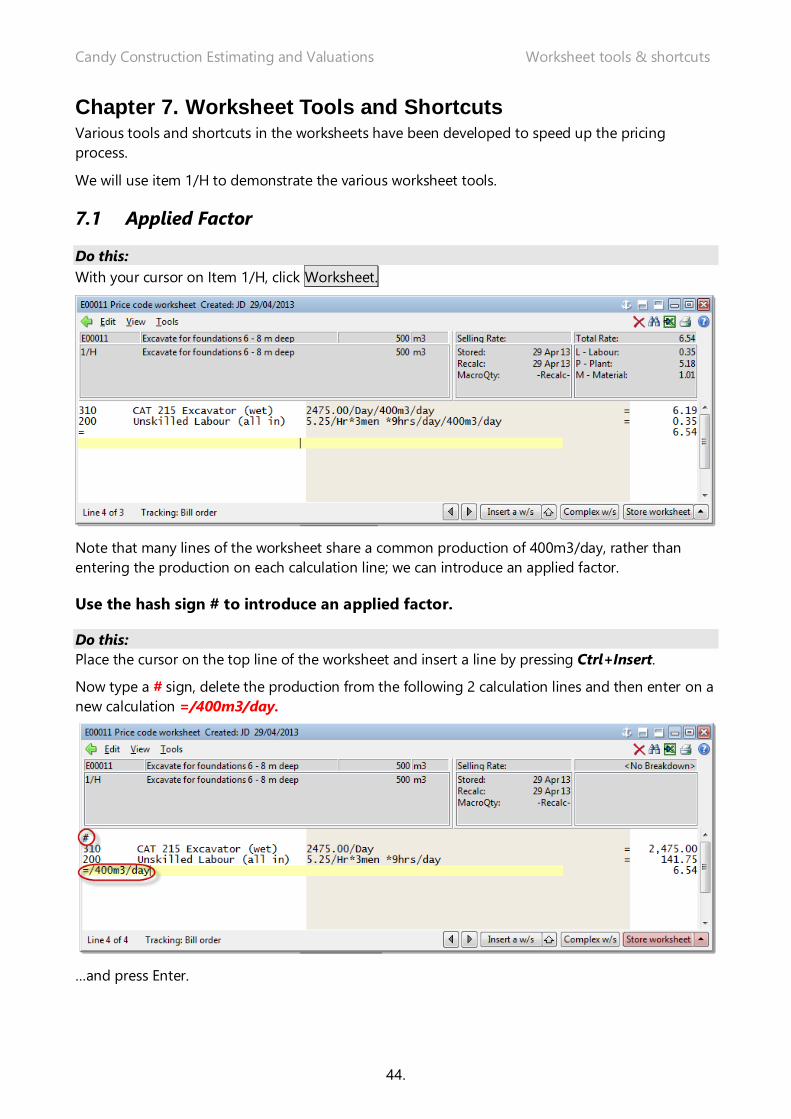
We will use item 1/H to demonstrate the various worksheet tools.
7.1 Applied Factor
Do this:
With your cursor on Item 1/H, click Worksheet.
Note that many lines of the worksheet share a common production of 400m3/day, rather than
entering the production on each calculation line; we can introduce an applied factor.
Use the hash sign # to introduce an applied factor.
Do this:
Place the cursor on the top line of the worksheet and insert a line by pressing Ctrl+Insert.
Now type a # sign, delete the production from the following 2 calculation lines and then enter on a
new calculation =/400m3/day.
…and press Enter.
Candy Construction Estimating and Valuations Worksheet tools & shortcuts
45.
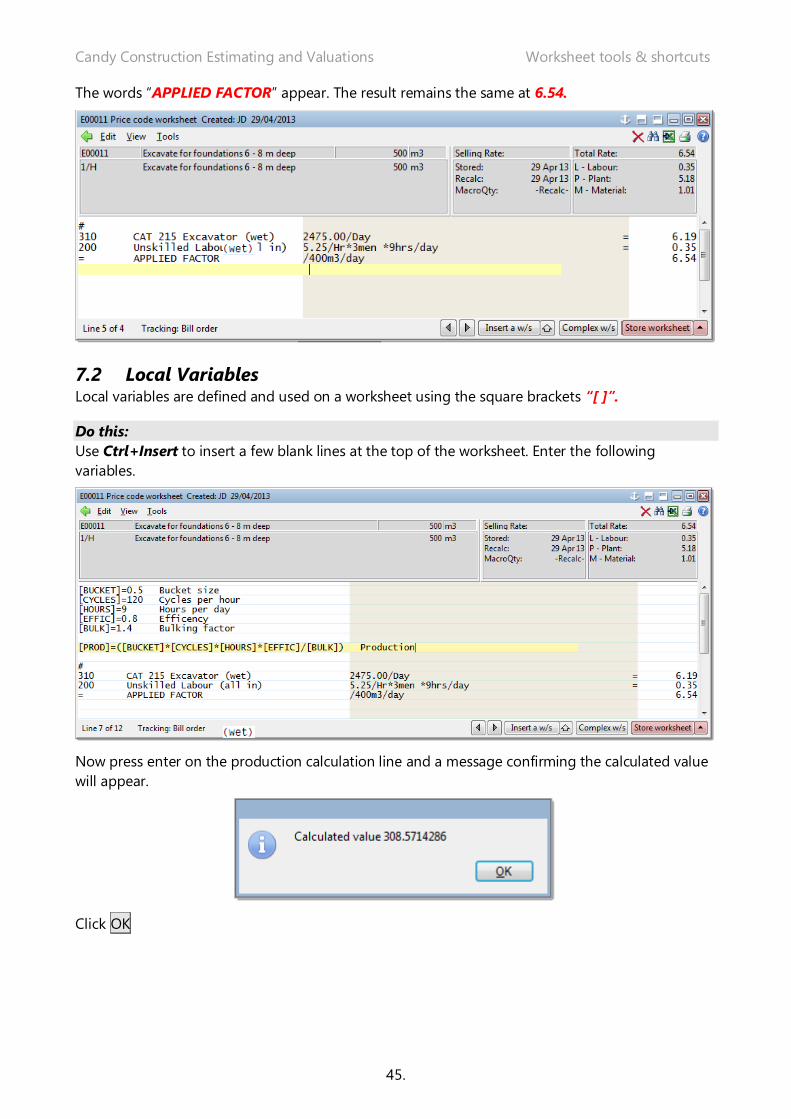
The words “APPLIED FACTOR” appear. The result remains the same at 6.54.
7.2 Local Variables Local variables are defined and used on a worksheet using the square brackets “[ ]”.
Do this:
Use Ctrl+Insert to insert a few blank lines at the top of the worksheet. Enter the following
variables.
Now press enter on the production calculation line and a message confirming the calculated value
will appear.
Click OK

Candy Construction Estimating and Valuations Worksheet tools & shortcuts
46.
Calculations are detailed by starting a calculation line with a question mark “?”.
To display the calculated value of production on the worksheet type the following “?[PROD]” and
press Enter.
Now delete the 400m3 production on the applied factor line and replace it with [PROD].
7.3 Comments Worksheets can be documented by leaving one blank space on the left of the worksheet followed
by the relevant comment.
Add +15% to the applied factor line and then type a comment “15% for over break”.
Click Store worksheet

Candy Construction Estimating and Valuations Subcontract Adjudicator
47.
Chapter 8. Subcontractor Adjudicator
8.1 Introduction The metalwork items on page 2 will be subcontracted.
The Subcontract Adjudicator will be used to adjudicate and select the most competitive
subcontractor.
The rates of up to twelve subcontractors can be allocated to a range of bill items representing a
package of work. The quotes can be compared and adjudicated. The cost (net) or selling rates of
the selected subcontractor can then be exported to the bill.
A more comprehensive explanation on the functionality of the subcontractor adjudicator can be
found in the course notes available for licenced users from their local distributors. (Refer page 7)
This explanation will include subcontractor discounts, adding lump sums, etc.
You can use split rate entry to complete the exercise in this quick start guide.

Candy Construction Estimating and Valuations Trade totals & Resource analysis
48.
Chapter 9. Trade Totals Display & Resource Analysis Now we can reap the rewards of our hard work. On screen analysis like a Trade summary and a
resource analysis can be viewed by the click of a button.
9.1 Trade Totals Display
Do this:
The job total by trade can be displayed by clicking icon
or selecting Finalisation > Trade totals display.
Select the Bill Quantity
Select Net rates
The Trade Total Display is shown.
The subcontractor Nett Amount of 90223.10 is the same total as calculated in the subcontract
adjudicator for Metalwork when we displayed the Subcontract adjudicator results.

Candy Construction Estimating and Valuations Trade totals & Resource analysis
49.
9.2 Resource Analysis Resource analysis can be displayed on screen using one of the resource documents which displays
the Bill Quantity Usage & Bill Quantity Usage value columns.
Do this:
Open resource document 1.4 Utilisation and value – billed quantity from the resource
document manager.
Click Calculate to recalculate the Usage.
The resource usage calculation rules reminder
will be displayed.
Note currently the calculation is only done up
to two decimal points, and allowable wastage
is included (handled later during the course).
Candy Construction Estimating and Valuations Trade totals & Resource analysis
50.
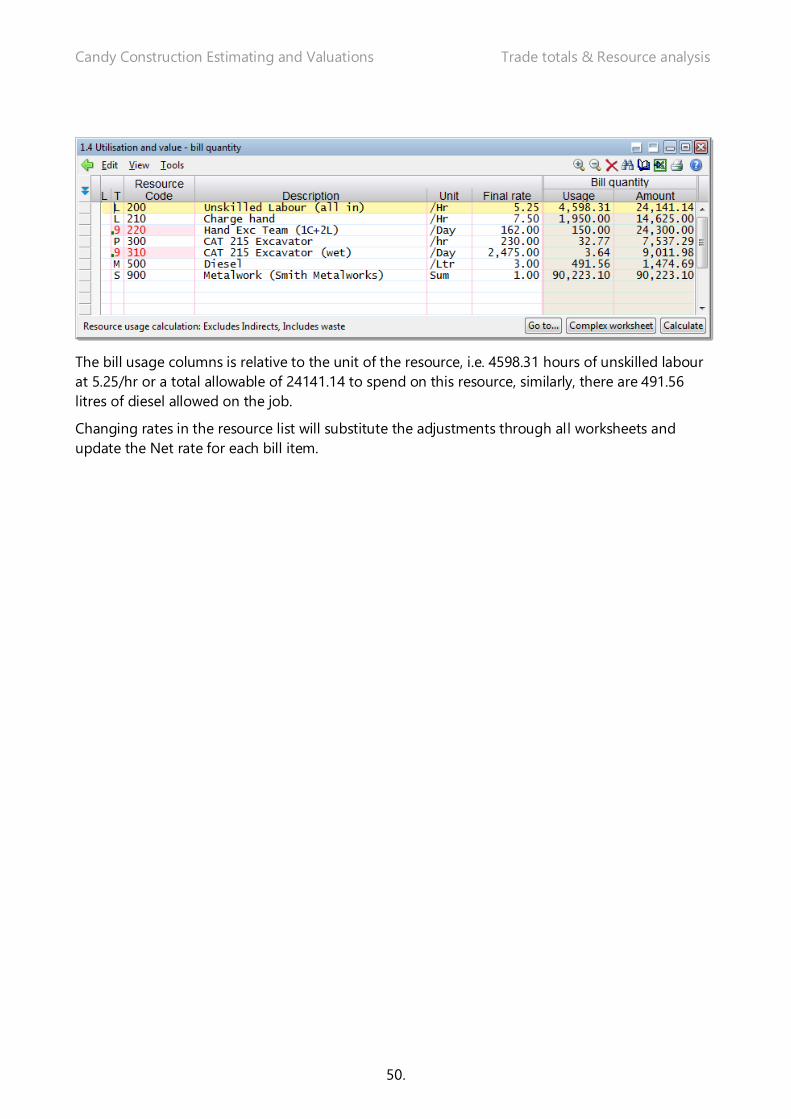
The bill usage columns is relative to the unit of the resource, i.e. 4598.31 hours of unskilled labour
at 5.25/hr or a total allowable of 24141.14 to spend on this resource, similarly, there are 491.56
litres of diesel allowed on the job.
Changing rates in the resource list will substitute the adjustments through all worksheets and
update the Net rate for each bill item.

Candy Construction Estimating and Valuations Mark Up
51.
Chapter 10. Mark Up
Up to now we have been working out the Net rate for each bill item. Mark up can now be
added to our job to calculate the Gross Rate.
In other words the gross rate is calculated {Net + Applied Mark-up = Gross}
Mark up can be added in various ways:
• Mark up all Trades
• Trade Mark up
• Individual Mark up
10.1 Mark up All Trades Mark up the whole job by 10% using the Mark-up All Trades facility.
Do this:
Open Estimating Bill document 1.6 Mark-up Bill (under the Estimating bills tab in the document
manager)
Right-click in the Mark up column and choose General mark-up utilities > Mark up ALL trades.
Enter a 10% mark up for all Trades and confirm.
Remember to calculate the bill for the updated heading
amount totals.

Candy Construction Estimating and Valuations Mark Up
52.
10.2 Trade Mark up Mark up can be applied to Trades using the Trade Mark facility. Apply 5% mark up to the
Metalwork Trade.
Do this:
Right-click in the Mark Up column and
choose General mark -up utilities >
Trade mark-up.
Adjust the Metalwork Mark Up to 5%
10.3 Individual Mark up Return to the Bill and adjust the mark up for item 1/A to 20% Mark up.
Click Yes to confirm the change.
The Mark up type column now indicates what type of mark-up has been applied.

Candy Construction Estimating and Valuations Mark Up
53.
The Metalwork items on page 2 have a 5% trade mark up.
10.4 Trade Totals Display Do a trade totals based on the Gross rate
Use the shortcut on the toolbar this time.
The Gross amount is displayed with the net split amounts for Labour, Plant, etc. The last column
represents total mark-up amount.
Candy Construction Estimating and Valuations Reports
54.
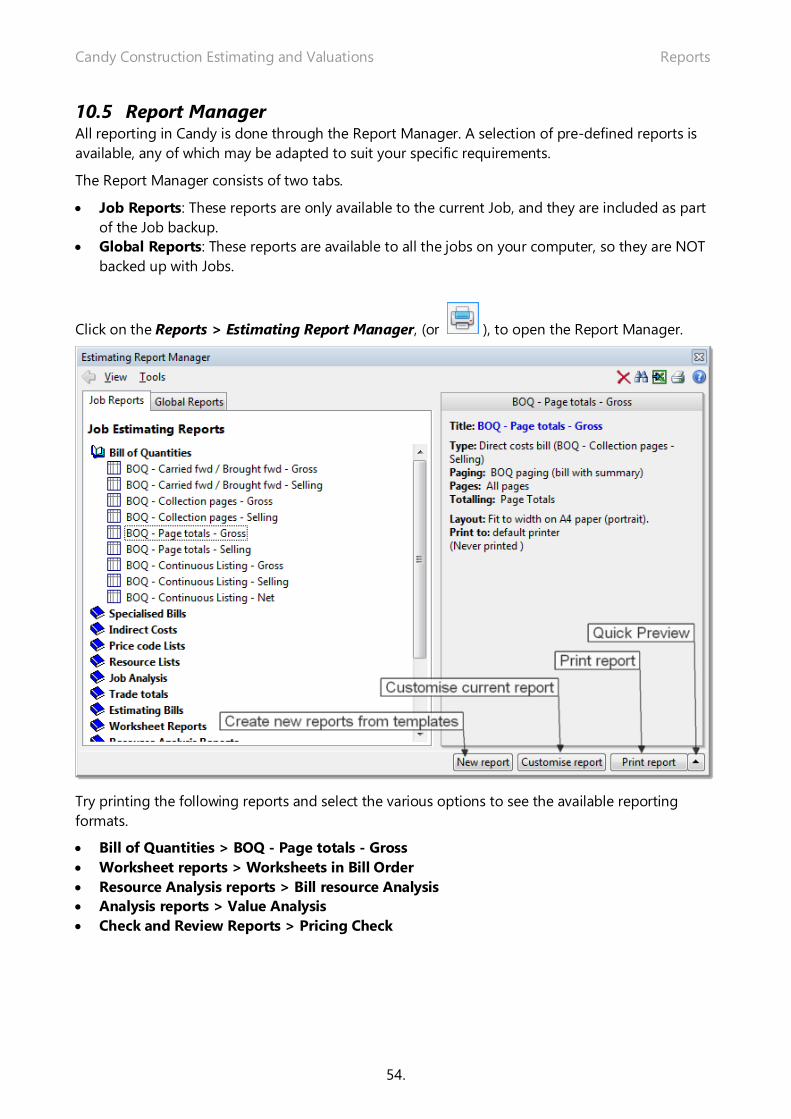
10.5 Report Manager All reporting in Candy is done through the Report Manager. A selection of pre-defined reports is
available, any of which may be adapted to suit your specific requirements.
The Report Manager consists of two tabs.
• Job Reports: These reports are only available to the current Job, and they are included as part
of the Job backup.
• Global Reports: These reports are available to all the jobs on your computer, so they are NOT
backed up with Jobs.
Click on the Reports > Estimating Report Manager, (or ), to open the Report Manager.
Try printing the following reports and select the various options to see the available reporting
formats.
• Bill of Quantities > BOQ - Page totals - Gross
• Worksheet reports > Worksheets in Bill Order
• Resource Analysis reports > Bill resource Analysis
• Analysis reports > Value Analysis
• Check and Review Reports > Pricing Check

Candy Construction Estimating and Valuations Post Tender Control
55.
Chapter 11. Post Tender Control You have established that: Net Rate + Applied Mark Up = Gross Rate
There is a third rate available in Candy called Selling Rate. This is an independent rate in that
changes made to the Net Rate and Applied Mark-up will not affect the selling rate. This is the rate
that you used to “sell” your tender to the client
11.1 Selling Rate
Do this:
Click on the button to return to the Job Manager and select the Waste water
treatment works job.
Open the Document Manager by choosing Documents > Estimating Bills.
Select 1.7 Selling bill of quantities and confirm.
This document layout is added to the Document Manager.

Candy Construction Estimating and Valuations Post Tender Control
56.
Now open this document 1.7 Selling bill of quantities
Note the selling rate column on the right side of the document. Having priced a job and applied
mark up, selling rates can be established by copying the Gross rate.
Right-click on the selling rate
column header and select
Copy selling rates from
gross.
Check the option to lock
selling rates after copy and
click OK…and confirm the
message.

Candy Construction Estimating and Valuations Value Engineering or re-modelling
57.
Chapter 12. Value Engineering or Re-modelling The site team can now re-visit each of the worksheets. They can adjust the productions to what
they believe will be achieved on site.
Alternatively, they may not even use the resources the estimator originally envisaged using and
must therefore adjust the worksheets to reflect how they intend on completing the job. They may
obtain cheaper resource and sub contract rates.
We will use an example to demonstrate this.
First do a Trade Totals Display on Net at 3.00/Ltr of Diesel. Notice the net total amount as well
as the material total amount before we make changes.
Let’s assume the site team will purchase diesel for 2.50/ Litre instead of 3.00/ Litre.
12.1 Resource List Open Resource document 1.4 Utilisation and value – bill quantity
Adjust the diesel rate accordingly and click Calculate
Note that the Diesel allowable decreases from 1474.69 to 1228.91, representing a buying saving
of 245.78.
Candy Construction Estimating and Valuations Value Engineering or re-modelling
58.
Now do a Trade Totals Display on Net at 2.50/Ltr of Diesel.
Original Net Amount – New Net Amount = (277,174.18 – 276,928.40) = 245.78 Saving
Original Material Net Amount – New Material Net Amount = (109,939.69 – 109,693.91) = 245.78
Saving
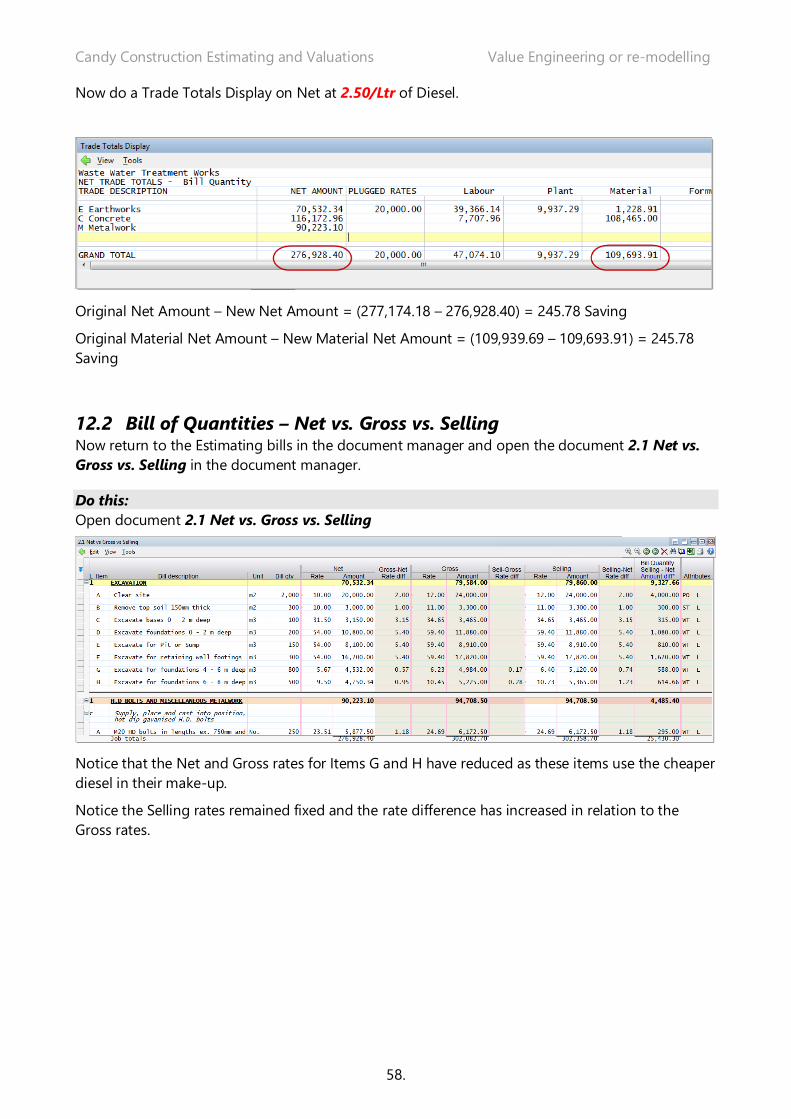
12.2 Bill of Quantities – Net vs. Gross vs. Selling Now return to the Estimating bills in the document manager and open the document 2.1 Net vs.
Gross vs. Selling in the document manager.
Do this:
Open document 2.1 Net vs. Gross vs. Selling
Notice that the Net and Gross rates for Items G and H have reduced as these items use the cheaper
diesel in their make-up.
Notice the Selling rates remained fixed and the rate difference has increased in relation to the
Gross rates.

Candy Construction Estimating and Valuations Other Candy Modules
59.
Chapter 13. Other Candy modules
13.1 Planning The Planning module is a simple, no-frills, yet powerful critical path networking system designed
specifically for the construction industry. It can be used effectively by a novice planner, but has the
features and functionality required by experienced and professional planners.
The ability to link the activities with related bill items allows for accurate budget forecast.
Combined with the Cashflow module, it assists with analysis and decision making related to project
management and project cost control.
A more comprehensive explanation of this functionality can be found in the course notes available
for licenced users from their local distributors. (Refer page 7)

Candy Construction Estimating and Valuations Other Candy Modules
60.
13.2 Link & Forecast The Link and Forecast module is a facility for forecasting quantities, values and resources, making
use of estimating and valuation information, and the planning time from the program.
Candy has the unique ability to integrate/link the Bill of Quantities and the Program. Items from the
Bill of Quantities can be allocated to the activities of a program. Once the link has been established,
all the information related the Bill of Quantities can be forecast over time.
A more comprehensive explanation of this functionality can be found in the course notes available
for licenced users from their local distributors. (Refer page 7)
13.3 Cash flow Candy Cash Flow models the financial requirements of a construction project so that the cash flow
can be optimised.
The lags on payment of invoices to suppliers and subcontractors can be specified, together with
predicted escalation on cost and value. Interest rates, retention rules, pre-payments and other
factors can be specified to model the cash flow.

Candy Construction Estimating and Valuations Other Candy Modules
61.
13.4 Valuations Candy Valuations provide continuity between Estimating and the Post Tender commercial control.
All the information used to price the tender is immediately available at post-award.
All Post Tender commercial functions can be carried out by site-based staff using the facilities
within the Valuations module.
Monthly applications for payment are produced by entering either a cumulative progress quantity
or a percentage complete against changed bill items.
Updating the linked Program will provide suggested progress quantities to the bill items each
month.
The progress quantity build up can be recorded using measurement sheets. The available progress
quantities are Claimed, Paid and Actual, and a number of derived quantities, such as Quantity to
Completion, are also provided.

Candy Construction Estimating and Valuations Other Candy Modules
62.
The integration of Estimating/Valuation and Planning enables monthly forecasts of both cost and
value to completion to be generated using the unique link between time and money.
A more comprehensive explanation of this functionality can be found in the course notes available
for licenced users from their local distributors. (Refer page 7)

Candy Construction Estimating and Valuations Other Candy Modules
63.
13.5 Subcontract Manager Subcontractor progress quantities are controlled through the subcontract bills together with other
subcontractor costs, claims, charges, materials on site and variation orders, culminating in
Subcontractor valuations and certificates.
It is integrated with the Candy main Bill of Quantities, the Subcontract Adjudicator and Subcontract
Liability reporting system.

Candy Construction Estimating and Valuations Other Candy Modules
64.
Cost & Allowable Link and Forecast can provide a very detailed level and huge amount of information. It is not
always possible to generate the cost information to the same level of detail or accuracy.
Candy can summarise bill items and resources into one or more cost codes to produce summaries
based on either one or a combination of the cost codes.
The three industry standard approaches to controlling a construction project are catered for, being
resource based (with), location (where) and task orientated control (what).
The monthly allowable can be imported into the Cost and Allowable module in order to compare
to the monthly costs.
On site, the costs would be collected against the various what, with and where cost codes in each
period (when). The costs should be compared back to the allowable for each code on a monthly
basis. The costs can be imported from a text file, which should be generated by your company
costing system.
Candy Construction Estimating and Valuations Other Candy Modules
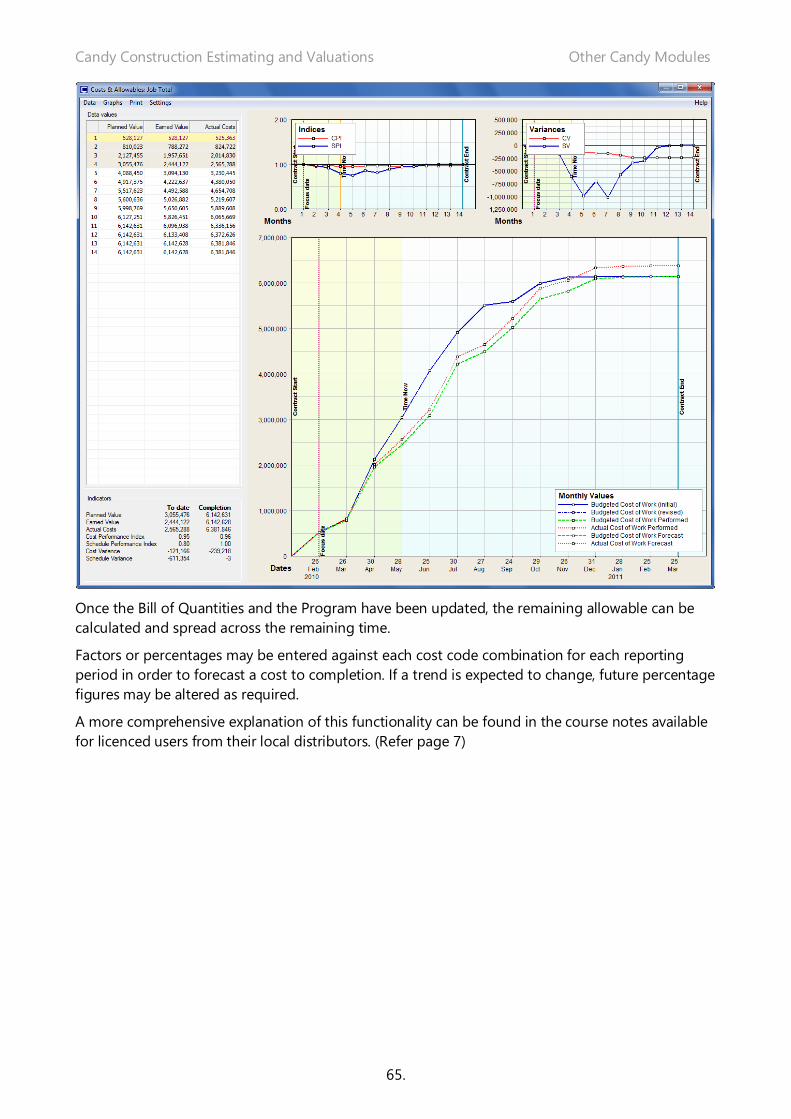
65.
Once the Bill of Quantities and the Program have been updated, the remaining allowable can be
calculated and spread across the remaining time.
Factors or percentages may be entered against each cost code combination for each reporting
period in order to forecast a cost to completion. If a trend is expected to change, future percentage
figures may be altered as required.
A more comprehensive explanation of this functionality can be found in the course notes available
for licenced users from their local distributors. (Refer page 7)

Candy Construction Estimating and Valuations User Interface
66.
Chapter 14. Candy User Interface
14.1 Candy menu bar The Candy screen consists of two basic areas. The Candy menu bar is at the top with the document
area below.
Candy button To select the company and job manager, system settings and to exit
the software.
Current Company Displays the current company you are working in.
Current Job Displays the current job you are working in.
Software version Displays the software version installed on the computer.
Application tabs To select the application, you want to work with.
Application menu Displays the menus of the application selected.
General menu Menu for general utilities including telephone list, daily dairies, card
games, etc.
Utilities toolbar Displays general tool buttons for use on all applications.
Application toolbar Displays tool buttons specific to the application selected. This tool bar
changes when a different application tab is selected.
Master Displays the current master selected. Will display “No Master” if none
selected.

Candy Construction Estimating and Valuations User Interface
67.
14.2 Document navigation
Document name Displays the name of the document.
Split screen buttons To display the document either on the top half or bottom half
of the screen.
Escape Escape back to the document manager
Document menus Displays the menus available for this document
Document toolbar Display tool buttons for larger or smaller screen fonts, line
deletion, find & replace, export to Excel and print screen
Select All records
button
Click this button to select all the line records on the screen.
Column help Displays the help file for the current column.

Candy Construction Estimating and Valuations User Interface
68.
Calculation status
button
Displays the current calculation status
Record selector bar The record bar is broken up into record buttons for each
activity, which are used for selecting the item record or records
Bill page indicator Displays the current bill page number. Bill page number refers
to the number as displayed on the Client’s bill. Can be alpha
numeric.
Document page
navigator
Displays the current document page or sheet.
Function buttons Used to perform common functions such as opening a
worksheet, etc.
Calculation button To calculate the Bill after changes were made. A red button
indicates that calculation of the program is required. (There is
NO auto calculation)
14.3 Menus on the documents The menu functions in Candy are context sensitive, i.e. the relevant functions associated with
specific data will be available at the data.
There are four menu selection methods
• Document menu bar
• Record button right-click menu
• Column right-click menu
• Cell right click menu
Document menu bar

Candy Construction Estimating and Valuations User Interface
69.
Document menus Each document has a document menu with relevant menu items suited for
the type of document
Dropdown menus Selecting a menu item will open a dropdown menu with a further set of
applicable menus
Menu help tip Move the mouse over the help button for a brief explanation of the menu
function
Menu help button Displays a detailed explanation of the menu function when selected
Record button right-click menu
Select All records button To select all records in the program
Record selector button To select single records / rows (CTRL+Click to select specific records;
SHIFT+Click to select a group of records)
Record right click menu Once a selection is made, right-click to open the menu with required
menu functions.
Candy Construction Estimating and Valuations User Interface
70.
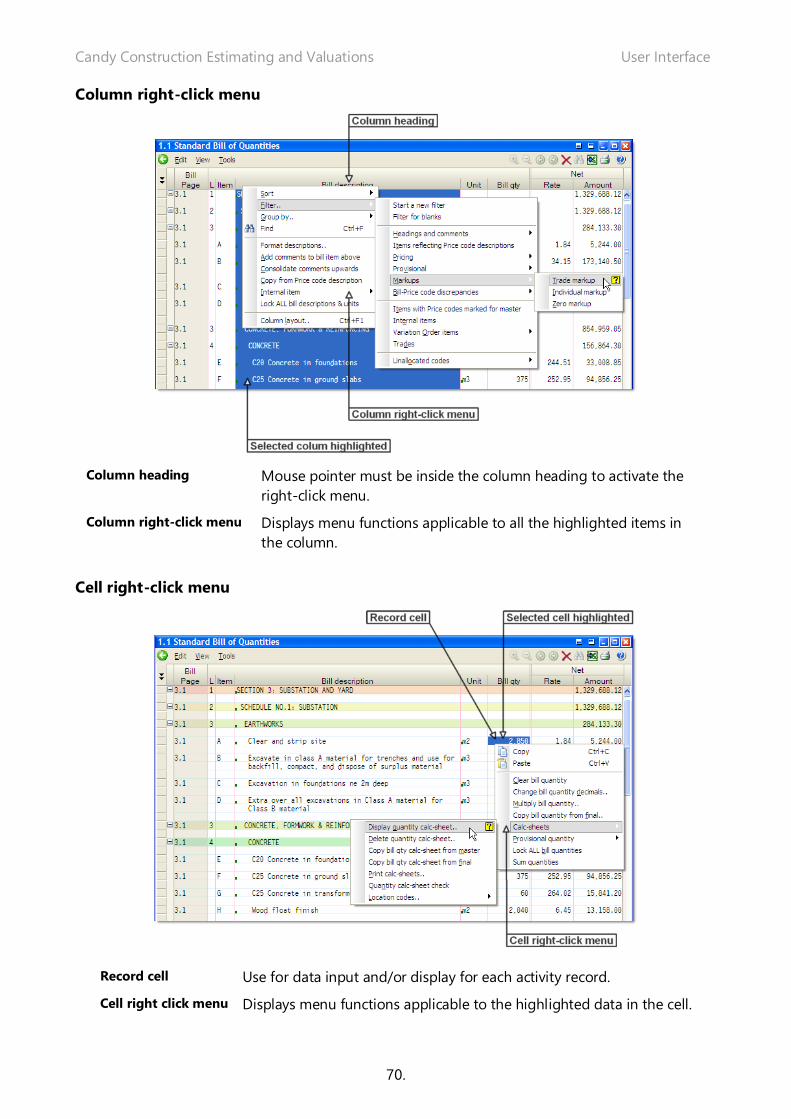
Column right-click menu
Column heading Mouse pointer must be inside the column heading to activate the
right-click menu.
Column right-click menu Displays menu functions applicable to all the highlighted items in
the column.
Cell right-click menu
Record cell Use for data input and/or display for each activity record.
Cell right click menu Displays menu functions applicable to the highlighted data in the cell.

Candy Construction Estimating and Valuations User Interface
71.
14.4 Customising the System The Candy desktop may be configured individually to your requirements. To open and configure
the global settings, click on the General menu Support > System settings or use the icon on
the System tool bar. Once in a job you can right-click on the Candy button > System settings
Desktop Set desktop images and/or calendars to display in the document area
Fonts Select the fonts for the screen display. Note report fonts are set when
customizing the reports.
Interface Change the appearance of the Candy screen interface.
Document styles Set heading colours and styles to display on the screen documents.
Folders and paths Set the folders and network path for backups and network masters. If Excel
is installed on the computer, the executable command can be located here
for exporting document information direct into Excel.
Number & date
formats
Set number and date styles to display.
Keyboard Set text input and Enter key direction
Languages Set the langue file to use (other than English)
Job start up Set the start tool button document to open immediately when a job is
selected.
Tool buttons Set tool buttons to display in each application toolbar.
Macro keys Set keyboard shortcuts to activate recorded keystrokes in sequence
Toolbar hotkeys Set keyboard short cut commands to activate tool button functions

Candy Construction Estimating and Valuations User Interface
72.
14.5 Keystrokes, Icons and Mouse Functions
Mouse Functions
Note that this table assumes that the mouse buttons are configured for a right-handed user.
Mouse action Function
Left-click On an Active Document - moves the cursor line to and positions the
editing cursor at the mouse pointer. On an Inactive Document -
Turns the document Active and acts as above.
Right-click On an Active Document calls up the context menu.
Double Click Fetch another document, i.e.: Double Click on a Nett Rate calls up
the Worksheet.
Row Record >Left-click Select a line of data for Dragging and Dropping.
Row Record > Shift+Left-
click
Marks the Start and End of a Range of records for Dragging and
Dropping.
Alt+Left-click Set an Alternate document.
Simple Keystrokes
This is a list of the major Editing and Cursor Movement Keystrokes, with a brief explanation of the
function, and the equivalent Icon if available.
Shift+Esc(ape) Returns to the job selector
Esc(ape) Returns to the company selector
Scroll Lock
(Ctrl+Tab)
Moves the document currently on top of the pile behind all other documents.
Ctrl+insert Inserts a space at the cursor position
Ctrl+Del Deletes the character at the cursor
Tab Move the cursor from Field to Field. Shift+Tab jumps backwards.
Home Cursor goes to Left Edge of current field.
Page Up Cursor to Top line of the Screen, or if already at the top of the screen, scrolls a
full screen up.
Page Down Cursor to Bottom line of the Screen, or if already at the bottom of the screen,
scrolls a full screen down.
Arrow Left Move cursor one character to the left.
Arrow Right Move cursor one character to the right.
Arrow Up Move cursor Up one line.
Arrow Down Move cursor Down one line.

Candy Construction Estimating and Valuations User Interface
73.
Enter Normally moves the cursor to the first field of the next line. If the direction for
Enter has been set, then the cursor is moved accordingly.
Combination Keystrokes
A combination keystroke involves holding down the Ctrl, Alt or Shift key and using another at the
same time. These keystrokes will generally perform the same function if used anywhere in the
System.
Ctrl+Del(ete) Delete the current Line
Ctrl+Insert Insert a Line above the current line
Ctrl+Page Up Position the cursor on the very top line of a document
Ctrl+Page Down Position the cursor on the very bottom line of a document
Ctrl+Enter Split the line at the cursor position
Ctrl+Backspace Bring text up from the line below and place it at the cursor position - i.e.
un-split
Ctrl+Left-arrow Bubble Up - move the current line up
Ctrl+Right-arrow Bubble Down - move the current line down
Ctrl+Up-arrow Close into a Family, if there is one
Ctrl+Down-arrow Open a Family one level
Shift+Ctrl+Down-
arrow
Open All levels in the family
Ctrl+Space Bar Open All Families completely
Shift+Ctrl+Space
Bar
Close All Families completely
Ctrl+R Pick Up the current Line
Shift+Ctrl+R
(Ctrl+D)
Drop (insert) Lines picked up using Ctrl+R at the current line
Ctrl+U Turn current line to UPPERCASE letters
Ctrl+L Turn current line to lowercase letters
Ctrl+T Turn current word to Proper case
Ctrl+K Copy the Field above
Shift+Ctrl+K Copy the Word above and position cursor for the next word
Ctrl+J Copy the Field above and Jump Down to the line below.
Ctrl+End Clear the line from the cursor position to the end of the current field.
Alt+Del Close the Top Document.

Candy Construction Estimating and Valuations User Interface
74.
Shift+Alt+Del Close All Documents.
Ctrl+Z Usually reinstates the current line. If a mistake is made on a line, Ctrl+Z
will re-display the line as it was before the mistake was made. As soon as
the cursor is moved off the line, the line is stored and cannot be
reinstated.