constructing posters in powerpoint 2011 using a...
TRANSCRIPT
Constructing Posters in PowerPoint 2011
™ Using a Template
[PowerPoint 2011 for Macintosh]

Designed and written by:
Deborah A. Sleight, PhD
Associate Professor Office of Medical Education Research and Development
College of Human Medicine Michigan State University
Updated by:
John Williamson, MA
OMERAD
April 2011
2011, OMERAD and MSU Board of Trustees

TABLE OF CONTENTS
INTRODUCTION .................................................................................................. 1
USE ZOOM VIEW ....................................................................................................................... 2
CREATE NEW TEXT BOX ................................................................................... 3 TYPE TEXT ................................................................................................................................. 3 COPY AND PASTE TEXT .......................................................................................................... 3 MANAGE BULLETS .................................................................................................................... 4 USE TEXT BOXES ..................................................................................................................... 5
INSERT IMAGES .................................................................................................. 6
INSERT AN IMAGE .................................................................................................................... 6 MOVE AN IMAGE ....................................................................................................................... 7 RESIZE AN IMAGE ..................................................................................................................... 7 ADD A BORDER ......................................................................................................................... 7 ADD A CAPTION ........................................................................................................................ 7
ALIGN TEXT AND GRAPHICS ............................................................................ 7
USE GUIDES .............................................................................................................................. 7 USE ALIGNMENT TOOLS .......................................................................................................... 8
POSTER FENG SHUI .............................................................................................. 9
PRINT THE POSTER ......................................................................................... 10
PRINT A SMALL DRAFT OF THE POSTER ............................................................................ 10 PRINT THE POSTER FULL SIZE ............................................................................................. 10


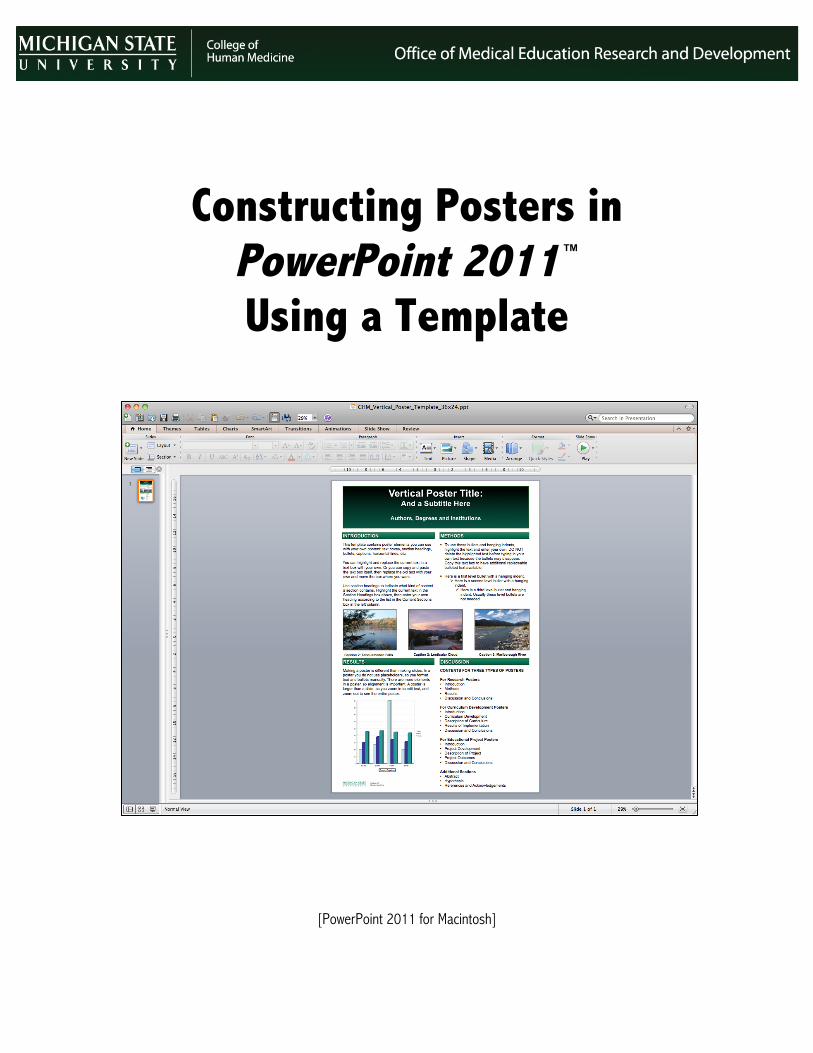
INTRODUCTION There are many ways to create a scientific poster. An easy way is to create one giant slide in PowerPoint, then take it to a commercial print shop. One way to design a poster in PowerPoint is to add your own information to a PowerPoint poster slide that’s already been created (called a template). Another way is to design your own PowerPoint template. This tutorial uses a template. Posters are made up of elements that include text boxes, tables, graphs, images and design elements such as lines and shapes. There are two main differences between creating slides for a slideshow and creating a poster. One is that slides for a presentation have few text boxes and the format of these are controlled by a master slide, so you don’t have to think about margins and hanging indents and so on. When you create a poster you have to manage multiple text boxes and align these multiple elements into a logical, easy to read and pleasing design. Second, a poster is much larger than a presentation slide, so you will have to zoom in to work with text and zoom out to see the poster as a whole. When you create a poster in PowerPoint, you will be creating a presentation containing one giant slide. Any poster can be used as a template. Simply replace the text, images, table and graphs in that poster with your own. The slide can be up to 56 inches wide and tall, but most poster printers use paper that is 36 inches wide, so in this tutorial you will be creating a slide that is 24 inches wide by 36 inches high. Below are examples of a vertical and a horizontal template containing a design (colors, font, point size, gradients, lines) and places for column titles.
Poster Templates
Constructing Posters in PowerPoint 2011™ Using a Template
2
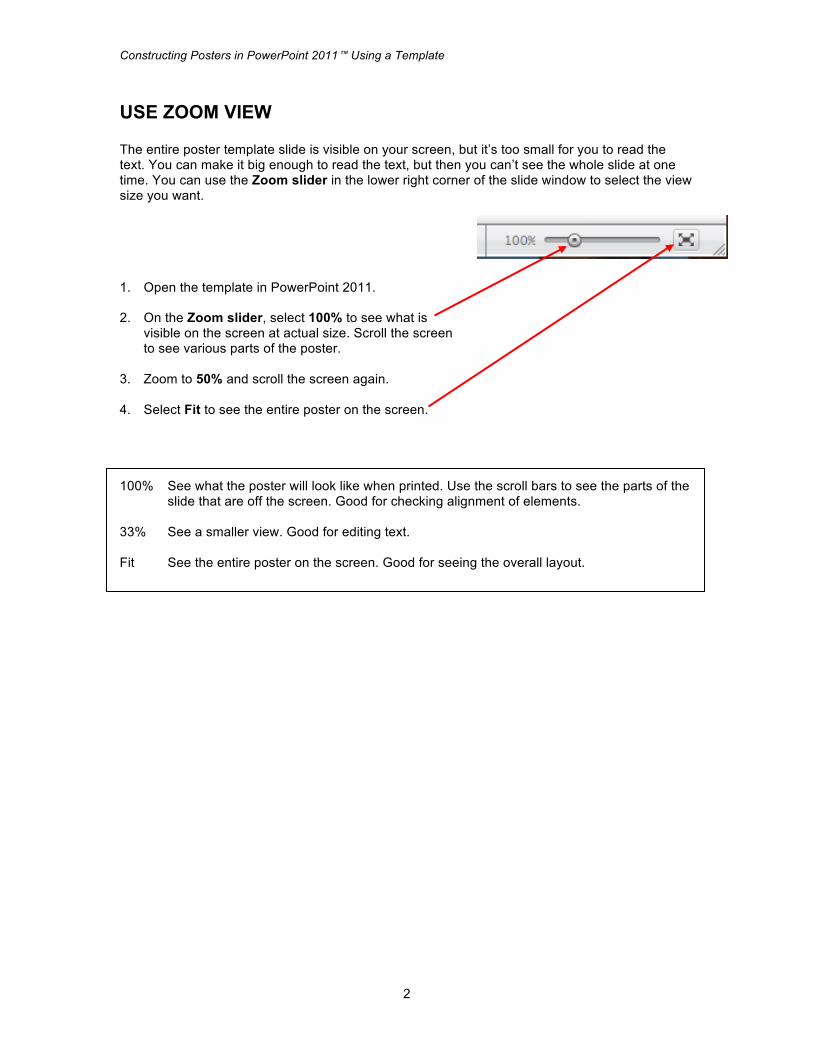
USE ZOOM VIEW The entire poster template slide is visible on your screen, but it’s too small for you to read the text. You can make it big enough to read the text, but then you can’t see the whole slide at one time. You can use the Zoom slider in the lower right corner of the slide window to select the view size you want. 1. Open the template in PowerPoint 2011.
2. On the Zoom slider, select 100% to see what is
visible on the screen at actual size. Scroll the screen to see various parts of the poster.
3. Zoom to 50% and scroll the screen again. 4. Select Fit to see the entire poster on the screen. 100% See what the poster will look like when printed. Use the scroll bars to see the parts of the
slide that are off the screen. Good for checking alignment of elements. 33% See a smaller view. Good for editing text. Fit See the entire poster on the screen. Good for seeing the overall layout.
Constructing Posters in PowerPoint 2011™ Using a Template
3
CREATE NEW TEXT BOX There are three ways of getting text onto a poster: 1) you can create a new text box; 2) you can replace text already in a text box by typing over it; or 3) you can copy text from another file and paste it into an existing text box.
TYPE TEXT If you want to type text into a poster, you must first create a text box in which to place it. 1. From the Home Tab select Text Box. 2. Click on the poster. A text box appears, with the cursor inside it. You can now start typing.
You can change the font, size, alignment, style and color of the text just as you would for any text on a slide.
If a text box already exists and you want to add or replace text, you can click inside the text box and start typing, as below: 3. Highlight the word or words you want to replace. 4. Type the text you want. The new text will replace the highlighted text.
COPY AND PASTE TEXT Another way to get text onto a poster is to copy it from another file, such as a Word or PowerPoint file, and paste it into the poster template. Each section of text in the poster will be contained in separate text boxes. 1. Copy the text you want from a Word file or a PowerPoint slide. 2. Go back to the poster in PowerPoint. 3. Select Paste Special from the Insert Menu, then click either Unformatted Text or Styled
Text.
This use of Paste Special allows you to control how the text looks on your poster. If you just use Paste, the text will keep the formatting from the original document, which may not match your poster format.
4. Check the point size and change it if necessary.

Constructing Posters in PowerPoint 2011™ Using a Template
4
MANAGE BULLETS Bullets will be formatted automatically when you apply them, as they are when you create presentation slides. Here you will learn how to manage bullets. If you are using a template, you can copy a text box that has the kind of bullet and formatting you want, and replace the text. This is one of the advantages of using a template. If you have had to create a new text box that is not formatted already, you will have to manually insert a bullets. Insert a Bullet and Indent Text Bullets can be used to display items in a list. 1. Highlight the text you want to have a bullet. 2. Click the Bullets button on the Home tab. Second Level Bullets Second level bullets are bullets indented below another bullet. 1. Highlight the bullets that you want to indent to
second level. 2. On the Home Tab, click Increase List Level. 3. To move bullets back a level (toward the left margin) select the bulleted text and click
Decrease List Level. Change Bullet Style You can change how bullets look: their style, size and color. It is a good idea to make first and second bullets look different. 1. Click in the text of the bullet you want to change. 2. On the Home Tab, click the Bullets menu then
select Define New Bullet. 3. Set the type, size and color you want.
Constructing Posters in PowerPoint 2011™ Using a Template
5
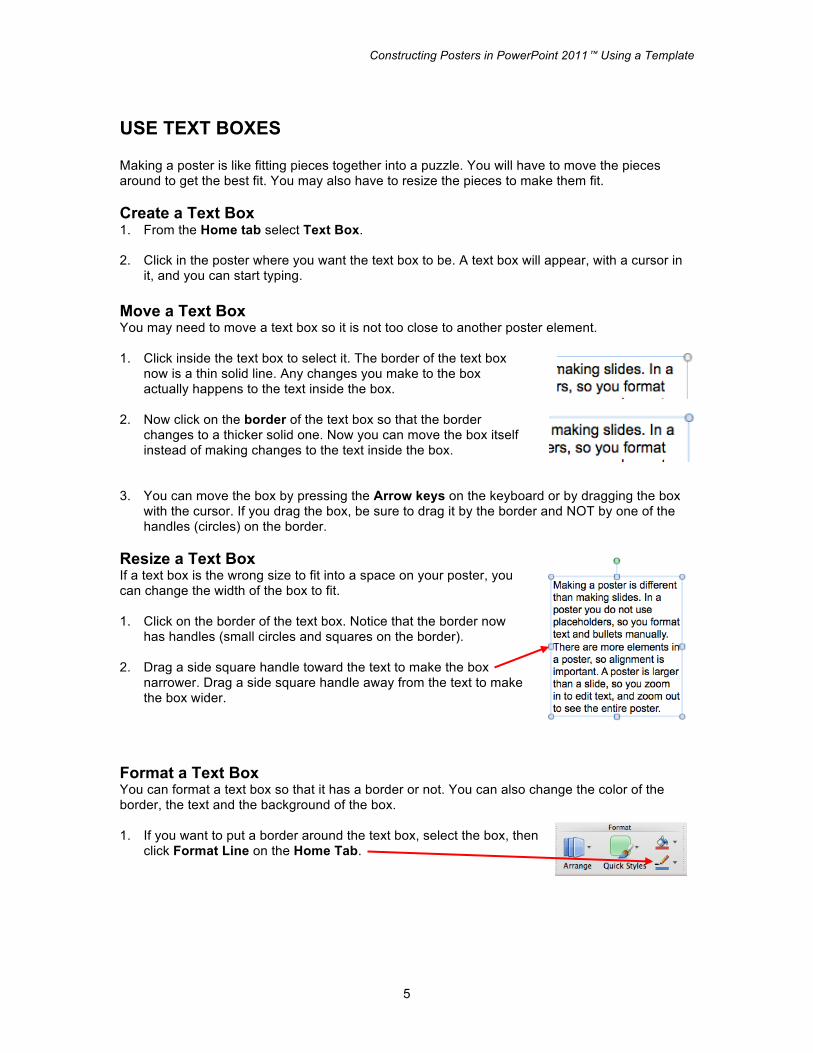
USE TEXT BOXES Making a poster is like fitting pieces together into a puzzle. You will have to move the pieces around to get the best fit. You may also have to resize the pieces to make them fit. Create a Text Box 1. From the Home tab select Text Box. 2. Click in the poster where you want the text box to be. A text box will appear, with a cursor in
it, and you can start typing. Move a Text Box You may need to move a text box so it is not too close to another poster element. 1. Click inside the text box to select it. The border of the text box
now is a thin solid line. Any changes you make to the box actually happens to the text inside the box.
2. Now click on the border of the text box so that the border
changes to a thicker solid one. Now you can move the box itself instead of making changes to the text inside the box.
3. You can move the box by pressing the Arrow keys on the keyboard or by dragging the box
with the cursor. If you drag the box, be sure to drag it by the border and NOT by one of the handles (circles) on the border.
Resize a Text Box If a text box is the wrong size to fit into a space on your poster, you can change the width of the box to fit. 1. Click on the border of the text box. Notice that the border now
has handles (small circles and squares on the border). 2. Drag a side square handle toward the text to make the box
narrower. Drag a side square handle away from the text to make the box wider.
Format a Text Box You can format a text box so that it has a border or not. You can also change the color of the border, the text and the background of the box. 1. If you want to put a border around the text box, select the box, then
click Format Line on the Home Tab.

Constructing Posters in PowerPoint 2011™ Using a Template
6
2. You can change the color of the border by
selecting from the Theme Colors. 3. You can change the thickness of the
border by selecting Weight and choosing the point size.
Copy a Text Box If you have a text box that has the formatting (font, font size, bullet, indents) you want, you can copy that box, then change the text in the copy, thus retaining the formatting in the copied box. 1. Click inside the text box, then on its border. 2. Select Copy from the Home Tab. 3. Click anywhere outside the box to deselect it. 4. Select Paste from the Home Tab. The copy is pasted almost on top of the original. 5. Drag the copy by its border (NOT a handle) and place it where you want it.
INSERT IMAGES You can insert photographs, charts, clip art and other graphics into your poster. First zoom out to FIT or 25% so you can see the entire poster on the screen because PowerPoint inserts images into the center of the poster. If you can’t see the center of the poster, you may not be able to find the image or may not realize that the image has already been inserted.
INSERT AN IMAGE 1. On the Insert Menu click Photo>Picture from File. 2. Browse to your image file then click Insert. Now you will want to move the image and
probably resize it.
Constructing Posters in PowerPoint 2011™ Using a Template
7
MOVE AN IMAGE Click in the middle of the image and drag it by its center to where you want it to be. Do not drag it by its border because you may accidentally resize it and distort its proportions.
RESIZE AN IMAGE 1. To decrease the size of an image, click on it to select it, then drag a round corner handle in
toward the center of the graphic. 2. To enlarge a graphic, click on it, then drag a round corner handle diagonally away from the
center of the graphic.
ADD A BORDER 1. To put a border around an image, first select it. 2. On the Format Picture Tab, click Format Line. You may apply a Theme Color and change
the Weight of the border. [See Format a Text Box on pages 5-6 for screen shots.] ADD A CAPTION You might want to put a caption beneath images, graphs, charts or tables. To do this, insert a text box, move it to just above or below the image, then click inside the text box and type the caption.
ALIGN TEXT AND GRAPHICS To make your poster look good, you must make sure that all elements of the poster—headings, text boxes, graphics and bullets—are lined up with each other. PowerPoint provides guides and alignment tools to help you.
USE GUIDES The vertical and horizontal guides can help you align objects. You can see them on the slide, but they will not print. First zoom out so you can see the entire poster on the screen. From the View Menu select Guides>Static Guides. One vertical and one horizontal guide are displayed on the poster. (To hide the guides, select Guides>Static Guides again.) You can drag these lines to line up text boxes and images against them.
Constructing Posters in PowerPoint 2011™ Using a Template
8
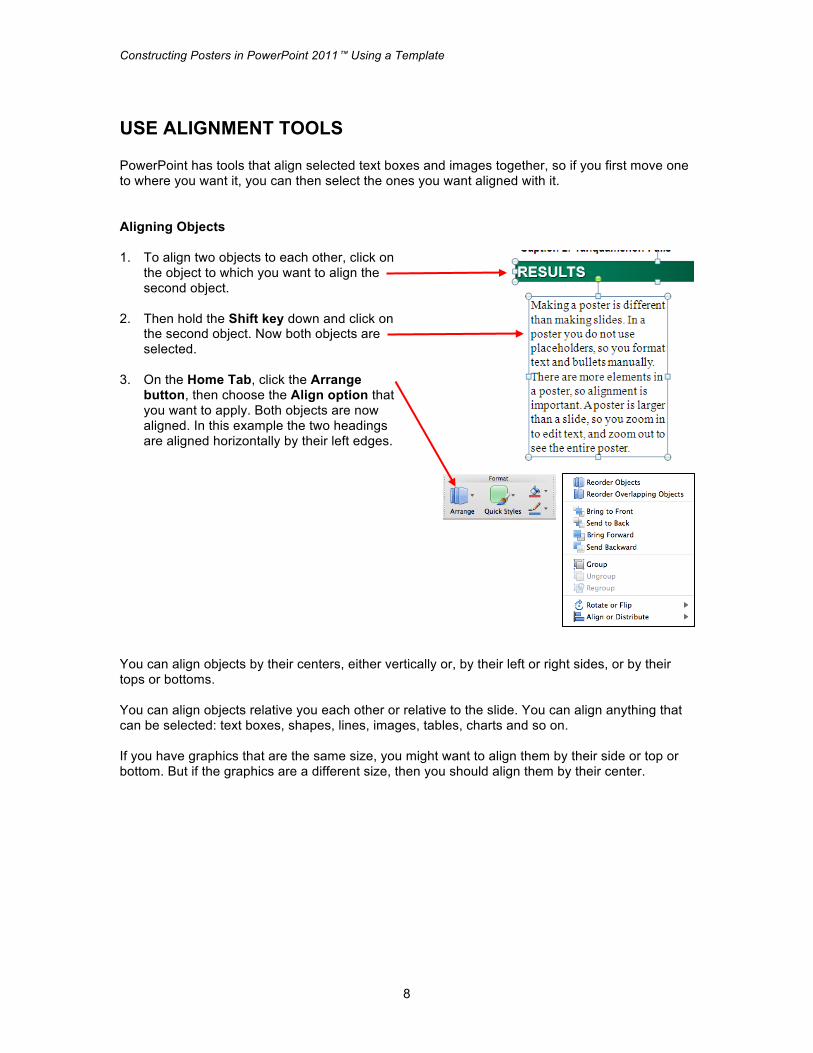
USE ALIGNMENT TOOLS PowerPoint has tools that align selected text boxes and images together, so if you first move one to where you want it, you can then select the ones you want aligned with it. Aligning Objects 1. To align two objects to each other, click on
the object to which you want to align the second object.
2. Then hold the Shift key down and click on
the second object. Now both objects are selected.
3. On the Home Tab, click the Arrange
button, then choose the Align option that you want to apply. Both objects are now aligned. In this example the two headings are aligned horizontally by their left edges.
You can align objects by their centers, either vertically or, by their left or right sides, or by their tops or bottoms. You can align objects relative you each other or relative to the slide. You can align anything that can be selected: text boxes, shapes, lines, images, tables, charts and so on. If you have graphics that are the same size, you might want to align them by their side or top or bottom. But if the graphics are a different size, then you should align them by their center.
Constructing Posters in PowerPoint 2011™ Using a Template
9
POSTER FENG SHUI Now that you have all the elements in place in your poster, you need to see how it looks as a whole. The principles guiding the design of an effective poster are similar to those of feng shui: balance and harmony. All elements of the poster, both the design elements and the content elements, need to harmonize with each other in terms of color, size, alignment and placement. All elements on the poster need to balance each other so that one does not overpower the others. Zoom to Fit and look at the entire poster. Then ask yourself these questions: • Does the poster look cluttered, with too many elements and not enough white space around
them? Either delete some elements or make them smaller or revise text to take up less space.
Or does the poster look empty because of too much white space? Make the text and graphics larger, and rearrange the elements to lessen the amount of white space in one place.
• Is the text too dense (long paragraphs)? Summarize it. Put bullets in front of short summary
phrases.
Or are there too many bullets? Combine text into small prose paragraphs. • Is there a sparing use of color that helps organize information or emphasize text or graphics?
Or are there too many colors used, or gratuitous use of color? Limit the use of color to two or three, and only use color to organize, emphasize or facilitate understanding. Do not use color just to make the poster colorful. Or are there colors that do not go well together? PowerPoint provides palettes of colors that go well together. Use them.
• Are there graphics that add information to the poster? Are they easy to read? • Is the text large enough to read at a distance of at least five feet? • Is the information arranged logically, so that readers can follow it without getting lost? • Are the elements aligned exactly with each other? • Does bulleted text have hanging indents? Does the NOT bulleted text NOT have a hanging
indent? Are levels of bullets different from each other? Questions like these help you look at the graphic design of a poster to see what you might want to change to make it look better. Show a small draft of the poster to others and ask for their suggestions. When you are done, you are ready to have the poster printed.
Constructing Posters in PowerPoint 2011™ Using a Template
10
PRINT THE POSTER When you print a poster, you usually send it to a print shop that has a large poster printer. Before you do that, however, you should print small drafts of the poster to check out alignment, layout, graphics, and to show to others for their opinion and suggestions.
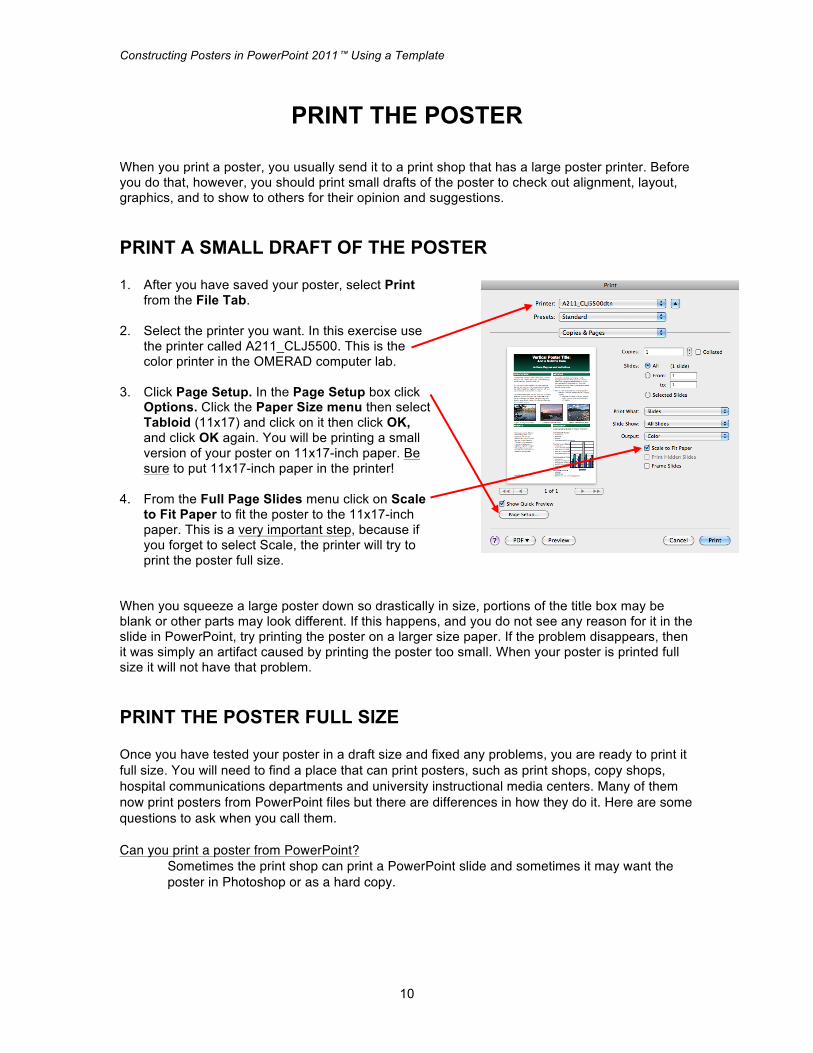
PRINT A SMALL DRAFT OF THE POSTER 1. After you have saved your poster, select Print
from the File Tab. 2. Select the printer you want. In this exercise use
the printer called A211_CLJ5500. This is the color printer in the OMERAD computer lab.
3. Click Page Setup. In the Page Setup box click
Options. Click the Paper Size menu then select Tabloid (11x17) and click on it then click OK, and click OK again. You will be printing a small version of your poster on 11x17-inch paper. Be sure to put 11x17-inch paper in the printer!
4. From the Full Page Slides menu click on Scale
to Fit Paper to fit the poster to the 11x17-inch paper. This is a very important step, because if you forget to select Scale, the printer will try to print the poster full size.
When you squeeze a large poster down so drastically in size, portions of the title box may be blank or other parts may look different. If this happens, and you do not see any reason for it in the slide in PowerPoint, try printing the poster on a larger size paper. If the problem disappears, then it was simply an artifact caused by printing the poster too small. When your poster is printed full size it will not have that problem.
PRINT THE POSTER FULL SIZE Once you have tested your poster in a draft size and fixed any problems, you are ready to print it full size. You will need to find a place that can print posters, such as print shops, copy shops, hospital communications departments and university instructional media centers. Many of them now print posters from PowerPoint files but there are differences in how they do it. Here are some questions to ask when you call them. Can you print a poster from PowerPoint?
Sometimes the print shop can print a PowerPoint slide and sometimes it may want the poster in Photoshop or as a hard copy.

Constructing Posters in PowerPoint 2011™ Using a Template
11
What version of PowerPoint can you accept? Make sure the version of PowerPoint that you use is the same as the one the print shop uses. If you have to convert the file to an older version of PowerPoint, print a smaller draft again in that version to make sure nothing was lost in the conversion.
How should I get the PowerPoint file to you?
Many print shops will accept PowerPoint files emailed to them or on a CD or flash drive. What fonts can you read?
It is best to stick to commonly used fonts, such as Times Roman and Arial, because the print shop will also have these fonts. If you do want to use an unusual font, some print shops will ask you to send them the font.
What size poster can you print?
The maximum size slide that PowerPoint can create is 56” x 56”. Many print shops print on plotters that use rolls of paper that are 36” high, so you need to ask what size posters they can print.
How much does printing cost?
Print shops usually price printing posters by the square foot. How much does laminating cost? And can you do matte laminating?
For extra strength you may want to get your poster laminated. This costs more and adds glare to the poster, but does make the poster sturdier. It is possible to get a matte laminate that reduces glare.
Can you mount the poster?
You can have the poster mounted on foam core or some other rigid backing, but this makes it more difficult to take to a conference. On the other hand, if you want to hang the poster and have it last a long time, you may want to have it mounted.
How much lead time do you need?
Most print shops need at least 24 hours to print your poster, but you should ask them how much time they need.